

Page 1
Thchnics
0 , G , T A
E N
S
M B L E
E
L
sx-PRSOV
sx-PR250
sx-PR350
VII. 2 PRACTICALAPPLICATIONS
Page 2
PRACTICALAPPLICATIONS
Part I Sounds and effects 2
Play Style 2
Sound Select 3
Pedals
.Effects 5
Digital Reverb (PR250/PR350)
Mixingtwosounds 6
Keyboard Split 7
Transpose
Partll Playing the rhythm 9
Rhythm Select 9
Start the rhythm 10
Balance 10
Tempo 11
Intro 11
Count 11
Fillin 12
-.#
Ending 12
Keyboard Percussion 12
AutoPlayChord 13
OneTouchPlay 16
PaneIMemory 16
5
6
8
Partlll Recording and playback 17
Sequencer 17
, . Storing a chord progression 17
. Store the following chord progression. . . . . . . . . . . . . . . . 18
. Automatic playback of the stored chord progression. . .. 19
. Storing rhythm changes 19
. An exampleof storing in the Sequencer. . . .. . . . . . . . . . 20
Storing a performance 21
. Example of storing a piano performance. . . . . . . . . . . . . . 22
, ~\~"\~~~'Q."\-~'i-~'Q.,,\ '2.~
. Playing back the performance 25
. Erasingthe recordedperformance. . .. .. . . . . . .. . . . .. . 25
Partrv Creating rhythm patterns 26
Composer 26
. Setting up 26
. Recordingpart-by-part 28
. Play back the stored pattern 30
. Editing a preset rhythm pattern 30
PartY Externalmemory 31
Digital Disk Recorder (SY-FD20) 31
Errordisplay 35
Part VI Setting the functions 36
Function-setting modes 36
Part VII MIDI 41
WhatisMIDI? 41
MIDI stickers 41
The following kinds of data can be transmitted/received. . . . . 42
CHANNEL 42
MIDI Implementation Chart 48
Page 3
PartI
In addition to standard piano sounds, this instrument is provided with the sounds of various other musical
instruments. This chapter includes explanations for how to select the various musical instrument sounds,
how to add effects to enhance the sound, and how to mix multiple sounds.
Soundsandellects
'" ~
'" 000 ..;:;~: 666-~mOo~~ 91 660"," o_'§",oo~~ "'-~'" '
- - -~~~ ...""'- ~ - . . . ooo6~u ~~_.~. .1
0 - -.- GI0 00 ot::!.;;. .-d!;b-~3IS~i5oo~ 0006 ;:;;~ .~.~!
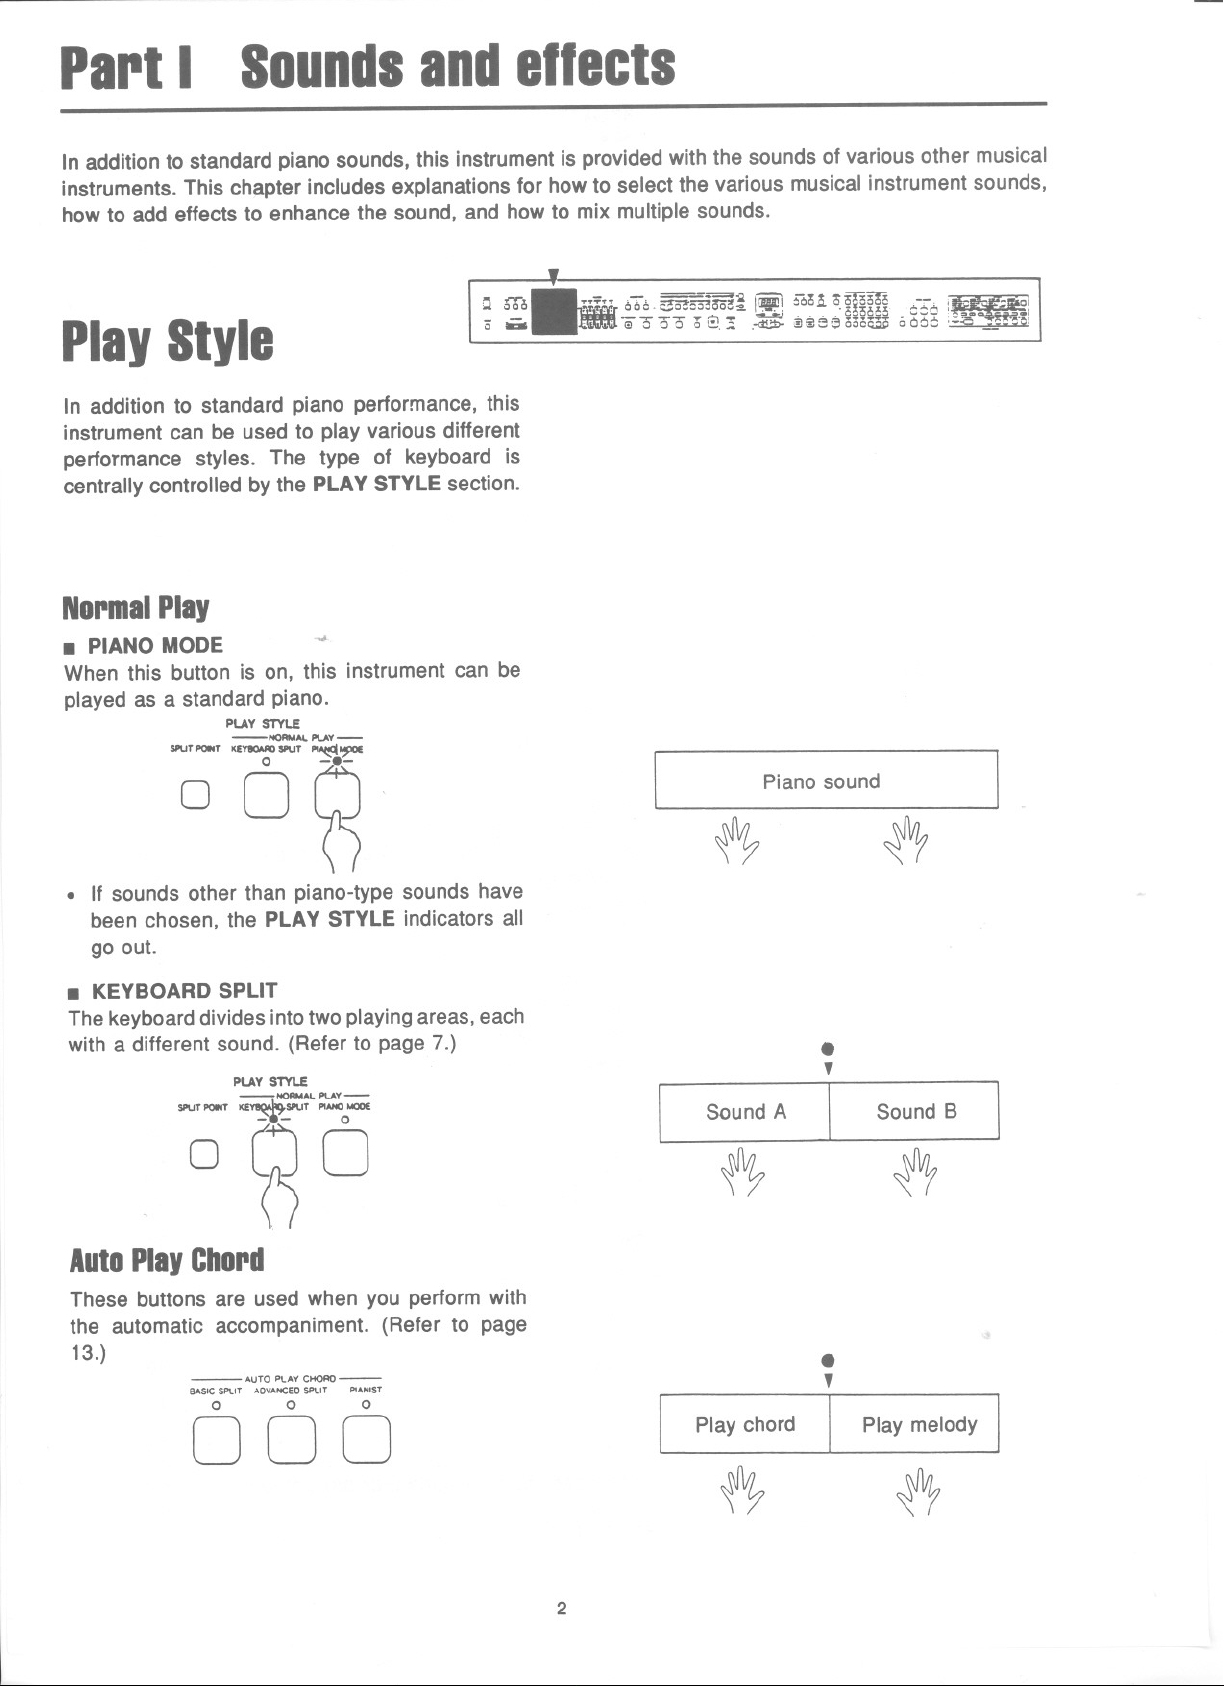
PlayStyle
In addition to standard piano performance, this
instrument can be used to play various different
performance styles. The type of keyboard is
centrally controlled by the PLAY STYLE section.
NormalPlay
. PIANO MODE ~
When this button is on, this instrument can be
played as a standard piano.
PLAY STYLE
SPuTPOINT"(_SPUT PI~~
-NORMAl. PUY-
OO~
. If sounds other than piano-type sounds have
been chosen, the PLAY STYLE indicators all
go out.
,
..
.- =="
- -"""'ffi~
1
Piano sound
~
~
. ~ -
~
. KEYBOARDSPLIT
The keyboard divides into two playing areas, each
with a different sound. (Refer to page 7.)
PLAY STYLE
SPuT POINT KE~SPUT PIANOMOO(
-NORMACPUY-
O~O
AutoPlayChord
These buttons are used when you perform with
the automatic accompaniment. (Refer to page
13.)
- AuTO PLAYCHOAO-
BASIC5Pt.IT ADvANCEDSPt.IT PtANI5T
0 0 0
000
.
,
Sound A
[
~ ~
.
,
Play chord
~
Play melody I
[
Sound B
~
2
Page 4
PartI
Soundsandenects
,~ .-v-. -:;a- -.~n ...,-. ==;<. ,-, -T~-
.. aoe
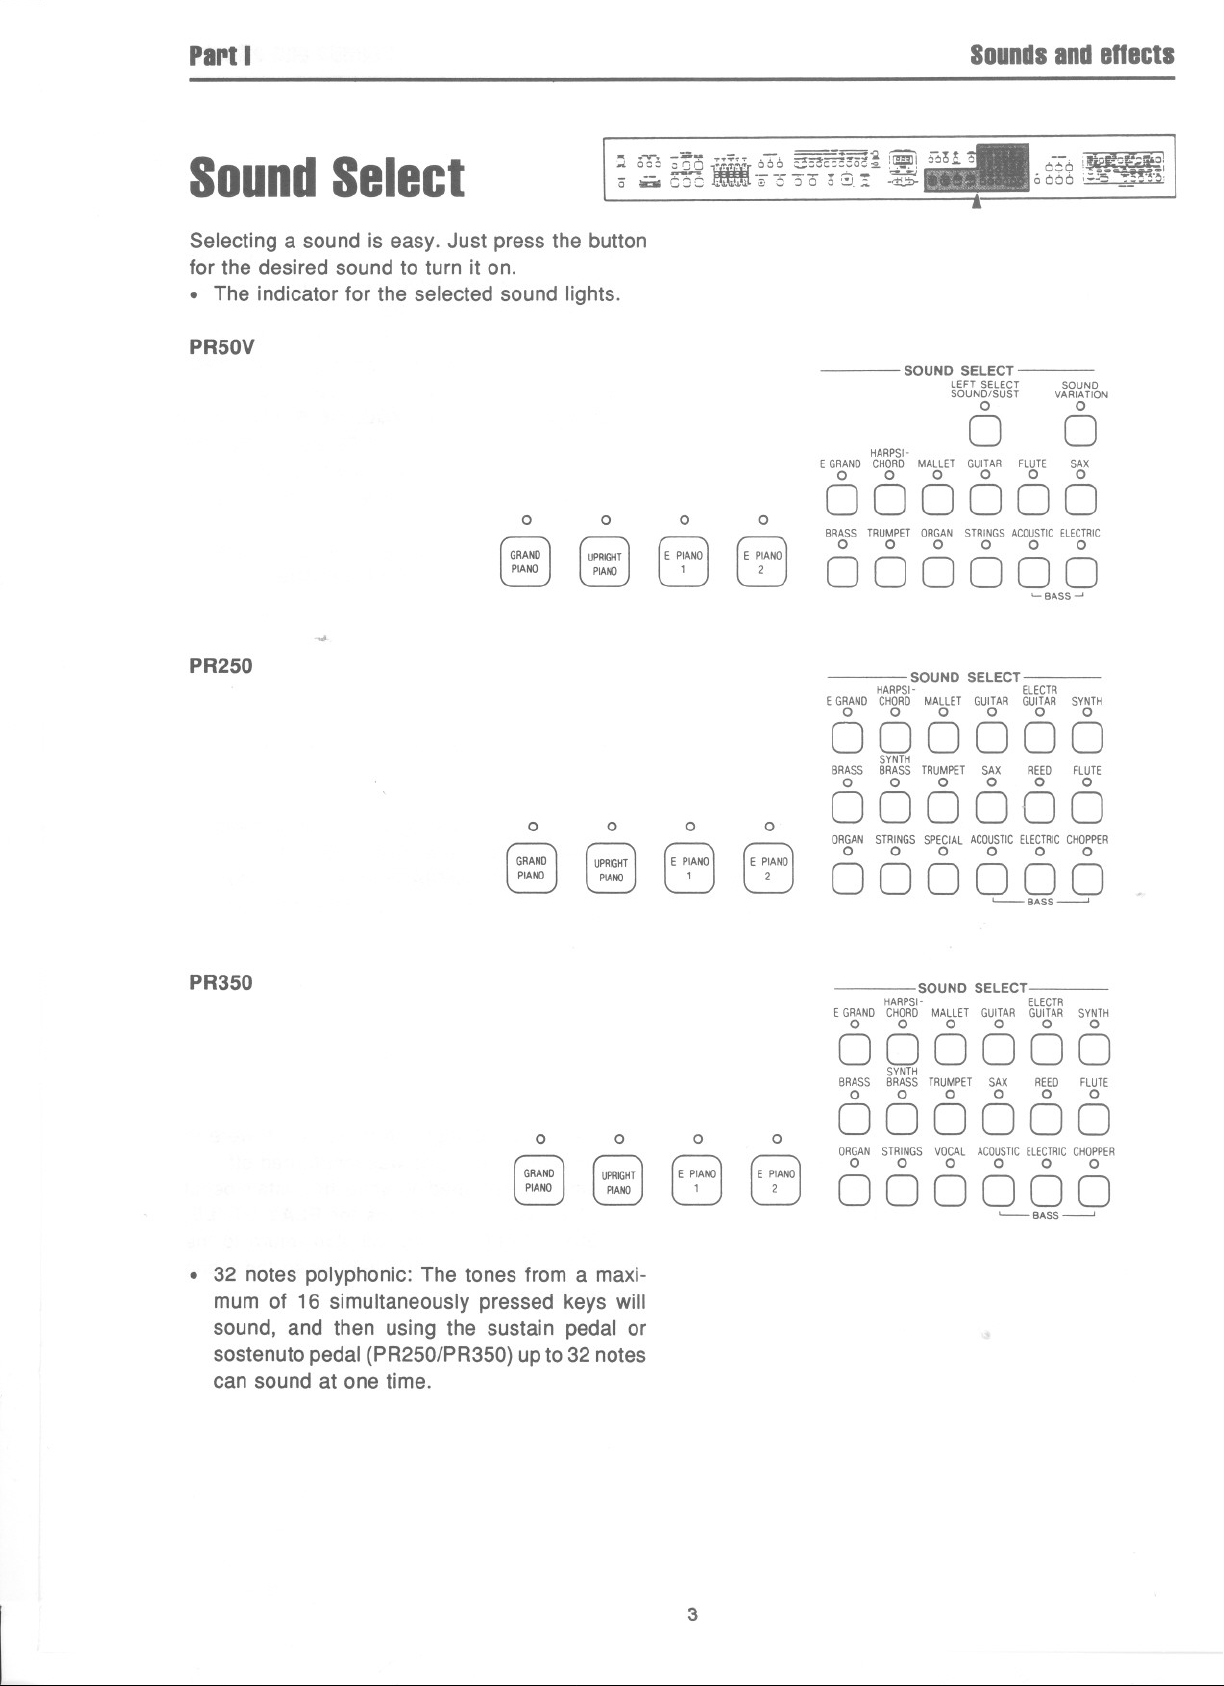
SoundSelect
0 !oi:iaC:JC' '~.).-~o3"o;~.! ~
Selecting a sound is easy. Just press the button
for the desired sound to turn it on.
. The indicator for the selected sound lights.
PR50V
0
UPRIGHT
PIANO
PR250
-oJ.
0
GRAND
PIANO
~ KCfl"[666 ;:;so-m:OOQ", i~! 660... 6
SOUND SELECT
HARPSI-
EGRANOCHORDMALLET GUITAR FLUTE SAX
0 0 0 0 0 0
0
(E P~ANOJ
0
(E P~ANOJ
000000
BRASSTRUMPETORGANSTRINGSACOUSTICELECTRIC
0 0 0 0 0 0
000000
SOUND SELECT
HARPSI- ELECTR
EGRANOCHOROMALLET GUITARGUITAR SYNTH
0 0 0 0 0 0
LEFT SELECT
SOUNDISUST
0
0
0-;-6 !W~o~-~o!
SOUND
VARIATION
0
00 -" I
. ".
0000 ,;;;;5 ~.~,
0
~BASS~
0 0
GRAND
PIANO
PR350
0
GRAND
PIANO
.
32 notes polyphonic: The tones from a maxi-
mum of 16 simultaneously pressed keys will
sound, and then using the sustain pedal or
sostenuto pedal (PR250/PR350) up to 32 notes
can sound at one time.
UPRIGHT
PIANO
0 0
UPRIGHT
PIANO
0
(E PtNoJ
(E P~ANOJ
0
(E P~ANOJ
0
(E P~ANOJ
000000
SYNTH
BRASS BRASSTRUMPET SAX REED FLUTE
0 0 0 0 0 0
000000
ORGAN STRINGS SPECIAL ACOUSTICELECTRICCHOPPER
0 0 0 0 0 0
000000
SOUND SELECT
HARPSI- ELECTR
EGRANDCHORDMALLET GUITAR GUITAR SYNTH
0 0 0 0 0 0
000000
SYNTH
BRASS BRASSTRUMPET SAX REED FLUTE
0 0 0 0 0 0
' BASS---'
000000
ORGAN STRINGS VOCAL ACOUSTICELECTRICCHOPPER
0 0 0 0 0 0
000000
'- BASS---'
3
Page 5
PartI
PianoMode
Soundsandeneets
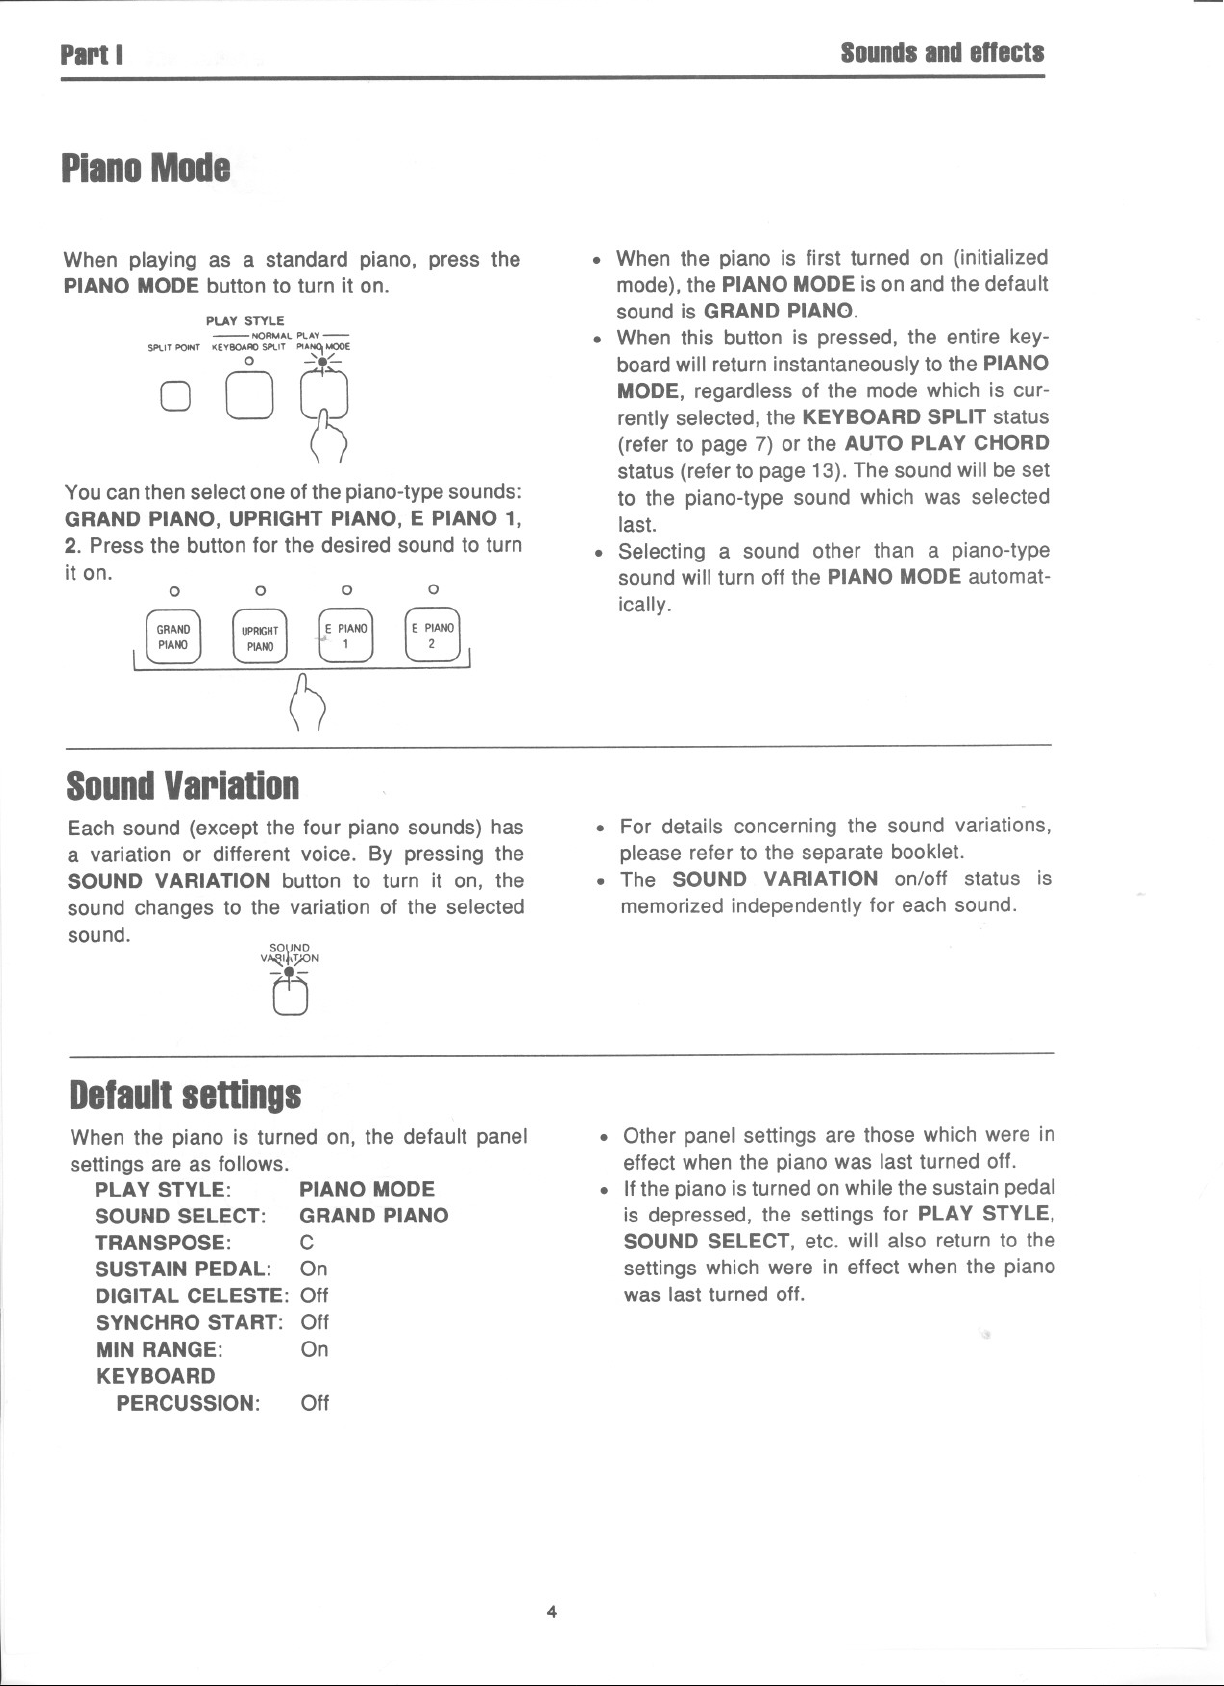
When playing as a standard piano, press the
PIANOMODEbutton to turn it on.
PLAY STYLE
-NORMAL PLAY-
~~' '0" ~
You can then select one of the piano-type sounds:
GRAND PIANO, UPRIGHT PIANO, E PIANO 1,
2. Press the button for the desired sound to turn
it on.
0
0 0
tE P:ANO]
0
(E PIANO)
2
I
0
SoundVariation
Each sound (except the four piano sounds) has
a variation or different voice. By pressing the
SOUND VARIATION button to turn it on, the
sound changes to the variation of the selected
sound.
SO\JNO
. When the piano is first turned on (initialized
mode), the PIANO MODE is on and the default
sound is GRAND PIANO.
. When this button is pressed, the entire key-
board will return instantaneously to the PIANO
MODE, regardless of the mode which is cur-
rently selected, the KEYBOARD SPLIT status
(refer to page 7) or the AUTO PLAY CHORD
status (refer to page 13). The sound will be set
to the piano-type sound which was selected
last.
. Selecting a sound other than a piano-type
sound will turn off the PIANO MODE automat-
ically.
. For details concerning the sound variations,
please refer to the separate booklet.
. The SOUND VARIATION on/off status is
memorized independently for each sound.
V~N
Delaultsettings
When the piano is turned on, the default panel
settings are as follows.
PLAY STYLE: PIANO MODE
SOUND SELECT: GRAND PIANO
TRANSPOSE: C
SUSTAIN PEDAL: On
DIGITAL CELESTE: Off
SYNCHRO START: Off
MIN RANGE: On
KEYBOARD
PERCUSSION: Off
. Other panel settings are those which were in
effect when the piano was last turned off.
. If the piano is turned on while the sustain pedal
is depressed, the settings for PLAY STYLE,
SOUND SELECT, etc. will also return to the
settings which were in effect when the piano
was last turned off.
4
Page 6

Pari.
Pedals
Soundsand enecls
. Sustainpedal
When a key is released while this pedal is
depressed, the sound is sustained so that it
lingers and slowly fades out.
. For the piano sounds, the sustain effect is on
for the 17 rightmost keys at all times, just like
an acoustic piano.
. PR350: This pedal is a four-stage pedal, and
the length of the sustain is controlled by the
degree to which the pedal is depressed.
. If the SUSTAIN PEDAL button is off, the sus-
tain effect does not work.
. Sostenutopedal(PR250/PR350)
When this pedal is pressed, the notes for the keys
already held--down will be sustained. If the pedal
is pressed first and the keys are then pressed,
the sustain effect is not applied to those notes.
. For continuous-type sounds, such as ORGAN,
the notes sound as long as the pedal is
pressed.
. Soft pedal
When this pedal is depressed, the overall sound
is softer and the volume is slightly lower.
Sostenuto pedal
(PR250/PR350)
Soft pedal
. Other functions can be programmed in the sos-
tenuto pedal (PR250/PR350) and soft pedal.
(Refer to page 39.)
Ellects
Various effects can be applied to the sound by
pressing the desired button to turn it on.
DIGITAL CELESTE SUSTAIN
1 2 PEDAL
0 0 0
.. _a.. ..=-- - =='2 ~ IE!I~ _",a.-",
- - ~ - - -- -'"'.. '~ . . . . 0000:;: ~oo " ~- - -I
.. ~o= "a:: IITfUocc ~:=
0 - 0- ,;;::: 0<:':,;;' ,-d::b- ]jii=~ooc5E 0000 !;:.;- --_'~'~I
000
. DIGITALCELESTE 1,2
DIGITAL CELESTE
depth and breadth.
. DIGITAL CELESTE 1 is the minimum amount
of this effect.
. DIGITAL CELESTE 2 is the maximum amount
of this effect.
. Select either of the two types, 1 or 2.
. This effect does not work for the left part
sounds of a split keyboard. (Refer to page 7.)
. When this effect is turned on, the number of
notes which can be simultaneously generated
is reduced to 16.
. The DIGITAL CELESTE feature is more effec-
tive for some sounds than others.
. The DIGITAL CELESTE effect turns off auto-
matically when a different sound is selected.
. The DIGITAL CELESTE effect turns off auto-
matically when a different sound is selected.
gives the sound greater
=_!5a:2.",,=,,1 ~ ":.=oc~ ,
.
. SUSTAIN PEDAL
If this button is on and the sustain pedal is
depressed, when a key is released, the sound is
sustained so that it lingers and slowly fades out.
. When this button is off, the sustain does not
work even when the pedal is depressed.
~
'
. The sustain on/off status can be set for the
right and left parts independently when the
keyboard is split. (Refer to page 7.)
5
Page 7
'art I
DigitalReverb(PR250/PR350)
SoundsandeUects
Q.;315
- -
0 - ,-,c::J.~' I;)0 00 "G..:;. .~ OO~::ioooo~ 0000 '-"5 ~__'~'Ol
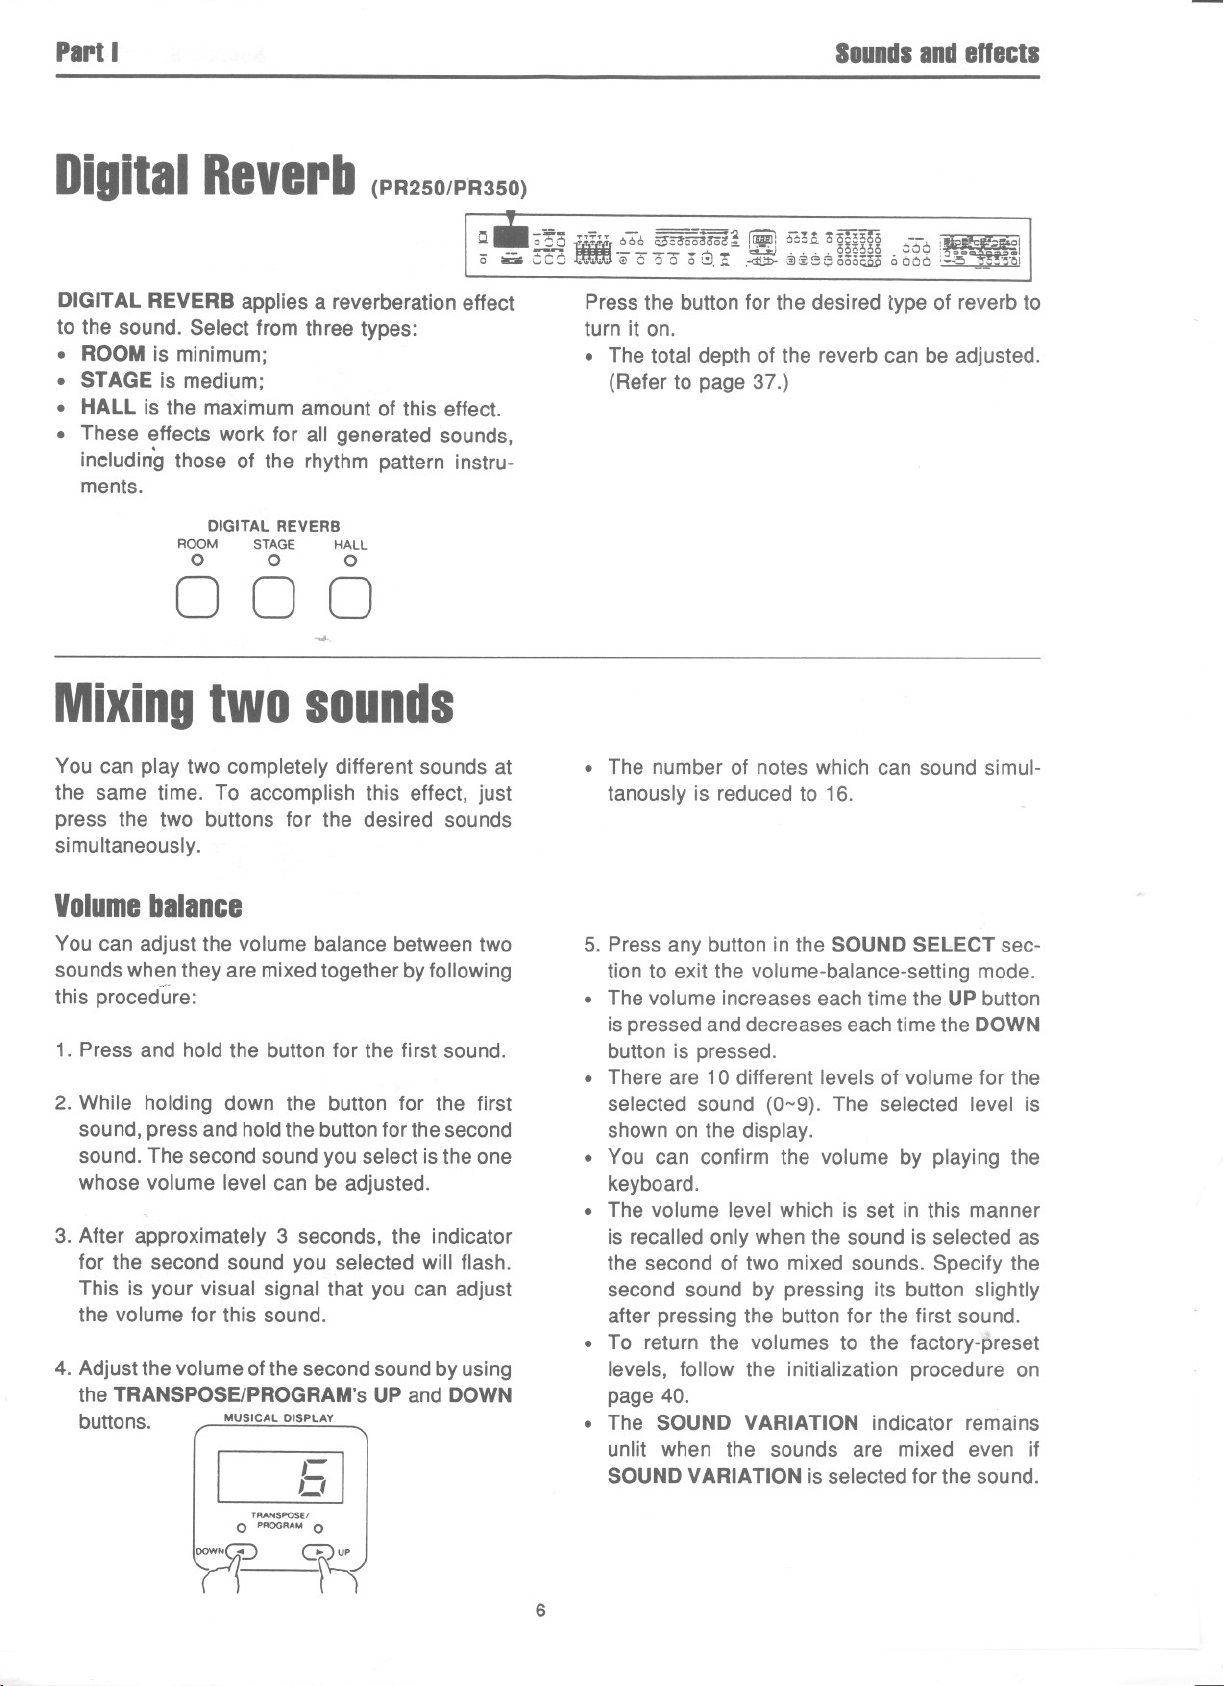
DIGITAL REVERB applies a reverberation effect
to the sound. Select from three types:
.ROOM is minimum;
. STAGE is medium;
. HALL is the maximum amount of this effect.
. These effects work for all generated sounds,
including those of the rhythm pattern instru-
ments.
DIGITAL REVERB
ROOM STAGE HALL
0 0 0
000
~
Mixingtwosounds
You can play two completely different sounds at
the same time. To accomplish this effect, just
press the two buttons for the desired sounds
simultaneously.
".;.. 666S"S"oEai50CS:-. 6tH °*350 --
~ - ~ ~~ - . ...-:,L,;J . . . . 000300 ::00 ,. ~O .
IE
Press the button for the desired type of reverb to
turn it on.
. -
~
. The total depth of the reverb can be adjusted.
(Refer to page 37.)
. The number of notes which can sound simul-
tanously is reduced to 16.
I
Volumebalance
You can adjust the volume balance between two
sounds when they are mixed together by following
this proced"ure:
1. Press and hold the button for the first sound.
2. While holding down the button for the first
sound, press and hold the button for the second
sound. The second sound you select is the one
whose volume level can be adjusted.
3. After approximately 3 seconds, the indicator
for the second sound you selected will flash.
This is your visual signal that you can adjust
the volume for this sound.
4. Adjust the volume of the second sound by using
the TRANSPOSE/PROGRAM's UP and DOWN
buttons. MUSICAL DISPLAY
,-
0
]
Gup
n-
TRANSPOSEf
0 PROGRAM 0
n
5. Press any button in the SOUND SELECT sec-
tion to exit the volume-balance-setting mode.
. The volume increases each time the UP button
is pressed and decreases each time the DOWN
button is pressed.
. There are 10 different levels of volume for the
selected sound (0-9). The selected level is
shown on the display.
. You can confirm the volume by playing the
keyboard.
. The volume level which is set in this manner
is recalled only when the sound is selected as
the second of two mixed sounds. Specify the
second sound by pressing its button slightly
after pressing the button for the first sound.
. To return the volumes to the factory-preset
levels, follow the initialization procedure on
page 40.
. The SOUND VARIATION indicator remains
unlit when the sounds are mixed even if
SOUND VARIATION is selected for the sound.
6
Page 8
PartI
KeyboardSplit
Soundsandenects
: 56:,8iiliir ~-;6~~m~ [ii1i\56n °mID QOQ~
0" .a. wOO~~"3"oo oG.! .~ ~ii1BeoooW 0000 ~
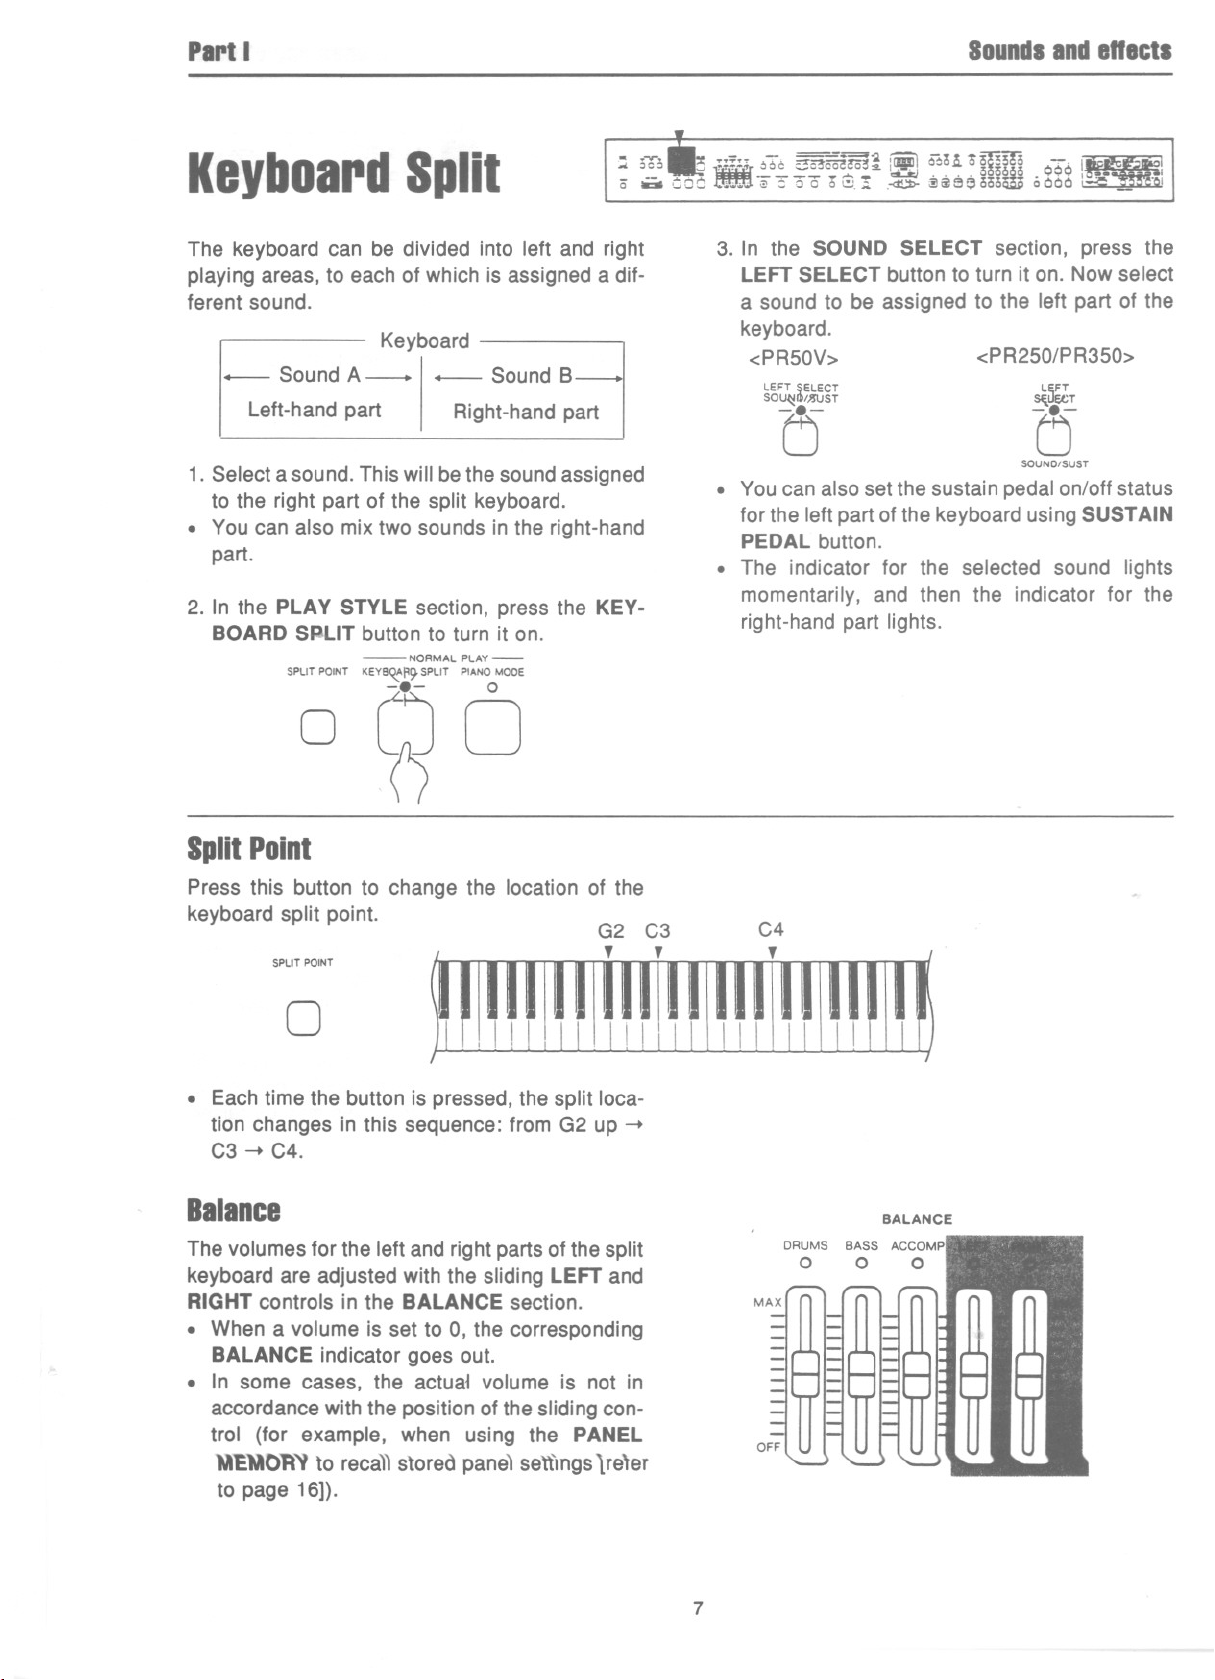
The keyboard can be divided into left and right
playingareas,to eachof which is assigneda dif-
ferent sound.
Keyboard
-- SoundA-I- SoundB
Left-hand part
1. Select a sound. This will be the sound assigned
to the right part of the split keyboard.
. You can also mix two sounds in the right-hand
part.
2. In the PLAY STYLE section, press the KEY-
BOARD SPLIT button to turn it on.
SPUT POINT
-NORMAL PLAY-
KEYB~fI~SPLIT PIANO MOOE
Right-hand part
0
~o
3. In the SOUND SELECT section, press the
LEFT SELECT button to turn it on. Now select
a sound to be assigned to the left part of the
keyboard.
<PR50V>
LEFT SELECT
SO~I)/)JIJST
(5
. You can also set the sustain pedal on/off status
for the left part of the keyboard using SUSTAIN
PEDAL button.
<PR250/PR350>
L~FT
~uecT
(5
SOUND/SUST
. The indicator for the selected sound lights
momentarily, and then the indicator for the
right-hand part lights.
SplitPoint
Press this button to change the location of the
keyboardsplit point.
SPLIT POINT
0
. Each time the button is pressed, the split loca-
tion changesin this sequence:from G2 up -+
C3 -+ C4.
Balance
The volumes for the left and right parts of the split
keyboard are adjusted with the sliding LEFT and
RIGHT controls in the BALANCE section.
. When a volume is set to 0, the corresponding
BALANCE indicator goes out.
. In some cases, the actua1 volume is not in
accordance with the position of the sliding con-
trol (for example, when using the PANEL
\I'E\lO~'l to reca)) stored pane) settIngs lre'er
to page 16]).
BALANCE
7
Page 9
PartI
Soundsandenects
,.. .rv-. _:vi- ~'~n -, -==~
'" 000 oeO ~ 000 'Zo~~Coi:l~
0 .,. 5CO~eGQQ 6G.!-
Transpose
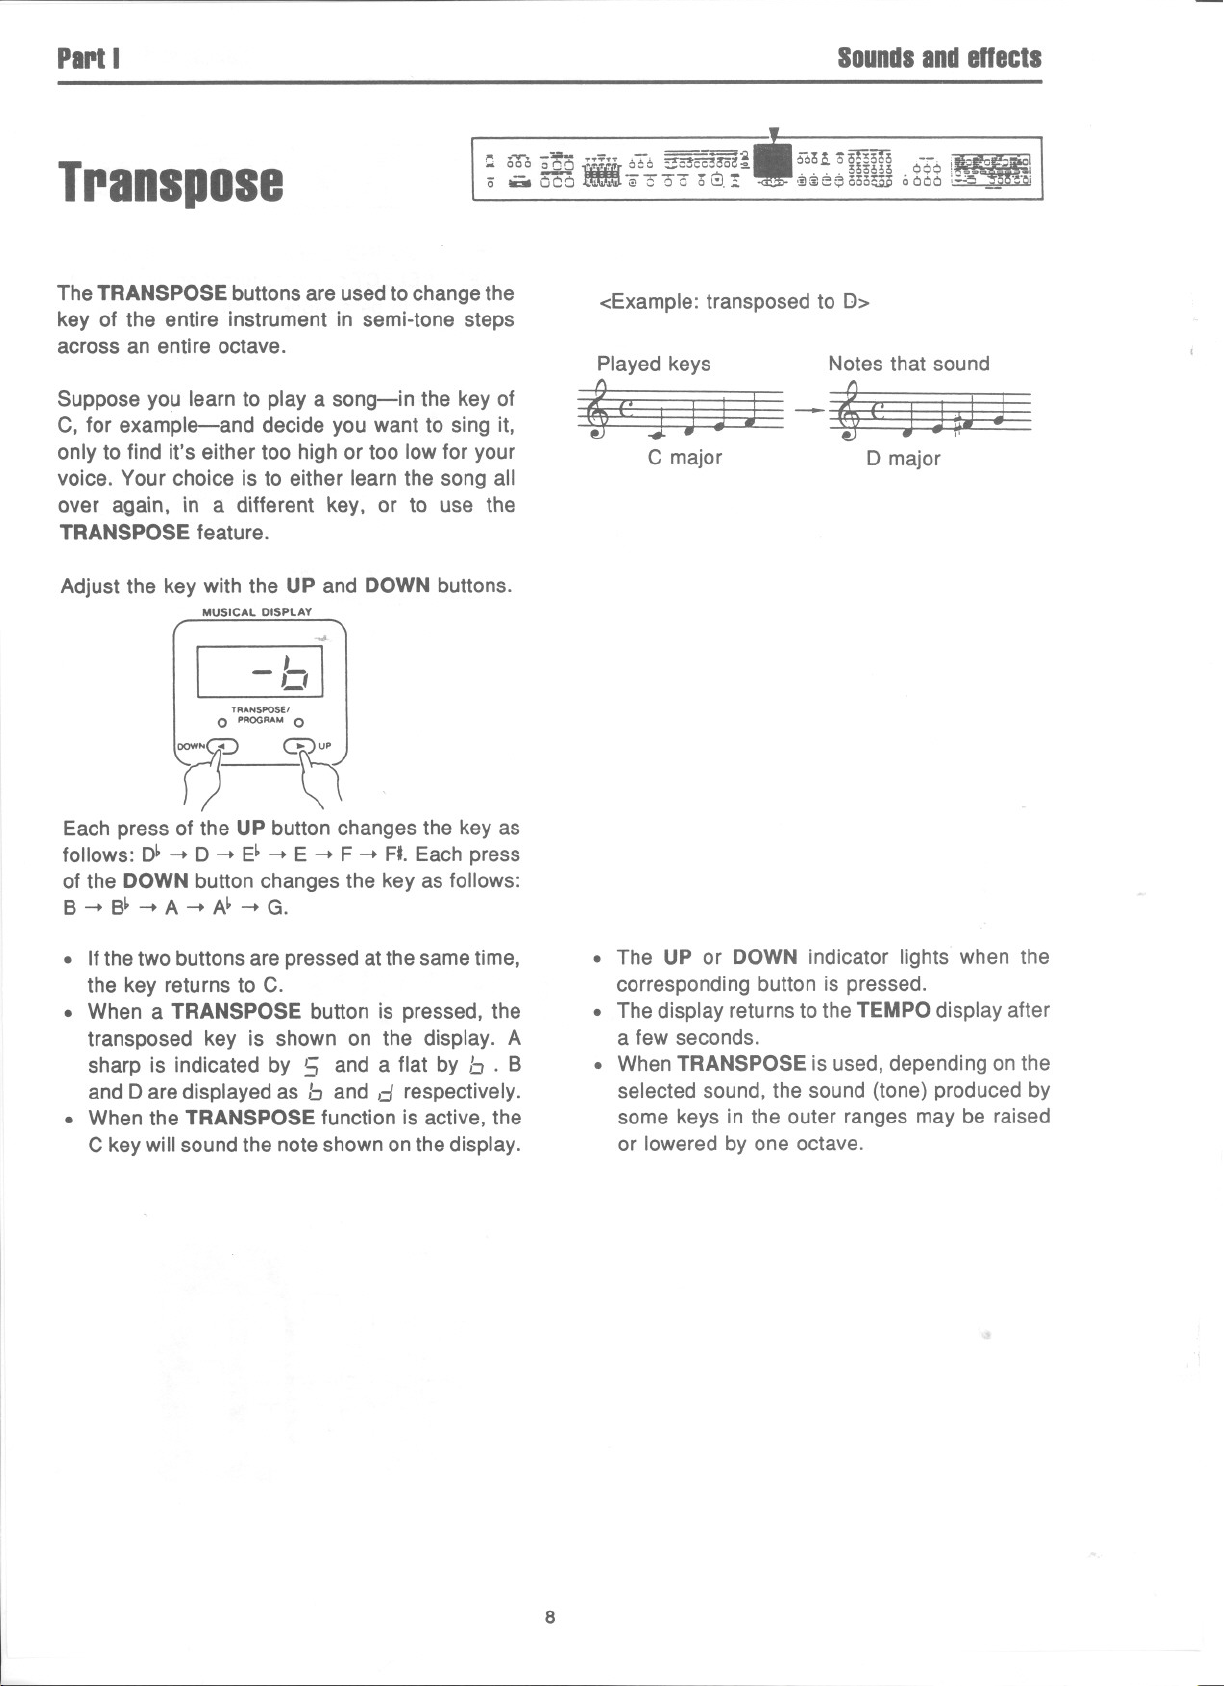
The TRANSPOSE buttons are used to change the
key of the entire instrument in semi-tone steps
across an entire octave.
Suppose you learn to playa song-in the key of
C, for example-and decide you want to sing it,
only to find it's either too high or too low for your
voice. Your choice is to either learn the song all
over again, in a different key, or to use the
TRANSPOSE feature.
Adjust the key with the UP and DOWN buttons.
MUSICAL DISPLAY
-b]
TRANSPOSEI
0 PROGRAM 0
~
6'6H o~~ 0-:;-6I
30o~~3 . Y. ,~~ .1
@~eeooo~ oaaO :~...
<Example: transposed to D>
Played keys Notes that sound
~
" ."
- ., i
~('~-~I:J~
C major
D major
U0
Each press of the UP button changes the key as
follows: D~-+ D -+ E~-+ E -+ F -+ F#.Each press
of the DOWN button changes the key as follows:
B -+ B~-+ A -+ A~-+ G.
. Ifthe two buttons are pressed at the same time,
the key returns to C.
. When a TRANSPOSE button is pressed, the
transposed key is shown on the display. A
sharp is indicated by 5 and a flat by b . B
and D are displayed as band d respectively.
. When the TRANSPOSE function is active, the
C key will sound the note shown on the display.
. The UP or DOWN indicator lights when the
corresponding button is pressed.
. The display returns to the TEMPO display after
a few seconds.
. When TRANSPOSE is used, depending on the
selected sound, the sound (tone) produced by
some keys in the outer ranges may be raised
or lowered by one octave.
8
Page 10
PartII
Various professional drums performances have been PCM-recorded and stored in your piano's memory.
This chapter includes explanations of intro and fill-in features which enhance the rhythm performance,
the KEYBOARD PERCUSSION with which you playa drums performance on the keyboard, and the AUTO
PLAY CHORD feature which allows you to play, using just one finger, an automatic accompaniment.
Playingtherhythm
.
,-
'I
a m o~ .:~;; 676_!~ 5?:Ho~mH ":;-0 ~
0 ... CCo -w ::: ::: 0 6~. ~ .~]lfS== 3coE; ,,000 ,-:" "",",_'~'~I
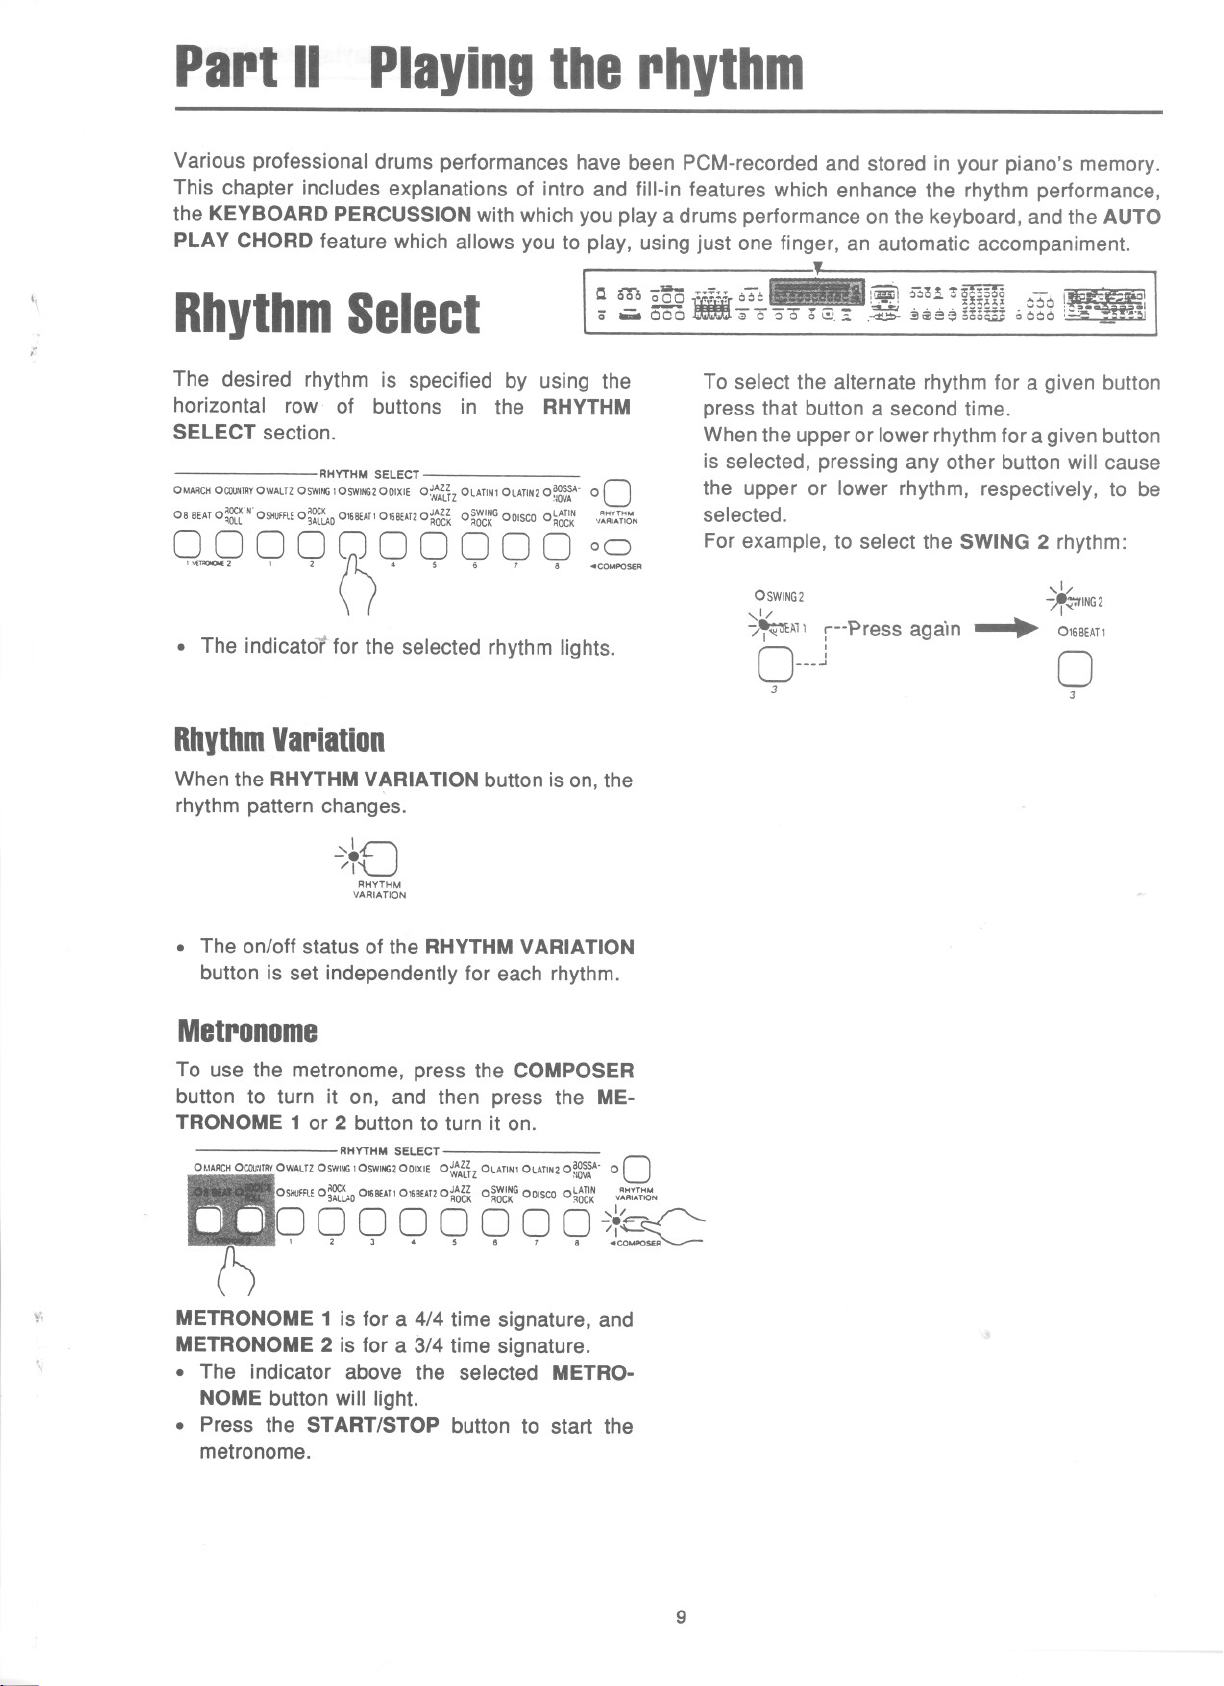
RhythmSelect
The desired rhythm is specified by using the
horizontal row of buttons in the RHYTHM
SELECT section.
RHYTHM SELECT
OMARCHOCOUNTIIYOWALTZOSWING1OSWINGZOOIXIE o:;;'lLh OLATIN! OLATINZO~' 0 0
oa aEATo;g:tN' OSHUfFlEO;~~D OU;8EATI016BEA11O:o~~ o~~d~ OOiSCOO~~~'~ ,,~~i:T~~
0 0 0 0 0 0 0 0 0 0 00
,-, , "0' . . . . -
.The indicator for the selected rhythm lights.
RhythmVariation
When the RHYTHM VARIATION button is on, the
rhythm pattern changes.
,1
-8
/1
0
RHYTHM
VARIATION
~ - ~-- -- - ~ . . . . ~ . :~!
To select the alternate rhythm for a given button
press that button a second time.
When the upper or lower rhythm for agiven button
is selected, pressing any other button will cause
the upper or lower rhythm, respectively, to be
selected.
For example, to select the SWING 2 rhythm:
OSWING2
,1/
/~A11 r--Press again
o--j
3
,1/
"~ING2
. 016BEAT1
0
3
. The on/off status of the RHYTHM VARIA TION
button is set independently for each rhythm.
Metronome
To use the metronome, press the COMPOSER
button to turn it on, and then press the ME-
TRONOME 1 or 2 button to turn it on.
RHYTHM SELECT
Ol.IARCHOCOI",T"I°WALTZOSWII<G1OSWINGIOOIXIEO~AthOLATlNIOLATlNZo~~~r' 00
SHUFFlEO;~~D 0168EATI 0'6B£AT1O~~~~ o~~d~G OOISCOo~~~~ V~~::;'~N
Q Q Q Q Q Q Q Q~1£~
,.
\
METRONOME 1 is for a 4/4 time signature, and
METRONOME 2 is for a 3/4 time signature.
. The indicator above the selected METRO-
NOME button will light.
. Press the START/STOP button to start the
metronome.
9
Page 11
PaPi D
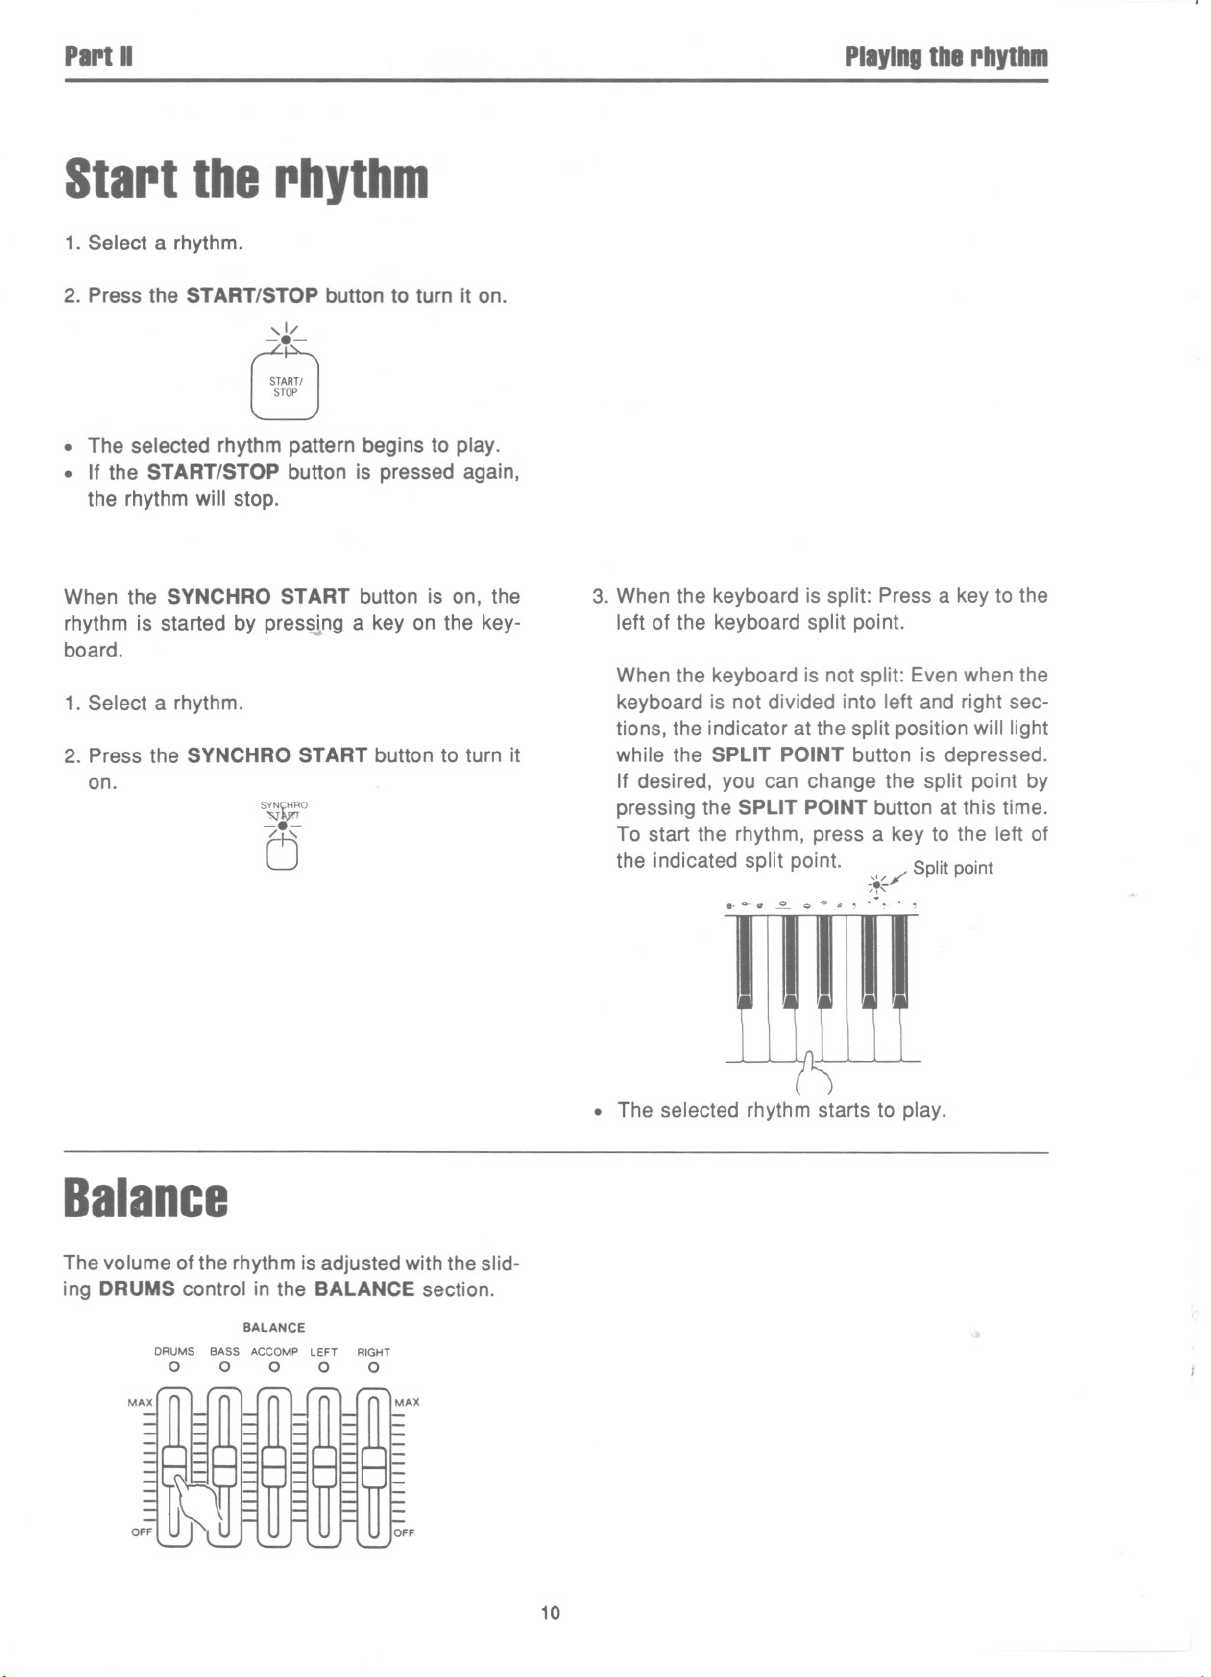
Start the rhythm
1. Select a rhythm.
2. Press the START/STOP button to turn it on.
,1/
-.8.-
START!
STOP
. The selected rhythm pattern begins to play.
. If the START/STOP button is pressed again,
the rhythm will stop.
PlayingIbl rbytbm
When the SYNCHRO START button is on, the
rhythm is started by pres~ng a key on the key-
board.
1. Select a rhythm.
2. Press the SYNCHRO START button to turn it
on.
SYN~HRO
'Slt.J>'T
(5
3. When the keyboard is split: Press a key to the
left of the keyboard split point.
When the keyboard is not split: Even when the
keyboard is not divided into left and right sec-
tions, the indicator at the split position will light
while the SPLIT POINT button is depressed.
If desired, you can change the split point by
pressing the SPLIT POINT button at this time.
To start the rhythm, press a key to the left of
the indicated split point. Splitpoint
..Q..~"~",.,.,,
f"I
J "
'" j
~,,)O
. The selected rhythm starts to play.
Balance
The volume of the rhythm is adjusted with the slid-
ing DRUMS control in the BALANCE section.
BALANCE
DRUMS BASS ACCOMP LEFT RIGHT
0 0 0 0 0
MAX
OFF
10
Page 12
PartII
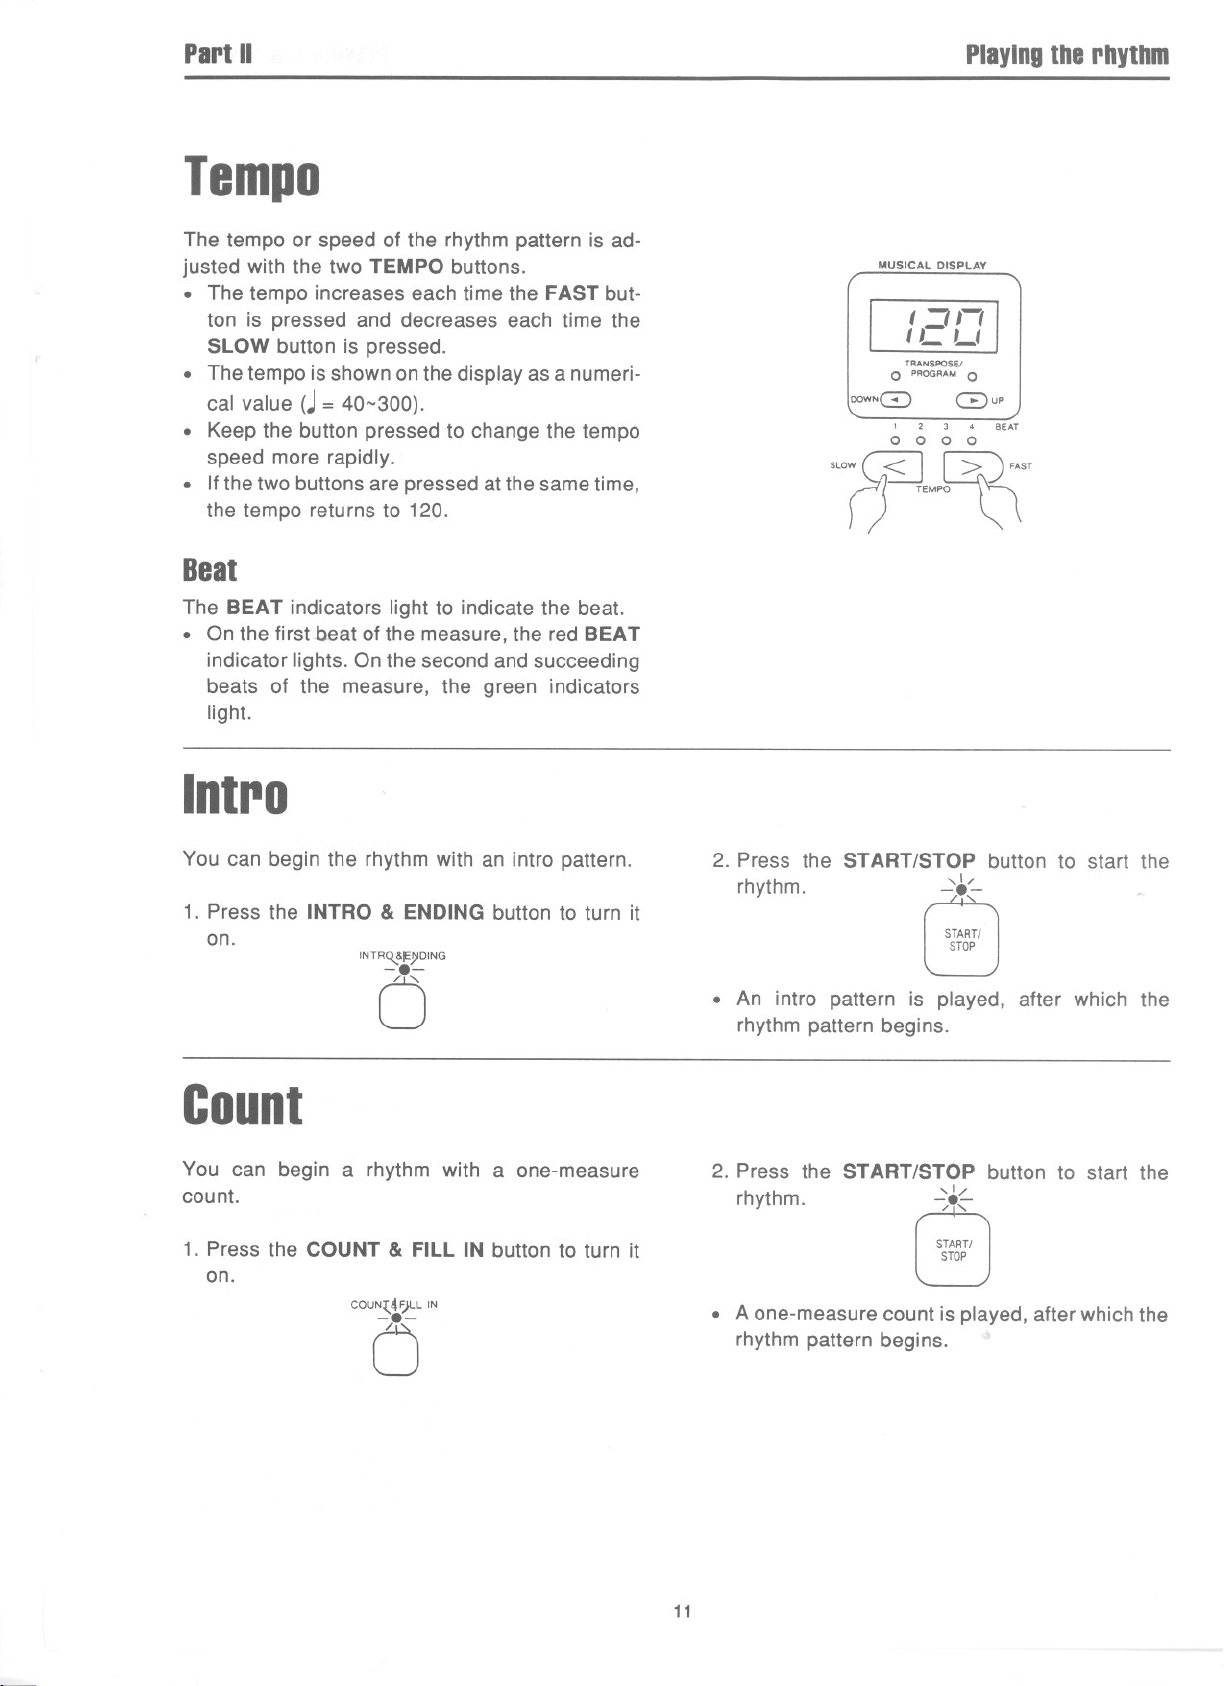
Tempo
Playingthe rhythm
The tempo or speed of the rhythm pattern is ad-
justed with the two TEMPO buttons.
. The tempo increases each time the FAST but-
ton is pressed and decreases each time the
SLOW button is pressed.
. The tempo is shown on the display as a numeri-
cal value (.I= 40-300).
. Keep the button pressed to change the tempo
speed more rapidly.
. If the two buttons are pressed at the same time,
the tempo returns to 120.
Beat
The BEAT indicators light to indicate the beat.
. On the first beat of the measure, the red BEAT
indicator lights. On the second and succeeding
beats of the measure, the green indicators
light.
Intra
MUSICAL DISPLAY
t =:III
tL L(
TRANSPOSEI
0 PROGRA" 0
OOWNC3) Gup
2 3 4 BEAT
0 0 0 0
SLOW ~ WAST
() TEMPO~ ~
You can begin the rhythm with an intro pattern.
1. Press the INTRO & ENDING button to turn it
on.
INTRQ,.&IE)IDING
0
Count
You can begin a rhythm with a one-measure
count.
1. Press the COUNT & FILL IN button to turn it
on.
COUN~J'7LL IN
C5
2. Press the START/STOP button to start the
rhythm. ~.-:..
START!
STOP
. An intro pattern is played, after which the
rhythm pattern begins.
2. Press the START/STOP button to start the
rhythm. -:,8,
. A one-measure count is played, after which the
rhythm pattern begins.
,1/
:.L
START!
STOP
11
Page 13
PartII Playingtherhythm
Fillin
You can insert a fill-in pattern any time during the
rhythm performance.
1. Select a rhythm and press the START/STOP
button.
,1/
-8.-
START!
STOP
Ending
Finish the rhythm performance with an ending
pattern.
1. Select a rhythm and press the START/STOP
button.
,1/
-.8.-
START!
STOP
2. Pressthe COUNT & FILL IN button to turn it
on. COUN~4'J-L IN
15
. A fill-in pattern is heard immediately for the
remainder of the measure.
. When the button is pressed on the last beat of
the measure, the fill-in pattern continues to the
end of the following measure.
2. Press the INTRO & ENDING button to turn it
on.
INTRQ..&t:):IDING
C5
. An ending pattern is produced, and then the
rhythm stops.
. If you accidentally press the INTRO & ENDING
button in the middle of the tune, you can press
the COUNT & FILL IN button to continue the
rhythm performance.
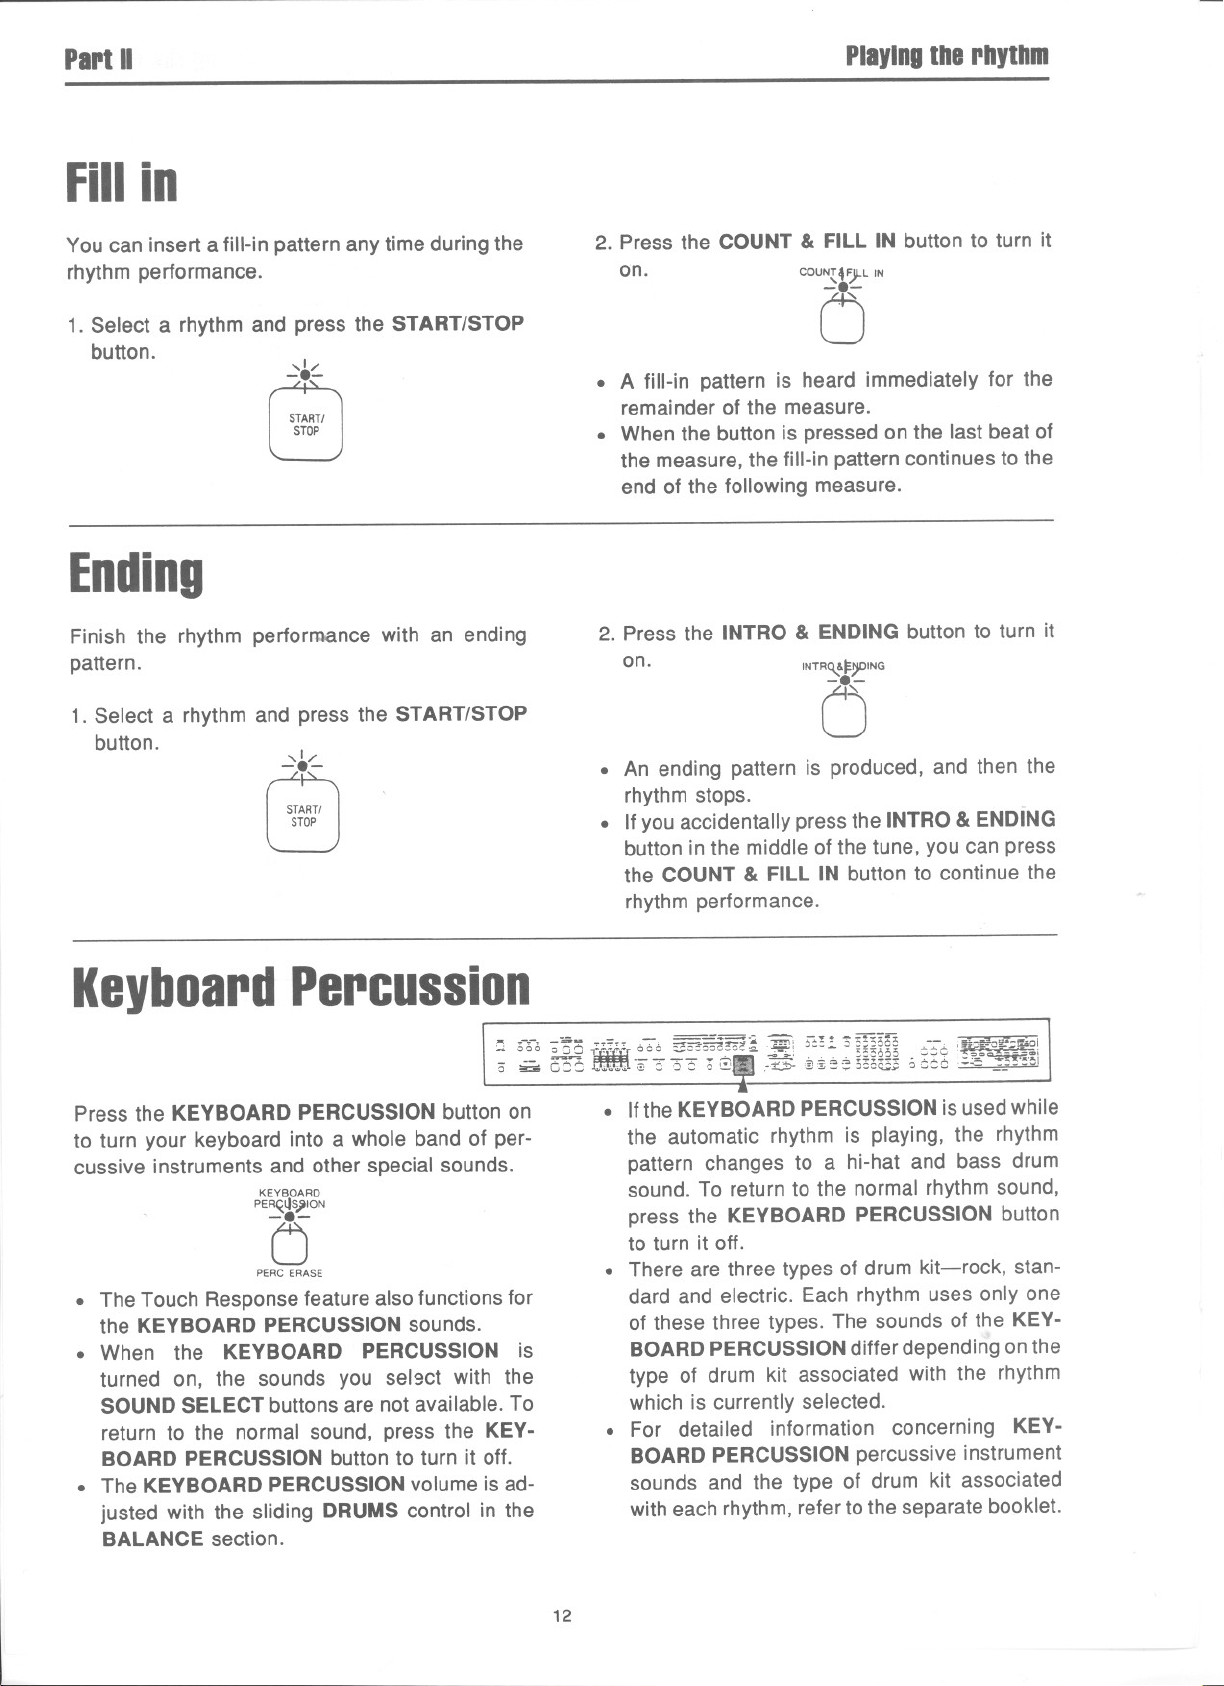
KeyboardPercussion
; ~ b~~ftlt([-,~~i~~~8f-*::;~mm;;-~g'f::~;i
Press the KEYBOARD PERCUSSION button on
to turn your keyboard into a whole band of per-
cussive instruments and other special sounds.
KEYBOARD
PEA~lI~ION
5
PERC ERASE
. The Touch Response feature also functions for
the KEYBOARD PERCUSSION sounds.
. When the KEYBOARD PERCUSSION is
turned on, the sounds you sel9ct with the
SOUND SELECT buttons are not available. To
return to the normal sound, press the KEY-
BOARD PERCUSSION button to turn it off.
. The KEYBOARD PERCUSSION volume is ad-
justed with the sliding DRUMS control in the
BALANCE section.
. Ifthe KEYBOARD PERCUSSION is used while
the automatic rhythm is playing, the rhythm
pattern changes to a hi-hat and bass drum
sound. To return to the normal rhythm sound,
press the KEYBOARD PERCUSSION button
to turn it off.
. There are three types of drum kit-rock, stan-
dard and electric. Each rhythm uses only one
of these three types. The sounds of the KEY-
BOARD PERCUSSION differ depending on the
type of drum kit associated with the rhythm
which is currently selected.
. For detailed information concerning KEY-
BOARD PERCUSSION percussive instrument
sounds and the type of drum kit associated
with each rhythm, refer to the separate booklet.
12
Page 14
PartII
Playingthe rhythm
.. T~-'-:;;;- ,- =--==~ r=\ -..~ '
.. OO~ a r-,r-,
-'--
a - '..'00000~.,;;, ,-d!!D-@ii)550i5owo066:;;""'~""
AutoPlayChord
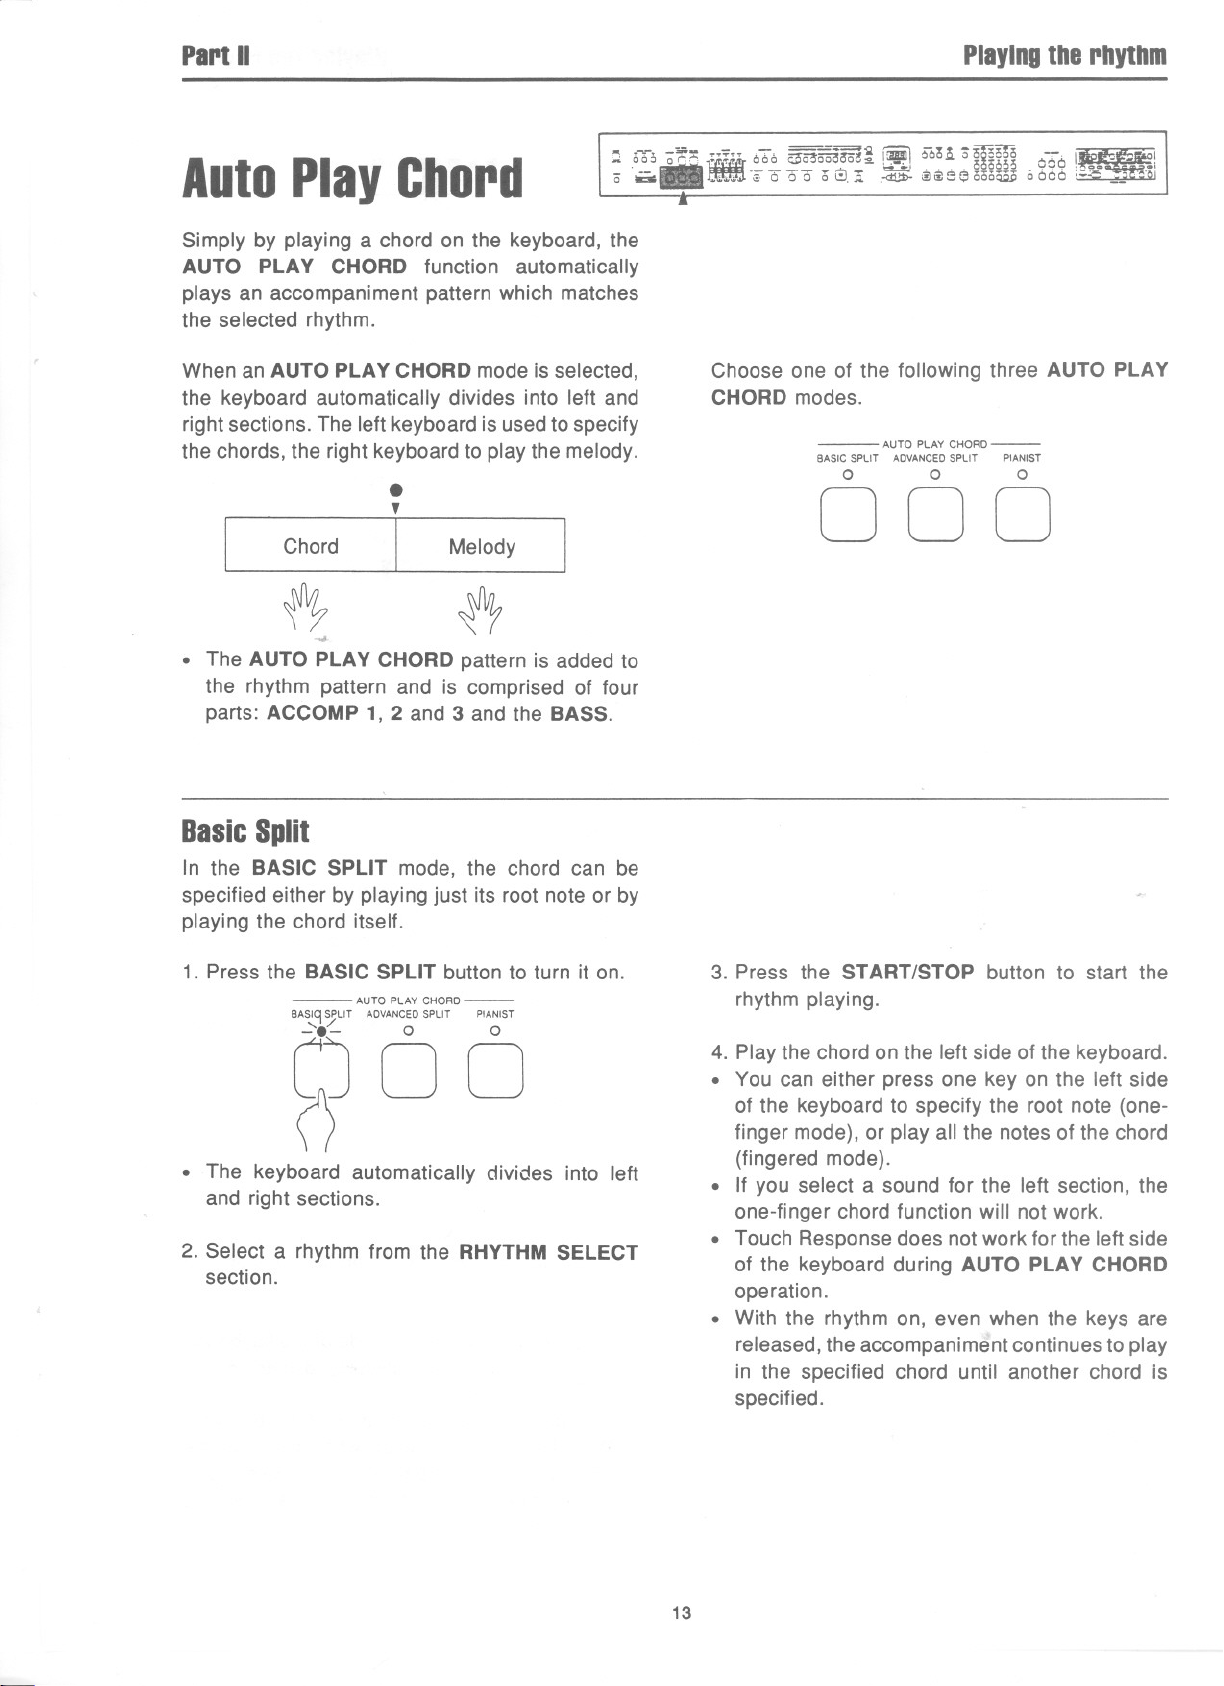
Simply by playing a chord on the keyboard, the
AUTO PLAY CHORD function automatically
plays an accompaniment pattern which matches
the selected rhythm.
When an AUTO PLAY CHORD mode is selected,
the keyboard automatically divides into left and
right sections. The left keyboard is used to specify
the chords, the right keyboard to play the melody.
.
,
Chord
~
-.J.
. The AUTO PLAY CHORD pattern is added to
the rhythm pattern and is comprised of four
parts: ACCOMP 1, 2 and 3 and the BASS.
Melody
I
~
.-:::" 000 i;3i53mOo(!~ !.I 000,," ~ is 0000 -,
iJi
81
,..-~..~--~' oiSoM 000,_. -.1
-:r.
W
.
Choose one of the following three AUTO PLAY
CHORD modes.
- AUTO PLAYCHORD-
BASIC SPLIT ADVANCEDSPLIT PIANIST
0 0 0
000
- ~ I
~
BasicSplit
In the BASIC SPLIT mode, the chord can be
specified either by playing just its root note or by
playing the chord itself.
1. Press the BASIC SPLIT button to turn it on.
- AUTO PLAY CHORD-
BASIC!SPLIT ADVANCEDSPLIT PIANIST
0 0
00
P
. The keyboard automatically divides into left
and right sections.
2. Select a rhythm from the RHYTHM SELECT
section.
3. Press the START/STOP button to start the
rhythm playing.
4. Play the chord on the left side of the keyboard.
. You can either press one key on the left side
of the keyboard to specify the root note (one-
finger mode), or play all the notes of the chord
(fingered mode).
. If you select a sound for the left section, the
one-finger chord function will not work.
. Touch Response does not work for the left side
of the keyboard during AUTO PLAY CHORD
operation.
. With the rhythm on, even when the keys are
released, the accompaniment continues to play
in the specified chord until another chord is
specified.
13
Page 15
PariII
PlayingIberbytbm
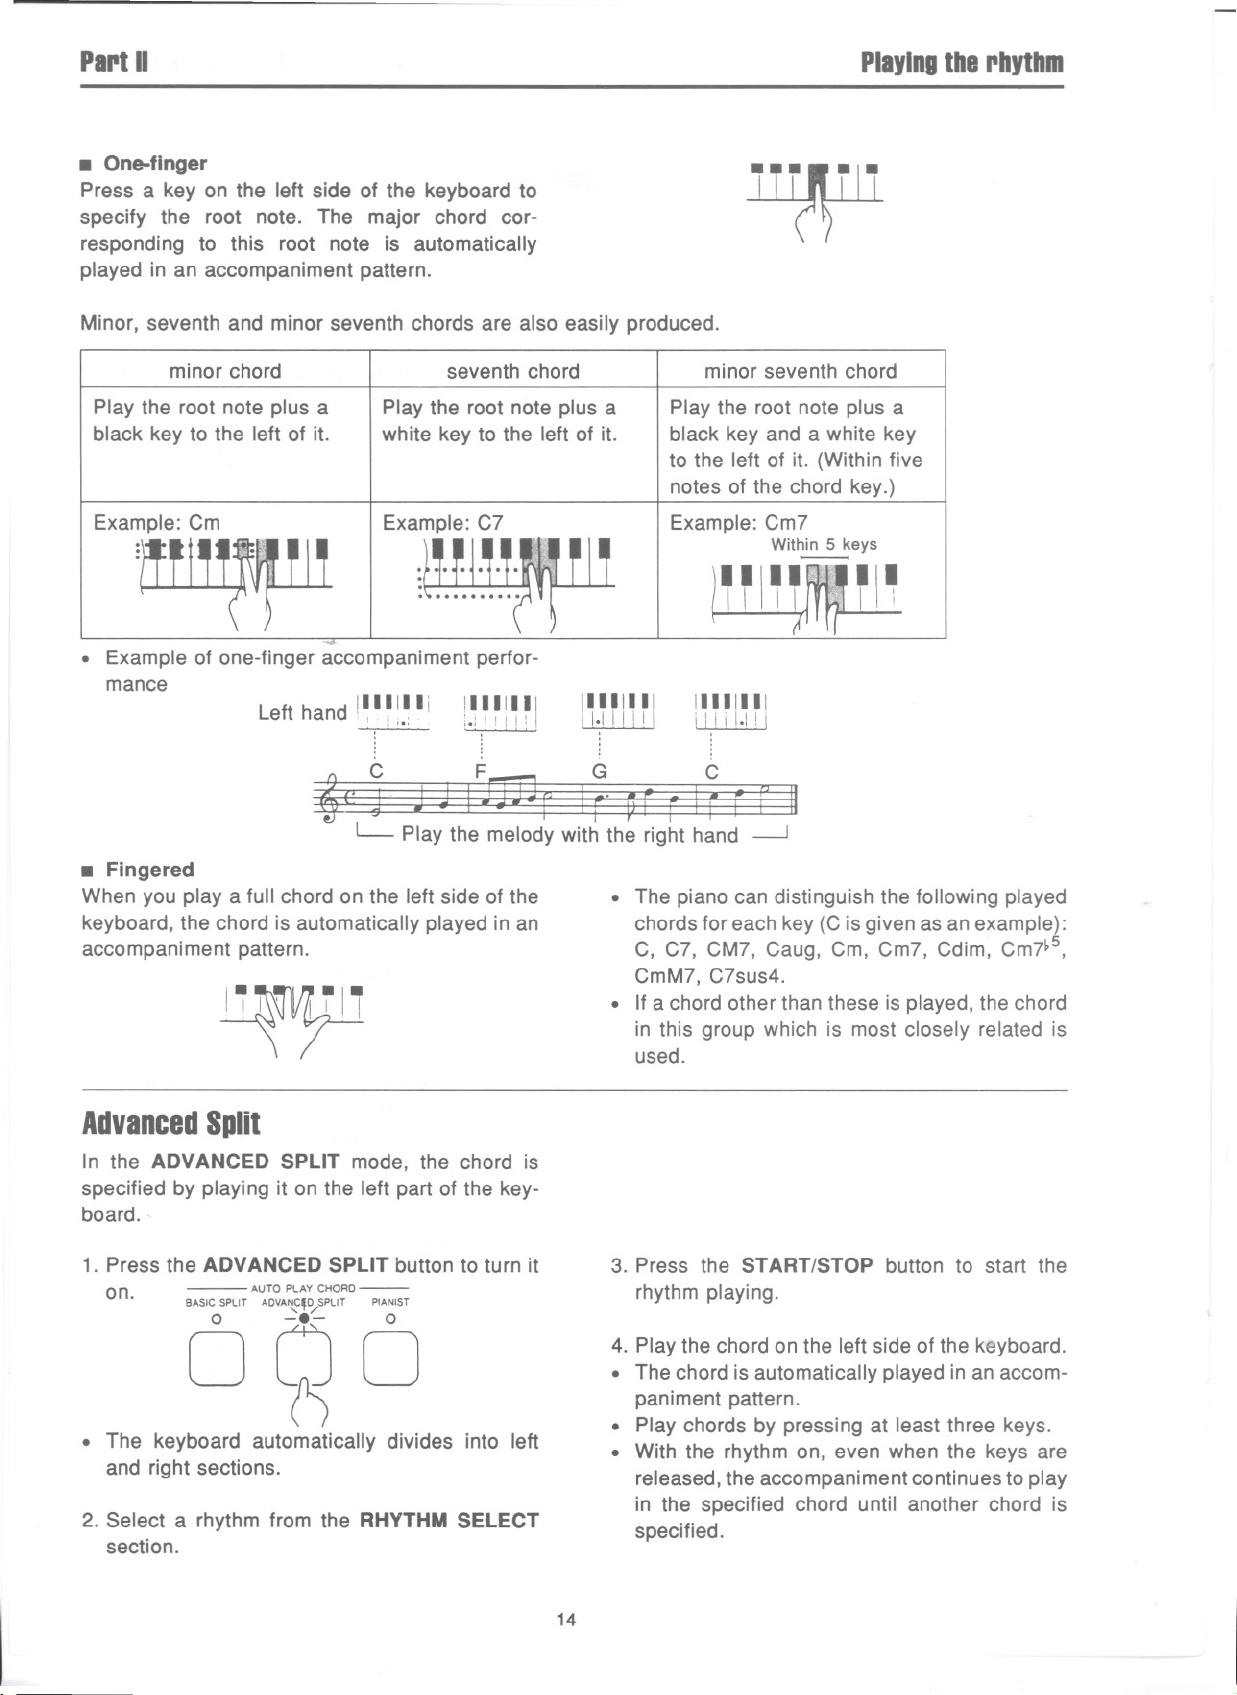
. One-finger
Press a key on the left side of the keyboard to
specify the root note. The major chord cor-
responding to this root note is automatically
played in an accompaniment pattern.
Minor, seventh and minor seventh chords are also easily produced.
minor chord
Play the root note plus a
black key to the left of it.
Example: Cm
Play the root note plus a
white key to the left of it.
Example: C?
seventh chord
Play the root note plus a
black key and a white key
to the left of it. (Within five
notes of the chord key.)
Example: Cm?
:~
. Example of one-finger accompaniment perfor-
mance
Left hand 11111IIi
: i.:
i~ ~ ~ ! ~ ~ I
" '
11111111
lliillJJ
,
11111111
i Iii I.I! i
nwu
minor seventh chord
With~eys
~I~
~
L- Play the melody with the right hand -.-J
. Fingered
When you playa full chord on the left side of the
keyboard, the chord is automatically played in an
accompaniment pattern.
1'1'"
AdvancedSplit
In the ADVANCED SPLIT mode, the chord is
specified by playing it on the left part of the key-
board.
1. Press the ADVANCED SPLIT button to turn it
on.
- AUTO PLAY CHORD -
BASIC SPLIT ADVA~'~SPLIT PIANIST
oqo
. The keyboard automatically divides into left
and right sections.
2. Select a rhythm from the RHYTHMSELECT
section.
.
The piano can distinguish the following played
chords for each key (C is given asan example):
C, C?, CM?, Caug, Cm, Cm?, Cdim, Cm?~5,
CmM?, C?sus4.
. If a chord other than these is played, the chord
in this group which is most closely related is
used.
3. Press the START/STOP button to start the
rhythm playing.
4. Play the chord on the left side of the keyboard.
. The chord is automatically played in an accom-
paniment pattern.
. Play chords by pressing at least three keys.
. With the rhythm on, even when the keys are
released, the accompaniment continues to play
in the specified chord until another chord is
specified.
14
Page 16
Plrt II Pllylngtherhythm
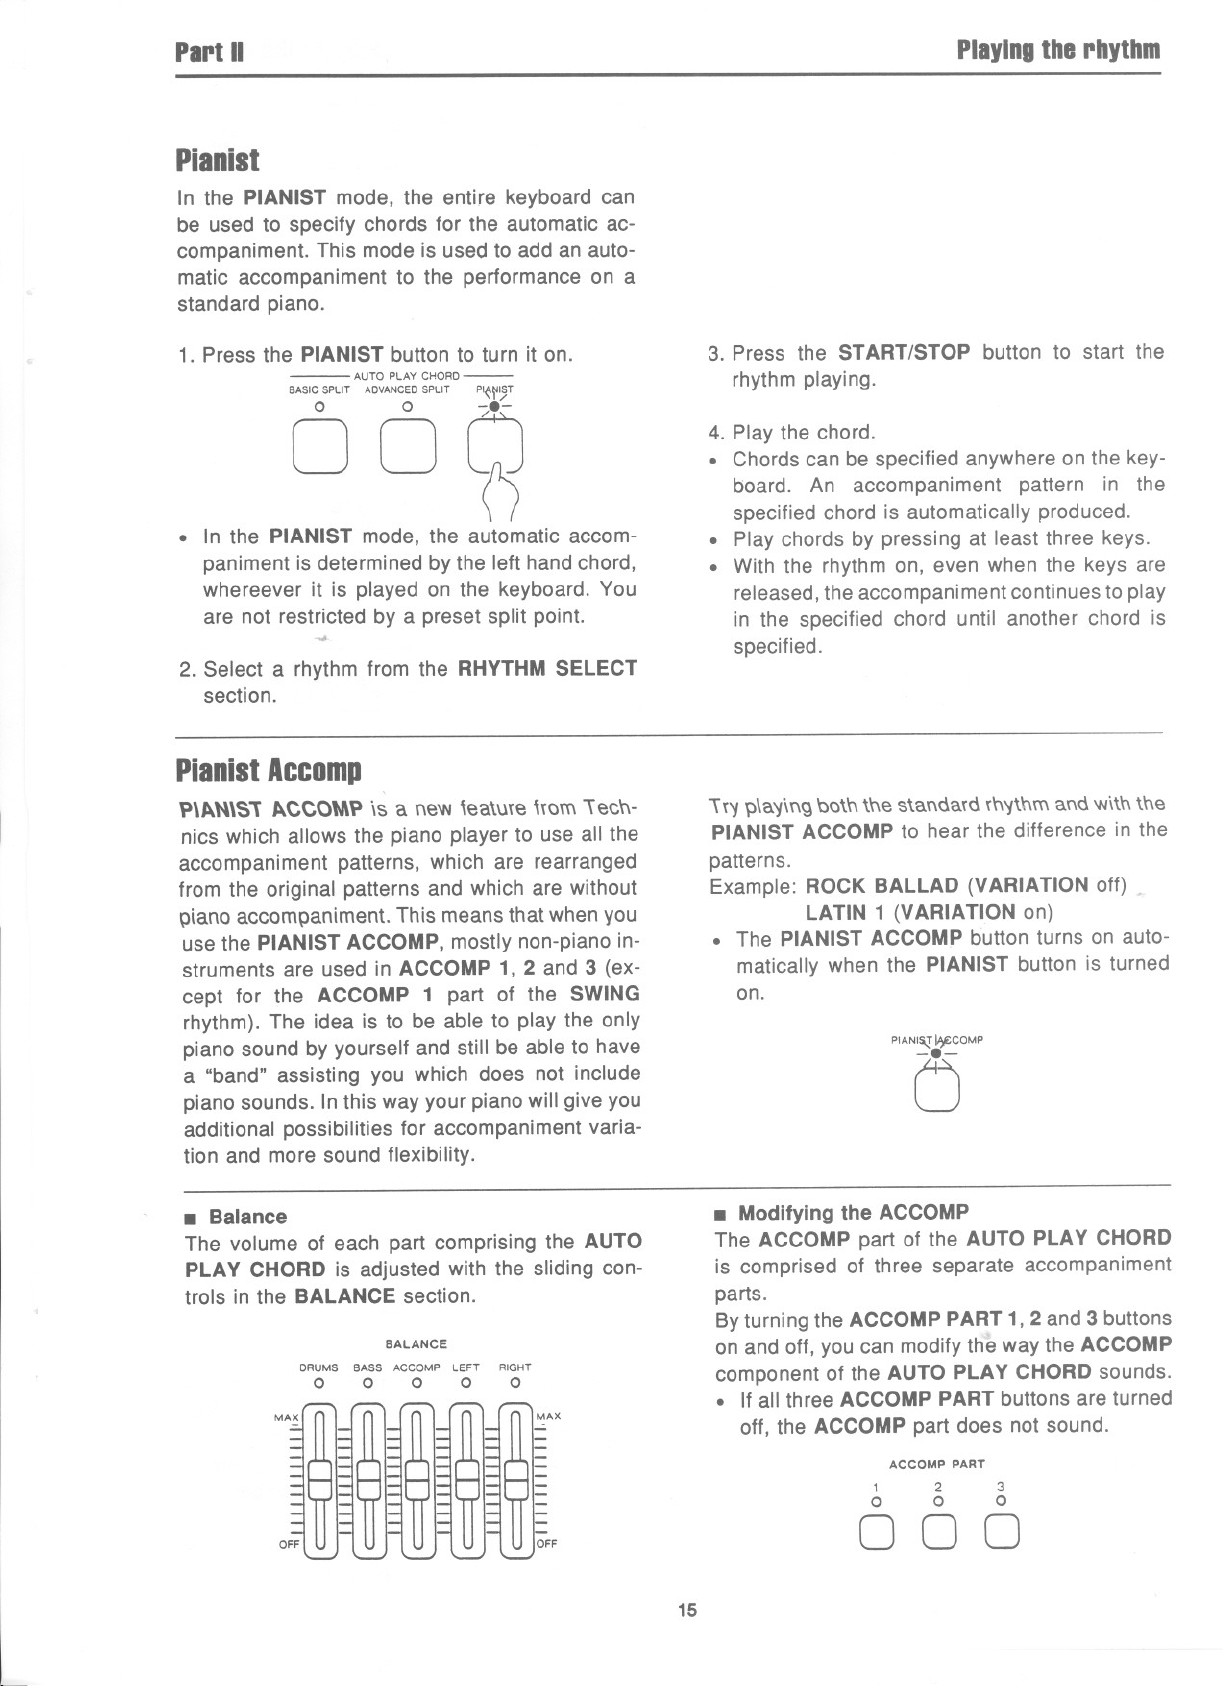
Pianist
In the PIANIST mode, the entire keyboard can
be used to specify chords for the automatic ac-
companiment. This mode is used to add an auto-
matic accompaniment to the performance on a
standard piano.
1. Press the PIANIST button to turn it on.
- AUTO PLAY CHORD-
BASIC SPLIT ADVANCEDSPLIT PI{~~T
OO~
. In the PIANIST mode, the automatic accom-
paniment is determined by the left hand chord,
whereever it is played on the keyboard. You
are not restricted by a preset split point.
2. Select a rhythm from the RHYTHM SELECT
section.
PianistAccomp
P\1t."'\S11t.CCOtAPis a new \ea\me \{Om'\ ecn-
nics which allows the piano player to use all the
accompaniment patterns, which are rearranged
from the original patterns and which are without
piano accompaniment. This means that when you
use the PIANIST ACCOMP, mostly non-piano in-
struments are used in ACCOMP 1, 2 and 3 (ex-
cept for the ACCOMP 1 part of the SWING
rhythm). The idea is to be able to play the only
piano sound by yourself and still be able to have
a "band" assisting you which does not include
piano sounds. In this way your piano will give you
additional possibilities for accompaniment varia-
tion and more sound flexibility.
....
3. Press the START/STOP button to start the
rhythm playing.
4. Play the chord.
. Chords can be specified anywhere on the key-
board. An accompaniment pattern in the
specified chord is automatically produced.
. Play chords by pressing at least three keys.
. With the rhythm on, even when the keys are
released, the accompaniment continues to play
in the specified chord until another chord is
specified.
\t'l p\a'ling bo\n \ne s\andatd tn'ltnm and witn tne
PIANISTACCOMPto hear the difference in the
patterns.
Example:ROCKBALLAD(VARIATIONoff) ,
LATIN 1 (VARIATION on)
. The PIANIST ACCOMP button turns on auto-
matically when the PIANIST button is turned
on.
PIANI~I.y;cOMP
C5
. Balance
The volume of each part comprising the AUTO
PLAY CHORD is adjusted with the sliding con-
trols in the BALANCE section.
BALANCE
DRUMS BASS ACCOMP LEFT RIGHT
0 0 0 0 0
MAX
OFF
. Modifying the ACCOMP
The ACCOMP part of the AUTO PLAY CHORD
is comprised of three separate accompaniment
parts.
By turning the ACCOMP PART 1,2 and 3 buttons
on and off, you can modify the way the ACCOMP
component of the AUTO PLAY CHORD sounds.
. If all three ACCOMP PART buttons are turned
off, the ACCOMP part does not sound.
ACCOMPPART
1 2 3
0 0 0
000
15
Page 17

PartII
Playingthe rhythm
"" ...". -=- - ...,..=--==~.- -o~ ;o~~~~o
:.< 000 000
OneTouchPlay
Withthe ONE TOUCH PLAY feature, the sounds
and appropriate effects are automatically set ac-
cording to the rhythm selection.
1. Select a rhythm pattern.
2. Pressthe ONETOUCH PLAY button until the
panel settings change.
. The panel settings automatically selected are
those which are suitable for the rhythm you
chose.
(; -oCC "'.' 0 co ,,~,.;;. ,-G:> ,~~eeoo=~ 00::0 ;~' ~ '~"'I
. The keyboard automatically splits into left and
right parts.
ONE TOUCH PLAY
~
~
PanelMemory
: 360 ;cl f{f{{["To :;sm'!o"~ :m 56o~o~~
- ~ - ~~ - ~ - ~ ' , , ,ct._oo ~-~, Qm mi
~.;';T 660 ~~m::a. !I!!IJ,I00 "- ,'i;:!, ;:;.,
8Ii
3. Play the keyboard.
", ,~
~
.
,
Play chords IPlay melody
~
. The automatic rhythm begins to play immedi-
ately when a key on the left keyboard is
pressed(SYNCHROSTART).
o-=-O:J[) -0""3""3""3":; G::!- ,~ :§@; ~J~~lli
~
:
,
~Q -- m'
~~J!~O:
'~.c -.:."t'6i
The PANEL MEMORY buttons allow you to set
up the sounds, effects and rhythm and store them
in memory. Then, simply by pressing just one but-
ton, the stored panel settings are recalled in-
stantly.
PR50V
PANELMEMORY
SET
0
1. Set up the desired panel settings.
2. With the SET button held down, press one of
the number buttons of the PANEL MEMORY.
rf
1 2 3
0 0 0
000
SET
,1/
-/l
[\j
PR250/PR350
SET
0
PANEL MEMORY
1 2 3
0 0 0
000
4 5 6
0 0 0
000
Storablesettings
. Soundsand effects
. DIGITAL REVERBsetting (PR250/PR350)
. PLAY STYLE setting
. BALANCE settings
. Keyboard split point
(Storing the rhythm selection requires setting the
P. MEM EXPAND mode to " 0 n ". [Refer to
page 39.])
. To recall the stored settings, just press the
corresponding PANEL MEMORY button. You
can then change the sound settings, etc.
manually; however, the memory contents of
the PANEL MEMORY remain unchanged until
you store them again.
. The range of storable panel settings can be
expanded. (Refer to page 39.)
16
Page 18

PartIII
Recordingandplayback
- ,."..a- - - ==~ ~ -.. ~==r.
A 000 C"'.-"
- ;'..;' ""'--~::" ~' §g~§,g .::::::::
0 - 000 . ~. I;) ::: CO c~.';;' .~ .:!)~e:;; 00°= "ao:::
n:::~= 600 ="""'3300c': 1i!!!J: 6::0,," 0 C.oooo -:-.
_
Sequencer
The SEQUENCER stores your entire performance-melody and accompaniment, sounds and panel setting
changes, even changes in the rhythm-for completely automatic playback whenever you desire. You can
store your performance part-by-part, then have it all play back at the same time. You can store a 'chord
progression to use with the AUTO PLAY CHORD. You can modify any or all of your performance. In other
words, the SEQUENCER is an incredibly useful and versatile tool which infinitely enhances the practicability
of your PR Digital Ensemble Piano.
Storinga chordprogression
To store a chord progression for use with the
AUTO PLAY CHORD feature, use the PRO-
GRAM SECTION controls located beneath the
sliding cover on the right side of the instrument.
Several keys on the keyboard (identified by sym-
bols and musical notes) are also used when you
store a chord progression.
~
SOUND CONTROL1 CONTROL2 MIDI
0 OCTAVESHIFT 0 PEOALSETTING 0 TRACKCLEAR 0 CHANNEL
0 REVERBOEPTH
0 ACCQMPVOLUME 0 MINRANGE 0 INITIAL 0 LOCALCONTROL
0 PIANOTUNING 0 MEDLEY 0 QUANTIZE
0 TOUCHSENSITIVITY 0 OISKFORMAT 0 BEAT COMPOSER0 OTHERS
OSEOUENCERORIGHT OLEFT OeASS OACCOMPlI OACCOMP2 OACCOMPJ OORUMS OCONTROL
REC CHORO
0 PMEMEXPANO
0
0
. The PROGRAM SECTION controls are also
used when setting functions for the SEQUEN-
CER, COMPOSER and MIDI. These functions
are explained later.
0 SONGCLEAR
]
0
0 OCTAVESHIFT
0 PMEMP-CHANGt
0
. 0 CD CD IT) CD CIJ CD CD CD
SEOUENCER-
RESET
0 EXECUTE OcJ~~~c OCO~~SEROC~~~~R 0 LOAD 0 SAVE
0
PROGRAM SECTION
00000
(PR250/PR350)
Reset key
~~- : Press to begin storing from the beginning.
Repeat key
C+' : Press to finish storing the chord progres-
sion and specify automatic repeat playback.
End key
---H : Press after all of the chord progression
has been stored (if automatic repeat playback is
not desired).
} J
J.
1
J
d .I 0
Note keys
0 : Pressto store a whole note.
J.: Press to store a dotted half note.
J : Press to store a half note.
J.: Press to store a dotted quarter note.
J : Press to store a quarter note.
~ :1=>ress'0 s'ore an 9lgn'n no'e.
17
Page 19

PariIII
StoreIhefollowingchordprogression.
Chord name
Recordingandplayback
C F
~
1. Press the STEP CHORD REC button to turn it
on.
. The ACCOMP1/CHORD indicator flashes.
2. Store the chords.
Measure 1: Store a C chord.
While holding down a C chord on the left part
of the keyboard, press the 0 key one time to
specify a whole note. This stores one measure
of a C chord.
~
.. [-.----
! Iii I i i.i 1.1i.1Ii i I i I ! i
C
,,1/ STEP
-8.qiOROREC
/10
~
G C
~
~
Measures 3 and 4: In the same way, store one
measure of a G chord and one measure of a
C chord.
g
~
. To store the chord progression again (redo)
from the beginning, press the reset key ~~- .
. You can specify the chords using just one
finger.
3. Press the ---H key to finish storing.
}
STEP RECORD
,~- J = .J
-.0
J
. A "beep" will sound to indicate that the chord
has been stored.
Measure 2: Store an F chord.
While holding down an F chord on the left part
of the keyboard, press the 0 key one time to
specify a whole note.
C
~
C
-
G
. If you want the chord progression to be
repeated automatically when it is played back,
instead of the --H key, press the ~ key.
18
Page 20

PartIII
It is possible to store these types of chords:
Recordingandplayback
Minor
flat fifth seventh
c- or
Cmi-5
Major major
CM7 or CmM7
Cmaj7
Major
C
Minor
Cm C7
Seventh
Minor
seventh mented
Cm7
Aug-
Caug
Diminished seventh
seventh
C'7 or
Cdlm7
. If you try to store a chord not shown above, it
will be converted to the storable chord which
sounds the closest.
Automaticplaybackofthestoredchordprogression
1. Confirm that the ACCOMP1/CHORD indicator
is lit.
,1/
ORIGHT OLEFT 08ASS/~~~IIOACCO"'P2 DACCa,,"' OORUMS OCOlllAOL
CDCTIcDCDCDffiCIJCD
. If the indicator is not lit, press the AC-
COMP1/CHORD button to turn it on.
2. Press the SEQUENCER RESET button.
,1/
"/'(EXECUTE
SEQUENCER - r-I
RESET L J
3. Press the START/STOP button to begin auto-
matic playback.
. An automatic accompaniment which follows
the stored chord progression is played.
Minor
seventh fourth
Seventh
suspended
C7sus4
Storingrhythmchanges
In addition to chord progressions, you can also
store changes in the rhythm by using the STEP
CHORD REC function.
. Storing the beginningpanelsettings
If you wish to have the panel settings for the
beginning of the tune stored, select the beginning
sounds, rhythm and other panel settings BEFORE
starting the recording procedure.
. Storinganintra
To store a drums-only intro, first turn on the STEP
CHORD REC button, then turn on the INTRO &
ENDING button.
. To store an intro played as part of the accom-
paniment pattern, first turn on the STEP
CHORD REC button, then, while pressing the
keys for a chord, turn on the INTRO & ENDING
button.
. Storingthe count
If you wish to store the count, first turn on the
STEP CHORD REC button, then turn on the
COUNT & FILL IN button.
. Storing a rhythm change In the middle of
the tune
1. Store the chord progression up to the point
wherethe rhythm changes.
2. Select a different rhythm.
. A "beep" will sound to indicate that the change
has been stored.
3. Continue storing the chord progression.
19
Page 21

PartIII
Recordingandplayback
. Storing a fill-In
To store a drums-only fill-in pattern, press the
COUNT & FILL IN button, then use the note unit
keys to specify the number of notes in the fill-in.
. To store a fill-in played as part of the accom-
paniment pattern, press the COUNT & FILL IN
button, then store a chord.
. Storing an ending
If the INTRO & ENDING button is pressed at the
end of the tune, an ending pattern is stored and
the STEP CHORD REC button turns off.
If the INTRO & ENDING button is pressed while
the keys for a chord are pressed, the ending will
be played as part of the accompaniment pattern.
-..#
. StoringPANEL MEMORY changes in the
middle of the tune
Changesin the PANEL MEMORYselection can
be stored in the SEQUENCER.
1. Store the chord progression up to the point
where the PANEL MEMORYselection chan-
ges.
2. Press the desired PANEL MEMORY button.
. A "beep" will sound to indicate that the change
has been stored.
3. Continue storing the chord progression.
. Other rhythm settings whichare stored in
the SEQUENCER
.ACCOMPPART button on/off status
. BALANCEsettingsfor the DRUMS,BASSand
ACCOMPparts
. TEMPOsetting
. TRANSPOSEsetting
AnexampleofstoringintbeSequencer
Whattostore
Chord
FILLIN, INTRO,ENDING
RHYTHM
Howtostore
I SWING 2 1- [
[ Coo
[ G7o0
[ Om o.J
]-1 F 00 1-[
]-116 BEAT1 1-[
]-1 G7°.J 1-[
C I F I C
INTRO
SWING 2
STEP CHORD REC ] -[
Coo
Em 00
Coo
]-1 COUNT&FILLIN1-
1-[
]-1 Co INTRO& ENDING I
G7
FILL IN
INTRO & ENDING
A700
Em I A7 I OmG7 I C
16 BEAT 1
]-
]-
C
ENDING
20
Page 22

PartIII
Storingaperformance
Your performance is made up of different parts,
as explained below. You can store one part at a
time or several parts at one time.
01E00<"'" ORIGHT OlEFT OBASS OAtCO"P" O'CCO"" OAtCO"" OORUMS OCo-fRO\.
REC COIORD
0 IT) CD CD CD CD CD CD CD
Parts which are stored Data which is stored
Recordingandplayback
RIGHT, LEFT, BASS, AC-
COMP1,ACCOMP2,A
COMP 3, DRUMS
CONTROL
-.# PLAY STYLE setting, BALANCE settings, changes in the PANEL
Performance data (including Touch Response), selected sounds, DIGI-
TAL CELESTE (RIGHT part only), SUSTAIN PEDAL on/off, pedal
data, rhythm start/stop, COUNT & FILL IN on/off, INTRO & ENDING
on/off, pitch bend data (only during MIDI receive)
MEMORY selection, TEMPO setting, changes in the RHYTHM
SELECT selection, rhythm start/stop, COUNT & FILL IN on/off, INTRO
& ENDING on/off.
. The maximum number of notes which can
sound simultaneously for each part is as fol-
lows:
RIGHT 16
LEFT
BASS 1
ACCOMP 1 4
ACCOMP 2 4
ACCOMP 3
DRUMS 6
16
4
Data for one tune can be stored in each part of
the SEQUENCER.
Before storing a new song in a part in which
another tune or chord progression is currently
stored, first follow the SONG CLEAR or TRACK
CLEAR procedure (refer to page 25) to erase
the previously stored data. If you wish to keep
the stored contents, you can save them on a
memory disk with the Digital Disk Recorder
(refer to page 33). (The Digital Disk Recorder
is sold separately for the PR50V/PR250.)
The maximum number of notes which can simul-
taneously sound for all parts combined is 32.
21
Page 23

PartIII
Exampleofstoringa pianoperformance
Store the following piano performance in the SEQUENCER.
Recordingandplayback
Settings:
Right hand
Left hand
Mode PIANO MODE Sound ""oooo GRAND PIANO
'\ t-
e
-
..
f\
'
e
1. Press the SEQUENCER REC button to turn it
on.
,1/
-8WJUENCER ORIGHT OLEFT 08ASS OACCOMPIIOACCOMP2
/ I" REG CHORD
.
.
- -
....
...
3. Play the music on the keyboard.
CJQJCDCDCDCD
0
. The indicators for the parts which can be
recorded flash.
2. Press the RIGHT button.
,1/ ,,1/
-8"'OUENCER-Oft'.GHT OLEFT 08ASS OACCOMPIIOACCOMP2
/ I' REG / I" CHORD
°oCDCDo:JCTI
. The RIGHT indicator flashes slowly. This is a
visual indication that the RIGHT part is now in
the recording mode. The indicators for the
other parts go out.
~
. Actual recording begins when you press a key
on the keyboard or press the START/STOP
button to start the rhythm.
. The START/STOP indicator remains lit while
the SEQUENCER is in the recording mode.
0
START!
STOP
4. At the end of your performance, press the SE-
QUENCER REC button to turn it off.
OSEOUENCEr>-"""-:fflGHTOLEFT 08ASS OACCOMPIIOACCOMP2
[JQJCDCDCDCD
. For playback of your recorded performance,
refer to page 25.
I
REG /1' CHORD
0
22
Page 24

PartIII
Storingpart-by-part
Store the following music by recording one part at a time.
Settings: RIGHT GRAND PIANO LEFT HARPSICHORD
RHYTHM 8 BEAT ACCOMP1 ORGAN
BASS ACOUSTIC TEMPO J=120
Recordingandplayback
C
RIGHT
LEFT
L
#---- r#
ACCOMP1
,-
r i
Om G7 - C
........
1
~
r
. Select the rhythm before beginning recording.
If beginning the performance with an INTRO
or a COUNT, turn on the button before begin-
ning recording.
,..,
I
,
r'
Am G 07 G
I
+-
-.....
fl
t
'
fBASS
F
'1 1
1-4
G . A- Ctt
Am
Ii
G7
1. Press the SEQUENCER REC button to turn it
on.
,1/
-.&EElUE'KERORIGHT OLEfT OBA55 OACCOMPII OACCOMP2
/ I' REC CHORD
(JCOCDCDCDo=J
n
. The indicators for the parts which can be
recordedflash.
2. Press the BASS button.
,1/ ,1/
-.SEQUENCERORIGHT OLEfT -081'.55 OACCOMPIIOACCDMP2
/I'REC /1' CHORD
OCDCDoCDCD
. The BASS indicator flashes slowly. This is a
visual indication that the BASS part is now in
the recording mode. The indicators for the
other parts go out.
. The sound and the SUSTAIN PEDAL button
on/off status for the BASS part can be stored
at this time.
. Any sound from the SOUND SELECT section
can be selected for the BASS part.
23
Page 25

PartIII
Recordingandplayback
3. Press the START/STOP button to turn it on.
The 8 BEAT rhythm begins to play. Play the
BASS part in time with the rhythm.
8
START!
STOP
ll!IWffi!!
. If you make an error in playing, you can erase
the part and redo it from the beginning. (Refer
to page 25.)
. You can record at a slow tempo and play back
at a fast tempo. The pitch does not change.
~
4. When you have finished playing the BASS part,
press the SEQUENCER REC button to turn it
off.
7. When you have finished playing the RIGHT
part, press the SEQUENCERREC button to
turn it off.
8. Record the other parts of the performance by
repeating steps 5-7.
9. When all the parts have been recorded, press
the SEQUENCER REC button to turn it off.
OSEOUENCEfl-
,,1/ ,1/ ,1/ ,1/
8ftt6HT -8t:ffT -
/
REG I' /1' I" / I 'CHORD
8e.oss-8J;et:OMP-1/0ACCOMP2
/
CJCTICDCDCDCD
0
. If you perform the storage procedures for a
part which has already been stored, the pre-
viously stored data is erased and the new data
is stored.
. You can save your recorded performances
using the Digital Disk Recorder to make your
own performance album. (Refer to page 33.)
5. Press the SEQUENCER REC button to turn it
on, and then press the buttonJor the next part
to record, for example RIGHT.
,1/ ,1/ ,1/
- 8,ffiJUENCER-0 RIGHT 0 LEFT - 8..e>'ss OACCOMP11OACCOMP 2
"8"~ CD'cD CD CD
. The indicator flashes slowly to show that the
RIGHT part is now in the recording mode.
. The sounds and effects for the RIGHT part can
be stored at this time.
. The RIGHT and LEFT parts of a split keyboard
can be stored at the same time. Press the
RIGHT and LEFT buttons so that both their
indicators are flashing slowly.
6. Press the START/STOP button. The BASS
part you recordedfirst beginsto play. Playthe
right-handpart in time with this.
,1/
-8-
~,
START!
STOP
~
24
Page 26

PartIII
PJayinlbacktile performance
1. Confirm that the indicators for the parts you
recorded are lit.
ORIGHT OLEFT OSASS OAeCO"P" OAeCOMP2 OAeCOMP, OORU,",. OCOHTAQL
CIJCDCDCDCDCOCDCD
. If the indicators are not lit, press the cor-
respondingbuttons to turn them on.
2. Press the SEQUENCER RESET button.
SEQUENCER-II
3. Press the START/STOP button.
. Your recorded performance is played back.
CliO""
,1/
-:-8,cXECUTE
I
RESET L--J
,1/
-8-
/-1.'
....
START!
STOP
Recordingandplayback
. SEQUENCERRESET
Whenthe START/STOPbuttonisoff, bypressing
the SEQUENCER RESET button for 1-2
seconds,thepanelsettingschangeto thesettings
at the beginningof the recordedperformance.
0 EXECUTE
SEQUENCER _/I
RESET L--J
. Storage capacity
Expressed in terms of notes, the total storage
capacity of the SEQUENCERis as follows.
PR50V
PR250/PR350
When the remaining storage capacity becomes
20% or less, it is shown as a percentage (%) on
the display.
approx. 2800 notes
approx. 7400 notes
. When" F U L " is shown on the display and
the error sig:1al sounds, no more data can be
stored in the SEQUENCER.
. The SEQUENCER contents remain in the
memory for about one week after the POWER
button is turned off.
Erasingtherecordedperformance
. TRACK CLEAR
You can erase a specified part (track) from the
SEQUENCER performance. This is useful, for ex-
ample, when you make a mistake in recording a
part and wish to redo only that part.
1. Press the CONTROL 2 button the number of
times necessary to make the TRACK CLEAR
indicator light.
2. Press the button for the part you wish to erase.
0 RIGHT OLEFT OBASS OAeCO"." OAeCO".' OAeCO".' OORU,",S OCONTROl
CIJCDCDCDCDCOCDCD
. The indicator for the selected part will flash.
CONTROL 2
'¥.=ACK CLEAR
"/ O'SONGCLEAR
0 INITIAL
0 QUANTIZE]COMPOSER
0 BEAT
CHORD
~
3. Press the EXECUTE button.
,1/
SEQUENCER /I
.
The recorded contents of the specified part are
erased.
-/'~XECUTE
RESET - L-J
. SONGCLEAR
You can erase all of the recorded parts from the
SEQUENCER performance at one time.
1. Press the CONTROL 2 button the number of
times necessary to make the SONG CLEAR
indicator light.
2. Press the EXECUTE button.
CONTROL 2
,<D)RACK CLEAR
-8-50NG CLEAR
/6'iNITIAL
0 QUANTIZE
0 BEAT COMPOSER'--- '
SEQUENCER-II
RESET L-J
Q
]
,1/
-/'~XECUTE
~
. The recorded contents of all the SEQUENCER
parts are erased.
25
Page 27

Part IV
Creatingrhythmpatterns
Composer
The COMPOSER allows you to create your own original two-measure rhythm patterns including drums,
bass and accomp parts. Just like with the preset rhythms, your original rhythm is recalled at the louch of.
a button. I
Settingup
1. Press the COMPOSER REC button to turn it
on.
0 STEP'" ItOMPOSER
COMPOSER
O
3. When creating a new rhythm pattern, all parts
of a previously stored rhythm pattern in the
selected number button should now be erased
by pressing the COMPOSER CLEAR button.
COMPOSEJt..
0 STEP
O
1tOMPOSER
.
0"]'['8 0
2. In the RHYTHM SELECT section, press one
of the number buttons 11-8) to specify which
memory you are going to store your new rhythm
pattern in.
RHYTHM SELECT
OMARCHo::wmtY owAm OSWING'OSWlt<GZOD'XIE O~AUZ OlAn., OlATI.Z o::S;' 0 0
08 8EATO~'; OS'iI"lf O:~lAOO~i'.'" OI;8!'12O~~~ O~~t~GODISCDO~&~~ :::O::T';;;..
OOOOOOOOOO~~O
",""""" \ , , , . . . , .14c"","",,0
0
. The indicator above the selected button will
light.
. " ALL" appears on the display.
Co cY'0
0
4. Specify a time signature for your rhythm pat-
tern.
a. Press the CONTROL 2 button the number of
times necessary to make the BEAT indicator
light.
b. Use the TRANSPOSE/PROGRAM buttons to
select the time signature.
. The specified time is shown on the display.
CONTROL 2
0 TRACKCLEAR
0 SONGCLEAR
0 INITIAL
QUANTIZE
~~~AT JCOMPOSER
I,""
MUSICAL DISPLAY
1'-/- '-/ I
0
'OAN5I'O'"
0 """" 0
~
j
26
-0D
4/4time
I LI - L: I
3/4time
13 - '-I I
Page 28

PartIV
qUANTIZEfunction
When you record with the QUANTIZE function on,
any unevenness inthe timing of your performance
is automatically smoothed out.
Creatingrhythmpatterns
Written score - - - - - - - - - - - - -
Timing of actual
performance - - - - - - - - - - - - - I
Recorded with
QUANTIZE function - - - - - - - - f
a. Press the CONTROL 2 button the number of
times necessary to make the QUANTIZE in-
dicator light.
~ CONTROL 2
0 TRACKCLEAR
0 SONGCLEAR
INITIAL
-=-~~ANTIZE
/<!>'BEAT JCOMPOSER'--"
b. Use the TRANSPOSE/PROGRAM buttons to
specify the QUANTIZE level.
0
~
. The specified level is shown on the display.
MUSICAL DISPLAY
I /5 I
"".
IO'O5(
0""'"
,RA. 0
D~
,...3-,
m Specify this level for
LI _t
I J , - 'I
triplet-type patterns.
, ,
; :
i "
~ '
,
,
,
i"
,
I
Note: Note units smaller than the selected QUAN-
TIZE level will not be recorded correctly. In this
case, record your performance with the QUAN-
TIZE function off.
I
Storage capacity
Expressed in terms of notes, the total storage
capacity of the COMPOSER is approximately
1300 notes.
. When the storage capacity becomes 50 notes
or less, the remaining number of notes that
can be stored is shown on the display.
. When" F U L " is shown on the display and
the error signal sounds, no more data can be
stored in the COMPOSER.
,,-
Ilt
)\ Specifythis level for other
patterns.
The QUANTIZEfunctiondoes
Lt,-,-
1" ,- '-I
not work.
. The default setting is )\.
. The QUANTIZE function can be turned on/off
and the level changed as desired during the
recording procedure, depending on the par-
ticular phrase you are playing.
27
Page 29

Part IV
Recordingpart-by-part
After the procedures in "Setting up" have been
completed, the separate parts which make up to
two-measure COMPOSER rhythm-DRUMS,
BASS and ACCOMP 1, 2, 3-can be recorded
one part at a time.
I.DRUMSpart
1. Press the DRUMS button to turn it on.
OBASS OACCOMPlI OACCOMP2 OACCOMP3/.~UMS
(I) CD CD CD L?~
. The DRUMS indicator flashes.
. The metronome begins to sound. The tempo
can be adjusted as desired.
2. Play the desired percussive keys on the key-
board in time with the metronome for two
measures.
L.-..',-"" .'.."",...,.-.,.,...
CHORD I"
I
. The two-measure pattern is repeated. You can
play the keyboard to add notes to the pattern.
. Up to 6 drum sounds can play simultaneously.
. The drum kit associated with the rhythm in
effect when the COMPOSER REC button was
turned on is available. (For detailed information
concerning the drum kits, refer to the separate
booklet.)
,1/
[)
I
\
Creating rhythm patterns
. The current measure number (1 or 2) is shown
on the display. (Note that if one of the CON-
TROL 2 indicators is lit, the current measure
is not displayed. Press the CONTROL 2 button
until all the indicators are off, and the measure
number will be shown on the display,)
. While pressing the PERC ERASE button, if you
press a percussive key, the specified instru-
ment will be erased as long as the key is
pressed. This is a convenient way to erase
performance errors.
KEYBOARD
PERCUSSION
0
0
PERC ERASE
. If you make an error in playing, you may press
the COMPOSER CLEAR button to erase the
entire DRUMS part.
STEP
0
CDMPOSEJ!:-~w.oPCSER
O
"0 [f~
Here is what you play:
mBass drum 2
9 Snare drum 1 ...e'
~ Hi-hat closed 1
Measu re 1
~ r , ~r
J
.eLL!III!1
28
, ~
J
Measure 2
r ,~r,~
J , J
Llilll!l
Page 30

PartIV
II.BASSpart
1. Pressthe BASS button to turn it on.
,i/
-.8I\SS OACCOMP1/0ACCOMP2 OACCOMPJ OORUMS
/ I" CHORD
O<IJGJCDCD
. The BASS indicator flashes.
Creatingrhythmpatterns
. Record the performance in C major for correct
chord progressions during playback.
. The BASS pattern can be played on the entire
keyboard.
. Since the BASS part is monophonic, only one
note can be played at a time.
2. Select the desired BASS sound from the
SOUND SELECT section.
3. Play two measures of the BASS pattern on the
keyboard.
~
III.ACCOMPpart
1. Press one of the ACCOMP buttons to turn it
on.
OBASS OACCOMP 1/ OACCOMP2 OACCOMPJ OORUMS
GJICD IT) (DICD
. The indicator flashes.
2. Select the desired ACCOMP sound from the
SOUND SELECT section.
CHORD
. ,
0
Here is what you play:
BASS part
. If you make an error in playing, you may press
the COMPOSER CLEAR button to erase the
entire BASS part.
. Record the performance in C major for correct
chord progressions during playback.
. Up to 4 notes can sound simultaneously on
each ACCOMP part..
Here is what you play:
ACCOMP part ~ ! I -= -=
1
: i : ~ ~ r I
I
3. Play two measures of the ACCOMP pattern on
the keyboard.
~
. You can store the other two ACCOMP parts in
the same manner.
. If you make an error in playing, you may press
the COMPOSER CLEAR button to erase the
entire ACCOMP part which is currently being
recorded.
29
Page 31

PartIV
IV.Finishstoringtherhythm
When all the parts to the pattern have been stored
as desired, press the COMPOSER REC button
once again to turn it off and complete the storage
operation.
OC~~~ECoC°'k~SER oc~m5JR
o~o
Playbackthestoredpattern
1. In the RHYTHM SELECT section, press the
COMPOSERbutton to turn it on. Then press
the buttonfor the rhythmpatternyouwouldlike
to have played back.
RHYTHM SELECT
OMARQlOCQJl1ll<OWAlrzOSWII<GIOSWII<G200lXlEo~.ih OLAnN' OLAnN20~' 00
08 BEATo~... OSI<JfILfO~UD O~BEA!IOUAT2 ol;',g o~~NG OO<SCIJo~~ :::;':.7':;'
y-QIY Q Q Q Q y.Q QI~!£C:
~
Creatingrhythmpatterns
2. Press the START/STOP button.
. The DRUMS part of the recorded rhythm
begins to play.
. The BASS and ACCOMP parts are played
back with the AUTO PLAY CHORD.
0
START!
STOP
/
-AUTO PLAY CHORD-
BASIC SPLIT ADVANCEDSPLIT PIANIST
0 0 0
000
0
. The indicator above the selected button will
light.
Editingapresetrhythmpattern
The editing feature of the COMPOSER allows you
to modify any of the factory-preset rhythms or
even your original rhythms, and then store the
new pattern in a COMPOSER number button.
1. Select a preset rhythm or a COMPOSER num-
ber button.
2. Press the COMPOSER REC button to turn it
on.
3. Press a number button in the RHYTHM
SELECT section to specify the memory in
which you wish to store the pattern.
. The ACCOMP PART 1-3 buttons should be
on.
4. Turn on the button for the part you wish to
modify.
5. Edit the pattern which is played back.
6. Repeat steps 4 and 5 for the other parts, if
desired.
7. After editing, turn off the COMPOSER REC
button.
30
Page 32

PartV
Externalmemory
DigitalDiskRecorder(SY-FD20)
Data for up to 20 performances-including all panel settings, button memories, COMPOSER and SE-
QUENCER contents-can be stored on one SY-D20 digital memory disk (floppy disk) using the Digital
Disk Recorder (included on the PR350; for the PR50V and PR250, the SY-FD20 is an option). The storable
internal memory is fixed at a limited capacity, but this external memory device expands the storable
memory infinitely. By recording performance data, one simple procedure lets you load the recorded settings
into the piano's memory at any time.
Save
Internal memory
Sequencer data:
one song
SY-FD20
Digital Disk
Recorder (sold
separately on the
PR50V and PR250)
(store the data from
the SEQUENCER to
the disk)
Load
(recall the stored
data from the disk)
InstallinginyourDigitalEnsemble(PR50V/PR250)
1. Make sure that the power to the Digital En-
semble is turned off.
2. Remove the cover from the connector unit by
first removing the screw.
r.: I I L--1
3. Use the gap at the top of the cover as a finger-
hold to apply downward pressure.
External memory
Sequencer data:
Max. 20 performances
[I]
SY-D20
Memory Disk
4. Pull the cover out horizontally and remove it
from the instrument.
5. Insert the Digital Disk Recorder and push it in
firmly and completely.
6. Secure the Digital Disk Recorder to the instru-
ment with the screw you removed in step 2.
Note: To affix the Digital Disk Recorder, the
same screw which was used to affix the cover
must be used. Use of a different screw may
result in malfunction of or damage to the Digital
Disk Recorder.
- '\ 1\
...
31
Page 33

PartV
Mainparts01theDigitalDiskRecorder
Disk slot
Externalmemory
Access indicator
Eject button:
Press to remove the memory disk from the Digital
Disk Recorder.
Access indicator:
Lights when data is being loaded from or saved
to a disk. .
Eject button
. To prevent data loss, do not remove the
memory disk from the Digital Disk Recorder or
turn off the power when the access indicator
is lit.
Diskformat
New memory disks can be used only after they
have been formatted. Follow the procedure below
to format a new disk or erase the contents of a
recorded disk.
. This procedure clears the entire contents of
the disk.
. Reformat a disk if it cannot be saved to or
loaded from properly because of exposure to
a magnetic field.
. If using commercially available floppy disks
other than the SY-D20 memory disk, be sure
to use 3.5 inch 2DD (double-sided, double-den-
sity, double-track) floppy disks.
Note: The memory disk is provided with a write
protect window. To format the disk, the window
must be closed, as illustrated.
Storage is not
possible
Ulj} ~
[lf
Q ~
Open
2. Use the CONTROL 1 button to select DISK
FORMAT.
CONTROL1
0 PEDALSETTING
0 PMEMEXPAND
0 MINRANGE
Q MEDLEY
-'r~K FORMAT
/1"
CJ
Storage is
possible
~
Closed
0
3. Press the EXECUTE button.
,1/
-8-;;XECUTE
SEQUENCER - r-I
/1'
RESET ~
1. Insert the disk into the Digital Disk Recorder
slot as shown in the illustration. Push it all the
way in until you hear a click.
" - - - " appears on the display while the
.
disk is being formatted. when formatting is
completed," End" is shown on the display,
and after a few seconds the TEMPO display
returns.
. Formatting takes approximately one minute.
32
Page 34

PartV
Savinga performance
Externalmemory
1. Store the performance in the SEQUENCER.
This is the data which is going to be saved in
the memory disk.
2. Insert a memory disk into the slot of the Digital
Disk Recorder.
3. Press the SAVE button.
"':~.4;AVE
/'D
4. Assign a song number to the tune you are
storing by using the TRANSPOSE/PROGRAM
buttons (1-20).
MUSICAL DISPLAY
,- "
I.LI
T.'NSPOSE,
0 '.00 0
OOWNW
r)
I
I
D
. If you specify a song number which is already
used, the song number flashes on the display.
In this case, if you wish to keep the previously
stored song, specify a different (unused) num-
ber for the new song.
5. Press the EXECUTE button.
-~--EXECUTE
SEQUENCER - r---I
/1'
RESET L J
[
,-
I.
. .. S . " appearson the display while the data
is being saved. When the indication goes out,
data saving is completed and you can now
remove the memory disk from the Digital Disk
Recorder.
Loadingthestoredperformance
1. Insert the memory disk into the slot of the
Digital Disk Recorder.
2. Press the LOAD button.
,1/
-84.0AD
/10
3. Use the TRANSPOSE/PROGRAM buttons to
specify the number of the tune you wish to
load.
MUSICAL DISPLAY
, "
L.LI
T..NSPOSE/
0 '.00 0
I
I
0(1
. If no song is stored inthe number you specified,
the song number flashes on the display. In this
case, specify a number in which a song has
been stored.
4. Press the EXECUTE button.
~.~XECUTE
SEQUENCER - r-I
RESET L J
/1'
[ L.
. .. L ." appearsonthe display whilethe data is
being loaded. When the indication goes out,
data loading is completed and you can now
remove the memory disk from the Digital Disk
Recorder.
. The LOAD procedure causes any data which
is currently stored in the SEQUENCER
memory to be erased.
5. Press the START/STOP button. The loaded
performance begins to play automatically.
33
Page 35

PartV
Medleyplay
You can specify continuous automatic playback
of songs recorded on a memory disk, starting with
tune No.1.
1. Insert the memory disk into the Digital Disk
Recorder. ~
2. Use the CONTROL 1 button to select MED-
LEY. CONTROL 1
3. Use the TRANSPOSE/PROGRAM buttons to
specify the number o~the last tune you wish
to have played (1-20).
0 PEDALSETTING
OPMEM EXPAND
,,(j))11N RANGE
-.-MEDLEY n
/6 tJlSKFORMAT ~ \
MUSICAL DISPLAY
Q
",
OOWN0
'- Lf
TR'NSPa..,
0 PROOR""0
]
Externalmemory
4. Press the EXECUTE button.
,1/
-}~~XECUTE
SEQUENCER - r-I
RESET L-..J
. The tunes will be played back in order from the
first tune on the disk through the number of the
tune you specified in step 3.
. The EXECUTE indicator flashes during medley
play.
. If you press the START/STOP button during
medley play, the tune currently playing will stop
and playback will continue from the next
recorded tune on the disk.
5. To stop medley play, press the EXECUTE but-
ton.
. To return the piano to the normal performance
mode, keep the CONTROL 1 button depressed
momentarily.
D
Precautionstotakewhenhandlingamemorydisk
. Do not open the shutter and touch the record-
ing surface of the memory disk.
. Fingerprints on the recording surface will
gather dust and damage the memory disk.
. Do not place heavy objects on the memory disk
or bend, throw or drop it.
. The memory disk may become deformed or
damaged.
. Do not bring the memory disk near radios, TVs,
or other devices that generate a magnetic field.
. This could cause the contents to be erased or
generate errors.
. Neveruse or store the memorydisk in places
where it may be subjected to direct sunlight,
dust, hightemperatures,or high humidity.
. Do not disassemble the memory disk.
. Do not use thinner, alcohol or freon to clean
the memorydisk.
. After use, be sure to store the memorydisk in
its case.
Warning:
To prevent data loss, do not remove the
memory disk from the Digital Disk Recorder or
turn off the power when the access indicator
islit.
[SE
~~
. Do not use a disk that is wet or has eraser
crumbs or metalpowderon it.
34
Page 36

PartV
Externalmemory
Errordisplay
If an error message appears on the display, follow the appropriate steps to solve the problem.
Display
,-"
,- J- Lt
, -
L'
i-"
CJ-L
,- -
L' _I"
- LI
,
L J I
,- J-
C J- _I
,-,-
, ,- J t
Remedy
The memory disk has not been formatted by the Digital Disk Recorder.
. Insert a correctlyformatteddisk.
I
I
Loadingfailure.
. Perform the loading procedure again.
No memorydisk in the Digital Disk Recorder.
. Inserta memorydisk.
You haveattemptedto load a song numberwhich has not been saved.
. Load a song numberwhich has beensaved.
No Digital Disk Recorder.
. Install the SY-FD20(PR50V/PR250).
Saving failure.
. Performthe savingprocedureagain.
The memorydisk is write-protected.
. Close the write-protectwindowof the disk.
,- I
,-,- t
,-"
, ,-, t
,-"
,-,- I
,-
II
C
I _I
Warning:
. Some pre-recorded disks (for example, those recorded by the manufacturer) are copy-protected. Data
from these disks cannot be copied.
. When the power is turned off after a copy-protected song has been loaded, the SEQUENCER contents
will be erased.
. If a copy-protected song has been loaded and you want to then record a new song in the SEQUENCER
and save it on a disk, be sure to first turn the power off once or perform the initialization procedure.
No remainingmemorystoragecapacity.
. Insert a new disk, perform the saving procedure after formatting it.
Formatting failure.
. Performthe formattingprocedure again.
You have attempted to save a song which is copy-protected.
. A copy-protectedsong cannot be saved.
The SEQUENCERdoes not function becausethe EXT SEQ MODEis on.
. Setthe EXTSEQMODEtooff.(Referto page47.)
35
Page 37

PartVI
Settingthefunctions
Function-settingmodes
Various functions on your Digital Ensemble can
be custom-set to match your personal tastes and
style of play, giving you maximum versatility and
control of your instrument.
Summaryofadjustablesettingsandprogrammablefunctions
PR50V
SOUND CONTROL I CONTROL2
0 OCTAVESHIFTR
0 OCTAVESHIFTL
0 ~COMPVOLUME 0 MINRANGE 0 INITIAL
0 PIA.NDTUNING 0 MEDLEY 0 aUAtI1lZE
0 TOUCHSENSITIVITY 0 DISKFORMAT 0 BEAT] COWPOS,"
0
0 PEDALSETTING
0 PMEMEXPAND
\
....
0
0 TRACKCLEAR
0 SONGCLEAR
\
0
. SOUND
. OCTAVE SHIFT: Modify the range of the
generated sound.
. REVERB DEPTH (PR250/PR350): Regulate
the depth of the reverberation.
. ACCOMP VOLUME: Adjust the volume of the
ACCOMP part.
. PIANO TUNING: Modify the pitch of the piano.
. TOUCH SENSITIVITY: Adjust the degree of
the keyboard's Touch Response.
. CONTROL1
. PEDALSETTING:Changethe functionsofthe
pedals.
. P. MEM EXPAND: Expand the range of set-
tings which can be stored in the PANEL
MEMORY.
. MIN RANGE: Selectwhether or not sound is
generated when the keys are pressed very
softly.
. MEDLEY: (Refer to the explanation on page
34.)
. DISK FORMAT: (Refer to the explanation on
page 32.)
PR250/PR350
SOUND CONTROL' CONTROL2
0 OCTAVESHIFT
0 REVERBDEPTH
0 ACCOMPVOlUt.lE 0 MINRANGE 0 INITIAL
0 PIAI:QTUNING 0 MEDLEY 0 QUANTIZE
0 TOUCHSEUSITIVITY 0 DISKFORMAT 0 BEAT ] COMPOSt"
0
0 PEDALSETTUjG
0 PMEtAEXPAND
\
0
0 TRACKCLEAR
0 SONGCLEAR
\
0
. CONTROL 2
. TRACK CLEAR: (Refer to the explanation on
page 25.)
. SONG CLEAR: (Refer to the explanation on
page 25.)
. INITIAL: Return all storable memories and set-
table functions to the initialized settings.
. QUANTIZE: (Refer to the explanation on page
27.)
. BEAT: (Refer to the explanation on page 26.)
The function you wish to set or adjust is selected
by pressing the appropriate mode button
(SOUND, CONTROL 1 or CONTROL 2) the num-
ber of times necessary to make the desired in-
dicator light.
SOUND
\Q)YCTAVESHIFT
- .!lEVERBDEPTH
/'0 'ACCOMPVOLUME
0 PIANOTUNING
0 TOUCHSENSITIVITY
~
. To cancel the mode and to return to the normal
status, press the mode button and hold it until
all the indicators are off.
.'
36
Page 38

PartVI
OCTAVESHIFT
The pitch of the keyboard can be shifted up or
down by one or two octaves.
Settingtbefunctions
<PR50V>
1. Use the SOUND button to select OCTAVE
SHIFT R or OCTAVE SHIFT L.
,1/ SOUND
-.~TAVE SHIFTR
/ ObCTAVESHIFT L
0 ACCOMPVOlUME
0 PIANOTUNING
0 TOUCHSENSITIVITY
~
. OCTAVESHIFT R is usedfor the right part of
a split keyboardandOCTAVESHIFT Lfor the
left.
2. Use the TRANSPOSE/PROGRAM buttons to
select the degree of octave shift.
....
MUSICAL DISPLAY
I
0 PROC
fr(i
- -;
TRAN'
L
""SE'
IRA..0
]
<PR250/PR350>
1. Use the SOUND button to select OCTAVE
SHIFT.
2. Octave shift can be set independently for the
left and right parts of the keyboard. Press either
the RIGHT or LEFT button in the SEQUENCER
section to specify the right or left part of the
keyboard.
ORIGHT OLEFT OBASS oAg~g~6'/ OAcca.,., OAcca.,.
" I/ SOUND
-~TAVE SHIFT
/6 1\EVERBDEPTH
0 ACCOMPVOLUME
0 PIANOTUNING ~
0 TOUCHSENSITIVITY~ l
0
CD CD IT) CD CD IT
h
. The indicatorof the selected part flashes.
. Select RIGHT for the entire unsplit keyboard
or for the right part of a split keyboard. Select
LEFT for the left part of a split keyboard.
3. Use the TRANSPOSE/PROGRAM buttons to
select the degree of octave shift.
Setting OCTAVE SHIFT value
. The settings which can be selected are -2,
-1, 1 and 2. For example, if 2 is set for the
left keyboard, when the left keyboard is
played, the generated sound will be2 octaves
above the normal pitch.
. The available setting range for the right part
of the keyboardis 0--2, and for the left part,
0-2.
. REVERBDEPTH(PR250/PR350)
You can specify the depth of the reverberation
effect for all DIGITAL REVERB types (ROOM,
STAGE and HALL).
'\ .\j~~ \~~ SOU'"'O ~~\\~~ \~ ~~\~t.\ R\:."\:.R~
DEPTH.
SOUND
,(j»JCTAVESHIF.T
-.~VERB DEPTH
/ c!> ACCOMPVOlUME
0 PIANOTUNING ~
0 TOUCHSENSITIVITY\ ~
0
MUSICAL'DISPLAY
- '
L
fRANSPOSE'
0 PROGRAM 0
1
f)D
2. Use the TRANSPOSE/PROGRAM buttons to
adjust the reverberation depth.
MUSICAL DISPLAY
C
-'
fRANSPOSE'
0 pROGRA" 0
)
DD
. Select from eight levels (1-8). The higher the
value, the greater the depth.
37
Page 39

PartVI
Settingtherunetlons
ACCOMPVOLUME
You can adjust the volume of each part (ACCOMP
1, 2, 3) of the AUTO PLAY CHORD inde-
pendently, thereby controlling the balance among
the three parts.
1. Use the SOUND button to select ACCOMP
VOLUME.
2. Select the part whose volume you will adjust
by pressing the relevant button in the SE-
QUENCER section (ACCOMP1, ACCOMP2 or
ACCOMP3).
SOUND
0 OCTAVESHIFT
,O}EVERBDEPTH
-8-ACCOMPVOLUME
/o'PIANO TUNING ~
0 TOUCHSENSITIVITY\ (
Q
-.;
PIANOTUNING
With this function you can select the type of tuning
for your instrument.
OBASS
OORUMS
CD
~
. The indicator of the selected part flashes.
3. Use the TRANSPOSE/PROGRAM buttons to
set the volume.
.
Select from ten levels (0-9). At level 0, no
sound is produced for that part.
. Repeat steps 2 and 3 to set the volume levels
for the other ACCOMP parts.
2. Use the TRANSPOSE/PROGRAM buttons to
select" 0 n " or " 0 F F ".
MUSICAl OISPLA'
,-
0
[
o'~
~. ~.
-,
,N..0
]
'\)-~ (
MUSICAlOISPlAY
1. Use the SOUND button to select PIANO
TUNING.
SOUND
0 OCTAVESHIFT
0 REVERBDEPTH
'o}CCOMPVOLUME
- 8.f'IANO TUNING ~
/ <!>'rOUCHSENSITIVITY\ (
0
TOUCHSENSITIVITY
Specify the degree of Touch Response.
1. Use the SOUND button to select TOUCH SEN-
SITIVITY.
SOUND
0 OCTAVESHIFT
0 REVERBDEPTH
0 ACCOMPVOLUME
oJIANOTUNING
~..f{)UCH SENSITIVITY
/1'
0
~
1011 I
".H'
-,
o~
'N..0
1-)-0
Standard piano tuning, in which the
]
[on
I II C C lone octaveis dividedintopitchesof
LI I I 12 equally spaced intervals.
2. Use the TRANSPOSE/PROGRAM buttons to
adjust the degree of touch sensitivity.
lower pitches are tuned slightly
lower and the higher pitches are
tuned slightly higher.
MUSICAl OISPlAY
0 O~
""',
,N.. 0
Of \
"lJ
\
rr-0
. Select from ten levels (0-9). The higher the
value, the greater the degree of keyboard touch
sensitivity. At level 0, the volume is the same
regardless of how hard or softly the keyboard
is played.
38
Page 40

PartVI
PEDALSETTING
You can assign a different function to the sos-
tenuto pedal (PR250/PR350) and soft pedal.
(Note: The function of the sustain pedal cannot
be changed.)
1. Use the CONTROL 1 button to select PEDAL
SETTING.
I CONTROL 1
~.~AL SETTING
/<1» MEMEXPAND
0 MINRANGE
0 MEDLEY ~
0 DISKFORMAT \ ~
2. Press the pedal whose function you wish to
change.
PR50V PR250/P R350
~
0
Settingthefunctions
3. Use the TRANSPOSE/PROGRAM buttons to
select the desired function for the pedal.
MUSICAL DISPLAY
=,,- C
\ ,-,-, ~
"'NSPOSt!
0 PROO"" 0
nM
15cI51
_II 1-
!I-I-L!
IEllol\
1/= /L I
151=/-1
Sostenuto pedal
Soft pedal
INTRO & ENDING
FILL IN
START/STOP on/off
. The function which is currently assigned to the
specified pedal is shown on the display.
P. MEM EXPAND
Set the range of panel settings which are stored
in the PANEL MEMORY buttons.
1. Use the CONTROL 1 button to select P. MEM
EXPAND.
2. Use the TRANSPOSE/PROGRAM buttons to
select" 0 n "or" 0 F F If.(The default set-
ting is " 0 F F ".)
CONTROL I
<PlEGAL SETiING
':-.ILMEM EXPAND
/ d>),IN RANGE
0 MEDLEY h
0 DISKFORMAT \ \
0
. The function newly assigned to the specified
pedal is shown on the display.
The sounds and volumes for each
LII I
11/1-1-1
[on
part, PLAY STYLE status, split
point, DIGITAL CELESTE on/off
status, SUSTAIN PEDAL on/off
status, DIGITAL REVERB type and
depth (PR250/PR350), and OC-
TAVE SHIFT setting are stored in
the PANEL MEMORY locations.
In addition to the above settings, the
]
selected RHYTHM, tempo setting,
TRANSPOSE status and the
PIANIST ACCOMP on/off status are
stored in the PANEL MEMORY loca-
tions.
39
Page 41

PartVI
MINRANGE
At the default setting (Minimum Range on), no
sound is generated for piano-type sounds when
the keys are played very softly. However, you can
change the setting so that sound is produced no
matter how softly the keys are pressed.
1. Use the CONTROL 1 button to select MIN
RANGE.
Settingthefunctions
2. Use the TRANSPOSE/PROGRAM buttons to
select" 0 n " or " 0 F F ".
MUSICAL DISPLAY
I 0'" I
fRANSPOSEI
0 PROGRAM 0
CONTROL 1
0 PEDALSETTING
cP P MEM EXPAND
~.~N RANGE
/d>'mEDLEY ~
0 DISKFORMAT \ (
[J
....
INITIAL
Reset the programmable memories and buttons
to their initialized status.
1. Use the CONTROL 2 button to select INITIAl.
CONTROL 2
0 TRACKCLEAR
<j>jONG CLEAR
.2'.~TIAL
/<I>'(,UANTIZE
0 BEAT COMPOSER
0
]
fJD
No sound is produced when a key is
[I 1I(
III C I-I Sound is produced regardless of
LI I I how softly the keys are pressed.
. This setting is effective only for piano sounds
(GRAND PIANO, UPRIGHT PIANO, E PIANO
1, 2).
111- 1-
II II I I
I
pressed extremely softly.
The COMPOSER memory contents,
SEQUENCER settings and memory
contents, sound, PANEL MEMORY
contents and all other settings and
functions are reset to their factory-
preset status.
2. Use the TRANSPOSE/PROGRAM buttons to
select the initialization mode.
MUSICAL DISPLAY
,=' I I
IlL L
fRANSPOSEI
0 PROGRAM 0
ffD
1'- ,( ] The COMPOSERmemorycontents
L 1- 1- are reset to their factory-preset
status.
3. Press the EXECUTE button.
,1/
-.~XECUTE
SEQUENCER - r-1
. The memories and settings are returned to
their initialized status, according to the
selected mode.
40
/\'
RESET L-.)
Page 42

PartVII
MIDI
WhatisMIDI?
MIDI (Musical Instrument Digital Interface) is the international standard for digital communication of
electronic musical instrument data.
This means that any equipment which has a MIDI terminal-such as electronic musical instruments and
personal computers-can easily exchange digital data with other MIDI equipment without resorting to
complicated conversions or connections.
AbouttheMIDIterminals
IN:
MIDI
THRU OUT IN
OUT: The terminal that transmits data from this
The terminal by which this instrument
receives data from other equipment.
instrument to other equipment.
000
...
THRU: The terminal that transfers data from the
IN terminal directly to other equipment.
. For these connections, use a commercially
available MIDI cable. Contact your Technics
dealerfor moreinformation.
Connectionexamples
. To generate sound frc;>ma connected instrument by playing this instrument
MIDI OUT
MIDI cable
1
I SX-KN400, for example I
. To generate sound from this instrument by operating a connected MIDI sequencer
MIDI IN
PR~
SY-MO8, for example
MIDI IN
MIDI OUT
MIDIstickers
Before using the MIDI functions, affix the included
, MIDI stickers 0 and @ to the panel as shown
in the figure.
RHYTHMSELECT
OMARCHOCOUIJTRY0 WALTZOSWINGI OSWING2ODIXIE O~lL~Z OLATIN1OLATIN2 O~~~;A-
OB BEATOROCKNOSHUFFl"0 ROCK 016 BEATI 016°EAT2OJAZZ OSWINGOOISCD OLATIN
0000000000
A
COUNT&FILL IN INTRQ &ENDING
0 0
@--( WIOt LOAD
ROLL 'BALLAD "ROCK ROCK ROCK
1""""""'" 2
NOR"AL SINGLE NOR"AL TEC 1 TEC'
~ P.CHANGE ...ooE
0 0
SYNCHRQ
0
SONG SELECT
NOTE ONLY DRU"S APC TRANSPOSE EXT SEO
START
0
WID!CLOCK
41
~ "OOE
0
START!
STOP
SUAT/STQP )
00
RHYTHM
VARIATION
00
"COMPOSER
Page 43

Part VII
Thefollowingkindsofdatacanbetransmitted/received
. CHANNEL
. OCTAVESHIFT
. LOCALCONTROL
. P. MEMP-CHANGE
. START/STOP
. MIDICLOCK
. SONGSELECT
. MIDILOAD
. INPUTMODE
. P-CHANGE MODE
. NOTE ONLY
. MIDIOUT
. DRUMS
. APC
. TRANSPOSE
. EXT SEa MODE
...
Select the desired MIDI function by pressing the
MIDI button the number of times necessary to
make the corresponding indicator light.
MIDI
0 CHANNEL
0 OCTAVESHIFT
0 LOCALCONTROL
OPMEMP-CHANGEfk<
0 OTHERS \ I
. For the START/STOP and subsequent func-
tions in the list, first use the MIDI button to
select OTHERS, then turn on or off the func-
tions indicated on the MIDI stickers.
. To cancel the function-setting mode and return
to the normal status, press the MIDI button and
hold it until all the indicators are off.
0
MIDI
CHANNEL
Many different kinds of performance data are sent
using just one MIDI cable. This is possible be-
cause MIDI signals are sent and received through
16 different "basic channels" (numbered 1-16).
In order for the exchange of data to take place,
the channels on the transmission side must match
the channels on the receiving side.
The default channel settings on this instrument
are as follows.
Part Channel
RIGHT
LEFT
BASS
ACCOMP1 5
ACCOMP2 9
ACCOMP3 10
DRUMS 15
CONTROL OFF
You can reassign channel numbers to parts on
this instrument as follows.
1
2
3
1. Use the MIDI button to select CHANNEL
,,1/ MIDI
- e.£HANNEL
/OOCTAVESHIFT
0 LOCALCONTROL
0 PMEMP-CHANGE
0 OTHERS
~
2. Press a button to select the part.
ORIGHT OLEFT OBASS OAeca"p" OAeca"p, OAeCaMPJ OORUMS OCa"HIOL
ICD CD CD CD CD CD GJ CD,
. The indicator for the selected part flashes.
3. Use the TRANSPOSE/PROGRAM buttons to
specify the channel number you wish to assign
to the selected part.
. Select one from 1-16 or OFF.
The same channel number cannot be assigned
to more than one part. If you attempt to do so,
an error "beep" will sound.
. When set to" 0 F F ", MIDI data for that part
will not be transmitted or received.
CHORD
0
MUSICAL DISPLAY
'-
RANSPOSE'
0
PROGRAM 0
,,'
[
oow-0 G) UP
r) tl
I
4. Repeat steps 2 and 3 to reassign channel num-
bers to other parts.
42
Page 44

PartVII
OCTAVESHIFT
MIDI
Set the octave shift value (-2, -1, 1, 2) for trans-
mitted key note data (MIDI OUT) of each part in-
dependently.
1. Use the MIDI button to select OCTAVE SHIFT.
MIDI
HANNEL
~ CTAVESHIFT
/ COCALCONTROL
~
0 PMEMP-CHANGE
0 OTHERS
~
2. Press a button (except for CONTROL) to select
the part.
ORIGHT OLEFT OIlASS O~~:;'61/ OAeCO"P2 OAeCO"P' OORUMS
ICD CD CD CD CD CD CD,
0
. The indicator--for the selected part flashes.
LOCALCONTROL
Specify, for each part, whether the performance
played on this instrument's keyboard is output by
this instrument's sound generator or not.
3. Use the TRANSPOSE/PROGRAM buttons to
specify the amount of octave shift.
MUSICAL DISPLAY
: I
TRANSPOSE'
0 PROGRAM 0
f)0
.Octave shift is set for MIDI OUT data only;
however, the MIDI OUT and MIDI IN octave
shifts are linked. For example, if the MIDI OUT
octave shift is set to 1, the MIDI IN octave shift
is automatically set to -1.
. The default setting is O.
3. Use the TRANSPOSE/PROGRAM buttons to
specify" 0 n " or " 0 F F "
MUSICAL DISPLAY
1. Use the MIDI button to select LOCAL CON-
TROL.
,,9/0CTAVE SHIFT
-8{t1CAL CONTROL
/<!>PMEMP-CHANGE
MIDI
0 CHANNEL
0 OTHERS
n
2. Press a button to select the part.
0 RIGHT OLEFT Os.SS O~~~61/ OAeCO"P2OAeCO"P' OORUMS OCONTooL
ICD CD CD CD CD CD CD OJ!
0
. . The indicator for the selected part flashes.
[0'-'
LII 1
I /lCC I
011 I
TRANSPOSE'
0 PROGRAM 0
Q0
Notes played on this instrument's
]
keyboard are output by this
instrument's sound generator.
Notes played on this instrument's
keyboard are not output by this
instrument's sound generator but
are sent to the MIDI OUT terminal.
(Note that the part must be assigned
to a MIDI channel for MIDI data to
be sent. [Refer to page 42.])
43
Page 45

PartVII
P. MEMP-CHANGE
MIDI
If program change number data for the RIGHT,
LEFT and/or BASS parts are stored inthe PANEL
MEMORY 1-3 (PR50V) or 1-6 '(PR250/PR350)
buttons, then just by pressing a PANEL MEMORY
button during a performance, you can send pro-
gram change data for multiple parts simul-
taneously.
1. Use the MIDI button to select P. MEM P-
CHANGE. MIDI
0 CHANNEL
0 OCTAVESHIFT
"Q LOCALCONTROL
-.'"'MEMP-tHANGE -n:::
/C,\'OTHERS(')
2. Press a button in the PANEL MEMORY sec-
tion.
PR50V
0
.,J.PANEL MEMORY
1 2 3
0 0 0
000
PR250/P R350
PANEL MEMORY
1 2 3
0 O' 0
000
4 5 6
0 0 0
3. Press a button to select the part.
. Select one from RIGHT, LEFT and BASS.
OACCOMPI/OACCOMP2 OACCOMP
CHORD
CD CD IT
. The indicator for the selected part flashes.
4. Use the TRANSPOSE/PROGRAM buttons to
specify the program change number.
. Select one from 0-127 or OFF.
. Keep the button depressed to change the num-
ber more rapidly.
MUSICAL DISPLAY
f"
,
RANSPOSEI
0
PfIOGRA.. 0
fl
I
[
DD
5. If desired, repeat steps 3 and 4 for other parts.
. When set to" 0 F F n,program change data
is not sent for that part when that PANEL
MEMORY button is pressed.
000
. The indicator for the selected number button
lights.
STARTISTOP
You can specify whether or not RHYTHM and SE-
QUENCER start/stop data are received/trans-
mitted.
1. Use,the MIDI button to select OTHERS.
,QJ'MEMP-CHANGE
-.eTHERS
/1"
2. Use the START/STOP button to specify the
on/off status.
COUNT&FILLIN INTRO&ENDING SYNCHRO
0
0 0
"IDI LOAD SONG SEU!CT
MIDI
0 CHANNEL
0 OCTAVESHIFT
0 LOCALCONTROL
0
1
~
START
0
0
IMOOCUX.
I
0
START!
STOP
On (indicator is lit): RHYTHM and SEQUENCER
start/stop data are received/transmitted.
Off (indicator is not lit): RHYTHM and SEQUEN-
CER start/stop data are not received/transmitted.
44
Page 46

PartVII
MIDICLOCK
Select whether this instrument's RHYTHM and
SEQUENCER performance is controlled by the
internal clock or by the clock of the connected
instrument.
MIDI
1. Use the MIDI button to select OTHERS.
2. Use the MIDI CLOCK button to select the in-
ternal clock or external clock.
I
0
STAR"
STOP
COUNT&FILLIN INTI'IO&ENDING
0
0
SYNCHRO
START
0
,-...,
0 0
WlOllOAO SONGSELECT
:;r
SONGSELECT
Specify whether or not song number data is trans-
mitted/received.
1. Use the MIDI button ~oselect OTHERS.
2.Use the SONG SELECTbutton to specify
w\\et\\ef Ofnot song numbef data can be ex-
changed.
COUNT &FILL IN INTRO &ENDING
0 0
0
( WIOllOAO
ECT WID' ClOC-
r{ ""XC- STAATISTO-
\.
START!
STOP
STAAT/STOP
0
SYNCHRO
START
0
0
On (indicator is lit): This instrument's RHYTHM
and SEQUENCER performance is controlled by
the connected instrument's clock. In this case,
"E::J" is shown on the display.
Off (indicator is not lit): This instrument's
RHYTHM and SEQUENCER performance is con-
trolled by the internal clock, not by the connected
instrument's clock.
On (indicator is lit): Song number data can be ex-
changed.
O" ~indicatOfis not \it): Song number data cannot
be exchanged.
MIDILOAD
When loading data from a memory disk into this
instrument's memory, specify whether or not the
. stored MIDI settings are also recalled.
1. Use the MIDI button to select OTHERS.
2. Use the MIDI LOAD button to specify whether
or not the stored MIDI settings are recalled.
COUNT&FILLIN
0
INTRO&ENDING SYNCHRO
0
0
SONGSELECT WIOIClOC-
START
0
0
START!
I
STOP
STAAT/STOPJ
On (indicator is lit): The stored MIDI settings are
recalled when loading data from a memory disk.
Off (indicator is not lit): The stored MIDI settings
are not recalled.
0
45
Page 47

PartVII MIDI
INPUTMODE
Set to the SINGLE mode when you wish to receive
data using only one channel. Set to the NORMAL
mode to receive data on multiple channels.
1. Use the MIDI button to select OTHERS.
2. In the RHYTHM SELECT section, use the
NORMAL and SINGLE buttons to select the
type of receive mode.
RHYTHM SELECT
OMARCHO:1'JI11!YOWALTZOSWING,OSWING2OOIXIEO~lL~ZOLATIN1OLATlN2O~~.
Os SEATO~~N OSHUflLfO~LAD 0168EATI016BEATZO~~~ O~~~G OOISCOO~~~:
00000000
, , 3 . . 6 7 8
"" 'EC' 7EC' NO7E0"'" OR!JUS APC ""SPOSE EXT SEO
P.c><AHGE"""" """ "'" """"
NORMAL: In this mode,~his instrument is used
as a sound generator, and performance data can
be received independently for all parts for which
a basic channel is assigned. When the AUTO
PLAY CHORD is on, the chord progression is
controlled by data for the LEFT part.
The maximum number of notes which can sound
simultaneously for each part is as follows:
RIGHT
LEFT 32
ACCOMP 1
ACCOMP 2 8
ACCOMP 3
32
The maximum num-
ber of notes for all
8
parts combined is
32.
8
BASS 8
DRUMS 8
SINGLE: Note on/off data is received only for the
basic channel assigned to the RIGHT part. The
note on/off data is controlled by this instrument's
AUTO PLAY CHORD and PLAY MODE settings.
P-CHANGEMODE
You can match the sound change data when
transmitting/receiving between different Technics
instruments.
1. Use the MIDI button to select OTHERS.
2. Inthe RHYTHM SELECT section, use the three
P-CHANGE MODE buttons (NORMAL, TEC 1
and TEC 2) to select the type of data-matching.
RHYTHM SELECT
OMARCHOCOOlITRY0 WALTZ0 SWING10 SWING2OOIXIEO~~~~ZOLATINIOLATIN2O~~~A'
OSSEATO~~'NC).S!iUfFLEO:~~A()016BEATI016BEAT2O~~~~ o~~~~GOOISCOO~~~:
00000
A . 6 7 8
QNlY OR APC YR"SPOSE EXTSEO I
~ """'"
NORMAL: The program change numbers cor-
respond to the order of the sounds as they are
lined up from left to right, with the bottom row
being program change numbers 0-9.
TEC 1: Program change numbers are stand-
ardized among all Technics models which are set
to this mode: the program change number as-
signed to a given sound on one model is assigned
to the same sound on all models set to the same
mode.
TEC 2: Program change numbers correspond to
those on Technics SX-PR Series Digital En-
semble Piano.
46
Page 48

PartVII
NOTEONLY
You can transmit/receive only note data (key-
board note on/off).
MIDI
1. Use the MIDI button to select OTHERS.
2. Use the NOTE ONLY button to specify the
on/off status.
RHYTHM SELECT
OMARCHOCOOI1RYOWAlTZOSWING10SWING2OOlXIE O~A}liz OlATlNI OlAIINZO~~~~A
08 BEATO:~N OSHUFfLEO:~AD 01lilltA1101ti8EA12O~~~~ O~~d~GOOISCOO~~~:
Q~QQQ QrJQ Q Q Q
NORMAL SONG"
'NPUT MODE'
EXTSEO
MOOE
MIDIOUT
Specify whether or not DRUMS, APC and
TRANSPOSE data are transmitted.
1. Use the MIDI button to select OTHERS.
2. In the RHYTHM SELECT section, turn on the
MIDI OUT buttQns (DRUMS, APC,
TRANSPOSE) for the data you wish to have
transmitted.
OMARCHOCOOlI1RYOWAlTZOSWING10 SWING2OOlXIEOl.:lliz OlAIINI OlATlNZO~~~~A-
OBBEATO~~~N OSl1UfflEO:~~AD 01G8EA1101liB!A11olto~~ o~~d~GOOISCOo~~~:
000000 0
,,""""".,, 1 , 3 4 .
I '"":~;~T';:" "",:M;~A::~~:e ,
~
RHYTHM SELECT
)~
On (indicator is lit): Only note-on/off and all-note-
off data are transmitted/received.
Off (indicator not lit): All MIDI messages ap-
plicable to this piano are transmitted/received.
J
DRUMS: When this button is on, the note on/off
data for the selected rhythm pattern is transmitted
as performance data.
APC: When this button is on, the note on/off data
for the AUTO PLAY CHORD accompaniment pat-
tern is transmitted as performance data.
TRANSPOSE: The TRANSPOSE status is trans-
mitted. That is, the note on/off data values are
offset by the TRANSPOSE function of the piano
before they are transmitted.
EXTSEQMODE
When using an external sequencer, select
whether or not the entire keyboard is devoted to
transmitting the BASS and ACCOMP parts.
1. Use the MIDI button to select OTHERS.
2. In the RHYTHM SELECT section, use the EXT
SEQ MODE button to specify the mode.
RHYTHM SELECT
OMARCHOCOU:.iRY0 WALTZOSWING1OSWING200lXIEO~~~iz OlATlNIOlATlNZO:g~~A-
08 BEATO:~R OSHliFfLEO:~AD 01liB!A1101lilltA11O~~~ O~~~G OOISCC_O~~:
000000000
'",I"""'" 1 , 3 4 S 6
I """MAl SONG" """"AI lEe' lEe,
t ~puf-.oo'e ~E ..00.
On (indicator is lit): Both the recording and
playback functions of this instrument's SEQUEN-
CER are disabled. When transmitting, if a SE-
QUENCER part button on this instrument
(RIGHT, LEFT, ACCOMP 1, 2, 3 , BASS or
DRUMS) is on, the entire keybo'ard is devoted to
that part.
Off (indicator is not lit): This instrument's SE-
QUENCER is enabled. The performance data for
the BASS and ACCOMP parts are transmitted
only when the SEQUENCER is used.
47
Page 49

Digital Ensemble MIDIImplementationChart
[ SX-PR50V/SX-PR250/SX-PR350 ]
(Transmitted)
Function
Basic
Channel
Mode
Note
Number
Velocity
After
Touch
Pitch Bender
Control
Change
RIGHT LEFT
Default 1-16 1-16
Changed
1-16
Default 3
Messages
Altered
x
- -
1-16
3 3
x x
31-102 31-102
Truevoice
Note ON 0
Note OFF
Key's
Ch's
7
64
66
67
80
82
83
93
94
- -
0 0
x (9nH:v-O)
x (9nH:v-O) x (9nH:v-O)
X
X X
X X
iY
0 0
0 0
0
X 0
X
0 0
0 0 0 0
x X
0
0 X X X
0 X X
0
ACCOMP1 ACCOMP2
1-16 1-16
1-16
1-16 1-16
ACCOMP3 BASS
1-16 1-16
1-16
3 3 3
x x
DRUMS CONTROL
1-16 1-16 memorized
1-16
3 3
x x X
- - - - -
31-102 31-102 31-102
- -
0
x (9nH:v-O) x (9nH:v-O)
X X
X X X
X X
0 0
0 0 0 0
X X
X X
- -
X X X
X X
x x x x 0 x
X X X X X
X
31-102 36-69**
- -
0 0
x (9nH:v-O) x (9nH:v-O)
X X
0 0
X X X X
0 X X
X X X
X X X X
X
X
0
X X
X X
X X
1-16
-
-
-
-
X
X
0
X
X
Remarks
OMNIOFFPOLYMODE
Changes depending
on ttm positionofthe
transpose control.
volume (MAINVOLUME)
sustain
sostenuto pedal
soft pedal
auto play chord
intro & ending, fill in
octave shift
chorus
(DIGITAL CELESTE 1)
celeste
(DIGITAL CELESTE 2)
Prog
Change
True #
System exclusive
Pos
System
common
Song
Song Set
Tune
System-
Clock
Real Time Commands
LocalON/OFF
Aux
Messages
Notes
Mode 1:
Mode 3:
All notes OFF
ActiveSense
Reset
OMNI ON, POLY
OMNI OFF, POLY
0
- -
0 0 0
- -
0 0 0
- - - -
X
X
X
*Ox (0-19)
X
0
*Ox
X
0 0
* 0 x .....................Whether or not the data for each of these items is transmitted can be set.
"When the program change mode is set to TEC (on), note numbers for DRUMS differ.
X X
X X X
0
0
0
0
X
0 0
X
start/stop, continue
-
-
\
Mode 2:
Mode 4:
OMNI ON, MONO
OMNI OFF, MONO
\
0: Yes
X: No
48
Page 50

Digital Ensemble MIDllmpllmlntatlonChart
[ SX-PR50VISX-PR250/SX-PR350 ]
(Recognized)
Function
Basic
Channel
Mode
Note
Number
Velocity
After
Touch
Pitch Bender
Control
Change
RIGHT
Default 1-16 1-16 1-16 1-16 1-16 1-16 1-16 1-16 memorized
Changed
Default
Messages
Altered
1-16 1-16 1-16 1-16 1-16
3 3 3 3 3 3 3
X X X X X X X
- - - - - -
0-127 0-127 0-127 0-127 0-127 0-127
LEFT ACCOMP1 ACCOMP2 ACCOMP3 BASS DRUMS
1-16 1-16 1-16
36-69..
Truevoice 36-119 36-119 36-119 36-119 36-119 24-107 36-69
Note ON 0 0 0 0 0
Note OFF
Key's
Ch's X X X
7
64 0 0 0 0 0 0 X X
66 0 0
67 0
80
82
83 0
93
94
X X X X X X X
X X X X X X X X
X X
0 0 0 0
l) 0 0 0 0 0 0 0
X X X X X X
0 0 0 0 0 X X
X 0 X
X X X
X X X X X X X
0 X X X X X X X
0 X
X X X X X X
X X X X X
X
0 0
X X 0 X
0
X X X
CONTROL
- -
0
X X
3 OMNIOFFPOLYMODE
X
-
Changesdepending
on the sound.
-
-
-
volume (MAINVOLUME)
sustain
sostenuto pedal
soft pedal
auto play chord
intra & ending, fill in
octave shift
chorus
(DIGITALCELESTE1)
cel8ste
(01 ITALCELESTE2)
Remarks
Prog
Change
System exclusive
System
common Song Sel
System
Real Time Commands
Aux
Messages
Notes
Mode 1:
Mode 3:
True #
Song Pas
Tune
Clock
LocalON/OFF
All notes OFF 0 0 0 0
Active Sense
Reset
OMNI ON, POLY
OMNI OFF, POLY
015 015 0-15
(PR50Y) (PR50Y) (PR50Y) (PR50Y)
021 021 0-21 0-21 021 0-21
(PR250/PR350)(PR2501PR350)(PR250/PR350)(PR250/PR350)(PR250IPR350)
X X X X X
0-15 0-15 0-15
'Ox (0-19)
(PR50Y) (PR50Y)
X
X
X
0
.Ox
0
0
X
(PR250/PR350)
X
0
0-29
0
starVstop, continue
X
-
-
.0 x .....................Whether or not the data for each of these items is transmitted can be set.
..When the program change mode is set to TEC (on), note numbers for DRUMS differ.
Mode 2:
Mode 4:
OMNION,MONO
OMNIOFF, MONO
0:Yes
x:No
49
Page 51

I
...,
Panasonlc Company
Divisionof MatsushitaElectricCorporationofAmerica
6650KatallaAve.,Cypress,CA90630
 Loading...