

Page 1
Technics
I G I T A L
0
E
N
S
E M
8 L E
sx-PRSOV
{
sx-PR250
sx-PR350
Vol.1 BASICFUNCTIONS
Page 2
A
A
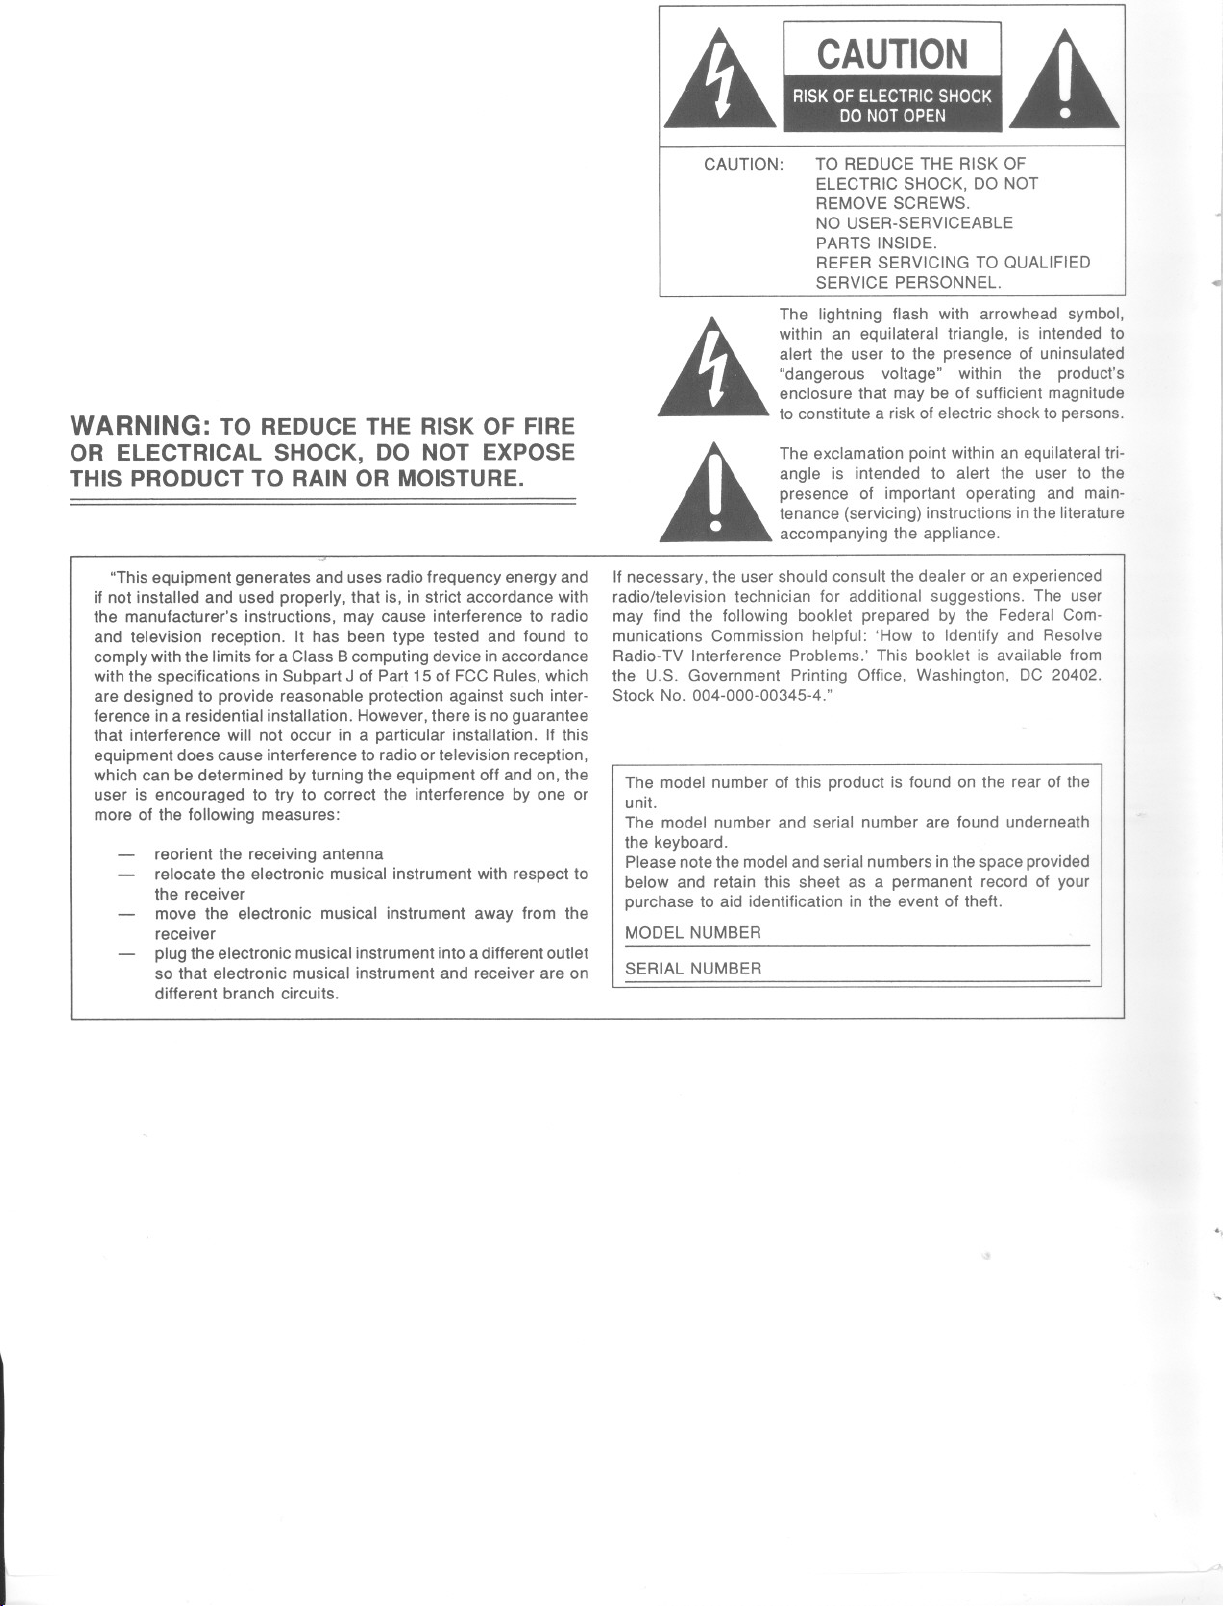
WARNING: TO REDUCE THE RISK OF FIRE
OR ELECTRICAL SHOCK, DO NOT EXPOSE
THIS PRODUCT TO RAIN OR MOISTURE.
"This equipment generates and uses radio frequency energy and
if not installed and used properly, that is, in strict accordance with
the manufacturer's instructions, may cause interference to radio
and television reception. It has been type tested and found to
comply with the limits for a Class B computing device in accordance
with the specifications in Subpart J of Part 15 of FCC Rules, which
are designed to provide reasonable protection against such inter-
ference in a residential installation. However, there is noguarantee
that interference will not occur in a particular installation. If this
equipment does cause interference to radio or television reception,
which can be determined by turning the equipment off and on, the
user is encouraged to try to correct the interference by one or
more of the following measures:
- reorient the receiving antenna
- relocate the electronic musical instrument with respect to
the receiver
- move the electronic musical instrument away from the
receiver
- plug the electronic musical instrument into a different outlet
so that electronic musical instrument and receiver are on
different branch circuits.
CAUTION:
A
A
If necessary, the user should consult the dealer or an experienced
radio/television technician for additional suggestions. The user
may find the following booklet prepared by the Federal Com-
munications Commission helpful: 'How to Identify and Resolve
Radio-TV Interference Problems.' This booklet is available from
the U.S. Government Printing Office, Washington, DC 20402.
Stock No. 004-000-00345-4."
The model number of this product is found on the rear of the
unit.
The model number and serial number are found underneath
the keyboard.
Please note the model and serial numbers in the space provided
below and retain this sheet as a permanent record of your
purchase to aid identification in the event of theft.
MODEL NUMBER
SERIAL NUMBER
TO REDUCE THE RISK OF
ELECTRIC SHOCK, DO NOT
REMOVE SCREWS.
NO USER-SERVICEABLE
PARTS INSIDE.
REFER SERVICING TO QUALIFIED
SERVICE PERSONNEL.
The lightning flash with arrowhead symbol,
within an equilateral triangle, is intended to
alert the user to the presence of uninsulated
"dangerous voltage" within the product's
enclosure that may be of sufficient magnitude
to constitute a risk of electric shock to persons.
The exclamation point within an equilateral tri-
angle is intended to alert the user to the
presence of important operating and main-
tenance (servicing) instructions in the literature
accompanying the appliance.
"
"
Page 3
Before vou plav
For a long and pleasurable use of this instrument, and to gain a thorough under-
standing of your PR Series Digital Ensemble's wonderful capabilities, it is strong-
ly recommended that you first read through this Owner's Manual.
The Owner's Manual is comprised of the following parts.
BASIC FUNCTIONS
VOL. 1:
PRACTICAL APPLICATIONS
VOL. 2:
REFERENCE GUIDE
Please read all of this part.
This volume includes an explanation of basic
procedures and some important points you
should be aware of for proper operation of your
instrument.
Read the parts which are relevant to the
functions you wish to use.
This volume comprises a detailed explanation of
sounds, effects, rhythms, SEQUENCER,
COMPOSER, Digital Disk Recorder (SY-FD20),
function-setting, and MIDI functions.
Reference guide for the contents of the SOUND
VARIATION and ONE TOUCH PLAY settings.
1
Page 4
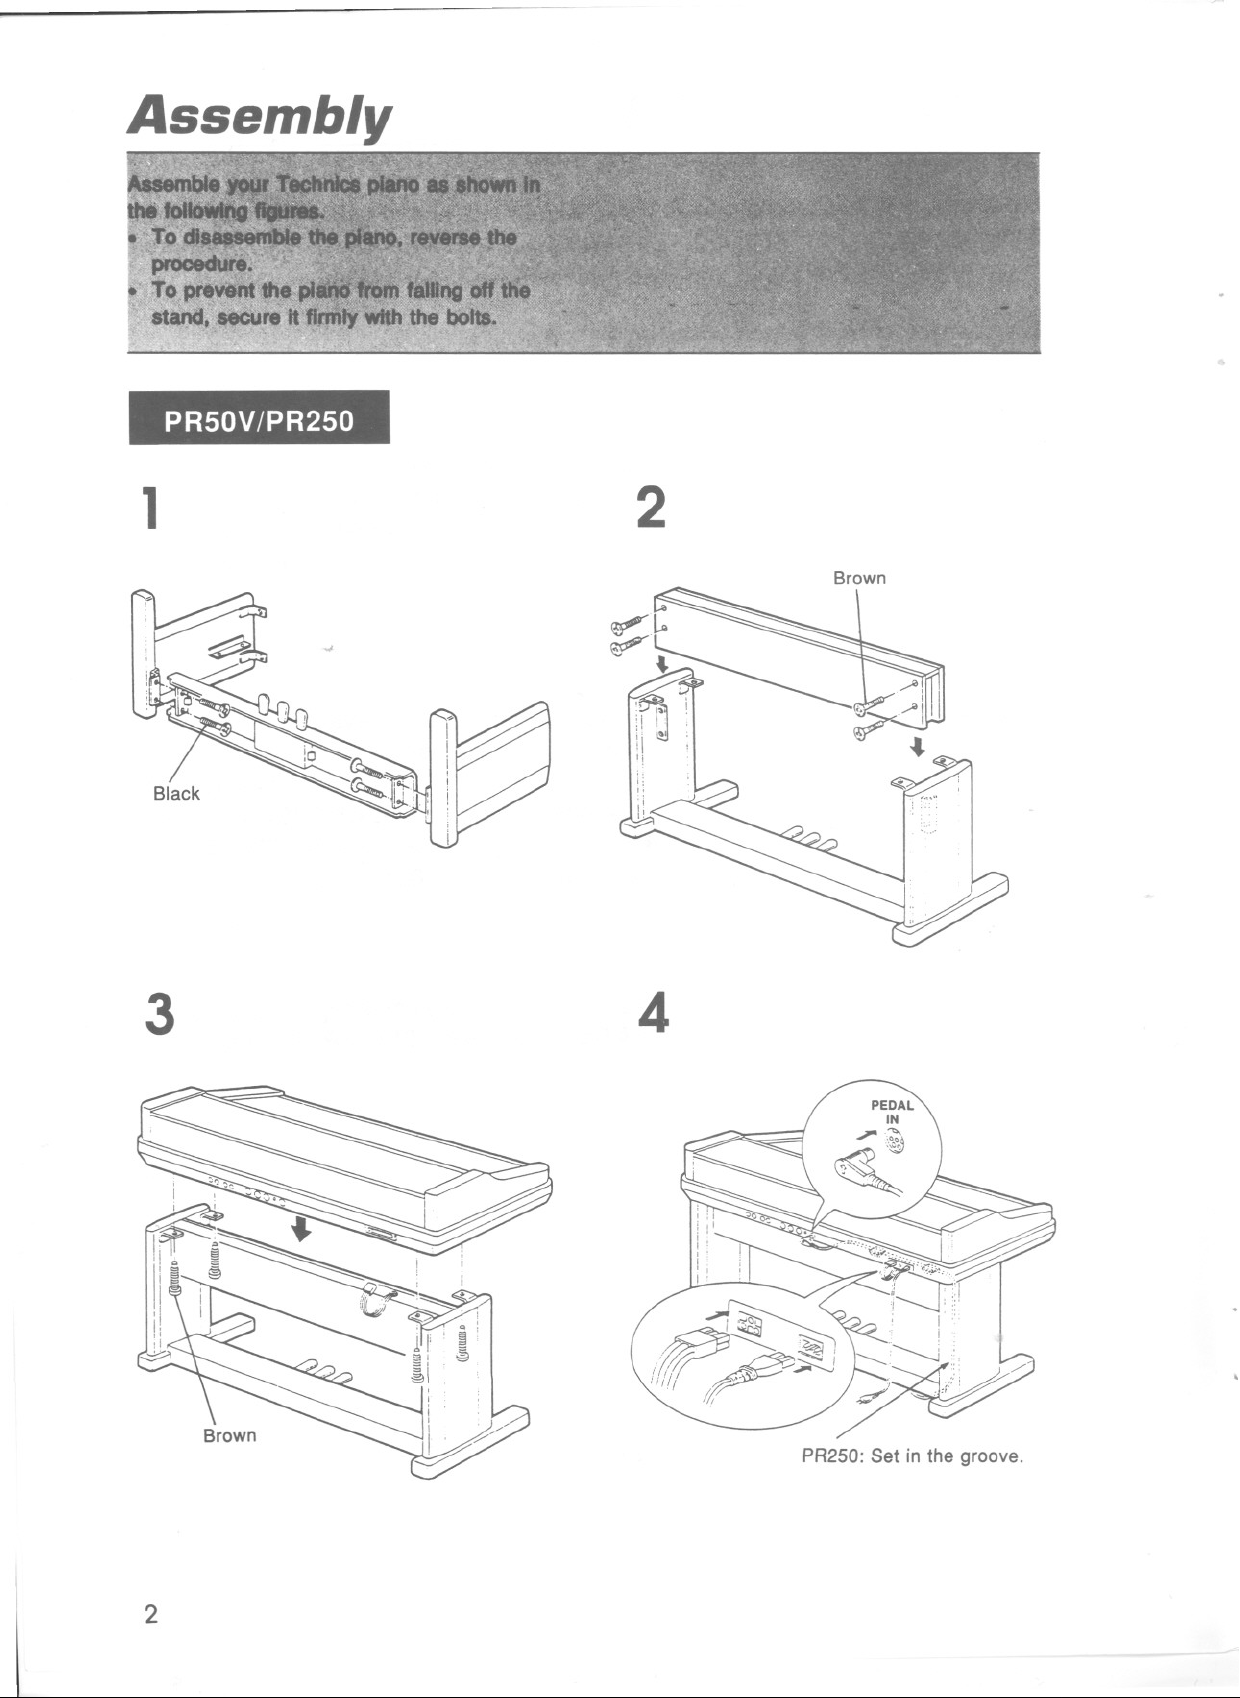
AsselTlbly
PR50V/PR250
1
Black
3
2
Brown
...
4
PR250: Set in the groove.
2
Page 5
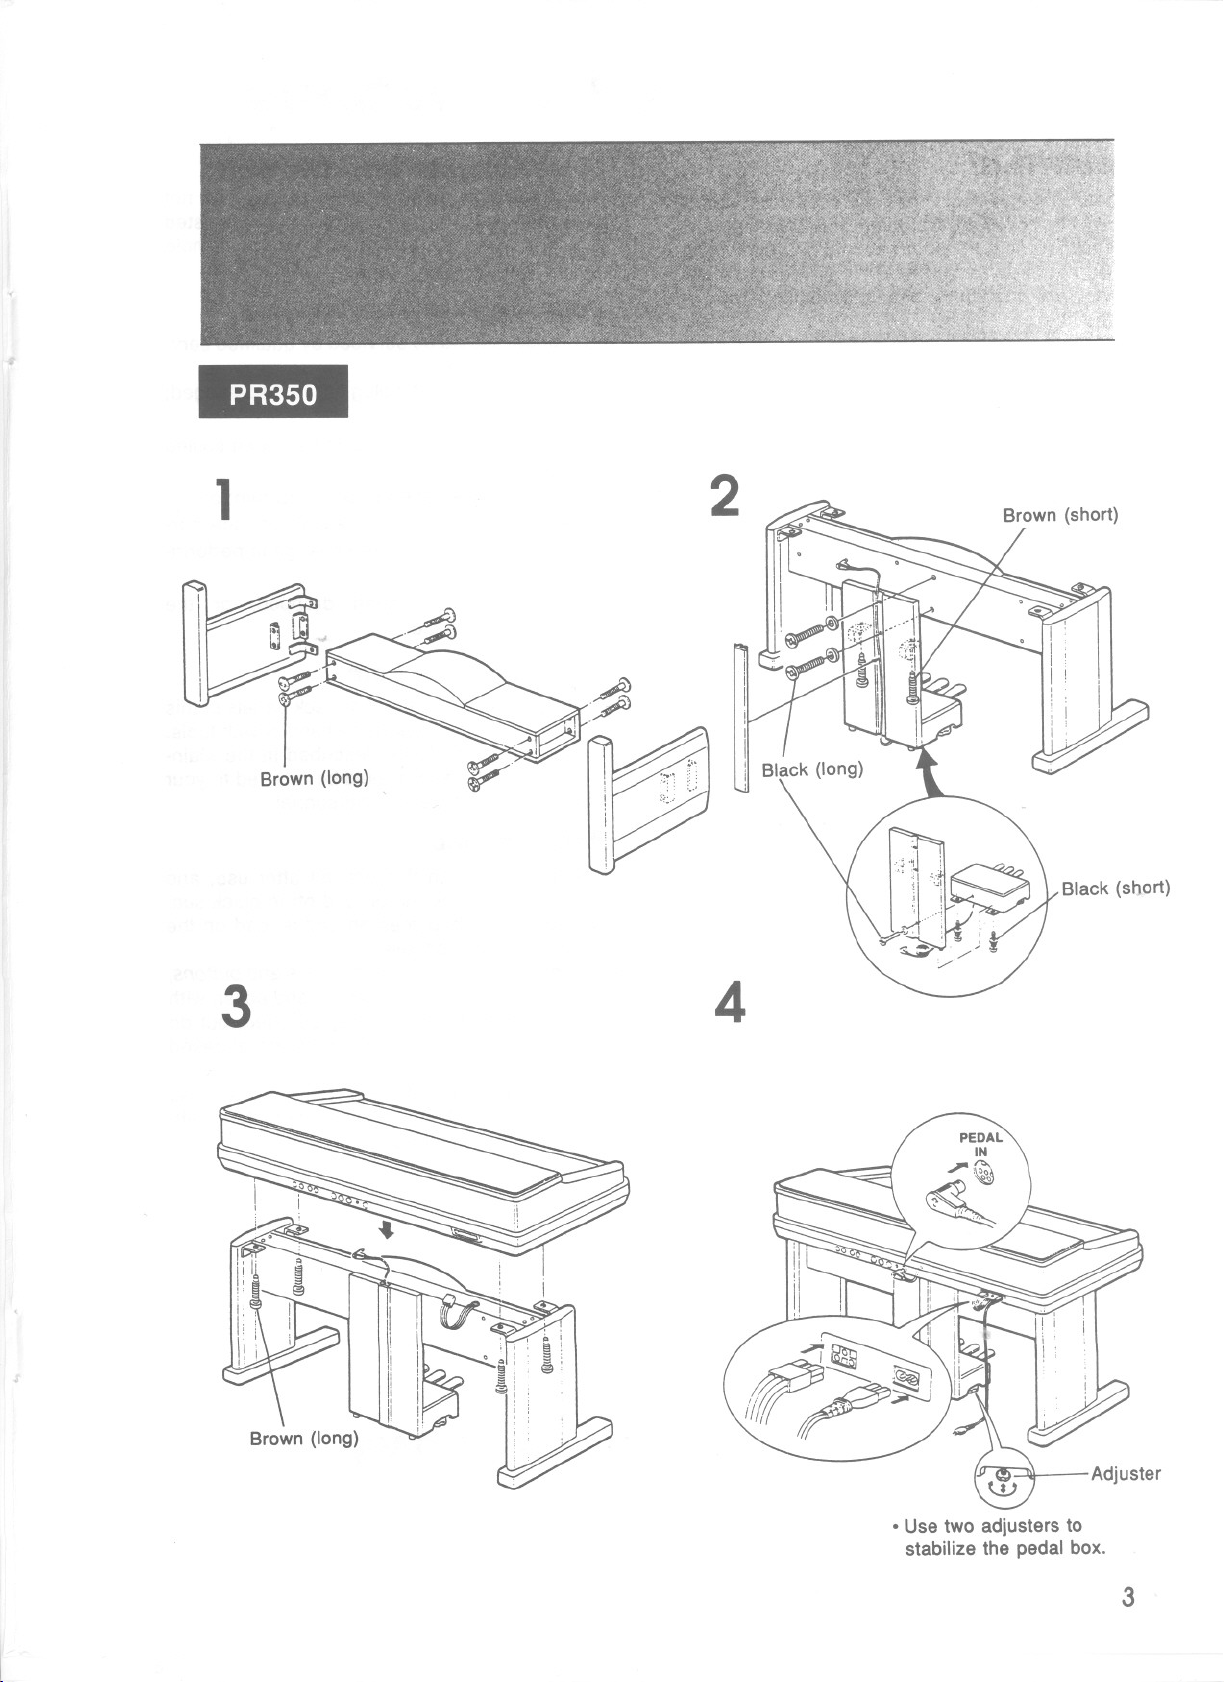
PR350
1
Brown (long)
3
2
4
.Use two adjusters to
stabilize the pedal box.
Adjuster
3
Page 6

Important Safety Instructions
WARNING!
When using this unit, basic precautions should
always be followed, including the following:
. Children using this unit should be supervised.
. Do not use this unit near water-for example,
in a wet basement, near a swimming pool, or
the like.
. This unit should be used only with a stand that
is recommended by the manufacturer.
Installation location
. Take care to use this unit in a place where it
will receive sufficient ventilation. Do not permit
the ventilation holes to be covered by curtains
or any similar materials.
. Place it away from direct sunlight and exces-
sive heat from heating equipment.
. Place it wherel1umidity, vibration and dust are
minimized.
Power source ,J
1. Use only a 120VAC power source.
2. DC power cannot be used.
Handling the power cord
. Never touch the power cord, or its plug, with
wet hands.
. Don't pull the power cord.
. The power cord of this unit should be un-
plugged from the outlet when the unit is left
unused for a long period of time.
Metal items inside the unit
may result in electric shock
or damage.
Do not permit metal articles to get inside the unit.
Be especially careful with regard to this point if
children are near this unit. They should be warned
never to try to put anything inside.
Protect 'lour hearing
This product, either alone or in combination with
an amplifier and headphones or speakers, may
be capable of producing sound levels that could
cause a permanent hearing loss. Do not operate
for a long period of time at a high volume level
or at a level that is uncomfortable. If you ex-
perience any hearing loss or ringing in the ears,
you should consult an audiologist.
If water gets into the unit...
Case should be taken so that liquids are not
spilled in the unit. As a precaution, it is suggested
that flower vases and other containers which hold
liquids not be placed on the top of this unit.
When to request service
The product should be serviced by qualified serv-
ice personnel when:
A. The power cord or the plug has been damaged;
or
B. Objects have fallen, or liquid has been spilled
into the unit; or
C.The product has been exposed to rain; or
D.The product does not appear to operate nor-
mally or exhibits a marked change in perform-
ance; or
E.The product has been dropped. or the
enclosure damaged.
Service and repair
Never try to remove the top or back panels of this
unit, or to touch inside parts by hand or with tools.
All servicing beyond that described in the Main-
tenance section below should be referred to your
dealer or qualified service personnel.
Maintenance
. Be sure to switch this unit off after use, and
do not switch the unit on and off in quick suc-
cession, as this places an undue load on the
electronic components.
. To maintain the luster of the keys and buttons.
wipe with a clean, damp cloth, and polish with
a soft, dry cloth. Polish may be used, but do
not use thinners or petro-chemical-based
polishes.
. A wax-based polish may be used on the
cabinet, although you will find that rubbing with
a soft cloth will suffice.
SAVE THESE INSTRUCTIONS
Page 7
BASIC FUNCTIONS
Assembly 2
Important Safety Instructions 4
Namesandfunctions 6
Basic operating guide 8
. Setting up 8
. P\aying 9
Listen to the demonstration tunes. . . . . . . . . . . . . . . .. 10
. Demonstration performance. .. . . . . . . . . . . . . . .. 10
Piano performance 12
Selecting sounds 13
Playing automatic rhythms 14
. Listentoapresetrhythm 14
. Control the rhythm 15
Automatic accompaniment 16
. Use the AUTO PLAY CHORD 17
Options and connections 18
Symptomswhichappearto be signs of trouble. . . . .. 19
Index 21
Specifications 23
5
Page 8
Names and functions
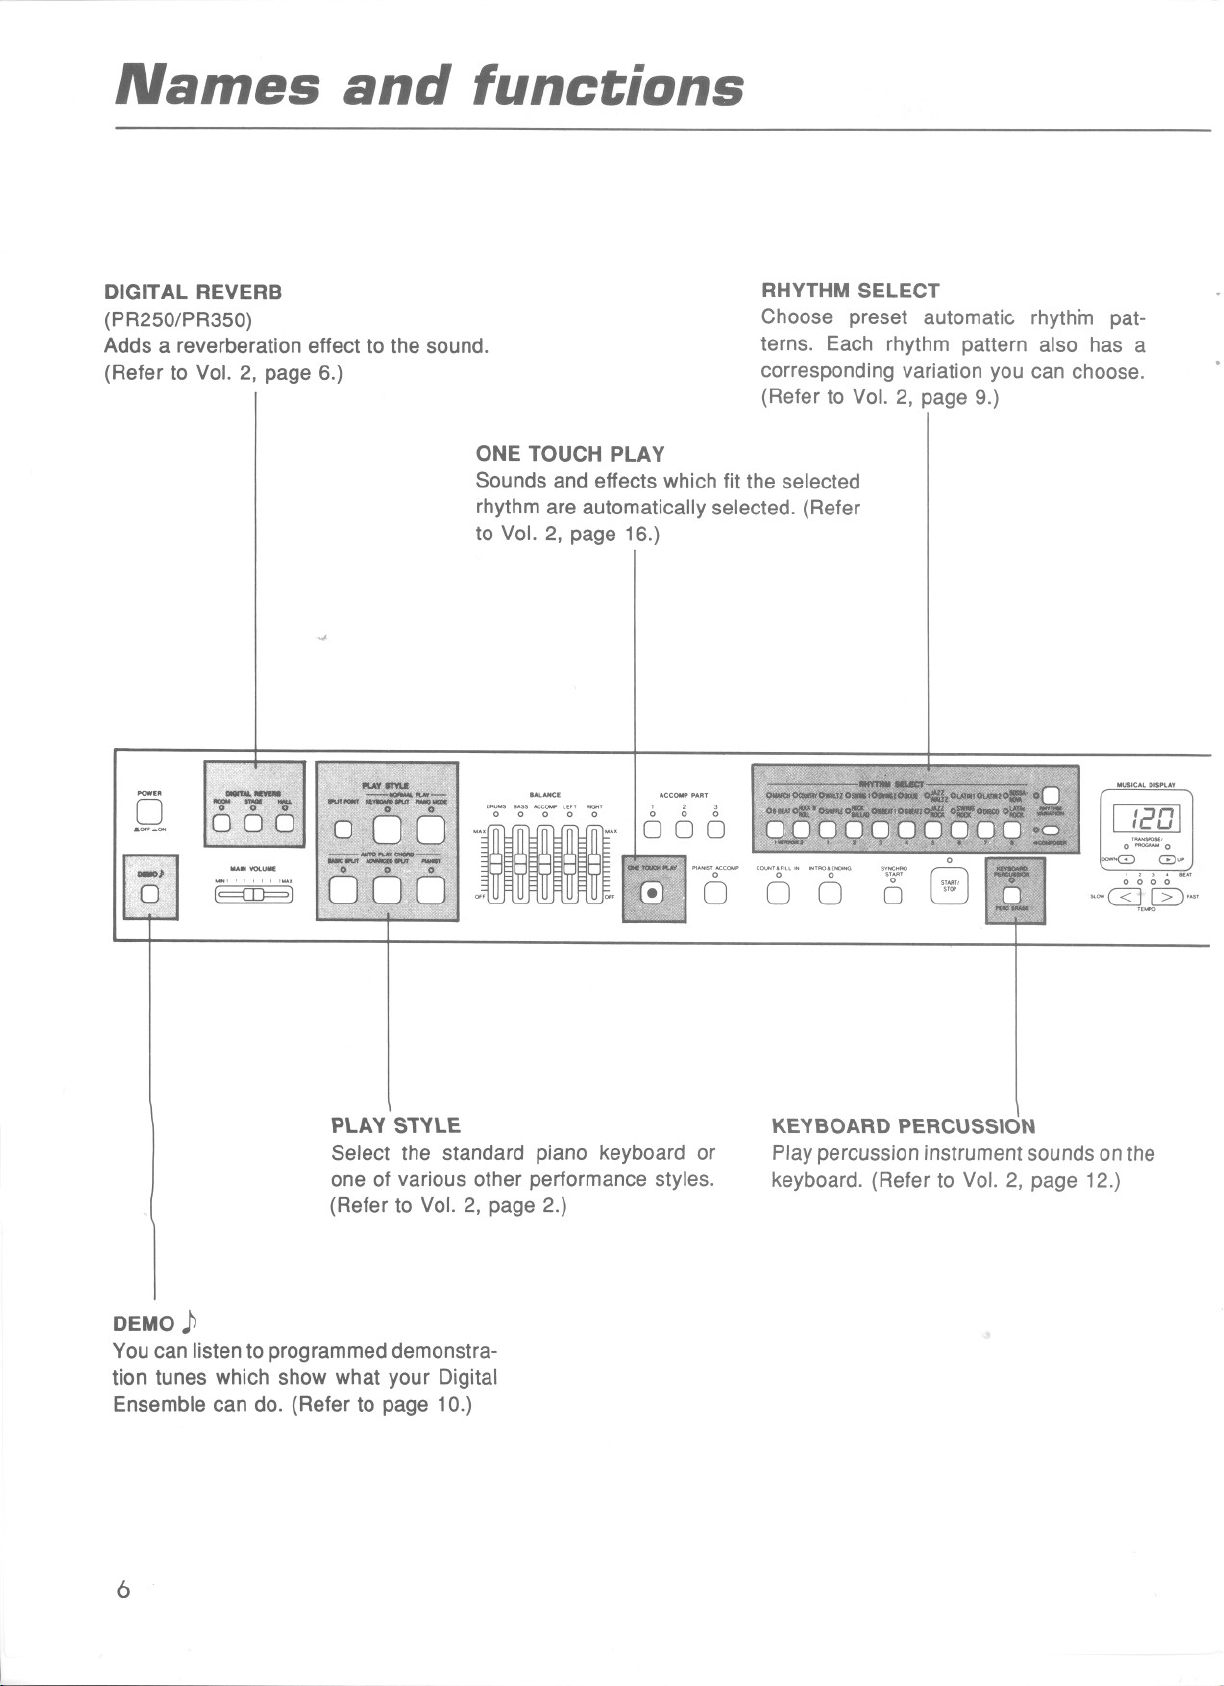
DIGITAL REVERB
(PR250/PR350)
Adds a reverberation effect to the sound.
(Refer to Vol. 2, page 6.)
...
oow..
0
&~,-~
-, ,~,
[==CIF= )
RHYTHM SELECT
Choose preset automatic rhythm pat-
terns. Each rhythm pattern also has a
corresponding variation you can choose.
(Refer to Vol. 2, page 9.)
ONE TOUCH PLAY
Sounds and effects which fit the selected
rhythm are automatically selected. (Refer
to Vol. 2, page 16.)
..SOC"DO""
1/201
0'::::='0
-0 G~
, , , , ...
0 0 0 0
.~~,~[2)""
PLAY STYLE
Select the standard piano keyboard or
one of various other performance styles.
(Refer to Vol. 2, page 2.)
DEMO J>
You can listen to programmed demonstra-
tion tunes which show what your Digital
Ensemble can do. (Refer to page 10.)
6
KEYBOARD PERCUSSION
Play percussion instrument sounds on the
keyboard. (Refer to Vol. 2, page 12.)
Page 9
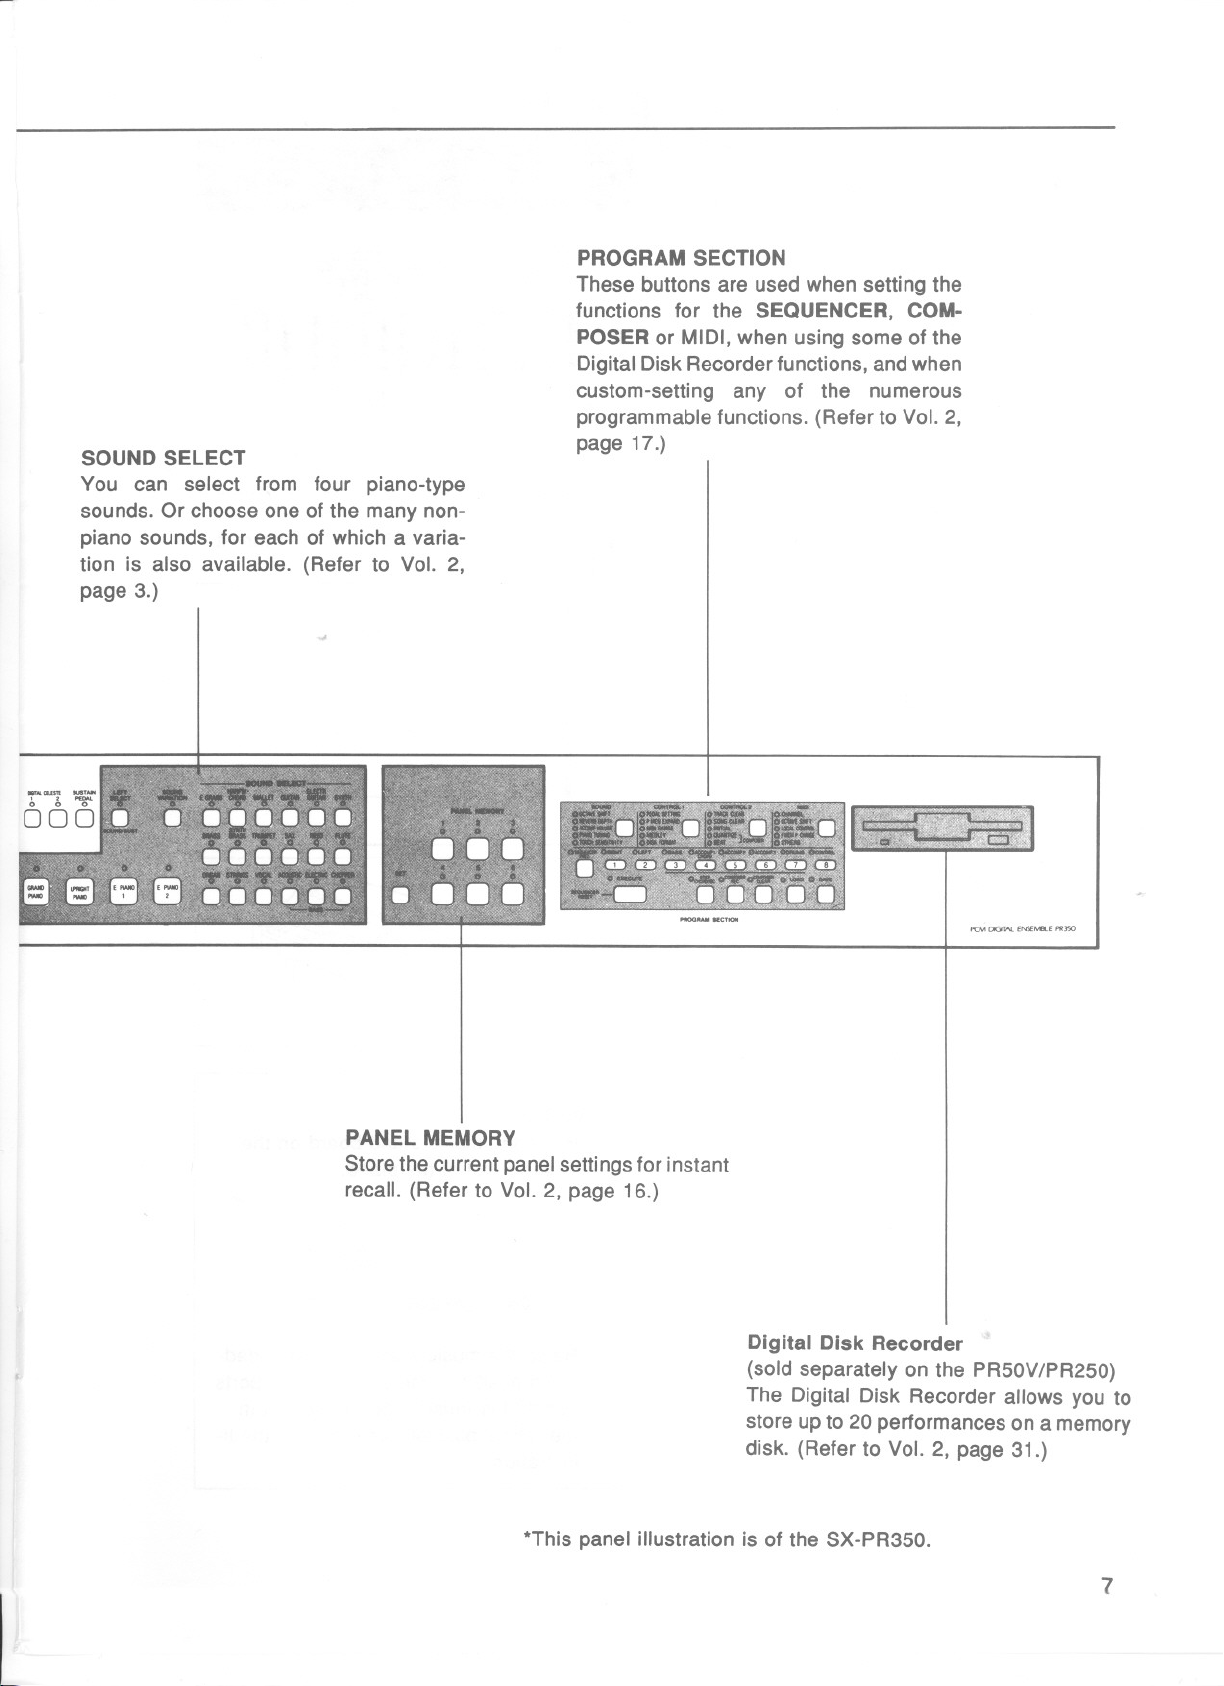
SOUND SELECT
You can select from four piano-type
sounds. Or choose one of the many non-
piano sounds, for each of which a varia-
tion is also available. (Refer to Vol. 2,
page 3.)
PROGRAM SECTION
These buttons are used when setting the
functions for the SEQUENCER, COM-
POSER or MIDI, when using some of the
Digital Disk Recorder functions, and when
custom-setting any of the numerous
programmable functions. (Refer to Vol. 2,
page 17.)
PANEL MEMORY
Store the current panel settings for instant
recall. (Refer to Vol. 2, page 16.)
PC" <>aN EN\£"'U """"
Digital Disk Recorder
(sold separately on the PR50V/PR250)
The Digital Disk Recorder allows you to
store up to 20 performances on a memory
disk. (Refer to Vol. 2, page 31.)
*This panel illustration is of the SX-PR350.
7
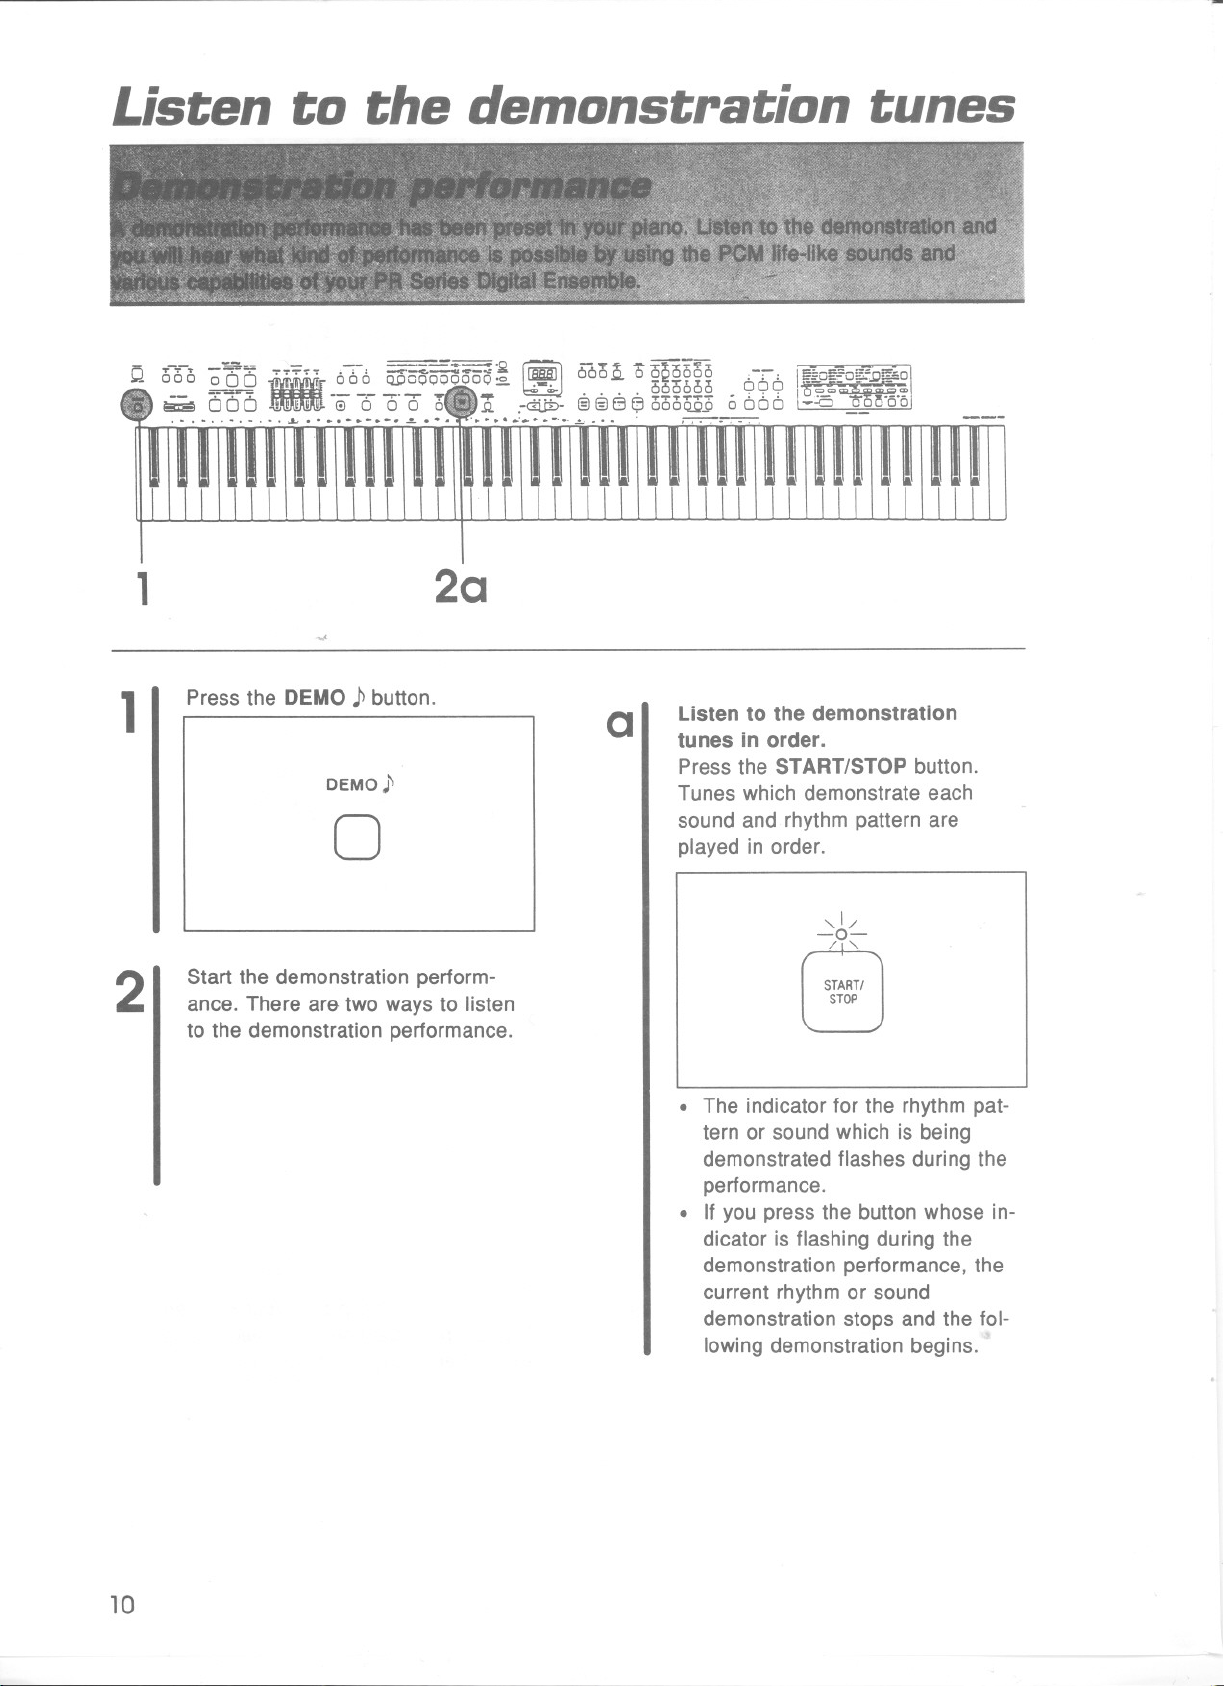
Page 10
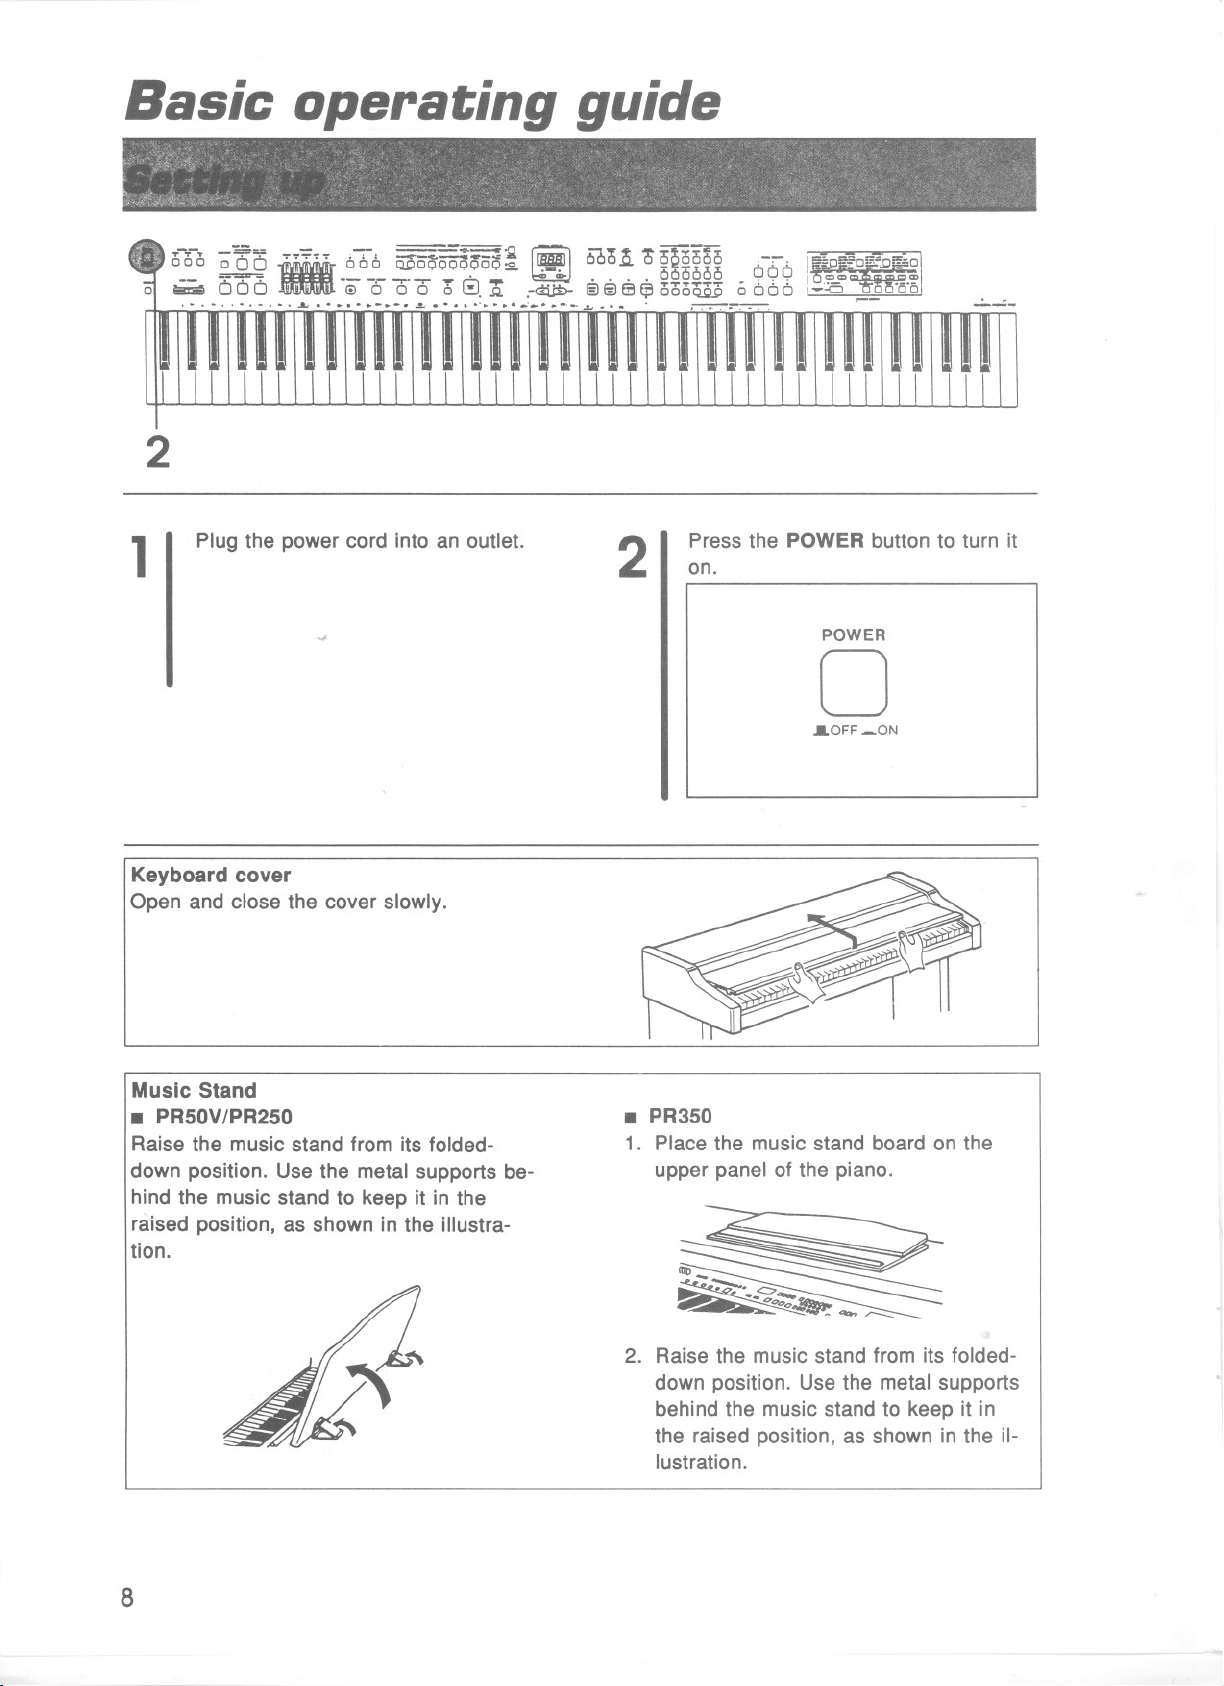
Basic operating guide
06-0 o~C5
-I - A~'" ,..6- 000000 QQQ I~
01 I!!i:&\ uuO . €I 6 0 0 0~..Q. .-G:ilD-§@Eltp oooQQ.9 a 606 ,~::a~'EiI
n-:;:-r-r 666 Q]"OQ~oo~~ ~J 060~ 09120360 ;-:: i~~o=o~~~ol
8
' Ao ,L ' ' , ~,..~~ ~
2
Plug the power cord intoan outlet.
1
-oJ
2
Press the POWERbutton to turn it
on.
POWER
0
.aOFF _ON
---
Keyboard cover
Open and close the cover slowly.
Music Stand
. PR50V/PR250
Raise the music stand from its folded-
down position. Usethe metal supports be-
hind the musicstand to keep it in the
raised position, as shown in the illustra-
tion.
. PR350
1. Place the music stand board on the
upper panel of the piano.
2. Raise the music stand from its folded-
down position. Use the metal supports
behind the music stand to keep it in
the raised position, as shown in the il-
lustration.
8
Page 11

---
. .T.. ,.. -r o
0
.~-, --: ~. ..,. "!'... , -
000 QPOOOOOOOO"" I~I -1< , ' :: ==0::'-0=:;1=0
---,--,-.~-'. -- ~ MOUDO QQQ ~
0 0 0 0 a 8,.Q. ,-ct:ti:b-@@Bt;J o6oQQ'p 0 000 I~::a ~'o
~
r=I
~ OOO~ '6'010000--
I
---
=~ -- "'= ""-
I
--
2
Play the keyboard. You hear the
1
PIA~O sound. 2
Set the MAIN VOLUME to an ap-
propriate level withthe slidingcon-
trol.
MAIN VOLUME
MIN I I I I IMAX
G
CD
»
. Yourpiano features Touch Response,
by which you controlthe volume by play-
ing the keys harder or softer.
Tuning
Unlike an acoustic piano, your PR Series
DigitalEnsemble does not need tuning
even after a longperiod of use.
9
Page 12
Listen to the detnonstration tunes
---
s;oe:o;;:.=.o"-"='OI
~
I' .... .... :".....;:: .-<;:JuuU.',j..!.J-u_uuu
I
18ftn.1
---
1
2
1
""
Press the DEMO .P button.
DEMO ~"
0
Start the demonstration perform-
ance. There are two ways to listen
to the demonstration performance.
20
0
Listen to the demonstration
tunes in order.
Pressthe START/STOPbutton.
Tuneswhich demonstrateeach
sound and rhythm patternare
played in order.
,,1/
-0-
/1'-.
START!
STOP
. The indicator for the rhythm pat-
tern or sound which is being
demonstrated flashes during the
performance.
. If you press the button whose in-
dicator is flashing during the
demonstration performance, the
current rhythm or sound
demonstration stops and the fol-
lowing demonstration begins.
10
Page 13

Q 06-6 -;;tjC5 ~ 6"6-6~ ~] 6661 (5
~ oDD -00~ .-~-
,L.-..-.-.-....
3 2b
. . . i~o~o~.DiEol
000 .~..~ I
666 :-:5' 0 '0'61
Q
b
3
Select a particular demonstrable
sound or rhythm.
Press any button whose indicator is
flashil19. The corresponding rhythm
or sound demonstration perfor-
mance will begin.
When you are finished listening to
the demonstration tunes, press the
DEMO )\ button again.
DEMO;\
0
. The other buttons and keys do not func-
tion while the demonstrationperforman-
ces are being played.
11
Page 14

Piano perforlJ1ance
0
0'
""",'I'.L.""'-'-'.1."""""_'-"-'-'~"
~
Inthe PLAYSTYLEsection, press
1
the PIANOMODEbuttonto turn it
on.
,
SPLIT POINT
0
PLAY STYLE
-NORMAL PLAY-
KEYBOARDSPLIT PIANOIMODE
660.0. 1J~2~U~ - 0-6"Q@D!56~~1
o6oQE:90000 12::0~-ol
--
0,' 0,-..
2
Play anywhere the keyboard.
3
2
o~
.The PIANO MODE indicator
lights.
.PIANO MODE is the default
selection when the instrumentis
firstturned on.
Select one of the piano sounds by
pressing the corresponding button.
. Select one of the four available
piano sounds.
~
~
0
0 0
UPRIGIIT
PIANO
(E P~ANO)
0
(E P~ANO)
Add rellerb (PR250/PR350)
Press one of the three DIGITAL
A
REVERB buttons to add the
desired reverberation effect to the
sound (ROOM, STAGE or HALL).
DIGITAL REVERB
ROOM STAGE HALL
0 0 0
000
.ROOM is the smallest amount of
reverberation.
. STAGE is the medium amount of
reverberation.
. HALL is the maximumamountof
reverberation.
. The indicator lights.
12
Page 15

Selecting sounds
- -- =-- - -- ==.n riiiil ~...+
Q 006 ~9-9 .,.~.,.~~666 Q]'ooQOO.Ooo;~ 66oQ
"5 ~ 000 '-0"-60'0 68. jl .-~-
,-,-, ,-..L",,"-'-""'-""""oo"-"',,--,-
Sounds are selected by pressing
A
the correspondingbutton in the
SOUND SELECT section.
. PR50V
SOUND SELECT-
LEFT SELECT
SOUND/$U$T
0
HARPSI-
EGRAND CHORD MALLET GUITAR FLUTE SAX
0 0 0 0 0 0
0
SOUNO
VARIATION
0
l
0
000000
BRASS TRUMPET ORGAN STRINGS ACOUSTIC ELECTRIC
0 0 0 0 0 0
000000
~BASS~
A 12
I . PR350
SOUND
VARIATION
0
0
. . .
~o===-o;;<~;"r=~oi
" . "coco '"
0 000 1-::0 "0"0 "o'o!
I
000 :- .~
SOUND SELECT
HARPSI- ELECTR
EGRANDCHORDMALLETGUITARGUITARSYNTH
0 0 0 0 0 0
000000
SYNTH
BRASS BRASS TRUMPET SAX REED FLUTE
0 0 0 0 0 0
000000
ORGAN STRINGS VOCAL ACOUSTICELECTRICCHOPPER
0 0 0 0 0 0
000000
~BASS~
.PR250 Sound variation
SOUND SELECT
SOUND
VARIATION
0
0
. When one of these sounds is selected,
the PIANO MODE indicator in the PLAY
STYLE section automatically turns off.
HARPSI- ELECTR
EGRANDCHORDMALLETGUITARGUITARSYNTH
0 0 0 0 0 0
000000
SYNTH
BRASS BRASS TRUMPET SAX REED FLUTE
0 0 0 0 0 0
000000
ORGAN STRINGS SPECIAL ACOUSTIC ELECTRIC CHOPPER
0 0 0 0 0 0
000000
~8ASS~
Each sound (except the four piano sounds)
has a variation or different voice.
Press the SOUND VARIATION but-
1
ton to turn it on and change the
nuance of the selected sound.
Press the SOUND VARIATION but-
2
ton again to return to the original
sound.
13
Page 16

Playing autotnatic rhvthtns
Q 66-0 ~~C5 ., :;:~.. 66-6
0' ~ 00 [) -e-0" o' 6 16
In the RHYTHM SELECT section,
1
select a rhytRm by pressing the but-
ton below the rhythm names. Each
button is used to select two
rhythms.
In the example below, 16 BEAT 1
is selected (the light is on). To
select SWING 2, press the button
and the light goes on for this new
rhythm pattern. To return to 16
BEAT 1 simply press the button
again.
L~"
123
6601 6600666 .-:: 1~~0~~0~j;J~01
<=1<=1<::1","..., 1 1
. . . . i5i53666 '099 '5Q-:~
<:J<:Ju y 0000...Q.Q 0000 l--CJ u 001
3
---
. '.'.'..
Stop the rhythm by pressing the
START/STOP button again.
2
OSWING2
,1/
-~ATI
,1/
-.~NG2
/1"
016BEATI
c::::>
0
/0 'n
3DPressagain '" \
Start the rhythm by pressing the
START/STOP button.
14
Page 17

Q 6-iro;30 ., :;= , 66-6 QiS'o~Q~~~~1
0 ~:7-, 0"56 -0"088 6 G. Q
~ ~ <r .,.. -r"""~'i'..
6
60.Q. 0 uQoooo -""". I=-~~o:Ej~ol
,
. . . . 666000 QQQ '~~~~~~""
§J§JG fP6C56QQ:90000 1-:0 -0-0'cra[
---
, . . .' -..
CBD
Adjust the tempo.
.....
Adjust the speed with the SLOW
A
Insert an intra pattern.
B
and FAST buttons for TEMPO.
The tempo you set is shown in the
MUSICAL DISPLAY.
MUSICAL DISPLAY
( :=lII
ILL'
""NSPOW
0 "'oc;...w 0
""""G
0 0 0 0
"OW GJ [8 'AS'
To start your performance with a
musically correct introduction,
press the INTRO & ENDING button
before starting the rhythm.
TEMI'O
I
Gup
'J 'EAT
A
Insert a fill-inpattern.
While the preset rhythm pattern is
c
playing, press the COUNT & FILL
IN button.
cou~ IIry-L IN
(5
Insert an ending pattern.
While the rhythm is playing, press
D
the INTRO & ENDING button. You
will hear an ending pattern, and
then the rhythm stops.
INTR6\&I~DING
~
INTR«.&lE~ING
(5
15
Page 18

AutolTlatic accolTlpanilTlent
She Wore A Yellow Ribbon
8 va...................................
~
~
~ .
~: :.
~
~
-
m
r
~. .~
~t~
.
G7 11.C If2.C
1f2.G7 C
~
~
~
§
,
I
16
Page 19

0 ~
.~-.
666 00'000000:£ ~ uOO ° ::2£°00 .-,: i~
_:::~~'2
-- - -6 '.;, 666600 OOO,~
~
0 . 0 6~..Q. .-ctuD- @@ EJ~ oooQQ'p 0 666 i~D ~'o
~'-"""".'.' ~.,.
I
~I ;::-:v... ""-;;::or.,.:;:""'.,. - ,
---
OE:O~.;J!E°
.
1
1
2
3
In the RHYTHM SELECT section,
...
select the MARCH rhythm.
2 1
,1/
-"'~RCH
08 BEAT
0
1N~
Press the ONE TOUCH PLAY but-
ton until the panel settings change.
. A red light will indicate the split
point. To the left of the indicator
is the accompaniment section
and to the right is the melody
section.
ONE TOUCH PLAY
(!J
~
3
4
In the PLAYSTYLE section, press
the BASIC SPLIT button to turn it
on.
. The keyboard automatically
divides into left and right playing
areas.
AUTO PLAY CHORD-
BASICpPLIT ADVANCED SPLIT PIANIST
~oo
Use your left hand to play the
chords and your right hand to play
the melody.
. Pressing a key on the left part of
the keyboard will cause the auto-
matic rhythm pattern to start play-
ing.
. Where C, G7 and F are indicated
in the musical score, you can
press the corresponding keys as
shown below.
C chord
lllirnJ
G7 chord F chord
lllW1J lllirnJ
17
Page 20

Options and connections
This page shows the many possible connections
to the piano's terminals and also the optional
accessory available for the PR50v/PR250.
(on the rear panel)
-
LINEOUT
lID/ 1!J+rb) l1:J
AUXIN
lID/ I!J+!IJ l1:J
00 00
TUNE
During an ensemble performance with other in-
struments, fine adjustments of pitch can be made
using this knob. The center position is standard
pitch (A=440 Hz). The pitch is adjustable in a
range of :f:50cents.
PEDAL IN
Connect the cord from the included stand to this
terminal.
AUX IN (input level 0.5 V, 33 kQ)
Other instruments such as a rhythm machine or
sound module can be connected to the piano so
that the sound is output from the piano. To receive
monaural sound, connect the other instrument to
the R/R+L terminal. (Do not connect the L ter-
minal.)
THRU OUT IN
MIDI
TUNE
I>~#
PEDAL
IN
~
000
PHONES ( 0 ) x 2
For silent practice, headphones may be used.
When plugged in, the speaker system is automa-
tically switched off, and sound is heard only
through the headphones.
~r~~
n..
n
MIC (PR350) (input level 7.5 mV, 10 kQ)
(under the keyboard)
I
iVOLUME
I':::
~
~@
LINE OUT (output level 1.5 V 600 Q)
By plugging into an external high-power amplifier,
the sound can be reproduced at a high volume.
Or connect a tape recorder and use them as
recording terminals. To output monaural sound,
connect the external equipment to the R/R+L ter-
minal. (Do not connect the L terminal.)
SY-FD20
Digital Disk Recorder
(optional for the PR50V/PR250)
18
The piano will accept a microphone of the uni-
directional type. This type of microphone reduces
feedback to a minimum. VOLUME balances in-
strumental or vocal sounds fed into the
microphone with the loudness of the piano.
Page 21

Symptoms which appear to be
signs of trouble
The following changes in performance may occur in the Technics Digital Ensemble but do not indicate trouble.
The buttons, keys, etc. malfunction.
No sound is produced when the keys are pressed.
1/1
Q
CII
-
Gi
"
c
as
1/1
"
C
The octave is higher or lower for some SOUND SELECT
~
sounds.
0
I/)
Only percussive instrument sounds are produced when
the keyboard is played.
The sustain does not work even when the sustain pedal
is depressed.
The sostenuto pedal (PR250/PR350) and soft pedal do
not operate properly. For example, when the soft pedal
is depressed, the rhythm starts or a fill-in is played.
The rhythm does not start.
E
.c
-
>-
.c
a:
The only rhythm produced is a hi-hat and bass drum
sound.
No sound is produced for the automatic accompaniment,
or only the sounds of some parts are produced.
Q
a:
0
:r:
0
>-
CI:
....
Q.
0
I-
:3
CI:
. Turn off the POWER button once, then turn it on again. If this
procedure is not successful, turn off the POWER button once.
Then, while pressing the three leftmost buttons in the RHYTHM
SELECT section (METRONOME 1, METRONOME 2 and 1) at
the same time, turn the POWER button on again. (Note that,
in this case, all programmable settings, functions and
memories return to their factory-preset status.)
.The MAIN VOLUME is at the minimum setting. Adjust the
volume with the MAIN VOLUME control.
. The DEMO )1 button is on, and" - - - .. is shown on the
display. Press the DEMO )1button to turn it off. The display
returns to the tempo display. (Refer to Vol. 1, page 10.)
. The BALANCE volumes are set to OFF. Use the sliding
BALANCE controls to set the volumes of the relevant parts to
appropriate levels. (Refer to Vol. 2, page 7.)
. The local control for a part performed on the keyboard is set
to off. Set the local control to on. (Refer to Vol. 2, page 43.)
. An octave change is programmed for some instrument sounds
in order to make them easy to play. This is not a malfunction.
. The KEYBOARD PERCUSSION button is on. Turn it off to
return the keyboard to the normal sound.
.When the SUSTAIN PEDAL button is off, the sustain does not
work even when the pedal is depressed. Turn on the SUSTAIN
PEDAL button. (Refer to Vol. 2, page 5.)
. Different functions can be programmed in these pedals. You
can return the pedals to their original functions by turning off
the instrument once, or by using the PEDAL SETTING mode.
(Refer to Vol. 2, page 39.)
.The DRUMS volume in the BALANCE section is set to OFF.
Use the sliding BALANCE control to set the DRUMS volume
to an appropriate level. (Refer to Vol. 2, page 10.)
. In the RHYTHM SELECT section, a COMPOSER number
button with no stored performance was selected. Change the
rhythm or store a new rhythm pattern in the COMPOSER.
(Refer to Vol. 2, page 26.)
.When a SEQUENCER part button (in the PROGRAM SEC-
TION) is on, the rhythm will not start unless the rhythm has
been stored. Turn off the SEQUENCER part buttons.
. The MIDI clock is set to the external clock. Set the MIDI clock
to the internal clock. (Refer to Vol. 2, page 45.)
. This is the rhythm sound produced when the KEYBOARD
PERCUSSION button is on. When the KEYBOARD PERCUS-
SION button is turned off, the rhythm returns to normal.
. The BALANCE volumes are set to OFF. Use the sliding
BALANCE controls to set the volumes of the relevant parts to
appropriate levels. (Refer to Vol. 2, page 15.)
. An ACCOMP part does not sound if its corresponding AC-
COMP PART 1,2 or 3 button isoff. Press the desired ACCOMP
PART 1, 2 and 3 buttons to turn them on. (Refer to Vol. 2,
page 15.)
.An ACCOMP part does not sound if its volume is set to O.The
volume of each ACCOMP part can be adjusted independently.
(Refer to Vol. 2, page 38.)
19
Page 22

Storage is not possible.
. The remaining storage capacity of the SEQUENCER memory
is O. Use the TRACK CLEAR or SONG CLEAR function to
erase the memory. (Refer to Vol. 2, page 25.)
. The MIDI EXT SEQ MODE is set to on. Set it to off. (Refer to
Vol. 2, page 47.)
Multi-track storage is not possible.
a: button has not been pressed. A flashing track indicator shows
w
CJ
Z
w
:;)
a
w
rn
A previously stored song is played back.
Storage is not possible.
The playback timing of.lhe rhythm pattern is different from
the timing with which it was stored.
a:
w
rn
Setting the time signature is not possible.
0
:E
0
CJ
When editing a preset rhythm, the drums sound is not
erased even when the PERC ERASE button is pressed.
The Digital Disk Recorder produces a noise during record-
0'
... It)
ing or playback.
III N
'0 a:
...
When the operation to load from a memory disk is per-
0 :>
formed, the contents of the SEQUENCER are erased.
(,) 0
III It)
a: a:
.J1t.
.!! ...
Q 0
-
iii -
-III
- c
.21 0
Q 'i
.2.
Noise from a radio or TV can be heard. .This sometimes occurs when electrical equipment such as a
...
III
s:.
0
The cabinet becomes warm during use.
.The playback track has been selected, but the START/STOP
the track which is ready for recording, and a lit track indicator
shows a track which is ready for playback. To record one track
while
listening
START/STOP button to begin playback. (Refer to Vol. 2, page
23.)
to
another (playback) track,
press
. The tracks of a song which was previously stored have not
been cleared. Use the TRACK CLEAR or SONG CLEAR
function to erase the memory before recording a new song.
(Refer to Vol. 2, page 25.)
.The remaining storage capacity of the COMPOSER memory
is O. Erase a COMPOSER number button in the RHYTHM
SELECT section in which a pattern is stored. (Refer to Vol. 2,
page 26.)
.The QUANTIZE function was on when the pattern was
recorded. (The default setting is" 1 6 ".) Set the QUANTIZE
function to " 0 F F n. (Refer to Vol. 2, page 27.)
. The time signature cannot be changed for a pattern which is
currently stored in the COMPOSER. When storing in the COM-
POSER and" ALL" appears on the display, press the
COMPOSER CLEAR button to erase the previously stored
rhythm pattern. (Refer to Vol. 2, page 26.)
. Some of the drums sounds of preset rhythm patterns cannot
be erased. Follow the COMPOSER CLEAR procedure. (Refer
to Vol. 2, page 26.)
. This occurs when the Digital Disk Recorder is reading a disk.
It does not indicate a problem.
. When performing the load operation from a memory disk, the
SEQUENCER memory changes to that of the data loaded from
the memory disk. If you wish to preserve a song which is stored
in the SEQUENCER memory, save it in a memory disk before
performing the load procedure. (Refer to Vol. 2, page 33.)
radio or TV is used near the piano. Try moving such electrical
equipment further away from the piano.
. The sound may be coming from a nearby broadcast station or
amateur radio station. If the sound is bothersome, consult your
dealer or servicenter.
. This piano has a built-in power source that heats the cabinet
to some degree. This is not an indication of trouble.
the
20
Page 23

Index
A
ACCOMPPART 2-15
ACCOMP VOLUME See Function-settingmodes
AdvancedSplit 2-14
APC button (MIDI OUT) See MIDI
Assembly 1-2
AUTO PLAY CHORD. . . . . . . .. .. . . . 1-16-17,2-2,13-15
B
BALANCE 2-7,10,12
BASIC SPLIT 1-17,2-13
BEAT indicators 2-11
BEAT, CONTROL 2 SeeCOMPOSER
c
CHANNEL See MIDI
Chord progression, storing a SeeSEQUENCER
COMPOSER ..2-26-30
ACCOMP part, storing 2-29
BASSpart,storing ~ 2-29
BEAT 2-26
COMPOSER CLEAR .2-26,29
DRUMS part, storing 2-28
Editing a preset rhythm pattern. . . . . . . . . . . . . . . . .2-30
EXECUTE 2-32
Memorycapacity 2-27
Part-by-part,recording. . . . . . . . . . . . . . . . . . . . .2-28-30
PERCERASE ' 2-28
Playback 2-30
QUANTIZE 2-27
Storage capacity 2-27
Timesignature 2-26
COMPOSER button SeeCOMPOSER
COMPOSER CLEAR See COMPOSER
Connections 1-18
COUNT & FILL IN 1-15,2-11-12
D
Defaultsettings 2-4
DEMO)\button 1-6,10
Demonstration performance. . . . . .. . . . . . . . . .. . . . . .1-10
DIGITALCELESTE1,2 2-5
Digital Disk Recorder 1-6,2-31-35
Copy-protecteddisks .2-35
Diskformat 2-32
Errordisplay 2-35
EXECUTE 2-33-34
Floppy disks 2-32
Handling a memory disk 2-34
Installing (PR50V/PR250) .2-31
Loading 2-33
Medleyplay 2-34
Memory disks 2-32
Parts 2-32
Saving 2-33
Writeprotectwindow 2-32
DIGITAL REVERB (PR250/PR350) 1-6,12,2-6,37
DISK FORMAT See Digital Disk Recorder
DRUMS button (MIDI OUT) See MIDI
E
Eftect 2-5
End key See SEQUENCER
Error display See Digital Disk Recorder
EXECUTE SeeDigital Disk Recorder
EXT SEQ MODE button See MIDI
External memory See Digital Disk Recorder
F
Fingered chords, BASIC SPLIT mode. . . . . . . . . . . . . .2-14
Floppydisks See Digital Disk Recorder
Function-settingmodes. .. . . . . . . . . . . . . . . . . . . .2-36-40
ACCOMPVOLUME 2-38
Ca\'\ce\tnemode 2-36
CONTROL1 2-36
CONTROL2 2-36
INITIAL 2-40
MINRANGE 2-40
OCTAVESHIFT 2-37
P.MEMEXPAND 2-39
PEDAL SETTING 2-39
PIANO TUNING 2-38
REVERB DEPTH (PR250/PR350) 2-37
SOUND mode 2-36
Summary of settings and functions. . . . . . . . . . . . . .2-36
TOUCH SENSITIVITY 2-38
INITIAL See Function-setting modes
INPUT MODE buttons SeeMIDI
INTRO&ENDING 2-11-12
K
KEYBOARDPERCUSSION ..... ..... ...1-6,2-12
KEYBOARDSPLlT 2-2,7
L
LEFTSELECT 2-7
LOCAL CONTROL See MIDI
M
MAINVOLUME 1-9
MEDLEY See Digital Disk Recorder
Memory disks See Digital Disk Recorder
METRONOME 2-9
MIDI 2-41-47
APC(MIDIOUT) 2-47
Channel 2-42
Connection examples 2-41
Datawhich can be transmitted/received. . . . . . . . . .2-42
DRUMS(MIDIOUT) 2-47
EXTSEQMODE 2-47
INPUTMODE 2-46
LOCAL CONTROL 2-43
MIDI button 2-42
MIDI CLOCK 2-45
MIDI Implementation Chart 2-48
MIDILOAD 2-45
MIDIOUT 2-47
NORMAL (INPUT MODE) 2-46
21
Page 24

NORMAL (P-CHANGE MODE) .2-46
NOTEONLY 2-47
OCTAVESHIFT .2-43
OTHERS 2-44-47
P-CHANGEMODE 2-46
P.MEMP-CHANGE 2-44
SINGLE (INPUT MODE) .2-46
SONGSELECT 2-45
START/STOP 2-44
Start/stop data 2-44
Stickers 2-41
TEC1 (P-CHANGEMODE) 2-46
TEC2(P-CHANGEMODE) .2-46
Terminals 2-41
TRANSPOSE (MIDI OUT) 2-47
MIDI CLOCK button See MIDI
MIDI LOAD button See MIDI
MIDI OUT buttons See MIDI
MIN RANGE See Function-setting modes
Mixingtwosounds 2-6
Volume balance 2-6
N
Namesandfunctions 1-6
NORMAL button (INPUT MODE) See MIDI
NORMAL button (P-CHANGE..MODE) See MIDI
NORMALPLAY 2-2
Note keys SeeSEQUENCER
NOTE ONLY button See MIDI
0
OCTAVE SHIFT See Function-setting modes
OCTAVE SHIFT (MIDI) See MIDI'
ONETOUCHPLAY 1-6,17,2-16
One-finger chords, BASIC SPLIT mode. . . . . . . . . . . . .2-14
Optionsandconnections .1-18
P
P-CHANGE MODE buttons See MIDI
P. MEM EXPAND See Function-settingmodes
P. MEM P-CHANGE See MIDI
PANELMEMORY 1-6,2-16
PEDAL SETTING See Function-setting modes
Pedals 2-5
PERC ERASE See COMPOSER
PIANIST 2-15
PIANISTACCOMP 2-15
PIANO MODE 1-12,2-2,4
PIANOTUNING See Function-setting modes
PLAY STYLE .1-6,12,17,2-2
PROGR.AMSECTION 1-6,2-17
Q
QUANTIZE See COMPOSER
S
Safetyinstructions 1-4
SEQUENCER .2-17-25
Chord progression, playback. . . . . . . . . . . . . . . . . . .2-19
Chord progression,storing. . . . . . . .. . . . . . . . . .2-17-18
COUNT, storing 2-19
ENDING,storing .2-20
Erasingthe recorded performance. . . . . . . . . . . . . . .2-25
Exampleofstoring 2-20,22
FILLIN,storing 2-2Q
INTRO,storing 2-19
Memorycapacity 2-25
Note keys 2-17
PANEL MEMORY changes, storing. . . . . . . . . . . . . .2-20
Part-by-part,storing. . . . . . . . . . . . . . . . . . . . . . .2-23-24
Parts 2-21
Performance,storing 2-21
Playback 2-25
PROGRAM SECTION 2-17
Rhythmchanges, storing 2-19
SEQUENCER RESET 2-25
SONG CLEAR 2-25
STEP CHORD REC 2-18
Storagecapacity 2-25
TRACKCLEAR 2-25
SEQUENCER RESET SeeSEQUENCER
Setting the functions See Function-settingmodes
Setting up 1-8
SINGLE button (INPUT MODE) See MIDI
Softpedal 2-5,39
SONG CLEAR SeeSEQUENCER
SONG SELECT button SeeMIDI
Sostenuto pedal (PR250/PR350) .2-5, 39
SOUNDSELECT 1-6,13,2-3
SOUNDVARIATION .1-13,2-4
Specifications 1-23
SPLIT POINT button 2-7
START/STOP See MIDI
Stickers See MIDI
Sustainpedal 2-5,7
SYNCHROSTART 2-10
T
TEC 1 button See MIDI
TEC 2 button SeeMIDI
TEMPO 1-15,2-11
Time signature See COMPOSER
TouchResponse 1-9
TOUCH SENSITIVITY SeeFunction-setting modes
TRACK CLEAR See SEQUENCER
TRANSPOSE 2-8
TRANSPOSE button (MIDI OUT) See MIDI
TRANSPOSE/PROGRAM 2-6
Troubleshooting 1-19
Tuning 1-9
R
Repeat key See SEQUENCER
Reset key See SEQUENCER
REVERB DEPTH (PR250/PR350)
See Function-setting modes
Rhythmpattem, editing See COMPOSER
RHYTHMSELECT .1-6,17,2-9
RHYTHMVARIATION.. . .. .. .. .. .. .. .. .. . . . .. .. .2-9
22
v
Volume SeeBALANCE
Page 25

Specifications
23
Page 26

r
MEMO
~
Page 27

Technics
.......
0
.~-~
0
t
0 ,
E
I=(D=I
N
G
S E
,
T A L
M 8 L E
..
PU' ITYU!
-_M-
~,,-, ~-~. -~
000
-~ro...~-
-~. ~~. -
0 0 0
000
" ,
,. ,
0 0
"";" ";;"7 ':;' ~ ,; ~ ~ 0 0~'0"""0:,,,,0""'0""'0:i: o~o... o:.:r: =;::.,
-..
~ ~
~ ~(!) (] (]6 (] L:jHo
~
~ ". 0 ", II' 0' II' o. II" 0- ~ ~ <:> "9 ~ ~, 0'- ~- 0" ~, a
""cow.." o o""",o.~"o_,o_,o...0~\10"T.'0","10::'00
-. 000 000000000000
@i~:;" ~,:_':'. ~~'-::f ).~"
_~M "-,~- ~"'". .;~.~ - 0 ~,~~
@ ( -- _.~ -- "-.~(0 ...-
IOtYtMII IELKT
120]
0'='0
CD~
1 (D
, , , . ...
0 0 0 0
.~@~[8'M'
~: ..," (), ()" ...' "
Page 28

~.."'" ~,- ""
1, b "g" ~\!"
OOO_Q~,
§)~E)E1
_0 me<"
"-,,.. ,..., """" ~, ""'" .".. ",,"
6 606666
0
0
0
-SOUND "LECT-
"'" ""'~, '" ,.., Run
666666
"""" ""'" oc"""" """'"
0 0 0 0 0 0
OOOQQ~
0
"N" ME""
, 2 3
0 0 0
000
. , ,
0 0 0
000
,sx-PR250
o~oT'd1tF.' 0 ,"" 0-
00000
00." ~.." mm
b.~'i: ~~ ~~"
'~'~EG""""""""""'GU""""""'"
000 ~Q"
0
§)~E)E1
-SOUND "LECT-
6 666666
0
",,"
"'" "'" "".",'" ~" R'"
0 0 0 0 0 0
000000
"",,., """ "'". """""
0 0 0 0 0 0
0 0 0 QQJ:J
0
"'" .'.0",
, 2 3
0 0 0
000
. , ,
0 0 0
000
':::,,~"-D
.sx-PR350
~~!
O,a'.. oT'o'\\'\W 0 ,"" 0 -.
00000
@ and @ are the includedthe Midi stickers.
QQCGOO66A
Page 29

Technics
0 , G , T A L
E
N S E M 8 L E
"0"" ...,... ",VI.. -,,-
0
,,-
.....
0
"(i"'
000
....""".
-""" ,
(=CD=]
"
,,, "'-" "
000..
o2J [] , ,
" EO. . " " .. . 8b . J!L, ..' Q
Pl.AVIVY..
0 0
"" , CO" ,
.cc"",, ..."
, , 3
0 0 0
000
"'-'O~'~
@
..' e, Q, e- Q- e" Q" il'
0 0
O~""O""'.OW""O"~~~~'~~'~o::.iho"""o"""o:r 00
00&"0:::;"o"""o:Z~o""'o""'oi:i~ O~::'O",$COo~ .::;'~,':I!.
0 0 0 0 0 0 0 0 0 0 00
,.,-. , . , . , . , .
@
~'g'U'" .,~O-
@I~'~
~" ~_. -:::~~' ':;:
,,~
'0'
0
~ $ '9-'1
0
O,O"O"O"O'~f"." l}'l}""""
120]
0'='0
~-~ ~~
0 0 0 0
.~@ [8'~'
0 ,,-
-..
0
""AL",vm
~ "(i" ~'
000
~
0
-
-""" ,~.
[=CD=)
Pl.AV ImE
--~""-
~,,~, "._~" ~~~
0 0
000
-~,,~,,~~
~~" ~O~" "~"
0 0 0
000
EO
,.," J!L,
~~, "" ~,~ CO" ~,
0 0 0 0 0
Jill
.co<"'" ,
, , 3
0 0 0
000
@
..' Q
..' e, Q' e- Q- e" Q" il'
0."'"0""'.0.""0'.."0,...'0°"" o~~\,o""..o"""o:r oQ
o. &" 0:::;' 0,,"'" °:z~ 0"'" 0"'" o~~~ o~::' 0",$COo~: .:::::,':I!.
0000000000 00
@i ':::' ~,,'~..:. ~',:;:')
"'".'O~'~ "~'g"'. .,~O-
0 0 0
@ ~ ~.""
RHYTHM SELICT
'~~:O 0 .:,,~~
6 L::J 6
.""- 10 ~~ '"~
$ '9 -'I O,O"O"O"O,~",," "l}'l}"""
~
120]
0'='0
~-~ ~~
, , , . ...
0 0 0 0
.~@ [8..
0 ,,-
Page 30

.sx-PRSOV
oW
~'" .,,'" ~,-
" b '"g"
000
0 0
§~8E1
~_IEUCT~
eo..", = """ ..,.. "'" '"
000000,
T'T'T"~~«"'b'"
OOOOQJJ
0
"".."" ""'"'
-1)"'" ..~"..
0 0
0
ME""'"
, , 3
0 0 0
000
PC" CIOOAl"""'MI.f ""'"
@ and @ are the included the Midi stickers.
Page 31

SoundVariationPR50V
SOUND
SELECT
E. GRAND E. GRAND
HARPSI- HARPSI-
CHORD CHORD
MALLET
GUITAR
FLUTE FLUTE
SAX TENOR SAX CLARINET
BRASS RASS TROMBONE
VIBRAPHONE GLOCKEN
ACOUSTIC
GUITAR
SoundVapiation
SOUND
SELECT
VARIATION
Off On
SYNTH PIANO
SYNTH CLAVI
JAZZ GUITAR
PAN FLUTE
PR!50
VARIATION
Off
On
SOUND
SELECT
TRUMPET TRUMPET SYNTH BRASS
ORGAN JAZZ ORGAN PIPE ORGAN
STRINGS STRINGS
ACOUSTIC ACOUSTIC
BASS BASS BASS
ELECTRIC
BASS BASS BASS
SOUND
SELECT
ELECTRIC
VARIATION
Off On
SLOW ATTACK
STRINGS
SYNTH PLUCK
CHOPPER
VARIATION
Off On
E. GRAND E. GRAND SYNTH PIANO
HARPSI- HARPSI-
CHORD CHORD
MALLET
GUITAR
ELECTR
GUITAR
SYNTH
BRASS BRASS TROMBONE
SYNTH SYNTH SYNTH
BRASS BRASS 1 BRASS 2
TRUMPET TRUMPET
SAX
VIBRAPHONE GLOCKEN
ACOUSTIC
GUITAR
JAZZ GUITAR SOLID GUITAR
PLUCKED BOTTLE
SYNTH
TENOR SAX ALTO SAX
SYNTH CLAVI
HARP
MARIMBA
FRUGELHORN
REED
FLUTE FLUTE PAN FLUTE
ORGAN JALZ ORGAN PIPE ORGAN
STRINGS STRINGS
SPECIAL
ACOUSTIC ACOUSTIC SYNTH PLUCK
BASS BASS BASS
ELECTRIC
BASS BASS 1 BASS 2
CHOPPER CHOPPER
BASS
CLARINET ACCORDION
SLOW ATTACK
STRINGS
SYNTH SYNTH
VOCAL 1
ELECTRIC ELECTRIC
BASS
VOCAL 2
SYNTH
CHOPPER
BASS
Page 32

KeyboardPercussion
Press the KEYBOARD PERCUSSION button on to
turn your keyboard into a whole band of percussive
instruments and other special sounds.
<Percussive Keyboard>
BASS ELECTRIC ELECTRICTOM HIHAT CLASH
DRUMSNAREDRUM LOW MID HIGH CLOSE CYMBAL
II I I I I r--I I
: ID.~fiii' 0 fiii' elL OL elM OM eI" 0" liT ,<:::>, ~ '9 A
Technics
-L-J
SNARE DRUM
1 2
1
TOM
LOWMIDHIGH
I
RIM
SHOT
I I I I I L-J
HIHAT RIDE CONGA TIMBALES
OPENCYMBALLOWHIGH CLASH LOW HIGH
. The KEYBOARD PERCUSSION sounds indicated above arethose which are available for ROCK-style preset
rhythms(seeDRUMKITbelow).Someofthe soundsaredifferentwhena STANDARD-or ELECTRIC-style
rhythmhasbeenselected.
DrumKit
RHYTHM
SELECT
MARCH S
COUNTRY
WALTZ
SWING 1
SWING 2
DIXIE S S
JAll. WALTZ
LATIN 1
LATIN 2 R
BOSSA NOVA
VARIATION
OFF ON
S
S S
S S
S S
S S
S R
S S
RHYTHM
SELECT
S
S
S
8 BEAT R
ROCK'N'ROLL R
SHUFFLE R S
ROCK BALLAD
16 BEAT 1
16 BEAT 2 R R
JAll. ROCK R R
SWING ROCK R S
DISCO E E
LATIN ROCK R R
VARIATION
OFF
R R
R R
ON
E
R
S: STANDARD, R: ROCK, E: ELECTRIC
aQCGOO68A
Page 33

-
sx-PR50Wsx-PR250/sx-PR350
OneTouchPlay
RHYTHM
SELECT
MARCH
COUNTRY
WALTZ
SWING 1
SWING 2
DIXIE
VARIA-
TION
off
on TRADITIONAL POLKA
off COUNTRY
on BLUE GRASS
off VIENNA WALTZ
on ENGLISH WALTZ
off
on
off
on SWING MODERN
off DIXIE
on
MUSIC STYLE
U.S. MARCH 2/4
BIG BAND (SLOW)
BIG BAND (FAST)
COMBO (SLOW)
QUICK STEP
RHYTHM
SELECT
8 BEAT
ROCK'N'ROLL
SHUFFLE
ROCK BALLAD
16 BEAT 1
16 BEAT 2
VARIA-
TION
off
on 8 POP
off
on
off SHUFFLE ROCK
on BOOGIE BOOGIE
off BALLAD AMORE
on BALLAD COUNTRY
off 16 POP
on 16 SLOW
off 16 BALLAD
on
MUSIC STYLE
STRAIGHT 8
U.S.ROCK
8 BALLAD
FUNK
JAZZ WALTZ
LATIN 1
LATIN 2
BOSSA NOVA
off
on
off
on
off SAMBA RIO
on
off BOSSA TIPICO
on BOSSA DOLCE
JAZZ WALTZ (FAST)
JAZZ WALTZ (SLOW)
RHUMBA
CHA CHA
ARGENTINE TANGO
JAZZ ROCK
SWING ROCK
DISCO
LATIN ROCK
off
on SOUL ROCK
off 80' SWING
on
off DISCO SIMPLE
on TECHNO POP
off SAMBA ROCK
on CARIBIAN MOOD
JAZZ ROCK
SWING COMBO
Page 34

SoundVariationPR350
SOUND
SELECT
E. GRAND E. GRAND SYNTH PIANO
HARPS1- HARPS1-
CHORD CHORD
MALLET
GUITAR
ELECTR
GUITAR
SYNTH
BRASS BRASS
SYNTH
BRASS BRASS 1 BRASS2
TRUMPET TRUMPET FRUGEL HORN
VIBRAPHONE GLacKEN
ACOUSTIC
GUITAR
JAZZ GUITAR SOLID GUITAR
PLUCKED BOTTLE
SYNTH
SYNTH SYNTH
VARIATION
Off On
SYNTH CLAVI
HARP
'"
MARIMBA
TROMBONE
SOUND
SELECT
SAX TENOR SAX ALTO SAX
REED CLARINET
FLUTE FLUTE PAN FLUTE
ORGAN JAZZ ORGAN PIPE ORGAN
STRINGS STRINGS
VOCAL VOCAL SYNTH VOCAL
ACOUSTIC ACOUSTIC SYNTH PLUCK
BASS BASS
ELECTRIC ELECTRIC ELECTRIC
BASS BASS 1 BASS 2
CHOPPER CHOPPER
BASS BASS
VARIATION
Off On
ACCORDION
SLOW ATTACK
STRINGS
BASS
SYNTH
CHOPPER
BASS
Page 35

Diagram of One-Finger Chord Positions
c
DP
C#
D
E
D#
E
Major
c
llIII!IillII
II!ll!llffiI
I!!Ill!IIDI
ll!ImIIfu
I!III!!illrI
][
Cm
DPm
C#m
Dm
EPm
D#m
Em
Minor
C
][
llIII!IillII
DP
llIIllIIIIII
IIIII!IIIDI
D
EP
llIIllIIIIII
E
llII!IIillJI
C7
DP7
C#7
D7
EP7
D#7
E7
7th
I!IIllWll
DP
llIII!IillII
IllI!llJ1m
II!I!!mfu
IllII!!IOO
][
Cm7
DPm7
C#m7
Dm7
EPm7
D#m7
Em7
Minor7th
C
llIIllmIII
Db
llIII!IillII
D
IIII!!mm
Eb
IllIllIIIDI
E
I!!I!llImI
F
F#
GP
G
AP
G#
A
BP
A#
F
rnmmm
G
IIIImIllJI
AP
llIIllIIIIII
Fm
F#m
GPm
Gm
APm
G#m
Am
BPm
A#m
F
rnmmm
F
llIIllIIIIII
G
IIIImIllJI
AP
llIIllIIIIII
A
llIlll!IllJI
BP
llIIllIIIIII
F7
F#7
GP7
G7
AP 7
G# 7
A7
BP7
A 7
F
rnmIIIIII
F
IllII!!illJI
G
IIllH!IffiI
AP
IIIImIllJI
A
rnmmm
BP
llIlll!IllJI
Fm7
GPm7
F#m7
Gm7
AP m7
G#m7
Am7
BPm7
A#m7
F
rnmIIIIII
GP
IImllI!JJI
G
IIllH!IffiI
AP
IIIImIllJI
A
rnmmm
Bb
llIlll!IllJI
B
1I!IIRIllII
B
Bm
B
mrmmII
B7
1I!IIRIllII
B
Bm7
rmmmI!
B
Page 36

Diagram of Fingered Chord Positions
Major
c
IImmmI
D=C#
IIIIIffiffi!
D
IHImIIDI
E"=D#
IIIImllIII
E
IIIImIllJI
F
][ ] [
Minor 7th
Cm
IHIm1IDI
Dm=C#m
Illill!illJI
Dm
IIIImIIDI
Em=D#m
IllII!llIDI
Em
II!lmillI!
Fm
C7
llIImJBII
D 7=C #7
I!!I!llJllII
D7
I!IImJW
Eh=D#
IIIIJIDHII
IIIImllm
7
E7
F7
][
Minor 7th Minor 7th ~5
IHIm1IDI
D m7=C m7
IIIImIllJI
IIIIllImJI
E" m7=D# m7
IllII!llIDI
I!IImllm
Cm7
Dm7
Em?
Fm7
I [
IIIImmJI
D" m7=Cm7
II!lmillI!
IIIIIHmII
,,(5) #(5)
E m7=D m7
IIIImillII
IIIImImI
(5)
Cm7
(5) (5)
(5)
Dm7
(5)
Em7
(5)
Fm7
IIIImIHII
F#=G"
IllII!llIDI
G
IIIImmII
A"=G#
IIIImmJI
A
IIIImJII!
B"=A#
mmmrn
IIIillIJIDI
F# m=G" m
IIIImillII
Gm
rmmrmI
A"rn=G#m
IIIIHmIII
Am
II!llIDllII
B"m=A#m
IIIImImI
IIIImIHII
F#7=G"7
I!IIllllRII
G7
lIIIJHIIDI
A" 7=G# 7
IIIillIIHII
A7
IIIImmJI
Bh=A# 7
llIIIHImI
IIIillIJIDI
F# m7=G" m7
IIIImJII!
Gm7
IJIImllll!
A" m7=G #m7
IIIIHmIII
Am7
II!JI!illJI
B m7=A m7
IIIImImI
I!!I!llJllII
#(5) (5)
F m7=G m7
IIIImJRII
(5)
Gm7
InImIm!
(5) #(5)
A m7=G m7
IJIImll!II
(5)
Am7
IIIImillJI
(5) (5)
B m7=A m7
I!IIllllRII
B
IIIIHmIII
Bm
JJIIHIDm
B7
IJIImJ!llI
Bm7
IIIImImI
(5)
Bm7
I!IllRIID!
Page 37

Major 7th
I[
Augmented
Diminished 7th
][
]17thSuspended 4th II Minor Major 7th I
Cmaj7
II!llRIRII
D maj7=C maj7
llIIll!illJI
Dmaj7
rnrmmII
E maj7=D maj7
rnrnmm
Emaj7
JJ!IHI[R[I
Fmaj7
Caug
mmmm
D aug=C aug
IIDmI!III
Daug
rmnmm
E aug=D# aug
IIDmJllII
Eaug
rnmmm
Faug
IIDmI!III
Cdim7
mmrnm
D dim7=C#dim7
mmmm
Ddim7
mmmm
E dim7=Ddim7
rnmmm
Edim7
rmmmII
Fdim7
C7SUS4
IIIImImI
D 7SUS4=C 7SUS4
llIllRIIDI
D7SUS4
mmnmI
E 7SUS4=D 7SUS4
llIIllllIDI
E7SUS4
IIIImJYJI
F7SUS4
Cm maj7
IImmmI
D m maj7=C#m maj7
IIIImImI
Dm maj7
IJ!JJIDmI
E m maj7=D #m maj7
IllImJIDI
Em maj7
mImmII
Fm maj7
IIIImJmI
F maj7=G maj7
InImlllJI
Gmaj7
rnmmm
A maj7=G#maj7
mmmm
Amaj7
rnmmm
B maj7=A maj7
mmmrn
#aug=G aug
F
rnrnmrn
Gaug
IIDmJllII
A aug=G aug
ll!llllJH[I
Aaug
IIIImillJI
B aug=A aug
rnrnmrn
rmmJIDI
F#dim7=G dim7
rnmmm
Gdim7
IllImIRII
A dim7=G dim7
IllIIRIIDI
Adim7
I!IImillII
B dim7=A dim7
mmm
rmmmII
F#7SUS4=G 7SUS4
rnrmImI
G7SUS4
IIIImJHJI
A 7SUS4=G #7SUS4
llIIllllIDI
I
A7SUS4
IIIImmII
B 7SUS4=A#7SUS4
InImlllJI
rnmmm
F#m maj7=G m maj7
IIDmI!III
Gm maj7
llIlJHIIDI
A m maj7=G #m maj7
IIDmJllII
Am maj7
IHImImI
B m maj7=A #m maj7
mmmm
Bmaj7
mmmm
Baug
mnmJJll!
Bdim7
mmmnJI
B7SUS4
II!ImillJI
Bm maj7
rmnmm
SOFGA20800
 Loading...