

Page 1

First help
HD-SX6 Owners manual
How to get help in the event of a problem:
If your HD-SX6 doesn't work properly, please follow the 3 steps below:
1. First read our trouble shouting and help information's on page 26.
2. If you cannot find a solution please ask your dealer or authorised
service/installation centre. All dealers and authorised service/installation centres are informed regularly of the latest help information and
solutions.
3. In the event that your dealer or authorised service/installation centre
cannot solve your problem please contact us directly:
KEY SOFT SERVICE (Switzerland)
Postmatte 1, CH-6214 Schenkon
Tel. 0041(0)41-922 03 14
Fax 0041(0)41-922 03 15
e-mail: info@keysoftservice.ch
To assist us in helping you when you phone please have the following information ready:
w Serial no. of HD-SX6 and KN6000
w HD/Soft Parameter
w Detailed problem description
Please understand that we are only able to answer questions about the HD-SX6. Your
Technics dealer will help you with all of your specific KN6000/6500 questions.
1
Page 2
Warranty and obligation:Warranty and obligation: KEY SOFT SERVICE offer a product warranty of 12 months.
HD-SX6 Owners manual
This will be handled from our domestic sales companies and can be different from
country to country. Decisive are the terms and conditions of your dealer.
KEY SOFT SERVICE UND IHRE PARTNER-FIRMEN HAFTEN NICHT FÜR
SCHÄDEN JEGLICHER ART, INSBESONDERE NICHT FÜR DATENVERLUST, VERMÖGENSSCHÄDEN, SACH-SCHÄDEN, ENTSTANDENE
VERBIND-LICHKEITEN GEGENÜBER DRITTEN UND SCHÄDEN, DIE AUS
FEHLFUNKTIONEN DES PROGRAMMS ODER AUFGRUND VON BEDIENUNGS- FEHLERN ENTSTEHEN. DIES BEINHALTET (IST ABER NICHT
BESCHRÄNKT AUF) JEDE FORM VON UNTERBRECHUNG EINES SERVICE, GESCHÄFTSVERLUSTE, FOLGESCHÄDEN ODER ANDERE
NACHTEILE, DIE AUS DER BENUTZUNG DES PROGRAMMS
ENTSTEHEN. IN STAATEN, IN DENEN DIESER TOTALE GEWÄHRLEISTUNGS- UND HAFTUNGSAUSSCHLUSS NICHT ERLAUBT IST, IST DIE
BENUTZUNG VON HD-SX6 NICHT ER-LAUBT.
We strongly recommend to keep your original data (software disks) on a save place and
to make regular backups of your HD-SX6 data.
All printed information and drawings in this owners manual are protected.
No part of this publication may be reproduced, transmitted or stored in a retrieval sys-
tem without the prior written permission of the copyright owner, KEY SOFT SERVICE CH6214 Schenkon. KEY SOFT SERVICE makes no warranties wit respect to this documentation and reserves the right to make changes without notice.
© Copyright 1995 by KEY SOFT SERVICE. All rights reserved.
Point Style is a registered trade mark of KEY SOFT SERVICE (Switzerland).
Printed in Switzerland.
Technics is a registered trade mark of Matsushita Electric Industrial Co., Ltd. Osaka, Japan.
Microsoft and WINDOWS registered trade mark of Microsoft Corporation.
2
Page 3

Content
HD-SX6 Owners manual
Introduction - About this manual 4
Button description and meanings 6
SELECT SONG (Load a title)
SELECT BY NAME 8
LOAD BY NUMBER 10
ALPHABETIC SORTED 11
SAVE SONG
Write protection 12
Directory naming 13
Save a song 14
Delete a song or a directory 14
SELECT JUKE BOX
Meaning, access and edit of JUKE BOX links 15
SELECT CUSTOM LOAD SCRIPT (C.L.S)
Meaning, action and selection of a C.L.S. 16
Create and edit Custom Load Script 17
SETUP & TOOLS
COPY FD TO HDD 20
HELP PAGES 21
PC-DATA LINK 22
Write Protect, Write Confirm, Select Partition 23
Load by number, Quick Load, Jump after Load
Stop HD-Motor, Display Font Size, Sep. Output Load
KN6000 AfterLoadMode, File Save Option Mode,
Display freeze, Save Options, Format HDD 26
LYRICS OPTIONS 27
OUTPUT SETTING
SUPPLEMENT
Separate Output Mode 28
Tips, Tricks and suggestions 29
Manipulation and trouble shouting 31
Accessories: HD-TechManager6000 32
FD-TechBackup/LyricsEditor 32
3
Page 4

Introduction - About this manual
HD-SX6 Owners manual
w Overview
HD-SX6 is a professional system extension with an advanced (min 3.2 GB) hard disk,
audio and data output extension which is integrated into the main operating system of
Technics KN6000/6500. HD-SX6 follows the same operation procedures as other features on the KN6000/6500.
You will very quickly be able to operate all of the functions of HD-SX6, but despite the
ease of use of the HD-SX6, please don’t be tempted not to read the manual! A hard disk
drive is a precision piece of equipment and needs special care and attention.
v Therefore, we strongly recommend that you read this manual.
HD-SX6 uses a very safe data handling system, including head parking and motor off
during play and data verifying during data write). In addition, the HD-SX6 offers highly
advanced shock resistance and reliability. Nevertheless, we strongly recommend that you
make monthly backup's of your valuable data. Every procedure is explained in this manual, including considerations about your own HD structure and HD handling practices.
Supplement pages 29 and 30 have further details about this.
w This owners manual
The HD-SX6 owner's manual is a supplement to the Technics SX-KN6000/6500 manual.
You will find a menu guide for all functions similar to those in the main KN6000/6500
manual. Additionally, special comments and notes in this manual highlight important
features.
Attention: The printed display pages in this manual may don’t match the effective display of the actual software version.
4
Page 5

w Technical description
HD-SX6 Owners manual
All data loaded from floppy disk to the internal RAM, and all data combinations made
on the KN6000/6500 can be stored on HD-SX6 hard disk drive. You can select with the
File Load/Save Option which parts of a song are saved.
When you turn the power ON the new HD-SX6 start-up display, followed by the regular
Technics standard display appears. HD-SX6 uses this time to check the FAT (File allocation table) and boot sector of the HDD and copy all text information (Directories/ File
names and CLUs) from the selected partition to the HD-SX6 SRAM. The Technics
KN6000/HD-SX6 is ready to play after the start up procedure has completed. To
increase data safety every written data block is verified before the data is stored on the
HDD. For copyright reasons (MS-DOS) and data read speed the HD-SX6 uses its own
HDD format.
v The HDD does not keep running during play, which means dataThe HDD does not keep running during play, which means data
loading takes a little longer compared to MIDI direct play. loading takes a little longer compared to MIDI direct play.
The only reason for this is safety precaution is lifetime of theThe only reason for this is safety precaution is lifetime of the
hard disk drive.hard disk drive.
Just for your reference: A progressive 2.5” hard disk drive can handle up to 150 G
shock resistance during operation but regarding vibration this parameter will be reduced
drastically to a critical 1.5G.
To make the system open for updates and improvements, the HD-SX6 uses Flash ROM
for the program area. The new bi-directional (PS2/ECP) parallel port and the new processor speeds up the data transfer between computer and keyboard. With the most
advanced USB port HD-SX6 is ready for the new operation systems like
WIN98/Win2000 already. All HD-SX6 functions are handled and controlled by the
KN5000 main CPU. Of course you need the special program to access these ports. You
can send all standard file format (KN2000, KN3000, KN5000, KN6000/6500 and
MIDI) through these ports.
2 separate Stereo Outputs (Presets and free SEQ. part assignable) offer more flexibility
for your stage setting.
All HD-SX6 operations are controlled through the KN6000/6500 display and powered
by the new speedy 32-bit RISC processor. The hardware connection between the HD-SX6
and the KN6000/6500 main board is made with an industrial 56-pin micro connector.
HD-SX6 is controlled and tested to reach the CE certification.
w Specification:
- HD-SX6 system board with 2.5” E-IDE hard disk drive mounted
- HD-SX6 owners manual, Update disk and warranty card
5
Page 6

HD-SX6 Owners manual
Congratulations on choosing the HD-SX6 as your hard disk option for the Technics
KN6000/6500 and thank you very much for your valued confidence in our latest product.
HD-SX6 (HD=HHard DDisk, SS=System, XX=eXtension, 6000= KN6000) offers a huge
memory capacity, a very quick loading and all the necessary option's which will support
your performance.
Button description of HD-SX6
Most of the HD-SX6 operations are controlled in the same way as the KN6000/6500
features.
HD-SX6 will be controlled with the display function buttons exclusively.
HD-SX6 naming
HD(D) Hard Disk (Drive)
File Single file
Song/Title One or more files with same name
Directory Folder of max. 16 Song/Title = DIR
C.L.S.C.L.S. CCustom LLoad SScript, Script utility to link up to 32 song/Title.
(*) A remark to some more information's in the appendix.
6
Page 7
SELECT SONG
HD-SX6 Owners manual
Since the load function is the most important thing on stage, the HD-SX6 is primarily
designed to offer fast HDD access and automated operation. Therefore, we start the
function explanations with a simple file load.
If your HD-SX6 is empty (no data transfer from previous HDD systems) you need to save
a song first. Please go to the page 14 (SAVE SONG).
"Function" HD-SX6 entry point
Because HD-SX6 uses the same page's for loading files, saving files and edit
functions, we have added an dedicated HD-SX6 icon.
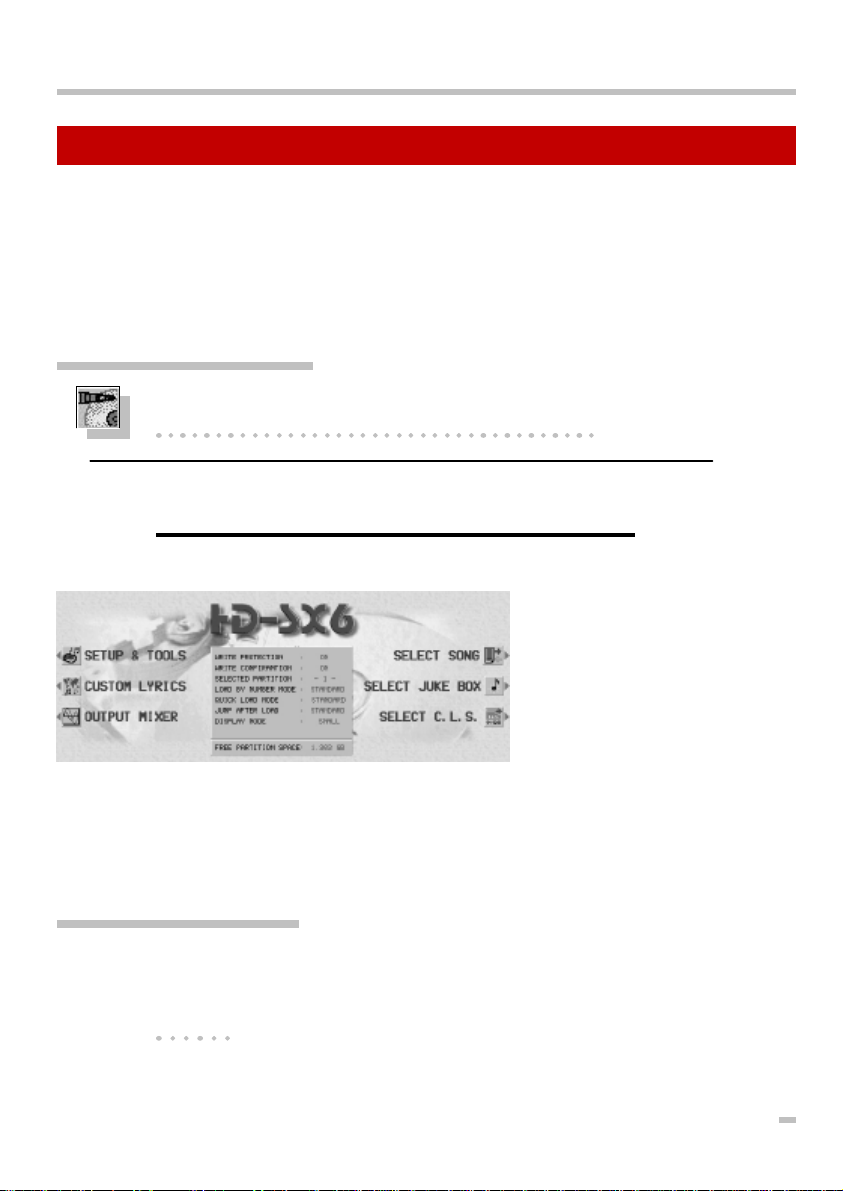
Ü 1. Press the DISK button on the MENU group followed by the
HARD DISK MAIN MENU button on the DISK MENU.
The HD-SX6 main menu page appears.
The right side buttons have
direct access to the basic load
selection.
The left side functions are
reserved for tools and settings
in the non playing mode.
In the centre part of the display you can see the status of WRITE PROTECT, WRITE CONFIRM, SELECTED PARTITION, LOAD BY NUMBER MODE, QUICK LOAD MODE,
JUMP AFTER LOAD, DISPLAY MODE and free memory capacity of HDD.
"Function" Selected Partition
One of the most important new features is the HDD division into 3 equal
partitions for each 3’840 songs/titles. The main reason for that was to keep
loading/file searching speed. More about that below SETUP & TOOLS on
page 20 .
7
Page 8
SELECT SONG by name
HD-SX6 Owners manual
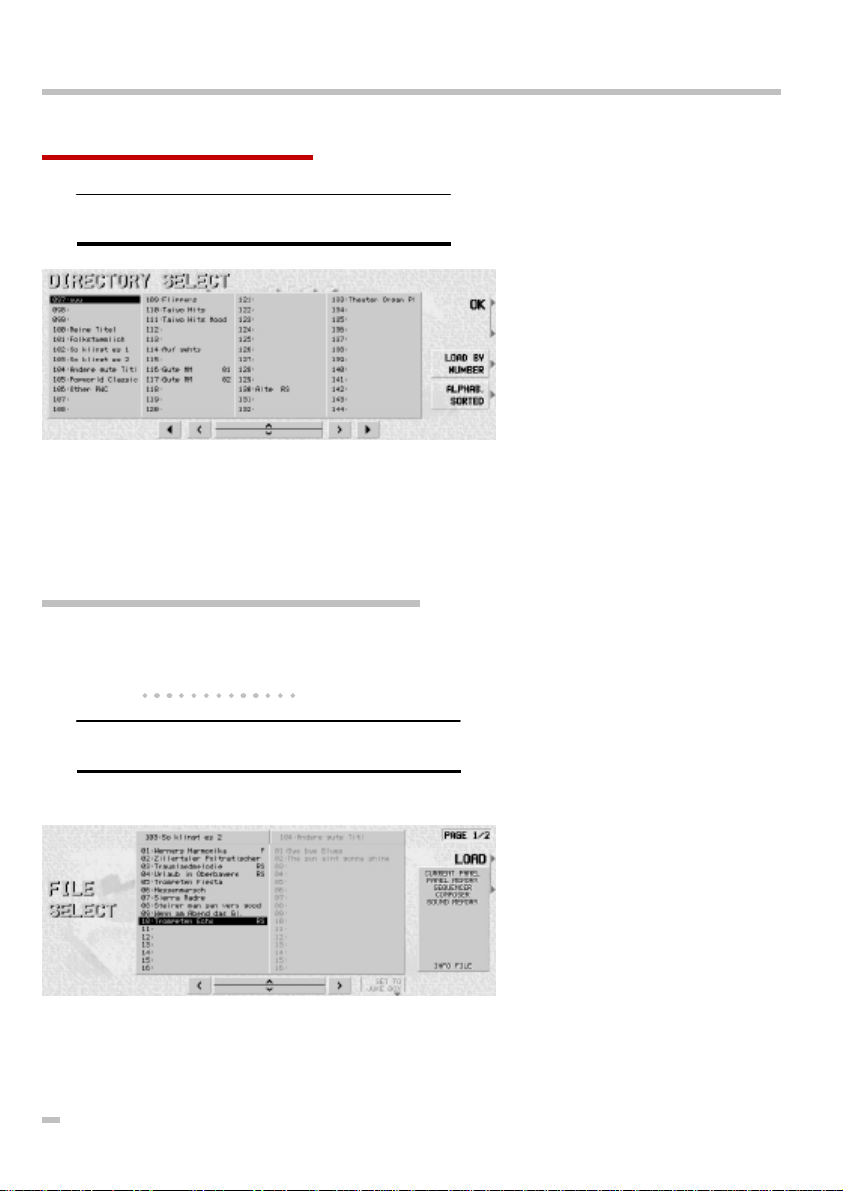
Ü 2. Press the SELECT SONG button
The DIRECTORY SELECT page
will appear.
For an easier operation in the
low light conditions such as on
stage, the OK function is set to
both top right buttons.
Use the UP/DOWN button, the LEFT/RIGHT or the Program/ Tempo wheel to select the
directory you wish to display. If you or your service centre made a data transfer from a
previous HDD system you will find all directories in the well-known structure.
With the BigFont selected you will only see 30 directories, but 8 different pages.
"Function" Directory select (Directory search)
The total of 240 directories are divided into 5 pages. Using the LEFT/RIGHT
button, you can change from column to column and with the page left/right
from page to page.
Ü 3. Select a directory and press OK.
The FILE SELECT page will appear.
In the left box you will see all
the selectable songs/titles. The
directory name is listed in the
top box. The right box (grey
label) is a preview of the following directory. The types of
data that can be loaded from
the selected file are shown in
the file info box.
If you selected BigFont, this page will only display 2 columns with each 8 songs.
8
Page 9
"Function" Song/Title search
HD-SX6 Owners manual
If you turn further on position 16, the following (grey labelled) directory
appears and the cursor is positioned on No. 1. For a faster search method
use the LEFT/RIGHT button to change to the next directory.
Change to the LOAD OPTION
(press the page button) to load
specific data only. (For example just Panel Memory, Sound
Memory or any combination of
the available data types). You
can start the loading operation
also from this page.
Ü 4. Select a Song/Title with the (UP/DOWN) buttons and
press LOAD.
Now you will see the LOADING ... PLEASE WAIT message for about 2-3 seconds.
Loading time depense on the number of file’s size. If you just select a small sequencer
file loading will take about 2 seconds. If you load the same title as a Performance file it
can take about 4-5 seconds.
If you select a *.ast (ALL CUSTOM STYLE), the data are
much bigger and they need to
be stored into a Flash-ROM
which can take up to 45
seconds.
Ü After LOADING is completed, the keyboard is ready to be
played.
Please note, that the data’s has the same condition as you loaded them from disk.
9
Page 10

LOAD BY NUMBER
HD-SX6 Owners manual
As many musicians organise their file’s based on numbers the HD-SX6 also offer this
kind of file loading.
The entry point for LOAD BY NUMBER will be found below SELECT SONG/DIRECTORY
SELECT.
Ü 1. Press SELECT BY NUMBER on the SELECT DIRECTORY
page.
Load by number offer the same
loading options as load by
name. Note, that
there is no LOAD OPTION
available when you have
selected the LOAD BY NUMBER MODE 2 on the SETUP &
TOOLS page.
"Function" 3 & 2 (5) digit number entry
Use the 10 marked buttons below the display and the HD-SX6 will automatically find the selected file.
The LOAD BY NUMBER MODE 2 will automatically load the file after receiving the 5th digit. Use CLEAR if your entry was wrong.
Ü 2. Type a 5 digit number with the UP/DOWN buttons
With the LEFT/RIGHT buttons you can switch to the next Title forward and back
Important! Only a complete 5 digit number will display a file.
For example: 001-01, means first directory/first file. If you type an empty
number, a warning message will be shown
There is a info line that will show you the actual loaded song.
10
Page 11

ALPHABETIC SORTED
HD-SX6 Owners manual
The loading from a sorted list is maybe not the most fast selection (to many buttons need
to be pressed). Nevertheless this function is very helpful since you can manage such a
enormous data amount.
For example: You know that you have somewhere the „Feelings” melody stored. But in
which directory? Go to the ALPHA SORTED LIST and simply press the „F” key to get the
list sorted starting from F.The system sort the list based on the first 5 characters. It need
some time if you select this page after you switched ON because the Keyboard CPU has
to search and sort the entire list.
Ü 1. Press the ALPHABETIC SORTED button on the DIRECTORY
SELECT page
The ALPHABETIC SORTED
page offer the same function
as the FILE SELECT page.
Even here you will find the file
detail list. Also the PAGE 2/2
is available here.
The LINK TO JUKE BOX button is explained on the JUKE BOX (page
Ü 2. Press one of the sorting character
The entire list will be displayed, beginning on the selected character.
Ü 3. With the dial or the UP/DOWN buttons you can select the
searched song/title
If you press an other character the list will be set new.
Ü 4. Press LOAD to start the loading
Even if your song/title names are centred on the file SELECT list the system will sort the
list as well.
11
Page 12

SAVE SONG
HD-SX6 Owners manual
Write data to a hard disk drive is much more difficult than load. Therefor we have spend
some more attention to this function.
As already mentioned: The HDD is always write protected when you turn ON the keyboard!
"Function" WRITE PROTECTION
The SAVE function on the HD-SX6 is secured of several reasons:
1. Save functions are mostly used at home. During performance on stage
you normally need LOAD functions only.
2. To prevent accidental loss of data the SAVE/EDIT buttons are hidden in
standard mode
3. Other people cannot delete or overwrite your data.
Ü 1. Press the SETUP & TOOLS button on the HD-SX6 main
page followed by the PAGE button
Further details you will find on
the chapter SETUP & TOOLS,
page 20.
Ü 2. Change the WRITE PROTECT from ON to OFF mode
This procedure has to be done only once for each turn ON. This parameter cannot be
stored in the SAVE OPTION memory.
F.
12
Page 13

Directory naming
HD-SX6 Owners manual
It’s up to your decision how to proceed the naming of directories. The most easy way is
to use the optional HD-TechManager6000 (page 32).
Ü 1. Press the SELECT SONG button on the HD-SX6 main
page.
You will find the same DIRECTORY SELECT page but there is
now the EDIT button in the
right bottom corner visible.
The naming page looks almost
the same as the KN6000/6500
naming page.
Ü 2. Press EDIT and you will find the NAMING page
You can use all characters, as well as capital and small letters based on the
KN6000/6500 operation.
"Function" Long directory names
Taking advantage of the big screen directories can be named with a maximum of 16 characters. Additionally the LST button offers a small memory
with the last naming string. Please refer also to the APPENDIX on page 26
and 27 for more information.
Ü 3. After generating a DIRECTORY name press the OK button
to save the new name in to the directory list.
The system will change back to the DIRECTORY SELECT and you can name other directories in the same way.
13
Page 14

Save a song/title to HDD
HD-SX6 Owners manual
Save an existing file from a floppy disk (whatever type of file) or the entire memory content to the HDD need the following procedure:
Ü 1. Load a file/song from FD (as you know well), then press
DISK, HARD DISK MAIN MENU and SELECT SONG, select a
named directory and press OK.
You will find the same FILE SELECT page as for the load function but with the addition of
the DEL. DIR., DEL. TITLE and SAVE TITLE button.
If you don’t want to save all types of file please change to page 2/2 and mark the files.
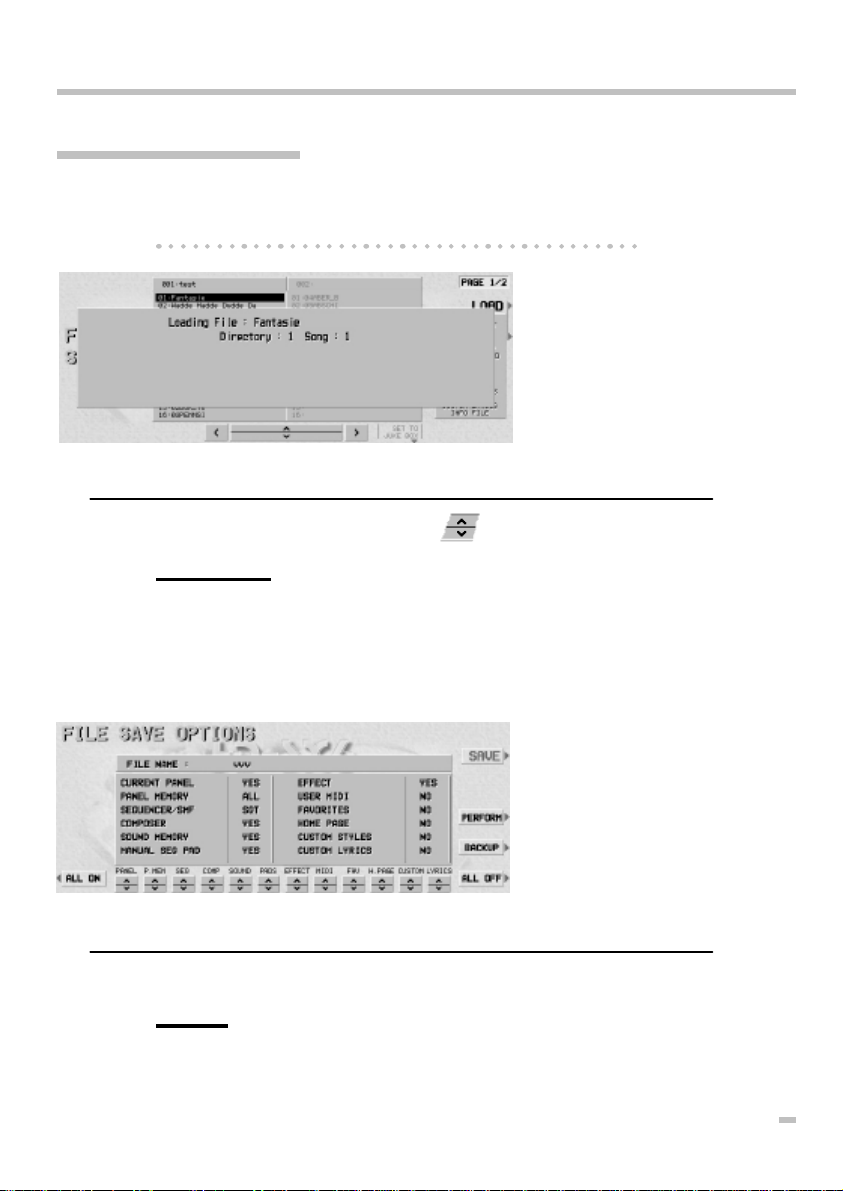
Ü 2. Select a free place and press SAVE. (The FILE NAMING
page appear.
Also for the songs/titles you can use long names now, up to 26 characters (based on the
international character set). Even here we have a LST button where you will find the last
naming string. (see also Tips & Tricks)
Ü 3. Press the OK button to save the data to the hard disk.
Since the system verify the data
before the official save will be
proceed, the save operation
need some more time than the
loading. If you also save the
CUSTOM STYLE file than the
saving takes about 12 seconds
more.
If you have selected a place with an already existing song a warning page appear.
DELETE TITLE /DELETE DIRECTORY
If you want to delete a title or an entire directory just press the button on the left side up
or down the display. Delete a single song/title will take about 10 seconds. An entire
directory nee more time, depend on the numbers of song/titles.
14
Page 15

SELECT JUKEBOX
HD-SX6 Owners manual
What is a Jukebox? No, we don’t talk about a record machine. But the system is almost
the same. We are using a reserved RAM area to temporarily store songs/titles. Similar to
a real music box you can preselect up to 8 links for the next dance round.
These settings will be stored only in the static RAM and there are no write/save to the
HDD necessary.
How can you create and recall a Jukebox ?
Ü 1. Press SELECT JUKE BOX on the HD-SX6 main page. On
the JUKE BOX page press the SET button
Now you will find the familiar
DIRECTORY SELECT page.
If the JUKE BOX SET MODE on
the SETUP & TOOLS 3/3 is set
to ALPHA LIST you will find the
ALPHABETIC SORTED page to
select your song/title.
Change to the corresponding FILE SELECT page and select a song/title.
Ü 2. On the FILE SELECT page press LINK TO JUKE BOX.
Back to the JUKE BOX select one of the 8 boxes. Automatically the address of the
selected song/title is linked now to the JUKE BOX and the name was copied.
Ü 3. Repeat this procedure up to 8 times
Important! Of course you can select the JUKEBOX by using the Quick Load or Tab
Tempo function.
After creating the JUKE BOX links you simply press the button of a marked box and the
song/title will be loaded directly. More about the JUKE BOX on page 29.
15
Page 16

CUSTOM LOAD SCRIPT
HD-SX6 Owners manual
As the memory capacity of the hard disk drive is very big (up to 11’520 songs/titles), it
can become difficult to find a specific music very quick. Also you would like to have an
other order for some specific songs/titles for special events.
Therefore the HD-SX6 offers a programmable file link table with load options. We call it
CUSTOM LOAD SCRIPT because you set it up like a script of file locations. Similarly to
the medley play function, you can use AUTO START (AS) and AUTO LOAD (AL) to create a load/play chain.
Important! Since your system don’t have C.L.S. (expect you made a data transfer
from the HD-AE5000 to HD-SX6 and already used the FLS there) already,
jump to the SAVE/EDIT C.L.S. on page 17.
Ü 1. Press SELECT C. L. S. on the HD-SX6 main page
This page looks and operates
in almost the same way as the
standard DIRECTORY SELECT
page.
Even the selection of a C.L.S. Is
working same.
Ü 2. Select a C.L.S. And press the OK button
16
The C.L.S. FILE LOAD page
shows the name of the script in
the top row as well as the location of the selected song/title.
Also the long file names followed by the AS/AL status is
shown in the script box.
Page 17

Ü 3. Press the LOAD button to start the script
HD-SX6 Owners manual
If the first song has AS (AutoStart) indicated, the sequencer will start playing the music
immediately after loading is complete.
With AL indicated, the next song will be automatically loaded after the sequencer has
stopped, or if a playback is stopped by the musician. There is a 2 second delay between
automatic selection and loading of the following song/title to give you a possibility to
interrupt the play/load chain with the PANIC button.
Important! On the APPENDIX (Page 29) you will find some more practical informa-
tion to optimise your C.L.S. by using the AL/AS option.
EDIT C.L.S. (CUSTOM LOAD SCRIPT)
Step by step you should be able to create your own C.L.S.
Before we start you have to change the WRITE PROTECT mode to OFF. (refer page 12)
Ü 1. Press the SELECT C.L.S. on the HD-SX6 main page
If you select this page the first time you will find them empty.
Ü 2. Select a free C.L.S. Place and press EDIT
Ü 3. Press OK to save the C.L.S. name
Write the name of the script file
in the way as naming on the
KN6000/6500. Up to 16
characters are allowed.
Our example is called: „Happy
birthday party”
17
Page 18

After saving your script name
HD-SX6 Owners manual
to the script list, the C.L.S. FILE
LOAD page name will appear.
The script name will be shown
on the C.L.S. title box, but the
rest of the file list box will be
empty.
Ü 4. Press the EDIT button.
Based on the C.L.S. EDIT page all further operations will be made on this page. But first
we will search the first title for the “birthday” C.L.S.
Ü 5. To find the first song/title for the C.L.S. press SEARCH
On the different background
coloured DIR SELECT FOR
C.L.S. you can select the directory where your song/title is
located.
Ü Press OK to get the FILE SELECT FOR C.L.S. page
Select your first song/title for the „Happy birthday party” script.
Ü 6. Press the SELECT button to transfer the selected song/title
into the C.L.S. List
On the C.L.S. EDIT page you
will find the linked song/title
with all information's like location (DIR/FILE) and file info's.
18
Page 19

Ü 7. Use the AS/AL options to get an automatic load/play
HD-SX6 Owners manual
script
AS marked = start the sequencer after loading is completed (if there is a sequencer).
AL marked = load the next song/title in the script, if the sequencer has an END
marking.
If you would like to use the AL function with Composer to play live (no MIDI files) you
need to create an empty sequencer with a conrtol track (CTL). In this control tack set a
rhythm START command at the beginning and very fare on the expected end of the music
a rhythm STOP event. (you have to try the end mark but about 250 bars should be OK)
Finally you can edit your C.L.S. with INSERT, ERASE and DELETE individually.
INSERT= Insert a song/title into the list move the following.
ERASE = Erase an entry and keep the place free.
DELETE= Delete the selected entry and move the rest.
Ü 8. Repeat this operation to complete the script
Please remind to set the cursor to a free place. Warring pages will inform you about
overwriting existing entries. Up to 32 song/title can be linked within a single C.L.S.
Ü 9. Confirm the script editing with SAVE C.L.S.
The script file will be stored to the HDD. Because the script doesn’t move song/title data
there is no risk for fragmentation or data lost.
Since the script files are very small, they also will be copied into the SRAM during keyboard start up. Therefor all of the C.L.S. Are available during play.
If you try to leaf the EDIT mode without saving C.L.S. A warning page will come up.
19
Page 20

SETUP & TOOLS
HD-SX6 Owners manual
With the extended HD-SX6 system the SETUP & TOOLS become more power and importance. Beside the already mentioned global settings (page 2/2), here you will find the
functions like COPY FD TO HD, LYRIC OPTION, PC DATA LINK or the planed plug-in
features.
Page 1/3
Different to other products
from us the settings were
moved to the page 2/2.
A TOOLS function always refer
to a next menu.
COPY FD TO HDD
To automate LOAD/SAVE functions from floppy disk HD-SX6 offer a very helpful and
convenient COPY FD TO HARD DISK option.
This HD write function is also only available when the HD write protection is turned OFF
(refer to page 12).
Ü 1. With a floppy disk (*) on the disk drive press the COPY FD
TO HD button on the HD-SX6 main menu
The disk directory will be written and displayed.
Since there is no space limitation on the HDD we always
copy all files of a song/title.
Use SMF to get the directory
listed with your MIDI files.
20
Page 21

Ü 2. Choose a song/title and press SELECT to mark it
HD-SX6 Owners manual
When you mark a song an indication is added behind the name of the selected song.
Continue by selecting other songs which you want to copy. With the SELECT ALL button
all song/title will be marked at once.
Ü 3. Press the COPY * TO button
If you press the COPY * TO button before you have selected any files an attention message will be displayed.
On the DIRECTORY SELECT
page, select a named directory
as the location for your new
files. Because you are in the
edit mode, you can also name
a directory for your files. To do
this, press the EDIT button.
Note, that you can only copy files to a named and empty directory.
Ü 4. Press COPY to start the procedure
Depending on the number of song/title you would like to copy, the entire process can
take some minutes.
HELP-PAGE
These “Help-Pages” show you what will be possible in the future with the HelpWorkshop on the plug-in area.
Use the left side to move the
text per line or per page up an
down.
Change the category by using
the 8 different register on the
bottom of the display.
In the future (V2.0) we will add
more graphical (lines & pictures) and link commands as well.
21
Page 22

PC DATA LINK
HD-SX6 Owners manual
To communicate with a PC via parallel port or USB the KN6000 has to be set on a special slave mode. HD-SX6 decide which connection is made and select automatically the
data protocol. You will find all detail explanations with the HD-TechManager6000 (refer
page 32) software.
Ü 1. Press the PC DATA LINK button
Here you can select to start the
communication test or you can
leave this page by using STOP.
Use RESET to initialise the connection to the computer.
PAGE 2/3
On the PAGE 2/3 you will find
the most important parameters
for your personal settings.
The operation on this page is
the same as the settings on the
KN6000.
"Function" WRITE PROTECTION
As already mentioned on page 12, the installed hard disk drive is write protected always
if you switch ON your KN6000.
Important! This function cannot be stored on the SAVE SETUP memory.
22
Page 23

"Function" WRITE CONFIRM ON/OFF
HD-SX6 Owners manual
All save functions normally need your confirmation by pressing YES or CANCEL. Experienced users may not want this confirmation procedure to appear every time, so it can be
set to OFF.
"Function" SELECT PARTITION
Since one of our main target was a compatibility to the HD-MEC2000, HD-HSO3000
and HD-AE5000 and the installed HDD is gigantic, we have decided to create 3 equal
partitions. Select your Partition 1, 2 or 3.
"Function" LOAD BY NUMBER MODE
STANDARD: The directory and the song/title will be displayed. The LOAD button
need to be pressed to start loading.
AUTO LOAD: The song/title will be loaded after the 5. Character entered.
"Function" QUICK LOAD MODE
STANDARD: Press and hold the DISK button for 3 seconds, and the most recently
selected directory page will appear.
LBN BOX: Like MODE 1 but change to the LOAD BY NUMBER page.
C.L.S.: Like MODE 1 but change to the C.L.S. page.
JUKE BOX: Like MODE 1 but change to the JUKE BOX page.
ALPHA LIST: Like MODE 1 but change to the ALPHA LIST page.
"Function" JUMP AFTER LOAD
STANDARD: This mode will set the display (after HD loading is completed) to the
KN6000 play mode screen.
HD-SX6: The SX-6 mode will keep the same HD-SX6 page present.
"Function" STOP HD-MOTOR
ON: The motor of the hard disk drive will be set OFF because of security
reasons after each load and save operation.
OFF: In studio or home use you can change this parameter to OFF mode
and earn 1 second less loading & saving time.
23
Page 24

"Function" DISPLAY FONT SIZE
HD-SX6 Owners manual
Select your preferred display font size. Small font means 48 directories and 2 x 16
songs/titles will be displayed. Big font has only 30 directories and 2 x 8 songs/titles.
"Function" TAB TEMPO ACCESS
The TAB TEMPO ACCESS is a kind of QUICK LOAD for the HD-SX6. To avoid press
and hold the DISK button and make acrobatic hand movements the TAB TEMPO button
can be set as you HD-SX6 FAVORITE access button.
Select from various pages and of course OFF mode to give the TAB TEMPO button his
official function.
"Function" ABOUT & HELP
On this page you will find al the important information's about your HD-SX6 system like
software version, HDD parameter and others.
PAGE 3/3
On the WRITE PROTECT mode
you don't have access to the
important functions like SAVE
OPTION and FORMAT HDD.
"Function" JUKE BOX SET MODE
STANDARD If you press the SET button on the JUKE BOX the DIRECTORY SELECT
will appear.
ALPHA LIST With this parameter the ALPHABETIC SORTED list will appear.
"Function" SEPARATE OUTPUT LOAD
GLOBAL: The OUTPUT SETTINGS are stored only global for all the songs/titles.
FILE: All the OUTPUT SETTINGS will be stored and loaded from each
song/title individually
24
Page 25

"Function" KN6000 AfterLoadPage
HD-SX6 Owners manual
HOME PAGE: After loading a song/title the home page will be displayed
SEQ PAGE: As Technics standard the sequencer page will be shown.
These settings are only effective with JumpAfterLoad Mode “STANDARD”.
"Function" SAVE OPTION MODE
STANDARD: If you save a song/title to HD-SX6, there is the KN6000 standard order
(PANEL/P.MEM/SEQ/COMP/SOUND/PADS/EFFECT) given.
HDD LOAD: IF you load a song with an other order than KN6000 standard, this
parameter automatically set that same order also to the SAVE
OPTION.
"Function" LYRICS FONT SIZE
STANDARD: Regular size of sentence, like MIDI file lyrics, close text lines
SMALL: Smaller font but more space between the lines
BIG: 4 lines only, very big letters.
"Function" SAVE OPTIONS
A small memory area store your personal settings expect WRITE PROTECT ON/OFF.
The WRITE PROTECT ON/OFF setting cannot be stored.
Ü Press the SAVE OPTION button and on the following page
the SAVE OPTIONs again
"Function" HDD FORMAT
One of the most important page is the HDD FORMAT screen.
Important! Already the installation guide explained how important the FULL format
for a proper working is! Every HD-SX6 need at least once that FULL format
25
Page 26

The FULL Format (Duration:
HD-SX6 Owners manual
about 25 min. p/partition) with
fine scanning need to be made
only once. QUICK Format
(Duration: about 3 min. p/partition) can be used for cleaning
a partition.
Without selection of a specific partition (1/2/3) the ALL function will be started. Only
with the correct typed code the procedure will be started.
Important! Please note, all this function delete all dada irrevocable. There
is no undo function. Be careful !!!
.
The Format Code is = 7 3 2 9 8 1 2 5
Type the number as same as on the LOAD BY NUMBER page.
Use RESET if your entry was wrong.
26
Page 27

CUSTOM LYRICS & OPTIONS
HD-SX6 Owners manual
The CUSTOM LYRICS is a specific lyrics format developed already for the HD-AE5000
and improved for the HD-SX6.
Important! The CUSTOM LYRICS is quite different to the MIDI file lyrics! Also the
KN6000/6500 cannot read/load that file. Only if the file is copied to the
HD-SX6 you can benefit from the advantages of the CUSTOM LYRICS.
If there is a CUSTOM LYRICS
(*.TLX) stored with a song and
loaded, the display will automatically show the lyrics.
In addition to the advanced lyrics there is also a chord and
info available from the *.TLX
file.
On the SETUP & TOOLS 3/3 you will find the LYRICS FONT SIZE parameter.
Ü Press that button to select one of the 3 different sizes.
The APC CHORD is the same chord information as you have on the sequencer page.
Please note that this chord is always in time. That means if you check/watch that info for
your playback, you will be late most the time.
Therefor we have add the CUSTOM LYRICS chord info. With the LyricsEditor or other
software programs you can move the chord info a little bit forward for a better replay.
With the button COPY TLX to HDD you will be lead to the COPY FD TO HDD page.
If you leaf the CUSTOM LYRICS page you will find it again by pressing the CUSTOM
LYRICS button on the HD-SX6 main page.
More detail you will find on the Appendix.
27
Page 28

OUTPUT SETTINGS
HD-SX6 Owners manual
A more important point on the new system extension is the separate output section.
Because the dimension of the output section could not be enlarged in its size the audio
signal lines need to be located on the D-Sub 26, parallel port connector. With the special audio cable AC25 (D-Sub26 - 4 jack connector) you can connect the KN6000 with
your mixing desk.
Basically the 4 separate audio
outputs are 2 selectable stereo
lines direct from the tone
generator.
If you have no connection to a
mixing desk, make sure that the
APC and PART SELECT are on
OFF mode.
Basically there are two groups of outputs: APC and sequencer
If your song is using APC and sequencer, APC has priority. If it is a MIDI file, the
sequencer part has priority.
SEPARATE OUTPUT MODE: Select from 4 different output presets for the APC
section.
PART SELECT FOR SEQ.: You can select 4 individual part for the sequencer.
EXPRESSION PEDAL CONTROL: Select whether the expression pedal should control
the 2 stereo outputs.
AUX RETURN: Without this function the selected parts are no more sounding on the
internal speakers. So you can bring back the sound of these parts.
28
Page 29

APPENDIX
HD-SX6 Owners manual
Tips, Tricks and suggestions
v DIRECTORY NAMING
Because of compatibility reasons (HD-MEC2000/HD-HSO3000/HD-AE5000) the
HD-SX6 use the international character set and don’t support umlaut and other special characters.
We recommend naming all directories with capital letters to distinguish them easily
from file lists.
v LST (Last NAMING String)
If you have entered a new directory name or song/title it is very helpful that this
name is stored on a small memory.
For example: You would like to name directories as Evergreen 1, Evergreen 2 and
3. With the LST button you only need to write the name EVERGREEN once and than
press LST button on the naming page and only add the number 2 or 3.
v LOAD BY NUMBER
If your repertoire is numbered for example from 1 to maybe 3’840 we recommend
to renumbering the songs like this:
001-010 Dir 1/Files 1-10 11 to 16 are reserved for news/olds
011-020 Dir 2/Files 1-10 11 to 16 are reserved for news/olds
021-030 Dir 3/Files 1-10 11 to 16 are reserved for news/olds
.........
181-190 Dir 19/Files 1-10 11 to 16 are reserved for news/olds
651-660 Dir 66/Files 1-10 11 to 16 are reserved for news/olds
.........
If you type instead of the correct number 008-11 an empty or wrong number you
can search trough the list by using the buttons.
29
Page 30

v JUKE BOX
HD-SX6 Owners manual
What is the difference between the JUKE BOX an a C.L.S. (Custom Load Script), or
why the JUKE BOX has no save function?
1. The JUKEBOX should be an easy function to preselect songs/titles created within
just one or two minutes means within a dancing break. If you have to store such a
selection (Write protect OFF, naming, save) than you need more time and you are
not quick enough for such an event.
2. The C.L.S. basically are the well prepared „BIG JUKE BOX’S”. Extended with the
AUTOLOAD and AUTOSTART the C.L.S. serve the purpose for highest requirements
in automated performance.
Therefor HD-SX6 offer now 2 different functions for different fields of application.
How delete/erase a JUKE BOX?
Nothing easier than that! Just press the CLEAR ALL button and the JUKE BOX is
ready for new selection. This procedure can be repeated unreserved.
v CUSTOM LOAD SCRIPT
Please use the C.L.S. Option AS/AL (Auto Start/Auto Load) carefully and keep in
mind that the AS (Auto Start) function need your special attention on stage.
Also please pay attention that a C.L.S. with AL and AS linked files need to be cancelled with the PANIC button. If you don’t stop such a chain with the PANIC button
the START/STOP button will always change to the C.L.S. And try to load the next
song/title.
v COPY TO HDD
If you would like to copy songs/titles into a directory where already songs/titles are
located, the new songs/titles will be placed on the end of the list.
If there is not enough space on the selected directory, only the number of free places
will be copied.
v Separate outputs
Right now there is no cable available for parallel port and separate audio output as
a unit. If you need to have simultaneous access for both data types (HDD and audio
output) you should use the AC25/4 and the USB cable.
We are working on special help and information pages also for our Internet home page
(www.keysoftservice.ch).
30
Page 31

Trouble shouting
HD-SX6 Owners manual
One of the most important benefits of the HD-SX6 is data security. The hardware as well
as the software is based on this objective.
Important! How to handle KN6000 with built-in HD-SX6
Even modern HDD has improved reliability very much, please be aware, that even such
a hard disk drive is a mechanical unit and needs care during transportation and operation.
As previously mentioned, the Hard Drive is not accessed during play and the motor is
always off during play mode. Additionally the heads are parked after every operation.
Please also be aware of dramatic changes in temperature when you transport the
KN6000 with the Hard Disk extension. The HDD can handle temperature variations
from -40° to 60° C in the Non-Operation mode, but when you bring your keyboard
from a cold place to a warm place, give the HDD a time of at least 60 min. to warm up
to the room’s temperature.
Don’t turn ON the keyboard in this time!
Another very important point is the shock resistance. The HDD can handle a direct
shock of 100G (Operating) and 500G (Nonoperating). More importantly, be careful of
excessive vibration. The limits are 1 G (Operating) and 5 G (Nonoperating).
Weak/shaky keyboard stands can be the death of a hard disk drive!
Therefore, we recommend strongly, to handle the KN6000 with HD-SX6 with all necessary care.
31
Page 32

Accessories:
HD-SX6 Owners manual
For security reasons we strongly recommend that you save your valuable data on the
HD-SX6 HDD to a backup media. The HD-TechManager6000 offer all necessary functions for a comfortable work with your HD-SX6 data and your computer.
The following elements built the frame of the HD-TechManager6000:
Ÿ Backup and Restore
Selection between the full or the archive backup and restore.
Ÿ HD managing tools
Convenient edit functions like directory and file move, directory and file delete, all text
string naming, copy data to HDD and many others
Ÿ Print options
Print your directory and file lists in the same order as your HDD structure or alphabetically. Also the C.L.S. can be printed.
The HD-TechManager6000 is delivered with the special CE approved parallel port and
USB cable, program CD-ROM, owners manual and the HD-SX6 system update disk.
The HD-TechManager6000 is a 32bit (Windows95/98/2000) application for the
IBM-PC or compatibles. Unfortunately the USB implementation on the Win95/USB version doesn’t fully support the actual USB standard (Message from Microsoft)
FD-TechBackup
If you like to have your data not only on the computer backup media but also as a FD
backup, the FD-TechBackup offer an easy to use program to generate disks with the
most important files. For more details and prices please ask your dealer for the main
software leaflet or send us a message (info@keysoftservice.ch).
LyricsEditor
Not only for the Technics Custom Lyrics we have developed a MIDI/TECH lyrics editor
where you can rework you personal lyrics on your songs. For more details and prices
please ask your dealer for the actual software leaflet or send us a short message
(info@keysoftservice.ch).
32
 Loading...