

Page 1

SX-
Page 2
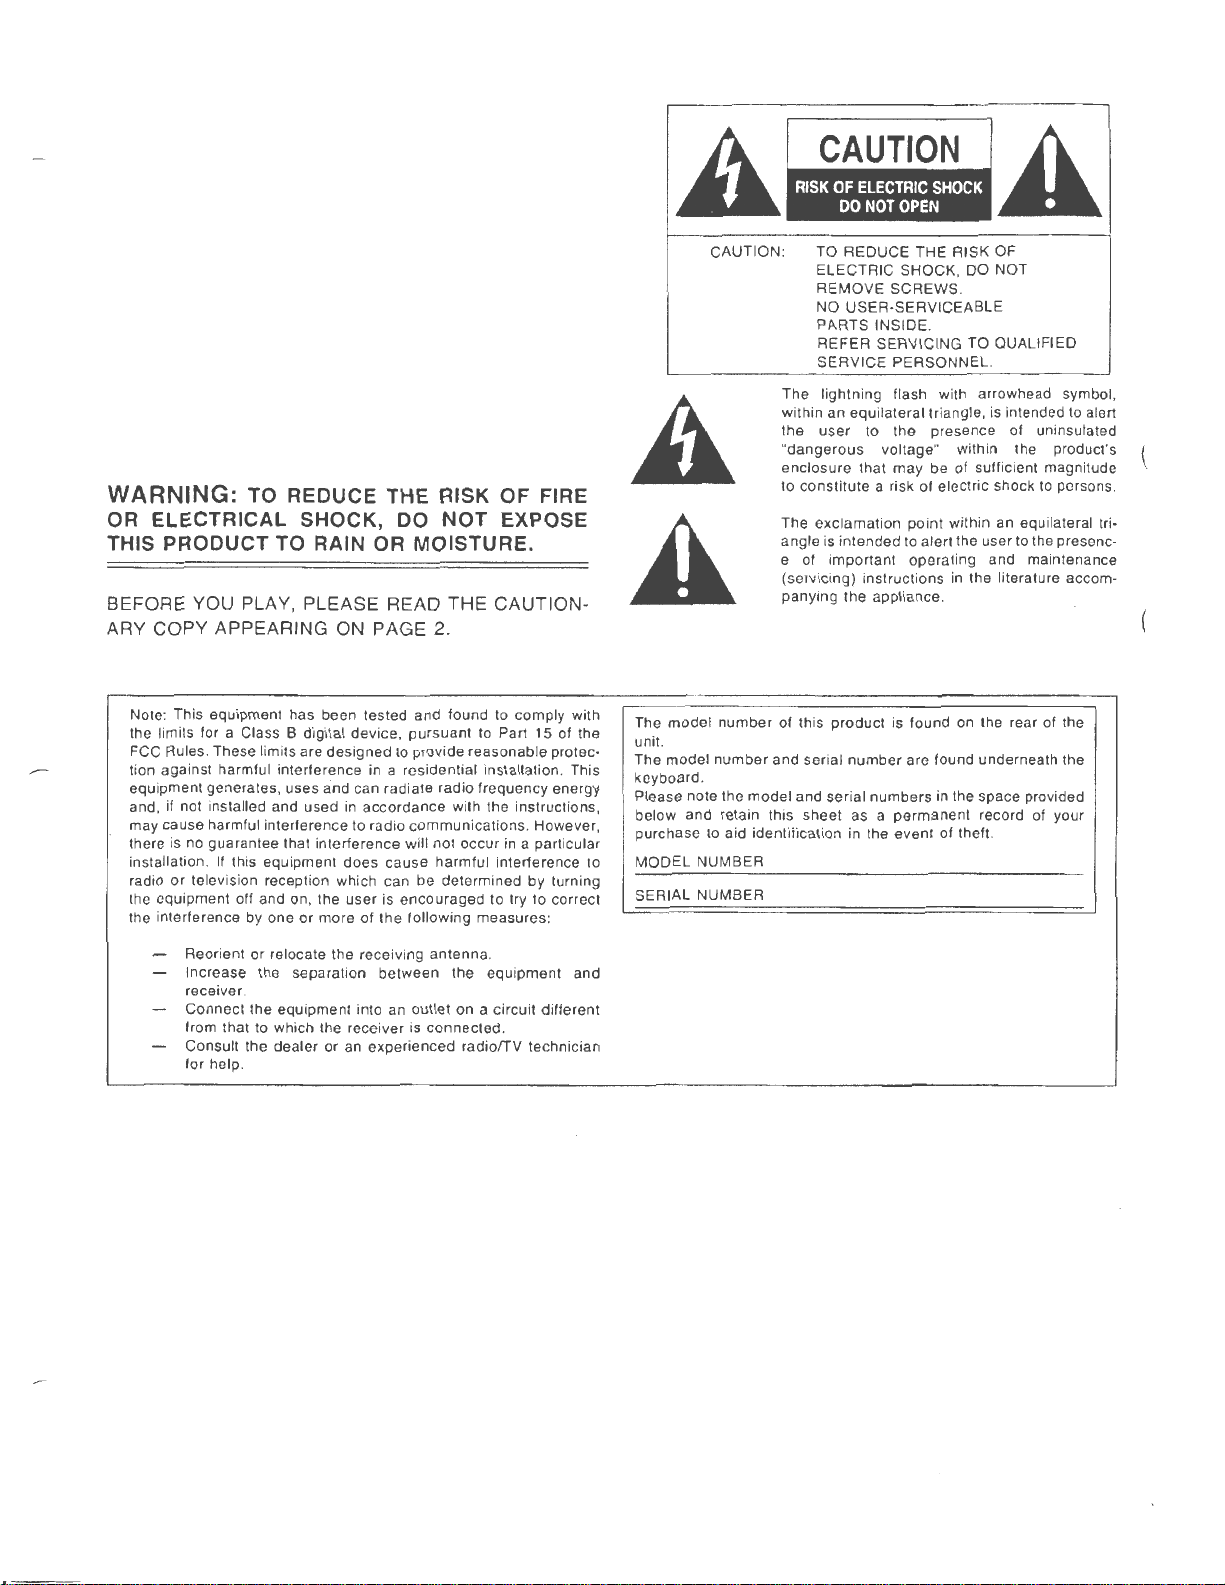
WARNING: TO REDUCE THE RISK
OF
FIRE
OR ELECTRICAL SHOCK, DO NOT EXPOSE
THIS PRODUCT TO RAIN OR MOISTURE.
BEFORE YOU PLAY, PLEASE READ THE CAUTIONARY COPY APPEARING ON PAGE 2.
CAUTION : TO REDUCE THE RISK OF
A
A
ELECTRIC SHOCK, DO NOT
REMOVE SCREWS.
NO USER-SERVICEABLE
PARTS INSIDE.
REFER SERVICING TO QUALIFIED
SERVICE PERSONNEL.
The lightning flash wi
within an equilateral triangle,
the
user
dangerous
"
enclosure that
to
constitute
The exclamation point within an equilateral
angle
e of important operating and
(servicing) instructions
panying the appliance.
to the presence of uninsulated
voltage" within the product's \
may
a risk of electric shock
is intended
th
arrowhead symbol,
is intended to alert
be of sufficient magnitude
to
alert the user
in
the literature accom-
to
to
the presenc-
ma
intenance
persons.
tri-
Note: This equipment has been tested and found to comply with
the limits for a Class B digital device,
FCC Rules. These limits are
tion against harmful interference in a residential
equipment generates, uses
and,
if not
may cause harmful interference to radio
there is no guarantee that interference
installation .
radio
the equipment off and on, the user is
the interference by one or more
installed and used in accordance with the instructions,
If
or
this equipment does cause harmful interference
television reception which can be determined by turning
Reorient or relocate the receiv ing antenna.
Increase the separation between the equipment and
receiver.
Connect the equipment into an
from that to which the receiver is connected.
Consult the dealer or
for help .
designed
and can radiate radio frequency energy
an
pursuant
to
provide
communicat
will not occur in a particular
encouraged
of
the following measures :
outlet
experienced radio/TV technician
to Part 15 of the
reasonable protec-
insta llation. This
ions. However ,
to
try to correct
on
a circu it different
to
The
model
unit.
The model number and serial
keyboard .
Please note the
below and retain this sheet as a
purchase to aid identificat i
MODEL
SERIAL NUMBER
number of this product is found on the rear of the
number
model
and serial
NUMBER
numbers
on
in the event of theft.
are found underneath the
in the space provided
permanent
record of your
---
---
-----------
Page 3
Technics
OWNER'S
Before
For long and pleasurable use of this instrument, and to gain a
F1
your
once.
The Owner's Manual is comprised of the following parts .
BASIC FUNCTIONS
PRACTICAL APPLICATIONS
00 organ, it is strongly recommended that you read through this Owner's Manual
you
play
This part includes an explanation of basic procedures
and points you should be aware of for proper operation
of your instrument.
This part comprises a detailed explanation of sound, effect, rhythm, SEQUENCER,
MIDI.
MANUAL
COMPOSER,
thorough
understanding of
Disk Drive and
REFERENCE GUIDE
(separate booklet)
Reference guide for the contents
and RHYTHM GROUP etc.
of
the SOUND GROUP
Page 4
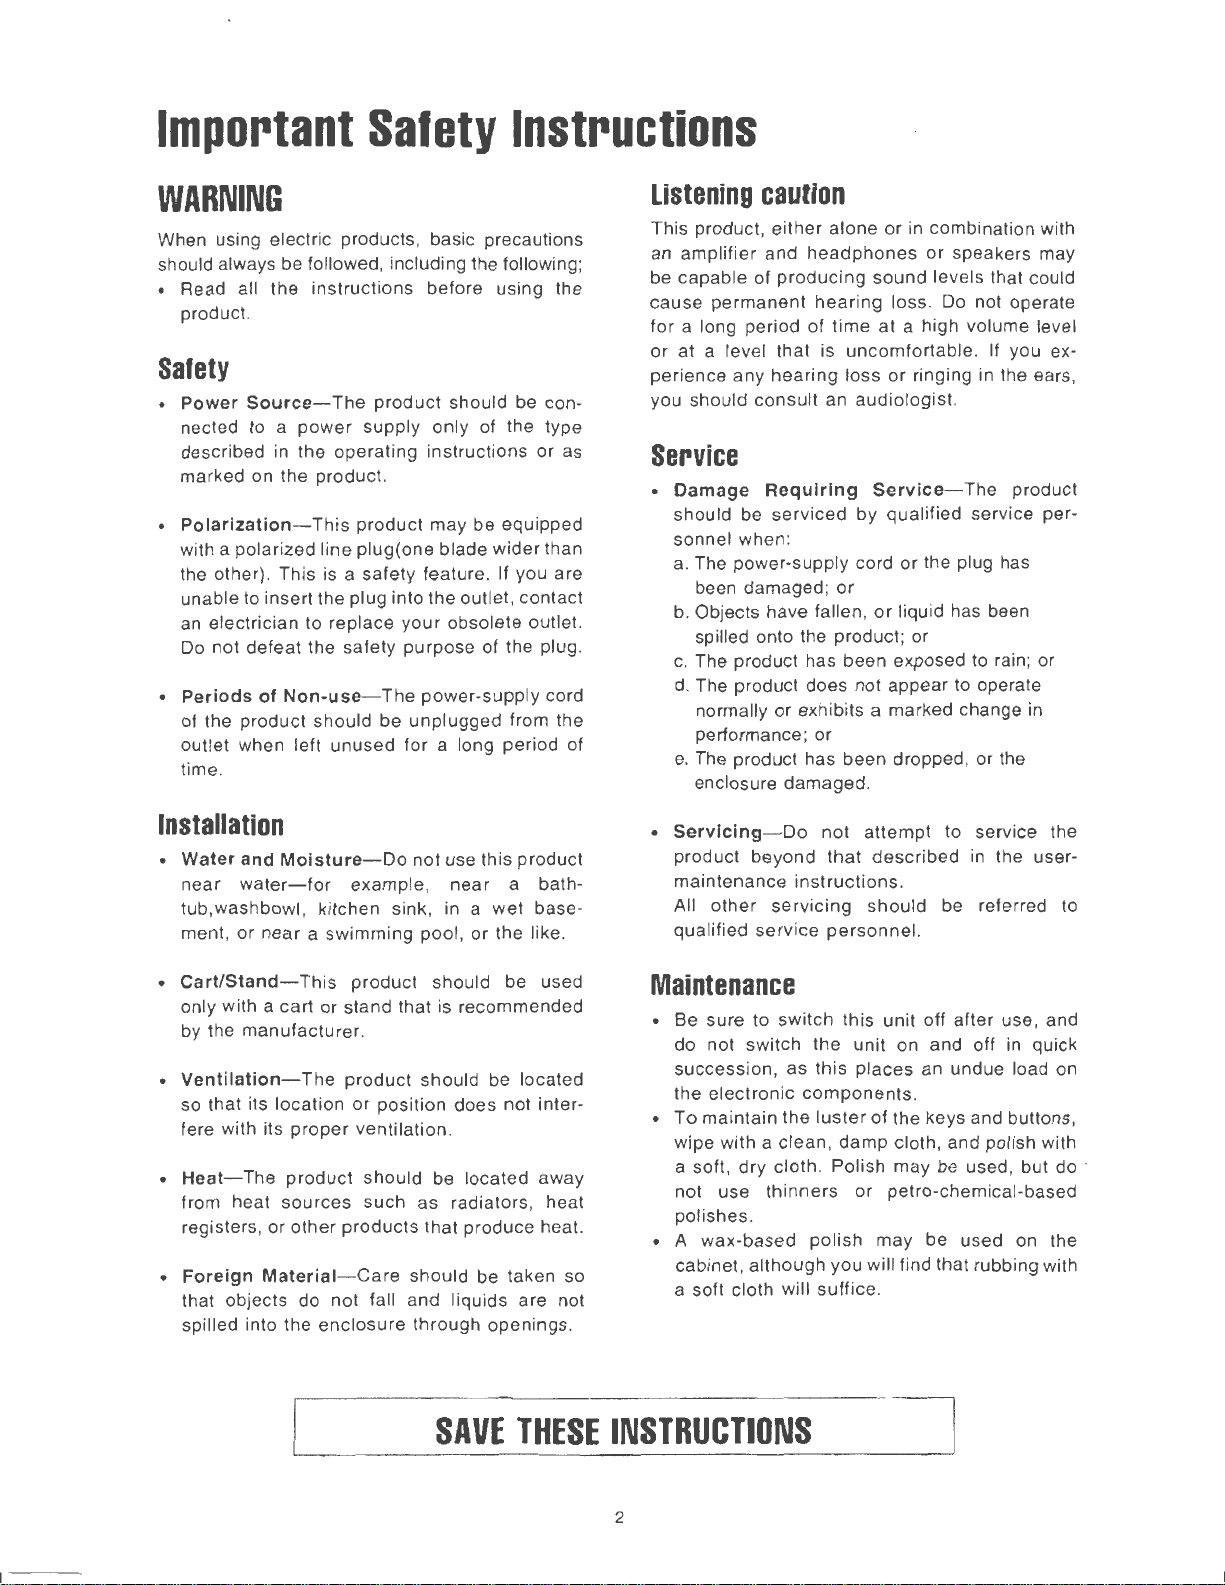
Important
Salety
Instructions
WARNING
When using electr ic products, basic precautions
should always be followed, including the following;
• Read all the instructions before using the
product.
Safety
•
Power
nected to a
described
marked on the product.
Polarization-
•
with a polarized line plug( one blade wider than
the other}. This is a safety feature. If you are
unable to insert the plug into the outlet, contact
an
Do
•
Periods
of the product should be unplugged from the
outlet when left unused for a long period of
time.
Source-
electrician to replace your obsolete outlet.
not
defeat the safety purpose of the plug .
of
The
product
power
in
the operating instructions or as
Non-use-
supply only of the type
This product may be equipped
The power-supply cord
should be con-
Listening
This product, either alone or
an amplifier and
be capable of producing sound levels that could
cause permanent
for a long period
or at a level that is uncomfortable . If you experience any hearing loss
you should consu lt an audiologist.
caution
headphones
hearing
of
time at a high volume level
in
combination with
or speakers may
loss.
Do
not operate
or
ringing in the ears,
Service
•
Damage
should be serviced by qualified service personnel when:
a. The power-supply cord or the plug has
been damaged;
b. Objects have fallen,
spilled onto the product ; or
c. The product has been exposed to rain; or
d. The product does not appear to operate
normally or exhibits a marked change in
performance; or
e.
The product has been dropped, or the
enclosure damaged.
Requiring
or
Service
or
- The product
liquid has been
Installation
•
Water
and
Moisture-Do
near
water-for
tub,washbowl, kitchen sink, in a wet base-
or
ment,
•
Cart/Standonly with a cart or stand that is recommended
by the manufacturer .
Ventilation-
•
so that its locat ion
fere wi
•
Heat-
from heat sources
registers , or other products that produce heat.
•
Foreign
that objects do
spilled into the enclosure through openings.
near a swimming pool , or the like.
th
its
The product should be located away
Material-Care
example, near a bath-
This product should be used
The product should be located
proper
not
not
use this product
or
position does not inter-
ventilation .
such
as radiators, heat
should be taken so
fall and liquids are not
Servicing
•
product beyond
maintenance
All other
qualified service
- Do
not
instructions
servicing
attempt
that
described in the user-
should be referred to
personnel.
to service the
.
Maintenance
• Be sure to switch this unit off after use, and
in
do not switch the unit on and off
succession , as this places an undue load
the electronic
• To maintain the
wipe with a clean, damp cloth, and polish with
a soft, dry cloth. Polish may be used, but do ·
not use thinners
polishes.
• A wax-based polish may be used
cab inet , although you will find that rubbing with
a soft cloth will suffice.
components
luster
of the keys and buttons,
or
petro-chemical-based
.
quick
on
on
the
SAVE
THESE
INSTRUCTIONS
2
Page 5
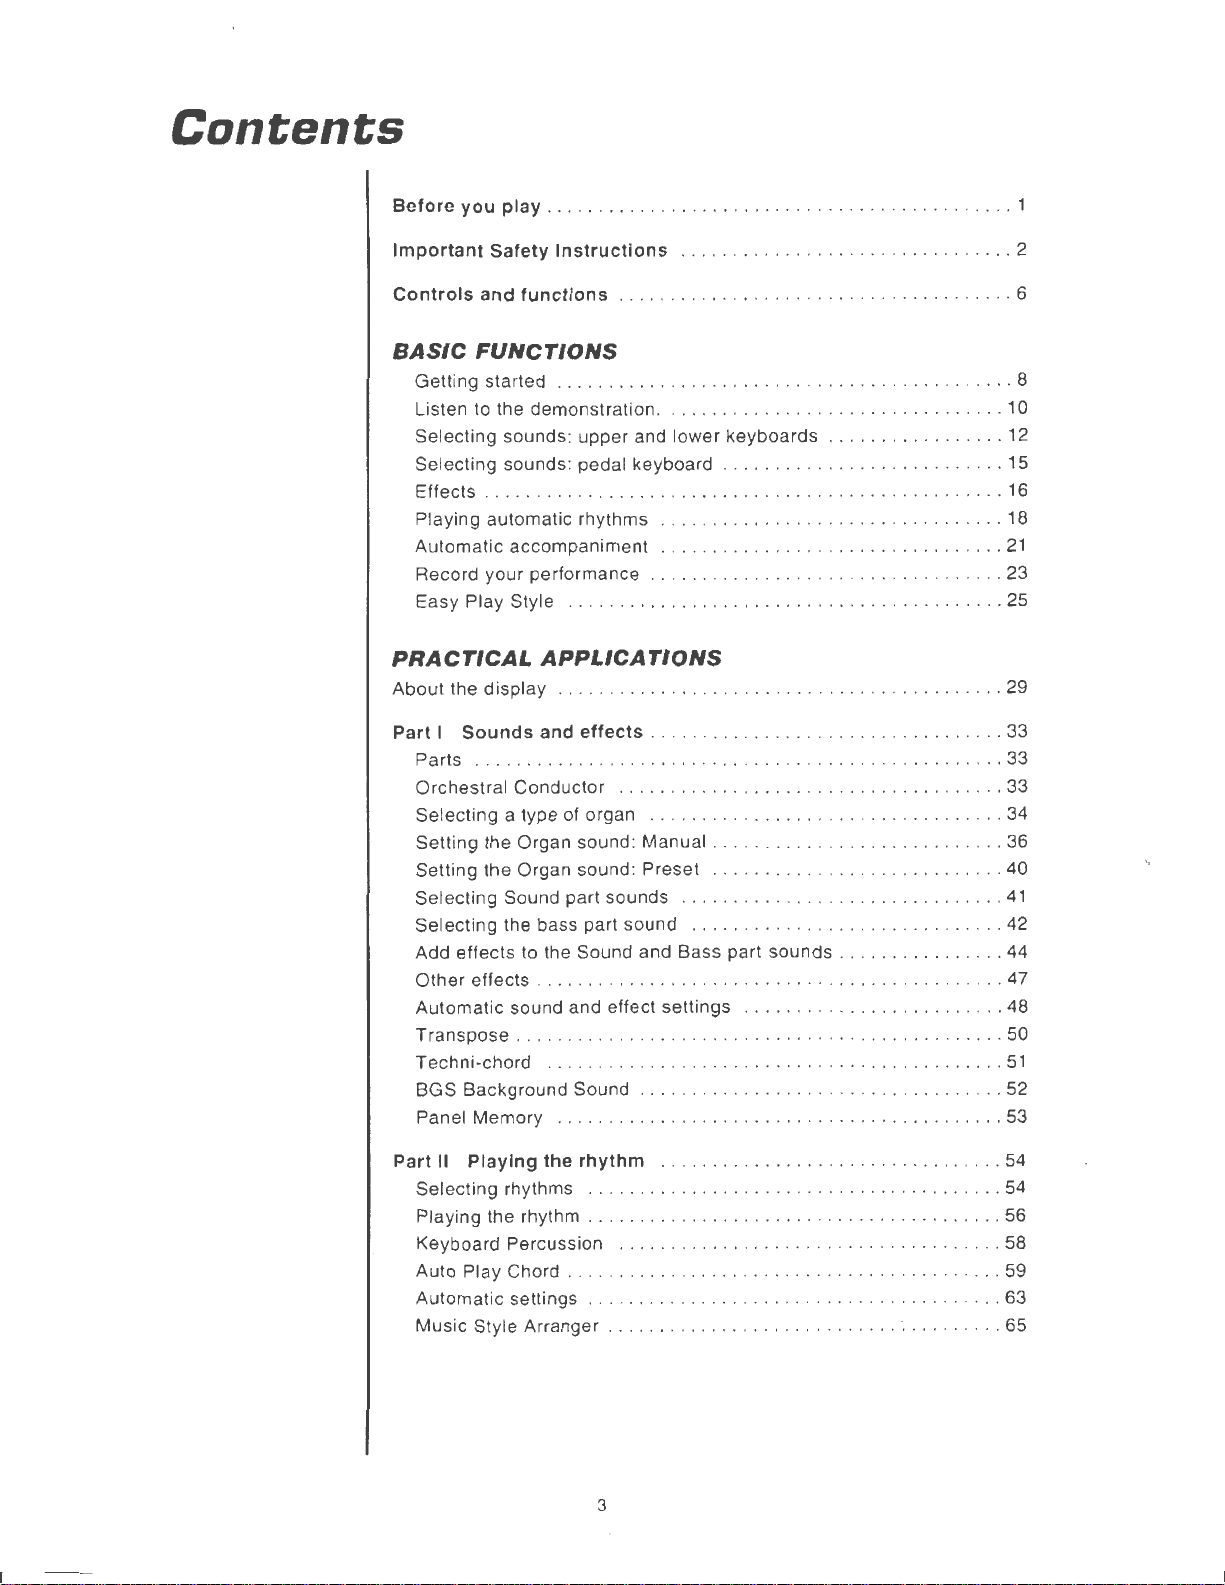
Contents
Before you play
Important Safety Instructions
Controls and functions . .
BASIC
Getting started
Listen to the demonstration
Selecting sounds: upper and lower
Selecting sounds: pedal keyboard
Effects ...
Playing automatic rhythms
Automatic
Record your performance . .
Easy Play Style .
FUNCTIONS
PRACTICAL
About
the
display
Part I Sounds and effects ....
Parts
Orchestra
Selecting a type of organ
Setting the Organ sound: Manual . . .
Setting the Organ sound: Preset
Selecting Sound part sounds
Selecting the bass part sound
Add effects to the Sound and Bass part
Other
Automat ic sound and effect settings
Transpose
Techni-chord . .
BGS Background Sound .......
Panel Memory
.............
effects . . . . . .
.....
..
...............
...........
...............
.....
...
. .
..................
.......................
............
accompaniment . .... . .
........
..........
.............
...............
......
APPLICATIONS
....
. .
......
.
.........................
l Conductor .....
.......................................
.........
..........
.......
.
............................
..............
........
..........
....
........
...............................
..............................
.
...............................
........
. . . . .
.........
. .
.. ...........
. .
...
................
.
...............
keyboards
.........
. . .
....
.....
..
............
............................
.........................
......................
...
...
.................
..
........
......
.....................
..
.......
.
. . .
sounds
.......
...
.
.....
......
........
...............
.
.......
..........
.......
.
...........
..............
..... . .
.
........
....
.
.........
.
.......
.. ...........
...
.....
........
.
.
........
.
............
...........
...
.....
..
.......
.
......
..
.......
....
....
....
..
10
12
15
16
18
.
21
. 23
25
29
33
33
..
33
34
. . 36
40
41
42
. . 44
47
48
. . 50
51
52
. 53
1
2
6
8
Part II Playing the rhythm ...........
Selecting rhythms
Playing the rhythm . .
Keyboard Percussion
Auto Play Chord
Automat ic settings
Music
Style Arranger
.......
.............
......
3
.
....
. .
..............................
...........
..
.....
. . .......
............................
.........
.
.....
. .
...............
...
.........
.........................
. .
...
..........
.........................
~
.
.....
.
......
..
.....
........
54
54
. 56
58
59
63
65
Page 6

Part
Ill
Sequencer
Outline of the Sequencer
Easy Record
Sequencer
parts . .
Realtime Record
Step Record
Track
Assign
Other
recording settings you can adjust
...................
............................
.............................
...
...
.............
......................................
.............
.
...................
................
Editing the recorded performance
Punch record
.......
.
.......
Playback from a specific measure
Sequencer
Part
IV
Outline of the Composer
Medley
Composer
............................
............
...................................
Setting up to create a rhythm pattern .
Record your rhythm pattern
Step Record
Composer Mode
.........
.....
................................
. . .
................................
.........
.
.......
.
.......
..........
.
.......
.
....................
......................
...........................
..
...
.....
...................
......................
.
.................
...........
.............
...........
..
...........
.....
.
...........
.
...........
.
..........
.
..........
.
.....
........
......
. . .
...
67
67
69
70
..
. 72
74
79
80
82
89
..
91
92
93
93
. 95
99
100
102
Part V Disk
Loading data
Formatting a disk
Saving data
Drive
............
...........
......................
.....
Single data type load
Part
VI
Adjusting
Sound mode
Sound setting
Part
VII
Adjusting
the
..................
.................
the
Outline of procedure
Touch functions
Control functions
Part
VIII
Creating
...................
................
sounds
Outline of the Sound Edit
Easy Edit
General Edit
Tone Edit
Effect Edit
............
........
........
.......
Store the new sound
.
...........•...................
......
....
sounds
functions
..
......
.
.....................
.................
...
. . ....
.
.........................
..
............................
. . .
....................
........................
.....................................
.... . .
.
.......................
..................
.................................
.......
..
....
...
....................................
............
.........................
....
.. ..
. . .
.................
...............................
.
.................
............
..
.
.............
...
...
.
..............
.
.............
.
. .
.......
..........
..
.......
. . .... 135
..
.....
....
..
103
105
106
. 107
..
109
111
113
123
123
124
125
128
128
. 130
131
139
140
111
4
Page 7
Part
IX MIDI ..........
What
is
MIDI? . .
...............
Outl ine of MIDI functions
Sett i
ng
the functions
. . . . . .... .
.............
.
.............
..
....
........................
.....................................
..........
........
.
.........
142
142
144
145
Initialize
Connections
Assembly
Disassembly
Symptoms
Error
Index ...........
Specifications ..........
. .
..........
. .
..........
............
which
messages
...................
appear
. .
...........
.
..............
.
................
.
...............
.
............................
to
be
..
. .
.
...................
. . .
.....................
..
.......
signs
of
trouble
.
............................
.
.........................
.........
.
.............
.
............
..............
. . .
.
...
....
154
155
156
157
158
160
161
163
5
Page 8
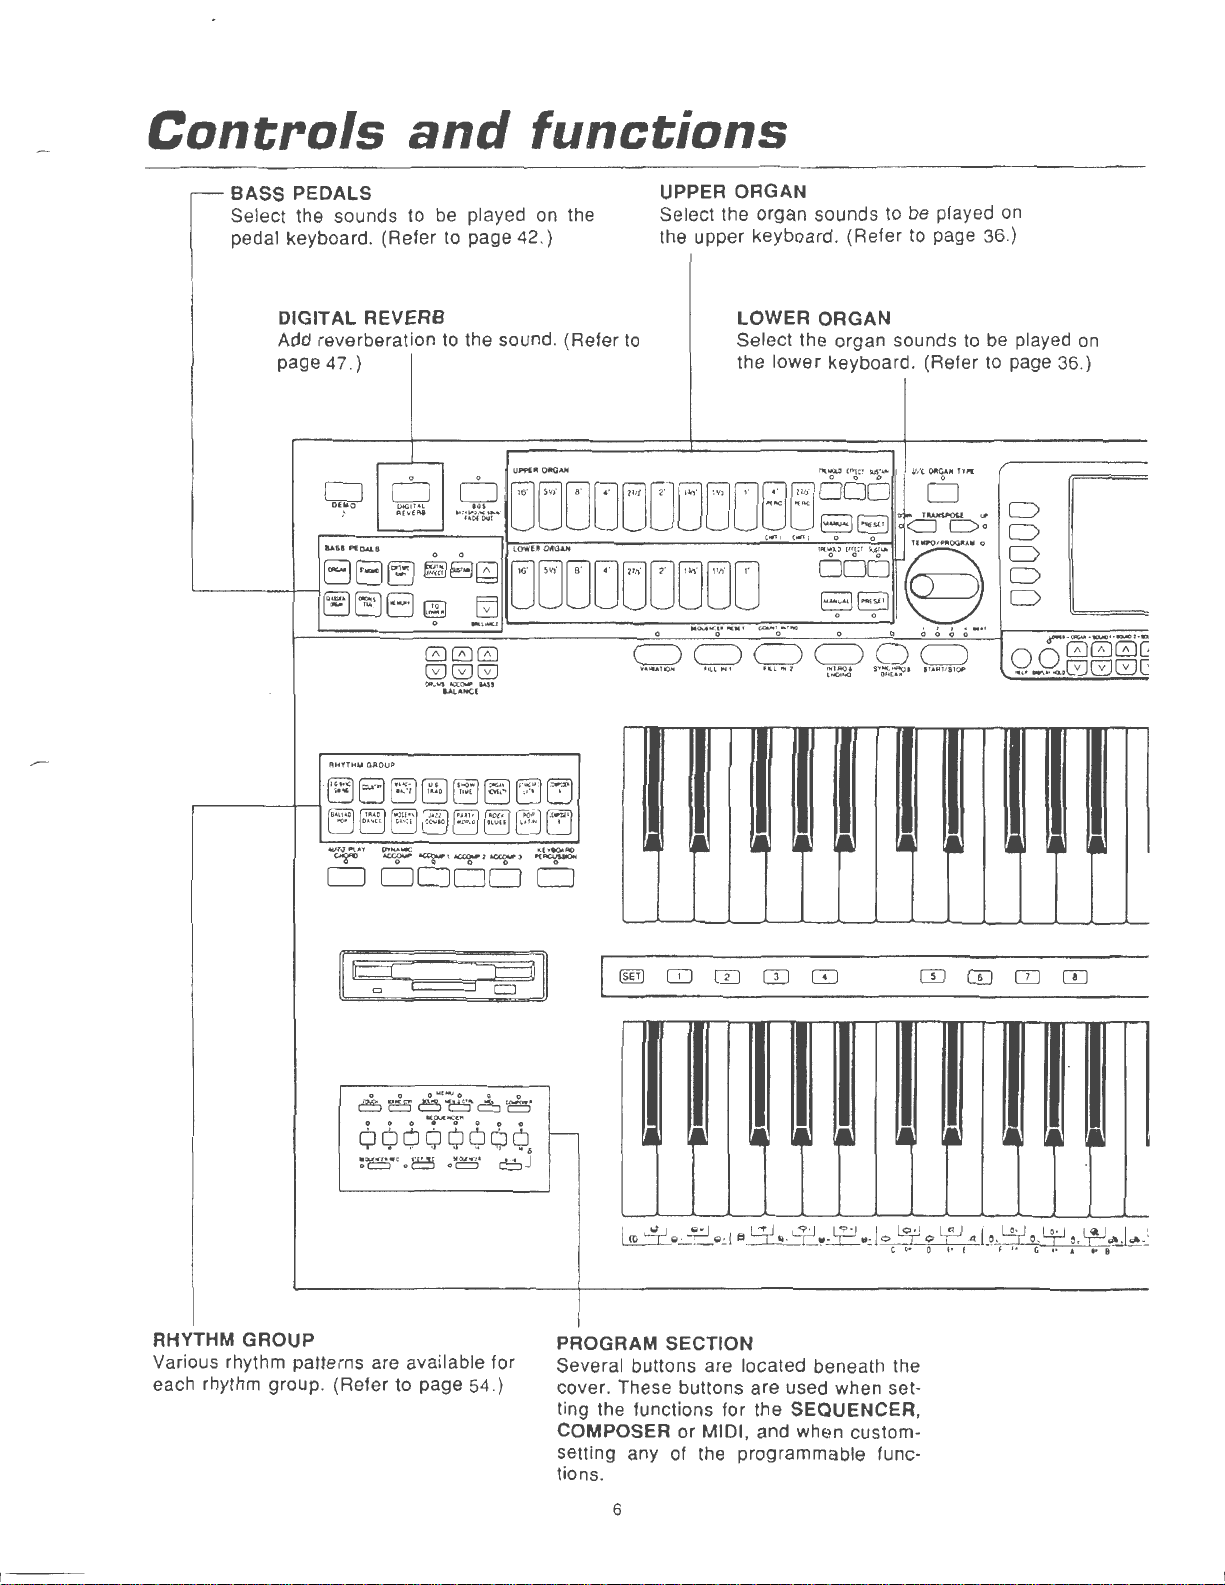
Controls
and
functions
- BASS PEDALS
Select the sounds to be played on the
pedal keyboard. (Refer to page 42.)
DIGITAL REVERB
to
Add reverberation
page 47.)
PIHYTHU
GROUP
the sound. (Refer
UPPER ORGAN
Select the organ sounds to be played
the upper keyboard. (Refer
LOWER ORGAN
to
Select the organ sounds to be played
the lower keyboard. (Refer to page 36.}
to
on
page 36.)
on
D
D
D
D
D
r•
·IJI'IIiNI·-··
000c:
00
...
---.GGGC:
-r•D
;g--nJI
RHYTHM GROUP
Various rhythm patterns are available for
each rhythm group. (Refer to page 54.}
CIJCD0CD
1---
PROGRAM SECTION
Several buttons are located beneath the
cover. These buttons are used when setting the functions for the SEQUENCER,
COMPOSER or MIDI, and when customsetting any of the programmable functions.
6
Page 9
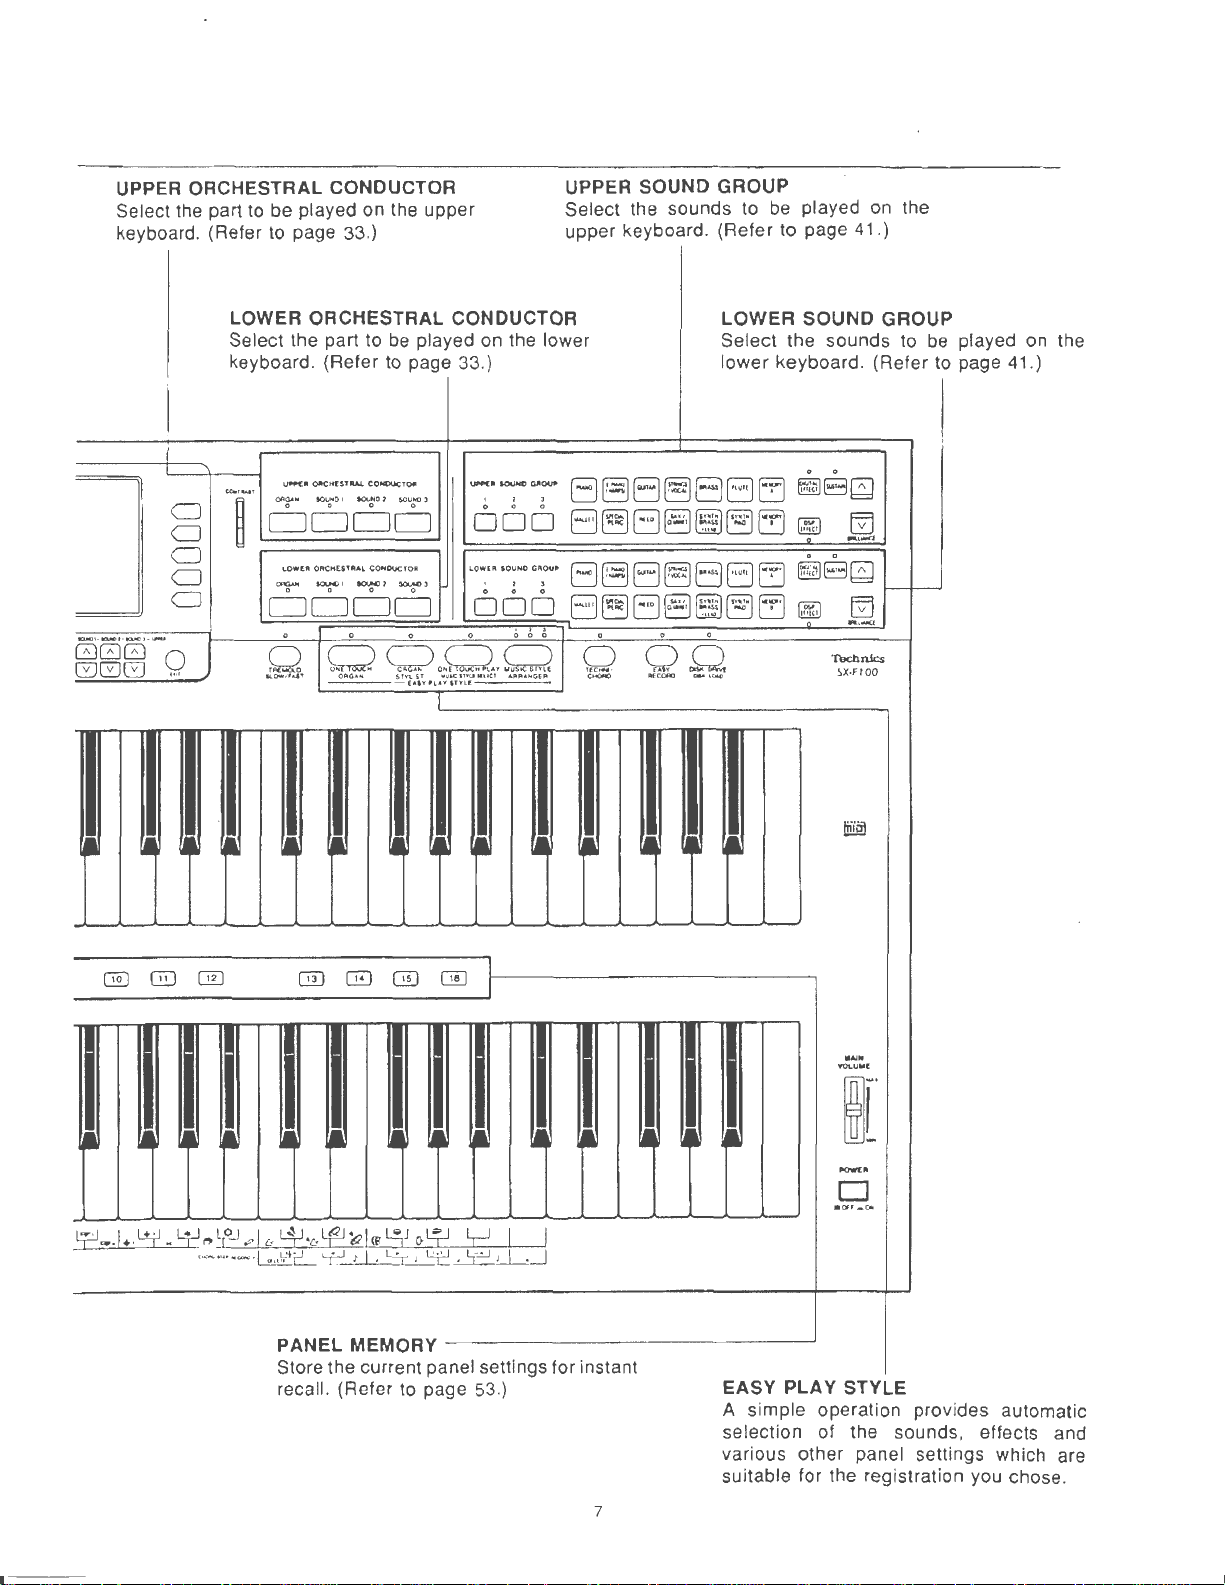
UPPER ORCHESTRAL CONDUCTOR
Select the part to be played on the upper
keyboard. (Refer
to
page 33.)
UPPER SOUND GROUP
Select the sounds to
be
played
on
upper keyboard. (Refer to page 41.)
the
0
·0·~r-
GGG
CJ
CJ
CJ
CJ
CJ
Q
LOWER ORCHESTRAL CONDUCTOR
Select the part to
keyboard. (Refer
U~ll
eoo.r..,.,
~
OJtCHfSTIW.
0 0 0
""'"''
"""'"
DODD
lOWfJI Orte"ESTIIAl
0
0
"""""
""""'
DODD
0 0
C!
Q
kOW""''
'
OAO""
~01
OW<>>
be
played on the lower
to
page 33.} lower keyboard. (Refer t o page 41.)
CCINOCKTQCII
~UNOl
\,llllft{ I IOONC
' ' '
0 0 0
C>JIIou-
ODD
COHOVCTOII
0
""""''
0
LQ~l~
IO~NO
G:Ou•
0 0 0
ODD
touc•
IHI..IIolHel
0 0 0
).,
L~
"'fiJ~•NGfR
,J
0 0
<:::>
o~
..
1/..,:::
Sl1'1.1
6f
("''"'l"'"''nu:
I
LOWER SOUND GROU
Select the sounds to
0
0
r-r--
~El~
•
~
0 0
~8~
~
Ej
_,
...,
Ej
..
,
_,
Technics
SX·FIOO
fii@l
EJEJEJBE16EJ
.,"'
(l
...
! -:-::-::
El~EJEJ~EJEJ
EJ
E)
El
E)
El~EJ~~[3EJ
0 0
Q
'"""'
OQ
Rf_t:.Of'IO
""'D
E3 6 EJ
'"..,
0
-l~
-
~
f--
p
played on the
be
f-.-
L?
@
....
1 •. L4.
@]
0
-
-
4-l~
·-·
t,2J
..
··-·1
[E)
@)
.,1
u-
L4J.&~~I
1
...
h'
c
L,:-J
r I 1
@)
w
~J
::X
o9
1 ¥ 1
OIJ
L,J
'::!~
I
I
I
I
J I
I
PANEL MEMORY
Store the current p anel settings for instant
recall. (Refer to page 53.}
.
..,.
VOLUW[
~[
..,....
D
acw,-o-.
EASY PLAY STYLE
A simple operation provides automatic
selection of the sounds , effects and
various other panel settings which are
suitable for the registration you chose.
7
- - -
------
Page 10

Getting
started
Before
Plug the
A
Music stand
B
c
Insert the music stand in the two
holes as shown in the figure.
Keyboard
Open and close the cover slowly.
you
power
cover
play
cord into an outlet.
Music stand
Music stand can
forword.
• To slide the
slightly .
Panel light
The panel light can be turned
pressing the button on the left underside
of the keyboards.
be
slided back or
music
stand, first rise it
on
up
by
• The music stand light and foot light
are also turned on .
• About the backup
The panel settings are maintained in the backup memory for
to this instrument is turned off.
COMPOSER,
before you turn off the instrument, use the SAVE procedure to store the desired data
disk for recall at a later time.
•
The
backup memory
• When you quit the operating mode, a warning display may appear to remind you to save
the data . If this occurs, after checking the reminder, press the
• Power-on settings
When the
• If you wish to retain the settings which were in effect when you last turned off this
instrument, set the POWER-ON MODE to BACK UP. (Refer to page 127.)
are maintained for about 80 minutes. If you wish to keep the memory contents,
power
memory
about
one week
Other
stored memories, such as the
does
not function until the power has been
to this instrument is turned on , ORGAN settings are automatically selected.
8
SEQUENCER
on
for about 10 minutes.
OK
button.
after
the power
and
on
a
Page 11
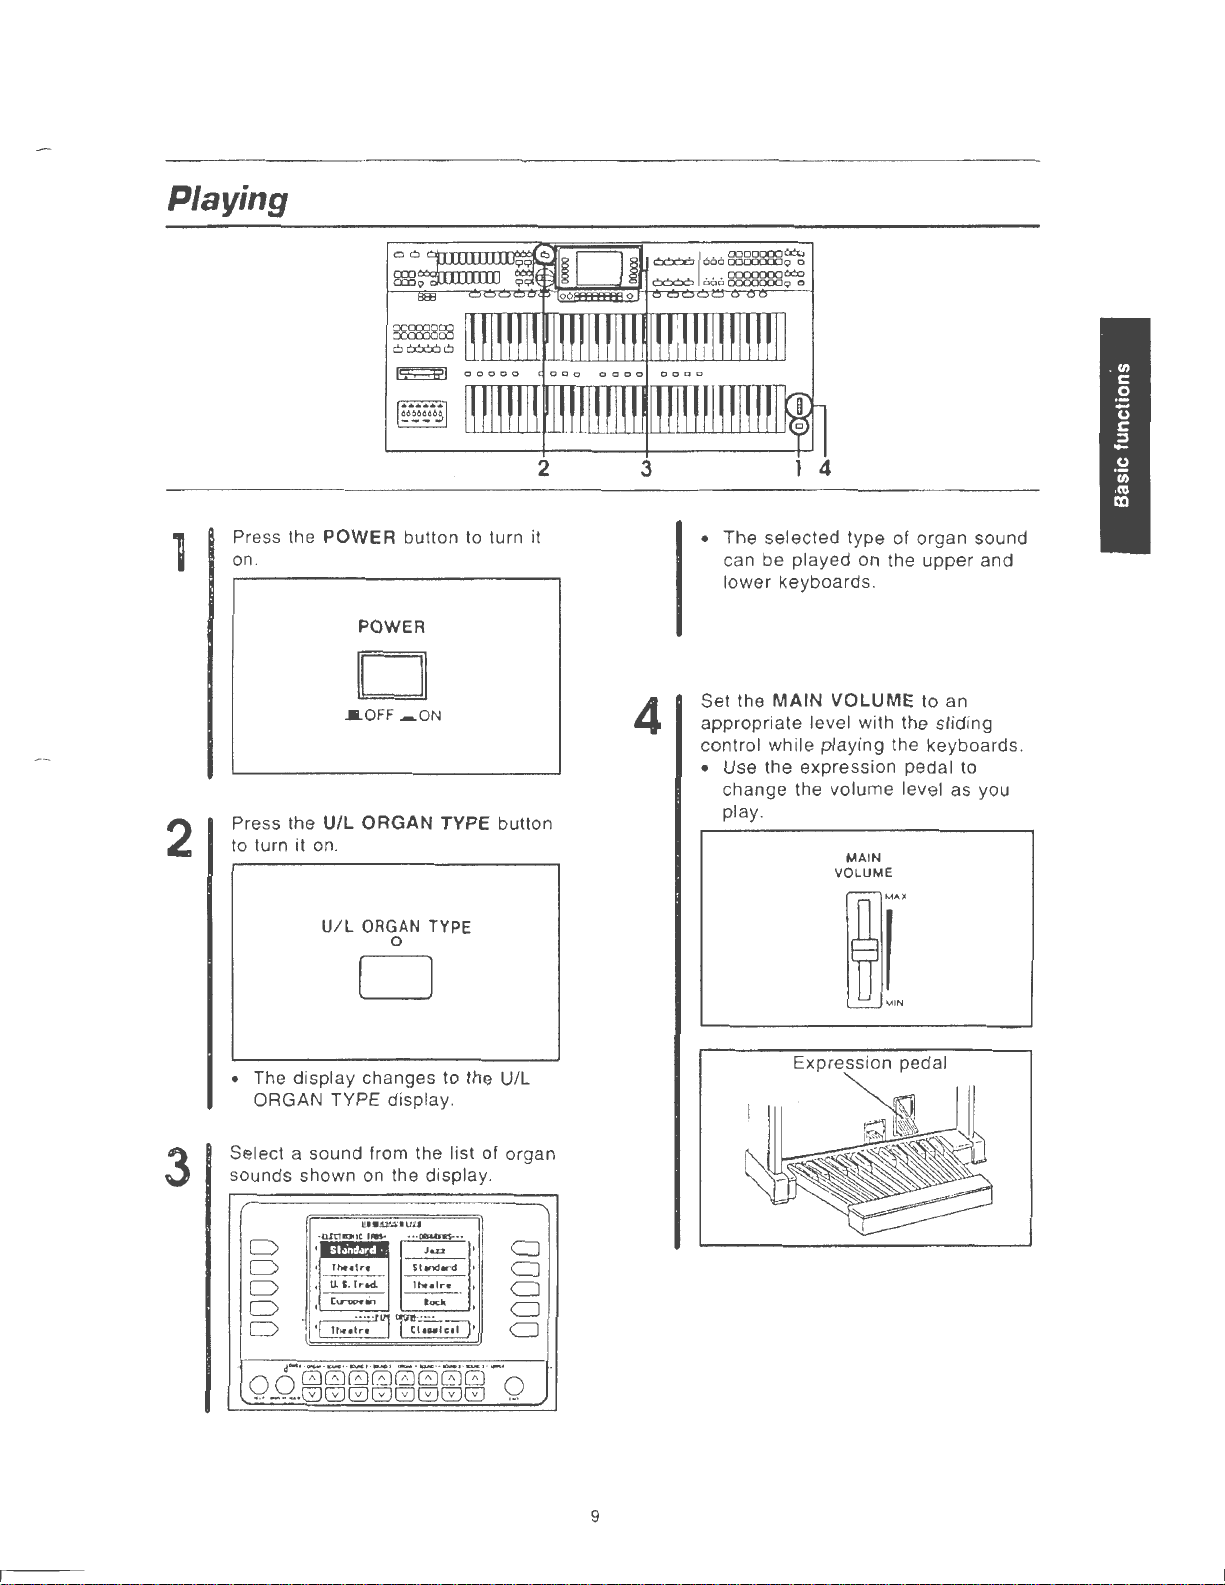
Playing
2
Press the POWER button to turn
on
.
POWER
D
IOFF
.-.ON
Press the
to turn it on.
U/L
U/L
ORGAN
ORGAN
0
TYPE button
TYPE
D
MAIN
4
VOLUME
MAIN
VOLUME
upper
to an
and
2
it
4
• The selected type of organ sound
can be played on the
lower keyboards.
Set the
appropriate level with the sliding
control while playing the keyboards.
• Use the expression pedal to
change the volume level as you
play.
3
• The display changes to the U/L
ORGAN TYPE display.
Select a sound from the list of organ
sounds shown
D
D
D
D
D
r··- ·-··-··
0 0
00000000
···--~.GGGGGGGG
on
the display.
uwn~·auu
·
nlt101tl,.,..
.
.
Th4-•lrt
---
U.
S.
.
(lr'VPCW,
.
·I
u\f.;~:-'j
Trad.
ic1·;:_1;;!1'
-·
- ·-··-·
···tiii:ROWS·-·
J
....
---
Sl.,_,ard
---
IN>•
Ire
loci<
'
'
'
· ··
-·
CJ
CJ
CJ
CJ
CJ
0
...
Expression pedal
9
Page 12
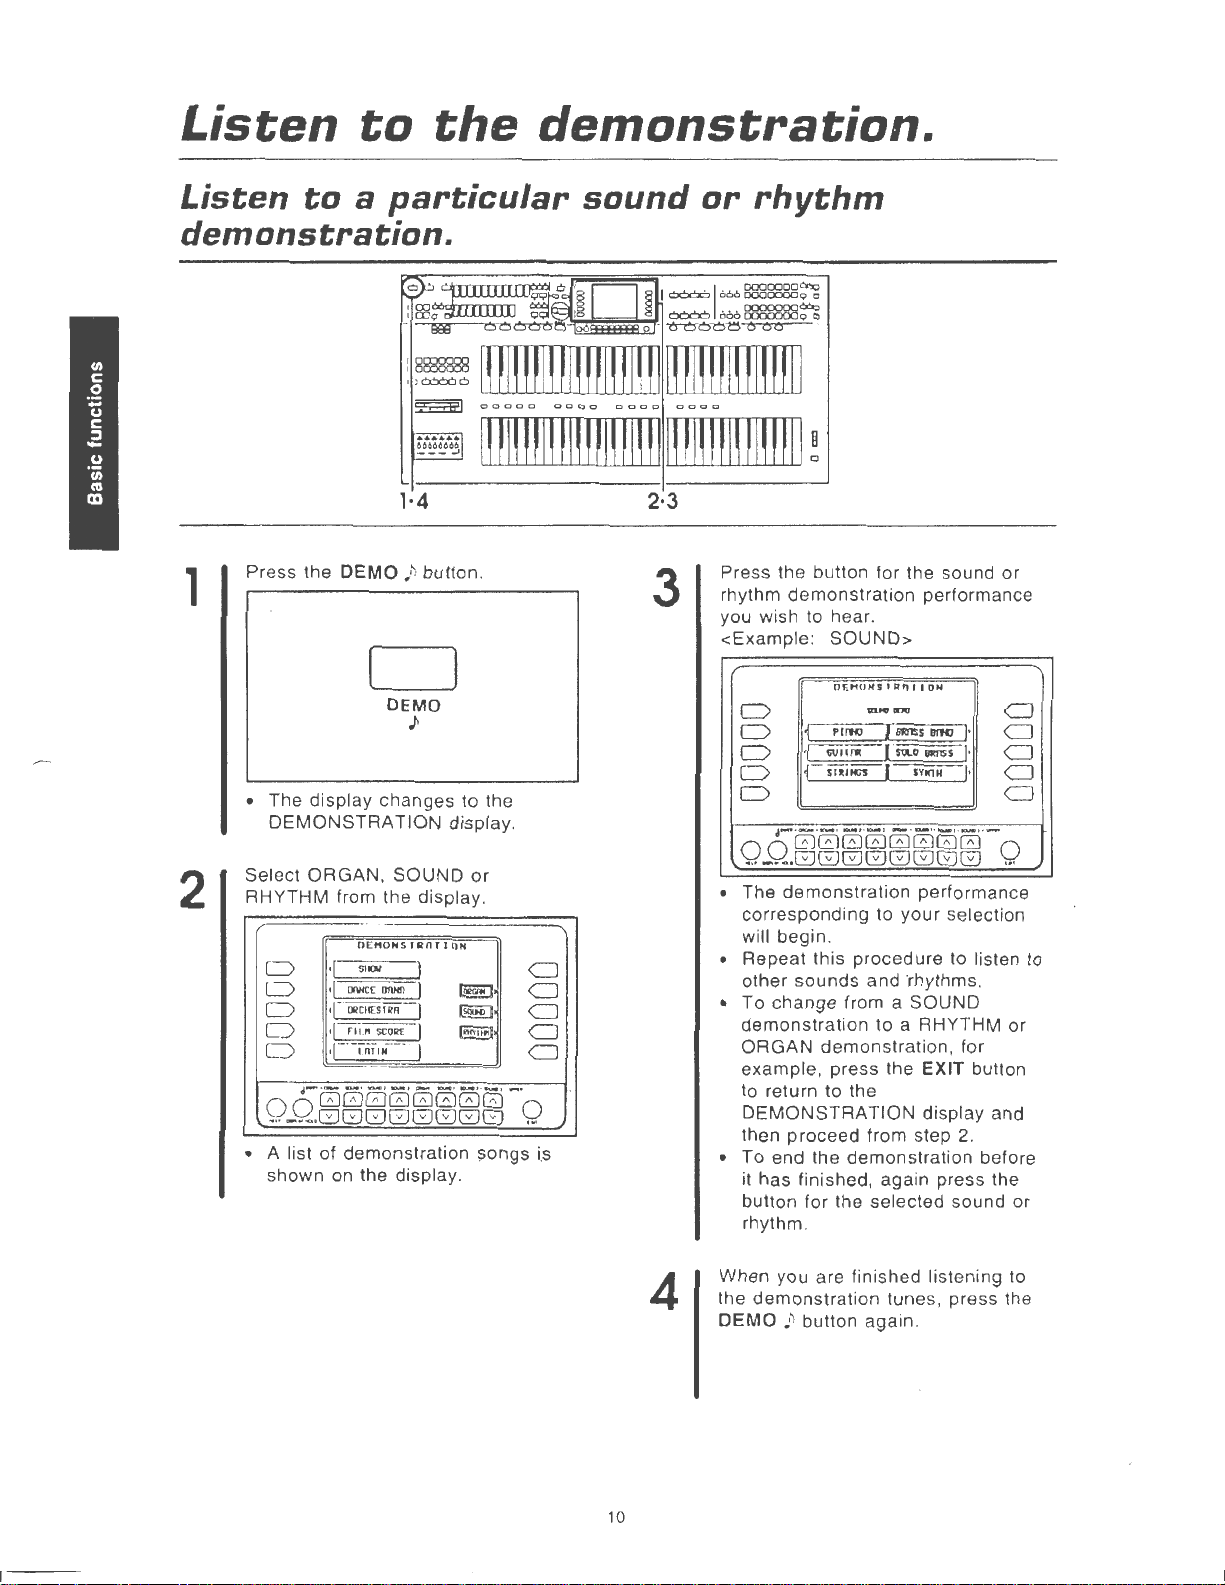
Listen
to
the
demonstration.
Listen
to
a
particular
demonstration.
~~::g:::~:~~~
:
~~~
~
~
1·4
Press the
DEMO
;
~
button.
1
D
DEMO
)
• The display changes to the
DEMONSTRATION
Select ORGAN, SOUND
2
RHYTHM from the display .
0Ef10HSJROrlOH
5101
D
D
D
D
D
0 0
...
• A list of demonstration songs i.s
shown on the display.
•[
00/IC[ llfiHil
·I
f
OIICHESI•n
rll
•I
f---,,,,.
·-·
00000000
--~.GGGGGGGG
.
."
SCORE
I
I
I
I
-- I
'-
· --· -··
sound
8Ei3
oo~~~~
IH
I
!H
00000
00
I
HI~n!HI~!I
0000
0000
IUIH!IUI!HI~!IHI
or
rhythm
~
I OO<X>
1666
~666~90
- 0
000~ v ~~
1n1nmmm1
0000
!?&3g?,g8~
IUIH!I!!IH!II!
2·3
display.
or
(011G110J
(s@D
l~MYn"f
-·
-·
CJ
CJ
CJ
CJ
CJ
0
..
3
Press the button for the sound
rhythm demonstration performance
you wish to hear.
<Example :
D
D
0
0 1 mi~ I
D
0 0
···-···GGGGGGGG
• The
corresponding to
will begin.
• Repeat this procedure to listen
other
• To change from a SOUND
demonstration
ORGAN
example, press the EXIT button
to return to the
DEMONSTRATION
then proceed from step
• To end the demonstration before
it has finished, again press the
button for the selected sound or
rhythm.
SOUND>
OF..HOHSfROitOH
""""""
Plrffi
I lmlSS
·C§•~
·-·-·-·
-··-·
00000000
demonstration
sounds
and ·rhythms.
to a RHYTHM or
demonstration, for
llfHI
(m.o
usmss
sv111H
___ , __ , __ , ._..
performance
your
display and
or
CJ
I·
CJ
I·
CJ
I·
CJ
CJ
0
...
selection
2.
to
10
4
When you are finished listening to
the demonstration tunes, press the
DEMO
~
~
button again.
Page 13
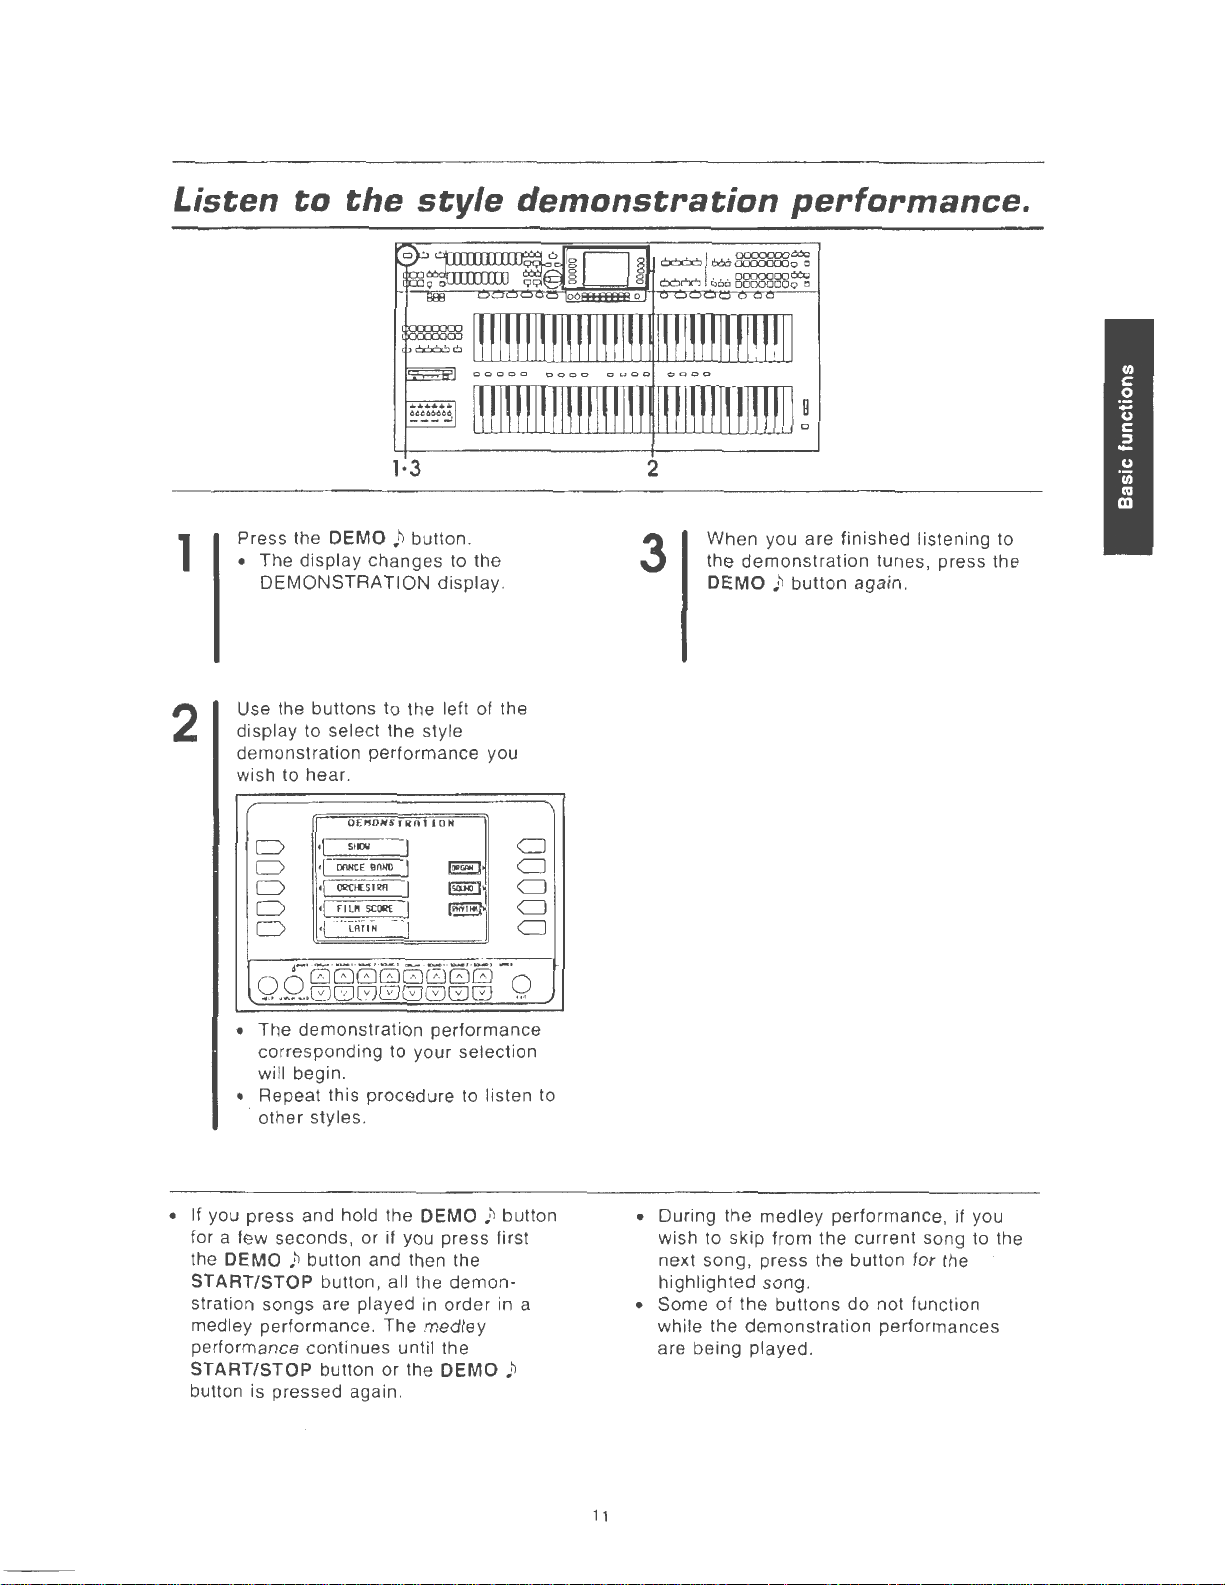
Listen
to
the
style
demonstration
performance.
1
2
1·3
Press the DEMO .h button .
• The display changes to the
I
I
I
-I
-·-
display
tON
DEMONSTRATION
Use the buttons to the left of the
display to select the style
demonstration performance you
hear
wish to
D
D
D
0
0
OOG000GG0G
...
-~--ElGGGGGGG
• The demonstration performance
corresponding to your selection
will begin.
• Repeat this procedure to listen to
· other styles.
.
OEt10NSHlOt
·l----s~i7J-I
f
OOlitE
BnHO
~t£5101
·I
fll"
saJI1E
·I
LATIN
·I
.-·
· ·
·-
..
-··-·
,
.......
(
(SilHI
1
~
..
-··-··-·
.
CJ
CJ
CJ
CJ
CJ
Q
2
3
When you are finished listen ing to
the
demonstration
DEMO
~
~
button again.
tunes, press the
• If you press and hold the
for a few seconds, or if you press first
DEMO
the
START/STOP button, all the demon-
stration songs are played in order in a
medley performance . The medley
performance continues until the
START/STOP button or the DEMO
button is
,:
~
button and then the
pressed
again.
DEMO
~
~
button
,:
~
• During the
• Some
11
medley
wish to skip from the current song to the
next song, press the button for the
highlighted
while the
are being played.
song.
of
the
demonstration
performance , if you
buttons
do not function
performances
Page 14
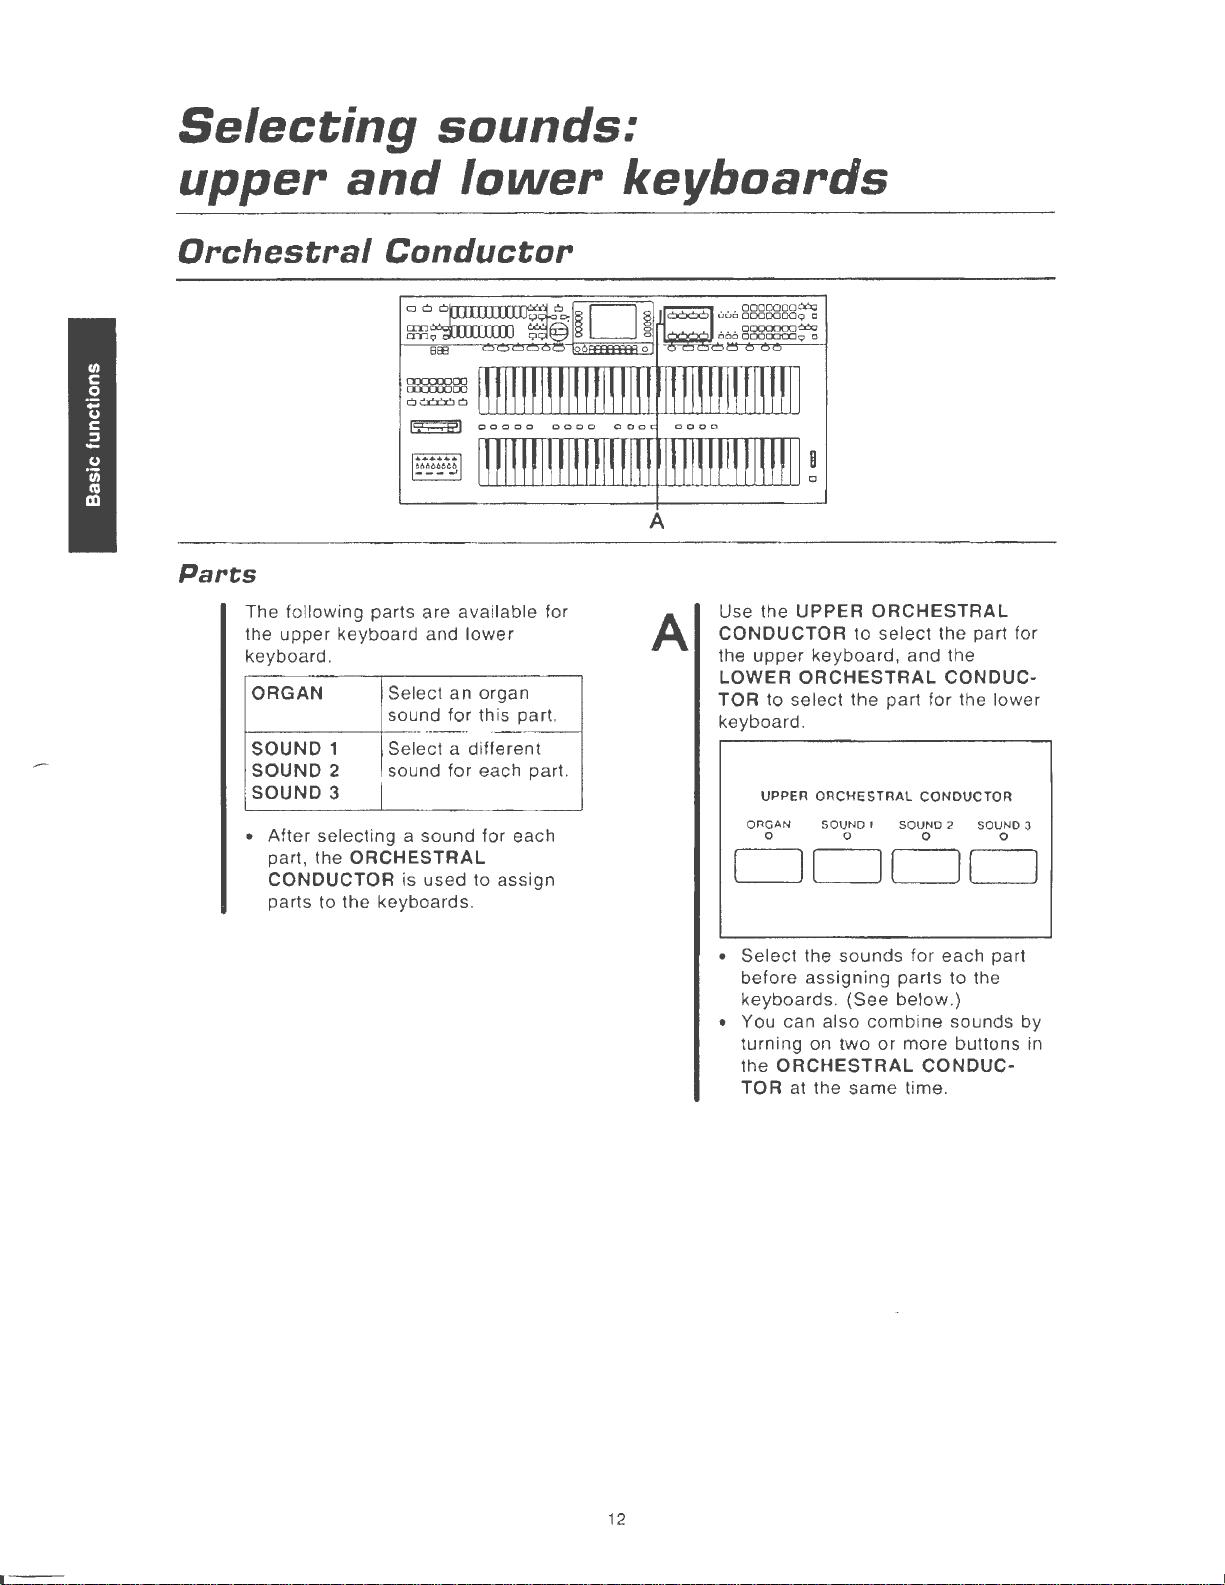
Selecting
sounds:
upper
and
Orchestral
Parts
The following parts are
upper
the
keyboard.
ORGAN
SOUND 1
SOUND 2
SOUND 3
• After selecting a
part, the
CONDUCTOR is used to assign
parts to the keyboards.
keyboard and
lower
Conductor
ava
lower
Select
sound
Select a different
sound
ORCHESTRAL
an
organ
for this part.
for
each part.
sound
for each
ilable for
keyboards
A
A
Use the UPPER
CONDUCTOR
upper
the
LOWER
TOR
keyboard .
ORCHESTRAL
to select the part
UPPER ORCHESTRAL CONDUCTOR
ORGAN S
0 0 0 0
ORCHESTRAL
to
select the part for
keyboard,
OUND
1 SOUND 2 SOUND 3
DODD
and the
CONDUC-
for
the lower
12
• Select the
before
keyboards. (See
• You can also
turning on
the
ORCHESTRAL
TOR at the
sounds
assigning
two
below
combine
or
same
for each part
parts to the
.}
sounds by
more
buttons
CONDUC-
time .
in
Page 15
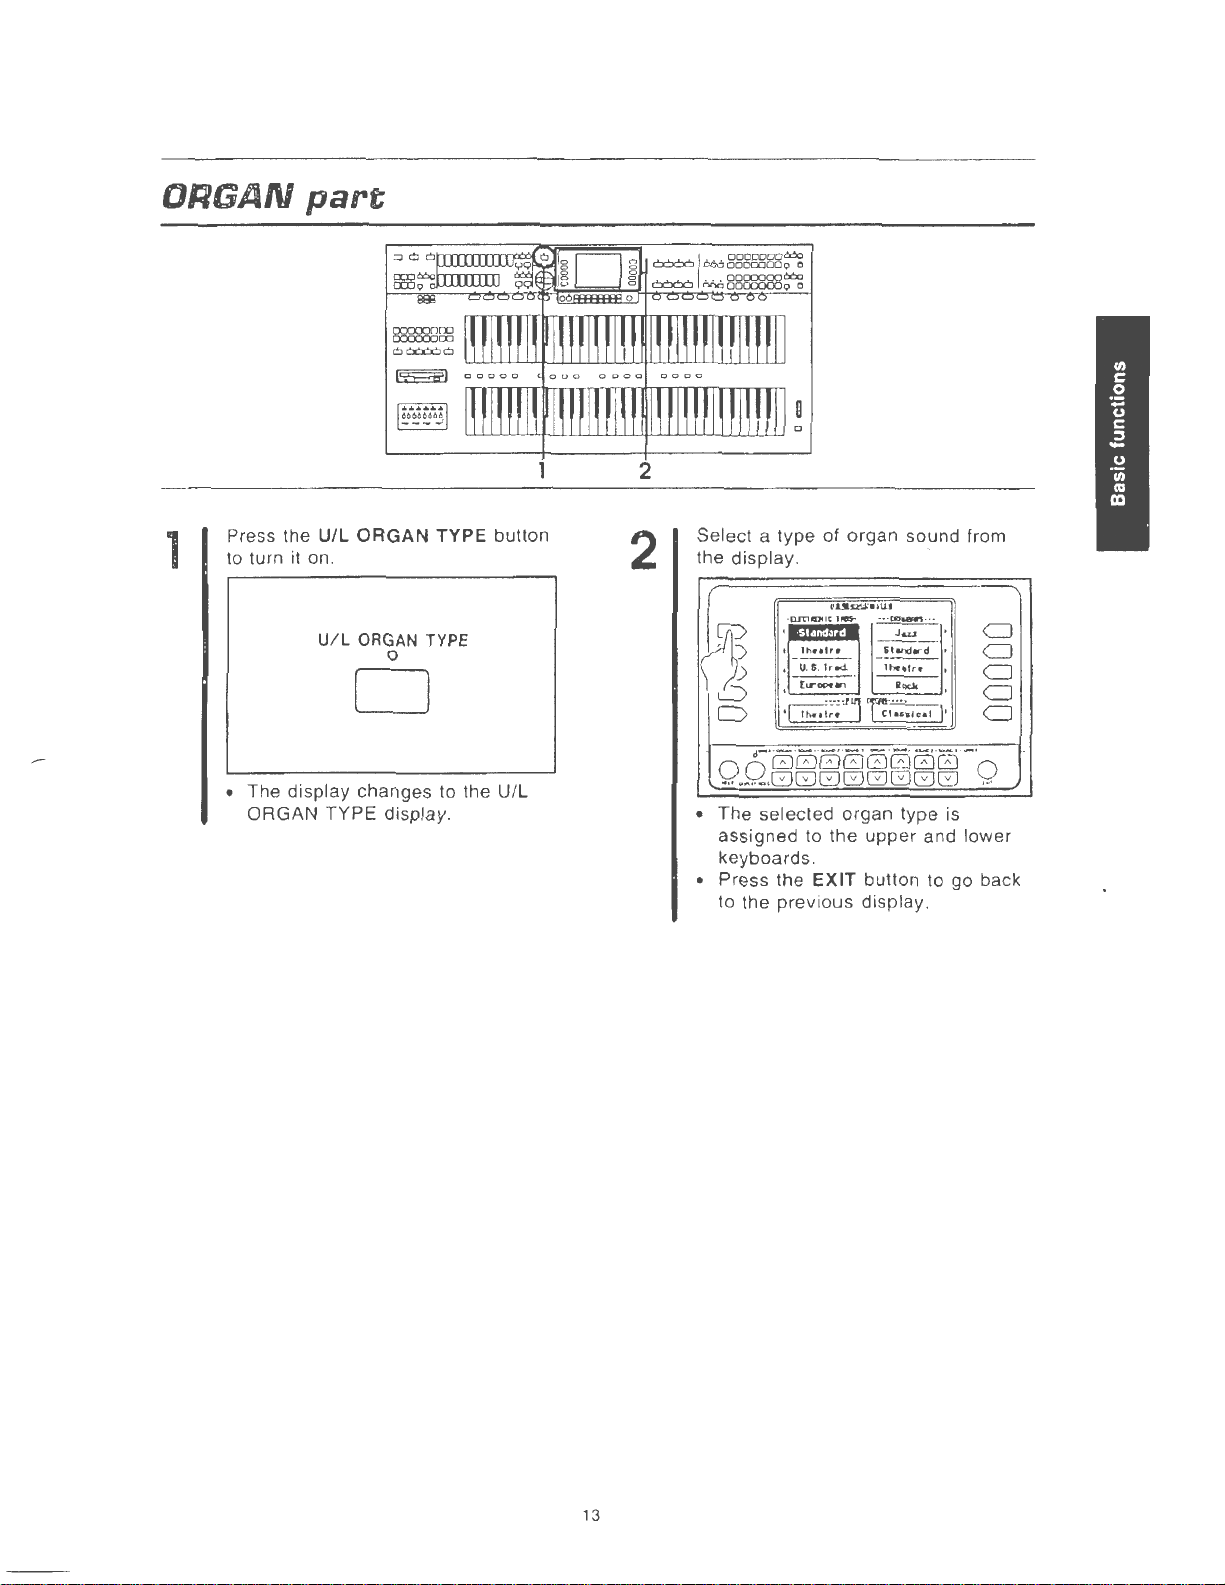
ORGAN
part
1
Press the
to turn it on.
U/L
ORGAN
U/L
ORGAN TYPE
TYPE button
0
D
• The display changes to the U/L
ORGAN TYPE display .
2
Select a type
the display.
[~
0
D
• The selected organ type is
assigned to the
keyboards.
• Press the EXIT button to go back
to the prev
of
organ sound from
~
t·~·1UJ
·
Q.rriiiDIICllleS-
1h••tr•
'
U. S.
---
(trDCl'9
'
·C!h!i1~1
io
·
- -~---
J&LJ
'ihnd..-d
-
--
lrod.
1hlf•frt·
·
...
us
Roclt
rri·~:~,;.J}·
upper
and lower
display .
CJ
CJ
CJ
CJ
CJ
13
Page 16

SOUND
The sound for the
and the sound for the
parts
upper
keyboard is selected with the buttons
lower
keyboard with the buttons in the
in
the
LOWER
UPPER
SOUND
SOUND
GROUP
GROUP,
.
1
2
Press the
UPPER
SOUND
1, 2 or
SOUND
GROUP
0 0 0
3 button in the
GROUP
to turn it on.
2 3
or
DOD
Press a sound button in the
SOUND
SOUND
group.
~'"'\CII.l~
L_j
GROUP
GROUP
rrn
c U
or
LOWER
to
select
LOWER
UPPER
a sound
3
Select a
list on the display.
~
0
0
0 0
• To view a different part of the list,
• Select
• Press
sound
~"""'''
•I@IQ¥1SoloPhno
~1~1
firr
{
{Pt
r ·- ·- · _,_
00000000
.
..
--.GGGGGGGG
press the
same
in the
the
to the
previous
for the part from the
Pl•..,(loct.
...
rr
....
,j..,.
1
acr.Ji
.....
~
Oct
.,...,
MORE
sounds
way.
EXIT button to
I
"'"'
1er
t
~
~
~
__ ,
CJ
CJ
CJ
CJ
CJ
__
.
0
...
button.
go
back
Phno
-(
Horl<v
tri
...
t•
ri
.....
. I
lUI
"""''
- ..
_,
SOUNDS
for the other parts
display.
• The
sounds.
display
changes
to a list
of
14
Page 17
Selecting
sounds:
pedal
BASS
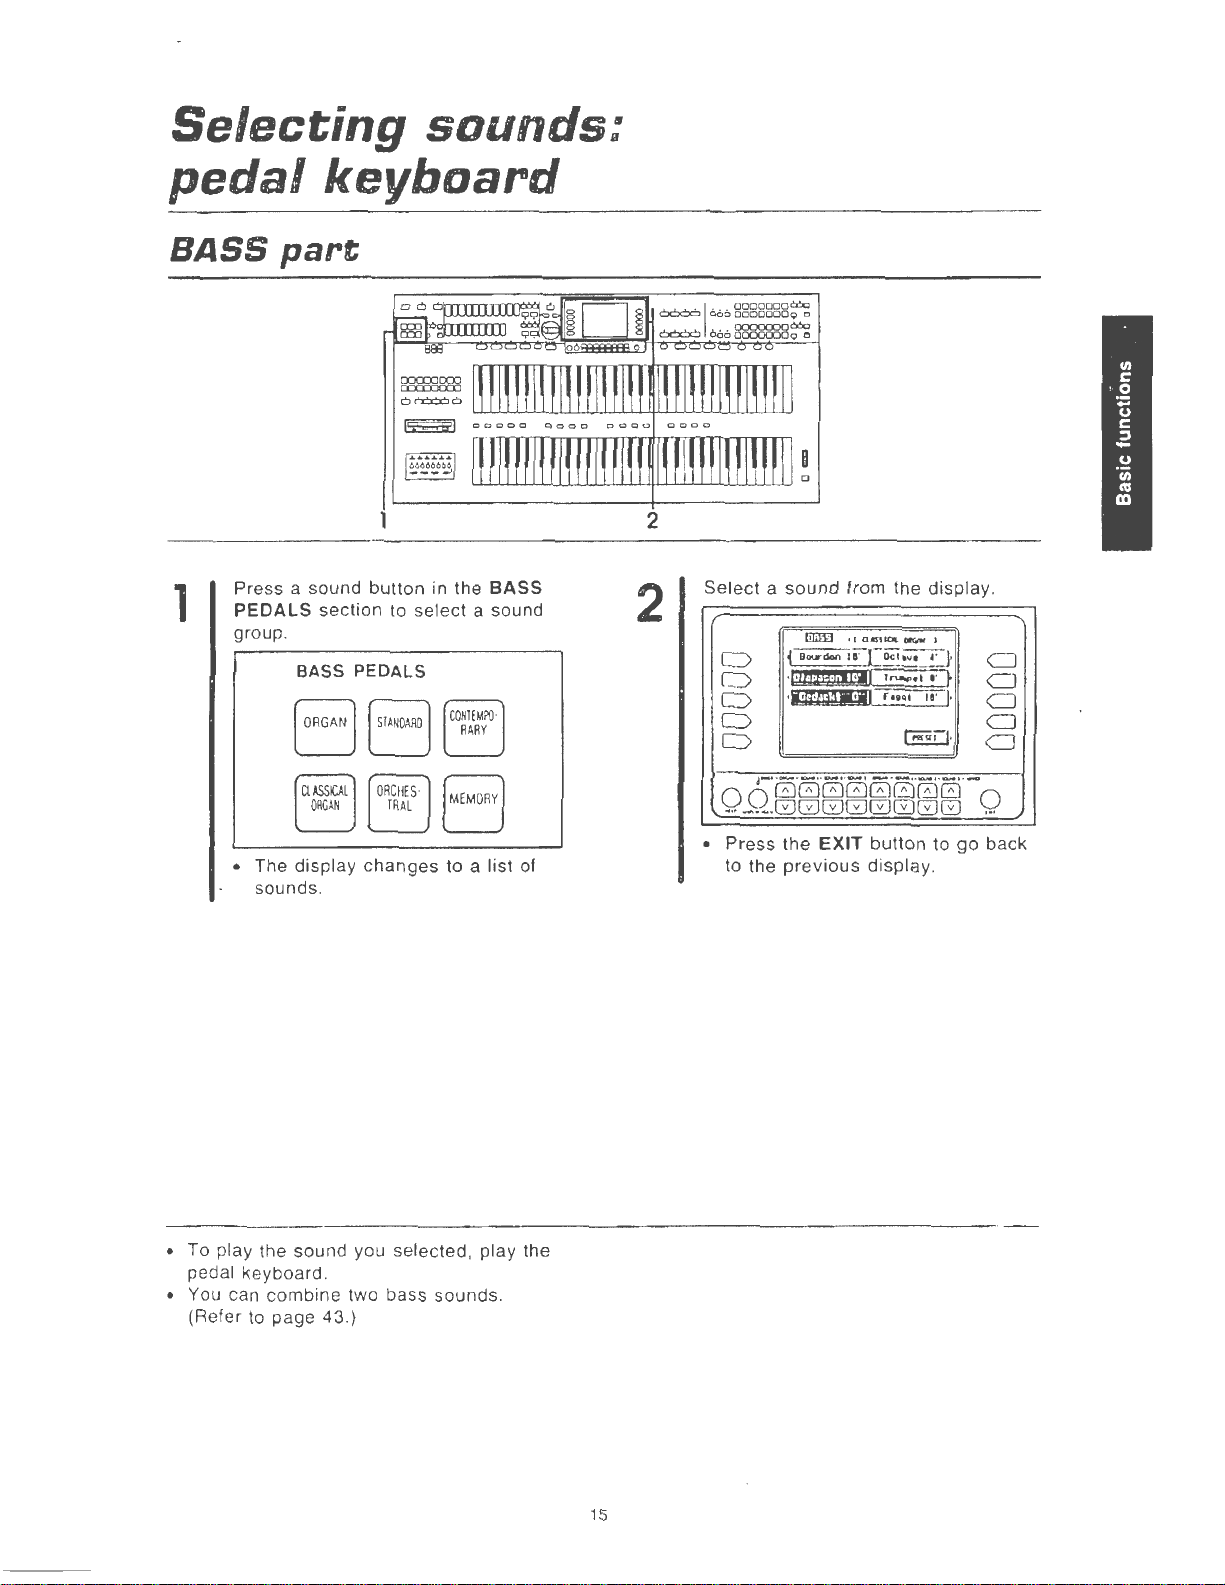
1
part
Press a sound button in the
PEDALS
group .
BASS
keyboard
BASS
section to select a sound
PEDALS
2
2
Select a sound
fiiiW • I
D
D
D
i Dourdon
,(,lt.!-f$-!,IJ•II
.
s.ntmN'·II
C>
D
from the display .
omKJ~.
orr.rw
l~•l
r•n*
..
(}§II
1
1
:.:
I'
. 1·
}
~
·
CJ
CJ
CJ
I!J::Oclovt
CJ
CJ
• The display
sounds .
• To play the sound you selected, play the
ke
pedal
• You can combine two bass sounds.
(Refer
yboard.
to
page 43.}
changes
to a list of
4-·
-- --··-·
0 0
00000000
...
-·~-8GGGGGGG
• Press the
to the
previous
·- · - --··-··-··-
EXIT
button to
display
.
go
0
.
..
back
15
Page 18
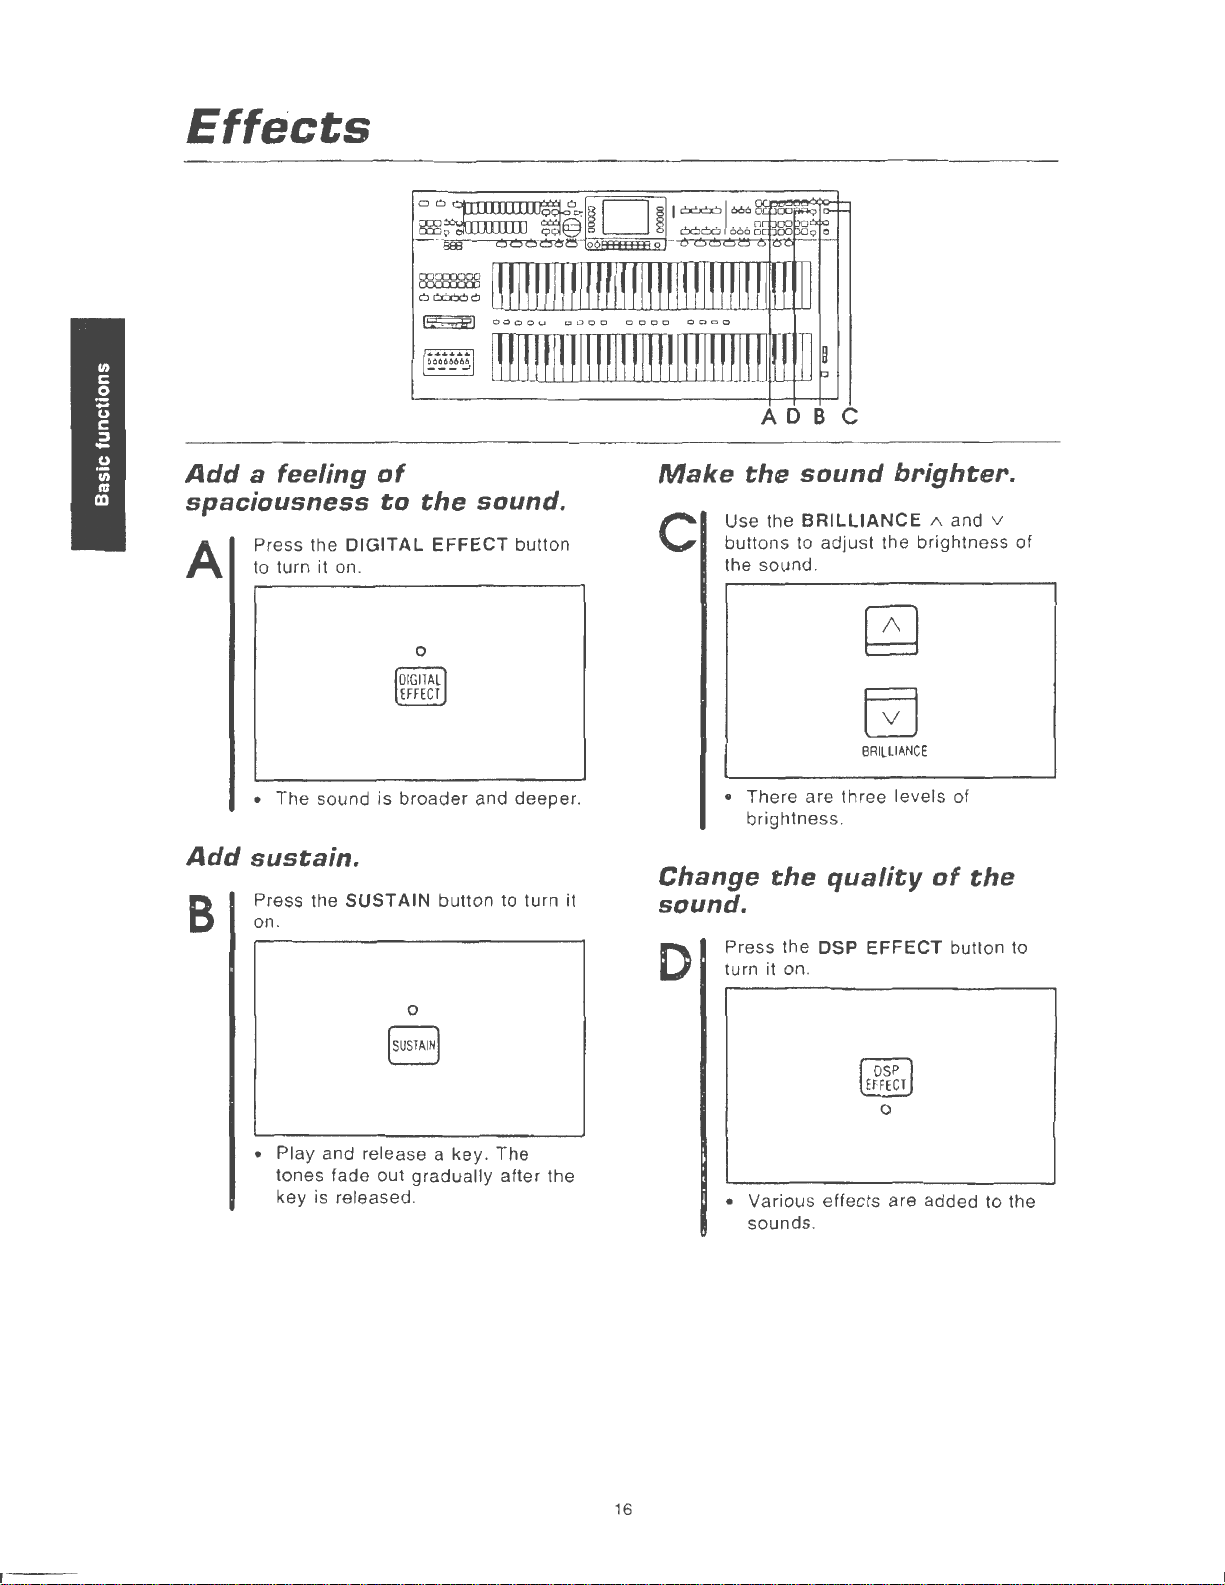
Effects
ADBC
Add
a feeling
spaciousness
Press the DIGITAL
A
Add
B
to turn it
•
The
sustain.
Press the SUSTAIN button to turn it
on.
on
sound is
of
.
to
the
0
broader
0
[susTAIN]
sound.
EFFECT
and
button
deeper
Make
c
.
Change
the
sound
Use the
buttons to adjust the brightness of
the sound.
• There are three levels of
BRILLIANCE
brightness.
the
quality
brighter.
1\
BRILLIAN
CE
of
and v
the
sound.
D
Press the DSP
turn it on.
EFFECT
button to
• Play and release a
tones fade out gradually after the
key is released.
key
. The
0
• Various effects are added to the
sounds .
16
Page 19
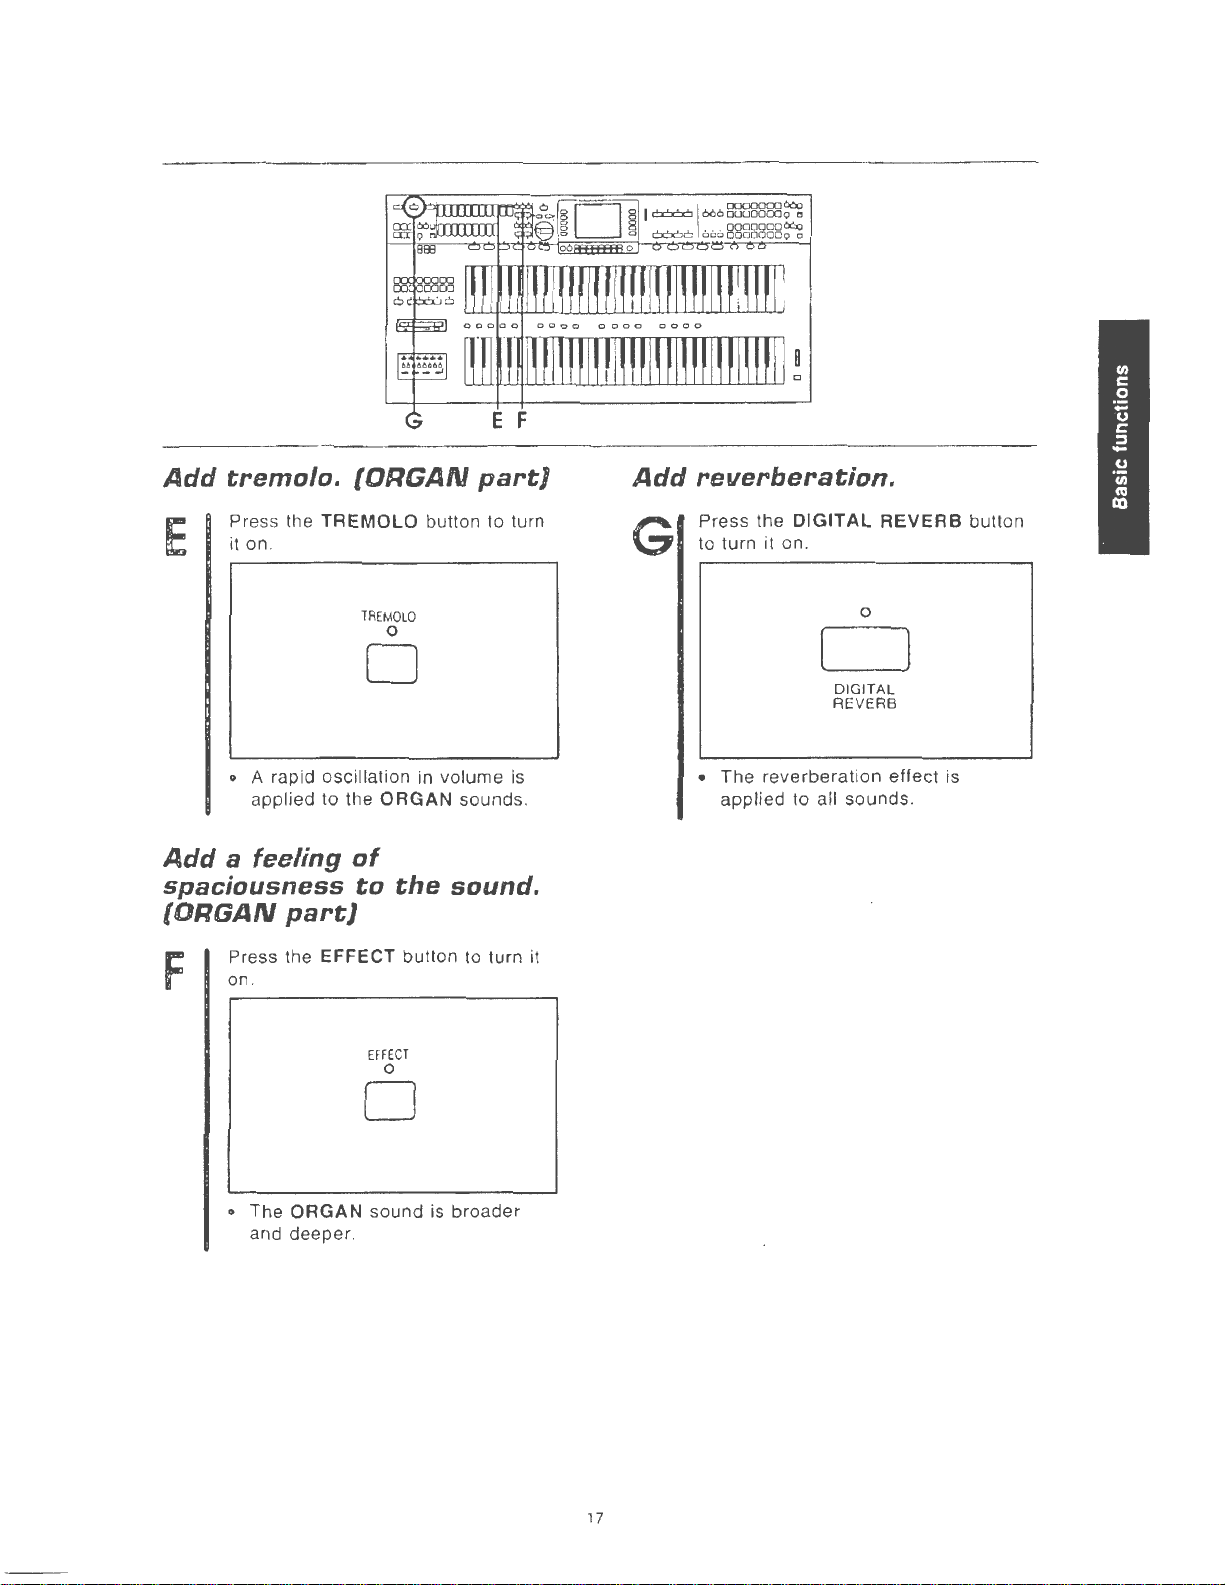
Add
tremolo.
(ORGAN
part}
Add
reverberation.
E
Add
Press the
it
on.
o A rapid oscillation in volume is
applied to the
a feeling
TREMOLO
spaciousness
(ORGAN
F
part}
Press the EFFECT button to turn
on
.
button to turn
TREMOLO
0
0
ORGAN sounds.
of
to
the
sound.
EFFE
CT
0
Press the
G
it
to turn it on.
• The reverberat ion effect is
applied to
DIGITAL
0
DIGITAL
REVERB
all sounds.
REVERB
button
0
o The ORGAN sound is broader
and deeper .
17
Page 20
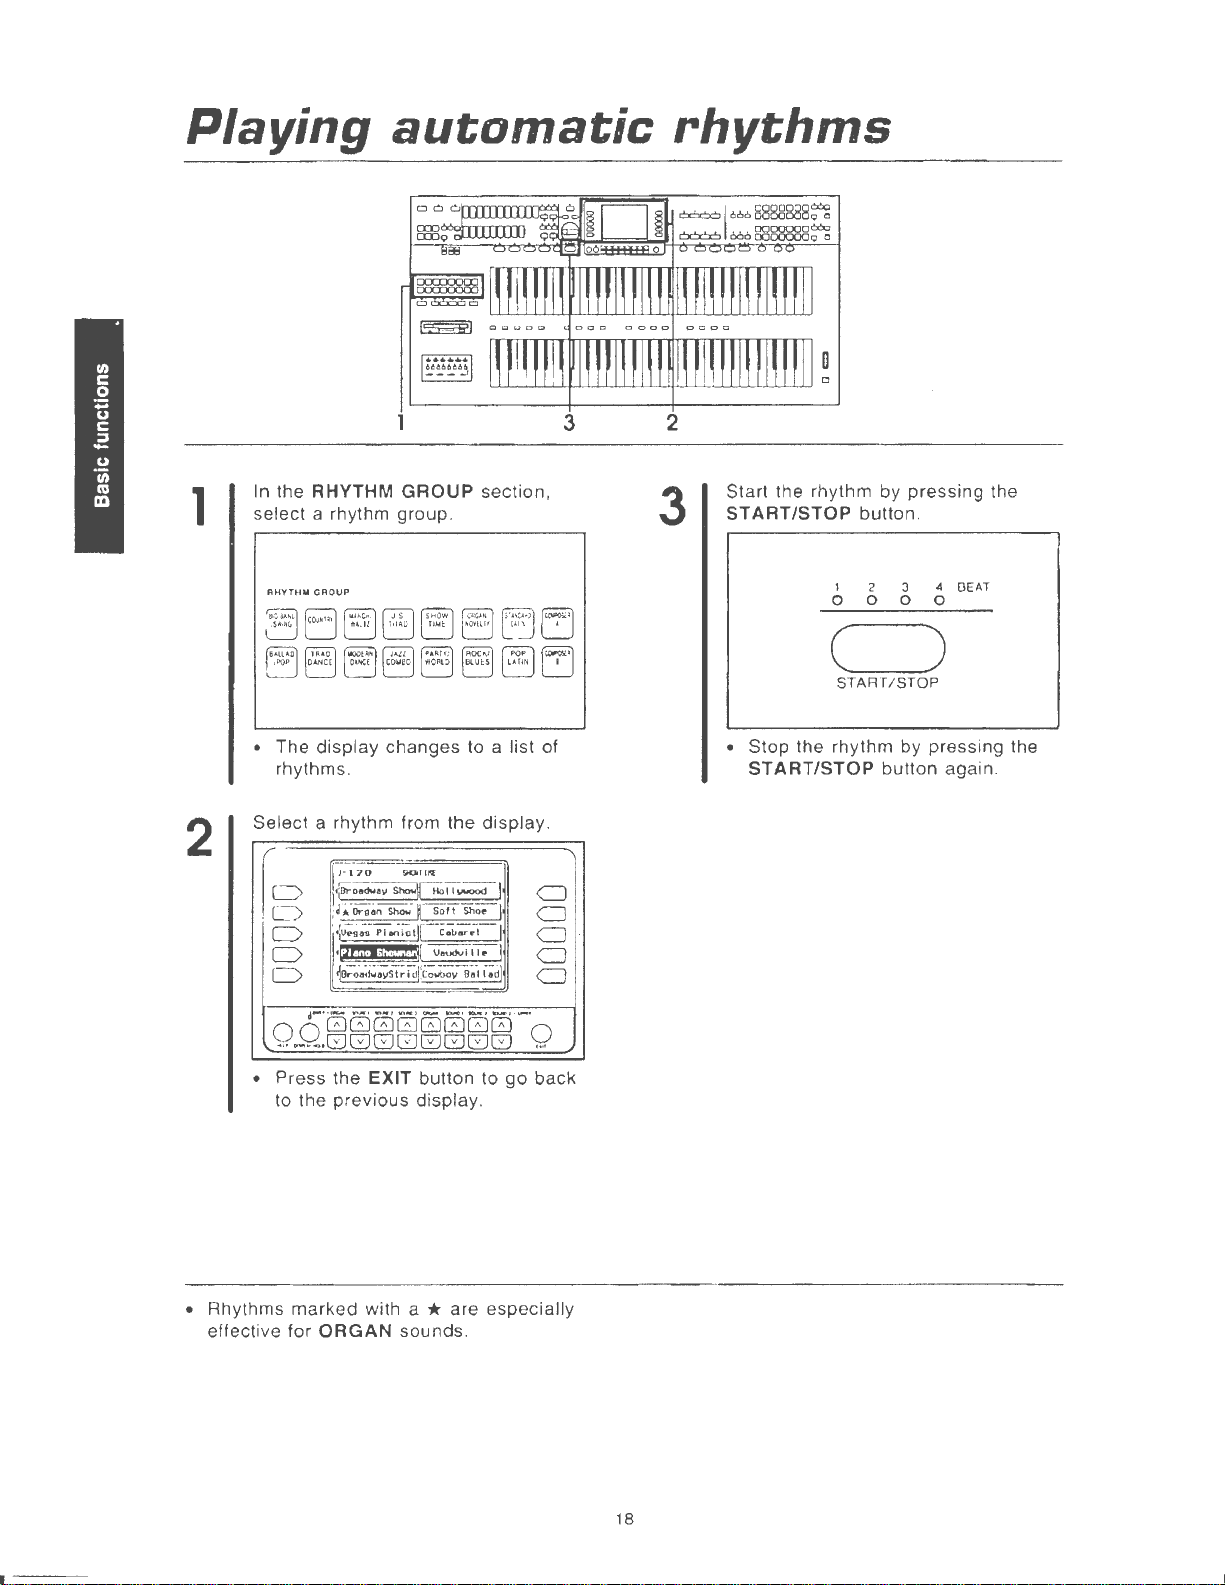
Playing
automatic
rhythms
1
2
In the RHYTHM
select a rhythm group.
RHYTHW
GROUP
• The
Select a rhythm from the display.
display
rhythms.
D
D
D
D
D
) •
j~ot<tw~Jiywood
{A..Oro-~
•
[v~;1J-
·IJtfflj\l.h.i,i,M
~Oro·~~~ySt;
GROUP
changes to a list of
170
SK)II
l.l'l
n
Show.~
Soft
Shoe
PI
~iol!IC.oar.-1
Veudvlllf'
i
djjCowbov
e~l
section,
I
CJ
I
CJ
I
CJ
l
CJ
i;
dJ
CJ
3
2
3
Start the rhythm by
START/STOP
1 2 3
0 0 0 0
pre
button.
·ssing the
~
BEAT
c )
START/STOP
• Stop the rhythm by pressing the
START/STOP
button again.
0 0
• Press the EXIT button to go back
• Rhythms
effective
d-
··-
,..,.
•. ~ .... , ,...,, --·
GGGGGGGG
...
~-~,GJGGGGGGG
to the
marked
for
previous
ORGAN
display.
with a * are especially
sounds.
-·
-~·-·
0
....
18
Page 21

D
CB
A
Adjust
Adjust the tempo with the
A
TEMPO/PROGRAM dial.
• The tempo
Insert
To start your performance with an
B
introduction, press the
ENDING button before starting the
rhythm.
the
tempo.
display as
an
intra
TEMPO/PROGRAM o
is
"J
shown
=
."
in
pattern.
INTRO &
0
the
Insert a count.
c
To begin
one-measure count,
COUNT INTRO (FILL IN
before starting the rhythm.
• A
after which the normal rhythm
pattern begins.
your
performance
COUNl
CJ
FILL
one-measure
0
Select a variation
During the rhythm performance,
press
the
D
it
on.
VARIATION
with a
press
the
2}
button
INTRO
IN 2
count is played,
pattern.
button to turn
( )
INTAO&
ENDING
• An intro is played, after which the
regular rhythm starts.
19
CJ
•
The
rhythm pattern changes to a
flashier pattern.
0
VARIATION
Page 22
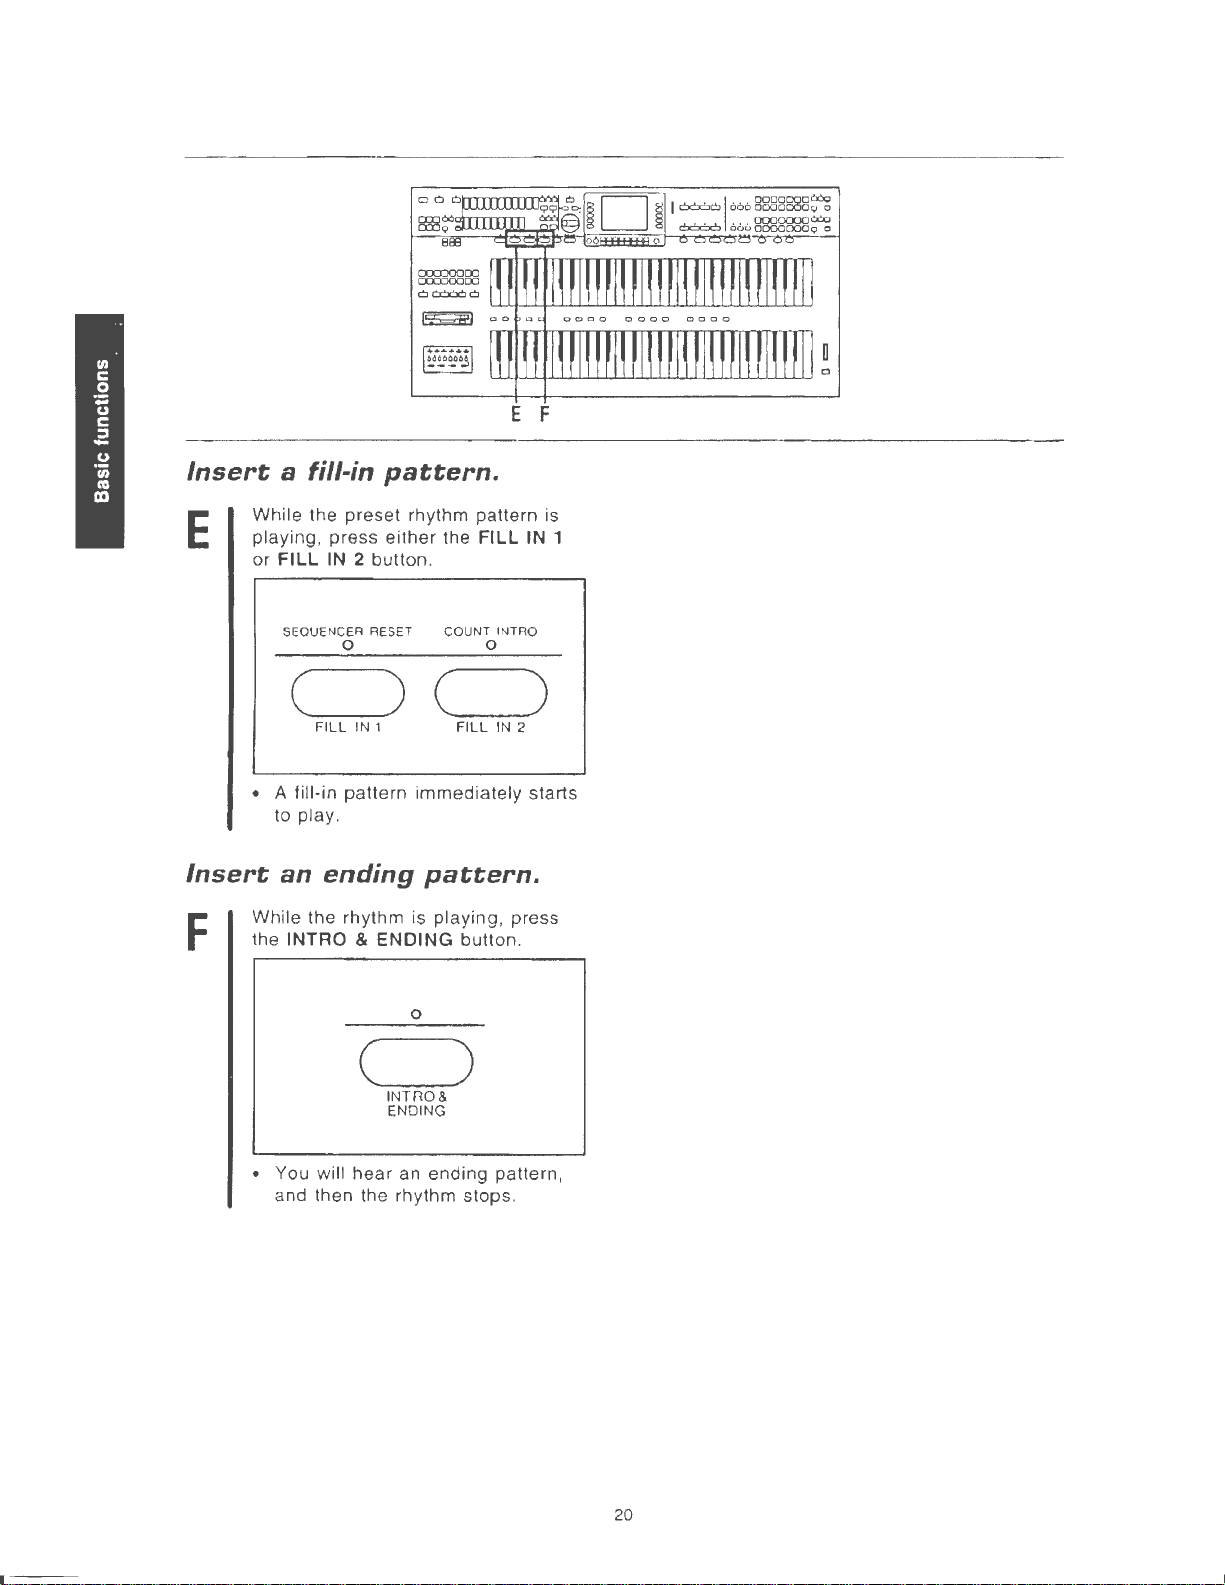
E F
Insert
While
E
playing, press either the
or FILL
• A fill-in
Insert
While the rhythm is
F
the
a fill-in
the preset rhythm pattern is
SEQUENCER RESET COUNT INTRQ
(._____...)
FILL
to play .
an
ending
INTRO & ENDING button.
pattern.
IN
2 button.
0 0
(..____)
IN
1
pattern
immediately starts
pattern.
playing
0
FILL
FILL
IN
, press
IN
1
2
( )
INTRO&
ENDING
• You will
and then the rhythm stops.
hear
an ending pattern,
20
Page 23
Automatic
accompaniment
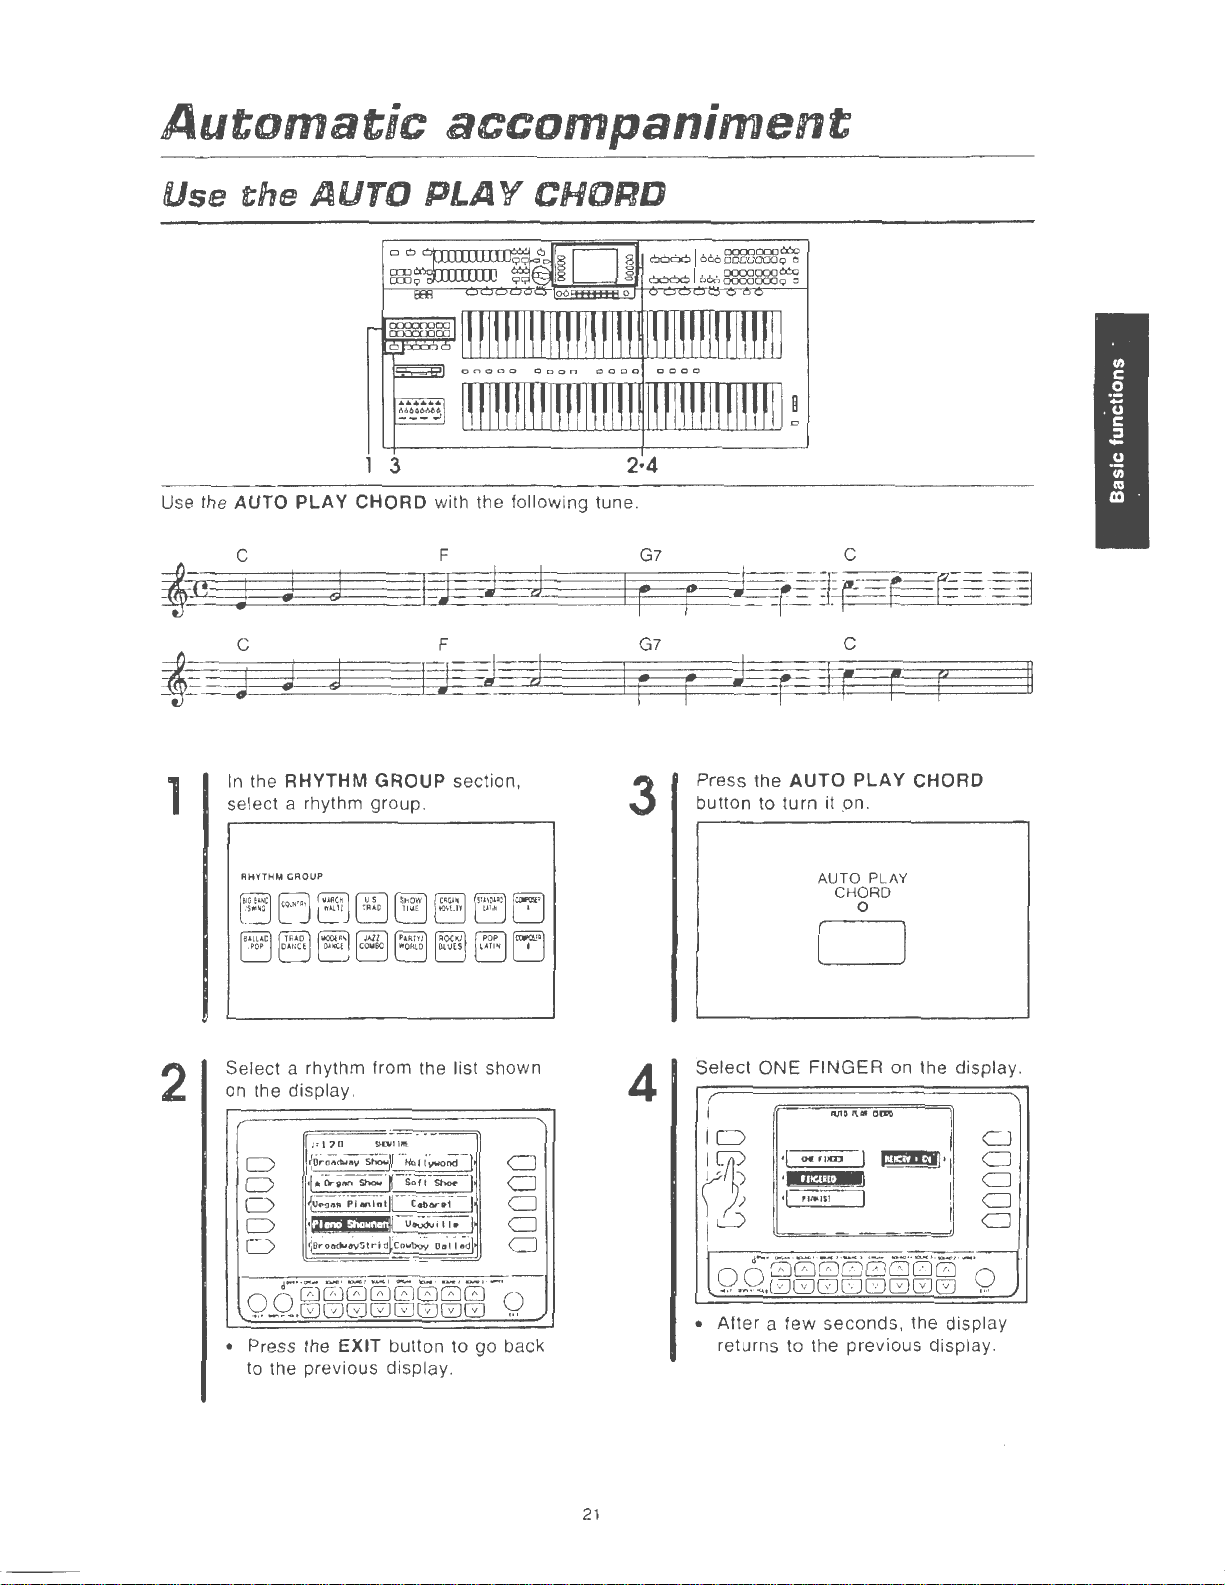
Use
Use the AUTO
the
c
~B
j
c
~
j
AUTO
PLAY
j
J
j
J
PLAY
3 2·4
CHORD
with the following tune.
F
I
E
F
J
I
CHORD
j
J
j
J
I
I
G7
r
G7
r
rA
r
-f-=J
~r-r=r
J
r
I
r
c
c
r
I
!2
II
1
2
In
the
RHYTHM
select a rhythm group.
RHYTHM
GAO
UP
Select a rhythm from the list shown
on the display .
o
C)
D
D
C)
• Press the
to the previous display.
/~
{o~~.;.;;<JC
•I•
{iJ
~NtttJ~,!.!Ii,i.I:M
~O;o
GROUP
1
"}0
sa.\11111'[
Holl;;;;;,-;;d-J
Oro on
Shoo.
'¥
Soli
...
;·;.•~•,;·II--
&c~Y~
Sf~idllCo~
EXIT
s-
c.i.;...; I
U~ill•
ooli;dl
button to go back
section,
CJ
)
CJ
CJ
I
CJ
CJ
3
4
Press the
button to turn it .on.
AUTO
AUTO
PLAY
PLAY
CHORD
0
CHORD
D
Select
•
ONE
FINGER
·I
.,..
ro>D:J
•MUJW
''
"~t~IS
I
After
a few seconds, the display
returns to the previous display.
on the display.
Afll)l\•
OD'I)
I
~
·MJ
CJ
·
CJ
CJ
CJ
CJ
21
Page 24
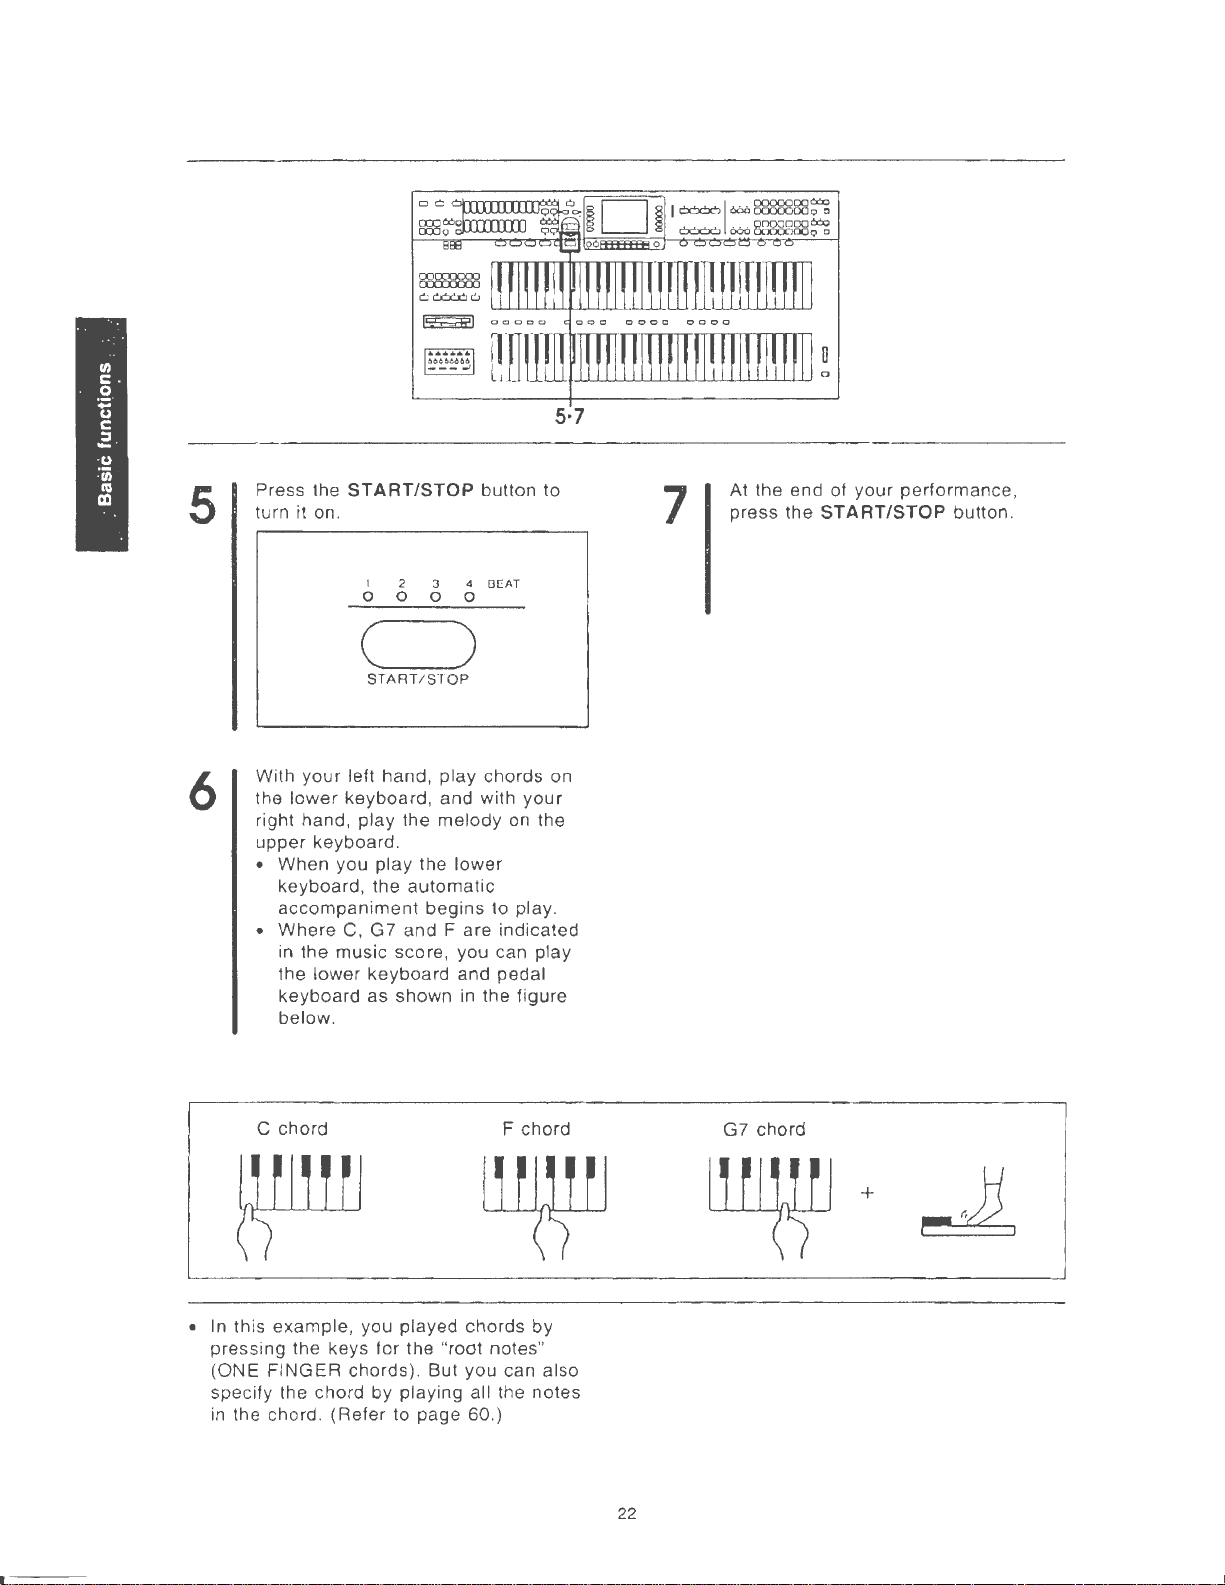
5·7
5
6
Press the
turn it on.
START/STOP
I
0 0
(
START/STOP
With
your
left
hand
lower
the
right hand,
upper
When
•
keyboard, the
accompaniment
Where
•
in the
the
keyboard as shown
below
keyboard, and with
play
keyboard .
you play the
C, G7 and
music
lower
keyboard and pedal
.
button to
3
0 0
4
OEAT
2
)
, play chords on
your
the
melody
automatic
begins
Fare
score, you can play
lower
to play.
indicated
in
the figure
on
the
7
At the end of your performance,
press the
START/STOP
button.
C chord
• In this example, you played chords by
pressing the keys for the "root notes"
FINGER
(ONE
specify the chord by playing all the
in
the chord. (Refer to page 60.)
chords). But you can also
F chord
notes
G7 chord
+
22
Page 25

Record
your
performance
Use the
SEQUENCER
March: IVIcdium
c
to record your performance.
She
Wore A Yellow
Ribbon
c
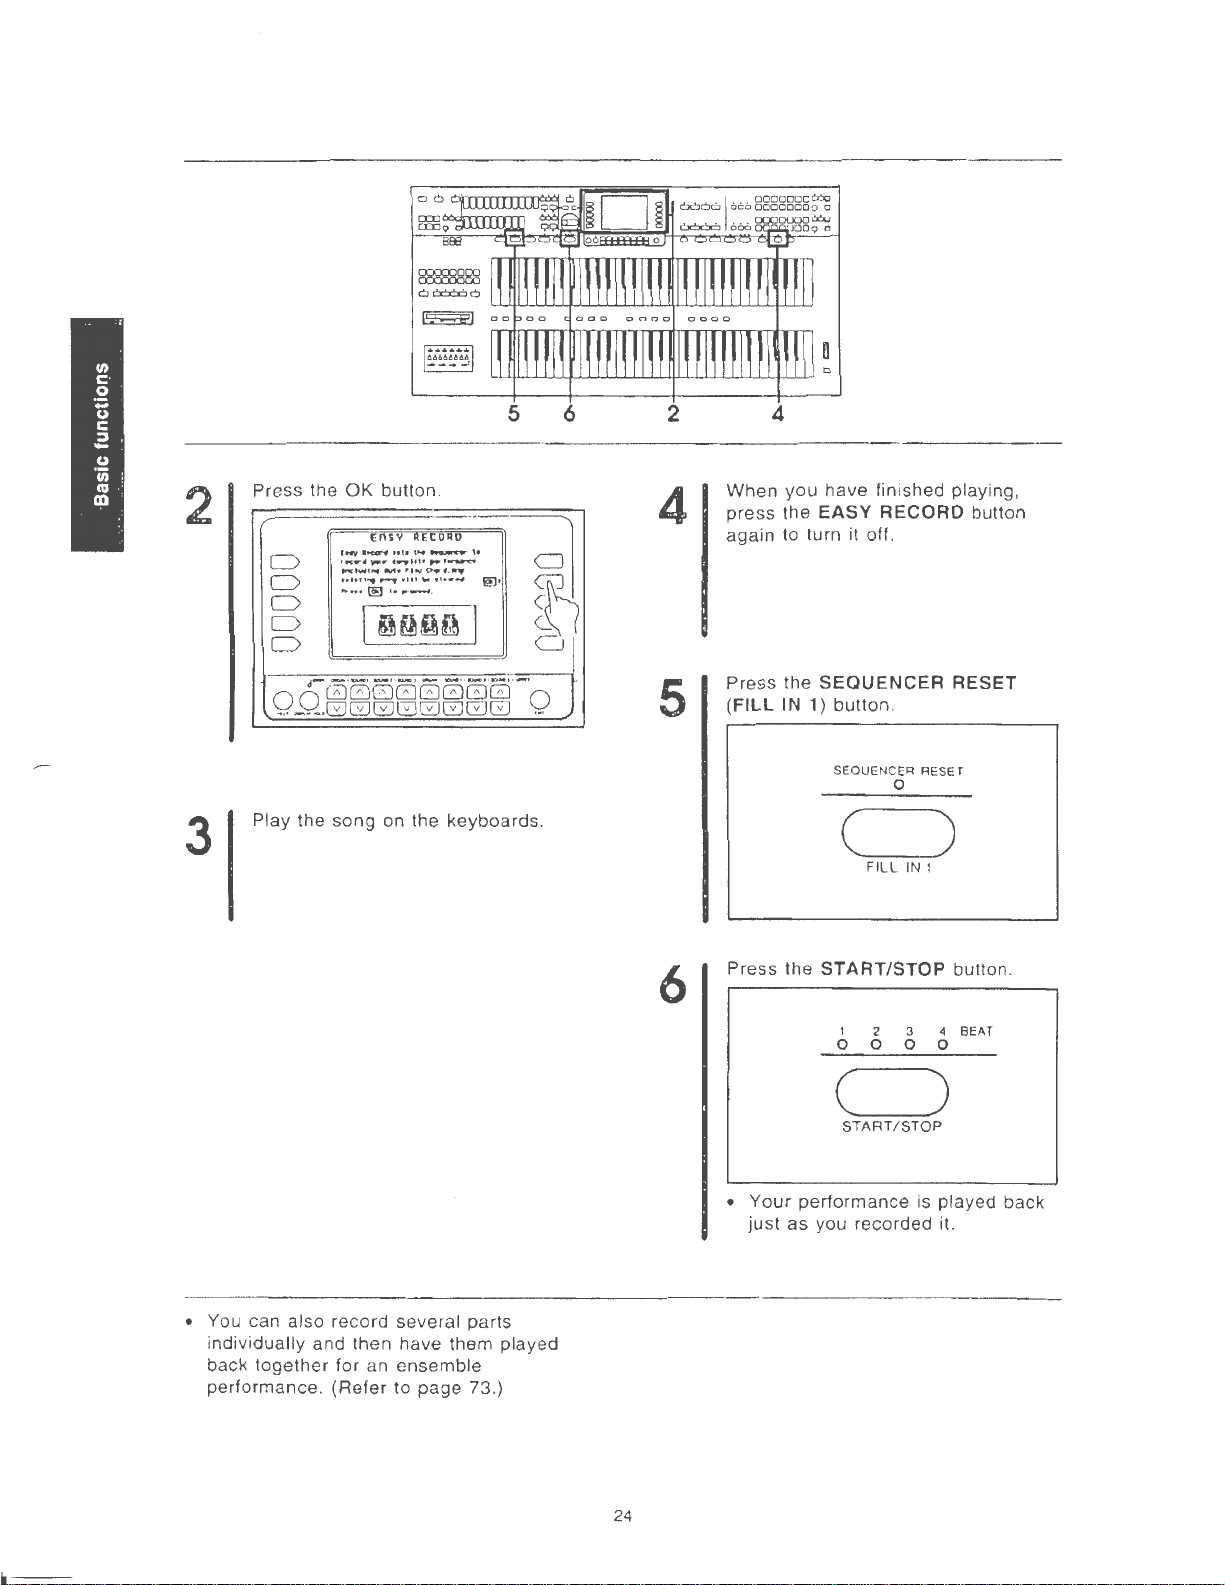
Press the EASY RECORD button to
1
turn it on .
• The display changes.
0
0
EASY
RECORD
Am
Om
G7
23
Page 26
5 6
2
4
2
3
Press the
D
D
D
D
D
0000000
.
..
Play the song on the keyboards.
OK
Ensv
1"'{1~,,,.,
·~
....................
firoCIWI,..
toltt'"",...,.
......
~
I
d-
- ·- · _ , __ , - ·-
--~·000
button .
RECORD
...
~,,
",...,~
.....
•'I""~~
.
....
Ifill"'
orh•""'
··~......,
.
~~~Q
··-1·-··
00
00000
1!!1•
l
0
CJ
-·
Q
~
0
4
5
6
When
you
have finished playing,
press
the EASY RECORD button
again to turn it off.
Press the
(FILL
SEQUENCER
IN
1) button .
SEQUENCER RESET
0
C)
FILL
Press the
START/STOP
1 2 3 4 BEAT
0 0 0 0
RESET
IN I
button.
• You can also record several parts
indivi
dually
back
performance.
and then have them played
together
for an
(Refer
ensemble
to
page
73.)
24
•
( )
START
/ STOP
Your
performance is played back
just
as
you recorded it.
Page 27
Easy
Play
Style
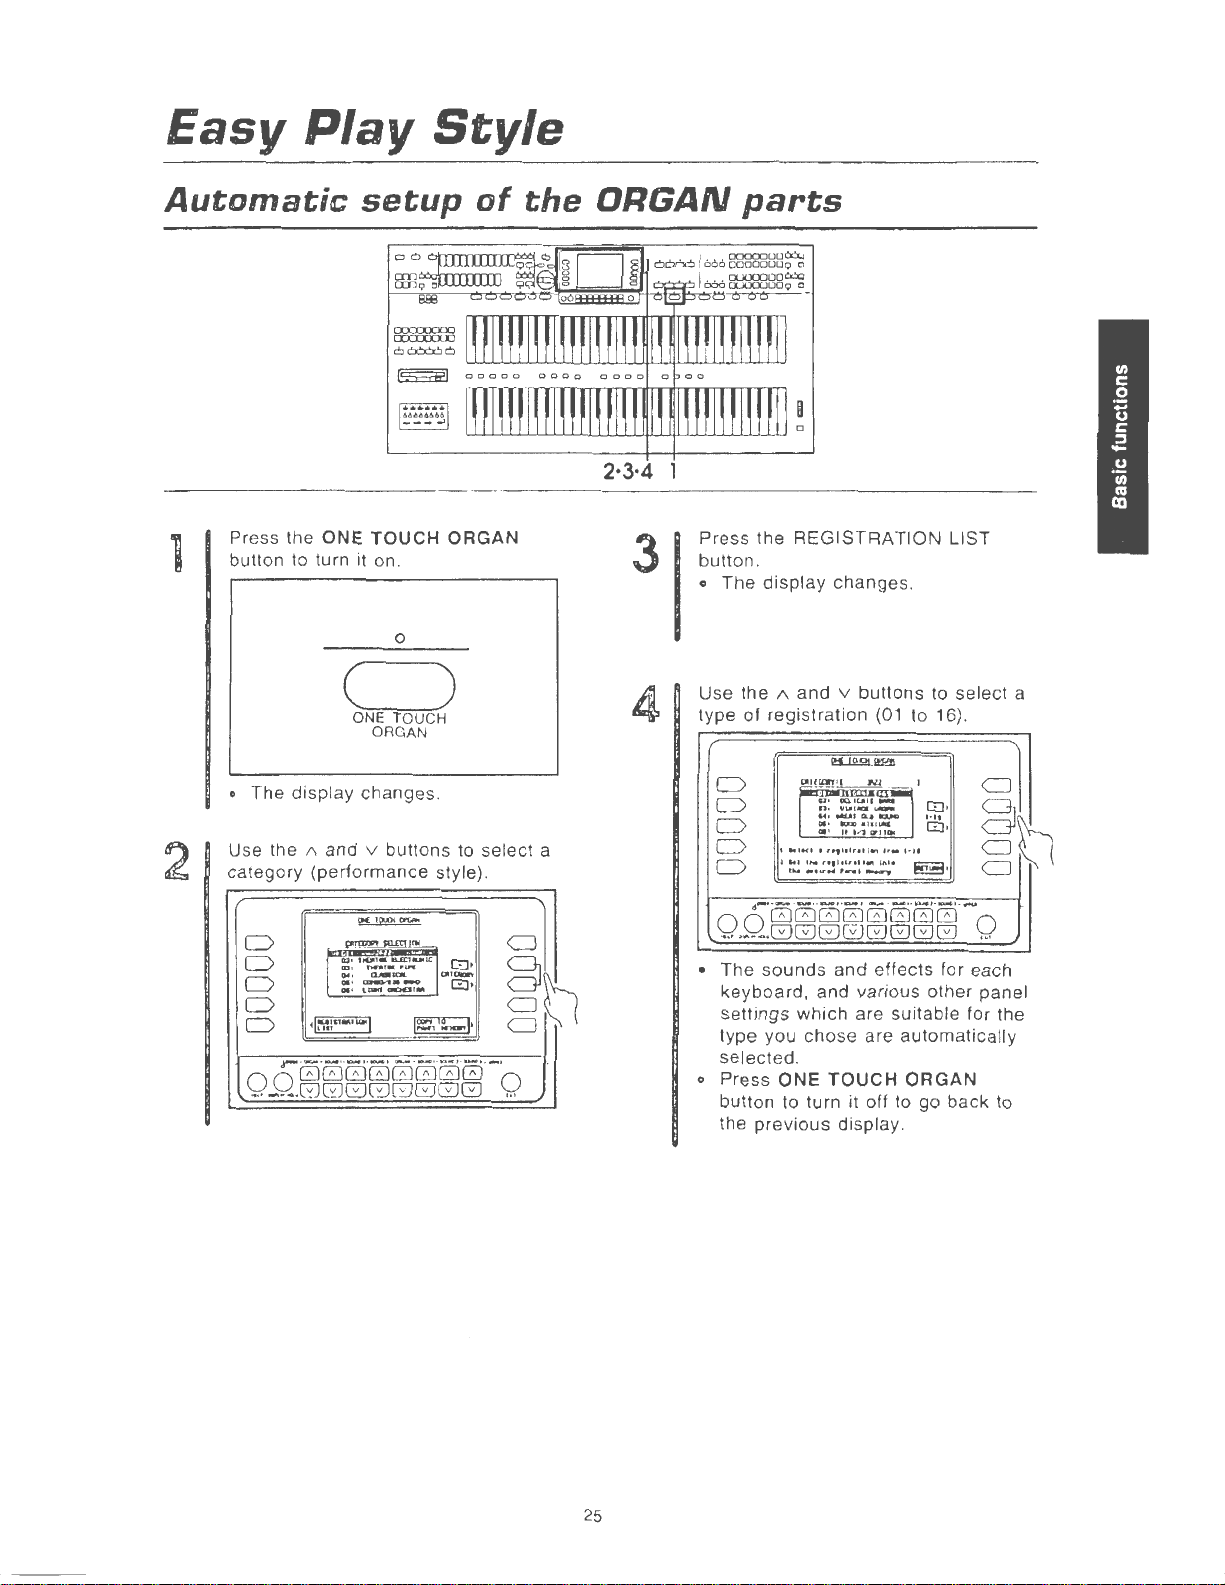
Automatic
Press the ONE
button to turn it on.
2
o The
Use the
category (performance style).
D
D
D
D
D
0 0
... -...
display
A and v buttons to select a
I
~l~:nM•~J
.-·-·-
00000000
00000000
setup
TOUCH
0
of
ORGAN
the
c=)
ONE TOUCH
ORGAN
changes.
(!!(
TCLQ!
m;;.
DJW"'snrtTJIII
.................
111
1
""'
::
~~-;o
..
-··-·
TM'llf•
~uw.
-·-
.,,.
r.....:
OlllQJQrt
...
1~.'~1·
..
~~
GJ·
0•
··
CJ
8
CJ
CJ
··
-·
0
...
ORGAN
2·3·4 1
Press the
3
button.
o The
Use the
type of registration
D
D
D
D
D
0 0
•
The
settings
type you
selected
o Press
button to turn it off
the
parts
REGISTRATION
display
r·-
00000000
.
..
·~--.00000000
sounds
keyboard, and various other panel
previous
changes.
A and v
l
I
..
IWI
)
....
u ••..........
--·--·
which are suitable for the
.
ONE
buttons
(01
pt:
([lot
"1!1'
tiiiHCUT
•C
JPoU
~:
~:~·=
&4• ..... ~ .,_
0.
•
IO'lO•luiAII
1
C.
1-'l
CPIIDII
U
II"Pflllrlll""
,,...
,.,
chose
I t • I · U
••
h•lltl'l
11>11
,_,
.._..,
· ,
---·-~·--·--
and effects for each
are automatically
TOUCH
display.
to select a
to 16).
I
I
GJ·
•
••
,
..
1
(!]
E3·
ORGAN
to
go back to
LIST
0
CJ
8
CJ
CJ
'"'
25
Page 28
Automatic
setup
of
the
ORGAN
style
1
2
Press the
to turn it on.
ORGAN
STYLIST
0
(~:-:-:-:-'"")
ORGAN
STYLIST
•
The
display
Use the
of the
display
(performance
D
D
D
D
D
• When a
contents
MEMORY are replaced. In this
case, when you attempt to
a category, a
appears. Press the YES
execute
• A list of styles is shown on
display
changes.
buttons
•
•
to
to
select a category
style).
ORGOH
Sho
... t 6me
Ja-,,
Ornan
category
of the
confirmat
the function.
(1
to 16).
the left and right
SlVL!Gl
Cfurr·ch
1
Hat
tz
1
is selected, the
current
PANEL
ion
button
button
CJ
0
CJ
CJ
Cl
select
display
to
the
3
3
1 2
Use
the
PANEL
to
select
•
The
shown
seconds.
•
The
for
accompaniment
suitable
are
Press
•
turn it off
previous
The
•
changes
EXPAND
53 .)
a style
name
on the
sounds
each
keyboard,
for the
automatically
ORGAN
display
PANEL
automatically
MEMORY
(1
to 16).
of the
to
mode.
selected
display
and
volume
rhythm,
and
tempo, etc
style
you chose
selected.
STYLIST
go
back
to the
.
MEMORY mode
(Refer to page
buttons
style is
for a few
balances
.
button to
to the
26
Page 29
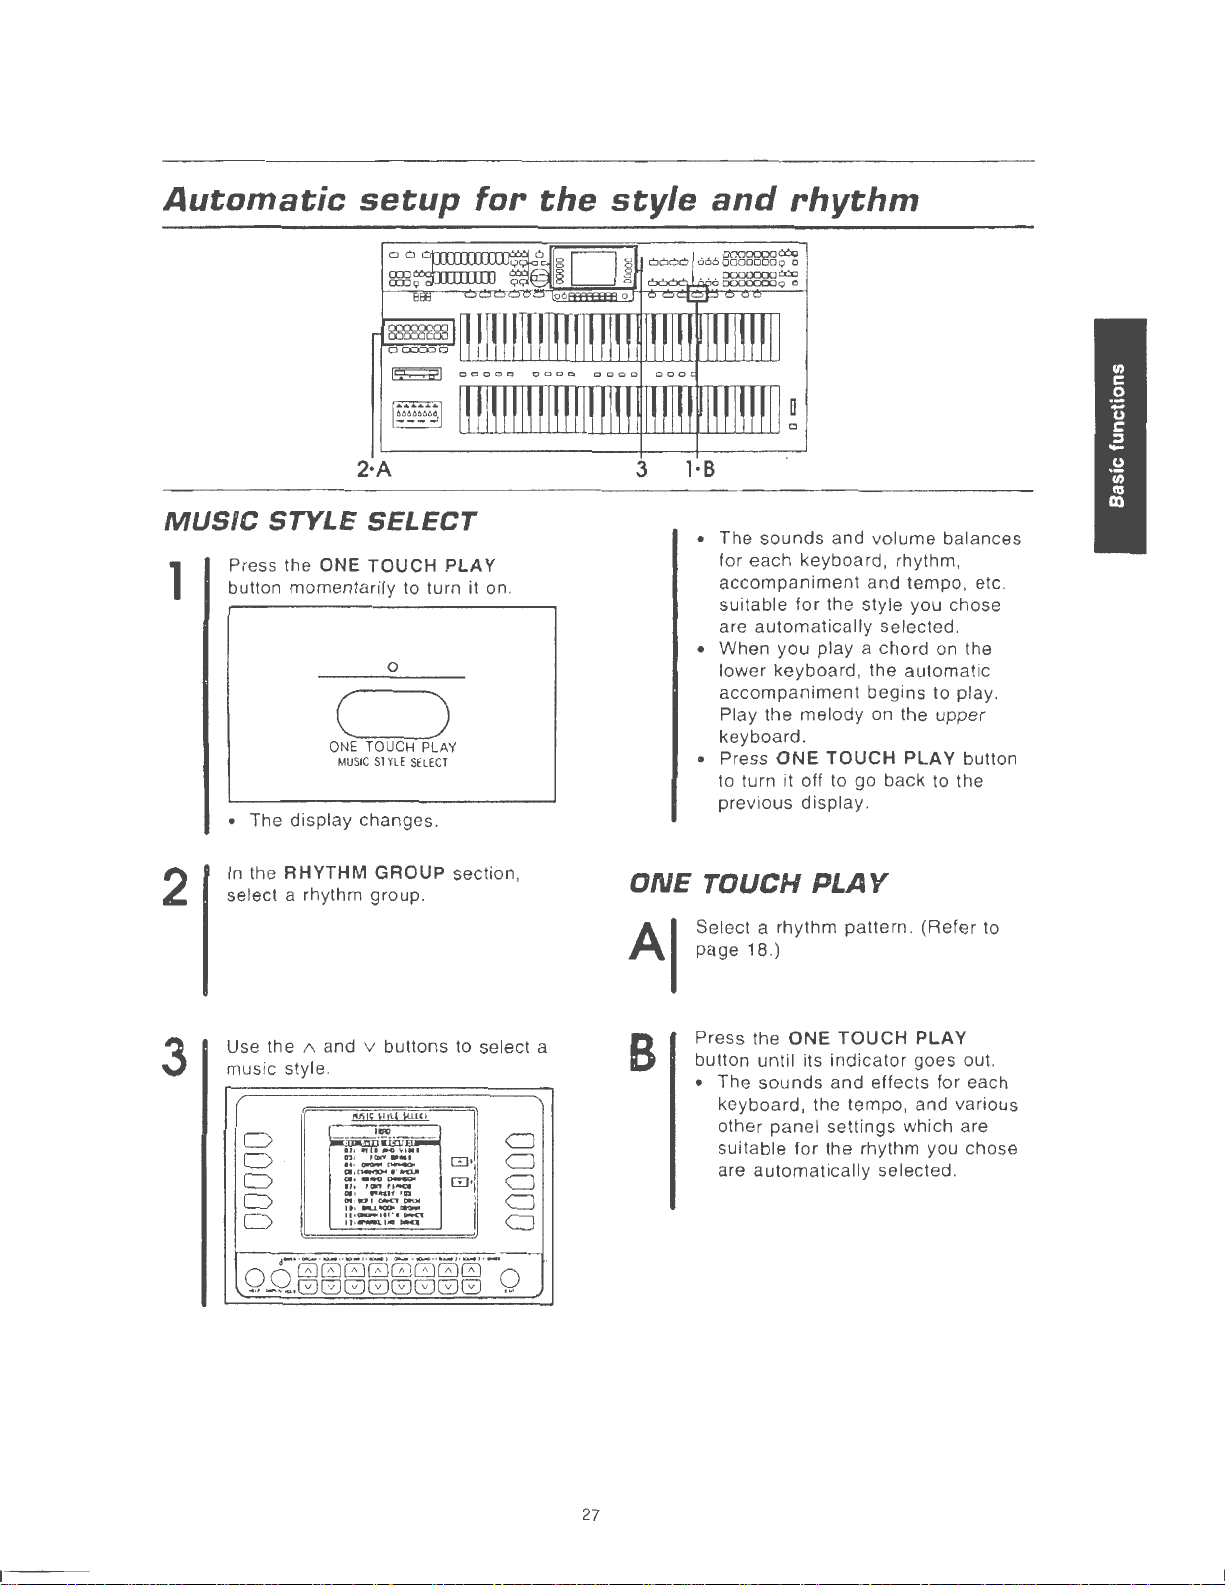
Automatic
setup
for
the
style
and
rhythm
MUSIC
Press the ONE
1
2
3
button momentarily to turn it on.
• The display changes.
In
select a rhythm group.
Use the
music style.
2·A
STYLE
SELECT
TOUCH
PLAY
0
C)
ONE TOUCH PL
MU
SIC SlVLE SELECT
the RHYTHM GROUP section,
1\
and v buttons to select a
M!C
\1!4
D
D
D
D
D
,.,.,
~~r!F
01 1
f(Wt'
.,.~~
Wo~I'IIPO..I'
c.
......
ron,,..,....
....
..
.
"'
ft;Qfc:.r.<l~
ltlfllliU"'CJJJ~
···~ltf'''"""'
,,,.,..._,_
....
.,....
.,.,
...
\U._
..
~
AY
UI
[!]
•
[!]·
C)
C)
CJ
C)
Cl
3
ONE
B
l·B
• The
• When
• Press
Select a rhythm pattern. (Refer to
page 18.)
Press the ONE
button unt il its indi
• The
sounds
for each keyboard, rhythm ,
accompaniment
suitable
are
automatically
lower keyboard, the
accompaniment
Play the
keyboard .
to turn it off to go back to the
previous
TOUCH
sounds
keyboard, the tempo , and various
other panel settings which are
suitable for the rhythm you chose
automatically
are
and volume balances
and tempo, etc.
for
the style you chose
selected.
you
play a chord on the
begins to play.
melody
ONE
display
on the
TOUCH
.
PLAY
TOUCH
cator
and
effects for each
selected .
automat
upper
PLAY button
PLAY
goes out.
ic
c~-··-·-··-··-
QQGGGGGGGG
.
..
---.GGGGG
·
-·-··-1·-··-
G
GG
Q
'"
27
Page 30
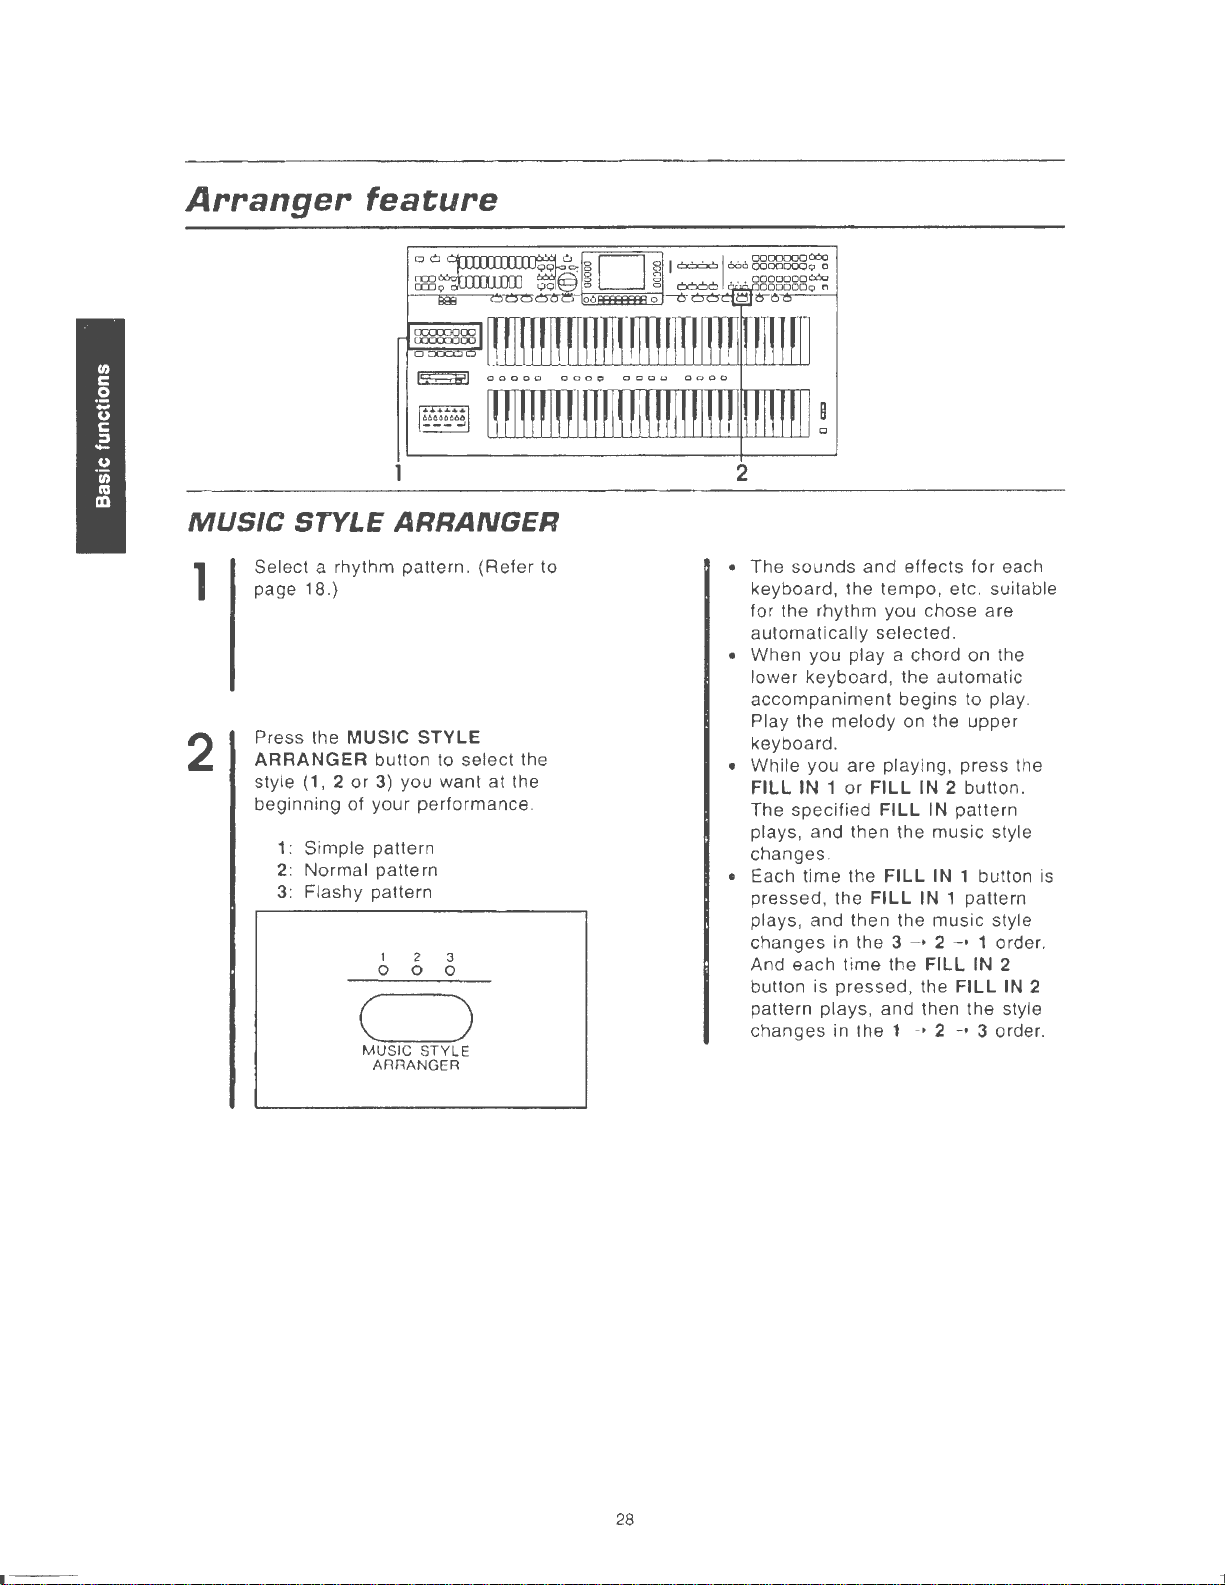
Arranger
feature
2
MUSIC
Select a rhythm pattern.
1
2
page 18.)
Press the
ARRANGER
style
beginning of your performance .
STYLE
(1, 2
1: Simple pattern
2: Normal pattern
3: Flashy pattern
ARRANGER
MUSIC STYLE
button to
or
3)
you
1
2
0 0
(
MUSIC
STYLE
ARRANGER
select
want
3
0
)
(Refer
the
at the
to
• The
• When
• While you are playing, press the
• Each time the
sounds
keyboard, the tempo,
for the rhythm you
automatically
lower keyboard, the automatic
accompaniment
Play the
keyboard.
FILL IN 1
The specified
plays, and then the
changes
pressed, the FILL
plays , and then the
changes
And each time the
button is
pattern
changes
and
effects for each
etc
. suitable
chose
selected.
you
play a chord on the
begins to play.
melody
.
in the 3 - • 2
pressed,
plays
in the 1 - • 2 - • 3 order .
on the
or
FILL
IN
FILL IN pattern
FILL
IN
FILL
the FILL
, and then the style
upper
2 button.
music
IN
1 button
1 pattern
music
-•
1 order.
IN
are
style
style
2
IN
2
is
28
Page 31

About
the
display
The display
Normai
This illustration shows the kind of information you
see on the display during a normal performance.
ORGAN
ORGAN ty
Selected
Tempo
shows
d~s~!ay
gr
rh
various information and is used for most of this
oup-----
pe
ythm
U/L
ORGAH
GROUP:
ELECH~.
TYPE:
Standard
RHYTHH
Organ
I
;=146
SOUHD
TABS
Fox
lA
LO~ER
BALAHCE
If you press one
below the display, the
balance display. The
is
part
to 127).
shown as a bar graph and a
of
the
display
volume
1\
or
v buttons directly
changes to the
balance of each
number
(0
I
I
I
I:HQRQ
min7
UPPER
[SOU~D
Grand
LOWER
Pi
[60UHD
E.Piano
BASS
PEDAL
Organ
onG~
UPPER
BAU~HCE
instrument
ll
ano i
11
1
t
SOUHD
t
-
-
-
-
's
operations
UPPER
sound
LOWER
sound
BASS
sound
Chord
.
SOUND
SOUND
PEDALS
name
part
part
part
Use the
adjust the volume of each part.
A and v
buttons
below
the display
U/L
ORGAM
GROUP:
ELECTR.
TYPE:
to
SOUND
TABS
Standard
RH'r'THH
Organ
I
m:•
:1:1:111;1•
96
11
LOWER
o
0"Ep~-EsJISJf2J-~f~"~·o
LOWER
LOWER SOUND
LOWER
LOWER
• A few seconds after you change the settings,
the display returns to the normal performance
display.
OR:~~''
SOUND
SOUND
Y""'-o
1 UPPER
2
3
Fox
:H!J
100
100
n n n
BALANCE
UPPER r SOUI'm
I
LOWER
I
BASS
II
100
IE
I J
Grand Piano
CSOUHD
I l
E.Piano 1
PEDAL
SOUHD
Organ
120 120
-
UPPER
Rnl
.---
nllrl"
120
r-
I
I
I
0
~PPER
UPPER
UPPER
SOUND
SOUND
SOUND
ORGAN
3
2
1
29
Page 32

About
• OTHER PARTS
If
display
parts.
the
display
you press the button for
changes
DRUMS
ACCOMP
BASS----------'
to the balance
(total)
OTHER
PARTS, the
display
GROUP:
U/L
for other
OROAH
ELECTR.
TYPE:
Standard
RHVTHM
Organ
I
~••11:
1::1:•~
100
110
,.--
SCUHD
TABS
Fox
• a1-;
118
UPPER
[ S
Grand Piano
1
LOWER r SOUND
E.Piano 1
I
BASS
PEDAL
Organ
120 120 115 120
r--
-
120
r-
II
OUWD
SOUND
,.--
1 l
I
1 l
I
I
r-
nr-
ACHP
B
~CP
RUt
o
6~~-CSJ-CSJ~1}f_[.o
l'[lP
DI$1'\"HOlO
AS!
I
~CP2
'--------ACCOMP
'---
-
CPJ
----
BG~
SF
K~1~BOARD
BACKGROUND
ACCOMP
-
ACCOMP
3
2
1
PERCUSSION
SOUND
• This button is also used to access the PART
8 to 15 volume display. These parts are used
in conjunction with
functions.
Menu
The MENU and other buttons beneath the PROGRAM
tiple functions . Pressing one of the
access the corresponding
•
display
SECTION cover are used to control mul-
Example
of
menu
SEQUENCER
menu
display:
MEM &
and MIDI
buttons
display.
CTRL
will
MEMORY
C>
C>
r£
C)
INITIAL
~I
SWITCH
~I
POWER-ON
~I
SETTING
ASSIGN
NODE
• A few seconds
the display returns to the normal performance
display.
0 0 0
TOUCH
SOU
c:::::J
tiD
c=J
& CONTROL
PANEL
II
II
II
MEM.MODE
11.5.A.
OUTPUT
NODE
SETT
lNG
after
EDIT
SOU
c=J
I~
I•
I•
you
MENU
ND
MEM
C=>
CJ
CJ
CJ
CJ
CJ
change
0 0 0
& C
the setting,
TAL MIDI
c::::J
SEQUENCER
0 c:::::J
COMPOSER
c:=J
Select a function from the menu
ing the corresponding button to the
of the display indicated
by
the
display
.,.
and • arrows.
lef1
by
press-
or right
• In this manual, the steps describing how
select a function from a menu display are
generally abbreviated as follows, for example:
30
"On the MEM &
SWITCH ASSIGN
CTRL
menu display , select
."
to
Page 33

About
the
display
Setting
When setting various functions, the available
operations are shown on the display. The buttons
to the right, left and/or
are used to select and adjust the settings.
• Example
display
of
setting
directly
display:
C>
below
the display
SWITCH ASSIGN
~IKNEE
LEVER
CDr:B
~~FOOT
C>
~~FULL
C>
<Example of procedure to set a function>
G)
In
the illustration above, four functions are
shown on the setting display:
FOOT SWITCH RIGHT, FOOT SWITCH LEFT
and FULL BASS PEDAL. First select one of
the functions by pressing the corresponding
<1111
button indicated by the
rently selected function is highlighted .}
In
this manual, the procedure to indicate that
•
you should press a button to select an item
is
from the display
follows: "Select FOOT SWITCH RIGHT
generally written simply as
arrow. {The cur-
S~ITCH
BASS
KNEE
LEFT
PEDAL
LEVER,
."
:SUSTAIN
:START/STOP
:BASS
TO
@T
he
operated by
tons indicated by the
tons are used,
the setting for the
• In this manual, this
follows : "Use the
the function."
UIR
1\
Gl~
I
OJ~
and v
buttons
pressing
when
selected
1\
CJ
CJ
<==)]
cv
c=Jb
CJ
on the display are
the
corresponding
~
arrows
appropriate,
procedure
and v
. These but-
function.
is written as
buttons
but-
to change
to select
EXIT
button
While the setting display is shown,
ton
to
go back to the previous display.
0
EX11
press
this but-
DISPLAY
Press this button to turn it on when you wish to
maintain the
during a performance,
tion which is not
• If any of the MENU
DISPLAY
31
HOLD
button
current
shown
DISPLAY
HOLD
display.
0
0
mode is canceled.
For example, even
you
can
monitor
on the normal display.
HOLD
buttons
is pressed, the
informa-
Page 34

About
the
display
TEMPO/PROGRAM
If the green
while you are using the
it indicates that the dial
the displayed value or setting.
HELP
You can find
strument functions right on the display.
1.
Press the
display) .
• The following
~!
~I
{
~I
41
• Press the MORE
tions.
~I
~I
~I
~I
11
TEMPO/PROGRAM
display
an
HELP
HELP
is
the following
ORGAN
ONE
TOUCH
ONE
TOUCH
ORGAN
MUSIC
HELP
is
the
following
MUSIC
STYLE
PANEL
MEMORY
TECHNI-CHORD
SEQUENCER
SOUND
EDIT
dial
indicator
display
TEMPO/PROGRAM
explanation
button (at the lower left of the
0
display
available
features
TYPE
PLAY
ORGAN
STYLIST
STYLE
SELECT
button
available
features.
ARRANGER
to
adjust
may
be used to change
0
of most of the in-
HELP
appears
.
for
.
I
I
I
I
I
to
display
for·
'l
[R§R'EI)~
other func-
I
I
I
(
I
is lit
a setting,
HOR[]~
CONTRAST
Adjust the contrast of the display.
CONTRAST
2.
Select a function.
• Information
appear
"pages" of information, which you can view by
following the
• If you press the
the process of setting a function: the display
may change
o For a detailed
please refer to the relevant pages
manual.
ORGAN
ONE
ONE TOUCH
ORGAN
MUSIC
MUSIC
PANEL
TECHNI-CHORD
SEQUENCER
SOUND
COMPOSER
FLOPPY DISK
MIDI
3.
When you
press
on the
TOUCH
STYLE
STYLE
MEMORY
......
have
the
HELP
about
TYPE
STYLIST
EDIT
the selected function will
display. There
instructions
HELP
button while you are
directly
to the
explanation
.................
PLAY
ORGAN
....
SELECT
ARRANGER
..............
. .............
................
.....
.................
FUNCTIONS
...
...
.....
finished reading the message,
button again.
may
on the display.
HELP
mode.
of each function,
..........
. ....
.....
.....
.....
........
.....
...
. . ......
....
.......
be several
in
page 34
..
page 63
page 48
page 49
page 64
page 65
page 53
page
. page
page 128
. page 93
page 103
page 142
in
this
51
67
• Press the RETURN
previous
display
.
button
to go back to the
32
Page 35

Parti
Sounds
and
effects
The sounds for the
sound is selected for each part, and then the parts are assigned
CONDUCTOR.
upper
keyboard ,
lower
keyboard and pedal keyboard
Parts
You can assign four sound parts to the
SOUND 2 or UPPER
SOUND 1, LOWER
The sound for each part is
Upper keyboard
Lower keyboard
Pedal keyboard BASS BASS
SOUND
SOUND 2 or
3) and four sound parts to the lower
selected
ORGAN
SOUND
SOUND
SOUND
ORGAN LOWER
SOUND
SOUND
SOUND
upper
keyboard (UPPER
LOWER
SOUND 3) . The BASS part is
with the buttons as shown
Part
UPPER
1
2
3
1
2 LOWER
3
UPPER
PEDALS
are
to
the
keyboards
ORGAN, UPPER
keyboard
used
in
the
diagram
Sound
ORGAN
SOUND
ORGAN
SOUND
GROUP
GROUP
grouped
by
(LOWER
for the pedal keyboard .
below
buttons
into "parts
the
ORCHESTRAL
SOUND
ORGAN, LOWER
.
1,
."
A
UPPER
After a sound is selected
part to the upper keyboard and a part to the l
The UPPER
ns
are used
to
board, and the LOWER
CONDUCTOR buttons to select the part for the
lower keyboard.
UPPER
ORGAN SOUNO 1 SOUNO 2 SOUNO 3
0 0 0 0
DODD
LOWER ORCHESTRAL CONDUCTOR
ORGAN SOUNO 1 SOUND 2 SOUNO 3
0 0 0 0
DODD
r o When an
selecti
on
currently selected sound for each part.
for
each part, the
ORCHESTRAL
to
select the part for the
ORCHESTRAL
ORCHESTRAL
is changed, the display shows the
CONDUCTOR
ORCHESTRAL
CONDUCTOR
CONDUCTOR
ORCHESTRAL
but-
upper
key-
ower
CONDUCTOR
keyboard.
o By selecting
you can easily
another during
selecting
TOR button.
o You can
more buttons in the
TOR at the
The
simultaneously for each part is as follows:
ORGAN
All other
another
combine
number
part: 64 notes
buttons
sounds
same time
of
parts
for
change
your
ORCHESTRAL
sounds by
ORCHESTRAL
notes
which can be produced
: 64 notes
are
used to assign a
each
part beforehand,
from one sound to
performance
turning on two or
.
just by
CONDUC-
CONDUC-
33
Page 36

Part
1
Selecting
a
type
of
organ
Sounds
~
~~
~
llll!Ltllllill
=·················
a I
UITIIIDllll
and
,~
~~~~~D~~
Ol
li!Il
ll!l
l!llim!II!UlTill!
effects
..
~-~
m
mmm
n
All types of organs are
another, not only the sounds,
if you were playing a
types of organs, all in
Organ
Select the desired organ type
sentative types provided.
1. Press the U/L
type
ORGAN
on.
U/L
available
completely
one
instrument.
TYPE button
ORGAN TYPE
0 .
D
• The display changes to the
-ELECTRONIC
Standard
Theatre
U.S. Trad.
~
1-------f
European
.
.__
_____
TABS-
......
---DRAWBARS---
Standard
Theatre
for
the ORGAN part. When you
but
the entire configuration changes to that of the selected type, just as
different instrument! You
from
the repre-
to
turn it
following
Jazz
Rock
.
~
~
~
~
don't
have
change
just
from one type of organ to
one organ, but many different
Theatre
2.
Select an organ type from the
ELECTRONIC
group
TABS
LJDLJOCJO
ORAWBARS group
'"
I 7
r~~'llm
·
I
~
Classical
Standard
Theat
re
U.
S.
Trad
European
Jazz
Standard
Theatre
Rock
display
.
Technics-type
Theatre-organ-type of
Typical American
Typical European electronic organ sound
Orawbar organ sound for jazz
Standard-type
Theatre-type
Orawbar organ sound
34
electronic
electronic
drawbar
drawbar
organ
electron
organ sound
organ
for
sound
ic organ sound
organ sound
performance
sound
rock performance
Page 37

Part
I
Sounds
and
effects
PIPE ORGAN group
11m
o On the display, the selected type is high-
lighted.
• The sounds for the
LOWER ORGAN part
selected type.
o To play the selected organ sound on each
keyboard, turn on the
ORCHESTRAL
• You cannot select a
the upper keyboard and
aJrean
Add effects to the
'
errects
TREMOlO
0 0 0
Theatre
Classical
UPPER
CONDUCTOR
ORGAN
EFFECT
ORGAN
change
ORGAN
different
lower
part sounds.
SUSTAIN
part and
to those for the
buttons in the
.
organ type for
keyboard.
Theatre-type pipe organ
Pipe organ sound for classical
• You can adjust the
lower parts.
• Press the
volume display.
sound
(Refer
EXIT button to return to the normal
e Adjusting the sound
The nuance of the
boards can be changed i
Two methods are available . With
36) you can control the various
the sound.
sounds (page 40)
Or
sound
you can
provided
music
volume
to page 29.)
select
performance
for the
for
upper
and
ndependently.
MANUAL
components
one of the
for each organ type.
upper
lower
key-
(page
PRESET
and
of
ODD
o These buttons do not work when the
button (page 40) for the same keyboard is on.
Ill TREMOLO
Tremolo
ing the effect of a rotating speaker. Various
tremolos can be set for use with high-range
sounds and low-range sounds. For example, you
can achieve effects such as those shown below .
ELECTRONIC TAB group :
DRAWBARS group :
• Single-rotor-type revolving
is
a rapid oscillation
in
volume, produc-
speaker
/
u
w
• Double-rotor-type revolving speaker effect.
'--------T/
PRESET
effect.
PIPE ORGAN
fect, peculiar to pipe organs, of air flowing
through the
TREMOLO
When the
TREMOLO
rotating speed of the
• The type of
can be
• The
TREMOLO
tab sound and
(Refer to page 38.)
group
pipes
•
SLOW/FAST
TREMOLO
SLOW/FAST
0
TREMOLO
SLOW/ FAST
TREMOLO
adjusted
. (Refer to page 118.)
can be set to on
EXTRA
: A
distinctive
(TREMULANT).
effect is active, press the
button to turn it on.
speaker
0
and
TAB
vibrating ef-
is accelerated .
how
it is applied
or
off for each
VOICES
sound.
The
35
Page 38

Part
I
• EFFECT
is
This
ments playing in unison.
• The type of effect can be changed. (Refer to
• EFFECT can be
the beautiful wide effect of
page 38 .)
set
to on
type tab
sound.
sound
and
or
EXTRA
many
off
for each flute-
TAB
VOICES
instru-
11
SUSTAIN
SUSTAIN
after
tones
The
•
length of the sustain can be adjusted.
(Refer to
Sounds
is the gradual fading out of musical
the key
page
is
45.)
released.
and
effects
Setting
After selecting the desired organ type, you can change the nuance of the
and the
Outline
1. Select the organ type .
2.
3. Use the tab
• Using the tab buttons
Organ sounds are
ferent sound pitches (feet). By turning the tab buttons on and off, you can combine pitches to
modify the selected organ sound.
display
of
In
the UPPER
section,
on
to change the sound for the respective
keyboard.
the desired
.)
tion
the
to adjust its
MANUAL
ORGAN
press
the
(MANUAL]
buttons
sound. (Refer
obtained
Organ
various
settings
or
LOWER
MANUAL
0
and the
button
display
to the following sec-
by
sound:
components.
ORGAN
to turn it
to select
combining
dif-
Manual
o Using the display
Special tabs
are
provided
These effects, used along with the tab buttons,
allow
you broad flexibility
sound
• The sound
differ
• The
the
• The
each organ
MANUAL
organ group, the
matically
• In the PIPE
Theatre), the
each type.
(EXTRA
you
want
depending
settings
same
organ
settings
sound
available
for each individual organ type.
components
~
lllllfmmmrm1mrrrmmm
=
·--··
....
s
rrmmnmHiliJID
sound
.
are
are
group
sound
by using the tab buttons
TAB
VOICES)
in
creating the exact
which you can adjust
on the type of organ.
common
group .
memorized
is selected for the same
sound
.
ORGAN
for all the sounds in
independently for
, so that
settings can be made for
whenever
you modified is auto-
group (Classical,
....... .
i
lliH!D!
and effects
~
the
Using
In the
tion, use the tab buttons to
the respective
the
UPPER
tab
buttons
ORGAN
keyboard
or
.
CJLJoooLJCJCJDoo
lQ
Wflll
o•G
AJrol
CJLJLJDuLJCJuo
to
mod9fy
LOWER
change
the
souml
ORGAN secthe sound for
o Press the
on, and the
o When an organ type from the DRAWBARS
group is selected, the tab buttons work
drawbar-volume-setting
press and
decrease
increase the volume . While the volume is
being adjusted, the
shown on the display .
36
lower
part of a tab button to turn it
upper
part to turn it off.
buttons . In this case,
hold
the
upper
part of the button to
the volume, and the lower part to
status
of the drawbars is
(Refer
to
page 38.}
as
Page 39

Part
I
11
Percussives
PERC adds a tone with a fast initial
tab sounds. You can get a
bining PERC sounds with
(upper
keyboard)
sharp
other
sound by
tab sounds.
attack
to the
com-
o
When
group is
CHIFF
sound of air
organ .
an
organ
selected,
buttons. "
being
(Refer
to
type
the
Chiff"
page
Sounds
from the PIPE
PERC
sent to the
39 .)
buttons
is the
and
eUects
ORGAN
work
characteristic
pipes
in
a pipe
as
About
The feet indication on
organ. If
octave below the 8' rank pitch, and a. 4' rank pitch
When the C
IIDSiU1J~
When a
a
operated , the sett ing
13
EXTRA
On the display, select the
add .
o The setting switches
feet
marks
each
8'
is
used as the standard (the pitch
1
key
is
pressed
e f g a
c d
'
i
1 ir
i~~
~~Sl!B~a!Y
MANUAL
MANUAL
ELECTRONIC
time the button is pressed.
(Example:
TAB
button
VOICES
Upper
ELECTRONIC
iaD
mo!l!l~Uy
button is
is on
and
display
TABS
group
settings
between
keyboard)
~~·rrrr~-------.
TABS
:[ Standard l
tab button (for
, the
sounds
' e'
f' g'
b c' d
h
8'
turned
the
tab
is
shown
--------------------------
sounds
on
5
~h~
SIDRllril!ll
on, or when
buttons are
.
you wish to
and
off
example
as
of
the
-
a'
I
I
i
1/3'
each
8')
refers to the
played on the
one
octave
different
b'
c' d
pitch ranks
f'
' e'
l
i
4'
keyboard).
above
g'
a'
b'
2
2/3'
pitch
of
a rank of
a 16' rank pitch wi
.
are
as
follows
-
' e'
f'
c' d
pipes
in a pipe
ll
be
one
.
g
mJ
I
I
1 /3'
i
1'
~1
Ce
I I o 16'
41
Trombone 16'
~1
I<
i
nura
~
I T
REHOLO:
~~
UIBRAJO: OFF
Press the
other settings.
o On
th
e display , the
lighted.
o You can select more than one sound at the
same time.
OFF
OTHER
II
II
8'
II
SETTING
selected
U i o I
in
Trumpet
C I
ar i net
button
sounds
8'
1~
8'
1~
8'
1~
to
change
are high-
37
Page 40

Part
I
Sounds
and
etrects
Adding
Add effects
Press the button for each effect to turn it on or
off.
TREMOLO:
EFFECT : Add breadth to the sound.
VIBRATO : Add vibrato to the sound.
Volume
Adjust the volume of the
in
tons.
Select
to adjust the
o When set to 100 , the volume of the
Effect
Use the
the type of effect (CELESTE or CHORUS).
o When this setting is changed, all effects ap-
• You can
effects
to
the
EXTRA
Tremolo
volume, producing the effect of a rotating
speaker.
balance
relation to the tab
BALANCE
TAB
VOICES
the tab sounds .
type
EFFECT
to
plied
type.
page 122.)
volume
setting
the
ORGAN
change
adjustment
, and use the
is the same
TYPE
TAB
VOICES
is a rapid oscillation
EXTRA
sounds
(O
other effect types. (Refer to
from the panel but-
1\
to 127).
as
1\
and v buttons to select
part change to the same
sounds.
TAB VOICES
and v buttons
EXTRA
the volume of
in
Percussive
only)
Adjust the PERC sound.
(1Ja~3;J
~~
~~
Select an attribute of the PERCUSSIVE TONE.
Use the
for the attribute.
DECAY
Adjust the decay time
LEVEL
Adjust the volwme
TREMOLO
Turn the tremolo effect on
EN:
tone.
DIS: The tremolo effect is off.
o If the
the tremolo effect
the
tone
ELECTROHJC
LEVEL
adjustment
OTHER
SETT
TABS=[
4
(upper
I
Standard
EXT.
TAB
I
BALANCE=
TREHOLO=EH
"
"
1\
and v buttons to change the setting
(1
to 8) .
(1
to 8).
or
off.
The
tremolo effect is on for the percussive
TREMOLO
TREMOLO
button on the panel is off,
is
not
applied even when
is set
to
EN.
keyboard
J
VOICES
100
I~
a
DRAWBARSgroup---------------------------------------------------------
Drawbar
Adjust with the respective tab buttons.
• The drawbars are shown
(tab
volumes)
(Example:
Press the OTHER
other settings.
upper
DRR~BRRS
adjustment
keyboard)
:[
SETTING
on
the display.
Jazz
button to change
38
Page 41

Part
I
• The numbers below the drawbars
to the feet
o Select a setting from 0 to 8. When set
no sound is produced.
11
PIPE ORGAN
EXTRA TAB VOICES
On the display, select the sounds you wish to
add.
• The setting switches
time the button is pressed.
~~,.....-U
~~
~I
Eng
numbers
PIPE
-o_
x_C_e_l_e_s_t_e--,llstr
Tuba 16'
I i
shHornB'
group
ORGAH
of the tab
settings
between
:( Theatre J
i ngCe I
II
Trumpet
11
Saxophone
correspond
buttons
on and off each
ES
.
este
8'
a·
to
0,
1~
I•
I~
Effect
type
setting
Select the type of
Percussive
only)
Adjust the
Volume
Adjust
in
relation
tons .
Effect
Select the
Chiff
For pipe
to add CHIFF
sound of air being
organ .)
and the
balance
the
(Refer
type
level
organ
Two
volume
tone
adjustment
PERC
adjustment
volume
to
the tab
to page 38.)
setting
type
of
adjustment
types,
sounds. (Chiff
chill
sounds,
can be
Sounds
EFFECT. (Refer
(upper
sound.
(Refer
of the
EFFECT. (Refer
EXTRA
sounds
the
sent
from the
(upper
adjusted
keyboard
PERC
buttons
is the
to the pipes
1 and 2, are available,
and
ellects
to
page 38.)
keyboard
to page 38.)
TAB VOICES
panel
to
page
only)
are used
characteristic
in
a pipe
for each.
but-
38.)
~
nWIIIW•miil 1
~I
VIBRATO:
Press the OTHER
other settings .
• On the display, the selected sound is highlighted.
• You can select more than one sound at the
same time.
Adding
Add effects to the
Press the button for each
off.
TREMULANT
Turn the tremulant on or off.
EFFECT
Add breadth
VIBRATO
Add vibrato
effects
OFF
EXTRA
to
the sound.
to
the sound.
I
SETTING
EFFEcr = oFF
button to change
TAB
VOICES sounds.
effect
to turn it on or
1
~
PIPE
ORGAH
:(
CHIFF
LEVEL
~
I!Hltla~nmn1
~r
CHIFF
2 = 4 1
1. Select
2.
Use the
8)
3.
Repeat steps 1 and 2 as
ch i
CHIFF 1 or
.
ll
volume
CHIFF
1\
and v to adjust the volume
.
Theatre J
EXT.
TAB
VOICES
I
BALANCE: 100
I"
......
....
EF.F.ECt.lYeE
~
. ' . . . .
l·
·,
:~.~ELE~IE
2.
desired
for the other
....
...
::
I~
.
~
·.;.·.
(1
to
39
Page 42

Part
I
Sounds
and
eltects
Setting
After selecting the desired organ type,
the
Organ
PRESET
Select one of the
each organ type.
1.
Select the organ type.
2.
To
change
board,
in the
keyboard, press the
on
o The
~-fli[Mi-N
press
UPPER
in
the LOWER ORGAN section.
display
!(JW~
g:1
il
4[LJ
GHT
4JTHEATRE
~1
caNT 1 NENTAL
4\WARM & BRI
PRESET
the organ sound for the
the
PRESET
ORGAN section. For the lower
(Pm
looks similar to the following.
ru~n:11m:~:l~1:u
ELECTRONIC
sounds provided for
button to turn it on
PRESET
button to turn it
st.TJ
0
TABS
-T-HE_rl_E
JAZZ l[rROMBONE
soLo
l!u
J\FULL
GHTj
GilT
THEnTRE
I
COPV
FLUTES
TO
MANUAL!~
sound:
choose
upper
TAB
any
key·
_,,.
J~
1~
1~
Preset
of the many
3.
o The selected
4.
o
Cl
When you copy a
MANUAL
desired.
Note: When you copy a sound to the MANUAL
1. Select a
2.
o A copy of the selected PRESET sound
preset
Select a
pendently
ever
the
same
organ type, the
matically available.
If necessary, repeat steps 2 and 3 to select a
PRESET
The
tab
effect buttons (except for the SUSTAIN but·
ton)
do
you wish
copy of the
modify
then
Copy a PRESET sound
memory, any sound which was pre·
viously
Press the
stored in the
change
MANUAL
sounds
sound
for each
PRESET
sound for the
buttons
not work for the
to
modify
PRESET
the copy.
memory
copied to the memory is erased.
PRESET
COPY
MANUAL
the characteristics of the sound in the
memory
r-~~~~~0~
~
lliillllilLfJlllllllliiilJJlii!II!W
=·············
a
tlmmmiiJn
provided for each type.
from the list on the display.
sound
, you can modify the copy as
is
memorized
organ
sound
(with feet indications) and
sound.
TO
. (Refer to page 36.)
type, so that when·
is selected for the
sound
you chose is auto·
other
PRESET
the sound , first make a
sound (see below), and
PRESET
MANUAL
memory. You can now
~~-II!IHil:1
....
11\Illlltll!mrHm!
keyboard.
sounds. If
sound to the
button.
inde·
is
40
Page 43

Part I
Sounds
and
effects
Selecting
Select from a
variety
Sound
of
sounds
Sound
1.
In the UPPER
SOUND
to
GROUP,
select a part.
SOUND
press
1
0
0
DOD
2.
In
the
UPPER
SOUND
tons to select a sound group.
GROUP,
SOUND
press
part
for the
GROUP
the 1, 2 or 3 button
2
GROUP
one
3
0
of
SOUND
or
or
the
sound but-
LOWER
LOWER
sounds
1,
2 and 3 parts of the
3.
Select
display.
(IJ~a:m
~-~;•-.r-•h
~lupr
~!Me
I I
~1
Pi
~1
P i a no 2
Press
ferent
upper
the
desired
SOUND
i
sht
ow
Pi
ana 1
the
MORE
part
of the list.
keyboard
I:
·~llso
Pi
anoJI
ano
Oct
Oct.
SOUNDS
and
sound
[
from the list on the
PIANO
I
oP i ano
Rock Pi
Jl
Hanky Tonk
.I!Jang
J
button
I e
MORE
lower
ana
Pi
SOUNDS
to see a dif-
keyboard
]
16'
J~
J~
J~
ana
J•
~
.
o A list of sounds available
can be found in the
GUIDE" provided.
o MEMORY A
storing sounds you
128.)
and
separate
MEMORY
modify.
for
each
"REFERENCE
B are
(Refer
sound
group
reserved
to
page
for
o
The
selected
pendently
other
SOUND
page
the
display.
whenever
same
steps
parts
on
adjust
29.)
so that
for the
automatically
4.
Repeat
the
o To play the
respective
ing
CONDUCTOR
turning
CHESTRAL
• You can
to
o
Press
vious
sound
for
each
sound
the
part,
the
avai
I able.
1 to 3 to
.
sound
keyboard,
two
EXIT
selected
button
. You
or
more
CONDUCTOR
the
volume
button
is
memorized
group
sound
turn on the
can
group
sound
select
for a part on the
in the
combine
buttons in the
at the
of each part.
to
go
back to the pre-
inde-
of
each
part,
is selected
you
chose
the sound for
correspond-
ORCHESTRAL
sounds
same
by
OR-
time .
(Refer
is
41
Page 44

Part
I
Sounds
and
effects
Selecting
A variety of sounds for you
the
to
bass
choose from is also available for the bass part (pedal keyboard).
part
Bass
1.
In
the
BASS
PEDALS
group.
BASS PEDALS
(ORGAN
• A list of sounds available
can be found in the separate "REFERENCE
GUIDE" provided .
• MEMORY is reserved for storing sounds you
modify.
(Refer
to page
section, select a sound
J (
SIA~OAHO}
for
each sound group
128
.)
sound
2.
Select the desired
display.
--·.
[lll
llli!!II!Ili!IlTI!ill!Hll!llliD
= ·················
EJIHIH!I!n!r!llffifllHIHIIUlllm!
sound
: C
CLASSICAL
from the list
ORGAN
Octave
Trumpet
Fagot
J
4'
8'
16'
on
the
• For
non-organ-type
OCTAVE
standard
octave when
• For organ-type
SICAL
sounds on the
a different
PRESET
sound .
The
•
pendently
ever the sound group is selected , the sound
you
• Press the
vious
button
is
8', so the pitch is lowered by one
16
ORGAN)
sound. Or
button, you can select the PRESET
selected sound is memorized inde-
for
each
chose
is
EXIT
display
.
sounds,
to select the octave. The
' is
selected
sounds
you can combine multiple
display
sound group, so that when-
automatically
button to go back to the pre-
you can use the
.
(ORGAN
(BASS
, when you press the
and
TABS) to create
available .
CLAS·
42
Page 45

Part
I
Sounds
and
effects
Mixing
You can combine bass sounds
so that they are produced simultaneously.
Press the ORGAN button,
ORGAN button, and
sound button
on
o The ORGAN sound and
• When sounds are combined, you can change
sounds
of
different groups
or
the
CLASSICAL
another
at
the same time to turn them both
.
sound cannot
the nuance of the
the sounds shown on the display on or off.
be
mixed.
organ-type
BASS
CLASSICAL
sound by turning
PEDALS
ORGAN
•
Volume
When mixing an organ-type sound with another
bass sound, the
sounds can be
of the
1.
Simultaneously
sounds.
:
2.
Use the
of the
o When set to 100, the volume
sound is the same
sound.
balance
volume
adjusted
non-organ-type
press the buttons for the two
: [
Gedack~
a~
UBUBLB~
100
Acoustic
1\
and v buttons, to adjust the volume
non-organ-type
balance between the two
by changing the volume
sound.
CLASS I CAL
Bass
bass sound (0 to 127).
as
the volume of the other
ORGAH
Octave
Trumpet
Fagot
II
PRESET
of
the organ-type
J
4'
B'
16'
I~
I~
I~
11~
Adjust
Adjust the volume of the
to the other parts.
Use the BASS buttons
to adjust the volume of the
the
volume
in
000
000
DRUMS
ACCOMP
BALANCE
BASS
the
BALANCE
BASS
BASS
part in relation
section
part (0 to 127).
• Each time the
increases, and each time the
pressed, the
• While the
balance setting
seconds
play returns to the
volume
after
1\
button is pressed, the volume
volume
you
decreases.
is being adjusted, the
display
change
previous
v button
is shown. A few
the setting, the dis-
display.
is
43
Page 46

Part
I
Sounds
and
etrects
Lower
You can add the
played on the
you can produce the
tually
Select from two
• TO LOWER
In the BASS PEDALS
LOWER
keyboard
bass
lower
keyboard. This
bass
playing
the pedal
methods
button to turn it on.
bass
sound
part sound
keyboard
.
sect
to
the
.
io n, press the TO
(TOl
~
0
• The bass
board sound as long as
• To turn off this function, press the
button again to turn it off .
sound
is
added
th
to
is
button
the
lowest
means
TO LOWER
without
lower
is
on.
note
that
ac-
key·
• Full bass pedal
Press
the
full bass pedal.
•
The
bass
sound
board
as l
ong
as
• If this
LOWER
turns off
released.
• You can
etc.) to the full bass
126.)
pedal
button is on,
automatically
assign a different
is
added
this pedal is
is
depressed
the
pedal.
to the lower key-
depressed.
when the TO
TO
LOWER button
when the pedal is
function (bass solo,
(Refer
to page
Add
effects
to
the
Sound
sounds
Various
DIGITAL
DIGITAL EFFECT
enhances
1. Turn
• This step is not
2. Press the DIGITAL EFFECT button to turn it
effects
add
character
to
the SOUND
and
EFFECT
gives
the
sound
richness and
your
performance
on
the part
in the
UPPER
ding the DIGITAL EFFECT to the BASS part.
on
.
button
or
LOWER SOUND GROUP).
necessary
.
0
for a sound (1, 2
when you are
or
ad·
and
BASS PEDALS
3. Repeat
• The
• The on
3
•
desired
the
is
EFFECT
selected.
The
changed.
.
DIGITAL
selected
or
preset
DIGITAL
Bass
sounds.
steps 1 and
sound
off
status
for
each
turns on when certain sounds are
(Refer
part
2 for other parts as
EFFECT
EFFECT
to page 139.)
differs
.
of the DIGITAL EFFECT
sound, so that the DIGITAL
depending
settings can be
on
44
Page 47

Part
I
DSP
EFFECT
You can change the quality of the sound .
(SOUND
parts)
0
Sounds
and
effects
1. Turn on the part button for a sound (1, 2 or 3
in
the UPPER or
2. Press the DSP
LOWER
EFFECT
SOUND
button to turn it on.
GROUP).
SUSTAIN
SUSTAIN is the
tones after the key is released.
1. If add ing this effect to a
the button for the part.
2. Press the
turn it
on
• The display
gradual
[suSTAIN]
corresponding
.
changes
A IHTEfffif
PARJ:[UPPER
fading out of musical
0
SOUND
SUSTAIN
to the following .
SOUND
part , turn on
button to
lJ
3. Repeat
desired .
• The on or
for
• The DSP
(Refer to
Use the
3.
of the
• A few
display returns to the
4. Repeat steps 1 to 3 for
o The on or off
memorized
• The
selected sound.
steps 1 and
off
each part.
EFFECT
page
1\
and v
sustain
seconds
for each part.
SUSTAIN
status
of the effect is memorized
settings
120
.)
buttons
( 1 to 8).
after
changing
status
effect
2 for other parts as
can
be changed.
to adjust the length
the setting, the
previous
other
of the
differs
display.
parts
as
SUSTAIN
depending
desired
.
is
on the
~GJ
~
I
~
8 '-·
SUSTAiN
______
LENGTH
:
7-J---Jo~
_,
r:~:p
45
Page 48

Part
I
BRILLIANCE
Change the brightness of the sound.
BRIWMICE
Sounds
and
effects
1. If adding this effect to a
the button for the
2. Use the corresponding BRILLIANCE
buttons
• The display changes to the following.
to
change the setting.
PART:CUPPER
• You can also specify the brightness with the
buttons to the right
BRIGHT: The
NORMAL: Standard
MELLOW: The sound is mellow .
• A few seconds after
display returns
sound
to
part
.
SOUHD
of
the display.
is brighter .
brightness
changing
the
prev
SOUND
part, turn on
2J
.
the setting, the
ious display .
1\
and v
3.
Repeat steps 1 and 2 for other parts
desired.
• The
• This effect differs depending on the selected
BRILLIANCE setting is memorized for
each part.
sound and on the keyboard section.
as
46
Page 49

Part
I
Sounds
and
effects
Other
Other effects give you
lever lets you instantly turn the sustain on and
re
verb
to
Knee
lever
You can operate the knee lever located under
the keyboards with
SUSTAIN
Knee
Raised position
Lowered position
(stand-by)
Pressed to the right
(on)
o You can assign a different function to the knee
lever . (Refer to page 126 .)
ellects
complete
all the sounds of your instrument.
your
right knee to turn the
effect on and off
lever
The
effect for each part
is
according to the
on/off status
SUSTAIN
each part.
The
effect is standing by
for those parts
whose
button status is on.
The
effect
the parts whose
SUSTAIN
status is on.
control over the way your performance sounds. For example, the knee
quickly
while you play.
Sustain
SUSTAIN
enabled/disabled
SUSTAIN
SUSTAIN
effect
button for
SUSTAIN
is
applied to
button
of
the
off·during
your
performance
, and you can easily add
Glide
The foot switch is used
1. Press the foot switch (left foot switch) to the
is
released
side
lower
left with the
Foot
switch~
(left)
o The pitch of the
one semitone.
2.
Release the foot
o The pitch returns to normal.
o A fast glide effect is appli
switch
• You can adjust the pitch range of the glide
effect, and specify
works for the
120.)
• You can assign a
switch. (Refer to
o The glide effect does
keyboard sounds and for some other sounds.
as
a glide control.
of
your
foot.
=ill=
instrument
switch
quickly
different
page
is lowered by about
.
ed
when the foot
.
whether
keyboard. (Refer to page
not
the glide effect
function to this foot
126.)
function for the pedal
DIGITAl
DIGITAL
to
the sound
the automatic rhythm sounds.
Press the
REVERB
REVERB
DIGITAL
applies a reverberation effect
of
the
who
REVERB
le instrument , including
button
0
to
turn it on.
D
DIGITAL
REVERB
• The display can also be used
on
or off for each part separately (effective
to
when the
• The type and depth of the reverberation can
be
DIGITAL
adjusted. (Refer to page 117.)
REVERB
to
set this effect
is on) .
47
Page 50

Part
I
Sounds
and
effects
Automatic
sound
and
effect
settings
The sound and effect settings (registration)
A great many automatic registrations are available for you to choose from.
ONE
TOUCH
A wide variety of
prepared for automatic panel setup.
1. Press the ONE TOUCH
it on.
ORGAN
ORGAN
0
registrations has been
ORGAN
button to turn
for
each keyboard can be executed automatically in seconds.
3.
Press the
• The display
REGISTRATION
looks
ONE
C)
ONE TOUCH
ORGAN
02:
o The display looks
ONE
similar
TOUCH
ORGAN
to
the following.
03:
04:
OS:
06:
GREAT
"""))IIIlliiiir:;,~,~IHIHE.":
~Ullllll
"'J€3
~
L_j
~
.!Hift£:
1
=
•••
lim~!
~
0103!1
EJ
similar
TOUCH
ORGRH
DELICATE
VINT~GE
GOOD
IT
OLD
HIXTURE
l/3
OPT
ORGRH
~
11
rnmumm
••
II
l[fffi11!llllllll!
BARS
SO~D
llilllffilllllllmn
••
• • • • • • • • • •
l
!lllllll
LIST button.
to the following.
ION
CATEGORY
02:
-·
03:
04:
as:
os:
2.
Use the
(performance style)
1\
and v buttons to select the category
SELECTION
THEATRE
THEATRE
CLASSICAL
COHBO/SIG
LIGHT
ORCHESTRA
(01 to
ELECTRONIC
PIPE
BAND
COP'I'
PAHEL
06)
.
8~
CATEGORY
8~
TO
HEHOR'I'
l.Se!ect a registration
Set
the
2.
the
4. Use the
name of a registration
o The sounds and
rhythm and various
are suitable for the registration you chose are
automatically
o Play and listen to the sound.
combination, store the registrations
PANEL
below.)
o When the ONE TOUCH
used, the
off .
registration
de~lred
1·16
1\
selected
MEMORY
ACCOMP
Pane!
and v buttons to select the
effects
other
for one-touch recall. (See
from 1-16
Into
Hemorv
(01 to 16).
for each keyboard, the
panel settings which
.
If
you like the
ORGAN
1, 2 and 3 buttons turn
function
in
the
is
48
---------
---------
-------
Page 51

Part I
11
Copy
to
the
PANEL
The registration
category can be copied to the
buttons (page 53) for
Notes
o When this
viously stored contents of the
MEMORY
registrations of the selected
procedure
buttons
MEMORY
contents
easy
of the selected
PANEL
recall.
is executed, any pre·
are replaced by the
category
MEMORY
PANEL
.
1. Select the
2. Press the
ton.
• A confirmation
button to execute the funct i
NO button to
• The automatic
PANEL
category
COPY
display
cancel
registrations
MEMORY
.
TO
the function .
1 to
Sounds
PANEL
appears
16
buttons
and
effects
MEMORY
. Press the YES
on, or
are
press
copied
.
to the
but·
the
ORGAN
Automatic settings for the
available to choose from.
1.
STYLIST
Press the
on.
ORGAN
STYLIST
0
( )
ORGAN
STYLIST
o The display looks
ORGAN
~
Gospe
4
Show-time
4
Jazz
similar
STYLIST
I
Organ
ORGAN
styles are also
button to turn it
to the following.
Theater
Church
Wa I tz
~
~
~
• When the YES
styles is
shown
ORGAN
Press
Panel
1 :
BASIC
GOSPEL
2:
BRIGHT
3:
4:60S-FULL
5:
6:
CHURCH
7:
AHAZIH'
8:
3. Use the
style
(1
CHURCH 10:
B-3
CELESTE
HUSIC
ORGAN
GRACE
IS
NOW I SEEI
ORGAN
PANEL
to
16).
button
on the
STYLIST
Hemorv
Gospel
9:
11
12:
13:
OPEN
14:
15:PLAY
16:
MEMORY
is
pressed,
display
to
(1
Select
RAISE
BROTHERS
:
PRSS
THE
AHEH
WRLK
WITH
GOSPEL
IT
EVERYBODY
buttons
a list
to 16).
THE
TE~T
+ SIS
PLRTE
ORGRH
THEE
CHURCH
HA~!
II I
SIHG
to select a
of
2. Use the buttons to the left
display
o A confirmation
button
NO
Notes
o When this procedure is
viously stored
MEMORY buttons are replaced by the
registrations of the
to
select a style category.
display
to
execute the function,
button to
cancel
contents
selected
appears. Press
the function .
and
right of the
or
executed,
of the
category.
the YES
press the
any pre·
PANEL
o The
o The sounds and
o Press
o The
49
name
the
display
keyboard, rhythm,
etc. suitable for the style you
matically
to
go
PANEL
matically to the
press the
off, the
previous
of the
for a few seconds.
selected.
ORGAN
back
PANEL
to the
MEMORY
ORGAN
mode.
STYLIST
MEMORY
(Refer
selected
volume
accompaniment
previous
EXPAND
STYLIST
style is shown
balances
chose
button
display
mode
mode
button to turn it
mode
to page 53.)
for each
and tempo,
are
auto·
to turn
changes
. When you
returns to the
it
.
auto·
on
off
Page 52

Part
I
Transpose
The
TRANSPOSE
across an entire octave.
buttons are used to change the key (pitch) of the entire instrument in semi-tone steps
Sounds
and
effects
Suppose you learn to play a
C,
for
example-and
only to find it's either too high
voice. Your choice
over
again,
TRANSPOSE
Adjust the key with the
(UP and DOWN).
in
DOWN
decide
is
to
a different key,
feature.
TRANSPOSE
oc=J
Each press of the UP button
follows: Dl
Each press of the DOWN button
as follows:
•
If
time, the key returns to C.
• When the
indicator for the UP or
lit.
• When the
transposed key is shown on the
-• D -•
B - • Bb
the two buttons are pressed at the same
TRANSPOSE
TRANSPOSE
El
-•
song-in
you
want
or
too low for your
either
learn the song all
or
to use the
TRANSPOSE
UP
c=>o
changes
-• E -• F -•
A
-•
A
function is active, the
DOWN
function is active, the
Fl.
changes
~
-•
G.
button remains
display
the key
to sing it,
the key as
of
buttons
the key
.
U/L
ORGAH
GROUP:
ELECTR.
TYPE:
Standard
RHYTHH
Organ
I
,)=146
LOWER
<Example:
Played keys
major
C
SOU~D
TABS
Fox
BALAHCE
Actual key
transposed
UPPER
[50U~D
Grand Piano
I
LOWER
CSOUMD
E.
I
II
to D>
Piano I I
BASS
PEDAL
Organ
r-(0
UPPER
Notes that sound
D major
IJ
I
ll
SOUMD
I
>
BALANCE
so
Page 53

Part
I
Techni-chord
Sounds
and
effects
r
TECHNI-CHORD transfers the chord notes you play on the
pl
ay
on
the upper keyboard.
1.
Press the
on.
2.
Play the example below, playing the chords
on
the lower keyboard
upper keyboard.
Lett hand (chord)
Right hand (melody)
• The melody you play on the
is
automatically played
based on the chords
keyboard.
• TECHNI-CHORDs cannot be played using the
lowest two octaves of the
• This feature is very effective when used with
the AUTO
• The display can be used to select the desired
harmony style. (Refer to page 119.)
TECHNI-CHORD
0
0
TECHNI-
CHORD
and
~~c
--1-
-~·
in
you
PLAY
CHORD
. (Refer to page 59.)
button
the melody on the
C F
to
turn it
•-·-•g§§)
..
I
!==+==·
upper
keyboard
chords which are
play on the
upper
keyboard .
lower
-f
.
lower
keyboard
to
each melody note you
G C
I=F---
~J-#df--
1
J====ll
• When the AUTO PLAY CHORD MEMORY
function is set to on,
continue to add the selected harmony to the
notes played on the upper keyboard even
after the chord on the lower keyboard is
released. This feature
AUTO PLAY CHORD on/off setting .
TECHNI-CHORD
is
not affected by the
will
51
Page 54

Part
I
BGS
Background
Sound
Sounds
O
<C
=
11£:=
~
"l@
~
IHi
mJWH!IDJIJ
rz=
................
a l
!mi!I!IIIDlmmlHl
and
effects
~..-.~~~-~
~
-~
-·
~OO'T"11
~
ffilJ1lJ
IIII1ll
.
rmmm
n!
Various preset
Use the
1.
• The
background
Press the
display
~I
~I
~I
BIRD
WAVE
RAIN
BGS
background
sounds
button
0
D
BGS
BACKGROUND SOU
FADE
OUT
changes
to
II
II
I
sounds such as the chirping of birds and the
to give your
to turn it on.
ND
the following.
CHURCH
APPLAUSE
lBALAI'ICE[I•
music
BELL
I•
I•
that special
2.
Press the
sound
• The
• The
two
• A few
the
3.
To turn off the
BGS button
• The
OUT).
• Volume
On the BACK
the
ting
volume.
atmosphere
.
selected
background
buttons
seconds
display
background
BALANCE
display
sound
.
button
sound
are
returns to the previous display.
again.
GROUND
button
. Use the
of waves are available .
for
the desired background
is immediately produced.
sounds
pressed
after
background
sound
can be mixed when
at the same time.
making
to
access
BGS
dies
SOUND
your selection ,
sound, press the
out slowly (FADE
display, press
the volume-set-
buttons to adjust the
52
Page 55

Part
I
Sounds
and
effects
PANEL MEMORY stores the panel setups of your instrument up
changes at the touch of a single button.
1. Select the sounds, effects and volumes for all
the parts.
2. With the SET button held down, press one of
number
PANEL
button
the numbered buttons of the
MEMORY.
• The current settings are now stored in the
specified number button. To recall the set-
tings, just press the respective
in
the
PANEL
t:::1
PANEL MEMORY
You can def ine which panel sett ings are stored
when the
1.
Press and hold the SET button for a few
seconds.
• The display changes to the following.
PANEL
MEMORY.
mode
MEMORY
PANEL
MEMORY
is used.
MODE
l~l·l~Hr:J~
Stores
settings
sound &
onliJ
balance
• After recalling the settings by pressing a
PANEL
change the panel
memory
remain
2.
Select the mode
NORMAL: Stores
tings, etc.
EXPAND: Stores all
ing rhythm ,
o After a few seconds, the display exits the set-
ting mode .
to
16, allowing you to make complex
MEMORY
contents
unchanged
TRANSPOSE
number
settings
of the
until you store them again.
(NORMAL
sound
and volume balance set-
instrument
button, you can
manually, but the
PANEL
or
status, tempo, etc.
MEMORY
EXPAND) .
settings, includ-
EXPAND
Stores
including
&
the
Tempo
total
setting
Rhl)thrn.Transpose
Suggestions
The initial factory setting of the
MEMORY contains various settings which you
may choose to use or to alter to your own taste.
These can be restored at any time by initializing the
154.) Selecting the
you to make full use of the initial factory settings of the
o You can
MEMORY to
(Refer to
53
for
PANEL
PANEL
change
page
using
MEMORY.
EXPAND
MEMORY
another
125 .)
PANEL
(Refer to page
mode will allow
.
from one
by using a foot switch.
MEMORY
PANEL
PANEL
Page 56

Part
n
Playing
the
rhythm
The rhythm section
performance of the
Selecting
After first selecting a
enhances
preset
the capabilities of your instrument with features such as automatic
rhythm patterns and
rhythms
RHYTHM
GROUP
, choose the desired rhythm from the display.
Select a rhythm.
1. In the
rhythm group.
RHYTHM
o A list of rhythms available for each rhythm
group can
ENCE GUIDE"
•
COMPOSER
reserved for storing rhythms you create
sell. (Refer to page 93.)
RHYTHM
GROUP
be
found
GROUP
in
provided
A and
section, select a
the separate "
.
COMPOSER
REFER·
B are
your·
accompaniment
• Rhythms marked with a * are especially ef-
fective for an
ance with
• The selected rhythm is memorized inde·
pendently for
whenever
pressed, the rhythm you
ically available.
o Press the EXIT button to go back to the pre-
vious display.
patterns.
ORGAN
a
AUTO
PLAY
sounds
each
RHYTHM
CHORD
.
rhythm group, so that
GROUP
chose
perform·
button
is automat-
is
2. Select the desired rhythm from the list on the
display.
SHOWT
J=l20
~~roadway
~1
*Organ
•!Vegas Pi
Shawl!
Show
ani
HIE
Ho
l l ywood
II
Soft
st
II
Cabaret
I Vaudv i l l e
Shoe
1~
1~
1~
I•
54
Page 57

Part
II
Playing
the
rhythm
Start
There are two ways to start the rhythm.
• Immediate rhythm start
1. Select a rhythm.
2.
the
Press the
rhythm
START/STOP
I 2 3 4 BE
0 0 0 0
button to turn it on.
AT
c )
START/ STOP
• The selected rhythm pattern
begins to play.
• You can stop the rhythm by pressing the
START/STOP
• During the rhythm performance, the
dicators above the
to indicate the beat. On the first beat of the
measure, the red indicator lights. On the
second and succeeding beats of the measure,
the green indicators light in
Adjust
The volume of the rhythm is adjusted with the
DRUMS
the
buttons in the
button again to turn it off.
START/STOP
volume
BALANCE
immediately
button light
order
.
section .
BEAT
in-
o Synchronized start
With the
pattern starts
keyboard
1. Select a rhythm.
2. Press the
3. Play a key on the
o The rhythm pattern
o You can
synchronized
when
or
pedal
SYNCHRO & BREAK
it on.
on
the pedal keyboard.
stop
START/STOP
button to turn it
you play a key on the lower
keyboard
SYNCH
the rhythm by pressing the
start feature, the rhythm
.
button to turn
0
0
RO&
BREAK
lower
keyboard or a pedal
begins
to play.
off
.
000
000
DRUMS
ACCOMP BASS
BALANCE
• While the volume is being adjusted, the
balance-setting display is shown.
Adjust
The tempo of the rhythm pattern is adjusted with
the
the
tempo
TEMPO/PROGRAM
TEMPO/ PROGRAM o
dial.
•
The
tempo is
numerical value
• When the
means
it
ting
GRAM
adjusting the tempo.
TEMPO/PROGRAM
that one of the various function-set-
modes
is active and the
dial is not currently available for
shown
U =
40
on the display as a
to 300).
indicator is lit,
TEMPO/PRO-
55
Page 58

Part
II
Playing
the
rhythm
r
Playing
lntro, fill-in and
instrument, thus allowing a
the
ending
patterns
INTRO
Begin the rhythm
tern.
1. Press the
on .
performance
INTRO & ENDING
0
(
__
:--:---)
INTRO&
ENDI
COUNTINTR(]
You can begin the rhythm
one-measure
count.
rhythm
fitting each
versatile
NG
performance
rhythm
with an intro pat-
button
to turn it
with a
different
performance.
rhythm
2. Press the
• An intro
pattern
rhythm.
mal
rhythm
;;_.~l0]'
~
="'
a n
are
permanently
START/STOP
I 2 3 4 BEAT
0 0 0 0
(...___,........--')
START
/ STOP
pattern
is
pattern
played,
begins
.
.,
1
:~
llmlmrmrrmmrrrrn
................
.
mmllmm!llllliillilll!I!Tm!
recorded in
button
after
.
to start the
which
your
the nor-
1.
Press the
to turn it on.
Each
rhythm
Add
drama
variation
the
melody
1.
.
Select
button.
COUNT
INTRO
COUNT INT
( )
FI
pattern
to
a rhythm and
also has a variation pattern.
your
performance
pattern
0
LL
IN 2
at
climactic
press
(FILL IN 2) button
RO
by switching to
points
the
START/STOP
in the
2. Press the
rhythm.
o A
one-measure
the
normal
2.
Press
the
o The rhythm
o Press the
off
and
go
o This
button
STYLE
ARRANGER
START/STOP
count is played,
rhythm
VARIATION
pattern
button to start the
begins
button
0
to turn it on.
c )
VARIATI ON
chang
es to a flashi
VARIATION
back
to the normal rhythm pattern.
does
button
not
funct
is on . (Refer to page 65.)
er
aga in to turn
ion when the MUSIC
after
.
pattern .
which
it
56
Page 59

Part
II
FILL
IN
You can insert a fill-in pattern any time during
the rhythm performance.
ferent fill-in patterns.
1. Select a rhythm and press the
button.
Choose
from two dif-
START/STOP
2.
Press the FILL IN 1
SEQUENCER RESET COUNT
0 0
Playing
or
FILL
the
IN
2 button.
INTRO
rhythm
ENDING
Finish the rhythm
pattern.
1. Select a rhythm and press the START/STOP
button.
performance
with an ending
CJ
FILL
IN 1
• A fill-in pattern is
remainder of the measure.
o When a FILL
beat of the
tinues
2. Press the
on.
to
IN
measure,
the end of the following measure.
INTRO & ENDING button to turn it
c )
FILL
IN 2
heard
button
immediately
is
pressed on the last
the fill-in pattern con-
0
for the
c )
INTRO&
ENDING
• An ending
rhythm
• If you
DING
press the
ending pattern stops, and a fill-in pattern is
produced,
formance
pattern
performance
accidentally
button in the
FILL
IN
after
which the normal rhythm per-
continues
is
produced
stops.
press the INTRO & EN-
middle
1
or
FILL
.
, and then the
of the tune, you can
IN
2 button. The
57
Page 60

Part
II
Playing
the
rhythm
Keyboard
A complete set of percussion
keyboard to play the
1. Press the
to turn it
• The display looks
KEYBOARD
on
.
KEYBOARD
Percussion
percussion
PERCUSSION
KEYElOARD
PE
RC
USSION
0
similar
PERCUSSION
Brush
Rock
~JL
i
ght
Rock K i t
Kit
2
I!
Brusk
orchestral
instruments
performance
to the following.
and other special sounds is at
button
KIT
Kit
Kit
2
K i t
.
J~
J~
j~
~
-
~[IJ
B lUliDi
your
fingertips. Use the lower
2. Select the KIT of
the list on the
3. Play the
• Percussion instrument
by the
the picture code
explanation
ENCE
• In the "
cussion
lower
lower
GUIDE"
Orchestral
instruments
percussion
display
keyboard.
keybo a
, refer to the
rd
above
provided.
kit
,"
is
181'
.
the arrangement of per-
i1Ji·~l=~
-occ'CII:IQ
~
]
tJ.!
I
IJ
Jl.
!J
i
lJ!WIU
)
!l.
mnnm
llll
UJill
l!!ll!ll!lllfill
instruments from
sound
s are produced
keys as indicated by
each key. For further
separate
different.
!TI
"REFER-
!
~[Soul
~~
Jazz
K i t
Kit
Jl
]
T
rad
I<
i t
J~
58
Page 61

Part
II
Playing
the
rhythm
Auto
Simply by playing a chord on the
an
accompaniment pattern which matches perfectly the selected rhythm. With a real
a background , you can concentrate
How
~'
[ _
Playing
You can choose from one of the following three
AUTO PLAY
the
__
_______
Play
AUTO
___
chords
PLAY
M_e_lo_d_Y
c_ho_r_d
CHORD
Chord
lower
on
CHORD
________
____
modes.
works
~I
__,_JI
keyboard, the
playing the melody.
Upper
Lower
AUTO
PLAY
CHORD
When an
an automatic
rhythm you have
which you specify on the
melody is played on the upper keyboard.
• The
AUTO
accompaniment
PLAY
DRUMS,
ACCOMP
CHORD
accompaniment
BASS, ACCOMP
3.
function automatically plays
PLAY
chosen
is
. .
IUIIniUIUffiJI!JJJUillmlll!ill
...
~.
. . .
..
.. ..
..
..
..
....
EJ
IIIII!!Ullnll\li\I!IIm!JllBIDD!
accompaniment
CHORD
composed of five parts :
mode is selected,
which matches the
is played
lower
pattern of the
in
the chord
keyboard. The
1,
ACCOMP
as
AUTO
2 and
• ONE FINGER mode
Press a key on the lower keyboard
root note. The major chord (on the lower keyboard) and the bass note (on the pedal keyboard)
corresponding to this root note are automatically
in
played
Example: C chord
an accompaniment pattern.
to
specify the
)!!I!!!IJ!I!!!I!!I!!!I
Minor, seventh and
minor chord
Play the root note on the Play the root
lower keyboard and any lower keyboard and any
black pedal.
:L
minor
seventh chords are also easily produced as
seventh chord
note
on the Play the root note on the
white pedal. black pedal and white
~
shown
minor
lower
keyboard and any
pedal, at the same time.
below .
seventh chord
I
~
59
Page 62

Part
II
Playing
the
rhythm
You can also use just the
minor· chord
Play the root note plus a Play the root note plus a Play the root note plus a
black key to the left
Example: Cm
I~
• FINGERED mode
Indicate the
keys on the
mode, the AUTO PLAY
more chord types, and thus the scope
performance expression is expanded.
Example: C
chord
by actually playing the chord
lower
keyboard. In the FINGERED
chord
lower
keyboard to specify minor, seventh and
seventh chord
of
it. white key to the left of it.
Example: C7 Example:
ll!illf~
CHORD
recognizes
of
your
minor
seventh
minor
seventh chord
black
key and a
to the left
of
it.
Cm7
white
I~
• PIANIST mode
Indicate the chord
keys on the lower
chords recognized
AUTO PLAY
13th chords.
• If a pedal is
chord in the
only the bass pattern is produced in the key
of the pressed pedal , thus making it possible
to play
chords
by
actually
keyboard.
in
the
CHORD
pressed
FINGERED
such as
FINGERED
also recognizes 9th and
while
and PIANIST mode ,
Done.
chords.
key
playing the chord
In addition to the
mode, the
you are playing a
r
• The AUTO
following
given as an example):
Cm7, Cdim7,
PLAY
played
Cmir.,
CHORD
chords for each key
can distinguish the
C,
C7, CM7, Caug, Cm,
CmM7, Csus4, etc.
(C
is
60
Page 63

Part
II
How
the
use
the
AUTO
1. Select the desired rhythm and sounds, and set
the tempo.
• Rhythms marked with a * are
fective for an
ance with
2. Press the AUTO
it on .
AUTO
ORGAN
PLAY
AU
sounds .
TO
CHORD
PLAY
CHORD
PLAY
0
PLAY
CHORD
especially
CHORD
button
ef-
perform-
to turn
D
• The display looks
FIHGER£0
PIANIST
RUTO
similar
PLRY
to the following.
CHOIW
Playing
3. Use the
select an
• After a few seconds, the display returns to the
previous
o When the
the keys
and the
you specify
4.
Press the
rhythm.
• You can
lower keyboard or pedal keyboard (synchronized start).
5.
Specify the
o
An
chord begins to play . Play the
upper keyboard.
• When you use
and
is also used in these patterns .
o When the rhythm is off, if the
CHORD
the specified root note and
produced .
buttons
AUTO
display
MEMORY
are
accompaniment
START/STOP
also
accompaniment
ENDING,
button is on and a chord is specified,
to the left of the display to
PLAY
.
released, the chord is memorized
another
start the rhythm by playing the
(Refer
chord
VARIATION, FILL
the
CHORD
is
set
continues
chord
button to begin the
to
page
on the l
automatic
ower
pattern
the
rhythm
mode.
to ON, even when
to play until
.
55.)
keyboard.
in
the specified
melody
accompaniment
AUTO
chord
on the
IN,
INTRO
PLAY
notes are
Adjust
The volume for each part is adjusted with the
re
in the
the
spective
BALANCE
volume
DRUMS,
section.
ACCOMP
or
BASS
buttons
000
000
DR
UMS
ACCOMP BASS
BALANCE
• While the volume is being adjusted, the
ba
lance setting
• The volumes for the
be
can
30 .)
adjusted independently. (Refer to page
display
ACCOMP
is shown.
1, 2 and 3 parts
6.
To stop the
the
START/STOP
automatic
button .
accompaniment
, press
61
Page 64

Part
II
Playing
the
rhythm
ACCOMP
The
ment is
can change the
or all of the three
parts
ACCOMP
composed
ACCOMP 1 ACCOMP 2 ACCOMP 3
part
0 0 0
ODD
•
If
all the
ACCOMP
DYNAMIC
DYNAMIC
each
accompaniment
CHORD .
1. Press the
it on.
ACCOMP
part sound is not
ACCOMP
ACCOMP
DYNAMIC
of
the
automatic
of
three
different
accompaniment
parts
on
or
off.
parts
are
is a
function
pattern
DYNAMIC
ACCOMP
of the
ACCOMP
0
D
accompani-
parts
by turning any
turned
produced.
which
off, the
changes
AUTO
button to turn
. You
PLAY
2. Play the
PLAY
• Depend ing on
played
for example, each
instrument
CHORD
or
how
with one of the AUTO
modes
how
complicated
on.
hard the
ACCOMP
keyboard
the
melody
part changes.
keys are
phrase ,
BREAK
Wi
the lower keyboard is
fingers are removed from
1. Turn on the AUTO PLAY
• At this time, the
2. Press the
3. Specify a chord on the
• The automatic
function
th
the break function, the
select a
OFF
it on.
(synchronized
mode
.
MEMORY
.
SYNCHRO & BREAK
accompaniment
start)
played
the
0
SYNCHRO&
BREAK
.
rhythm
and stops when
CHORD
0
lower
starts when
keys
.
button and
should
button to turn
keyboard
begins to play
the
be set to
.
4. Release the
• The
automatic
the keys are
accompaniment
lower
keyboard
accompaniment
pressed
starts from the first beat.
keys.
stops. When
again , the automatic
62
Page 65

Part
II
Playing
the
rhythm
Automatic
With the automatic settings , the panel settings change depend ing on the
select. This lets you get a great sound straight away, even if you are playing this
time.
ONE
TOUCH
Set
up
sounds and balances suitable for your selected
rhythm style.
1. Select a rhythm pattern.
•
Do
not select a rhythm from the COMPOSER
A or COMPOSER 8 group.
2. Press the ONE TOUCH
indicator goes out.
PLAY
your instrument with a combination of
C)
ONE TOUCH PLAY
• The display looks similar to the following .
ONE
settings
PLAY
0
MUSIC
STYLE
SELECT
TOUCH
PLAY
button until its
pltll:;,;~=:>=;;;;"m;,.;::l€J;;;;:'"•.~;Jf~
~
!liiiiiii:2 ..................
EJ
rhythm
3. Play the keyboards.
• When a chord is specified on the lower keyboard, the
to
play. Play the
board.
Suggestions
• Press the
you play
duction .
•
Use
a starting point for your own registration.
• Alter the sounds,
own taste and store
in
the
(Refer to page 53
automatic
melody
for
using
INTRO & ENDING
for a professional-sounding
the
ONE
TOUCH
balance
PANEL
MEMORY
.)
rrmrnumm]lllllllll!lll
.
l
nm
IT!IllHIJI!Ol!IIHm!lliillHiliiJ!
or
music style you
instrument
accompaniment
on the upper key-
ONE TOUCH
PLAY
and tempo to your
your
for the first
begins
PLAY
button before
intro-
registration as
new registration
for
future use .
(
ORGANIST'
• The AUTO
&
BREAK
effects and tempo are automatically set.
PLAY
button turn on , and the sounds,
S
CHORD
DANCE
and the
)
SYNCHRO
63
Page 66

Pari
II
Playing
the
rhythm
MUSIC
With this feature, the panel settings are automatically set to match the
1. Press the ONE
• The display looks
STYLE
SELECT) button momentarily.
SELECT
selected
TOUCH
similar
MUSIC
STYLE
PLAY
to the following.
SELECT
music
(MUSIC
style.
STYLE
TRAD
-·IIJiil:t:l::t:t•;;t•·:i
02:
REED
03:
04:
ORGAN
OS:CHANSON
06:
GRAHD
07:
08:
09:SOFT
10:
BALLROOH
II:ORGAHIST'S
12:SPARKLIHO
2. In the RHYTHM
rhythm group.
FOXV
FOXV
BRASSV
GROUP
AND
VIBES
BRASS
CHANSON
D'AMOUR
CHAHSOH
PlAHOS
FOX
DANCE
ORGnH
DANCE
. I
ORCH
DANCE
section, select a
3.
Use the A and v
style.
• The
4. Play the keyboards .
• When a chord is specified on the lower key-
• To return to the normal
AUTO
&
BREAK
effects, rhythm and
suited for the selected music style are automatically selected.
board, the
to play. Play the
board.
press
it off,
Suggestions
SELECT
• Press the
you
duction.
• Use the
tion as a starting point
tion.
• Alter the sounds, ba
own
in
the
(Refer to
PLAY
button turn on, and the sounds,
automatic
the
ONE
or
press the EXIT button.
INTRO & ENDING
play
for a
MUSIC
taste
and
PANEL
page
buttons
CHORD
melody
TOUCH
for
using
professional-sounding
STYLE
store your new registration
MEMORY
53.)
to select a music
and the SYNCHRO
tempo
accompaniment
lance
which are best
on the upper key -
performance
PLAY
button to turn
MUSIC
button before
SELECT
for
your
own registra-
and tempo to your
for future use.
STYLE
registra-
begins
display,
intro-
64
Page 67

Part
II
Playing
the
rhythm
Music
The
MUSIC
ance. Select between three contrasting registrations at the touch of a
ARRANGER
sounding arrangement.
~ow
!o
1.
Select a rhythm pattern.
2.
Press the
to
select the style (1, 2
beginning of your performance.
Sty!e
STYLE
will alter the
RBSe
ihe
MUSIC
1 2 3
0 0 0
CJ
MUSIC
STYLE
ARRANGER
Arranger
ARRANGER
accompaniment
MUSIC
STYLE
STVI.E
ARRANGER
or
3)
1: Simple pattern
2:
Normal pattern
3: Flashy pattern
helps you make professional registration
in
character with the registration change, creating a polished·
ARRANGER
• Each time the
button is pressed, the
as follows : 1
o The panel settings
selected rhythm
PLAY
CHORD
button turn on.
board is pressed, the
ment starts to play immediately.
o The
MUSIC
rhythm
VARIATION
the
VARIATION
MUSIC
STYLE
you
want
button
at the
-•
STYLE
button
~
mJllliHli!IllmilJDlilllffiillll
=·················
a
l!TII!llillillll
changes
button
MUSIC
2
-• 3 -•
and
and the
When
during your perform·
. The
MUSIC
STYLE
style
indication changes
off.
change
music
ARRANGER
setting. Therefore, the
does
ARRANGER
according to the
style. The
SYNCHRO & BREAK
a key on the lower key·
automatic
not function when
illlli'JlllllffilliD
ARRANGER
accompani·
includes the
is on.
!
STYLE
AUTO
While you are playing your instrument with the
MUSIC
IN 1
o Each time the
STYLE
or
FILL IN 2 button.
FILL IN 1 pattern plays, and then the music
style changes in the 3
each time the
FILL IN 2 pattern plays, and then the music
style changes
ARRANGER
SEQUENCER RESET COUNT INTRO
0 0
CJCJ
FILL IN I
FILL
IN 1 button
FILL
IN 2 button is pressed, the
in
the 1 - • 2
on, press the
LL
IN 2
FI
is
-•
2
-•
1 order . And
__,
3 order.
pressed, the
FILL
65
Page 68

Part
II
Playing
the
rhythm
• MUSIC STYLE
You can define which panel settings
when the MUSIC
a
FILL
IN
button is pressed.
1. Press and hold the
RANGER button for a few
• The display
MUSIC
ARRANGER
STYLE
changes
STVLE
mode
ARRANGER
MUSIC
to the following.
ARRANGER
STYLE
seconds
MODE
SOUND
RHVTHI1
PANEL
MEMORY
change
is on and
AR-
.
2. Select the mode.
SOUND
Only the sound
RHYTHM
Only the rhythm changes.
SOUND & RHYTHM
Both the sound and rhythm chang
• PANEL
The
•
• You can
PANEL
After
ting
&
CTRL
MEMORY
a few
mode
changes
MEMORY
seconds
.
also
access
button . (Refer to
.
number
, the display exits the set·
this
display with
page
e.
changes .
the MEM
123.)
66
Page 69

Part
Ill
Sequencer
··~.-.[P
Outline
A sequencer records your performance in a similar way to a tape recorder. This
allows you to record
(especially if you are using
arrangement with several different parts playing together, like an orchestral score. This SEQUENCER
16
has
tracks. For some uses you may only need to use one or two tracks. The
edit your recorded performance. Unlike a tape recorder, you can
playback, or correct wrong notes
S~QUENCE!llleatures
til You can
When you record
tempo and play it back at a faster tempo, the pitch
stays the same.
c
Your performance is reproduced by a sound
module as
recorded tape, the sound never deteriorates no
matter how many times you play back your per·
formance.
tracks. This means that you can record 16 different parts.
the
pitch
Consistent
ol
the
in
a variety of ways. You may want to record your entire performance
change
it
the
tempo
your
performance at a slow
sound
reads digital data. So, unlike a
Sequencer
AUTO
PLAY
or
without
CHORD to provide the accompaniment), or to build up a complex
timing errors.
changing
However, you
change
Memory
Expressed
notes which
about 28,000.
for recording is shown on the
centage
• When
no more data can be
CER .
o It
performances on
the
107 .)
capacity
in
terms of notes , the total
can be stored
The
(MEMORY=%)
"Memory
is
a good practice to save your recorded
SEQUENCER
I!H:"1IIIIliiD :.:l@
-~'C:I'CJOICI'
~
rrmm!mrmilli!
=·················
~
[illii!ill!H
instrument's
don't
SEQUENCER
the
sound
remaining
.
full!"
appears
stored
disks
before
memories.
...
J]'~I-~
~
-lffiffl!:":
·
V"QC;n:)·~
I
llllflllfiTIID
I!
fill]
I
IIWI!illm
SEQUENCER
in
have to use all
enables
or the tempo during
number
in
all the tracks
memory
display
on the display ,
in the
SEQUEN·
clearing any of
(Refer
!
one go
16
you to
available
as
a per·
to
page
of
is
RJ
Edit
your
recorded
Comprehensive editing functions allow you to
modi
fy
your recorded performance. Data can
easily
be
erased, corrected
an
espe cially convenient tool for creating your
original tunes.
1.11
Instant
A recorded tape has to be rewound, but digital
action means you can return to the beginning of
your performance, or find any measure, instantly.
11
Save
All the data of your recorded performances can
be
allows you
your own instrument.
• Features and operation of the built-in Disk
Drive are explained in Part V: Disk Drive (page
103) .
search
your
performances
stored on disks. The built-in Disk Drive also
to
play commercially sold disks on
performance
or
copied, providing
on
disks
67
Page 70

Part
m
Sequencer
SEQUENCER
The
buttons
and editing are briefly
• EASY RECORD
Begin recording quickly
up procedures.
EASY RECORD (page 69)
This feature allows you to
plex recording procedures so you can record and
play back your
• You can also record an accompaniment from
the AUTO PLAY
• SEQUENCER REC
Record your
the keyboard.
buttons
related to
performance
performance
SEQUENCER
explained
without
0
0
EASY
RECORD
CHORD
SEQUENCER
below .
complicated set-
bypass
just
the more com-
quickly
.
REG
and easily .
as you play it on
recording
oc=J
• SEQUENCER
Edit the
These features
specific tracks
the kind
contents
of
playback
SEQUENCER
PUNCH
~I
~
l
~~
~I
RECORD
TRACK
ASSIGN
EXPRESSION--]
SETT
lNG
AFTER
TOUCH
SETT
lNG
of
your
recorded performance .
allow
you
to edit the contents of
or
measures, and also to define
you want.
SEQUENCER
0
c:::J
EDIT
II
PLRV
ll
!
P1EDLEV
I
I~
I~
I
~
REALTIME
Record your performance in up to
create your
• STEP REC
Store the
STEP
For repeating patterns or those especially complicated phrases, this
recording the notes one-by-one.
o Th is mode can be used to store both the chord
progress ion for the
and the rhythm changes.
RECORD
own
sounds
RECORD
(page 72)
orchestra or band.
note-by-note
S
TEP REC
0
c:::J
(page 74)
mode
automatic
on the display .
is convenient for
accompaniment
16
tracks and
PUNCH
Correct a
formance.
TRACK
Assign parts to up to 16 different tracks.
EXPRESSION
Specify how pedal
during recording
AFTER
Specify
recorded.
RECORD
selected
ASSIGN
SETTING
TOUCH
whether
(page 89)
portion
(page 79)
or
playback
SETTING
or
of your recorded per-
(page 80)
operation
.
(page 81)
not aftertouch data
data is handled
is
68
Page 71

Part
Ill
Sequencer
EDIT (page 82)
The following editing features are available .
o SONG CLEAR: Erase the recorded contents
of all tracks.
• TRACK CLEAR : Erase the contents of a
specific track.
o TRACK MERGE: Merge the recorded contents
of two tracks and store in a third track .
• QUANTIZE: Correct the timing of the recorded
performance.
• MEASURE ERASE: Erase the contents of
specific measures.
COPY
• MEASURE
specific measures .
Suppose you are playing your instrument, and you wish to record and play
hear how it sounds. You can bypass the set-up procedures of the full-scale
qu
ickly and easily.
: Copy the contents of
•
MEASURE
ures.
o
MEASURE
specified point.
• VELOCITY
(how hard the keys are played).
PLAY
(page 91)
Adjust the
MEDLEY
Specify
a disk.
settings
(page 92)
medley
DELETE
INSERT: Insert measures at a
CHANGE
related to
playback
sequencer
: Delete specific meas-
: Modify
of songs recorded on
~~!Qt=l=~
-
~.,o
~I
~
.
a
I!IT!IIIllllllm
back
your
velocity
playback
.......
...
.....
l
!llllml!ll!llll~!
performance
and begin recording
data
operation .
(lo
-co
o o
~
I
.
to
~ea:orruKJJ~Ui!D
1. Set the desired sounds, effects, rhythms, etc.
2. Press the EASY RECORD button to turn it on.
• The display changes to the following.
llDr'IOCI!HIIM!f'lat
0
0
EASY
RECORD
D
Easv Record
record your complete perfornance
Including
existing
Press
Auto
song
@Ell
sets
the
Plav Chord.Anv
will
be
to
proceed.
Sequencer
cleared.
to
[QR]J~
Note that when you
mode, the following
fected.
o Tracks available for
follows.
1: UPPER part
performance.)
2: LOWER part
performance.)
3: BASS part
formance.)
5:
CONTROL
changes in the
3. Press the OK button.
o Note that when you
contents of all
(SONG CLEAR).
o The
4. Begin
o Recording
display
RECORD
rhythm or play a
display
your
begins
select
settings
(Record
(Record
(Record
part (Record rhythm changes,
panel
SEQUENCER
changes
.
performance
as soon as you start the
keyboard
the
EASY
RECORD
are
automatically
recording
the pedal keyboard per·
press
are selected as
the upper keyboard
the
lower
keyboard
button status, etc.)
the
OK
button , the
tracks are erased
to the
.
.
REAL
TIME
ef-
5. When you have
EASY
69
RECORD
finished
button to turn it off.
rec ording, press the
Page 72

Part
Ill
Playback
1.
Press the
button.
SEQUENCER
SEQUENCER
RESET
0
f1ESE
T
(FILL IN
1)
2. Press the
START/STOP
1 2 3 4 SEAT
0 0 0 0
Sequencer
button.
CJ
FILL
IN I
Sequencer
The
SEQUENCER
parts
has
16
recording tracks. The track
in the following table.
(Recorded keyboard)
UPPER
[US1 to US3]
(Upper keyboard)
LOWER
[LS1 to LS3)
lower
(
UPPER ORGAN [UOR]
(Upper keyboard) part
LOWER ORGAN [LOR)
(lower
UPPER [UPR)
(Upper keyboard)
LOWER [LWR)
(lower
Part 8 to
(Upper keyboard) pa
BASS [BAS ]
(Pedal, lower keyboard
[full bass pedal))
KEYBOARD
PERCUSSION
(Lower
CHORD
(Lower
Part
SOUND 1 to
SOUND
keyboard)
keyboard)
keyboard)
15
[PB to P15). Recording the respective • Selected sounds, volume
keyboard)
[CHD]
keyboard)
3
Recording the respective • Keyboard note data
keyboard
(realtime/step)
1
to 3
Recording the ORGAN
(real time/step)
Recording all parts of the
respective
performance
(rea ltime/step)
Recording the keyboard • Selected sound (drum kit), vo lume
[KBP) performance using the
KEYBOARD
PERCUSSION
(realtime/step)
Recording the chord • Chord progression
progression for the
AUTO PLAY CHORD
(step)
o
Your
recorded performance is played back
automatically.
assignment
Used for Recorded contents
performance
performance
keyboard
rt
(realtime/step)
Se
lected sounds , volumes
•
• DIGITAL
• Aftertouch, knee
• Keyboard note data
• Tab settings,
• Tab tremolo, effect,
• EXTRA TAB
• EXTRA TAB
• Same as recorded
SOUND 1 to
•
ORCHESTRAL
• Glide on/off
• DIGITAL
• Aftertouch
IN
• FILL
and recorded contents are
EFFECT
EFFECT
1, FILL
, DSP
lever
volume
SUSTAIN
settings
tremolo
3,
, effect on/off
contents
and
UPPER/LOWER
CONDUCTOR
, DSP EFFECT, SUSTAIN on/off
IN
2, INTRO & ENDING on
c )
START/STOP
EFFECT
on/off
, SUSTAIN on /off
on/off
of
UP
PER/LOWER
ORGAN, above
status
as
outlined
70
.
---
· - - -
-----
Page 73

Part
Ill
Sequencer
--
Part
(Recorded
RHYTHM [RHY) Recording settings • Rhythm settings
CONTROL [CTL]
keyboard)
related to the rhythm
(step)
Reco rding panel button • Tab,
settings and changes
(realtime/step)
Used
for
COMPOSER)
•
START/STOP, FILL
lNG on
•
Tempo
tings, volumes
• Tab tremolo, effect
DIGITAL
•
• DSP EFFECT on/off, type
•
DIGITAL
• AUTO
•
DYNAMIC
• MUSIC
•
VARIATION
•
PANEL
•
TRANSPOSE
BACKGROUND
•
• Tempo setting
• CONDUCTOR,
• Knee lever,
• EXTRA TAB
•
ACCOMP
•
KEYBOARD
•
TECHNI-CHORD
• Full bass pedal on/off
setting
SOUND
1, 2 and 3
EFFECT,
REVERB
PLAY
CHORD
ACCOMP
STYLE
on/off,
MEMORY settings
status
expression
settings
PART
PERCUSSION
Recorded
and
selection
IN 1,
sound
SUSTAIN
on/off
status
on/off
ARRANGER
FILL
IN 1, 2,
SOUND
PART
on/off
on/off
setting
SELECT
pedal
contents
changes
FILL
IN
2,
INTRO & END-
settings, rhythm set·
on/off
and
depth
setting
status
INTRO & ENDING
status
operation
on/off
(including
• You can use the TRACK ASSIGN function to assign parts to tracks as you wish. (Refer to page 79.)
on
• During recording, the MEASURE count
the display corresponds to the
rhythm. However, if rhythm data is stored in the RHYTHM part and
time
signature of the selected
that
part is played back, the
MEASURE count on the display corresponds to the stored rhythm data.
Iii
Factory-preset
0 0 0 0 0 0 0 0
00000000
9
10
track
SEQUENCER
11
assignment
12
13
1•1
15 16
~J
1:
UPPER SOUND1
2:
UPPER
3: UPPER
4: LOWER
5:
0
LOWER
6: CHORD
SOUND2
SOUN03
SOUN01
SOUN02
7: BASS
8: CONTROL
9: PART9
10: PART10
11
: PART11
12: PART12
13: UPPER ORGAN
14: LOWER ORGAN
15: RHYTHM
16: KEYBOARD
PERCUSSION
71
Page 74

Part
Ill
Sequencer
r
Realtime
With
REAL
TIME
keyboard. And with multi -track recording, you can use up to 16
Record
RECORD. your
performance is recorded with the timing
Recording
1. Set the sounds, effects,
parts you are going to record.
2.
Press the
on.
• The display looks
SEQUENCER
SEQUENCER REC
0
REALTIME
!'lEASURE
TIME
4(BALANCEij
J::120
REC
REC REC REC
MEMORY
c:::J
similar
SIG.
volumes,
REC
to
etc. for the
button to turn
the
following .
!RECORD
:
= 4/4
=
99
7.
3. Use the
the
(For
it
pages 70 and 79.)
• Press
track
For
•
tracks 9 to 16 use the
tracks.
o You can select two or more tracks to record
at
one
o At this time,
in
step 1 are stored.
o You can also
tons to
0 0 0 0 0 0 0 0
'2
OOOODDOO
9 10
~~~~IF.Ia~~~
o .
To
lu~l
~filM)
[ill]
till]
B]J
lillllr~~~
select
while
o The
flashes
dicator
pressed
exactly
tracks
tracks
details
numbers
tracks
pressing
indicator for
to record your performance.
buttons
for the parts you are going
the
time.
select
tracks
slowly. (For
flashes
.)
below the display to specify
about
track assignment, refer
buttons
1 to 8,
to display "REC" above the
you are going to record.
use
the
panel settings you selected
use
the
the tracks.
SEQUENCER
3 4 s s 1 a
11
12 13
9 to 16, make your selection
the
9-16
the selected track button
when the
as you played it on the
to
record.
the
1\
buttons, and for
v buttons to select the
SEQUENCER
111
track but-
15
16
Q J
button.
tracks 9 to 16, the in-
9-16
button is
to
0
4. Use the
tempo
o The
numerical
o If you wish to record the tempo setting and
tempo
part,
5. Turn the
the ON or
o The
ON
o The
72
TEMPO/PROGRAM
.
tempo
or
metronome
and
metronome
is
shown
value
(J
changes,
use
metronome
OFF
record them in the
the RHYTHM STEP RECORD .
OFF
button.
select ion alternates between
each
sound is not recorded.
dial to adjust the
on the display as a
=).
on or off as desired with
time the button is pressed.
--
---
- -
CONTROL
---
Page 75

Part
Ill
6.
Play the keyboard.
• Recording begins.
o You can also press the START/STOP button
to start the rhythm and begin recording.
If
the metronome is on, when you press the
•
START/STOP button, a two-measure count
plays, after which recording automatically
does
begins. In this case, the rhythm
• On the display, the following information
shown.
MEASURE:;;: Current measure
TIME SIG.:;;: Time signature
MEMORY:;;: Remaining memory
not start.
is
number
(%)
P~ayback
1.
Turn
on
the track buttons for the parts you
wish to play back.
o Tracks whose indicators are not lit wi
played back.
ll
not be
Sequencer
• If you wish to adjust the volume of each track
or part during recording, press the
button to recall the
You can then
• If you make a
correct a specific
without
to
7.
When you have finished recording, press the
SEQUENCER
3.
Press the
The
•
automatically
page
recorded
having
89 .)
START/STOP
.
PART
adjust
mistake
portion
to redo the whole part. (Refer
REC button to turn it off.
performance
BALANCE display.
the volumes.
in recording, you can
of your performance
button.
BALANCE
is played back
2. Press the
button.
SEQUENCER
SEQUENCER RESET
0
RESET
(FILL IN
1)
c )
FILL
IN
1
o The SEQUENCER returns to the beginning
the song and the
recalled.
Mum-track
When recording several tracks, you can record
one track while listening to the track or tracks
already recorded.
1. Follow the procedure to record the first track.
o When you turn the
off, confirm that the indicator for the track you
recorded
tracks you wish to have played back.
2. Follow the procedure to record the next track .
o When the START/STOP button is turned on ,
the track recorded
You can record the next track
• On the display "REC" indicates tracks which
are being recorded, and "PLAY" indicates
tracks which are being played back.
is
beginning
panel settings are
l!'ecord~ng
SEQUENCER
lit. Turn on the buttons for the
in
step 1 is played back.
REC button
in
time with this.
of
3. Repeat step 2 to record all the desired parts.
73
Page 76

Part
Ill
Sequencer
Step
STEP
Instead of playing the keyboards
to input each single note . This
are difficult to play or when the
Recording
Record the keyboard perfo r
changes .
1.
Press the STEP REC button to turn it on.
• The display looks
Record
RECORD
STEP
is simply a
procedure
RECORD
STEP REC
0
c==J
similar
method
to the following.
of making a tune by storing the
direct
is
an
especially
exact
mance
:
PART
and panel
SELECT
Press the Sequencer Track buttons
In
the
Program
up/down
the
part
RECORD.
buttons under the
Press
that
svctlon
vou
want
@E)
to proceed.
or
to
the
LCD
STEP
for
ly as
in
the REALTIME
effective method for storing
timing of a part
@gJ]~
RECORD
is
critical.
3. Press the
•
The
display
display
input
,-J ----,
154
1D•
• •
155
I
1·
. •
l5B
1 t · - · t · • •
1155
HERS
sounds
OK
.---J .............,
1·
• •
1t
•.•
•t
*•
1*
C2
NOTE
note-by-note on the display .
mod
e,
you can take your time
complicated
button.
changes
.
STEP
RECORO:~ELDDY
TRACK:
.---J .............,
• • • 1 • •
•It
• • • t • •
••
t•.
·
t!·
. • • . .
• • • t • • •
1*
• • • t · • •
V90 J •
VEL
LE~GTH
to the STEP RECORD
I
J>
passages that
.---J -------,
•1t
• • • t • • • I
'I*'
•••••
1*
• • • t • • • 1
STOC
PHRS
ffif±Jffif±JffiffiQJ[J
lBALJI~
- I
I
lRESTJi~
CURSOR
--
-- ----- ·
[Q@~fili]~lili)~~fYIU
lu~2l
~gl
~
B1J
ICHI
rnl
~I
f2ID
2. Use the buttons
the tracks for the parts you are going to record.
• For tracks 1 to 8,
track s 9 to 16, use the
track.
• You can also use the
tons to
tracks 9 to 16,
pressing the 9-16 button.
• On the
highlighted.
track .
select
display
--
below
the track. In this case, to select
, the selected track
Confirm
-
-----
the di
use
the
v b
uttons
SEQUENCER
make
your
that th is
-- -
splay
to specify
1\
buttons, and for
to select the
track but-
selection while
number
is
the correct
--
-- - -- - -- ----
• If you
• If you
4. Use the M EAS
• This step
is
selected
part has been
to the
CHORD
to page 76.)
selected
part has been
to the
(Refer to
measure.
from
RHYTHM
page 78.)
is
measure
----
the track to which the CHORD
assigned
STEP
the track to which the RHYTHM
assigned,
1\
not
necessary
1 of a blank track.
, the display changes
RECORD
STEP
and v buttons to select the
.
-----------
display. {Refer
the display changes
RECORD display.
if you are recording
74
Page 77

Part
Ill
Sequencer
r
5. Use the
the cursor (reverse video box) to the note
position (dot) you are going to store.
• Each dot represents
note
• When storing triplets, it may not be possible
to
steps. However, if you select triplet-type notes
for the note
the timing is
6. Use the left LENGTH
specify the note value . Select from
.\ h
triplet-type note.)
o For note values other than these, use the right
LENGTH
value
with the left buttons.
Example : To record a dotted quarter-note
7. Use the PHRS
actual length of the
desi
TENU (tenuto):
NORM (normal):
ST
CUTT (cutting) :
CURSOR
(a thirty-second note) .
match the
length
~
\
h. J,
1\
and v buttons to
to
be
added
< and >
timing
exactly
(LENGTH)
automatically
J.
,,
..
x 2
to that which you specified
J +
1\
and v buttons to specify the
red
legato or staccato effect.
Sound
100%
80%
AC
(staccato):
50%
25%
buttons
one-eighth
with the 1/32-note
in step 6 below,
corrected.
1\
and v buttons to
to
4. (A 3 denotes a
specify
~~
produced
sound for the
is produced for
of the note length.
to
move
of a quarter-
.~3
.
} ,
.~3
the note
(J.)
.
8.
Specify
playing the
•
The
stored
• When recording
tiple
•
Any
changes
operation,
posit ion.
REST
To
store a rest,
LENGTH,
nothing is
ERS
If you
error, and
erase, press
BAL
To
specify
pressing the
to set the
9.
Repeat
notes.
o To
EXIT button
step
10. When you
STEP
the
pitch
keyboard
dot on the
changes
notes
at one
panel
in
etc.-are
press
stored
make a mistake,
after
this
the
volume
BAL
volume
steps
input
data
4.
have
REC
button
and
velocity
.
display
to a * mark.
chords
position
setting
the
the
are read as rests .
displaying
button
button, use
5 through 8 to continue storing
and
changes-for
sound
recorded
after
specifying
REST
button. Points at which
move
the
.
at the
(O
to 127).
on
another
repeat
finished recording,
to turn it off.
of the note
where the note is
, you can store mul-
.
example
selection, button
at
the
cursor
the note
the
cursor
data
cursor
position, after
the VALUE buttons
track, press the
the
procedure
to the
you wish to
press
by
from
the
rn
Correcting
1.
In
the STEP
you wish
2. Use the MEAS buttons to
you wish to modify. Use the
to
move the cursor to the
to edit .
o The data stored at that point is
display .
o When multiple data is stored at one point,
different data is displayed in
a CURSOR button is pressed. When a chord
is recorded, a different note
displayed each time a
pressed .
3. Correct the data.
There are three types of data:
Performance
NOTE data (note pitch) and VEL data (how hard
the key was played), etc. are displayed.
re
levant buttons to correct the data as desired.
the
RECORD
to
correct.
data
data
mode,
go
CURSOR
point
CURSOR
specify
to the
measure
(*)
you wish
shown
order
each time
in
the chord is
button is
the track
buttons
on
the
Use
the
Sound
The
name
sound as
interposed
Control
The
name
the data as
o Press the ERS
is
displayed
75
data
of
desired
data
of
the
on
the
the
desired.
.
sound
(the
current
function
button
is displayed.
sound
display) .
is displayed. Change
to
erase the data which
setting
Change
display
the
is
Page 78

Part
Ill
Sequencer
Store a chord
Store the chord
CHORD in the track for the
when the
playback, even if you do not specify the chords
with your left hand, the
ically.
• The chord length
STEP RECORD keys of the
AUTO
I
J
,.,.W
Note
value
Whole
"
Dotted half-note
J.
Half-note
J
I
Dotted
. .
I
Quarter-note
.
Jl
Eighth-note
progression
progression
PLAY
CHORD
chords
is
specified
I!
Y r I J
keys
note
quarter-note
for the
CHORD
AUTO
part. Then,
is used during
change
with the
lower
automat-
CHORD
keyboard.
I I I
L=t
J
LT
J r J I
PLAY
. I
Reset
Correction
DELETE
Repeat
End
key
~~-
P.ress to begin storing from the begin-
. nmg.
keys
~
Move
back
one chord .
..,..
Move
forward
Press to
key
c;-:::J
Press to end the chord-storing procedure
specify
and to
of the stored progression.
key
--H
Press after the whole chord progression
has been stored .
erase
one chord.
data.
automatic
repeat playback
• Example
of
storing a chord
progression
c c F Am
0
1. Press the STEP REC button
2. Use the buttons
QUENCER track
which the CHORD part is
preset
• On the display, the track for the
(CHD} is highlighted.
correct track.
3. Press the OK button.
• The display changes to the
RECORD input display
is 4}.
below
buttons
Confirm
the
to
select
assigned
similar
to
turn it on.
display
that this
CHORD
to
the following.
or
the track to
(the factory
CHORD
is
STEP
SE-
part
the
,--J ---,
l
Et-lD
HEAS
f±)
,---
STEP
~ECORO:CHORO
TR~CK:
J
---,
,---
4
J ----,
--
,---
J
-,
·
--
-
--
-
------
76
Page 79

Part
m
4.
Use the MEAS
1\
and v buttons to select the
measure you wish to record.
o This step
is
not necessary if you are recording
from measure 1 of a blank track.
5.
Store the chords on the
lower
keyboard.
Sequencer
<Measure 4>
(1) While playing a C chord, press the
time.
(2) While
playing
one time.
an Am chord, press the J key
J key one
<Measure 1, measure 2>
While playing a C chord with
the"
key one time with
your
your
left hand, press
right hand.
• You can
or a FILL IN
desired pattern at the
can be stored
o Store a rest by
without
lm!.mnrnnurmlffim~
o Chords can
press
the
INTRO
button
on the panel
cursor
only
at the beginning.)
pressing
specifying a chord.
also
be
specified
& ENDING button
to
store the
position. (An intro
a note valve key
with the one-
finger method.
o A "beep" tone indicates that the chord has
been successfully stored.
o The chord name is shown on the display.
<Measure
(1)
3>
While playing
an
F chord, press the J key one
time.
6. At the end of the chord progression, press the
End key (
o The instrument exits the recording mode.
o During playback,
chord progression
matic repeat
press
sion,
of the End key (
o If you press the
instead
play back
produced
will be
1
-;
) .
playback
stops
playback
the
Repeat
-;
1 ) .
INTAO
of
the End key ( -;, ), when you
your
performance,
of the recorded
at this point. For auto-
of the
key (
chord
4=1
progres-
) instead
& ENDING button
an ending pattern
and then the performance will
stop.
(2)
While playing a G7 chord, press the J key
one time.
o When
you
part, the
ment
change
play
chords
in
back
the track for the CHORD
of the automatic accompan i-
accordance
with the stored
chord progression.
C!l
Correct the recorded chord progression
1. Select CHORD STEP
RECORD
on the dis-
play.
2. Use the MEAS
measure you wish to
tl>
Correction keys to
1\
and v buttons to go to the
modify
move
. Use the
the
<J
cursor
and
to the
point you wish to edit.
o The measure number, beat
number
, specified
chord name, specified note length, and func-
etc
.)
tion {INTRO, FILL IN,
are shown on the
display.
o To move to the end of the chord progression,
while pressing the Reset key (
the
<1
key.
1-~-
),
press
o The lengths of rests are ind icated as follows.
Example:
I
...........
7
..•.........
I x 1
I x 1 0
+;
....... 1 0-beat
.....
1-beat
1
rest (quarter rest)
/2-beat
1-1/2-beat
(dotted
quarter
rest
rest (eighth rest)
rest
rest)
3. Correct the chord data.
77
Page 80

Part
m
Sequencer
Chord
When the chord name
position, you can press the
the data and then store a new
• If you do not erase the displayed data before
• Rests can also be erased. Each time the
Store a rhythm
Data for the rhythm progression can be stored
by measures with the step
o The rhythm progression is recorded
1. Press the STEP REC button to turn it on.
2. Use the buttons
• On the display, the track for the RHYTHM part
3. Press the OK button .
• The display changes to the RHYTHM STEP
data
is
displayed
DELETE
new
entering the
inserted at this point, and the displayed data
is
merely shifted
chord.
DELETE
units of 1 x 1. The
key is pressed, the rest is erased in
chord data, the new data is
by
the note value of the new
7 rest is
chord
erased
at the cursor
key
to
erase
.
last.
progressiof1J
recording
track for the RHYTHM part.
below
QUENCER track buttons to
wh
ich the RHYTHM part is assigned (the fac-
tory preset
(RHY) is highlighted.
correct track.
RECORD input display similar to the following .
r--
is
STEP
J
--,.---J -,-
6).
RECORD:RHYTHI1
TRACK:
the
select
Confirm
6
J
----,,-
method .
display
the track to
that
this is the
J---,
or
in
the
SE-
Control
The name of the stored function (INTRO, FILL,
etc
key to erase the data which is displayed.
Ei
To erase all data from the current track, press
the
button on the confirmation display.
o If you wish to cancel the clear procedure,
4. Use the
o This step is not
5.
o Data which can be stored
• Be sure to store the
o If you are storing a
data
.)
is
displayed
TRACK
TRACK
press the NO button.
measure you wish to record.
from measure 1 of a blank track.
Use the panel buttons to store the rhythm data .
START/STOP
Changes
COUNT
Tempo
measure
store this data
CLEAR
TION,
changes
. You can press the DELETE
CLR button, and then press the YES
MEAS
1\
and v buttons to select the
necessary
in
the rhythm selection
INTRO,
ENDING
in
INTRO, FILL
which the rhythm starts.
COUNT
before
if you are recording
START/STOP
INTRO or INTRO ,
the
START/STOP
IN,
data
VARIA-
in
the
data .
- -
---
E~D
I
HEAS
t±J
--
and
1
2
[ffi]]~
TRACK
lEU~~
l
I>
!REPJIEHoJ
·
--
------
- - -
----
- -
6. Repeat steps 4
rhythm progression.
7. At the end of the rhythm progression, press
the REP button or the END
REP: During
progression is repeated.
END: During playback , playback of the recorded
rhythm progression stops at this point.
o The instrument exits the recording mode.
--
78
--
·-
playback
- -
5 to continue storing the
button.
, the recorded rhythm
----
- - - -
--
--
Page 81

Part
Ill
11
Correct the recorded
1.
Follow the procedure to
STEP RECORD display.
2. Use the MEAS
measure you wish to
3.
Correct the rhythm data.
• Press the ERS button to
cursor position.
o
If
you select a rhythm with a
signature, the time
measures will
• If data has already
tracks, you cannot select a rhythm with a different time signature.
also
1\
and v
signature
change.
rhythm
select
buttons
modify.
been
progression
the
to go to the
erase
data
different
of all
subsequent
recorded
RHYTHM
in
at the
time
other
•
TRACK
To
erase
TRACK
the
button on the
• If you wish to
press the NO
CLEAR
all
data
CLR
confirmation
from
button,
cancel
button.
Sequencer
the
current
and
then press the
disp
the clear procedure,
track , press
lay.
YES
Track
Each SEQUENCER part is
ASSIGN function to
used for the rhythm
1. Press the
• The display looks similar to the following.
Assign
already
assign
SEQUENCER
SEOVENCER
0
c::::J
data
parts
and chord
button
assigned to a track number.
to
tracks
as you wish. This function is
progression
to turn it on.
SEQUENCER
PUNCH
~I
~!
~I
~I
RECORD
TRACK
ASSIGN
EXPRESSION
SEIT
lNG
AFTER
TOUCH
SETTING
I I
II
I I
I
EDIT
PLAY
I'IEOLEV
data.
I
~
I
~
I~
2. On the
TRACK
o The
3. Use the
• You can
display
E1
It:•
RACK
TR 2 LOWER
TR
0
TR 4 CHORD
TR
TR S RHYTHH
TR
TR 8 U.SI'lO I OH
w:
track.
for
tracks
to 16 with the
However,
also
SEQUENCER
ASSIGN.
looks
you
used
similar
TRACK
TRACK
ASSlGH
10101:
-
BASS
3
COHTROL
5
7
KB.PERC
TRACK
switch
1 to 8
1-8
1\
and
between
and
and 9-16
can
use the
to
designate
menu
display
to the following.
TRACK
the tracks
, select
ASSIGN
LOCAL
COHTROl
lj._
OH
OH
--
OH
OH
OH
"101-0UT
CHAHI'IEL
Ill.
IIi~
CH
--
3
CH
CH
--
CH
15
CH
IS
CH
16
CH
1
CHAHI'\EL
ffi
v buttons to select the
the setting
the
display
buttons
for
display
tracks
.
9
79
------
Page 82

Part
Ill
Sequencer
4. Use the ASSIGN
the part for the specified track.
• Select one of the following parts: UPPER,
LOWER, BASS, CHORD, CONTROL,
RHYTHM, KB.PERC,
LSOUND 1 to
GAN,
15
. (For an explanation of each
part , refer to page 70.)
• When a part other than the RHYTHM, CONTROL
or CHORD part is assigned, the track
assign procedure is
o The RHYTHM,
cannot
• You can use the LOCAL
turn the LOCAL
CHANNEL
BASIC CHANNEL . (For a
of these MIDI functions,
and 146.)
These settings allow you to specify whether or not expression pedal and
with your performance .
be
assigned
CONTROL
CONTROL
1\
and v
1\
and v buttons to select
USOUND
3,
LORGAN
completed
to
more
buttons
detailed
1 to
3,
, PART8 to
SEQUENCER
at this point .
and
CHORD
than one track.
1\
and v buttons to
on or off, and the
to assign the
explanation
refer
to pages 145
UOR-
parts
5. When assigning the RHYTHM , CONTROL or
CHORD
• The confirmation
that currently stored data in the tracks concerned will be erased. Press the YES button
to confirm that you wish to execute the
specified track
button to stop the
part, press the OK button .
display
assignment. Or
aftertouch
appears to warn you
track
assignment.
data
press the NO
is
recorded
EXPRESSION
You can specify whether
operation data is recorded with your perfor-
e.
manc
recorded expression pedal operation data is read
when your performance is played back.
1. Press the
2. Select EXPRESSION
" The display looks
And you can also specify
Sg\gct
Expression pedal
recorded or
~mrm-amu1
~~
PLAY
SETTING
or
not expression pedal
SEQUENCER
similar
EXPRESSION
whgther
ptaved
FROM
SEDUENCER=EHABLE
button
SETTING.
SETTING
or
not
movements
bv
to the following .
the
whether
to
turn it on.
the
are
Sequencer.
E~~~
)
~~
--
- - -----
80
--
--
Page 83

Part
Ill
Sequencer
3.
Select RECORD TO
1\
EN/DIS
pression pedal
ENABLE: The expression
is recorded (factory -preset
DISABLE: The data is not
AFTER
Specify for each
whether or not the
with the performance.
1. Press the
2. Select AFTER
• The display looks
Select
and v
TOUCH
SETTING
SEQUENCER
TOUCH
~FTER
~hether
Is recorded
SEQUENCER.
buttons
performance
keyboard
aftertouch
similar
TOUCH
or not Aft9r
bv
4-:!JJ
Use the
to
specify
is recorded.
pedal
setting)
recorded
(upper
data
button to turn it on.
SETTING
to
the
if the ex-
operation data
.
.
and lower)
is recorded
.
follow ing .
SETTING
Touch
the Sequencer.
4. Select
the
recorded
played back.
ENABLE:
played
DISABLE:
3. Select
BOARD.
specify if the
ENABLE: Aftertouch
performance
DISABLE:
preset
4. Repeat
desired.
•
For
refer to
PLAY
EN/DIS
expression
The
back
The
UPPER
Use the
The
setting)
step 3 for
an
explanation
page
FROM
1\
and v buttons
recorded
(factory-preset
data
KEYBOARD
aftertouch
.
data
.
125
SEQUENCER
to
pedal
expression
is
not
EN/DIS
data
is not recorded (factory-
the
of the
.
performance
setting).
played
or
1\
and v buttons
data
is recorded.
is recorded with
other
aftertouch
and use
specify
pedal data is
back .
LOWER
keyboard, if
effect ,
if
the
KEY-
to
the
is
41
LO~ER
KEVBOARO:OJSABLE
I
81
Page 84

Part
Ill
Sequencer
Editing
The edit feature
Select
1.
2.
• The display
the
Press the
Select
EDIT.
the
allows
edit
SEQUENCER
looks
SEQUENCER
SONG
~I
~I
~I
~I
~I
CLEAR
TRACK
CLEAR
MEASURE
MEASURE
UELOC
ERASE
COPY
IT y CHANGE
recorded
you
to
erase
or
function
similar
I I
I I
I
I
I I
button
EDIT
TRACK
OURNTI2E
MEASURE
MEASURE
to turn it on .
to the following.
MERGE
DELETE
INSERT
I
change
~
~
~
~
performance
portions
of
your
3.
Select
The
•
selection.
4.
Perform
deta
•
During
the
CER
•
During
for
use
performance
the
function
display
il
EXIT
EDIT
the
the dial
changes
the
editing
below).
the
editing
button
the
TEMPO/PROGRAM
display
editing
for
the
to
after
to
edit.
in
procedures
procedure
go
.
procedure
editing
it has been recorded.
accordance
back
to the
, if the
dial is lit, you can
function.
with your
(explained in
, you can press
SEQUEN·
indicator
SONG
Erase the
• Press the
CLEAR
recorded
or
press the NO
ATTENTIONT
Using
anv
existing
Sequencer.
Are
•
When
PLETED
i
mode
the
nstrument
.
YES
SONG
Vou
data
!"
appears
returns
contents
button
button
SONG
CLEAR
recording
has
on the
to
of all
to
execute
to
cancel
CLEAR
Hill
erase
Sure?
been
the
normal
tracks
the function,
the function.
in
the
erased,
display,
performance
.
IYEsll~
[EEJJ~
"COM·
and the
--
--
------
--
--
---
--
--
- ·
--
---
--
---
--
- -
--
--
---
--
--
- --
82
Page 85

Part
Ill
Sequencer
TRACK
Erase the contents of a specific track.
CLEAR
Press
the Sequencer Track
in
the
PrograB
up/down
the
Press
buttons
Tracks
@Ell
that
to
TRACK
section
under
vou
Camp
l&tll
CLEAR
or
the
want
to
TRACK
buttons
the
LCD
1or
clear.
CLEAR
@Ell~
.
2. Press the OK button .
• The following confirmation display appears .
TRAD:
CLEAR
ATTENTION!
Using
TRACK
CLEAR
will
erase
anv
existing
selected
Are
nct~rdings
TrackS.
You
Sure?
in
HM~~tda~~lQ!U
~,
rwm
le~sl
~
~ ~
~UlmUilfilllfill)Ol1]~f21]
~mmmmBtJu:mti])~~
1. Use the buttons below the
QUENCER track buttons to
tracks you wish to clear. .
•
on
the display, the selected tracks are high-
lighted.
display
select
or the SE-
the track or
• Press the YES button to
or press the NO button to cancel the
• When the data
PLETED!"
appears
has
execute
been erased , COM -
on the
display
the
IYESli~
~~
IKfPI
~
the function,
fu~ct1on
.
.
(
---
TRACK
Merge the recorded contents of
(source tracks) and store the
in
• When
MERGE
two
tracks
merged
a third track (destination track). . .
the
TRACK
ecuted, the data is erased from the two source
tracks.
MERGE
TRACK
MERGE
funct1on
TRACK
TRACK
contents
IS
10
ex-
[±)
1. Select the two source tracks (left half of the
display). .
on
• Use the buttons
to select one of the source tracks, and use the
1\
TRACK
number. Repeat for the
• This function does not work for the
RHYTHM and CHORD tracks.
and v buttons to specify the track
the left side of the display
other
source track .
CONTROL
,
83
Page 86

Part
Ill
Sequencer
• If the part
("upper"
MERGE display) is different from the part assigned to the
parts are
new track
upper track.
2. Select the dest ination track (right half of the
display) .
• Press the button on the right
to select the destination track, and use the
TRACK
number
assigned
meaning
merged
is
assigned the
A and v buttons to
.
to the
its position on the
lower
source track, when the
in the destination track , the
upper
same
side
specify
source track
TRACK
part as the
of the display
the track
QUANTIZE
The QUANTIZE function
of your performance
is
If the rhythm
will automatically be
quantize level.
Rhythm as written
in the score . . .
Timing of actual ! :
performance
Quantized per- : : .
formance
slightly
..
. . . . . . . ·
(}level) ...
can
correct
after
it
has
out
of
sync
corrected
··
·~
t----:---
.
~-·--#----..---
oumn
: __
I2E
the timing
been recorded.
or inexact, it
to the specified
~_J_
' .
. '
. .
.,_._
__ .
__
3.
Press the OK button .
• The
1. Select
• This function
• If ALL is selected, all
2. Select
3. Select
4.
• Select from h .•
confirmation
YES button to
NO
the
specify the track
RHYTHM and
buttons to specify the start point (measure
number).
buttons to specify the
number).
Select
buttons to specify the
a triplet-type note .)
button to cancel the function .
TRACK. Use
FIRST
LAST
QUANTIZE
display
execute
number.
does
not
CHORD
MEASURE
MEASURE
VALUE
~
.•
~
3, ~~.
appears . Press the
the function, or press
the
1\
and v buttons to
work
for the CONTROL,
tracks.
the
tracks are quantized.
. Use the
. Use the A and v
end
. Use the A and v .
quantize
h . .
~
.
1\
point (measure
leve
l.
J. (A 3 denotes
and v
-----
TRACK
LAST
MEASURE
OUAHTIZE
-
--
VALUE
--·--
:
:
139
: J
--
12
--
·- -----
5. Press the
• The
84
OK
button.
confirmation
YES button to
the NO button to
execute
---
display
cancel
appears . Press the
the function, or press
the function.
-- -- --
--
--
-
Page 87

Part
Ill
Sequencer
MEASURE
Erase the recorded contents of specific
measures. You can also specify which type of
da
ta
is
1. Select TRACK. Use the
specify the track
o You cannot select the track for the RHYTHM
part or CHORD part in
mand has been stored.
•
If
ALL is selected , data is erased from the
specified measures of all the tracks at one
time.
ERASE
to
be
TRACK
FIRST
MEASURE
LAST
MEASURE
erased.
MEASURE
number
ERASE
:
12
:112
:139
1\
.
which
and v buttons to
a repeat com-
1\
1\
and v
and v
2. Select FIRST MEASURE. Use the
buttons
number
3. Select LAST
buttons
number
4. Select ERASE DATA. Use the
to
ALL: All data is erased.
NOTE: Only note data.
CONTROL : Only control
other panel settings as well as selection changes) is erased .
5. Press the OK button.
• The confirmation display appears. Press the
YES button to execute the function, or press
he
t
to
specify the start point (measure
).
MEASURE
to
specify the end point (measure
).
specify the type of
NO
button to cancel the function.
. Use the
data
data
1\
and v buttons
to be erased.
(volume , effect and
85
Page 88

Part
Ill
Sequencer
MEASURE
Copy measures from one track (source track)
another
• On the destination track, the new data
replaces the current
COPY
track (destination track).
measure
MEASURE
COPY
~T
O~T;;;R~~C~~~~~
STRRT
contents.
"ERSURE
:45
to
~
I~
_,.
HEASURE
ffi
1.
Select FROM
v buttons to
• You cannot
or
part
mand has been stored.
If
ALL
copied
is
to
•
TRACK.
specify
select
CHORD
selected, the specified measures are
all
tracks
Use
the
TRACK
the
source track.
the track
part in which a repeat com-
at the same time.
for
the RHYTHM
A and
2.
Select FIRST
A and v
(measure number) on the source track.
3.
Select LAST
A and v
(measure number) on the source track.
4.
Select TO
to specify the
• Measures in a track for the CONTROL,
RHYTHM
to the same track.
5.
Select START
buttons to specify the start point (measure
number) on the destination track.
6. Press the OK button.
• The
confirmation
YES button to
the NO button
MEASURE
buttons
buttons
TRACK. Use
or
to specify the start point
MEASURE.
to specify the end point
destination
CHORD
MEASURE.
display
execute
to
cancel the function.
. Use the
Use the
the A and v buttons
track.
part can be copied
appears. Press the
the function, or press
MEASURE
MEASURE
Use the A and v
only
86
- - - -
--
--
--
-
--
-
--
-·
---
Page 89

Part
Ill
Sequencer
MEASURE
Delete specified measures from a track.
• The length of the performance accordingly
decreases by the number of deleted
measures.
MEASURE
Insert specified·measures at a specified point.
• The length of the performance accordingly increases by the number of inserted measures .
DELETE
TRACK
FIRST
MEASURE
INSERT
P1EASU~E
DELETE
:
12
:J12
MEASURE
INSERT
1. Select
select the track from which measures are to
be deleted .
• You cannot select a
in
• If ALL is selected, the specified measures are
deleted from all the tracks
2. Select FIRST
buttons to
3. Select
buttons to
4.
Press the
• The confirmation display appears. Press the
YES button to execute the function, or press
the NO button to cancel the function .
1. Select FROM
v buttons to
• You cannot
in
• If ALL is selected, the measures are inserted
in all tracks at the same time .
TRACK
which the repeat function has been stored .
LAST
which the repeat function has been stored .
. Use the
CHORD
MEASURE
specify
specify
OK
select a CHORD
the first measure to delete.
MEASURE
the last measure to delete.
button.
TRACK
select
. Use the TRACK
the source track.
1\
and v buttons to
or RHYTHM track
at
one time.
. Use the
. Use the
or RHYTHM track
1\
1\
and v
and v
1\
and
r
LAST
MEASURE
:
116
TRACK
ffi
2.
Select FIRST
1\
and v buttons to specify the first measure
on
the source track from whi
3. Select LAST
1\
and v buttons to specify the last measure
on
the source track from which to copy.
4. Select TO
buttons to specify the destination track.
• Measures from the CHORD , RHYTHM or
CONTROL
same track .
5. Select
1\
the destinat ion track .
6. Press the OK button.
• The confirmation display appears. Press the
YES button to execute the function, or press
the NO button to cancel the function.
START
and v buttons to specify the insert point on
MEASURE
MEASURE
TRACK
track can only be inserted in the
MEASURE . Use the MEASURE
. Use the MEASURE
ch
. Use the MEASURE
. Use the
TRACK
to copy .
1\
and v
87
Page 90

Part
Ill
Sequencer
VElOCITY
Modify the recorded
of specific tracks (except for the CONTROL,
RHYTHM and
1. Select
specify the track number.
o If ALL is selected, all the tracks are modified.
2.
Select
buttons to specify the start point (measure
number) of the velocity change.
CHANGE
CHORD
VELOCITY
FIRST
MEASURE
LAST
MEASURE
UELOCITY
TRACK. Use
FIRST
velocity
tracks).
CHRNGE
:112
:139
:+40
the
MEASURE
in
specific
1\
and
. Use the A and v
measures
v buttons to
5.
Press the
o
The
YES button to
the NO button to cancel the function.
OK
button.
confirmation
execute
VELOCITY
display
CHANGE
appears. Press the
the function,
or
press
3. Select
buttons to
of the
4.
Select VELOCITY. Use the
to specify the
+127).
• The value you select will
deleted from the
LAST
specify
velocity
MEASURE
change.
change
current
. Use the
the end (measure number)
in
velocity
;,
1\
and v buttons
velocity
be
(-127
added to or
.
and v
to
FIRST
4[
LAST
41
~I
I
MEASURE
VELOCITY
Are
MEASURE
You
:
112
:
139
: •40
Sure?
!Y@II~
lE§J]~
--
--
--
-
--
--
88
-
---
-
---
--
--
--
- -- - -
Page 91

Part
Ill
Sequencer
Punch
If you make a playing error during REAL TIME RECORD or would like to
other reason, you can correct a selected portion of the performance
part. "Punch in" means to enter the recording mode, and "punch out"
Recording the performance
1. Press the
2. Select PUNCH RECORD
o The display looks similar
PLAY PLAY
~~~~813~~~
[Q]ii~[YWrnJ~rnl~f2ID
record
Playback
SEQUENCER
PUNCH
~E
11EASURE
TIME
11EHORY = 99
J=120
=
SIG. = 4/4
button to turn it on.
on
the display.
to
the following.
(PU~CH
7.
!Nil~
I~
OFF)i~
change
without
means
Playing
error
~
Punch in Punch out
Replay this
Recording
4. Select the track
want to correct.
o Use the buttons below the
"REC"
to record .
o If you use the
select the tracks, press the track buttons to
make the
5. Press the
playback
6. During
at
the
o Recording
pressed . Beg in
o The PUNCH IN button switches to the PUNCH
OUT
button.
portion
mode
above
point
the track numbers you are going
indicators
START/STOP
of the
playback,
you
begins
SEQUENCER
the recording for some
having to redo the whole
to exit it.
X
!
which
contains
flash.
specified
press the PUNCH
want
to begin recording.
as
soon as the button
playing
at this point.
the portion you
display
track buttons to
button to begin
track.
to
display
IN
button
is
3. Select the tracks you wish to play back during
punch recording.
o Use the buttons below the display to display
"PLAY" above the track
to play back.
o
If
you use the
select the tracks, press the track buttons to
turn the indicators on.
SEQUENCER
numbers
you are going
track buttons to
7. Press the
want to stop recording.
o Recording stops
8. When you
formance,
turn it off.
o You can also begin
ing the
in/punch-out points with a foot switch .
to page 125.)
89
PUNCH
have
press
keyboard
OUT
button at the point you
immediately
finished correcting the per-
the
SEQUENCER
punch-in
. You can specify the punch·
.
button to
recording by play-
(Refer
Page 92

Part
Ill
• AUTO PUNCH RECORD
You can set the punch-in and punch-out points
beforehand , so that recording automatically
begins and ends at the specified points .
Sequencer
1.
On the SEQUENCER menu
PUNCH RECORD, and then select the track
which conta ins the portion you
2.
Press the AUTO PUNCH button.
• The display looks similar to the following.
AUTO
PUHCH
CURRENT
PUNCH
MEASURE
Press the
3. Select PUNCH
1\
and v buttons to specify the
punch-in measure.
4. Select PUNCH
MEAS
of the punch-out measure.
• The
• The specified PUNCH
number
must be higher than the
IN
MEASURE.
recorded.
MEASURE
OUT
MEASURE
COUNT
:JB
IH
START/STOP
IN
MEASURE.
OUT
MEASURE
1\
and v buttons to specify the
of
the PUNCH OUT
number
OUT
display
want
to correct.
RECORD
button to begin
Use the MEAS
number
. Use the
MEASURE
of the PUNCH
MEASURE is not
, select
of
number
the
6. Press the
• Playback beg ins from the measure specified
in
step
7. Correct the performance .
• The mode changes automatically to the
recording mode at the specified punch-in
measure. Begin play ing at this point. The
mode automatically changes back to the
playback mode at the specified punch-out
measure.
• Note that, even when you have set the punch·
in
and punch-out measures, you can begin
recording before the
by playing the keyboard
switch to which the
has been assigned.
8. When you have finished correcting the performance, press the
ton to turn it off.
START/STOP
5.
button.
punch
-in measure starts
or
pressing a foot
PUNCH IN/OUT
SEQUENCER
function
REC but-
5. Select
1\
lead-in measures you wish to have played
back before the punch-in measure.
• Playback will begin from the measure indi·
cated by
play .
• Set the metronome to on or off with the ON
or OFF button .
MEASURE
and v
COUNT
buttons
CURRENT
to specify the
IN. Use the MEAS
number
MEASURE on the dis-
of
90
--
-
---
--
--
--
---
~--
Page 93

Part
Ill
Sequencer
Playback
You
can specify the
1. Press the
2. Select PLAY on the display.
• The display looks
~EJ
HEASURE
~G
~~BALjj
PLAY
SEQUENCER
J =
PLAY
lrom
measure
similar
SEQUENCER
MEASURE
T
!ME
MEMORY
120
SIG.
PLAY
:
=
=
a
specific
from which you wish playback to begin.
button to turn it on.
to the following.
4/4
99
jRESETIJ~
[]E[J]~
%
measure
5.
Press the
• The recorded
the specified
• When
which an
ENDING is recorded, the corresponding function does
6.
To stop playback,
ton again.
• If the
playback will
interrupted .
START/STOP
performance
measure
playback
INTRO, COUNT
START/STOP
not
is
work .
press
continue
.
begun
the
button is pressed again,
from the point it was
MM~~ldilfi§il~~
~~mHJ[H)!ill][H]faiD[21)
3. Select the tracks you wish to have played
back.
button .
is played back from
from a measure
INTRO,
START/STOP
FILL
IN or
in
but-
4.
Use the MEASURE
the beginning measure of playback.
• "MEASURE=" indicates the current measure
number.
• You can quick-search
while listening
holding down the FWD button. (This button
does not work during normal playback.)
• You can press the RESET button to return to
the beginning of the first measure and recall
the panel status which was in eHect at the
beginning of recording . (This button
work during playback.)
• If you wish to adjust the volume of each track,
press the SAL button to recall the PART
BALANCE display. You can then adjust the
volumes.
1\
and v buttons to specify
for
the desired measure
to
the recorded performance by
does
not
91
Page 94

Part
Ill
Sequencer
Sequencer
You can
1. Insert the
2. Press the
3. Select
• The
have
disk
SEQUENCER
MEDLEY
display
NOW
PLAYING
the
songs
into the Disk Drive.
looks
SEQUENCER
Medley
on a disk
button
on the
similar
SONG
display
to the following.
MEDLEY
OS
played
to turn it on.
.
:RBCDEF
~~
back
continuously
in
order
6. Press the
•
The
songs
repeatedly
• If you
stop, and
7.
To
8. Press the
•
• The
press
medley
recorded
Only
nics file
performance
performances
V: Disk Drive
play,
stop
medley
data
procedure
.
START
played
playback
song
SEQUENCER
which
format
button
.
from the specified range are
back
in
order .
the
START/STOP
the
song
currently
continues
on
the
disk.
play,
press
button
has
been
can
be
played
for
saving
on a disk is explained
(page
103
).
button during
from the next
the
STOP
to
saved
in
your
SEQUENCER
playing will
turn
in
the Techa medley
button.
it
off .
in
Part
4. Select FIRST
and v buttons to
wish to
5. Select
and v buttons to
have
LAST
SONG. Use
specify
played.
SONG.
Use
specify
the
SONG
the first song you
the SONG NO.
the
last song .
NO.
1\
1\
.r--
t
--
----
- -- - --
--
-----
92
- -- -
--
- -
-------
- -- - -
Page 95

The COMPOSER
ment patterns. Your original pattern is then stored in a
rhythms in the
!J
Example
enables
RHYTHM
of a rhythm
you to create your own
GROUP
pattern
section.
accompaniment
memory
patterns
and
can
or
to edit preset
be
used
accompani-
just
like the preset
ACCOMP1
ACCOMP2
""""
v
II
..;.
v
_/1
ACCOMPJ
BASS
DRUMS
Com!»OJ'!ents
You can store up to 12
in banks A and B).
o Each pattern is
DRUMS,
o When you set
EXPAND MODE, you
FILL
IN
102.)
• The recorded contents can
for recall at a later time.
0)
f:!l:
"'
oa
~
BASS,
and ENDING patterns.
and
the
v v
I
uuhynRim
different
comprised
ACCOMP
COMPOSER
can
v
11
"
J_
_J_
~
~
B»inUUarU1
rhythms
of five parts:
1, 2 and 3.
mode
also
create
(Refer
be
saved
(Refer
to
page
'-._..../
h
v
J
~
I
(6 each
to the
INTRO,
to page
on a disk
107.)
'-'
~
.0.
T}
..___...
"
v v
J
J J J J J J J J
;
There
rhythm.
1!1
Edit a preset
Use the
to a
it as a new
e Create a
Clear
new 'rhythm from
o You can
methods.
store
keyboard.
want to
the
a
I
are
two
COPY
MEMORY, change
rhythm
completely
the
memories
use
your
use
notes
one
music
score .
v
.
~
ways
to
rhythm
function to
parts
.
new
and
scratch.
either
or
Realtime
rhythm
But
the
recording
exactly
for diff icult phrases, you
STEP
RECORD
by one,
~--
-U
h
v
I
create
copy a preset
of
rhythm
compose a completely
both
as
just
as you
v
.J
J
;
and record a
rhythm
it, and then store
of
two recording
allows
play
mode
you to
it on the
to
might
may
store
write
Memory
Expressed
memories is about 8600. The rema ining
display as a
o When "Memory full!"
o
capacity
in
terms of notes, the total
percentage
It
is a good practice to save
COMPOSER
memories
(MEMORY=%)
appears
number
on the display, no more data can
your
completed
.
memory
.
of
notes which can be stored in
available for
rhythm patterns on disks
93
recording
be
stored
is
shown
in the
before
all
the
COMPOSER
on the
COMPOSER.
clearing
RECORD
any
of
the
Page 96

Part
IV
Composer
COMPOSER
When you press the
it on, the display changes to the following.
menu
COMPOSER
COMPOSeR
button to turn
0
c:=::J
COMPOSER
~I
~1
~
•
Summary
RECORD
RECORD
LOAD
COMPOSER
MEMORY-A
MEMORY-8
SINGLE
PATTERN
of
the COMPOSER
PATTERN
MODE
COPY
SELECT
menu
items
I~
I~
RECORD
Create rhythm patterns in the COMPOSER A
bank .
RECORD
Create rhythm patterns
bank.
MODE
Specify whether or not you are making your own
INTRO,
PATTERN COPY (page 95)
Copy a rhythm pattern into a memory.
LOAD
Recall the
saved
• The items on this menu are also
DRIVE menu, and the procedures are the
same. (Refer to page 1 09.)
MEMORY-A
MEMORY·B
SELECT
FILL
IN and ENDING patterns.
SINGLE
desired
on
a disk.
(page 95)
(page 95)
in
(page 1 02)
COMPOSER
COMPOSER
the COMPOSER B
PATTERN
data from data
on
the DISK
- · - -· -
--
--
-------
-------~--
94
Page 97

Part
IV
Composer
Setting
First decide whether you are going to "Edit a preset rhythm pattern" or "
Below are the instructions for preparing to edit a preset rhythm pattern. If you are going to create a
completely new rhythm pattern, follow the instructions on page 96.
Edit
a preset
1. On the COMPOSER menu display , select
PATTERN COPY .
• The display loo ks similar to the following.
FROM
GROUP:
RHYTHl1:
organ
PATTERH:
up
rhythm
COMPOSER
TRAD
~ORHAL
PATTERN
Fox
to
......_
.._....
create a
pattern
COPY
TO
HEHORV:
A
PATTERH:
HEHDRV
(Qg]]~
1
rhythm
5.
Press the
6. On the
bank to which
(the memory
• Select
MEMORY-B
• The display looks
~I
~I
~I
COMPOSER
RECORD
r1EI10RV
t1Er10RV
MEMORY
pattern
Create
EXIT
.
a completely new rhythm ."
button.
menu
you
copied
bank
you
selected
MEMORY-A
similar
RECORD
MEMORY
1
2
II
3
II
r1EI10RV
II
l'fErlORV
l'fEMORV
display , select the
the rhythm pattern
in step 3).
or
RECORD
to the following.
-A
4
I~
5
I~
6
I~
2. Select a rhythm
copy (FROM).
• Use the GRP
rhythm group.
• Use the RHY
rhythm name.
• Use the PTN
rhythm pattern (NORMAL, INTRO, FILL
FILL IN 2, ENDING,
VAAl or FILL
• You can also select the rhythm group and
rhythm name with the panel buttons.
3. Select a memory
to
copy
• Use the MEM
memory bank
• Use the PTN
pattern (MEMORY 1 to
2, INTRO or ENDING).
4. Press
• When copying has been successfully completed, "COPY COMPLETED
display .
(TO).
th
e OK button.
group
, name and pattern
1\
and v
1\
and v
1\
and v buttons to specify the
IN
1\
(A
1\
and v buttons
buttons
buttons
VARIATION
2 VARI).
bank
and pattern name to
and v button to specify the
or 8).
12
to specify the
to specify the
, FILL
to
specify the
, FILL
IN
!"
appears on the
1, FILL
IN
IN
IN
to
1,
FILL
~I
~I
7. Select the pattern
the pattern (the pattern name you selected in
1
step 3). ·
• The
display
IN
INTRO
looks
PATTERH
RECORD
START
RECORDING
1
II
II
name
similar
RECORD
CLEAR
MEMORY-A
THE
NAMING
SETT
FILL
EHTIRE
IN
2
I p
ENDING
to which you copied
to the following .
PATTERN
I~
I~
I~
lNG
]
~
95
Page 98

Part
IV
8.
If
you wish to name
select
• FILL
be named.
• If you do
original rhythm from which you copied.
• The
PATTERN
IN, INTRO
not
pattern, the
display
RECORD
Please
of your
name
looks similar to the following.
MEHORY-A:PATTERN
your
new rhythm pattern,
NAMING
and ENDING patterns cannot
input a
becomes
enter
new
.
name
for
the same as the
NAMING
the
name
pattern
!lrnNCE6
·······A· ·a
:
....
~ro>HJ
LJ
··
c't!l
·e· · ·
F'
·
ii
. ii · · i · ·j· ·
P 0 R S T U V W X V Z a b c d e j
f g h l J k I m n o p q r s t u i
vwxyz012345S7891
"IISX&'()+-•/=
: .. :
.. ? ..
v. ~ ..
":'
.. : ...
!
... ~ ... ':. <
~<·A>\)
LJ
L2J
...
i<.
>
...
'L
£ ... l
..
ti
your
rhythm
.. H · ·o
..
..
0 i
..
. ~ ... l ... . i
[cLRJ
[Fva!
. ::
Composer
9.
Type a new
to 13
o Use the
light the
Use the ABC ·
the
character.
whole
• To erase the name, press the CLR button.
• Use the A/a button to switch between upper
case and
10. Press the
o The
11
i
• The
display
. In the
play, select the rhythm part you want to
record first.
DRM:
AC1:
AC2:
AC3:
BAS :
pattern
sound start, and recording begins . (Refer to
page
name
for your rhythm pattern (up
characters)
POSITION
character
name
lower
EXIT
START
DRUMS
ACCOMP
ACCOMP
ACCOMP
BASS
99 .)
.
< and > buttons to high-
posit ion
")
{ }
<and>
Repeat these steps to type the
.
case characters.
button .
returns to the previous display.
RECORDING
1
2
3
you
copied
in
buttons to select
area on the dis-
and the metronome
the name box.
G~ea!Uall
Here are the
completely new rhythm from scratch.
1. On the
bank
o Select
o The display looks
a!
COmi!B~IBU!a~lf
COMPOSER
in
which to record the rhythm.
RECORD
MEMORY-B.
f1EHORV
41
PiEfiORY
~I
MEMORY
~I
FILL
~I
41
INTRO
preparatory
menu disp lay, select a
MEMORY-A
similar
RECORD
IN
flEMORY-R
1
II
2
II
3
II
I!
II
lltliaW
IJilfruyU!rnm
steps to compose a
or RECORD
to the follow ing.
rlEI'lORV
AEfiORV
rJ810RV
FILL
IN
ENDlNG
4
5
6
2
I~
I~
I~
I~
I~
2. Specify the pattern you are going to create.
o The
display
START
looks
similar
RECORD
CLEAR
PATTERN
RECORD
tiEMORY-A
THE
HAHIHG
SETTING
RECORDIHG
to the following.
EHTIRE
PATTERH
I~
I~
1~
----·-
- -
----
-
--
- - - ·- - -
96
--
--
-
---
- ·- -
---------
-
--------
Page 99

Part
IV
Composer
3. Press the CLEAR THE ENTIRE
button.
• The following confirmation display appears.
Press the YES button to execute the function,
or press the NO button to cancel the function.
RECORD
r1£110RY-A
PATTERN
ATTENTION!
11EKORY I PATTERN
Are
4.
Select PATTERN
• FILL IN, INTRO
be
named.
o The display looks similar to the following.
You
and
CLEAR
Sure?
NAMING
ENDING
.
patterns
cannot
6.
Press the
•
The
display
7.
Adjust the
to the
tings.")
8. When all
press
"
The
9.
In
play, select the
first.
DRM:
AC1:
AC2:
AC3:
BAS
• The
begins.
following
the
display
the
START
:
metronome
(Refer
EXIT
button
returns
various
the
settings
EXIT
button.
returns
RECORDING
rhythm
DRUMS
ACCOMP
ACCOMP
ACCOMP
BASS
sound
to page 99.)
.
to the
previous
recording
section
have been completed,
to
the
part you want to record
1
2
3
settings
on
"Recording
previous
area on the dis-
starts, and recording
display
. (Refer
set-
display.
.
RECORD
~···jg··rdi··c:··o···ii.··F··ii··H··i···:;··K"··c"··ii··o····1
i
PDRSTUVWXYZabcde
fghtjkl11nopqrstu
i
i
vwxvzOl2:l.-SS7B91
:
"IISX&'
l
.... : ...
L1JTd.J
5. Type a name for your rhythm pattern (up to
13
characters).
o Use the
light the
Use the ABC • · · ] { }
the character. Repeat these steps to type the
whole name.
• To erase the name,
o Use the A/a button to switch between
case and lower case characters.
HE~ORY-A:PATTERN
Please
of
: .
..
?
...
POSITION
character
vour
jm
~
..
-~
.. ·'·
enter
new
pattern
Clear I
<
)+-•/:,,
.. : ...
!
..
::
..
:: ...
rn
0
< and > buttons to high-
position in the
< and > buttons to select
press
NRKING
the
name
~
...
~
...
~
...
?
...
~
..
§]
name
the CLR button.
D:
.?..
...
a
i
i
i
!
box.
upper
97
Page 100

Part
IV
Composer
Recording
Press the
HEASURE
TIHE
I<EV
CHORD
BASS
ACCOHP
GROUP
PATTERN
settings
RECORD
RECOIW
HERSURE & TIHE
SIGMATURE
RECORD
TVPE
TYPE
FILLIH
SETTING
MEMDR~-A:
SETTI~O
SELEC:T
:
:
SETTING
SIGMRTURE
:
4
:~/~
~E~8abE1_
:C
:HAJOR
:~ORHRL
:7TH
( 4/·C>
TRAD
Organ
Fox
button .
~~
~~~~~~~~
•
MEASURE
MEASURE
Use the
number of
to 8).
SIGNATURE
TIME
Use
the
gnature
si
•
These
pattern
TIRE
• RECORD
KEY
Use the KEY
note of the
CHORD
Use the
of chord you wish to record (MINOR or MAJOR).
TYPE
BASS
Use the
type of
(NORMAL
ACCOMP
Use the ACMP "
of phrase
(NORMAL
& TIME
MEAS
TIME
settings
PATTERN
CHD
BASS
phrase
" and v
measures
1\
and v
(1
/4 to 8/4).
was
cleared
SETTING
1\
and v buttons
chords
" and v
1\
progression
or
7TH)
TYPE
progression
or 7TH).
SIGNATURE
buttons
in
your
repeating pattern (1
buttons
can be
and
and v buttons
adjusted
by
function.
you
wish
buttons
v buttons to
.
for
the
to record.
for the
the
to
to
specify
only
CLEAR
to
specify
to
specify
to
specify
ACCOMP
specify
the time
when the
THE EN-
the root
the type
specify
BASS
to type
the
the
part
parts
•
FILL
IN
SELECT
You
can
select fill-in,
from a preset rhythm pattern.
terns are
INTRO & ENDING
playback
GROUP
Use the G RP
rhythm
PATTERN
Use the PTN
rhythm
• This
POSER
(Refer
• If you
SELECT
IN
been
PLETED! "
• You
ture
TURE
produced
of your
group
name
.
setting
mode
to
page
changed
area
SELECT
successfully
cannot
different
you
1\
.
1\
is
button
appears
select
specified
intra
and
when a FILL
button
new
rhythm pattern.
and v
and v
effective
is set to
1 02 .)
on
from that of the TIME SIGNA-
buttons
buttons
only when the COM-
the
the
settings
the
display
. When the settings have
stored, "COPY COM-
on the display.
a rhythm with a time signa-
.
ending
These
IN button or the
is pressed during
NORMAL
in
, press the FILL
patterns
preset pat-
to specify the
to specify the
MODE.
the FILL IN
·-
-·-
- - - - - ·- -
98
- - ·
---
--
-
----
- - - -
---·
 Loading...