


 Loading...
SL-1210MK7R
Direct Drive Turntable System
Operating Instructions

Music is borderless and timeless, touching people’s hearts across cultures and generations.
Each day the discovery of a truly emotive experience from an unencountered sound awaits.
Let us take you on your journey to rediscover music.
Delivering the Ultimate Emotive Musical Experience to All
At Technics we understand that the listening experience is not purely about technology but the magical and emotional relationship between people and music.
We want people to experience music as it was originally intended and enable them to feel the emotional impact that enthuses and delights them.
Through delivering this experience we want to support the development and enjoyment of the world’s many musical cultures. This is our philosophy.
With a combination of our love of music and the vast high-end audio experience of the Technics team, we stand committed to building a brand that provides the ultimate emotive musical experience by music lovers, for music lovers.
Director
Michiko Ogawa
02

Introduction
Thank you for purchasing this product. Please read these instructions carefully before using this product, and save this manual for future use.
About descriptions in these operating instructions
-Pages to be referred to are indicated as “( 00)”.
-The illustrations shown may differ from your unit.
Sales and Support Information
Customer Communications Centre
For customers within the UK: 0333 222 8777
For customers within Ireland: 01 447 5229
Monday–Friday 9:00 am – 5:00 pm, (Excluding public holidays).
For further support on your product, please visit our website: www.technics.com/uk/
Features
Coreless direct drive motor for high torque and reliability
The newly developed coreless direct drive motor can reduce minute vibration during rotation while maintaining high torque.
The high-precision motor control technology switches the drive mode depending on the operational status of the motor and thus enables high torque and stability.
The digital control method improves tracking and accuracy, allowing for accurate and stable pitch control.
High-precision bearings for highly sensitive tone arm
The machine-cut, high-precision bearing used in the tone arm bearing with gimbal suspension allows for improved tracking, making skating less likely even during the most intense performances.
Vibration-cutting highly rigid cabinet and high-damping insulator
This unit is designed to not only deliver high-quality sound and high feedback resistance, but also to efficiently cut off external vibration in very loud environments.
Functions to deliver a wide range of performances
Allows for torque and brake speed adjustment.
Allows for reverse playback.
Allows the user to select from two LED lamp colours depending on user's preference or the environment.
Table of contents |
|
Before use |
|
Safety precautions ........................................ |
04 |
Accessories ................................................... |
07 |
Parts Name ................................................... |
08 |
Getting started |
|
Putting the player together ........................... |
09 |
Attaching the cartridge ........................... |
09 |
Attaching the head shell.......................... |
09 |
Before fitting the turntable...................... |
11 |
Fitting the turntable ................................ |
11 |
Fitting the slipmat ................................... |
11 |
Attaching the balance weight.................. |
11 |
To remove the turntable.......................... |
11 |
Connections and installation ......................... |
12 |
Connecting to a pre-main amplifier or |
|
component system / |
|
Connecting to a mixer ............................. |
12 |
Installation .............................................. |
13 |
Fit the dust cover..................................... |
13 |
Adjustment ................................................... |
14 |
Horizontal balance .................................. |
14 |
Stylus pressure ........................................ |
14 |
Anti-skating............................................. |
15 |
Tone arm height...................................... |
16 |
Armlift height.......................................... |
17 |
Operation settings
(LED colour setting / Reverse playback
setting / 78 rpm setting / Torque setting / |
|
Brake setting) ......................................... |
17 |
Playing back |
|
Playing records.............................................. |
18 |
Pitch control (fine adjustment to pitch).......... |
20 |
Maintenance |
|
Maintenance................................................. |
21 |
Troubleshooting guide .................................. |
22 |
Specifications................................................ |
23 |
<![endif]>started Getting use Before
<![if ! IE]><![endif]>Playing
<![if ! IE]><![endif]>Maintenance back
03

Safety precautions
Warning
Unit
To reduce the risk of fire, electric shock or product damage,
-Do not expose this unit to rain, moisture, dripping or splashing.
-Do not place objects filled with liquids, such as vases, on this unit.
-Use only the recommended accessories.
-Do not remove covers.
-Do not repair this unit by yourself. Refer servicing to qualified service personnel.
-Do not let metal objects fall inside this unit.
-Do not place heavy items on this unit.
AC mains lead
To reduce the risk of fire, electric shock or product damage,
-Ensure that the power supply voltage corresponds to the voltage printed on this unit.
-Insert the mains plug fully into the socket outlet.
-Do not pull, bend, or place heavy items on the lead.
-Do not handle the plug with wet hands.
-Hold onto the mains plug body when disconnecting the plug.
-Do not use a damaged mains plug or socket outlet.
The mains plug is the disconnecting device. Install this unit so that the mains plug
can be unplugged from the socket outlet immediately.
Ensure the earth pin on the mains plug is securely connected to prevent electrical shock.
-An apparatus with CLASS I construction shall be connected to a mains socket outlet with a protective earth connection.
Caution
Unit
Do not place sources of naked flames, such as lighted candles, on this unit.
This unit may receive radio interference caused by mobile telephones during use. If such interference occurs, please increase
separation between this unit and the mobile telephone.
This unit is intended for use in moderate climates.
Do not put any objects on this unit. This unit becomes hot while it is on.
Placement
Place this unit on an even surface.
To reduce the risk of fire, electric shock or product damage,
-Do not install or place this unit in a bookcase, built-in cabinet or in another confined space.
Ensure this unit is well ventilated.
-Do not obstruct this unit’s ventilation openings with newspapers, tablecloths, curtains, and similar items.
-Do not expose this unit to direct sunlight, high temperatures, high humidity, and excessive vibration.
Ensure that the placement location is sturdy enough to accommodate the weight of this unit ( 23).
Do not lift or carry this unit by holding the knobs. Doing so may cause this unit to fall, resulting in personal injury or malfunction of this unit.
Keep any IC card or magnetic card such as a credit card away from the turntable.
-Otherwise the IC card or magnetic card may become unusable due to the magnetic effect.
04
Caution for AC Mains Lead
(For the AC mains plug of three pins)
For your safety, please read the following text carefully.
This appliance is supplied with a moulded three pin mains plug for your safety and convenience. A 10-ampere fuse is fitted in this plug.
Should the fuse need to be replaced please ensure that the replacement fuse has a rating of 10-ampere and that it is approved by ASTA or BSI to BS1362.
Check for the ASTA mark  or the BSI mark
  on the body of the fuse.
If the plug contains a removable fuse cover you must ensure that it is refitted when the fuse is replaced.
If you lose the fuse cover the plug must not be used until a replacement cover is obtained.
A replacement fuse cover can be purchased from your local dealer.
Before use
Remove the connector cover.
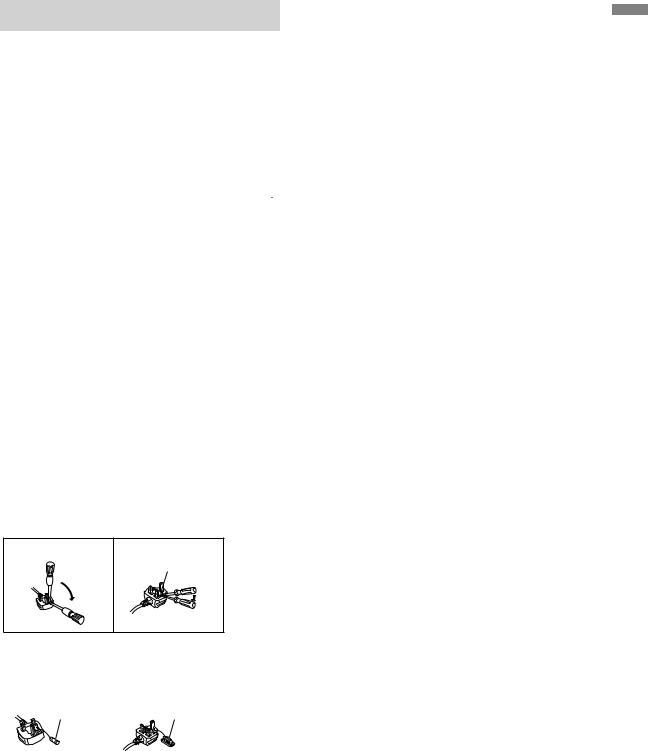
How to replace the fuse
The location of the fuse differ according to the type of AC mains plug (figures A and B). Confirm the AC mains plug fitted and follow the instructions below.
Illustrations may differ from actual AC mains plug.
1. Open the fuse cover with a screwdriver.
Figure A |
Figure B |
Fuse cover
2.Replace the fuse and close or attach the fuse cover.
Figure A |
Figure B |
Fuse |
Fuse |
(10 ampere) |
(10 ampere) |
|
|
<![endif]>use Before
05

Safety precautions (continued)
Disposal of Old Equipment
Only for European Union and countries with recycling systems
These symbols on the products, packaging, and/or accompanying documents mean that used electrical and electronic products must not be mixed with general household waste.
For proper treatment, recovery and recycling of old products, please take them to applicable collection points in accordance with your national legislation.
By disposing of them correctly, you will help to save valuable resources and prevent any potential negative effects on human health and the environment.
For more information about collection and recycling, please contact your local municipality. Penalties may be applicable for incorrect disposal of this waste, in accordance with national legislation.
06
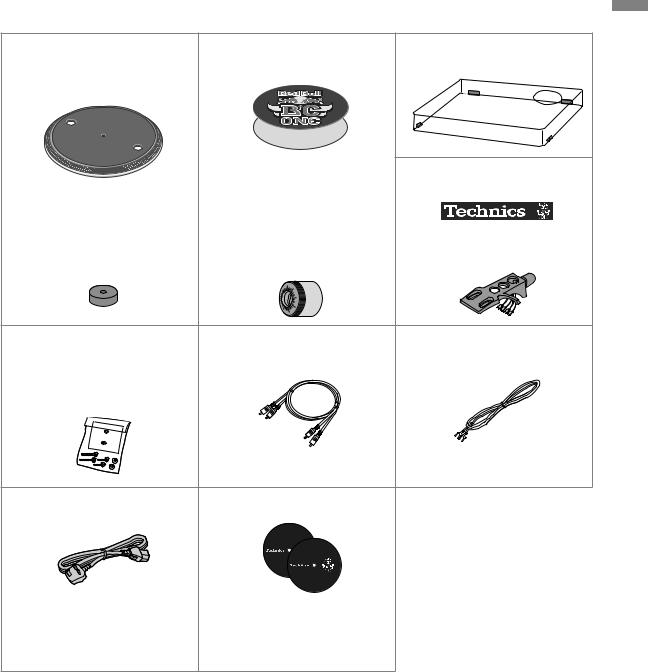
Accessories
In order to prevent damage during shipping some of the equipment has been disassembled. Please check and identify the supplied accessories. (Some accessories parts are supplied in a bag.)
Turntable (1 pc.) |
Slipmat (1 pc.) |
Dust cover (1 pc.) |
(TYL0332) |
Slip sheet (1 pc.) |
(TTFA0454) |
|
One of each is provided with |
Technics label (1 pc.) |
||||||||
|
the unit. The slip sheet is a |
|
||||||||
|
thin, transparent sheet. |
|
||||||||
|
Be careful not to throw it |
|
||||||||
|
away by mistake. |
|
||||||||
|
|
|
|
|
|
|
|
|
|
|
EP record adaptor (1 pc.) |
Balance weight (1 pc.) |
Head shell (1 pc.) |
||||||||
(TPH0339) |
(TYL0295) |
|
||||||||
|
|
|
|
|
|
|
|
|
|
|
Screw set for cartridge (1 set) |
PHONO cable (1 pc.) |
PHONO earth lead (1 pc.) |
|
Nuts |
(2 pc.) |
(K4EY4YY00003) |
(K4EY1YY00189) |
Screws-short |
(2 pc.) |
|
|
Screws-long |
(2 pc.) |
|
|
Washers |
(2 pc.) |
|
|
(Supplied in a bag) |
|
|
|
AC mains lead (1 pc.) |
Control vinyl labels (2 pc.) |
(K2CT3YY00096) |
|
With your control vinyl installed on the turntable, affix the label passing the spindle through its centre hole.
In case of repair, they might be different in colour, logo, and so on.
The model numbers of the accessories are as of June 2020. They are subject to change without notice.
Keep the packaging materials after taking out the goods.
You will need them when carrying the product over long distances.
Follow the local regulations when disposing of the product.
Do not use any other AC mains lead, PHONO cable and PHONO earth lead except the supplied one.
Keep the cartridge, nuts, screws and washers out of reach of children to prevent swallowing.
<![endif]>use Before
07

Parts Name |
|
|
|
|
|
|
Numbers such as ( 00) indicate reference pages. |
Arm clamp ( 14) |
|||||
|
|
|
|
|||
|
EP record adaptor ( 18) |
Arm rest ( 14) |
||||
|
|
|
|
|||
Front |
Centre spindle ( 10) |
|
|
|
||
|
|
|
|
|||
|
|
|
Head shell stand ( 9) |
|
||
START-STOP button ( 18) |
|
|
|
|
|
Balance weight ( 11) |
|
|
Tone arm ( 9,11) |
|
|||
ON/OFF (power) ( 18) |
|
|
|
|||
|
|
|
|
|
Stylus pressure control ( 14) |
|
|
Locking nut ( 9) |
|
|
|||
|
|
|
|
|||
Strobe light ( 20) |
|
|
|
|
||
|
|
|
|
|
|
|
Head shell ( 9)
Arm lock ( 16) |
Anti-skating |
control ( 15) |
Cue lever ( 14) |
Speed select buttons ( 18)
Turntable ( 10)
Slipmat ( 10)
Stylus light ( 19)
RESET button The LED lamps can be set to ( 19)
blue or red with the LED colour setting. (Factory setting : Red) ( 17)
Arm-height control ring ( 16)
Pitch range select button ( 20)
PITCH ADJ control ( 20)
RESET LED lamp
( 19)
Insulator ( 13)
Back
PHONO |
L |
EARTH |
|
|
R |
PHONO OUT |
AC ( ) input terminal ( 12)
PHONO output terminal ( 12)
PHONO earth terminal ( 12)
08
Loading...