

Technics SL1210M5G Operating Instructions
Turntable System
Operating Instructions
Model No.
SL-1210M5G
EB E
GN
Note:
“EB” on the packaging indicates the United Kingdom.
Before connecting, operating or adjusting this product, please read these instructions completely.
Please keep this manual for future reference.
RQT7020-B
Dear customer
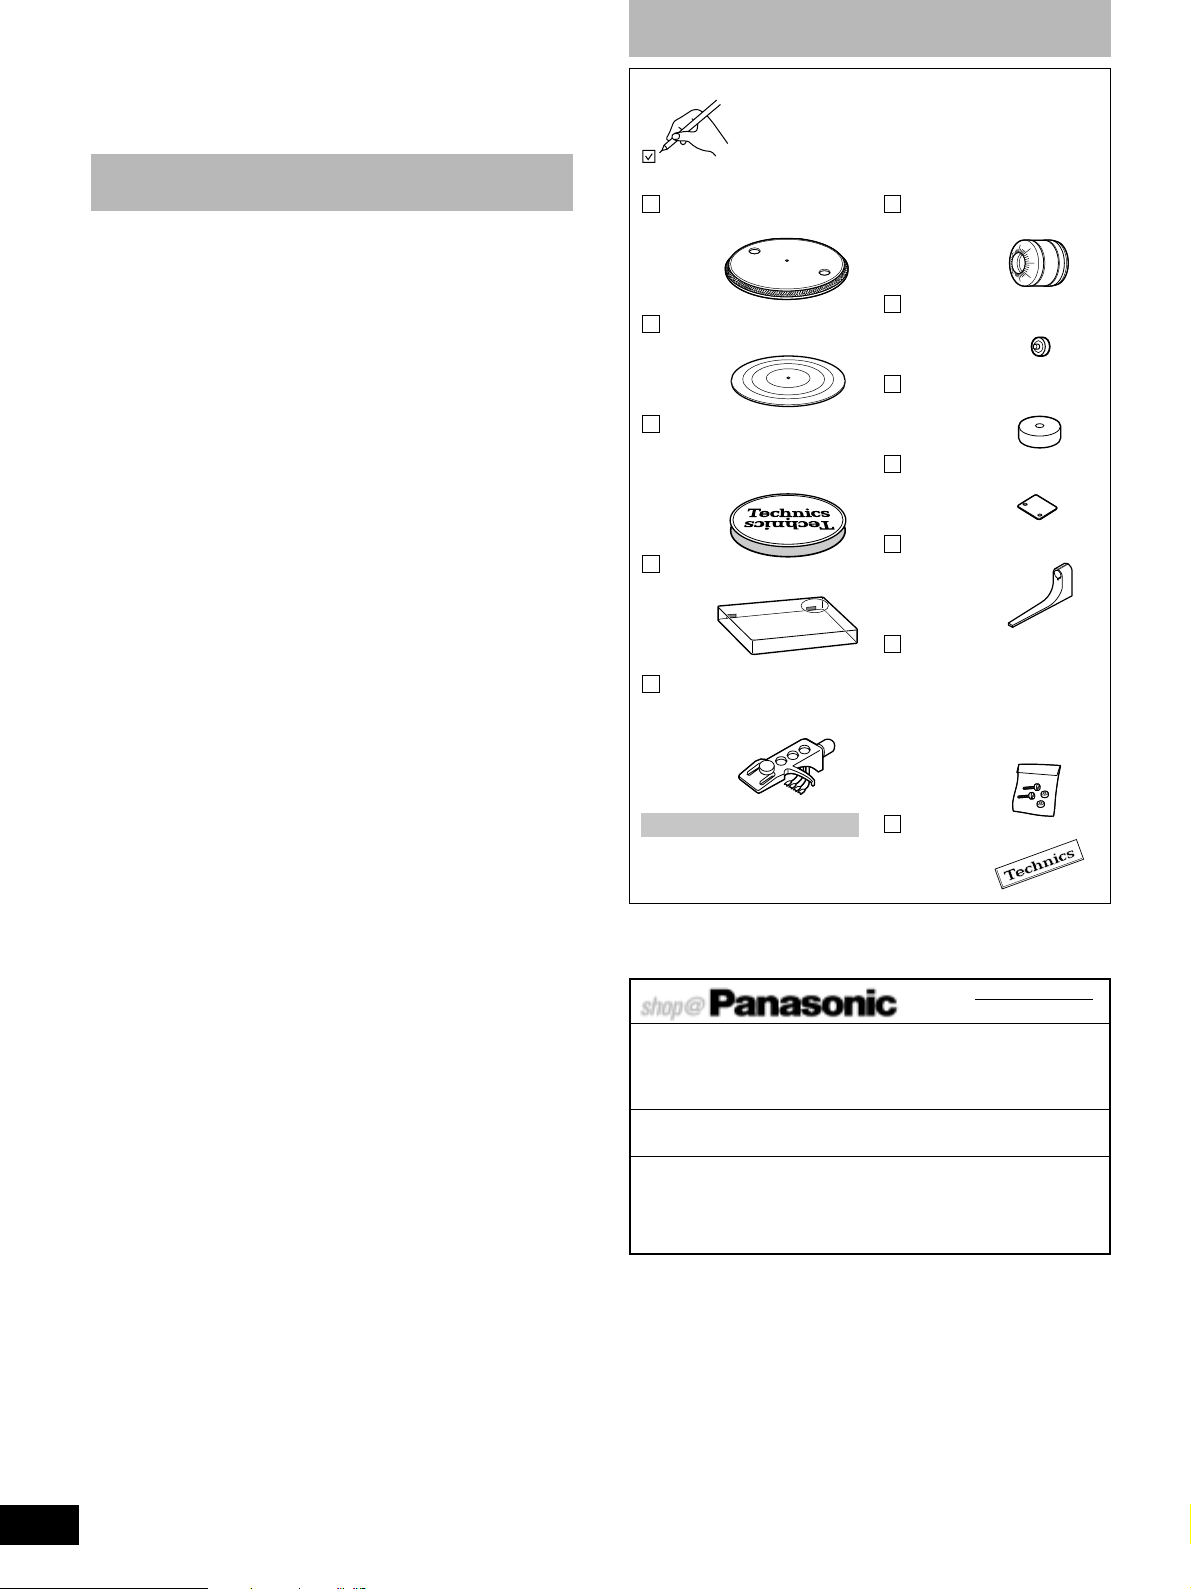
Supplied accessories
Thank you for purchasing this product.
For optimum performance and safety, please read these instructions
carefully.
Table of contents
Supplied accessories................................................................... 2
Caution for AC mains lead .......................................................... 4
Safety precautions ....................................................................... 4
Features ......................................................................................... 5
Preparation of the cartridge ........................................................ 5
Controls ......................................................................................... 5
Putting the player together ......................................................... 6
Connections and installation ...................................................... 6
Connecting to an amplifier and AC mains lead ......................... 6
Connecting to an Audio Mixer (not included) ............................ 7
Installation .................................................................................. 7
Preparatory adjustments ............................................................. 7
Horizontal balance and stylus pressure .................................... 7
Anti-skating ................................................................................ 8
Armlift height .............................................................................. 8
Tone arm height ......................................................................... 8
Fit the dust cover ....................................................................... 8
Playing records............................................................................. 9
Adjustments while using the unit............................................. 10
Pitch control ............................................................................. 10
Adjusting tone arm horizontal weight to reduce skipping when
scratch playing. ........................................................................ 10
Adjusting the turntable brake speed ........................................ 10
Maintenance .................................................................................11
Troubleshooting guide................................................................ 11
Specifications .............................................................................. 11
Please check and identify the supplied accessories.
For the United Kingdom only:
Use numbers indicated in parentheses when
asking for replacements parts.
Turntable ................. 1pc.
(SFTE172-01Z1)
Turntable mat.......... 1pc.
(RGS0008)
Disc slip sheet set
(RGS0005Z-1) ................ 1
•Disc slip sheet
•Transparent sheet
Dust cover ............... 1pc.
(RYF0370A-X)
Head shell (with stylus
weight)
(SFPCC31006K) ...... 1pc.
Balance weight ....... 1pc.
(SFPWG17201BK)
Auxiliary weight ...... 1pc.
(SFPWG17202)
EP record adaptor
(SFWE010A) ............ 1pc.
Shell weight ............ 1pc.
(SFPZB3501)
Overhang gauge ..... 1pc.
(SFK0135-01)
Screw set for cartridge
........................................ 1
•Nuts(RHN26003)
•
Screws-short(SFCZV8801-1)
•
Screws-long(SFPEV9801-1)
•Washers(SFPEW9601)
A cartridge is not included.
Sticker ...................... 1pc.
(RQLC0142-1)
For United Kingdom and Republic of Ireland
www.panasonic.co.uk
(for UK customers only)
•
Order accessory and consumable items for your product with ease and confidence by telephoning our Customer Care Centre Mon–Friday 9:00am–5:30pm.(Excluding public holidays.)
•
Or go on line through our Internet Accessory ordering application.
•
Most major credit and debit cards accepted.
•
All enquiries transactions and distribution facilities are provided directly by Panasonic UK Ltd.
•
It couldn’t be simpler!
Customer Care Centre
For UK customers: 08705 357357
For Republic of Ireland customers: 01 289 8333
Technical Support
For UK customers: 0870 1 505610
This Technical Support Hot Line number is for Panasonic PC software related products only.
For Republic of Ireland, please use the Customer Care Centre number listed above
for all enquiries.
For all other product related enquiries, please use the Customer Care Centre numbers listed above.
2
RQT7020
CAUTION!
•DO NOT INSTALL OR PLACE THIS UNIT IN A
BOOKCASE, BUILT-IN CABINET OR IN ANOTHER
CONFINED SPACE. ENSURE THE UNIT IS WELL
VENTILATED. TO PREVENT RISK OF ELECTRIC SHOCK
OR FIRE HAZARD DUE TO OVERHEATING, ENSURE
THAT CURTAINS AND ANY OTHER MATERIALS DO
NOT OBSTRUCT THE VENTILATION VENTS.
•DO NOT OBSTRUCT THE UNIT’S VENTILATION
OPENINGS WITH NEWSPAPERS, TABLECLOTHS,
CURTAINS, AND SIMILAR ITEMS.
•DO NOT PLACE SOURCES OF NAKED FLAMES, SUCH
AS LIGHTED CANDLES, ON THE UNIT.
•DISPOSE OF BATTERIES IN AN ENVIRONMENTALLY
FRIENDLY MANNER.
WARNING:
TO REDUCE THE RISK OF FIRE, ELECTRIC SHOCK OR
PRODUCT DAMAGE, DO NOT EXPOSE THIS APPARATUS
TO RAIN, MOISTURE, DRIPPING OR SPLASHING AND
THAT NO OBJECTS FILLED WITH LIQUIDS, SUCH AS
VASES, SHALL BE PLACED ON THE APPARATUS.
This product may receive radio interference caused by
mobile telephones during use. If such interference is
apparent, please increase separation between the product
and the mobile telephone.
THIS UNIT IS INTENDED FOR USE IN MODERATE CLIMATES.
SUOMI
VAROITUS!
•ÄLÄ ASENNA TAI LAITA TÄTÄ LAITETTA
KABINETTITYYPPISEEN KIRJAKAAPPIIN TAI MUUHUN
SULJETTUUN TILAAN, JOTTA TUULETUS ONNISTUISI.
VARMISTA, ETTÄ VERHO TAI MIKÄÄN MUU
MATERIAALI EI HUONONNA TUULETUSTA, JOTTA
VÄLTETTÄISIIN YLIKUUMENEMISESTA JOHTUVA
SÄHKÖISKU- TAI TULIPALOVAARA.
•ÄLÄ PEITÄ LAITTEEN TUULETUSAUKKOJA
SANOMALEHDELLÄ, PÖYTÄLIINALLA, VERHOLLA TAI
MUULLA VASTAAVALLA ESINEELLÄ.
•ÄLÄ ASETA PALAVAA KYNTTILÄÄ TAI MUUTA
AVOTULEN LÄHDETTÄ LAITTEEN PÄÄLLE.
•HÄVITÄ PARISTOT LUONTOA
VAHINGOITTAMATTOMALLA TAVALLA.
VAROITUS:
TULIPALO-, SÄHKÖISKUVAARAN TAI TUOTETTA
KOHTAAVAN MUUN VAHINGON VÄHENTÄMISEKSI EI
LAITETTA SAA ALTISTAA SATEELLE, KOSTEUDELLE,
VESIPISAROILLE TAI ROISKEELLE, EIKÄ NESTETTÄ
SISÄLTÄVIÄ ESINEITÄ, KUTEN ESIMERKIKSI
MALJAKOITA, SAA ASETTAA LAITTEEN PÄÄLLE.
TÄMÄ LAITE ON TARKOITETTU KÄYTETTÄVÄKSI
LEUDOSSA ILMASTOSSA.
NORSK
ADVARSEL!
•APPARATET MÅ IKKE PLASSERES I EN BOKHYLLE, ET
INNEBYGGET KABINETT ELLER ET ANNET LUKKET
STED HVOR VENTILASJONSFORHOLDENE ER
UTILSTREKKELIGE. SØRG FOR AT GARDINER ELLER
LIGNENDE IKKE FORVERRER
VENTILASJONSFORHOLDENE, SÅ RISIKO FOR
ELEKTRISK SJOKK ELLER BRANN FORÅRSAKET AV
OVERHETING UNNGÅS.
•APPARATETS VENTILASJONSÅPNINGER MÅ IKKE
DEKKES TIL MED AVISER, BORDDUKER , GARDINER
OG LIGNENDE.
•PLASSER IKKE ÅPEN ILD, SLIK SOM LEVENDE LYS,
OPPÅ APPARATET.
•BRUKTE BATTERIER MÅ KASSERES UTEN FARE FOR
MILJØET.
ADVARSEL:
FOR Å REDUSERE FAREN FOR BRANN, ELEKTRISK
STØT ELLER SKADER PÅ PRODUKTET, MÅ DETTE
APPARATET IKKE UTSETTES FOR REGN, FUKTIGHET,
VANNDRÅPER ELLER VANNSPRUT. DET MÅ HELLER
IKKE PLASSERES GJENSTANDER FYLT MED VANN,
SLIK SOM BLOMSTERVASER, OPPÅ APPARATET.
DETTE APPARATET ER BEREGNET TIL BRUK UNDER
MODERATE KLIMAFORHOLD.
3
RQT7020
Caution for AC mains lead
Safety precautions
(For the United Kingdom)
(“EB” area code model only)
For your safety, please read the following text carefully.
This appliance is supplied with a moulded three pin mains plug for
your safety and convenience.
A 5-ampere fuse is fitted in this plug.
Should the fuse need to be replaced please ensure that the
replacement fuse has a rating of 5-ampere and that it is approved
by ASTA or BSI to BS1362.
Check for the ASTA mark m or the BSI mark o on the body of the fuse.
If the plug contains a removable fuse cover you must ensure that it
is refitted when the fuse is replaced.
If you lose the fuse cover the plug must not be used until a
replacement cover is obtained.
A replacement fuse cover can be purchased from your local dealer.
CAUTION!
IF THE FITTED MOULDED PLUG IS UNSUITABLE FOR
THE SOCKET OUTLET IN YOUR HOME THEN THE FUSE
SHOULD BE REMOVED AND THE PLUG CUT OFF AND
DISPOSED OF SAFELY.
THERE IS A DANGER OF SEVERE ELECTRICAL SHOCK
IF THE CUT OFF PLUG IS INSERTED INTO ANY 13AMPERE SOCKET.
If a new plug is to be fitted please observe the wiring code as
stated below.
If in any doubt please consult a qualified electrician.
IMPORTANT
The wires in this mains lead are coloured in accordance with the
following code:
Blue: Neutral, Brown: Live.
As these colours may not correspond with the coloured markings
identifying the terminals in your plug, proceed as follows:
The wire which is coloured Blue must be connected to the terminal
which is marked with the letter N or coloured Black or Blue.
The wire which is coloured Brown must be connected to the terminal
which is marked with the letter L or coloured Brown or Red.
WARNING: DO NOT CONNECT EITHER WIRE TO THE
EARTH TERMINAL WHICH IS MARKED WITH THE
LETTER E, BY THE EARTH SYMBOL
GREEN OR GREEN/YELLOW.
THIS PLUG IS NOT WATERPROOF—KEEP DRY.
Before use
Remove the connector cover.
nn
n OR COLOURED
nn
Placement
Set the unit up on an even surface away from direct sunlight,
high temperatures, high humidity, and excessive vibration. These
conditions can damage the cabinet and other components, thereby
shortening the unit’s service life.
Do not place heavy items on the unit.
Voltage
Do not use high voltage power sources. This can overload the
unit and cause a fire.
Do not use a DC power source. Check the source carefully when
setting the unit up on a ship or other place where DC is used.
AC mains lead protection
Ensure the AC mains lead is connected correctly and not damaged. Poor connection and lead damage can cause fire or electric
shock. Do not pull, bend, or place heavy items on the lead.
Grasp the plug firmly when unplugging the lead. Pulling the AC
mains lead can cause electric shock.
Do not handle the plug with wet hands. This can cause electric
shock.
Foreign matter
Do not let metal objects fall inside the unit. This can cause electric shock or malfunction.
Do not let liquids get into the unit. This can cause electric shock
or malfunction. If this occurs, immediately disconnect the unit from
the power supply and contact your dealer.
Do not spray insecticides onto or into the unit. They contain flammable gases which can ignite if sprayed into the unit.
Service
Do not attempt to repair this unit by yourself. If sound is interrupted, indicators fail to light, smoke appears, or any other problem
that is not covered in these operating instructions occurs, disconnect the AC mains lead and contact your dealer or an authorized
service center. Electric shock or damage to the unit can occur if the
unit is repaired, disassembled or reconstructed by unqualified persons.
Extend operating life by disconnecting the unit from the power
source if it is not to be used for a long time.
4
RQT7020
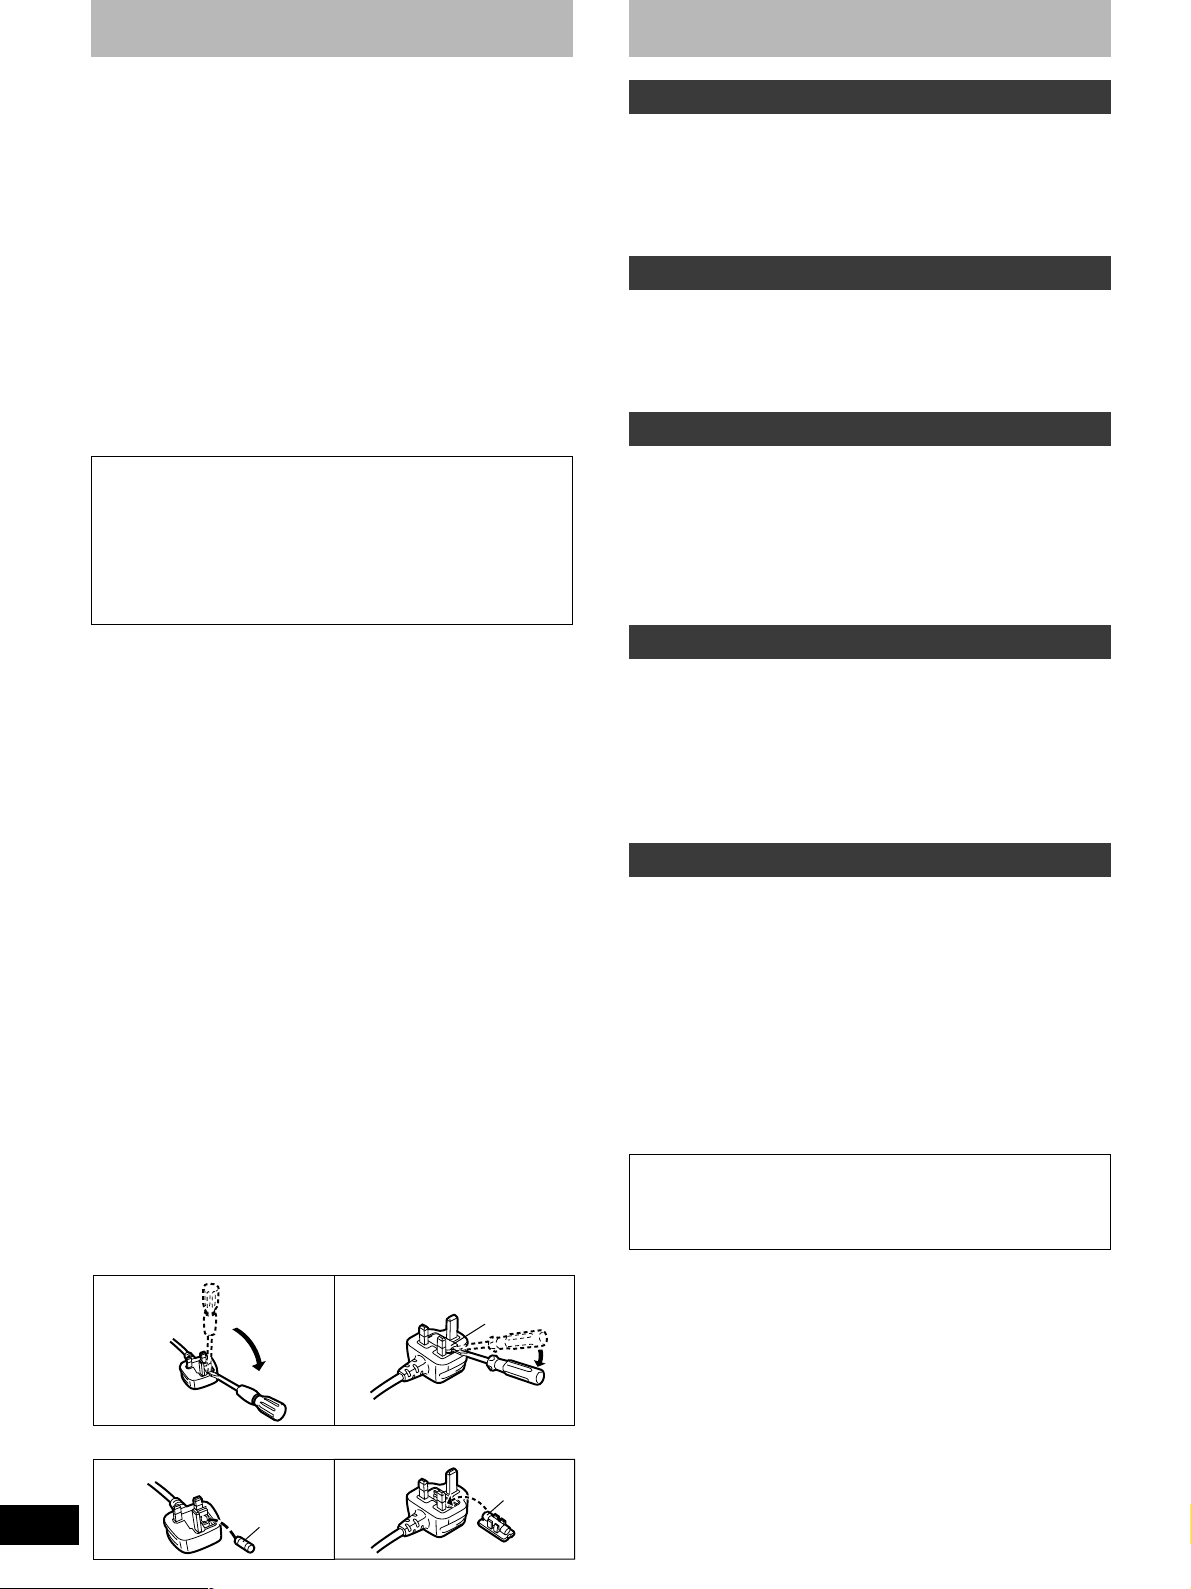
How to replace the fuse
The location of the fuse differ according to the type of AC mains
plug (figures A and B). Confirm the AC mains plug fitted and follow
the instructions below.
Illustrations may differ from actual AC mains plug.
1. Open the fuse cover with a screwdriver.
Figure A
2. Replace the fuse and close or attach the fuse cover.
Figure A
Fuse
(5 ampere)
Figure B
Figure B
Fuse cover
Fuse
(5 ampere)
CAUTION:
The AC voltage is different according to the area. Be sure
to set the proper voltage in your area before use.
(For details, please refer to page 6.)
 Loading...