

Page 1
DVD Stereo System
Operating Instructions
Model No. SC-DV170
The illustrations show the model for United Kingdom and Continental Europe.
EB EG GN
Note
“EB” on the outer packaging indicates the United
Kingdom.
Before connecting, operating or adjusting this product, please read these instructions completely.
Please keep this manual for future reference.
RQT5471-B
GC EE
Page 2
Dear customer
Thank you for purchasing this product.
For optimum performance and safety, please read these instructions carefully.
These operating instructions are applicable to the following system.
System
Sound processor
Stereo tuner/amplifier
DVD/Video CD/CD changer
Stereo cassette deck
Front
Speaker
¤
Except for the United Kingdom, Continental Europe, Australia and
N.Z.
Center
Surround
Subwoofer
¤
CAUTION!
THIS PRODUCT UTILIZES A LASER.
USE OF CONTROLS OR ADJUSTMENTS OR PERFORMANCE OF PROCEDURES OTHER THAN THOSE SPECIFIED HEREIN MAY RESULT IN HAZARDOUS RADIATION
EXPOSURE.
DO NOT OPEN COVERS AND DO NOT REPAIR
YOURSELF. REFER SERVICING TO QUALIFIED
PERSONNEL.
SC-DV170
SH-DV170
SA-DV170
SL-DV170
RS-DV170
SB-EH760
SB-PC75
SB-PS75
SB-W85
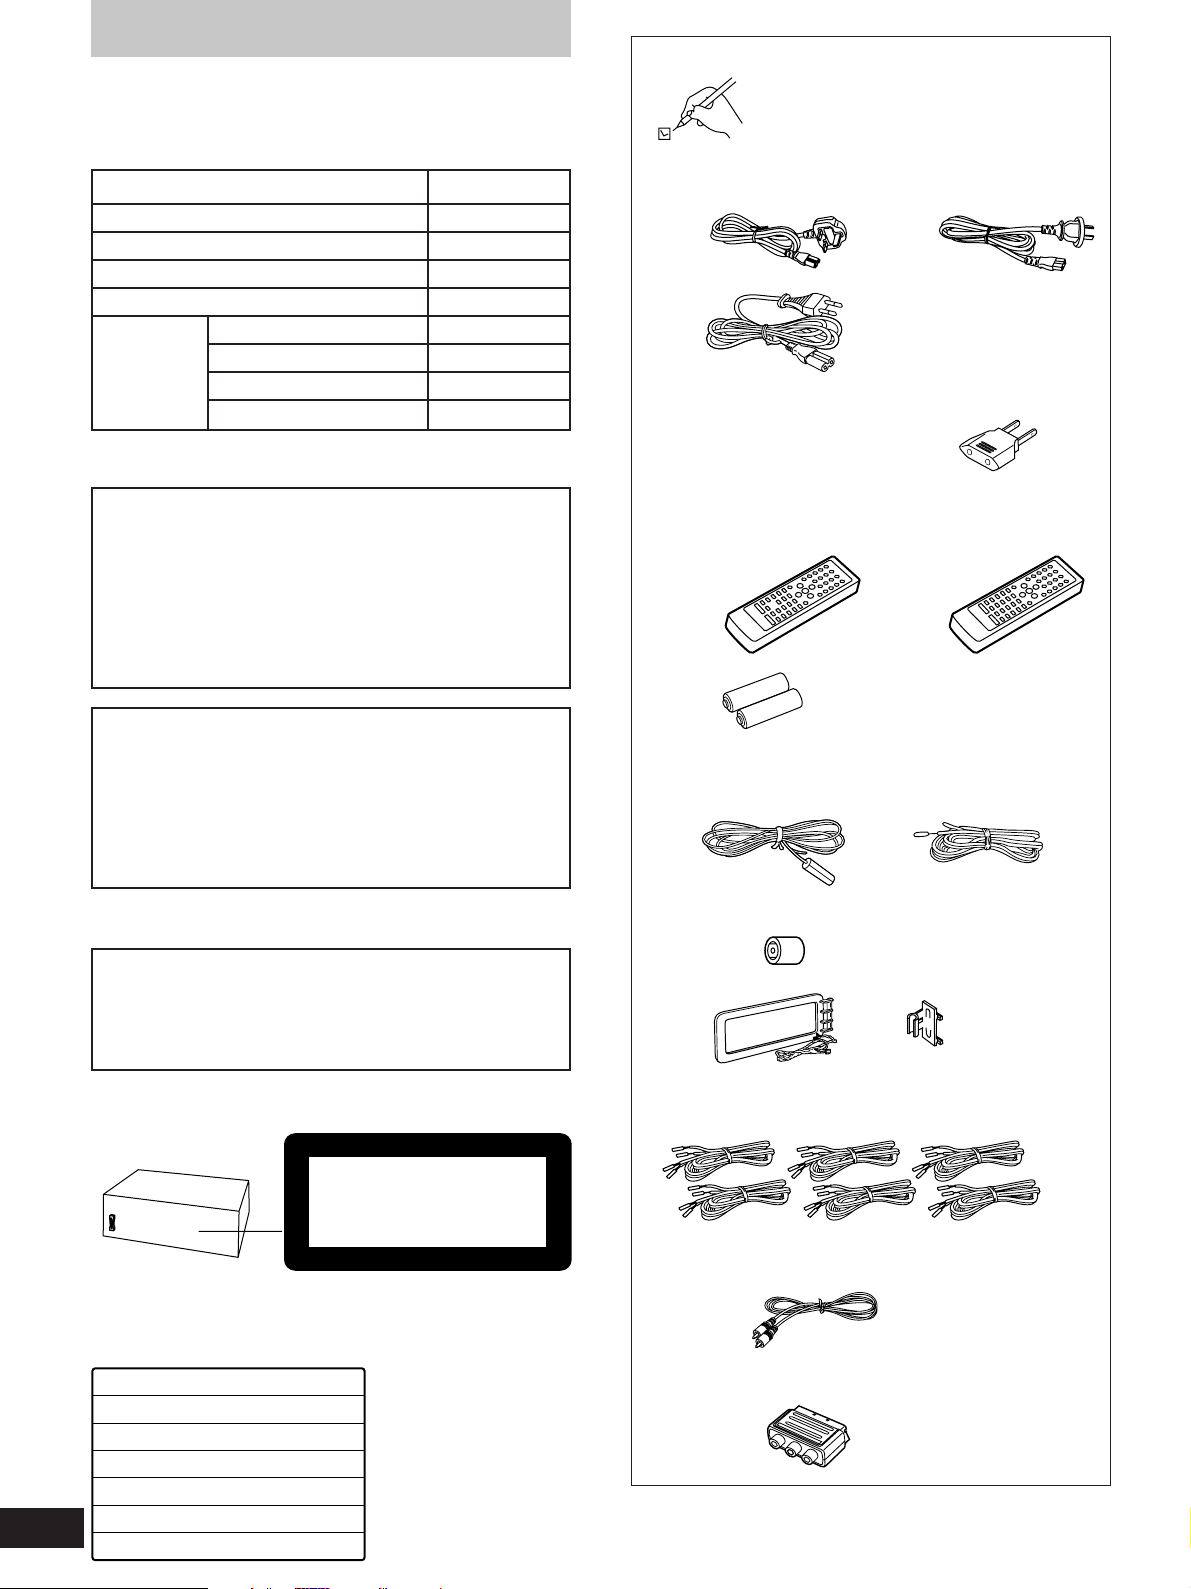
Supplied accessories
Please check and identify the supplied
accessories.
¸ AC mains lead . . . . . . . . . . . . . . . . . . . . . . . . . . . . . 1 pc.
For the United Kingdom For Australia and N.Z.
(VJA0733) (RJA0035-X)
For others
(RJA0019-X)
¸ Power plug adaptor (SJP5213-2) . . . . . . . . . . . . . . 1 pc.
(Except for the United Kingdom, Continental
Europe, Russia, Australia and N.Z.)
¸ Remote control transmitter . . . . . . . . . . . . . . . . . . . 1 pc.
For the United Kingdom, For others
Continental Europe, Australia (RAK-EHA33WH)
and N.Z. (RAK-EHA32WH)
¸ Remote control batteries . . . . . . . . . . . . . . . . . . . 2 pcs.
CAUTION!
DO NOT INSTALL OR PLACE THIS UNIT IN A BOOKCASE, BUILT IN CABINET OR IN ANOTHER CONFINED
SPACE. ENSURE THE UNIT IS WELL VENTILATED. ENSURE THAT CURTAINS AND ANY OTHER MATERIALS
DO NOT OBSTRUCT THE VENTILATION TO PREVENT
RISK OF ELECTRIC SHOCK OR FIRE HAZARD DUE TO
OVERHEATING.
(Except for the United Kingdom, Continental Europe,
Russia, Australia and N.Z.)
CAUTION!
The AC voltage is different according to the area.
Be sure to set the proper voltage in your area before
use.
(For details, please refer to page 5.)
CLASS 1
LASER PRODUCT
DVD/Video CD/CD changer
(Back of product)
¸ FM indoor antenna . . . . . . . . . . . . . . . . . . . . . . . . . . 1 pc.
For the United Kingdom, For others
Continental Europe, and (RSA0006-J)
Russia (RSA0007)
¸ FM antenna plug adaptor (SJP9009) . . . . . . . . . . . 1 pc.
(Only for the United Kingdom)
¸ AM loop antenna set (RSA0022-J) . . . . . . . . . . . . . 1 set
¸ Speaker cords . . . . . . . . . . . . . . . . . . . . . . . . . . . . 6 pcs.
(REE0393) (REE0984) (REE0985)
(Red0Black) (Blue0Black) (Gray0Black)
¸ Video cord (RJL1P019B15)
For the United Kingdom and Continental Europe . . 1pc.
For others . . . . . . . . . . . . . . . . . . . . . . . . . . . . . . . . 2 pcs.
2
RQT5471
LASER RADIATION WHEN OPEN.
DANGER
AVOID DIRECT EXPOSURE TO BEAM.
RADIATION LASER LORSQUE OUVERT.
DANGERS
ÉVITER TOUTE EXPOSITION AU FAISCEAU.
LASERSTRÅLING VED ÅBNING, NÅR SIKKERHEDSAFBRYDERE
ADVARSEL
ER UDE AF FUNKTION. UNDGÅ UDSÆTTELSE FOR STRÅLING.
AVATTAESSA JA SUOJALUKITUS OHITETTAESSA OLET ALTTIINA
VARO!
LASERSÄTEILYLLE. ÄLÄ KATSO SÄTEESEEN.
LASERSTRÅLNING NÄR DENNA DEL ÄR ÖPPNAD OCH
VARNING
SPÄRREN ÄR URKOPPLAD. BETRAKTA EJ STRÅLEN.
LASERSTRÅLING NÅR DEKSEL ÅPNES OG SIKKERHEDSLÅS
ADVARSEL
BRYTES. UNNGÅ EKSPONERING FOR STRÅLEN.
LASERSTRAHLUNG, WENN ABDECKUNG GEÖFFNET.
VORSICHT
NICHT DEM STRAHL AUSSETZEN.
(Inside of product)
(Intérieur de I’appareil)
(Indersiden at apparatet)
(Tuotteen sisällä)
(Apparatens insida)
(Produktets innside)
(Im Inneren des Gerätes)
¸ RCAJ adaptor (VFA0151-1) . . . . . . . . . . . . . . . . . . . 1 pc.
(Only for the United Kingdom and Continental Europe)
Use numbers indicated in parentheses when asking for replacement
parts.
Page 3

Table of contents
Safety precautions
Before use
Safety precautions . . . . . . . . . . . . . . . . . . . . . . . 13
Caution for AC Mains Lead. . . . . . . . . . . . . . . . . 14
Installation . . . . . . . . . . . . . . . . . . . . . . . . . . . . . . 15
Basic connections. . . . . . . . . . . . . . . . . . . . . . . . 16
Optional antenna connections . . . . . . . . . . . . . . 17
Television settings . . . . . . . . . . . . . . . . . . . . . . . 18
Front panel controls . . . . . . . . . . . . . . . . . . . . . . 19
The remote control . . . . . . . . . . . . . . . . . . . . . . . 11
Setting the time . . . . . . . . . . . . . . . . . . . . . . . . . . 12
Turning DEMO off . . . . . . . . . . . . . . . . . . . . . . . . 12
Saving power in the standby mode . . . . . . . . . . 12
Region numbers . . . . . . . . . . . . . . . . . . . . . . . . 113
Types of discs . . . . . . . . . . . . . . . . . . . . . . . . . . 113
Basic operations
Discs. . . . . . . . . . . . . . . . . . . . . . . . . . . . . . . . . . . 14
Normal play . . . . . . . . . . . . . . . . . . . . . . . . . . . . . . . . . . . . . . . . 14
Skip/Search/Still picture(Pause)/Slow-motion play/
Frame-by-frame viewing function . . . . . . . . . . . . . . . . . . . . . . 16
Changing soundtrack, subtitle languages and angles. . . . . . . . 17
Using menus to play . . . . . . . . . . . . . . . . . . . . . . . . . . . . . . . . . 17
Changing the picture quality for movie viewing. . . . . . . . . . . . . 18
Marking a position . . . . . . . . . . . . . . . . . . . . . . . . . . . . . . . . . . . 18
Repeat function . . . . . . . . . . . . . . . . . . . . . . . . . . . . . . . . . . . . . 19
Program play . . . . . . . . . . . . . . . . . . . . . . . . . . . . . . . . . . . . . . . 20
Random play . . . . . . . . . . . . . . . . . . . . . . . . . . . . . . . . . . . . . . . 21
Starting play from a specific track . . . . . . . . . . . . . . . . . . . . . . . 21
Using GUI screens . . . . . . . . . . . . . . . . . . . . . . . 22
The radio: manual tuning. . . . . . . . . . . . . . . . . . 24
The radio: preset tuning . . . . . . . . . . . . . . . . . . 25
Cassette tapes . . . . . . . . . . . . . . . . . . . . . . . . . . . 26
Changing sound field and quality
Changing sound field and quality . . . . . . . . . . . 28
Boosting the super woofer . . . . . . . . . . . . . . . . . 29
Enjoying surround sound. . . . . . . . . . . . . . . . . . 30
DOLBY DIGITAL . . . . . . . . . . . . . . . . . . . . . . . . . . . . . . . . . . . . 32
DOLBY PRO LOGIC . . . . . . . . . . . . . . . . . . . . . . . . . . . . . . . . . 33
SUPER SURROUND . . . . . . . . . . . . . . . . . . . . . . . . . . . . . . . . 34
SIMULATED STEREO . . . . . . . . . . . . . . . . . . . . . . . . . . . . . . . 34
Surround effects . . . . . . . . . . . . . . . . . . . . . . . . . 34
Recording operations
Before recording (Deck 2 only) . . . . . . . . . . . . . 36
Recording discs . . . . . . . . . . . . . . . . . . . . . . . . . 38
Recording the radio . . . . . . . . . . . . . . . . . . . . . . 39
Tape-to-tape recording . . . . . . . . . . . . . . . . . . . . 39
Placement
Set the system up on an even surface away from direct sunlight,
high temperatures, high humidity, and excessive vibration. These
conditions can damage the cabinet and other components, thereby
shortening the unit’s service life.
Place it at least 15 cm away from wall surfaces to avoid distortion
and unwanted acoustical effects.
Do not place heavy items on the unit.
Voltage
Do not use high voltage power sources. This can overload the unit
and cause a fire.
Do not use a DC power source. Check the source carefully when
setting the unit up on a ship or other place where DC is used.
AC mains lead protection
Ensure the AC mains lead is connected correctly and not damaged. Poor connection and lead damage can cause fire or electric
shock. Do not pull, bend, or place heavy items on the lead.
Grasp the plug firmly when unplugging the lead. Pulling the AC
mains lead can cause electric shock.
Do not handle the plug with wet hands. This can cause electric
shock.
Foreign matter
Do not let metal objects fall inside the unit. This can cause electric
shock or malfunction.
Do not let liquids get into the unit. This can cause electric shock
or malfunction. If this occurs, immediately disconnect the unit from
the power supply and contact your dealer.
Do not spray insecticides onto or into the unit. They contain flammable gases which can ignite if sprayed into the unit.
Service
Do not attempt to repair this unit by yourself. If sound is interrupted,
indicators fail to light, smoke appears, or any other problem that is not
covered in these instructions occurs, disconnect the AC mains lead
and contact your dealer or an authorized service center. Electric
shock or damage to the unit can occur if the unit is repaired, disassembled or reconstructed by unqualified persons.
Extend operating life by disconnecting the unit from the power
source if it is not to be used for a long time.
Before use
Convenient functions
Enjoying KARAOKE . . . . . . . . . . . . . . . . . . . . . . 40
Using the timers . . . . . . . . . . . . . . . . . . . . . . . . . 42
Initial settings . . . . . . . . . . . . . . . . . . . . . . . . . . . 45
Changing the sound range display . . . . . . . . . . 50
Muting the volume. . . . . . . . . . . . . . . . . . . . . . . . 50
Using headphones (not included) . . . . . . . . . . . 50
External unit connections . . . . . . . . . . . . . . . . . 51
Using other equipment . . . . . . . . . . . . . . . . . . . . 52
Reference
Technical specifications. . . . . . . . . . . . . . . . . . . 53
Troubleshooting guide . . . . . . . . . . . . . . . . . . . . 54
Maintenance. . . . . . . . . . . . . . . . . . . . . . . . . . . . . 55
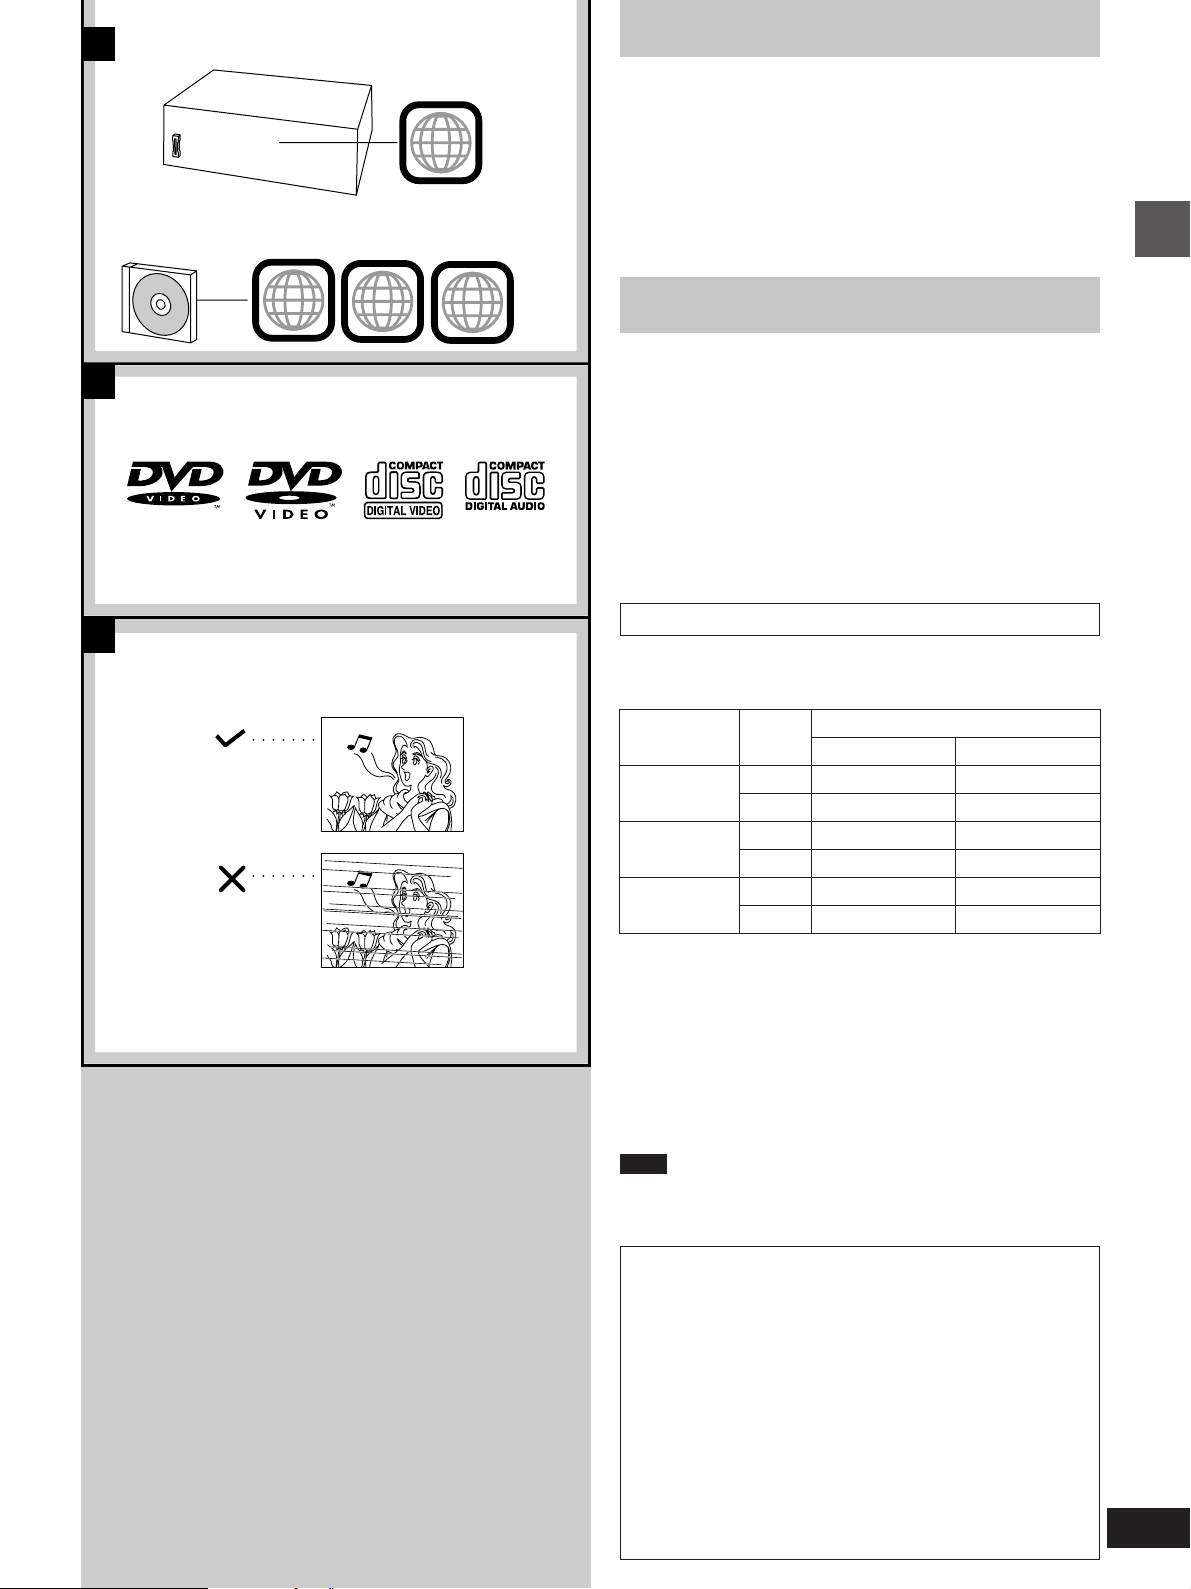
Disc symbols used in these operating
instructions
The functions you can use depend on the type of disc you
play.
These marks are used to indicate which type of disc is explained.
[DVD]: Feature can be used with DVD-Video
[V-CD]: Feature can be used with Video CD
[CD]: Feature can be used with Audio CD
Some features cannot be used even if these symbols are indicated.
3
RQT5471
Page 4

Caution for AC Mains Lead
(For United Kingdom)
(“EB” area code model only)
For your safety, please read the following text carefully.
This appliance is supplied with a moulded three pin
mains plug for your safety and convenience.
A 5-ampere fuse is fitted in this plug.
Should the fuse need to be replaced please ensure
that the replacement fuse has a rating of 5-ampere
Before use
and that it is approved by ASTA or BSI to BS1362.
Check for the ASTA mark m or the BSI mark o on
the body of the fuse.
If the plug contains a removable fuse cover you must
ensure that it is refitted when the fuse is replaced.
If you lose the fuse cover the plug must not be used
until a replacement cover is obtained.
A replacement fuse cover can be purchased from
your local dealer.
CAUTION!
IF THE FITTED MOULDED PLUG IS UNSUITABLE FOR THE SOCKET OUTLET IN YOUR
HOME THEN THE FUSE SHOULD BE REMOVED AND THE PLUG CUT OFF AND DISPOSED OF SAFELY.
THERE IS A DANGER OF SEVERE ELECTRICAL SHOCK IF THE CUT OFF PLUG IS INSERTED INTO ANY 13-AMPERE SOCKET.
WARNING: DO NOT CONNECT EITHER WIRE TO
THE EARTH TERMINAL WHICH IS MARKED WITH
THE LETTER E, BY THE EARTH SYMBOL n OR
COLOURED GREEN OR GREEN/YELLOW.
THIS PLUG IS NOT WATERPROOF—KEEP DRY.
Before use
Remove the connector cover.
How to replace the fuse
The location of the fuse differ according to the type of
AC mains plug (figures A and B). Confirm the AC
mains plug fitted and follow the instructions below.
Illustrations may differ from actual AC mains plug.
1. Open the fuse cover with a screwdriver.
Figure A
If a new plug is to be fitted please observe the wiring
code as stated below.
If in any doubt please consult a qualified electrician.
IMPORTANT
The wires in this mains lead are coloured in accordance with the following code:
Blue: Neutral, Brown: Live.
As these colours may not correspond with the coloured markings identifying the terminals in your plug,
proceed as follows:
The wire which is coloured Blue must be connected to
the terminal which is marked with the letter N or coloured Black or Blue.
The wire which is coloured Brown must be connected
to the terminal which is marked with the letter L or coloured Brown or Red.
Figure B
2. Replace the fuse and close or attach the fuse cover.
Figure A
Figure B
Fuse cover
Fuse
(5 ampere)
Fuse
(5 ampere)
4
RQT5471
Page 5
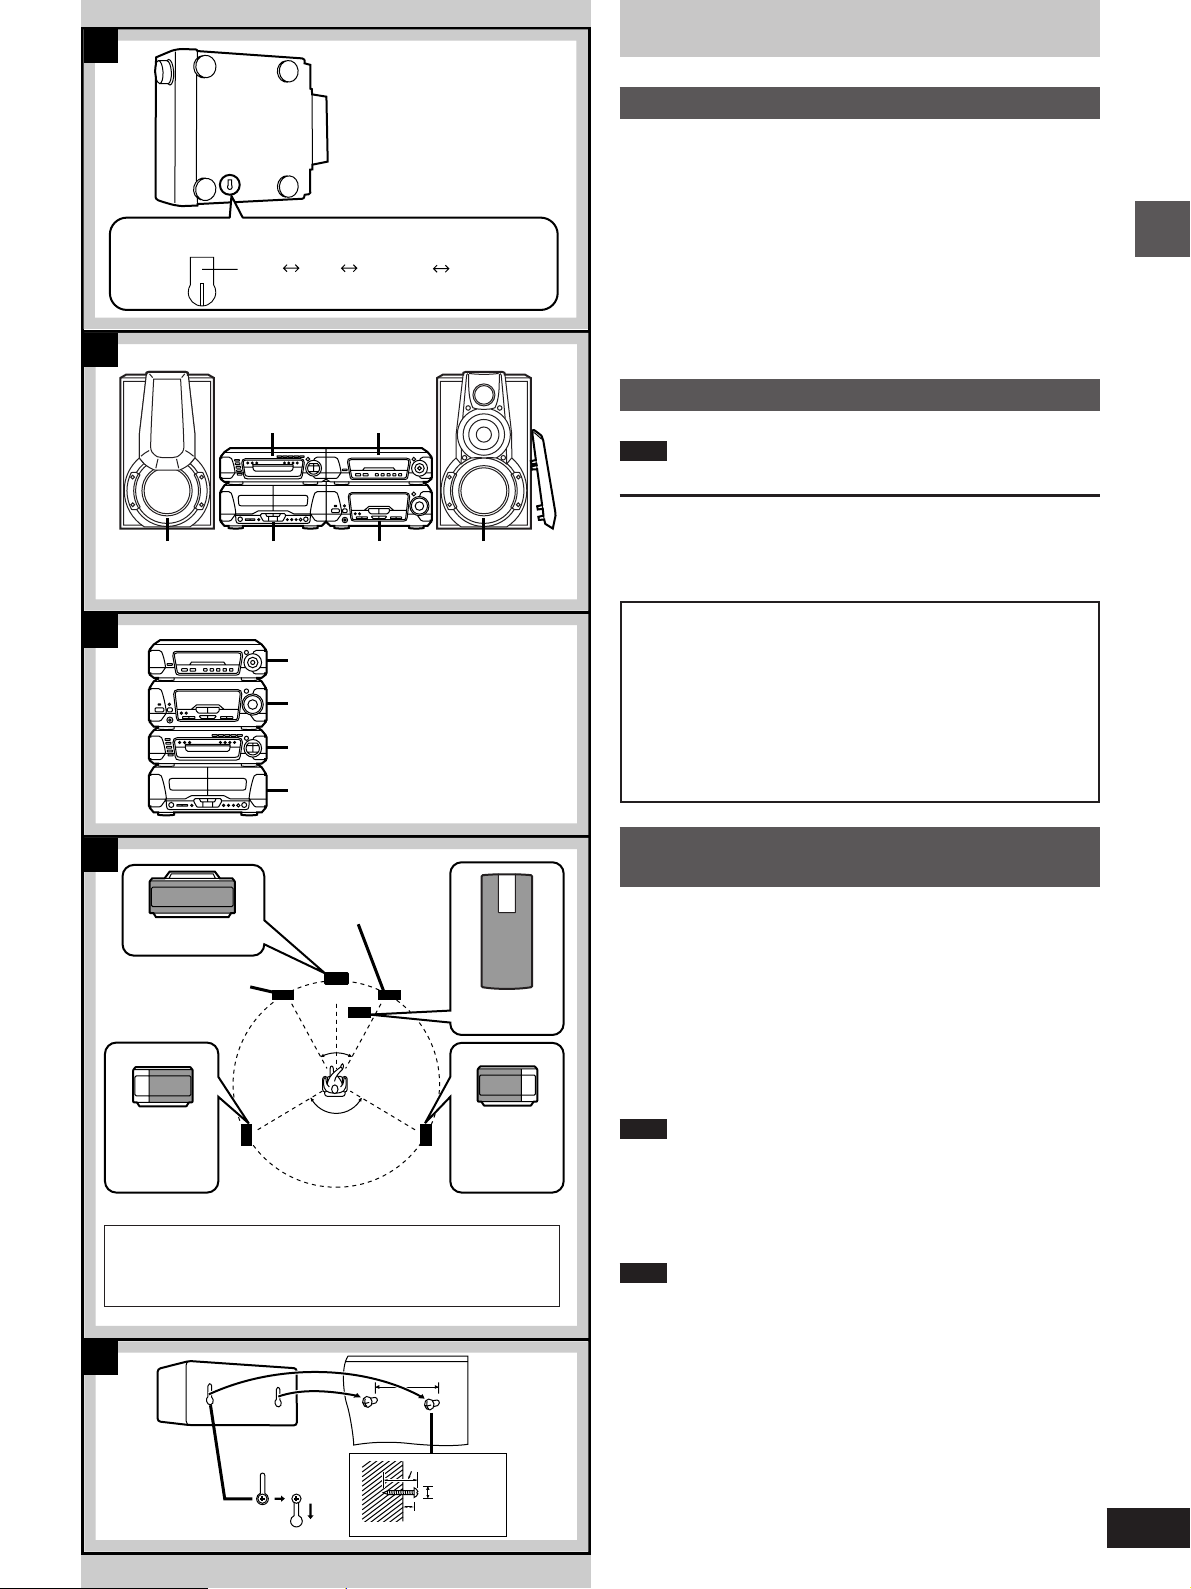
A
VOLTAGE ADJUST SWITCH
127V 110V 220–230V 240V
B
b DVD/Video CD/
CD changer
(SL-DV170)
d Front speaker (L)
(SB-EH760)
e Cassette deck
(RS-DV170)
a (Bottom of tuner/amplifier)
c Sound
processor
(SH-DV170)
f Tuner/amplifier
(SA-DV170)
g Front speaker (R)
(SB-EH760)
Installation
A
Set the voltage
»
(Except for the United Kingdom, Continental Europe, Russia,
Australia and N.Z.)
Be sure to disconnect the AC mains lead before setting the voltage.
Use a flat-head screwdriver to turn the voltage selector to the appropriate position for the area in which this system is to be used.
If the power supply in your area is 115 V, 120 V or 230 V, set the
voltage selector as follows:
³For 115 V: set to 110 V
³For 120 V: set to 127 V
³For 230 V: set to 220–230 V
Note that the unit will be seriously damaged if this setting is not made
correctly.
Locating the components
[B] Side-by-side set-up/[C] Stacking
Note
Left and right front speakers are exactly the same.
Use only the supplied speakers.
The combination of the system and the speakers provides the best
sound. Using other speakers can damage the unit and sound quality
will be negatively affected.
Before use
C
c Sound processor
(SH-DV170)
f Tuner/amplifier
(SA-DV170)
b DVD/Video CD/CD changer
(SL-DV170)
e Cassette deck
(RS-DV170)
D
g Front speaker (R)
h Center speaker
(SB-PC75)
d Front speaker (L)
(SB-EH760)
l Front view
i Surround
speaker (L)
(SB-PS75)
The front, center, and surround speakers should be placed
at approximately the same distance from the listening position. The angles in the diagram are approximate.
k Listening
(SB-EH760)
30e 30e
position
120e
m Subwoofer
(SB-W85)
l Front view
j Surround
speaker (R)
(SB-PS75)
Caution
³Use the speakers only with the recommended system.
Failure to do so may lead to damage to the amplifier
and/or the speakers, and may result in the risk of fire.
Consult a qualified service person if damage has occurred or if you experience a sudden change in performance.
³Do not attempt to attach these speakers to walls using
methods other than those described in this manual.
Placement of center/surround
D
»
speakers (and subwoofer)
Center speaker
Place the center speaker (h) directly above the television.
Surround speakers
Place the surround speakers (i, j) on either side of the listening
position, or slightly to the rear, about 1 meter higher than ear level.
Place the speakers with the Technics logo facing toward the listening
position.
However the position should be adjusted to your personal preference, because the effect varies to some degree depending upon the
type of music and the music source.
Note
If you are unable to position the surround speakers as recommended, you can put them near the front speakers and still achieve a surround-like effect (á page 35, “VIRTUAL REAR SURROUND”).
[E] Attaching to a wall
Set speaker onto screws and slide through the bracket to lock into
position.
Note
The wall or pillar on which the speaker systems are to be attached
should be capable of supporting 5 kg.
E
100 mm
30–35 mm
7–9 mm
Ø7.5~9.5
Subwoofer
(Included only for areas other than the United Kingdom, Continental Europe, Australia and N.Z.)
The subwoofer (m) can be placed anywhere as long as it is standing
and not too far from the television.
If irregular coloring occurs on your television
Turn the television off for about 30 minutes.
The television’s demagnetizing function should correct the problem.
If it persists, move the speakers farther away from the television.
5
RQT5471
Page 6
Basic connections
2
Adhesive tape
e To your
television
(Right)
Before use
4
The illustrations show the model for Russia.
1
a To connect cables
b Connector
(For the United
2
Kingdom, Continental Europe, and
Russia)
75∞
FM ANT
d To unplug cables
Hold the connector
on both ends
and pull it out.
c White
line
(For others)
FM ANT
75∞
GND
3
1
1
3
A1
1
B2
4
Speaker side
1
1
(Right)
Tuner/amplifier side
HIGH
LOW MID
HIGH
LOW MID
HF
MF
LF
R
L
Black (j)
Black (j)
2
+
-
B1
1
Red (i)
2
Red (i)
7
Gray (i)
Blue (i)
Gray (i)
Blue (i)
5
3
5
6
(Left)
4
f To household
mains socket
(Left)
5
A
B
(Only for the United Kingdom and
Continental Europe)
VIDEO
OUT
Changer
(Except for the United Kingdom and
C
Continental Europe)
Sound processor
MONITOR
OUT
g Video cord
h Video terminal
i Audio terminals
Changer
DVD
IN
RCAJ adaptor
VIDEO
OUT
6
RQT5471
2
(For the United Kingdom, Continental Europe, and Russia)
(For others)
5
Subwoofer: Except for the United
Kingdom, Continental Europe, Australia
and N.Z.
SUB
-WOOFER
CENTER
R
Center speaker cord
Surround speaker (R) cord
Surround speaker (L) cord
SURROUND
L
Subwoofer cord
e To your television
j Appliance
D
inlet
k Approx. 6 mm
(Except for the United Kingdom,
E
Continental Europe, Russia, Australia
and N.Z.)
l Connector
Page 7

Optional antenna connections
Before connection
³Do not connect the AC mains lead until all other connections
are complete.
³To prepare the AM loop antenna and speaker cords (and FM
antenna for areas other than the United Kingdom, Continental Europe, and Russia), twist the vinyl tip and pull off ([A]).
1 Flat cables.
Keep the cables as flat as possible against the back of the
unit.
Note
Connect the black connectors to the black terminals and the
blue connector to the blue terminal. Incorrect connection of the
flat cables can damage the unit.
2 FM antenna.
Fix the other end of the antenna where reception is best.
3 AM loop antenna.
1 Attach the antenna holder to the rear panel of the changer .
Then clamp the antenna into the antenna holder.
2 Connect the antenna to the rear panel of the tuner/ amplifi-
er.
Keep loose antenna cord away from other wires and cords.
4 Front (L/R) speaker cords.
Connect the cords to the terminals of the same colour.
Note
³To prevent damage to circuitry, never short-circuit positive
(i) to negative (j) speaker wires.
³Be sure to connect only positive (red, blue or gray) wires to
positive (i) terminals and negative (black) wires to negative
(j) terminals.
5 Surround and center speaker cords.
Subwoofer cord.
dom, Continental Europe, Australia and N.Z.)
(Except for the United King-
Use outdoor antennas if radio reception is poor.
FM outdoor antenna
Note
³Disconnect the FM indoor antenna.
³The antenna should be installed by a competent technician.
b FM outdoor antenna
a Tuner/amplifier
A
(For the United Kingdom, Continental
Europe and Russia)
A
75∞
FM ANT
AM ANT
LOOP
EXT
(Only for the United Kingdom)
(For others)
A
FM ANT
75∞
GND
AM ANT
LOOP
EXT
c 75 coaxial cable
(not included)
Use the antenna
plug adaptor
(included).
Before use
6 Video cord(s).
[B] Only for the United Kingdom and Continental Europe
Use the RCAJ adaptor (included) if your television has a 21pin SCART terminal.
You do not have to connect anything to the AUDIO terminals.
[C] Except for the United Kingdom and Continental Europe
Use this connection if you have connected a VCR or Laser
Disc player (á page 51 [D]). This enables you to control the
video and audio from this equipment with [INPUT SELECTOR] (á page 52).
(For the United Kingdom only)
READ THE CAUTION FOR THE AC MAINS
LEAD ON PAGE 4 BEFORE PROCEEDING TO
STEP 7.
7 AC mains lead.
[D] Insertion of connector
Even when the connector is perfectly inserted, depending on
the type of inlet used, the front part of the connector may jut
out as shown in the drawing.
However there is no problem using the unit.
[E] Except for the United Kingdom, Continental Europe,
Russia, Australia and N.Z.
If the power plug will not fit your socket, use the power plug
adaptor (included).
Note
The included AC mains lead is for use with this unit only. Do not use
it with other equipment.
For your reference:
Information you enter into the unit’s memory, except for time, remains
intact for up to two weeks after the mains lead is disconnected.
1 Remove a piece of the outer vinyl
insulator.
30mm
2 Twist the shield braid to expose the
core wire.
15mm
Core wireShield braid
AM outdoor antenna
Run a piece of vinyl wire horizontally across a window or other convenient location.
Note
³Leave the loop antenna connected.
³Disconnect the antenna when the unit is not in use. Do not use the
antenna during an electrical storm.
a Tuner/amplifier
d AM outdoor antenna
5–12m
AM ANT
LOOP
EXT
7
RQT5471
Page 8
Before use
1
a Numbered
buttons
H
1
2
3
SUBTITLE
TOP MENU
H
SLEEP
1 3
2
46
5
7890
MENU
EQ
ENTER
3D AI EQ/
M.EQ BAND
MARKER
DIGITAL
TEST
U
PRO LOGIC
CH SELECT
VCR(EXT)/
VDP(AUX)
CANCEL
PLAY MODE
MIX 2CH
AUDIO
SHIFT
S.WOOFER
TAPE/
DVD
DECK 1/2
⁄/g¤ ¤»
SLOW/SEARCH
MUTING
SKIP
∂ VOLUME µ
SETUP
DISPLAY
DISC
j/-/--
RETURN
AV EFFECT
ANGLE
SUPER SRND
TUNER/
BAND
3
6
4, 5
Television settings
Remote control only
The menu language has been factory preset to English. You can
change the language by going to “3 Menu Language” of the initial
settings screen (á page 46).
Set the screen size to suit your television. The initial setting is for a
regular television with an aspect ratio of 4:3.
You do not have to change the setting if you have this kind of
television.
Preparation:
Turn on the television and switch the video input mode of the television to suit the type of connection you have made (e.g., VIDEO 1).
1 Press [ê] to turn the unit on.
2 Press [DVD] to select “DVD” as the
source.
3 While stopped
Press [SHIFT] i [SETUP] to display
the initial settings screen.
2
3
DVD
SHIFT
4, 5
SETUP
b (On the TV screen)
1 Disc Languages
2 Ratings
3 Menu Language
4 On-Screen Messages
5 TV Aspect
6 Speaker Setting
9 Other Settings
Press RETURN to exit
Select your TV aspect
Level 8
English
4:3
4 Press [3] or [4] to highlight “5 TV
Aspect”, and press [ENTER].
5 Press [3] or [4] to highlight the re-
quired size, and press [ENTER].
4:3: Regular television
16:9: Widescreen television
The initial settings screen is shown after you make your selection.
6 Press [RETURN] to exit.
You can also do steps 4 and 5 with the numbered buttons.
Press the number next to the selected item.
For example, in step 4, press [5] to select “5 TV Aspect”.
8
RQT5471
6
RETURN
ENTER
1 4 : 3
2 16 : 9
Press RETURN to exit
Page 9
A
Front panel controls
B
5 6 : ;7 8 9 =<3 41 2
œ
PLAY/œREC
H
MODE
H/I
CLOCK/TIMER
PHONES
INPUT SELECTOR TUNER/BAND
FM AUTO/
MONO
ECHO
@
DEMO
TUNING MODE SET KARAOKE
?
TUNING
@
MIC EFFECT
KEY CON LOUNGE CHORUS
V.MUTE
> ? @ DA B C
E IF HG J
DIRECT OPEN
DIRECT OPEN
DISC 1DISC
2
DISC 3DISC 4DISC
DISC 1DISC
2
DISC
DISC
1
1
REPEAT
CD EDIT
REPEAT
EDIT
A-B REPEAT
RANDOM
2
2
3
3
4
4
5
5
CINEMA
DISC 3DISC 4DISC
SLOW/SEARCH
1 DISC/ALL
L PONM RQ
DIGITAL
S.WOOFER
VOLUME
UP
DOWN
MIC VOL
MIC
12
OPEN/CLOSE
OPEN/CLOSE
5
5
E
E
SKIP
MN
»
»
g
g
MIN MAX
K
A
Tuner/amplifier
»
7, :, ;, C and D: Not available for the United Kingdom, Continental Europe, Australia and N.Z.
1 Standby/on switch (ê/I) . . . . . . . . . . . . . . . . . . . . . . . . . . . . . 8
Press to switch the unit from on to standby mode or vice versa.
In standby mode, the unit is still consuming a small amount of
power.
2 Standby indicator (ê)
When the unit is connected to the AC mains supply, this indicator lights up in standby mode and goes out when the unit is
turned on.
3 Play timer/record timer button and indicator
(FPLAY/FREC) . . . . . . . . . . . . . . . . . . . . . . . . . . . . . . . . 42, 43
4 ECO mode button (MODE) . . . . . . . . . . . . . . . . . . . . . . . . . . 12
5 Clock/timer, Demo button
(CLOCK/TIMER, –DEMO) . . . . . . . . . . . . . . . . . . . . . . . . 12, 42
6 FM mode button (FM AUTO/MONO) . . . . . . . . . . . . . . . . . . 24
7 [Except\for\the\United\Kingdom,\Continental\Europe,\Australia\and\N.Z.]
Echo button (ECHO) . . . . . . . . . . . . . . . . . . . . . . . . . . . . . . . 41
8 Source input button (INPUT SELECTOR) . . . . . . . . . . . . . . 52
9 Tuner/band button (TUNER/BAND) . . . . . . . . . . . . . . . . . . . 24
: [Except\for\the\United\Kingdom,\Continental\Europe,\Australia\and\N.Z.]
Key control button (KEY CON) . . . . . . . . . . . . . . . . . . . . . . 41
; [Except\for\the\United\Kingdom,\Continental\Europe,\Australia\and\N.Z.]
MIC effect buttons (MIC EFFECT, LOUNGE, CHORUS) . . . . 41
< Digital super woofer button and indicator
(DIGITAL S.WOOFER) . . . . . . . . . . . . . . . . . . . . . . . . . . . . . . 29
= Volume control (VOLUME) . . . . . . . . . . . . . . . . . . . . . . . . . . 14
> Headphone jack (PHONES) . . . . . . . . . . . . . . . . . . . . . . . . . 50
? Tuning mode button (TUNING MODE) . . . . . . . . . . . . . . . . 24
@ Set button (SET) . . . . . . . . . . . . . . . . . . . . . . . . . . . . . . . . . . 12
A [For\the\United\Kingdom,\Continental\Europe,\Australia\and\N.Z.]
Tuning buttons (X, W TUNING) . . . . . . . . . . . . . . . . . . . 12, 24
[For\others]
Tuning, Key up/down buttons
(X, W TUNING, Ý, ß) . . . . . . . . . . . . . . . . . . . . . . . . 12, 24, 41
B ]For\the\United\Kingdom\and\Continental\Europe\
RDS display mode buttons
(RDS, PS–DISP MODE–PTY) . . . . . . . . . . . . . . . . . . . . . . . . 24
[For\Australia\and\N.Z.\
No buttons.
[For\others\
KARAOKE, Voice mute buttons
(KARAOKE, V.MUTE) . . . . . . . . . . . . . . . . . . . . . . . . . . . . . . 40
C [Except\for\the\United\Kingdom,\Continental\Europe,\Australia\and\N.Z.]
Microphone jacks (MIC, 1, 2) . . . . . . . . . . . . . . . . . . . . . . . . 40
D [Except\for\the\United\Kingdom,\Continental\Europe,\Australia\and\N.Z.]
Microphone volume control (MIC VOL) . . . . . . . . . . . . . . . 40
Before use
B
DVD/Video CD/CD changer
»
E Disc select buttons and indicators (DISC, 1–5) . . . . . . . . . 14
Green: Indicates that the tray is ready to play its disc or to be
opened.
F A-B repeat button (A-B REPEAT) . . . . . . . . . . . . . . . . . . . . 19
G Repeat button (REPEAT) . . . . . . . . . . . . . . . . . . . . . . . . . . . 19
H CD edit button (CD EDIT) . . . . . . . . . . . . . . . . . . . . . . . . . . . 38
I Disc direct open buttons
(DIRECT OPEN, DISC 1– DISC 5) . . . . . . . . . . . . . . . . . . . . . 14
J Disc tray open/close button (< OPEN/CLOSE) . . . . . . . . . 14
K Skip buttons (:, 9 SKIP) . . . . . . . . . . . . . . . . . . . . . . . 16
L Disc tray . . . . . . . . . . . . . . . . . . . . . . . . . . . . . . . . . . . . . . . . . 14
M Cinema mode button (CINEMA) . . . . . . . . . . . . . . . . . . . . . . 18
N Disc management select button (1 DISC/ALL) . . . . . . . . . . 15
O Slow/search buttons (6, 5 SLOW/SEARCH) . . . . . . . 16
P Stop button (º) . . . . . . . . . . . . . . . . . . . . . . . . . . . . . . . . . . . 14
Q Pause button (;) . . . . . . . . . . . . . . . . . . . . . . . . . . . . . . . . . . 16
R Play button and indicator (!) . . . . . . . . . . . . . . . . . . . . . . . 15
The colour of the indicator depends on the operation taking place.
If stopped: orange
If playing: green
If paused: flashes green
RESUME on: flashes orange
9
RQT5471
Page 10
A
A
Before use
B
E
OPEN
DECK 1/2
COUNTER
DISPLAY
RESET
Y \] _^Z [X
` cba
DISPLAY MODE
U
PRO LOGIC
OFF/ON
SUPER
SURROUND
d e f g i jh
CENTER
FOCUS
DSP CONTROL
@
VIRTUAL REAR
SURROUND
Front panel controls
UT V WS
A
Cassette deck
»
S Deck 1 cassette holder open button (< OPEN) . . . . . . . . . 26
T Deck 1 cassette holder
U Fast forward/rewind buttons (6, 5) . . . . . . . . . . . . . . . 27
V Deck 2 cassette holder
GF
DOLBY NR
3D ENHANCED
MULTI REAR
SURROUND
SURROUND
REV MODE TAPE EDIT
SEAT
POSITION
E
OPEN
H
REC
PAUSE
3D AI EQ/
M.EQ BAND
MULTI JOG
W Deck 2 cassette holder open button (< OPEN) . . . . . . . . . 26
X Counter reset, display buttons
(COUNTER, RESET, DISPLAY) . . . . . . . . . . . . . . . . . . . . . . 36
Y Deck 1/deck 2 select button (DECK 1/2) . . . . . . . . . . . . . . . 26
Z Playback buttons and indicators (", !) . . . . . . . . . . . . . . 26
The colour of the indicators depends on the operation taking
place.
If stopped, fast-forwarding or rewinding: orange
If playing or recording: green
While carrying out TPS or recording is on standby: flashes green
[ Stop button (º) . . . . . . . . . . . . . . . . . . . . . . . . . . . . . . . . . . . 26
\ Dolby noise reduction button (DOLBY NR) . . . . . . . . . . . . 26
] Reverse mode button (REV MODE) . . . . . . . . . . . . . . . . . . . 26
^ Tape edit button (TAPE EDIT) . . . . . . . . . . . . . . . . . . . . . . . 39
_ Record pause button (´ REC PAUSE) . . . . . . . . . . . . . . . . 38
B
Sound processor
»
` Display mode button (DISPLAY MODE) . . . . . . . . . . . . . . . 50
a Display
b 3D AI EQ, M.EQ BAND button
(3D AI EQ/M.EQ BAND) . . . . . . . . . . . . . . . . . . . . . . . . . . . . . 28
c Jog control and joystick (MULTI JOG) . . . . . . . . . . . . . . . . 28
d DOLBY PRO LOGIC button and indicator
(ë PRO LOGIC, OFF/ON) . . . . . . . . . . . . . . . . . . . . . . . . . . 33
e Super surround button and indicator
(SUPER SURROUND) . . . . . . . . . . . . . . . . . . . . . . . . . . . . . . 34
f Center focus button and indicator (CENTER FOCUS) . . . 35
g Virtual rear surround button and indicator
(VIRTUAL REAR SURROUND) . . . . . . . . . . . . . . . . . . . . . . . 35
h Multi rear surround button and indicator
(MULTI REAR SURROUND) . . . . . . . . . . . . . . . . . . . . . . . . . 35
i 3D enhanced surround button and indicator
(3D ENHANCED SURROUND) . . . . . . . . . . . . . . . . . . . . . . . 35
j Seat position button and indicator
(SEAT POSITION) . . . . . . . . . . . . . . . . . . . . . . . . . . . . . . . . . 34
10
RQT5471
Page 11

A
B
k
1
l
m
n
o
d
r
t
v
x
p
q
s
u
w
SUBTITLE SETUP
H
123
456
7890
MENU
EQ
3D AI EQ/
M.EQ BAND
MARKER
U
PRO LOGIC
VCR(EXT)/
VDP(AUX)
CANCEL
PLAY MODE
MIX 2CH
AUDIO
SHIFT
∂VOLUME µ
TOP MENU
SLEEP
ENTER
TEST
CH SELECT
TAPE/
DECK 1/2
⁄/g¤»
KARAOKE
MUTING
DISPLAY
DIGITAL
SUPER SRND
S.WOOFER
DVD
SLOW/SEARCH
SKIP
j/-/--
RETURN
KARAOKE
AV EFFECT
ANGLE
TUNER/
DISC
EFFECT
BAND
<
9
°
y
z
{
|
}
~
e
†
¢
£
K
=
The remote control
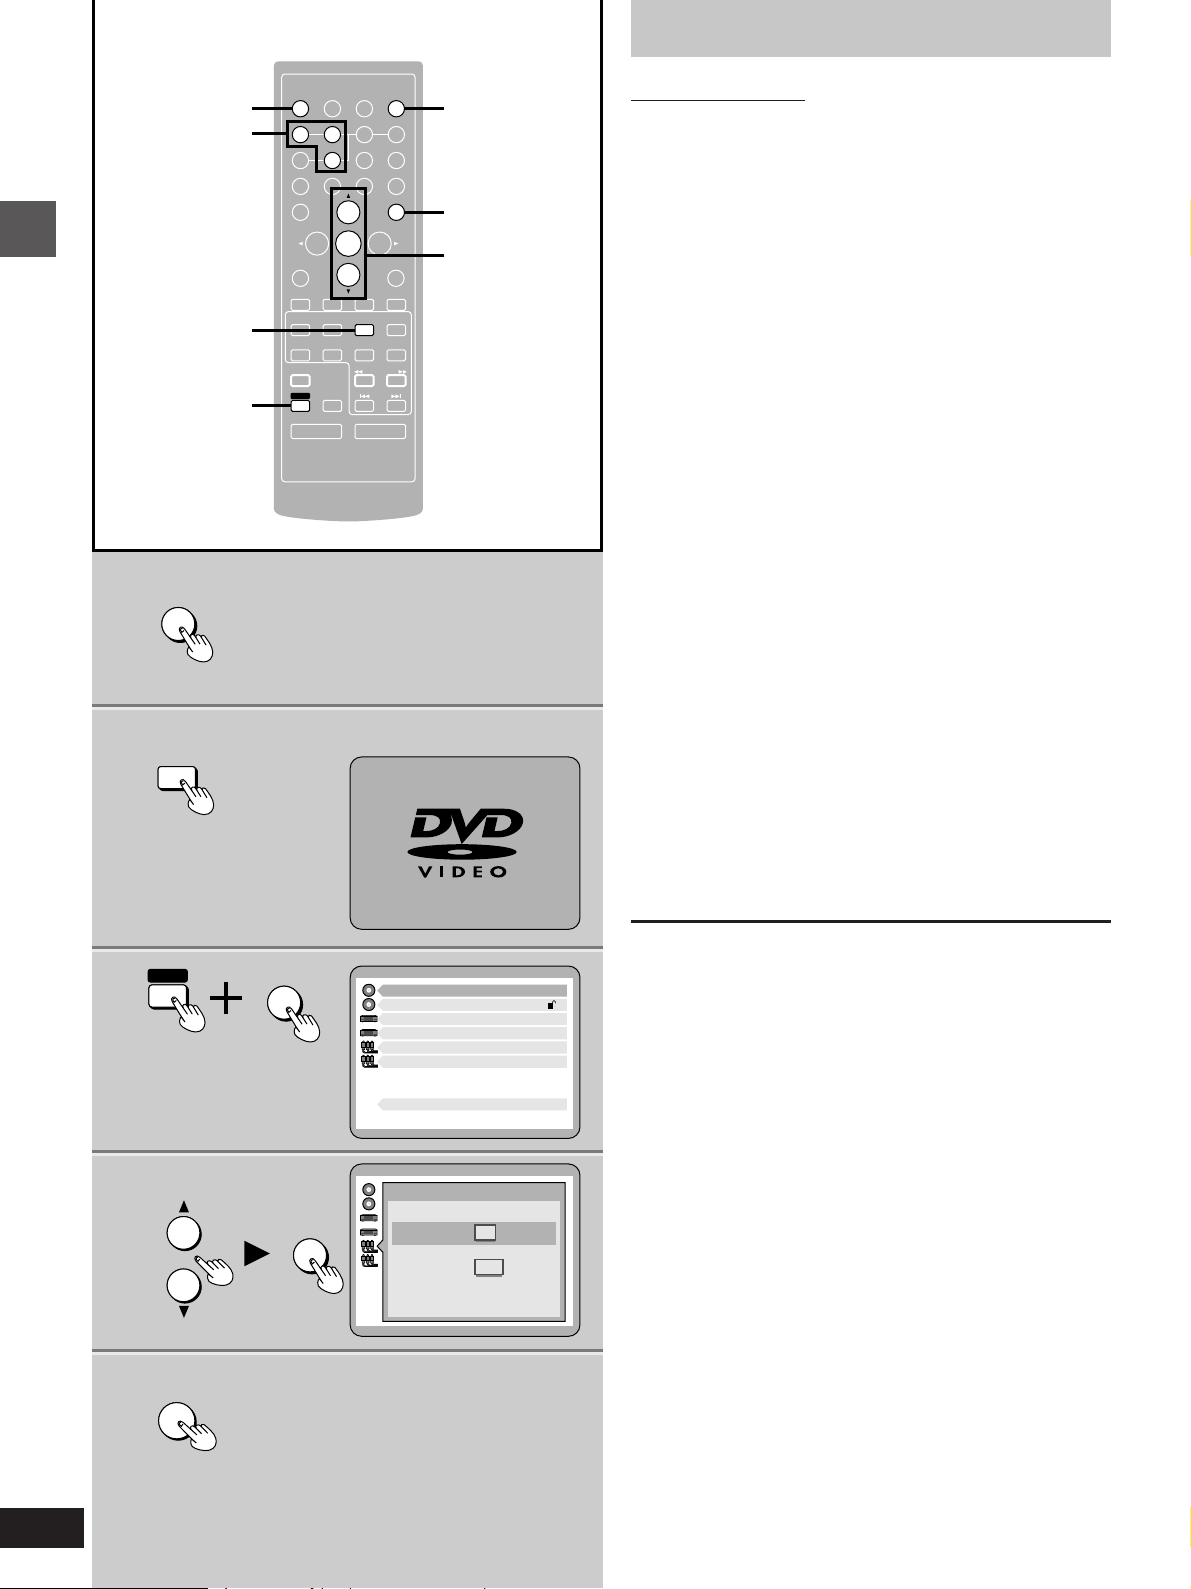
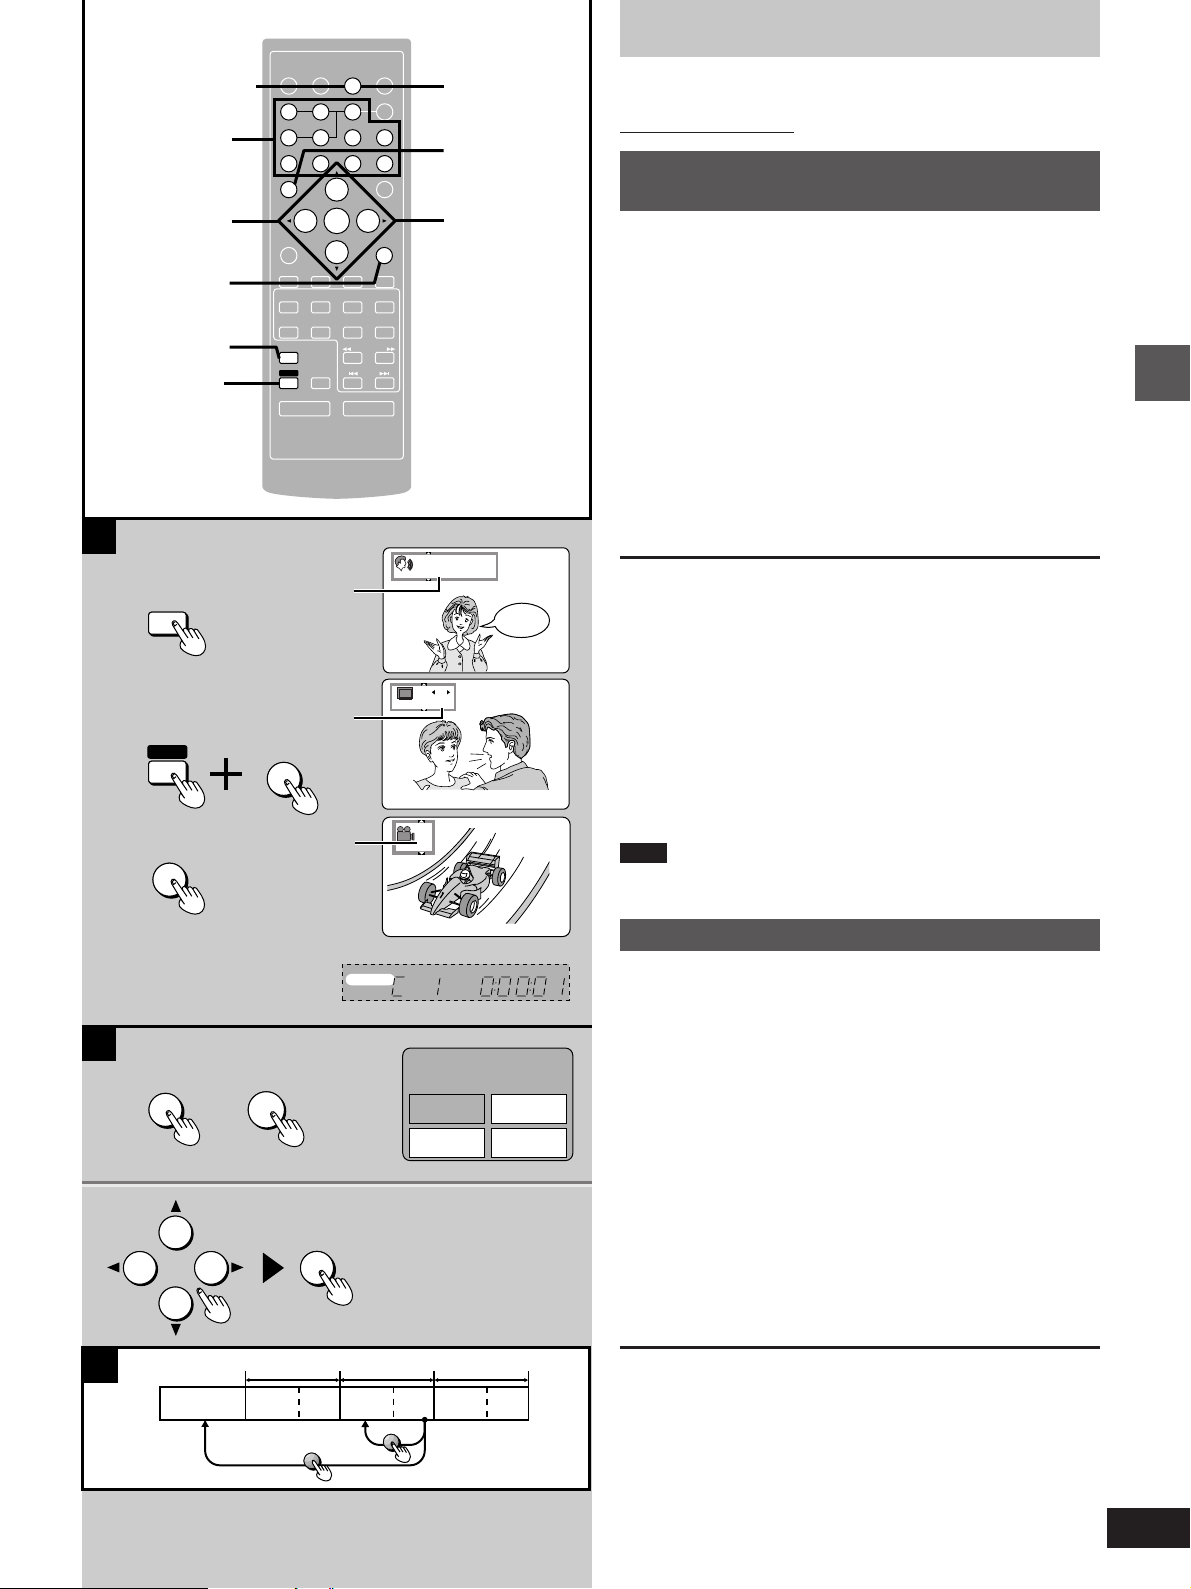
A
Controls
»
Buttons such as 1 and d function in the same way as the corresponding controls on the main unit.
k Sleep timer button (SLEEP) . . . . . . . . . . . . . . . . . . . . . . . . . 44
l Numbered buttons (1–9, 0, M) . . . . . . . . . . . . . . . . . . 14
m Menu, EQ button (MENU, EQ) . . . . . . . . . . . . . . . . . . . . 17, 28
n Cursor buttons (2, 1, 3, 4) . . . . . . . . . . . . . . . . . . . . . 8, 45
o Marker, 3D AI EQ, M.EQ BAND button
(MARKER, 3D AI EQ/M.EQ BAND) . . . . . . . . . . . . . . . . . 18, 28
p Channel select, Test signal button
(CH SELECT, TEST) . . . . . . . . . . . . . . . . . . . . . . . . . . . . . . . 32
q Input select button [VCR (EXT)/VDP (AUX)] . . . . . . . . . . . . 52
r TAPE, Deck 1/deck 2 select button (TAPE/DECK 1/2) . . . . 26
s Play mode, Cancel button (PLAY MODE, CANCEL) . . 18, 20
t Disc pause, Tape reverse play button (2/;) . . . . . . . . 16, 26
u Audio select, 2 channel down mixing button
(AUDIO, MIX 2CH) . . . . . . . . . . . . . . . . . . . . . . . . . . . . . . 17, 32
v [Except\for\the\United\Kingdom,\Continental\Europe,\Australia\and\N.Z.]
KARAOKE button (KARAOKE) . . . . . . . . . . . . . . . . . . . . . . 40
w Shift button (SHIFT)
To operate functions labeled in orange, press [SHIFT] and then
the corresponding button at the same time.
x Muting button (MUTING) . . . . . . . . . . . . . . . . . . . . . . . . . . . . 50
y Top menu, Subtitle select button
(TOP MENU, SUBTITLE) . . . . . . . . . . . . . . . . . . . . . . . . . . . . 17
z GUI display, Initial setting button (DISPLAY, SETUP) . . 8, 22, 45
{ Disc button (DISC) . . . . . . . . . . . . . . . . . . . . . . . . . . . . . . . . . 21
| [For\the\United\Kingdom,\Continental\Europe,\Australia\and\N.Z.]
Return button (RETURN) . . . . . . . . . . . . . . . . . . . . . . . . . 8, 45
[For\others\
Return, Karaoke effect button
(RETURN, KARAOKE EFFECT) . . . . . . . . . . . . . . . . . 8, 41, 45
} Enter button (ENTER) . . . . . . . . . . . . . . . . . . . . . . . . . . . . 8, 45
~ Angle select, AV effect button (ANGLE, AV EFFECT) . . 17, 34
DVD button (DVD) . . . . . . . . . . . . . . . . . . . . . . . . . . . . . . . . . 20
¡ Disc play, Tape forward play button (1) . . . . . . . . . . . 15, 26
¢ Disc stop, Tape stop button (º) . . . . . . . . . . . . . . . . . . 14, 26
£ Disc slow/search, Tape fast forward/rewind buttons
(6, 5 SLOW/SEARCH) . . . . . . . . . . . . . . . . . . . . . . 16, 27
Before use
C
a Tuner/amplifier
1
f
30 o 30 o
R6/LR6
AA,UM-3
7m
B
Batteries
»
³Insert so the poles (i and j) match those in the remote control.
ÁDo not use rechargeable type batteries.
Do not;
³mix old and new batteries.
³use different types at the same time.
³heat or expose to flame.
³take apart or short circuit.
³attempt to recharge alkaline or manganese batteries.
³use batteries if the covering has been peeled off.
Mishandling of batteries can cause electrolyte leakage which can
damage items the fluid contacts and may cause a fire.
If electrolyte leaks from the batteries, consult your dealer.
Wash thoroughly with water if electrolyte comes in contact with any
part of your body.
Remove if the remote control is not going to be used for a long period
of time. Store in a cool, dark place.
Replace if the unit does not respond to the remote control even when
held close to the front panel.
If the battery lid comes loose, slide it back into place horizontally.
C
Use
»
Aim at the sensor, avoiding obstacles, at a maximum range of 7 meters directly in front of the unit.
³Keep the transmission window and the unit’s sensor free from dust.
³Operation can be affected by strong light sources, such as direct
sunlight, and the glass doors on cabinets.
Do not;
³put heavy objects on the remote control.
³take the remote control apart.
³spill liquids onto the remote control.
11
RQT5471
Page 12
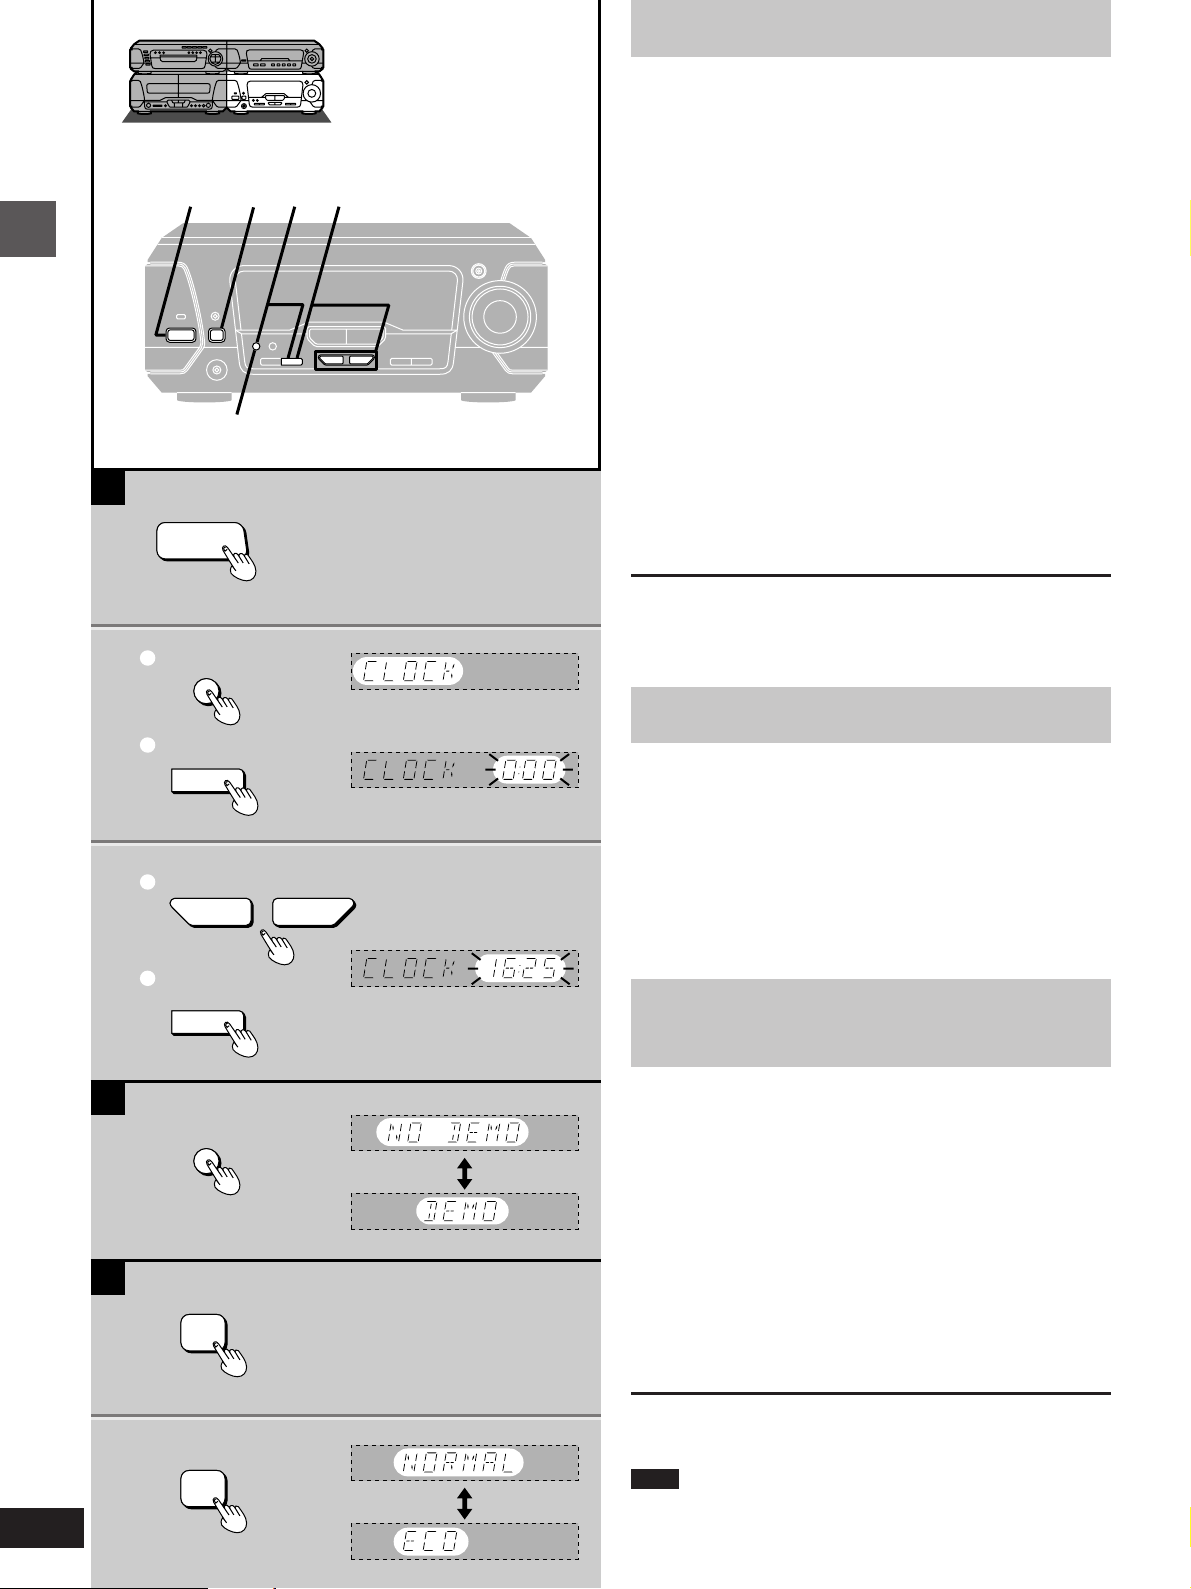
A
Setting the time
»
This is a 24-hour clock.
The example shows how to set the clock for 16:25 (4:25 p.m.).
Before use
A
1
1
2
2
1
1 2 32
CLOCK/TIMER
—DEMO
H/I
CLOCK/TIMER
—DEMO
SET
1 Press [ê/I] to turn the unit on.
2 1 Press [CLOCK/TIMER, –DEMO] to
display “CLOCK”.
Each time you press the button:
CLOCK>FPLAY>FREC>Original display
^-------------------------------------------------------------------}
2 Within 7 seconds
Press [SET].
3 1 Press [TUNING (X or W)] to set the
time.
The time display can be changed in one minute units by
tapping the buttons, and quickly by holding down the buttons.
2 Press [SET].
The time is set and the original display is restored.
Displaying the clock
Press [CLOCK/TIMER, –DEMO].
The clock is shown for about 5 seconds.
B
Turning DEMO off
»
A demonstration of the display is shown if you have not set the clock.
Turn DEMO off to get the most from ECO mode (see below).
3
B
C
1
1
2
?
TUNING
SET
CLOCK/TIMER
—DEMO
MODE
While the unit is on:
Press and hold [CLOCK/TIMER, –DEMO]
@
until “NO DEMO” is displayed.
Each time you press and hold the button:
NO DEMO (off)bDEMO (on)
Saving power in the standby
C
»
mode
Set the unit to reduce energy consumption in the standby mode
(11 W>0.5 W for the United Kingdom, Continental Europe, Russia,
Australia and N.Z. or 11 W>1.0 W for others).
While the unit is on:
1 Press [MODE].
The current mode is displayed.
2 Within 5 seconds
Press [MODE] to display “ECO”.
Each time you press the button:
NORMAL (off)bECO (on)
12
RQT5471
2
MODE
ECO: The clock is not displayed in the standby mode. The “ê” and
the “FPLAY/FREC” indicators still light.
Note
The mode can be switched to ECO when the unit is in standby but it
cannot be switched back to NORMAL.
Page 13
a DVD/Video CD/CD changer
A
(Back of product)
c
B
2
b (For example)
2
1
2
4
ALL
[A]Region numbers
Region numbers are allocated to DVD players and software according to where they are sold.
DVDs can be played on this unit if their region number is the same or
includes the same number, or if the DVD is marked “ALL”.
Confirm the region number for this unit before choosing discs. The
number for this unit is indicated on the rear panel of the DVD/Video
CD/CD changer.
c Discs that can be played by the unit shown in this example.
[B]Types of discs
This system can play discs bearing any of the marks shown.
This system does not have a DTS decoder so it cannot play audio
encoded with DTS.
This system cannot play the following discs:
³DVD with an unsuitable region number
³DVD-Audio ³DIVX Video Disc ³CD-RW
³DVD-ROM ³VSD ³SACD
³DVD-R ³CD-ROM ³SVCD
³DVD-RAM ³CDV ³CD-R
³DVDiRW ³CVD ³Photo CD, etc.
³DVD-RW ³CD-G
Before use
C
Type of disc for the type of connected TV
C
»
DVDs and Video CDs are recorded using either PAL or NTSC.
Refer to this table when selecting discs.
The picture will appear on the screen as shown here.
4
4
k
4
4
4
¤1
¤1¤2
TV Monitor
For others
4
¤4
4
k
k
4
¤3
4
TV type
Multi-
system TV
NTSC TV
PAL TV
¤1
You may not able to perform operations that require interaction
with the television (e.g., initial settings) because on-screen messages are not displayed correctly.
¤2
In “9 Other Settings”–“6 NTSC Disc Output”, select “1 PAL60” (á
page 46). If your television is not equipped to handle PAL 525/60
signals the picture will not be shown correctly.
¤3
The factory setting for NTSC disc output is “PAL60”, so no changes to the initial settings are necessary.
¤4
If you select “2 NTSC” in “9 Other Settings”–“ 6 NTSC Disc Output” (á page 46), the picture may be clearer.
Note
The bottom part of the picture may be cut off if the Video CD played
does not comply with standards.
Disc
PAL
NTSC
PAL
NTSC
PAL
NTSC
For Russia
Glossary
Track
This is the smallest division on Video CDs and CDs, and
usually equates to a single song.
Chapter
This is the smallest division on DVDs and is roughly equivalent to a track.
Title
This is the largest division on DVDs.
Playback control (PBC)
This method of controlling disc play is included on version 2.0
Video CDs. You are able to interact with the disc through
menus.
13
RQT5471
Page 14
Discs
Screens illustrated are examples.
1
DISC 1 DISC 2
2
Basic operations
3
OPEN/CLOSE
E
DISC
1
2
3
4
5
H/I
32
4
1
Normal play
[DVD] [V-CD] [CD]
Preparation:
³Press [ê/I] to turn the unit on.
³If you are going to play a DVD or Video CD, turn on the television
and switch the video input mode of the television to suit the type of
connection you have made (e.g., VIDEO 1).
1 Press [DIRECT OPEN] ([DISC 1]–
»
DIRECT OPEN
DISC 3 DISC 4 DISC 5
c Indicates a DVD is in the play position.
d Indicates a Video CD is in the play position.
a Label must face
upward.
b (On the tuner/amplifier)
f Chapter number
g Playing time
DVD
ÎDIGITAL
[DISC 5]) to open a tray and set a disc.
2 Press [< OPEN/CLOSE] to close the
tray.
The tray closed is in the play position (its disc indicator turns green).
Some discs start playing automatically.
Load other trays by repeating steps 1 and 2.
3 Press [DISC 1]–[DISC 5] to change
the play position tray and start play.
[A] If a menu screen appears on the television
Remote control only
Use [2, 1,3,4] to highlight a title/chapter/track and press
[ENTER].
You can also select the desired item by pressing the numbered buttons with some discs.
To select title No.10 or over, press [L] then the two digits.
e.g. Title No. 12: [L] >[1] >[2]
³The cursor buttons are not effective for selecting items for
Video CDs.
4 Adjust the volume.
4
A
MENU
VOLUME
UP
DOWN
H
123
456
7890
MENU
EQ
3D AI EQ/
M.EQ BAND
MARKER
U
PRO LOGIC
VCR(EXT)/
VDP(AUX)
CANCEL
PLAY MODE
MIX 2CH
AUDIO
SHIFT
∂ VOLUME µ
h Track number g Playing time
e Indicates a CD is in the play position.
SLEEP
TEST
CH SELECT
TAPE/
DECK 1/2
⁄/g¤»
MUTING
ENTER
SUBTITLE
TOP MENU
DIGITAL
S.WOOFER
DVD
SETUP
DISPLAY
DISC
j/-/--
RETURN
AV EFFECT
ANGLE
SUPER SRND
TUNER/
BAND
SLOW/SEARCH
SKIP
TOP MENU
j Numbered
buttons
RETURN
2, 1, 3, 4,
ENTER
SKIP
i (On the TV screen)
TITLE MENU
Dogs
Lovers
Birds
of the world
Castles
Birds
To stop the disc
Press [º]. (The resume function is activated. á page 15)
[A] Using menus
To return to a menu
during play
To show the next or
previous menu
DVD: [MENU] or [TOP MENU]
Video CD: [RETURN]
[SKIP 9] (next menu)
[: SKIP] (previous menu)
“/” on the TV screen means:
The operation is prohibited by the unit or the disc.
The following messages on the tuner/amplifier mean:
³“NO DISC”: There is no disc on the selected tray or the disc is
³“NO PLAY”: The disc does not correspond to the system and
³“96kHz 24bit”: The disc is one with high quality sound recorded
Note
The disc continues to rotate while the menu is displayed even after a
particular item has finished. When no more items are to be selected,
be sure to press [º] to clear the menu display.
set incorrectly.
cannot be played.
with a sampling frequency of 96 kHz and 24 bits.
14
RQT5471
Page 15
A
B
C
D
1 DISC/ALL
a
b
c
1 DISC/ALL
»
ALL DISC
Discs
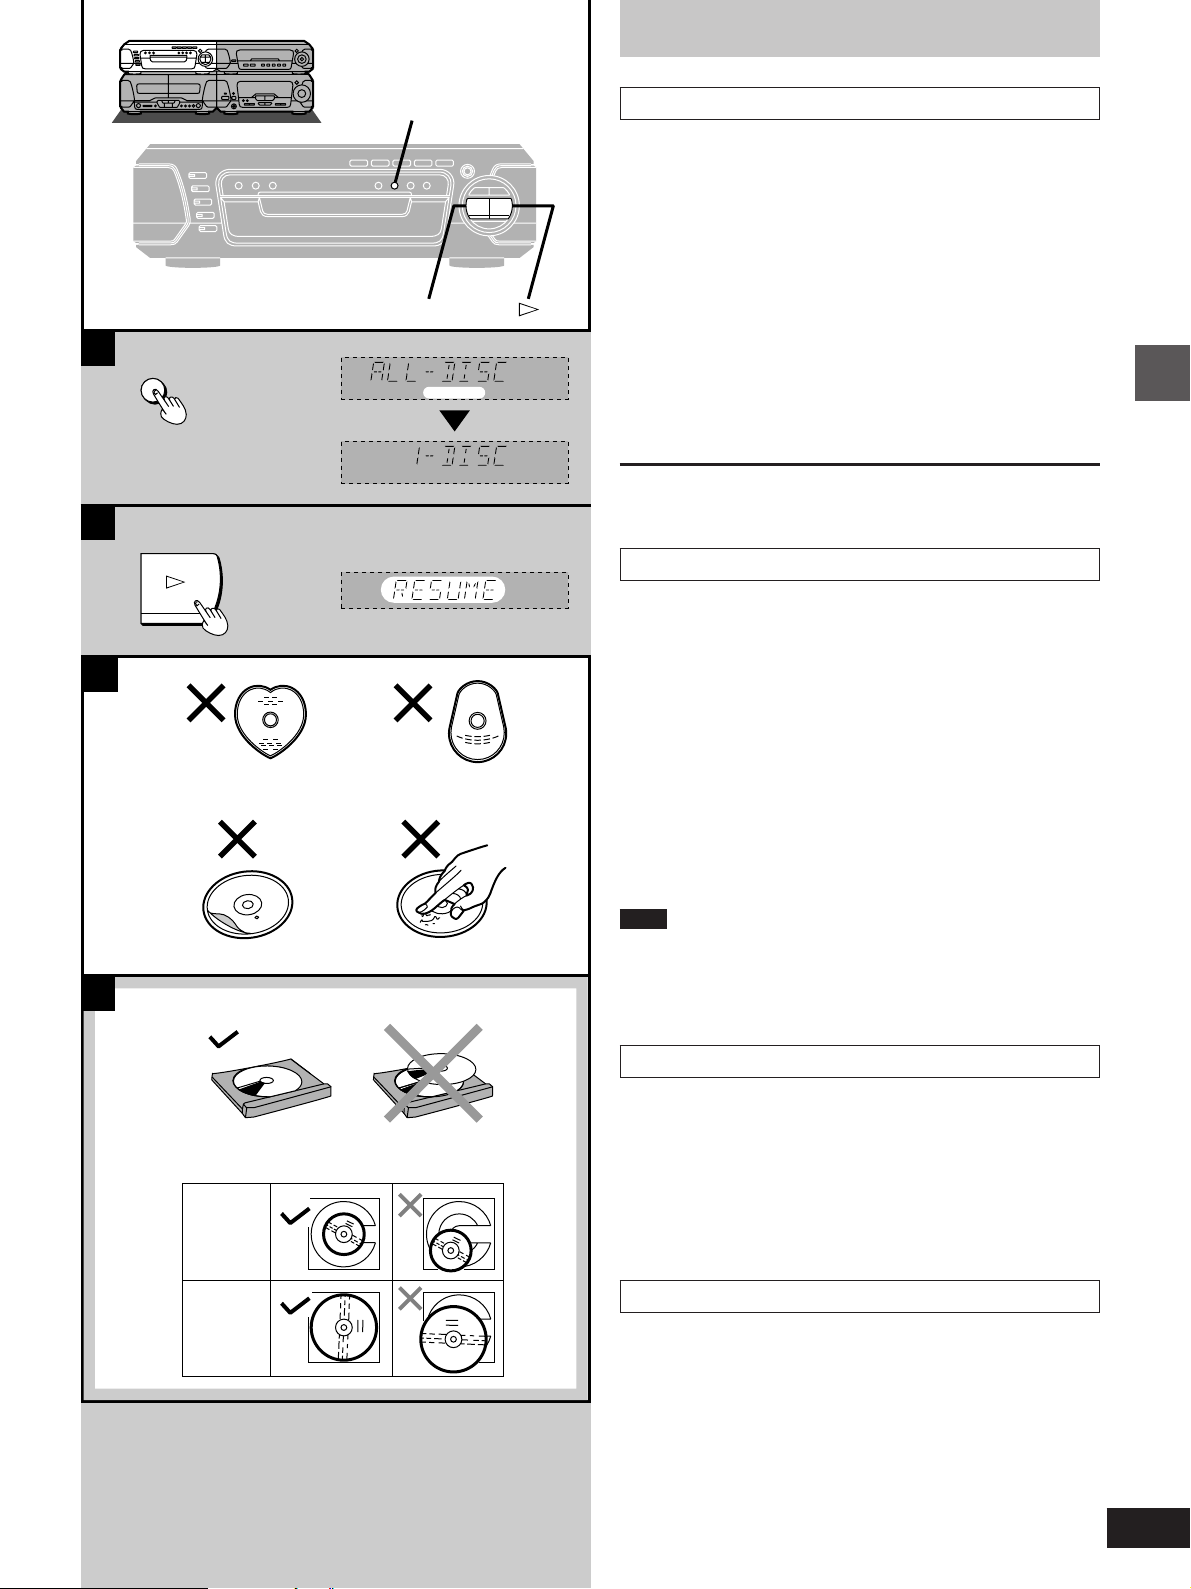
Selecting ALL-DISC/1-DISC
A
»
[V-CD] [CD]
You can play up to 5 discs in succession to the “final disc”. ALLDISC skips trays that are empty or contain DVDs. If the disc is a
Video CD with PBC, menu play is automatically canceled.
Preparation:
Ensure a Video CD or CD is in the play position tray.
(You cannot switch between ALL DISC and 1-DISC if the play position tray contains a DVD or is empty.)
Before play
Press [1 DISC/ALL] to select the desired
method while stopped.
Each time you press the button:
ALL-DISC: To play all discs in succession
1-DISC: To play 1 disc only
What is meant by “final disc”?
For example, if play starts from disc 4, disc 3 will be the “final disc”.
Order of progression: Disc 4 )5 )1 )2 )3
Resume function
B
»
[DVD] [V-CD] [CD]
If you press [º] during play, the unit remembers the
position.
This function does not work if the disc’s play time is not displayed on
the tuner/amplifier.
To restart play from the point (Only when “RESUME” is lit)
Press [!].
Play resumes from the point it was stopped.
With DVD
“Press PLAY to Chapter Review” appears on the TV screen for a few
seconds. If you press [!] while the message is on the screen, the
beginning portions of each chapter up to the current one are played.
Full play resumes from the point where you stopped play.
To cancel the resume function
Press [º] when “RESUME” is lit.
Note
³Resume is canceled if the disc tray is opened or if you change
discs.
³The position is saved even if the unit is turned off or a source other
than “DVD” is selected.
³Chapter review is not possible with some DVDs.
Basic operations
d
8 cm disc
12 cm disc
Disc selection
C
»
Do not;
³use irregularly shaped discs (a).
³attach extra labels and stickers.
³use discs with labels and stickers that are coming off or with adhe-
sive exuding from under labels and stickers (b).
³attach scratch-proof covers or any other kind of accessory.
³write anything on the disc.
³clean discs with liquids. (Wipe with a soft, dry cloth.)
³use discs printed with label printers available on the market.
To prevent damage
D
»
Always observe the following points.
³Load only 1 disc per tray (c).
³Load discs as shown in figure (d).
An adaptor is not needed with 8 cm discs (singles).
³Set the system on a flat, level surface.
³Always unload all discs before moving the system.
Do not;
³set the system on top of magazines, inclined surfaces, etc.
³move the system while a tray is opening/closing, or when loaded.
³put anything except discs in trays.
³use cleaning discs or discs which are badly warped or cracked.
15
RQT5471
Page 16
Discs
A
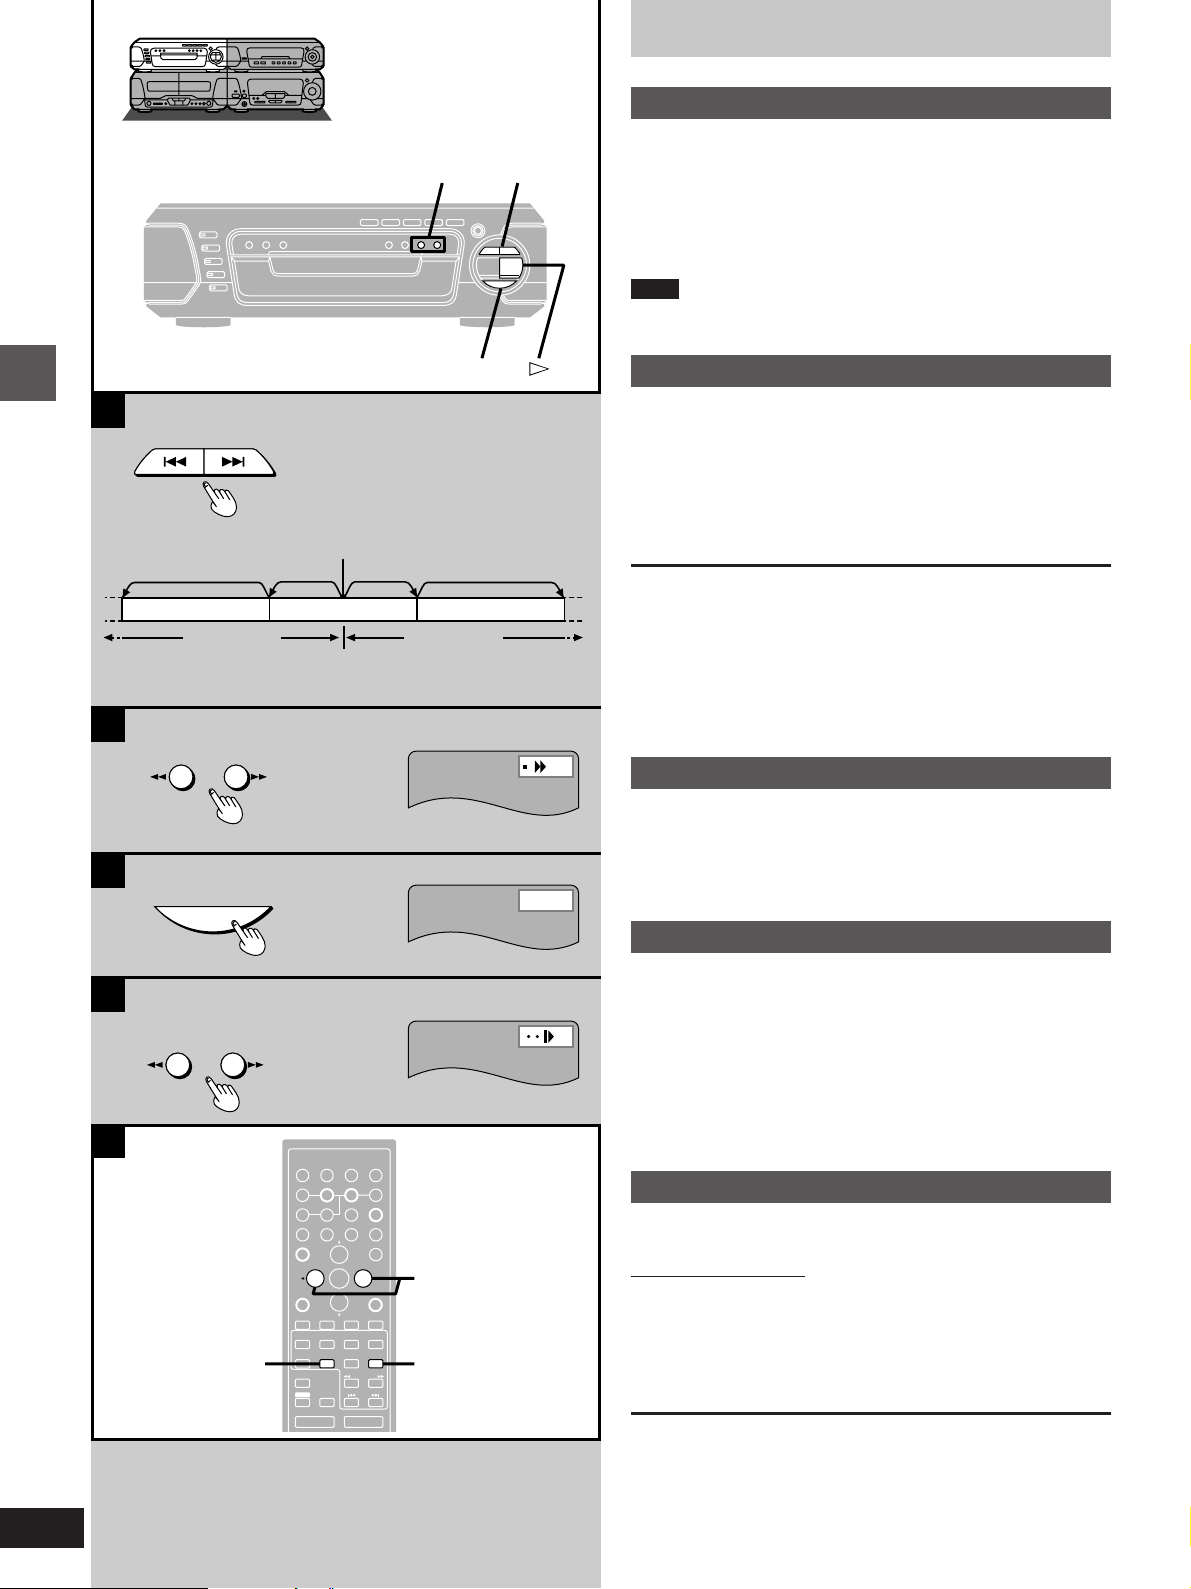
Skip function
»
A
SKIP
b Twice
Basic operations
d Chapter/track
B
SLOW/SEARCH
SLOW/SEARCH
6, 5
SKIP
:, 9
g
a Play position
c Once
d Chapter/track d Chapter/track
[ : ][ 9
e (On the TV screen)
b Twicec Once
]
[DVD] [V-CD] [CD]
You can skip chapters on DVDs and tracks on Video CDs and CDs.
Press [SKIP (: or 9)] during play.
:: Backward 9: Forward
Each press increases the number of skips.
Note
If pressed while playing a Video CD with PBC, you may return to a
menu screen.
B
Search function
»
[DVD] [V-CD] [CD]
Press [SLOW/SEARCH (6 or 5)]
during play.
6: Backward 5: Forward
³Each press increases the speed of the search. There are 5 speeds.
³Press [!] to resume play.
For your reference:
³Sound will be heard at speed one when searching forward during
DVD and Video CD play. You can turn this sound off
(á “9 Other Settings”–“2 Audio during Search”, page 46).
Audio is heard at any speed when playing CDs, regardless of any
settings at “2 Audio during Search”.
³If pressed while playing a Video CD with PBC, you may return to a
menu screen.
C
Still picture (Pause)
»
16
RQT5471
C
D
E
g
SLOW/SEARCH
SUBTITLE
SETUP
TOP MENU
H
SLEEP
DISPLAY
123
456
7890
MENU
EQ
3D AI EQ/
M.EQ BAND
MARKER
U
PRO LOGIC
VCR(EXT)/
VDP(AUX)
CANCEL
⁄/g¤
PLAY MODE
MIX 2CH
AUDIO
SHIFT
∂VOLUME µ
DISC
j/-/--
RETURN
ENTER
AV EFFECT
ANGLE
DIGITAL
TEST
CH SELECT
SUPER SRND
S.WOOFER
TAPE/
TUNER/
DVD
DECK 1/2
BAND
⁄/g¤»
SLOW/SEARCH
MUTING
SKIP
2, 1
Still
[DVD] [V-CD] [CD]
Press [;] during play.
³Press [!] to resume play.
D
Slow-motion play
»
[DVD] [V-CD]
While play is paused
Press [SLOW/SEARCH (6 or 5)].
6: Backward (DVD only)
5: Forward (DVD/Video CD)
³Each press increases the speed of the slow-motion. There are 5
speeds.
³Press [!] to resume play.
E
Frame-by-frame viewing
»
[DVD] [V-CD]
Remote control only
While play is paused
Press the cursor button [2] or [1].
2: Backward (DVD only)
1: Forward (DVD/Video CD)
³Press [1] to resume play.
³Each press changes the frame.
³The frames change in succession if you press and hold a cursor
button.
³The frame also advances each time you press [2/;] on the remote
control or [;] on the changer.
Page 17
a Numbered
2, 1, 3, 4
ENTER
A
SUBTITLE
buttons
ANGLE
AUDIO
SHIFT
c Soundtrack language
AUDIO
d Subtitle language
SHIFT
ANGLE
SUBTITLE
e Angle number
SUBTITLE
TOP MENU
H
SLEEP
1 2 3
4 5 6
7 8 9 0
MENU
EQ
ENTER
3D AI EQ/
M.EQ BAND
MARKER
TEST
U
PRO LOGIC
CH SELECT
VCR(EXT)/
VDP(AUX)
CANCEL
PLAY MODE
MIX 2CH
AUDIO
SHIFT
S.WOOFER
TAPE/
DECK 1/2
⁄/g ¤»
MUTING
∂ VOLUME µ
SETUP
DISPLAY
DISC
j/-/--
RETURN
AV EFFECT
ANGLE
DIGITAL
SUPER SRND
TUNER/
DVD
BAND
SLOW/SEARCH
SKIP
b (On the TV screen)
Î Digital
1
ENG
ON
1
ENG
I love you
1
1
1
2
3/2.1ch
Hello
Discs
[DVD]
Remote control only
Changing soundtrack, subtitle
A
»
languages and angles
Some DVDs have multiple soundtracks, subtitle languages and camera angles. You can change these during play.
“ANGLE” lights up on the tuner/amplifier during scenes recorded
with multiple angles.
Press the appropriate button(s) during
play.
[AUDIO]: To change the soundtrack
[SHIFT] i [SUBTITLE]: To change the subtitle language
[ANGLE]: To change the angle (only while “ANGLE”
Each time you press the button(s), the item changes.
³The item can also be changed with [3] or [4], or the numbered
buttons.
³See the bottom of page 23 for the language abbreviation key.
To turn the subtitles on/off
Press the cursor button [2] or [1] after pressing [SHIFT] i
[SUBTITLE].
To clear the display
Press [ENTER].
For your reference:
³Soundtrack and subtitle languages can be set before play with the
initial settings (á “1 Disc Languages”, page 46).
³While playing Karaoke DVDs, you can also change the karaoke
mode as follows by pressing [AUDIO].
Solo: --- (off) or ON
Duet: --- (off), 1i2, V1 or V2
Note
You can change the items only if they are available on the disc.
is lit)
Basic operations
B
1
2
C
TOP MENU
j Disc’s top
menu
f (On the tuner/amplifier)
DVD
ANGLE
Î
DIGITAL
MENU
TITLE MENU
Dogs
Lovers
ENTER
g Title 1 h Title 2 i Title 3
kMenu
kMenu kMenu
MENU
TOP MENU
Castles
Birds
B
Using menus to play
»
By calling up menus during play, you can start play from a specific
title or chapter.
Menu content depends on the disc. These operating instructions describe the basic steps.
1 Press [TOP MENU] or [MENU].
A menu screen is displayed.
Press again to return to what you were watching with some
discs.
2 Select an item with [2, 1, 3, 4] and
press [ENTER] to confirm the selection.
You can select items with the numbered buttons with some
discs.
Repeat if another menu is shown.
[C] DVDs can have several menus. The menu displayed by press-
ing [TOP MENU] may be different from the menu displayed by
pressing [MENU].
17
RQT5471
Page 18

CINEMA
Discs
Changing the picture quality for
A
»
movie viewing
Basic operations
CANCEL
SHIFT
A
CINEMA
2
1
SUBTITLE
TOP MENU
H
SLEEP
1 2 3
4 5 6
7 8 9 0
MENU
EQ
ENTER
3D AI EQ/
M.EQ BAND
MARKER
DIGITAL
TEST
U
PRO LOGIC
CH SELECT
VCR(EXT)/
VDP(AUX)
CANCEL
PLAY MODE
MIX 2CH
AUDIO
SHIFT
S.WOOFER
TAPE/
DECK 1/2
⁄/g ¤»
MUTING
∂ VOLUME µ
SETUP
DISPLAY
DISC
j/-/--
RETURN
AV EFFECT
ANGLE
SUPER SRND
TUNER/
DVD
BAND
SLOW/SEARCH
SKIP
a (On the TV screen)
[DVD] [V-CD]
You can enjoy better pictures by changing the picture quality.
Press [CINEMA].
The CINEMA display appears on the TV screen.
Each time you press the button:
C (CINEMA is on)bN (CINEMA is off)
To cancel
Press [CINEMA] to display “N”.
11
B
Marking a position
»
22
[DVD] [V-CD] [CD]
Remote control only
This feature allows you to mark up to 5 points on a disc so you can
return to them easily at a later time.
Marking a position
1 Press [MARKER] during play.
The marker display appears on the TV screen.
C
2 Press [ENTER] at the point you want
to mark.
B
1
2
11
22
MARKER
ENTER
ENTER
b (On the tuner/amplifier)
DVD
Î
DIGITAL
CINEMA
¢ ¢¢ ¢¢¢¢ ¢ ¢¢
c No marker
1
¢ ¢¢ ¢¢ ¢¢ ¢
d Marker 1
1 2 3 4
¢¢
To mark another position
While the marker display is on the screen, press the cursor button
[2] or [1] to select another “¢” and press [ENTER].
Recalling a marked position
1 While the marker display is on the screen
Press the cursor button [2] or [1] to
highlight the required marker.
2 Press [ENTER] to recall the position.
To clear a marker
While the marker display is on the screen
Press the cursor button [2] or [1] to highlight the marker you want to
clear and press [SHIFT] i [CANCEL].
To clear the marker display
Press [MARKER].
Note
³This feature cannot be used if the play time for the disc is not
displayed on the tuner/amplifier.
³Some subtitles may not appear around the marker (DVD).
³Markers clear in the following situations:
³The unit is turned off.
³The disc is changed or removed.
³A source other than “DVD” is selected.
18
RQT5471
Page 19

Discs
Repeat function
A
B
1
REPEAT
A-B REPEAT
A-B REPEAT
REPEAT
e (On the tuner/amplifier)
f
g
a (On the TV screen)
DVD only
b
c
d
OFF
C
T
@
A
!
[DVD] [V-CD] [CD]
Repeating chapters, titles and tracks
A
»
Press [REPEAT] during play.
Each time you press the button:
DVD
b ` C: Current chapter is repeated.
c ` T: Current title is repeated.
d ` OFF: Repeat mode is canceled.
Video CD, CD
f “`” is displayed: All tracks on the disc(s) are repeated.
g “`” is cleared: Repeat mode is canceled.
For your reference:
Use the 1 DISC/ALL function if you want to listen to all discs (Video
CD/CD) repeatedly (á page 15).
To cancel repeat play
Press [REPEAT] to clear “`” on the tuner/amplifier.
Note
Repeat play does not work if the play time for the disc is not displayed
on the tuner/amplifier.
To repeat only your favorite tracks (Video CD/CD only)
1 Program the tracks you want (á page 20).
2 Press [1] . Play will start.
3 Press [REPEAT] to display “`”.
Basic operations
2
A-B REPEAT
Repeating a specific section (A-B REPEAT)
B
»
1 Press [A-B REPEAT] during play at
the starting point (A).
@
AB
2 Press [A-B REPEAT] at the finishing
point (B).
To cancel A-B repeat play
Press [A-B REPEAT] to clear “`” on the tuner/amplifier.
Note
³This feature cannot be used if the play time for the DVD is not
displayed on the tuner/amplifier.
³The end of a track or title is automatically determined as point B
when the end of the title/track is reached.
³Subtitles may not appear arround A and B.
19
RQT5471
Page 20

CANCEL
SHIFT
1
PLAY MODE
Basic operations
DISC
2
2
1
SUBTITLE
TOP MENU
H
SLEEP
1 2 3
4 5 6
7 8 9 0
MENU
EQ
ENTER
3D AI EQ/
M.EQ BAND
MARKER
DIGITAL
TEST
U
PRO LOGIC
CH SELECT
VCR(EXT)/
VDP(AUX)
CANCEL
PLAY MODE
MIX 2CH
AUDIO
SHIFT
1 2 3
4 5
S.WOOFER
TAPE/
DECK 1/2
⁄/g ¤»
MUTING
∂ VOLUME µ
DVD
SLOW/SEARCH
SKIP
SETUP
DISPLAY
DISC
j/-/--
RETURN
AV EFFECT
ANGLE
SUPER SRND
TUNER/
BAND
DISC
2
3
DVD
4
»
: SKIP 9
PRGM
Discs
Program play
[V-CD] [CD]
Remote control only
You can select up to 24 tracks on any of the loaded Video CDs or
CDs to play in the order you choose.
Preparation:
³Press [DVD] to select “DVD” as the source.
³Ensure a Video CD or CD is in the play position tray. (Program play
is not possible if the play position tray contains a DVD or is empty.)
1 While stopped
Press [PLAY MODE] to select
“PRGM” on the tuner/amplifier.
Each time you press the button: PRGM#RANDOM#(off)
^__-----------------__}
2 Press [DISC] and (within 10 seconds)
[1] –[ 5] to select the disc.
3 Select the track with the numbered
buttons.
For tracks numbered 10 and over, press [L] then the two
digits.
Repeat steps 2 and 3 to program the tracks in the required order.
3
4
1 2 3
4 5 6
7 8 9 0
¤
j/-/--
a Programmed
disc no.
DISC PRGM
c Programmed
order
b Programmed
track no.
4 Press [1].
All the tracks are played in the selected order.
To exit program mode
Press [PLAY MODE] while in the stop mode to clear “PRGM” on the
tuner/amplifier.
Program contents will be saved in the memory.
You can do the following while the disc is stopped in
program mode
³Checking program contents
Each time you press [: SKIP] or [SKIP 9], the disc number,
track number and program position are displayed.
³Adding to the program
Repeat steps 2 and 3.
³Canceling a particular track
Select the track with [: SKIP] or [SKIP 9] then press [SHIFT]
i [CANCEL].
³Canceling all tracks
Hold [º] for 3 seconds.
If “FULL” is displayed
24 tracks have been programmed. No further tracks can be
programmed.
Note
³Discs and tracks the unit cannot find can be programmed but are
skipped during play. This is also the case if you program a DVD.
³You can program individual tracks even if the disc is a Video CD
with PBC.
³Skipping is done in the programmed order.
³You can search only within a track being played in program order.
³You cannot start play by pressing [DISC 1]– [ DISC 5] on the main
unit while in the program mode.
20
RQT5471
Page 21

A
1
PLAY MODE
1
SUBTITLE
TOP MENU
H
SLEEP
123
456
7890
MENU
EQ
3D AI EQ/
M.EQ BAND
MARKER
DIGITAL
TEST
U
PRO LOGIC
CH SELECT
VCR(EXT)/
VDP(AUX)
CANCEL
PLAY MODE
MIX 2CH
AUDIO
SHIFT
S.WOOFER
TAPE/
DVD
DECK 1/2
2/; 1∫
SLOW/SEARCH
MUTING
SKIP
s VOLUME r
SETUP
DISPLAY
DISC
j/-/--
RETURN
AV EFFECT
ANGLE
SUPER SRND
TUNER/
BAND
2
RANDOM
Discs
[V-CD] [CD]
Remote control only
Preparation:
Press [DVD] to select “DVD” as the source.
A
Random play
»
Plays all discs once each in random order.
Ensure a Video CD or CD is in the play position tray. (Random play is
not possible if the play position tray contains a DVD or is empty.)
1 While stopped
Press [PLAY MODE] to select “RANDOM” on the tuner/amplifier.
Each time you press the button: PRGM )RANDOM )(off)
^__-----------------__}
2 Press [1] .
All tracks on all discs are played in random order.
2
B
1
¤
DISC
H
123
1
123
45
456
7890
MENU
EQ
3D AI EQ/
M.EQ BAND
MARKER
U
PRO LOGIC
VCR(EXT)/
VDP(AUX)
CANCEL
PLAY MODE
MIX 2CH
AUDIO
SHIFT
s VOLUME r
SLEEP
ENTER
TEST
CH SELECT
TAPE/
DECK 1/2
2/;1∫
KARAOKE
MUTING
SUBTITLE
TOP MENU
DIGITAL
S.WOOFER
DVD
SLOW/SEARCH
SETUP
DISPLAY
DISC
j/-/--
RETURN
KARAOKE
AV EFFECT
ANGLE
SUPER SRND
TUNER/
BAND
SKIP
EFFECT
1
2
∫
To exit random mode
Press [PLAY MODE] while in the stop mode to clear “RANDOM” on
the tuner/amplifier.
Note
³If the disc is a Video CD with PBC, menu play is automatically can-
celed during random play.
³This function skips DVDs.
³You cannot skip tracks already played.
³You can search only within a track being played in random play.
³You cannot start play by pressing [DISC 1]– [DISC 5] on the main
unit while in the random mode.
B
Starting play from a specific track
»
1 Press [DISC] and (within 10 seconds)
[1]–[5] to select the disc.
Play starts from the first track.
³If a menu appears (Video CD with PBC), press [º] to cancel
menu play.
2 Select the track with the numbered
buttons.
For tracks numbered 10 or over, press [L] then the two digits.
Play starts from the selected track.
Basic operations
2
123
456
7890
j/-/--
21
RQT5471
Page 22

a Numbered
buttons
CANCEL
SHIFT
DISPLAY
1
1
b (On the TV screen)
c
Basic operations
d
e
s100
2
H
123
456
7890
MENU
EQ
3D AI EQ/
M.EQ BAND
MARKER
U
PRO LOGIC
VCR(EXT)/
VDP(AUX)
CANCEL
PLAY MODE
MIX 2CH
AUDIO
SHIFT
1 1:56:37 1
1
OFF
SLEEP
ENTER
TEST
CH SELECT
TAPE/
DECK 1/2
1/;1∫
MUTING
SUBTITLE
TOP MENU
DIGITAL
S.WOOFER
DVD
SLOW/SEARCH
SETUP
DISPLAY
DISC
j/-/--
RETURN
AV EFFECT
ANGLE
SUPER SRND
TUNER/
BAND
SKIP
ENG
¢¢¢¢¢
f
LPCM
48k 16
1
RETURN
2, 3
ENTER
b
1
N
F
3
ON
ENG
r100
Using GUI screens
[DVD]
GUI (Graphic User Interface) are icons which appear on the TV
screen to allow you to interact with the unit. GUI screens show information about the unit and discs. You can perform various operations
by changing the information shown in these screens.
Note
GUI screens will not be displayed if the play position tray contains a
Video CD or CD.
1 Press [DISPLAY].
The GUI screen appears.
Each time you press the button:
Disc GUI (c)>Unit GUI (d)>Shuttle GUI (e)
^---------- Original display (f)-----------}
Disc GUI (c):
You can change the title or chapter, or change the position by
specifying the time. You can also change soundtracks, subtitles and angles.
Unit GUI (d):
1
You can start repeat play, mark a position and recall it, or turn
on/off the cinema mode.
Shuttle GUI (e):
You can fast-forward, backward or start slow-motion play.
Original display (f):
GUI is not displayed.
2 Press the cursor button [2] or [1] to
select an item.
Settings can only be changed if “#” or “$” appears at the top
or bottom of the icon.
3 Press [3] or [4] to change the set-
ting.
Some items can also be changed with the numbered buttons.
Press [ENTER] to confirm the setting after entering it with the
numbered buttons.
3
A B C
D
E F
g
1
ENG
1
LPCM
48k 16b
h
kj
ON
ENG
G H
I
¢¢¢¢¢
K
-
100
m
11
J
lm
1:56:37
Vocal
1 ¢ V1 + V2
i
1
OFF
N
To clear the GUI screen
Press [DISPLAY] until the original display is restored or press
[RETURN].
For your reference:
³The contents of each screen depend on the kind of disc you are
playing.
³Some items require different operations to change the contents, so
refer to the GUI icon descriptions (á page 23) for details.
³The GUI screens disappear after performing some operations, such
as changing the title or chapter.
³If the GUI screen is partially cut off or fails to appear, change the
position with the initial settings, “4 On-Screen Messages”– “ 2 Colour and Position” (á page 46).
Note
Some discs will not allow some of these operations.
+
100
22
RQT5471
o
on
Page 23

Disc GUI descriptions
Unit GUI descriptions
Content
[A] Title number
[B] Chapter number
[C] Time (select a position to
start play by specifying a time)
[D] g Soundtrack language
(See below for language
abbreviations.)
[D] h Audio attribute
LPCM/ëDigital/DTS/MPEG:
Type of audio signal
48k/96k (LPCM):
Sampling frequency
(k=kHz)
16b/20b/24b (LPCM):
Number of bits
-- ch (ëDigital/DTS/MPEG):
Number of channels
(¤1 See below for details.)
Operation
(á page 22 for details)
[3], [4] or numbered buttons
Ð
[ENTER]
[3], [4] or numbered buttons
Ð
[ENTER]
Numbered buttons
Ð
[ENTER]
[3], [4] or numbered buttons
—
Content
[G] A-B repeat
(start and finish points for
A-B repeat)
[H] Repeat play
(select a repeat play
mode)
C (chapter), T (title), OFF
[I] Mark a position
[I] Recall a mark
[I] Erase a mark
[J] Cinema mode
C (on), N (off)
Shuttle GUI descriptions
K
»
Operation
[ENTER] (at the start point)
Ð
[ENTER] (at the finish point)
³To cancel A-B repeat: [ENTER]
[3] or [4]
[ENTER] (to highlight the first marker)
Ð
[ENTER] (at the desired point)
[2] or [1] (to select the mark)
Ð
[ENTER] (to recall the position)
[2] or [1] (to select the mark)
Ð
[SHIFT] i [CANCEL]
[3] or [4]
Basic operations
[D] i Switching vocals on
Karaoke discs
Solo : --- (off) or ON
Duet: --- (off), V1iV2, V1 or V2
[E] j Subtitle language
(See below for language
abbreviations.)
[E] k Subtitles on or off
[F] Angle number
Note
Actual information displayed depends on the disc.
[Karaoke\DVD\only]
[3] or [4]
[3], [4] or numbered buttons
[3] or [4]
[3], [4] or numbered buttons
Content
l Pause
m Slow-motion play
E: Backward
D: Forward
You can select 5 levels of
speed in either direction.
n Play
o Search
6: Backward
5: Forward
³You can select 5 levels of
speed in either direction.
³The numbers on either sides
of the shuttle screen indicate
the maximum speeds.
¤1
The number of channels recorded on the disc
Example:
3/2 .1ch
[3]
[3] (to pause)
Ð
[2] or [1]
[4]
[4]
Ð
[2] or [1]
Operation
Language abbreviations
ENG: English
FRA: French
DEU: German
ITA: Italian
ESP: Spanish
NLD: Dutch
SVE: Swedish
NOR: Norwegian
DAN: Danish
POR: Portuguese
RUS: Russian
JPN: Japanese
CHI: Chinese
KOR: Korean
MAL: Malay
VIE: Vietnamese
THA: Thai
¢: Others
.1: Subwoofer signal
(not displayed if there is no subwoofer signal)
0: No surround
1: Mono surround
2: Stereo surround (left/right)
1: Center
2: Front leftiFront right
3: Front leftiFront rightiCenter
23
RQT5471
Page 24

H/I
TUNER/BAND
1
2
Basic operations
TUNER/BAND
TUNING MODE
FM AUTO/
MONO
DISP MODE
1 42 3
RDS
The radio: manual tuning
Radio stations can be tuned manually by selecting the station’s frequency or they can be preset into channels to make it easy to tune
with the tuner/amplifier or the remote control (á page 25).
Preparation: Press [ê/I] to turn the unit on.
1 Press [TUNER/BAND] to select “FM”
or “AM”.
Each time you press the button: FMbAM
2 Press [TUNING MODE] to select
“MANUAL”.
Each time you press the button: MANUALbPRESET
3 Press [TUNING (X or W)] to tune in the
desired broadcast.
“TUNED” is displayed when a radio station is tuned.
PTYPS
“ST” is displayed when a stereo FM broadcast is being received.
4 Adjust the volume.
MHz
Auto tuning
Press and hold [TUNING (X or W)] for a moment until the frequency
starts changing rapidly. The unit begins auto tuning, stopping when it
finds a station.
³Auto tuning may not function when there is excessive interference,.
³To cancel auto tuning, press [TUNING (X or W)] once again.
24
RQT5471
?
TUNING
@
TUNED
3
VOLUME
4
A
B
UP
DOWN
FM AUTO/
MONO
RDS
DISP MODE
PS PTY
a PTY displays
NEWS VARIED FINANCE COUNTRY
AFFAIRS POP M CHILDREN NATIONAL
INFO ROCK M SOCIAL A OLDIES
SPORT M.O.R M
EDUCATE LIGHT M PHONE IN DOCUMENT
DRAMA CLASSICS TRAVEL TEST
CULTURE OTHER M LEISURE ALARM
SCIENCE WEATHER JAZZ
TUNED
TUNED
¤
RELIGION FOLK M
RDS PS
RDS PTY
ST
MHz
MONO
MHz
If noise is excessive in FM
A
»
Press [FM AUTO/MONO] to display “MONO.”
This mode improves sound quality if reception is weak, but broadcasts will be heard in monaural.
Press [FM AUTO/MONO] again to cancel the mode. “MONO” goes
out. MONO is also canceled if the frequency is changed.
Turn off “MONO” for normal listening. Stereo and monaural broadcasts are automatically played as they are received.
Stations can be preset in monaural manually (á page 25).
RDS broadcasting
B
»
(Only for the United Kingdom and Continental Europe)
This unit can display the text data transmitted by the radio data system (RDS) available in some areas.
If the station you are listening to is transmitting RDS signals, “RDS”
will light up on the display.
Displaying the name of a broadcasting station
Press [PS-DISP MODE] to display the station name.
Press [DISP MODE-PTY] to display the program type.
Each time you press the button:
ST
Frequency displaybPS or PTY display
If the PS display isn’t shown
Press and hold [PS-DISP MODE] for about 4 seconds.
The mode switches every time the button is pressed and held:
MODE 1bMODE 2
Note
RDS displays may not be available if reception is poor.
¤
“M.O.R M”l“Middle of the road music”
AM allocation settings:
(Except for the United Kingdom, Continental Europe,
Russia, Australia and N.Z.)
By adjusting the AM allocation, you can enable the tuner to
receive AM broadcasts allocated in 10 kHz steps.
Press and hold [TUNER/BAND].
After a few seconds the display will change to a flashing display of the current minimum AM frequency. If you continue to
hold [TUNER/BAND] down, the minimum frequency will
change. Release the button at this time.
To return to the original frequency indication, repeat above.
Note
After changing the allocation setting, the frequencies you previously preset in the memory will be cleared.
Page 25

TUNING MODE
A
B
SET
SET
32,4
SET
The radio: preset tuning
You can choose either automatic presetting, which presets all the
stations the tuner/amplifier can receive, or manual presetting, which
allows you to select the stations to preset and the order they are to be
preset in.
There are 39 channels available for presetting.
A
Automatic presetting
»
Do the following once each for FM and AM.
Preparation: Tune to the frequency where presetting is to begin
(á page 24).
Hold down [SET].
Release the button when “AUTO MEMORY” appears.
The tuner presets all the stations it can receive into the channels in
ascending order. FM stations are preset into channels 1 to 39, and
AM stations are preset into channels 21 to 39.
MHz
“SET OK” is shown when presetting is complete and the last station
that was preset is played.
“ERROR” is displayed if the tuner doesn’t receive any stations. Try
presetting manually if this happens (see below).
Note
AM stations replace any FM channels that were preset in channels
21 to 39.
Basic operations
2
3
4
C
1
?
SET
TUNER/
BAND
TUNING
U
@
SUBTITLE
TOP MENU
H
SLEEP
DISPLAY
123
456
7890
MENU
EQ
3D AI EQ/
M.EQ BAND
MARKER
PRO LOGIC
VCR(EXT)/
VDP(AUX)
CANCEL
PLAY MODE
MIX 2CH
AUDIO
SHIFT
∂VOLUME µ
ENTER
DIGITAL
TEST
CH SELECT
S.WOOFER
TAPE/
DVD
DECK 1/2
⁄/g¤»
SLOW/SEARCH
MUTING
SKIP
j/-/--
RETURN
AV EFFECT
ANGLE
SUPER SRND
TUNER/
B
Manual presetting
»
Preset the stations one at a time.
1 Tune to the required station.
2 Press [SET].
3 Press [TUNING (X or W)] to select a
channel.
4 Press [SET].
SETUP
DISC
2
BAND
1
The station occupying a channel is erased if another station is preset
in that channel.
C
Selecting channels
»
On the remote control
1 Press [TUNER/BAND].
2 Press the numbered buttons to select
the channel.
3
For channels 1 to 9 press the corresponding number.
For channels 10 or over press [L], then the two digits.
e.g. To select channel 21: [L]>[2]>[1]
3 Adjust the volume.
123
456
2
7890
∂ VOLUME µ
3
j/-/--
a Preset channel
On the main unit
1 Select “PRESET” with [TUNING MODE].
2 Press [TUNING (X or W)] to select the channel.
25
RQT5471
Page 26

DECK 1/2
Cassette tapes
Preparation: Press [ê/I] to turn the unit on.
1 Press [< OPEN] on deck 1 or deck 2
324 11
and insert the cassette.
2 Press [DOLBY NR] to select Dolby NR
(“ëNR” appears) or off.
on
(á “Dolby noise reduction”, page 27)
3 Press [REV MODE] to select the re-
verse mode.
Each time you press the button:
@
5H/I
h: One side is played.
d: Both sides are played.
f: Both sides are played 8 times each.
4 Press ["] (reverse side) or [!] (forward side).
Play begins and the indicator changes to green.
5 Adjust the volume.
Basic operations
E
1
2
3
OPEN
DOLBY NR
REV MODE
4
To stop the tape
Press [º].
[A] To change the deck to be used
a Forward side
b Tape facing down
1
Î
NR
ÎNR1
c Tape direction
Press [DECK 1/2] to select the deck you want to play.
To listen to 2 tapes consecutively
Insert a tape into each deck and select “f”. Both tapes will be
played 8 times each.
Cassette tape selection and care
The unit can correctly play the following types. It identifies the type
automatically.
Normal position/TYPE I 4
High position/TYPE II 4
Metal position/TYPE IV 4
³Tapes exceeding 100 minutes are thin and can break or get caught
in the mechanism.
³Tape slack can get caught up in the mechanism and should be
wound up before the tape is played.
³Endless tapes can get caught up in the deck’s moving parts if used
incorrectly. Use tapes appropriate to this unit’s auto-reverse mechanism.
26
RQT5471
5
A
VOLUME
UP
DOWN
DECK 1/2
ÎNR
2
d Deck in use
Page 27

Cassette tapes
Fast-forwarding and rewinding
A
»
A
B
DECK 1/2
GF
GF
F, G
Press [6] or [5] while the tape is
stopped.
Tape direction rewind fast-forward
!65
"56
For your reference:
³Each deck’s play direction is stored in the system’s memory.
³You can fast-forward or rewind the tape while you are playing or
recording a tape in the other deck. Press [DECK 1/2] to switch to the
non-playing deck, and then press [6] or [5]. After the above
operation, be sure to press [DECK 1/2] to select the other deck in
which you are playing a tape.
Tape program sensor (TPS)
B
»
TPS finds the beginning of a track and resumes play from there.
Press [6] or [5] during play.
Tape direction backward forward
!65
"56
Note
TPS may not operate correctly in the following situations:
If the interval between tracks is less than 4 seconds.
If there is noise between tracks.
If there are silent sections within tracks.
Basic operations
Dolby noise reduction
Dolby NR reduces “hissing” when playing tapes. It increases the high
frequency region when recording and then reduces it during play.
Use the same system during play and recording. This unit has Dolby
B NR which reduces noise to a third.
Prerecorded cassettes and equipment marked “ë” use Dolby B NR.
Dolby noise reduction manufactured under license from Dolby
Laboratories.
“Dolby” and the double-D symbol are trademarks of Dolby
Laboratories.
27
RQT5471
Page 28

FLAT
HEAVY
CLEAR
AI-EQ
M.EQ
HALL
Changing sound field and quality
Changes to sound field and quality have no effect on recordings.
A
MULTI JOG
a (On the tuner/amplifier)
b (On the sound processor)
B
1
2
Changing sound field and quality
3
1 1
MULTI JOG
3D AI EQ/
M.EQ BAND
2
MULTI JOG
2
1
2
c
b (On the sound processor)
FLAT
HEAVY
CLEAR
a (On the tuner/amplifier)
b (On the sound processor)
FLAT
HEAVY
CLEAR
LOW
FLAT
HEAVY
CLEAR
FLAT
HEAVY
CLEAR
MID
MULTI JOG
1, 32
HIGH
HALL
AI-EQ
M.EQ
HALL
AI-EQ
M.EQ
HALL
AI-EQ
M.EQ
[A]
Turn [MULTI JOG] to select a setting.
Each time you turn [MULTI JOG]:
HEAVY: Adds power to rock.
CLEAR: Clarifies higher sounds.
HALL: Expands sound.
AI-EQ: Adjust sound with the acoustic image equalizer
(á page 29).
M.EQ: Create your own effects (á see below).
FLAT: Canceled (no effect is added).
On the remote control
Press [SHIFT] i [EQ].
Note
Turn off the effect if sound quality is reduced when using HALL or 3D
AI EQ with a source.
B
Using the manual equalizer
»
Create your own sound quality effects.
1 Turn [MULTI JOG] to select “M.EQ”.
2 Press [3D AI EQ/M.EQ BAND] to se-
HALL
AI-EQ
M.EQ
lect the band.
Each time you press the button:
LOW>MID>HIGH
^------------------------}
3 Use [", !, #, $] to make the desired
curve.
1 Select the frequency you want to use as the peak with [",
!].
2 Adjust the level of the peak with [#, $].
³Adjacent frequencies are adjusted at the same time to
maintain a smooth curve.
³When you have adjusted the curve, you can move the
peak of the curve by pressing [", !] (c).
Repeat steps 2 and 3 to adjust the three bands.
The original display is restored on the display panel in about
5 seconds.
To cancel
Turn [MULTI JOG] to select “FLAT”.
Note
³The changes you make are stored and automatically recalled the
next time you select “M.EQ”.
³After making a curve in one band, any adjustments in another band
make a curve that is a combination of the two.
[C] To flatten the curves in all three bands
Set the frequencies d in LOW, e in MID, and f in HIGH to flat.
28
RQT5471
C
FLAT
HEAVY
CLEAR
d e f
HALL
AI-EQ
M.EQ
Page 29

A
1
2
MULTI JOG
3D AI EQ/
M.EQ BAND
1, 32
a (On the tuner/amplifier)
b (On the sound processor)
FLAT
HEAVY
CLEAR
Changing sound field and quality
Using the acoustic image equalizer
A
»
(3D AI EQ)
Achieve subtle sound quality settings with the soft, sharp, heavy, and
light coordinates.
Select one of the two 3D settings for a surround effect.
1 Turn [MULTI JOG] to select “AI-EQ”.
2 Press [3D AI EQ/M.EQ BAND] to se-
lect the surround level.
Each time you press the button:
AI EQ>3D AI 1>3D AI 2
^__-----------------__}
3 Change the sound quality with [", !,
#, $].
1 Adjust softness and sharpness with [", !].
2 Adjust heaviness and lightness with [#, $].
The original display is restored on the display panel in about
5 seconds.
HALL
AI-EQ
M.EQ
To cancel
Turn [MULTI JOG] to select “FLAT”.
3
1
B
2
MULTI JOG
2
DIGITAL
S.WOOFER
1
1
FLAT
HEAVY
CLEAR
2
FLAT
HEAVY
CLEAR
DIGITAL
S.WOOFER
a (On the tuner/amplifier)
Note
³The changes you make are stored and automatically recalled the
HALL
AI-EQ
M.EQ
HALL
AI-EQ
M.EQ
next time you select “AI-EQ”.
³“3D AI 1” and “3D AI 2” cannot be selected while the surround sys-
tem or Karaoke mode is on (á page 30 or 40).
B
Boosting the super woofer
»
Changing sound field and quality
Press [DIGITAL S.WOOFER].
The indicator lights.
Each time you press the button:
MID (middle)>MAX (maximum)>cancel
^_______---------------__}
There is only one level when listening through headphones.
To cancel
Press [DIGITAL S.WOOFER] to turn the indicator off.
For your reference:
(Except for the United Kingdom, Continental Europe, Australia
and N.Z.)
The level of the subwoofer (included) is also boosted with the super
woofer.
29
RQT5471
Page 30

Enjoying surround sound
The following chart gives a summary of this unit’s surround features. It also shows additional features that can be used to enhance your listening
enjoyment.
Note
³None of the features are effective when headphones are used or when radio is selected as the source.
³You may experience a reduction in sound quality when these surround systems and effects are used with some sources. If this occurs, either turn
the surround system or effect off or reduce the level of the effect.
Surround system Features Software
DOLBY DIGITAL
(á page 32)
DOLBY PRO LOGIC
(á page 33)
Changing sound field and quality
SUPER
MOVIE
SURROUND
(á page 34)
MUSIC
³Dolby Digital is a discrete 5.1 (6) channel
surround system developed for cinema
use. The sound signals in Dolby Digital
format are compressed to 1/10 their
original size, allowing an entire movie to
be recorded on a single DVD.
³This unit automatically recognizes DVDs
that have been recorded with Dolby
Digital.
³Not all Dolby Digital sources are
recorded with 5.1 (6) channels.
Some sources marked Dolby Digital may
be recorded in Dolby Surround, a 2
channel system.
³Dolby Pro Logic is a decoding system
that was developed to get a better sense
of presence from sources encoded with
Dolby Surround. Positioning has been
improved by the addition of a separate
center speaker channel.
³This unit has built-in Dolby Pro Logic
circuitry.
³This mode adds surround effects to
movie software that hasn’t been
recorded with the above systems.
³In MOVIE mode you can adjust the
volume of the surround speakers to get
the best surround effect.
This mode adds surround effects to stereo
sources.
DVDs encoded with Dolby Digital can be
identified with this mark.
Software encoded with Dolby Surround
can be identified with this mark.
³DVD
³Video CD
³CD
³Laser Disc
³Video tape
Any stereo sound source except for radio.
³DVD
³Video CD
³CD
³Cassette tape
³Laser Disc
³Video tape
30
RQT5471
SIMULATED STEREO
(á page 34)
This mode adds stereo-like effects to
monaural sources.
Amplifier modes
When using the above surround systems (except for SIMULATED STEREO), the
amplifier is automatically switched to the surround mode.
In all other cases, the TRI-AMP mode (stereo) is engaged. In this mode, three
separate amplifiers are used to drive the three sections (LOW, MID, and HIGH) of
the two front speakers.
Any monaural sound source except for
radio.
³DVD
³Video CD
³CD
³Cassette tape
³Laser Disc
³Video tape
(On the tuner/amplifier)
Surround mode
TRI-AMP mode (stereo)
Page 31

Additional effects
A Seat position
B Center focus
C Virtual rear surround
D Multi rear surround
E 3D enhanced surround
See pages 34 and 35 for operation.
A Seat position
Maintains the sound position even if the
listening position is changed.
A Seat position
B Center focus
C Virtual rear surround
D Multi rear surround
E 3D enhanced surround
A Seat position
C Virtual rear surround
D Multi rear surround
E 3D enhanced surround
When you select a surround effect, the corresponding indicator of the effects you can
use lights.
B Center focus
³The sound from the center speaker
appears to come from within the
television.
You can select one of two levels.
³The center speaker should be placed on
top of the television.
D Multi rear surround
Feels like there are multiple surround
speakers in your room, increasing a
cinema-like atmosphere.
C Virtual rear surround
If you have to place your surround speakers near the front speakers, the sound from
the surround speakers appears to come
from behind you.
Changing sound field and quality
Virtual rear speakers
E 3D enhanced surround
Adds width to the sound from the surround
and front speakers.
Manufactured under license from Dolby
Laboratories. “Dolby”, “Pro Logic” and the
double-D symbol are trademarks of Dolby
Laboratories. Confidential unpublished
works. C 1992– 1997 Dolby Laboratories.
All rights reserved.
Virtual rear speakers
31
RQT5471
Page 32

ENTER
RETURN
KARAOKE
EFFECT
3D AI EQ/
M.EQ BAND
AV EFFECT
H
ANGLE
SLEEP
MARKER
TOP MENU
SUBTITLE
123
456
7890
j/-/--
DISC
PLAY MODE
CANCEL
AUDIO
KARAOKE
U
PRO LOGIC
CH SELECT
TEST
DIGITAL
S.WOOFER
SUPER SRND
⁄/g¤»
∂ VOLUME µ
VCR(EXT)/
VDP(AUX)
TAPE/
DECK 1/2
TUNER/
BAND
DVD
SLOW/SEARCH
MUTING
SKIP
SHIFT
SETUP
DISPLAY
MIX 2CH
ENTER
RETURN
KARAOKE
EFFECT
3D AI EQ/
M.EQ BAND
AV EFFECT
H
ANGLE
SLEEP
MARKER
TOP MENU
SUBTITLE
123
456
7890
j/-/--
DISC
PLAY MODE
CANCEL
AUDIO
KARAOKE
U
PRO LOGIC
CH SELECT
TEST
DIGITAL
S.WOOFER
SUPER SRND
⁄/g¤»
∂ VOLUME µ
VCR(EXT)/
VDP(AUX)
TAPE/
DECK 1/2
TUNER/
BAND
DVD
SLOW/SEARCH
MUTING
SKIP
SHIFT
MENU
EQ
SETUP
DISPLAY
MIX 2CH
A
DVD
Î DIGITAL
B
MIX 2CH
SHIFT
SHIFT
MIX 2CH
MIX2CH
C
3
1
2
Changing sound field and quality
1
SHIFT
2
s VOLUME r
MENU
EQ
TEST
Enjoying surround sound
DOLBY DIGITAL
Play a DVD encoded with Dolby Digital.
[A] “ëDIGITAL” appears on the tuner/amplifier.
[B] To down-mix Dolby Digital (5.1ch) signals to 2 chan-
nels
Press [SHIFT] i [MIX 2CH].
To cancel
Press [SHIFT] i [MIX 2CH] again.
Speaker level adjustments
C
»
Remote control only
DVD
Î
DIGITAL
2
1
If the level of the speakers appears to be different while listening to a
source, adjust the levels of the speakers to the same apparent level.
1 Press [SHIFT] i [TEST] to output a test signal.
A test signal is output from the speakers in the following order.
Lch: Front left speaker
Cch: Center speaker
Rch: Front right speaker
RSch: Right surround speaker
LSch: Left surround speaker
(No signal is output for the subwoofer.)
2 Press [VOLUME (` or _)] to set the volume level of the front
speakers normally used for enjoying the source.
3 While the speaker to be adjusted is outputting a signal
Press [3] (to increase the level) or [4] (to decrease the level).
The level of the speaker changes.
Repeat step 3 as desired.
To stop the test signal
Press [SHIFT] + [TEST] again.
To adjust the levels during play
1 Press [CH SELECT] to select the speaker.
Each time you press the button:
Lch>Cch>Rch>RSch>LSch>SWch
^---------------------------------------------------------------}
SWch: Subwoofer (Adjust only when connected)
2 Press [3] or [4] to adjust the level.
Repeat steps 1 and 2 as desired.
32
RQT5471
3
Page 33

Enjoying surround sound
DOLBY PRO LOGIC
1
A
1
U
SHIFT
PRO LOGIC
OFF/ON
3
1
2
1
SUBTITLE
TOP MENU
H
SLEEP
123
456
7890
MENU
EQ
ENTER
3D AI EQ/
M.EQ BAND
MARKER
DIGITAL
TEST
U
PRO LOGIC
CH SELECT
VCR(EXT)/
VDP(AUX)
CANCEL
PLAY MODE
MIX 2CH
AUDIO
SHIFT
TEST
S.WOOFER
TAPE/
DVD
DECK 1/2
⁄/g¤»
SLOW/SEARCH
MUTING
SKIP
∂VOLUME µ
SETUP
DISPLAY
DISC
j/-/--
RETURN
AV EFFECT
ANGLE
SUPER SRND
TUNER/
BAND
2
1
1 Press [ëPRO LOGIC, OFF/ON].
The indicator turns green.
2 Play a Dolby Surround source.
To cancel
Press [ëPRO LOGIC, OFF/ON] so the indicator goes out.
Note
Turn Dolby Pro Logic off when playing a DVD recorded with 5.1channel Dolby Digital. The surround effects will not be reproduced
correctly if this is left on.
Speaker level adjustments
A
»
Remote control only
If the level of the speakers appears to be different while listening to a
source, adjust the levels of the speakers to the same apparent level.
1 Press [SHIFT] i [TEST] to output a test signal.
A test signal is output from the speakers in the following order.
Lch: Front left speaker
Cch: Center speaker
Rch: Front right speaker
Sch: Surround speakers
2 Press [VOLUME (j or i)] to set the volume level of the front
speakers normally used for enjoying the source.
3 While the speaker to be adjusted is outputting a signal
Press [3] (to increase the level) or [4] (to decrease the level).
The level of the speaker changes.
Repeat step 3 as desired.
To stop the test signal
Press [SHIFT] i [TEST] again.
To adjust the levels during play
1 Press [CH SELECT] to select the speaker.
Each time you press the button:
Lch>Cch>Rch>Sch
^-----------------------------------}
2 Press [3] or [4] to adjust the level.
Repeat steps 1 and 2 as desired.
Changing sound field and quality
∂ VOLUME µ
2
3
33
RQT5471
Page 34

A
B
C
SUPER
SURROUND
SUPER
SURROUND
SUPER
SURROUND
H
123
456
7890
MENU
EQ
3D AI EQ/
M.EQ BAND
MARKER
U
PRO LOGIC
VCR(EXT)/
VDP(AUX)
CH SELECT
DECK 1/2
1
1
a (On the tuner/amplifier)
SUBTITLE
SETUP
TOP MENU
SLEEP
DISPLAY
DISC
j/-/--
RETURN
AV EFFECT
ANGLE
SUPER SRND
TUNER/
BAND
2
ENTER
DIGITAL
TEST
S.WOOFER
TAPE/
DVD
2
Enjoying surround sound
Note
Turn SUPER SURROUND or SIMULATED STEREO off when playing a DVD recorded with 5.1-channel Dolby Digital. The surround effects will not be reproduced correctly if this is left on.
A
SUPER SURROUND
»
Press [SUPER SURROUND] and select
“MOVIE” or “MUSIC”.
The indicator turns green.
Each time you press the button:
MUSIC>MOVIE>SIMULATED STEREO
^----------STEREO SOUND
¤
Original display when playing DVDs
¤
(off)(---------}
To cancel
Press [SUPER SURROUND] to select “STEREO SOUND”. The indicator goes out.
[B] Surround speaker level adjustments
While playing a source
1 Press [CH SELECT].
2 Press [3] (to increase the level) or [4] (to decrease the level).
C
SIMULATED STEREO
»
Press [SUPER SURROUND] and select
“SIMULATED STEREO”.
The indicator turns green.
Each time you press the button:
MUSIC>MOVIE>SIMULATED STEREO
^----------STEREO SOUND
¤
Original display when playing DVDs
To cancel
Press [SUPER SURROUND] to select “STEREO SOUND”. The indicator goes out.
¤
(off)(---------}
Changing sound field and quality
D
SEAT
POSITION
1
2
MULTI JOG
E
H
123
456
7890
MENU
1
3D AI EQ/
M.EQ BAND
MARKER
U
PRO LOGIC
VCR(EXT)/
VDP(AUX)
CANCEL
PLAY MODE
MIX 2CH
AUDIO
SHIFT
EQ
2, 3, 4
34
RQT5471
b (On the sound processor)
FLAT
HEAVY
CLEAR
SUBTITLE
SETUP
TOP MENU
SLEEP
DISPLAY
DISC
j/-/--
RETURN
ENTER
AV EFFECT
ANGLE
SUPER SRND
TUNER/
SKIP
1
BAND
TEST
CH SELECT
TAPE/
DECK 1/2
⁄/g¤»
MUTING
DIGITAL
S.WOOFER
DVD
SLOW/SEARCH
Surround effects
This effect is available when the indicator is lit.
D
SEAT POSITION
»
1 Press [SEAT POSITION].
The indicator flashes green.
2 While the indicator is flashing (10 seconds)
Adjust the seat position with [MULTI
JOG].
HALL
AI-EQ
M.EQ
To cancel
1 Press [SEAT POSITION] so the indicator flashes.
2 Press [SEAT POSITION] again while the indicator is flashing so it
turns orange.
[E] On the remote control
1 Press [SHIFT] i [AV EFFECT].
2 Press the cursor button [2] or [1] so the “SEAT POSITION” indi-
cator flashes.
3 Press [3] (ON).
4 Adjust the seat position with [2, 1, 3, 4] .
To turn it off, after steps 1 and 2 press [4] so the indicator turns orange.
With virtual rear surround or
3D enhanced surround:
3 horizontal steps (c)
Page 35

A
CENTER
FOCUS
B
VIRTUAL REAR
SURROUND
C
MULTI REAR
SURROUND
CENTER
FOCUS
MULTI REAR
SURROUND
VIRTUAL REAR
SURROUND
SUBTITLE
SETUP
TOP MENU
H
SLEEP
DISPLAY
ENTER
DIGITAL
TEST
CH SELECT
S.WOOFER
TAPE/
DVD
DECK 1/2
⁄/g¤»
SLOW/SEARCH
MUTING
SKIP
DISC
j/-/--
RETURN
AV EFFECT
ANGLE
SUPER SRND
TUNER/
BAND
123
456
7890
MENU
2, 3
1
EQ
3D AI EQ/
M.EQ BAND
MARKER
U
PRO LOGIC
VCR(EXT)/
VDP(AUX)
CANCEL
PLAY MODE
MIX 2CH
AUDIO
SHIFT
∂VOLUME µ
a (On the tuner/amplifier)
b (On the sound processor)
FLAT
HEAVY
CLEAR
a (On the tuner/amplifier)
b (On the sound processor)
FLAT
HEAVY
CLEAR
a (On the tuner/amplifier)
b (On the sound processor)
FLAT
HEAVY
CLEAR
3D ENHANCED
SURROUND
1
HALL
AI-EQ
M.EQ
HALL
AI-EQ
M.EQ
HALL
AI-EQ
M.EQ
Surround effects
These effects are available when the corresponding indicators are lit.
A
CENTER FOCUS
»
Press [CENTER FOCUS].
The indicator turns green.
Each time you press the button:
CENTER FOCUS 1>CENTER FOCUS 2>(off)
^_____----------------------------------------__-_}
To cancel
Press [CENTER FOCUS] so the indicator turns orange.
On the remote control
1 Press [SHIFT] i [AV EFFECT].
2 Press the cursor button [2] or [1] so the “CENTER FOCUS” indi-
cator flashes.
3 Press [3] (to turn on or increase the level) or [4] (to decrease the
level or turn off).
(The indicator turns orange when off.)
B
VIRTUAL REAR SURROUND
»
Press [VIRTUAL REAR SURROUND].
The indicator turns green.
To cancel
Press [VIRTUAL REAR SURROUND] so the indicator turns orange.
On the remote control
1 Press [SHIFT] i [AV EFFECT].
2 Press the cursor button [2] or [1] so the “VIRTUAL REAR SUR-
ROUND” indicator flashes.
3 Press [3] (ON) or [4] (OFF).
(The indicator turns orange when off.)
C
MULTI REAR SURROUND
»
Press [MULTI REAR SURROUND].
The indicator turns green.
To cancel
Press [MULTI REAR SURROUND] so the indicator turns orange.
On the remote control
1 Press [SHIFT] i [AV EFFECT].
2 Press the cursor button [2] or [1] so the “MULTI REAR SUR-
ROUND” indicator flashes.
3 Press [3] (ON) or [4] (OFF) .
(The indicator turns orange when off.)
D
3D ENHANCED SURROUND
»
Press [3D ENHANCED SURROUND].
The indicator turns green.
Changing sound field and quality
D
3D ENHANCED
SURROUND
a (On the tuner/amplifier)
b (On the sound processor)
FLAT
HEAVY
CLEAR
To cancel
Press [3D ENHANCED SURROUND] so the indicator turns orange.
On the remote control
HALL
AI-EQ
M.EQ
1 Press [SHIFT] i [AV EFFECT].
2 Press the cursor button [2] or [1] so the “3D ENHANCED SUR-
ROUND” indicator flashes.
3 Press [3] (ON) or [4] (OFF).
(The indicator turns orange when off.)
35
RQT5471
Page 36

Before recording (Deck 2 only)
A
B
COUNTER
RESET DISPLAY
COUNTER
DISPLAY
COUNTER
RESET
DECK 1/2
a Side A
Selection of tapes for recording
The unit automatically identifies the type of tape.
Normal position/TYPE I 4
High position/TYPE II 4
Metal position/TYPE IV 4
To display the tape counter while recording
A
»
Press [COUNTER DISPLAY].
The counter is displayed for about 5 seconds.
To reset the tape counter
Press [COUNTER RESET].
³To display or reset the tape counter for deck 1, first press
[DECK 1/2].
Erasure prevention
B
»
The illustration shows how to remove the tabs to prevent recording.
To record on the tape again, cover as shown, being careful not to
cover the high position discrimination hole.
b Tab for side “B”
d To re-record
e Normal tape f High-position tape
A
Recording operations
C
c Tab for side “A”
g Discrimination hole
1
A
3 5 2
Volume, sound quality and surround effects
These have no effect on recording. Sound quality and surround
effects are automatically set to flat when recording.
Erasing recordings
C
»
1 Press [INPUT SELECTOR] to select “TAPE”.
2 Insert the recorded tape into deck 2.
3 Press [DOLBY NR] so the “ëNR” indicator goes out.
4 Select the reverse mode.
5 Press [´ REC PAUSE].
6 Press ["] or [!].
Your attention is drawn to the fact that recording pre-recorded
tapes or discs or other published or broadcast material may
infringe copyright laws.
36
RQT5471
46
Page 37

Before recording (Deck 2 only)
Preparatory steps
1
2
E
OPEN
DOLBY NR
23
1
Do these steps before each recording.
Wind up the leader tape in deck 2 so recording can begin immediately.
1 Press [< OPEN] on deck 2 and insert
the cassette.
Insert the cassettes in both decks for tape-to-tape recording
(á page 39).
DECK 1: For playback
DECK 2: For recording
2 Press [DOLBY NR] to select Dolby NR
on (“ëNR” appears) or off.
(á “Dolby noise reduction”, page 27)
3 Press [REV MODE] to select the re-
a Forward sida
b Tape facing
down
2
Î
NR
verse mode.
Each time you press the button:
h: One side only records.
d and f: Both sides record (forward> reverse).
“f” automatically changes to “d” when [´ REC PAUSE],
[CD EDIT] or [TAPE EDIT] is pressed.
3
REV MODE
2
Î
NR
Recording operations
37
RQT5471
Page 38

INPUT SELECTOR
CD EDIT
Recording discs
Preparation:
³Do the preparatory steps (á page 37).
³Insert the disc(s) you want to record (á page 14).
21
³Press [DISC 1]–[DISC 5] to select the disc you want to start record-
ing, then press [º] twice to stop the disc.
A
Normal recording
»
[DVD] [V-CD] [CD]
1 Press ["] (reverse side) or [!] (forward side)
3
then [º] to set the tape direction.
2 Press [´ REC PAUSE].
DISC 1—5
A
1
2
Recording operations
H
REC
PAUSE
3
REC
@
@
Î
NR2
3 Press [!] on the changer.
Recording starts automatically.
4 seconds after the disc(s) finishes, the deck goes into the recording
standby mode.
To stop recording
EITHER
Press [º] on the changer.
The deck goes into recording standby mode 4 seconds later.
OR
Press [º] on the deck.
Recording stops immediately but the disc continues to play.
To record programmed tracks
Program tracks before step 1 (á page 20).
B
One touch disc editing
»
[V-CD] [CD]
This function makes it easier for you to record from Video CDs and
CDs.
³When recording, if a track is cut off in mid-track at the end of the
forward side, it is recorded from the beginning on the reverse side.
(Ensure the reverse mode “d” is selected.)
³At the end of the reverse side recording stops and the current track
will be interrupted.
38
RQT5471
B
CD EDIT
REC
Press ["] or [!] then [º] to set the tape direction, and
press [INPUT SELECTOR] to select “DVD” as the source,
then
Press [CD EDIT].
Recording starts. In the meantime, “CD EDIT” will scroll across the
display from right to left.
EDIT
Î
NR2
After edit-recording has finished, the cassette deck automatically
stops.
To stop editing
Press [º] on the changer. The cassette deck also stops.
“EDIT OUT” is displayed.
To edit programmed tracks
Program the tracks (á page 20) and press [CD EDIT].
For your reference:
³“ALL DISC” or “1-DISC” can be combined (á page 15).
³PBC on Video CDs is automatically canceled.
³“ERROR” is displayed if the disc in the playing position is a DVD or
the resume function is activated.
Page 39

[A] Recording the radio
Preparation: Do the preparatory steps (á page 37).
1 Tune to the required station.
(á page 24 or 25)
23 ∫
2 Press [´ REC PAUSE].
The deck goes into the recording standby mode and the play
indicator “"” or “!” starts flashing.
3 Press ["] (reverse side) or [!] (forward side) to
start recording.
To stop recording
Press [º].
A
2
3
B
1
1
H
REC
PAUSE
DECK 1/2
To pause recording
Press [´ REC PAUSE].
ÎNR2 REC
The deck goes into recording standby mode.
To resume recording press the flashing ["] or [!].
B
Tape-to-tape recording
»
Preparation: Do the preparatory steps 1 and 3 (á page 37).
1 Set the tape direction on both decks.
1 Press [DECK 1/2] to select “DECK 2”.
21
2 First press ["] or [!], and then [º].
Repeat steps 1 and 2 for deck 1.
2 Press [TAPE EDIT] to start recording.
The indicator “"” or “!” shows deck 2 direction.
If either deck stops, the other deck also stops.
To stop recording
Press [º].
Both decks will stop.
To enjoy another source while recording
Start playing the other sound source.
You can change the volume level and tone quality without affecting
the recording.
Recording operations
2
2
Note
The recording level and the noise reduction effect of the original
(play) tape will be recorded on the new tape.
@
TAPE EDIT
2 REC1
39
RQT5471
Page 40

Enjoying KARAOKE
(Except for the United Kingdom,
Continental Europe, Australia and N.Z.)
Í/I
3
A
VOLUME
UP
DOWN
KARAOKE
a (On the TV screen)
1
Title No.
Convenient functions
B
KARAOKE
KARAOKE
MIC VOL
MIN MAX
OFF
Guide melody
(á page 41)
c (On the tuner/amplifier)
b Vocal select
V.MUTE
---
MONO·L
3
[DVD] [V-CD] [CD]
Preparation:
³Press [ê/I] to turn the unit on.
³Turn on the television and switch the video input mode of the televi-
sion to suit the type of connection you have made (e.g., VIDEO 1).
³Lower volume with [MIC VOL], then connect the microphone(s) to
the microphone jack(s). (Plug type 6.3 mm monaural)
1 Start the source.
2 Select the Karaoke mode.
See below ([A], [B] or [C]) for operation details.
3 Adjust the main volume and micro-
phone volume.
Karaoke DVD
A
»
Icons are displayed on the television to assist operation.
Press [KARAOKE] to select the appropriate mode.
(Refer to the jacket concerned for Karaoke mode.)
Each time you press the button:
³Solo ³Duet
--- : Vocal off --- : Vocal off
ON: Vocal on 1+2: Vocal 1 i 2 on
On the remote control
1 Press [KARAOKE].
2 Press the cursor button [2] or [1] to select the vocal select
mode.
3 Press [3] or [4] to select the appropriate mode.
³To select another song
Press the cursor button [2] or [1] to select and press [3] or
[4] to select the number for the song.
Other sources (except for radio)
The changes in Karaoke mode are shown on the tuner/amplifier.
[B] Video CD/CD/cassette tape (multiplex)
Press [KARAOKE] to turn the vocals off.
Each time you press the button:
MONO L: Vocal off (Lch only)
MONO R: Vocal on (Rch only)
(off): Karaoke mode canceled.
[C] DVD/Video CD/CD/cassette tape/video tape
(non-Karaoke)
Press [V.MUTE] to turn the vocals off.
V.MUTE: Vocal off
(off): Karaoke mode canceled.
V1: Vocal 1 on
V2: Vocal 2 on
1
40
RQT5471
C
V.MUTE
V.MUTE
Note
³The Karaoke modes cannot be used with the radio, 3D AI EQ or
surround effects (á pages 29 and 30).
³If a strange noise (squealing or howling) is emitted during use,
move the microphone away from the speakers, or turn down the
microphone volume.
When you are not using the microphone, disconnect it from the MIC
jack, and turn down the microphone volume level to MIN.
When using the VOICE MUTE function
Voice mute may not function sufficiently or noise may interfere when
using the following software.
³Monaural software
³Software with few musical instruments, including classical music
and poetry recitations
³Software with duets or strong choruses
To record your performance
Start recording in deck 2 and then start singing.
Page 41

ECHO
2
1
LOUNGE
Enjoying KARAOKE
(Except for the United Kingdom,
Continental Europe, Australia and N.Z.)
Using the echo effect
A
»
Press [ECHO].
Each time you press the button:
ECHO 1>ECHO 2>ECHO 3
^---------- ECHO OFF ------------}
Changing the key (up to 6 steps)
B
»
A
B
1
2
C
D
ECHO
KEY CON
?
LOUNGE
CHORUS
TUNING
CHORUS
a (On the tuner/amplifier)
@
KEY CON
KEY CON
ECHO
1 Press [KEY CON].
“KEY 0” appears on the display.
2 Press [TUNING (Ý or ß)] to change
the key.
Ý: Lower the key by a halftone (j1, j2, j3)
ß: Raise the key by a halftone (i1, i2, i3)
To restore the original key
Press [KEY CON] to display “KEY OFF” on the tuner/amplifier.
Giving the effect of singing at a Karaoke bar
C
»
Press [LOUNGE].
Each time you press the button:
LOUNGE 1>LOUNGE 2>LOUNGE 3
^---------------LOUNGE OFF--------------}
To cancel the effect
Press [LOUNGE] to select “LOUNGE OFF”.
Giving the effect of singing in a chorus
D
»
Press [CHORUS].
Each time you press the button:
CHORUS 1>CHORUS 2
^----CHORUS OFF-----}
To cancel the effect
Press [CHORUS] to select “CHORUS OFF”.
Convenient functions
E
2, 3
2, 3
b (On the TV screen)
1
1
SUBTITLE
TOP MENU
H
SLEEP
123
456
7890
MENU
EQ
ENTER
3D AI EQ/
M.EQ BAND
MARKER
DIGITAL
TEST
U
PRO LOGIC
CH SELECT
S.WOOFER
VCR(EXT)/
TAPE/
DVD
VDP(AUX)
DECK 1/2
CANCEL
⁄/g¤»
PLAY MODE
MIX 2CH
AUDIO
KARAOKE
SLOW/SEARCH
SHIFT
MUTING
∂VOLUME µ
1
DISPLAY
j/-/--
RETURN
SUPER SRND
SKIP
SETUP
DISC
KARAOKE
EFFECT
AV EFFECT
ANGLE
TUNER/
BAND
1
1
Selecting the Karaoke effect with the remote
E
»
control
1 Press [SHIFT] i [KARAOKE EFFECT].
2 Press [2] or [1] to select the desired effect.
ECHO,-.KEY,-.LOUNGE,-.CHORUS
^----------------------------------------------------J
3 Press [3] or [4] to select the desired level.
Using the guide melody function
E
»
Remote control only
This function can be used only with some Karaoke DVDs.
When singing a song whose melody you do not know well, use this
function to raise the volume of the melody.
1 Press [KARAOKE] to display the Karaoke screen.
---
2 Select the guide melody with [2, 1] .
3 Select the desired level with [3, 4] .
1: Normal volume
2: Louder volume
OFF: Guide melody offc Guide melody
41
RQT5471
Page 42

6 1 2–5
C
Using the timers
The play timer
This timer starts play of a selected source at a selected time.
The example shows settings for preset radio channel 8 to play between 6:30 and 7:40 at j40 dB.
œPLAY/œREC
CLOCK/TIMER
1
1
2
2–5
1
2
—DEMO
SET
?
TUNING
SET
Preparation: Turn the unit on, set the time (á page 12), preset
radio stations if you want the timer to start playing
the radio (á page 25).
1 1 Press [CLOCK/TIMER, –DEMO] to
select “FPLAY.”
Each time you press the button:
CLOCK>FPLAY>FREC>Original display
^-------------------------------------------------------------------}
2 Press [SET] within 3 seconds.
FPLAY
@
2–5
1 Press [TUNING (X or W)] to select
the appropriate setting and
2 press [SET] to confirm.
2 Select the start time.
3 Select the finish time.
4 Select the source.
TUNER()DVD()TAPE
^----------------------------------J
Insert a disc or tape if you select these sources.
If you select TUNER
Select a preset channel.
5 Select the volume.
The play timer is now on standby. The display shows each
setting again then restores the original display.
Convenient functions
2
3
4
5
6 Press [ê/I] to turn the unit off.
The “FPLAY/FREC” indicator remains lit to show the play (or
FPLAY
FPLAY
FPLAY
H
FPLAY
FPLAY
FPLAY
MHz
record) timer is on even when ECO mode is selected (á page
12).
The timer starts at the set time with the volume increasing gradually
to the set level.
To cancel the timer
Press [FPLAY/FREC] so “FPLAY” goes out.
Each time you press the button:
FPLAY>FREC>FPLAY FREC>Light off (OFF)
^---------------------------------------------------------------------------------}
The play timer function will be canceled, but the settings stay in
memory.
For your reference:
When you insert cassettes in decks 1 and 2, deck 1 has priority.
42
RQT5471
6
H/I
FPLAY
Page 43

Using the timers
The record timer
œPLAY/œREC
CLOCK/TIMER
1
1
2
2–4
1
6 1 2–4
—DEMO
SET
?
TUNING
@
5
FREC
This timer records the radio at a set time.
The example shows settings for recording preset channel 8 from
18:30 to 19:30.
Preparation: Turn the unit on, set the time (á page 12), preset
radio stations (á page 25).
1 1 Press [CLOCK/TIMER, –DEMO] to
select “FREC”.
Each time you press the button:
CLOCK>FPLAY>FREC>Original display
^-------------------------------------------------------------------}
2 Press [SET] within 3 seconds.
2–4
1 Press [TUNING (X or W)] to select
the appropriate setting and
2 press [SET] to confirm.
2 Select the start time.
3 Select the finish time.
4 Select the preset channel.
The record timer is now on standby. The display shows each
setting again then restores the original display.
5 Prepare for recording.
1 Insert a tape into deck 2.
2 Select the Dolby NR mode.
3 Select the reverse mode.
4 Select the tape direction.
6 Press [ê/I] to turn the unit off.
The “FPLAY/FREC” indicator remains lit to show the record
(or play) timer is on even when ECO mode is selected (á
page 12).
6
2
H/I
SET
2
3
4
Recording starts 30 seconds before the set time with the volume muted during the set time.
To cancel the timer
Press [FPLAY/FREC] so “FREC” goes out.
FREC
FREC
CH
FRE
FREC
FREC
MHz
Each time you press the button:
FPLAY>FREC>FPLAY FREC>Light off (OFF)
^---------------------------------------------------------------------------------}
The record timer function will be canceled, but the settings stay in
memory.
Convenient functions
43
RQT5471
Page 44

A
B
œPLAY/œREC
CLOCK/TIMER
—DEMO
SLEEP
SUBTITLE
TOP MENU
H
SLEEP
123
456
7890
MENU
EQ
ENTER
3D AI EQ/
M.EQ BAND
MARKER
DIGITAL
TEST
U
PRO LOGIC
CH SELECT
VCR(EXT)/
VDP(AUX)
CANCEL
PLAY MODE
MIX 2CH
AUDIO
SHIFT
S.WOOFER
TAPE/
DVD
DECK 1/2
⁄/g¤»
SLOW/SEARCH
MUTING
SKIP
∂ VOLUME µ
SETUP
DISPLAY
DISC
j/-/--
RETURN
AV EFFECT
ANGLE
SUPER SRND
TUNER/
BAND
Using the timers
A
The play and record timers
»
Checking the timers
Press [CLOCK/TIMER, –DEMO] to select “FPLAY” (or “FREC”).
The timer settings are shown in the following order:
Play timer:
Start time>Finish time>Source>Volume
Record timer:
Start time>Finish time>Broadcast station you select
The timers can be checked even if the unit is off.
Playing the unit after the timers are set
The unit can be used after the timers are set, but ensure the unit is off
before the set start time.
Turning the timers on and off
The timers come on at the set times if the “FPLAY/FREC” indicator
is lit. They can be turned on and off by pressing [FPLAY/FREC] (á
pages 42 and 43).
Note
³If you turn the unit off and on again while a timer is functioning, the
finish time setting will not be activated.
³If the power is on, the timer will not function. The system must be in
the standby mode.
³This system retains the ON/OFF time settings until you make a new
setting. If you make a new ON time setting, you must make a new
OFF time setting.
B
The sleep timer
»
Remote control only
This timer turns the unit off after a set time.
Press [SLEEP] to select the time
(minutes).
Each time you press the button:
SLEEP 30_--)SLEEP 60_--)SLEEP 90
^-=SLEEP OFF(=SLEEP 120(_}
Convenient functions
SLEEP
44
RQT5471
SLEEP
To cancel the sleep timer
Press [SLEEP] to select “SLEEP OFF”.
“SLEEP” goes out.
To confirm the remaining time
(While the timer is functioning)
Press [SLEEP].
The remaining time is shown for about 5 seconds.
To change the setting
Press [SLEEP] to display the remaining time, then press again to select the required time.
Using the timers together
Any of the timers can be used together, but ensure the unit is off before the start time for the record and play timers.
Page 45

a Numbered
1
buttons
SHIFT
1
1
TOP MENU
H
SLEEP
123
456
7890
MENU
EQ
ENTER
3D AI EQ/
M.EQ BAND
MARKER
TEST
U
PRO LOGIC
CH SELECT
VCR(EXT)/
TAPE/
VDP(AUX)
DECK 1/2
CANCEL
⁄/g¤»
PLAY MODE
MIX 2CH
AUDIO
SHIFT
MUTING
∂ VOLUME µ
b (On the TV screen)
SETUP
SUBTITLE
SETUP
DISPLAY
DISC
j/-/--
RETURN
AV EFFECT
ANGLE
DIGITAL
SUPER SRND
S.WOOFER
TUNER/
DVD
BAND
SLOW/SEARCH
SKIP
1 Disc Languages
2 Ratings
3 Menu Language
4 On-Screen Messages
5 TV Aspect
6 Speaker Setting
9 Other Settings
RETURN
2, 3
DVD
Level 8
English
4:3
Press RETURN to exit
Initial settings
Changing the initial settings
Remote control only
Once the initial settings have been completed, the system can
always be operated under the same settings.
Preparation: Press [DVD] to select “DVD” as the source.
1 While stopped
Press [SHIFT] r [SETUP].
The initial settings menu is displayed.
2 Press [3] or [4] to highlight an item,
and press [ENTER].
3 Press [2, 1, 3, 4] to select an item
and press [ENTER].
Repeat step 3 as the menus require to make changes.
Steps 2 and 3 can also be done with the numbered buttons.
Press the number next to the required item. For example, press [3] to
select “3 Menu Language”.
To return to the previous screen
Press [RETURN].
To exit the initial settings menu
Press [RETURN].
2
3
ENTER
1 Disc Languages
2 Ratings
3 Menu Language
4 On-Screen Messages
5 TV Aspect
6 Speaker Setting
9 Other Settings
ENTER
Level 8
English
4:3
Press RETURN to exit
Note
The initial settings menu will not be displayed if one of the program/
random/ALL DISC modes is activated.
Convenient functions
45
RQT5471
Page 46

Initial settings
Summary of initial settings
This chart shows the initial settings for this unit. See page 45 for details on menu operation.
³The menu and on-screen message language has been factory preset to English. You can change the language by going to “3 Menu Language”.
³There is no item 7 or 8.
Item
1 Disc Languages
2 Ratings
3 Menu Language
Function
Select the soundtrack language.
Select the subtitle language.
Select the language for the top menu and other menus shown by
the disc.
Set a ratings level for playing a DVD.
Select the language used for menus and messages the unit
displays on the television (including these menus).
Options
1 Audio
2 Subtitle
3 Menus
Setting ratings (When level 8 is selected)
Level 8: All DVDs can be played.
Level 1 to level 7: Prohibits play of DVDs with
corresponding ratings recorded on them.
Level 0: Prohibits play of all DVDs.
Changing ratings
(When level 0–7 is selected)
1 Unlock Player 3 Change Level
2 Change Password 4 Temporary Unlock
1 English 4 Italiano
2 Français 5 Español
3 Deutsch
4 On-Screen Messages
5 TV Aspect
6 Speaker Setting
Convenient functions
9 Other Settings
Choose whether to show the on-screen messages that appear
on the television when you perform operations.
Select the colour and position of on-screen massages and GUI.
Select the aspect ratio that suits your television (á page 8).
Set the delay time for your center and surround speakers (á
page 48).
Select a picture type for when the picture is paused.
Select whether to have sound on or off during the first level of
forward search (DVD/Video CD only).
Select to view how software made for a widescreen television is
displayed on a regular television (á page 49).
Select whether to have dynamic range compression during play
of Dolby Digital software.
1 On-Screen Messages
2 Colour and Position
1 4:3 (Regular television)
2 16:9 (Widescreen television)
Center speaker delay time
Surround speakers delay time
1 Still Mode
2 Audio during Search
3 TV Mode (4:3)
4 D. Range Compression
46
RQT5471
Select whether to show the picture type (I/P/B) when a DVD is
paused.
Select whether to output the video signal on NTSC discs as PAL
60 or as NTSC.
5 Still Picture Display
6 NTSC Disc output
Page 47

³Shaded items are the factory settings.
³Changes to the initial settings remain intact after the unit is turned off.
Do the setting procedures again to restore to the original settings.
Remarks
1 English 4 Italian 7 Other ¢¢¢¢
2 French 5 Spanish
3 German 6 Original
1 Automatic 4 German 7 Other ¢¢¢¢
2 English 5 Italian
3 French 6 Spanish
1 English 4 Italian
2 French 5 Spanish
3 German 6 Other ¢¢¢¢
1On
2 Off
³Some discs are designed to start in a certain language despite any changes you
make here.
³“Other ¢¢¢¢”: Input a code number with the numbered buttons (á page 49).
³“Original”: The original language of each disc will be selected.
³“Automatic”:
If the language selected for “1 Audio” is not available, subtitles of that language will
automatically appear if available on that disc.
³The password screen is shown if you choose levels 0 to 7 (á page 48).
³The DVDs must have ratings levels recorded on them for this feature to be effective.
Discs with this feature will be marked.
If the level 0 to level 7 has been selected, the password screen is shown when you
select “2 Ratings”. Enter your password with the numbered buttons and press
[ENTER]. The menu for changing ratings appears.
1 Blue 4 Blue
2 Violet 5 Violet
3 Green 6 Green
0 ms 3.9 ms
1.3 ms 5.3 ms
2.6 ms
0 ms 10.6 ms
5.3 ms 15.9 ms
1 Automatic
2 Field
3 Frame
1 On
2 Off
1 Pan & Scan
2 Letterbox
1 Off
2 On
1 Off
2 On
For optimum listening with 5.1 channel sound, all the speakers, except for the
subwoofer, should be the same distance from the listening position.
You can adjust the delay time for the center and surround speakers to adjust for
differences in distances between the speakers.
These adjustments are effective when playing DVDs recorded in Dolby Digital.
Field: Less blurred field stills are shown. Select if jittering occurs when “1
Automatic” is selected.
Frame: Sharper frame stills are shown. Select if small text or fine patterns cannot be
seen clearly when “1 Automatic” is selected.
Dynamic range is the difference between the loudest sound and the softest sound. By
compressing this range, you can listen at low volume but still enjoy clear dialog.
Convenient functions
1 PAL60 (Factory setting: “NTSC” for Russia,
2 NTSC “PAL60” for others)
³If you have connected a PAL system television, select “1 PAL60”.
³If you have connected an NTSC system television, select “2 NTSC”.
47
RQT5471
Page 48

A
a Numbered
buttons
2, 1, 3, 4
ENTER
SUBTITLE
TOP MENU
H
SLEEP
123
456
7890
MENU
EQ
ENTER
3D AI EQ/
M.EQ BAND
MARKER
DIGITAL
TEST
U
PRO LOGIC
CH SELECT
VCR(EXT)/
VDP(AUX)
CANCEL
PLAY MODE
MIX 2CH
AUDIO
SHIFT
S.WOOFER
TAPE/
DVD
DECK 1/2
2/;1∫
SLOW/SEARCH
MUTING
SKIP
s VOLUME r
b (On the TV screen)
Ratings
Enter a 4-digit password,
then press ENTER
SETUP
DISPLAY
DISC
j/-/--
RETURN
AV EFFECT
ANGLE
SUPER SRND
TUNER/
BAND
RETURN
Initial settings
A
Entering a password
»
The password screen is shown if you choose levels 0 to 7.
1 Input a 4-digit password with numbered buttons and press
[ENTER].
2 Press [ENTER] to confirm the 4 digits.
Press [RETURN] to restore the original display.
To change the level setting or the password
1 Select “2 Ratings”.
The password screen is shown.
2 Input the password with the numbered buttons and press
[ENTER].
3 Select the item with [3] or [4] and press [ENTER].
B
Calculating delay time
»
1 Select “Center delay time” or “Surround delay time” with [2,
1,3,4] and press [ENTER].
2 Select the desired delay time with [3] or [4] and press
[ENTER].
B
d Center delay time
Convenient functions
¢¢¢¢
Press RETURN to exit
Ratings
The player is locked.
Remember the password.
4 3 4 3
Press ENTER to continue
c Example: “4343”
Speaker Setting
0
C
C
ms
LR
Exit
LS
0
ms
SW
RS
Press RETURN to exit
Center speaker delay time
If D1 R D2, then set the delay time to 0 ms.
If D1 N D2, then set the delay time as follows:
Difference between D1 and D2
50 cm
100 cm
150 cm
200 cm
Surround speaker delay time
If D1 R D3, then set the delay time to 0 ms.
If D1 N D3, then set the delay time as follows:
Difference between D1 and D3
200 cm
400 cm
600 cm
D1: The distance from the front speaker
D2: The distance from the center speaker
D3: The distance from the surround speaker
Delay time
1.3 ms
2.6 ms
3.9 ms
5.3 ms
Delay time
5.3 ms
10.6 ms
15.9 ms
48
RQT5471
e Surround delay time
f Ideal position of
the center speaker
L
i Listening
position
LS
C
D2
R
D1
SW
D3
RS
h It is recommended to locate all the
speakers inside of this circle.
g Ideal position
of the surround
speaker
Page 49

How different kinds of software appear on your television
DVD software is recorded in a variety of picture formats, and how they appear on your television depends on the software, the kind of television you
have, and the picture mode your television is set to.
³Letterbox refers to pictures where black bands appear at the top and bottom.
³Pan and Scan refers to pictures where part of the picture is cut off so it fills the whole screen.
Television and
picture mode
Software format
4:3
16:9
Full mode
16:9
Zoom mode
16:9
Auto mode
a Wide screen,
pan and scan
f Wide screen,
non-pan and scan
h Regular (4:3)
m Regular (4:3) letterbox
b
Edges cut off
g
Letterbox
i
Full screen
n Letterbox
c
Full screen
j
Screen stretched
horizontally
o Letterbox with screen
stretched horizontally
d
Top and bottom cut off
k
Top and bottom cut off
p Full screen
e
Full screen
l Full screen with black
bands on the left and right
q Letterbox with extremities
of picture stretched
The names given to the television picture modes depend on the maker of your television. There may also be slight differences in how the pictures
appear on the screen. Refer to your television’s operating instructions for details.
Language code list
6566: Abkhazian
6565: Afar
6570: Afrikaans
8381: Albanian
6577: Ameharic
6582: Arabic
7289: Armenian
6583: Assamese
6588: Aymara
6590: Azerbaijani
6665: Bashkir
6985: Basque
6678: Bengali, Bangla
6890: Bhutani
6672: Bihari
6682: Breton
6671: Bulgarian
7789: Burmese
6669: Byelorussian
7577: Cambodian
6765: Catalan
9072: Chinese
6779: Corsican
7282: Croatian
6783: Czech
6865: Danish
7876: Dutch
6978: English
6979: Esperanto
6984: Estonian
7079: Faroese
7074: Fiji
7073: Finnish
7082: French
7089: Frisian
7176: Galician
7565: Georgian
6869: German
6976: Greek
7576: Greenlandic
7178: Guarani
7185: Gujarati
7265: Hausa
7387: Hebrew
7273: Hindi
7285: Hungarian
7383: Icelandic
7165: Irish
7378: Indonesian
7365: Interlingua
7384: Italian
7465: Japanese
7487: Javanese
7578: Kannada
7583: Kashmiri
7575: Kazakh
7589: Kirghiz
7579: Korean
7585: Kurdish
7665: Latin
7686: Latvian, Lettish
7678: Lingala
7679: Laotian
7684: Lithuanian
7775: Macedonian
7771: Malagasy
7783: Malay
7776: Malayalam
7784: Maltese
7773: Maori
7782: Marathi
7779: Moldavian
7778: Mongolian
7865: Nauru
7869: Nepali
7879: Norwegian
7982: Oriya
8083: Pashto, Pushto
7065: Persian
8076: Polish
8084: Portuguese
8065: Punjabi
8185: Quechua
8277: Rhaeto-
Romance
8279: Romanian
8285: Russian
8377: Samoan
8365: Sanskrit
7168: Scots Gaelic
8382: Serbian
8372: Serbo-Croatian
8378: Shona
8368: Sindhi
8373: Singhalese
8375: Slovak
8376: Slovenian
8379: Somali
6983: Spanish
8385: Sundanese
8387: Swahili
8386: Swedish
8476: Tagalog
8471: Tajik
8465: Tamil
8484: Tatar
8469: Telugu
8472: Thai
6679: Tibetan
8473: Tigrinya
8479: Tonga
8482: Turkish
8475: Turkmen
8487: Twi
8575: Ukrainian
8582: Urdu
8590: Uzbek
8673: Vietnamese
8679: Volapük
6789: Welsh
8779: Wolof
8872: Xhosa
7473: Yiddish
8979: Yoruba
9085: Zulu
Convenient functions
49
RQT5471
Page 50

Changing the sound range
A
»
display
The sound processor shows the level of each sound range with the
three types of displays described below.
A
DISPLAY MODE
DISPLAY MODE
B
MUTING
a (On the sound processor)
a
FLAT
HEAVY
CLEAR
FLAT
b
HEAVY
CLEAR
c
FLAT
HEAVY
CLEAR
VCR(EXT)/
TAPE/
VDP(AUX)
DECK 1/2
CANCEL
PLAY MODE
MIX 2CH
AUDIO
SHIFT
MUTING
∂ VOLUME µ
⁄/g¤»
DVD
SLOW/SEARCH
SKIP
TUNER/
BAND
Press [DISPLAY MODE].
Each time you press the button, the spectrum display will change as
follows.
[a] Normal display
This display indicates the strength of the sound in each tonal
range.
[b] Peak-hold display
The peak sound value of each sound range is held on the display for about one second after it occurs.
[c] Aurora display
The peak sound value of each sound range is displayed in inverted form.
HALL
AI-EQ
M.EQ
B
Muting the volume
»
HALL
AI-EQ
M.EQ
HALL
AI-EQ
M.EQ
Remote control only
Press [MUTING].
Volume is muted.
To cancel
Press [MUTING] again.
“MUTING” goes out and the volume is restored.
To cancel from the tuner/amplifier, turn [VOLUME] to the minimum
(–– dB), then raise it to the required level.
Muting is also canceled when the unit is turned off.
MUTING
Convenient functions
C
b (On the tuner/amplifier)
VOLUME
Using headphones
C
»
(not included)
Reduce the volume before connection.
Avoid listening for prolonged periods of time to prevent hearing damage.
Plug type: 3.5 mm stereo
50
RQT5471
Page 51

A
(R)
(L)
A
B
c Laser Disc player, etc.
a Television
b DVD/Video CD/CD changer
S-VIDEO
OUT
External unit connections
³Turn off all units before making connections.
³Refer to the manuals of the other units for details.
(Cords and equipment not included.)
f S-video cord (not included)
g Video cord
(1 pc. included for the United Kingdom and Continental
Europe
2 pcs. included for others)
AUDIO
L/R OUT
C
e Video cassette recorder
AUDIO
OUT
D
e Video cassette recorder
VIDEO IN
a Television
E
AUDIO
IN
VIDEO OUT
VIDEO
IN
d Sound processor
VDP
(AUX)
L
R
d Sound processor
VCR
(EXT)
OUT IN
L
R
d Sound processor
VIDEO
VCR
OUT
MONITOR
OUT
c Laser Disc player, etc.
VCR
IN
VDP
IN
VIDEO
OUT
h Stereo phono cable (not included)
i White
j Red
[A] Television with S-VIDEO terminal
The S-VIDEO output terminal achieves a more vivid picture than
the video output terminal by separating the colour and luminance signals before transmitting them to the television. (Actual
results depend on the television.)
[B] Laser Disc player (without 5.1ch output), etc.
This unit has Dolby Pro Logic circuitry. The sound will be reproduced with the same powerful stereophonic effects found in
movie theaters.
[C] Video cassette recorder
You can play the sound from a video cassette recorder through
this unit’s speakers or record sound from this unit onto a video
cassette.
[D] Televison
(Except for the United Kingdom and Continental Europe)
By connecting a video cord as shown along with the audio connections shown in [B] and [C], you are able to control the video
and audio with [INPUT SELECTOR].
Subwoofer
For the United Kingdom, Continental Europe, Australia
and N.Z.
The included front speakers have subwoofers, but you can
enhance the sound by connecting an optional subwoofer to
SUBWOOFER OUT on the back of the sound processor.
[E] If you connect a subwoofer:
Press and hold [DIGITAL S.WOOFER] on the main unit until
“SUB W ON” is displayed.
Sound will not come from the subwoofer if there is no specific
channel for the low frequency effect on DVD.
Convenient functions
DIGITAL
S.WOOFER
DIGITAL
S.WOOFER
For others
Connect the included subwoofer (á page 6 for connection).
(You do not have to press [DIGITAL S.WOOFER] to turn the
SUBWOOFER on.)
51
RQT5471
Page 52

Using other equipment
A
Listening to an external source
»
A
1
B
INPUT SELECTOR
1
1
1 Press [INPUT SELECTOR] to select
the external source.
Each time you press the button:
TUNER>DVD>TAPE>VCR (EXT)>VDP (AUX)
^----------------------------------------------------------------------------}
On the remote control
Press [VCR (EXT)/VDP (AUX)].
2 Operate the unit.
See the unit’s manual for details on connection and operation.
B
Recording an external source
»
1 Press [INPUT SELECTOR] to select
the external source.
2 Select Dolby NR and reverse mode.
(á page 37)
3 Press [´ REC PAUSE].
4 Press ["] or [!] to start recording.
5 Start the source to be recorded.
See the unit’s manual for details on connection and operation.
Convenient functions
1
INPUT SELECTOR
2
3
DOLBY NR
H
REC
PAUSE
4 2 3
@
REV MODE
To stop recording
Press [º] on the deck.
To pause recording
Press [´ REC PAUSE].
The deck goes into recording standby mode.
To resume recording press the flashing ["] or [!].
Recording onto an external unit
1 Press [INPUT SELECTOR] to select the source to be recorded.
2 Start recording on the external unit and start playing the source to
be recorded.
52
RQT5471
4
Page 53

Technical specifications
SOUND PROCESSOR
º EQ/SFP section
MANUAL GEQ
3-Band parametric EQ
Center frequency
High band
Mid band 240 Hz, 390 Hz, 630 Hz, 1 kHz,
Low band 70 Hz, 90 Hz, 143 Hz, 240 Hz
Level control n1.2, 2.4, 3.6, 4.8, 6 dB
EQ SPACE mode
3 modes HEAVY, CLEAR, HALL
3D acoustic image EQ
3 modes AI EQ, 3D AI 1, 3D AI 2
º Pre-amplifier section
Input sensitivity/impedance
VCR (EXT) 250 mV/15 k
VDP (AUX) 250 mV/15 k
Output level
VCR REC OUT 150 mV/1.5 k
(Except for the United Kingdom and
Continental Europe)
VIDEO OUTPUT
MONITOR OUT 1 Vp-p, 75
VCR REC OUT 1 Vp-p, 75
º DOLBY PRO LOGIC section
PRO LOGIC mode SURROUND
CENTER mode NORMAL
DELAY TIME 20 ms (Fixed)
º AV SURROUND section
AV surround mode SIMULATED STEREO
º DSP CONTROL section
DSP control mode SEAT POSITION
º Spectrum analyzer section
Display mode NORMAL, PEAKHOLD, AURORA
º General
Dimensions (WtHtD) 293k89k270 mm
Mass 1.5 kg
3.5 kHz, 5.3 kHz, 8 kHz, 12.5 kHz
1.5 kHz, 2.3 kHz, 3.5 kHz
SUPER SURROUND (MUSIC, MOVIE)
CENTER FOCUS (1, 2),
VIRTUAL REAR SURROUND,
MULTI REAR SURROUND,
3D ENHANCED SURROUND
TUNER/AMPLIFIER
º Amplifier section
Power output (L/R both channel driven)
(For the United Kingdom, Continental Europe,
Australia and N.Z.)
Stereo Mode
DIN 10 kHz THD 1 %/6 (High) 2k20 W
1 kHz THD 1 %/6 (Mid) 2k20 W
100 Hz THD 1 %/8 (Low) 2k45 W
RMS 10 kHz THD 10 %/6 (High) 2k30 W
1 kHz THD 10 %/6 (Mid) 2k30 W
100 Hz THD 10 %/8 (Low) 2k65 W
PRO LOGIC mode
DIN
FRONT 1 kHz THD 1 %/TTL Imp. 6
(High/Mid) 2k20 W
100 Hz THD 1 %/8 (Low) 2k45 W
SURROUND 1 kHz THD 1 %/8 2k20 W
CENTER 1 kHz THD 1 %/8 60 W
RMS
FRONT 1 kHz THD 10 %/TTL Imp. 6
100 Hz THD 10 %/8 (Low) 2k65 W
SURROUND 1 kHz THD 10 %/8 2k30 W
CENTER 1 kHz THD 10 %/8 80 W
PMPO 1 kHz/High or Mid 6 , Low 8 ,
CENT. 8 , SURR. 8 3,000 W
(For others)
Stereo Mode
DIN 10 kHz THD 1 %/6 (High) 2k20 W
1 kHz THD 1 %/6 (Mid) 2k20 W
100 Hz THD 1 %/8 (Low) 2k45 W
100 Hz THD 1 %/8 (Sub. W) 60 W
RMS 10 kHz THD 10 %/6 (High) 2k30 W
1 kHz THD 10 %/6 (Mid) 2k30 W
100 Hz THD 10 %/8 (Low) 2k65 W
100 Hz THD 10 %/8 (Sub. W) 80 W
PRO LOGIC mode
DIN
FRONT 1 kHz THD 1 %/TTL Imp. 6
(High/Mid/Low) 2k20 W
100 Hz THD 1 %/8 (Sub. W) 65 W
SURROUND 1 kHz THD 1 %/8 2k20 W
CENTER 1 kHz THD 1 %/8 60 W
(High/Mid) 2k30 W
RMS
FRONT 1 kHz THD 10 %/TTL Imp. 6
100 Hz THD 10 %/8 (Sub. W) 96 W
SURROUND 1 kHz THD 10 %/8 2k34 W
CENTER 1 kHz THD 10 %/8 88 W
PMPO 1 kHz/High or Mid 6 , Low
or Sub. W 8 3,000 W
Total harmonic distortion
Rated power at 1 kHz 1 % (6 )
Half power at 1 kHz 0.1 % (6 )
Load impedance
(For the United Kingdom, Continental
Europe, Australia and N.Z.)
FRONT (High/Mid) total impedance 6
FRONT (Low) 8
(For others)
FRONT (High/Mid/Low) total impedance 6
(Sub. W) 8
SURROUND 8
CENTER 8
S. WOOFER
Center frequency 70 Hz
LEVEL (VOL s20 dB) MID i8 dB
º FM tuner section
Frequency range 87.50–108.00 MHz
Sensitivity 1.8 ¬V (IHF usable)
S/N 26 dB 1.5 ¬V
S/N
MONO 70 dB (75 dB, IHF)
Antenna terminal(s) 75 (unbalanced)
º AM tuner section
Frequency range 522–1629 kHz (9 kHz steps)
Sensitivity (S/N 20 dB) 500 ¬V/m
º Timer section
Clock Quartz-lock type
Function Play timer (1 time, daily),
Setting intervals (Play/Rec)
1 minute–23 hours 59 minutes (1 min intervals)
º General
Power supply
(For the United Kingdom, Australia and N.Z.)
(For Continental Europe and Russia)
(For others)
Power consumption 230 W
Dimensions (WtHtD) 293k118.5k346 mm
Mass
AC 110/127/220–230/240 V, 50/60 Hz
Standby
Normal mode 11 W
ECO mode
(For the United Kingdom, Continental
Europe, Russia, Australia and N.Z.) 0.5 W
(For others) 1.0 W
(For the United Kingdom, Continental
Europe, Russia, Australia and N.Z.) 5.3 kg
(For others) 5.4 kg
(High/Mid/Low) 2k34 W
MAX i12 dB
(0.05 MHz steps)
520–1630 kHz (10 kHz steps)
Rec timer (1 time, daily),
Sleep (120 min, 30 min intervals)
AC 230–240 V 50 Hz
AC 230 V 50 Hz
DVD/VIDEO CD/CD CHANGER
º Discs played
DVD-Video disc
Compact disc (CD-DA, Video CD) 8/12 cm disc
º Video
Signal system
(For Russia) NTSC/PAL (decided by disc format)
(For others) PAL (PAL 60/NTSC)
Output level
Composite video 1 Vp-p (75 )
S-video Y 1 Vp-p (75 )
S-video C 0.300 Vp-p (75 ) PAL
º Pickup
Beam source Semiconductor laser
Wavelength 668 nm
º General
Dimensions (WtHtD) 293k89k288 mm
Mass 2.5 kg
CASSETTE DECK
Deck system Stereo cassette deck
Track system 4 track, 2 channel
8/12 cm single-sided, single-layer
8/12 cm single-sided, double-layer
8/12 cm double-sided, double-layer
(One layer per side)
0.286 Vp-p (75 ) NTSC
Recording system AC bias
Bias frequency 100 kHz
Erasing system AC erase
Heads
Deck 1 (Playback head) Permalloy head
Deck 2
(Recording/Playback head) Permalloy head
(Erasing head) Double gap ferrite head
Motors
Deck 1, 2 Capstan drive DC servo motor
Tape speed 4.8 cm/s
Wow and flutter 0.16 % (WRMS)
Fast forward and rewind times
Approx. 110 seconds with C-60 cassette tape
Frequency response (Dolby NR off)
TYPE I (NORMAL) 20 Hz–16 kHz (DIN)
TYPE II (HIGH) 20 Hz–16 kHz (DIN)
TYPE IV (METAL) 20 Hz–16 kHz (DIN)
S/N (Signal levelumax recording level, TYPE II
type tape)
NR off 56 dB (A weighted)
Dolby B NR on 66 dB (A weighted)
Input sensitivity and impedance
REC (IN) 150 mV/23 k
Output voltage and impedance
PLAY (OUT) 280 mV/360
º General
Dimensions (WtHtD) 294k118.5k281 mm
Mass 2.1 kg
FRONT SPEAKER
Type 3 way, 3 speakers
Speaker(s)
Super woofer 17 cm cone type
Woofer 12 cm cone type
Tweeter 6 cm ring shaped dome type
Impedance High 6 , Mid 6 , Low 8
Input power (Music)
Output sound pressure level 87 dB/W (1.0 m)
Crossover frequency 120 Hz, 4 kHz
Frequency range 42 Hz–50 kHz (j16 dB)
º General
Dimensions (WtHtD) 254k422k260 mm
Mass 6.4 kg
CENTER SPEAKER
Type 2 way, 2 speakers
Speaker
Woofer 10 cm cone type
Tweeter 6 cm cone type
Impedance 8
Input power (Music) 120 W
Output sound pressure level 85 dB/W (1.0 m)
Crossover frequency 4 kHz
Frequency range 75 Hz–22 kHz (j16 dB)
º General
Dimensions (WtHtD) 250k121k147 mm
Mass 1.6 kg
SURROUND SPEAKER
Type 1 way, 1 speaker
Speaker
Full range 8 cm cone type
Impedance 8
Input power (Music) 60 W
Output sound pressure level 84 dB/W (1.0 m)
Frequency range 120 Hz–20 kHz (j16 dB)
º General
Dimensions (WtHtD) 170k106k118 mm
Mass 0.9 kg
SUBWOOFER
(Except for the United Kingdom, Continental
Europe, Australia and N.Z.)
Type 1 way, 1 speaker, Bass-ref.
Speaker
Woofer 17 cm cone type
Impedance 8
Input power
Music 180 W
DIN 90 W
Output sound pressure level 80 dB/W (1.0 m)
Frequency range 41 Hz–1.8 kHz (j16 dB)
º General
Dimensions (WtHtD) 200k450k300 mm
Mass 5.9 kg
High 60 W, Mid 60 W, Low 120 W
46 Hz–36 kHz (j10 dB)
45 Hz–1.6 kHz (j10 dB)
Note
1. Specifications are subject to change without
notice. Mass and dimensions are approximate.
2. Total harmonic distortion is measured by the
digital spectrum analyzer.
Reference
53
RQT5471
Page 54

Troubleshooting guide
Before requesting service, make the below checks. If you can’t fix the system as described below, or if something not listed here occurs, refer to the
enclosed directory to locate an Authorized Service Center convenient to you or contact your dealer.
Reference pages are shown as black circled numbers 6.
Common Problems
No sound.
Sounds unfixed, reversed or come
from one speaker only.
Humming heard during play.
“ERROR” displayed.
“––:––” appears on display.
“U70” displayed.
“F61” displayed.
ECO mode on but display still
lights up in standby mode.
“DTS NO AUDIO” displayed.
“DVD U11” displayed.
“DVD H ··” displayed.
(·· will be numbers.)
Initial settings menu cannot be
accessed.
Turn the volume up.
The speaker cords may be shorted. Turn the unit off, check and correct the connections and turn the
unit on. 6
Check the speaker connections. 6
An AC mains lead or fluorescent light is near the cables. Keep other appliances and leads away
from this unit’s cables.
If possible in your area, turn the AC mains lead’s plug or connector over to reverse the plug’s
polarity.
Incorrect operation performed. Read the instructions and try again.
You plugged the AC mains lead in for the first time or there was a power failure recently.
Set the time. <
Connect the flat cables firmly. If “U70” remains on the display, contact the dealer.
There is a problem with the tuner/amplifier. Contact the dealer.
Turn DEMO off. <
This unit is unable to decode DTS signals.
The disc is dirty. Wipe it with a soft cloth.
A problem has occurred. Turn the unit off and unplug the AC mains lead. Wait a moment and then
plug the lead in and turn on the unit again. If the unit is still not working correctly, consult your dealer.
Select DVD as the source. ]
Cancel ALL DISC, program and random play. ? D E
Listening to the radio
Noise heard.
Stereo indicator flickers or doesn’t
light.
Sound distorted.
A beat sound heard.
A low hum heard during AM
broadcasts.
Correct AM frequency can’t tune
in.
Reference
Listening to tapes
Poor quality sound.
Recording not possible.
Use an outdoor antenna. 7
Turn the television off or separate it from the unit.
Separate the antenna from other cables and leads.
For the United Kingdom, Continental Europe, Russia, Australia and N.Z.
Change the frequency step. Hold [TUNER/BAND] down for 10 seconds to change the step to 9 kHz.
For others
Change to the correct frequency step. H
Clean the heads. g
Check the Dolby NR setting. J
If the erasure prevention tabs have been removed, cover the holes with adhesive tape. T
54
RQT5471
Page 55

Enjoying discs
Display is wrong or play won’t
start.
“TAKE OUT/DISC” appears on
display.
Picture does not appear on TV
screen when playing DVD.
Picture does not appear on TV
screen when playing Video CD.
ALL DISC, program and random
play cannot be used.
Picture on TV screen disappears
or stripes appear on screen.
You have forgotten your ratings
password.
(Reset all the settings to Factory
Preset)
The disc may be upside down. >
Wipe the disc.
Replace the disc if it is scratched, warped, or nonstandard.
Condensation may have formed inside the changer due to a sudden change in temperature. Wait
about an hour for it to clear and try again.
There is a problem with the disc mechanism. (A power failure may have occurred.)
The tray will open automatically. Remove the disc from the tray, and close it after ensuring there is
no disc in the tray. The unit will make disc changing noises for a few moments and then it should
operate normally.
The region number of the disc doesn’t match the region number of this unit. =
Connect the video cord. 6
Set the television to video input mode.
Connect the video cord. 6
Set the television to video input mode.
Ensure a Video CD or CD is in the play position tray.
The location and orientation of the antenna are incorrect. If you are using an indoor antenna, change
to an outdoor antenna.
The television antenna wire is too close to the system. Separate the antenna wire of the television
from the system.
Reset the unit to its original factory settings by doing the following procedure.
When “DVD” is selected as a source, press [º] on the changer and [L] on the remote control at
the same time for about 3 seconds until the message “Initialized” disappears from the television
screen.
During one touch disc editing (ápage 38)
“DECK NO TAPE” displayed.
“DECK CHANGE TAPE”
displayed.
Load a cassette into deck 2. U
If the erasure prevention tabs have been removed, cover the holes with adhesive tape. T
Remote control
Remote control doesn’t work. Check the batteries are inserted correctly. ;
All components are required to service the system. If service is ever necessary, bring the entire system.
Replace the batteries if they are worn.
Maintenance
If the surfaces are dirty
To clean this unit, wipe with a soft, dry cloth.
If the surfaces are extremely dirty, use a soft cloth dipped in a soapand-water solution or a weak detergent solution.
ÁNever use alcohol, paint thinner or benzine to clean this unit.
ÁBefore using chemically treated cloth, read the instructions that
came with the cloth carefully.
For a cleaner crisper sound
Clean the heads regularly to assure good quality playback and recording. Use a cleaning tape (not included).
Reference
55
RQT5471
Page 56

This product incorporates copyright protection technology that is protected by method claims of certain U.S. patents and other intellectual
property rights owned by Macrovision Corporation and other rights owners. Use of this copyright protection technology must be authorized
by Macrovision Corporation, and is intended for home and other limited viewing uses only unless otherwise authorized by Macrovision
Corporation. Reverse engineering or disassembly is prohibited.
Matsushita Electric Industrial Co., Ltd.
Osaka 542-8588, Japan
%
RQT5471-B
F0300MF0
 Loading...