

Page 1

Therheo system
SC-CH730
Operating instructions
Connecting, working and adjusting this product, use, read the full set.
one
Page 2
Another buyer
Thank you for purchasing this system.
For optimum safety, use the correct instructions, read this
instructions thoroughly.
This manual describes the following systems:
Sylagares accessory
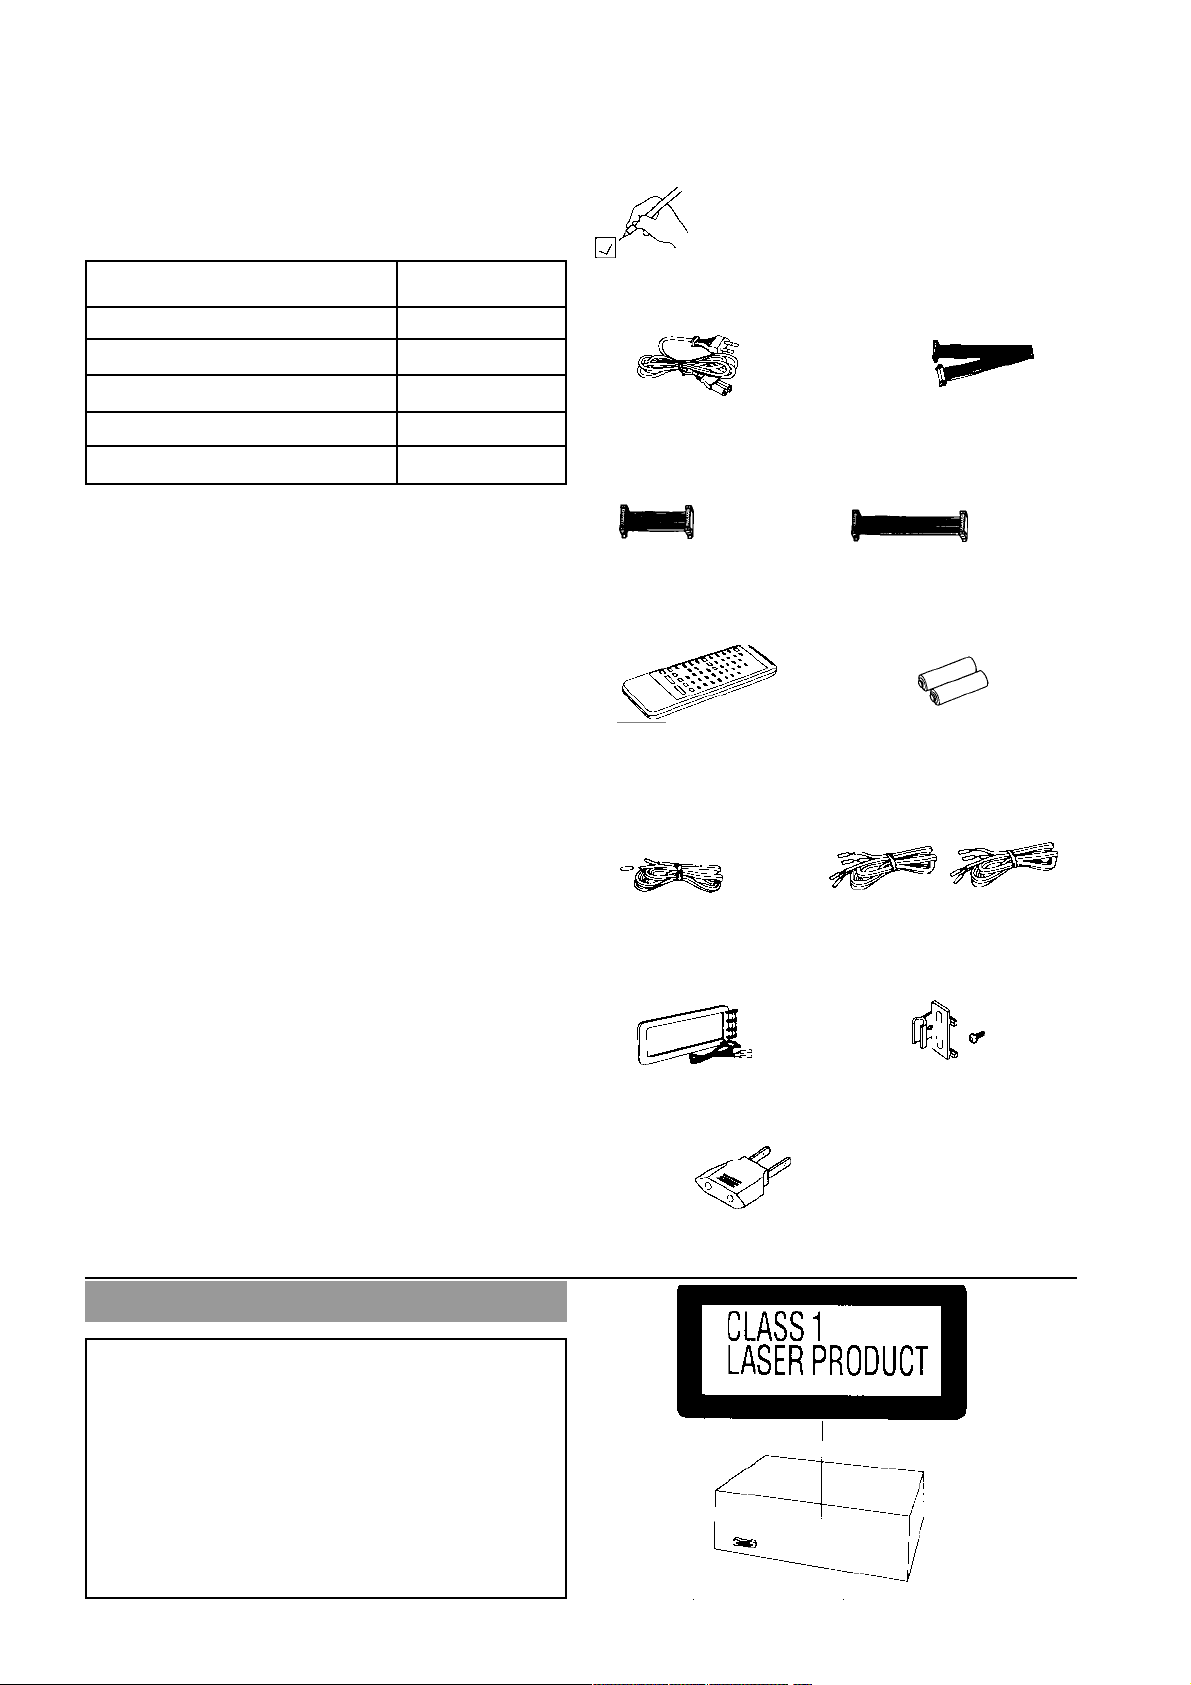
Order, check and identify the accessories.
System CH-CH730
Enhancer
Ner / Equalayzer
CD player
Bus Magnetophone
Columns
SE-CH730
ST-CH730
SL-CH530
RS-CH730
SB-CH530A
Contents
Sylagares accessory
Rule of safety
Safety advice
Before Use
Connections
Arrangement of Regulators
Preparing the remote control 11 Setting the time
Removing the frame 13
Listening to radio stations 16
Listening to discs 17
Listening to cassettes 22
Additional features 26
FOR RECORDING 27
Record of radio station 28
Written with disc company 29
Write from the register to the register 35
Change tone 36
Using Dolby Pro-Logic Surround 38
Using the Timer 42
Performing a Microphone Mix fifty
Using an external device 51
A quick reference for the remote control
management
Microcompact discs
Cellular cassette
Possible faults
Go
TECHNICAL SPECIFICATIONS
2
2
3
3
4
nine
12
54
56
57
58
59
60
Mains 1p. Flat cable (long) 1 pcs.
Flat cable
(short) 1p.
Remote control kit for remote control 1 pc.
FM internal
antenna 1øò.
AM loop antenna 1 pc. Anti-slip device 1 pcs.
Secondary switch 1øò.
Flat cable
(middle) 1 pc.
zionnogo control 2 pcs.
TABLE for columns 2 pcs.
Rule of safety
ОСТОРОЖНО!
LET'S GETTING STARTED. LET'S LOOK, FORWARD-
THERE IS A LOOKING FORWARD, THERE IS A LOT OF
GETTING THERE, WE ARE YOU ARE ABOUT.
THERE IS A FUNCTIONALITY AND A REFERRAL TO
YOURSELF. PRESENTATION AND BREAKTHROUGH
2 МУ ТЕХНИКУ.
On the rear
CD player
Page 3

Safety advice
n Use the default network Rosette
ku
1. Using from a network with an increased voltage, such as, as is
used for the support of the power supply.
And this is the connection of the speed indicator.
2. The constant current source is not used.
Checking the power supply, special
but at the same time or in another place where a constant current is
being used.
or a serious carriage by current. Please connect to the network
immediately and consult with your dealer.
n Do not use aerosols from
insec
Can you get rid of insects or? of the valve body. In addition, used in
such aerosols, it also flashes out of the way.
n Never use alcohol or paint remover
n Do not use a fork when you are disconnecting
Mains port from the power outlet
1. Close hands and danger.
Disposing of an electric current will remove it by touching it with a
hand.
2. Whenever you do not use the mains on the mains, do not
energize it all the way around.
n Place the unit in place with a good
Ventilation
Measure the unit at a distance of at least 10 cm from the wall, etc.
Operate the shutters to get the source and the source materials not
over the ventilation time.
n Please follow the following dimensions:
In direct bright light or in other places with a high temperature.
In places where there are high vibrations or high temperatures.
Under such conditions, you can delete the body or Before Use
Other parts that will shorten the service life of the device.
n Mind you, the device is measured on
Flat, regular surface
If the surface is tilted, there is no sign of a problem.
See and check out the chemistry before you use it, so, at the end of
the end of the time, start to start.
n Connect to the network, if the device is
The product will not be used for a long time
Если устройство оставляется на долгое время с вклю ч енным
питанием, это, в итоге, приведет к сокращению полезного рабо ч его
времени, но так же может стать при ч иной неисправности.
n Potential problems
Если во время работы пропал звук или индикаторы более не
светятся, или если появился ненормальный запах или дым, немедленно
отсоедините сетевой шнур и обратитесь к Вашему дилеру или в
сервисный центр.
Be sure that the mains is off, first, adjust the power switch. Use the
shutter switch to set the switch (at the start of the amplifier) to the
rear of the switch.
n Whenever you do not flow or before
Select the device
Можно полу ч ить серьезную травму током, если будете ч инить,
разбирать или переделывать это устройство будет не
квалифицированный техник или, если слу ч айно коснуться
внутренней ч асти.
n Find out when you are
children
Whenever it is not necessary to play the device, it is not necessary
to use the device, especially the metal parts, outside the center.
How to get a serious one, or use the device, if the product is the
same as the original. The internal device will lose its ventilation due
to the ventilation approval of this device.
n If in a water burner
If the water is dispensed on the device, in the case of the device it
will be able to
(Power supply in your area 117 or
120V, set to ?? 127V ??). Note that this device washes out of the
way seriously after the order has been set. (There is no voltage
switch for some country models, the correct voltage is already set.)
3
Page 4

Connections
C
Á Television
 Central column
à This system
B
D
HAVE COLUMN
À New column
Å Necrocolonization
New column
Ä HAVE COLUMN
Æ HAVE ENVIRONMENTAL COLUMN
l Á, Â, Å è Æ does not apply to this system
one
Connection Connection
Positioning the company
l Stop the different components as shown.
on the picture.
l In order to obtain a better effect, the
Turn both columns further from the system.
Horizontal Position A
Vertical position B
EXAMPLE SIZE OF SYSTEM C
4
CONNECTING SYSTEM D
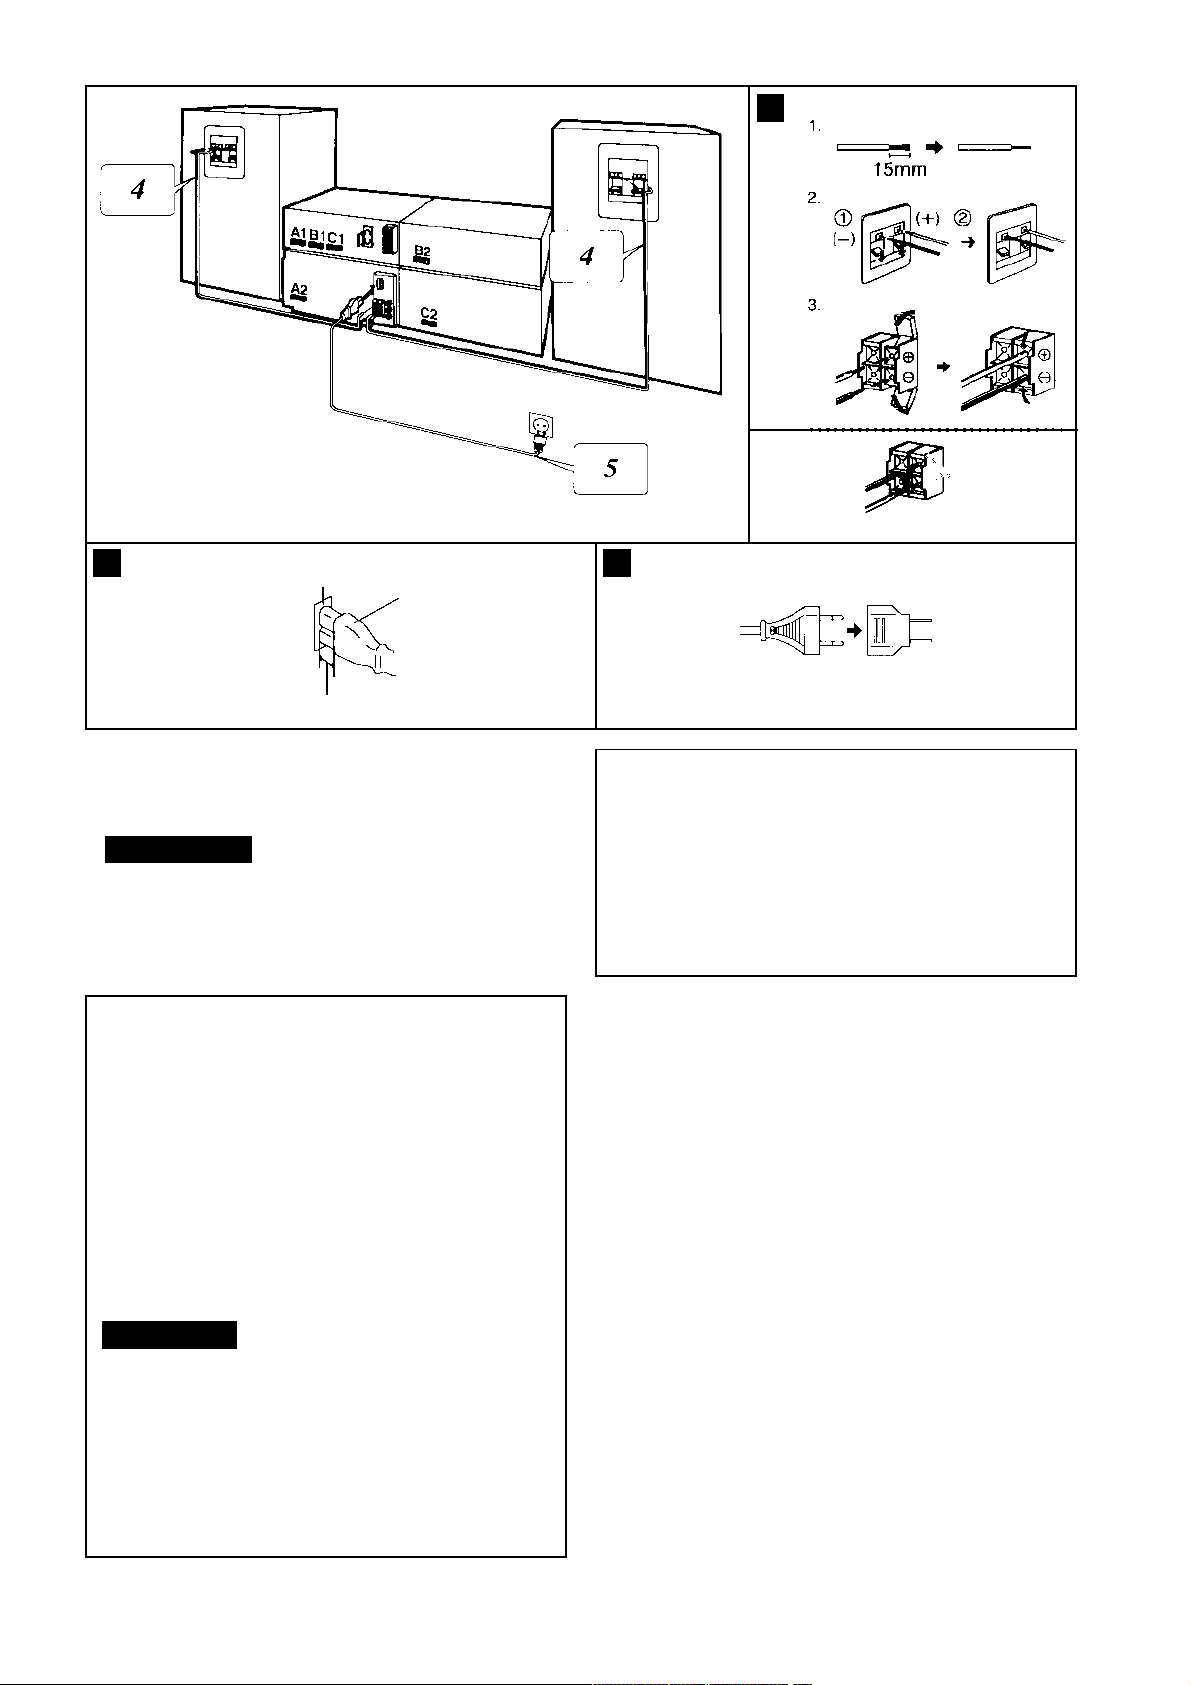
Connect the mains power supply after that, as you do with all the
original cables.
one Connecting a flat cable.
Hold the plug in front of the lens and hold it on the center until
you turn off the bore.
1. Connect short, flat cables to slots A1 and A2.
2. Connect the mid-length flat cables to ports B1 and B2.
3. Connect the long flat cables to the slots # 1 and # 2.
To connect a flat cable, use the plug as shown on the picture and
use it. After connecting, check and insert a flat cable to the rear
of this set-up. (For minimizing directional noises when listening to
AM radio.)
Do not connect or connect a flat cable while the power is on.
Page 5

2
FM internal an
tenna (used)
Alekara Lenta
3
2 FM Connections Internal Antenna
The cable end of the internal anticancer is not extended with a
compressor with any kind of metal.
Note
When you are away and receive good FM radio stations:
Daliteisolation
Hide
Insert the lead
Shortcut
A
B
Sooka listen to AM radio station,
Hit the flywheel in favor of the best way.
Remove the anti-tension device from the anti-virus device to any
other structure. Use the screws (provided) for the connection as
shown in the figure. A
l Protect the anti-wall at this height and in
in such a direction, in which direction is at hand.
l When you are not away, you will receive a good reception with
internal FM, high-recommended
Set FM to external antenna (not supported).
3 Connect AM Loop Antenna
1. Rear panel attachment
Power / Equalizer unit. Put the anti-tension on the driver pretty
hard, so that he is sure to sit in the place, just a little.
2. The attached cables are installed on the top of the antenna.
3. Connector to the rear of the panel of the power bank / battery.
Note
Duration of the drive, sviteshnurpetLeft antenna, use a ribbon, or take it so that a flat cable has been
supplied with a sufficient supply of AM B
5
Page 6
A
Hide
B
Appliance inlet
Plug
Approximately 6 mm.
4 Connect right (R) and left (L) to
White for columns.
Notes
l Power source, plug in speaker cable
We have a mains connection.
l Input resistance of the speaker, use
Zero with this system, for a full length of 6 - 8 mm.
Connecting the speaker cable A
1. Take out the isolation and trim the center cable. Beware
that the indicated end of the wire is not lost. (If this is so,
scroll through it several times.)
2. À Open the door to the back and leave the
water.
Á Close the aperture and firmly
At the end of the connection, be sure that it has been inserted
correctly.
3. Insert the lead into the rear amplifier panel and close the
plugs.
Notes
l To prevent the rotation of the
When freezing, never interrupt the positive (+) and
negative (-) speaker cables.
C
Spontaneously
Use these columns with the Recommended System only.
Errors can become a problem for the amplifier and / or the
columns, and in the result of the failure of the amplifier.
Conceal with the calibrated technology, if the signal is turned
on or after the signal is applied.
5 Connect to the network after connecting
None of all the old shoes.
Inserting Plug B
Даже когда разъем полностью вставлен, в зависимости от типа
используемого входного отверстия, передняя ч астьразъемаможет
выступать, как показано на рисунке.
However, it will not create problems when using the device.
If the network is not plugged into the socket, use a network
adapter (supplied). C
l Use the stop, connect to the user
Another (red) connection to a positive (+) port, and a negative (partial)
connection to a positive (positive) port, and a negative (partial) connection to a
positive (positive) port.
6
Page 7

A
FM tuned aerial
Coaxial cable 75 mm
B
AM Loop aerial
Antennas Advanced Connections
FM external antenna (not available) A
Self-care, if
If you use this system in a local area, or in a free-standing building,
etc. Keep the anti-tack for a long time only for the length of the time
that is set only for the optimum temperature.
1. Remove a piece of vinyl from the end.
2. Spread and scroll in place of the screen cover and remove the
video space, while
Variable center conductor.
3. Connect the central cable and the screened cable.
AM External antenna (not used) B
The spare antenna can be removed from the space required or, if
the system is available for the use of power.
Connect to the device, not from the AM to the electric antenna.
Move from 5 to 12 m cables in the vinyl display horizontally in front
of the window or in the other accessory.
7
Page 8

A
Red
D
Mel
B DCC or min disc player
Ner / Equalayzer
C
TerreofonyHearty juice
mainnew cable
Remote video magnetophone
Analogue player
No ?? GND ??
Connected
Stereo cables
Ner / Equalayzer
E Remote video magnetophone
Connected
video cable
21 single
cable scan
Ner / Equalayzer
Connecting to external devices
l For details, refer to the operating instructions.
the stage of this device, which you connect.
l When you connect the device to the other
Sleep, service, check with your dealer.
l All the sound cables and the sound of the device,
The batteries for the batteries (by excluding the power supply /
booster and the booster) are available separately.
Connection of a connecting cable (not available) A
Connect the red plug to the right (R) inlet.
Connect the white plug to the left (L) inlet.
Ner / Equalayzer
DCC (Digital Cassette Magnetophone) or Min Disc
Player B
Analog player C
This example will show you how to connect an analogue player with
the PHONO OUT / LINE OUT switch.
No ?? GND ?? for using the ground wire.
Turn the switch to the PHONO OUT position at the rear of the
analog player.
External video recorder D
l Use of 21 stitch cables (not
is applied) E
8
Page 9

Arrangement of Regulators
A
B
Amplifier section A Neer / Equalizer B
À Power Switch ?? STANDBY / ON ??
(POWER, STANDBY O / ON)
Press to switch the device from the mode of rotation or rotation.
When the unit is running, the unit will equally consume a small
amount of energy.
Á Mode indicator (STANDBY)
When the unit is connected to the AC mains, the indicator will
show the alternating current.
No, when the device is turned on.
 Dolby Pro-Logic Sur Mode Indicator
round (SURROUND, 3 STEREO)
à Dolby Pro-Logic Surround (PRO
LOGIC, TTEST, DELAYTIME, CENTERMODE)
Ä Volume control (VOLUME)
Å Source direction indicator
(SOURCE DIRECT)
Æ Source direction button (SOURCE
DIRECT)
Ç EQ SPASE / SPACE button (EQ SPACE /
FLAT)
È Bass Boost Button (V.BASS)
É Headphones (PHONES)
eleven Microphone Connector (MIC)
12 Volume controller (MICVOL)
À Input source selection button (SE-
LECTOR)
Á Remote control signal transducer
SENSOR
 Echo button (ECHO)
à KARA-KE MODE SELECTION BUTTON (KARA-
OKE)
Ä Adjustment / Timer Button
(TUNING / TIMER,,)
Å Setting button (SET)
Æ Record Timer Button (REC)
Ç Playback Timer Button (PLAY)
È FM (FM) button
É TUNER Indicator
eleven AM (AM) button
12 Tuning mode button (TUNINGMODE)
13 TIMER / CLOCK button
nine
Page 10

A
B
C
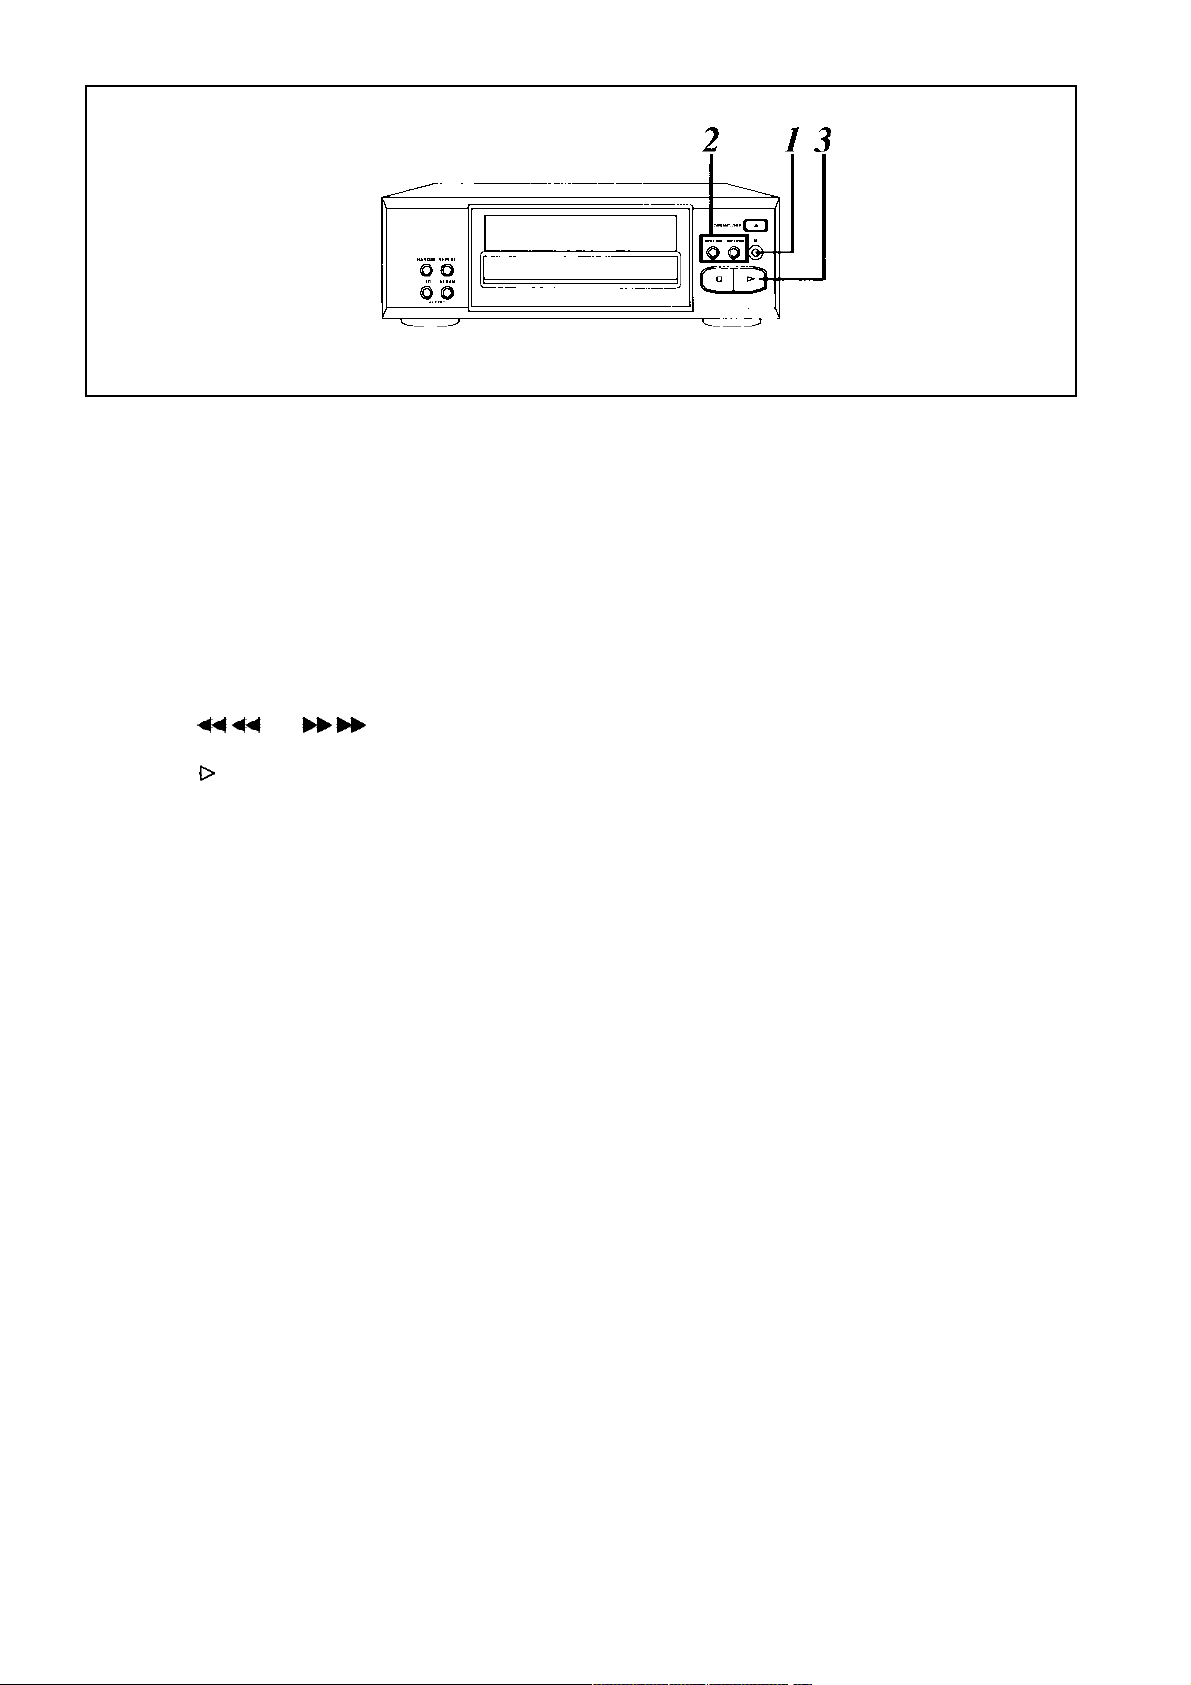
Player CD Section A
À Playback button in case of emergency
ðÿдke (RANDOM)
Á REPEAT button
 Stream for discs
à SEARCH / START buttons (|
- SKIP / ?? SEARCH)
Ä Open / close button for the printer
ков (OPEN / CLOSE,)
Å Pause button ( yy) Æ Disk edit button (AI EDIT,
J.FIT, ALBUM)
Ç Stop button ( o)
È Playback Button and Indicator ()
Tester magnetophone B
/ , / |,
D
E
F
É Counter display button (DISPLAY)
eleven OPEN / CLOSE BUTTON for use
for cassette recorder 1 (OPEN / CLOSE)
12 Dolby (DOLBYNR)
13 REV MODE SELECTOR
MODE)
14 Forward / backward / forward speed button
Lying Sand [(TPS) , (TPS) ]
15 Playback indicators (,
)
16 Stop button ( o)
17 Pause button when recording ( l REC PAUSE)
eighteen Cassette Edit Button (TAPE
EDIT, NOR, HIGH)
19 OPEN / CLOSE BUTTON for use
for cassette recorder 2 (OPEN / CLOSE)
À Cassette selector button 1 / cassette
Sequencer 2 (DECK 1/2)
Á Cassette Receiver Indicator 1
 The owner of the cassette of the cassette 1
à TPS release button (TPS SKIP)
Ä Forward / backward speed indicator
(HIGH SPEED FF / REW)
Å The owner of the cassette recorder 2
Æ Reset button (RESET)
Ç Recording indicator (RECPAUSE)
È Cassette receiver indicator 2
ten
Glowing C
The indicator on the button will show you an easier way to listen.
l To listen to the radio: D
l To listen to discs: E
l To listen to the cassette: F
Page 11

Preparing the remote control
A
Insert the batteries in accordance with the fullness (+, -).
Take out the batteries, use the positive side (+)
B
Immediate sensopulputadisstationary control
Ner / Equalayzer
Installing Batteries A Proper way of use B
Using the Batteries
l Do not mix old and new batteries or ba-
Stores of different types (magnetized and alkaline, etc.).
l Whenever you do not raise the batteries and
Do not run into the runway, do not try to disassemble them, and
make sure that they do not open shortly.
l Remote control of non-operation
There are no longer periods of time, take out the batteries and
keep them in a cool, dark place.
l Do not try to add an alkaline bat
Batteries or magnetized batteries.
How to use the batteries
The service life of the batteries is usually one year.
Батарейки должны быть заменены, если сигналы передат ч ика
пульта дистанционного управления не выполняются устройством, даже
когда передат ч ик о ч ень близко к передней панели.
l Go to the front window of the remote control.
a new control on the device's sensor. SAVE ANY HITS.
l Maximum distance - within 7 meters
in the direction of the remote control signal from the remote
control
l Look out for the front windows and the front windows.
so the freedom of the fly. Please check for performance if you
are charged.
l The work is not correct, if it is
The light sensor will drop directly from the sun or another strong
light. If such problems are identified, change the power from the
light source.
l If this system is installed in front of the stacks
A single door, a single or a vertical glass door, has a very low
operating capacity, and it is very efficient.
l Never put any other items on the remote control.
l Do not create and do not construct.
l Do not apply water or other liquids.
eleven
Page 12

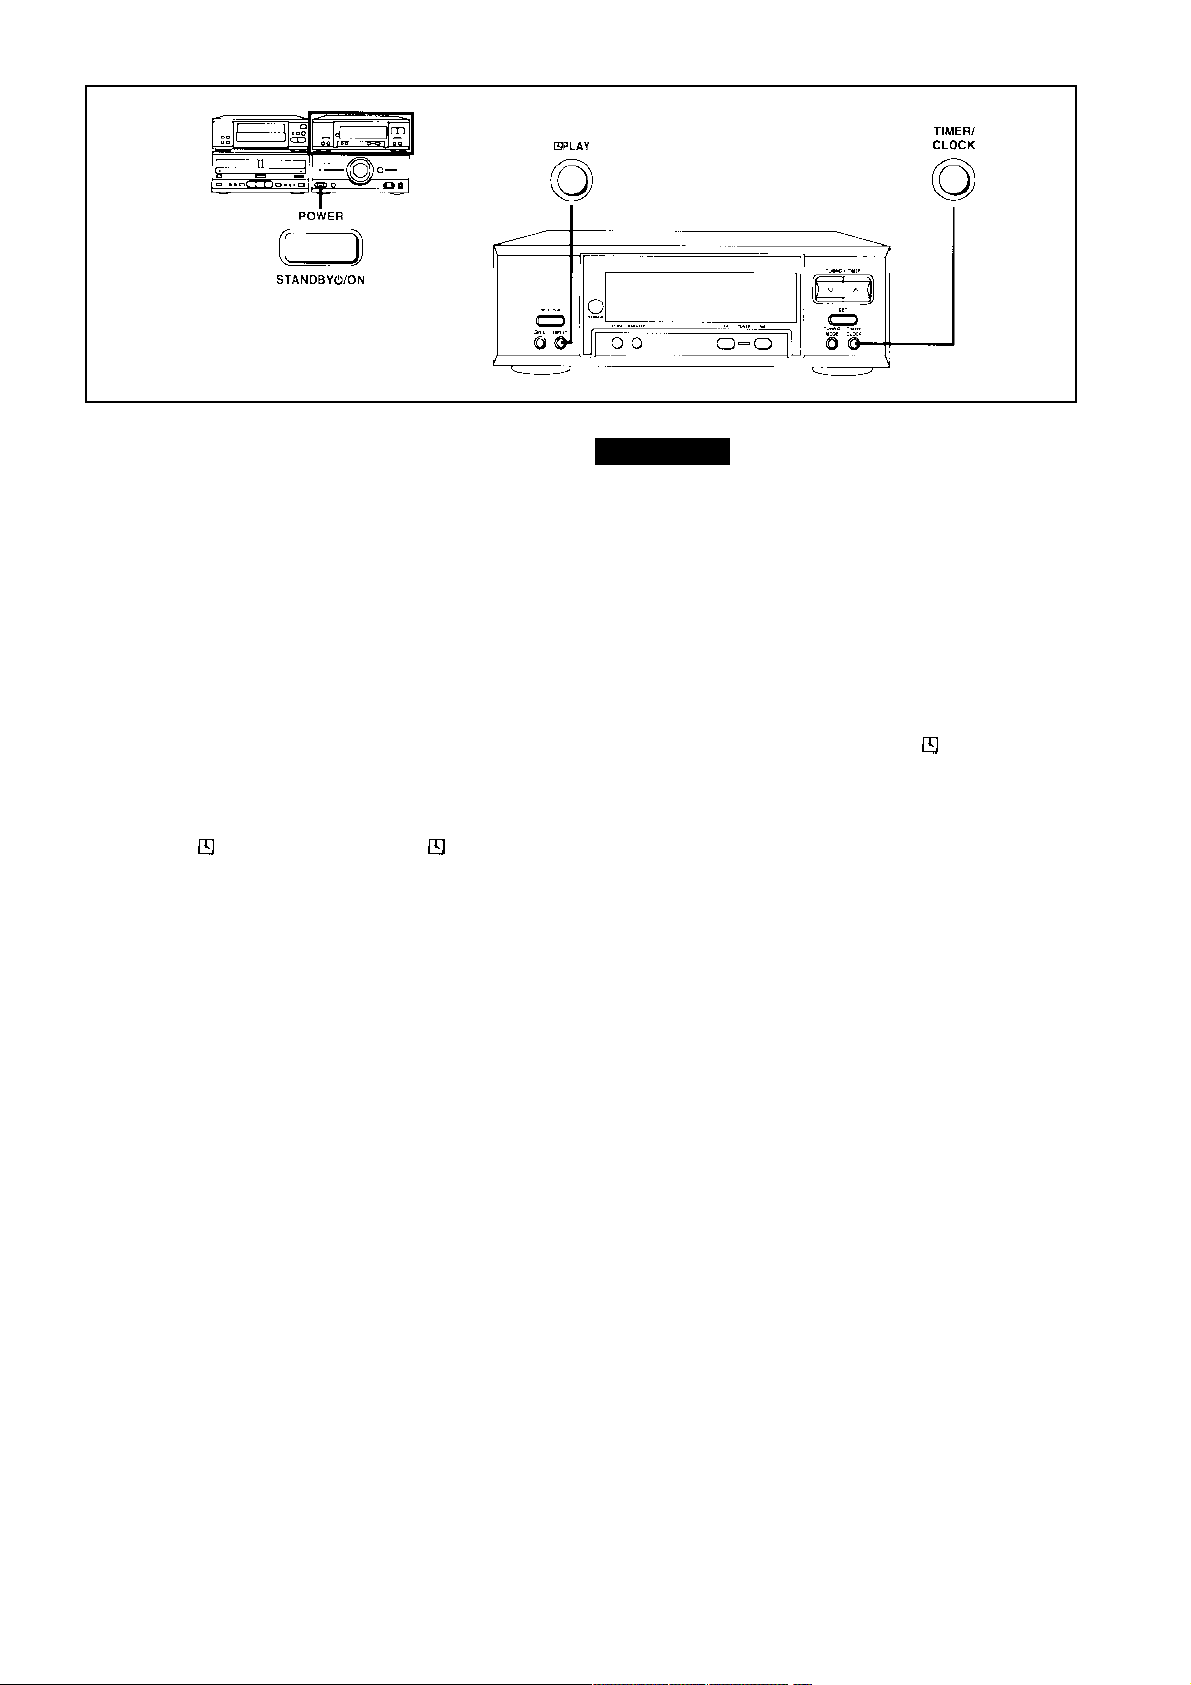
Setting the time
This display has a 24-hour pump system. This guide will show you
how to set the time to 16:25 on Wednesday.
one Turn on the power.
2 À Press TIMER CLOCK to get the
line ?? CLOCK ??. At the end of 8 seconds:
Á Press SET.
3 À Press TUNING / TIMER
day settings.
Á Press SET.
4 À Press TUNING / TIMER
setting.
Á Press SET.
5 À Press TUNING / TIMER
set minutes.
Á Press SET to complete the settings.
and time.
or for ous-
or for ous-
or for ous-
When does ?? SUN 0:00 ??:
It blinks when you are connected to the mains in the first place, or if
the power is lost. If this is the case, stop the time.
If the minutes are not running correctly:
1. Press TIMER / CLOCK.
2. Press SET 3 times.
3. Press TUNING / TIMER
minute, and then press SET.
Here are some basic examples:
Press TIMER / CLOCK.
The display will run for about 8 seconds.
or for installation
The display will return to the previous indication after 3 seconds.
12
Page 13

Removing the frame
A one.
2.
This feature will allow you to set the frequency of the radio stations in
front of you.
Automatic presetting of firing.
The frequency of the automatic is set (in order from low to high
frequencies) in the case of: ?? 1 to 39 are preset for presetting FM
stations, ?? channels ?? 21 to 39 preset for AM stations.
one Turn on the power.
2 Press FM.
3 Press TUNINGMODE to select ?? MAN-
UAL ??.
Each time you press the button, either ?? MANUAL ??, or ??
PRESET ??.
4 Press and operate TUNING / TIMER
or, while the display is not at the speed, start the automatic
Fill up the memory.
TUNING / MANUAL or multi-mode
The setting of the frequency change, when the frequency on the
display will set a lower value. Press the TUNING / TIMER
shortcut, or the frequency does not appear on the display.
5 Press and run SET, and start
Automatic filling of the memory.
Active, show the display does not
Press ?? AUTO MEMORY ??, then release the button.
After the automatic memory setting has been completed, the display
will show ?? SET OK ?? and the last memory frequency channel.
To confirm the presetting of the stations: A
1. Press TUNING MODE to select "PRESET".
2. Press TUNING / TIMER or.
When will the ?? ERROR ??:
The automatic setting has not been adjusted. In this case, perform
the manual installation. (See page 15).
To preset the AM frequency of the radio stations
in memory:
[When the AM steps of the radio stations turn off, adjust the grid.
(See page 14.)] Press AM on step 2, then turn steps 3 through 5.
13
Page 14

A
C
B
Note
When the channel has been preempted,
Some of the previous ones have been removed, the current content of
the channel will be deleted. Так если, например, FM ч астоты
устанавливаются в каналах с 1 по 39, а затем устанавливаются AM
ч астоты, первая AM ч астота будет установлена в 21 канал (таким
образом, сотрется FM ч астота из 21 канала), вторая AM ч астота
установится into 22 channels (the FM frequency of 22 channels is
removed) and so on.
Preset channel
Setting the grid of the distribution of the stations:
A
(only on basic device)
This device is equipped with an electronic digital engine, which
provides a high speed of the engine. The two inter- vals match the
frequencies, the assigned radio stations, and the inter- vals between
the time.
Digital display of channels in presets ??: B
The number of the selected channel is lit (when the selected channel
is on the right side), the selected channel is unavailable (when the
selected channel is on the right side). When a pre-installed channel
is not used, the display of the pre-installed channel is satin (1 - 12,
).
TUNER indicator: C
When listening to the radio:
The answer is green.
And a choice of any other source:
Acknowledged by the Oranjev.
Saving content:
The modemopharmacy is stored in the saved standard
No 2 weeks, before turning off the mains power supply.
The majority of the country assigns (designates) the radio station to
the strip in accordance with the requirements. When adjusting the
stripe, wipe the setting from 9 ct to 10 ct pitch.
1. Press AM.
2. Press and hold AM for about 3 seconds.
To return to the original starting frequency, repeat steps 1 and 2.
Note
After changing the pitch setting, the previously set in the frequency
will be updated.
14
Note
The proper pre-installation will remove the unintentional in the event
that the signal is too strong or silky. In such cases, follow the manual
preset. (See page 15).
Page 15

MANUAL FRAME ADJUSTMENT
This feature will allow you to prevent the radio station from being
sent to the local channel.
This example in the figure will show how to store the FM 88.10 radio
station in the preset channel 1.
one Press FM or AM.
2 Press TUNING MODE to select
?? MANUAL ??.
Each time you press the button, either ?? MANUAL ??, or ??
PRESET ??.
3 À Press TUNING / TIMER or for
Directions to the new station.
Answer "STEREO", when you have set the stereo FM radio
station. Light up "QUARTZ LOCK" when you are in the right
position.
Á Press SET once.
Light up ?? MEMO ??.
Automatic scanning:
Press and maintain TUNING / TIMER, the speed on the
display does not start.
l Changing the frequency on the display of the automatic
If you set the frequency of the radio station at the time of the
setup process.
l When there is a substantial interference, the automatic
Scanning will not work.
To set the automatic scanning, press TUNING / TIMER
or several one way.
Ratio speed:
Display frequency changes with pitch: FM: 0.05Hz
AM: 9köö or 10köö.
or,
4 À Press TUNING / TIMER or to
Selecting a new preset channel.
Á Press SET once.
?? MEMO ?? will go off.
15
Page 16

Listening to radio stations
2
3
A
Working with the handheld manually.
one Turn on the power.
2 Press AM or FM.
3 Press TUNINGMODE to select ?? MAN-
UAL ??.
Each time you press the button, either ?? MANUAL ??, or ??
PRESET ??.
4 Press TUNING / TIMER
Directions to the new station.
Light up "STEREO" when you start using the STEREO FM radio
station. Light up "QUARTZ LOCK" when you are in the right
position.
or for nà-
5 Adjust the volume level as
It is.
Operating with the A-side
Turn on the power and be sure that you have completed the steps
from the unit ??. on pages 13 to 15.
Monophonic Mode in FM Stereo Mode B
(only available with remote control)
If there is a lot of noise in FM stereo mode:
Set the AUTO / MONO to the remote control
Directions for selecting MONO. The sound will be heard as
monophonic. If the radio signal is weak or if the level of interruption
is on, then you will get a clear sound.
To preset the FM station with monophonic sound:
1. Select the set frequency.
2. Press AUTO / MONO on the remote control to select MONO.
3. Perform procedure 2, 3- Á and 4 on page 15.
one Press TUNINGMODE to select ?? PRE-
SET ??.
Each time you press the button, either ?? MANUAL ??, or ??
PRESET ??.
2 Press TUNING / TIMER or to select
16 On the new channel.
Page 17

Listening to discs
Full number of tracks
(When the source of sound is selected - Full time of the program - the
player of the batch
disks)
Marked side -
All the way to the top.
Less time
Follow-up Playback
one Turn on the power.
2 Press OPEN / CLOSE to open slot
êà. Place the highlighted side up on the disc.
Place your pallet at the top of the center slot. When the tray is
closed, check it.
3 Press OPEN / CLOSE to close the slot.
êà.
4 Press.
Playback starts from the first line of the disc. The playback
automatically stops when the playback is finished, and the next
screen stops. When there are more than 13 tracks on the disk,
will it work ?? ??.
5 Adjust the volume level as
It is.
To stop playing a disc:
Press o.
To temporarily stop the disc playback:
Press the button yy, The indicator will blink green. To continue
playing, press.
For your reference:
If you have a mind
The disc is inserted, the tray is left to close, and the playback starts
with the first bar of the disc.
instead OPEN / CLOSE AFTER
When the display shows ?? NO DISC ??:
This means that the disk has not been inserted.
Sensitive indicator:
At the time of stop:
During playback: Green answer.
Acknowledged by the Oranjev.
Full playing time:
The full time of the play is shown with the help of the clock. As an
example, there is a difference during the full playing and sounding
time.
1 7
Page 18

A
B
C
Repeat function A
This function will overwrite the playback of all tracks.
Press REPEAT before or during playback.
Solve ?? REPEAT ??.
To monitor the repeated playback Search function C
nèÿ:
Press REPEAT repeatedly. Said ??
REPEAT ??.
For your reference:
In program play mode (see page 20), the CD player will start
playing. Wip it on one line of the base and the base while
programming only one line.
Start B function
For your reference:
l In the play mode in a random order
(see page 19), Do not skip ahead to the front of the line.
l When playing by program (see
(see page 20), if you do not skip past the programmed lines only.
(Fits only with main unit)
During playback, press and hold any of the buttons |
/ or / |.
Release the button when you reach the desired point.
/ |: Forward search: Forward
search| /
For your reference:
While playing the program and playing as appropriate, the search
will come up in progress. (See page 19 and 20.)
Press each button |
/
|: to run forward
Whenever you press the button, skip just a few lines.
| / : to run backward
When you are empty, skip to start the playable line. If you are shortly
on the base button, then let go until the start of the second line
starts.
eighteen
/ or / |.
Page 19
A
A
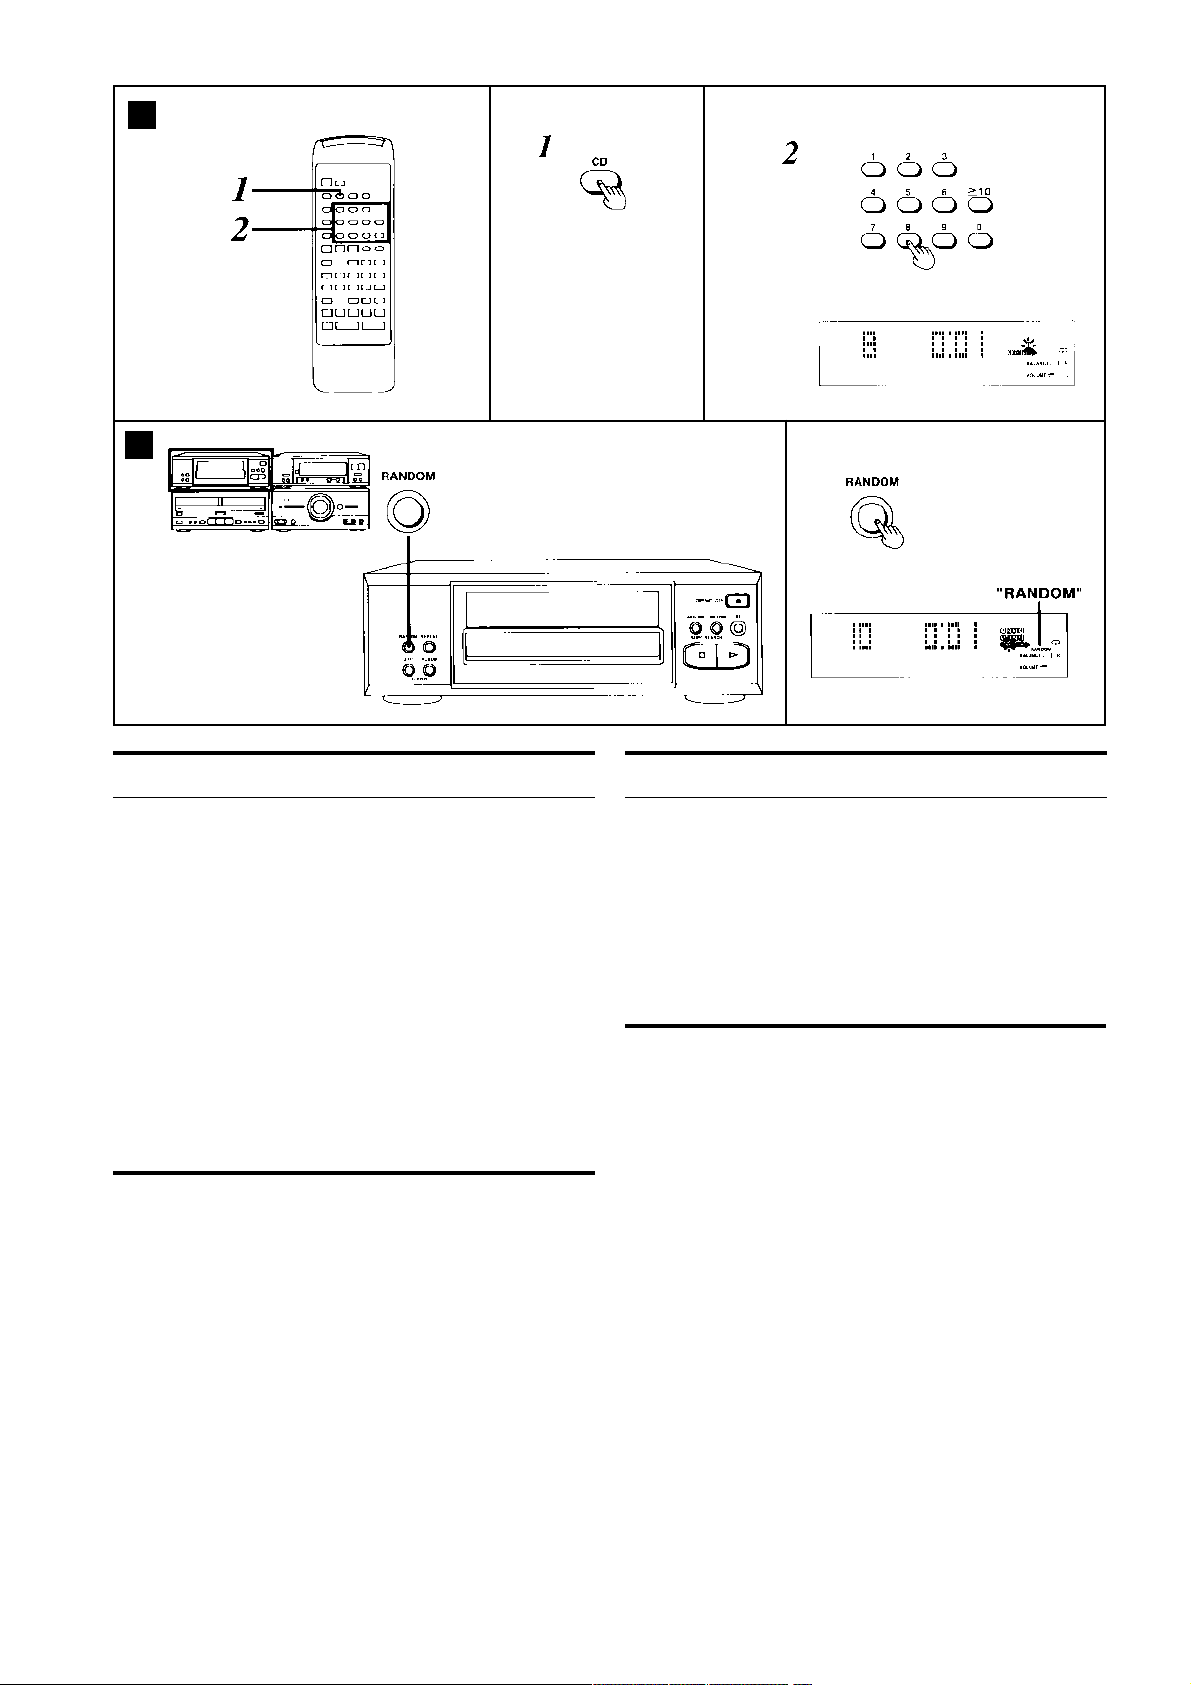
Playback with Access A Play in random order B
(Operated only by remote control) The automatic function selects the order of the tracks for playback in
the case of a random order.
The quick access will start the next video, with the specified next
image.
The example on the picture will show you how to start playing with a
different line.
Take RANDOM.
"RANDOM", and then start playing back in random order. Playback
stops automatically when all the bars on the disc stop playing
automatically.
one Press CD.
2 Press the numbered button to select
The desired number of the line.
Playback will start with the selected track.
To select a dual line number:
≥
≥
≥
Press ≥
Example:
Listing number 13: ≥
Lane number 20: ≥
Listing number 35: ≥
ten.
≥
≥
≥
≥
ten Ö one Ö 3
≥
≥
≥
ten Ö 2 Ö 0
≥
≥
≥
≥
ten Ö 3 Ö 5
≥
≥
To monitor the playback in a random order:
Press RANDOM several times. ?? RANDOM ?? will go off. The CD
player turns back to the Follow-up Mode. When you think of
REPEAT in the up-to-date state, the CD player will repeat the
start-up, ready to run.
For your reference:
In the programmed mode (see page 20), the preprogrammed clock
will be displayed on the fly.
Whenever you press REPEATE in the previously described state,
the CD player will play back as soon as you start.
19
Page 20
Programmed
number line
Grammar step
Full play time
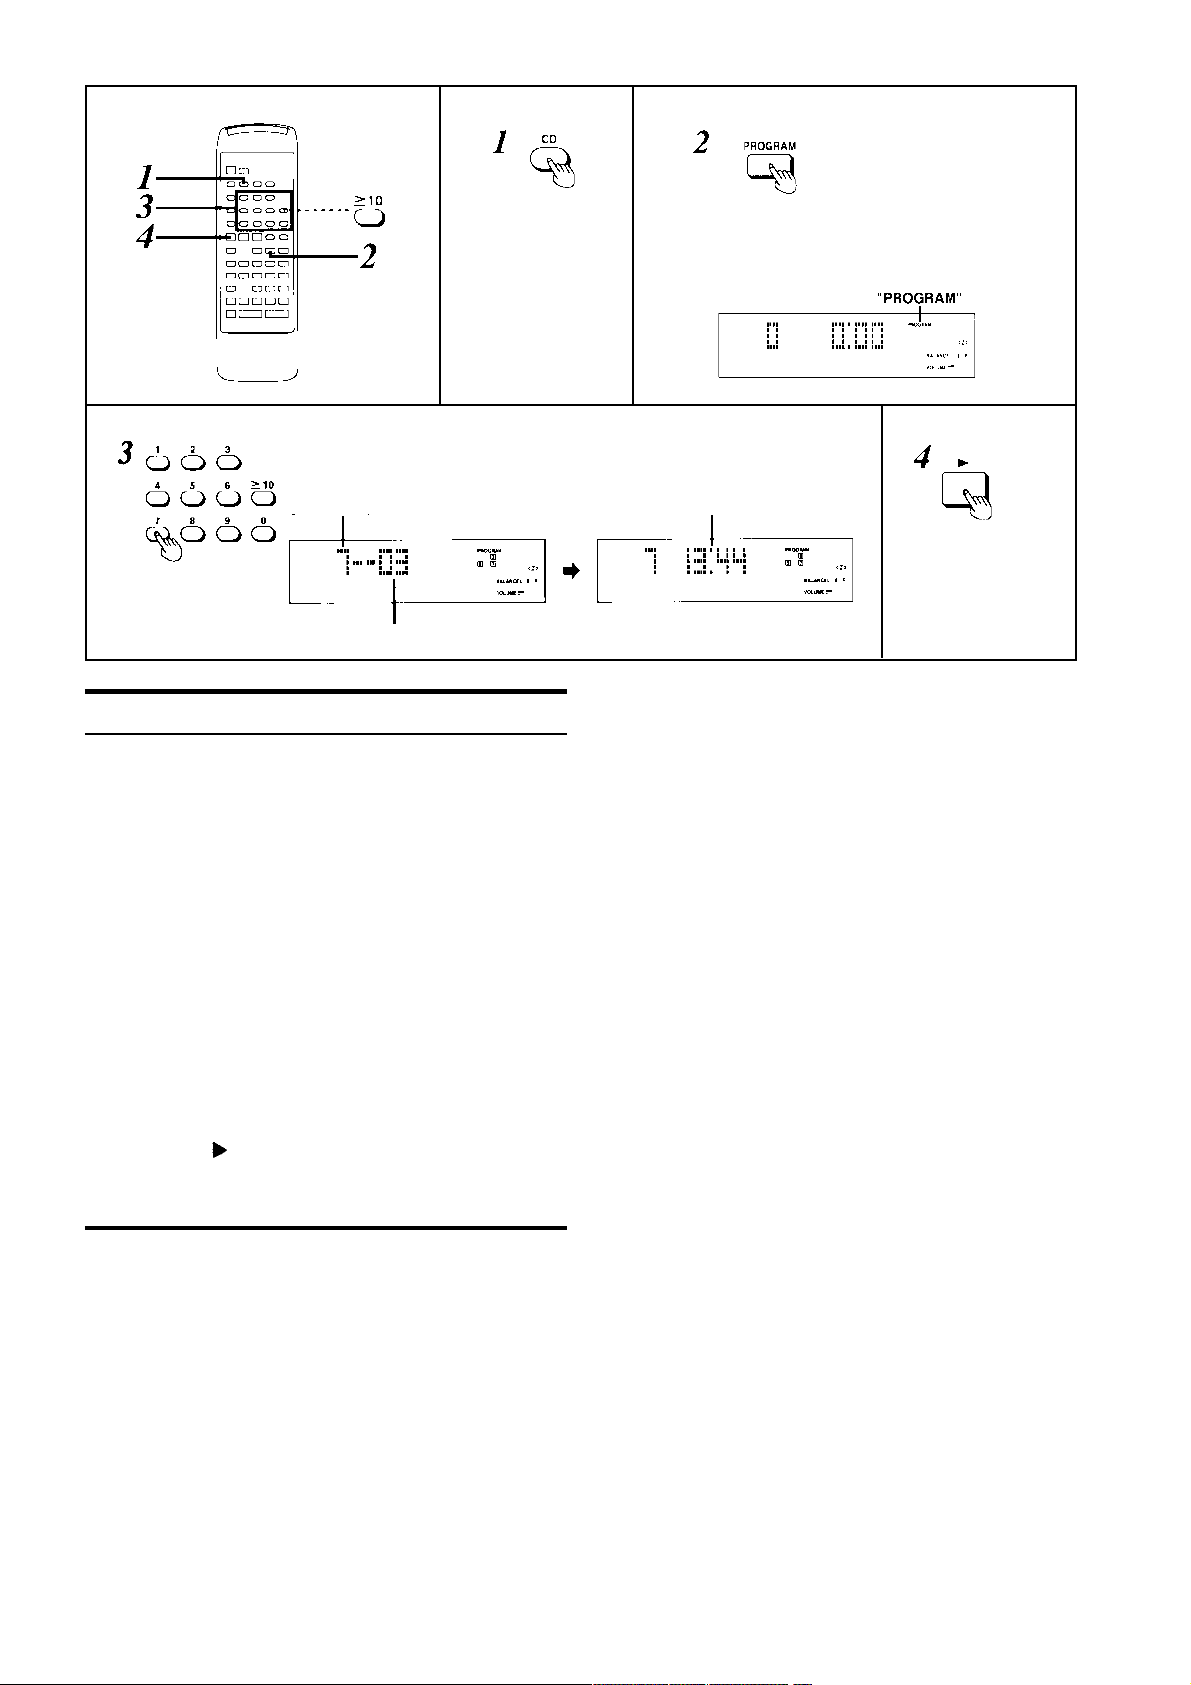
Playing by program
(Operated only by remote control)
This function will let you play up to 24 tracks from the disk in one,
right now, okay. The example in the figure shows how to program
lines 3, 5, and 7 in order.
one Press CD.
2 Press PRORGAM.
Says ?? PRORGAM ??.
3 Press the numbered button to select
The line that you want to play in your own order.
4 Press.
Playback starts in the programmed order.
To finish playing by program:
Press PRORGAM.
The CD player turns back to the Follow-up Mode.
FOR SELECTING DUAL NUMBERS LINE:
≥
Press ≥
Example:
Listing number 13: ≥
Lane number 20: ≥
Listing number 35: ≥
≥
≥
ten.
≥
≥
≥
≥
ten Ö one Ö 3
≥
≥
≥
ten Ö 2 Ö 0
≥
≥
≥
≥
ten Ö 3 Ö 5
≥
≥
For additions to the list:
Press the number buttons, corresponding to the number of the
additional line.
twenty
Page 21

When is ?? FULL ??:
× The loaded tracks are limited to 24. No one else can wipe the
loaded tracks from the other one.
To clear programmed tracks one at a time: C
When will it run ?? -: - ??:
For a full time of playing the loaded tracks, over 99 minutes and 59
seconds, or at the start of 25 times However, the programming and
playback are all possible.
(Using the Digital Buttons)
1. Press CANCEL.
Solve ?? CANCEL ??.
2. Press the numbered buttons on the track you want to delete.
3. Press CANCEL.
?? CANCEL ?? will go off.
(Use |
/ or / | on CD play
vattele)
1. Press CANCEL on the remote control.
Solve ?? CANCEL ??.
2. Please | / or
/ |, while the display is not
Shows the number of the line you want to delete.
3. (Within 10 seconds) Press
CANCEL.
4. Repeat steps 2 and 3 to remove other tracks.
5. Press CANCEL.
?? CANCEL ?? will go off.
To clear all lines:
Press n One way during the stop, or two times during the playback.
2 1
Page 22

Listening to cassettes
Playback
The type of cassettes that can be played on this device:
POTENTIAL / ÒÈÏ I
CRO / ÒÈÏ II
2
ÅÒÀË / ÒÈÏ IV
The automatic device determines the type of film. This page shows
an example of use of the cartridge 1.
O
O
O
one Turn on the power.
2 Press OPEN / CLOSE on the cassette
nike 1, and then insert the cassette.
Insert the cassette with the open side of the cassette on the side.
Insert the cassette, follow the illustration. The display will show
you an example when you start playing from the start of the
canvas.
Insert the cassette, see if it is visible on the rear part of the
compartment.
REVMODE, control the source
from the indicators.
: The magnetophone plays only one side, and then
automatically stops. : The magnetophone plays only on both
sides, but automatically stops. : The magnetophone plays
only on both sides 8 times, and then automatically stops.
When you put the cassette in on the cassette, before playing
the
nits. (See page 25.)
6 Press or.
: Playback to the front side. : Reverse side is played
back.
7 Adjust the volume level like you
It is.
To stop the playback:
Press o.
To change a used cassette recorder:
Press DECK 1/2 to select the cassette recorder you want to play.
Litigated indicator of cassetotoprimernika 1 or cassetotoprimernika
3 Press OPEN / CLOSE on the cassette
nike 1 to close the cassette holder.
4 Press DOLBYNR to select ON (incl-
ON) or OFF (ON).
Is it ok ?? DD B ?? when the Dolby sound system is turned on.
5 Press REV MODE to select the mode
2 2 Heaven.
2.
Relative indicators and:
At the time of stop, move forward or backward: OK.
At the time of playback, recording, or searching for the start of a piece of
music: Welcome green.
Note
Leave your pallet and so on. in the cassette holder.
Page 23

A
B
C
To clear the chip count: A
Это удобно для сброса с ч ет ч ика, когда Вы хотите запомнить
определенноеместо (например, когдаВы хотите перемотать пленку в
середину мелодии и т.п.).
The reader shows the number of the previous films, as a reference
value, the reference value is
1. Press the DECK 1/2 to select a usable cassette player.
2. Press RESET.
l When the display shows the mode or CD
the player, display, counter, control,
Monthly by 1 second.
For your reference:
When the film is moving in the reverse direction, the displayed
counter reads the reverse direction.
äke.
After reaching ?? 000 _ ??, the display is set to ?? 999 _ ??, and
then reads in the online connection.
To change the tape counter: B
During the recording from the disc or radio station, turn the counter,
turn off the timer.
The display shows the mode of the player or the CD player.
Press DISPLAY.
The display will change to the display mode of the film counter.
To return to the front of the display, press DISPLAY once (or when it
has lasted 5 seconds, the display stops.)
TO RUNNING THE FILM FORWARD OR BACK C
Press (TPS)
Example of stopping.
If the indicator is on the front side (): (TPS)
: The timetable will move forward. (TPS)
: The train will run back.
or (TPS) , poka cassette in the
High-speed Backward / Forward:
The magnetophone switches backwards / forwards at high speed
when:
l The magnetophone switches back to the end
cashier
l The magnetophone switches ahead of the release to start.
a cassette
When the high speed backward / forward function is activated, the
?? HIGH SPEED ?? FF / REW indicator flashes.
When at hand (TPS)
High speed back / forward, the magnetophone switches back to the
normal speed.
or (TPS) in time
For your reference:
l Directing the playback of each cassette
The memory will be remembered in the system memory.
l The magnetophone will occasionally flush out the
Backward / forward backward in the middle of the cassette.
l When you turn the cassette forward or
Go back to play or play the cassette in another cassette recorder.
Press DECK 1/2 to switch on non-playable cassette, but press
(TPS) or (TPS)
... After the described operation,
Be sure to use DECK 1/2 to select
The cassette recorder, in which you play the cassette.
2 3
Page 24

When started (TPS)
When started (TPS)
This illustration is for
orders for example,
when it is playing
front side ():
Playable lines
Playback
start
To search for the start of the film (TPS: search for the beginning of the film)
Во время воспроизведения, ч исломелодий соответствующее ч ислу
нажатий кнопкиTPSSKIPбудет пропущено, а нужная мелодия будет
найдена (до 9 мелодий перед и после воспроизводимоймелодии).
one Take TPS SKIP.
Each time you press this button, the display changes as shown
below:
2 Press (TPS) or (TPS) ...
If the front side is playing (): (TPS)
: Drop melodies forward in accordance with the
chosen one on step 1. (?? + ?? illuminated.)
Start lines.
When playing 1 line before or after playing the music:
Press (TPS)
playback.
Notes
TPS is a feature that has a quiet place in youngsters. It will help to
recognize incorrect work in the following situations:
l When there is no spot between the liquid (on
For example, the cassette is recorded with a microphone)
l When the interval is programmed for 4
kund
l When in youth, there are certain codes with
low volume level (for example, classical music)
l When the melody is less than 10 seconds or when the
Less than 10 seconds from the listened point to the next
or (TPS) one at a time
(TPS)
The display shows an example when you have selected ?? TPS
3 ??. If the reverse side is playing: the operations are in place.
Notes
l To change the setting (including the music for the
start, control of the motion of the film, etc.), while the TPS start
function is active, select [] the frequency of the frequency.
l If the specified reference is provided, the
However, the ink is no longer on the sheet, but the nozzle will
stop at the end of the sheet, but the chip will be removed.
: Drop the melodies back according to the chosen
one on step 1. (?? - ?? illuminated.)
2 4
l When a Melting is Recorded with the Zoom Function
or increase the volume
Page 25

one
2
Sequential playback of 2 cassettes
one Press OPEN / CLOSE on the cassette
nike 1 and 2, and then insert the cassette.
Turn on the first side, which you want to listen to first, up the
cassette 1.
2 Press
OPEN / CLOSE to close
each cassette recorder.
3 Press DOLBY NR to select ON or
OFF.
Are you happy ??
Dolby playback.
B ??, when the system is switched on
4 Press REV MODE to select the mode
??.
??
5 Press DECK1 / 2 to select the cassette
Moment 1.
Litigated cassette recorder indicator 1.
6 Press.
À The middle side of the cassette in the cassette
nike 1 ß
â
Á The reverse side of the cassette in the cassette
nike 1
â
 The middle side of the cassette in the cassette
nike 2
â
à The reverse side of the cassette in the cassette
nike 2 -
l After repeating the previously described operation 8 times,
The magnetophone automatically stops.
l When you start playing with the sound
a place with the front side of the cassette recorder 1 ( A). In this
case, the inhibitor 4 will supply 1 after the end of the cycle time.
To stop the playback:
Press o.
For your reference:
l Clean out and select Dolby for
Cassetterecorder 1 and cassettoreceiver 2 correspond. Ìû We
recommend that you use the same type of cassette (Dolby
audio).
Inositelno priority of the cassette
ka:
When you put the cassettes into the cassette, the indicator is lighted
up, part 1 and 2;
When the power is switched on, the indicator of the cassette
recorder is lit 1.
2 5
Page 26

Additional features
D
Easy Playback
A
B C
E
(When R starts)
To turn off the volume D
(Operated only by remote control)
l From the status of the ordering mode, wipe away
Begin playback.
l Playback starts with a ramp
low volume.
Listening to Disc A
Press.
Playback will start with the first line.
If you have programmed the lines (see
(see page 20), playback starts on request. TO ADJUST THE BALANCE RIGHT AND LEFT
Grammed order.
Listening to Radio B
(Operated only by remote control)
Press MUTING -20dB.
Says ?? MUTING ??.
This feature is useful when you call your phone and so on.
To switch, press MUTING -20dB once. For the indication, use the
booster, lower the volume to the minimum level
(???????????????????
Channel E
(Operated only by remote control)
Press TUNER / BAMD.
Take the station to which you have set up the next step.
Listening to cassettes C
Press L or R BALANCE
Display will show ?? ?? or ?? ??. (The display on the picture shows
the incident when the ?? R ?? button is turned on.) The L and R
BALANCE display provides the same time
Press or.
l Playback automatically starts at the same time.
The states (times), which came to the fore.
l When the cassette is inserted into the cassette
kka, cassetotopremennik 1 has a priority.
2 6
Page 27

FOR RECORDING
Magnetic tape
Filament texture
Native panels of the cassettes:
The type of film that can be easily used for recording:
POTENTIAL / ÒÈÏ I
CRO / ÒÈÏ II
2
ÅÒÀË / ÒÈÏ IV
O
O
O
The automatic device determines the type of film.
To use a film pattern:
The rule of thumb is that it’s just a little bit of first revolutions, but do
not write it down.
To tune a recorded sound:
1. Connect the microphone if it is connected.
2. Press SELECTOR on the second / equalizer to select ?? TAPE
??
3. Press DOLBY NR to display the indicator
B.
4. Insert the cassette for recording in the cassette recorder
2.
5. Press REV MODE to select the REV MODE.
Nuclear system of noise suppression Dolby.
The Dolby Amplifier System is pre-set for an efficient, high-speed,
high-speed performance. Во время записифункция системы увели ч
ивает уровень высоко ч астотной составляющей звука, а затем, во
время воспроизведения, эта самая ч асть ослабляется назад до
предыдущего уровня. This system turns on the system of the Dolby
type
B.
Dolby Type B Audio
Fueling, about which the mark comes, one of the three. Используйте
эту систему, когда воспроизводите кассеты, записанные с
использованием системы шумопонижения Dolby B, такие как кассеты
с записанной музыкой и т.п.
The Dolby Sound System is licensed by Dolby
Laboratories Licensing Corporation.
?? DOLBY ?? and double D symbol
Your brand Dolby Laboratories Licensing Corporation.
- this is another
6. Press REC PAUSE.
7. Press or.
2 7
Page 28

Record of radio station
The initial HOWTO is extended by hand. (See page 27.)
one Press AM or FM on the
for transferring the pump / battery in the setup mode.
2 Press TUNING / TIMER or on the block
Power / Equalizer of the new set-up
new station.
Turn off the station, use new setup.
3 Press OPEN / CLOSE on the cassette
nike 2, and then insert the cassette.
Insert the cassette as shown on the cassette. The display shows
an example, when you start recording from the start of the
cassette from the side of the A (front) ??. Enter
the cassette, as long as it does not cover the spare parts of the compartment.
4 Press OPEN / CLOSE on the cassette
nike 2 to close the carrier.
5 Press DOLBY NR to switch on or
turn on.
Lights up "DDB" when Dolby is on.
6 Press REV MODE to select the mode
Heaven.
: Written on one side, but then the auto-matical cassette stops
at the end of the cassette.
: Recorded on both sides (front side Ö back side), and then
the automatic cassette stops at the cassette end.
: Like and above (When you use REC PAUSE, Time ??
?? automatic switch
Are there any ?? ?? and go back when the record is
confirmed.)
7 Press RECPAUSE to transfer the cassette
of a new magnetophone in the pause mode when
writing.
Litted by the RECPAUSE indicator. Indicator ?? ?? or ?? ??
flashes on the play buttons.
8 Please press or to start recording.
To stop recording:
Press o.
For changing the non-technical part at the time of the recording:
1. Press REC PAUSE.
The system of the interdetermination of the transmission
Continuation of the recording.
2. To renew the recording, keep the correspondence of the direction,
in which, write down before the time.
or â
2 8
Page 29

Written with disc company
A
(Side A)
(Side B)
First line
Space
?? ALBUM ??
C First disc Second disc
First line
The third disc Second disc
Part 2 Ways of recording with the disk comp: Editing in one touch
and syncronous Editing.
B
(Side A)
(Side B)
First line
?? J.FIT ??
Linking from multiple discs (LINK): C
After completing the selected recording of the inserted discs,
immediately after that you need to add the
Editing in one touch
Система подс ч итывает длину используемой кассеты и
предохраняется от обрыва звука в середине, когда запись
переходит с одной стороны кассеты на другую сторону.
Editing all tracks in the original sequence (ALBUM): A
Если система определяет, ч то возможна запись большего ч исла
треков на сторонуA, кассетныймагнитофон перематывает назад сторону
A, а затем первый трек, назна ч енный на сторону B, будет записан на
сторону A кассеты.
Up to 24 tracks can be unselected.
Distribution of all tracks without empty cartridge length (J.FIT):
B
Если вели ч ина оставшегося места достато ч но велика, кассетный
магнитофон перематывает сторону A кассеты назад, а CD
проигрыватель выбирает треки, которые более всего подходят для
заполнения до конца стороны A кассеты.
Up to 24 tracks can be unselected.
a car seat.
This function is convenient for recording with 8 cm discs.
Synchronous Editing
The system writes the lines in the original order without counting the
length of the cassette. When you write down only one track, as long
as you need it, use this time.
Whenever you want to save to a new location, use a syncrono drive.
(See page 33.)
2 9
Page 30

A
B
Getting Started for One Touch Recording A
The type of film that can be easily used for recording:
Formal / Type I
CrO / Type II
2
Metal / Type IV
The automatic device determines the type of film. Check the
cassette plate (see page 57) is not a problem.
O
O
O
one Press OPEN / CLOSE on the cassette
nike 2, and then insert the cassette.
It is estimated that the selected record, cassetotopri-
auto-matic cipher caster
If you write it down, it’s completed. So you don't need to
re-arrange the film.
2 Press OPEN / CLOSE on the cassette
nike 2 to close the carrier.
C
D
To start editing in one touch B
There are 2 types of editing in one touch.
Do you have finished the procedure ?? preparation for the record in
one touch ??, described above.
Recording of tracks in their original order (ALBUM) C
See ALBUM.
The record starts after that, how does the system perform the
selection in one touch ?? See page 31.
Distribution of tracks on the cassette without
Free spot on the film (J.FIT) D
Please see J.FIT.
The record starts after that, how does the system perform the
selection in one touch ?? See page 31.
3 Press DOLBY NR to switch on or
turn on.
Are you happy ??
Day.
B ??, when the system is Dolby on
4 Press REV MODE to select the mode
For automatic recording on both sides.
5 Press the OPEN / CLOSE button to insert
Lenin disc, then press it again.
thirty
To end the selection in one touch:
Press o on a cassette magnetophone. The CD player stops.
Page 31

Notes
l Use cassettes for less than 99 minutes.
l Do not delete, select-write down the lines with the number-
over 24.
Operation of selection in one touch:
1. The mains magnet moves the cassette forward and backward to
measure its length.
2. The bus magnetophone will let the initial register pass through,
but then it stops.
3. The CD player will set the lines for sides A and B, and will show
the result. In addition to the updated information, so it will be
shown that the time is on the side of A and B.
When the lines are distributed for side B of the case:
After recording the tracks, provided for the side
A.
To indicate paths for selection:
Please note the lines for selection using the program sequence.
(See page 20.)
Following step 5 on page 30:
1. Place a CD on the remote control.
2. Press PROGRAM on the remote control, and then click on the
lines to write to the memory.
3. Press one of the selection buttons per touch (ALBUM, J.FIT) to
start selection.
After the end of the selection:
The bus magnetophone automatically enters in the recording mode.
When it flashes ?? LINK ??, this means that you need to select the
line from this or another disc for the add-on.
Note
When you do not run, program for more than 24 lines and lines with a
number of more than 24.
To stop a selection:
Press o on the CD player.
3 1
Page 32

Time is gone
at the desk
A
Linking multiple discs (LINK)
When flashing LINK after selecting from a disc, please turn off other
discs.
one Press
One disk on another.
Press
Disk slot. The display shows the cartridge time.
OPEN / CLOSE for replacement
OPEN / CLOSE again to close
2 Press.
The record will start in this mode of choice, that for the first disc.
The system assigns the lines for recording to the original location
of the cassette and will show the Result.
3 Repeat steps 1 - 2 for recording with more
Number of disks.
B
To display the LINK function: A
Press o on the CD player.
To indicate the tracks for selection: B
1. Replace disc.
2. Press the CD on the remote control.
3. Press the PROGRAM on the remote control and display the
number of tracks, while the signal is running.
4. Press the CD player.
Notes
l When the display shows ?? 0:00 ??, do not wash
Write other discs. Press o on the CD player.
l If you have left on the cassette shortly
Go to the track for recording, but do not delete the track. Replace
the disc with a shorter time frame, if left in place, or keep it o
3 2
on the CD player.
Page 33

Synchronous Editing
The type of film that can be easily used for recording:
The point stops at the end of the cassette.
: Like and above (When you use REC PAUSE, Time ??
?? automatic switch
Available ?? ?? and go back when the record is confirmed.)
POTENTIAL / ÒÈÏ I
CRO / ÒÈÏ II
2
ÅÒÀË / ÒÈÏ IV
The automatic device determines the type of film. Check the
cassette plate (see page 57) is not a problem.
The start-up procedure is continued by hand.
(See page 27.)
one Press OPEN / CLOSE on the cassette
nike 2, and then insert the cassette.
The display shows an example, when you start
Please write down from the start of the cassette on side A ( 7 Press RECPAUSE for transferring cassettes
Middle side) with the help of the button ?? ??. Authorized
The cassette, as long as it does not cover the rear part of the compartment.
2 Press OPEN / CLOSE on the cassette
nike 2 to close the carrier.
O
O
O
5 Set the direction of motion
foils.
To change the direction of motion, first press
or on a cassette magnetophone, and on
then o.
: Write down the front side: Write
down the back side.
6 Press
OPEN / CLOSE for insertion
disc.
Press
Sewing.
OPEN / CLOSE again to close
the new magnetophone in the recording mode.
The REC PAUSE indicator is illuminated.
8 Press on the CD player.
The writing starts automatically in the pre-selected direction.
3 Press DOLBY NR to switch on or
turn on.
Are you happy ??
Day.
4 Press REV MODE to select the mode
Heaven.
: Written on one side, but then the auto-matical cassette stops
at the end of the cassette.
: Recorded on both sides (front side Ö back side), and then
the auto-
B ??, when the system is Dolby on
To stop recording:
Press o on a cassette magnetophone. The record stops, and the CD
player continues playback.
When you look o On CD player:
Mains magnetophone supplying system
4 seconds, then enter the start of the record.
3 3
Page 34
After the end of the disc playback:
Mains magnetophone supplying system
4 seconds, then enter the start of the record.
When you go out of the wrong line at the time of the recording:
Before the start of a small line:
1. Press yy on the CD player.
The bus magnetophone creates a place for 4 seconds long, and
then it is displayed in the current format.
2. Load |
next line.
3. Press
Lenia of the record.
/ or
/ | for releasing
on CD player for voices
3 4
Page 35

Write from the register to the register
The level of recording and the effect of noise reduction on the new
drive will have a recorded analogue drive (in sync) The initial code in
some of the cassette recorders is available for the first time.
one Press
OPEN / CLOSE at the same office
and set the cassette.
For playback: In cassette recorder 1 For recording: In
cassette recorder 2.
The display will show you an example when you start recording
from the start of the side of the screen (back to the front). ??.
Insert the cassette while it is not on the spare part of the unit.
2 Press
each owner of the cashier.
OPEN / CLOSE to close
o
3 Press REV MODE to select the mode
Heaven.
: Write on one side
: Write on two sides (front side Ö Reverse side)
: Like and above (When you press TAPE EDIT,
?? The automatic switch is on ?? ??).
??
4 Set the direction of motion ?? ?? but
cassettes 1 and 2.
Press the DECK 1/2 and follow the direction of the plate for each
cassette receiver. To change the direction of motion, first press,
and then o.
To record on the reverse side, set the cassette recorder 2 on ??
??.
5 Press NOR or HIGH from TAPE
EDIT to start recording.
NOR: When you want to follow the sound of the
ìÿ records
HIGH: When the file is written to the
Heights (for example, in 2 times of higher normal speed).
Во время записи светятся оба индикатора кассетоприемников 1 и
2. Индикатор направления движения показывает направления
кассетоприемника 2. Если любой кассетоприемник 1 или 2
останавливается, другой кассетоприемник также
останавливается.
To stop recording:
Press o.
All the cassette recorder stops.
To listen to another source at the time of recording:
Start playing the power source. Vomo-
Do not change the volume level and the tone quality, which will not
appear on the record.
Notes
l Some TVs will create the noise that
Are recorded from the cassette to the cassette at the time. Do
not use this system close to the TV to prevent this kind of
capacity.
l Do not refer to ALBUM or J.FIT at the time of recording
from cassette to cassette.
For your reference:
For an optimal performance, use a cassette to record as long as you
like, if you want to.
3 5
Page 36

Change tone
A B
FOR RESTORING THE CURRENT BATTERY AND SIMULATING
THE CURRENT MEDIUM
Listening A
Press EQ SPACE / FLAT to select the mode. Each time you press
the EQSPACE / FLAT mode, the EQ and SPACE modes are
toggled as shown.
HALL
It is used for generating low-frequency depths and sound
transmission, which is quite useful.
CLEAR
Use for middle to top range for water and so on.
HEAVY
Use to add ?? favors ?? into a latent and other music.
For listening with the addition of bass (V.BASS) B
Press V.BASS.
If you press a button, the display will change as follows:
l V.BASS 2 is more effective than V.BASS 1.
Note
Do not delete the file with the use of the effect
V.BASS.
Effect ?? V.BASS 1 ?? Only for listening from the speaker or the
headphone.
Notes
l Take care not to record with the use of the timer.
HALL, CLEAR or HEAVY.
l ?? HALL ??, ?? CLEAR ?? è ?? HEAVY ?? indicator goes off
Time of recording and starts when recording is finished.
3 6
Page 37

For obtaining the same high quality sound from a disc or
other source
Press to turn on SOURCE DIRECT.
The SOURCE DIRECT indicator is lit at a variable volume. The
sound signal will pass through without the use of a graphics drive,
but instead of the graphics drive
To set the SOURCEDIRECT mode, press the button once. The
SOURCE DIRECT indicator will go off, and the FLAT mode will be
restored.
Notes
l When the button is turned off
Advantage, all other effects (HALL, CLEAR, HEAVY, V.BASS)
and the mode are on.
l When you connect the microphone:
l SOURCE DIRECT button is ON, Mode
SOURCE DIRECT turns on, while FLAT is selected.
l Do not turn off the switch on the mode
SOURCE DIRECT.
3 7
Page 38

Using Dolby Pro-Logic Surround
A
C
B
Both the combination of the front, center, and focus columns, you
can use the SUND, also provide a wide range of
presence, or Mode of the 3-d intermittent sound (3 Setting the center mode C
STEREO), which creates the direction of the
noses.
SURROUND
Playback of depth and dynamic sound, video or disc compilation,
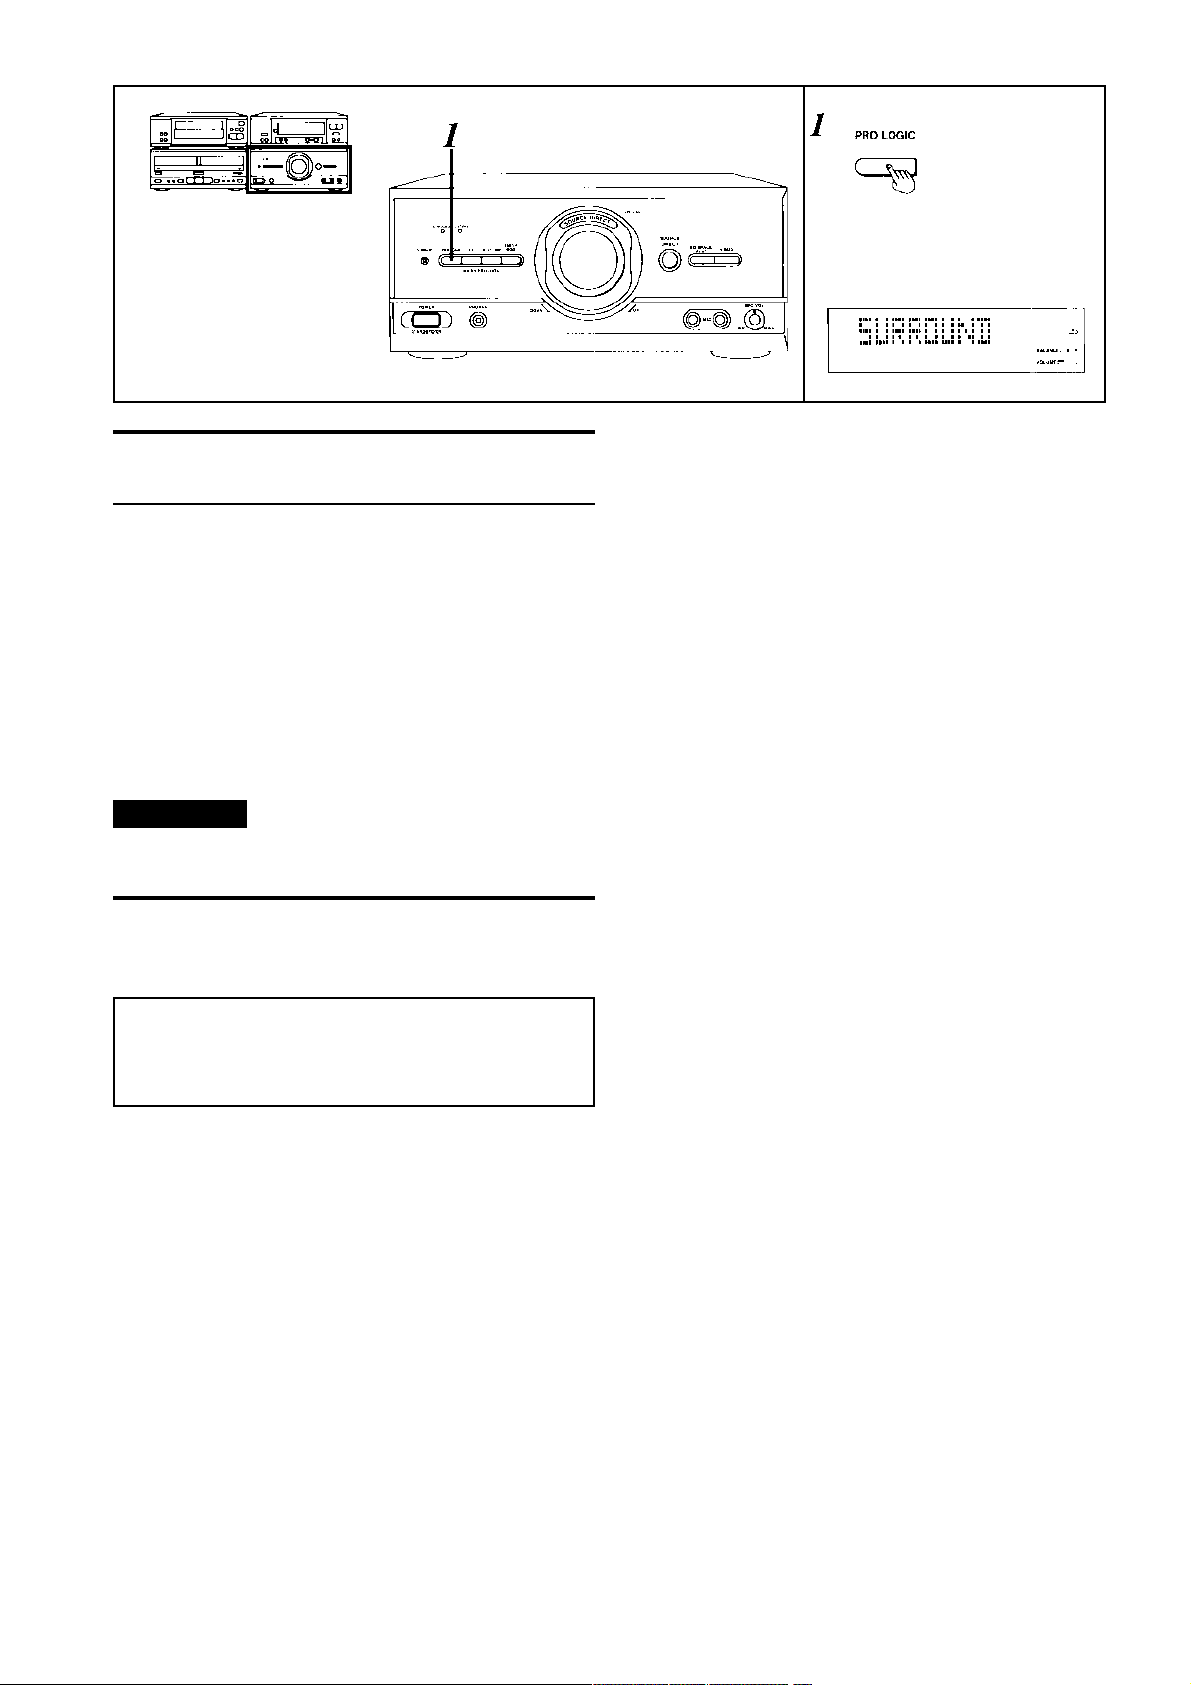
recorded in Dolby Surround mode, securely one Press PRO LOGIC to turn on the system
The listener is a test of the presence, which is created in the cinema.
Installation example: A
À Middle column (L) Ã Middle column (R)
Á Television Ä Tilt bar (L)
 Central column ŠSURROUND bar (R) To get the effect
SURROUND, please note
Turn on the panning column.
To get effect 3 STEREO, please be sure to turn on the center glass.
For Dolby Pro Logic, Center Mode is not necessary for efficient,
low-fidelity playback. Adjust the center mode according to the size of
your center column.
Dolby Pro Logic Tempo to select the new mode.
Pressing the button before pressing the button will change the display as
follows:
2 Press CENTER MODE to select the right
3 STEREO
Wake up the audio source / video source with a good sense of the
sound and sound. 3 STEREO Free to use with source, not recorded
with DOLBY SURROUND.
Variety central mode.
Pressing the button before pressing the button will change the display as
follows:
Setting example: B
À Middle column (L) Ã Tilt bar (L)
Á Central column Ä Tilt bar (R)
 Middle column (R)
3 8
Note
?? PHANTOM ?? Does not show when you select ?? 3 STEREO ??
on the first step.
Page 39

NORMAL:
When the center column is smaller than the front columns.
Note
The zero signal is not received from the center column when the
center PHANTOM mode is selected.
WIDE:
When the center column is of the same size, or more of the front
columns.
PHANTOM:
When the center speaker is not connected.
Note
In PHANTOM mode, the sounds that are 3 Adjust the VOLUME dial to the level
through the central column, will be
Between the right and the left center column.
For Mode 3 STEREO
Middle column a Central column
(left)
Middle column (right) ß
The volume, which is commonly used for listening to the
source.
á
â
Adjusting the output level of speakers A
In order to monitor the sound measurement and its proper
orientation, it is important to adjust the input sound output. Adjust the
output to the correct level while listening to the test signal.
one Press PRO LOGIC to turn on the system
Dolby Pro Logic Tempo to select the new mode.
2 Press the TEST for a test syng
nala.
The signal is received as follows:
For SURROUND Mode
Middle column (left) a Central
column
á
Surrounding columns ß
(left, right)
â
Middle column
(right)
4 Press CENTER (-) or (+) or SUR-
ROUND (-) or (+) on the remote control for adjusting the
balance of the input level.
Adjust the current level of each column based on the position of
the listener, as long as the clock has not stopped. The input level
is +/- 12 in from the front speaker level.
3 9
Page 40

A
A
Notes
l The signal is only inserted in this column,
Regulate some times, but do not repeat afterwards, as long as
the adjustment does not need to be added.
l Please remember, do not wash Adjust the level
of the setting columns, if you selected Mode 3 one Press PRO LOGIC to turn on the system
STEREO on step 2.
To check the test signal: A
Press TEST.
Adjusting the delay time B
(Only when listening with SURROUND effect)
Adjust the sound from the panes until you get the right effect.
Dolby Pro Logic and select SURROUND mode.
2 Press DELAY TIME to select the appropriate
for a long time.
When the button is started, check the current delay, repetitively
changing the delay. The start time will increase the time delay by
5 ms.
Ö 20 мс Ö 25 min Ö 30 min Ö 15 мс Ö
To calculate the timing of the block, refer to the calculation
methods.
Standard installation - 20 ms.
D1 - Distance from the front columns D2 - Distance
from the speakers
4 0
If D1 is equal or less than D2
Stop 15 ms.
If D2 is less than D1
Start at 15ms and increase to 5ms for each 1.5m difference
between D1 and D2.
Page 41
Using the SURROUND Effect or 3 STEREO
Be careful to set the center mode and adjust the output level of the
speakers.
one Press PRO LOGIC to turn on the system
Dolby Pro Logic Temperament and select the internal mode.
2 Select the desired source.
3 Start playing a new one.
point.
Note
WHEN USE SURROUND, USE RECORD,
Full-length with Dolby Surround.
To turn on Dolby Pro Logic:
Press PRO LOGIC to select ?? OFF ??.
Copyright © Dolby Laboratories Licensing Corporation.
?? Dolby ?? and the dual D symbol is the trademark of Dolby
Laboratories Licensing Corporation.
4 1
Page 42

Using the Timer
Setting the playback timer
Would you like to set the time ?? on page 12. Select this timer when
you want to use the timer, which is the signal. When you wash it off,
listen to the music (disc, thread, cassette), while maintaining the
volume level.
The illustrated example on the picture shows how 4 ( Switch-on time setting)
Set the playback time for disc playback to -40 in every day, starting
at 7:40 a.m.
one À Press TIMER / CLOCK to select ??
PLAY ??.
Are you happy ?? PLAY ??.
At the end of 8 seconds:
Á Press SET.
3 ( Power on time setting)
À Press TUNING / TIMER or
Á Press SET.
 Press TUNING / TIMER
à Press SET.
À Press TUNING / TIMER
Á Press SET.
 Press TUNING / TIMER
à Press SET.
2 À Press TUNING / TIMER or to
Good day.
Refer to the chapter “Relatively different settings”? See page
43.
Á Press SET.
for âû-
good luck.
or for âû-
Borya minutes.
or for âû-
good luck.
or for âû-
Borya minutes.
4 2
Page 43

7
A
5 À Press TUNING / TIMER or to
Finding a new source.
Each time you press TUNING / TIMER, the source is changed
as follows:
Á Press SET.
When you selected ?? TUNER ??, select the default preset
channel, use TUNING / TIMER or SET, but instead.
6 À Press TUNING / TIMER or to
Selecting the level of the playback timer.
Á Press SET.
The display shows the day, when the power is turned on, when
the power is turned on, the selected source and the start time
7 Prepare for playing.
When you play the disc:
When you are playing a cassette: Insert a cassette.
Insert disc
To turn off the timer: A
Press PLAY to turn on the indicator ?? PLAY ??.
If you have a mistake:
Press TIMER / CLOCK to return to the first step.
Setting options for the setting:
Day to day
Sunday morning:
Every day since
Sunday morning:
Every day since
servicing:
Every day since
Pertinetics:
Only on the occasion and
salutation:
SUN ... SAT
SUN TO SAT
MON TO SAT
MON TO FRI
SAT TO SUN
8 Press POWER to switch off in
Moderation.
Goodness, confirm ?? PLAY ??. Timer starts playback at the set
time, progressively high-speed, high-speed
value.
4 3
Page 44
To set the time for playback:
Press TIMER / CLOCK to call ?? OPLAY ??.
The display shows the day, when the power is turned on, when the power is
turned on, the power supply, the selected time, and the time
To change the time setting to playback:
Carry out the procedure from the first step.
Using the timer when setting the same time:
Take it out, given that the system is in the mode of origin. The
playback timer setting is in the memory.
1. Press
PLAY, whats the problem ?? PLAY ??.
2. Press POWER to initialize the unit in the serial mode after
listening.
To listen to a new source after the timer is set:
1. Start playing the source from your source. If you change the
volume level or the sound source, then turn on at the same time.
Notes
l When the power is on, the timer does not work.
The system is full of life in the mode of ordination.
l The system saves the set time on
Switch on / off, until you make a new setting. Set the switch-on
time to a new setting, pre-set the switch-on time.
l Do not stop at the same time.
And switching off.
l The time of play is working until the same time, while
Do not turn on the Play Timer. When does the display show ??
PLAY ??, the time of play is active.
l If the system is in the mode of rotation,
When the playback timer is running, at the set time the timer is
not activated.
For your reference:
When the cassettes are inserted into both cassettes 1 and 2,
cassette 1 will be available in the mode of type 1 and 2.
2. Press POWER to initialize the unit in the serial mode after
listening.
4 4
Page 45

Setting the Recording Timer
Would you like to set the time ?? on page 12. Select this timer when
you want to use the timer to record a long time. The system will write
the internal radio station at the specified time.
The illustrated example on the picture shows how to set the time of
the record so that you record the time at 20:30 at 18:30.
one À Press TIMER / CLOCK to select ??
REC ??.
Lit up indicator ?? REC ??. At the end of 8
seconds:
Á Press SET.
2 À Press TUNING / TIMER or to
Good day.
Refer to the chapter “Relatively different settings”? See page
46.
Á Press SET.
3 ( Power on time setting)
À Press TUNING / TIMER or
good luck.
Á Press SET.
 Press TUNING / TIMER
Borya minutes.
à Press SET.
or for âû-
for âû-
4 ( Switch-on time setting)
À Press TUNING / TIMER or to
good luck.
Á Press SET.
 Press TUNING / TIMER
Borya minutes.
à Press SET.
or for âû-
4 5
Page 46

5 À Press TUNING / TIMER or to turn off the timer: A
Find a new channel.
Each time you press TUNING / TIMER, channel
6
A
Press REC, what is the indicator ?? REC ??.
If you have a mistake:
Press TIMER / CLOCK to return to the first step.
The presets are changed as follows: If you choose TUNING /
TIMER, the channels will be available on the board.
Á Press SET.
The display will show the day, during the switch-on, during the
switch-on, the selected radio station, and the start-up time.
6 Prepare to record.
1. Insert the cassette into cassette recorder 2.
2. Select ØÏ Dolby Mode.
3. Select the Mode of the Rovers.
4. Select the direction of the motion of the film.
7 Press POWER to switch off in
Moderation.
Goodness, confirm ?? REC ??.
Writing from the page will start in 30 seconds before the set time.
The sound of the automatic is turned off during the recording.
Setting options for the setting:
Day to day
Sunday morning:
Every day since
Sunday morning:
SUN ... SAT
SUN TO SAT
4 6
Page 47

To set the time for playback:
Press TIMER / CLOCK for the correct time ?? REC ??. The display
will show the day, when turned on, when turned off, radio station by
day.
To change the time setting to playback:
Carry out the procedure from the first step.
Using the timer when setting the same time:
Take it out, given that the system is in the mode of origin. The
playback timer setting is in the memory.
1. Press REC, what is it? REC ??.
2. Press POWER to initialize the unit in the serial mode after
listening.
Notes
l When the power is on, the timer does not work.
l The system saves the set time on
Switch on / off, until you make a new setting. If you set a new
power-on time setting, pre-set the power-on time.
l Do not stop at the same time.
And switching off.
l As soon as the work of the timer is completed,
Timer of the recording is cleared (by excluding the daily timer ??
SUN TOSAT ??). When does the display show ?? REC ??, the
recording time is active.
l If the system is in the mode of rotation,
When the playback timer is running, it will not start at the set
time.
To listen to a new source after the timer is set:
1. Start playing the source from your source. When listening to the
cassette, use cassette recorder 1.
Now, change the sound source, while it is on at the default state.
2. Press POWER to initialize the unit in the serial mode after
listening.
For your reference:
If you want to write one and one program to a non-non-volatile unit
(because you need to search for the source, you should be using
the S).
REC, to get the indicator
?? REC ?? after the end of the timer.
4 7
Page 48

To use the start time
To check that the start time is off:
(Accessible when using the remote control)
Select this timer when you want to use the timer to automatically
start the throttle. The system transmits the power supply in the
interval at the specified time (in the interval of 30 times).
The illustrated example on the picture shows how to set the system
in the order of 30 minutes.
Re-listening to the selected source nika:
Press SLEEP.
Says ?? SLEEP ??.
And by pressing the button, the display changes, as shown below:
(When the timer is off) Press SLEEP.
The display will show the correct time.
To change the timer setting, while the timer is off:
1. Press SLEEP.
The display will show the correct time.
2. Press SLEEP to select a preset time.
Each time you press a button, the display changes as follows:
4 8
Page 49

Using Each Timer upon Coincidence
To store when listening to an FM radio, so that the
next day is listening, listen to
Priority of timers:
The sequence of timers is defined in the following order: time for
switching on, time for recording, time for preset. When setting each
time, be sure not to change the settings.
1. Set the playback timer for listening to the disc.
2. Set up to the internal radio and adjust the volume level.
3. Set the timer to OFF.
To record in time with the radio, while you are sleeping, and
then start listening to the radio, and listen to
1. Set the time to the recording.
2. Set the timer to play for cassette receiver 1, and switch off the
power supply in the mode. (Choose a mode ?? ??. ??.) Be
careful, that the time on the record is switched off, but it should
be turned on.
Listen, listen to the disc, and then write down the radio
station
1. Set the time to the recording.
2. Play the disc and adjust the volume level.
For your reference:
l When the recording time is on and the time is
Turning on the playback timer is matched, and the playback
timer is in operation.
l When the playback time is on
If the time of the recording is on and off, the timer will be set to
work.
3. Set the shutdown timer.
Be careful that the system is moving in the ordering mode of yours, so
that the timers are activated for the record.
Start, listen to the cassette, and start on the next morning,
listen to the disc, and write down the album,
1. Set the time to the recording.
2. Set the playback timer for the disc. Be careful to turn the playback
timer on, so that the timer will start working with the sampler
instead.
3. Play the cassette in cassette 1 and adjust the volume level.
(Choose the Mode of Heaven ?? ??.)
4. Set the timer to power off.
4 9
Page 50

Performing a Microphone Mix
A B
This function will make you enjoy karaoke.
one Connect Microphone to MIC Jacks
after the volume level has been changed.
Pod Type: Monophonic large pane
2 Start playing the disc.
3 Press KARAOKE to select the time.
And with each name KARAOKE, the mode of karaoke is
switched as follows:
VOICE MUTE If you do not use any
small disks.
MONO-L or When use discs with MONO-R
multiplexed sound
or multimultiplexed
net.
OFF
When you use a regular karaoke disks,
use a karaoke normal disk.
To set the KARAOKE mode: A
Press KARAOKE to turn on the KARAOKE indicator.
When the "VOICE MUTE" is on, press 3 times. When is the light
?? MONO-L ??, Press 2 times.
When is ?? MONO-R ??, Press 1 Re.
To adjust the sound: B
1. Press the ECHO.
Lighted by the ECHO indicator.
2. Stimulate the beeping sound on ECHO.
Turn off the beeping sound in the range from ECHO 1 to ECHO
4.
4 Start mixing the microphone and the
Adjust the microphone level.
fifty
Page 51

To record your performance ?? KAKAOKE ??:
Start recording on tape recorder 2, then start with "KAKAOKE". To
play a cassette recorded in the ?? KAKAOKE ?? example, press
KAKAOKE to display the KAOKE indicator.
To record your voice:
1. Connect the microphone to the MIC jacks.
2. Press SELECTOR to select ?? TAPE ??.
3. Press REC PAUSE to re-transfer the cassette
magnetophone at the start of the recording.
Do not use the function ?? KAKAOKE ?? ñ:
l Effects of Tone Changing (HALL, CLEAR,
HEAVY)
l Radio source
If you do not write down in the "KAKAOKE" mode, use:
l Effects of changing the tone (HALL, CLEAR, HEAVY
и V.BASS)
l Radio and cassette as a source
Notes
l This function removes the ineffectiveness of the
Come in different types of music.
l Do not use KARAOKE while recording.
l IF YOU LISTEN TO OTHER NOISES (VISION AND VOI)
During mixing, deactivate the microphone as much as possible
from the speakers or dim the volume of the microphone.
l When you are not using a microphone, connect
These are from the MIC jack, and set the volume level of the
microphone to the minimum.
4. Press or to start recording.
5. Adjust the volume of the microphone.
6. Speak in the microphone.
Note:
Do not record with a microphone with Dolby Pro Logic on.
5 1
Page 52

Using an external device
A
B
FOR USING HEAD PHONES A
Connect your headphone to the headphone socket. Before
connecting, decrease the volume level. Make sure to listen for a long
time to ensure that the hearing range is correct.
Type of Injector: Three Min.
2
Serving external unit B
The illustrated example in the figure will show you how to choose an
analogue player. When you play a device connected to the ??
EXTERNAL ??, select ?? EXT ??.
one Press SELECTOP for "PHONO".
Each time you press the SELECTOR button, the sound source is
switched as follows:
5 2
2 Operate with a device that is connected
Sensitive to the system.
Operation and operation manuals
Neither device for work.
Page 53

A
Written from an external source
The illustrated example on the picture will show you how to write
with an analogue player. When the device is discharged, the
Do ?? EXTERNAL ??, select ?? EXT ??.
one Press RECPAUSE to transfer the cassette
a new magnetophone in the mode of the pause.
2 Press SELECTOR for "PHONO". Letter to external device
3 Please press or to start recording.
4 Start playing the source for the
writing.
Operation and operation manuals
Neither device for work.
To stop recording: A
Press o.
For a simple recording:
Press RECPAUSE. Passenger Magnetophone
Children at the start of the recording.
To update the recording:
Take or in accordance with the direction, in which you want to write.
Start recording with an external device, and then play the source for
recording.
Notes
l Take a while to record the sound with the
power tank, one-time servicing efSurround effect and V.BASS, external.
l Do not use KARAOKE when you write to
external device.
5 3
Page 54

Quick Reference for Remote Control
General Operations
Switching on and off in standby mode
Live playback from the state of the mode
Selecting an input source
Adjusting the volume
Adjusting the volume balance
Switching off the sound temporarily
Working with a timer, a timer
Listening to the radio
Switching the device FM stereoimonore
Cimamè
Turning on / off the timer
Thinking
CD Player
Opening or closing the disc tray
Beginning the play
Timely stopping the playback
L BALANCE R
MUTING -20
one 2 3
AUTO
SLEEP
5 4
Setting up the playback
Launching Tracks
Repeat playback
Start playback with a defined track
Playing specific programs
stokov
Deleting Defined Tracks from a Program
CD
CD
CD
one 2 3
Page 55

Dolby Pro-Logic Surround Operation
Switching off Dolby Pro-Logic Surround
Adjusting the Delay Time
Activating the sound of the test signal
Adjusting the level for the center speaker
Adjusting the level for the columns
The section of the cassette magnetophone
Opening or closing the cassette holder
Switching off between cassette recorder 1 and cassette recorder 2
Beginning the play
- CENTER +
- SURROUND +
Timing the cassette forward or backward.
Search for the start of the music.
Setting the playback and recording
Write
Tone control section
Switching off between the current and the current mode of operation
Turning off the current or current mode of operation
In Stop Mode
During the playback
né
EQ SPACE
FLAT
5 5
Page 56

Microcompact discs
A
D
Only the discs that have this brand can be used with the discs that
have this brand. A
B
E
Marked
side
For disc time from bottle B
Press on the central charge and hold up the disc, keeping it on the
screen.
How to do disc C
C
(Avilino) (Safely)
(Avilino) (Safely)
Preventing disk storage:
Take a look at the disks, if you keep them in the following places:
l Supplied in direct sun light
l Great or good places
l Places where heat is absorbed
or heating appliances
Maintenance requirements:
l Do not write on the marked side with the help of
Wicked handles or other writing tool.
Hold the disc on the back so that the pad is on the surface of the
pallet.
The printouts of the pallets, the load and the carapine may be a problem with
the start and the search.
For storing discs in the D
Place the highlighted disc on the top and take it out of the center.
If the surface is loaded E
Hand-to-hand, light-to-light (single-water)
Dotted.
If the disk is permeable from a cold in a warm environment,
wipes out the moisture on the disk
Wipe off this water with a soft, non-vatted shake before using the
disc.
l It does not use the aerozol, benzin,
ton, antistatics and other substances.
l Do not touch the palms.
5 6
Page 57

Cellular cassette
Side A
Stretch
side A
Choice of cassettes
When using a normal, natural and metal film for playback and
recording
Магнитофон автомати ч ески определяет срок вставленной кассеты и
устанавливает ток (для записи), уровень записи и
соответствующую характеристику усиления.
The color of the cassettes is over 90 minutes:
These cassettes are convenient for long-term playback and
recording, but be sure to keep it there. При ч астых остановках,
пусках и перемотках в пределах короткого интервала эти пленки,
из-за их тонкости, имеют тенденцию растягиваться и запутываться
в механизме.
Stretch
side B
Alekara Lenta
Detective
Verification
If the weakness is weak, see the weakness A
The band of the tape washes away due to film breakage.
To preset the recorded sound
Remove the sheets using the answer or the original item. B
For the second write-up in the charger, open the holes with the help
of the adhesive tape. C
Make sure to check the detectors on clean or metal cages.
End-of-line:
When this tape is running, it must be run correctly, and it must be
changed to the correct setting. For this device, it is recommended to
use the cassette, so that it is ready for the operation with the help of
the system.
Safe storage of cassettes:
If you keep the cassette in the following places, take the film out:
l High temperature (35OC or more) or
moisture (80% or more).
l In strong magnetic fields (near the columns, on
TV, etc.) This can be erased.
l Supplied in direct sun light.
5 7
Page 58

Possible faults
Before starting the procedure for this device, check the reference table for possible probes. Some quick checks or minimal adjustments at
your setting will allow you to keep the volume up and running.
Если Вы сомневаетесь относительно некоторых пунктов, или если средство, показанное в таблице, не решает проблему, обратитесь в уполномо ч
енный сервисный центр или проконсультируйтесь у Вашего дилера.
The problem Cause of the problem Recommended remedy
Problems Relative to the Entire System
There is no sound when the system is turned
on.
Location of different
Musical Instruments
Bad Critical.
The right and left channels are not correct.
When you listen to the outside
No device, right and left channel is
disabled.
Only one speaker emits sound.
There is no sound when the source starts
playing.
On display
?? U70 ??.
will check
Low volume setting.
(+) And (-) Mismatched Sockets Connect the speakers properly.
Incorrect right and left Use the right and left hand jacks for the speakers.
Right and left wrongly connect to the outside
Connectors for an external device. System.
One from the cables of the inner cable should suitably connect the inner columns of the connecting
cable.
(+) and (-) the order of the columns as follows - the system in the mode of order - is correct.
The flat cable is not steel, connect to the flat instead of the place.
Adjust the volume with the help of the controller on
the amplifier.
of columns.
of columns.
of columns.
If you want to connect to the
Columns so that they are not closed. Then turn on
the power.
white. When ?? U70 ?? does not count from the disc
After that, as a flat cable will be connected
properly,
Probably the device has been verified.
Confirm with your dealer.
When listening to FM radio
Is ?? what umû ?? At the same time, it’s
not a good thing at the time of the
monophonic radio station.
Listen to strong noise at the same time as
the third station, and sometimes the sound
is lost
The second indicator flickers and is not
fully illuminated
Sound at the time of the test is very hard
to find
5 8
The default position is slash-
KOM has been very deleted.
Positions and adjustments
Antenna is not suitable.
The default position is slash-
KOM has been very deleted.
Power on TV
or video magnetophone.
Disposable
or go. [Scripts - Typical Interference
Between
Signal from previous
Stations (direct wave) and a signal
removed from a neoplasm or a signal
(sent a wave).]
l If you are using an internal
anti-tennu, change the
shade.
l If you are using a geo-directed
If you have a new antenna, try changing the
installation location, height and orientation.
Try to turn off your TV or video magnetophone.
Use a highly directed
and set it up in a good place, up and down, and set
it up for reception.
Page 59

When listening to the AM radio
When listening to the sound of the If you are using the system, turn off the TV or use the
beating
Listen to low frequency Antenna wire with a slime Separate the antenna wire and the network
sound
Timely with TV. The system is better off from it.
Close to the network port.
food.
If the TV is available
TELEVISORESIS - RELATIONSHIP AND PRINCIPLES - WITHOUT SUPPLY SUPPLIES
The shade, change it to the outside.
on the screen.
The cable to the rear of the system is not a separate cable for the television.
From the system.
When listening to the cassette
Sound low, firstWhether it is of poor quality, it is dumb, it
is delicate or unstable.
The magnetophone is not entering the recording
mode.
Boards are heavy.
ØÏDolby is not installed in the correct position according to the recorded position.
Remove the plate from the cassette Shut down the drive, you have saved it from the record.
When you listen to the disc pack
The display does not indicate a
guideline. I do not
starts up when at the same time
Press the play button.
The disc is not correctly positioned in the
disc tray.
The disk is set highlighted on the top.
The disk is heavy.
The disk is posed.
The disk has been lost badly.
The disk is not standard.
Formulated donations inside
Disc player.
Clean the head.
This is Dolby NR mode.
after removing the plates, the
records.
Insert the disc into the tray correctly.
Enter the disc.
Erase the disc with a soft dot. Replace the disc
with a new one.
Replace disc with other discs.
Turn the power on, then wait 60 minutes before
using the disc player.
When the remote control is in use
The system does not stop working The capacity of the batteries is wrong - just put the batteries in.
from the remote control of the remote control nà.
Directions
All computers are out-of-service to maintain your system. However, if you do not need to maintain the system, be aware that if you are in the
entire system.
Standard sellers.
Insert new batteries.
Go
n Access to the external surface
To clean the device, use a dry, dry cloth. Use a small glass of water,
ample in light water or in a low amount of water.
Turn the point carefully before using the device. Then, rub with a
soft, dry stain. Whenever you do not use alcohol, do not use
body, benzin or chemistry for cleaning this device. Like chemistry, at
the end of the end, it can be used to change your system.
n Clearing Heads
To guarantee the sound quality during recording and playback, you
are sure that the sound frequency is high enough to play.
5 9
Page 60

TECHNICAL SPECIFICATIONS
SEARCH / SEPARATE
n Preamplifier section
Input Sensitivity / Compatibility
PHONO 2.5 ìВ / 47 êÎì
EXTERNAL, VCR, VDP 250 ì / 15 êÎì
Input level
EXTERNAL RECOUT
Playback frequency
PHONO 30Ãö - 15 êÃö / + 1.5äÁ - 2.0äÁ
EXTERNAL, VCR, VDP 20Ãö - 40êÃö
n DOLBY PRO LOGIC PRO LOGIC MODE
SURROUND, 3 STEREO
CENTER Mode NORMAL, WIDE, PHANTOM
Delay time 15, 20, 25, 30 min
n EQ, SFP
EQ SPACE Mode 3 Mode HALL, CLEAR, HEAVY
n FM section Bandwidth 87.50 - 108.00 ÌÃö (0.05ÌÃö øàã)
Liability 1.8 ìêÂ
Signal / Шум 26дÁ 1.5ìêÂ
Signal Shum
MONO
Splitting the three channels
1êÃö
Anti-theft inlet
75Îм (not balanced)
n The AM section
Varace
Functions
24 hour programmable
Play Timer (1 setting), Record Timer (1 setting), Off
(120 minutes, 30 minutes)
Installation 1 minute - 23 hours 59 minutes (Interval 1
minute)
n Bùåå
Size
Weight
УСИЛИТЕЛЬ
n Amplifier section
INPUT CAPACITY
DIN 1 cut, full burner detection 1%, no channel RMS 1 crt,
full detection volume 10%, no channel 2 x 65W (6m)
Pro Logic Mode
DIN 1 cc, full discharge bar 1%,
pre- 2 x 40W (6m)
nesting 40W (4m + 4m)
central 40W (8m)
Full discharge of the batteries
Minimum space at 1 cut 1% (6Îì)
Holster 1kts 0.09% (6Îì)
Input Impedance
Wednesday
nesting
central
Signal um (normal capacity)
Wednesday 90äÁ
150 ì / 1.5 êÎì
70äÁ (75äÁ, IHF)
35 äÁ
270 x 89 x 274 mm
1.7 kg
2 x 50W (6m)
6 - 8Îì
4 - 8Îì
8Îì
n Bùåå
Consumable capacity
213Vò
Power supply 110/127/220 /
230-240V, variable current 50/60 Ãö
Size
Weight
270 x 118.5 x 341.5 mm
4.8 kg
CD REFERENCE
n Audio
ÖÀÏ
1 bit
n Pinza
The length of the wave
780 íì
n Bùåå
Size
Weight
270 x 89 x 266 mm
1.5 kg
SHARE
Magnetophone system Flight Stereo
magnetophone
Tracing system
Recording system
× frequency of current
System of washing
4-line, 2-channel
variable current
100êÃö
erasing the parameters
nim current
Boats
Timer 1
(Playback head)
Temporary head
Runner 2
(record / play head)
Temporary head
(worn head)
Back-to-back strip with double gap
That
Runner 1, 2
Double file
The first motor is on a
constant current
Carrying out a wheel motor
constant current motor
Film speed
Handling and Fluctuations
4.8 см / с
0.1% (WRMS)
Rush time Approximately 52 seconds
(with case C-60)
Playback frequency
(ØÏ Dolby ON)
Formal 20Ãö - 16êÃö (DIN)
CrO 20Ãö - 16êÃö (DIN)
2
Metal 20Ãö - 16êÃö (DIN)
Signal um (Line of Signal = maximum level of record, CrO)
ØÏ on
ØÏ Dolby ON
2
56äÁ
66äÁ
Input sensitivity and resistance
REC (IN) 400ìВ / 23êì
Input voltage and resistance
PLAY (OUT) 280 ìВ / 220 ìì
n Bùåå
Size
Weight
270 x 118.2 x 262 mm
2.3 kg
6 0
Page 61

NOTE КОЛОНКИ
Type 3-strip with 3 dynamics, bass drive
Dinamics
Low frequency:
Percentage range:
Label:
Resistance
Consumable capacity
14cm end-type
6cm end-type
Uezo type
6Îì
100W (musical),
50W (DIN)
Inlet pressure level 86äÁ / Âò (1.0m)
Interval speed 3.3êÃö, 10êÃö
Playback frequency 42Ãö-22êÃö (-16äÁ)
49Ãö-20êÃö (-10äÁ)
n Bùåå
Size
Weight
210 x 413 x 253 mm
4.1 kg
Notes:
1. Specifications can be removed without additional warning. Weight
and size are usable.
2. A complete check of the chargers is measured by a digital
analyzer.
6 1
 Loading...