

Page 1
Technic
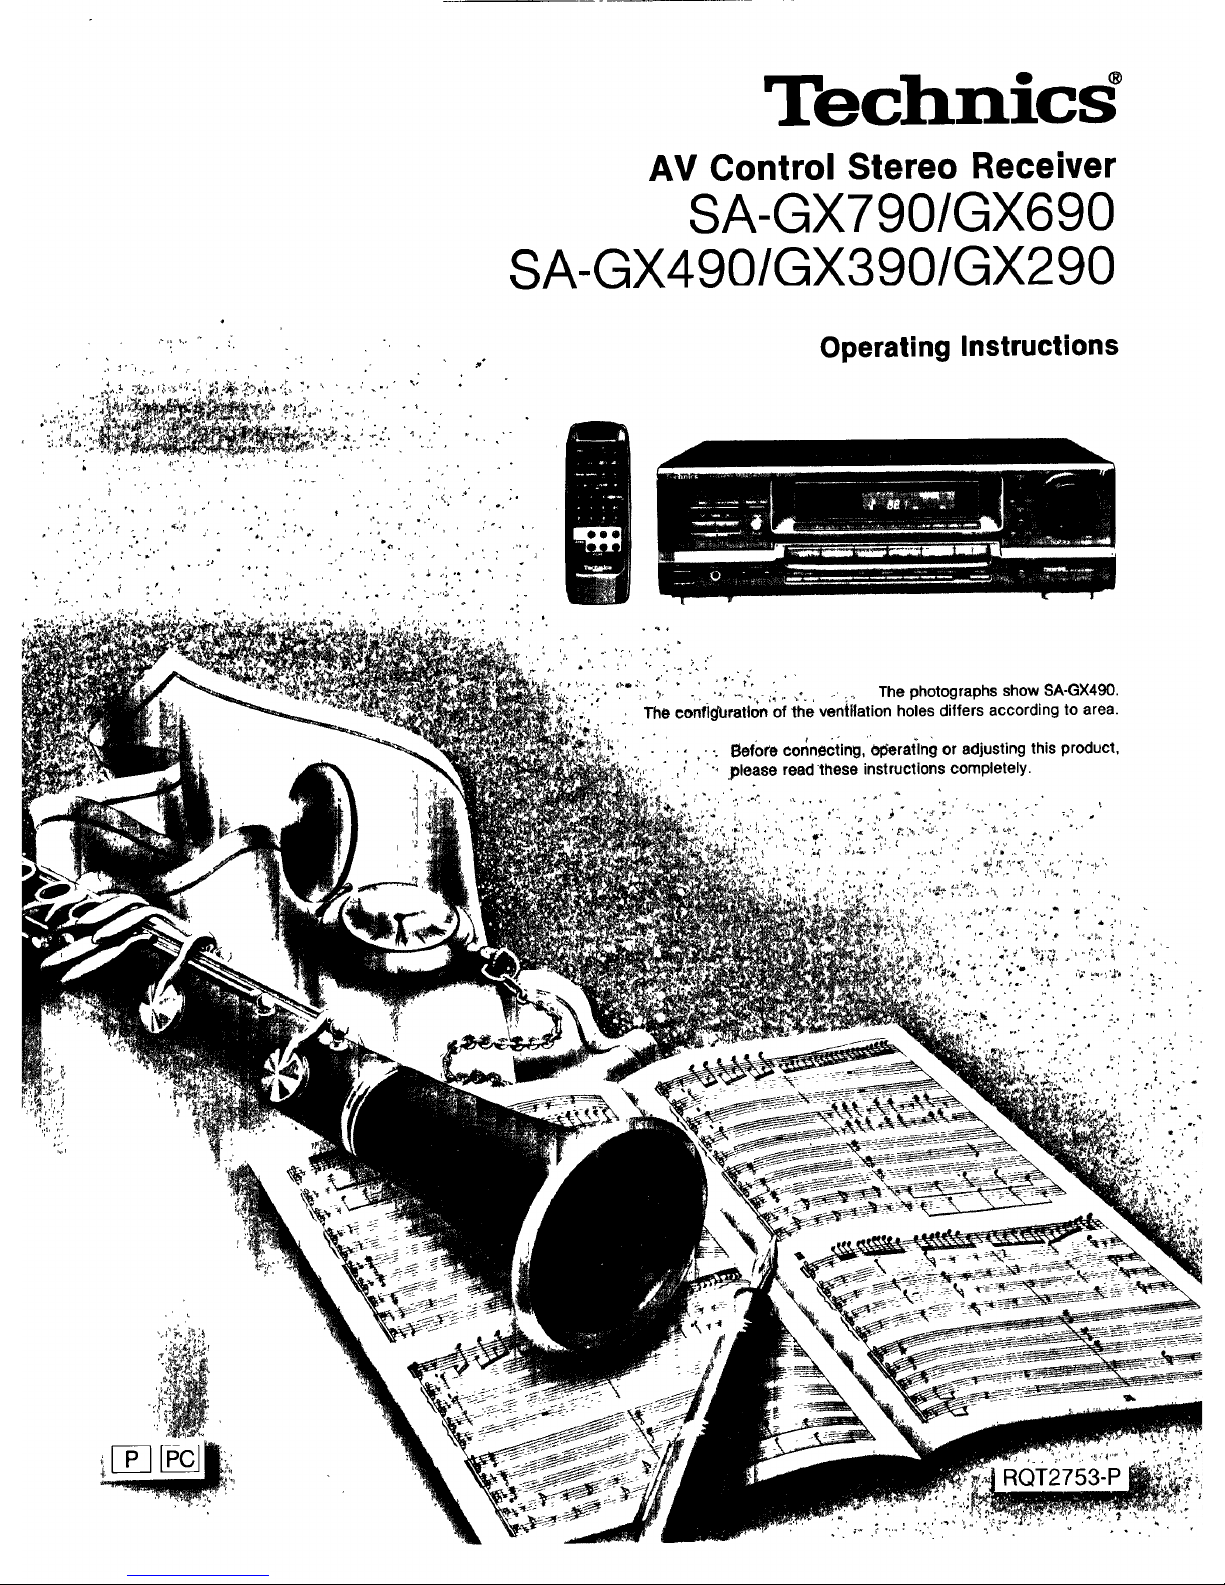
AV Control Stereo Receiver
SA-GX790/GX690
SA-GX490/GX 390/GX290
P
Operating Instructions
, , ,:,, -,,-'
:f. , :, _..... . " _.,,,. j .....¢. , _ , The photographs show SA-GX490.
The configUration of the ventilation holes differs according to area•
!'_' ' " .... . *. Before connecting, olSeratlng or adjusting this product,
, _ ", .please read these instructions completely•
' "7,' °":
4,',' ''_ " '.':" " ,,',,
RQT2753-P
Page 2
Dear Customer
Thank you for purchasing this Technics product.
For optimum performance and safety, please read
these instructions carefully.
These operating Instructions are applicable to
models SA.GX790, SA.GX690, SA.GX490, SA-GX390
and SA-GX290, however, are Intended primarily for
model SA-GX490.
The model number and serial number of this product can be
found on either the back or the bottom of the unit.
Please note them in the space provided below and retain
them for future reference.
MODEL NUMBER .......................................
SERIAL NUMBER .......................................
THIS PHRASE IS APPLIED ONLY FOR U.S.A.:,
CAUTION:
Any unauthorized changes or modifications to this equipment
would void the user's authority to operate this device.
WARNING:
TO REDUCE THE RISK OF FIRE OR
ELECTRIC SHOCK, DO NOT EXPOSE THIS
APPLIANCE TO RAIN OR MOISTURE.
Precautions ................................. ....... ,3
Accessories ........................................ ,4
Front panel controls .............................. S
Equipment connections .......................... 6
Antenna connections ............................. 8
Speaker connections ............................. 9
Basic operetions .................................. 12
If sound output stops during use or if you are unsure
what to do ............................................ 13
To adjust the tone quality .............................. 13
To mute the sound level ............................... 13
To adjust the sound balance ........................... 13
To emphasize low frequency sound
l.-f_,_et:qrJ_[e)let:(,1=IiJFJ,ql ............................... 13
To listen through headphones .......................... 13
To switch the VCR to the front or rear "VCR 2" terminal
...................................... 13
Listening to redid broadcasts .................... 14
Direct access tuning .................................. 14
Sequential tuning ...................................... 14
Preset tuning ......................................... 15
Enjoying sound with DOLBY PRO LOGIC ..... 17
SURROUND .......................................... 17
3 STEREO ............................................ 17
Setting the center mode ............................... 17
Adjusting speaker output level .......................... 18
Adjusting the delay tlme Ik'f_,_et:f_I)n_.,_l,=.mql ........ 19
Enjoying with SURROUND or 3 STEREO ................. 19
Enjoying sound with SFC
E_,'_r_'_[l_'D[f_[I TJ[4_i_,_(;I_I fll,] i i i,i ................................ 20
Adjusting field of sound ................................ 20
Making a recording ................................ 21
Recording on the tape deck ............................ 21
Recording on the VCR (VCR 1).......................... 21
About the HELP function ....................... .22
About the On-Screen Display function
........................................ 22
Product service .................................... 22
Troubleshooting guide .......................... .23
Technical specifications ............. _.Back cover
CAUTION:
TO PREVENT ELECTRIC SHOCK MATCH
WIDE BLADE OF PLUG TO WIDE SLOT,
FULLY INSERT.
CAUTION
CAUTION: TO REDUCE TH E RISK OF ELECTRIC
SHOCK, DO NOT REMOVE SCREWS.
NO USER-SERVICEABLE PARTS
INSIDE.
REFER SERVICING TO QUALIFIED
SERVICE PERSONNEL.
A The lightning flashwitharrowhead symbol, within
_'_ anequilateraltriangle,isintendedtoalertthe user
• P_ tothepresenceofuninsulated"dangerousvoltage"
IL. withintheproduct'senclosurethat maybe ofsuffi-
i cientmagnitudetoconstitutea riskof electricshock
to persons.
__IL Theexclamationpointwithinanequilateraltriangle
Is intendedto alert the user to the presence of
importantoperating and maintenance(servicing)
instructionsinthe literatureaccompanyingtheap-
pliance.
2
Page 3
Before using this unit please read these operating instructions
carefully. Take special care to follow the warnings indicated on
the unit itself as well as the safety suggestions listed below.
Afterwards keep them handy for future reference.
Safety
1. Power Source -- The unit should be connected to power sup-
ply only of the type described in the operating instructions or
as marked on the unit.
2. Polarization -- If the unit is equipped with a polarized AC
power plug (a plug having one blade wider than the other),
that plug will fit into the AC outlet only one way. This is a safe-
ty feature. If you are unable to insert the plug fully into the
outlet, try reversing the plug. If the plug should still fall to fit,
contact your electrician to replace your obsolete outlet. Do
not defeat the safety purpose of the polarized plug.
3. Power Cord Protection -- AC power supply cords should be
routed so that they are not likely to be walked on or pinched
by items placed upon or against them. Never take hold of the
plug or cord if your hand is wet, and always grasp the plug
body when connecting or disconnecting it.
4. Nonuae Periods -- When the unit is not used, turn the power
off. When left unused for a long period of time, the unit should
be unplugged from the household AC outlet.
i
Installation
Environment
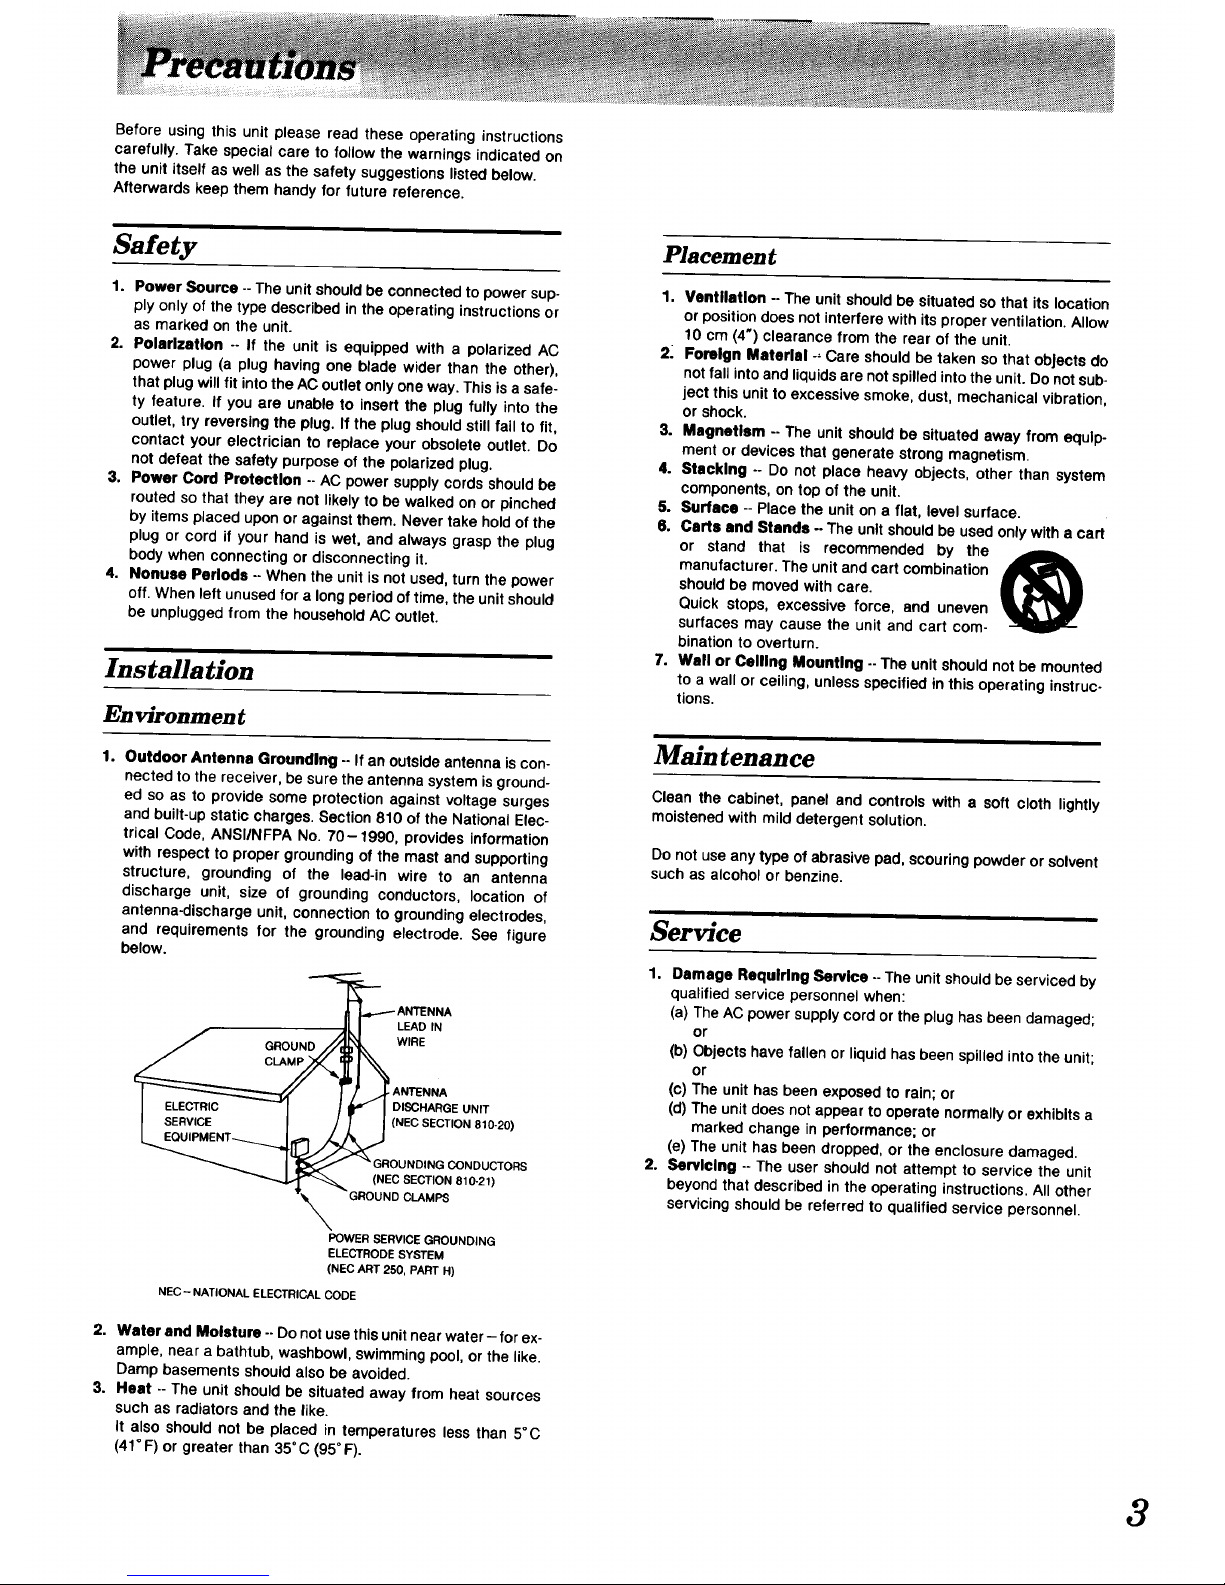
1. Outdoor Antenna Grounding -- If an outside antenna is con-
nected to the receiver, be sure the antenna system is ground-
ed so as to provide some protection against voltage surges
and built-up static charges. Section 810 of the National Elec-
trical Code, ANSI/NFPA No. 70-1990, provides information
with respect to proper grounding of the mast and supporting
structure, grounding of the lead-in wire to an antenna
discharge unit, size of grounding conductors, location of
antenna-discharge unit, connection to grounding electrodes,
and requirements for the grounding electrode. See figure
below.
LEAD IN
WIRE
ANTENNA
DISCHARGE UNIT
(NEC SECTION 810-20)
ORS
810-21)
POWER SERVICE GROUNDING
ELECTRODE SYSTEM
(NEC ART 250, PART H)
NEC- NATIONAL ELECTRICAL CODE
2. Water and Moisture --Do not use this unit near water-for ex-
ample, near a bathtub, washbowl, swimming pool, or the like.
Damp basements should also be avoided.
3. Heat -- The unit should be situated away from heat sources
such as radiators and the like.
It also should not be placed in temperatures less than 5°C
(41 ° F)or greater than 35°C (95° F).
Placement
1. Ventilation --The unit should be situated so that its location
or position does not interfere with its proper ventilation. Allow
10 cm (4") clearance from the rear of the unit.
2. Foreign Material -, Care should be taken so that objects do
not fall into and liquids are not spilled into the unit. Do not sub-
ject this unit to excessive smoke, dust, mechanical vibration,
or shock.
3. Magnetism -- The unit should be situated away from equip-
ment or devices that generate strong magnetism,
4. Stacking -- Do not place heavy objects, other than system
components, on top of the unit.
5. Surface -- Place the unit on a flat, level surface.
6. Carts and Stands -- The unit should be used only with a cart
or stand that is recommended by the
manufacturer. The unit and cart combination
should be moved with care.
Quick stops, excessive force, and uneven
surfaces may cause the unit and cart com-
bination to overturn.
7. Wall or Ceiling Mounting -- The unit should not be mounted
to a wall or ceiling, unless specified in this operating instruc-
tions.
Maintenance
Clean the cabinet, panel and controls with a soft cloth lightly
moistened with mild detergent solution.
Donot use anytypeof abrasivepad,scouringpowderor solvent
suchas alcoholor benzine.
Service
1. Damage Requiring Service -- The unit should be serviced by
qualified service personnel when:
(a) The AC power supply cord or the plug has been damaged;
or
(b) Objects have fallen or liquid has been spilled into the unit;
or
(c) The unit has been exposed to rain; or
(d) The unit does not appear to operate normally or exhibits a
marked change in performance; or
(e) The unit has been dropped, or the enclosure damaged.
2. Servicing -- The user should not attempt to service the unit
beyond that described in the operating instructions. All other
servicing should be referred to qualified service personnel.
3
Page 4
4
Listening caution
@
Selecting fine audio equipment such as the unit you've just pur-
chased is only the start of your musical enjoyment. Now it's time
to consider how you can maximize the fun and excitement your
equipment offers. This manufacturer and the Electronic In-
dustries Association's Consumer Electronics Group want you to
get the most out of your equipment by playing it at a safe level.
One that lets the sound come through loud and clear without an-
noying blaring or distortion-and, most importantly, without affec-
ting your sensitive hearing.
We recommend you to avoid prolonged exposure to excessive
noise.
Sound can be deceiving. Over time your hearing "comfort level"
adapts to higher volumes of sound. So what sounds "normal"
can actually be loud and harmful to your hearing.
Guard against this by setting your equipment at a safe level
BEFORE your hearing adapts.
To establish a safe level:
• Start your volume control at a low setting.
• Slowly increase the sound until you can hear it comfortably and
clearly, and without distortion.
Once you have established a comfortable sound level:
• Set the dial and leave it there.
Taking a minute to do this now will help to prevent hearing
damage or loss in the future. After all, we want you listening for a
lifetime.
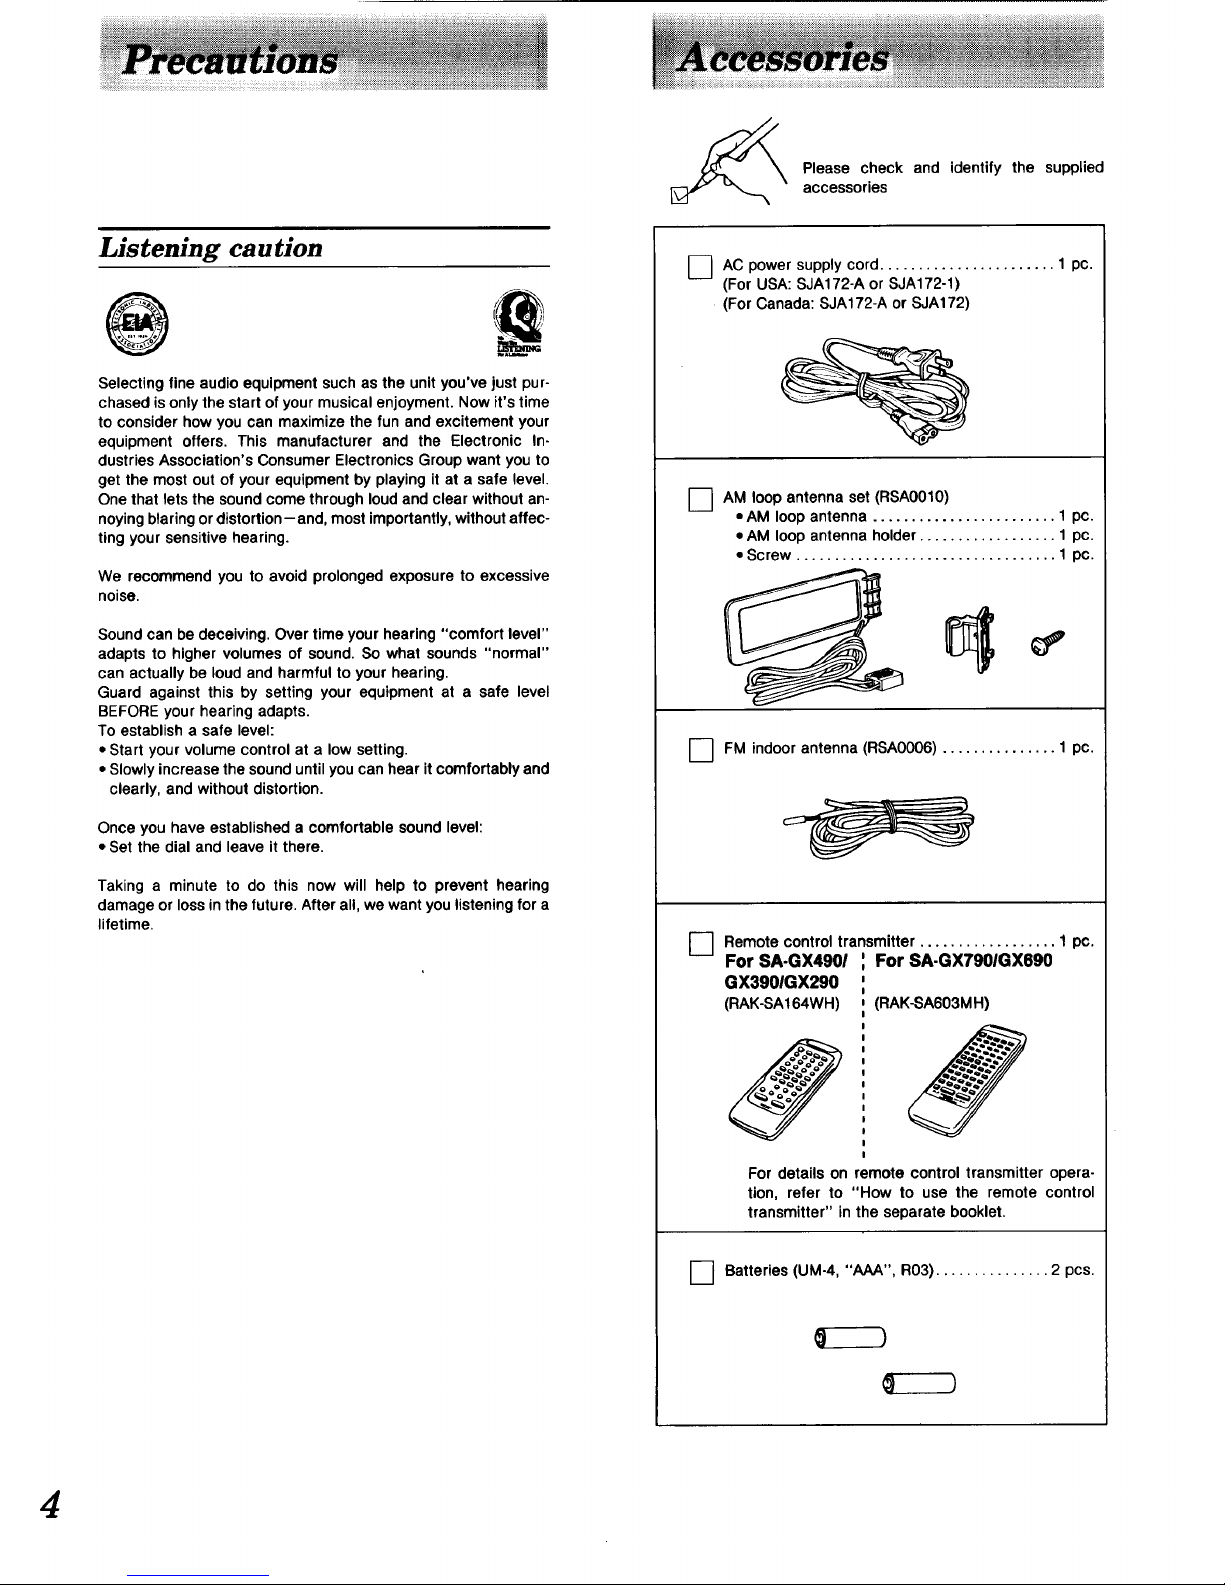
Please check and identify the supplied
accessories
O AC supply cord 1 pc.
power
(For USA: SJA172-A or SJA172-1)
(For Canada: SJA172-A or SJA172)
O AM loop antenna set (RSA0010)
• AM loop antenna ........................ 1 pc.
• AM loop antenna holder .................. 1 pc.
• Screw .................................. 1 pc.
FM indoor antenna (RSAO006) ............... 1 pc.
0
Remotecontroltransmitter.................. 1 pc.
For SA.GX4901 For SA-GX7901GX690
GX3901GX290
(RAK-SA164WH) (RAK-SA603MH)
For detailson remote control transmitter opera-
tion, refer to "How to use the remote control
transmitter"inthe separatebooklet.
O Batteries (UM-4, "AAA", R03) ............... 2 pcs.
Page 5
J
[ 13tTil_" f_IIl'}:f# IlYIlt:(,'_ll !
I DOLB¥ _ -MUTING
g g
]
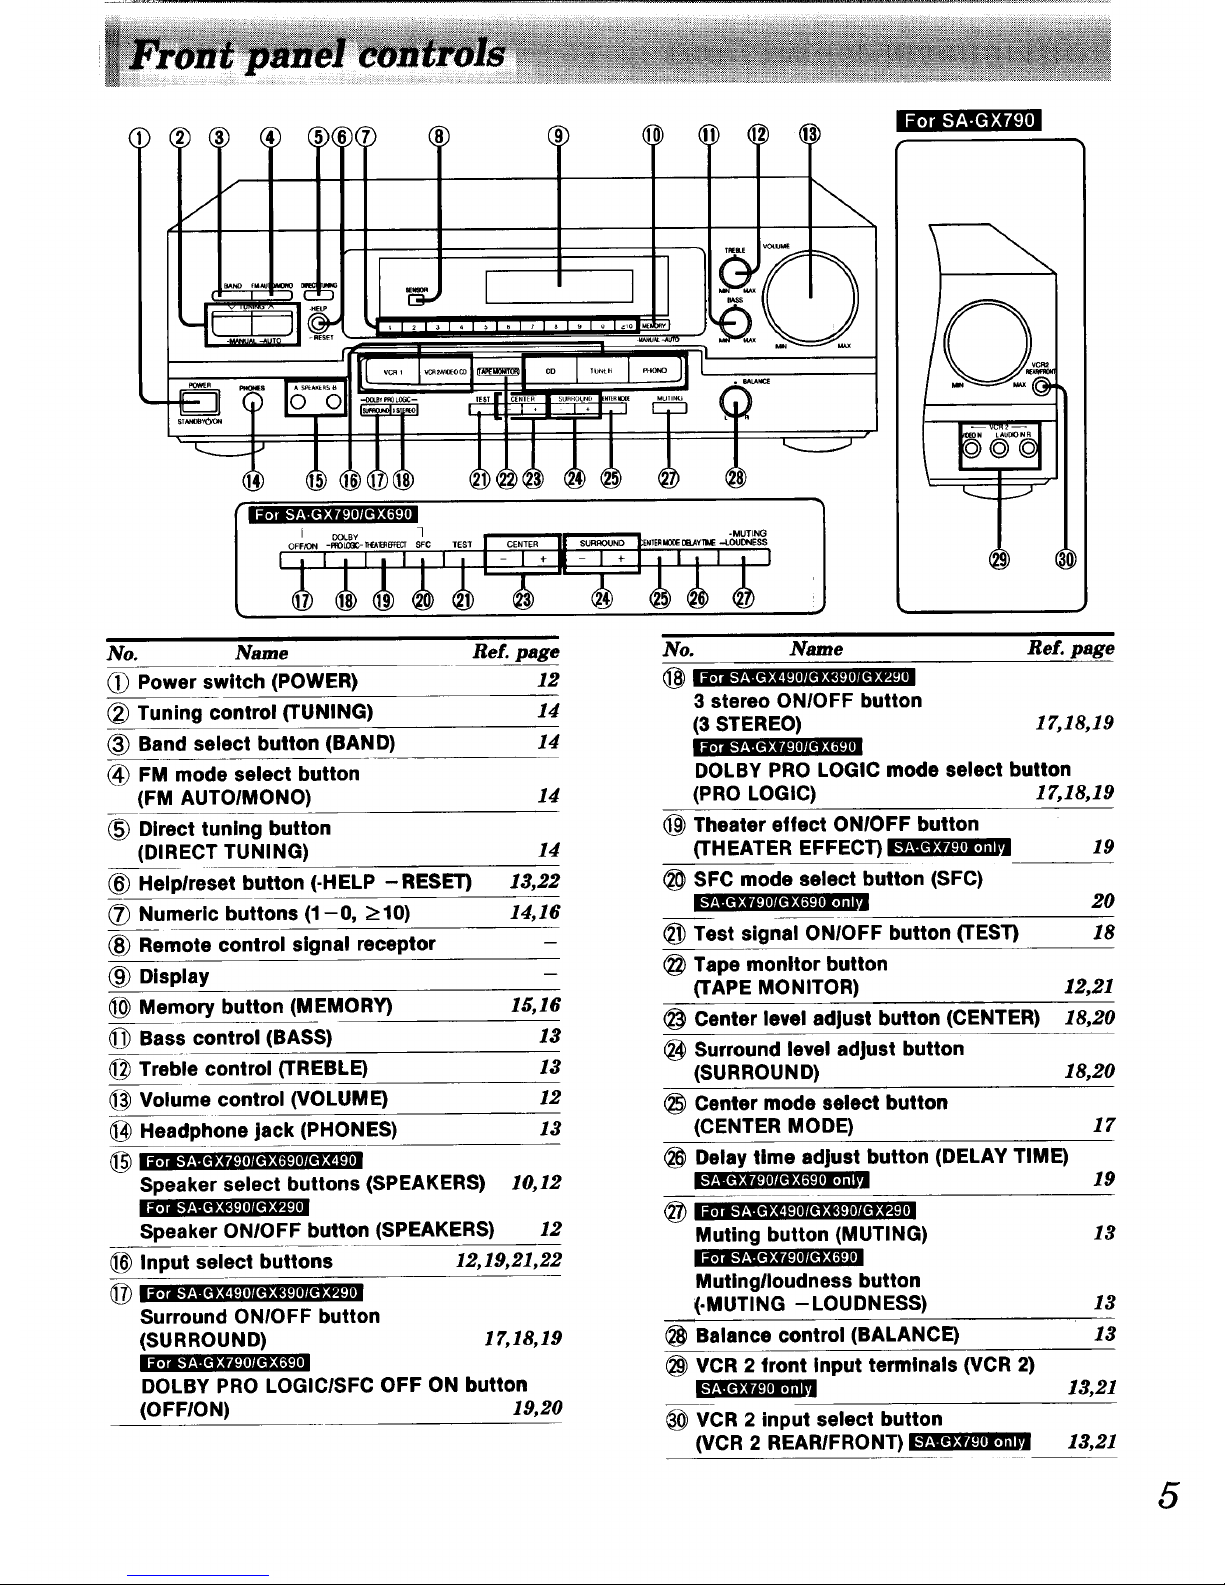
No. Name Re£. page
Power switch (POWER) 12
Tuning control (TUNING) 14
Band select button (BAND) 14
FM mode select button
(FM AUTOIMONO) 14
Direct tuning button
(DIRECT TUNING) 14
Helplreset button (.HELP -RESET) 13,22
Numeric buttons (1-0, >10) 14,16
Remote control signal receptor
Display
Memory button (MEMORY) 15,16
Bass control (BASS) 13
Treble control (TREBLE) 13
1_ Volume control (VOLUME) 12
Headphone jack (PHONES) 13
_ I _;Ti_'Y;][elt;f_l I//tlKq._IITIlt;q_ l_lll
Speaker select buttons (SPEAKERS) 10,12
I'tTdl_l_]It_ilrd_II]IltN *'I_l
__ O};f_DMtI.(.'_DI;]_ I
11;1"i._',.N£etP:_IeTI4riK4PJ_I
Speaker ONIOFF button (SPEAKERS) 12
Input select buttons 12,19,21,22
_ i IISTdl.'__,I[I_;4_KIIIII}:qC_IITII};4_III
Surround ONIOFF button
(SURROUND) 17",18,19
:l;1"m=f-_:#'_I01IO:( ,_]
lsTi." f__Nlel:4r4_10KO:(,_]
DOLBY PRO LOGICISFC OFF ON button
(OFFION) 19,20
No. Name
3 stereo ONIOFF button
(3 STEREO)
Ref. page
1_1&19
@
®
@
®
@
@
DOLBY PRO LOGIC mode select button
(PRO LOGIC) 17,18,19
Theater effect ONIOFF button
(THEATER EFFECT) I_
SFC mode select button (SFC)
Test signal ONIOFF button (TEST)
Tape monitor button
(TAPE MONITOR)
Center level adjust button (CENTER)
Surround level adjust button
(SURROUND)
Center mode select button
(CENTER MODE)
Delay time adjust button (DELAY TIME)
I I'_'i€ f *_1[0:4_ KIOIIIt}:I{_I IT|t]}If_l_lll
Muting button (MUTING)
19
20
18
12,21
18,20
18,20
17
19
13
Mutinglloudness button
(-MUTING - LOUDNESS)
Balance control (BALANCE)
VCR 2 front Input terminals (VCR 2)
VCR 2 input select button
(VCR 2 REARIFRONT)
13
13
13,21
13,21
5
Page 6
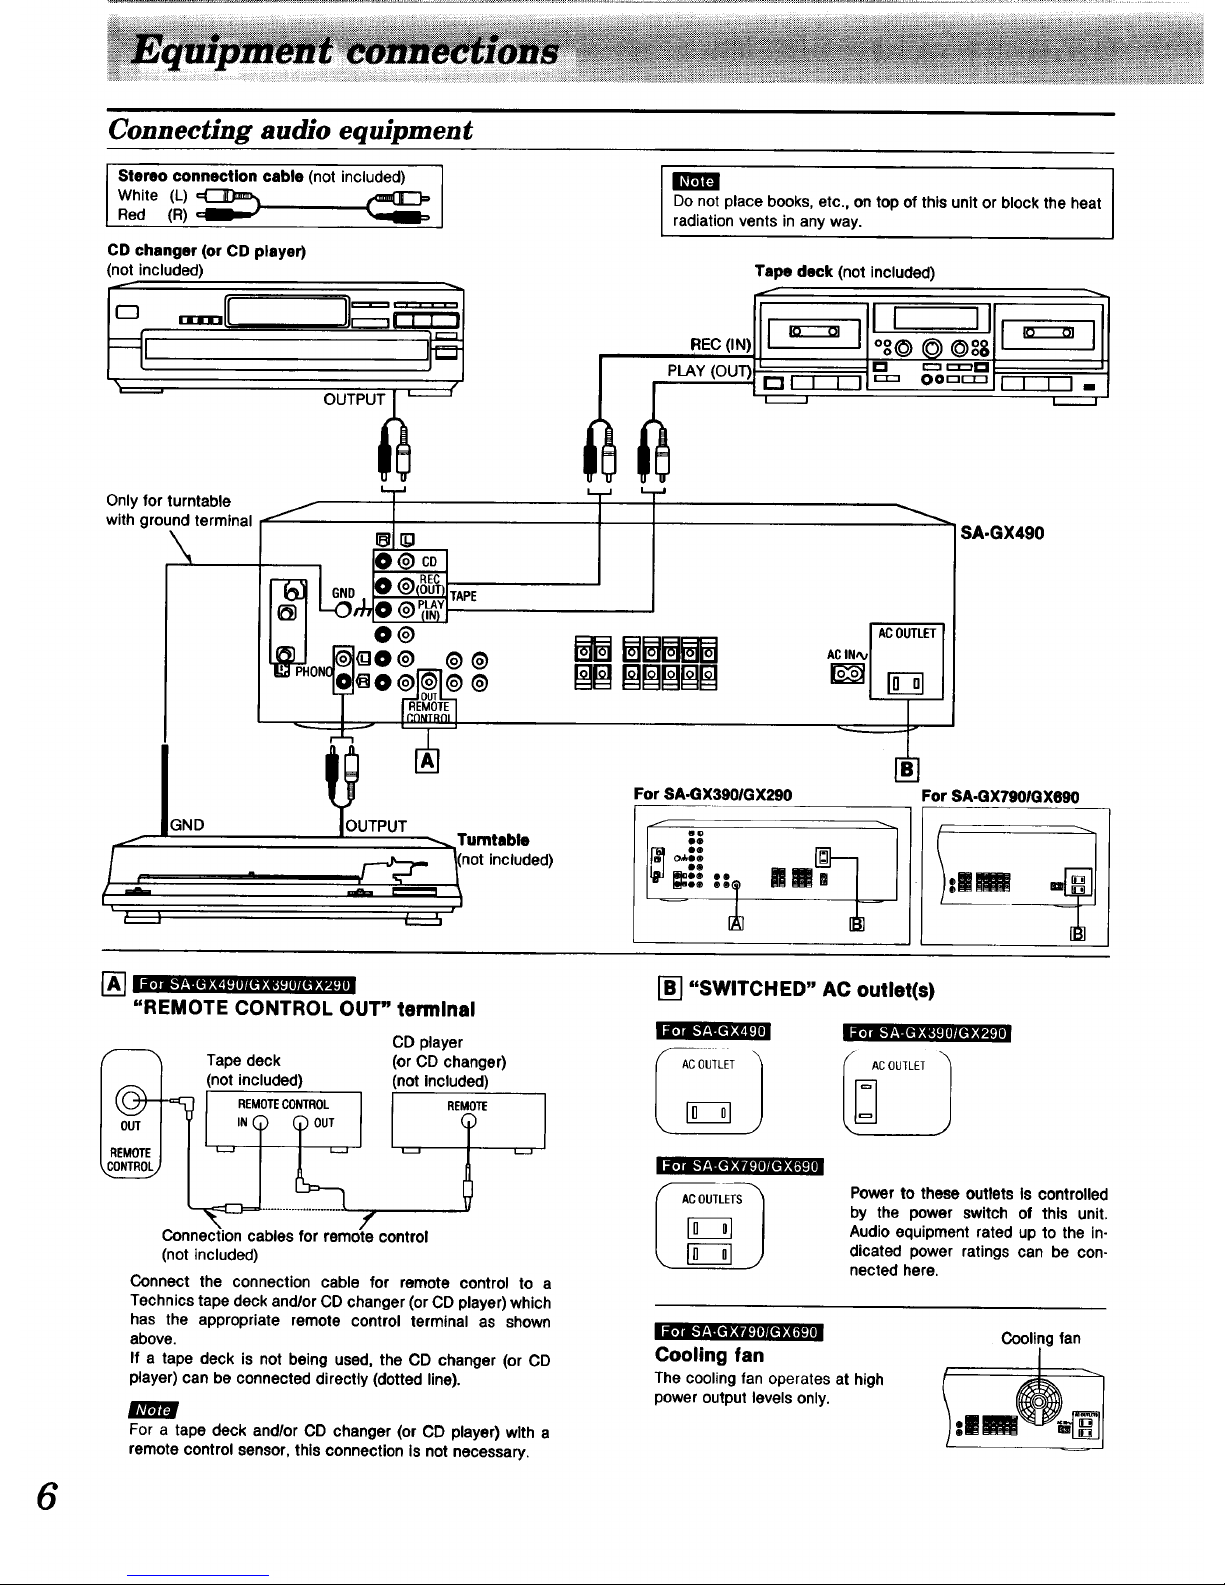
Connecting audio equipment
Stereo connection cable (not included) ]
White (L)
Red (R) • •
I
Do not place books, etc., on top ofthis unitor block the heat
radiationvents in anyway.
CD changer (or CD player)
(not included)
L. J
Only for turntable
with ground terminal /
8
ONOL_ 0 _
"-; T
IGND
_3
@ CD
REC
IOUT)TAPE
/_ PLAY
(IN) :
@
@
@
Tape deck (not included)
REO(,N)f',ro oooo',,I,Dil
L_ -J
BBBBB
/-
q
TPUTp:I
_. Turntable
,/_" I(n°t included)
"_" "-" ,/
t___5
ACOUTLET
SA-GX490
For SA-GX3901GX290 For SA-GX7901GX690
_:: t'_ M " tmU ,=
] I ii)] Ib'1;llL'l_t I:1 IILtI_I{_J Irlll:f_i:{I l
"REMOTE CONTROL OUT" terminal
iD] I1" f!lltl_qCg lll{I}:f,_]
Tape deck
not included)
REMOTECONTROL
CD player
(or CD changer)
(not Included)
I REM0111:
f
i[o]m.-f±l[_'_Zvm:ImlAt't,_1.'1€1
Connection cables for remote control
(not included)
Connect the connection cable for remote control to a
Technics tape deck and/or CD changer (or CD player) which
has the appropriate remote control terminal as shown
above.
If a tape deck is not being used, the CD changer (or CD
player) can be connected directly (dotted line).
i[,] I-'I-'1_;f$I IllL1;q ,_1_
m
For a tape deck and/or CD changer(or CD player)with a
remotecontrolsensor,thisconnectionIsnot necessary.
l-_ "SWITCHED" AC outlet(s)
I ACOUTLETS I
Powerto these outlets Is controlled
by the power switch of this unit.
Audioequipmentrated up to the in-
dicated power ratings can be con-
nected here.
Cooling fan
The cooling fan operates at high
power output levels only.
Cooling fan
Page 7
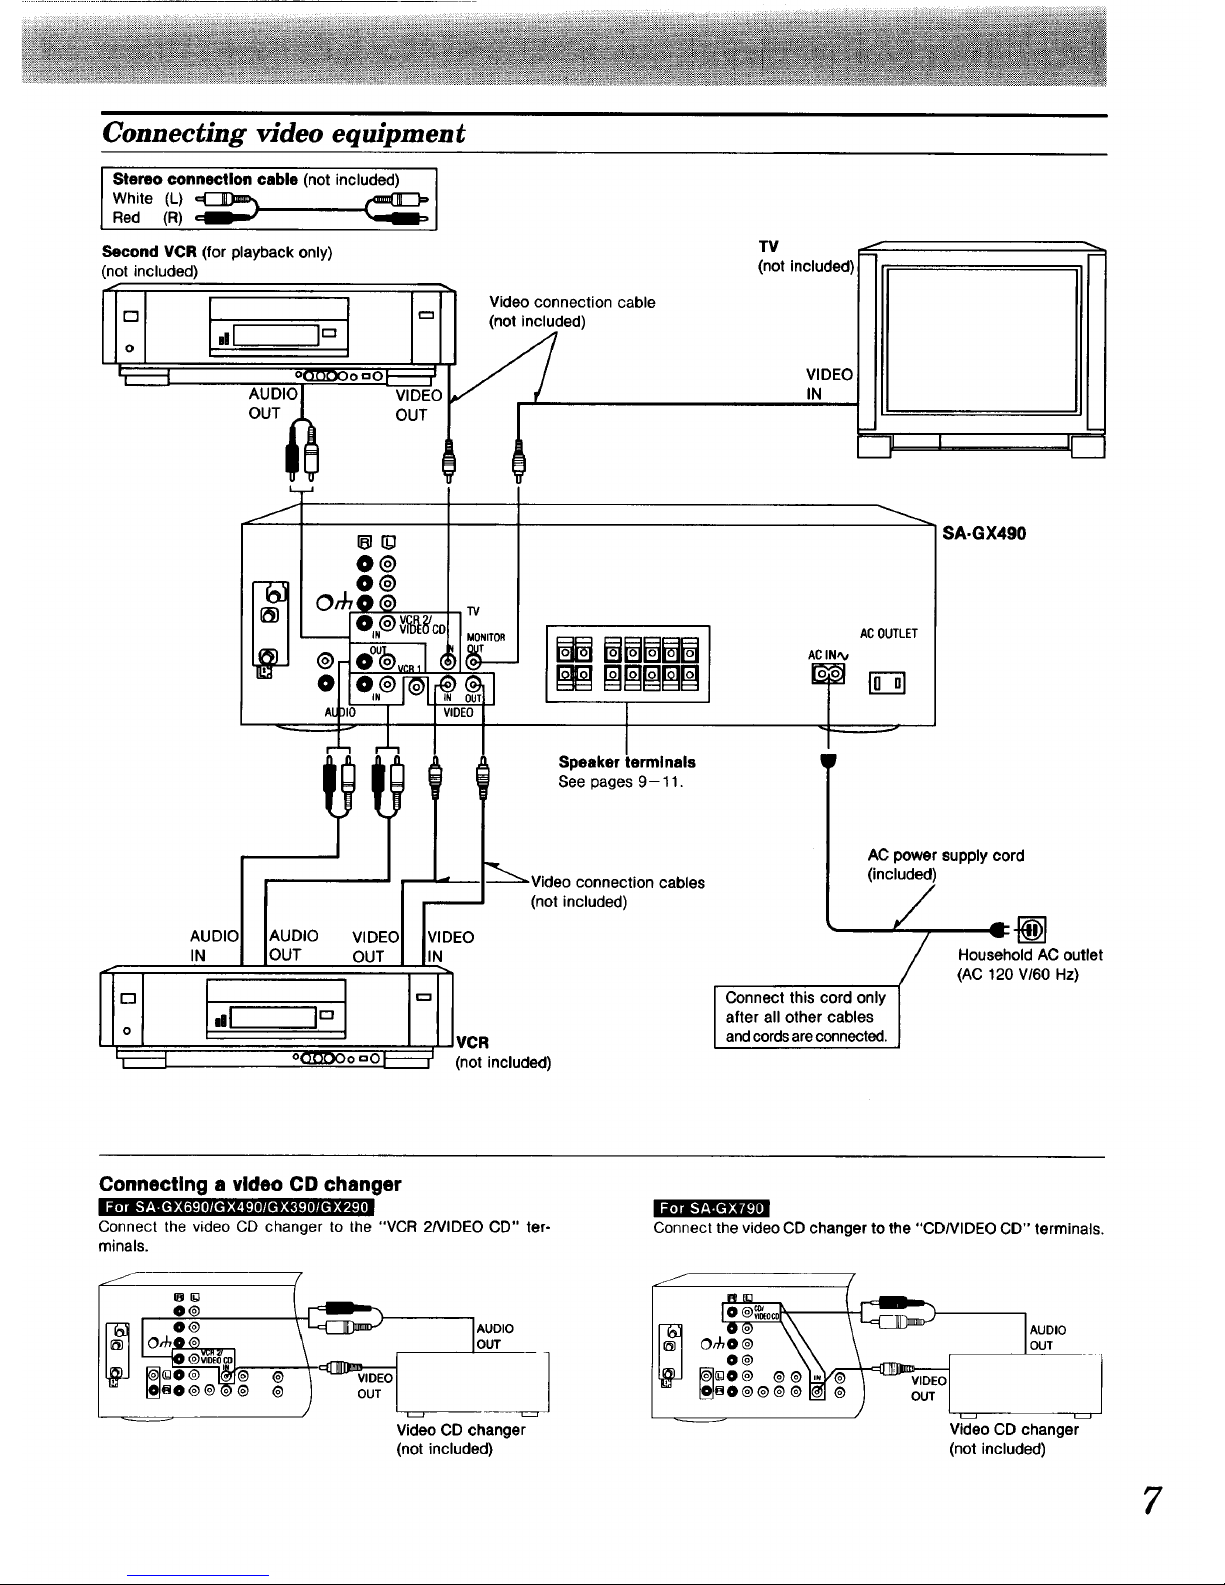
Connecting video equipment
Stereo connection cable (not included)
White (L)
Red (R)
Second VCR (for playback only)
(not included)
r"l _
o ,,I J'_
i i
oQ.O.QOo=O I--_- 1
AUDI_J_ OUTVIDEO
Video connection cable
(not included)
+
TV
(not included)
VIDEO
IN
:-'-71 I I1_
IANUDIDI {AUDIO VIDEO
lOUT OUT
rv
MONITOR
g__
VIDEO
IN
I.., ,°J v.
(not included)
----....
Speaker terminals
See pages 9-11.
cables
(not included)
ACOUTLET
ACIN_
I
I onnect this cord only (after all other cables
andcords are connected.
SA-GX490
AC power supply cord
(included)
/
Household AC outlet
(AC 120 V/60 Hz)
Connecting a video CD changer
JI1';11[."]_[_
;!;1"i." f;_ll):(,_IIl{If;,e It Zll|tl);_ltlllJ[It;,f_]
Connect the video CD changer to the "VCR 2NIDEO CD" ter-
minals.
J
O@
O,_
@ @
I_mo @®-_-@ ®
AUDIO
OUT
OUT
Video CD changer
(not included)
Connect the video CD changer to the "CD/VIDEO CD" terminals.
J
_oo@@@ I_ @
AUDIO
OUT
Video CD changer
(not included)
?
Page 8

FM indoor antenna (i.clude_j
This antenna is normally sufficient for reception of FM broad-
casts.
FM Indoor antenna
(included)
_'", __.._Adhesive tape
(_) Pull off the plastic on the tip of
the antenna wire.
(_) Twist the wire and connect as
shown at the left.
__ _ _YJOBBfBB_
Twist
Attach to a wall (using a tape) facing Inthe direction of best recep-
tion.
For best reception sound quality
An FM outdoor antenna is recommended.
Disconnect the antenna if an FM outdoor antenna is installed.
FM outdoor antenna (rot ineJu_ed)
The outdoor antenna should be used when using the main unit in
mountainous areas or in spaces enclosed by reinforced concrete
where the FM indoor antenna (included) does not provide
satisfactory reception.
FM outdoor antenna
(not included)
75 £1coaxial
(notincluded)
(_ Remove a piece of the outer
vinyl insulator.
20 mm (25132")
(_) Twist the shield braid to
expose the core wire.
,,,.. Core wire
Shie_l braid 10/_mm(3/8")
_) Connect the shield braid and thq
core wire as shown at the left.
L. ...J
W
An outdoor antenna should be Installed by a qualified technician
only.
AM loop antenna (i.cl.de )
This antenna is normally sufficient for reception of AM broad-
casts.
(included)
[
/
AM ANT
AM LOOPANT
k..._.__.___.J
Install the AM loop antenna holder (Included) at the rear panel of
this unit and then attach the AM loop antenna to the AM loop
antenna holder (facing in the direction of best reception).
tab into
the hole and then
push the holder
of this unit
AM loop antenna holder
(included)
Pay attention to the following points when mounting the
antenna.
• Do not mount it horizontally (Doing so will impair reception).
• Do not mount it close to power cords, speaker wires or metal
surfaces (Doing so will result in noise).
• Do not mount it close to a tape deck. When the tape deck is be-
ing used, chirping or beeping sounds may result.
When mounting the antenna to a column, a wall
or rack
Mount it vertically.
loopantennaholder
(included)
Screw(included)
Page 9

AM outdoor antenna ( ot i,,ol., em
The outdoor antenna should be used when using the main unit in
mountainous areas or in spaces enclosed by reinforced concrete
where the AM loop antenna (included) does not provide satisfac-
tory reception.
/
AM AI_
AM LOOPANT
t.
AM outdoor antenna
(not included)
V _ loop antenna
inyl-covered wire AM
(not included) (included)
Stretch 5-12 m (16-40 ft.) of vinyl-coveredwtrehorizontally
across a windowframe or other convenientlocation,keepingit
as highas possiblefrom the ground.
When the unit is not in use, disconnect the outdoor antenna to
prevent possible damage that may be caused by lightning. Never
use an outdoor antenna during an electrical storm.
Be sure to connect the AM loop antenna even when an outdoor
antenna is used.
Placement of speakers
As well as enjoying normal stereo reproduction with the left and
right front speakers, a center speaker and surround speakers
can also be connected to the main unit in order to enjoy the
sound performance of Dolby Pro Logic Systems and the SFC
function.
The illustration below shows where to place the speakers so as to
best enjoy sound with Dolby Pro Logic systems and the SFC func-
tion.
We recommend that surround speakers be placed on the side of
or slightly behind the listener, and about one meter higher than
ear level.
However the position should be adjusted to your personal
preference, because the effect varies to some degree depending
upon the type of music and the music source.
Front speaker
(not included)
(Left)
Front speaker
(not Included)
t.. o_ L_......._
Center speaker
(not included) -_ Subwoofer
(not included)
Surround speaker
(not included)
(Left)
Surround speaker
(not included)
(Right)
•_ The subwoofer can be placed in any position.
9
Page 10

Connection of front speakers
To connect to the "A" terminals
To connect to the "B" terminals
Right speaker
(not included)
Left speaker
(not included)
For connection to a second pair of speakers.
Right speaker Left speaker
(not included) (not included)
®® GO
(not included)
This unit
(not included)
This unit
F
1 15ram 2
H
3
®
I I
®
To prevent damage to circuitry,
never short-circuit positive (+) and
negative (-) speaker wires.
Speaker cables
(not included)_
SURROUND
qY qJ
Right speaker
(not included)
®®
2_'
Left speaker
(not included)
®®
I
_r/ti_7.=,__ ._l_lIT[_]
÷
I I
q_ q_
CENTER FRONT
This uv
SURROUND
®
I I
I Speakerimpedance
When only the "A" or only the "B" speakers are connected:
For SA-GX490 8
For SA-GX790/GX690 4-8
_ (SA-GX790/GX690 only)
If connecting speakers of less than 8 _, be sure to set the im-
pedance on the main unit to LOW as described below.
IPOWERONI
Hold down either button A or button B for 4 seconds or more.
(Hold down once again for 4 seconds or more to turn it off.)
Note that when this indicator is lit up, speakers A and B can-
not be used at the same time.
To change a speaker.
e.g. To use speaker B, press A and the [] indicator goes out,
_.press B to activate speaker B.
When both the "A" and the "B" speakers are connected
simultaneously: For SA-GX790/GX690/GX490 8
The impedance of any speaker used with this unit must be 8 _.
10
Page 11

Connection of surround speakers Connection of center speaker
m
Before sound can be heard, the SURROUND mode or 3 STEREO
mode (of the Dolby Pro Logic system) must be on.
Right speaker Left speaker
(not included) (not included)
@® @®
FRONT
(not included)
This unit
®
@
I I
Center speaker
(not included)
CE_IER
N
This unit
:°: I
I I
Center speaker
(not included)
I
This unit
OE_ER FRONT
@
I I
• Speaker impedance
The impedance of any speaker used with this unit must be 8 Q,
Connection of subwoofer
_]r'..1[.et[fl_IIIL _el_.'f,_IU[,] _ii
Rightspeaker Leftspeaker
(not included) (not included)
@® @®
__ _,Speaker cables
/ I_ (not included)
S_D_I I_ .___ _ ThIs unit
=, IIc,.,R,RO,,
ooo ®
®_ o o o _
m
1.
2.
Before sound can be heard, both surround speakers must be
connected.
Do not connect the surround speakers to the front speaker ter-
minals. The surround speakers may be damaged if connected
to the front terminals due to the output power difference bet-
ween the front and surround terminals.
• Speaker Impedance
The impedance of any speaker used with this unit must be 4-8 Q.
The subwoofer is connected when bass sounds are inadequately
reproduced because front speakers are too small.
When connected, the subwoofer can be placed in any position.
This unit has no amplifier section designed especially for the sub-
woofer, so it is necessary to purchase a subwoofer with a built in
amplifier or buy the two separately.
1Subwoofer with built-in
q_ Jamplifier (not included)
__ / Stereo connection cable
/
j_l(not included)
-- _ _ This unil
.o.. 0_..0_0II ®®_ ®®=CENTER FRONT
o.o
I I
Connecting a subwooFer which does not have
a built-in amplifier
Connect an optional amplifier to the "SUBWOOFER" terminals of
this unit and then connect a subwoofer to the speaker terminals
of the amplifier.
For your reference:
The level of sound output from the subwoofer will always be at
80 Hz or less, regardless of the settings of the speaker select but-
tons on this unit, thus the intensity of the low frequency range will
be maintained.
When adjusting the volume of the subwoofer
After setting the volume control on the subwoofer or on the
amplifier which is connected to the subwoofer, make any further
adjustments with the volume control on this unit.
11
Page 12

1 2 3 5
I: I: I :i, I sl. , I. I,Io i=,ol w_l °
LJ ....i_J coJ- I-J]
PO fEn ITAPE MONITOR I VOLUME
• Before operation, set VOLUME to the "MIN" position.
• When viewing e video, turn on the power supply for the TV and
set the TV to video mode.
_ """._.,;i,;;.;,_,;;;.;i;,;; ...................
ASPEAKERSBPress A andlor B to select
(_O the speaker system(s) to be
used.
A and B refer to the speaker terminals
at the rear of the unit.
Caution
Beforeselectingyour
speakersystem,
makesure
impedanceiscorrect
in the speakersyou
want to use.
(See page 10.)
QUARTZLm
DO
O U.
1
Lights up
I
I m
If the button Is pressed once more, the
indicator will switch off and no sound
will be heard from the speakers.
1;_!." f__lO:f¢ _IIIIO:_P_I
SPEAKERS
Press SPEAKERS and check
the "ON" Indication lights
up.
LIL-/. I =, =n=
I
Lights Up
If the button Is pressed once more, the
indicator will switch off and no sound
will be heard from the speakers.
___P;_,; to,;,i;cith.de,;Jr,;+
source.
Button
Source SA.GXOg01GX4901
SA.GXT90
GX3901GX290
Video tapes (VCR 1) VCR 1 VCR 1
Video tapes (VCR 2) VCR 2/VIDEO CD VCR 2
Video CD VCR 2NIDEO CD CD/VIDEO CD
TAPE MONITOR TAPE MONITOR
Tape The tape monitor indicator will light
up.
Compact discs CD CD/VIDEO CD
Radio broadcasts TUNER TUNER
Phono discs PHONO PHONO
The selected video source is output from the
"TV (MONITOR OUT)" terminal on the back of the unit.
OUARTZ LOCK
OTEREO
g_M I-) I-) I
C.I l--.._l. I ..,
1
Video source
'"Si:4'ti,';,_,_ir,,ci'",_;_'i.................
(Refer to the appropriate operating instructions for
details.)
"" om' VOLUME io ad}usi the;v0i,melevel.
After listening Is finished
Be sure to reduce the volume level, and switch the power to the
standby condition by pressing POWER.
12
When the tape monitor Indicator Is lit or flashing
This indicates that the tape monitor function of this unit is ON.
To listen to sources other than a tape, be sure to press
]TAPE MONITOR I and check the indicator goes out.
Lit or flashing
IT ,. _I
Page 13

- HELP
(3
--RESET
TREBLE BASS
Input select buttons Q Q VOLUME
J -.,
--- o JEt--,=.....=._o _-2
: (A, B) MUTING BALANCE
_ Headphones [_
(not included) Q
Plug type:
1/4 inch phone plug
stereo type
VCR 2
REAR/FRONT
?
VCR 2 front
Input terminals
If sound output stops during use or
if you are unsure what to do
- HELP
Press -H ELP. (Touchonly.)
The help function can be used to display opera-
tions you are expected to do.
For details, see page 22.
To adjust the sound balance
BALANCE
Turn BALANCE to adjust the
O sound balance.
leftlrlght
To emphasize low frequency sound
To adjust the tone quality
TREBLE
(3
Turn TREBLE to adjust the high fre-
quency sound.
BASS
©
Turn BASS to adjust the low fre-
quency sound.
-MUTING
--LOUDNESS
Press -LOUDNESS until the
"LOUDNESS" lights up.
/-) I") i
n I--I, I ..,
Lights up
To return to the previous condition, hold down
the button until the "LOUDNESS" indication
turns off.
To mute the sound level
ffmK__._e___lOte_ _glt_.',._I,
MUTING
Press MUTING.
1";i!." f__l[eFfMIIlll}:( ._llllel!if_ L_I_
I;lil." f__l£w;(€_Iff/w;!*,i_]
i31rib-fi__lt);4r_ I Iltlt;(._]
m.
-MUTING
--LOUDNESS
Press -MUTING. (Touchonly.)
I
The message "MUTING ON NOW" runs
repeatedly from right to left across the display
as long as the muting function is on.
Press once again to return to the previous
volumelevel.
To listen through headphones
Use VOLUME to reduce the volume level, and
connect the headphones.
If you do not want sound from the speakers, press SPEAKERS (A)
and (B) and check the speaker select indicators go out.
If you do not want sound from the speakers, press SPEAKERS
and check the "ON" indication goes out.
Avoid listening for prolongedperiodsof time to prevent hearing
damage.
To switch the VCR to the front or
rear "VCR 2" terminal =.-__,eo:qr.I,=,],,,,.
1. Press VCR 2 (Input select button).
2. Press VCR 2 REARIFRONT.
(Either "REAR" and "FRONT" will appear on the display end will
change each time you press the button.)
13
Page 14

m
m
14
Direct access tuning
Specify the frequency using the numeric buttons to directly tune
to the desired broadcast station.
J
c o _=_,,_ ,"','r".,"_._"=_ r=':!
FM AUTO/ 3
MONO
\
,.,,.,...._J "
1 4
_ _ Pr_;,;Tu.E"I.................
'
_";,.;__._p...;Di.ia_÷ui_i_ia2 .....
Flashes
While cursor display is flashing
(approx. 10 seconds)
numeric buttons to enter the
_ frequency.
Tuning Intervals
FM: 0.1 MHz
AM: 10 kHz
If the desired FM frequency Is 107.9 MHz
q
Lights up when tuned
I
If the frequency has been input correctly, the
displayed frequency will blink once.
1. If no button Is pressed while the cursor display Is flashing, the
display will return to the frequency which is currently being
received. To re-specify the frequency, repeat the procedure
from step 3.
2. If the frequency has not been input correctly, "ERROR" in-
dication will be displayed. In this case, re-enter the frequency.
Sequential tuning
If the frequency is not known, use the tuning buttons to search for
it.
f \
] _-J"
t 3 1
_ ' _" Press' TIJNERI .................
'v";u.;,;G'"2"'Pr;" '_orXto'i,;n;iOihe
I j desired broadcast.
Tuning Intervals
FM: 0.2 MHz
AM: 10 kHz
If either button is held down for an ins-
tant until the frequency begins to
scroll, the broadcast stations can be
tuned in automatically when a broad-
cast station is found.
Tuningmay stop automaticallyif any
jammingis encountered.
When the FM stereo broadcast Is received
This unit will automatically switch to FM stereo reception and the
"STEREO" indication will light up.
mO
{ _t ,w.
Lights up when a stereo broadcast is tuned in
If noise is excessive In the FM stereo mode
Press FM AUTOIMONO. (The FM stereo indicator will switch off.)
The broadcast will be monaural, but noise will be reduced. If the
button is pressed once more, the stereo mode will be resumed.
Page 15

Preset tuning
By presetting the desired broadcast stations into the memory
channels of this unit, broadcast stations can be selected simply
by pressing numeric button(s). (Refer to page 16 for tuning.)
-Before presetting
How many broadcast stations can be preset?
A total of 30 FM and AM stations can be preset.
How Is presetting done?
The two following methods are available.
(_ Automatic memory presetting
Automatic memory presetting allows this unit to
automatically search for broadcast stations and then
preset them into memory.
With this function, searching proceeds from the frequency
currently being displayed and continues through higher fre-
quencies, (up to 107.9 MHz for FM, up to 1710 kHz for AM)
and broadcast stations are preset in the order in which
they are located.
With this method, the channels that can be preset into the
memory are set as follows for different bands (FM or AM).
Channel
--
ForFMbroadcast stations ...................... 1-30
For AM broadcast stations ..................... 21-30
If the FM stations (channels I - 30) are preset end then
the AM stations (channels 21-30) are preset
Because this unit can accommodate a total of 30 preset
channels, the settings for FM channels 21-30 will be
replaced by the AM settings which were subsequently
preset, and the channel allotment will be as shown below.
Channel
I_ FM _ _ AM-_ 1
For FM broadcast stations ...................... 1-20
For AM broadcast stations ..................... 21-30
Manual memory presetting
The desired broadcast stations can be preset Into the
desired channels by the user.
This can also be used as a method for changing selected
broadcast stations that were preset in "Automatic
memory presetting".
Please remember this
If a new broadcast station is preset into a channel, the setting
for the broadcast station which was previously entered in that
channel will be automatically erased.
Automatic memory presetting
f \
_L-' I.... I-'=-! - I-" I -_1'
2
which you want to start
automatic memory preset-
ting. (See page 14.)
quency begins to change.
L \ (Automatic memory presetting will
start.)
During automatic memory presetting,
the memory indicator will flash while
the frequency scrolls.
Flashes
I'-/I-_ t
I-I F/, I ..,
I
To stop, press MEMORY once again.
When a broadcast station Is preset
The memory indicator and the preset channel number will be
displayed for approximately 1 second.
I® I L n
Lights up
J
When presettlng Is completed
The last broadcast station to be preset will be displayed.
Frequencies may not be preset correctly in cases where the
broadcast waves are too strong or too weak. In such cases, carry
out presetting manually.
15
Page 16

m
16
Preset tuning (continued)
Manual memory presetting
/
(i r
]
i o i, i = i.,o|.
_"1_.11 .... I-.I - I-I"
FM AUTOIMONO _
\
=Q-
seiioti ed..,r.dbroadca;L............
(See page 14.)
If interference or static Is keeping you from enjoying
an FM broadcast, press FM AUTO/MONO and
change to monaurual. You can preset the memory in
monaurual just as in stereo.
--_" I==_°°'<_ I
L / I-, _ntl7 f')
"_1® 'uI'.-' -
Lights up
To cancel the memory function, press
MEMORY again.
..... to be preset using the
numeric button(s) (com-
pletes presetting).
To designate channels 1-9
Press the appropriate (1-9) preset-tuning button.
To designate channels 10-30
(Example: Channel 12)
(_3D )(ZED ) (23E_
(within 10 sec.) (within 10 sec.)
I-- ,,1_ _
L /IX
I-- El I_1,.
L I I lit "
Off Preset channel
® f:!:3
Once completed step 3, the display
reverts back to step 1.
To continue presetting
Repeat steps 1 through 3.
To listen to preset broadcast stations
r_o oo_ _.,._-,_ ,._ (:::)-
• _ I
1
using the numeric button(s).
To designate channels 1-9
Press the appropriate (1-9) preset-tuning button.
To designate channels 10-30
(Example: Channel 12)
>C£D )(23£23
(within 10 sec.) (within 10 sec,)
I I-- I I\1/
® L I-'//T\ -
I-- H I xl_.,,
I._ Ill x
Preset channel
I I- I I II_1
m L f_ tL
After the preset channel is displayed,
the frequency of the selected channel
is displayed.
I
To confirm the channel number of the broadcast
station being received
Press TUNER.
(The channel number will be displayed for about one second.)
The channel number is not displayed if you change the reception
frequency or FM mode setting.
For your reference
Even if the power is switched to standby or the power cord is
disconnected from the household AC outlet, the memory will re-
tain its contents for approximately one month.
If frequency presettings are accidentally erased
Make the presettings once again.
The power cord should remain connected for one hour or more
for the memory back-up to be effective.
Page 17

Bycombiningfront,centerandsurroundspeakers,youcanenjoy
the SURROUND mode which conveys a feeling of presence or
the 3 STEREO mode which conveys a feeling of orientation.
SURROUND
By reproducing the feeling of depth and movement of sound,
video software or compact discs recorded with Dolby Surround
provide the listener with a feeling of presence like that of a movie
theater.
Also, to enjoy • theater like sound with all the emotion of
Dolby Pro Logic and a full stereo effect, this stereo comes
with a THEATER EFFECT function which spreads out the
sound as actually happens at the theater.
To enjoy SURROUND, be sure to connect the surround speakers.
Front Front
speaker (L) TV/.__._ speaker (R)
. . _ Center
_I \_speaker_/
Surround Surround
spe_(il) ((ip _]r (R)
3 STEREO
You can enjoy audiolvisual sources with clear sound, more
presence and a good feeling of orientation. 3 STEREO can be us-
ed with non DOLBY SURROUND recordings.
To enjoy 3 STEREO, be sure to connect the center speaker.
Front Center Front
speaker (L) speaker speaker (R)
Surround
speaker (L)
Surround
speaker (R)
Manufactured under license from Dolby Laboratories Licens-
ing Corporation. Additionally licensed under Canadian patent
number 1,037,877.
"Dolby", "Pro Logic" and the double-D symbol are
trademarks of Dolby Laboratories Licensing Corporation.
Setting the center mode
For Dolby Pro Logic systems, center mode setting is necessary
to play back bass sounds effectively.
Set the center mode in accordance with the size of your center
speaker.
I....... _(L, I....n.-.-_= _-i,J- Jj1'
oo=p .....o- 1
'I .... I'
o o
I 2
'"._-k.,._,L,;,;.._,_L,_,;,,;,;_,,;:...................
I SURROUNDI Press SURROUND or
-: 3 STEREO to turn on the
desired mode.
or
Pressing the same button again turns
off the activated listening mode.
DOLBY
--PRO LOGIC -
Press PRO LOGIC to turn on
the Dolby Pro Logic systems
and select the desired
mode.
When the button Is pressed, the cur-
rent mode is displayed.
Pressing it again changes the Dolby
Pro Logic mode.
For SURROUND mode For 3 STEREO mode
Lights up Lights up
";;?""/';;""i E"TEiR""MciiiE"iO
I I select the correct center
' _-_ ' mode.
\/ I- ---
/ n nt') n_ nn
Inn I II LI l-r i l
When the button is pressed, the current center mode
is displayed.
Pressing it again changes the center mode.
NORM (NORMAL)
When the center speaker is smeller than the front
speakers
WIDE (WIDEBAN D)
When the center speaker is the same or larger size as
the front speakers
PHAN (PHANTOM)
When no center speaker is connected.
Bm._
In the PHANTOM mode, the sound which would have
been sent to the center speaker will be divided equal-
ly between both the left and right front speakers. J "dr
Page 18

jr_v_
• _, . • o e_[_l_
El
18
Adjusting speaker output level
In order to reproduce the movement of the sound and its clear
orientation, it is important to adjust the output level of each
speaker. Adjust output to the correct levels while listening to the
test signal.
TEST
................ ,_-', JQ
1235 4
TEST
T
1
_'_Jo_
_,--,IT°,J;_.:L__'c_
JJ "
4
]"'; s;_i_.s"."".;_4_:,,;;:;,ii,;;,;;:;_I,;_:.,_.i,i.....
or
SPEAKEFI_
Press SPEAKERS and check
the "ON" Indication lights
up.
I/I-I-I I
II I_ I'T I _.,
1
Lights up
";;:;_..,7;,_,i,,_.;,;1_,;,_.,;;;;,;;,,.,_;...................
I suRRou.oi Press SURROUND or
3 STEREO to turn on the
_ desired mode.
or
Pressing the same button again turns
off the activated listening mode.
OOLSV Press PRO LOGIC to turn on
--PRO LOGIC --
[ j the Dolby Pro Logic systems
and select the desired
mode.
......;_s;......Pr.,,_,_i_S_iooui;;ui;,t.,t
I = l signal"
"-'h'_R-"I "_
\ _ I T_-_- T
_J i® I I- "-/ I vc._
The test signal is emitted in the follow-
ing order:
For SURROUND mode
Front speaker-_, Center speaker
(left)1" [
Surround speakers *----Front speaker
(left, right) (right)
The test signal is not emitted from the
center speaker when the center mode
is on PHANTOM.
For 3 STEREO mode
Front speaker _ Center speaker
(left) ,__
--.Front speaker (right)
_" :_o_" "'+.m'"voL0MEio.; "the
volume level normally used
_ for enjoying the
source.
....cE"_E"......Pr.*_,CENTERii0;(+i0r
J - J +j- + SURROUND(-)or(+)toad.
just the output level
_,,,,,__balance.
SURROUND Adjust the output level of each
L,_ peaker from the listening position un-
til they are all identical.
I_: Decrease the output level.
F-F-I: Increase the output level.
® ÷3- .=
Output level canlbe varied within a
range of - 12 dB to + 12 dB according
to that output from the front speakers.
i
[
1. The test signal is output only by the
speaker you are now adjusting and
does not repeat the sequence until
adjustments are complete.
2. Remember you cannot adjust out-
put level of the surround speakers
if you selected the 3 stereo mode
in step 2.
TEST
To stop the test signal
J Press TEST.
Page 19

Adjusting the delay time
_:/:1[ _e]):trJ_ZolLON,_IOEo],ns!
_[.1_1_, -,,,,Jmh'lk'llJ:| _llll _lltl*]nz s!
Adjust the sound from the surround speakers until the proper ef-
fect is produced.
The diagram below shows SA-GX790.
f
!......!_l/
1 2
;PROIOGIC-II the Dolby Pro Logic systems
I, _ and select the SURROUND
_ mode.
[_" ;._;;.-.....P;..OeLA_iTi,EtO..ito
I _ I the suitable time.
__="= When the button is pressed, the cur-
L \ rent delay time is displayed, pressing
it again changes the delay time.
Lights up
i1--.*
m I --I ,,,
Each time the button is pressed, the
delay time will increase by 5 ms.
To calculate the delay time, refer to
the calculation methods below.
The standard setting is 20 ms.
Front Center Front
speaker (L) speaker speaker (R)
J.
D): Distance from front speakers
D2: Distance from surround speakers
• If D1 Is equal to or less than D=
Set to 15 ms.
• If D= Is less than D1
Start at 15 ms and increase by 5 ms
for every 5 feet of difference bet-
ween D1 and D2.
Enjoying with SURROUND or
3 STEREO
1 2
OFFION THEATER EFFECT
I'
....._-:.. :_;....................
SURROUND I Press SURROUND or
' _' 3 STEREO to turn on the
_ desired mode.
or
I 3 STEREO I Pressing the same button again turns
_x_ off the activated listening mode.
DOLBY Press PRO LOGIC to turn on
--PRO LOGIC -
[ I the Dolby Pro Logic systems
and select the desired
_ mode.
................St;;.th.d,;,Imd,,_;.,_e.....
m
When employing SURROUND, use
software recorded in Dolby Surround.
[
OFF,ON To turn off the Dolby
I systems
Press OFF/ON.
Press once again to turn it on.
Pro Logic
To enjoy THEATER EFFECT
UsevideosoftwarerecordedInDolbysurround.
The THEATER EFFECT works only when the surround mode Is
ON.
THEATER EFFECT
Select the surround mode with the
above procedure, and then press
THEATER EFFECT.
Lights up
Pressonce againto turn it off.
19
Page 20

2O
The SFC function gives presence and spread thereby enhancing
and enriching the music or movie.
The diagram shows SA-GX790.
to Io,I--I .....I-L,-j_
T;_,%'--,_,=..:,-,_..,==--_-_ O- $_%
I
OFF/ON 1 2
.......;c......Pv.,;.si;€totu'r,;'on'ti,,;
SFC function and select the
L__ desired mode.
(_ \ When the button is pressed, the cur-
rent mode is displayed.
Pressing it again changes the SFC
mode.
vc.21 SIMULATED , THEATER
HALL
This mode imparts a reflection and spread which will make you
feet as if you are in a large concert hall.
LIVE
Primarily for vocal pieces, this mode adds gloss to the vocals and
you'll feel as though you were hearing a live stage performance.
THEATER
You can clearly perceive the directions and source of the movie.
Real ambience of sound can also be recreated naturally using
this mode.
THEATER mode can be used with stereo sources not encoded
with DOLBY SURROUND.
When using Dolby surround encoded source materials, select
the DOLBY PRO LOGIC SURROUND.
SIMULATED
Choose this mode if little or no sound will be heard from the sur-
round speakers.
You can feel as if you were in a more expanded space adding to
the actual sound from the source.
This mode also adds effect to monaural sources by outputttng the
sound from surround speakers.
You can adjust center speaker volume only in the theater mode.
The center speaker is not used in the hall, and simulated modes.
L
................Si_;ti.; _i,;;;l_a;,o_;c......
OFFION
To turn off the SFC function
Press OFFION.
Press once again to turn it on.
Adjusting field of sound
With this unit,you can adjustspeakervolume andselect delay
time.Adjustthe field of soundwhile listeningtoa source.
To adjust center speaker volume
CENTER
[illll l[:,]ll I l 1:,]_,| 1:,]IIII I [lie [:,][l] i I I
L_ Press CENTER (-) or (+).
To adjust surround speaker volume
SURROUND
Press SURROUND (-) or (+).
: Decrease the output level.
: Increase the output level.
. ::
÷3"
I
Output levels can be varied within a range of
-12 dB to +12 dB according to that output
from the front speakers.
To adjust the delay time
DELAY TIME
Press DELAY TIME to set to the
suitable time.
When the button is pressed, the current delay
time is displayed, pressing it again changes
the delay time.
As the time displayincreases, the feeling of
the soundbecomeswider.
Page 21

Recording on the tape deck
Before recording, prepare the tape deck for recording (recording
level adjustment, etc.).
See the tape deck's operating instructions for details.
Recording on the VCR (VCR 1)
Before recording, prepare the VCR (VCR1) for recording (recor-
ding level adjustment, input selector setting, etc.).
See the VCR's operating instructions for details.
ITAPE MONITOR I
Recording from VCR 2
/
.....ia;....,,;a,;;,;id;;o
[._.J __-- source to be recorded. _l"°"°;°'_'--_;":;e_1
Camcorder _
(not included)
There are VCR 2 terminals on both the front and rear of this unit.
It is easier to carry out dubbing from a camcorder if it is con-
[ 1_" ....1---'_'_- _=_Q nected to the front terminals.
f_-r-;-r;-r%'-r,
................ Begin recordingl ..............
Follow your tape deck's operating in-
structions.
source to be recorded.
I_ ___ Press VCR2,VIDE_oC01 .....
To check the sound recorded while a recording
Is being made
With a tape deck with 3 head system, ft Is possible to check the
sound recorded on the tape.
Press ]TAPE MONITOR] on this unit and set the monitor button
on the tape deck to "TAPE".
Lit
I
,,R
Ft f-i t
I--II7. I ,,,
Press [TAPE MONITOR] once again to turn it off.
L_ Press VCR 2.I/FO D
u LllL
i-2-_.....v;.;......Pres,,vc"26_A"_i_i6'+
REA_FRONT to select the VCR for
_ playback.
................B;o"n_,_;,r=;,g;" ih;v€R
1 and playback the tape on
the VCR 2.
Follow your VCR's operating instruc-
tions.
11
For your reference
If a video CD changer isconnected to the "VCR 2/VIDEO CD" ter-
minals, recording from the video CD changer is possible by follow-
ing the above procedure.
21
Page 22

Recording on the VCR (VCR 1)
Recording from an audio source
Recording from the tape deck is not possible.
1
_ S.i.ctt,. ;.d,o;o.rc;tobe recorded.
If you make a mistake in operation or if sound output stops due to
some operation which was performed, the HELP function
displays information which can be useful for indicating the
method by which this condition can be remedied.
If "ERROR" or scrolling characters (for instance, "TAPE
MONITOR ON NOW") appears on the display during operation,
carry out the following operation.
- HELP
(D
--RESET
f \
....!...........]_
_ _"_'-_s,_ .... "_0-
- HELP
Press -HELP. (Touchonly.)
The method for remedying this situation will be
displayed,
................ o.i..vc"
Follow your VCR's operating instruc-
tions.
For your reference
If the above button is pressed for 2 second or more until
"RESET" appears on the display, the operation settings for the
unit will be initialized to the settings made at the time of ship-
ment.
However, any broadcasting stations which have been preset into
memory will not be erased at this time.
................_,gi.ii_,;,;.aio;Ourc;toberecorded.
For your reference
If a video CD changer is connected to the "CDNIDEO CD" ter-
minals, you can record a picture from the video CD changer by
following the above procedure.
Precautions in recording a audio source
If not recording the picture from VCR2 or a video CD player,
either turn the unit OFF or select VCRI.
The unit is set such that video signals input at video input ter-
minals "VCR2" and "VIDEO CD" are output from the "VCR1" vi-
deo output terminal on the back of the stereo.
Therefore, when recording an audio source, if the VCR2 source
or video CD player is playing, the picture will be recorded through
VCR1.
The On-Screen Display function can provide a wide range of infor-
mation on a TV screen making the operation even easier. For ex-
ample, by using the amplifier button(s), the state of each setting
will display. If there is no sound and you do not understand the
operation, press the HELP button to use the unit diagram
displayed on the TV to display the applicable method.
Refer to the included supplemental instruction manual for details
on the On-Screen Display functions.
Product service
Do not attempt to remove the cover(s) or repair the unit
yourself.
Refer servicing to qualified personnel only.
Product information
For product service, product information or assistance in pro-
duct operation, refer to the servicenter directory.
22
Page 23

Before requesting service for this unit, check the chart below for
a possible cause of the problem you are experiencing. Some sim-
ple checks or a minor adjustment on your part may eliminate the
problem and restore proper operation.
If you are in doubt about some of the check points, or If the
remedies indicated in the chart do not solve the problem, refer to
the directory of authorized service centers (enclosed with this
unit) to locate a convenient service center, or consult your
Technics dealer for instructions.
(In U.S.A. consult MSC Authorized Servicenters for detailed In-
structions.)
Problem Probable cause(s) I Suggested remedy
While listening to FM broadcasts
An unusual hissing noise is
heard when listening to the
broadcast in stereo, but not
heard when listening
monaurally.
Noise Is excessive In both
stereo and monaural broad-
casts.
The FM stereo indicator or
the quartz lock Indicator
flickers, without completely
Illuminating.
Excessive distortion in the
sound of stereo broad-
casts.
A slight noise may be heard because the method
used for modulation of FM stereo broadcasts is
different than that used for monaural broadcasts.
Poorlocationand/ordirectionof the antenna
Transmittingstationis too far away.
Poor locationandlor direction of the antenna
TransmittingstationIs too far away.
Nearbybuildingormountain
• Try reducing the treble sound by using the treble con-
trol.
• Try changing the location, height andlor direction of
the antenna.
• If an indoor antenna is being used, change to an
outdoor antenna.
• Try using an antenna with more elements.
• Try changingthe location, heightandlordirectionof
the antenna.
• If an Indoor antenna Is beingused, changeto an
outdoorantenna.
• Try usingan antenna with more elements.
While listening to AM broadcasts
An unusual "beat" sound Is
heard.
A low.pitched =hum" sound
Is heard when the
broadcast is tuned.
A strange hissing noise Is
produced continuously or
Intermittently.
The unit isbeingused at the same time as the
televisionset.
Interferencefrom adjacentbroadcastsignals
The AM loop antenna connection wires are too
close to the power cord.
Causedbythe "discharge phenomenon"and the
"oscillation phenomenon"ofelectric appliances
(suchas fluorescent lights,TV, smallseries-type
motors,rectificationequipment,etc.).
• Turn off the television set, or use this unitfarther
awayfrom it.
• Tryreducingthetreble soundbyusingthetreblecon-
trol.
• Place the antenna connectionwires and the power
cord farther apart.
• Tryplacingthis unitfarther away from sucheClulp-
ment.
Problems noted at all times
Power will not switch ON. The power cord plug is not completely inserted.
No sound Is heard.
Sound stops during a
performance, or no sound
Is heard when the power Is
switched ON.
(The word "OVERLOAD"
appears on the display.)
The word "ERROR"
appears on the display.
BothA and B speakersare turndOFF.
The tape monitorfunction isON.
The muting function is ON.
Connectionsare incompleteor Incorrect to the
speaker systems,etc.
The Incorrectinputselector has beenpressed.
The protectioncircuitryhas functionedbecause
the positiveandnegative speakerconnection
wiresare "shorted". Speakersystemswithan
impedanceless than the indicatedrated
impedanceof thisunitare usedor under severe
use,suchas loudvolume,excessivepowerand In
an excessivelyhotenvironment.
When the DolbyPro Logic systemis ON, bothA
and B speakersare turnd ON.
When both A and Bspeakersare being used
simultaneously,the DolbyPro LogicsystemIs
turned ON.
• Confirmthatthe powercord plug is connected
completely.
• Pressthe HELPbutton. (Thedisplay will scroll
throughthe causesof the problem.)Use thisdisplay
as a guideto remedythe problem.
• Check to be sure that all connectionwires are
correctlyconnected.
• Checkto be sure that the correct selector Is
pressed.
• Switchoff the power,and after determiningand
correctingthe cause, switch ON the power once
again.
• Use a speakersystemofthe properImpedance
rating.
• Press the HELP button.
(The display will scroll through the causes of the pro-
blem.)
Use this display as a guide to remedy the problem.
23
Page 24

• AMPLIFIER SECTION
Rated minimum sine wave
RMS power output
20 Hz-20 kHz both channels
driven
0.05%
tion
total harmonic distor-
[SA-GX790]
120 W per channel (8 Q)
[SA-GX690/GX490]
100 W per channel (8 Q)
40 Hz-20 kHz both channels
driven
0.8% total harmonic distortion
[SA-GX390/GX290]
70 W per channel (8 £_)
1 kilt €ontinuous power output
both channels driven
0.05% total harmonic distortion
[SA-GX790] 125 W per channel (8 _)
[SA-GX6901GX490] 105 W per channel (8 _)
1 kHz continuous power output
both channels driven
0.8% total harmonic distortion
[SA-GX390/GX290] 73 W per channel (8 Q)
Total harmonic distortion
rated power at 20 Hz-20 kHz
[SA-GX790/GX6901GX490] 0.05 % (8 Q)
rated power at 40 Hz-20 kHz
[SA-GX3901GX290] 0.8% (8 Q)
half power at 1 kHz
[SA-GX790/GXG90/GX490] 0.03 % (8 Q)
[SA-GX390/GX290] 0.07 % (8 Q)
Power output at the Dolby Pro Logic
operation 0.8% st 1 kHz,
Front [SA-GX790/GX690] 2 x 100 W (8
[SA-GX490] 2 x 80 W (8
[SA-GX3901GX290] 2 x 50 W (8
Center [SA-GX7901GX690] 100 W (8
[SA-GX490] 80 W (8
[SA-GX390/GX290] 50 W (8
Surround [SA-GX7901GX690] 100 W (8
[SA-GX490] 80 W (8
[SA-GX390/GX290] 50 W (8
Low frequency damping factor 30 (8
Load Impedance
Front [SA-GX3901GX290] 8
A or B [SA-GX790/GX690] 4-8
[SA-GX490] 8
A and B[SA-GX790/GX6901GX490] 8
Center 8
Surround 4- 8
Dynamic headroom
[SA-GX790/GX690/GX490] 2 dB (8
SMPTE Intermodulatlon distortion
0.3% (8
Frequency response
PHONe RIAA standard curve :1:0.8 dB
CDNIDEO CO, VCR 1, VCR 2, TAPE
[SA-GX790] 7 Hz-70 kHz, +3 dB
CD, VCR 1, VCR 2/VIDEO CD, TAPE
[SA-GX6901GX490] 7 Hz-70 kHz, ±3 dB
[SA-GX390/GX290] 10 Hz-70 kHz, ±3 dB
Input sensitivity
PHONe 0.4 mV (3 mV, IHF'66)
CDNIDEO CD, VCR 1, VCR 2, TAPE
[SA-GX790] 27 mV (200 mV, IHF'66)
CD, VCR 1, VCR 2/VIDEO CD, TAPE
[SA-GX6901GX 4901GX3901GX290 ]
27 mV (200 mV, IHF'66)
SIN (IHF A)
PHONe [SA-GX7901GX6901GX490]
70 dB (80 dB, IHF'66)
[SA-GX390/GX290]
70 dB (78 dB, IHF'66)
CD/VIDEO CD, VCR 1, VCR 2, TAPE
[SA-GX790] 75 dB (85 dB, IHF'66)
CD, VCR 1, VCR 2NIDEO CD, TAPE
[SA-GX690/GX490]
75 dB (85 dB, IHF'66)
[SA-GX3901GX290]
75 dB (83 dB, IHF'66)
Input Impedance
PHONe 47 k_
CDNIDEO CD, VCR 1, VCR 2, TAPE
[SA-GX790] 22 kQ
CD, VCR 1, VCR 2/VIDEO CD, TAPE
[SA-GX6901GX490/GX3901GX290] 22 kQ
Tone controls
BASS 50 Hz, + 10 to - 10 dB
TREBLE 20 kHz, +10 to -10 dB
Loudness control (volume at -30 dB)
[SA-GX7901GX690] 50 Hz, +9 dB
D) • FM TUNER SECTION
Q) Frequency range 87.9-107.9 MHz
Q) Sensitivity 11.2 dBf (2 gV, IHF '58)
O) 50 dB quieting sensitivity
_) MONO 18.3 dBf (4.5 IJIV,IHF '58)
Q) STEREO 38.3 dBf (45 IJV, IHF '58)
Q) Total harmonic distortion
£2) MONO 0.2%
Q) STEREO 0.3%
Q) S/N
MONO 75 dB
Q STEREO 70 dB
Q Frequency response
20 Hz-15 kHz, +1 dB, -2 dB
Q Alternate channel selectivity 65 dB
Q Capture ratio 1 dB
Q Image rejection at 98 MHz 45 dB
IF rejection at 98 MHz 80 dB
_)
Spudous response rejection at 98 MHz
75 dB
AM suppression 50 dB
Stereo separation
1 kHz 40 dB
10 kHz 30 dB
Carder leak
19 kHz -35 dB
38 kHz -50 dB
Antenna terminal(s) 75 Q (unbalanced)
• AM TUNER SECTION
;Frequency range 530-1710 kHz
Sensitivity 20 IJV, 330 pV/m
Selectivity 55 dB
image rejection at 1000 kHz 40 dB
IF rejection at 1000 kHz 60 dB
• VIDEO SECTION
Output voltage at I V input
(unbalanced)
Msxlmum Input voltage
1±0.1 Vp-p
1.5 Vp-p
• GENERAL
Power consumption
[SA-GX790] 290 W, 370 VA
(In standby condition: 2W)
[SA-GX690] 280 W, 365 VA
(In standby condition: 2W)
=[SA-GX490] 255 W, 330 VA
(In standby condition: 2W)
[SA-GX3901GX290] 225 W, 290 VA
(In standby condition: 2W)
Power supply AC 120 V, 60 Hz
Dimensions (W x H x D)
[SA-GX7901GX690] 430 x 158 x 352 mm
(16-15116" x 6-7/32" x 13-27132" )
[SA-GX490IGX3901GX290]
430 × 136 x 352 mm
(16-15116" x5-11132" x 13-27/32")
Weight [SA-GX7901GX690] 9.8 kg (21.6 lb.)
[SA-GX490] 8.6 kg (19 lb.)
[SA-GX390/GX290] 7.6 kg (16.8 lb.)
Notes:
1. Specifications are subject to change
without notice. Weight and dimensions
are approximate.
2. Total harmonic distortion is measured by
the digital spectrum analyzer.
Mataushlta Consumer Electronics
Company, Division of Matsushlta
Electric Corporation of America
One Panasonic Way Secaucus,
New Jersey 07094
Printed in Japan
Psnasonlc Sales Company,
Division of Matsushlta Electdc of
Puerto Rico, inc. ("PSC")
Ave. 65 de Infanteda. Km. 9.5
San Gabriel Industrial Park, Carolina,
Puerto Rico 00985
Matsushlts Electric of
Canada Limited
5770 Ambler Drive, Mississauga,
Ontario L4W 2T3
RQT2753-P
H1194C0
 Loading...