

Page 1
SC-C50
Wireless Speaker System
Drahtloses Lautsprechersystem
Système d’enceinte sans fil
Sistema Speaker Wireless
Draadloos luidsprekersysteem
Sistema de altavoces
Trådlöst högtalarsystem
Trådløst højttalersystem
Langaton kaiutinjärjestelmä
Basic Operating Instructions
Kurz-Bedienungsanleitung
Manuel d’utilisation Fonctions de base
Istruzioni per l’uso di base
Beknopte gebruiksaanwijzing
Instrucciones básicas
Grundläggande bruksan
Vejledning i den grundlæggende betjening
Perusasetukset Käyttöohjeet
visning
Page 2

Music is borderless and timeless, touching people’s
hearts across cultures and generations.
Each day the discovery of a truly emotive experience
from an unencountered sound awaits.
Let us take you on your journey to rediscover music.
02
(02)
Page 3

Delivering the Ultimate Emotive Musical
Experience to All
At Technics we understand that the listening experience is not
purely about technology but the magical and emotional relationship
between people and music.
We want people to experience music as it was originally intended
and enable them to feel the emotional impact that enthuses and
delights them.
Through delivering this experience we want to support the
development and enjoyment of the world’s many musical cultures.
This is our philosophy.
With a combination of our love of music and the vast high-
end audio experience of the Technics team, we stand committed
to building a brand that provides the ultimate emotive musical
experience by music lovers, for music lovers.
Director
Michiko Ogawa
(03)
03
Page 4
Thank you for purchasing this product.
Please read these instructions carefully before using this product, and save this manual for future use.
• About descriptions in these operating instructions
- Pages to be referred to are indicated as “ ○○”.
- The illustrations shown may differ from your unit.
• A more detailed operating instruction is available in “Operating Instructions” (PDF
format). To read it, download it from the website.
www.technics.com/support/
• You will need Adobe Reader to browse or print “Operating Instructions” (PDF format).
You can download and install a version of Adobe Reader that you can use with your OS
from the following website.
http://www.adobe.com/products/acrobat/readstep2.html
For the United Kingdom and Ireland customer
Sales and Support Information
Customer Communications Centre
• For customers within the UK: 0333 222 8777
• For customers within Ireland: 01 447 5229
• Monday–Friday 9:00 am – 5:00 pm, (Excluding public holidays).
• For further support on your product, please visit our website: www.technics.com/uk/
Table of contents
Safety precautions 05
Installation 07
Control reference guide 08
Connections 09
Network settings 10
Available input sources 14
Basic
Using Bluetooth
®
15
Streaming music over the network 16
Licenses 17
Specifications 18
Accessories
AC mains lead (2)
For the United Kingdom and Ireland
K2CT3DR00009
For continental Europe
K2CMZDR00001
• The smartphone on the cover page is not supplied with this unit.
• Product numbers provided in these operating instructions are correct as of July 2018.
• These may be subject to change.
• Do not use AC mains lead with other equipment.
(04)
04
Page 5
Safety precautions
Warning
Unit
• To reduce the risk of fire, electric shock or
product damage,
- Do not expose this unit to rain, moisture,
dripping or splashing.
- Do not place objects filled with liquids, such
as vases, on this unit.
- Use the recommended accessories.
- Do not remove covers.
- Do not repair this unit by yourself. Refer
servicing to qualified service personnel.
- Do not let metal objects fall inside this unit.
- Do not place heavy items on this unit.
AC mains lead
• To reduce the risk of fire, electric shock or
product damage,
- Ensure that the power supply voltage
corresponds to the voltage printed on this
unit.
- Insert the mains plug fully into the socket
outlet.
- Do not pull, bend, or place heavy items on
the lead.
- Do not handle the plug with wet hands.
- Hold onto the mains plug body when
disconnecting the plug.
- Do not use a damaged mains plug or socket
outlet.
• The mains plug is the disconnecting device.
Install this unit so that the mains plug can be
unplugged from the socket outlet immediately.
• Ensure the earth pin on the mains plug is
securely connected to prevent electrical shock.
- An apparatus with CLASS I construction shall
be connected to a mains socket outlet with a
protective earth connection.
Caution
Unit
• Do not place sources of naked flames, such as
lighted candles, on this unit.
• This unit may receive radio interference caused
by mobile telephones during use. If such
interference occurs, please increase separation
between this unit and the mobile telephone.
• This unit is intended for use in moderate and
tropical climates.
• Do not put any objects on this unit. This unit
becomes hot while it is on.
Placement
• Place this unit on an even surface.
• To reduce the risk of fire, electric shock or
product damage,
- Do not install or place this unit in a bookcase,
built-in cabinet or in another confined space.
Ensure this unit is well ventilated.
- Do not obstruct this unit’s ventilation
openings with newspapers, tablecloths,
curtains, and similar items.
- Do not expose this unit to direct sunlight,
high temperatures, high humidity, and
excessive vibration.
Caution for AC Mains Lead
(For the AC mains plug of three pins)
For your safety, please read the following text
carefully.
This appliance is supplied with a moulded three
pin mains plug for your safety and convenience.
A 3-ampere fuse is fitted in this plug.
Should the fuse need to be replaced please
ensure that the replacement fuse has a rating of
3-ampere and that it is approved by ASTA or BSI
to BS1362.
Check for the ASTA mark
on the body of the fuse.
If the plug contains a removable fuse cover you
must ensure that it is refitted when the fuse is
replaced.
If you lose the fuse cover the plug must not be
used until a replacement cover is obtained.
A replacement fuse cover can be purchased
from your local dealer.
Before use
Remove the connector cover.
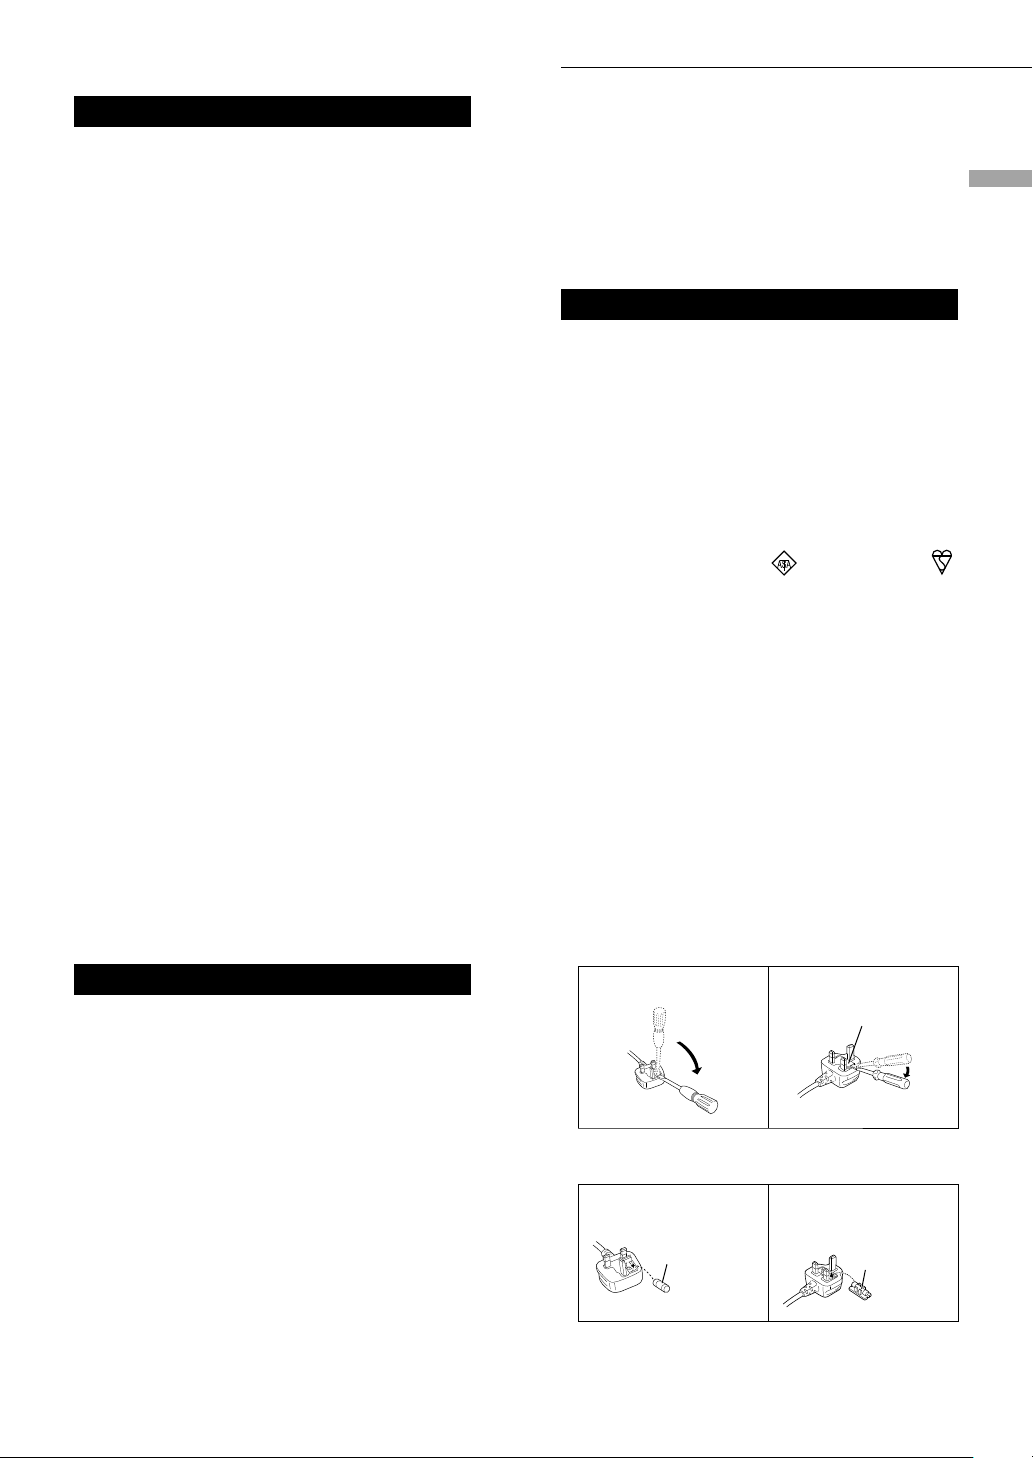
How to replace the fuse
The location of the fuse differ according to
the type of AC mains plug (figures A and B).
Confirm the AC mains plug fitted and follow the
instructions below. Illustrations may differ from
actual AC mains plug.
1. Open the fuse cover with a screwdriver.
Figure A Figure B
or the BSI mark
Fuse cover
2. Replace the fuse and close or attach the fuse
cover.
Figure A Figure B
Fuse
(3 ampere)
Fuse
(3 ampere)
English
(05)
05
Page 6

Safety precautions (Continued)
Panasonic Corporation, a company having its registered office of 1006, Oaza Kadoma, Kadoma City,
Osaka 571-8501, Japan, automatically collects personal data such as IP address and/or Device ID from
your device as soon as you connect it to the Internet. We do this to protect our customers and the
integrity of our Service as well as to protect the rights or property of Panasonic.
You have a right of access, rectification and objection to in certain circumstances, a right of erasure,
restriction of processing, data portability and a right to object to other forms of processing. If you wish
to exercise any of the above rights and/or wish to know more about the processing of your personal data
in this context, please refer to the full text of our privacy policy displayed at the support page of your
device, http://panasonic.jp/support/global/cs/audio/, http://www.technics.com/support/ or contact our
customer communications/support number or address described in the Pan European Guarantee included
in your device box to send you the full text of our privacy policy.
Disposal of Old Equipment
Only for European Union and countries with recycling systems
This symbol on the products, packaging, and/or accompanying documents means that used
electrical and electronic products must not be mixed with general household waste.
For proper treatment, recovery and recycling of old products, please take them to applicable
collection points in accordance with your national legislation.
By disposing of them correctly, you will help to save valuable resources and prevent any
potential negative effects on human health and the environment.
For more information about collection and recycling, please contact your local municipality.
Penalties may be applicable for incorrect disposal of this waste, in accordance with national
legislation.
Declaration of Conformity (DoC)
Hereby, “Panasonic Corporation” declares that this product is in compliance with the essential
requirements and other relevant provisions of Directive 2014/53/EU.
Customers can download a copy of the original DoC to our RE products from our DoC server:
http://www.ptc.panasonic.eu
Contact to Authorised Representative:
Panasonic Marketing Europe GmbH, Panasonic Testing Centre, Winsbergring 15, 22525 Hamburg,
Germany
Type of wireless Operating Frequency Maximum Power (EIRP)
WLAN 2412 - 2472 MHz
5180 - 5320 MHz
5500 - 5700 MHz
Bluetooth
5.15 - 5.35 GHz band is restricted to indoor operations only in the following countries.
Product Identification Marking is located on the bottom of the unit.
®
2402 - 2480 MHz 10 dBm
20 dBm
20 dBm
20 dBm
06
(06)
Page 7

Installation
Installation
Turn off all the equipment before connection
and read the appropriate operating instructions.
Be sure to raise this unit when moving, and do
not drag this unit.
Notes on the speakers
These speakers do not have magnetic shielding.
Do not place them near TV, PC or other
equipment easily influenced by magnetism.
• Playing music at high volumes for a long period
can cause damage to the system and shorten
the life of the system.
• Decrease the volume in the following
conditions to prevent damage.
- When playing distorted sound
- When adjusting the sound quality
- When turning on/off this unit
For optimum sound effects
The quality and volume of the bass sound, sound
localisation performance, sound ambience,
etc. will change depending on the installation
location of this unit, listening position, room
conditions, and other factors. Refer to the
information below when installing this unit.
Determining the installation location
• Place this unit on a flat safe surface.
Adjusting the distances between this unit
and the wall
• If you install this unit close to a wall or a
corner, the bass sound will be more powerful,
however, if the unit is too close to it, sound
localisation performance and sound ambience
may deteriorate.
Adjusting with the Space Tune function
You can adjust the sound quality automatically
according to the installation location (near the
wall or the corner of the room).
Press and hold [ ] for 5 seconds.
• ”Space Tune (Auto)” is displayed.
Press [ ] again while “Space Tune (Auto)” is
displayed.
• A test tone outputs quite big while the
measurement is in progress.
• When the adjustment is complete, “Success”
is displayed.
• To cancel the adjustment in the middle,
press [
].
Unit care
Pull out the AC mains lead from the socket
before maintenance. Clean this unit with a soft
cloth.
• When dirt is heavy, wring a wet cloth tightly
to wipe the dirt, and then wipe it with a soft
cloth.
• Do not use solvents including benzine, thinner,
alcohol, kitchen detergent, chemical wiper, etc.
Doing so may cause the exterior case to be
deformed or the coating to come off.
Using “Technics Audio Center”
If you install the dedicated app “Technics
Audio Center” (free of charge) on your tablet/
smartphone, you can stream music files from
the device on your network to this unit and
configure the settings of sound quality, etc.
For details, visit:
www.technics.com/support/
Firmware updates
Occasionally, Panasonic may release updated
firmware for this unit that may add or improve
the way a feature operates. These updates are
available free of charge.
• Update via Internet ( 10)
• For details of the update via USB flash memory,
refer to the following website.
www.technics.com/support/firmware/
To dispose of or transfer this
unit
Before disposing of or transferring this unit,
be sure to erase all the recorded information
by restoring the settings to factory default. To
restore the settings to factory default, press
and hold both [•DIMMER/-INFO] and [ ]
simultaneously for 5 seconds or longer while the
unit is on. The unit restarts automatically, and all
the settings are restored to factory default.
• Before you dispose of or transfer this unit
to a third party, be sure to log out of your
music streaming services accounts to prevent
unauthorised use of your accounts.
English
(07)
07
Page 8

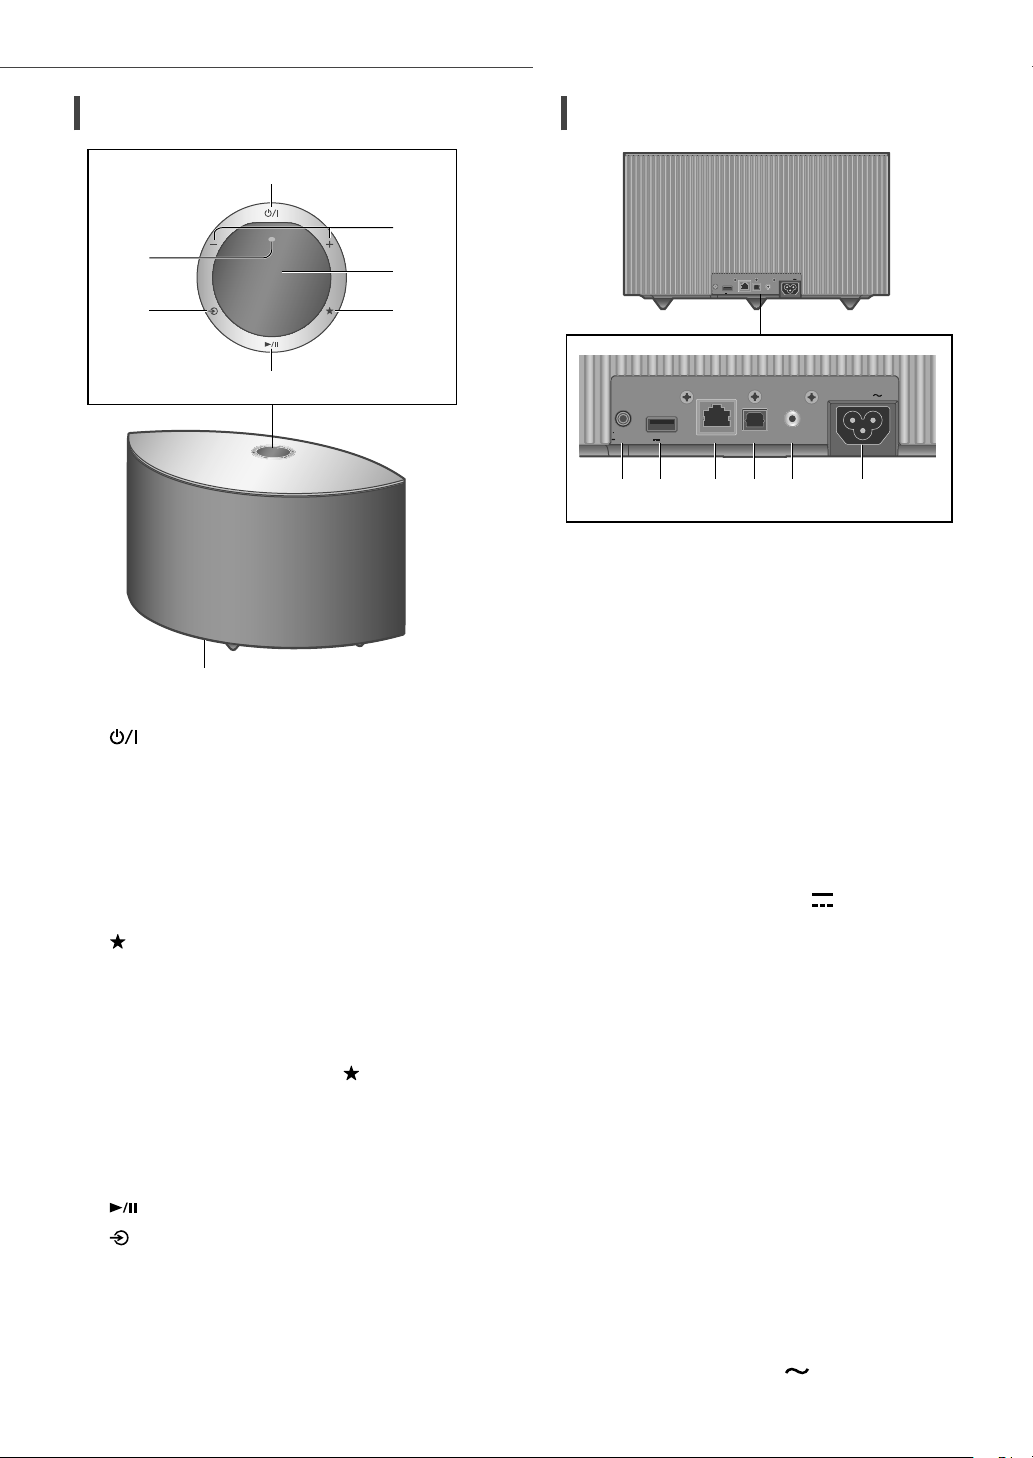
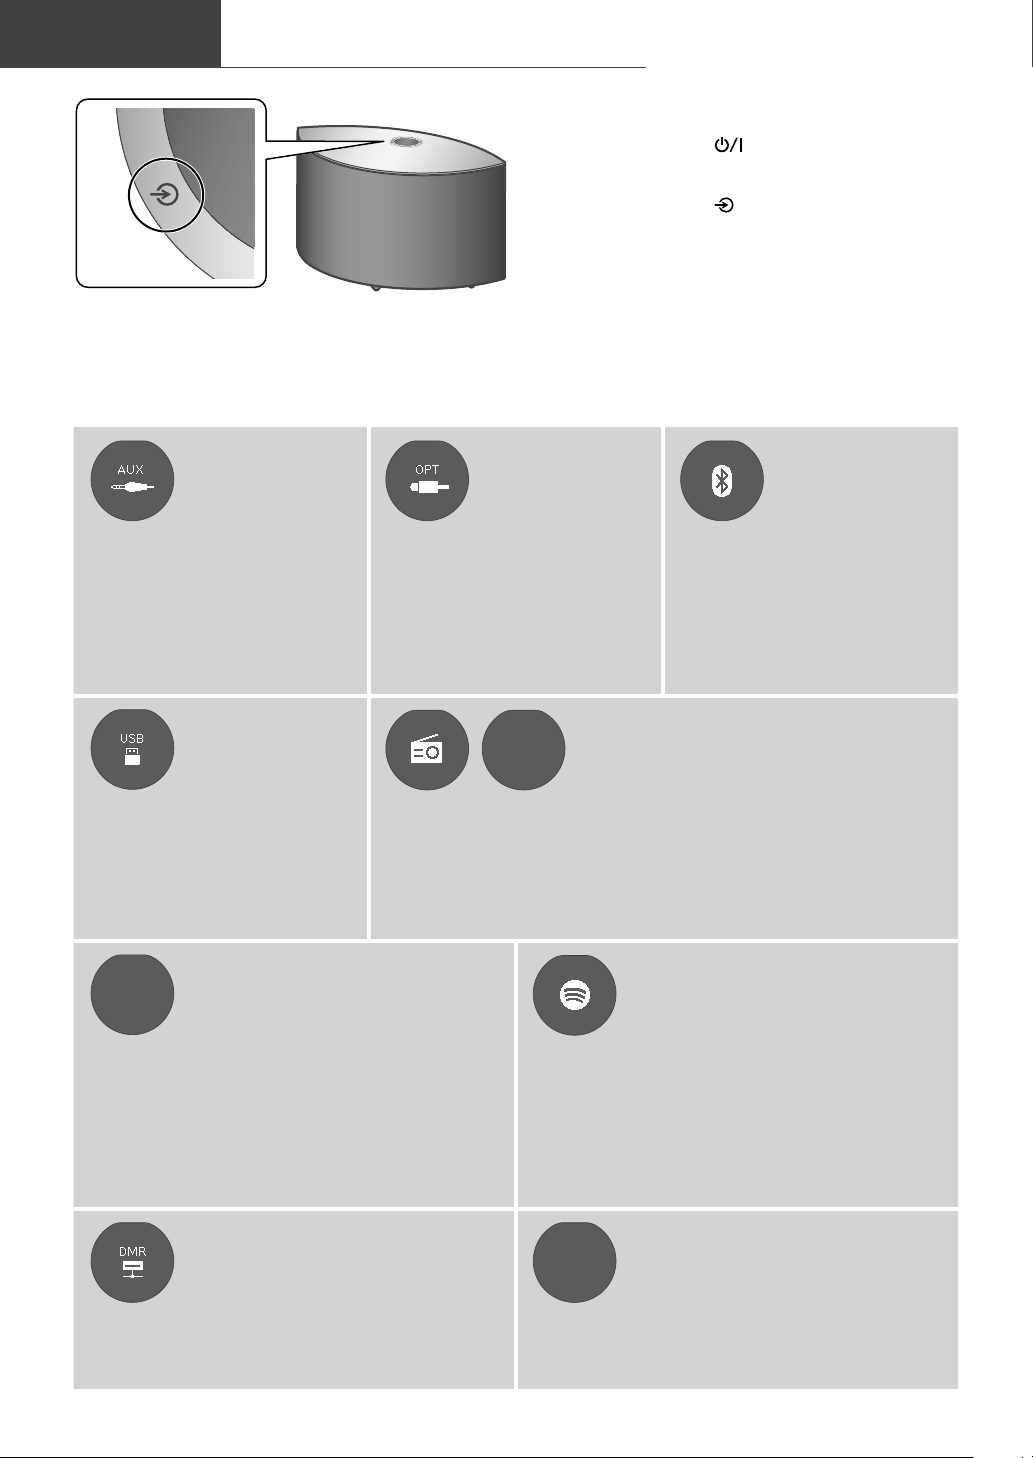
Control reference guide
This unit (front/top)
01 [ ] Standby/on switch
Press to switch the unit from on to standby
mode or vice versa. In standby mode, the
unit is still consuming a small amount of
power.
02 Adjust volume
• 0 (min) to 100 (max)
03 Display
Input source, etc. are displayed.
04
] Favourite
[
You can register your favourite station or
playlist (USB, Podcasts, Spotify, etc.), and call
them.
• You can register up to 9 favourite stations
or playlists. To register, press and hold [
until “Memorised” is displayed while
a station tuned in or music is being
played back. Then, the station or music
is automatically registered to an unused
number from 1 to 9.
05 [
] Switch the input source
06 [
07 Built-in microphone
08 Product identification marking (Bottom
of this unit)
• The model number is indicated.
] Play/Pause
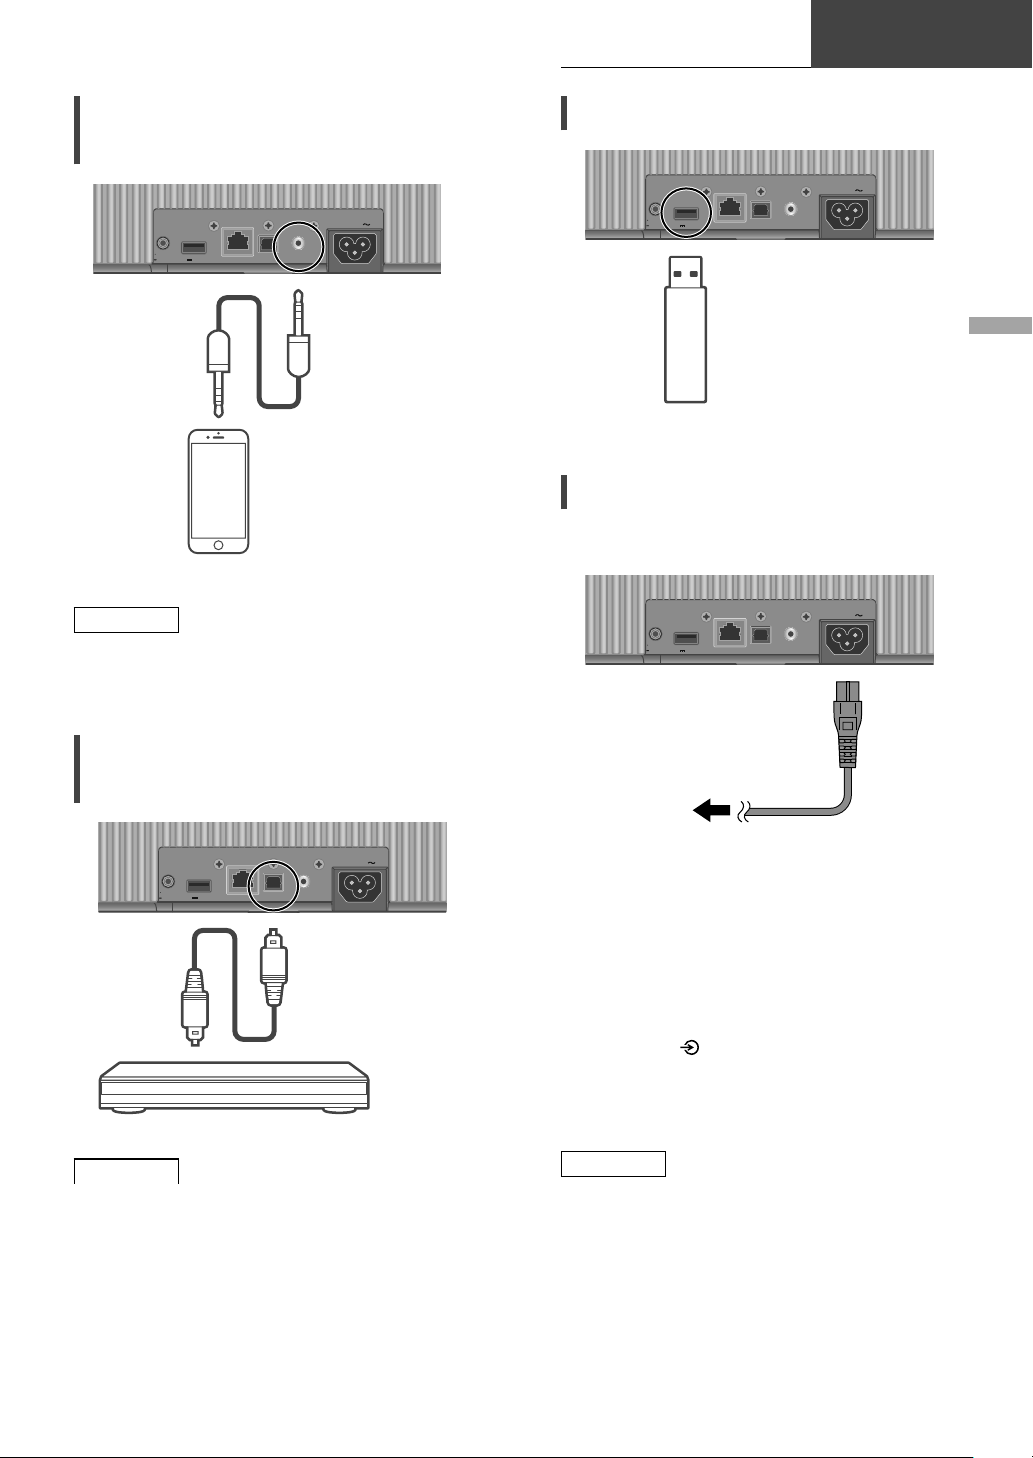
This unit (rear)
10BASE-T/
100BASE-TX
500mA5V
OPT INLAN AUX IN
AC IN
OPT INLAN AUX IN
) ( 09)
AC IN
500 mA)
DIMMER
INFO
10BASE-T/
100BAS E-TX
DIMMER
INFO
500mA5V
09 [• DI M M ER / - IN F O]
Adjust the brightness of illumination of the
display and bottom of the unit.
• When the display is turned off, it will
light up for a few seconds only when you
operate this unit. Before the display turns
off, “Display Off” will be displayed for a few
seconds.
• Press [•DIMMER/-INFO] repeatedly to
switch the brightness.
• Press and hold [•DIMMER/-INFO] to
display the network status or settings. The
displayed items are changed by pressing
[•DIMMER/-INFO] repeatedly. (The
brightness does not change during this
period.)
10 USB-A terminal (DC 5 V
You can play back music stored on the
connected USB device using the dedicated
app “Technics Audio Center” (free of charge)
on your tablet/smartphone ( 09). For
details, visit:
www.technics.com/support/
]
• If a USB device is connected, [•DIMMER/-
INFO] is difficult to press. Remove the USB
device as necessary.
11 LAN terminal ( 11)
12 Optical digital input terminal
You can connect a CD player, etc. with
optical digital audio cable (not supplied) and
play back music. ( 09)
13 AUX IN terminal
You can connect a portable audio player, etc.
with an analogue audio cable (3.5 mm) (not
supplied) and play back music. ( 09)
14 AC IN terminal (
08
(08)
Page 9
Connections
Basic
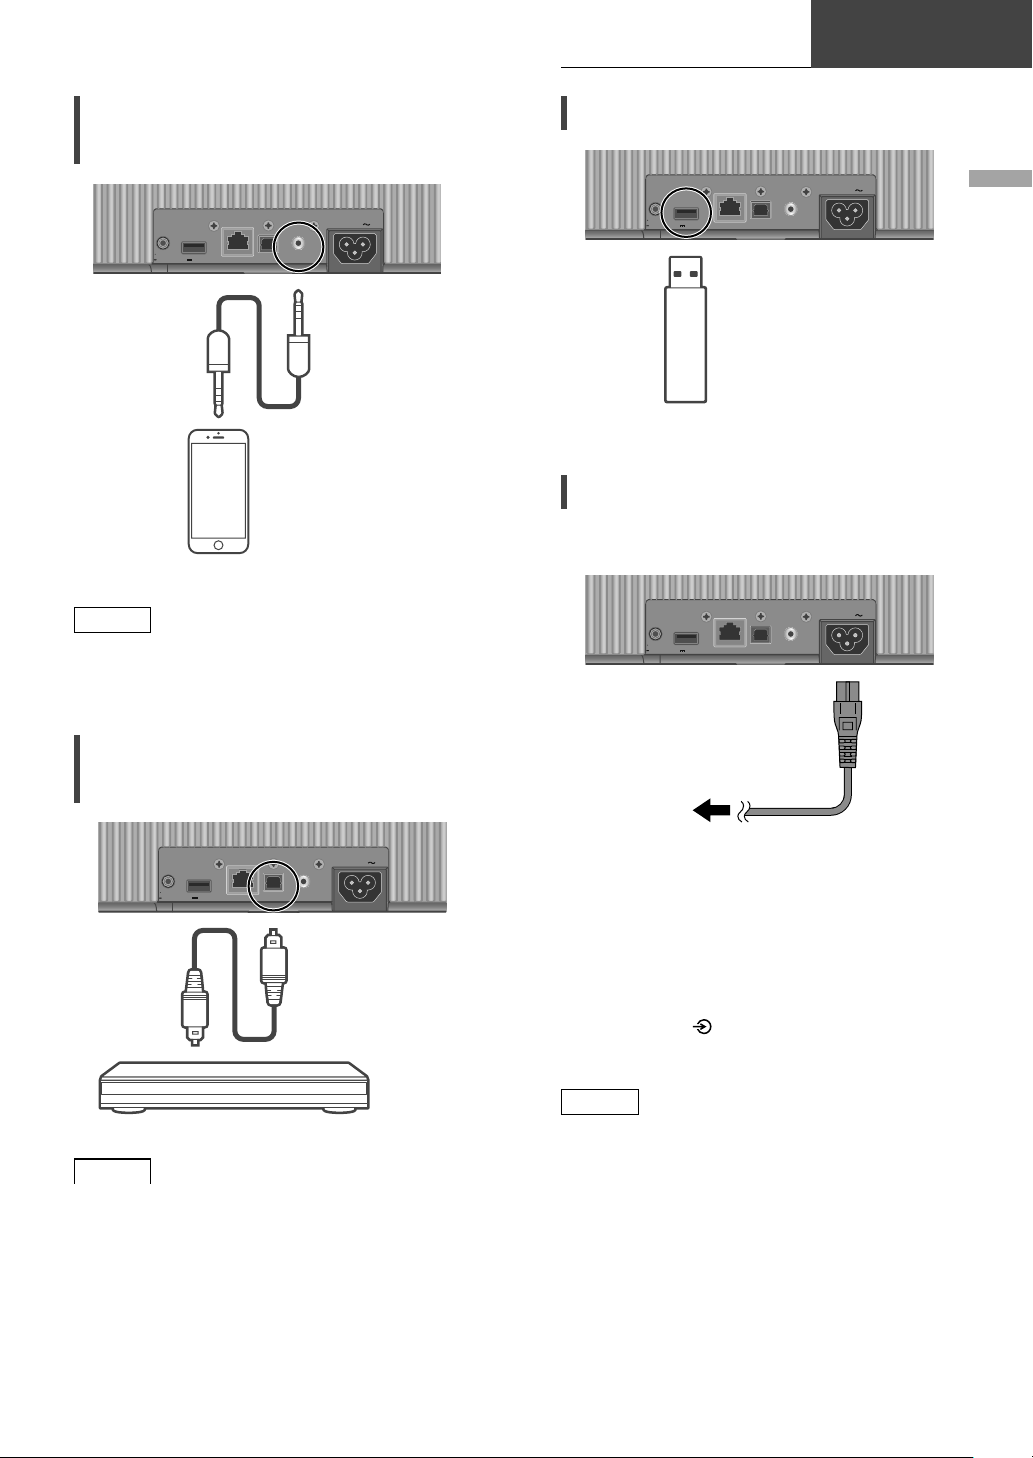
Connecting analogue audio
output device
10BASE-T/
100BASE-TX
DIMMER
INFO
500mA5V
OPT INLAN AUX IN
Portable audio player, etc.
Note
• When enjoying video contents with this
function, the video and audio output may not
be synchronised.
AC IN
Analogue audio
cable (3.5 mm)
(not supplied)
Connecting USB device
10BASE-T/
DIMMER
INFO
100BASE-TX
500mA5V
OPT INLAN AUX IN
AC IN
USB device
AC mains lead connection
Connect only after all other connections are
completed.
10BASE-T/
DIMMER
INFO
100BASE-TX
500mA5V
OPT INLAN AUX IN
AC IN
English
Connecting digital audio output
device
10BASE-T/
100BASE-TX
DIMMER
INFO
500mA5V
OPT INLAN AUX IN
CD player, etc.
Note
• When enjoying video contents with this
function, the video and audio output may not
be synchronised.
AC IN
Optical digital
audio cable
(not supplied)
To a household mains
socket
• Use only the supplied AC mains lead.
• Do not connect the AC mains lead until all
other connections are complete.
• Insert the plugs of the cables to be connected
all the way in.
• Do not bend cables at sharp angles.
®
• Wireless LAN (Wi-Fi
) setting may start when
this unit is turned on. If you stop the Wi-Fi
setting, press [
]. To keep the Wi-Fi setting,
start the “Google Home” app and follow the
on-screen instructions. ( 11)
Note
• This unit consumes a small amount of AC
power ( 18) even when the unit is in standby
mode. Remove the plug from the main
electrical outlet if you will not be using the unit
for an extended period of time. Place the unit
so the plug can be easily removed.
(09)
09
Page 10
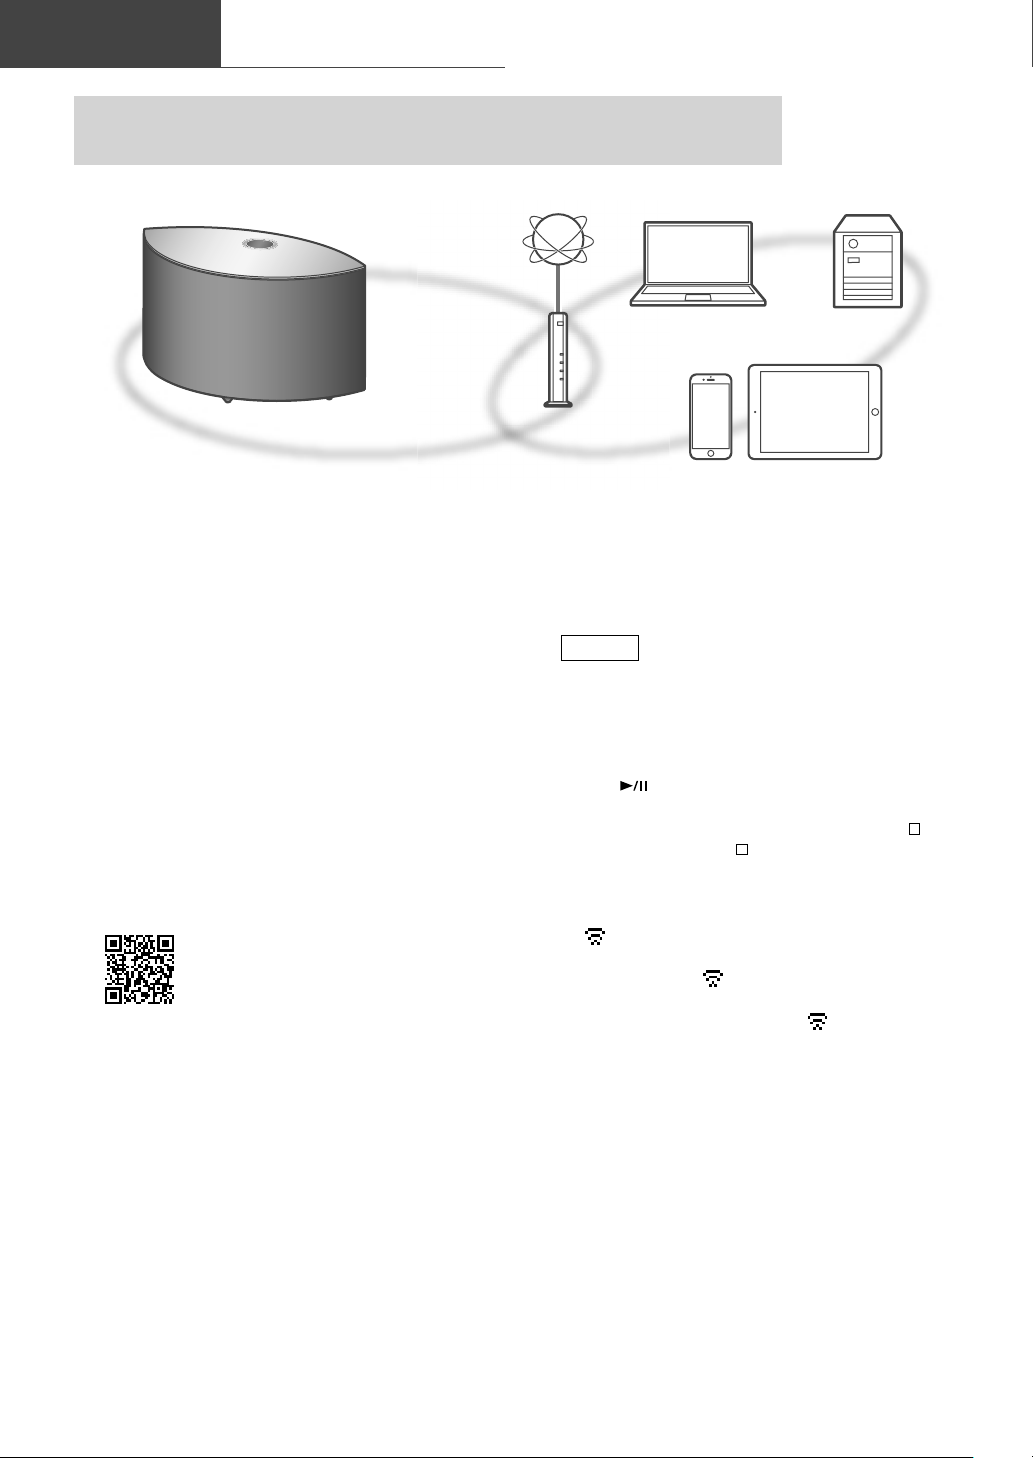
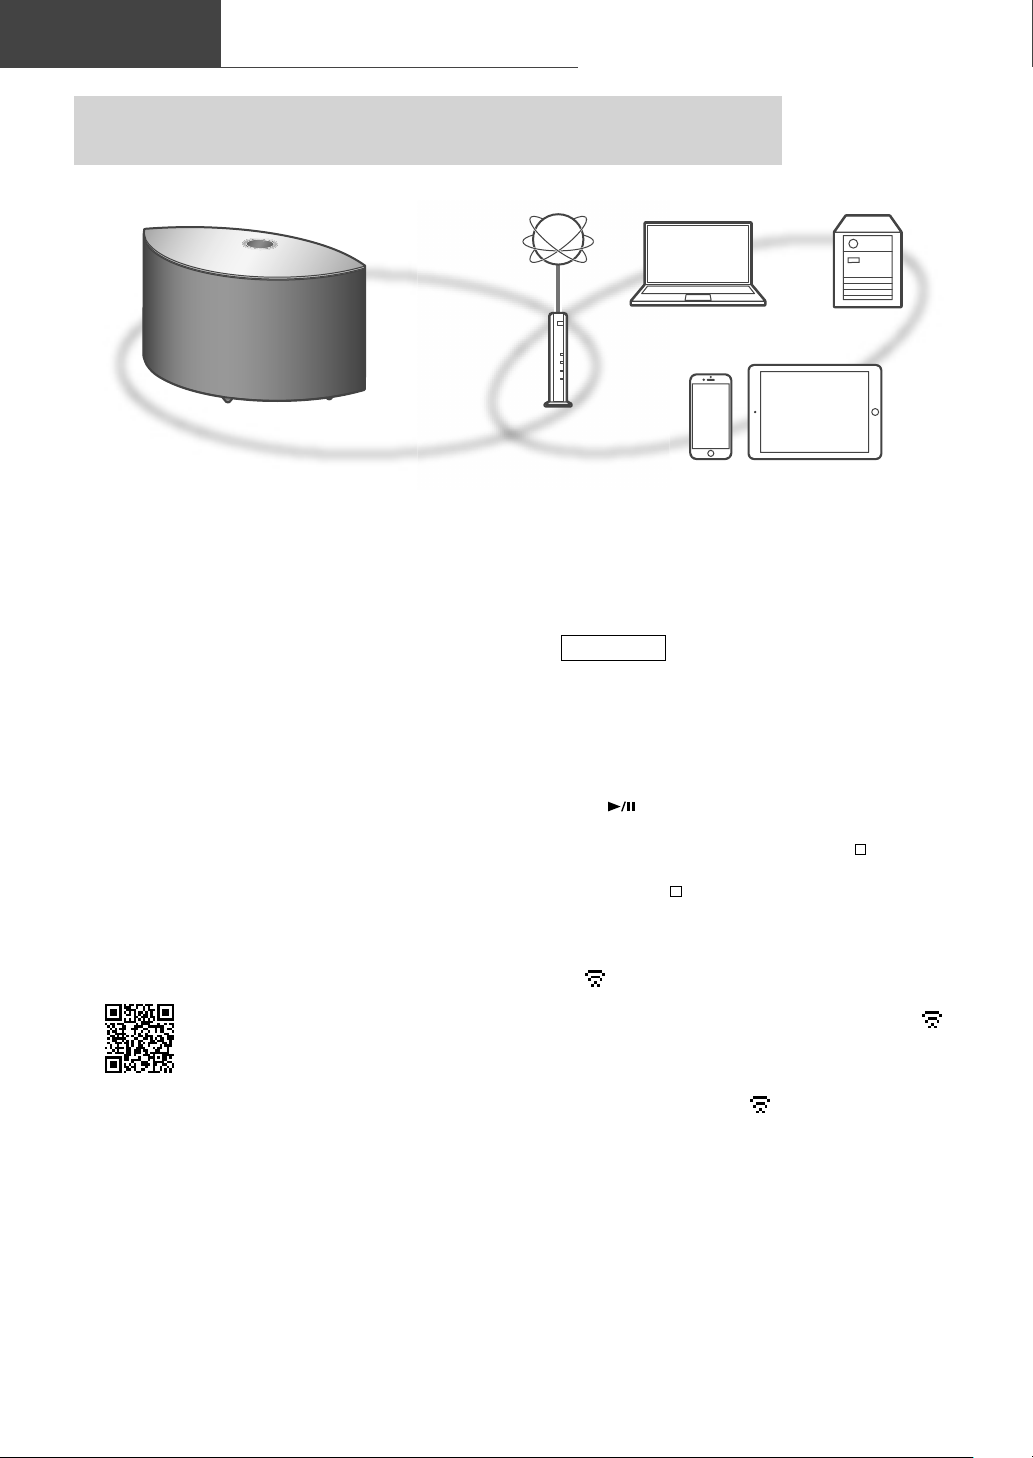
Basic
You can stream online music services or music files from your smartphone/tablet
to this unit.
This unit can be connected to a router using a LAN cable or built-in Wi-Fi®.
For a stable connection to the network, a wired LAN connection is recommended.
■
Preparation
If you install the “Google Home” app on your
smartphone/tablet, you can set up a connection
using the application.
• When using the Chromecast-enabled apps
to play music on this unit ( 16), set up a
connection using the “Google Home” app.
• Make sure that the Wi-Fi function is activated
on your smartphones/tablet.
1 Install the “Google Home” app on
your smartphone/tablet.
• To download the “Google Home” app, visit:
https://www.google.com/cast/setup/
2 Connect your smartphone/tablet to
the same network as this unit before
Network settings
Note
• After turning on this unit, it may take some
time until this unit is activated.
• If “Firmware update is available” is displayed
after the network connection is set up, the
firmware for this unit is available. Press and
hold [
update.
- The progress is displayed as “Updating
- When the update has finished successfully,
• “
not established. When the network connection
is established, “
The network setting using the “Google Home”
app may be available while “
the “Google Home” app and follow the onscreen instructions. ( 13)
] for 5 seconds or longer to start the
while updating. (“
“Success” is displayed. Turn this unit off and
on.
” blinks while the network connection is
setting.
%”
” stands for a number.)
” disappears.
” blinks. Start
10
(10)
Page 11
Basic
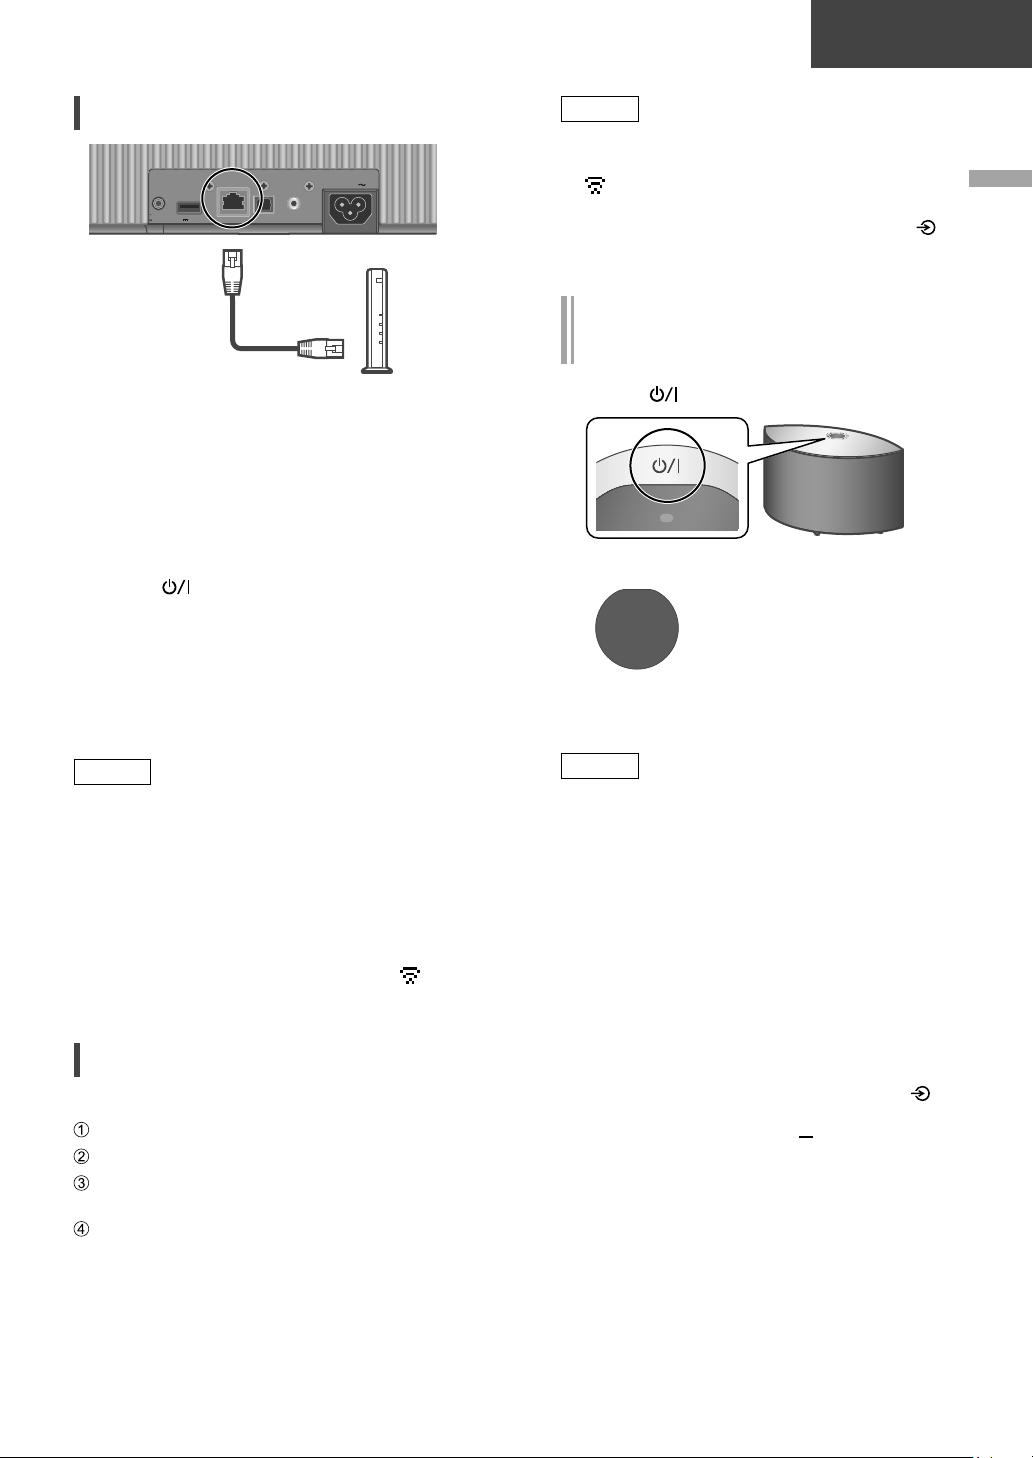
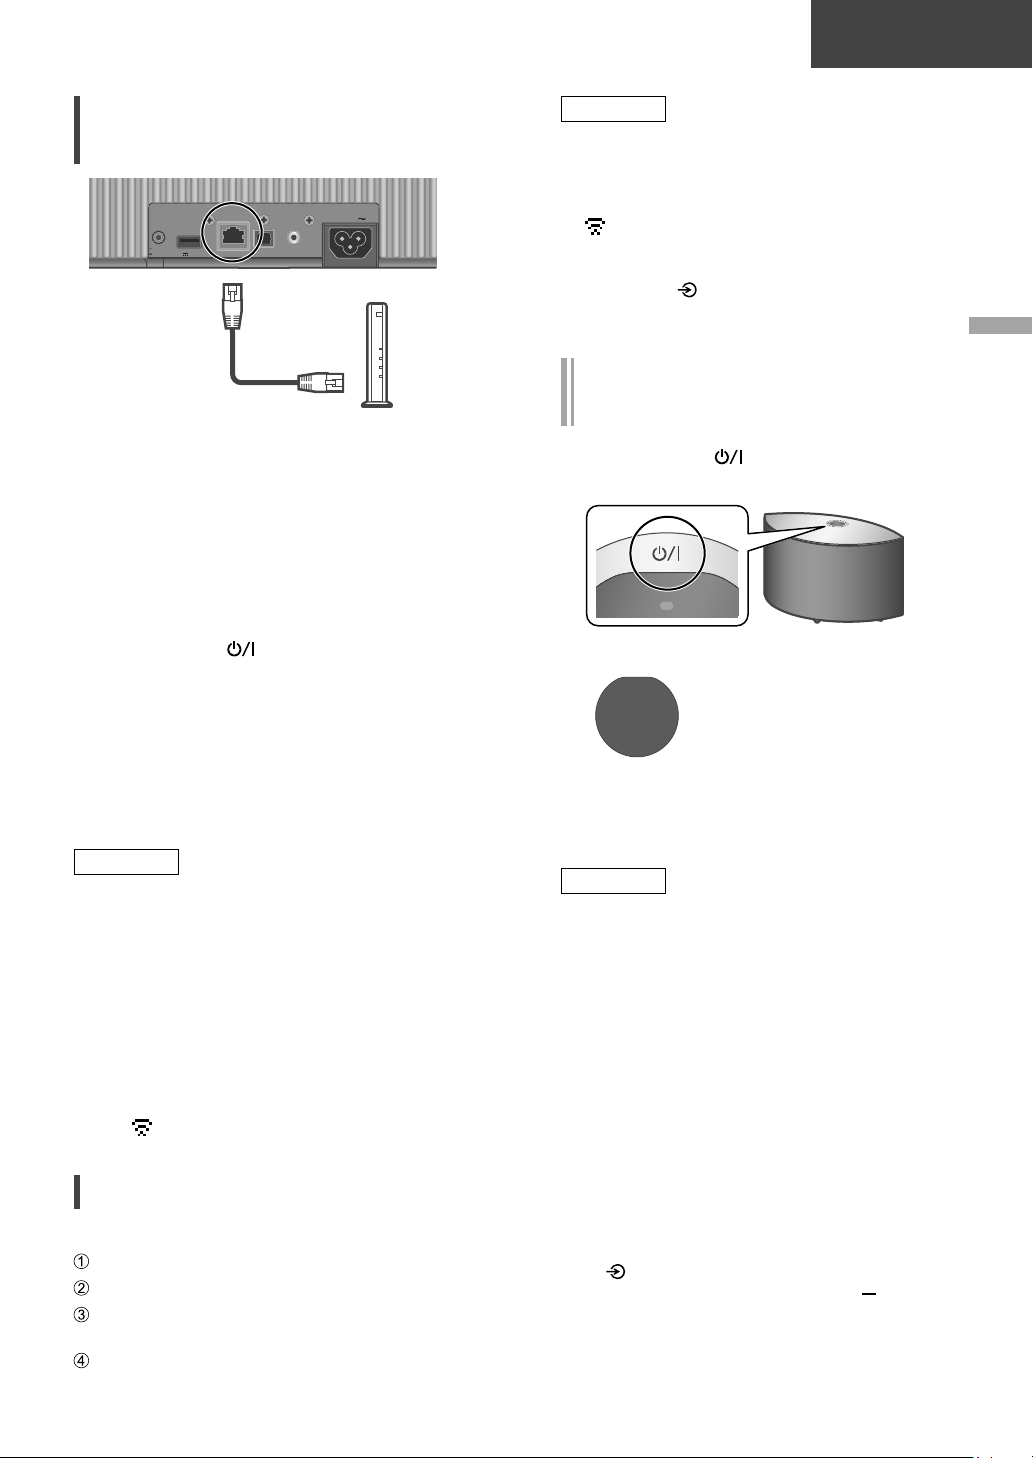
Wired LAN connection
10BASE-T/
100BASE-TX
DIMMER
INFO
500mA5V
LAN cable
(not supplied)
OPT INLAN AUX IN
1 Disconnect the AC mains lead.
2 Connect this unit to a broadband
router, etc. using a LAN cable.
3 Connect the AC mains lead to this
unit. ( 09)
4 Press [
(To use the Chromecast-enabled apps with
5
this unit ( 16))
] to turn this unit on.
Make sure to set up a connection
using “Google Home” app on your
smartphone/tablet.
AC IN
Broadband router, etc.
Note
• The setting will be cancelled after the set time
limit. In that case, try the setting again.
” disappears when the Wi-Fi setting is
• “
complete.
• To cancel this setting in the middle, press [
or turn the unit to standby mode.
Network setting for the first time
using the “Google Home” app
1 Press [ ] to turn this unit on.
• “Wi-Fi Setup” starts blinking.
Wi-Fi
Setup
2 Start the “Google Home” app and
follow the on-screen instructions.
English
]
Note
• While the AC mains lead is disconnected, the
LAN cable must be connected or disconnected.
• Use category 7 or above straight LAN cables
(STP) when connecting to peripheral devices.
• Inserting any cable other than a LAN cable in
the LAN port can damage the unit.
• Even when the Wi-Fi function is set to
“On”, the wired LAN function is activated
while a LAN cable being connected. (“
”
disappears.)
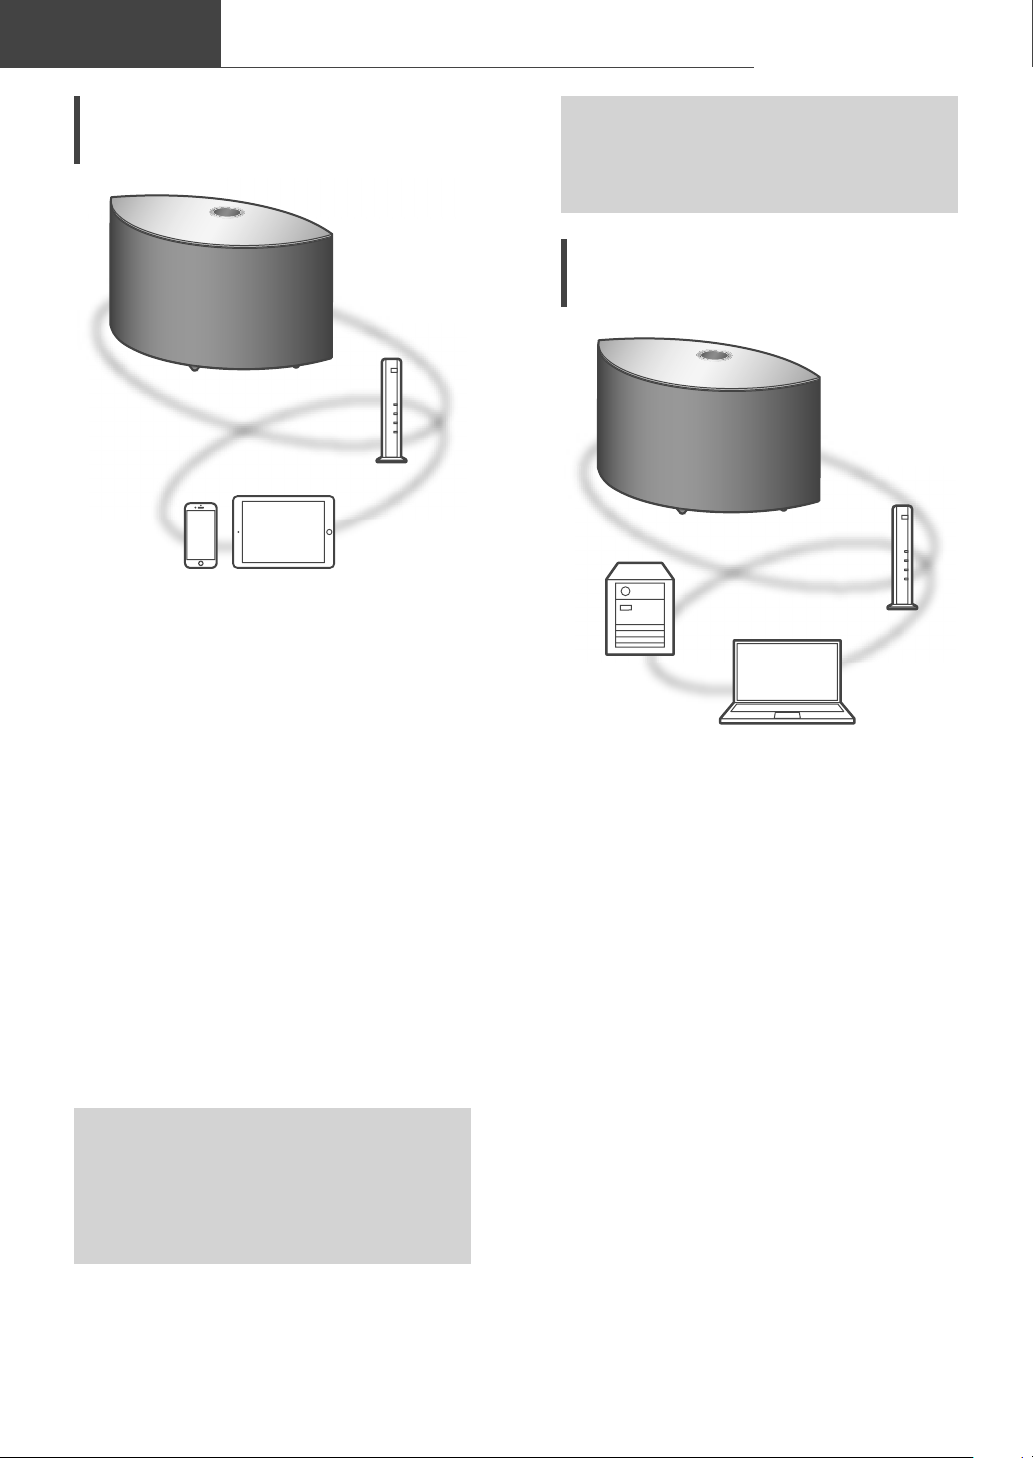
Wireless LAN connection
■
Preparation
Disconnect the AC mains lead.
Disconnect the LAN cable.
Place this unit as close to the wireless router
as possible.
Connect the AC mains lead to this unit.
( 09)
Note
• This unit will be displayed as “Technics-
SC-C50(“
****
” if the device name is not set.
****
” stands for characters unique to each
set.)
• You can check your network information (SSID,
MAC address and IP address) from the “Google
Home” app or “Technics Audio Center” app.
• Some items on the “Google Home” app are
irrelevant to this unit.
• When this unit is turned off and on before
the Wi-Fi setting is complete, “Wi-Fi Setup”
is displayed again. Perform the Wi-Fi setting
or set the Wi-Fi function to “Off” so that it is
not displayed thereafter. To switch the Wi-Fi
function between “On” and “Off”, press [
]
to cancel the Wi-Fi setting in the middle,
press and hold the volume [
] on the top and
[•DIMMER/-INFO] on the rear of this unit for
approx. 5 seconds.
• For other connection methods ( 12)
(11)
11
Page 12
Basic
Setting the network from the setup
Network settings (Continued)
menu
1 Press and hold [ ] on the top and
[•DIMMER/-INFO] on the rear of this
unit.
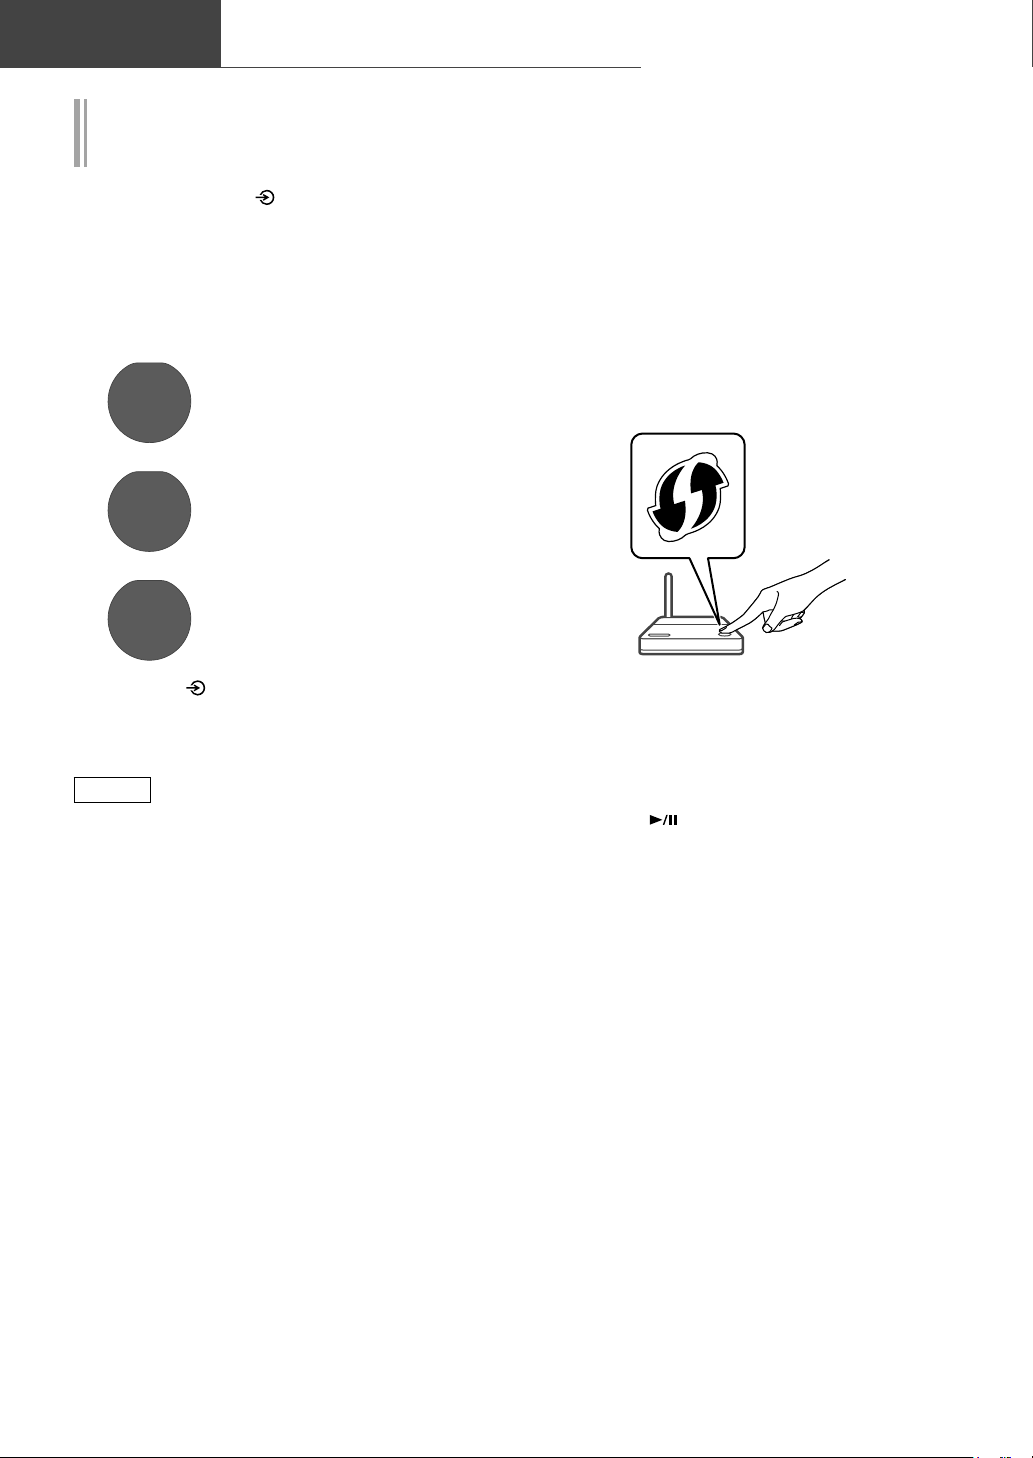
2 Connection methods (WPS/WPS PIN/
Wi-Fi Setup) are displayed in turn.
• The display changes every 5 seconds.
• If your wireless broadband
WPS
WPS PIN
64428147
Wi-Fi
Setup
3 Release [ ] and [•DIMMER/-INFO]
while the selected connection
method is displayed.
Note
• When using the Chromecast-enabled apps
to play music on this unit ( 16), set up a
connection using the “Google Home” app.
router supports the WPS (WiFi Protected Setup™) push
button (Using the WPS button)
• If your wireless broadband
router support the WPS PIN
code method (Using the WPS
PIN code)
• When using the “Google
Home” app to set up a
connection (Using the “Google
Home” app)
■
Using the WPS button
“WPS”
(When not using the Chromecast-enabled apps
with this unit)
If your wireless router supports WPS, you can
set up a connection by pressing the WPS button.
• A compatible wireless router may have the
WPS identifier mark.
• Complete the settings within 2 minutes while
“WPS” is displayed.
1 After “WPS” is displayed, press the
WPS button on the wireless router.
Example:
• When the connection is established,
“Success” is displayed.
- “Fail” may be displayed if the connection
was not complete. Try this method again
from the setup menu. If “Fail” is still
displayed, try other methods.
2 Press [ ] to exit the setting.
■
Using the WPS PIN code
“WPS PIN”
(When not using the Chromecast-enabled apps
with this unit)
If your wireless router supports WPS, you can
set up a connection by entering the WPS PIN
code.
• For details on how to enter the PIN code, refer
to the operating instructions of the wireless
router.
• Complete the settings within 2 minutes while
“WPS PIN” and the PIN code are displayed.
1 Enter the PIN code into the wireless
router from PC, etc.
• When the connection is established,
“Success” is displayed.
- “Fail” may be displayed if the connection
was not complete. Try this method again
from the setup menu. If “Fail” is still
displayed, try other methods.
12
(12)
Page 13

Basic
2 Press [ ] to exit the setting.
Note
• Depending on a router, other connected
devices may temporarily lose their connection.
• For details, refer to the operating instructions
of the wireless router.
■
Using the “Google Home” app
“Wi-Fi Setup”
(When using the Chromecast-enabled apps with
this unit)
You can set up a connection using the “Google
Home” app.
1 Start the app and follow the on-
screen instructions.
2 Press [
Note
• This unit will be displayed as “Technics-
SC-C50(“
****
set.)
• You can check your network information (SSID,
MAC address and IP address) from the “Google
Home” app or “Technics Audio Center” app.
• Some items on the “Google Home” app are
irrelevant to this unit.
] to exit the setting.
” if the device name is not set.
****
” stands for characters unique to each
To use Chromecast-enabled apps
When using the Chromecast-enabled apps to
play music on this unit, you need to set up a
network connection using “Google Home” app.
When the network has been set up with another
method, try the setting again with the following
procedure.
1 Press and hold [ ] on the top and
[•DIMMER/-INFO] on the rear of this
unit.
• The displayed connection method is
switched every 5 seconds.
2 When “Wi-Fi Setup” is displayed,
release [
• “Wi-Fi Setup” starts blinking.
] and [•DIMMER/-INFO].
3 Proceed to “Using the “Google
Home” app”.
English
(13)
13
Page 14

Basic
Available input sources
1 Press [ ] to turn this unit on.
2 Press [
] repeatedly to select the
input source.
• Each input source can be played back with this
unit (see below).
• Some inputs can be available when using “Google Home” or “Technics Audio Center” (free of charge). For
details, visit:
www.technics.com/support/
- Complete the network settings. ( 10)
Using the
auxiliary input
You can connect a portable
audio player, etc. with an
analogue audio cable (3.5 mm)
(not supplied) and play back
music. ( 09)
• Start playback on the
connected device.
Using USB device
You can play back music stored
on the connected USB device.
• Use the dedicated app
“Technics Audio Center” (free
of charge) to play back.
Chromecast
built-in
Using Chromecast-enabled
apps
You can connect a CD player,
etc. with optical digital audio
cable (not supplied) and play
back music. ( 09)
• Start playback on the
connected device.
Using the free app “Technics Audio Center”, you can play an internet
radio by setting this unit as a speaker for the internet radio.
• Use the dedicated app “Technics Audio Center” (free of charge) to
play back.
This unit has the Chromecast built-in. You can
stream music files from your device (smartphone,
tablet, etc.) with Chromecast-enabled apps and
select this unit as the output speaker. ( 16)
• For detailed information of Chromecast-enabled
apps, visit:
g.co/cast/apps
Using digital
audio output
device
Podcasts
Playing Internet Radio and Podcasts
You can listen to the sound
from the Bluetooth® audio
device from this unit wirelessly.
( 15)
• Start playback on the
Bluetooth
Using music streaming services
(Spotify, etc.)
Using Bluetooth
®
device.
You can play music from music streaming services,
such as Spotify etc. by setting this unit as a
speaker.
• For music streaming services supported by this
unit, visit:
www.technics.com/support/
®
Streaming music files on
network devices
You can stream music files from the device on
your network to this unit by using the free app
“Technics Audio Center”. ( 16)
(14)
14
AirPlay
Using AirPlay
You can play back music stored on iOS device, etc.
using AirPlay.
Page 15

B
Bluetooth® device
Using Bluetooth
sing
®
Basic
English
Pairing a Bluetooth® device
• Turn on this unit, Bluetooth® device and place
the device near this unit.
• Turn on the Bluetooth
1 Press [ ] repeatedly to select “ ”.
• “ ” blinks at 1 second interval.
” blinks per second and this unit tries to
• “
connect to the last connected Bluetooth
device. After the connection is complete,
proceed to step 4.
2 Press and hold [ ].
• “ ” blinks at 1 second interval and this unit
enters the registration standby state.
3 Open the Bluetooth® connection
screen, etc. on the Bluetooth
and select “Technics-SC-C50-
• “
” stands for numbers unique to each
****
set.
• If the device name is set on the “Google
Home” app, the set name is displayed.
4 Play music by operating the
Bluetooth
®
®
device.
feature of the device.
®
device,
”.
****
Listening to music stored on a
Bluetooth® device
• If a Bluetooth® device is already connected,
disconnect it.
1 Press [ ] repeatedly to select “ ”.
• “ ” blinks per second and this unit will
®
automatically try to connect to the last
connected Bluetooth® device. After the
connection is complete, proceed to step 3.
2 Open the Bluetooth® connection
®
screen, etc. on the Bluetooth
and select “Technics-SC-C50-
device,
”.
****
3 Play music by operating the
Bluetooth® device.
Note
• Refer to the operating instructions of the
Bluetooth
• This unit can only be connected to one device
at a time.
• The Bluetooth
different audio source is selected.
®
device for details.
®
device will be disconnected if a
Note
• If prompted for the passkey, input “0000”.
• You can register up to 8 devices with this unit.
If a 9th device is paired, the device that has not
been used the longest will be replaced.
(15)
15
Page 16
Basic
Streaming music over the network
Listening to music using
Chromecast-enabled app
This unit is compatible with Chromecast-enabled
apps. For detailed information of Chromecastenabled apps, visit:
g.co/cast/apps
Important notice:
Before you dispose of or transfer this unit
to a third party, be sure to log out of your
music streaming services accounts to prevent
unauthorised use of your accounts.
Streaming music files on
network devices
■
Preparation
• Complete the network settings. ( 10)
- Make sure that the network is connected to
the Internet.
• Install a Chromecast-enabled app on your
device (smartphone, tablet, etc.).
• Connect the device to the network currently
used at home.
1 Start the Chromecast-enabled app
on your device (smartphone, tablet,
etc.).
• The input source is automatically switched
to “Chromecast built-in”.
2 Play back the music.
Not all music streaming services are available
in all countries/regions. Registration/
subscription may be required, or fees may
be charged to use music streaming services.
Services are subject to change or be
discontinued. For details, visit an individual
music streaming service’s website.
You can stream music files from the device on
your network to this unit by using the free app
“Technics Audio Center”.
■
Preparation
• Complete the network settings. ( 10)
• Connect the following devices to the same
network as this unit.
- Device with “Technics Audio Center” app
installed
- Device containing music source
1 Install the free app “Technics Audio
Center” on your smartphone, tablet,
etc.
• Download and install the app from the
website below.
www.technics.com/support/
2 Start the app “Technics Audio
Center”.
• Always use the latest version of the app.
3 Select this unit as the output speaker.
4 Select a music source.
5 Select a music file.
16
(16)
Page 17
The Wi-Fi CERTIFIED™ Logo is a certification
mark of Wi-Fi Alliance
The Wi-Fi Protected Setup™ Logo is a
certification mark of Wi-Fi Alliance
®
“Wi-Fi
” is a registered trademark of Wi-Fi
®
.
®
.
Alliance®.
“Wi-Fi Protected Setup™”, “ W PA™”, and
“WPA2™” are trademarks of Wi-Fi Alliance
®
.
Use of the Works with Apple badge means
that an accessory has been designed to work
specifically with the technology identified
in the badge and has been certified by
the developer to meet Apple performance
standards.
Apple and AirPlay are trademarks of Apple
Inc., registered in the U.S. and other
countries.
Google, Google Home, Android, Google Play,
Chromecast, Chromecast built-in and other
related marks and logos are trademarks of
Google LLC.
Windows is a trademark or a registered
trademark of Microsoft Corporation in the
United States and other countries.
Windows Media and the Windows logo
are trademarks or registered trademarks
of Microsoft Corporation in the United
States and/or other countries. This product
is protected by certain intellectual property
rights of Microsoft Corporation and third
parties. Use or distribution of such technology
outside of this product is prohibited without
a license from Microsoft or an authorized
Microsoft subsidiary and third parties.
Mac and OS X are trademarks of Apple Inc.,
registered in the U.S. and other countries.
The Bluetooth
®
word mark and logos
are registered trademarks owned by the
Bluetooth SIG, Inc. and any use of such marks
by Panasonic Corporation is under license.
Other trademarks and trade names are those
of their respective owners.
Licenses
FLAC Decoder
Copyright (C) 2000, 2001, 2002, 2003, 2004,
2005, 2006, 2007, 2008, 2009 Josh Coalson
Redistribution and use in source and binary
forms, with or without modification, are
permitted provided that the following
conditions are met:
- Redistributions of source code must retain
the above copyright notice, this list of
conditions and the following disclaimer.
- Redistributions in binary form must
reproduce the above copyright notice,
this list of conditions and the following
disclaimer in the documentation and/
or other materials provided with the
distribution.
- Neither the name of the Xiph.org
Foundation nor the names of its contributors
may be used to endorse or promote
products derived from this software without
specific prior written permission.
THIS SOFTWARE IS PROVIDED BY THE
COPYRIGHT HOLDERS AND CONTRIBUTORS
“AS IS” AND ANY EXPRESS OR IMPLIED
WARRANTIES, INCLUDING, BUT NOT
LIMITED TO, THE IMPLIED WARRANTIES OF
MERCHANTABILITY AND FITNESS FOR A
PARTICULAR PURPOSE ARE DISCLAIMED.
IN NO EVENT SHALL THE FOUNDATION
OR CONTRIBUTORS BE LIABLE FOR ANY
DIRECT, INDIRECT, INCIDENTAL, SPECIAL,
EXEMPLARY, OR CONSEQUENTIAL
DAMAGES (INCLUDING, BUT NOT LIMITED
TO, PROCUREMENT OF SUBSTITUTE GOODS
OR SERVICES; LOSS OF USE, DATA, OR
PROFITS; OR BUSINESS INTERRUPTION)
HOWEVER CAUSED AND ON ANY THEORY
OF LIABILITY, WHETHER IN CONTRACT,
STRICT LIABILITY, OR TORT (INCLUDING
NEGLIGENCE OR OTHERWISE) ARISING
IN ANY WAY OUT OF THE USE OF THIS
SOFTWARE, EVEN IF ADVISED OF THE
POSSIBILITY OF SUCH DAMAGE.
The Spotify software is subject to third party
licenses found here:
www.spotify.com/connect/third-party-licenses
English
DSD is a trademark of Sony Corporation.
(17)
17
Page 18

Specifications
■
GENERAL
Power supply
Power consumption 42 W
Power consumption
in standby mode
(Network Standby
Off)
Power consumption
in standby mode
(Network Standby
On with Wireless
LAN)
Power consumption
in standby mode
(Network Standby
On with Wired
LAN)
Dimensions
(W×H×D)
Mass Approx. 5.9 kg
Operating
temperature range
Operating humidity
range
■
AMPLIFIER SECTION
Output power
■
SPEAKER SECTION
Front speaker (L/C/R)
Type 2 way, 2 speaker (Closed)
Woofer 6.5 cm × 1/ch, Cone type
Tweeter 1.6 cm × 1/ch, Dome type
Subwoofer
Type
Subwoofer 12 cm × 1, Cone type
AC 220 V to 240 V,
50/60 Hz
0.2 W
2.0 W
2.0 W
375 mm × 220 mm ×
197 mm
0 °C to +40 °C
35 % to 80 % RH
(no condensation)
Front speaker (L/R):
20 W + 20 W
(1 kHz, T.H.D. 1.0 %,
8 , 20 kHz LPF)
Front speaker (Center):
20 W
(1 kHz, T.H.D. 1.0 %,
8 , 20 kHz LPF)
Subwoofer:
40 W
(100 Hz, T.H.D. 1.0 %,
4 , 20 kHz LPF)
1 way,
1 speaker (Bass reflex)
■
Bluetooth® SECTION
Bluetooth® system
specification
Wireless equipment
classification
Supported profiles A2DP, AVRCP
Supported codec AAC, SBC
Frequency band 2.4 GHz band FH-SS
Operating distance
1: Prospective communication distance
*
Measurement environment:
Temperature 25 °C/ Height 1.0 m
Measure in “Mode1”
■
TERMINALS SECTION
USB
Support Memory
Capacity
Maximum
number of folders
(albums)
Maximum
number of files
(songs)
Ethernet interface
AUX Input Stereo, 3.5 mm Jack
Digital Input
Format support LPCM
■
Wi-Fi SECTION
Standard IEEE802.11a/b/g/n/ac
Frequency band
Security
WPS version Version 2.0
• The WLAN feature of this product shall
exclusively be used inside buildings.
Bluetooth
Class 2 (2.5 mW)
Approx. 10 m Line of
sight
Type A Connector
USB 2.0 High-Speed
DC 5 V 500 mA
USB Mass Storage Class
File system:
FAT16, FAT32, NTFS
2 TB (max)
800
8000
LAN
(100BASE-TX/10BASE-T)
Optical digital input
(Optical terminal)
2.4 GHz band
5 GHz band
WPA2™,
Mixed mode WPA2™/
WPA™
®
Ver.4.2
1
*
18
(18)
Page 19
■
File format
This unit supports the following file formats.
• This unit does not support the playback of copy-protected music files.
• Playback of all files in formats supported by this unit is not guaranteed.
• Playback of a file in a format not supported by this unit may cause choppy audio or noise. In such cases,
check to see if this unit supports the file format.
• This unit does not support VBR (Variable Bit Rate) playback.
• Some of the connected devices or servers may be capable of converting files in formats not supported by
this unit and output them. For details, refer to the operating instructions for your devices or servers.
• File information (sampling frequency, etc.) shown by this unit and playback software may differ from each
other.
Optical digital input
Bit rate/
Format support Sampling frequency
LPCM 32/44.1/48/88.2/96 kHz 16/24 bit
USB-A
File format Extension Sampling frequency
MP3 .mp3 32/44.1/48 kHz 16 to 320 kbps
AAC .m4a/.aac 32/44.1/48/88.2/96 kHz 16 to 320 kbps
WAV .wav 32/44.1/48/88.2/96/176.4/192/352.8/384 kHz 16/24/32 bit
FLAC .flac 32/44.1/48/88.2/96/176.4/192/352.8/384 kHz 16/24 bit
AIFF .aiff 32/44.1/48/88.2/96/176.4/192/352.8/384 kHz 16/24/32 bit
ALAC .m4a 32/44.1/48/88.2/96/176.4/192/352.8/384 kHz 16/24 bit
DSD .dff/.dsf 2.8/5.6/11.2 MHz
Number of
quantisation bits
Bit rate/
Number of
quantisation bits
English
LAN (DMR)
File format Extension Sampling frequency
MP3 .mp3 32/44.1/48 kHz 16 to 320 kbps
AAC .m4a/.aac 32/44.1/48/88.2/96 kHz 16 to 320 kbps
WAV .wav 32/44.1/48/88.2/96/176.4/192/352.8/384 kHz 16/24/32 bit
FLAC .flac 32/44.1/48/88.2/96/176.4/192/352.8/384 kHz 16/24 bit
AIFF .aiff 32/44.1/48/88.2/96/176.4/192/352.8/384 kHz 16/24/32 bit
ALAC .m4a 32/44.1/48/88.2/96/176.4/192/352.8/384 kHz 16/24 bit
DSD .dff/.dsf 2.8/5.6/11.2 MHz
: Whether or not each music file can be played back over your network is determined by the network server
*
even if the format of the file is listed above. For example, if you are using Windows Media Player 11, not
all music files on the PC are playable. You can play back only those added to the library of Windows Media
Player 11.
Note
• Specifications are subject to change without notice.
• Mass and dimensions are approximate.
*
Bit rate/
Number of
quantisation bits
(19)
19
Page 20
Wir möchten Ihnen dafür danken, dass Sie sich für dieses Gerät entschieden haben.
Bitte lesen Sie diese Anleitung vor der Inbetriebnahme dieses Produkts aufmerksam durch, und bewahren
Sie dieses Handbuch für spätere Bezugnahme griffbereit auf.
• Hinweise zu Beschreibungen in dieser Bedienungsanleitung
- Seitenverweise werden dargestellt als “ ○○”.
- Die gezeigten Abbildungen können sich von Ihrem Gerät unterscheiden.
• Eine ausführlichere Bedienungsanleitung finden Sie unter “Bedienungsanleitung” (PDF-
Format). Sie können sie von der Website herunterladen.
www.technics.com/support/
• Sie benötigen Adobe Reader zum Lesen oder Drucken der “Bedienungsanleitung”
(PDF-Format). Von der folgenden Website können Sie eine Version von Adobe Reader
herunterladen und installieren, die mit Ihrem Betriebssystem kompatibel ist.
http://www.adobe.com/products/acrobat/readstep2.html
Inhaltsverzeichnis
Sicherheitsvorkehrungen 05
Installation 07
Benutzung der Bedienelemente 08
Anschlüsse 09
Netzwerkeinstellungen 10
Verfügbare Eingangsquellen 14
Verwendung von Bluetooth
Grundlagen
®
15
Streaming von Musik über das Netzwerk 16
Lizenzen 17
Technische Daten 18
Zubehör
Netzkabel (2)
Für das Vereinigte Königreich und Irland
K2CT3DR00009
Für Kontinentaleuropa
K2CMZDR00001
• Das Smartphone auf der Titelseite ist nicht im Lieferumfang dieses Geräts enthalten.
• Produktnummern, die Sie in dieser Bedienungsanleitung finden, entsprechen dem Stand Juli 2018.
• Änderungen vorbehalten.
• Verwenden Sie das Netzkabel nicht mit anderen Geräten.
(20)
04
Page 21

Sicherheitsvorkehrungen
Warnung
Gerät
• Zur Reduzierung der Gefahr von Brand,
elektrischem Schlag und Beschädigung:
- Setzen Sie dieses Gerät weder Regen, noch
Feuchtigkeit, Tropfen oder Spritzern aus.
- Stellen Sie keine mit Flüssigkeiten gefüllten
Gefäße, wie Vasen, auf dieses Gerät.
- Verwenden Sie das empfohlene Zubehör.
- Entfernen Sie die Abdeckungen nicht.
- Reparieren Sie dieses Gerät nicht
selbst. Wenden Sie sich zur Wartung an
qualifiziertes Kundendienstpersonal.
- Lassen Sie keine Gegenstände aus Metall in
dieses Gerät fallen.
- Stellen Sie keine schweren Gegenstände auf
dieses Gerät.
Netzkabel
• Zur Reduzierung der Gefahr von Brand,
elektrischem Schlag und Beschädigung:
- Gewährleisten Sie, dass die Spannung der
Stromversorgung dem auf diesem Gerät
angegebenen Wert entspricht.
- Stecken Sie den Netzstecker vollständig in
die Steckdose ein.
- Ziehen Sie nicht an der Leitung, knicken
Sie sie nicht und stellen Sie keine schweren
Gegenstände darauf.
- Fassen Sie den Stecker nicht mit nassen
Händen an.
- Fassen Sie den Stecker beim Herausziehen an
seinem Korpus an.
- Verwenden Sie keinen Netzstecker und keine
Steckdose, die beschädigt sind.
• Der Netzstecker ist das trennende Gerät.
Installieren Sie dieses Gerät so, dass der
Netzstecker sofort aus der Steckdose gezogen
werden kann.
• Stellen Sie sicher, dass der Erdungsstift sicher
mit dem Netzstecker verbunden ist, um einen
elektrischen Schlag zu vermeiden.
- Ein Gerät mit CLASS I-Konstruktion wird an
eine Netzsteckdose mit Schutzleiteranschluss
angeschlossen.
Achtung
Gerät
• Stellen Sie keine Quellen offener Flammen, z.B.
brennende Kerzen, auf das Gerät.
• Dieses Gerät kann beim Betrieb
Hochfrequenzstörungen auffangen, die durch
die Benutzung von Mobiltelefonen verursacht
werden. Sollte eine solche Störung festgestellt
werden, muss das Handy in größerer
Entfernung zu diesem Gerät betrieben werden.
• Dieses Gerät ist für den Betrieb in Ländern mit
moderatem und tropischem Klima bestimmt.
• Legen Sie keine Gegenstände auf dieses Gerät.
Dieses Gerät wird heiß, wenn es an ist.
Aufstellung
• Stellen Sie dieses Gerät auf eine ebene
Oberfläche.
• Zur Reduzierung der Gefahr von Brand,
elektrischem Schlag und Beschädigung:
- Installieren oder positionieren Sie dieses
Gerät nicht in einem Bücherregal,
Einbauschrank oder einem sonstigen engen
Raum. Stellen Sie eine gute Belüftung des
Geräts sicher.
- Achten Sie darauf, die Entlüftungsschlitze des
Geräts nicht durch Gegenstände aus Papier
oder Stoff zu blockieren, z.B. Zeitungen,
Tischdecken und Vorhänge.
- Setzen Sie dieses Gerät keinem direkten
Sonnenlicht, hohen Temperaturen,
starker Feuchtigkeit und übermäßigen
Erschütterungen aus.
Deutsch
(21)
05
Page 22
Sicherheitsvorkehrungen (Fortsetzung)
Panasonic Corporation, ein Unternehmen mit Sitz in 1006, Oaza Kadoma, Kadoma City, Osaka 571-8501,
Japan, erfasst automatisch personenbezogene Daten wie IP-Adresse und/oder Geräte-ID von Ihrem Gerät,
sobald Sie es mit dem Internet verbinden. Wir tun dies zum Schutz unserer Kunden und der Integrität
unseres Dienstes sowie zum Schutz der Rechte oder des Eigentums von Panasonic.
Sie haben ein Recht auf Zugang, Berichtigung und unter bestimmten Umständen auf Widerspruch, ein
Recht auf Löschung, Einschränkung der Verarbeitung, Datenübertragung und ein Recht auf Widerspruch
gegen andere Formen der Verarbeitung. Wenn Sie eines der oben genannten Rechte ausüben und/
oder mehr über die Verarbeitung Ihrer persönlichen Daten in diesem Zusammenhang erfahren möchten,
lesen Sie bitte den vollständigen Text unserer Datenschutzerklärung auf der Support-Seite Ihres Geräts,
http://panasonic.jp/support/global/cs/audio/, http://www.technics.com/support/ oder kontaktieren
Sie unsere Kundenkommunikation/Supportnummer oder Adresse, die in der in Ihrer Geräteverpackung
enthaltenen Pan Europäischen Garantie angegeben ist, damit dieser Ihnen den vollständigen Text unserer
Datenschutzerklärung zusendet.
Entsorgung von Altgeräten
Nur für die Europäische Union und Länder mit Recyclingsystemen
Dieses Symbol, auf den Produkten, der Verpackung und/oder den Begleitdokumenten,
bedeutet, dass gebrauchte elektrische und elektronische Produkte nicht in den allgemeinen
Hausmüll gegeben werden dürfen.
Bitte führen Sie alte Produkte zur Behandlung, Aufarbeitung bzw. zum Recycling gemäß den
gesetzlichen Bestimmungen den zuständigen Sammelpunkten zu.
Indem Sie diese Produkte ordnungsgemäß entsorgen, helfen Sie dabei, wertvolle Ressourcen
zu schützen und eventuelle negative Auswirkungen auf die menschliche Gesundheit und die
Umwelt zu vermeiden.
Für mehr Informationen zu Sammlung und Recycling, wenden Sie sich bitte an Ihren örtlichen
Abfallentsorgungsdienstleister.
Gemäß Landesvorschriften können wegen nicht ordnungsgemäßer Entsorgung dieses Abfalls
Strafgelder verhängt werden.
Konformitätserklärung (DoC)
Hiermit erklärt “Panasonic Corporation”, dass dieses Produkt den grundlegenden Anforderungen sowie
den anderen relevanten Vorschriften der Richtlinie 2014/53/EU entspricht.
Kunden können eine Kopie der Original-Konformitätserklärung zu unseren RE-Produkten von unserem
KE-Server herunterladen:
http://www.ptc.panasonic.eu
Kontaktadresse des zugelassenen Vertragsbüros:
Panasonic Marketing Europe GmbH, Panasonic Testing Centre, Winsbergring 15, 22525 Hamburg,
Deutschland
Art der kabellosen Verbindung Betriebsfrequenz Maximale Leistung (EIRP)
WLAN 2412–2472 MHz
5180–5320 MHz
5500–5700 MHz
Bluetooth
Das 5,15–5,35-GHz-Band ist auf die folgenden Länder und den Betrieb in Innenräumen beschränkt.
Die Produktkennzeichnung finden Sie unten am Gerät.
®
2402–2480 MHz 10 dBm
20 dBm
20 dBm
20 dBm
06
(22)
Page 23

Installation
Installation
Schalten Sie das Gerät vor dem Anschließen
aus und lesen Sie die entsprechende
Bedienungsanleitung. Heben Sie das Gerät an,
um es zu versetzen, und ziehen Sie es nicht.
Hinweise zu den Lautsprechern
Diese Lautsprecher haben keine magnetische
Abschirmung. Stellen Sie sie nicht neben
Fernseher, PCs oder andere Geräte, die auf
Magnetismus empfindlich reagieren.
• Das Abspielen von Musik über einen längeren
Zeitraum und mit hoher Lautstärke kann das
System beschädigen und dessen Lebensdauer
verkürzen.
• Verringern Sie unter den folgenden Umständen
die Lautstärke, um Schäden zu vermeiden.
- Wenn verzerrter Ton abgespielt wird
- Beim Einstellen der Klangqualität
- Beim Ein-/Ausschalten dieses Geräts
Für optimale Klangeffekte
Die Qualität und Lautstärke des Bassklangs, die
Leistung der Klanglokalisierung, die Klanglandschaft
usw. variieren je nach Installationsstandort dieses
Geräts, der Hörposition, den Raumbedingungen
sowie anderen Faktoren. Beachten Sie bei der
Installation des Geräts die folgenden Informationen.
Bestimmung des Installationsstandorts
• Stellen Sie dieses Gerät auf eine ebene und
sichere Oberfläche.
Anpassung der Entfernung zwischen diesem
Gerät und der Wand
• Wenn Sie dieses Gerät nahe an einer Wand
oder in einer Ecke installieren, ist der Bassklang
kraftvoller; befindet sich das Gerät jedoch
zu nahe daran, können sich die Leistung der
Klanglokalisierung und die Klanglandschaft
verschlechtern.
Anpassung mit der Space Tune-Funktion
Sie können die Klangqualität entsprechend dem
Installationsstandort (an der Wand oder in der
Zimmerecke) automatisch einstellen.
Drücken und halten Sie [ ] für 5 Sekunden.
• “Space Tune (Auto)”wird angezeigt.
Drücken Sie [ ] erneut, während “Space
Tune (Auto)” angezeigt wird.
• Während der Messung ist ein lauter Testton
zu hören.
• Wenn die Einstellung abgeschlossen ist, wird
“Success” angezeigt.
• Um diese Einstellung abzubrechen, drücken
].
Sie [
Gerätepflege
Stecken Sie vor der Wartung das Netzkabel aus
der Steckdose aus. Reinigen Sie dieses Gerät mit
einem weichen Tuch.
• Wenn der Schmutz hartnäckig ist, wringen Sie
ein nasses Tuch gründlich aus, um den Schmutz
damit abzuwischen. Trocknen Sie das Gerät
anschließend mit einem weichen Tuch ab.
• Verwenden Sie keine Lösungsmittel wie
Benzin, Verdünner, Alkohol, Haushaltsreiniger,
chemische Wischer usw. Diese könnten dazu
führen, dass sich das äußere Gehäuse verformt
oder die Beschichtung abblättert.
Verwendung von “Technics Audio Center”
Wenn Sie die dedizierte App “Technics
Audio Center” (kostenlos) auf Ihrem Tablet/
Smartphone installieren, können Sie
Musikdateien vom Gerät in Ihrem Netzwerk auf
dieses Gerät streamen und die Einstellungen für
die Tonqualität usw. konfigurieren.
Details finden Sie unter:
www.technics.com/support/
Firmware-Updates
Panasonic kann gelegentlich eine aktualisierte
Firmware für dieses Gerät ausgeben, die neue
Funktionen hinzufügen oder die Weise, in der
eine Funktion arbeitet, verbessern könnte. Diese
Aktualisierungen stehen kostenlos zur Verfügung.
• Aktualisierung über das Internet ( 10)
• Einzelheiten zur Aktualisierung über ein USB-
Speichermedium finden Sie auf der folgenden
Website.
www.technics.com/support/firmware/
Entsorgung oder Weitergabe
dieses Geräts
Bevor Sie dieses Gerät entsorgen oder weitergeben,
müssen Sie alle gespeicherten Informationen
löschen, indem Sie die Einstellungen auf die
Werkseinstellungen zurücksetzen. Um die
Einstellungen auf die Werkseinstellungen
zurückzusetzen, halten Sie [•DIMMER/-INFO] und
[ ] gleichzeitig für mindestens 5 Sekunden
gedrückt, während das Gerät eingeschaltet ist. Das
Gerät wird automatisch neu gestartet, und alle
Einstellungen werden auf die Werkseinstellungen
zurückgesetzt.
• Melden Sie sich von Ihren Musik-Streaming-
Diensten ab, bevor Sie dieses Gerät entsorgen
oder an Dritte weitergeben, um eine unbefugte
Nutzung Ihrer Konten zu verhindern.
Deutsch
(23)
07
Page 24
Benutzung der Bedienelemente
Dieses Gerät (vorne/oben)
01 [ ] Standby-/Ein-Schalter
Drücken Sie diese Taste, um vom Standby-Modus
auf “ein” zu wechseln oder umgekehrt. Auch im
Standby-Modus verbraucht das Gerät Energie.
02 Anpassen der Lautstärke
• 0 (min) bis 100 (max)
03 Display
Eingangsquelle usw. werden angezeigt.
04
] Favorit
[
Sie können Ihren Lieblingssender oder Ihre
Lieblingswiedergabeliste registrieren (USB,
Podcasts, Spotify usw.) und benennen.
Sie können bis zu 9 Lieblingssender oder
•
Lieblingswiedergabelisten registrieren.
Halten Sie zum Registrieren [ ] gedrückt,
bis “Memorised” angezeigt wird, während
ein Sender eingestellt ist oder Musik
wiedergegeben wird. Der Sender oder
Titel wird automatisch unter einer nicht
verwendeten Nummer von 1 bis 9 registriert.
05 [ ] Wiedergabe/Pause
] Umschalten der Eingangsquelle
06 [
07 Eingebautes Mikrofon
08 Produktkennzeichnung
(Geräteunterseite)
• Es wird die Modellnummer angegeben.
Dieses Gerät (hinten)
10BASE-T/
100BASE-TX
500mA5V
OPT INLAN AUX IN
OPT INLAN AUX IN
AC IN
AC IN
) ( 09)
DIMMER
INFO
10BASE-T/
100BAS E-TX
DIMMER
INFO
500mA5V
09 [• DI M M ER / - IN F O]
Stellen Sie die Helligkeit des Displays und der
Unterseite des Geräts ein.
• Wenn das Display ausgeschaltet ist,
leuchtet es nur dann einige Sekunden lang
auf, wenn Sie dieses Gerät bedienen. Bevor
das Display ausschaltet, wird “Display Off”
einige Sekunden lang angezeigt.
• Drücken Sie [•DIMMER/-INFO] mehrfach,
um die Helligkeit anzupassen.
Halten Sie [•DIMMER/-INFO] gedrückt, um den
•
Netzwerkstatus oder die Einstellungen anzuzeigen.
Die angezeigten Elemente werden geändert, wenn
Sie [•DIMMER/-INFO] wiederholt drücken. (Die
Helligkeit ändert sich währenddessen nicht.)
10 USB-Anschluss A (DC 5 V 500 mA)
Sie können die auf dem verbundenen USBGerät gespeicherte Musik über die dedizierte
App “Technics Audio Center” (kostenlos) auf
Ihrem Tablet/Smartphone wiedergeben
( 09). Details finden Sie unter:
www.technics.com/support/
• Wenn ein USB-Gerät angeschlossen ist,
lässt sich [•DIMMER/-INFO] nur schwer
drücken. Entfernen Sie das USB-Gerät ggf.
11 LAN-Anschluss ( 11)
12 Optischer digitaler Eingangsanschluss
Sie können einen CD-Player usw. mit einem
Lichtwellenleiter-Digitalkabel (nicht mitgeliefert)
anschließen und so Musik wiedergeben. ( 09)
13 AUX-Eingang
Sie können einen tragbaren Audio-Player
usw. mit einem analogen Audiokabel
(3,5 mm) (nicht mitgeliefert) anschließen
und so Musik wiedergeben. ( 09)
14 Netzkabel-Anschluss (
08
(24)
Page 25
Anschlüsse
Grundlagen
Anschluss eines analogen
Audio-Ausgangsgeräts
10BASE-T/
100BASE-TX
DIMMER
INFO
500mA5V
OPT INLAN AUX IN
Tragbarer Audio-Player usw.
Hinweis
• Wenn Sie Videoinhalte mit dieser Funktion
ansehen, sind die Video- und Audioausgabe
möglicherweise nicht synchron.
AC IN
Analoges
Audiokabel
(3,5 mm)
(nicht mitgeliefert)
Anschluss eines USB-Geräts
10BASE-T/
DIMMER
INFO
100BASE-TX
500mA5V
OPT INLAN AUX IN
AC IN
USB-Gerät
Netzkabelanschluss
Erst anschließen, wenn alle anderen Kabel
bereits angeschlossen sind.
10BASE-T/
DIMMER
INFO
100BASE-TX
500mA5V
OPT INLAN AUX IN
AC IN
Deutsch
Anschluss eines digitalen
Audio-Ausgangsgeräts
10BASE-T/
100BASE-TX
DIMMER
INFO
500mA5V
OPT INLAN AUX IN
CD-Player usw.
Hinweis
• Wenn Sie Videoinhalte mit dieser Funktion
ansehen, sind die Video- und Audioausgabe
möglicherweise nicht synchron.
AC IN
LichtwellenleiterDigitalkabel
(nicht mitgeliefert)
An eine Netzsteckdose
• Verwenden Sie ausschließlich das mitgelieferte
Netzkabel.
• Verbinden Sie das Netzkabel erst, wenn alle
anderen Verbindungen hergestellt wurden.
• Stecken Sie die Stecker der zu verbindenden
Kabel vollständig ein.
• Knicken Sie Kabel nicht in spitzen Winkeln.
®
• Das Wireless LAN (Wi-Fi
) kann eingestellt
werden, sobald dieses Gerät eingeschaltet ist.
Drücken Sie [
], wenn Sie die
Wi-Fi-Einstellungen beenden. Um die
Wi-Fi-Einstellung beizubehalten, starten Sie
die App “Google Home” und befolgen Sie die
Anweisungen auf dem Bildschirm. ( 11)
Hinweis
• Dieses Gerät verbraucht kleine Mengen an
Wechselstrom ( 18), auch wenn es sich im
Standby-Modus befindet. Ziehen Sie den
Stecker aus der Steckdose, wenn das Gerät
über einen längeren Zeitraum nicht verwendet
wird. Positionieren Sie das Gerät so, dass der
Stecker leicht gezogen werden kann.
(25)
09
Page 26
Grundlagen
Sie können Online-Musikdienste oder -Musikdateien von Ihrem Smartphone/Tablet
auf dieses Gerät streamen.
Dieses Gerät kann über ein LAN-Kabel oder integriertes Wi-Fi® an einen Router angeschlossen werden.
Für eine stabile Netzwerkverbindung wird eine verdrahtete LAN-Verbindung empfohlen.
■
Vorbereitung
Wenn Sie die App “Google Home” auf Ihrem
Smartphone/Tablet installieren, können Sie über
diese App eine Verbindung aufbauen.
• Wenn Sie zum Abspielen von Musik auf diesem
Gerät die Chromecast-fähigen Apps verwenden
( 16), muss eine Verbindung über die App
“Google Home” hergestellt werden.
• Vergewissern Sie sich, dass die Wi-Fi-Funktion
auf Ihrem Smartphone/Tablet aktiviert ist.
1 Installieren Sie die App “Google
Home” auf Ihrem Smartphone/
Tablet.
• Unter folgendem Link können Sie die App
“Google Home” herunterladen:
https://www.google.com/cast/setup/
2 Verbinden Sie Ihr Smartphone/Tablet
mit demselben Netzwerk wie dieses
Netzwerkeinstellungen
Hinweis
• Nach dem Einschalten dieses Geräts kann es
einige Zeit dauern, bis es aktiviert wird.
• Falls nach dem Aufbau einer
Netzwerkverbindung “Firmware update is
available” angezeigt wird, ist die Firmware für
dieses Gerät verfügbar. Drücken und halten
Sie [
Aktualisierung zu starten.
• “ ” blinkt, solange die Netzwerkverbindung
noch nicht hergestellt wurde. Wenn die
Netzwerkverbindung hergestellt ist, wird “ ”
ausgeblendet.
Die Netzwerkeinstellung mithilfe der
App “Google Home” ist möglicherweise
verfügbar, während “
die App “Google Home” und folgen Sie den
Anweisungen auf dem Bildschirm. ( 13)
] für mindestens 5 Sekunden, um die
- Der Vorgang wird als “Updating %”
angezeigt, während die Aktualisierung
erfolgt. (“ ” steht für eine Zahl.)
- Nachdem das Update erfolgreich beendet
wurde, wird “Success” angezeigt. Schalten
Sie dieses Gerät aus und wieder ein.
” blinkt. Starten Sie
Gerät, bevor Sie die Einrichtung
vornehmen.
10
(26)
Page 27
Grundlagen
Kabelgebundene LANVerbindung
10BASE-T/
DIMMER
INFO
LAN-Kabel
(nicht
mitgeliefert)
100BASE-TX
500mA5V
OPT INLAN AUX IN
AC IN
Breitband-Router usw.
1 Ziehen Sie das Netzkabel.
2 Verbinden Sie dieses Gerät über ein
LAN-Kabel usw. mit einem BreitbandRouter.
3 Schließen Sie das Netzkabel an dieses
Gerät an. ( 09)
4 Drücken Sie [
], um dieses Gerät
einzuschalten.
(Verwendung der Chromecast-fähigen Apps
5
mit diesem Gerät ( 16))
Stellen Sie über die App “Google
Home” auf Ihrem Smartphone/Tablet
eine Verbindung her.
Hinweis
• Wenn das Netzkabel getrennt wird, muss das
LAN-Kabel angeschlossen oder getrennt sein.
• Verwenden Sie zum Anschluss von
Peripheriegeräten gerade LAN-Kabel (STP) der
Kategorie 7 oder darüber.
• Wird ein anderes Kabel als ein LAN-Kabel in
den LAN-Anschluss eingesteckt, kann das
Gerät beschädigt werden.
• Selbst wenn die Wi-Fi-Funktion auf “On” steht,
bleibt die kabelgebundene LAN-Funktion
aktiviert, solange ein LAN-Kabel angeschlossen
ist. (“
” wird ausgeblendet.)
WLAN-Verbindung
■
Vorbereitung
Ziehen Sie das Netzkabel.
Ziehen Sie das LAN-Kabel.
Positionieren Sie das Gerät so nahe wie
möglich am WLAN-Router.
Schließen Sie das Netzkabel an dieses Gerät
an. ( 09)
Hinweis
• Die Einstellung wird nach der festgelegten
Zeitdauer abgebrochen. Versuchen Sie in
diesem Fall, die Einstellung noch einmal
vorzunehmen.
• “ ” wird ausgeblendet, wenn die Wi-Fi-
Einstellung abgeschlossen ist.
• Um diese Einstellung mittendrin abzubrechen,
drücken Sie [ ] oder versetzen Sie das Gerät
in den Standby-Modus.
Erstmalige Netzwerkeinstellung mit
der App “Google Home”
1 Drücken Sie [ ], um dieses Gerät
einzuschalten.
• “Wi-Fi Setup” beginnt zu blinken.
Wi-Fi
Setup
2 Starten Sie die App “Google Home”
und folgen Sie den Anweisungen auf
dem Bildschirm.
Hinweis
• Diese Einheit wird angezeigt als “Technics-
SC-C50festgelegt wird. (“
einzigartig für jedes Gerät sind.)
• Sie können Ihre Netzwerkinformationen (SSID,
MAC-Adresse und IP-Adresse) in der App
“Google Home” oder der App “Technics Audio
Center” nachschlagen.
• Einige Elemente der App “Google Home” sind
für dieses Gerät irrelevant.
•
Wenn dieses Gerät aus- und eingeschaltet wird,
bevor die Wi-Fi-Einstellung vorgenommen wurde,
wird “Wi-Fi Setup” erneut angezeigt. Nehmen
Sie die Wi-Fi-Einstellung vor oder stellen Sie die
Wi-Fi-Funktion auf “Off”, damit es anschließend
nicht mehr angezeigt wird. Um die Wi-Fi-Funktion
zwischen “On” oder “Off” umzuschalten, drücken
Sie [ ], um die Wi-Fi-Einstellung abzubrechen,
und halten Sie die Tasten Lautstärke [ ] oben
und [•DIMMER/-INFO] hinten an dieser Einheit
für ca. 5 Sekunden gedrückt.
• Andere Verbindungsmethoden ( 12)
”, wenn kein Gerätename
****
” steht für Zeichen, die
****
(27)
Deutsch
11
Page 28

Grundlagen
Einstellung des Netzwerks über das
Netzwerkeinstellungen (Fortsetzung)
Einrichtungsmenü
1 Drücken und halten Sie [ ] oben und
[•DIMMER/-INFO] an der Rückseite
dieses Geräts.
2 Die Verbindungsmethoden (WPS/
WPS PIN/Wi-Fi Setup) werden
nacheinander angezeigt.
• Die Anzeige wechselt alle 5 Sekunden.
• Drücken Sie die Taste, wenn
WPS
WPS PIN
64428147
Wi-Fi
Setup
3 Lassen Sie [ ] und [•DIMMER/-
INFO] los, während die ausgewählte
Verbindungsmethode angezeigt
wird.
Hinweis
• Wenn Sie zum Abspielen von Musik auf diesem
Gerät die Chromecast-fähigen Apps verwenden
( 16), muss eine Verbindung über die App
“Google Home” hergestellt werden.
Ihr drahtloser Breitband-Router
WPS (Wi-Fi Protected Setup™)
unterstützt (Verwendung der
WPS-Taste)
• Wenn Ihr kabelloser
Breitbandrouter die WPS PINCode-Methode unterstützt
(Verwendung des WPS-PINCodes)
• Wenn Sie die App “Google
Home” zum Aufbau einer
Verbindung verwenden
(Verwendung der App “Google
Home”)
■
Verwendung der WPS-Taste
“WPS”
(Wenn keine Chromecast-fähigen Apps mit
diesem Gerät verwendet werden)
Wenn Ihr WLAN-Router WPS unterstützt,
können Sie durch Drücken der WPS-Taste eine
Verbindung aufbauen.
• Ein kompatibler WLAN-Router kann über die
WPS-Identifizierungskennzeichnung verfügen.
• Vervollständigen Sie die Einstellungen
innerhalb von 2 Minuten, während “WPS”
angezeigt wird.
1 Nachdem “WPS” angezeigt wird,
drücken Sie die WPS-Taste am WLANRouter.
Beispiel:
• Wenn die Verbindung hergestellt ist, wird
“Success” angezeigt.
- “Fail” wird evtl. angezeigt, wenn die
Verbindung nicht vollständig hergestellt
werden konnte. Versuchen Sie diese
Methode erneut vom Einrichtungsmenü
aus. Wenn “Fail” weiterhin angezeigt wird,
probieren Sie andere Methoden.
2 Drücken Sie [ ], um die Einstellung
zu verlassen.
12
(28)
■
Verwendung des WPS-PIN-Codes
“WPS PIN”
(Wenn keine Chromecast-fähigen Apps mit
diesem Gerät verwendet werden)
Wenn Ihr WLAN-Router WPS unterstützt,
können Sie durch Eingabe des WPS-PIN-Codes
eine Verbindung aufbauen.
• Weitere Details zur Eingabe des PIN-Codes
finden Sie in der Bedienungsanleitung des
WLAN-Routers.
• Vervollständigen Sie die Einstellungen
innerhalb von 2 Minuten, während “WPS PIN”
und der PIN-Code angezeigt werden.
Page 29

Grundlagen
1 Geben Sie den PIN-Code in den
WLAN-Router über den PC usw. ein.
• Wenn die Verbindung hergestellt ist, wird
“Success” angezeigt.
- “Fail” wird evtl. angezeigt, wenn die
Verbindung nicht vollständig hergestellt
werden konnte. Versuchen Sie diese
Methode erneut vom Einrichtungsmenü
aus. Wenn “Fail” weiterhin angezeigt wird,
probieren Sie andere Methoden.
2 Drücken Sie [ ], um die Einstellung
zu verlassen.
Hinweis
• Je nach Router kann bei anderen verbundenen
Geräten vorübergehend die Verbindung
unterbrochen werden.
• Weitere Details finden Sie in der
Bedienungsanleitung des WLAN-Routers.
■
Verwendung der App “Google Home”
“Wi-Fi Setup”
(Wenn Chromecast-fähige Apps mit diesem
Gerät verwendet werden)
Sie können eine Verbindung über die App
“Google Home” herstellen.
1 Starten Sie die App und folgen
Sie den Anweisungen auf dem
Bildschirm.
2 Drücken Sie [
], um die Einstellung
zu verlassen.
Verwendung von Chromecastfähigen Apps
Bei der Verwendung der Chromecast-fähigen
Apps für die Wiedergabe von Musik auf diesem
Gerät müssen Sie eine Netzwerkverbindung
über die App “Google Home” herstellen. Wenn
das Netzwerk mit einer anderen Methode
eingerichtet wurde, versuchen Sie die Einstellung
erneut mit dem folgenden Verfahren.
1 Drücken und halten Sie [ ] oben und
[•DIMMER/-INFO] an der Rückseite
dieses Geräts.
• Die angezeigte Verbindungsmethode wird
alle 5 Sekunden gewechselt.
2 Lassen Sie [ ] und [•DIMMER/-INFO]
los, wenn “Wi-Fi Setup” angezeigt
wird.
• “Wi-Fi Setup” beginnt zu blinken.
3 Fahren Sie fort mit “Verwendung der
App “Google Home””.
Deutsch
Hinweis
• Diese Einheit wird angezeigt als “Technics-
SC-C50festgelegt wird. (“
einzigartig für jedes Gerät sind.)
• Sie können Ihre Netzwerkinformationen (SSID,
MAC-Adresse und IP-Adresse) in der App
“Google Home” oder der App “Technics Audio
Center” nachschlagen.
• Einige Elemente der App “Google Home” sind
für dieses Gerät irrelevant.
”, wenn kein Gerätename
****
” steht für Zeichen, die
****
(29)
13
Page 30
Grundlagen
Verfügbare Eingangsquellen
1 Drücken Sie [ ], um dieses Gerät
einzuschalten.
2 Drücken Sie [
] wiederholt, um die
Eingangsquelle auszuwählen.
• Jede Eingangsquelle kann mit diesem Gerät
wiedergegeben werden (siehe unten).
• Einige Eingangsquellen können verfügbar sein, wenn Sie “Google Home” oder “Technics Audio Center”
(kostenlos) verwenden. Details finden Sie unter:
www.technics.com/support/
- Beenden der Netzwerkeinstellungen. ( 10)
Verwendung des
Hilfseingangs
Sie können einen tragbaren Audio-
Player usw. mit einem analogen
Audiokabel (3,5 mm) (nicht
mitgeliefert) anschließen und so
Musik wiedergeben. ( 09)
•
Starten Sie die Wiedergabe auf
dem angeschlossenen Gerät.
Verwendung des
USB-Geräts
Sie können auf dem
angeschlossenen USB-Gerät
gespeicherte Musik wiedergeben.
•
Verwenden Sie für die Wiedergabe
die dedizierte App “Technics Audio
Center” (kostenlos).
Chromecast
built-in
Verwendung von Chromecastfähigen Apps
Sie können einen CD-Player usw.
mit einem LichtwellenleiterDigitalkabel (nicht mitgeliefert)
anschließen und so Musik
wiedergeben. ( 09)
•
Starten Sie die Wiedergabe auf
dem angeschlossenen Gerät.
Mit der kostenlosen App “Technics Audio Center” können Sie
Internetradio abspielen, indem Sie dieses Gerät als Lautsprecher für
das Internetradio einstellen.
• Verwenden Sie für die Wiedergabe die dedizierte App “Technics
Audio Center” (kostenlos).
Verwendung eines
digitalen AudioAusgangsgeräts
Dieses Gerät verfügt über Chromecast built-in. Sie können
Musikdateien von Ihrem Gerät (Smartphone, Tablet usw.)
streamen, indem Sie Chromecast-fähige Apps verwenden
und dieses Gerät als Ausgangslautsprecher wählen. ( 16)
• Weitere Informationen zu Chromecast-fähigen
Apps finden Sie unter:
g.co/cast/apps
Verwendung von
Bluetooth
Sie können den Klang vom
Bluetooth®-Audio-Gerät über
dieses Gerät drahtlos hören.
( 15)
• Starten Sie die Wiedergabe
auf dem Bluetooth
Podcasts
Wiedergabe von Internet Radio und
Podcasts
Verwendung von MusikStreaming-Diensten (Spotify
Sie können Musik von Musik-Streaming-Diensten
wie beispielsweise Spotify wiedergeben, indem
Sie dieses Gerät als Lautsprecher einstellen.
• Von diesem Gerät unterstützte Musik-Streaming-
Dienste finden Sie unter:
www.technics.com/support/
usw.)
®
®
-Gerät.
Streaming von Musikdateien
auf Netzwerkgeräten
Mit der kostenlosen App “Technics Audio Center”
können Sie Musikdateien vom Gerät in Ihrem
Netzwerk auf dieses Gerät streamen. ( 16)
(30)
14
AirPlay
Verwendung von AirPlay
Sie können auf einem iOS-Gerät usw.
gespeicherte Musik mit AirPlay wiedergeben.
Page 31

Verwendung von Bluetooth
V
B
erwendung von
Bluetooth®-Gerät
®
Grundlagen
Deutsch
Kopplung eines Bluetooth®Geräts
• Schalten Sie diese Einheit und das Bluetooth®Gerät ein und stellen Sie das Gerät neben diese
Einheit.
Aktivieren Sie die Bluetooth®-Funktion des Geräts.
•
1 Drücken Sie wiederholt [ ], um “ ”
auszuwählen.
• “ ” blinkt im Abstand von 1 Sekunde.
• “ ” blinkt im Sekundentakt und das Gerät
versucht, eine Verbindung zum zuletzt
verwendeten Bluetooth®-Gerät herzustellen.
Fahren Sie nach Verbindungsherstellung mit
Schritt 4 fort.
2 Drücken und halten Sie [ ].
• “ ” blinkt im Abstand von 1 Sekunde und
dieses Gerät wechselt in den RegistrierungsStandby-Status.
3 Öffnen Sie den Bluetooth®-
Verbindungsbildschirm usw. auf dem
®
Bluetooth
“Technics-SC-C50-
• “
****
jedes Gerät sind.
• Wenn der Gerätename in der App “Google
Home” eingestellt wurde, wird der
eingestellte Name angezeigt.
4 Geben Sie Musik wieder, indem Sie
das Bluetooth
-Gerät und wählen Sie
”.
****
” steht für Zahlen, die einzigartig für
®
-Gerät bedienen.
Hören von Musik, die auf
einem Bluetooth®-Gerät
gespeichert ist
• Wenn bereits ein Bluetooth®-Gerät
angeschlossen ist, trennen Sie es.
1 Drücken Sie wiederholt [ ], um “ ”
auszuwählen.
• “ ” blinkt im Sekundentakt und das Gerät
versucht automatisch, eine Verbindung
zum zuletzt verwendeten Bluetooth
Gerät herzustellen. Fahren Sie nach
Verbindungsherstellung mit Schritt 3 fort.
2 Öffnen Sie den Bluetooth®-
Verbindungsbildschirm usw. auf dem
®
Bluetooth
“Technics-SC-C50-
-Gerät und wählen Sie
”.
****
3 Geben Sie Musik wieder, indem Sie
®
das Bluetooth
Hinweis
• Weitere Details finden Sie in der
Bedienungsanleitung des Bluetooth
• Dieses Gerät kann nur mit einem Gerät auf
einmal verbunden werden.
• Das Bluetooth
eine andere Audio-Quelle ausgewählt wird.
-Gerät bedienen.
®
-Gerät wird getrennt, wenn
®
-
®
-Geräts.
Hinweis
• Geben Sie bei Aufforderung zur Eingabe des
Zugangsschlüssels “0000” ein.
• Auf diesem Gerät können Sie bis zu 8 Geräte
registrieren. Wird ein 9. Gerät angekoppelt,
wird das Gerät, das am längsten nicht
verwendet wurde, ersetzt.
(31)
15
Page 32

Grundlagen
Streaming von Musik über das Netzwerk
Musik hören mit einer
Chromecast-fähigen App
Dieses Gerät ist mit Chromecast-fähigen
Apps kompatibel. Weitere Informationen zu
Chromecast-fähigen Apps finden Sie unter:
g.co/cast/apps
■
Vorbereitung
• Beenden der Netzwerkeinstellungen. ( 10)
- Stellen Sie sicher, dass das Netzwerk mit dem
Internet verbunden ist.
• Installieren Sie die Chromecast-fähige App auf
Ihrem Gerät (Smartphone, Tablet usw.).
• Verbinden Sie das Gerät mit dem Netzwerk,
das derzeit in Ihrer Wohnung verwendet wird.
1
Starten Sie die Chromecast-fähige App auf
Ihrem Gerät (Smartphone, Tablet usw.).
• Die Eingangsquelle wird automatisch
umgeschaltet auf “Chromecast built-in”.
2 Geben Sie Ihre Musik wieder.
Nicht alle Musik-Streaming-Dienste sind in allen
Ländern/Regionen verfügbar. Möglicherweise ist
eine Registrierung/ein Abonnement erforderlich,
oder es können Gebühren für die Nutzung von
Musik-Streaming-Diensten anfallen. Dienste
können geändert oder eingestellt werden.
Weitere Informationen finden Sie auf der
Website des jeweiligen Musik-Streaming-Diensts.
Streaming von Musikdateien
auf Netzwerkgeräten
Mit der kostenlosen App “Technics Audio
Center” können Sie Musikdateien vom Gerät in
Ihrem Netzwerk auf dieses Gerät streamen.
■
Vorbereitung
• Beenden der Netzwerkeinstellungen. ( 10)
• Verbinden Sie die folgenden Geräte mit
demselben Netzwerk wie dieses Gerät.
- Gerät mit installierter App “Technics Audio
Center”
- Gerät, das Musikquelle enthält
1 Installieren Sie die kostenlose App
“Technics Audio Center” auf Ihrem
Smartphone, Tablet usw.
• Laden Sie die App von der folgenden
Website herunter und installieren Sie diese.
www.technics.com/support/
2 Starten Sie die App “Technics Audio
Center”.
• Verwenden Sie immer die aktuellste Version
der App.
3 Wählen Sie dieses System als
Ausgangs-Lautsprecher aus.
4 Wählen Sie eine Musikquelle aus.
5 Wählen Sie eine Musikdatei aus.
Wichtiger Hinweis:
Melden Sie sich von Ihren Musik-StreamingDiensten ab, bevor Sie dieses Gerät entsorgen
oder an Dritte weitergeben, um eine unbefugte
Nutzung Ihrer Konten zu verhindern.
(32)
16
Page 33

Das Logo Wi-Fi CERTIFIED™ ist eine
Zertifizierungskennzeichnung von Wi-Fi
Alliance
®
.
Das Logo Wi-Fi Protected Setup™ ist eine
Zertifizierungskennzeichnung von Wi-Fi
Alliance
“Wi-Fi
®
.
®
” ist ein eingetragenes Warenzeichen
von Wi-Fi Alliance®.
“Wi-Fi Protected Setup™”, “ W PA™” und
“WPA2™” sind Warenzeichen von Wi-Fi
Alliance
®
.
Die Verwendung des “Works with Apple”Abzeichens bedeutet, dass ein Zubehörteil
speziell für die im Abzeichen angegebene
Technologie entwickelt wurde und vom
Entwickler für die Erfüllung der AppleLeistungsstandards zertifiziert wurde.
Apple und AirPlay sind Marken von Apple
Inc., die in den USA und in anderen Ländern
eingetragen sind.
Google, Google Home, Android, Google Play,
Chromecast, Chromecast built-in und andere
verwandte Marken und Logos sind Marken
von Google LLC.
Windows ist eine eingetragene Marke von
Microsoft Corporation in den USA und
anderen Ländern.
Windows Media und das Windows-Logo
sind Marken oder eingetragene Marken der
Microsoft Corporation in den Vereinigten
Staaten und/oder anderen Ländern. Dieses
Produkt unterliegt dem Schutz durch
bestimmte Rechte an geistigem Eigentum
von Microsoft Corporation und Dritten.
Nutzung oder Verteilung einer derartigen
Technologie außerhalb dieses Produkts
ohne Erteilung einer entsprechenden Lizenz
durch Microsoft, ein autorisiertes MicrosoftTochterunternehmen oder autorisierte Dritte
ist verboten.
Mac und OS X sind Marken von Apple Inc.,
die in den USA und in anderen Ländern
eingetragen sind.
Lizenzen
Die Bluetooth®-Wortmarke und -Logos sind
eingetragene Markenzeichen von Bluetooth
SIG, Inc. und jede Verwendung dieser
Marken durch Panasonic Corporation erfolgt
unter Lizenz. Andere Warenzeichen und
Handelsnamen sind Eigentum der jeweiligen
Inhaber.
DSD ist eine Marke der Sony Corporation.
FLAC Decoder
Copyright (C) 2000, 2001, 2002, 2003, 2004,
2005, 2006, 2007, 2008, 2009 Josh Coalson
Redistribution and use in source and binary
forms, with or without modification, are
permitted provided that the following
conditions are met:
- Redistributions of source code must retain
the above copyright notice, this list of
conditions and the following disclaimer.
- Redistributions in binary form must
reproduce the above copyright notice,
this list of conditions and the following
disclaimer in the documentation and/
or other materials provided with the
distribution.
- Neither the name of the Xiph.org
Foundation nor the names of its contributors
may be used to endorse or promote
products derived from this software without
specific prior written permission.
THIS SOFTWARE IS PROVIDED BY THE
COPYRIGHT HOLDERS AND CONTRIBUTORS
“AS IS” AND ANY EXPRESS OR IMPLIED
WARRANTIES, INCLUDING, BUT NOT
LIMITED TO, THE IMPLIED WARRANTIES OF
MERCHANTABILITY AND FITNESS FOR A
PARTICULAR PURPOSE ARE DISCLAIMED.
IN NO EVENT SHALL THE FOUNDATION
OR CONTRIBUTORS BE LIABLE FOR ANY
DIRECT, INDIRECT, INCIDENTAL, SPECIAL,
EXEMPLARY, OR CONSEQUENTIAL
DAMAGES (INCLUDING, BUT NOT LIMITED
TO, PROCUREMENT OF SUBSTITUTE GOODS
OR SERVICES; LOSS OF USE, DATA, OR
PROFITS; OR BUSINESS INTERRUPTION)
HOWEVER CAUSED AND ON ANY THEORY
OF LIABILITY, WHETHER IN CONTRACT,
STRICT LIABILITY, OR TORT (INCLUDING
NEGLIGENCE OR OTHERWISE) ARISING
IN ANY WAY OUT OF THE USE OF THIS
SOFTWARE, EVEN IF ADVISED OF THE
POSSIBILITY OF SUCH DAMAGE.
Die Spotify-Software unterliegt Lizenzen
Dritter, die hier zu finden sind:
www.spotify.com/connect/third-party-licenses
Deutsch
(33)
17
Page 34

Technische Daten
■
ALLGEMEIN
Spannungsversorgung
Stromverbrauch 42 W
Stromverbrauch im
Standby-Modus
(Netzwerk-Standby
aus)
Stromverbrauch im
Standby-Modus
(Netzwerk-Standby
an mit WLAN)
Stromverbrauch im
Standby-Modus
(Netzwerk-
Standby an mit
kabelgebundenem
LAN)
Abmessungen
(B×H×T)
Gewicht Ca. 5,9 kg
Betriebstemperaturbereich
Betriebsfeuchtigkeitsbereich
■
ABSCHNITT VERSTÄRKER
Ausgangsleistung
■
ABSCHNITT LAUTSPRECHER
Frontlautsprecher (L/M/R)
Art
Tieftöner
Hochtonlautsprecher
Subwoofer
Art
Subwoofer 12 cm × 1, Kegelform
220 V bis 240 V
Wechselstrom, 50/60 Hz
0,2 W
2,0 W
2,0 W
375 mm × 220 mm ×
197 mm
0 °C bis +40 °C
35 % bis 80 % rel.
Feuchte
(keine Kondensbildung)
Frontlautsprecher (L/R):
20 W + 20 W
(1 kHz, T.H.D. 1,0 %,
8 , 20 kHz LPF)
Frontlautsprecher (Mitte):
20 W
(1 kHz, T.H.D. 1,0 %,
8 , 20 kHz LPF)
Subwoofer:
40 W
(100 Hz, T.H.D. 1,0 %,
4 , 20 kHz LPF)
2 Wege, 2 Lautsprecher
(geschlossen)
6,5 cm × 1/Kanal,
Kegelform
1,6 cm × 1/Kanal,
Kugelform
1 Weg,
1 Lautsprecher
(Bassreflex)
■
ABSCHNITT Bluetooth
Systemspezifikation
Bluetooth
Klassifizierung von
Drahtlosgeräten
Unterstützte Profile A2DP, AVRCP
Unterstützter
Codec
Frequenzband 2,4 GHz Band FH-SS
Reichweite Ca. 10 m Sichtlinie
1: Voraussichtlicher Kommunikationsabstand
*
USB
EthernetSchnittstelle
AUX-Eingang Stereo, 3,5 mm Buchse
Digitaler Eingang
Standard IEEE802.11a/b/g/n/ac
Frequenzband
Sicherheit
WPS-Version Version 2.0
• Die WLAN-Funktion dieses Produkts darf
ausschließlich innerhalb von Gebäuden
verwendet werden.
®
Messumgebung:
Temperatur 25 °C/ Höhe 1,0 m
Maß in “Mode1”
■
ABSCHNITT ANSCHLÜSSE
Unterstützte
Speicherkapazität
Maximale Anzahl
an Ordnern
(Alben)
Maximale Anzahl
an Dateien
(Lieder)
Formatunterstützung
■
ABSCHNITT Wi-Fi
®
Bluetooth® Ver. 4.2
Klasse 2 (2,5 mW)
AAC, SBC
1
*
Anschlusstyp A
USB 2.0 High-speed
DC 5 V 500 mA
USB-Massenspeicher-
Klasse
Dateisystem:
FAT16, FAT32, NTFS
2 TB (max.)
800
8000
LAN
(100BASE-TX/10BASE-T)
Optischer digitaler
Eingang
(Optischer Anschluss)
LPCM
2,4 GHz Band
5 GHz Band
WPA2™,
gemischter Modus
WPA2™/WPA™
18
(34)
Page 35

■
Dateiformat
Dieses Gerät unterstützt die folgenden Dateiformate.
• Dieses Gerät unterstützt nicht die Wiedergabe von kopiergeschützten Musikdateien.
• Die Wiedergabe aller Dateien in Formaten, die von diesem Gerät unterstützt werden, kann nicht garantiert
werden.
• Die Wiedergabe einer Datei in einem Format, das von diesem Gerät nicht unterstützt wird, kann zu
abgehacktem Audio oder zu Rauschen führen. Überprüfen Sie in solchen Fällen, ob dieses Gerät das
Dateiformat unterstützt.
• Dieses Gerät unterstützt nicht die Wiedergabe von VBR (Variable Bitrate).
• Einige der angeschlossenen Geräte oder Server sind möglicherweise in der Lage, Dateien in Formate
zu konvertieren, die von diesem Gerät nicht unterstützt werden, und diese auszugeben. Detaillierte
Informationen finden Sie in der Bedienungsanleitung Ihrer Geräte oder Server.
• Die von diesem Gerät und von der Wiedergabe-Software angezeigten Dateiinformationen (Abtastfrequenz,
usw.) können sich voneinander unterscheiden.
Optischer digitaler Eingang
Formatunterstützung Abtastrate
LPCM 32/44,1/48/88,2/96 kHz 16/24 Bit
USB-A
Dateiformat Erweiterung Abtastrate
MP3 .mp3 32/44,1/48 kHz 16 bis 320 kbps
AAC .m4a/.aac 32/44,1/48/88,2/96 kHz 16 bis 320 kbps
WAV .wav 32/44,1/48/88,2/96/176,4/192/352,8/384 kHz 16/24/32 Bit
FLAC .flac 32/44,1/48/88,2/96/176,4/192/352,8/384 kHz 16/24 Bit
AIFF .aiff 32/44,1/48/88,2/96/176,4/192/352,8/384 kHz 16/24/32 Bit
ALAC .m4a 32/44,1/48/88,2/96/176,4/192/352,8/384 kHz 16/24 Bit
DSD .dff/.dsf 2,8/5,6/11,2 MHz
Bitrate / Anzahl der
Quantisierungsbits
Bitrate / Anzahl der
Quantisierungsbits
Deutsch
LAN (DMR)
Dateiformat Erweiterung Abtastrate
MP3 .mp3 32/44,1/48 kHz 16 bis 320 kbps
AAC .m4a/.aac 32/44,1/48/88,2/96 kHz 16 bis 320 kbps
WAV .wav 32/44,1/48/88,2/96/176,4/192/352,8/384 kHz 16/24/32 Bit
FLAC .flac 32/44,1/48/88,2/96/176,4/192/352,8/384 kHz 16/24 Bit
AIFF .aiff 32/44,1/48/88,2/96/176,4/192/352,8/384 kHz 16/24/32 Bit
ALAC .m4a 32/44,1/48/88,2/96/176,4/192/352,8/384 kHz 16/24 Bit
DSD .dff/.dsf 2,8/5,6/11,2 MHz
: Ob eine Musikdatei über Ihr Netzwerk wiedergegeben werden kann, wird durch den Netzwerk-Server
*
bestimmt, auch wenn das Dateiformat oben aufgelistet ist. Wenn Sie beispielsweise Windows Media
Player 11 verwenden, sind nicht alle Musikdateien auf dem PC abspielbar. Sie können nur diejenigen
wiedergeben, die zur Bibliothek von Windows Media Player 11 hinzugefügt wurden.
Hinweis
• Die technischen Daten können ohne Benachrichtigung geändert werden.
• Gewicht und Maße sind ungefähre Werte.
*
Bitrate / Anzahl der
Quantisierungsbits
(35)
19
Page 36

Merci d’avoir porté votre choix sur cet appareil.
Veuillez lire attentivement les présentes instructions avant d’utiliser ce produit, et conserver ce manuel pour
utilisation ultérieure.
• À propos des descriptions dans ce mode d’emploi
- Les pages à consulter sont désignées par le signe “ ○○”.
- Les illustrations montrées peuvent être différentes de votre appareil.
• Un mode d’emploi plus détaillé est disponible à la section le “Mode d’emploi” (format
PDF). Pour le lire, il suffit de le télécharger depuis le site Web :
www.technics.com/support/
• Vous devrez utiliser Adobe Reader pour consulter ou imprimer le “Mode d’emploi”
(format PDF). Vous pouvez télécharger et installer une version d’Adobe Reader compatible
avec votre système d’exploitation, à partir du site Web suivant :
http://www.adobe.com/products/acrobat/readstep2.html
Table des matières
Consignes de sécurité 05
Installation 07
Guide de référence de la télécommande 08
Connexions 09
Configuration réseau 10
Sources d’entrée disponibles 14
Bases
Utilisation Bluetooth
®
15
Diffusion de musique sur le réseau 16
Licences 17
Caractéristiques 18
Accessoires
Cordon d’alimentation secteur (2)
Pour le Royaume-Uni et l’Irlande
K2CT3DR00009
Pour l’Europe continentale
K2CMZDR00001
• Le smartphone figurant sur la page de couverture n’est pas fourni avec cet appareil.
• Les numéros de produit fournis dans ces instructions d’utilisation sont exacts à partir de juillet 2018.
• Sous réserve de modifications.
• N’utilisez pas de cordon d’alimentation avec d’autres appareils.
(36)
04
Page 37

Consignes de sécurité
Avertissement
Appareil
• Pour réduire les risques d’incendie,
d’électrocution ou de dommages au produit,
- N’exposez pas cet appareil à la
pluie, l’humidité, l’égouttement ou
l’éclaboussement.
- Ne placez pas d’objets remplis d’eau, tels que
des vases, sur l’appareil.
- Utilisez les accessoires préconisés.
- Ne retirez pas les caches.
- Ne réparez pas l’appareil vous-même. Confiez
l’entretien a un personnel qualifié.
- Ne laissez pas d’objets métalliques tomber
dans cet appareil.
- Ne pas placer d’objets lourds sur cet appareil.
Cordon d’alimentation secteur
• Pour réduire les risques d’incendie,
d’électrocution ou de dommages au produit,
- Assurez-vous que la tension d’alimentation
électrique correspond à la tension inscrite sur
l’appareil.
- Branchez la prise secteur dans la prise
électrique.
- Ne pas tirer, plier ou placer des objets lourds
sur le cordon.
- Ne manipulez pas la prise avec les mains
mouillées.
- Tenez le corps de la prise secteur en la
débranchant.
- N’utilisez pas de prise secteur ni de prise de
courant endommagée.
• La fiche secteur est le dispositif de
déconnexion.
Installez cet appareil de sorte que la fiche
secteur puisse être débranchée immédiatement
de la prise de courant.
• Assurez-vous que la broche de terre de la prise
secteur est connectée de manière sécurisée
pour éviter tout risque d’électrocution.
- Un appareil de construction de CLASSE I doit
être raccordé à une prise secteur équipée
d’une protection par mise à la terre.
Attention
Appareil
• Ne placez pas de sources de flammes vives
telles que des bougies allumées sur cet
appareil.
• Cet appareil peut être perturbé par des
interférences causées par des téléphones
mobiles pendant l’utilisation. En présence de
telles interférences, éloignez le téléphone
mobile de cet appareil.
• Cette unité est destinée aux climats tempérés
et tropicaux.
• Ne posez aucun objet sur cet appareil. Cette
unité chauffe lorsqu’elle est en marche.
Emplacement
• Placez cet appareil sur une surface plane.
• Pour réduire les risques d’incendie,
d’électrocution ou de dommages au produit,
- N’installez pas et ne placez pas cet appareil
dans une bibliothèque, un placard ni dans
aucun autre espace réduit. Assurez-vous que
l’appareil est bien ventilé.
- Ne bouchez pas les ouvertures d’aération
de cet appareil avec des journaux, nappes,
rideaux ou objets similaires.
- N’exposez pas cet appareil directement aux
rayons du soleil, à des températures élevées,
à une humidité élevée ni à des vibrations
excessives.
Français
(37)
05
Page 38

Consignes de sécurité (suite)
Panasonic Corporation, dont le siège social est sis 1006, Oaza Kadoma, Kadoma-shi, Osaka 571-8501,
Japon, collecte automatiquement des données à caractère personnel tel que votre adresse IP et/ou le
Device ID de votre appareil dès que vous vous connectez à Internet. Nous faisons cela pour protéger nos
clients et l’intégrité de notre Service, ainsi que pour protéger les droits et biens de Panasonic.
Vous avez un droit d’accès, de correction et d’opposition au traitement dans certaines circonstances,
le droit d’effacement, de limitation du traitement, le droit à la portabilité des données et un droit de
s’opposer à d’autres formes de traitement. Si vous souhaitez exercer l’un des droits susmentionnés, et/ou
souhaitez en savoir plus à propos du traitement de vos données à caractère personnel dans ce contexte,
veuillez vous référer au texte complet de notre politique de vie privée affichée sur la page du support
de votre appareil, http://panasonic.jp/support/global/cs/audio/, http://www.technics.com/support/ ou
contactez notre service de communications/support aux clients au numéro de téléphone ou à l’adresse
mentionnés dans la Garantie Européenne de Panasonic incluse dans la boîte de votre appareil afin de vous
envoyer le texte complet de notre politique de vie privée.
L’élimination des équipements usagés
Applicable uniquement dans les pays membres de l’Union européenne et les pays disposant de
systèmes de recyclage.
Apposé sur le produit lui-même, sur son emballage, ou figurant dans la documentation qui
l’accompagne, ce pictogramme indique que les appareils électriques et électroniques usagés,
doivent être séparés des ordures ménagères.
Afin de permettre le traitement, la valorisation et le recyclage adéquats des appareils
usagés, veuillez les porter à l’un des points de collecte prévus, conformément à la législation
nationale en vigueur.
En les éliminant conformément à la réglementation en vigueur, vous contribuez à éviter le
gaspillage de ressources précieuses ainsi qu’à protéger la santé humaine et l’environnement.
Pour de plus amples renseignements sur la collecte et le recyclage, veuillez vous renseigner
auprès des collectivités locales.
Le non-respect de la réglementation relative à l’élimination des déchets est passible d’une
peine d’amende.
Déclaration de Conformité (DoC)
Par les présentes, “Panasonic Corporation” déclare que ce produit est conformes aux critères essentiels
et autres dispositions applicables de la Directive 2014/53/UE.
Les clients peuvent télécharger un exemplaire de la DoC originale concernant nos produits relevant de la
Directive RE sur notre serveur DoC :
http://www.ptc.panasonic.eu
Pour contacter un Représentant Autorisé :
Panasonic Marketing Europe GmbH, Panasonic Testing Centre, Winsbergring 15, 22525 Hamburg, Allemagne
Type de sans fil Fréquence de fonctionnement Puissance maxi (EIRP)
WLAN 2412-2472 MHz
5180-5320 MHz
5500-5700 MHz
Bluetooth
La bande 5,15-5,35 GHz est limitée au fonctionnement en intérieur uniquement dans les pays suivants.
Le repère d’identification du produit est situé au bas de l’appareil.
(38)
06
®
2402-2480 MHz 10 dBm
20 dBm
20 dBm
20 dBm
Page 39

Installation
Installation
Éteignez tous les appareils avant le branchement
et lisez le mode d’emploi approprié. Assurezvous de soulever cet appareil et de ne pas le
trainer au sol.
Remarques sur les haut-parleurs
Ces haut-parleurs n’ont pas de blindage
magnétique. Ne les placez pas près d’un téléviseur,
d’un PC ou d’autres équipements facilement
impactés par les phénomènes magnétiques.
• Écouter de la musique à fort volume pendant
de longues périodes peut endommager le
système et en réduire la durée de vie.
• Diminuez le volume dans les conditions
suivantes afin d’éviter tout dommage :
- Lorsque le son est déformé ;
- Lorsque vous réglez la qualité sonore ;
- Lorsque vous allumez/éteignez l’appareil.
Pour des effets sonores optimaux
La qualité et le volume du son de basse, les
performances de la localisation du son et
l’ambiance sonore, entre autres, dépendent de
l’emplacement d’installation de cette unité, de la
position d’écoute, de l’état de la pièce et d’autres
facteurs. Consultez les informations qui suivent
pour installer cet appareil.
Déterminer l’emplacement d’installation
• Placez l’appareil sur une surface plane où il ne
risque pas de tomber.
Réglage de la distance entre l’appareil et les
murs
• Si vous installez l’appareil près d’un mur ou
d’un coin, le son de basse sera plus puissant.
Cependant, si l’appareil est trop près de celuici, les performances de la localisation du son et
l’ambiance sonore peuvent en être amoindries.
Réglage à l’aide de la fonction Space Tune
Vous pouvez ajuster automatiquement la
qualité sonore en fonction de l’emplacement
d’installation (près du mur ou du coin de la pièce).
Maintenez [ ] enfoncé pendant 5 secondes.
• “Space Tune (Auto)” s’affiche.
Appuyez de nouveau sur [ ] lorsque “Space
Tune (Auto)” s’affiche.
• Une tonalité d’essai forte retentit quand la
mesure est en cours.
• Une fois le réglage effectué, “Success” est
affiché.
• Pour annuler le réglage au milieu, appuyez
].
sur [
Entretien de l’appareil
Débranchez le cordon d’alimentation secteur de
la prise avant l’entretien. Nettoyez cet appareil à
l’aide d’un chiffon doux.
• Si la saleté est importante, utilisez un chiffon
mouillé bien essoré pour nettoyer la saleté, puis
essuyez-le à l’aide d’un chiffon doux.
N’utilisez pas de solvants, y compris essence,
•
diluant, alcool, liquide vaisselle, lingette chimique,
etc. L’utilisation de ces produits peut déformer le
boîtier externe ou décoller le revêtement.
Utilisation de “Technics Audio
Center”
Si vous installez l’application dédiée “Technics
Audio Center” (gratuite) sur votre tablette/
smartphone, vous pouvez écouter de la
musique en flux de fichiers du périphérique sur
votre réseau vers cet appareil et configurer les
paramètres de qualité du son, etc.
Pour plus de détails, accédez à :
www.technics.com/support/
Mises à jour du microprogramme
À l’occasion, Panasonic édite un micrologiciel
actualisé de cet appareil qui peut ajouter ou
améliorer la manière de fonctionner d’un accessoire.
Ces mises à jour sont disponibles gratuitement.
• Mise à jour via Internet ( 10)
• Pour obtenir des détails sur la mise à jour
via une mémoire flash USB, consultez le site
Internet suivant.
www.technics.com/support/firmware/
Pour éliminer ou transférer cet
appareil
Avant de vous débarrasser de cet appareil ou
de le transférer, assurez-vous d’effacer toutes
les informations enregistrées en rétablissant
les paramètres d’usine par défaut. Pour rétablir
les paramètres d’usine par défaut, appuyez et
maintenez enfoncées les touches [•DIMMER/INFO] et [
5 secondes au moins quand l’appareil est allumé.
L’appareil redémarre automatiquement et tous
les paramètres d’usine sont rétablis.
• Avant de vous débarrasser de cet appareil ou
de le transférer à un tiers, assurez-vous de vous
déconnecter de vos comptes de services de
streaming de musique afin d’empêcher toute
utilisation non autorisée de vos comptes.
] simultanément pendant
Français
(39)
07
Page 40

Guide de référence de la télécommande
Cette unité (avant/dessus)
01 [ ] Commutateur veille/marche
Appuyez pour faire passer l’unité de la marche à
l’état de veille, ou inversement. Même en veille, cette
unité consomme une petite quantité de courant.
02 Règle le volume
• 0 (min) à 100 (max)
03 Affichage
Source d’entrée, etc., sont affichés.
04
] Favoris
[
Vous pouvez enregistrer votre station ou liste
de lecture favorite (USB, Podcasts, Spotify,
etc.) et leur donner un nom.
Vous pouvez enregistrer jusqu’à 9 stations ou
•
listes de lecture favorites. Pour enregistrer,
maintenez la touche [ ] enfoncée jusqu’à ce que
“Memorised” s’affiche lorsque qu’une station est
réglée ou qu’une musique est en cours de lecture.
Puis la station ou la musique est automatiquement
enregistrée avec un numéro inutilisé entre 1 et 9.
05 [ ] Lecture/Pause
] Permutation de la source d’entrée
06 [
07 Microphone intégré
08 Repère d’identification du produit (au
bas de cet appareil)
• Le numéro de modèle est indiqué.
Unité (face arrière)
10BASE-T/
100BASE-TX
500mA5V
OPT INLAN AUX IN
OPT INLAN AUX IN
AC IN
AC IN
DIMMER
INFO
10BASE-T/
100BAS E-TX
DIMMER
INFO
500mA5V
09 [• DI M M ER / - IN F O]
Réglez la luminosité de l’éclairage de
l’affichage et le bas de l’appareil.
Lorsque l’écran est éteint, il s’allume quelques
•
secondes uniquement lorsque vous faites fonctionner
l’appareil. Avant que l’écran ne s’éteigne, “Display
Off” est affiché pendant quelques secondes.
• Appuyez plusieurs fois sur la touche
[•DIMMER/-INFO] pour changer la
luminosité.
•
Maintenez la touche [•DIMMER/-INFO]
enfoncée pour afficher le statut ou les
paramétrages du réseau. Les éléments affichés
sont modifiés en appuyant à plusieurs reprises
sur [•DIMMER/-INFO]. (La luminosité ne change
pas pendant ce laps de temps.)
10 Borne USB-A (5 V c.c. 500 mA)
Vous pouvez écouter de la musique enregistrée sur le
périphérique USB connecté avec l’application dédiée
“Technics Audio Center” (gratuite) sur votre tablette/
smartphone ( 09). Pour plus de détails, accédez à :
www.technics.com/support/
Quand un périphérique USB est connecté, il
•
est difficile d’appuyer sur [•DIMMER/-INFO].
Retirez le périphérique USB si nécessaire.
11 Borne LAN ( 11)
12 Borne d’entrée optique numérique
Vous pouvez raccorder un lecteur de CD, etc.
avec un câble audio numérique optique (non
fourni) et écouter de la musique. ( 09)
13 Prise AUX IN
Vous pouvez raccorder un lecteur audio portable, etc.
avec un câble audio analogique (3,5 mm) (non fourni)
à cet appareil et écouter de la musique. ( 09)
14 Prise AC IN ( ) ( 09)
08
(40)
Page 41

Connexions
Bases
Branchement d’un périphérique
de sortie audio analogique
10BASE-T/
100BASE-TX
DIMMER
INFO
500mA5V
OPT INLAN AUX IN
Lecteur audio portable, etc.
Remarque
• En bénéficiant des contenus vidéo avec cette
fonction, les sorties vidéo et audio peuvent ne
pas être synchronisées.
AC IN
Câble audio
analogique
(3,5 mm)
(non fourni)
Connexion du périphérique
USB
10BASE-T/
DIMMER
INFO
100BASE-TX
500mA5V
OPT INLAN AUX IN
AC IN
Périphérique USB
Branchement du câble
d’alimentation secteur
À raccorder uniquement une fois tous les
autres branchements effectués.
10BASE-T/
DIMMER
INFO
100BASE-TX
500mA5V
OPT INLAN AUX IN
AC IN
Français
Branchement d’un périphérique
de sortie audio numérique
10BASE-T/
100BASE-TX
DIMMER
INFO
500mA5V
OPT INLAN AUX IN
Lecteur CD, etc.
Remarque
• En bénéficiant des contenus vidéo avec cette
fonction, les sorties vidéo et audio peuvent ne
pas être synchronisées.
AC IN
Câble audio
numérique optique
(non fourni)
Vers une
prise secteur
• N’utilisez que le cordon d’alimentation secteur
fourni.
• Ne branchez pas le cordon d’alimentation
secteur avant que les autres raccordements
soient effectués.
• Insérez les connecteurs des câbles à raccorder
complètement.
• Ne pliez pas les câbles trop abruptement.
• La configuration du réseau sans fil (Wi-Fi
®
) peut
démarrer lorsque cette unité est sous tension.
Pour arrêter le paramétrage Wi-Fi, appuyez
]. Pour conserver le paramétrage Wi-Fi,
sur [
lancez l’application “Google Home” et suivez
les instructions à l’écran. ( 11)
Remarque
• Cette unité consomme une petite quantité de
courant alternatif ( 18) même lorsqu’elle est
en veille. Retirez la prise du secteur lorsque
vous n’utilisez pas l’unité pendant une longue
période. Positionnez l’unité pour pouvoir
facilement débrancher la prise.
(41)
09
Page 42

Bases
Vous pouvez utiliser des services de musique en ligne ou écouter de la musique en
flux de fichiers depuis votre smartphone/tablette vers cet appareil.
Cet appareil peut être connecté à un routeur à l’aide d’un câble réseau ou Wi-Fi® intégré.
Pour obtenir une connexion au réseau stable, une connexion LAN filaire est préférable.
■
Préparation
Si vous installez l’application “Google Home”
sur votre smartphone/tablette, vous pouvez
configurer une connexion avec l’application.
• Lorsque vous utilisez l’application activée par
Chromecast pour écouter de la musique sur cet
appareil ( 16), configurez une connexion avec
l’application “Google Home”.
• Veillez à ce que la fonction Wi-Fi soit activée
sur votre smartphone/tablette.
1 Installez l’application “Google Home”
sur votre smartphone/tablette.
• Pour télécharger l’application “Google
Home”, accédez à :
https://www.google.com/cast/setup/
2 Connectez votre smartphone/
tablette au même réseau que cet
appareil avant le paramétrage.
Configuration réseau
Remarque
• Après la mise sous tension de cet appareil, il
peut s’écouler un certain temps avant qu’il soit
activé.
• Si “Firmware update is available” s’affiche
une fois que la connexion est établie, le
micrologiciel de cette unité est disponible.
Maintenez [
5 secondes pour démarrer la mise à jour.
- La progression s’affiche sous la forme
“Updating %” pendant la mise à jour. (“ ”
représente un nombre.)
- Si la mise à jour s’est effectuée avec succès,
“Success” s’affiche. Mettre cet appareil hors
tension puis sous tension.
• “ ” clignote quand la connexion réseau n’est
pas établie. Quand la connexion réseau est
établie, “ ” disparaît.
Le paramètre réseau utilisant l’application
“Google Home” peut être disponible quand
“
” clignote. Lancez l’application “Google
Home” et suivez les instructions à l’écran.
( 13)
] enfoncé pendant au moins
10
(42)
Page 43

Raccordement du réseau local
filaire
10BASE-T/
DIMMER
INFO
Câble réseau
(LAN)
(non fourni)
Routeur de bande large passante, etc.
100BASE-TX
500mA5V
OPT INLAN AUX IN
AC IN
1 Débranchez le cordon d’alimentation
secteur.
2 Raccordez cette unité à un routeur à
haut débit, etc. via un câble réseau.
3 Branchez le cordon d’alimentation
secteur à cette unité. ( 09)
4 Appuyez sur [
] pour mettre cet
appareil en marche.
(Pour utiliser les applications activées par
5
Chromecast avec cet appareil ( 16))
Veillez à configurer une connexion
avec l’application “Google Home” sur
votre smartphone/tablette.
Remarque
• Tandis que le cordon d’alimentation secteur est
débranché, le câble réseau doit être branché
ou débranché.
• Utilisez des câbles LAN droits de catégorie 7 ou
supérieure (STP) pour connecter les appareils
périphériques.
• L’introduction d’un tout autre câble que
le câble réseau dans le port LAN peut
endommager l’appareil.
• Même lorsque la fonction Wi-Fi est réglée sur
“On”, la fonction LAN filaire est activée si un
câble LAN est connecté. (“
” disparaît.)
Connexion LAN sans fil
■
Préparation
Débranchez le cordon d’alimentation secteur.
Débranchez le câble réseau.
Rapprochez cette unité aussi près que
possible du routeur sans fil.
Bases
Branchez le cordon d’alimentation secteur à
cette unité. ( 09)
Remarque
• Le paramétrage est annulé une fois la limite
de temps définie écoulée. Dans ce cas,
recommencez le paramétrage.
• “ ” disparaît quand le réglage Wi-Fi est
terminé.
• Pour annuler ce paramétrage au milieu,
appuyez sur [
Premier paramétrage du réseau avec
l’application “Google Home”
1 Appuyez sur [ ] pour mettre cet
appareil en marche.
• “Wi-Fi Setup” commence à clignoter.
Wi-Fi
Setup
2 Lancez l’application “Google Home”
et suivez les instructions à l’écran.
Remarque
• Cet appareil sera affiché sous “Technics-
SC-C50n’est pas paramétré. (“
caractères uniques pour chaque réglage.)
• Vous pouvez vérifier vos informations réseau
(SSID, adresse MAC et adresse IP) depuis
l’application “Google Home” ou l’application
“Technics Audio Center”.
•
Certains éléments de l’application “Google
Home” ne sont pas pertinents pour cet appareil.
• Lorsque cette unité est mise hors tension puis
sous tension avant que le paramétrage Wi-Fi ne
soit terminé, “Wi-Fi Setup” s’affiche à nouveau.
Effectuez le paramétrage Wi-Fi ou réglez
la fonction Wi-Fi sur “Off” de sorte qu’il ne
s’affiche plus par la suite. Pour commuter la
fonction Wi-Fi entre “On” et “Off”, appuyez
sur [ ] pour annuler le paramétrage Wi-Fi au
milieu, maintenez enfoncé le [
haut et [•DIMMER/-INFO] sur l’arrière de cet
appareil pendant environ 5 secondes.
• Pour d’autres méthodes de connexion ( 12)
****
] ou mettez l’unité en veille.
” si le nom du périphérique
” représente des
****
] de volume du
Français
(43)
11
Page 44

Bases
Paramétrage du réseau depuis le
Configuration réseau (suite)
menu de configuration
1 Maintenez [ ] enfoncé sur le haut et
[•DIMMER/-INFO] sur l’arrière de cet
appareil.
2 Les méthodes de connexion (WPS/
WPS PIN/Wi-Fi Setup) sont affichées
à tour de rôle.
• L’affichage change toutes les 5 secondes.
• Si votre routeur haut débit sans
WPS
WPS PIN
64428147
Wi-Fi
Setup
3 Relâchez les touches [ ] et
[•DIMMER/-INFO] quand la méthode
de connexion sélectionnée s’affiche.
Remarque
• Lorsque vous utilisez l’application activée par
Chromecast pour écouter de la musique sur cet
appareil ( 16), configurez une connexion avec
l’application “Google Home”.
fil prend en charge le WPS
(Wi-Fi Protected Setup™),
appuyez sur la touche (En
utilisant le bouton WPS)
• Si votre routeur haut débit sans
fil prend en charge la méthode
de code PIN WPS (En utilisant
le code PIN WPS)
• Lorsque vous utilisez
l’application “Google
Home” pour paramétrer une
connexion (Utilisation de
l’application “Google Home”)
■
En utilisant le bouton WPS
“WPS”
(Lorsque vous n’utilisez pas l’application activée
par Chromecast avec cet appareil)
Si votre routeur sans fil prend en charge le
WPS, vous pouvez configurer une connexion en
appuyant sur le bouton WPS.
• Il se peut qu’un routeur sans fil compatible
dispose de l’identifiant WPS.
• Terminez les paramétrages dans les 2 minutes
quand “WPS” est affiché.
1 Une fois que “WPS” est affiché,
appuyez sur le bouton WPS du
routeur sans fil.
Exemple :
• Une fois la connexion établie, “Success” est
affiché à l’écran.
- “Fail” peut s’afficher si la connexion n’a
pas été effectuée. Essayez à nouveau
cette méthode depuis le menu de
configuration. Si “Fail” s’affiche à
nouveau, essayez d’autres méthodes.
2 Appuyez sur [ ] pour quitter le
réglage.
■
En utilisant le code PIN WPS
“WPS PIN”
(Lorsque vous n’utilisez pas l’application activée
par Chromecast avec cet appareil)
Si votre routeur sans fil prend en charge le
WPS, vous pouvez configurer une connexion en
saisissant le code PIN WPS.
• Pour plus de détails sur la manière de saisir
le code PIN, consultez le mode d’emploi du
routeur sans fil.
• Terminez les paramétrages dans les 2 minutes
quand “WPS PIN” et le code PIN sont affichés.
12
(44)
Page 45

Bases
1 Entrez le code PIN dans le routeur
sans fil depuis le PC, etc.
• Une fois la connexion établie, “Success” est
affiché à l’écran.
- “Fail” peut s’afficher si la connexion n’a
pas été effectuée. Essayez à nouveau
cette méthode depuis le menu de
configuration. Si “Fail” s’affiche à
nouveau, essayez d’autres méthodes.
2 Appuyez sur [ ] pour quitter le
réglage.
Remarque
• En fonction du routeur, les autres périphériques
connectés peuvent momentanément perdre
leur connexion.
• Pour plus de détails, référez-vous au mode
d’emploi du routeur sans fil.
■
Utilisation de l’application “Google Home”
“Wi-Fi Setup”
(Lorsque vous utilisez l’application activée par
Chromecast avec cet appareil)
Vous pouvez paramétrer une connexion en
utilisant l’application “Google Home”.
1 Lancez l’application et suivez les
instructions à l’écran.
2 Appuyez sur [
] pour quitter le
réglage.
Pour utiliser des applications activées
par Chromecast
Lorsque vous utilisez des applications activées
par Chromecast pour écouter de la musique
sur cet appareil, vous devez paramétrer une
connexion réseau avec l’application “Google
Home”. Lorsque le réseau a été paramétré avec
une autre méthode, essayer de paramétrer à
nouveau avec la procédure suivante.
1 Maintenez [ ] enfoncé sur le haut et
[•DIMMER/-INFO] sur l’arrière de cet
appareil.
• La méthode de connexion affichée change
toutes les 5 secondes.
2 Lorsque “Wi-Fi Setup” est affiché,
relâchez les touches [
[•D I M ME R /- I N F O] .
• “Wi-Fi Setup” commence à clignoter.
3 Passez à “Utilisation de l’application
“Google Home””.
] et
Français
Remarque
• Cet appareil sera affiché sous “Technics-
SC-C50n’est pas paramétré. (“
caractères uniques pour chaque réglage.)
• Vous pouvez vérifier vos informations réseau
(SSID, adresse MAC et adresse IP) depuis
l’application “Google Home” ou l’application
“Technics Audio Center”.
• Certains éléments de l’application “Google
Home” ne sont pas pertinents pour cet
appareil.
” si le nom du périphérique
****
” représente des
****
(45)
13
Page 46

Bases
Sources d’entrée disponibles
1 Appuyez sur [ ] pour mettre cet
appareil en marche.
2 Appuyez à plusieurs reprises sur [
pour sélectionner la source d’entrée.
• Chaque source d’entrée peut être lue avec cet
appareil (voir ci-dessous).
• Certaines entrées sont disponibles en utilisant “Google Home” ou “Technics Audio Center” (gratuit). Pour
plus de détails, accédez à :
www.technics.com/support/
- Terminez la configuration réseau. ( 10)
]
Utilisation de
l’entrée auxiliaire
Vous pouvez raccorder un lecteur
audio portable, etc. avec un câble
audio analogique (3,5 mm) (non
fourni) à cet appareil et écouter de
la musique. ( 09)
• Démarrez la lecture sur le
périphérique connecté.
Utilisation du
périphérique USB
Vous pouvez écouter la musique stockée
sur le périphérique USB connecté.
•
Utilisez l’application dédiée
“Technics Audio Center” (gratuit)
pour écouter de la musique.
Chromecast
built-in
Utilisation des applications
activées par Chromecast
Vous pouvez raccorder un
lecteur de CD, etc. avec un
câble audio numérique optique
(non fourni) et écouter de la
musique. ( 09)
• Démarrez la lecture sur le
périphérique connecté.
Avec l’application gratuite “Technics Audio Center”, vous pouvez
écouter une radio Internet en réglant cet appareil comme hautparleur pour la radio Internet.
• Utilisez l’application dédiée “Technics Audio Center” (gratuit) pour
écouter de la musique.
Utilisation d’un
périphérique de sortie
audio numérique
Podcasts
Cet appareil dispose du Chromecast built-in. Vous
pouvez diffuser des fichiers de musique provenant de
votre périphérique (smartphone, tablette, etc.) avec des
applications activées par Chromecast et sélectionner
cet appareil comme haut-parleur de sortie. ( 16)
•
Pour des informations détaillées sur les
applications activées par Chromecast, accédez à :
g.co/cast/apps
Utilisation
Bluetooth
®
Vous pouvez écouter le son
provenant d’un périphérique
audio Bluetooth
cette unité. ( 15)
• Démarrez la lecture sur le
périphérique Bluetooth
Écouter Internet Radio et Podcasts
Utilisation de services de
streaming de musique
Vous pouvez écouter de la musique à partir de
services de streaming de musique comme Spotify
etc. en réglant cet appareil comme haut-parleur.
Pour connaître les services de streaming de
•
musique pris en charge par cet appareil, accédez à :
www.technics.com/support/
(Spotify, etc.)
®
sans fil avec
®
.
Diffusion de fichiers musique
sur des périphériques réseau
Vous pouvez diffuser des fichiers de musique depuis le
périphérique de votre réseau sur cet appareil en utilisant
l’application gratuite “Technics Audio Center”. ( 16)
(46)
14
AirPlay
Utilisation de AirPlay
Vous pouvez lire de la musique stockée sur un
appareil iOS, etc. avec AirPlay.
Page 47

Utilisation Bluetooth
tion B
sa
®
Bases
Appareil Bluetooth
Appairage d’un périphérique
Bluetooth
• Allumez cet appareil, le périphérique
Bluetooth
cet appareil.
• Activez la fonction Bluetooth® de ce
périphérique.
1 Appuyez plusieurs fois sur [ ] pour
sélectionner “
• “ ” clignote à 1 seconde d’intervalle.
• “
” clignote à 1 seconde d’intervalle et cet
appareil tente de se connecter au dernier
périphérique Bluetooth® connecté. Une fois
la connexion effectuée, passez à l’étape 4.
2 Maintenez [ ] enfoncé.
• “ ” clignote à 1 seconde d’intervalle
et cet appareil passe en état d’attente
d’enregistrement.
3 Ouvrez l’écran de connexion
Bluetooth
Bluetooth
SC-C50-
• “
****
pour chaque réglage.
•
Si le nom du périphérique est réglé dans
l’application “Google Home”, ce nom s’affiche.
4 Écoutez de la musique en utilisant le
périphérique Bluetooth
®
®
et placez le périphérique près de
”.
®
, etc. sur le périphérique
®
et sélectionnez “Technics-
”.
****
” représente des nombres uniques
®
.
®
Français
Écouter de la musique stockée
sur un périphérique Bluetooth
• Si un autre périphérique Bluetooth® est déjà
connecté, déconnectez-le.
1 Appuyez plusieurs fois sur [ ] pour
sélectionner “
• “ ” clignote à 1 seconde d’intervalle et
cet appareil tente automatiquement de
se connecter au dernier périphérique
Bluetooth
effectuée, passez à l’étape 3.
2 Ouvrez l’écran de connexion
Bluetooth
Bluetooth
SC-C50-
****
3 Écoutez de la musique en utilisant le
périphérique Bluetooth
Remarque
• Pour plus de détails, référez-vous au mode
d’emploi du périphérique Bluetooth®.
• Cet appareil ne peut être connecté qu’à un seul
dispositif à la fois.
• Le périphérique Bluetooth
qu’une autre source audio est sélectionnée.
”.
®
connecté. Une fois la connexion
®
, etc. sur le périphérique
®
et sélectionnez “Technics-
”.
®
.
®
est déconnecté dès
®
Remarque
• Si vous êtes invité à saisir le mot de passe,
saisissez “0000”.
• Vous pouvez mémoriser jusqu’à 8 dispositifs
sur cet appareil. Si un 9e dispositif est couplé,
le dispositif inutilisé depuis le plus longtemps
sera remplacé.
(47)
15
Page 48

Bases
Diffusion de musique sur le réseau
Écouter de la musique avec une
application activée par Chromecast
Cet appareil est compatible avec les applications activées
par Chromecast. Pour des informations détaillées sur les
applications activées par Chromecast, accédez à :
g.co/cast/apps
Remarque importante :
Avant de vous débarrasser de cet appareil ou
de le transférer à un tiers, assurez-vous de
vous déconnecter de vos comptes de services
de streaming de musique afin d’empêcher
toute utilisation non autorisée de vos comptes.
Diffusion de fichiers musique
sur des périphériques réseau
■
Préparation
• Terminez la configuration réseau. ( 10)
- Assurez-vous que le réseau est connecté à
Internet.
• Installez une application activée par
Chromecast sur votre périphérique
(smartphone, tablette, etc.).
• Connectez le périphérique au réseau
actuellement utilisé à domicile.
1 Lancez l’application activée par
Chromecast sur votre périphérique
(smartphone, tablette, etc.).
• La source d’entrée est automatiquement
commutée sur “Chromecast built-in”.
2 Écouter de la musique.
Tous les services de streaming de musique ne sont
pas disponibles dans tous les pays/régions. Une
inscription/un abonnement peut être nécessaire,
ou des frais peuvent être facturés pour utiliser
de tels services. Les services sont susceptibles
d’être modifiés ou interrompus. Pour des détails,
consultez le site Web des services de streaming de
musique individuels.
Vous pouvez diffuser des fichiers de musique depuis le
périphérique de votre réseau sur cet appareil en utilisant
l’application gratuite “Technics Audio Center”.
■
Préparation
• Terminez la configuration réseau. ( 10)
• Connectez les périphériques suivants sur le
même réseau que cet appareil.
- Périphérique avec l’application “Technics
Audio Center” installée
- Périphérique contenant une source de musique
1 Installez l’application gratuite
“Technics Audio Center” sur votre
smartphone, tablette, etc.
• Téléchargez et installez l’application à partir
du site Web ci-dessous.
www.technics.com/support/
2
Lancez l’application “Technics Audio Center”.
•
Utilisez toujours la dernière version de l’application.
3 Sélectionnez cet appareil comme
haut-parleur de sortie.
4 Sélectionnez une source de musique.
5 Sélectionnez un fichier musique.
16
(48)
Page 49

Le logo Wi-Fi CERTIFIED™ est une marque de
certification de Wi-Fi Alliance®.
Le logo Wi-Fi Protected Setup™ est une
marque de certification de Wi-Fi Alliance
®
“Wi-Fi
” est une marque déposée de Wi-Fi
®
.
Alliance®.
“Wi-Fi Protected Setup™”, “ W PA™”, e t
“WPA2™” sont des marques commerciales de
Wi-Fi Alliance
®
.
L’utilisation du badge Works with Apple
signifie qu’un accessoire a été conçu
pour fonctionner spécifiquement avec la
technologie identifiée dans le badge et a été
certifié par le développeur pour répondre aux
normes de performance Apple.
Apple et AirPlay sont des marques de
commerce d’Apple Inc. enregistrées aux ÉtatsUnis et dans d’autres pays.
Google, Google Home, Android, Google Play,
Chromecast, Chromecast Intégré et autres
marques et logos connexes sont des marques
commerciales de Google LLC.
Windows est une marque ou une marque
déposée de Microsoft Corporation aux ÉtatsUnis et dans d’autres pays.
Windows Media et le logo Windows sont
soit des marques de Microsoft Corporation,
soit des marques déposées de Microsoft
Corporation aux États-Unis et/ou dans
d’autres pays. Cet appareil est protégé par
certains droits de propriété intellectuelle de
Microsoft Corporation et de tiers. L’utilisation
ou la distribution de cette technologie à
l’extérieur de cet appareil est interdite sans
une licence de Microsoft ou d’une filiale
Microsoft autorisée et des tiers.
Mac et OS X sont des marques de commerce
de Apple Inc., enregistrées aux Etats-Unis et
dans d’autres pays.
Le nom de la marque Bluetooth
®
ainsi
que les logos sont des marques déposées
appartenant à Bluetooth SIG, Inc. et toute
utilisation de ces marques par Panasonic
Corporation est effectuée sous licence.
Les autres marques et noms commerciaux
appartiennent à leurs propriétaires respectifs.
Licences
DSD est une marque commerciale de Sony
Corporation.
FLAC Decoder
Copyright (C) 2000, 2001, 2002, 2003, 2004,
2005, 2006, 2007, 2008, 2009 Josh Coalson
Redistribution and use in source and binary
forms, with or without modification, are
permitted provided that the following
conditions are met:
- Redistributions of source code must retain
the above copyright notice, this list of
conditions and the following disclaimer.
- Redistributions in binary form must
reproduce the above copyright notice,
this list of conditions and the following
disclaimer in the documentation and/
or other materials provided with the
distribution.
- Neither the name of the Xiph.org
Foundation nor the names of its contributors
may be used to endorse or promote
products derived from this software without
specific prior written permission.
THIS SOFTWARE IS PROVIDED BY THE
COPYRIGHT HOLDERS AND CONTRIBUTORS
“AS IS” AND ANY EXPRESS OR IMPLIED
WARRANTIES, INCLUDING, BUT NOT
LIMITED TO, THE IMPLIED WARRANTIES OF
MERCHANTABILITY AND FITNESS FOR A
PARTICULAR PURPOSE ARE DISCLAIMED.
IN NO EVENT SHALL THE FOUNDATION
OR CONTRIBUTORS BE LIABLE FOR ANY
DIRECT, INDIRECT, INCIDENTAL, SPECIAL,
EXEMPLARY, OR CONSEQUENTIAL
DAMAGES (INCLUDING, BUT NOT LIMITED
TO, PROCUREMENT OF SUBSTITUTE GOODS
OR SERVICES; LOSS OF USE, DATA, OR
PROFITS; OR BUSINESS INTERRUPTION)
HOWEVER CAUSED AND ON ANY THEORY
OF LIABILITY, WHETHER IN CONTRACT,
STRICT LIABILITY, OR TORT (INCLUDING
NEGLIGENCE OR OTHERWISE) ARISING
IN ANY WAY OUT OF THE USE OF THIS
SOFTWARE, EVEN IF ADVISED OF THE
POSSIBILITY OF SUCH DAMAGE.
Ce produit inclut le logiciel Spotify qui est
soumis aux licences tierces disponibles ici :
www.spotify.com/connect/third-party-licenses
Français
(49)
17
Page 50

Caractéristiques
■
GÉNÉRALITÉS
Alimentation
électrique
Consommation
électrique
Consommation
électrique en mode
de veille
(Veille réseau
désactivée)
Consommation
électrique en mode
de veille
(Veille réseau activée
avec LAN sans fil)
Consommation
électrique en mode
de veille
(Veille réseau activée
avec LAN à fil)
Dimensions (L×H×P)
Poids Environ 5,9 kg
Plage de
température en
fonctionnement
Plage d’humidité de
fonctionnement
■
SECTION AMPLIFICATEUR
Puissance de sortie
■
SECTION HAUT-PARLEUR
Haut-parleur avant (G/C/D)
Type
Woofer
(Haut-parleur de
graves)
Tweeter
(Haut-parleur des
aigus)
220 V à 240 V CA,
50/60 Hz
42 W
0,2 W
2,0 W
2,0 W
375 mm × 220 mm ×
197 mm
0 °C à +40 °C
35 % à 80 % HR
(sans condensation)
Haut-parleur avant (G/D) :
20 W + 20 W
(1 kHz, T.H.D. 1,0 %,
8 , 20 kHz LPF)
Haut-parleur avant
(centre) :
20 W
(1 kHz, T.H.D. 1,0 %,
8 , 20 kHz LPF)
Caisson de basse :
40 W
(100 Hz, T.H.D. 1,0 %,
4 , 20 kHz LPF)
2 voies,
2 haut-parleurs (fermé)
6,5 cm × 1/ch, conique
1,6 cm × 1/ch, dôme
Caisson de basse
Type
Caisson de basse 12 cm × 1, conique
■
SECTION Bluetooth
Spécification
système Bluetooth
Classification de
l’équipement sans fil
Profils pris en charge
Codec pris en charge
Bande de fréquence Bande FH-SS 2,4 GHz
Distance d’action
1 : Distance de communication estimée
*
Environnement des prises de mesures :
Température 25 °C/ Hauteur 1,0 m
Mesure en “Mode1”
■
SECTION CONNECTEUR
USB
Capacité de mémoire
prise en charge
Nombres maximum
de dossiers (albums)
Nombres maximum
de fichiers (chansons)
Interface Ethernet
Entrée AUX Stéréo, prise jack 3,5 mm
Entrée numérique
Formats pris en
charge
■
SECTION Wi-Fi
Standard IEEE802.11a/b/g/n/ac
Bande de fréquence
Sécurité
Version WPS Version 2.0
• La fonction WLAN de ce produit ne doit être
utilisée qu’à l’intérieur des bâtiments.
1 voie, 1 haut-parleur
(bass-reflex)
®
Bluetooth® Ver. 4.2
®
Classe 2 (2,5 mW)
A2DP, AVRCP
AAC, SBC
Environ 10 m en ligne de
1
*
mire
Connecteur Type A
USB 2.0 haut débit
5 V c.c. 500 mA
USB Classe de stockage
de masse
Système de fichiers :
FAT16, FAT32, NTFS
2 TB (max)
800
8000
LAN
(100BASE-TX/10BASE-T)
Entrée numérique optique
(borne optique)
LPCM
Bande 2,4 GHz
Bande 5 GHz
WPA2™,
Mode mixte WPA2™/
WPA™
18
(50)
Page 51

■
Formats des fichiers
Cet appareil prend en charge les formats de fichier suivants :
• Cet appareil ne prend pas en charge la lecture des fichiers musicaux protégés contre la copie.
• La lecture de tous les formats de fichier pris en charge par cet appareil n’est pas garantie.
• La lecture d’un fichier ayant un format qui n’est pas pris en charge par cet appareil peut causer un son
saccadé ou des parasites. Dans ce cas, vérifiez pour voir si cet appareil prend en charge le format du fichier.
• Cet appareil ne prend pas en charge la lecture VBR (Variable Bit Rate pour Taux d’échantillonnage variable).
• Certains périphériques ou serveurs connectés peuvent être en mesure de convertir les fichiers dont le
format n’est pas pris en charge par cet appareil et de les reproduire. Pour plus de détails, consultez le mode
d’emploi de vos périphériques ou serveurs.
• Les informations du fichier (fréquence d’échantillonnage, etc.) affichées par cet appareil et par le logiciel de
lecture peuvent être différentes.
Entrée numérique optique
Débit/
Formats pris en charge Fréquence d’échantillonnage
LPCM 32/44,1/48/88,2/96 kHz 16/24 bits
USB-A
Formats des
fichiers
MP3 .mp3 32/44,1/48 kHz 16 à 320 kbps
AAC .m4a/.aac 32/44,1/48/88,2/96 kHz 16 à 320 kbps
WAV .wav 32/44,1/48/88,2/96/176,4/192/352,8/384 kHz 16/24/32 bits
FLAC .flac 32/44,1/48/88,2/96/176,4/192/352,8/384 kHz 16/24 bits
AIFF .aiff 32/44,1/48/88,2/96/176,4/192/352,8/384 kHz 16/24/32 bits
ALAC .m4a 32/44,1/48/88,2/96/176,4/192/352,8/384 kHz 16/24 bits
DSD .dff/.dsf 2,8/5,6/11,2 MHz
Extension Fréquence d’échantillonnage
nombre de bits de
quantification
Débit/
nombre de bits de
quantification
Français
LAN (DMR)
Formats des
fichiers
MP3 .mp3 32/44,1/48 kHz 16 à 320 kbps
AAC .m4a/.aac 32/44,1/48/88,2/96 kHz 16 à 320 kbps
WAV .wav 32/44,1/48/88,2/96/176,4/192/352,8/384 kHz 16/24/32 bits
FLAC .flac 32/44,1/48/88,2/96/176,4/192/352,8/384 kHz 16/24 bits
AIFF .aiff 32/44,1/48/88,2/96/176,4/192/352,8/384 kHz 16/24/32 bits
ALAC .m4a 32/44,1/48/88,2/96/176,4/192/352,8/384 kHz 16/24 bits
DSD .dff/.dsf 2,8/5,6/11,2 MHz
: La possibilité qu’a chaque fichier musical d’être lu sur votre réseau est déterminée par le serveur du réseau
*
même si le format du fichier est présent dans la liste ci-dessus. Par exemple, si vous utilisez Windows
Media Player 11, tous les fichiers musicaux de l’ordinateur ne sont pas lisibles. Vous ne pouvez lire que
ceux qui ont été ajoutés à la bibliothèque de Windows Media Player 11.
Remarque
• Les caractéristiques techniques sont sujettes à des modifications sans préavis.
• Le poids et les dimensions sont approximatifs.
*
Extension Fréquence d’échantillonnage
Débit/
nombre de bits de
quantification
(51)
19
Page 52

Grazie per aver acquistato questo prodotto.
Leggere attentamente queste istruzioni prima di utilizzare il prodotto e conservare questo manuale per usi
futuri.
• Descrizioni contenute in queste istruzioni per l’uso
- I riferimenti alle pagine sono indicati con “ ○○”.
- Le illustrazioni potrebbero non rappresentare l’unità in possesso.
• Per maggiori dettagli, si rimanda a “Istruzioni per l’uso” (in formato PDF). Per leggerle,
scaricarle dal sito web.
www.technics.com/support/
• Per la consultazione o la stampa delle “Istruzioni per l’uso” (in formato PDF), occorrerà
utilizzare Adobe Reader. Scaricare e installare la versione di Adobe Reader idonea per il
proprio OS dal seguente sito web.
http://www.adobe.com/products/acrobat/readstep2.html
Indice
Precauzioni per la sicurezza 05
Installazione 07
Guida di riferimento e controllo 08
Collegamenti 09
Impostazioni di rete 10
Sorgenti di ingresso disponibili 14
Uso del Bluetooth
Informazioni di base
Riproduzione della musica in streaming tramite la rete
®
15
16
Licenze 17
Specifiche 18
Accessori
Cavo di alimentazione CA (2)
Per Regno Unito e Irlanda
K2CT3DR00009
Per l’Europa continentale
K2CMZDR00001
• Lo smartphone raffigurato sulla copertina non è in dotazione con l’unità.
• I codici prodotto forniti in queste istruzioni per l’uso sono corretti e aggiornati a luglio 2018.
• Possono essere soggetti a modifiche.
• Non utilizzare il cavo di alimentazione CA con altri apparecchi.
(52)
04
Page 53

Precauzioni per la sicurezza
Avvertenza
Unità
• Per ridurre il rischio di incendi, folgorazioni o
danni all’unità:
- Non esporre l’unità a pioggia, umidità,
gocciolamenti o spruzzi.
- Non posare su questa unità oggetti
contenenti liquidi, quali i vasi.
- Utilizzare gli accessori consigliati.
- Non rimuovere le coperture.
- Non riparare quest’unità da sé. Per
qualsiasi riparazione, rivolgersi a un tecnico
qualificato.
- Non introdurre oggetti metallici all’interno di
questa unità.
- Non appoggiare oggetti pesanti su questa
unità.
Cavo di alimentazione CA
• Per ridurre il rischio di incendi, folgorazioni o
danni all’unità:
- Accertare che la tensione di alimentazione
corrisponda a quella indicata sull’unità.
- Inserire la spina del cavo di alimentazione a
fondo nella presa.
- Non tirare, piegare né appoggiare oggetti
pesanti sul cavo.
- Non maneggiare la spina con le mani
bagnate.
- Scollegare la spina senza tirarla dal cavo.
- Non utilizzare spine o prese di rete
danneggiate.
• La spina del cavo di alimentazione è il
dispositivo che stacca la corrente elettrica.
Installare l’unità in modo che la spina possa
essere scollegata prontamente dalla presa di
corrente.
• Assicurarsi che il pin di massa nella spina di
alimentazione sia collegato correttamente al
fine di evitare il rischio di folgorazione.
- I dispositivi di CLASSE I devono essere
collegati a prese di alimentazione dotate di
messa a terra di protezione.
Attenzione
Unità
• Non poggiare sull’unità fiamme libere, come
candele accese.
• Durante l’uso, l’unità potrebbe essere soggetta
ad interferenze radio causate dai telefoni
cellulari. Se ciò accadesse, aumentare la
distanza tra l’unità e il cellulare.
• Questa unità è progettata per l’uso nei paesi
con clima mite e tropicale.
• Non collocare oggetti sull’unità. Questa unità
diventa calda quando è accesa.
Collocazione
• Collocare l’unità su una superficie piana.
• Per ridurre il rischio di incendi, folgorazioni o
danni all’unità:
- Non installare né collocare l’unità in librerie,
armadi integrati o altri spazi angusti.
Garantire una buona ventilazione.
- Non ostruire le aperture di ventilazione
dell’unità con giornali, tovaglie, tende e altri
oggetti simili.
- Non esporre l’unità alla luce diretta del sole,
a temperature elevate, a eccessiva umidità e
a forti vibrazioni.
Italiano
(53)
05
Page 54

Precauzioni per la sicurezza (segue)
Panasonic Corporation, una società con sede legale in 1006, Oaza Kadoma, Kadoma City, Osaka 5718501, Giappone, raccoglie in maniera automatica dati personali, come l’indirizzo IP e/o l’ID del dispositivo,
dal tuo dispositivo non appena ti connetti ad Intenet. Lo facciamo in modo da proteggere i nostri i clienti e
l’integrità dei nostri Servizi, così come per proteggere i diritti o la proprietà di Panasonic.
Tu hai il diritto di ottenere l’accesso ai tuoi dati, il diritto di rettifica e in certe circostanze il diritto di
opposizione al trattamento, il diritto alla cancellazione, alla limitazione del trattamento, alla portabilità
dei dati e il diritto ad opporti ad altre forme di trattamento. Se desideri esercitare uno dei diritti di cui
sopra e/o desideri sapere di più a proposito del trattamento dei tuoi dati personali in questo contesto, sei
pregato di far riferimento al testo completo della nostra privacy policy che appare sulla pagina di supporto
del tuo dispositivo, http://panasonic.jp/support/global/cs/audio/, http://www.technics.com/support/
o contattare il nostro numero per le comunicazioni o per l’assistenza ai clienti o l’indirizzo indicato nella
nostra Garanzia Pan-Europea contenuta nella scatola del tuo dispositivo affinché ti venga inviato il testo
completo della nostra privacy policy.
Smaltimento di vecchie apparecchiature
Solo per Unione Europea e Nazioni con sistemi di raccolta e smaltimento
Questo simbolo sui prodotti, sull’imballaggio e/o sulle documentazioni o manuali
accompagnanti i prodotti indica che i prodotti elettrici, elettronici non devono essere buttati
nei rifiuti domestici generici.
Per un trattamento adeguato, recupero e riciclaggio di vecchi prodotti vi invitiamo a portarli
negli appositi punti di raccolta secondo la legislazione vigente nel vostro paese.
Con uno smaltimento corretto, contribuirete a salvare importanti risorse e ad evitare i
potenziali effetti negativi sulla salute umana e sull’ambiente.
Per ulteriori informazioni su raccolta e riciclaggio, vi invitiamo a contattare il vostro comune.
Lo smaltimento non corretto di questi rifiuti potrebbe comportare sanzioni in accordo con la
legislazione nazionale.
Dichiarazione di conformità (DoC)
Con il presente atto, “Panasonic Corporation” dichiara che questo prodotto è conforme ai requisiti base
e altre disposizioni applicabili della direttiva 2014/53/UE.
I clienti possono scaricare una copia della DoC originale per i nostri prodotti RE dal nostro server DoC:
http://www.ptc.panasonic.eu
Contatto del Rappresentante Autorizzato:
Panasonic Marketing Europe GmbH, Panasonic Testing Centre, Winsbergring 15, 22525 Hamburg,
Germania
Tipo di wireless Frequenza di funzionamento Potenza massima (EIRP)
WLAN 2412-2472 MHz
5180-5320 MHz
5500-5700 MHz
Bluetooth
La banda 5,15-5,35 GHz è limitata al solo uso in ambienti interni, nei paesi che seguono.
Il contrassegno identificativo del prodotto è posto nella parte inferiore dell’unità.
®
2402-2480 MHz 10 dBm
20 dBm
20 dBm
20 dBm
06
(54)
Page 55

Installazione
Installazione
Prima di effettuare il collegamento, spegnere
tutti gli apparecchi e leggere le relative istruzioni
per l’uso. Quando occorre spostare l’unità,
sollevarla e non trascinarla.
Note sugli altoparlanti
Questi altoparlanti non sono dotati di
schermatura magnetica. Non posizionarli vicino
a TV, PC o altre apparecchiature facilmente
influenzabili dal magnetismo.
• La riproduzione della musica ad alto volume
per un lungo periodo può causare danni al
sistema e ridurre la vita del sistema stesso.
• Nelle condizioni riportate sotto, ridurre il
volume per evitare danni:
- In caso di suoni distorti
- Durante la regolazione della qualità audio
- Accendendo/spegnendo l’unità
Effetti sonori ottimali
La qualità e il volume dei bassi, la localizzazione
del suono, l’ambiente sonoro, ecc. cambiano a
seconda del punto in cui è installata l’unità, della
posizione di ascolto, delle condizioni della stanza
e di altri fattori. Quando si installa questa unità,
tenere conto di quanto segue.
Scelta del punto di installazione
• Collocare l’unità su una superficie piana, sicura.
Regolazione della distanza tra l’unità e la
parete
• Se si installa l’unità vicino a una parete o a un
angolo, i bassi saranno più potenti; se, però, è
troppo vicina all’una o all’altro, la localizzazione
e l’ambiente sonori possono peggiorare.
Regolazione tramite la funzione Space Tune
La qualità del suono può essere regolata
automaticamente in base al punto di
installazione (vicino alla parete o all’angolo della
stanza).
Tenere premuto [ ] per 5 secondi.
• Viene visualizzato “Space Tune (Auto)”.
Premere nuovamente [ ] mentre è
visualizzato “Space Tune (Auto)”:
• Mentre la misurazione è in corso, viene
emesso un segnale acustico di prova al
quanto forte.
• Una volta terminata la regolazione, viene
visualizzato “Success”.
• Per annullare la regolazione mentre è in
corso, premere [
].
Cura dell’unità
Prima di eseguire qualsiasi intervento di
manutenzione, staccare il cavo di alimentazione
CA dalla presa. Pulire l’unità con un panno
morbido.
• Se l’unità è molto sporca, pulirla passando
un panno inumidito e ben strizzato e
successivamente un panno morbido.
• Non utilizzare solventi come benzina, diluenti,
alcol, detergenti da cucina, panni chimici, ecc.
Diversamente, l’involucro esterno potrebbe
deformarsi o il rivestimento potrebbe staccarsi.
Utilizzo di “Technics Audio
Center”
Installando l’app dedicata “Technics Audio
Center” (gratuita) sul tablet/smartphone, è
possibile riprodurre i file musicali in streaming
dal proprio dispositivo collegato in rete all’unità
e configurare le impostazioni della qualità del
suono, ecc.
Per maggiori informazioni, visitare:
www.technics.com/support/
Aggiornamenti firmware
Di tanto in tanto, Panasonic pubblica firmware
aggiornati per questa unità che possono
aggiungere o migliorare alcune funzioni. Questi
aggiornamenti sono disponibili gratuitamente.
• Aggiornamento via internet ( 10)
• Per maggiori informazioni sull’aggiornamento
tramite unità flash USB, si rimanda al sito web
seguente.
www.technics.com/support/firmware/
Per smaltire o trasferire l’unità
Prima di smaltire o trasferire questa unità,
eliminare tutte le informazioni registrate
riportando le impostazioni ai valori di fabbrica.
Per riportare le impostazioni ai valori di fabbrica,
tenere premuti insieme [•DIMMER/-INFO] e
[ ] per almeno 5 secondi, avendo l’unità
accesa. L’unità si riavvierà automaticamente e
tutte le impostazioni saranno riportate ai valori
di fabbrica.
• Prima di smaltire o trasferire l’unità a terzi,
uscire dagli account dei servizi di streaming
musicale onde evitare che siano utilizzati senza
autorizzazione.
Italiano
(55)
07
Page 56

Guida di riferimento e controllo
L’unità (parte anteriore/superiore)
01 [ ] Interruttore di standby/accensione
Premere per portare l’unità dalla modalità di
accensione a quella di standby e viceversa.
In modalità standby, l’unità continua a
consumare una quantità ridotta di energia.
02 Regolazione del volume
• Da 0 (min) a 100 (max)
03 Display
Vengono visualizzate informazioni quali, ad
esempio, la sorgente di ingresso.
04
] Preferiti
[
È possibile registrare la stazione o la playlist preferita
(USB, Podcasts, Spotify, ecc.) e richiamarla.
•
È possibile registrare fino a 9 stazioni o playlist
preferite. Per effettuare la registrazione, tenere
premuto [
mentre viene riprodotta una stazione
sintonizzata o la musica. Successivamente, la
stazione o la musica sarà registrata in automatico
su un numero libero, compreso tra 1 e 9.
05 [ ] Play/Pausa
] Per la commutazione della sorgente
06 [
di ingresso
07 Microfono integrato
08 Contrassegno identificativo del prodotto
(nella parte inferiore dell’unità)
• Indicazione del numero del modello.
] fino alla comparsa di “Memorised”
Questa unità (parte posteriore)
10BASE-T/
100BASE-TX
500mA5V
OPT INLAN AUX IN
OPT INLAN AUX IN
AC IN
AC IN
DIMMER
INFO
10BASE-T/
100BAS E-TX
DIMMER
INFO
500mA5V
09 [• DI M M ER / - IN F O]
Per la regolazione della luminosità del display
e della parte inferiore dell’unità.
Quando il display è spento, si accenderà
•
per alcuni secondi solo in caso di utilizzo
dell’unità. Prima che il display si spenga, verrà
visualizzato per alcuni secondi “Display Off”.
• Premere ripetutamente [•DIMMER/-INFO]
per cambiare la luminosità.
•
Tenere premuto [•DIMMER/-INFO]
per visualizzare lo stato della rete o le
impostazioni. Per cambiare le voci visualizzate,
premere ripetutamente [•DIMMER/-INFO].
(La luminosità non cambia in questo periodo.)
10 Terminale USB-A (5 V CC 500 mA)
Tramite l’app dedicata “Technics Audio
Center” (gratuita), presente sul tablet/
smartphone, è possibile riprodurre la musica
salvata nel dispositivo USB collegato ( 09).
Per maggiori informazioni, visitare:
www.technics.com/support/
• Se è collegato un dispositivo USB, risulta
difficile premere[•DIMMER/-INFO]. Se
opportuno, rimuovere il dispositivo USB.
11 Terminale LAN ( 11)
12 Terminale di ingresso digitale ottico
Utilizzando un cavo audio digitale ottico (non
in dotazione), l’unità può essere collegata
a un lettore CD o altro dispositivo per la
riproduzione della musica. ( 09)
13 Terminale AUX IN
Utilizzando un cavo audio analogico (3,5 mm)
(non in dotazione), l’unità può essere collegata
a un lettore audio portatile o altro dispositivo
per la riproduzione della musica. ( 09)
14 Terminale AC IN ( ) ( 09)
08
(56)
Page 57

Collegamenti
Informazioni di base
Connessione del dispositivo di
uscita audio analogico
10BASE-T/
100BASE-TX
DIMMER
INFO
500mA5V
OPT INLAN AUX IN
Lettore audio portatile, ecc.
Nota
• Quando si accede a contenuti video con questa
funzione, il video e l’audio potrebbero non
essere sincronizzati.
AC IN
Cavo audio
analogico
(3,5 mm)
(non in dotazione)
Collegamento di un dispositivo
USB
10BASE-T/
DIMMER
INFO
100BASE-TX
500mA5V
OPT INLAN AUX IN
AC IN
Dispositivo USB
Collegamento del cavo di
alimentazione CA
Collegare solo dopo aver completato tutti
gli altri collegamenti.
10BASE-T/
DIMMER
INFO
100BASE-TX
500mA5V
OPT INLAN AUX IN
AC IN
Italiano
Connessione del dispositivo di
uscita audio digitale
10BASE-T/
100BASE-TX
DIMMER
INFO
500mA5V
OPT INLAN AUX IN
Lettore CD, ecc.
Nota
• Quando si accede a contenuti video con questa
funzione, il video e l’audio potrebbero non
essere sincronizzati.
AC IN
Cavo audio digitale
ottico
(non in dotazione)
A una presa di corrente
domestica
• Utilizzare solo il cavo di alimentazione CA in
dotazione.
• Collegare il cavo di alimentazione CA solo dopo
aver eseguito tutti gli altri collegamenti.
• Inserire fino in fondo gli spinotti dei cavi da
collegare.
• Non piegare eccessivamente i cavi.
• All’accensione dell’unità, potrebbe avviarsi
l’impostazione della rete LAN wireless (Wi-Fi
®
).
Se si interrompe l’impostazione Wi-Fi, premere
[ ]. Per mantenere l’impostazione Wi-Fi,
lanciare l’app “Google Home” e seguire le
istruzioni che appaiono a video. ( 11)
Nota
• L’unità consuma una quantità ridotta di energia
( 18) anche quando è in standby. Se non
si intende utilizzare l’unità per un periodo di
tempo prolungato, staccare la spina dalla presa
elettrica principale. Posizionare l’unità in modo
da riuscire a staccare la spina agevolmente.
(57)
09
Page 58

Informazioni di base
È possibile riprodurre in streaming servizi di musica online o file musicali dal proprio
smartphone/tablet all’unità.
Questa unità può essere connessa ad un router tramite cavo LAN o Wi-Fi® integrato.
Per una connessione stabile alla rete, si raccomanda la connessione LAN cablata.
■
Preparazione
Installando l’app “Google Home” sul proprio
smartphone/tablet, è possibile configurare una
connessione utilizzando l’applicazione.
• Quando si utilizzano le app abilitate
Chromecast per riprodurre la musica su
questo apparecchio ( 16), configurare una
connessione utilizzando l’app “Google Home”.
• Verificare che la funzione Wi-Fi sia attiva sugli
smartphone/tablet in uso.
1 Installare l’app “Google Home” sul
proprio smartphone/tablet.
• Per scaricare l’app “Google Home”, visitare:
https://www.google.com/cast/setup/
2 Prima di effettuare la configurazione,
collegare lo smartphone/tablet alla
stessa rete dell’unità.
Impostazioni di rete
Nota
• Dopo l’accensione, l’unità potrebbe impiegare
del tempo prima di attivarsi.
• La visualizzazione di “Firmware update is
available” dopo aver impostato la connessione
di rete indica che è disponibile il firmware per
l’unità. Per avviare l’aggiornamento, tenere
premuto [
- Durante l’aggiornamento, l’avanzamento
è visualizzato come “Updating %”. (“ ”
indica un numero.)
- Al termine dell’aggiornamento, verrà
visualizzata l’indicazione “Success”. Spegnere
e riaccendere l’unità.
• Mentre la connessione di rete non è ancora
stabilita, “ ” lampeggia. Una volta stabilita la
connessione di rete, “ ” scompare.
L’impostazione di rete tramite l’app “Google
Home” potrebbe essere disponibile mentre
lampeggia “ ”. Lanciare l’app “Google
Home” e seguire le istruzioni che appaiono a
video. ( 13)
] per almeno 5 secondi.
10
(58)
Page 59

Informazioni di base
Collegamento LAN cablata
10BASE-T/
DIMMER
INFO
Cavo LAN
(non in
dotazione)
100BASE-TX
500mA5V
OPT INLAN AUX IN
Router a banda larga, ecc.
AC IN
1 Staccare il cavo di alimentazione CA.
2 Collegare questa unità ad un router a
banda larga, ecc., utilizzando un cavo
LAN.
3 Collegare il cavo di alimentazione CA
all’unità. ( 09)
4 Premere [
(Per usare le app abilitate Chromecast con
5
l’unità ( 16))
] per accendere l’unità.
Configurare una connessione
tramite l’app “Google Home” sullo
smartphone/tablet in uso.
Nota
• Il cavo LAN deve essere collegato o scollegato
avendo il cavo di alimentazione CA staccato.
• Per il collegamento delle periferiche, utilizzare
soltanto cavi LAN dritti, di categoria 7 o
superiore (STP).
• L’inserimento di un cavo non LAN nella porta
LAN può danneggiare l’unità.
• Anche quando la funzione Wi-Fi è impostata
su “On”, la funzione LAN cablata rimane attiva
fintanto che il cavo LAN non è connesso.
” scompare.)
(“
Collegamento LAN wireless
■
Preparazione
Staccare il cavo di alimentazione CA.
Scollegare il cavo LAN.
Posizionare questa unità il più vicino possibile
al router wireless.
Collegare il cavo di alimentazione CA all’unità.
( 09)
Nota
• L’impostazione verrà annullata superato il limite
di tempo impostato. In questo caso, ritentare
l’impostazione.
• “ ” scompare una volta completata
l’impostazione Wi-Fi.
• Per annullare questa impostazione mentre
è in corso, premere [ ] o portare l’unità in
modalità standby.
Prima impostazione della rete
tramite l’app “Google Home”
1 Premere [ ] per accendere l’unità.
• “Wi-Fi Setup” inizia a lampeggiare.
Wi-Fi
Setup
2 Lanciare l’app “Google Home” e
seguire le istruzioni che appaiono a
video.
Nota
• Se il nome del dispositivo non è stato
impostato, questa unità sarà visualizzata come
“Technics-SC-C50-****” (“****” indica dei
caratteri univoci per ciascun set).
• È possibile controllare informazioni sulla rete
quali SSID, indirizzo MAC e indirizzo IP, dall’app
“Google Home” oppure dall’app “Technics
Audio Center”.
• Alcune voci dell’app “Google Home” non
riguardano questa unità.
• Quando l’unità viene spenta e riaccesa prima
di aver terminato l’impostazione Wi-Fi, viene
appare nuovamente “Wi-Fi Setup”. Lanciare
l’impostazione Wi-Fi o impostare la funzione
Wi-Fi su “Off” in maniera che non riappaia
più. Per commutare la funzione Wi-Fi da “On”
a “Off”, premere [
l’impostazione Wi-Fi e tenere premuto il
volume [ ] sulla parte superiore e [•DIMMER/INFO] sul retro dell’unità, per circa 5 secondi.
• Per altri metodi di connessione ( 12)
] al centro per annullare
Italiano
(59)
11
Page 60

Informazioni di base
Impostazione della rete dal menu di
Impostazioni di rete (segue)
impostazione
1 Tenere premuto [ ] nella parte
superiore e [•DIMMER/-INFO] sul
retro dell’unità.
2 Alternativamente, vengono
visualizzati i metodi di connessione
(WPS/WPS PIN/Wi-Fi Setup).
• La visualizzazione cambia ogni 5 secondi.
• Se il router wireless a banda
WPS
WPS PIN
64428147
Wi-Fi
Setup
3 Rilasciare [ ] e [•DIMMER/-INFO]
mentre è visualizzato il metodo di
connessione selezionato.
Nota
• Quando si utilizzano le app abilitate
Chromecast per riprodurre la musica su
questo apparecchio ( 16), configurare una
connessione utilizzando l’app “Google Home”.
larga supporta WPS (Wi-Fi
Protected Setup™), premere
il tasto (Utilizzo del pulsante
WPS)
• Se il router wireless a banda
larga supporta il metodo
codice PIN WPS (Utilizzo del
codice PIN WPS)
• Se si utilizza l’app “Google
Home” per configurare una
connessione (Uso dell’app
“Google Home”)
■
Utilizzo del pulsante WPS
“WPS”
(Quando non si utilizzano le app abilitate
Chromecast con questa unità)
Se il router wireless supporta WPS, è possibile
impostare una connessione premendo il pulsante
WPS.
• Se il router wireless è compatibile, potrebbe
recare il marchio identificativo WPS.
• Completare le impostazioni entro 2 minuti
mentre è visualizzato “WPS”.
1 Dopo che è comparso “WPS”,
premere il pulsante WPS sul router
wireless.
Esempio:
• Una volta stabilita la connessione, viene
visualizzato “Success”.
- Se la connessione non va a buon fine,
potrebbe comparire “Fail”. Riprovare con
questo metodo dal menu di impostazione.
Qualora venisse ancora visualizzato “Fail”,
tentare con un altro metodo.
2 Premere [ ] per uscire
dall’impostazione.
12
(60)
■
Utilizzo del codice PIN WPS
“WPS PIN”
(Quando non si utilizzano le app abilitate
Chromecast con questa unità)
Se il router wireless supporta WPS, è possibile
impostare una connessione inserendo il codice
PIN WPS.
• Per maggiori informazioni relative
all’inserimento del codice PIN, si rimanda al
manuale per l’uso del router wireless.
• Completare le impostazioni entro 2 minuti,
mentre vengono visualizzati “WPS PIN” e il
codice PIN.
Page 61

Informazioni di base
1 Inserire il codice PIN nel router
wireless da PC, ecc.
• Una volta stabilita la connessione, viene
visualizzato “Success”.
- Se la connessione non va a buon fine,
potrebbe comparire “Fail”. Riprovare con
questo metodo dal menu di impostazione.
Qualora venisse ancora visualizzato “Fail”,
tentare con un altro metodo.
2 Premere [ ] per uscire
dall’impostazione.
Nota
• A seconda del router, gli altri dispositivi
collegati potrebbero temporaneamente
perdere la connessione.
• Per maggiori informazioni, si rimanda al
manuale per l’uso del router wireless.
■
Uso dell’app “Google Home”
“Wi-Fi Setup”
(Quando si utilizzano le app abilitate Chromecast
con questa unità)
È possibile configurare una connessione
utilizzando l’app “Google Home”.
1 Lanciare l’app e seguire le istruzioni
che appaiono a video.
2 Premere [ ] per uscire
dall’impostazione.
Per usare le app abilitate Chromecast
Quando si utilizzano le app abilitate Chromecast
per riprodurre la musica su questo apparecchio,
configurare una connessione di rete utilizzando
l’app “Google Home”. Dopo aver configurato
la rete con un altro metodo, riprovare
l’impostazione nel modo che segue.
1 Tenere premuto [ ] nella parte
superiore e [•DIMMER/-INFO] sul
retro dell’unità.
• Il metodo di connessione visualizzato cambia
ogni 5 secondi.
2 Quando è visualizzato “Wi-Fi Setup”,
rilasciare [
• “Wi-Fi Setup” inizia a lampeggiare.
] e [•DIMMER/-INFO].
3 Procedere con “Uso dell’app “Google
Home””.
Italiano
Nota
• Se il nome del dispositivo non è stato
impostato, questa unità sarà visualizzata come
“Technics-SC-C50-****” (“****” indica dei
caratteri univoci per ciascun set).
• È possibile controllare informazioni sulla rete
quali SSID, indirizzo MAC e indirizzo IP, dall’app
“Google Home” oppure dall’app “Technics
Audio Center”.
• Alcune voci dell’app “Google Home” non
riguardano questa unità.
(61)
13
Page 62

Informazioni di base
Sorgenti di ingresso disponibili
1 Premere [ ] per accendere l’unità.
2 Premere ripetutamente [
selezionare la sorgente di ingresso.
• Questa unità è in grado di riprodurre tutte le
sorgenti di ingresso (vedere sotto).
• Alcuni ingressi possono essere disponibili utilizzando “Google Home” o “Technics Audio Center” (gratuito).
Per maggiori informazioni, visitare:
www.technics.com/support/
- Completare le impostazioni di rete. ( 10)
] per
Utilizzando
l’ingresso
ausiliario
Utilizzando un cavo audio
analogico (3,5 mm) (non in
dotazione), l’unità può essere
collegata a un lettore audio
portatile o altro dispositivo per la
riproduzione della musica. ( 09)
• Avviare la riproduzione sul
dispositivo collegato.
Utilizzo di un
dispositivo USB
È possibile riprodurre la musica
salvata sul dispositivo USB collegato.
• Per la riproduzione, usare
l’app dedicata “Technics Audio
Center” (gratuita).
Chromecast
built-in
Utilizzando le app abilitate
Chromecast
Utilizzando un cavo audio
digitale ottico (non in dotazione),
l’unità può essere collegata a un
lettore CD o altro dispositivo per
la riproduzione della musica.
( 09)
• Avviare la riproduzione sul
dispositivo collegato.
Utilizzando l’app gratuita “Technics Audio Center”, è possibile
riprodurre una web radio impostando questa unità come
altoparlante per detta radio.
• Per la riproduzione, usare l’app dedicata “Technics Audio Center”
(gratuita).
Utilizzando il
dispositivo di uscita
audio digitale
Questa unità ha Chromecast built-in. È possibile
riprodurre file musicali in streaming dal proprio dispositivo
(smartphone, tablet, ecc) con le app abilitate Chromecast e
selezionare questa unità come riproduttore di uscita. ( 16)
• Per maggiori informazioni sulle app abilitate
Chromecast, visitare:
g.co/cast/apps
Uso del
Bluetooth
L’unità è in grado di riprodurre
l’audio trasmesso in modalità
Podcasts
wireless dal dispositivo
Bluetooth
• Avviare la riproduzione sul
dispositivo Bluetooth
Riproduzione della Internet Radio e dei
Podcasts
Utilizzando i servizi di
streaming (Spotify, ecc.)
®
. ( 15)
È possibile riprodurre musica da servizi
di streaming musicale quale Spotify ecc.,
impostando questa unità come riproduttore.
• Per i servizi di streaming musicale supportati da
questa unità, visitare:
www.technics.com/support/
®
®
.
Riproduzione dei file musicali in
streaming dai dispositivi di rete
È possibile riprodurre file musicali in streaming dal
dispositivo collegato alla rete a questa unità, utilizzando
l’app gratuita “Technics Audio Center”. ( 16)
(62)
14
AirPlay
Utilizzo di AirPlay
È possibile riprodurre la musica salvata sul
dispositivo iOS, ecc., utilizzando AirPlay.
Page 63

Uso del Bluetooth
del B
so
®
Informazioni di base
Dispositivo Bluetooth
Accoppiamento con un
dispositivo Bluetooth
• Attivare l’unità e il dispositivo Bluetooth®
quindi posizionarli l’uno vicino all’altra.
• Attivare la funzione Bluetooth® del dispositivo.
1 Premere ripetutamente [ ] per
selezionare “
• “ ” lampeggia alla frequenza di 1 secondo.
• “ ” lampeggia al secondo e l’unità tenta di
collegarsi all’ultimo dispositivo Bluetooth
collegato. Completata la connessione,
procedere con il passaggio 4.
2 Tenere premuto [ ].
• “ ” lampeggia alla frequenza di 1 secondo
e l’unità entra nello stato di stand-by
registrazione.
3 Aprire la schermata di connessione
al Bluetooth
Bluetooth
“Technics-SC-C50-
• “
” indica dei numeri univoci per ciascun
****
set.
• Se il nome del dispositivo è impostato
nell’app “Google Home”, sarà visualizzato.
4 Riprodurre la musica tramite il
dispositivo Bluetooth
”.
®
, ecc. sul dispositivo
®
, quindi selezionare
****
®
”.
®
.
®
Ascolto della musica salvata sul
”.
®
.
®
®
®
collegato.
sarà
Italiano
dispositivo Bluetooth
• Se il dispositivo Bluetooth® è già connesso,
disconnetterlo.
1 Premere ripetutamente [ ] per
selezionare “
• “ ” lampeggia al secondo e l’unità
tenta di collegarsi automaticamente
®
all’ultimo dispositivo Bluetooth
Completata la connessione, procedere con il
passaggio 3.
2 Aprire la schermata di connessione
al Bluetooth
Bluetooth
“Technics-SC-C50-
3 Riprodurre la musica tramite il
dispositivo Bluetooth
Nota
• Per maggiori informazioni, si rimanda alle
istruzioni per l’uso del dispositivo Bluetooth®.
• Questa unità può essere collegata a un solo
dispositivo alla volta.
• Se viene selezionata una diversa sorgente
audio, il dispositivo Bluetooth
disconnesso.
”.
®
, ecc. sul dispositivo
®
, quindi selezionare
****
Nota
•
Se viene richiesta la passkey, immettere “0000”.
• Su questa unità, è possibile registrare sino
a 8 dispositivi. Se viene registrato un 9°
dispositivo, quello non utilizzato da più tempo
viene sostituito.
(63)
15
Page 64

Informazioni di base
Riproduzione della musica in streaming tramite la rete
Ascolto della musica tramite
l’app abilitata Chromecast
L’unità è compatibile con le app abilitate
Chromecast. Per maggiori informazioni sulle app
abilitate Chromecast, visitare:
g.co/cast/apps
Riproduzione dei file musicali in
streaming dai dispositivi di rete
È possibile riprodurre file musicali in streaming
dal dispositivo collegato alla rete a questa
unità, utilizzando l’app gratuita “Technics Audio
Center”.
■
Preparazione
• Completare le impostazioni di rete. ( 10)
- Accertarsi che la rete sia collegata a Internet.
• Installare un’app abilitata Chromecast sul
dispositivo in uso (smartphone, tablet, ecc.).
• Collegare il dispositivo alla rete attualmente
utilizzata a casa.
1
Lanciare l’app abilitata Chromecast sul
dispositivo in uso (smartphone, tablet, ecc.).
• La sorgente di ingresso commuta
automaticamente su “Chromecast built-in”.
2 Riprodurre la musica.
In qualche paese/regione, non tutti i servizi di
streaming sono disponibili. Per utilizzare i servizi
di streaming musicale, potrebbero essere richiesti
la registrazione/l’abbonamento o, in alcuni casi,
potrebbero essere addebitati dei costi. I servizi
sono soggetti a modifiche o a interruzioni. Per
maggiori informazioni, visitare il sito web del
singolo servizio di streaming musicale.
Informazioni importanti:
Prima di smaltire o trasferire l’unità a terzi,
uscire dagli account dei servizi di streaming
musicale onde evitare che siano utilizzati
senza autorizzazione.
■
Preparazione
• Completare le impostazioni di rete. ( 10)
• Collegare i seguenti dispositivi alla stessa rete
dell’unità:
- Dispositivo su cui è installata l’app “Technics
Audio Center”
- Dispositivo contenente la sorgente musicale
1 Installare l’app gratuita “Technics
Audio Center” sullo smartphone,
tablet, ecc.
• Scaricare e installare l’app dal sito web
sottostante.
www.technics.com/support/
2 Lanciare l’app “Technics Audio
Center”.
• Usare sempre l’ultima versione dell’app.
3 Selezionare questa unità come
riproduttore di uscita.
4 Selezionare una sorgente musicale.
5 Selezionare un file musicale.
16
(64)
Page 65

Il logo Wi-Fi CERTIFIED™ è un marchio di
certificazione di Wi-Fi Alliance®.
Il logo Wi-Fi Protected Setup™ è un marchio
di certificazione di Wi-Fi Alliance
®
“Wi-Fi
” è un marchio registrato di Wi-Fi
®
.
Alliance®.
“Wi-Fi Protected Setup™”, “ W PA™”, e
“WPA2™” sono marchi di Wi-Fi Alliance
®
.
L’uso del logo Works with Apple indica che
un accessorio è stato progettato per lavorare
specificamente con la tecnologia identificata
nel logo e che lo sviluppatore ha certificato
che soddisfa gli standard prestazionali di
Apple.
Apple e AirPlay sono marchi di fabbrica di
Apple Inc., registrati negli Stati Uniti e in altri
paesi.
Google, Google Home, Android, Google
Play, Chromecast, Chromecast built-in e altri
marchi e loghi relativi sono marchi registrati di
Google LLC.
Windows è un marchio di fabbrica o un
marchio registrato di Microsoft Corporation
negli Stati Uniti e in altri paesi.
Windows Media e il logo Windows sono
marchi di fabbrica o marchi registrati di
Microsoft Corporation negli Stati Uniti e/o
in altri Paesi. Questo prodotto è protetto
da certi diritti di proprietà intellettuale di
Microsoft Corporation e di terze parti. L’uso
o la distribuzione di tale tecnologia fuori di
questo prodotto sono proibiti senza una
licenza di Microsoft o da una consociata
Microsoft autorizzata e terze parti.
Mac e OS X sono marchi di fabbrica di Apple
Inc., registrati negli Stati Uniti e in altri paesi.
Il marchio denominativo Bluetooth
®
e i
loghi sono marchi registrati di proprietà di
Bluetooth SIG, Inc. e qualsiasi utilizzo di tali
marchi da parte di Panasonic Corporation
è concesso in licenza. Altri marchi e nomi
di marchi sono di proprietà dei rispettivi
proprietari.
Licenze
FLAC Decoder
Copyright (C) 2000, 2001, 2002, 2003, 2004,
2005, 2006, 2007, 2008, 2009 Josh Coalson
Redistribution and use in source and binary
forms, with or without modification, are
permitted provided that the following
conditions are met:
- Redistributions of source code must retain
the above copyright notice, this list of
conditions and the following disclaimer.
- Redistributions in binary form must
reproduce the above copyright notice,
this list of conditions and the following
disclaimer in the documentation and/
or other materials provided with the
distribution.
- Neither the name of the Xiph.org
Foundation nor the names of its contributors
may be used to endorse or promote
products derived from this software without
specific prior written permission.
THIS SOFTWARE IS PROVIDED BY THE
COPYRIGHT HOLDERS AND CONTRIBUTORS
“AS IS” AND ANY EXPRESS OR IMPLIED
WARRANTIES, INCLUDING, BUT NOT
LIMITED TO, THE IMPLIED WARRANTIES OF
MERCHANTABILITY AND FITNESS FOR A
PARTICULAR PURPOSE ARE DISCLAIMED.
IN NO EVENT SHALL THE FOUNDATION
OR CONTRIBUTORS BE LIABLE FOR ANY
DIRECT, INDIRECT, INCIDENTAL, SPECIAL,
EXEMPLARY, OR CONSEQUENTIAL
DAMAGES (INCLUDING, BUT NOT LIMITED
TO, PROCUREMENT OF SUBSTITUTE GOODS
OR SERVICES; LOSS OF USE, DATA, OR
PROFITS; OR BUSINESS INTERRUPTION)
HOWEVER CAUSED AND ON ANY THEORY
OF LIABILITY, WHETHER IN CONTRACT,
STRICT LIABILITY, OR TORT (INCLUDING
NEGLIGENCE OR OTHERWISE) ARISING
IN ANY WAY OUT OF THE USE OF THIS
SOFTWARE, EVEN IF ADVISED OF THE
POSSIBILITY OF SUCH DAMAGE.
Il software Spotify è soggetto a licenze di
terze parti disponibili qui:
www.spotify.com/connect/third-party-licenses
Italiano
DSD è un marchio di fabbrica di Sony
Corporation.
(65)
17
Page 66

Specifiche
■
GENERALI
Alimentazione
Consumo di energia 42 W
Consumo di energia
in modalità standby
(standby rete
disattivo)
Consumo di energia
in modalità standby
(standby rete attivo
con LAN wireless)
Consumo di energia
in modalità standby
(standby rete attivo
con LAN via cavo)
Dimensioni (L×A×P)
Peso Circa 5,9 kg
Intervallo
temperatura di
funzionamento
Intervallo di umidità
di esercizio
■
SEZIONE AMPLIFICATORE
Potenza d’uscita
■
SEZIONE ALTOPARLANTI
Altoparlante anteriore (SX/centro/DX)
Tipo
Woofer
Tweeter
Subwoofer
Tipo
Subwoofer Tipo a cono, 12 cm × 1
Da 220 V a 240 V CA,
50/60 Hz
0,2 W
2,0 W
2,0 W
375 mm × 220 mm ×
197 mm
Da 0 °C a +40 °C
Da 35 % a 80 % RH
(senza condensa)
Altoparlante anteriore
(SX/DX):
20 W + 20 W
(1 kHz, T.H.D. 1,0 %,
8 , 20 kHz LPF)
Altoparlante anteriore
(centrale):
20 W
(1 kHz, T.H.D. 1,0 %,
8 , 20 kHz LPF)
Subwoofer:
40 W
(100 Hz, T.H.D. 1,0 %,
4 , 20 kHz LPF)
2 vie,
2 altoparlanti (chiusi)
Tipo a cono, 6,5 cm × 1/
canale
Tipo a cupola, 1,6 cm × 1/
canale
1 via, 1 altoparlante
(Bass reflex)
■
SEZIONE Bluetooth
Specifiche del
sistema Bluetooth
Classificazione delle
apparecchiature
wireless
Profili supportati A2DP, AVRCP
Codec supportati AAC, SBC
Banda di frequenza Banda da 2,4 GHz FH-SS
Distanza di
funzionamento
1: Distanza comunicazione potenziale
*
Ambiente di misurazione:
Temperatura 25 °C/ Altezza 1,0 m
Misurazione in “Mode1”
■
SEZIONE TERMINALI
USB
Capacità memoria
del supporto
Numero massimo
di cartelle (album)
Numero massimo
di file (brani)
Interfaccia Ethernet
Ingresso AUX Stereo, jack da 3,5 mm
Ingresso digitale
Supporto formati LPCM
■
SEZIONE Wi-Fi
Standard IEEE802.11a/b/g/n/ac
Banda di frequenza
Sicurezza
Versione WPS Versione 2.0
• La funzionalità WLAN di questo prodotto deve
essere utilizzata esclusivamente all’interno
degli edifici.
®
Bluetooth® ver. 4.2
®
Classe 2 (2,5 mW)
Linea ottica circa 10 m
Connettore di tipo A
USB 2.0 alta velocità
5 V CC 500 mA
Dispositivi di archiviazione
di massa USB
File system:
FAT16, FAT32, NTFS
2 TB (max)
800
8000
LAN
(100BASE-TX/10BASE-T)
Ingresso digitale ottico
(Terminale ottico)
Banda a 2,4 GHz
Banda a 5 GHz
WPA2™, Modalità mista
WPA2™/WPA™
*
1
18
(66)
Page 67

■
Formato file
Questa unità supporta i seguenti formati di file.
• Questa unità non supporta la riproduzione di file musicali protetti da copia.
• Non è garantita la riproduzione di tutti i file nei formati supportati da questa unità.
• La riproduzione di un file non supportato da questa unità può causare audio discontinuo o rumore. In
questi casi, verificare se l’unità supporta il formato del file.
• Questa unità non supporta la riproduzione VBR (bit rate variabile).
• Alcuni dei dispositivi o dei server connessi possono essere in grado di convertire i file in formati non
supportati da questa unità e di trasmetterli. Per maggiori dettagli, consultare le istruzioni per l’uso dei
propri dispositivi o server.
• Le informazioni relative ai file (frequenza di campionamento, ecc.) visualizzate dall’unità possono differire
da quelle visualizzate dal software di riproduzione dei file audio.
Ingresso digitale ottico
Bit rate/
Supporto formati Frequenza di campionamento
LPCM 32/44,1/48/88,2/96 kHz 16/24 bit
USB-A
Formato file Estensione Frequenza di campionamento
MP3 .mp3 32/44,1/48 kHz 16 a 320 kbps
AAC .m4a/.aac 32/44,1/48/88,2/96 kHz 16 a 320 kbps
WAV .wav 32/44,1/48/88,2/96/176,4/192/352,8/384 kHz 16/24/32 bit
FLAC .flac 32/44,1/48/88,2/96/176,4/192/352,8/384 kHz 16/24 bit
AIFF .aiff 32/44,1/48/88,2/96/176,4/192/352,8/384 kHz 16/24/32 bit
ALAC .m4a 32/44,1/48/88,2/96/176,4/192/352,8/384 kHz 16/24 bit
DSD .dff/.dsf 2,8/5,6/11,2 MHz
Numero di bit di
quantizzazione
Bit rate/
Numero di bit di
quantizzazione
Italiano
LAN (DMR)
Formato file Estensione Frequenza di campionamento
MP3 .mp3 32/44,1/48 kHz 16 a 320 kbps
AAC .m4a/.aac 32/44,1/48/88,2/96 kHz 16 a 320 kbps
WAV .wav 32/44,1/48/88,2/96/176,4/192/352,8/384 kHz 16/24/32 bit
FLAC .flac 32/44,1/48/88,2/96/176,4/192/352,8/384 kHz 16/24 bit
AIFF .aiff 32/44,1/48/88,2/96/176,4/192/352,8/384 kHz 16/24/32 bit
ALAC .m4a 32/44,1/48/88,2/96/176,4/192/352,8/384 kHz 16/24 bit
DSD .dff/.dsf 2,8/5,6/11,2 MHz
: La riproducibilità di un file musicale attraverso la propria rete dipende dal server di rete anche se il formato
*
del file compare nell’elenco sopra. Per esempio, se si utilizza Windows Media Player 11, non tutti i file
musicali presenti sul PC possono essere riprodotti. È possibile riprodurre solo quelli aggiunti alla libreria di
Windows Media Player 11.
Nota
• Le specifiche sono soggette a modifiche senza preavviso.
• Peso e dimensioni sono approssimativi.
*
Bit rate/
Numero di bit di
quantizzazione
(67)
19
Page 68
Dank u voor de aankoop van dit product.
Lees deze instructies zorgvuldig door voordat u dit product gebruikt en bewaar deze handleiding, zodat u
deze later kunt raadplegen.
• Over de beschrijvingen die in deze handleiding staan
- Doorverwijspagina’s worden aangeduid als “ ○○”.
- De getoonde illustraties kunnen afwijken van uw apparaat.
• U vindt meer gedetailleerde bedieningsinstructies in “Gebruiksaanwijzing” (PDF-bestand).
Download het van de website om het te lezen.
www.technics.com/support/
• U hebt Adobe Reader nodig om “Gebruiksaanwijzing” (PDF-bestand) te lezen of af te
drukken. U kunt een versie van Adobe Reader voor het besturingssysteem dat u gebruikt
downloaden en installeren via de volgende website.
http://www.adobe.com/products/acrobat/readstep2.html
Inhoudsopgave
Veiligheidsmaatregelen 05
Installatie 07
Bedieningsgids 08
Aansluitingen 09
Netwerkinstellingen 10
Beschikbare invoerbronnen 14
Basis
Gebruik van Bluetooth
®
15
Muziek streamen via het netwerk 16
Licenties 17
Specificaties 18
Accessoires
Netsnoer (2)
Voor het Verenigd Koninkrijk en Ierland
K2CT3DR00009
Voor het Europese vasteland
K2CMZDR00001
• De smartphone op het voorblad wordt niet bij dit apparaat geleverd.
• De in deze bedieningsinstructies vermelde productnummers zijn correct in juli 2018.
• Ze kunnen aan wijzigingen onderhevig zijn.
• Het netsnoer niet met andere apparatuur gebruiken.
(68)
04
Page 69

Veiligheidsmaatregelen
Waarschuwing
Toestel
• Om het risico op brand, elektrische schokken of
productschade te verkleinen
- Stel dit toestel niet bloot aan regen, vocht,
druppels of spetters.
- Plaats geen met vloeistof gevulde objecten,
zoals vazen, op dit toestel.
- Gebruik de aanbevolen accessoires.
- Verwijder de afdekking niet.
- Repareer dit toestel niet zelf. Laat
onderhoud over aan gekwalificeerd
onderhoudspersoneel.
- Laat geen metalen voorwerpen in dit toestel
vallen.
- Plaats geen zware voorwerpen op dit toestel.
Netsnoer
• Om het risico op brand, elektrische schokken of
productschade te verkleinen
- Controleer of de voedingsspanning
overeenkomt met de spanning die op dit
toestel afgedrukt is.
- Steek de stekker volledig in het stopcontact.
- Trek niet aan de voedingskabel, buig hem
niet en plaats er geen zware voorwerpen op.
- Hanteer de stekker niet met natte handen.
- Houd het hoofddeel van de stekker vast als u
deze uit het stopcontact neemt.
- Gebruik geen beschadigde stekker of
stopcontact.
• De stekker schakelt het apparaat uit.
Installeer het apparaat op een dergelijke wijze
dat de stekker onmiddellijk uit het stopcontact
kan worden getrokken.
• Zorg dat de aardingspen in het stopcontact
goed is aangesloten om elektrische schok te
voorkomen.
- Een KLASSE I-apparaat moet worden
aangesloten op een stopcontact met een
aardingspen.
Voorzichtig
Toestel
• Plaats geen bronnen van open vuur, zoals
brandende kaarsen, op dit toestel.
• Dit toestel kan tijdens het gebruik de
interferentie van radio’s ontvangen die
veroorzaakt wordt door mobiele telefoons. In
dat geval dient u de afstand tussen dit toestel
en de mobiele telefoon te vergroten.
• Dit toestel is bedoeld voor gebruik in
gematigde en tropische klimaten.
• Plaats geen voorwerpen op dit toestel. Dit
toestel wordt warm wanneer het aanstaat.
Opstelling
• Plaats dit toestel op een vlakke ondergrond.
• Om het risico op brand, elektrische schokken of
productschade te verkleinen
- Installeer of plaats dit toestel niet in een
boekenkast, een muurkast of in een andere
omsloten ruimte. Controleer of het toestel
goed geventileerd wordt.
- Blokkeer de ventilatieopening van dit toestel
niet met kranten, tafelkleden, gordijnen,
enzovoorts.
- Stel dit toestel niet bloot aan rechtstreeks
zonlicht, hoge temperaturen, hoge
vochtigheid en overmatige trillingen.
Nederlands
(69)
05
Page 70

Veiligheidsmaatregelen (Vervolg)
Panasonic Corporation of Japan, met maatschappelijke zetel te 1006, Oaza Kadoma, Kadomashi, Osaka 571-8501, Japan, verzamelt automatisch persoonsgegevens zoals uw IP-adres en/of
apparaatidentificatiecode wanneer u uw apparaat op het internet aansluit. Wij doen dit om onze
klanten te beschermen en om de integriteit van onze Dienst te handhaven alsook om onze rechten of
eigendommen te beschermen.
U heeft het recht op toegang tot of rechtzetting van uw gegevens of bezwaar te maken tegen het
verwerken van uw gegevens in bepaalde omstandigheden, het recht om te vragen uw persoonsgegevens
te wissen of de verwerking ervan te beperken, het recht op de overdraagbaarheid van uw gegevens
alsook het recht om bezwaar te maken tegen andere vormen van verwerking. Indien u een van deze
rechten wil uitoefenen en/of indien u meer wilt weten over de verwerking van uw persoonsgegevens
in dit verband, gelieve de volledige tekst van ons privacybeleid te lezen op de help-pagina van uw
apparaat, http://panasonic.jp/support/global/cs/audio/, http://www.technics.com/support/ of onze
klantencommunicatiedienst / helpnummer of adres zoals beschreven in de pan-Europese Garantie die is
ingesloten in uw apparaatdoos te contacteren om u de volledige versie van ons privacybeleid te bezorgen.
Het ontdoen van oude apparatuur.
Enkel voor de Europese Unie en landen met recycle systemen.
Dit symbool op de producten, verpakkingen en/of begeleidende documenten betekent dat
gebruikte elektrische en elektronische producten niet samen mogen worden weggegooid
met de rest van het huishoudelijk afval.
Voor een juiste verwerking, hergebruik en recycling van oude producten, gelieve deze in te
leveren bij de desbetreffende inleverpunten in overeenstemming met uw nationale wetgeving.
Door ze op de juiste wijze weg te gooien, helpt u mee met het besparen van kostbare
hulpbronnen en voorkomt u potentiële negatieve effecten op de volksgezondheid en het milieu.
Voor meer informatie over inzameling en recycling kunt u contact opnemen met uw
plaatselijke gemeente.
Afhankelijk van uw nationale wetgeving kunnen er boetes worden opgelegd bij het onjuist
weggooien van dit soort afval.
Conformiteitsverklaring (DoC)
“Panasonic Corporation” verklaart hierbij dat dit product conform de essentiële eisen en andere
relevante bepalingen van Richtlijn 2014/53/EU is.
Klanten kunnen een kopie van de originele DoC voor onze RE-producten downloaden vanaf onze DoCserver:
http://www.ptc.panasonic.eu
Neem contact op met de bevoegde vertegenwoordiger:
Panasonic Marketing Europe GmbH, Panasonic Testing Centre, Winsbergring 15, 22525 Hamburg,
Duitsland
Type draadloos Werkfrequentie Maximaal vermogen (EIRP)
WLAN 2412-2472 MHz
5180-5320 MHz
5500-5700 MHz
Bluetooth
5,15-5,35 GHz-band is alleen in de volgende landen beperkt tot gebruik binnenshuis.
De markering voor productidentificatie bevindt zich onderaan op het toestel.
®
2402-2480 MHz 10 dBm
20 dBm
20 dBm
20 dBm
06
(70)
Page 71

Installatie
Installatie
Schakel alle apparatuur uit voordat u
verbinding maakt en lees de bijbehorende
bedieningsinstructies. Til dit toestel op wanneer
u het verplaatst. Versleep het niet.
Opmerkingen over de
luidsprekers
Deze luidsprekers beschikken niet over een
magnetische afscherming. Plaats ze niet in de
buurt van tv’s, pc’s of andere apparatuur die
gemakkelijk door magnetisme wordt beïnvloed.
• Wanneer u het geluid langdurig met een
hoog volume afspeelt, kan dit schade aan het
systeem toebrengen en de levensduur van het
systeem verkorten.
• Verlaag het volume in de volgende
omstandigheden om schade te verhinderen.
- Wanneer u vervormd geluid afspeelt
- Wanneer u de geluidskwaliteit aanpast
- Wanneer u dit toestel in- of uitschakelt
Voor optimale geluidseffecten
De kwaliteit en het volume van het basgeluid, de
geluidslokalisatieprestaties, de geluidsambiance
etc. variëren naargelang de plaatsing van dit
toestel, de luisterpositie, de ruimtecondities en
andere factoren. Raadpleeg de onderstaande
informatie bij het installeren van dit toestel.
De installatielocatie bepalen
Plaats dit toestel op een vlakke, veilige ondergrond.
•
De afstanden tussen dit toestel en de muren
aanpassen
• Als u het toestel dicht bij een muur of in een
hoek zet, zal het basgeluid krachtiger zijn.
Wanneer het toestel echter te dicht bij de muur
staat, kunnen de geluidslokalisatieprestaties en
de geluidsambiance verminderen.
De geluidskwaliteit aanpassen met de
functie Space Tune
U kunt de geluidskwaliteit automatisch aanpassen
volgens de plaats van de installatie (in de buurt
van de muur of een hoek van de kamer).
Houd [ ] 5 seconden ingedrukt.
• “Space Tune (Auto)” wordt weergegeven.
Druk opnieuw op [ ] terwijl “Space Tune
(Auto)” wordt weergegeven.
• Terwijl de meting aan de gang is, weerklinkt
een testtoon vrij luid.
• Wanneer de aanpassing voltooid is, wordt
“Success” weergegeven.
• Om deze instelling in het midden te
annuleren, drukt u op [
].
Zorg voor het toestel
Trek het netsnoer uit het stopcontact alvorens
onderhoud uit te voeren. Reinig dit toestel met
een zachte doek.
• Als het erg vuil is, knijp dan een natte doek
goed uit, veeg het vuil weg en droog het
toestel met een zachte doek.
• Gebruik geen oplosmiddelen zoals benzine,
thinner, alcohol, vaatwasmiddel, chemische
reinigingsmiddelen, enz. De externe behuizing
kan erdoor beschadigd raken of de coating kan
loskomen.
Met behulp van “Technics
Audio Center”
Als u de speciale app “Technics Audio Center”
(gratis) op uw tablet/smartphone installeert, kunt u
via het apparaat muziekbestanden op uw netwerk
streamen naar dit toestel en de instellingen voor
geluidskwaliteit configureren, enz.
Meer informatie vindt u in:
www.technics.com/support/
Firmware-updates
Af en toe zal Panasonic bijgewerkte firmware
uitgeven voor dit apparaat die een toevoeging
of een verbetering kan vormen op de manier een
eigenschap werkt. Deze bijwerkingen zijn gratis
beschikbaar.
• Bijwerken via het internet ( 10)
• Raadpleeg de volgende website voor
meer informatie over de update via USBflashgeheugen.
www.technics.com/support/firmware/
Voor de afvalverwerking of
overdracht van dit toestel
Voordat u dit apparaat weggooit of overdraagt,
moet u alle opgenomen informatie wissen
door de instellingen terug te zetten naar de
fabrieksinstellingen. Om de instellingen terug
te zetten naar de fabrieksinstellingen, houdt u
[•DIMMER/-INFO] en [ ] samen gedurende
5 seconden of langer ingedrukt terwijl het
apparaat ingeschakeld is. Het apparaat start
automatisch opnieuw op en alle instellingen
worden hersteld naar de fabrieksinstellingen.
• Voordat u dit apparaat weggooit of overdraagt
aan een derde partij, moet u zich afmelden bij
uw accounts voor muziekstreamingdiensten
om ongeoorloofd gebruik van uw accounts te
voorkomen.
(71)
07
Nederlands
Page 72

Bedieningsgids
Dit toestel (voorzijde/bovenzijde)
01 [ ] Stand-by/aan-schakelaar
Druk hierop om het toestel van aan- naar
stand-bymodus te schakelen of omgekeerd.
In de stand-bymodus verbruikt het toestel
nog steeds een kleine hoeveelheid stroom.
02 Regelt het volume
• 0 (min.) tot 100 (max.)
03 Display
Invoerbron enz. worden weergegeven.
04
] Favoriet
[
U kunt uw favoriete zender of afspeellijst registreren
(USB, Podcasts, Spotify, etc.) en oproepen.
• U kunt maximaal 9 favoriete zenders of
afspeellijsten registreren. Om te registreren
houdt u [ ] ingedrukt tot “Memorised”
wordt weergegeven terwijl op een zender
is afgestemd of muziek wordt afgespeeld.
Vervolgens wordt de zender of de muziek
automatisch geregistreerd met een
ongebruikt nummer van 1 tot 9.
05 [
] Schakel tussen invoerbronnen
06 [
07 Ingebouwde microfoon
08 Markering voor productidentificatie
(onderkant van dit toestel)
• Het modelnummer staat vermeld.
] Afspelen/Pauzeren
Dit toestel (achterkant)
10BASE-T/
100BASE-TX
500mA5V
OPT INLAN AUX IN
OPT INLAN AUX IN
AC IN
AC IN
) ( 09)
DIMMER
INFO
10BASE-T/
100BAS E-TX
DIMMER
INFO
500mA5V
09 [• DI M M ER / - IN F O]
Regel de helderheid van de verlichting van
het scherm en de onderkant van het toestel.
• Wanneer het scherm is uitgeschakeld, licht
het lampje slechts enkele seconden op
wanneer u dit toestel bedient. Voordat het
scherm wordt uitgeschakeld, wordt “Display
Off” enkele seconden weergegeven.
• Druk herhaaldelijk op [•DIMMER/-INFO] om
de helderheid aan te passen.
Houd [•DIMMER/-INFO] ingedrukt om de
•
netwerkstatus of de instellingen weer te geven.
De weergegeven items worden gewijzigd door
herhaaldelijk op [•DIMMER/-INFO] te drukken.
(De helderheid verandert in deze periode niet.)
10 USB-A-aansluiting (DC 5 V 500 mA)
U kunt muziek afspelen die is opgeslagen op
het aangesloten USB-apparaat met behulp
van de speciale app “Technics Audio Center”
(gratis) op uw tablet/smartphone ( 09).
Meer informatie vindt u in:
www.technics.com/support/
Als een USB-apparaat is aangesloten, is het
•
moeilijk om op [•DIMMER/-INFO] te drukken.
Verwijder het USB-apparaat indien nodig.
11 LAN-aansluiting ( 11)
12 Aansluiting voor optische digitale invoer
U kunt een cd-speler enz. aansluiten met
een optische digitale audiokabel (niet
meegeleverd) en muziek afspelen. ( 09)
13 AUX IN-aansluiting
U kunt een draagbare audiospeler enz.
aansluiten op dit toestel met een analoge
audiokabel (3,5 mm) (niet meegeleverd) en
muziek afspelen. ( 09)
14 AC IN-aansluiting (
08
(72)
Page 73

Aansluitingen
Basis
Aansluiting van het apparaat
voor analoge audio-uitvoer
10BASE-T/
100BASE-TX
DIMMER
INFO
500mA5V
OPT INLAN AUX IN
Draagbare audiospeler enz.
Opmerking
• Wanneer u met deze functie van de video-
inhoud geniet, kunnen de video- en audiouitgave mogelijk niet gesynchroniseerd zijn.
AC IN
Analoge
audiokabel
(3,5 mm)
(niet bijgeleverd)
Een USB-apparaat aansluiten
10BASE-T/
DIMMER
INFO
100BASE-TX
500mA5V
OPT INLAN AUX IN
AC IN
USB-apparaat
Netsnoeraansluiting
Sluit aan nadat alle andere aansluitingen
zijn gemaakt.
10BASE-T/
DIMMER
INFO
100BASE-TX
500mA5V
OPT INLAN AUX IN
AC IN
Aansluiting van het apparaat
voor digitale audio-uitvoer
10BASE-T/
100BASE-TX
DIMMER
INFO
500mA5V
OPT INLAN AUX IN
Cd-speler enz.
Opmerking
• Wanneer u met deze functie van de video-
inhoud geniet, kunnen de video- en audiouitgave mogelijk niet gesynchroniseerd zijn.
AC IN
Optische digitale
audiokabel
(niet bijgeleverd)
Op een stopcontact
• Gebruik alleen het meegeleverde netsnoer.
• Sluit het netsnoer niet aan zolang alle andere
verbindingen niet voltooid zijn.
• Steek de stekker van de aan te sluiten kabels
volledig naar binnen.
• Buig de kabels niet om bij scherpe hoeken.
®
• De instelling Draadloos LAN (Wi-Fi
)
kan starten wanneer dit toestel wordt
ingeschakeld. Druk op [
] als u de wifiinstelling stopt. Om de wifi-instelling te
behouden, start u de app “Google Home” en
volgt u de instructies op het scherm. ( 11)
Opmerking
• Dit toestel verbruikt een kleine hoeveelheid
stroom ( 18) zelfs wanneer het toestel in
stand-bymodus staat. Verwijder de stekker uit
het stopcontact als u het toestel langdurig niet
gebruikt. Plaats het toestel op een plaats waar
de stekker gemakkelijk kan worden verwijderd.
Nederlands
(73)
09
Page 74

Basis
U kunt online muziekdiensten of muziekbestanden van uw smartphone/tablet naar
dit toestel streamen.
Dit toestel kan worden verbonden met een router met een LAN-kabel of via ingebouwde Wi-Fi®.
Voor een stabiele verbinding met het netwerk wordt een bedrade LAN-verbinding aangeraden.
■
Voorbereiding
Als u de app “Google Home” installeert op
uw smartphone/tablet, kunt u een verbinding
instellen met behulp van de app.
• Wanneer u apps met Chromecast-functie
gebruikt om muziek op dit toestel af te spelen
( 16), moet u een verbinding opzetten via de
app “Google Home”.
• Zorg ervoor dat de wifi-functie geactiveerd is
op uw smartphones/tablet.
1 Installeer de app “Google Home” op
uw smartphone/tablet.
• U kunt de app “Google Home” downloaden
via:
https://www.google.com/cast/setup/
2 Verbind uw smartphone/tablet met
hetzelfde netwerk als dit toestel
voordat u de instellingen invoert.
Netwerkinstellingen
Opmerking
• Nadat dit toestel is ingeschakeld, kan het enige
tijd duren voordat dit toestel geactiveerd is.
• Als “Firmware update is available” verschijnt
nadat de netwerkverbinding ingesteld werd,
dan is de firmware voor dit toestel beschikbaar.
Houd [
de update te starten.
- Tijdens het bijwerken wordt de voortgang
weergegeven als “Updating %”. (“ ” staat
voor een nummer.)
- Wanneer het bijwerken is voltooid, wordt
“Success” weergegeven. Schakel dit toestel
uit en weer in.
• “ ” knippert als de netwerkverbinding
nog niet tot stand is gebracht. Wanneer de
netwerkverbinding tot stand is gebracht,
verdwijnt “ ”.
De netwerkinstelling die gebruikmaakt van de
app “Google Home” is wellicht beschikbaar
wanneer “
Home” en volg de instructies op het scherm.
( 13)
] 5 seconden of langer ingedrukt om
” knippert. Start de app “Google
10
(74)
Page 75
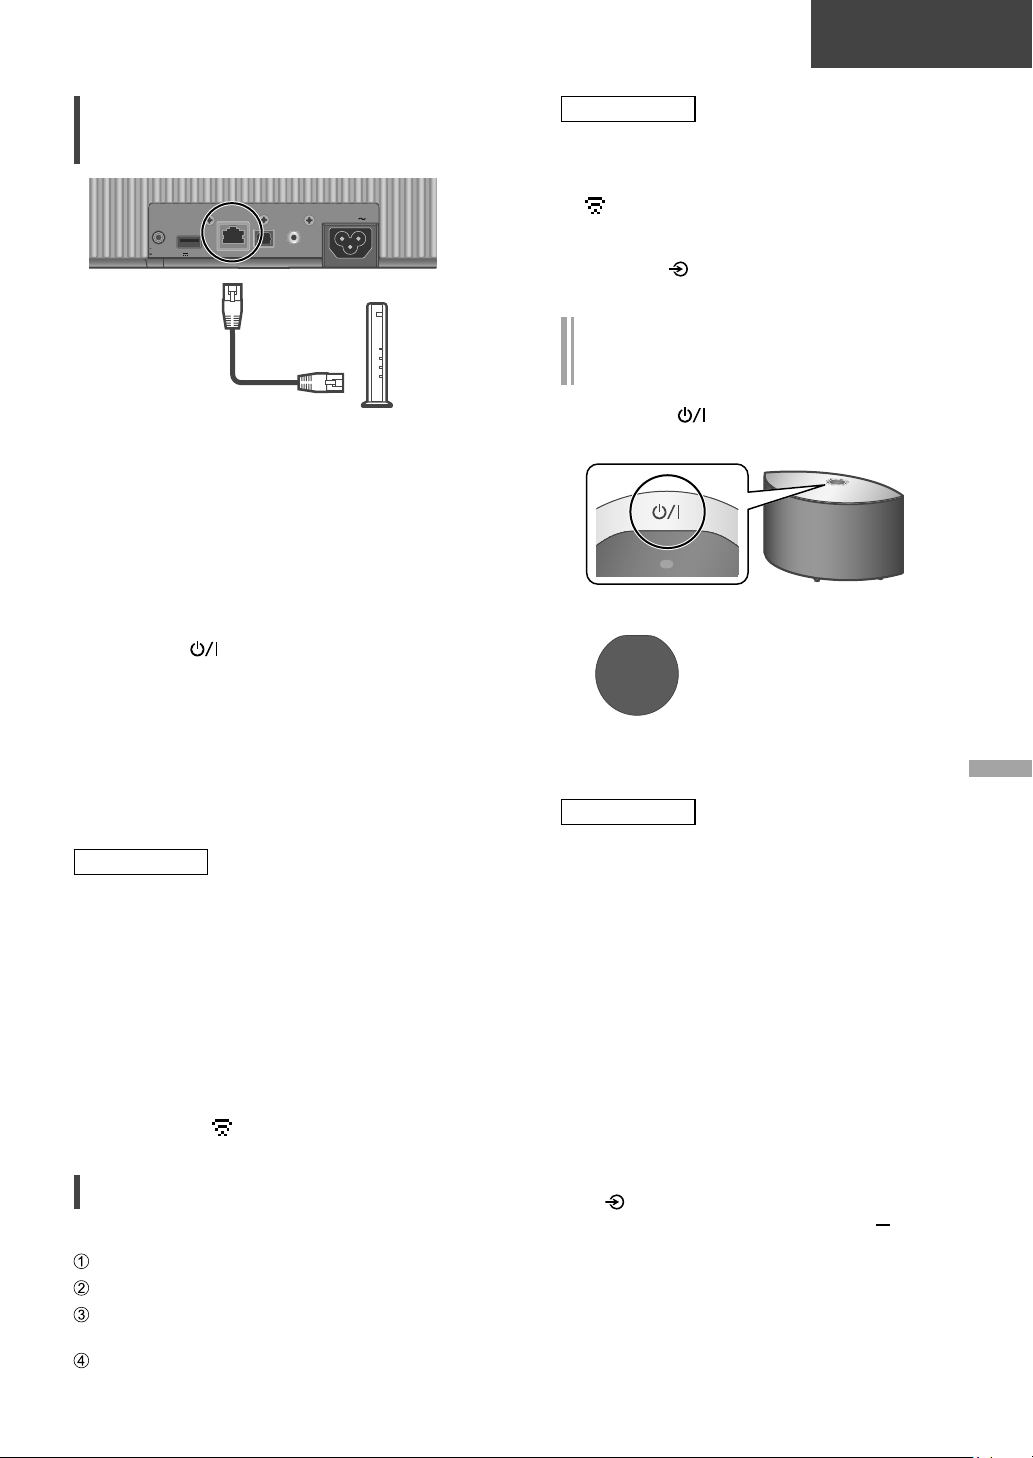
Basis
Permanent bedrade LANverbinding
10BASE-T/
DIMMER
INFO
500mA5V
LAN-kabel
(niet bijgeleverd)
100BASE-TX
OPT INLAN AUX IN
AC IN
Breedbandrouter enz.
1 Koppel het netsnoer los.
2 Verbind dit toestel met een
breedbandrouter enz. met een LANkabel.
3 Sluit het netsnoer aan op dit toestel.
( 09)
4 Druk op [
] om dit toestel in te
schakelen.
(Om de apps met Chromecast-functie te
5
gebruiken met dit toestel ( 16))
Breng een verbinding tot stand met
behulp van de app “Google Home”
op uw smartphone/tablet.
Opmerking
• Om de LAN-kabel aan te sluiten of los te
koppelen moet het netsnoer losgekoppeld zijn.
• Gebruik rechte LAN-kabels van categorie 7
of hoger (STP) als u een aansluiting op
randapparatuur tot stand brengt.
• Als een kabel anders dan een LAN-kabel in de
LAN-poort gestoken wordt, kan het toestel
beschadigd raken.
• Zelfs wanneer de wifi-functie is ingesteld
op “On”, wordt de bekabelde LAN-functie
geactiveerd terwijl een LAN-kabel wordt
aangesloten. (“
” verdwijnt.)
Draadloze LAN-verbinding
■
Voorbereiding
Koppel het netsnoer los.
Koppel de LAN-kabel los.
Plaat dit toestel zo dicht mogelijk bij de
draadloze router.
Sluit het netsnoer aan op dit toestel. ( 09)
Opmerking
• De instelling wordt geannuleerd na de
ingestelde tijdslimiet. Probeer in dat geval de
instelling opnieuw.
• “ ” verdwijnt wanneer de wifi-instelling is
voltooid.
• Om deze instelling in het midden te annuleren,
drukt u op [ ] of zet u het toestel in stand-by.
Eerste instelling van het netwerk via
de app “Google Home”
1 Druk op [ ] om dit toestel in te
schakelen.
• “Wi-Fi Setup” begint te knipperen.
Wi-Fi
Setup
2 Start de app “Google Home” en volg
de instructies op het scherm.
Opmerking
• Dit toestel wordt weergegeven als “Technics-
SC-C50ingesteld is. (“
zijn voor elke set.)
• U kunt uw netwerkinformatie (SSID, MAC-
adres en IP-adres) controleren vanuit de app
“Google Home” of de app “Technics Audio
Center”.
• Sommige items in de app “Google Home” zijn
niet relevant voor dit toestel.
• Wanneer dit toestel wordt uitgeschakeld en
weer wordt ingeschakeld voordat de wifiinstelling is voltooid, wordt “Wi-Fi Setup”
weergegeven. Voer de wifi-instelling uit of
stel de wifi-functie in op “Off” zodat dit niet
meer wordt weergegeven. Om de wifi-functie
te schakelen tussen “On” en “Off” drukt u
op [
te annuleren en houdt u het volume [
[•DIMMER/-INFO] op de achterzijde van dit
toestel ongeveer 5 seconden ingedrukt.
• Voor andere verbindingsmethoden ( 12)
” indien de apparaatnaam niet
****
” staat voor tekens die uniek
****
] om de wifi-instelling in het midden
] en
Nederlands
(75)
11
Page 76

Basis
Het netwerk instellen via het
Netwerkinstellingen (Vervolg)
instellingenmenu
1 Houd [ ] bovenaan en [•DIMMER/-
INFO] op de achterkant van dit
toestel ingedrukt.
2 Verbindingsmethoden (WPS/WPS
PIN/Wi-Fi Setup) worden afgewisseld
weergegeven.
• Het scherm wordt om de 5 seconden
gewijzigd.
• Als uw draadloze
WPS
WPS PIN
64428147
Wi-Fi
Setup
3 Laat [ ] en [•DIMMER/-INFO]
los terwijl de geselecteerde
verbindingsmethode wordt
weergegeven.
Opmerking
• Wanneer u apps met Chromecast-functie
gebruikt om muziek op dit toestel af te spelen
( 16), moet u een verbinding opzetten via de
app “Google Home”.
breedbandrouter de drukknop
WPS (Wi-Fi Protected Setup™)
ondersteunt (Met behulp van
de WPS-knop)
• Als uw draadloze
breedbandrouter de WPSpincodemethode ondersteunt
(Met behulp van de WPSpincode)
• Bij gebruik van de app “Google
Home” om een verbinding tot
stand te brengen (Via de app
“Google Home”)
■
Met behulp van de WPS-knop
“WPS”
(Wanneer geen gebruik wordt gemaakt van de
apps met Chromecast-functie met dit toestel)
Als uw draadloze router WPS ondersteunt, kunt
u een verbinding instellen door op de WPS-knop
te drukken.
• Een compatibele draadloze router kan het
WPS-teken bevatten.
• Voltooi de instellingen binnen 2 minuten terwijl
“WPS” wordt weergegeven.
1 Nadat “WPS” wordt weergegeven,
drukt u op de WPS-knop op de
draadloze router.
Voorbeeld:
• Wanneer de verbinding tot stand is
gebracht, wordt “Success” weergegeven.
- “Fail” kan worden weergegeven als de
verbinding niet kon worden voltooid.
Probeer deze methode opnieuw via het
instellingenmenu. Als “Fail” nog steeds
wordt weergegeven, probeer dan andere
methoden.
2 Druk op [ ] om de instelling af te
sluiten.
■
Met behulp van de WPS-pincode
“WPS PIN”
(Wanneer geen gebruik wordt gemaakt van de
apps met Chromecast-functie met dit toestel)
Als uw draadloze router WPS ondersteunt, kunt
u een verbinding instellen door de WPS-pincode
in te voeren.
• Informatie over het invoeren van de pincode
vindt u in de gebruiksaanwijzing van de
draadloze router.
• Voltooi de instellingen binnen 2 minuten
terwijl “WPS PIN” en de pincode worden
weergegeven.
12
(76)
Page 77

Basis
1 Voer de pincode in de draadloze
router in vanaf de pc, enz.
• Wanneer de verbinding tot stand is
gebracht, wordt “Success” weergegeven.
- “Fail” kan worden weergegeven als de
verbinding niet kon worden voltooid.
Probeer deze methode opnieuw via het
instellingenmenu. Als “Fail” nog steeds
wordt weergegeven, probeer dan andere
methoden.
2 Druk op [ ] om de instelling af te
sluiten.
Opmerking
• Afhankelijk van de router kunnen andere
verbonden apparaten tijdelijk hun verbinding
verliezen.
• Meer informatie vindt u in de
gebruiksaanwijzing van de draadloze router.
■
Via de app “Google Home”
“Wi-Fi Setup”
(Wanneer gebruik wordt gemaakt van de apps
met Chromecast-functie met dit toestel)
U kunt een verbinding instellen met behulp van
de app “Google Home”.
1 Start de app en volg de instructies op
het scherm.
2 Druk op [
] om de instelling af te
sluiten.
Om apps met Chromecast-functie te
gebruiken
Wanneer u apps met Chromecast-functie
gebruikt om muziek op dit toestel af te spelen,
moet u een verbinding opzetten via de app
“Google Home”. Wanneer het netwerk met
een andere methode is ingesteld, probeert u de
instelling opnieuw met de volgende procedure.
1 Houd [ ] bovenaan en [•DIMMER/-
INFO] op de achterkant van dit
toestel ingedrukt.
• De weergeven verbindingsmethode wordt
om de 5 seconden gewijzigd.
2 Wanneer “Wi-Fi Setup” wordt
weergegeven, laat u [
[•D IM MER /- INF O] l os.
• “Wi-Fi Setup” begint te knipperen.
3 Ga door naar “Via de app “Google
Home””.
] en
Nederlands
Opmerking
• Dit toestel wordt weergegeven als “Technics-
SC-C50ingesteld is. (“
zijn voor elke set.)
• U kunt uw netwerkinformatie (SSID, MAC-
adres en IP-adres) controleren vanuit de app
“Google Home” of de app “Technics Audio
Center”.
• Sommige items in de app “Google Home” zijn
niet relevant voor dit toestel.
” indien de apparaatnaam niet
****
” staat voor tekens die uniek
****
(77)
13
Page 78
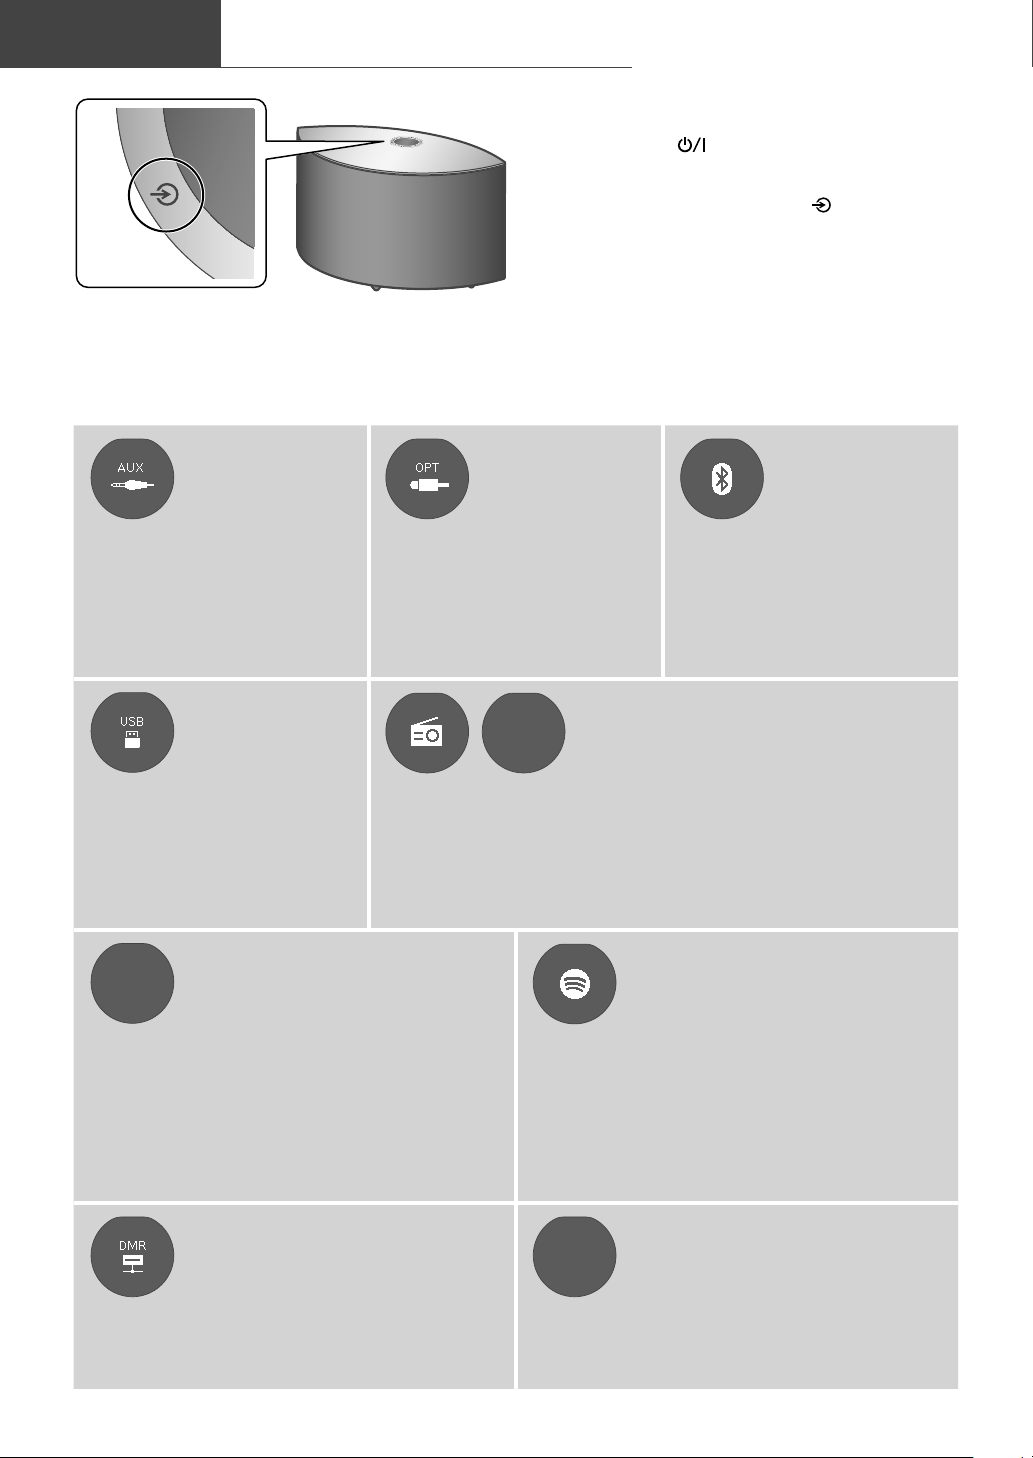
Basis
Beschikbare invoerbronnen
1 Druk op [ ] om dit toestel in te
schakelen.
2 Druk herhaaldelijk op [
] om de
invoerbron te selecteren.
• Elke invoerbron kan met dit toestel worden
afgespeeld (zie hieronder).
• Sommige ingangen kunnen beschikbaar zijn bij gebruik van de app “Google Home” of “Technics Audio
Center” (gratis). Meer informatie vindt u in:
www.technics.com/support/
- Voltooi de netwerkinstellingen. ( 10)
Gebruik van de
AUX-ingang
U kunt een draagbare audiospeler enz.
aansluiten op dit toestel met een analoge
audiokabel (3,5 mm) (niet meegeleverd)
en muziek afspelen. ( 09)
• Start het afspelen op het
verbonden apparaat.
Gebruik van USBapparatuur
U kunt muziek afspelen die is
opgeslagen op het aangesloten
USB-apparaat.
Gebruik de speciale app “Technics
•
Audio Center” (gratis) om de
muziek af te spelen.
Chromecast
built-in
Via apps met Chromecastfunctie
U kunt een cd-speler enz.
aansluiten met een optische digitale
audiokabel (niet meegeleverd) en
muziek afspelen.
• Start het afspelen op het
verbonden apparaat.
Met de gratis app “Technics Audio Center” kunt u een internetradio
afspelen door dit toestel in te stellen als luidspreker voor de
internetradio.
• Gebruik de speciale app “Technics Audio Center” (gratis) om de
muziek af te spelen.
Gebruik van het
apparaat voor
digitale audio-uitvoer
Podcasts
Dit toestel heeft Chromecast built-in. U kunt
muziekbestanden van uw apparaat (smartphone,
tablet, enz.) streamen via apps met Chromecast-functie
en dit toestel als uitvoerluidspreker selecteren. ( 16)
• U vindt meer informatie over apps met
Chromecast-functie op:
g.co/cast/apps
Gebruik van
Bluetooth
U kunt vanaf dit toestel
( 09)
draadloos naar het geluid
van het Bluetooth
luisteren. ( 15)
• Start het afspelen op het
Bluetooth
Internet Radio en Podcasts afspelen
Muziekstreaming-services
gebruiken (Spotify, etc.)
®
®
-apparaat.
-apparaat
U kunt muziek afspelen van
muziekstreamingservices, zoals Spotify etc. door
dit toestel in te stellen als luidspreker.
• U vindt de lijst met muziekstreamingservices die
door dit apparaat worden ondersteund op:
www.technics.com/support/
®
Muziekbestanden streamen op
netwerkapparaten
U kunt muziekbestanden van het apparaat op uw
netwerk naar dit apparaat streamen met behulp
van de gratis app “Technics Audio Center”. ( 16)
(78)
14
AirPlay
AirPlay gebruiken
U kunt muziek opgeslagen op iOS-apparaat etc.
afspelen met AirPlay.
Page 79

B
Bluetooth®-apparaat
Gebruik van Bluetooth
ruik van
®
Basis
Een Bluetooth®-apparaat
koppelen
• Schakel dit toestel en het Bluetooth®-apparaat
in en plaats het apparaat in de buurt van dit
toestel.
•
Schakel de Bluetooth®-functie van het apparaat in.
1 Druk herhaaldelijk op [ ] om “ ” te
selecteren.
•
“ ” knippert met een interval van 1 seconde.
• “ ” knippert per seconde en dit toestel
probeert verbinding te maken met het laatst
verbonden Bluetooth®-apparaat. Nadat de
verbinding tot stand is gekomen, gaat u
verder met stap 4.
2 Houd [ ] ingedrukt.
• “ ” knippert met een interval van 1 seconde
en dit toestel gaat naar de stand-bystatus
voor de registratie.
3 Open het scherm van de Bluetooth®-
®
verbinding etc. op het Bluetooth
apparaat en selecteer “TechnicsSC-C50-
• (“
****
elke set.)
Als de apparaatnaam is ingesteld in de app “Google
•
Home” wordt de ingestelde naam weergegeven.
”.
****
” staat voor cijfers die uniek zijn voor
4 Speel muziek af door het Bluetooth®-
apparaat te bedienen.
-
Luisteren naar muziek op een
Bluetooth®-apparaat
• Als er al een Bluetooth®-apparaat is verbonden,
verbreek dan de verbinding.
1 Druk herhaaldelijk op [ ] om “ ” te
selecteren.
• “ ” knippert per seconde en dit toestel
probeert automatisch verbinding te maken
met het laatst verbonden Bluetooth
apparaat. Nadat de verbinding tot stand is
gekomen, gaat u verder met stap 3.
2 Open het scherm van de Bluetooth®-
verbinding etc. op het Bluetooth
apparaat en selecteer “TechnicsSC-C50-
****
”.
3 Speel muziek af door het Bluetooth
apparaat te bedienen.
Opmerking
• Meer informatie vindt u in de
gebruiksaanwijzing van het Bluetooth®apparaat.
• Dit toestel kan met één apparaat per keer
verbonden worden.
• Het Bluetooth
als een andere audiobron wordt geselecteerd.
®
-apparaat wordt losgekoppeld
®
-
®
-
Nederlands
®
-
Opmerking
• Als om het password gevraagd wordt, voer
dan “0000” in.
• U kunt tot 8 apparaten voor dit toestel
registreren. Als een 9e apparaat gekoppeld
wordt, zal het apparaat dat het langst
ongebruikt gebleven is vervangen worden.
(79)
15
Page 80

Basis
Muziek streamen via het netwerk
Muziek beluisteren via een app
met Chromecast-functie
Dit toestel is compatibel met apps met
Chromecast-functie. U vindt meer informatie
over apps met Chromecast-functie op:
g.co/cast/apps
Muziekbestanden streamen op
netwerkapparaten
U kunt muziekbestanden van het apparaat
op uw netwerk naar dit apparaat streamen
met behulp van de gratis app “Technics Audio
Center”.
■
Voorbereiding
• Voltooi de netwerkinstellingen. ( 10)
- Zorg ervoor dat het netwerk verbinding met
het internet maakt.
• Installeer de app met Chromecast-functie op
uw apparaat (smartphone, tablet, enz.).
• Sluit het apparaat aan op het netwerk dat
momenteel thuis wordt gebruikt.
1
Start de app met Chromecast-functie op
uw apparaat (smartphone, tablet, enz.).
• De ingangsbron wordt automatisch
overgeschakeld naar “Chromecast built-in”.
2 Speel de muziek af.
Niet alle muziekstreamingdiensten zijn in alle
landen/regio’s beschikbaar. Registratie of een
abonnement kan vereist zijn, of er kunnen
kosten in rekening worden gebracht om
muziekstreamingservices te gebruiken. De services
kunnen zonder kennisgeving worden gewijzigd of
worden stopgezet. Ga voor meer informatie naar de
website van de individuele muziekstreamingdienst.
Belangrijke opmerking:
Voordat u dit apparaat weggooit of overdraagt aan
een derde partij, moet u zich afmelden bij uw accounts
voor muziekstreamingdiensten om ongeoorloofd
gebruik van uw accounts te voorkomen.
■
Voorbereiding
• Voltooi de netwerkinstellingen. ( 10)
• Verbind de volgende apparaten met hetzelfde
netwerk als dit toestel.
- Apparaat met daarop de app “Technics
Audio Center” geïnstalleerd
- Apparaat met muziekbron
1 Installeer de gratis app “Technics
Audio Center” op uw smartphone,
tablet, enz.
• Download de app van onderstaande website
en installeer deze.
www.technics.com/support/
2 Start de app “Technics Audio Center”.
• Gebruik altijd de laatste versie van de app.
3 Selecteer dit toestel als
uitvoerluidspreker.
4 Selecteer een muziekbron.
5 Selecteer een muziekbestand.
16
(80)
Page 81

Het logo Wi-Fi CERTIFIED™ is een keurmerk
van Wi-Fi Alliance®.
Het logo Wi-Fi Protected Setup™ is een
keurmerk van Wi-Fi Alliance
®
“Wi-Fi
” is een geregistreerd handelsmerk
®
.
van Wi-Fi Alliance®.
“Wi-Fi Protected Setup™”, “ W PA™” en
“WPA2™” zijn handelsmerken van Wi-Fi
Alliance
®
.
De Works with Apple-badge betekent
dat een accessoire speciaal is ontworpen
om te werken met de technologie die
is geïdentificeerd in de badge en dat de
ontwikkelaar heeft verklaard dat het voldoet
aan de prestatienormen van Apple.
Apple en AirPlay zijn handelsmerken van
Apple Inc., die in de VS en andere landen
gedeponeerd zijn.
Google, Google Home, Android, Google
Play, Chromecast, Chromecast ingebouwd
en andere gerelateerde merken en logo’s zijn
handelsmerken van Google LLC.
Windows is een handelsmerk of een
geregistreerd handelsmerk van Microsoft
Corporation in de Verenigde Staten en andere
landen.
Windows Media en het Windows-logo
zijn handelsmerken of gedeponeerde
handelsmerken van Microsoft Corporation
in de Verenigde Staten en/of andere
landen. Dit product wordt beschermd door
bepaalde intellectuele-eigendomsrechten
van Microsoft Corporation en van derden.
Het gebruik of de verspreiding van dergelijke
technologie buiten dit product is verboden
zonder een licentie van Microsoft of erkende
dochteronderneming van Microsoft, en van
derden.
Mac en OS X zijn handelsmerken van
Apple Inc., die in de V.S. en andere landen
gedeponeerd zijn.
®
Het Bluetooth
woordmerk en logo’s zijn
gedeponeerde handelsmerken die het bezit
zijn van Bluetooth SIG, Inc. en ieder gebruik
van dergelijke merken door Panasonic
Corporation vindt plaats onder licentie.
Andere handelsmerken en handelsnamen zijn
die van de respectievelijke eigenaren.
Licenties
DSD is een handelsmerk van Sony
Corporation.
FLAC Decoder
Copyright (C) 2000, 2001, 2002, 2003, 2004,
2005, 2006, 2007, 2008, 2009 Josh Coalson
Redistribution and use in source and binary
forms, with or without modification, are
permitted provided that the following
conditions are met:
- Redistributions of source code must retain
the above copyright notice, this list of
conditions and the following disclaimer.
- Redistributions in binary form must
reproduce the above copyright notice,
this list of conditions and the following
disclaimer in the documentation and/
or other materials provided with the
distribution.
- Neither the name of the Xiph.org
Foundation nor the names of its contributors
may be used to endorse or promote
products derived from this software without
specific prior written permission.
THIS SOFTWARE IS PROVIDED BY THE
COPYRIGHT HOLDERS AND CONTRIBUTORS
“AS IS” AND ANY EXPRESS OR IMPLIED
WARRANTIES, INCLUDING, BUT NOT
LIMITED TO, THE IMPLIED WARRANTIES OF
MERCHANTABILITY AND FITNESS FOR A
PARTICULAR PURPOSE ARE DISCLAIMED.
IN NO EVENT SHALL THE FOUNDATION
OR CONTRIBUTORS BE LIABLE FOR ANY
DIRECT, INDIRECT, INCIDENTAL, SPECIAL,
EXEMPLARY, OR CONSEQUENTIAL
DAMAGES (INCLUDING, BUT NOT LIMITED
TO, PROCUREMENT OF SUBSTITUTE GOODS
OR SERVICES; LOSS OF USE, DATA, OR
PROFITS; OR BUSINESS INTERRUPTION)
HOWEVER CAUSED AND ON ANY THEORY
OF LIABILITY, WHETHER IN CONTRACT,
STRICT LIABILITY, OR TORT (INCLUDING
NEGLIGENCE OR OTHERWISE) ARISING
IN ANY WAY OUT OF THE USE OF THIS
SOFTWARE, EVEN IF ADVISED OF THE
POSSIBILITY OF SUCH DAMAGE.
De Spotify-software is onderhevig aan
licenties van derden die u hier kunt vinden:
www.spotify.com/connect/third-party-licenses
Nederlands
(81)
17
Page 82

Specificaties
■
ALGEMEEN
Stroomtoevoer
Stroomverbruik 42 W
Stroomverbruik in
stand-bymodus
(Netwerk stand-by
Uit)
Stroomverbruik in
stand-bymodus
(Netwerk stand-by
Aan met draadloos
LAN)
Stroomverbruik in
stand-bymodus
(Netwerk stand-by
Aan met bedraad
LAN)
Afmetingen
(B×H×D)
Massa Ca. 5,9 kg
Bedrijfstemperatuurbereik
Bedrijfsvochtigheidsbereik
■
VERSTERKER
Uitgangsvermogen
■
LUIDSPREKERGEDEELTE
Voorste luidspreker (L/M/R)
Type
Woofer
Tweeter
Subwoofer
Type
Subwoofer 12 cm × 1, kegelvormig
AC 220 V tot 240 V,
50/60 Hz
0,2 W
2,0 W
2,0 W
375 mm × 220 mm ×
197 mm
0 °C tot +40 °C
35 % tot 80 % RH
(geen condensatie)
Voorste luidspreker (L/R):
20 W + 20 W (1 kHz,
T.H.D. 1,0 %, 8 ,
20 kHz LPF)
Voorste luidspreker
(Midden):
20 W (1 kHz,
T.H.D. 1,0 %, 8 ,
20 kHz LPF)
Subwoofer:
40 W (100 Hz,
T.H.D. 1,0 %, 4 ,
20 kHz LPF)
2-wegs, met
2 luidsprekers (gesloten)
6,5 cm × 1/kan.,
kegelvormig
1,6 cm × 1/kan.,
koepelvormig
1-wegs, met
1 luidspreker (basreflex)
■
Bluetooth®-GEDEELTE
Gegevens van het
Bluetooth®-systeem
Draadloze
apparatuurclassificatie
Ondersteunde
profielen
Ondersteunde
codec
Frequentieband 2,4 GHz-band FH-SS
Bedieningsafstand
1: Verwachte communicatieafstand
*
Meetomgeving:
Temperatuur 25 °C/ Hoogte 1,0 m
Er wordt gemeten in “Mode1”
■
AANSLUITINGEN
USB
Ondersteuning
geheugencapaciteit
Maximum aantal
mappen (albums)
Maximum aantal
bestanden
(liedjes)
Ethernet-interface
AUX-ingang
Digitale invoer
Ondersteunde
formaat
■
WIFI-GEDEELTE
Standaard
Frequentieband
Beveiliging
WPS-versie Versie 2.0
• De WLAN-functie van dit product mag
uitsluitend binnen in gebouwen worden
gebruikt.
Bluetooth® Ver. 4.2
Klasse 2 (2,5 mW)
A2DP, AVRCP
AAC, SBC
Ca. 10 meter
gezichtsveld
Type A-aansluiting
USB 2.0 hoge snelheid
DC 5 V 500 mA
USB-massaopslag klasse
Bestandssysteem:
FAT16, FAT32, NTFS
2 TB (max)
800
8000
LAN
(100BASE-TX/10BASE-T)
Stereo, aansluiting van
3,5 mm
Optische digitale invoer
(optische aansluiting)
LPCM
IEEE802.11a / b / g / n /
ac
2,4 GHz-band
5 GHz-band
WPA2™,
Gemengde modus
WPA2™/WPA™
1
*
18
(82)
Page 83

■
Bestandsformaat
Dit toestel ondersteunt de volgende bestandsformaten.
• Dit toestel ondersteunt niet het afspelen van muziekbestanden met kopieerbeveiliging.
• Het afspelen van alle bestanden in formaten die door dit toestel ondersteund worden, wordt niet
gegarandeerd.
• Het afspelen van een bestand in een formaat dat niet door dit toestel ondersteund wordt, kan een
hakkelend geluid of ruis veroorzaken. Controleer in die gevallen of dit toestel het bestandsformaat
ondersteunt.
• Dit toestel ondersteunt niet het afspelen van VBR (Variable Bit Rate).
• Sommige verbonden apparaten of servers kunnen in staat zijn bestanden in formaten te converteren die
niet door dit toestel ondersteund worden en deze uitvoeren. Raadpleeg voor details de gebruiksaanwijzing
van uw apparaten of servers.
• De bestandsinformatie (samplingfrequentie enz.) die door dit toestel getoond wordt en de afspeelsoftware
kunnen van elkaar verschillen.
Optische digitale invoer
Ondersteunde formaat Bemonsteringsfrequentie
LPCM 32/44,1/48/88,2/96 kHz 16/24 bit
USB-A
Bestandsformaat Extensie Bemonsteringsfrequentie
MP3 .mp3 32/44,1/48 kHz 16 tot 320 kbps
AAC .m4a/.aac 32/44,1/48/88,2/96 kHz 16 tot 320 kbps
WAV .wav 32/44,1/48/88,2/96/176,4/192/352,8/384 kHz 16/24/32 bit
FLAC .flac 32/44,1/48/88,2/96/176,4/192/352,8/384 kHz 16/24 bit
AIFF .aiff 32/44,1/48/88,2/96/176,4/192/352,8/384 kHz 16/24/32 bit
ALAC .m4a 32/44,1/48/88,2/96/176,4/192/352,8/384 kHz 16/24 bit
DSD .dff/.dsf 2,8/5,6/11,2 MHz
Bitsnelheid/
Aantal kwantisatiebits
Bitsnelheid/
Aantal kwantisatiebits
Nederlands
LAN (DMR)
Bestandsformaat Extensie Bemonsteringsfrequentie
MP3 .mp3 32/44,1/48 kHz 16 tot 320 kbps
AAC .m4a/.aac 32/44,1/48/88,2/96 kHz 16 tot 320 kbps
WAV .wav 32/44,1/48/88,2/96/176,4/192/352,8/384 kHz 16/24/32 bit
FLAC .flac 32/44,1/48/88,2/96/176,4/192/352,8/384 kHz 16/24 bit
AIFF .aiff 32/44,1/48/88,2/96/176,4/192/352,8/384 kHz 16/24/32 bit
ALAC .m4a 32/44,1/48/88,2/96/176,4/192/352,8/384 kHz 16/24 bit
DSD .dff/.dsf 2,8/5,6/11,2 MHz
: Het al dan niet kunnen afspelen van ieder muziekbestand via uw netwerk wordt bepaald door de
*
netwerkserver, zelfs als het formaat van het bestand hierboven vermeld wordt. Als u bijvoorbeeld
Windows Media Player 11 gebruikt, kunnen niet alle muziekbestanden op de pc afgespeeld worden. U
kunt alleen die afspelen die aan de bibliotheek van Windows Media Player 11 toegevoegd zijn.
Opmerking
• Specificaties kunnen zonder kennisgeving worden gewijzigd.
• Gewicht en afmetingen zijn bij benadering.
*
Bitsnelheid/
Aantal kwantisatiebits
(83)
19
Page 84

Gracias por comprar este producto.
Lea detenidamente estas instrucciones antes de usar este producto y conserve este manual para consultarlo
en el futuro.
• Acerca de las descripciones en este manual de instrucciones
- Las páginas de consulta se indican del siguiente modo “ ○○”.
- Las ilustraciones que se muestran pueden ser distintas a las de su aparato.
• Hay instrucciones de funcionamiento más detalladas disponibles en “Instrucciones de
funcionamiento” (formato PDF). Descárguelas del sitio web para leerlas.
www.technics.com/support/
• Necesitará Adobe Reader para ver o imprimir “Instrucciones de funcionamiento” (formato
PDF). Puede descargar e instalar una versión de Adobe Reader para su sistema operativo
desde el siguiente sitio web.
http://www.adobe.com/products/acrobat/readstep2.html
Contenidos
Normas de seguridad 05
Instalación 07
Guía de referencia de control 08
Conexiones 09
Ajustes de red 10
Fuentes de entrada disponibles 14
Usar Bluetooth
Aspectos básicos
Reproducir música en la red 16
®
15
Licencias 17
Especificaciones 18
Accesorios
Cable de alimentación de CA (2)
Para Reino Unido e Irlanda
K2CT3DR00009
Para Europa continental
K2CMZDR00001
• El teléfono inteligente que aparece en la portada no está incluido con este aparato.
• Los números de productos que se suministran en estas instrucciones de funcionamiento son correctos a
partir de julio de 2018.
• Pueden estar sujetos a cambios.
• No utilice el cable de alimentación de CA con otros equipos.
(84)
04
Page 85

Normas de seguridad
Aviso
Unidad
• Para reducir el riesgo de incendio, descarga
eléctrica o daño del producto,
- No exponga esta unidad a la lluvia,
humedad, goteo ni salpicaduras.
- No coloque objetos llenos con líquidos, como
floreros, sobre esta unidad.
- Use los accesorios recomendados.
- No saque las cubiertas.
- No repare esta unidad usted mismo.
Consulte al personal de servicio calificado
para la reparación.
- No permita que objetos de metal caigan
dentro de esta unidad.
- No ponga objetos pesados en esta unidad.
Cable de alimentación de CA
• Para reducir el riesgo de incendio, descarga
eléctrica o daño del producto,
- Asegúrese de que el voltaje de alimentación
corresponda al voltaje impreso en esta
unidad.
- Inserte por completo el enchufe del cable de
alimentación en la toma de CA.
- No tire, doble o coloque elementos pesados
sobre el cable de alimentación.
- No manipule el enchufe con las manos
mojadas.
- Agarre el cuerpo del enchufe del cable de
alimentación al desconectar el enchufe.
- No use un enchufe del cable de alimentación
o toma de CA dañado.
• El enchufe de conexión a la red eléctrica es el
dispositivo de desconexión.
Instale esta unidad de forma que el enchufe
de conexión a la red eléctrica pueda
desenchufarse de la toma de forma inmediata.
• Asegúrese de que la toma de tierra del enchufe
de conexión a la red eléctrica está bien
conectada para evitar una descarga eléctrica.
- Un aparato de CLASE I debe conectarse a
una toma de corriente con una conexión a
tierra protegida.
Advertencia
Unidad
• No coloque objetos con llama descubierta, una
vela por ejemplo, encima de la unidad.
• Esta unidad puede tener interferencias de
radio causadas por teléfonos móviles durante
su utilización. Si tales interferencias resultan
evidentes, aumente la separación entre la
unidad y el teléfono móvil.
• Este aparato ha sido diseñado para ser utilizado
en climas moderados y tropicales.
• No coloque ningún objeto encima de este
aparato. El aparato se calienta mientras está
encendido.
Ubicación
• Coloque esta unidad sobre una superficie
pareja.
• Para reducir el riesgo de incendio, descarga
eléctrica o daño del producto,
- No instale ni ponga esta unidad en un
estante de libros, mueble empotrado u
otro espacio de dimensiones reducidas.
Asegúrese de que esta unidad está bien
ventilada.
- No obstruya las aberturas de ventilación de la
unidad con periódicos, manteles, cortinas u
objetos similares.
- No exponga esta unidad a la luz solar
directa, altas temperaturas, mucha humedad
y vibración excesiva.
Español
(85)
05
Page 86

Normas de seguridad (Continuación)
Panasonic Corporation, una sociedad con domicilio social en 1006, Oaza Kadoma, Ciudad de Kadoma,
Osaka 571-8501, Japón, recoge de forma automática datos personales tales como dirección IP y/o ID de
Dispositivo desde su dispositivo tan pronto como usted lo conecta a internet. Actuamos de esta forma
para proteger a nuestros clientes y la integridad de nuestro Servicio, así como para proteger los derechos
o bienes de Panasonic.
Usted tiene un derecho de acceso, rectificación y objeción en ciertas circunstancias, un derecho de
supresión, limitación del tratamiento, portabilidad de los datos y un derecho a oponerse a otras formas de
tratamiento. Si usted desea ejercitar cualquiera de los anteriores derechos y/o deseara saber más sobre
el tratamiento de sus datos personales en este contexto, le rogamos se remita al texto íntegro de nuestra
política de privacidad mostrada en la página de ayuda de su dispositivo, http://panasonic.jp/support/
global/cs/audio/, http://www.technics.com/support/ o se ponga en contacto con nuestro número o
dirección de comunicaciones con el cliente/ayuda al cliente que aparece en la Garantía Paneuropea
incluida en la caja de su dispositivo para enviarle el texto íntegro de nuestra política de privacidad.
Eliminación de Aparatos Viejos
Solamente para la Unión Europea y países con sistemas de reciclado.
Este símbolo en los productos, su embalaje o en los documentos que los acompañen significa
que los productos eléctricos y electrónicos usadas no deben mezclarse con los residuos
domésticos.
Para el adecuado tratamiento, recuperación y reciclaje de los productos viejos llévelos a los
puntos de recogida de acuerdo con su legislación nacional.
Si los elimina correctamente ayudará a preservar valuosos recursos y evitará potenciales
efectos negativos sobre la salud de las personas y sobre el medio ambiente.
Para más información sobre la recogida u reciclaje, por favor contacte con su ayuntamiento.
Puede haber sanciones por una incorrecta eliminación de este residuo, de acuerdo con la
legislación nacional.
Declaración de Conformidad (DoC)
Por la presente, “Panasonic Corporation” declara que este producto es de conformidad con los requisitos
sustanciales y con las disposiciones pertinentes de la Directiva 2014/53/UE.
Los usuarios pueden descargar una copia de la declaración de conformidad original (DoC) de los
productos RE del servidor DoC:
http://www.ptc.panasonic.eu
Contacto con el representante autorizado:
Panasonic Marketing Europe GmbH, Panasonic Testing Centre, Winsbergring 15, 22525 Hamburg,
Alemania
Tipo de conexión inalámbrica Frecuencia de funcionamiento Potencia máxima (EIRP)
WLAN 2412-2472 MHz
5180-5320 MHz
5500-5700 MHz
Bluetooth
Las bandas de 5,15 a 5,35 GHz están limitadas a un uso exclusivo en interiores en los siguientes
países.
El marcado de identificación del producto está ubicado en la parte inferior del aparato.
®
2402-2480 MHz 10 dBm
20 dBm
20 dBm
20 dBm
06
(86)
Page 87

Instalación
Instalación
Apague todos los equipos antes de la conexión
y lea los manuales de uso correspondientes.
En lugar de arrastrar el aparato, asegúrese de
levantarlo cuando lo mueva.
Notas sobre los altavoces
Estos altavoces no incluyen protección
magnética. No los coloque cerca de televisores,
ordenadores u otros equipos sensibles al
magnetismo.
Si reproduce música a un volumen elevado
•
durante un largo periodo de tiempo, el sistema
puede dañarse y disminuir su tiempo de vida útil.
• Reduzca el volumen en los casos que se indican
a continuación para evitar daños.
- Cuando reproduzca sonido distorsionado
- Cuando ajuste la calidad del sonido
- Cuando encienda/apague este aparato
Efectos de sonido óptimos
La calidad y el volumen de los sonidos graves,
el desempeño de la localización del sonido, el
ambiente de sonido, etc. varían dependiendo del
lugar donde se instale este aparato, la posición
desde la que se escucha, las condiciones de
la sala y otros factores. Cuando instale este
aparato, consulte la información que se presenta
a continuación.
Determinar el sitio para la instalación
• Ponga este aparato en una superficie plana
segura.
Ajustar la distancia entre el aparato y la
pared
• Si instala este aparato cerca de una pared
o en una esquina, los sonidos graves serán
más potentes. Sin embargo, si el aparato está
muy cerca de la pared o de una esquina, el
desempeño de la localización del sonido y el
ambiente de sonido pueden deteriorarse.
Ajustar con la función Space Tune
Puede ajustar de forma automática la calidad del
sonido en función del lugar de instalación (cerca
de la pared o una esquina de la habitación).
Mantenga pulsado [ ] durante 5 segundos.
• Se mostrará “Space Tune (Auto)”.
Vuelva a pulsar [ ] mientras se muestra
“Space Tune (Auto)”.
• Se emite un tono de prueba bastante fuerte
durante la medición.
• Una vez que se haya completado el ajuste,
se mostrará “Success”.
• Para cancelar el ajuste a mitad, pulse [
].
Cuidados de la unidad
Desconecte el cable de alimentación de CA de
la toma de corriente antes de realizar cualquier
mantenimiento. Limpie este aparato con un
paño suave.
• Cuando esté muy sucio, humedezca un paño
en agua para limpiar el aparato; a continuación
limpie otra vez con un paño suave.
• No use solventes, como por ejemplo, bencina,
disolvente, alcohol, detergente de cocina,
limpiador químico, etc. Si lo hace, podría
provocar que la caja exterior se deforme o que
el revestimiento se caiga.
Usar “Technics Audio Center”
Si instala la aplicación específica “Technics Audio
Center” (gratuita) en su teléfono inteligente o
tableta, podrá reproducir archivos de música
desde el dispositivo de su red en este aparato y
configurar los ajustes de calidad de sonido, etc.
Para obtener más información, visite:
www.technics.com/support/
Actualizaciones del firmware
En ocasiones, Panasonic puede lanzar
actualizaciones del firmware para esta unidad
que pueden optimizar el funcionamiento de
ciertas características. Estas actualizaciones se
encuentran disponibles de forma gratuita.
• Actualizar a través de Internet ( 10)
• Para obtener más información acerca de la
actualización a través de una memoria USB,
consulte el siguiente sitio web.
www.technics.com/support/firmware/
Para eliminar o transferir este
aparato
Antes de transferir o eliminar este aparato, borre
toda la información grabada restableciendo
todos los ajustes a los valores de fábrica. Para
restablecer todos los ajustes a los valores
de fábrica, mantenga pulsados [•DIMMER/INFO] y [ ] a la vez durante 5 segundos o
más con el aparato encendido. El aparato se
reinicia automáticamente y todos los ajustes se
restablecen a los de fábrica.
• Antes de transferir este aparato a un tercero o
de eliminarlo, asegúrese de cerrar sesión en sus
cuentas de servicios de reproducción de música
en streaming para evitar el uso no autorizado
de sus cuentas.
Español
(87)
07
Page 88
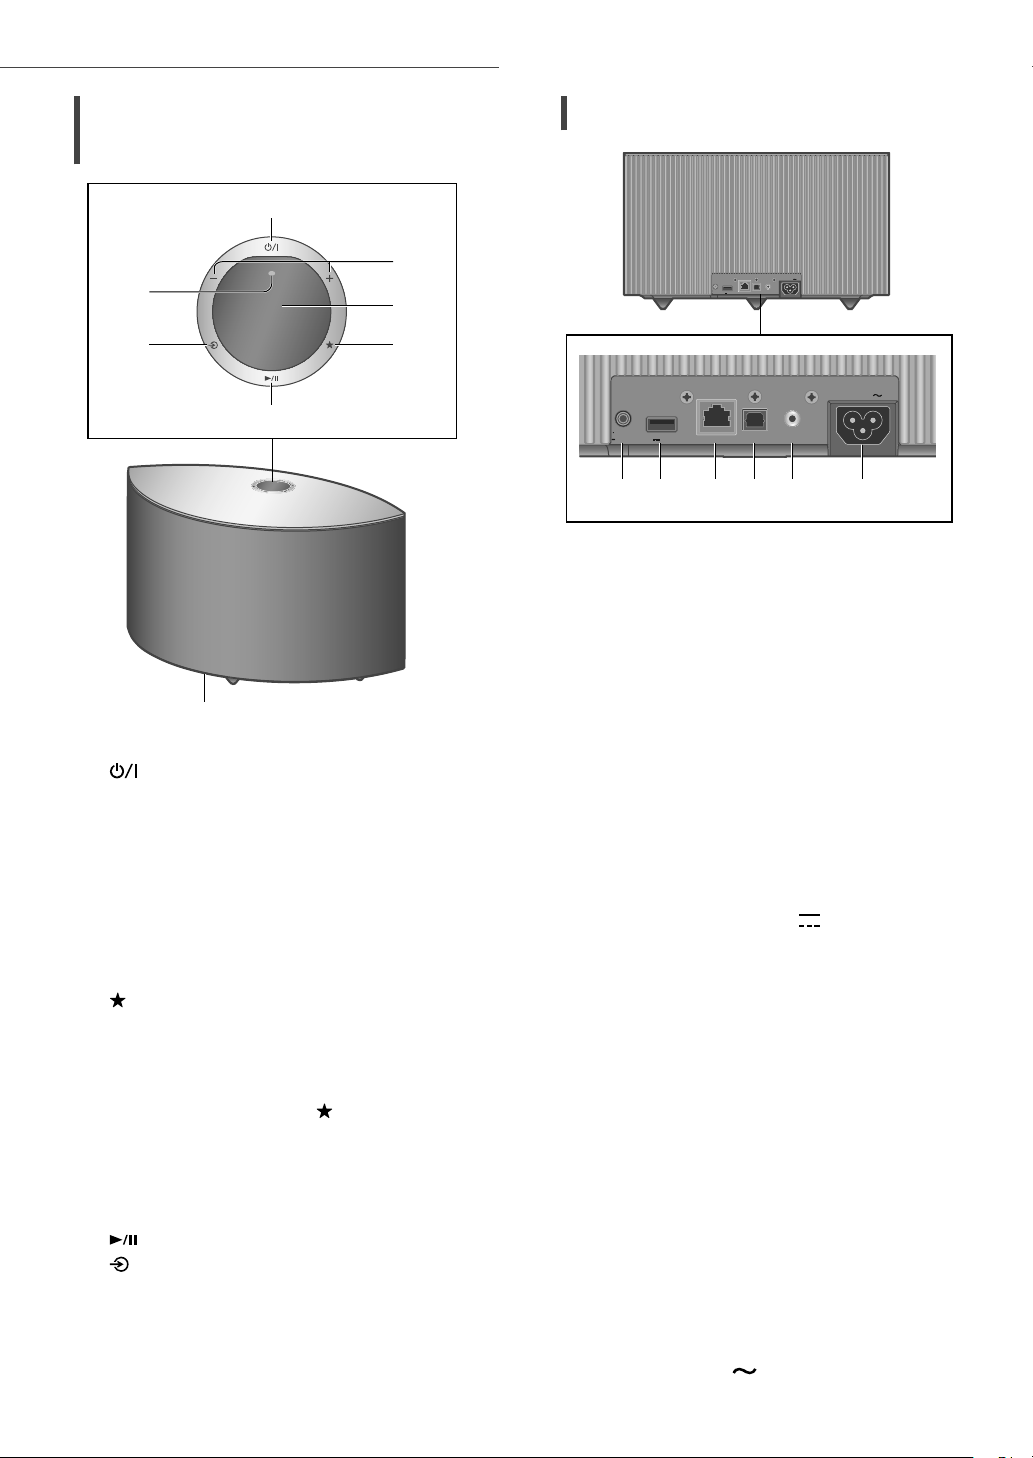
Guía de referencia de control
Este aparato (parte delantera/
superior)
01 [ ] Interruptor de espera/encendido
Pulse para que el aparato pase de encendido
a modo de espera o viceversa. En el modo
de espera, el aparato todavía consume una
pequeña cantidad de energía.
02 Ajuste el volumen
• De 0 (mínimo) a 100 (máximo)
03 Pantalla
Se muestra la fuente de entrada, entre otras
informaciones.
04
] Favoritos
[
Puede guardar su emisora o lista de reproducción
favorita (USB, Podcasts, Spotify, etc.) y recuperarlas.
• Puede registrar hasta 9 emisoras o listas
de reproducción favoritas. Para registrar
una, mantenga pulsado [ ] hasta que se
muestre “Memorised” mientras se está
reproduciendo una emisora sintonizada
o música. A continuación, la emisora o la
música se registra automáticamente en un
número que no se utilice del 1 al 9.
05 [
06 [
] Cambiar la fuente de entrada
07 Micrófono integrado
08 Marcado de identificación del producto
(parte inferior de este aparato)
• Se indica el número de modelo.
] Reproducir/Pausar
Este aparato (parte trasera)
10BASE-T/
100BASE-TX
500mA5V
OPT INLAN AUX IN
OPT INLAN AUX IN
AC IN
AC IN
500 mA)
DIMMER
INFO
10BASE-T/
100BAS E-TX
DIMMER
INFO
500mA5V
09 [• DI M M ER / - IN F O]
Ajustar el brillo de la iluminación de la
pantalla y la parte inferior del aparato.
• Si el panel de visualización está apagado,
se encenderá durante unos segundos
únicamente cuando opere este aparato.
Antes de que el panel de visualización se
apague de nuevo, se mostrará “Display Off”
durante unos segundos.
• Pulse [•DIMMER/-INFO] repetidas veces
para cambiar el brillo.
• Mantenga pulsado [•DIMMER/-INFO] para
ver el estado de la red o su configuración.
Los elementos mostrados se cambian al
pulsar [•DIMMER/-INFO] repetidas veces.
(El brillo no cambia durante este periodo).
10 Terminal USB-A (CC 5 V
Puede reproducir música almacenada en
el dispositivo USB conectado utilizando la
aplicación específica “Technics Audio Center”
(gratuita) en su teléfono inteligente o tableta
( 09). Para obtener más información, visite:
www.technics.com/support/
• Si hay un dispositivo USB conectado, es
difícil pulsar [•DIMMER/-INFO]. Extraiga el
dispositivo USB si fuera necesario.
11 Terminal LAN ( 11)
12 Terminal de entrada digital óptica
Puede conectar un reproductor de CD,
etc. con el cable de audio digital óptico (no
suministrado) y reproducir música. ( 09)
13 Terminal AUX IN
Puede conectar un reproductor de audio portátil,
etc. con el cable de audio analógico (3,5 mm)
(no suministrado) y reproducir música. ( 09)
14 Terminal AC IN ( ) ( 09)
08
(88)
Page 89

Conexiones
Aspectos básicos
Conectar un dispositivo de
salida de audio analógico
10BASE-T/
100BASE-TX
DIMMER
INFO
500mA5V
OPT INLAN AUX IN
Reproductor de audio portátil, etc.
Nota
• Cuando visualice contenido de vídeo con esta
función, puede que la salida del vídeo y el
audio no estén sincronizadas.
AC IN
Cable de audio
analógico
(3,5 mm)
(no suministrado)
Conexión de un dispositivo USB
10BASE-T/
DIMMER
INFO
100BASE-TX
500mA5V
OPT INLAN AUX IN
AC IN
Dispositivo USB
Conexión del cable de
alimentación de CA
Conecte solamente después de haber
finalizado todas las demás conexiones.
10BASE-T/
DIMMER
INFO
100BASE-TX
500mA5V
OPT INLAN AUX IN
AC IN
Conectar un dispositivo de
salida de audio digital
10BASE-T/
100BASE-TX
DIMMER
INFO
500mA5V
OPT INLAN AUX IN
Reproductor de CD, etc.
Nota
• Cuando visualice contenido de vídeo con esta
función, puede que la salida del vídeo y el
audio no estén sincronizadas.
AC IN
Cable de audio
digital óptico
(no suministrado)
A una toma de
corriente de casa
• Utilice solamente el cable de alimentación de
CA suministrado.
• No conecte el cable de alimentación de
CA si no se han finalizado todas las demás
conexiones.
• Inserte los enchufes de los cables hasta el
fondo para que queden bien conectados.
• No doble los cables en ángulos muy cerrados.
• La configuración LAN inalámbrica (Wi-Fi®)
puede iniciarse cuando este aparato está
activado. Si detiene la configuración Wi-Fi,
pulse [ ]. Para mantener la configuración
Wi-Fi, lance la aplicación “Google Home” y siga
las instrucciones que aparecen en pantalla.
( 11)
Nota
• Este aparato consume una pequeña cantidad
de corriente CA ( 18) aunque se haya puesto
en modo de espera. Retire el enchufe de la
toma de corriente principal si no va a usar el
aparato durante un largo periodo de tiempo.
Coloque el aparato de tal forma que el enchufe
se pueda retirar fácilmente.
Español
(89)
09
Page 90

Aspectos básicos
Puede reproducir servicios de música en línea o archivos de música desde su
teléfono inteligente o tableta en este aparato.
Este aparato se puede conectar a un router mediante un cable de red LAN o Wi-Fi® integrada.
Para realizar una conexión estable a la red, se recomienda usar una conexión de red LAN con cable.
■
Preparación
Si instala la aplicación “Google Home” en su
teléfono inteligente o tableta, puede configurar
una conexión mediante la aplicación.
• Al utilizar las aplicaciones compatibles con
Chromecast para reproducir música en este
aparato ( 16), configure una conexión
mediante la aplicación “Google Home”.
• Asegúrese de que la función Wi-Fi esté
activada en su teléfono inteligente o tableta.
1 Instale la aplicación “Google Home”
en su teléfono inteligente o tableta.
• Para descargar la aplicación “Google Home”,
visite:
https://www.google.com/cast/setup/
2 Conecte su teléfono inteligente
o tableta a la misma red que este
aparato antes de realizar ajustes.
Ajustes de red
Nota
• Después de encender este aparato, puede
transcurrir un tiempo hasta que se active.
• Si se muestra el mensaje “Firmware update is
available” después de configurar la conexión de
red, significa que el firmware de esta unidad
está disponible. Mantenga pulsado [
durante 5 segundos o más para iniciar la
actualización.
- El progreso se muestra como “Updating
%” durante la actualización. (“ ” significa
un número).
- Cuando la actualización finalizó
correctamente, se visualiza “Success”.
Apague y encienda este aparato.
• “ ” parpadea mientras la conexión de red no
está establecida. Cuando la conexión de red
está establecida, “ ” desaparece.
La configuración de la red con la aplicación
“Google Home” puede estar disponible
mientras “
“Google Home” y siga las instrucciones en
pantalla. ( 13)
” parpadea. Lance la aplicación
]
10
(90)
Page 91

Conexión LAN convencional
Aspectos básicos
Conecte el cable de alimentación de CA a
este aparato. ( 09)
10BASE-T/
DIMMER
INFO
500mA5V
Cable de
red LAN (no
suministrado)
100BASE-TX
OPT INLAN AUX IN
Router de banda ancha, etc.
AC IN
1 Desconecte el cable de alimentación
de CA.
Conecte este aparato a un router de banda
2
ancha, etc. con un cable de red LAN.
3 Conecte el cable de alimentación de
CA a este aparato. ( 09)
4 Pulse [
] para encender este
aparato.
(Para utilizar aplicaciones compatibles con
5
Chromecast en este aparato ( 16))
Asegúrese de configurar una
conexión utilizando la aplicación
“Google Home” en su teléfono
inteligente o tableta.
Nota
• Mientras el cable de alimentación de CA esté
desconectado, el cable de red LAN debe estar
conectado o desconectado.
• Use la categoría 7 o superior de cables LAN
derechos (STP) al conectar a dispositivos
periféricos.
• Insertar otro cable que no sea un cable de red
LAN en el puerto LAN puede dañar el aparato.
• Incluso cuando la función Wi-Fi está ajustada
en “On”, la función LAN por cable está activada
mientras haya un cable LAN conectado. (“ ”
desaparece).
Conexión de red LAN
inalámbrica
■
Preparación
Desconecte el cable de alimentación de CA.
Desconecte el cable de red LAN.
Coloque este aparato lo más cerca posible del
router inalámbrico.
Nota
• La configuración se cancelará transcurrido
el límite de tiempo establecido. En ese caso,
vuelva a realizar la configuración.
• “ ” desaparece cuando la configuración
Wi-Fi se haya completado.
• Para cancelar esta configuración a mitad del
proceso, pulse [
] o ponga el aparato en
modo de espera.
Configuración de la red por primera
vez mediante la aplicación “Google
Home”
1 Pulse [ ] para encender este
aparato.
• “Wi-Fi Setup” empieza a parpadear.
Wi-Fi
Setup
2 Lance la aplicación “Google Home” y
siga las instrucciones en pantalla.
Nota
• Este aparato aparecerá como “Technics-
SC-C50dispositivo. (“
es único para cada set).
• Puede comprobar la información de su red
(SSID, dirección MAC y dirección IP) desde
la aplicación “Google Home” o la aplicación
“Technics Audio Center”.
• Algunos elementos de la aplicación “Google
Home” no son relevantes para este aparato.
Cuando este aparato se apague y se encienda
•
antes de finalizar la configuración de la red Wi-Fi,
volverá a mostrarse “Wi-Fi Setup”. Realice la
configuración Wi-Fi o ajuste la función Wi-Fi en
“Off” para que no se muestre después. Para
cambiar la función Wi-Fi entre “On” u “Off”, pulse
[ ] para cancelar la configuración Wi-Fi a mitad,
mantenga pulsado el botón de volumen [ ] de
la parte superior y [•DIMMER/-INFO] en la parte
trasera de este aparato durante aprox. 5 segundos.
• Para otros métodos de conexión ( 12)
” si no se establece el nombre del
****
” representa un carácter que
****
(91)
11
Español
Page 92

Aspectos básicos
Configuración de la red desde el
Ajustes de red (Continuación)
menú de configuración
1 Mantenga pulsado [ ] en la parte
superior y [•DIMMER/-INFO] en la
parte trasera de este aparato.
2 A continuación, se muestran los
métodos de conexión (WPS/WPS
PIN/Wi-Fi Setup).
• La pantalla cambia cada 5 segundos.
• Si su router inalámbrico admite
WPS
el botón de comando WPS
(Wi-Fi Protected Setup™) (Usar
el botón WPS)
■
Usar el botón WPS
“WPS”
(Cuando no se utilizan las aplicaciones
compatibles con Chromecast con este aparato)
Si su router inalámbrico admite WPS, puede
configurar una conexión pulsando el botón WPS.
• Un router inalámbrico compatible puede incluir
la marca de identificación WPS.
• Complete los ajustes en 2 minutos mientras se
muestra “WPS”.
1 Una vez que se muestre “WPS”,
pulse el botón WPS en el router
inalámbrico.
Ejemplo:
• Si su router inalámbrico admite
el método de código PIN WPS
(Usar el código PIN WPS)
• Al utilizar la aplicación “Google
Home” para configurar una
conexión (Uso de la aplicación
“Google Home”)
WPS PIN
64428147
Wi-Fi
Setup
3 Suelte [ ] y [•DIMMER/-INFO]
mientras se muestra el método de
conexión seleccionado.
Nota
• Al utilizar las aplicaciones compatibles con
Chromecast para reproducir música en este
aparato ( 16), configure una conexión
mediante la aplicación “Google Home”.
• Una vez que se haya establecido la
conexión, se mostrará “Success”.
- “Fail” podría mostrarse si la conexión no
se había finalizado. Intente seguir este
método de nuevo desde el menú de
configuración. Si sigue apareciendo “Fail”,
pruebe otros métodos.
2 Pulse [ ] para salir de la
configuración.
■
Usar el código PIN WPS
“WPS PIN”
(Cuando no se utilizan las aplicaciones
compatibles con Chromecast con este aparato)
Si su router inalámbrico admite WPS, puede
configurar una conexión introduciendo el código
PIN WPS.
• Para obtener información sobre cómo
introducir el código PIN, consulte las
instrucciones de funcionamiento del router
inalámbrico.
• Complete los ajustes en 2 minutos mientras se
muestran “WPS PIN” y el código PIN.
12
(92)
Page 93

Aspectos básicos
1 Introduzca el código PIN en el router
inalámbrico desde el PC, etc.
• Una vez que se haya establecido la
conexión, se mostrará “Success”.
- “Fail” podría mostrarse si la conexión no
se había finalizado. Intente seguir este
método de nuevo desde el menú de
configuración. Si sigue apareciendo “Fail”,
pruebe otros métodos.
2 Pulse [ ] para salir de la
configuración.
Nota
• En función del router, es posible que se
desconecten temporalmente otros dispositivos
conectados.
• Para obtener más información, consulte las
instrucciones de funcionamiento del router
inalámbrico.
■
Uso de la aplicación “Google Home”
“Wi-Fi Setup”
(Al utilizar las aplicaciones compatibles con
Chromecast con este aparato)
Puede configurar una conexión mediante la
aplicación “Google Home”.
1 Lance la aplicación y siga las
instrucciones en pantalla.
2 Pulse [
] para salir de la
configuración.
Uso de las aplicaciones compatibles
con Chromecast
Al utilizar las aplicaciones compatibles con
Chromecast para reproducir música en este
aparato, tiene que configurar una red mediante
la aplicación “Google Home”. Cuando se haya
configurado una red con otro método, vuelva a
realizar el ajuste con el siguiente procedimiento.
1 Mantenga pulsado [ ] en la parte
superior y [•DIMMER/-INFO] en la
parte trasera de este aparato.
• El método de conexión mostrado se cambia
cada 5 segundos.
2 Cuando aparece “Wi-Fi Setup”, suelte
] y [•DIMMER/-INFO].
[
• “Wi-Fi Setup” empieza a parpadear.
3 Vaya a “Uso de la aplicación “Google
Home””.
Nota
• Este aparato aparecerá como “Technics-
SC-C50dispositivo. (“
es único para cada set).
• Puede comprobar la información de su red
(SSID, dirección MAC y dirección IP) desde
la aplicación “Google Home” o la aplicación
“Technics Audio Center”.
• Algunos elementos de la aplicación “Google
Home” no son relevantes para este aparato.
” si no se establece el nombre del
****
” representa un carácter que
****
(93)
Español
13
Page 94

Aspectos básicos
Fuentes de entrada disponibles
1 Pulse [ ] para encender este
aparato.
2 Pulse [
] repetidas veces para
seleccionar la fuente de entrada.
• Cada fuente de entrada puede reproducirse
con este aparato (ver a continuación).
• Algunas entradas pueden estar disponibles cuando se utilizan “Google Home” o “Technics Audio Center”
(gratuito). Para obtener más información, visite:
www.technics.com/support/
- Complete los ajustes de la red. ( 10)
Uso de la entrada
auxiliar
Puede conectar un reproductor de
audio portátil, etc. con el cable de audio
analógico (3,5 mm) (no suministrado) y
reproducir música. ( 09)
• Inicie la reproducción en el
dispositivo conectado.
Uso del
dispositivo USB
Puede reproducir música almacenada
en el dispositivo USB conectado.
• Utilice la aplicación específica
“Technics Audio Center”
(gratuita) para reproducirla.
Chromecast
built-in
Uso de las aplicaciones
compatibles con Chromecast
Puede conectar un reproductor
de CD, etc. con el cable de audio
digital óptico (no suministrado) y
reproducir música. ( 09)
• Inicie la reproducción en el
dispositivo conectado.
Con la aplicación gratuita “Technics Audio Center”, puede
reproducir la radio por Internet ajustando este aparato como altavoz
para la radio por Internet.
• Utilice la aplicación específica “Technics Audio Center” (gratuita)
para reproducirla.
Uso de un
dispositivo de salida
de audio digital
Este aparato tiene Chromecast built-in. Puede
reproducir archivos de música en streaming desde su
dispositivo (teléfono inteligente, tableta, etc.) con las
aplicaciones compatibles con Chromecast y seleccionar
este aparato como el altavoz de salida. ( 16)
• Para obtener información detallada sobre las
aplicaciones compatibles con Chromecast, visite:
g.co/cast/apps
Usar Bluetooth
Puede escuchar el sonido
desde el dispositivo de audio
Bluetooth
forma inalámbrica. ( 15)
• Inicie la reproducción en el
dispositivo Bluetooth
Podcasts
Reproducción de Internet Radio y
Podcasts
Uso de los servicios de
reproducción de música en
Puede reproducir música desde los servicios
de música en streaming, como Spotify etc.,
ajustando este aparato como altavoz.
• Para conocer los servicios de música en
streaming que admite este aparato, visite:
www.technics.com/support/
streaming (Spotify, etc.)
®
de este aparato de
®
®
.
Reproducir archivos de música
en dispositivos de red
Puede reproducir archivos de música desde el
dispositivo de su red en este aparato mediante la
aplicación gratuita “Technics Audio Center”. ( 16)
(94)
14
AirPlay
Uso de AirPlay
Puede reproducir música almacenada en un
dispositivo iOS, etc. mediante AirPlay.
Page 95

Usar Bluetooth
B
sar
®
Aspectos básicos
Dispositivo Bluetooth
Sincronizar un dispositivo
Bluetooth
• Active este aparato, la función Bluetooth® del
dispositivo, y coloque este último cerca del
aparato.
• Active la función Bluetooth® del dispositivo.
1 Pulse [ ] varias veces para
seleccionar “
• “ ” parpadeará en intervalos de 1 segundo.
• “ ” parpadeará por segundo y este aparato
intentará conectarse al último dispositivo
Bluetooth® conectado. Después de que
finalice la conexión, vaya al paso 4.
2 Mantenga pulsado [ ].
• “ ” parpadeará en intervalos de 1 segundo
y este aparato pasará al estado de espera de
registro.
3 Abra la pantalla de conexión de
Bluetooth
Bluetooth
SC-C50-
• “
****
para cada set.
• Si el nombre del dispositivo se ajusta en la
aplicación “Google Home”, se mostrará el
nombre ajustado.
4 Reproduzca música utilizando el
dispositivo Bluetooth
®
”.
®
, etc. en el dispositivo
®
y seleccione “Technics-
”.
****
” representa un dígito que es único
®
.
®
Escuchar música almacenada
en un dispositivo Bluetooth
• Si un dispositivo Bluetooth® ya está conectado,
desconéctelo.
1 Pulse [ ] varias veces para
seleccionar “
• “ ” parpadeará por segundo y este aparato
intentará conectarse automáticamente al
último dispositivo Bluetooth
Después de que finalice la conexión, vaya al
paso 3.
2 Abra la pantalla de conexión de
Bluetooth
Bluetooth
SC-C50-
****
3 Reproduzca música utilizando el
dispositivo Bluetooth
Nota
• Consulte las instrucciones de funcionamiento
del dispositivo Bluetooth® para obtener
información.
• Esta unidad se puede conectar solamente a un
dispositivo por vez.
• El dispositivo Bluetooth
selecciona otra fuente de audio.
”.
®
conectado.
®
, etc. en el dispositivo
®
y seleccione “Technics-
”.
®
.
®
se desconectará si se
®
Español
Nota
• Si se le solicita la contraseña, ingrese “0000”.
• Puede registrar hasta 8 dispositivos con este
aparato. Si se sincroniza un noveno dispositivo,
se reemplazará el dispositivo que menos se ha
utilizado.
(95)
15
Page 96

Aspectos básicos
Reproducir música en la red
Escuchar música mediante
una aplicación compatible con
Chromecast
Este aparato admite las aplicaciones compatibles
con Chromecast. Para obtener información
detallada sobre las aplicaciones compatibles con
Chromecast, visite:
g.co/cast/apps
■
Preparación
• Complete los ajustes de la red. ( 10)
- Asegúrese de que la red esté conectada a
Internet.
• Instale una aplicación compatible con
Chromecast en su dispositivo (teléfono
inteligente, tableta, etc.).
• Conecte el dispositivo a la red que se esté
utilizando en ese momento en casa.
1 Lance la aplicación compatible
con Chromecast en su dispositivo
(teléfono inteligente, tableta, etc.).
• La fuente de entrada cambia
automáticamente a “Chromecast built-in”.
2 Reproduzca la música.
No todos los servicios de música en streaming
están disponibles en todos los países o todas
las regiones. Puede requerirse el registro
o suscripción, o bien pueden aplicarse
cargos por utilizar los servicios de música en
streaming. Los servicios podrían cambiar o
interrumpirse. Para obtener más información,
visite el sitio web concreto de los servicios de
música en streaming.
Aviso importante:
Antes de transferir este aparato a un tercero o de
eliminarlo, asegúrese de cerrar sesión en sus cuentas
de servicios de reproducción de música en streaming
para evitar el uso no autorizado de sus cuentas.
Reproducir archivos de música
en dispositivos de red
Puede reproducir archivos de música desde el
dispositivo de su red en este aparato mediante la
aplicación gratuita “Technics Audio Center”.
■
Preparación
• Complete los ajustes de la red. ( 10)
• Conecte los siguientes dispositivos a la misma
red que este aparato.
- Dispositivo con la aplicación “Technics Audio
Center” instalada
- Dispositivo que contenga la fuente de música
1 Instale la aplicación gratuita
“Technics Audio Center” en su
teléfono inteligente, tableta, etc.
• Descargue e instale la aplicación de la
siguiente página.
www.technics.com/support/
2
Lance la aplicación “Technics Audio Center”.
• Utilice siempre la versión más reciente de la
aplicación.
3 Seleccione este aparato como el
altavoz de salida.
4 Seleccione una fuente de música.
5 Seleccione un archivo de música.
16
(96)
Page 97

El logotipo Wi-Fi CERTIFIED™ es una marca de
certificación de Wi-Fi Alliance®.
El logotipo Wi-Fi Protected Setup™ es una
marca de certificación de Wi-Fi Alliance
®
“Wi-Fi
” es una marca comercial registrada de
®
.
Wi-Fi Alliance®.
“Wi-Fi Protected Setup™”, “ W PA™” y
“WPA2™” son marcas comerciales de Wi-Fi
Alliance
®
.
El uso de la insignia Works with Apple
(compatible con Apple) significa que el
accesorio se ha diseñado para funcionar
específicamente con la tecnología que se
indica en la insignia y el desarrollador lo
ha certificado para cumplir las normas de
rendimiento de Apple.
Apple y AirPlay son marcas comerciales de
Apple Inc., registradas en EE.UU. y otros
países.
Google, Google Home, Android, Google
Play, Chromecast, Chromecast built-in y otros
logotipos y marcas relacionados son marcas
comerciales de Google LLC.
Windows es una marca comercial o una
marca comercial registrada de Microsoft
Corporation en los Estados Unidos y en otros
países.
Windows Media y el logotipo de Windows
son marcas comerciales o marcas comerciales
registradas de Microsoft Corporation en
los Estados Unidos y/o en otros países. Este
producto está protegido por ciertos derechos
de propiedad intelectual pertenecientes a
Microsoft Corporation y a terceros. El uso o
la distribución de tal tecnología fuera de este
producto están prohibidos si no se cuenta con
una licencia de Microsoft o de una subsidiaria
de Microsoft y terceros.
Mac y OS X son marcas comerciales de Apple
Inc., registradas en EE. UU y otros países.
La marca denominativa Bluetooth
®
y sus
logos son marcas comerciales registradas de
Bluetooth SIG, Inc. y cualquier uso de dichas
marcas por parte de Panasonic Corporation
se realiza bajo licencia. Otros nombres de
marcas y marcas comerciales son propiedad
de sus respectivos propietarios.
Licencias
DSD es una marca comercial de Sony
Corporation.
FLAC Decoder
Copyright (C) 2000, 2001, 2002, 2003, 2004,
2005, 2006, 2007, 2008, 2009 Josh Coalson
Redistribution and use in source and binary
forms, with or without modification, are
permitted provided that the following
conditions are met:
- Redistributions of source code must retain
the above copyright notice, this list of
conditions and the following disclaimer.
- Redistributions in binary form must
reproduce the above copyright notice,
this list of conditions and the following
disclaimer in the documentation and/
or other materials provided with the
distribution.
- Neither the name of the Xiph.org
Foundation nor the names of its contributors
may be used to endorse or promote
products derived from this software without
specific prior written permission.
THIS SOFTWARE IS PROVIDED BY THE
COPYRIGHT HOLDERS AND CONTRIBUTORS
“AS IS” AND ANY EXPRESS OR IMPLIED
WARRANTIES, INCLUDING, BUT NOT
LIMITED TO, THE IMPLIED WARRANTIES OF
MERCHANTABILITY AND FITNESS FOR A
PARTICULAR PURPOSE ARE DISCLAIMED.
IN NO EVENT SHALL THE FOUNDATION
OR CONTRIBUTORS BE LIABLE FOR ANY
DIRECT, INDIRECT, INCIDENTAL, SPECIAL,
EXEMPLARY, OR CONSEQUENTIAL
DAMAGES (INCLUDING, BUT NOT LIMITED
TO, PROCUREMENT OF SUBSTITUTE GOODS
OR SERVICES; LOSS OF USE, DATA, OR
PROFITS; OR BUSINESS INTERRUPTION)
HOWEVER CAUSED AND ON ANY THEORY
OF LIABILITY, WHETHER IN CONTRACT,
STRICT LIABILITY, OR TORT (INCLUDING
NEGLIGENCE OR OTHERWISE) ARISING
IN ANY WAY OUT OF THE USE OF THIS
SOFTWARE, EVEN IF ADVISED OF THE
POSSIBILITY OF SUCH DAMAGE.
El software Spotify está sujeto a las licencias
de terceros que se pueden consultar en la
siguiente página:
www.spotify.com/connect/third-party-licenses
Español
(97)
17
Page 98

Especificaciones
■
GENERAL
Suministro de energía
Consumo de energía
Consumo de energía
en modo de espera
(con el modo de espera
de la red desactivado)
Consumo de energía
en modo de espera
(con el modo de espera
de la red activado con
LAN inalámbrica)
Consumo de energía
en modo de espera
(con el modo de espera
de la red activado con
LAN con cable)
Dimensiones
(An×Al×Prof)
Peso Aproximadamente 5,9 kg
Gama de temperaturas
de funcionamiento
Gama de humedades
de funcionamiento
■
SECCIÓN DEL AMPLIFICADOR
Potencia de salida
■
SECCIÓN DE ALTAVOCES
Altavoz frontal (I/C/D)
Tipo
Woofer
Tweeter
CA 220 V a 240 V,
50/60 Hz
42 W
0,2 W
2,0 W
2,0 W
375 mm × 220 mm ×
197 mm
0 °C a +40 °C
35 % a 80 % RH
(sin condensación)
Altavoz frontal (I/D):
20 W + 20 W
(1 kHz, distorsión armónica
total del 1,0 %, 8 y filtro
de paso bajo de 20 kHz)
Altavoz frontal (centro):
20 W
(1 kHz, distorsión armónica
total del 1,0 %, 8 y filtro
de paso bajo de 20 kHz)
Subwoofer:
40 W
(100 Hz, distorsión
armónica total del 1,0 %,
4 y filtro de paso bajo
de 20 kHz)
Bidireccional, 2 altavoces
(cerrado)
6,5 cm × 1/ch, de tipo cono
1,6 cm × 1/ch, de tipo cúpula
■
SECCIÓN DE Bluetooth
Especificaciones del
sistema Bluetooth
Clasificación del
equipo inalámbrico
Archivos admitidos A2DP y AVRCP
Códec admitido AAC y SBC
Banda de frecuencia
Distancia de
operación
1: Distancia de comunicación prospectiva
*
Entorno de medición:
25 °C de temperatura/1,0 m de altura
Medición en “Mode1”
■
SECCIÓN TERMINAL
USB
Capacidad de
la memoria de
soporte
Número máximo
de carpetas
(álbumes)
Número máximo
de archivos
(canciones)
Interfaz de Ethernet
Entrada AUX Clavija estéreo, 3,5 mm
Entrada digital
Formato admitido LPCM
■
SECCIÓN DE Wi-Fi
Norma IEEE802.11a/b/g/n/ac
Banda de
frecuencia
Seguridad
Versión WPS Versión 2.0
• La función WLAN de este producto se utilizará
exclusivamente dentro de edificios.
®
®
Bluetooth® Ver.4.2
Clase 2 (2,5 mW)
2,4 GHz banda FH-SS
Aproximadamente 10 m de
distancia de la línea de visión
Conector de tipo A
USB 2.0 de alta velocidad
CC 5 V 500 mA
Clase de almacenamiento
masivo USB
Sistema de archivo:
FAT16, FAT32, NTFS
2 TB (máx)
800
8000
LAN (100BASE-TX/10BASE-T)
Entrada digital óptica
(terminal óptico)
Banda de 2,4 GHz
Banda de 5 GHz
WPA2™ y modo combinado
WPA2™/WPA™
1
*
Subwoofer
Tipo
Subwoofer 12 cm × 1, de tipo cono
(98)
18
Unidireccional, 1 altavoz
(reflexión de graves)
Page 99

■
Formato de archivo
Este aparato es compatible con los siguientes formatos de archivo.
• Este aparato no soporta la reproducción de archivos de música protegidos contra copia.
• No está garantizada la reproducción de todos los archivos en los formatos compatibles con este aparato.
• La reproducción de un archivo en un formato no compatible con este aparato podría producir un audio
disparejo o ruido. En ese caso, compruebe si este aparato es compatible con el formato del archivo.
• Este aparato no soporta reproducción VBR (Variable Bit Rate).
• Algunos de los dispositivos o servidores conectados podrían convertir los archivos de formatos no
compatibles con este aparato y reproducirlos. Para obtener más información, consulte las instrucciones de
funcionamiento de sus dispositivos o servidores.
• La información de archivo (frecuencia de muestreo, etc.) mostrada por este aparato y por el software de
reproducción puede diferir.
Entrada digital óptica
Velocidad de
Formato admitido Frecuencia de muestreo
LPCM 32/44,1/48/88,2/96 kHz 16/24 bits
USB-A
Formato de
archivo
MP3 .mp3 32/44,1/48 kHz 16 a 320 kbps
AAC .m4a/.aac 32/44,1/48/88,2/96 kHz 16 a 320 kbps
WAV .wav 32/44,1/48/88,2/96/176,4/192/352,8/384 kHz 16/24/32 bits
FLAC .flac 32/44,1/48/88,2/96/176,4/192/352,8/384 kHz 16/24 bits
AIFF .aiff 32/44,1/48/88,2/96/176,4/192/352,8/384 kHz 16/24/32 bits
ALAC .m4a 32/44,1/48/88,2/96/176,4/192/352,8/384 kHz 16/24 bits
DSD .dff/.dsf 2,8/5,6/11,2 MHz
Extensión Frecuencia de muestreo
transferencia de bits/
Número de bits de
cuantificación
Velocidad de
transferencia de bits/
Número de bits de
cuantificación
LAN (DMR)
Formato de
archivo
MP3 .mp3 32/44,1/48 kHz 16 a 320 kbps
AAC .m4a/.aac 32/44,1/48/88,2/96 kHz 16 a 320 kbps
WAV .wav 32/44,1/48/88,2/96/176,4/192/352,8/384 kHz 16/24/32 bits
FLAC .flac 32/44,1/48/88,2/96/176,4/192/352,8/384 kHz 16/24 bits
AIFF .aiff 32/44,1/48/88,2/96/176,4/192/352,8/384 kHz 16/24/32 bits
ALAC .m4a 32/44,1/48/88,2/96/176,4/192/352,8/384 kHz 16/24 bits
DSD .dff/.dsf 2,8/5,6/11,2 MHz
: Que un archivo de música pueda reproducirse o no en su red lo determina el servidor de red, aunque el
*
formato del archivo esté en la lista anterior. Por ejemplo, si está usando Windows Media Player 11, no
todos los archivos de música en el PC son reproducibles. Puede reproducir solo los añadidos a la biblioteca
de Windows Media Player 11.
Nota
• Las especificaciones están sujetas a cambios sin previo aviso.
• El peso y las dimensiones son aproximadas.
*
Extensión Frecuencia de muestreo
Velocidad de
transferencia de bits/
Número de bits de
cuantificación
(99)
Español
19
Page 100

Tack för ditt val av denna produkt.
Läs igenom de här anvisningarna noggrant innan du använder produkten och spara bruksanvisningen för
framtida bruk.
• Om beskrivningarna i bruksanvisningen
- Sidor som hänvisas till anges som “ ○○”.
- Bilderna som visas kan skilja sig från din enhet.
• Mer detaljerade driftsinstruktioner finns i “Bruksanvisning” (PDF-format). Hämta den från
webbplatsen för att läsa den.
www.technics.com/support/
• Du behöver Adobe Reader för att söka eller skriva ut “Bruksanvisning” (PDF-format). Du
kan hämta och installera en version av Adobe Reader som du kan använda med ditt OS
från följande webbplats.
http://www.adobe.com/products/acrobat/readstep2.html
Innehållsförteckning
Säkerhetsföreskrifter 05
Installation 07
Referensguide för fjärrkontrollen 08
Anslutningar 09
Nätverksinställningar 10
Tillgängliga ingångskällor 14
Att använda Bluetooth
Grundläggande
Strömma musik över nätverket 16
®
15
Licenser 17
Specifikationer 18
Tillbehör
Nätkabel (2)
För Storbritannien och Irland
K2CT3DR00009
För Kontinentaleuropa
K2CMZDR00001
• Smartphonen på omslaget medföljer inte denna enhet.
• De produktnummer som anges i dessa användarinstruktioner är korrekta i juli 2018.
• Numren kan komma att ändras.
• Använd inte nätkabeln tillsammans med annan utrustning.
(100)
04
 Loading...