

Page 1

ABS Molded Powered Speaker
QUESTIONS / COMMENTS CALL 888-842-6277
or email info@tpro.com
User Manual
MODEL: PW1610PKG
Page 2

P-1
PW1610PKG
WARNING!
CAUTION: TO REDUCE THE RISK OF ELECTRIC SHOCK, DO NOT REMOVE THE COVER ON THIS SPEAKER. THERE ARE NO USER-
SERVICEABLE PARTS INSIDE. REFER ALL SERVICING TO A QUALIFIED TECHNICIAN
The lightning flash with arrowhead symbol within an equilateral triangle is intended to alert the user to the presence of "dangerous"
voltage within the product's enclosure that may be of sufficient magnitude to constitute a risk of electric shock to humans. Users
should exhibit extra safety when this symbol appears in this instruction manual and follow all precautions as they are stated.
The exclamation point within an equilateral triangle is intended to alert the user to the presence of important operating and
maintenance (servicing) instructions in this manual.
1- Read these instructions thoroughly before using this item.
2- Keep these instructions for future reference.
3- Heed all warnings.
4- Follow all instructions.
5- WARNING: To prevent fire or electric shock, do not expose this equipment to rain or moisture. Do not store or operate this
product near any liquids.
6- Clean only with a dry cloth.
7- Do not store or operate this product near any heat sources such as radiators, heat registers, stoves, or other apparatuses
(including amplifiers) that produce heat.
8- Do not defeat the safety purpose of the polarized or grounding-type plug. A polarized plug has two blades with one wider than the
other. A grounding plug has two blades and a round grounding prong. The wide blade or third prong is provided for your safety. If
the provided plug does not fit your outlet, consult an electrician for the replacement of the obsolete outlet.
9- Protect the all wires connected to this unit from being walked on or pinched, particularly plugs and the point where they exit from
the unit. When removing the cord from the power outlet, remove it by holding the plug not by pulling the cord.
10- Unplug the unit during lightning storms or when unused for long periods of time.
11- When wiring this unit and all other equipment used in connection to this unit make sure that all of your equipment is turned OFF.
12- Once installation and wiring is complete power on all your equipment with the volume and level controls turned DOWN. Once all
the equipment is ON slowly raise the volume or level controls to their proper positions.
13- When grounding this unit, be sure to do so correctly, so as not to defeat the built-in grounding in this unit.
14- Before placing, installing, rigging, or suspending any product, inspect all hardware, suspension, cabinets, transducers, brackets
and associated equipment for damage. Any missing, corroded, deformed, or non-load rated component could significantly reduce
the strength of the installation, placement or array. Any such condition severely reduces the safety of the installation and should be
immediately corrected. Use only hardware which is rated for the loading conditions of the installation and any possible short-term,
unexpected overloading. Never exceed the rating of the hardware or equipment.
15- Consult a licensed, Professional Engineer regarding physical equipment installation. Ensure that all local, state and national
regulations regarding the safety and operation of equipment are understood and adhered to.
16- Refer all servicing to qualified service personnel. Servicing is required when the apparatus has been damaged in any way, such
as power supply cord or plug is damaged, liquid has been spilled or objects have fallen into the apparatus, the apparatus has been
exposed to rain or moisture, does not operate normally, or has been dropped.
Introduction
Congratulations and thank you for your purchase of this Technical Pro professional powered speaker system. To get the most
from your speakers, it is recommended that you review all of the information provided in this instruction manual before
operating this equipment.
If you've spent any time at all in professional audio, you know the name Technical Pro and what it stands for — incredible
performance & sound, and the ultimate in reliability under harsh conditions. And now, Technical Pro offers the same
technology in a series of powered loudspeaker systems bringing more of what sets Technical Pro apart from all others.
Page 3
P-2
PW1610PKG
Use with 6-8 Ohm ONLY
PW1610PKG
ON
OFF
ON & Flashing
LED Woofer
Rear Panel:
Page 4

P-3
PW1610PKG
PW1610PKG
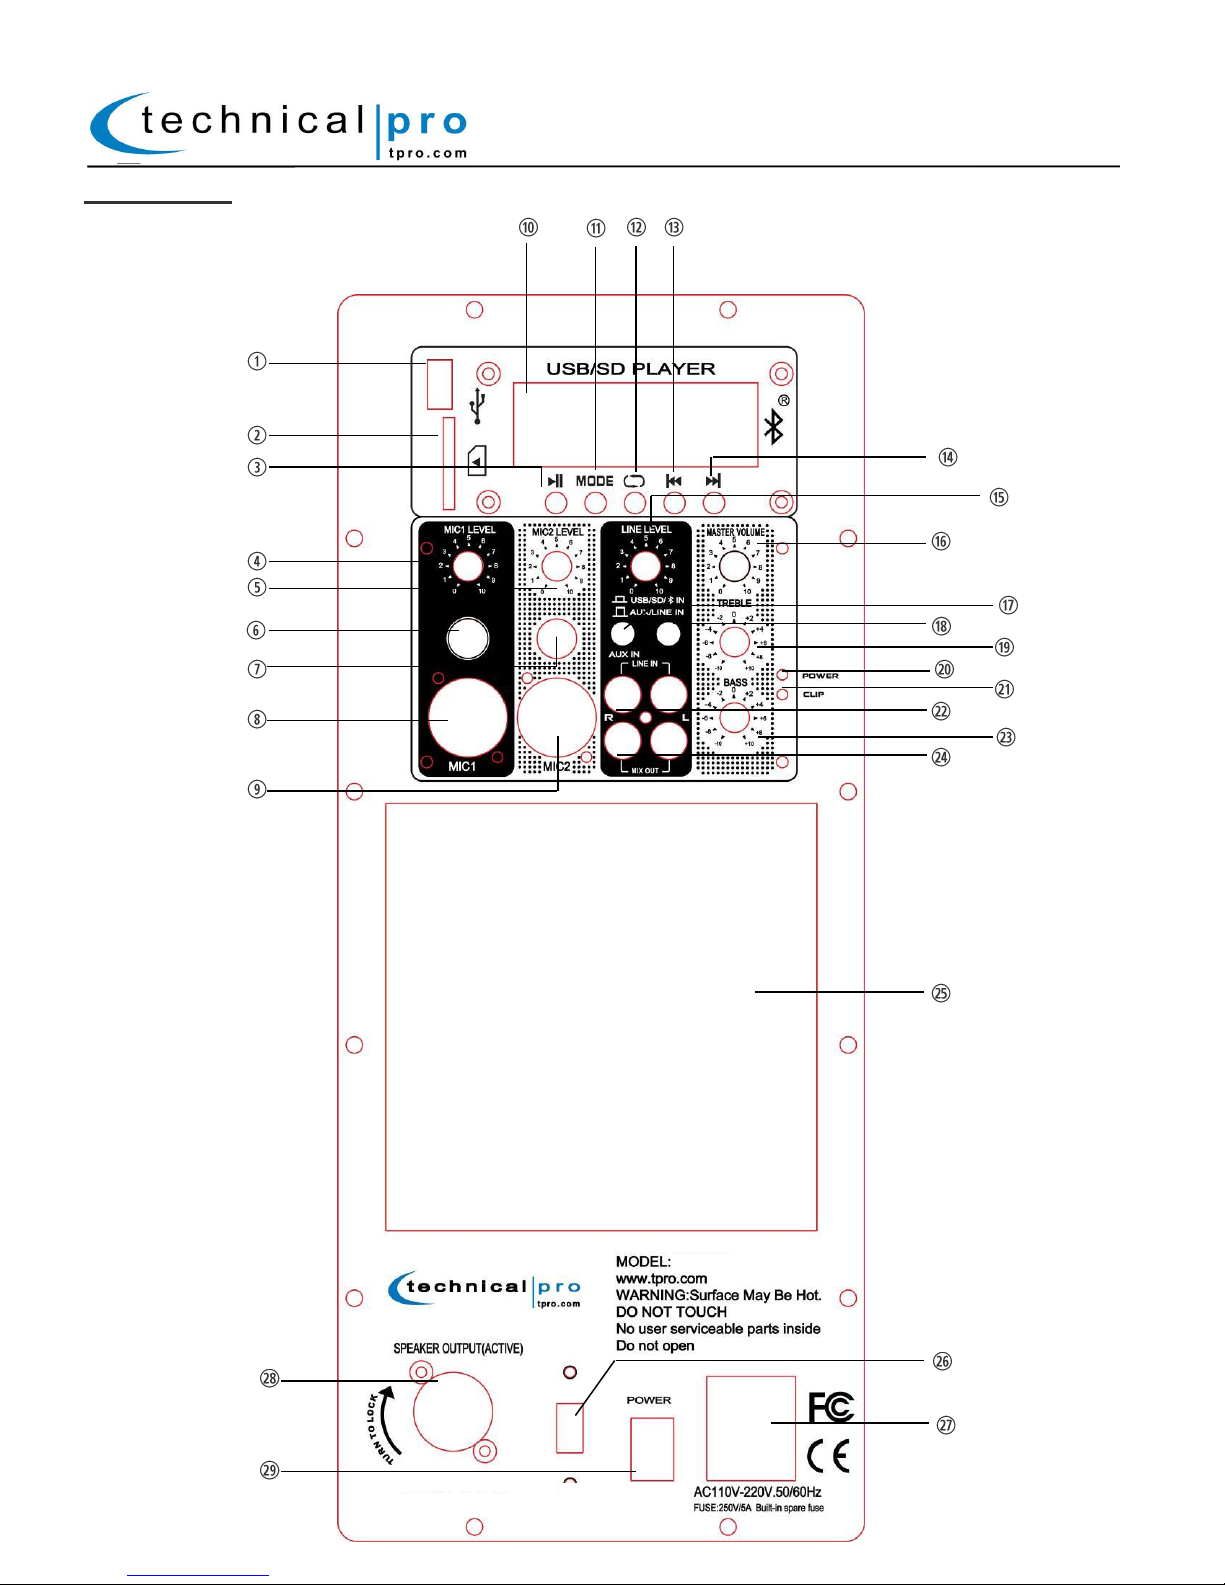
1. USB Flash Drive Input: Insert your USB flash drive into this slot. The unit will only read .mp3, .wma files
from the USB flash drive. The maximum storage size of the USB flash drive cannot exceed 32GB. Do not
attempt to connect a computer to the USB input as the speaker will not be able to connect to a computer.
2. SD Input: Insert your SD Card into this slot. The unit will only read .mp3, .wma files from the SD Card.
The maximum storage size of the SD Card cannot exceed 32GB.
3. Play/Pause: Press this button to pause the signal from the USB flash drive, SD Card or Bluetooth Inputs.
4. Microphone1 Volume Knob: Use this knob to adjust the microphone volume levels for the microphones
connected to the MIC1 Inputs.
5. Microphone2 Volume Knob: Use this knob to adjust the microphone volume levels for the microphones
connected to the MIC2 Inputs.
6. ¼” Microphone1 Input
7. ¼” Microphone2 Input
8. XLR Microphone1 Input
9. XLR Microphone2 Input
10. USB / SD Display Screen: The elapsed time and format will appear on this display screen for the USB /
SD Card inputs.
11. Mode Selector: Press this button to switch between USB, SD and Bluetooth Inputs.
12. Repeat Selector: Press the REPEAT Track button to switch between repeating the CURRENT track (R1),
repeating ALL tracks (RA) and turning the repeat function OFF (RO).
13. Previous Track / Volume - : When in USB / SD Card & Bluetooth Mode, press this button to go to the
previous track. Press and hold this button to decrease the volume on the USB/SD input.
14. Next Track / Volume + : When in USB / SD Card & Bluetooth Mode, press this button to go to the next
track. Press and hold this button to increase the volume on the USB/SD input.
15. Line Level Volume Knob: Use this knob to adjust the volume of any line level input (USB, SD,
Bluetooth, AUX or RCA).
16. Master Volume Knob: Use this knob to adjust the volume of all Line and microphone inputs.
17. AUX Input: Connect your MP3 player here using the 1/8” input. Be sure the Input selector button (18) is
set to AUX/LINE IN when using this unit.
18. Input Selector Button: Press this button to set the input to AUX/LINE IN or USB/SD/Bluetooth.
19. Treble Knob: Use this knob to adjust the treble levels.
20. Power LED Indicator: The Power LED will illuminate Blue when the unit has successfully powered on. If
the Power LED fails to light up when the unit is powered on and the does not respond to the power being
turned on the unit’s fuse as probably blown. For fuse replacement instructions contact Technical Pro via
the contact information on the front cover of this manual.
21. Clipping LED Indicator: The Clipping indicator will illuminate when the unit is clipping. You might also
hear the sound cut in and out indicating that the volume levels might be set too high. It is normal for the
clipping indicator to light up occasionally, however if the unit is constantly lighting up the volume levels
should be lowered to a proper setting.
22. RCA Line Input: Connect your sound source to this RCA input. The line volume will be controlled by
the line level (15) and master volume knob (16). Only passive signals should be connected to this input.
23. Bass Knob: Use this knob to adjust the bass levels.
24. RCA MIX Output: This output will pass through a passive signal of all the inputs (MIC1, MIC2, AUX,
LINE, USB, SD & Bluetooth) to another device. This signal will not have power and would need to be
amplified so that it can produce a sound. (See Page 12 for more information).
25. Heat Sink: Caution. The heat sink will get hot during usage. Do not touch.
26. Voltage Selector: The voltage selector will display the voltage the unit is set to. When using in the USA
the voltage should be set to 110-115V.
27. Power Supply: Connect the power cord here. The power button (29) should be set to the off position
before the power supply is connected.
28. Powered Speakon Output: Connect the speakon output on to the input on a passive speaker. Insert the
speakon connector and turn clockwise to lock into place. Only connect to a 6-8 ohm passive speaker.
29. Power Switch: Before the unit is powered on, all of the level controls should be turned down all the
way. Once powered on, slowly begin to raise the levels of the inputs. This will prevent damaging both the
speakers and the mixer. Set the switch of On & Flashing to power on the speaker and LED woofer.
Page 5
P-4
PW1610PKG
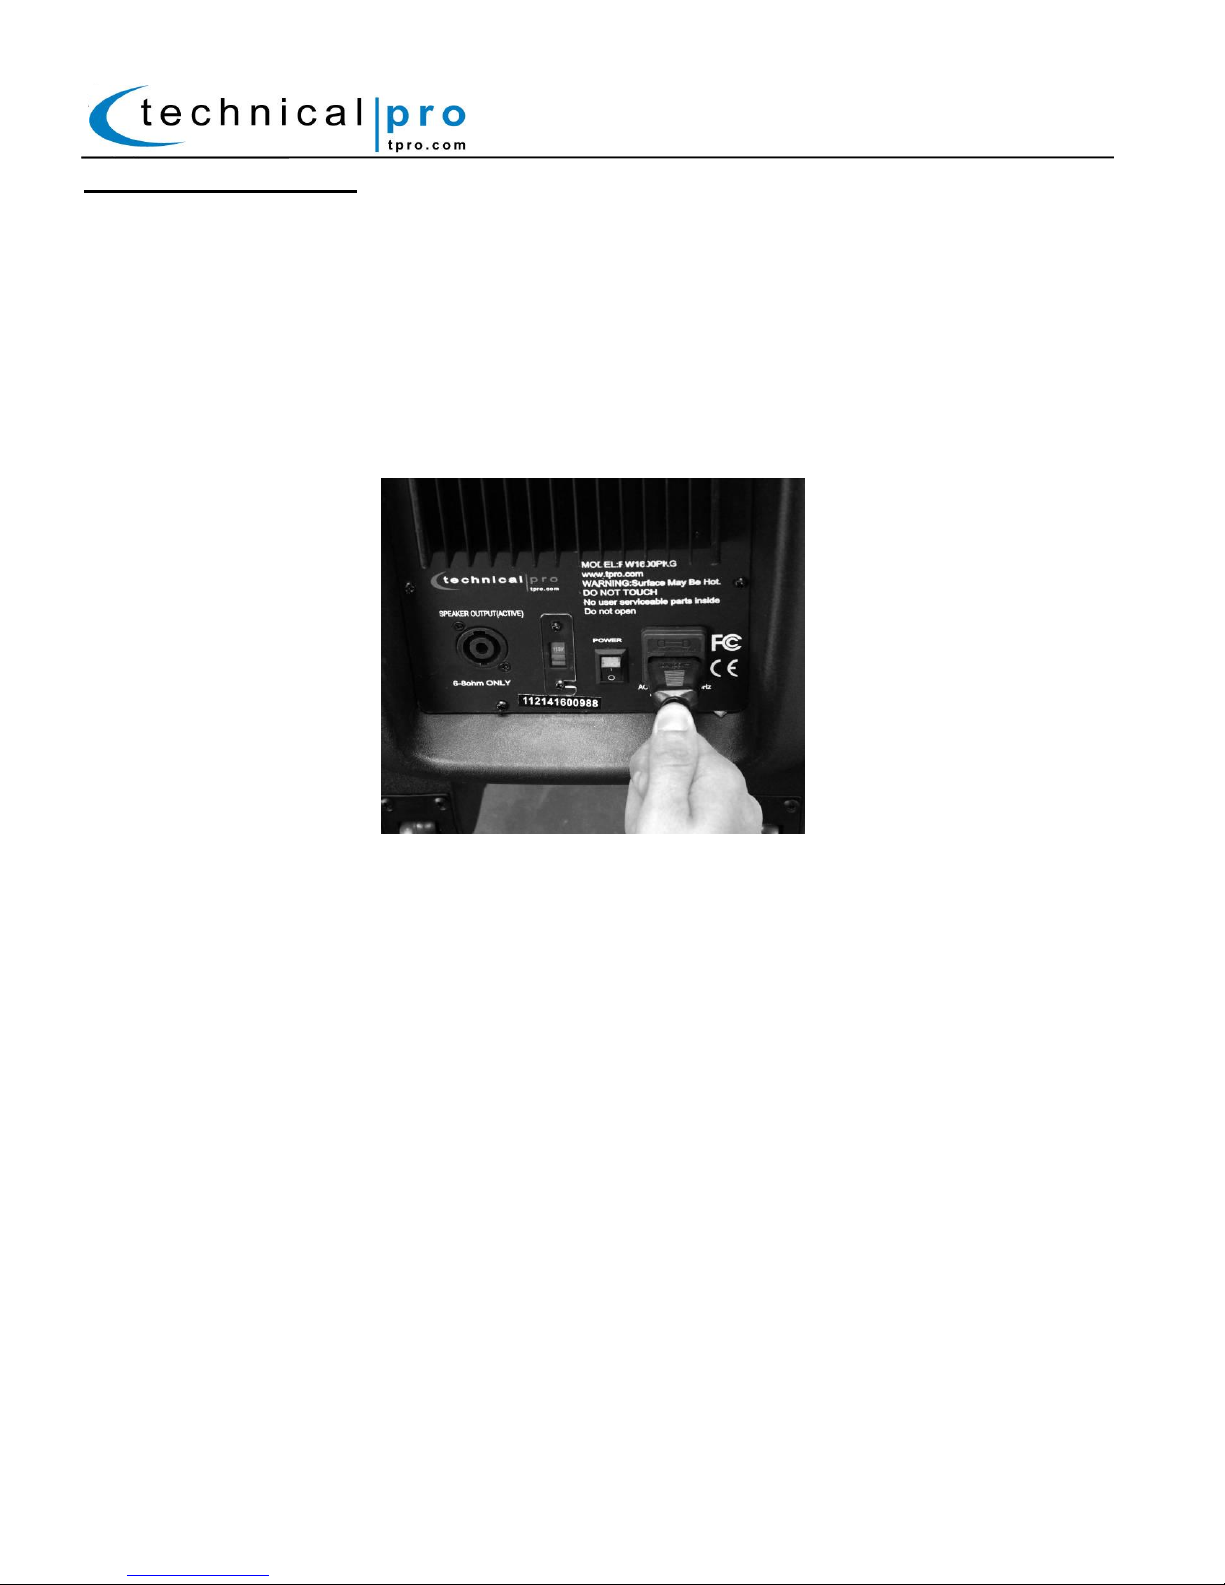
Power Cord Connection
The PW1610PKG is a powered speaker which means it has the built in amplifier. The PW1610PKG’s speakon
output allows you to connect a passive speaker directly to the PW1610PKG and receive its power from there.
To connect the power cord to the powered speaker simply plug female side of the power cord into the power cord
input which is on the rear of the unit. Then plug the male side of the power cord to an electric outlet. The AC power
cords supplied purposefully have 2 blades and one grounding prong.
If your outlet is not equipped to handle this type of plug, do not attempt to forcefully plug this AC power cord into the
outlet, and do not alter the plug so that it can fit in the outlet. The only course of action you can take is to find
another outlet which is properly equipped to handle a grounded plug or have an electrician upgrade your electrical
outlet. Be sure that the plug is well connected so that it does not disconnect in the middle of usage. If at any point in
time the supplied AC power cord is punctured or damaged replace it with a new power cord from a local electrician.
NOTE:
-ONLY PLUG IN THE AC POWER CORD WHILE THE UNIT’S POWER IS OFF AND THE VOLUME IS
TURNED DOWN.
-TURNING ON THE UNIT WITH THE VOLUME TURNED UP MAY CAUSE THE UNIT OR ANY
SPEAKERS CONNECTED TO IT TO BE DAMAGED.
-ALWAYS TURN DOWN THE VOLUME PRIOR TO TURNING OFF THE UNIT.
Page 6

P-5
PW1610PKG
Picture above shows 1/8” cable connecting to
the AUX IN
Picture above shows a RCA cable connecting
to the LINE IN (TOP).
Audio Input Connections
LINE RCA (Red and White) & 1/8” Inputs
Connecting a Signal Source (DVD / MIXER / MP3)
The speaker has RCA & 1/8” (AUX) input jacks on the rear of the unit which is designed to receive the signal
directly from your CD, mixer, MP3 player or any of your other audio sources. To ensure that you have correctly
connected your CD player (other sound sources) to the unit, make sure that the CD player has a cable coming from
its output and that this cable is plugged into the RCA / 1/8” Input on the rear of the speaker.
The Input selector (18) should be set to the AUX / LINE IN when using the RCA or 1/8” inputs.
When the Line Input selector is set to AUX / LINE IN the LCD Screen will NOT light up. This is normal.
Only the power indicator will light up.
NOTE: BE SURE NOT TO CONNECT AN AMPLIFIER OR ANY AMPLIFIER SIGNAL INTO THE RCA INPUT
JACK. AS THIS COULD DAMAGE THE SPEAKER. NO OTHER AMPLIFIER IS NEEDED TO POWER YOUR
SIGNAL IN ADDITION TO THE SPEAKER. ALWAYS MAKE SURE THAT THERE IS ONLY ONE AMPLIFIER IN
THE SIGNAL PATH.
Set the Input selector button to Aux / Line IN
When using the 1/8” or RCA LINE IN.
Page 7

P-6
PW1610PKG
Set the Input selector button to USB / SD
/ Bluetooth IN when using these inputs
Insert USB Flash Drive
(32GB max)
Insert SD Card
(32GB max)
OR
Press the MODE Selector (11) to switch
between the USB, SD and Bluetooth Inputs.
If the Display shows “Bluetooth NOLINK”
Press the Play button to begin
playing audio from the USB / SD Input
Connecting USB Flash Drive & SD Card Inputs
There are input jacks for a USB flash drive and SD card on the rear panel of the speaker. Simply connect the USB
flash drive or SD card into their respective input jacks and use the input mode selector button and Mode button to
choose the corresponding input. Be sure that the volume knobs on the powered speaker are turned down at first
and then slowly raise the volume to prevent damage the speakers or any of your other equipment.
DO NOT ATTEMPT TO CONNECT THE USB INPUT TO A SMART PHONE, COMPUTER OR LAPTOP.
The Input selector (18) should be set to the USB / SD / BLUETOOTH IN when using those inputs.
When using the USB / SD inputs the LCD Screen will light up and display information such as the track
number, track title, elapsed time and Repeat mode.
Page 8

P-7
PW1610PKG
Set the Input selector button (18)
to USB / SD / Bluetooth IN when
using these inputs
Press the MODE button (11) to
switch between the USB, SD
and Bluetooth Inputs.
If a Bluetooth device is not connected
to the speaker the unit will display
“Bluetooth NOLINK”
If a Bluetooth device has successfully
connected to the speaker the unit will
display “Bluetooth PAUSE”
Press PLAY on either the rear panel
or Bluetooth device to play the audio
Connecting a Compatible Device
The PW1610PKG is Bluetooth compatible. To connect a Bluetooth device (ie smart phone) to the speaker follow the
steps listed below.
Be sure that the volume knobs on the powered speaker are turned down at first and then slowly raise the volume to
prevent damage the speakers or any of your other equipment.
The Line Input selector (15) should be set to the USB / SD / BLUETOOTH IN when using those inputs.
When a Bluetooth device has successfully paired with the PW1610PKG the LCD Screen will light up and
display “Bluetooth PLAY” or “Bluetooth Pause”
At this point you can attempt to connect a Bluetooth device to the speaker.
Open the Bluetooth connections on your Bluetooth device and search for Bluetooth Devices.
Locate “TP-PW1610” and connect to this device. If required, enter password 0000 (4 zeroes).
If you have successfully paired to the speaker the display screen will show “Bluetooth PAUSE”
Once a device has been paired with the unit it will disconnect once it outside of the range of the speaker (about 30
feet.) the device will automatically re-connect with the speaker once it is within range again when the unit is in
Bluetooth mode unless another device has already been connected to the speaker.
Page 9

P-8
PW1610PKG
Press and hold down the Previous
Track button to reduce the volume
of the USB, SD & Bluetooth inputs
Press and hold down the Next Track
button to increase the volume of the
USB, SD & Bluetooth inputs
Use the Line Level knob to increase
or decrease the volume of the all of the
Stereo inputs (AUX, LINE, USB, SD &
Bluetooth)
Use the Master Volume knob to
increase or decrease the volume of all
the inputs (MIC1, MIC2, AUX, LINE,
USB, SD & Bluetooth)
Playing Audio from the USB /SD / Inputs
After following the steps above to connect a USB / SD / Bluetooth see the details below for tips on using these
inputs.
Volume Control:
The first volume control is the previous / next track number. Press and hold the previous or next track buttons to
either decrease or increase the volume. This will only affect the volume on the USB, SD & Bluetooth inputs.
The second volume control is the Line Level knob.
The third volume control is the Master Volume knob.
Page 10

P-9
PW1610PKG
Press the Previous Track button to
move to the previous track when using
the USB, SD & Bluetooth inputs
Press the Next Track button to move
to the next track when using the USB,
SD & Bluetooth inputs
Press the REPEAT Track button to switch between
repeating the CURRENT track (R1), repeating ALL tracks
(RA) and turning the repeat function OFF (RO).
Playing Audio from the USB /SD / Bluetooth Inputs
When playing audio from the USB / SD / Bluetooth inputs press use the play/pause, previous and next track buttons
to control the audio. When using the Bluetooth inputs you will also be able to control these features from the
Bluetooth device.
The Repeat Feature is limited to the USB /SD Card inputs. Press the Repeat button to switch between repeating the
CURRENT track (R1), repeating ALL tracks (RA) and turning the repeat function OFF (RO).
Page 11

P-10
PW1610PKG
On the rear of the powered speaker insert the speakon
cable into the speaker output. The speakon connector has
2 cut-outs, a wide one and a narrow one. These must
match the cutouts on the speakon input.
Once the speakon cable has been installed, turn the
cable clockwise to lock it into place. Once locked into
place the metal portion of the cable will be in the
center position.
The image above shows the speakon cable properly installed
into the speakon connector.
As shown above, the metal portion of the connector has been
turned and is now in the center position.
Connecting the PW1610PKG to a Passive Speaker Using the Speakon Output
The PW1610PKG comes with a powered speakon output which will provide the power to produce sound from both
the powered and passive speakers. Using the speakon speaker cable connect the Speaker OUTPUT on the
powered speaker to the Input on the passive speaker.
NOTE: When making this connection the powered speaker should be powered OFF and the volume knobs
should be turned down. After the connection is completed the powered speaker can be turned on. Once the
audio begins to play the volume can slowly be raised.
After inserting the speakon cable turn the connector to the right so the lock it into place. The metal portion of the
cable should be in the center position when the cable is properly in place.
Once the speakon cable has been connected to the PW1610PKG speaker, follow the same steps listed above and
connect the cable to the INPUT on the passive speaker.
Page 12

P-11
PW1610PKG
To disconnect the speaker cable, while pulling on the metal tab
turn the connector to the left (counter-clockwise) and pull out
the connector.
The MIX OUTPUT will pass through a passive signal of all
the inputs (MIC1, MIC2, AUX, LINE, USB, SD & Bluetooth)
to another device.
Disconnecting the Speakon Cable
When the speakon cable is properly installed it will be locked into place.
To disconnect the speakon cable from the speakers pull on the metal portion of the connector to unlock the
connector, and while pulling this metal piece turn the connector to left (counter-clockwise).
Connecting the RCA MIX Output
The RCA MIX output is designed to pass through the input signals to another powered speaker, amplifier or
recording device.
This a passive signal, therefore it must be connected to an amplifier so that it can properly reproduce sound.
Connect the RCA MIX OUTPUT to the line input on another powered speaker, amplifier or recording device. This
will allow you to transfer the audio to another device.
NOTE: WHEN MAKING THESE CONNECTIONS THE POWER OF THE SPEAKER AND THE SIGNAL SOURCE
SHOULD ALL BE IN THE OFF POSITION WITH THE VOLUME LEVELS TURNED DOWN. ONCE THE UNITS
ARE ALL POWERED ON, SLOWLY INCREASE THE VOLUME TO AVOID DAMAGING ANY OF YOUR
EQUIPMENT.
Page 13

P-12
PW1610PKG
The remote sensor is located only the front on the
PW1610PKG. Point the remote directly at this sensor.
USB / SD Remote Control:
1. Standby Button: Press this button to enter into standby mode.
2. Stop: Press this button to stop play back on the USB / SD Card inputs.
3. Mode Selector: Press this button to switch between USB and SD Card mode.
4. Previous Track: When in USB/SD Card Mode, press this button to go to the previous track.
5. Volume – Control: Press this button to decrease the volume
6. Volume + Control: Press this button to increase the volume
7. Track Selector Keys: The number keys are used to input the track number when using the USB / SD
Card inputs. For example if you press 6-4-3, the unit will go to track number 643 on either the USB flash
drive or SD Card.
8. Play/Pause: Press this button to pause the signal from the USB flash drive, SD Card inputs
9. Next Track: When in USB/SD Card Mode, press this button to go to the next track.
10. Preset Equalizer Selector: Press this button to switch between the preset equalization modes. This
function will only work with USB / SD Card inputs.
11. Repeat Mode Selector: Press this button to choose the repeating mode. Repeat current track (R1),
Repeat ALL tracks (RA) and Repeat off (RO).
12. Mute
Remote Sensor:
Page 14

P-13
Top tightening knob is shown here.
Never adjust tripod knobs or metal rod while a speaker
is mounted on the tripod
PW1610PKG
Insert the metal rod at the desired height.
Make sure the metal rod is installed correctly by
checking that it has been inserted all the way
through the tripod.
Once complete tighten the top.
Setting Up the Tripod:
When opening the tripod, pull the three legs apart to properly stand the tripod. It is recommended the tripod is
opened to the maximum angle. Once the tripod is opened turn the BOTTOM tightening knob to lock the angle into
place. (When closing the tripod this knob will need to be loosen first).
To set the height of the tripod loosen the TOP tightening knob and allow the tripod tube to move up or down to the
desired position and insert the metal rod. Then tighten the knob once again.
Page 15

P-14
SYMPTOM
POSSIBLE CAUSES
REMEDIES
No Power
The power cord is not plugged in
The power switch is set to the OFF
position
The fuse has blown
Plug the power cord into an outlet
Set the main power to the ON
position
Contact Technical for fuse
replacement instructions
No sound
The line or master volume controls are
set to the zero position
The input cables wires are not
connected securely
The input selector is set to the wrong
input
Turn the volume control in the
clockwise direction
Connect the wires securely
Switch the input selector to the
correct setting using the input &
mode selector buttons
No sound from the
wired microphone
The wired microphone is turned off
The wired mic is not plugged in
securely
The mic volume is set to zero
Turn the wireless mic ON
Securely plug in the wired mic
Increase the mic volume to the
desired level
Mic output is being
drowned out by the
music
The mic output volume is too low
relative to other inputs
Set mic priority to ON
Increase Mic volume relative to
master volume
USB input will not
function properly
A smartphone, laptop, computer or
hard drive is connected to the USB
input but the unit will not play
A USB flash drive is connected to the
USB input but it will not play because
the flash drive is larger than 32GB or
the files are not properly formatted
Only a USB flash drive (memory
stick) can be connected to the USB
input
The USB flash drive must be 32GB
or less and the files must be
formatted as .mp3 or .wma
Unit does not
respond when SD
Card is inserted
The unit is not recognizing the SD
Card
Power off the unit and then power it
back on again
Bluetooth mode will
not function properly
The unit will not enter into Bluetooth
mode
Switch the input selector to the
correct setting using the input &
mode selector buttons
Remote is not
functioning
The remote is not being pointed at the
remote sensor on the front of the unit
Point the remote at the remote sensor
on the front of the unit
PW1610PKG
Troubleshooting:
THIS DEVICE COMPLIES WITH PART 15 OF THE FCC RULES. OPERATION IS SUBJECT TO THE FOLLOWING TWO CONDITIONS: (1) THIS DEVICE MAY NOT CAUSE HARMFUL
INTERFERENCE AND (2) THIS DEVICE MUST ACCEPT ANY INTERFERENCE RECEIVED, INCLUDING INTERFERENCE THAT MAY CAUSE UNDESIRED OPERATION.
Federal Communications Commission Requirements: The equipment has been tested and found to comply with the limits for Class B Digital Device, pursuant to part 15 of the FCC Rules.
These limits are designed to provide reasonable protection against harmful interference in a residential installation. This equipment generates uses and can radiate radio frequency energy
and, if not installed and used in accordance with the instruction, may cause harmful interference to radio communication. However, there is no guarantee that interference will not occur in a
particular installation. If this equipment does cause harmful interference to radio or television reception, which can be determined by turning the equipment off and on, the user is encouraged to
try to correct the interference by one or more of the following measures:
●Increase the separation between the equipment and receiver.
●Connect the equipment into an outlet on a circuit different from that to which the receiver is connected.
●Consult the dealer or an experienced radio/TV technician for help.
THE CHANGES OR MODIFICATIONS NOT EXPRESSLY APPROVED BY THE PARTY RESPONSIBLE FOR COMPLIANCE COULD VOID THE USER’S AUTHORITY TO OPERATE THE
EQUIPMENT. FCC Radiation Exposure Statement The equipment complies with FCC radiation exposure limits set forth for uncontrolled equipment and meets the FCC radio frequency (RF)
Exposure Guidelines in Supplement C to OET65. The equipment has very low levels of RF energy that it is deemed to comply without testing of specific absorption ratio (SAR).
The Bluetooth word mark and logos are registered trademarks owned by SIG, Inc. and any use of such marks by Technical Pro is under license. Other trademarks and trade name are those of
their respective owners.
 Loading...