

Page 1
Technical Pro
User Manual for PSHAKE3000 Portable Speaker
QUESTIONS / COMMENTS CALL 888-842-6277 or email info@tpro.com
Page 2

WARNING!
CAUTION: TO REDUCE THE R ISK OF ELECTRIC SHOCK , DO NOT REMOVE THE COVER ON THIS SPEAKER.
THERE ARE NO USER-SERVICEABLE PARTS INSIDE. R EFER ALL SERVICING TO A QUALIFIED TECHNICIAN
The lightni ng flash with arrowhe ad symbol within an equ il ateral triangle is in tended to alert the use r to
the presence of dange rous voltage within t he product's enclos ure that may be of sufficient magnitud e to constitute
a risk of electric shoc k to humans.
Users should exhibi t extra safety when thi s symbol appears in thi s instruction manua l and follow all precau ti ons
as they are stated.
The exclama tion point within an eq uilateral triangl e is i ntended to alert th e us er to the presence of
important operati ng and maintenance (s ervicing) instruc tions in this manual.
1- Read these instruc tions.
2- Keep these instruc tions.
3- Heed all warnings.
4- Follow all instruc tions
5- WARN ING: To prevent fir e or electric shock, do n ot expose this equipm ent to rain or moisture . Do not store or
operate this produc t near any liquids.
6- Clean only with a dry cl oth.
7- Do not store or operat e this product near any h eat sources such as rad iators, heat regist ers, stoves, or other
apparatuses (incl uding amplifiers) t hat produce heat. Kee p this product in a well ve ntilated area.
8- Do not defeat the safe ty purpose of the polar ized or grounding-t ype plug. A polarized plu g has two blades with
one wider than the othe r. A gr ounding plug has two bl ades and a round ground in g prong. The wi de blade or third
prong is provided for y our safety. If t he provided plug does not f it your outlet, consu lt an electrician for t he
replacement of the ob solete outlet.
9- Protect all the wire s connected to this uni t from being walked on or p inched, particula rly plugs and the point
where they exit from th e unit. When removing t he cord from the power ou tlet, remove it by hold ing the plug, not
by pulling the cord.
10- Unplug the unit dur ing lightning storm s or when unused for long p eriods of time.
11- When wirin g th is unit and all other equ ipment used in connec tion to this unit make su re that all of your
equipment is turned O FF.
12- Once installati on and wiring is comple te power on all your equi pment with the volume a nd l evel
controls turned DOW N. Once all the equipme nt in ON slowly raise the v olume or level contro ls to their
proper positions.
13- Before Placing, I nstalling, riggin g, or suspending any pr oduct, inspect all ha rdware, suspensio n, c abinets,
transducers, brac kets and associate eq uipment for damage. An y missing, corroded , deformed, or non-lo ad
rated component cou ld significantly re duce the strength of th e installation, pla cement or array. An y such
condition severel y reduces the safety of t he installation and s hould be immediatel y corrected. Use only
hardware which is rat ed for the loading cond itions of the install ation and any possibl e sh ort-term, unexp ec ted
overloading, Neve r exceed the rating of th e hardware or equipme nt.
14- Consult a license d, Professional Eng ineer regarding phy sical equipment ins ta llation, Ensure tha t all local,
state and national re gulations regardi ng the safety and opera tion of equipment are u nderstood and adher ed t o.
15- Refer all servici ng to qualified servi ce personnel. Servi cing is required when t he a pparatus has been dam aged
in any way, such a s power supply cord or pl ug i s damaged, liquid has b een spilled or object s have fallen into the
apparatus, the appa ratus has been expose d to rain or moisture, do es not operate normal ly, or has been drop ped.
Introduction
Congratulations a nd thank you for your pur chase of this Tec hn ical Pro Powered PA System
with wireless handh eld microphone, USB & S D Card inputs. To get t he most from your syste m, we recommend
you review all the info rmation provided in t his instruction Man ual.
You will see it on pa ge 2 ( rear board)
- 1-
Page 3
PSHAKE3000
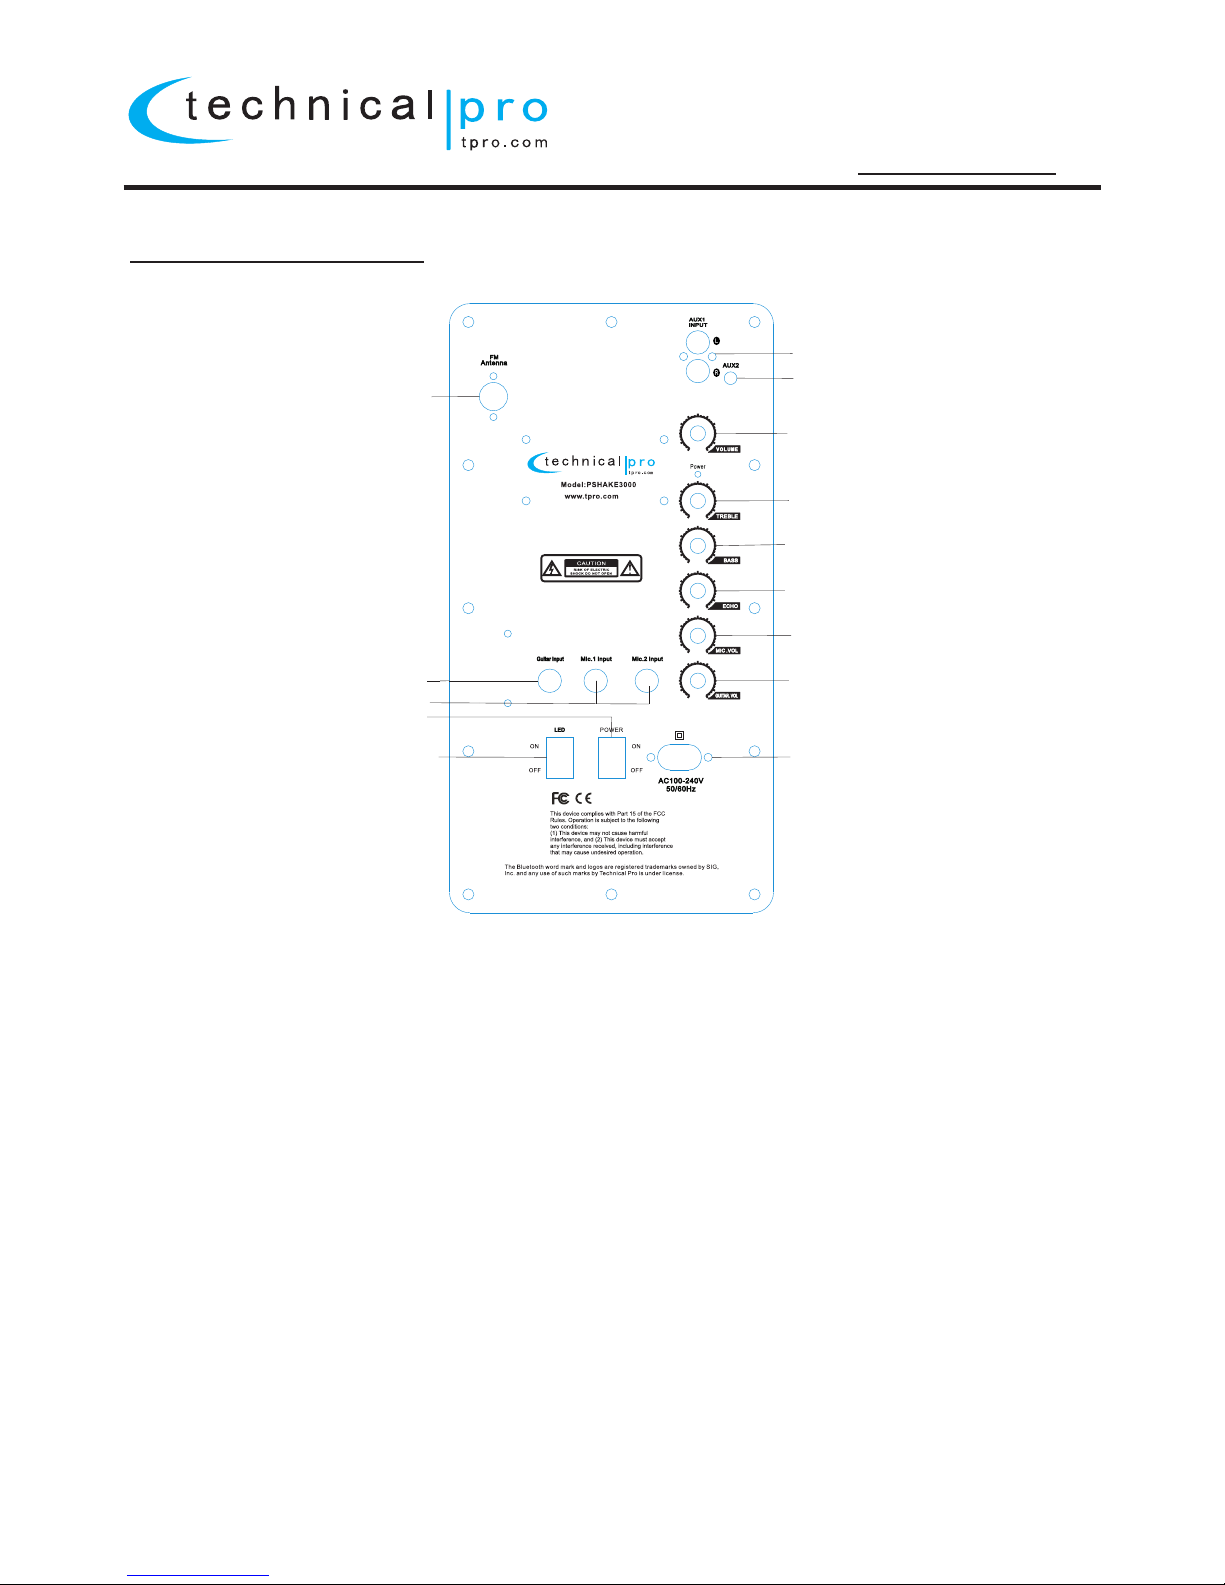
PSHAKE3000 REAR PANEL
1.FM Antenna.
2.AUX1 Input (RCA): Connect any stereo signal output from a DVD, CD, TAPE,
Mixer etc to this input.
3. AUX2 Input (1/8"): Connect your MP3 player or computer here.
4. Master Volume: Use this knob to adjust the master volume output.
5.TREBLE: Use this knob to increase or decrease the treble effects on the main output.
6.BASS: Use this knob to increase or decrease the bass effects on the main output.
7.Microphone Echo: Use this knob to adjust the microphone's echo.
8.Microphone Volume: Use this knob to adjust the volume of the microphones.
9.Guitar Volume: Use this knob to adjust the volume of the guitar.
10.Power Supply: Only use the power cord provided with the unit to power the unit.
When connecting and disconnecting the power cord, be sure the power of the unit is
off. Connect the cord to the rear of the unit and then connect it to the outlet.
11.Power:Press this button to power the unit on and off.
12.LED Power: Press this button to power the woofer light on and off.The unit must be
powered on for the LED function.
13.Mic. 1 Input /Mic. 2 Input: Dual 1/4” Microphone inputs.
14.Guitar Input: 1/4” Guitar input.
1
2
3
4
5
6
7
8
9
10
11
12
13
14
- 2-
Page 4

PSHAKE3000
PSHAKE3000 FRONT PANEL
1.USB Input: Insert yo ur USB card into this slo t. The USB flas h drive only read mp3, wm a. f iles. The max imum
storage size of the USB f lash drive cannot exc eed 32GB.Make sure to s et the mode selector bu tton (5) to
USB. When the unit is pla ying tracks from the US B flash drive the track a nd elapsed time will di splay on
the screen.
2.SD Card Input: Inser t your SD card into this sl ot.The unit will only r ead mp3.,wma. files f rom SD card.The
maximum storage siz e of the SD card cannot exc eed 32GB.Make sure to s et the mode selector bu tton (5)to
SD. When the unit is play ing tracks from the SD Ca rd the track and elapse d time will display on th e screen.
3. Repeat: Th is b utton only contro l th e USB/SD inputs.T he u nit's default setup i s repeating all track s. Press
this button once to rep eat the current track , press again to repeat a ll tracks.
4. EQ: Press this butto n to adjust woofer and tw eeter sound.This on ly work for USB/SD card i nputs.There are 6
pre-set equalizat ion modes.
5. Mode (Input) Selec tor: Use this button to s witch between all the i nputs.
6. Previous Track / - Volum e / - FM CH Button: Press thi s button to go to the begin ning of the previous tr ack
on either USB/SD Card o r Bluetooth inputs. P ress and hold down this b utton to decrease the v olume of the
USB/SD or Bluetooth i nput. In Tuner mode, pre ss this button to go to the p revious stored FM sta tion.
7. Play / Pause Button: S hort press to pause the s ignal from the USB/SD c ard input,Bluetoo th,FM. Press
again to play. In tuner mode,long pre ss t o scan stations. The scan will not pau se until the unit finds a s trong
enough frequency.
8. Next Track / + Volume / + FM CH Bu tton: Press this butt on to go to the beginning o f the next track on eithe r
USB/SD Card or Bbluet ooth inputs.Press a nd hold down this butto n to decrease the volum e of the USB/SD
or Bluetooth input. I n Tuner mode,press thi s button to go to the previ ous stored FM station .
9.LED Display scree n.
Ma ki ng a Blue to ot h Connect io n
1. Pres s “Mode” but ton and set th e uni t to Blue too th mode .
2. Open t he Bluetoo th device' s Bluetoot h con necti ons a nd sear ch fo r Bluet oot h
enabl ed devices .
3. The Bluet ooth devic e should be ab le to locate a d evi ce name d “Tech nical P ro” .
Selec t this devic e and connec t to it .
4.It is r eady to be pai red with Blu eto oth ena ble d devic e. No p asswo rd an d can
conne ct to the devi ce.
5. Once s uccessfu lly paired y ou will be abl e to pl ay musi c on sp eaker d ire ctly.
Only on e Bluetoot h enabled de vice can suc ces sfull y be pa ired wi th th e unit at a ny
time. To conne ct a second de vice pleas e disconne ct th e first B lue tooth e nab led
devic e.
1
2
9
3
4
5
6
7
8
- 3-
Page 5

PSHAKE3000
PSHAKE3000 WIRELESS MICROPHONE
1. Before powering on the wireless microphone, be sure to set the Wireless
Microphone Volume Knob to zero. Once the wireless microphone is powered
on, slowly turn up the wireless microphone volume knob.
2. If you notice static or distortion in the wireless microphone replace the battery
with a new battery.
3. When not in use, turn off the power of the wireless microphone.
4. If the power indicator does not illuminate properly, check the batteries power
and make sure it is installed correctly.
5.Note: the led on the microphone will flash when the microphone Is powered on
and then the led will turn off. This is the normal Function of this led.
- 4-
Page 6

PSHAKE3000
PSHAKE3000 REMOTE CONTROL
1. Standby.
2."0-9 " songs select button,to select songs on USB/SD Card, FM only. In USB/SD mode,press those
buttons to s elect stored songs according to tracks, sequent ially short press two or more buttons
one time to se lect 2 or more digits tracks.In FM mode,press those b uttons to select stored station,
sequen tially short press two or more buttons one time to select 2 o r more digits station stored.
3. Mode (Inp ut) Selector: Use this button to switch between all t he inputs.
4. MUTE Key.
5. EQ Mode But ton: Press this button to adjust woofer and tweeter s ound,and there are 6 pre-set
modes to sel ect.This only work for USB/SD card inputs.
6. In USB / SD Car d Mode, Press this button to repeat the current track, al l tracks on the USB/SD
Card.The u nit's default setup is repeating all tracks. Pres s repeat the current track, press again
back to defa ult setup.
7.USB/SD m ode.
8. Next Track Button: Press this button to go to the beginning of the ne xt track on USB/SD Card
or Bluetoo th.Long Press to Fast Forward USB/SD or Bluetooth . In Tuner mode, press this button
to go to the nex t stored FM station.
9.Previous Track Button: Press this button to go to the beginnin g of the previous track on USB/SD
Card or Blue tooth inputs.Long Press to Fast Backward USB/SD o r Bluetooth input. In Tuner mode,
press this b utton to go to the previous stored FM station.
10.Pla y / Pa use Button: Short press to pause the signal from the US B/SD card or Bluetooth,FM.
Press agai n to play.In tuner mo de,long press to scan stations. The scan will not pause until the
unit finds a s trong enough frequency.
11.MP3 Volume up control.Only control USB/SD/AUX,FM.
12.MP3 Vo lume down control,Only control USB/SD/AUX,FM.
1
2
3
4
5
6
7
89
10
11
12
- 5-
Page 7

PSHAKE3000
The Bluetooth word mark and logos are reg is tered trademarks owned by SIG,Inc. and an y us e of such marks by
Technical Pro is under license. Other tra de marks and trade name are those of their respe ct ive owners.
THIS DEVICE COMPLIES WITH PART 15 OF THE FCC RULES.OPERATIO N IS SUBJECT TO THE FOLLOWING
TWO CONDITIONS: (1) THI S DEVICE MAY NOT CAUSE HARMFUL INTERFERENCE AND (2) THIS DEVICE
MUST ACCEPT ANY INTERFERENCE RECEIVED, I NC LUDING INTERFERENCE THAT MAY CAUSE
UNDESIRED OPERATION.
Federal Communications Commissi on R equirements: The equipm en t has been tested and found to
comply with the limits for Class B Digita l De vice, pursuant to part 15 of the FCC Rules.Th ese limits are designed to
provide reasonable protection aga in st harmful interference in a residentia l in stallation. This equipm en t generates
uses and can radiate radio frequency en er gy and, if not installed and used in accordan ce w ith the instruction, may
cause harmful interference to radio c om munication. However, there is no guarant ee t hat interference will not occur
in a particular installation. If this e qu ipment does cause harmful interferenc e to r adio or television reception, which
can be determined by turning the equipm en t off and on, the user is encoura ge d to try to correct the interference by
one or more of the following measures:
●Increase the separation between the e qu ipment and receiver.
●Connect the equipment into an outlet on a c ir cuit different from that to w hi ch the receiver is connected.
●Consult the dealer or an experienced ra di o/TV technician for help.
THE CHANGES OR MODIFICATIONS NOT EXPR ES SLY APPROVED BY THE PARTY RESPONSIBL E FOR
COMPLIANCE COULD VOID THE U SER’S AUTHORITY TO OPERATE THE EQUIPMENT. FCC
Radiation Exposure Statement The equipment complies with FCC rad ia tion exposure limits set forth for uncont ro lled equipment and meets the FCC radio fre qu ency (RF) Exposure Guidelines in Supple me nt C to OET65. The equipment has very low levels of RF energy that it i s de emed to comply without testing of specifi c absorption ratio (SAR).
The Bluetooth word mark and logos are reg is tered trademarks owned by SIG, Inc. and any u se o f such marks by
Technical Pro is under license. Other tra de marks and trade name are those of their respe ct ive owners.
- 6-
U S b USB
This will d isplay wh en the un it is readi ng the USB flash dri ve.
S d SD
This will d isplay wh en the un it is readi ng the SD flash driv e.
0001 02:11 0001 02:11
This will d isplay wh en the un it is playi ng tracks from USB o r SD card.
The track N o. Is 1 and the elapse d time is 2 min 8 s ec.
ONE ONE
This will d isplay wh en the un it is set to re peat current tra ck.
ALL ALL
This will d isplay wh en the un it is set to re peat all tracks.
LINE LINE
This will d isplay wh en the un it no signa l input .
98.3 98.3
This will d isplay wh en the un it is playi ng FM tuner and stat ion frequ ency is 98.3MHz.
BLUE BLUE
This will d isplay wh en the in put selec ted is blue tooth .
0002
When the cu rrent track No. is 3 , pressin g the “Previous” b utton or sy mbol shows it.
When the cu rrent track No. is 1 , pressin g the “Next” butto n or symbol s hows it.
“Eq 0”“Eq 1”“Eq 2”“Eq 3”“Eq 4”“Eq 5”
This will d isplay wh en sequ entiall y short pre ssing “EQ”but ton or key.
PRU PAU
This will d isplay wh en pres sing the “P ause” button or sy mbol.
U 30 V 30
This will d isplay wh en the vo lume leve l is det to 30
PSHAKE3000 SCREEN DISPLAY
 Loading...