

Page 1
Professional Hybrid Amplifier
Technical Pro
User Manual for:
H12X500UBT
with USB & SD Card Inputs
with 12 Speaker Outputs
Bluetooth Compatibility
®
Page 2
Congratulations and thank you for your purchase of this Technical Pro professional H12X500UBT. To get the most from your H12X500UBT
,
it is recommended that you review all of the information provided in this instruction manual before operating this equipment.
If you've spent any time at all in professional audio, you know the name Technical Pro and what it stands for — incredible performance &
sound, and the ultimate in reliability under harsh conditions. And now, Technical Pro offers the same technology in a series of hybrid amplifier
bringing more of what sets Technical Pro apart from all others.
1- Read these instructions thoroughly before using this item.
2- Keep these instructions for future reference.
3- Heed all warnings.
4- Follow all instructions.
5- WARNING: To prevent fire or electric shock, do not expose this equipment to rain or moisture. Do not store or operate this
product near any liquids.
6- Clean only with a dry cloth.
7- Do not store or operate this product near any heat sources such as radiators, heat registers, stoves, or other apparatuses
(including amplifiers) that produce heat.
8- Do not defeat the safety purpose of the polarized or grounding-type plug. A polarized plug has two blades with one wider than
the other. A grounding plug has two blades and a round grounding prong. The wide blade or third prong is provided for your safety.
If the provided plug does not fit your outlet, consult an electrician for the replacement of the obsolete outlet.
9- Protect the all wires connected to this unit from being walked on or pinched, particularly plugs and the point where they exit from
the unit. When removing the cord from the power outlet, remove it by holding the plug not by pulling the cord.
10- Unplug the unit during lightning storms or when unused for long periods of time.
11- When wiring this unit and all other equipment used in connection to this unit make sure that all of your equipment is turned OFF.
12- Once installation and wiring is complete power on all your equipment with the volume and level controls turned DOWN. Once
all the equipment is ON slowly raise the volume or level controls to their proper positions.
13- When grounding this unit, be sure to do so correctly, so as not to defeat the built-in grounding in this unit.
14- When you have finished using this unit, be sure that both tray doors are closed using the open / close button before powering
off the unit.
15- Before placing, installing, rigging, or suspending any product, inspect all hardware, suspension, cabinets, transducers,brackets
and associated equipment for damage. Any missing, corroded, deformed, or non-load rated component could significantly reduce
the strength of the installation, placement or array. Any such condition severely reduces the safety of the installation and should be
immediately corrected. Use only hardware which is rated for the loading conditions of the installation and any possible short-term,
unexpected overloading. Never exceed the rating of the hardware or equipment.
16- Consult a licensed, Professional Engineer regarding physical equipment installation. Ensure that all local, state and national
regulations regarding the safety and operation of equipment are understood and adhered to.
17- Refer all servicing to qualified service personnel. Servicing is required when the apparatus has been damaged in any way,
such as power supply cord or plug is damaged, liquid has been spilled or objects have fallen into the apparatus, the apparatus
has been exposed to rain or moisture, does not operate normally, or has been dropped.
WARNING!
CAUTION: TO REDUCE THE RISK OF ELECTRIC SHOCK, DO NOT REMOVE THE COVER OF THIS UNIT. THERE
ARE NOUSER-SERVICEABLE PARTS INSIDE. REFER ALL SERVICING TO A QUALIFIED TECHNICIAN.
The lightning flash with arrowhead symbol within an equilateral triangle is intended to alert the user to the presence
of "dangerous" voltage within the product's enclosure that may be of sufficient magnitude to constitute a risk of
electric shock to humans. Users should exhibit extra safety when this symbol appears in this instruction manual and
follow all precautions as they are stated.
The exclamation point within an equilateral triangle is intended to alert the user to the presence of important
operating and maintenance (servicing) instructions in this manual.
Introduction
H12X500UBT
Page 3
H12X500UBT
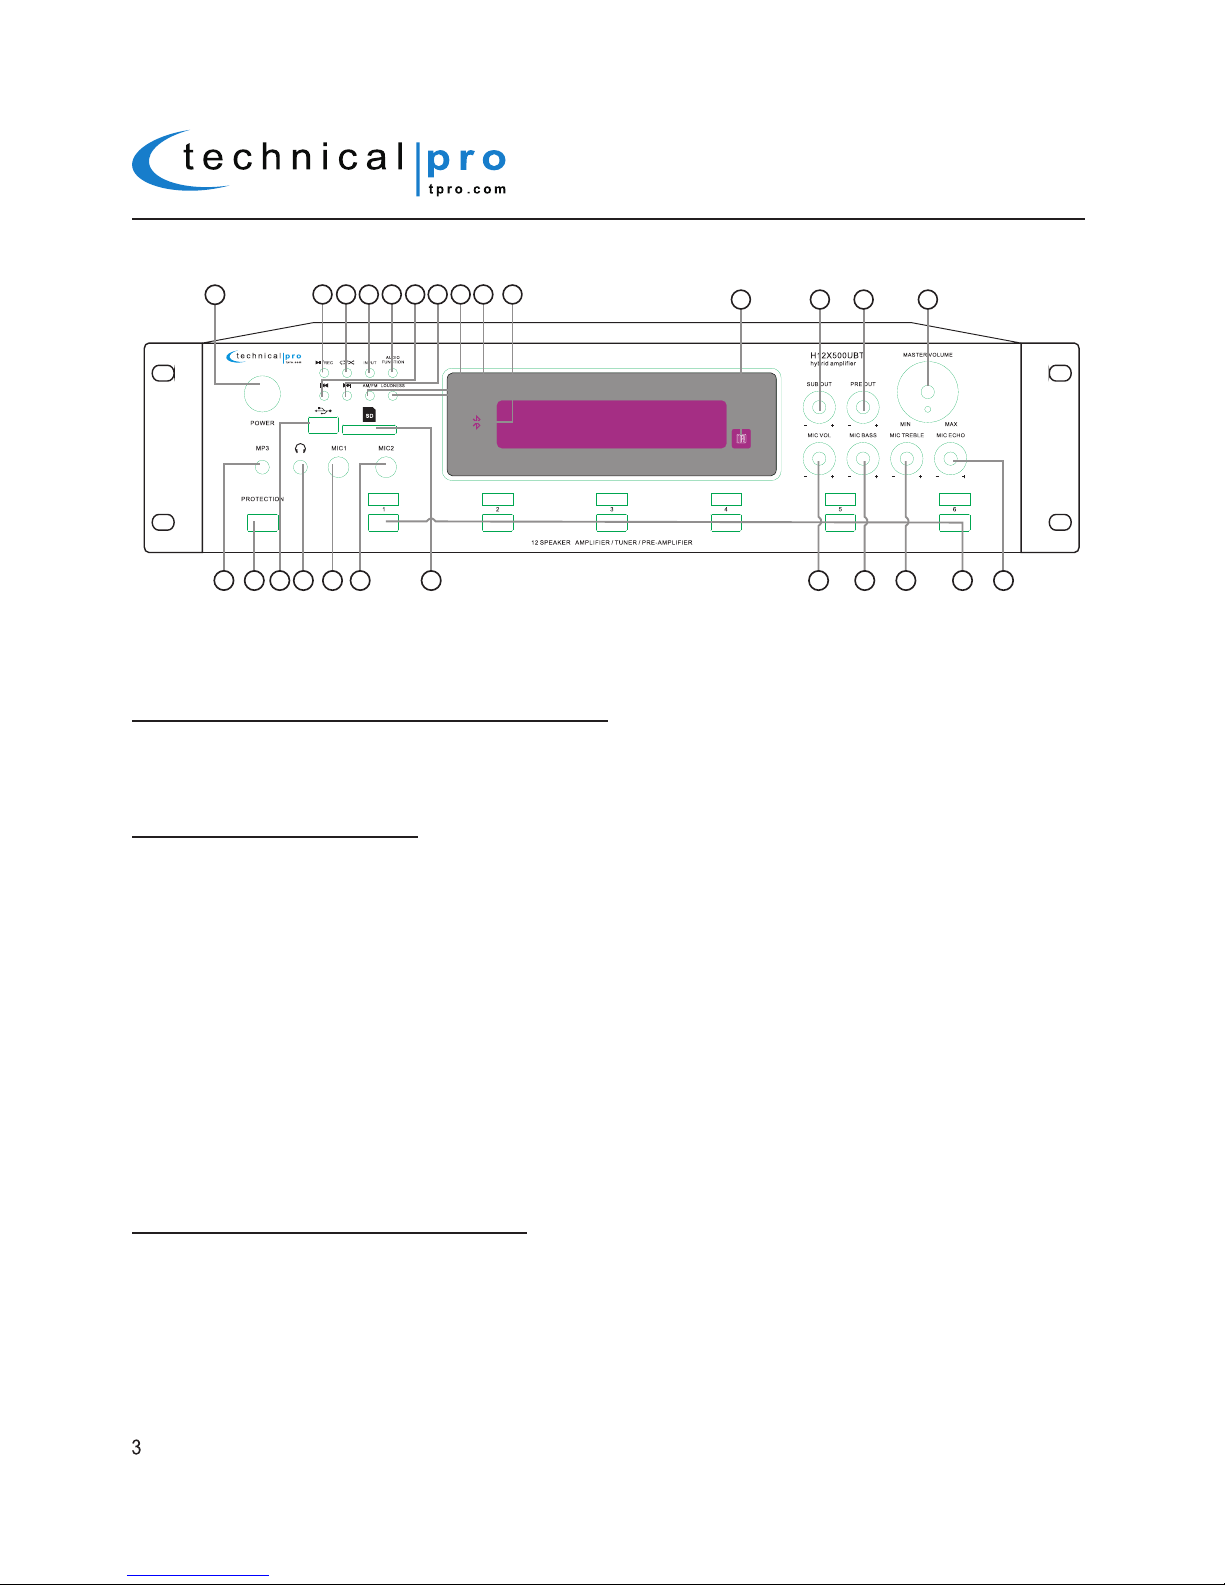
Front Panel
1.Power:Press this button to power the unit on and off.
2.MP3(1/8”) Input: Connect your MP3 player or computer here.Make sure to press the input selector button (5) until
“MP3” appears on the display screen to play the signal from the MP3 player or computer.
3.
Play / Pause / Record Button:
PLAYING AUDIO FROM THE USB / SD CARD INPUT
When the input selected is USB/SD/Bluetooth, press this button to pause the signal from the USB flash drive,
SD card,bluetooth or iPod™(Classic and Nano) connected to the USB input. Press this button again to play.
The play/pause function will only work for the USB flash drive, SD card, bluetooth or iPod™(Classic and Nano).
THERE IS NO RECORDING FUNCTION WHEN INPUT SELECTED IS USB/SD/BLUETOOTH.
HOW TO MAKE A RECORDING
When the input selected is TUNER/MP3/DVD/CD/VCD and there is an USB flash drive or SD card (with blank
space on it) inserted into their respective slot, pressing and holding this button will activate the recording
function.Press this button and hold for several seconds and the word “REC” will display on the screen. The unit
will create a new file in the connected USB flash drive or SD card and get ready to make a recording. At this
point there is no actual recording yet. Press the button again and the unit will start recording onto the USB flash
drive or SD Card and the elapsed time and “REC” will display on the screen. Press the button a third time to
pause the recording and the word “REC” and the elapsed time displayed on the screen will start flashing. Press
again to continue the recording. Press and hold this button for several seconds to save the file and end the
recording and exit. If both USB flash drive and SD card are connected, the unit will begin recording onto the
USB flash drive. If the USB flash drive is full, remove it and then press the record button again to start another
recording. The unit will also be able to record the signal from microphone onto the USB flash drive or SD Card.
When the recording funcion is activated and there is a microphone connected and have it turned on, the unit
will mix the signal from Tuner, MP3 or DVD with the microphone’s into one track. If two microphone are
connected and turned on,both signals from them will be recorded and mixed into one track with the signal from
Tuner, MP3 or DVD.
THE RECORDING FILE FORMAT IS .MP3.
RELEASING A BLUETOOTH CONNECTION
In Bluetooth mode, press button and hold for several second to
make the unit release current Bluetooth
connection and get ready for new paring and connecting.
4.Repeat and Random Control: Press this button to repeat the current track, all tracks or play random tracks
on the USB flash drive,SD Card or
iPod™(Classic and Nano).The unit’s default setup is repeating all tracks.
Press this button once to repeat the current track, press again to play random tracks, press three times to
repeat all tracks.In tuner mode to save a specific frequency (station), go to the station and then press the
“RPT/RDM” button on the face of unit or the “RPT” key on the remote control and then using the number keys
on the remote enter a number for the saved station. The number entered should be between1 and 30. After
H12X500UBT
1
2
17 1816 19 20 21
25
22 2623 24
11
4
5
6
8
9
10
3
12
13 14 15
7
Page 4

entering the numbers, press the “RPT/RDM” button or “RPT” key again to save. And the unit will exit the scan
and play the station stored.
5.Input Selector: Use this button to switch between all the inputs.
6.Audio Function: Use this to switch among treble, bass, balance & master volume control mode, then use
the master volume knob to adjust the corresponding sound effect.
7.Previous Track Button: Press this button to go back to the beginning of the previous track on
either the
iPod™
(Classic
and Nano)
, USB flash drive,SD Card or bluetooth. In tuner mode, press this button and hold for several seconds to
scan stations from the current frequency to the lowest frequency. The scan will not pause until the unit finds a strong
enough frequency. To save a specific frequency (station), go to the station and then press the “RPT/RDM” button on
the face of unit or the “RPT” key on the remote control and then using the number keys enter a number for the saved
station. The number entered should be between1 and 30. After entering the numbers, press the “RPT/RDM” button or
“RPT” key again to save. And the unit will exit the scan and play the station stored.
8.Next Track Button: Press this button to go back to the beginning of the next
track
on either the iPod™(Classic and
Nano)
, USB flash drive,SD Card or bluetooth. In tuner mode,press this button and hold for several seconds to scan
station from the current frequency to the highest frequency.The unit will not pause the scan untill the unit finds a strong
enough frequency. To save a specific frequency (station), go to the station and then press the “RPT/RDM” button on
the face of unit or the “RPT” key on the remote control and then using the number keys enter a number for the saved
station. The number entered should be between1 and 30. After entering the numbers, press the “RPT/RDM” button or
“RPT” key again to save. And the unit will exit the scan and play the station stored.
9.AM/FM Selector: Press this button to switch the inputs between the FM and AM.
10.Loudness: Press
this button to adjust the loudness effect on the main output.
11.BLUETOOTH Indicator: When the unit is turned on, the bluetooth function will be activated. This indicator will flash
when there is a bluetooth enabled device (ie cellphone) pairing with the unit. When the unit is connected to the
Bluetooth enabled device, the indicator will remain illuminated.
12.Infrared Sensor: This infrared sensor is designed to receive the signal from remote control. Do not obstruct the
infrared sensor to ensure the remote control operates optimally.
13.SUB OUT: Use this knob to adjust the subwoofer output volume.
14.PRE OUT: Use this knob to adjust the pre-amp volume output in addition to the master volume control.
15.MASTER Volume:Use this knob to adjust the master volume output.
16.Protection:Press this button to the lower position to enable speaker output. Press it again to the higher position to
disable.
17.USB Input:
Insert your USB flash drive or iPod™(Classic and Nano) into this slot. The unit will only read
.mp3, .wav, .wma files from the USB flash drive or iPod™(Classic and Nano).The maximum storage size of the
USB flash drive cannot exceed 32GB. Make sure to set the input selector button (5) to “USB” to play the signal
from the USB flash drive or iPod™(Classic and Nano). When the unit is playing tracks from the USB flash drive
the track and elapsed time will display on the screen.
18.Headphone Output:
Connect your headphone here. Make sure the volume level of the unit is turned down before
making the connection.
19.MIC1:
Microphone Input ¼".
20.MIC2:Microphone Input
¼"
.
21.SD Card Input:
Insert your SD card into this slot. The unit will only read .mp3, .wav, .wma files from SD card. The
maximum storage size of the SD card cannot exceed 32GB. Make sure to set the input selector button to “SD CARD”
to play the signal from the SD Card. When the unit is playing tracks from the SD Card the track and elapsed time will
display on the screen.
22.Microphone Volume:
Use this knob to adjust the volume of the microphones.
23.
Microphone
Bass Control:Use this knob to adjust the microphone’s bass.
24.
Microphone
Treble Control: Use this knob to adjust the microphone’s treble.
25.
Speaker Output Selector
: Use these selectors to select output speakers.
Press either of these buttons to the
lower position to enable corresponding speaker output. Press it again to the higher position to disable.
26.Microphone ECHO:
Use this knob to adjust the microphone’s echo.
H12X500UBT
Page 5

H12X500UBT
Rear Panel
1.Power Supply: Only use the power cord provided with the unit to power the unit. When connecting and
disconnecting the power cord, be sure the power of the unit is off. Connect the cord to the rear of the unit and
then connect it to the outlet.
2.Voltage selector: Select between 230V AC 50Hz / 115V AC 65Hz. When using with a 115V outlet, the unit
should be set to 115V.
3.FM & AM Antenna: Connect your FM and AM antennas here.
4.SUB Outputs: Connect the sub output to either a recording device, another amplifier or a powered (active)
subwoofer.The signal from the line output is a passive output and cannot be connected directly to a passive
speaker.
5.Pre Output:Connect the line output to either a recording device or another amplifier. The signal from the line
output is a passive output and can not be connected directly to a passive speaker.
6.REC LINE Output: Connect the REC line output to a recording device. The signal from the line output is a
passive output and cannot be connected directly to a passive speaker.
7.DVD Input: Connect any stereo signal output such as a DVD, CD, TAPE, Mixer etc to this input. To play a
signal connected to this input make sure the DVD input is selected on the front panel.
8.CD Input: Connect any stereo signal output such as a DVD, CD, TAPE, Mixer etc to this input. To play a signal
connected to this input make sure the VCD/CD input is selected on the front panel.
9.Speaker Output Sets: Connect the passive speakers to these six groups of output sets. Press the selectors
on the front panel to select the output speakers. It is recommended to use 8 ohm speakers only.
H12X500UBT
3 2
9
146 58 7
Page 6

H12X500UBT
Remote
H12X500UBT
1.Play/Pause:
Press this button to pause the signal from
the USB flash drive,SD Card or
iPod™(Classic and Nano)
or bluetooth
signals,press again to play. This button will
only function for the USB flash drive,SD Card, iPod™
(Classic and Nano) or bluetooth signals.
2.Stop:
Press this button to pause the signal from the USB
flash drive,SD Card or
iPod™(Classic and Nano) signals,
press again to play. This button will only function for the
USB flash drive,SD Card, iPod™(Classic and Nano)
signals.
3.Mute: Press this button to mute the output volume level.
4.Input Selector: Use this button to switch between the
inputs.
5.Next & Previous Track: Press either of these buttons
to go to the next or previous track on USB flash drive,SD
Card, iPod™(Classic and Nano) or bluetooth signals.
In tuner mode, press either of these buttons and hold for
several seconds to scan stations from the current frequency
to the highest or lowest frequency. The scan will not pause
until the unit finds a strong enough frequency. To save a
specific frequency (station), go to the station and then press
the “RPT/RDM” button on the face of unit or the “RPT” key on
the remote control and then using the number keys enter a
number for the saved station.The number entered should be between1 and 30. After entering the numbers,
press the “RPT/RDM” button or “RPT” key again to save. And the unit will exit the scan and play the station
stored.
6.Fast Forward & Rewind: Press either of these buttons to fast forward of rewind. The unit will
continue to fast forward or rewind until the button is pressed again. This function will only work for
the USB flash drive,SD Card or iPod™(Classic and Nano) signals
.
In FM mode, press
fast forward to increase the frequency by 0.1MHz and press fast rewind to decrease
the frequency by 0.1MHz. In AM mode,press fast forward to increase the frequency by 10KHz and
press fast rewind to decrease the frequency by 10KHz.
7.Treble Control: Press either of these buttons to increase or decrease the treble effects on the main
output.
8.Master Volume Control: Use these buttons to adjust the master volume output.
9.Enter Button: Press this button to confirm the track number or station number you entered using
the numbers keys to quickly go to that track on the USB flash drive,SD Card or
iPod™(Classic and
Nano) signals.
1
3
4
5
8
7
9
10
12
14
13
15
16
17
21
18 22
19
20
23
11
6
2
Page 7

H12X500UBT
10.Balance Control: Press these buttons to adjust the balance effect of master output.
11.Bass Control: Press either of these buttons to increase or decrease the bass effects on the main
output.
12.EQ Mode Selector: The H12X500UBT has five built-in pre-set equalization modes. Press this
button to switch among the pre-set equalization modes.
13.P.Call: Press this button to switch entry functions in tuner mode. Press this button the first time,
and then press the number keys to enter the frequency. Press this button again and then press the
number keys to enter the stored station’s number. For example, in FM mode,press this button the first
time and press 956,the unit will go to 95.6MHz. Press the “P.Call” button again and then press 12, the
unit will go to the number 12 FM station stored.
14.LOUDNESS: Press this button to adjust the loudness effect on the main output.
15.Number Keys: The number keys are used to input the track number,station number or frequency.
For example if you press 6-4-3 , then ENTER, the unit will go to track number 643 on either the USB
flash drive,SD Card or iPod™(Classic and Nano). If you do not press ENTER after inputting the track
number there will be a delay of about 5 seconds before the unit goes to track number 643. This
funciton will only function for the USB flash drive,SD Card or iPod™ (Classic and Nano) signals
.
In tuner mode, after pressing the P.CALL button (13) press these buttons to enter the station frequency or
stored station number.
16.NEXT 10 & PREV 10: Press either of these buttons to quickly go 10 tracks ahead or back. This
button will only function for the USB flash drive,SD Card or iPod™(Classic and Nano) signals.
17.Random Control: Press this button to play random tracks on the USB flash drive,SD Card or
iPod™(Classic and Nano). Press again to turn this function off.
18.Repeat Control: Press this button to repeat the current track, all tracks on the USB flash drive,SD
Card or
iPod™(Classic and Nano). The unit’s default setup is repeating all tracks. Press this button
once to repeat the current track, press again to repeat all tracks.
In tuner mode to save a specific frequency (station), go to the station and then press the “RPT/RDM”
button on the face of unit or the “RPT” key on the remote control and then using the number keys on the
remote enter a number for the saved station. The number entered should be between1 and 30. After
entering the numbers, press the “RPT/RDM” button or “RPT” key again to save. And the unit will exit the
scan and play the station stored.
19.Mono & Stereo Control: Press this button to switch the audio output between mono and stereo.
It only functions for tuner input.
20.AM & FM Control: Press this button to switch between AM tuner and FM tuner. In tuner mode,
press this button and hold for a few seconds, the unit will scan all the available stations and save
automatically. The scan will be ended if this button is press again during the scan.
21.Recording:
When the input selected is TUNER/MP3/DVD/CD/VCD and there is an USB flash drive
or SD card (with blank space on it) inserted into their respective slot, pressing and holding this button
will activate the recording function.Press this button and hold for several seconds and the word “REC”
will display on the screen. The unit will create a new file in the connected USB flash drive or SD card
and get ready to make a recording. At this point there is no actual recording yet. Press the button
again and the unit will start recording onto the USB flash drive or SD Card and the elapsed time and
“REC” will display on the screen. Press the button a third time to pause the recording and the word
Page 8

H12X500UBT
1. The remote should be used within 20 feet in front of the unit.
2. There should be no obstacles in between your remote and the unit,as this will hinder the remote’s
functionality.
3. To maximize the effectiveness of your remote control,keep the remote sensor(located on the front
of the unit)out of direct sunlight.
REMOTE CONTROL OPERATION
“REC” and the elapsed time displayed on the screen will start flashing. Press again to continue the
recording. Press and hold this button for several seconds to save the file and end the recording and
exit. If both USB flash drive and SD card are connected, the unit will begin recording onto the USB
flash drive. If the USB flash drive is full, remove it and then press the record button again to start
another recording. The unit will also be able to record the signal from microphone onto the USB flash
drive or SD Card. When the recording funcion is activated and there is a microphone connected and
have it turned on, the unit will mix the signal from tuner, MP3 or DVD with the microphone’s into one
track. If two microphone are connected and turned on, both signals from them will be recorded and
mixed into one track with the signal from tuner, MP3 or DVD.
THERE IS NO RECORDING FUNCTION WHEN INPUT SELECTED IS USB/SD/BLUETOOTH.
THE RECORDING FILE FORMAT IS .mp3.
22.A/B: Press this button to switch the output speakers among Group A, Group B and Group A&B.
WHEN THE OUTPUT SPEAKERS SELECTED IS GROUP B, THERE WILL BE NO VOLUME
OUTPUT.
23.
Next & Previous Station:
Press either these buttons to go to the previous or next stored station
on FM or AM Input.
Page 9

In the typical setup, a user should wire from the output of the signal source directly to one of the RCA
inputs on the rear of the H12X500UBT.Once the input signal source is connected to the H12X500UBT,
connect the speakers to the H12X500UBT’s speaker outputs. Pictured above is an iPhone™ and CD
player connected to the H12X500UBT inputs.To play tracks from the iPhone™ to H12X500UBT via
bluetooth, firstly press the “INPUT” button on the front panel or the “Input” key on the remote to select
the bluetooth input mode, then turn on the bluetooth function on iPhone™ and search H12X500UBT
whose bluetooth device is named TPRO-H12X500UBT, and then pair and connect. There is no
pairing code for smart phones.
The H12X500UBT has four groups of full range loudspeakers and one subwoofer connected to it
which will play either the signal from either the iPhone™, DVD, USB Flash Drive, SD Card, iPod™
(Classic and Nano) or MP3 player. You can connect up to six groups of full range loudspeakers to the
speaker outputs. Press the speaker selector on the face to select the desired speaker outputs. The
SOURCE OUTPUT is connected to the input of a tape recorder. You can alsoconnect the SOURCE
OUTPUT directly to the input of another amplifier. The SOURCE OUTPUT will send the signal from
the selected input (AUX, DVD, USB Flash Drive, SD Card, iPod™(Classic and Nano), MP3 player or
Bluetooth).
H12X500UBT
Typical H12X500UBT Input and Output Connections
NOTE: WHEN MAKING THESE CONNECTIONS THE POWER OF THE
H12X500UBT
AND THE
SIGNAL SOURCE SHOULD ALL BE IN THE OFF POSITION WITH THE VOLUME LEVELS TURNED
DOWN. THE OPERATIONS OF BLUETOOTH FUNCTION IS ONLY FOR THE UNIT WHICH HAS
BLUETOOTH FUNCTION.
TAPE RECORDER
CD Player
iPhone™
(Bluetooth enabled)
Amplifier
POWER AMPLIFIER (AUDIO INPUT)
Wall Socket
POWERED
SUBWOOFER
Page 10

H12X500UBT
Connecting the speaker wire to the H12X500UBT speaker outputs
NOTE: WHEN MAKING THESE CONNECTIONS THE POWER OF THE H12X500UBT AND THE SIGNAL
SOURCE SHOULD ALL BE IN THE OFF POSITION WITH THE VOLUME LEVELS TURNED DOWN
1.Remove approximately 10 mm (0.4 in) of insulation from the end of each speaker
cable and twist the exposed wires of the cable together to prevent short circuits.
2.Press down the red and black of the speaker output terminal on the rear of the
H12X500UBT. Insert the exposed speaker wire into the opening.
10 mm (0.4 in)
3.Let go of the red and black terminals.
For any audio to be played by the H12X500UBT the protection button must be pushed IN.
When the Protections button is pushed OUT, there will be NO audio output.
There are 6 Speaker Selector Buttons on the front of the H12X500UBT.
To allow the sound to pass through to the corresponding speaker the Speaker Selector
button needs to be pushed IN.
Protection & Speaker Selector Buttons:
PUSHED OUT PUSHED IN
Page 11

There are also SD Card and USB flash drive inputs
on the front panel of the
H12X500UBT
which is compatible with iPod™
(Classic and Nano) via the USB input.
The maximum size of the SD Card or USB flash drive is 32GB. If your memory card
exceeds 32GB, the unit will not be able to read the files from the memory cards. You will only be able to play
.mp3, .wav,
.wma
files directly from these memory cards once they are inserted into the front panel of the unit. Press the play/pause
button on the front panel of the unit to begin playing files from your USB /SD Card, press this button again to pause. Press
the NEXT button to move to the next track on either the USB,SD Card or
iPod™(Classic and Nano)
. Press the PREVIOUS
button to move to the previous track on either the USB,SD Card or
iPod™ (Classic and Nano)
.
NOTE: THE USB INPUT WILL ONLY CONNECT TO A USB FLASH DRIVE OR iPod™(Classic and Nano). DO NOT
ATTEMPT TO CONNECT THE USB INPUT DIRECTLY TO A COMPUTER AS THIS WILL NOT WORK. BE SURE NOT
TO HOOK-UP AN AMPLIFIER OR ANY AMPLIFIED SIGNAL INTO THE RCA INPUT JACK AS THIS COULD DAMAGE
THE
H12X500UBT
. NO OTHER AMPLIFIER IS NEEDED TO POWER YOUR SIGNAL IN ADDITION TO THE
H12X500UBT
.
ALWAYS MAKE SURE THAT THERE IS ONLY ONE AMPLIFIER IN THE SIGNAL PATH.
NOTE: ONLY VOLUME +/-. PREVIOUS/NEXT TRACK & PLAY/PAUSE FUNCTION WORK FOR BLUETOOTH. THE
OPERATIONS OF THE BLUETOOTH CONNECTION MAY VARY AS DIFFERENT BLUETOOTH DEVICE. THIS MANUAL
IS BASED ON THE CONNECTION TO AN iPhone™ AND ARE ONLY CORRECT FOR THE UNITS WHICH HAVE
BLUETOOTH CAPABILITY.
Turn on the unit and the bluetooth function on iPhone™, then search for the device named “TPRO+MODEL” and pair the
devices. There is no pairing code for smart phones. Connect after successfully pairing. The indicator on the front panel of the
unit will be on after iPhone™ successfully connected to the unit. You can play the tracks from iPhone™ and press the previous,
next or pause button on either the front panel of the unit, the remote control or iPhone™ to control the playing. When iPhone™
is taken away for a long distance from the H12X500UBT until it disconnects, or when the bluetooth function of iPhone™ is
disabled, the H12X500UBT will still be occupied by this iPhone™ unless the “Play/Pause” button on the face or the
“Play/Pause” key on the remote is pressed to release the H12X500UBT to other blueooth devices.
There are two ¼" inputs on the face of the unit which you can plug microphones directly into. It is important to note that these
inputs are to be used solely by microphones. Do not attempt to use the ¼" inputs for any other use. To use, simply plug the
microphones into the ¼" inputs while the speaker and microphones are in the OFF position. Once plugged in, power on the
unit and microphones. Once turned on, simply turn up the Microphone Volume and the Master Volume.
Note: IF YOU HAVE TWO MICROPHONES PLUGGED INTO THE HYBRID THEN THE ECHO,BASS AND TREBLE
CONTROLS WILL ADJUST THE SOUND ON BOTH OF THE MICROPHONES.
The two microphone inputs have many options which can be controlled on the front panel of the unit. The microphone volume
control can be found on the front panel of the unit. Use this control to adjust the volume of the microphones. There are also
three microphone sound controls on the front panel of the unit, an echo control,a bass control and a treble control. Use these
controls to adjust the sound from the microphones.
Microphone Controls
Connecting Two Microphones to H12X500UBT
Connecting a device with Bluetooth (for example an iPhone™) to H12X500UBT via Bluetooth
Volume and Tone Controls
The volume control on the face of the unit controls the volume at which the signal is played at. Turn the volume control
clockwise to increase the volume and counter-clockwise to decrease the volume.
H12X500UBT
USB Flash Drive & SD Card & iPod
™(Classic and Nano)
& Bluetooth Connection
MP3 Player
Page 12

AC Power Cord Connection
To connect the power cord to your
H12X500UBT
simply plug female side of the power cord into the
power cord input which is on the rear of the
unit
. Then plug the male side of the power cord to an
electric outlet. The AC power cords supplied purposefully have 2 blades and one grounding prong. If
your outlet is not equipped to handle this type of plug, do not attempt to forcefully plug this AC power
cord into the outlet, and do not alter the plug so that it can fit in the outlet. The only course of action you
can take is to find another outlet which is properly equipped to handle a grounded plug or have an
electrician upgrade your electrical outlet. Be sure that the plug is well connected so that it does not
disconnect in the middle of usage. If at any point in time the supplied AC power cord is punctured or
damaged replace it with a new power cord from a local electrician.
NOTE: ONLY PLUG IN THE AC POWER CORD WHILE THE UNIT’S POWER IS OFF AND THE
VOLUME IS TURNED DOWN. TURNING ON THE UNIT WITH THE VOLUME TURNED UP MAY
CAUSE THE UNIT OR ANY SPEAKERS CONNECTED TO IT TO BE DAMAGED. ALWAYS TURN
DOWN THE VOLUME PRIOR TO TURNING OFF THE UNIT.
The H12X500UBT is designed to power up to six groups of full-range passive loudspeakers and two active
subwoofers. The speakers should be connected via the speaker wire outputs on the rear of the
H12X500UBT
.
Connecting the H12X500UBT to Passive Loudspeakers
Input / Output Connections
Connecting the Signal Source to the H12X500UBT(DVD/MIXER/MP3 etc.)
NOTE: BE SURE NOT TO CONNECT AN AMPLIFIER OR ANY AMPLIFIER SIGNAL INTO THE RCA
INPUT JACKS. AS THIS COULD DAMAGE THE H12X500UBT. NO OTHER AMPLIFIER IS NEEDED
TO POWER YOUR SIGNAL IN ADDITION TO THE H12X500UBT. ALWAYS MAKE SURE THAT
THERE IS ONLY ONE AMPLIFIER IN THE SIGNAL PATH.
There are also input jacks for a MP3 player, USB flash drive and SD card on the front panel of the
H12X500UBT which is compatible with iPod™(Classic and Nano) via the USB input. Just plug the MP3
player, USB flash driver, SD card or iPod™(Classic and Nano) into their respective input jacks and set
the H12X500UBT to the corresponding input. Be sure that the volume of your MP3 player and
H12X500UBT
are turned down at first and then slowly raise the volume to prevent damaging the
speakers or any of your other equipment.
The
unit
has two RCA input jacks on the rear of the unit which is designed to receive the signal directly
from your CD,mixer or any of your other sources.To ensure that you have correctly connected your CD
player (other sound sources) to the unit, make sure that the CD player has a RCA cord coming from its
output and that this cord is plugging into the RCA Input on the rear of the H12X500UBT. Ensure that the
polarity of your signals always maintained by using color coordinated RCA cables.
NOTE: WHEN MAKING THESE CONNECTIONS THE POWER OF THE
H12X500UBT
AND THE SIGNAL
SOURCE SHOULD ALL BE IN THE OFF POSITION WITH THE VOLUME LEVELS TURNED DOWN.
ONCE
THE UNITS ARE ALL POWERED ON, SLOWLY INCREASE THE VOLUME TO AVOID DAMAGING ANY
OF YOUR EQUIPMENT. THE
H12X500UBT
OPERATES MOST EFFICIENTLY WHEN USED WITH 8 OHM
SPEAKERS.
Power Cord, MP3 Cable, User Manual, Warranty, Remote Control, Antenna.
Accessories
H12X500UBT
iPod™ & iPhone™ are registered trademarks of Apple Computers, Inc. Apple Computers, Inc. is not endorsing, sponsoring, or otherwise affiliated with this manufacturer.
Page 13

H12X500UBT
THIS DEVICE COMPLIES WITH PART 15 OF THE FCC RULES. OPERATION IS SUBJECT TO THE FOLLOWING TWO CONDITIONS:
(1) THIS DEVICE MAY NOT CAUSE HARMFUL INTERFERENCE AND
(2) THIS DEVICE MUST ACCEPT ANY INTERFERENCE RECEIVED, INCLUDING INTERFERENCE THAT MAY CAUSE UNDESIRED OPERATION.
Federal Communications Commission Requirements
The equipment has been tested and found to comply with the limits for Class B Digital Device, pursuant to part 15 of the FCC Rules. These limits are designed to provide
reasonable protection against harmful interference in a residential installation. This equipment generates uses and can radiate radio frequency energy and, if not installed
and used in accordance with the instruction, may cause harmful interference to radio communication. However, there is no guarantee that interference will not occur in a
particular installation. If this equipment does cause harmful interference to radio or television reception, which can be determined by turning the equipment off and on, the
user is encouraged to try to correct the interference by one or more of the following measures:
●Reorient of relocate the receiving antenna.
●Increase the separation between the equipment and receiver.
●Connect the equipment into an outlet on a circuit different from that to which the receiver is connected.
●Consult the dealer or an experienced radio/TV technician for help.
THE CHANGES OR MODIFICATIONS NOT EXPRESSLY APPROVED BY THE PARTY RESPONSIBLE FOR COMPLIANCE COULD VOID THE USER’S AUTHORITY TO
OPERATE THE EQUIPMENT.
FCC Radiation Exposure Statement
The equipment complies with FCC radiation exposure limits set forth for uncontrolled equipment and meets the FCC radio frequency (RF) Exposure Guidelines in
Supplement C to OET65. The equipment has very low levels of RF energy that it is deemed to comply without testing of specific absorption ratio (SAR).
Screen Display
This will display when the unit is reading the USB flash drive.
This will display when the unit is reading the SD card.
This will display when the input selected is MP3.
This will display when the unit is playing tracks from USB flash drive
or SD card.The track No. is 5 and the elapsed time is 5min 8sec.
This will display when the playing is paused.
This will display when the unit is recording and the elapsed time is
4seconds.When the recording is paused this will flash on the screen.
This will display when the equalizer is set to POP.
This will display when the equalizer is set to ROCK.
This will display when the equalizer is set to CLASS.This will display when the unit is set to repeat all tracks.
This will display when the unit is set to repeat current tracks.
This will display when the unit is set to play random tracks.
This will display when the unit is playing from USB flash drive or
SD card without any tracks inside.
This will display when the equalizer is set to JAZZ.
This will display when the volume level is set to 31.
This will display when pressing the “Previous” button or key.
This will display when pressing the “Next” button or key.
This will display when the unit is playing FM tuner and station
frequency is 98.3MHz.
FM 98.3
This will display when the unit is playing AM tuner and station
frequency is 850KHz.
AM 850
This will display when the input selected is VCD/CD.
VCD/CD
This will display when the input selected is bluetooth.
Bluetooth
The Bluetooth word mark and logos are registered trademarks owned by SIG, Inc. and any use of such marks by Technical Pro is under license. Other trademarks and trade name are those of
their respective owners.
 Loading...