

Page 1
1
TABLE OF CONTENTS
History of Tech 21’s SansAmp 2
Introduction 2
Quick Start Instructions 3
Powering the SansAmp PSA-1 4
Front Panel 4
Programming 5
Input jack 5
Pre-Amp 6
Character controls 6
Buzz 6
Punch 7
Crunch 7
Drive 7
Low and High 7
Level 7
2-Digit LED display 7
Save switch 8
Saving a program 8
Down switch and Up switch 9
Rear Panel 9
Input 2 section 9
Input 2 jack 9
Level selector switch 9
0dB and -10dB positions 9
Effects Loop 9
Effects Send 9
Mix 50/50 switch 10
Left & right returns 10
Universal Output Section 10
1/4" output level switch 10
1/4" output jacks 10
XLR output jacks 11
XLR output level switch 11
Footswitch 11
MIDI In and MIDI Thru/Out 11
Suggested Setups 11
Using the SansAmp PSA-1’s Inputs 12
Using the SansAmp PSA-1’s Outputs 13
Using the Effects Loop 13
Using MIDI and Remote Footswitch 14
Special Page Functions & MIDI Implementation 15
Function 1: Custom Preset Data Dump 16
Function 2: MIDI Mapping 16
Function 3: Set Footswitch Loop Count 18
Function 4: Fixed/Programmable Swap Bit 19
Function 5: MIDI Channel Select 20
Function 6: Software Revision Number 20
Function 7: MIDI Map Dump 21
Function 8: Disengage All Pots 21
Function 9: MIDI Thru Disable 21
List of Presets and List of Custom Settings 22
Custom Settings Diagrams 24
Global Reset Back Cover
Warranty Information Back Cover
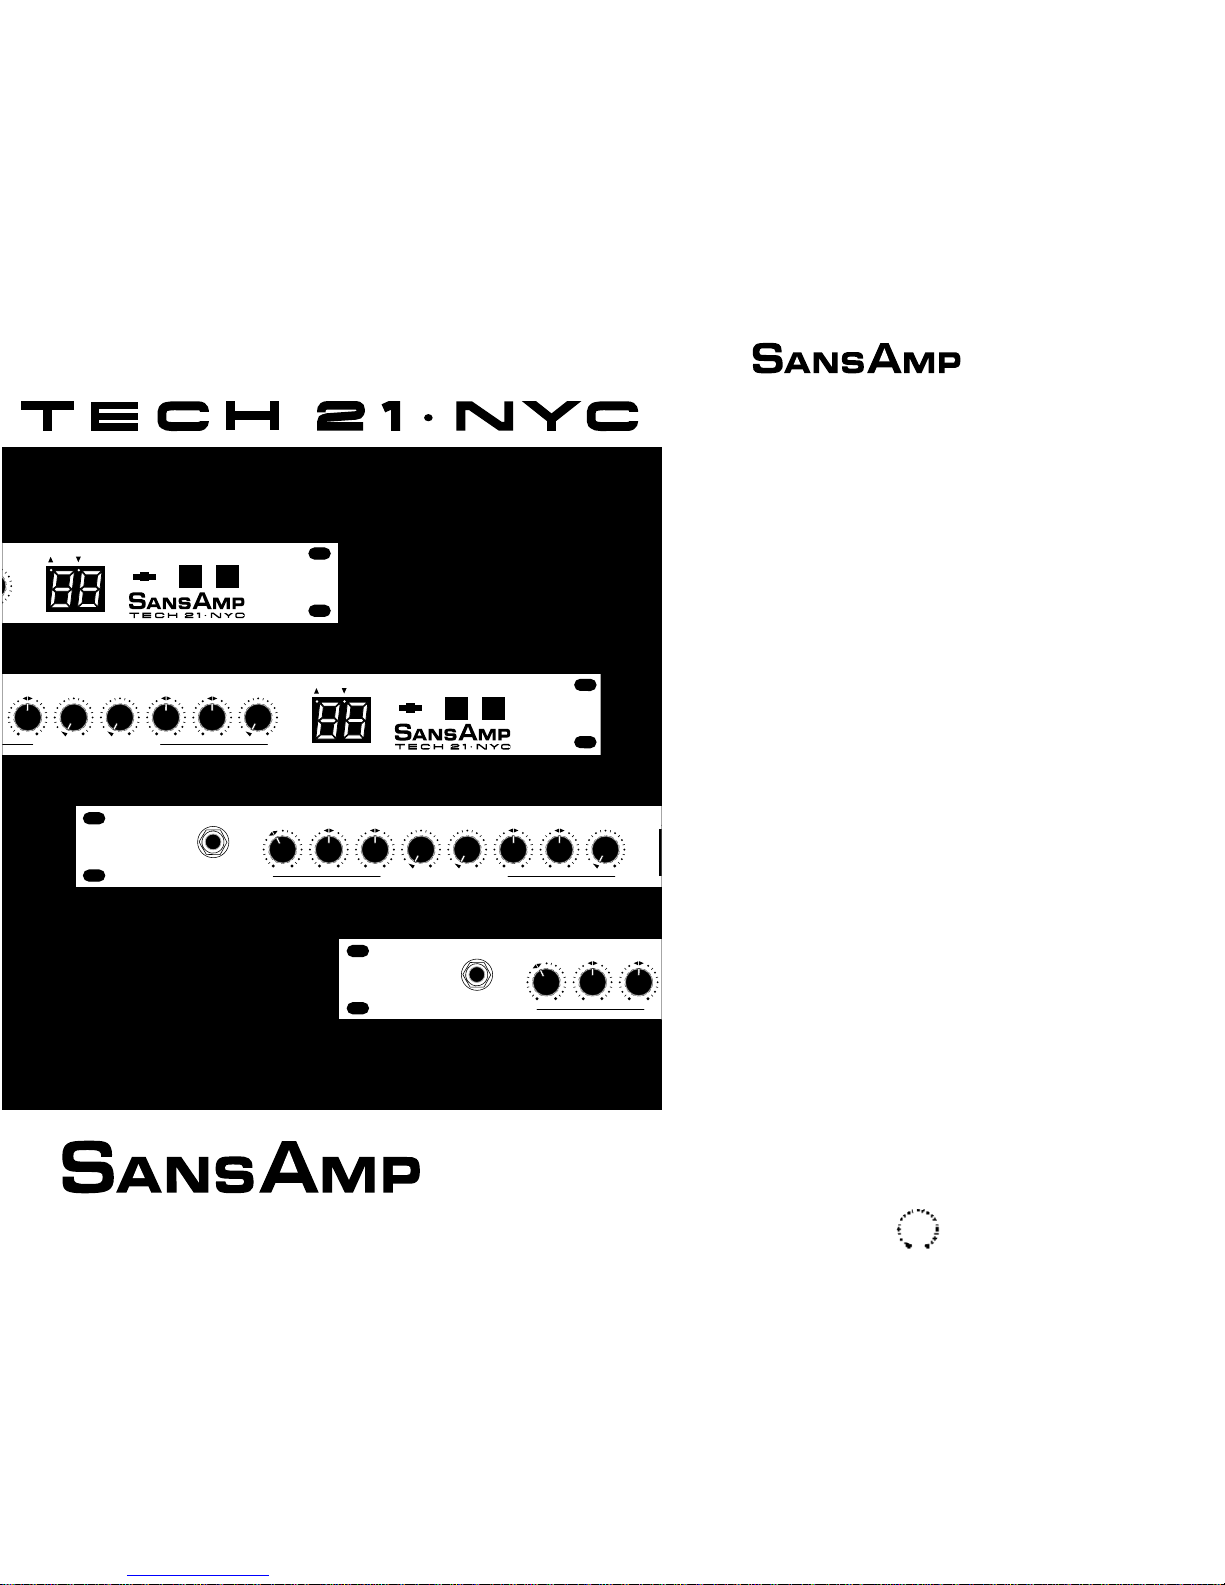
PSA-1
MODEL
TM
SAVE DOWN UP
PUSH 2X
TM
L
SAVE DOWN UP
PUSH 2X
TM
PUNCH CRUNCH DRIVE LOW HIGH LEVEL
P R O G R A M M A B L E
PRE - AMP BUZZ PUNCH CRUNCH DRIVE LOW HIGH LEVELINPUT
P R O G R A M M A B L E
PSA-1
MODEL
PRE - AMP BUZZ PUNCHINPUT
P
PSA-1
MODEL
PSA-1
MODEL
TM
USER S GUIDE
Page 2
The History of Tech 21’s SansAmp™
Tech 21, Inc., introduced SansAmp “Classic” (the original pedal design) in 1989. Our proprietary F.E.T. hybrid-based circuitry pioneered Tube Amplifier Emulation for professional
applications.
Engineered for direct recording and live performances, SansAmp delivers consistent quality
sound --studio to studio, club to club, arena to arena. Players, engineers, and producers can
now obtain a wide spectrum of warm, natural tube amplifier sounds from one convenient unit.
Available in various formats, each SansAmp is suitable for any music style, from jazz to metal,
and can be used with a variety of instruments --guitar, bass, keyboards, samplers, even sax and
vocals.
The SansAmp Classic was conceived and developed by a guitarist who possesses the unusual
combination of a trained ear and electronics expertise. The technology is designed in the true
tradition of tube amplifiers in their totality—with a pre-amp stage and an output stage. It
incorporates the harmonics and sweet overdrive characteristics unique to tube amplifiers—
largely caused by what is referred to as “push-pull” symmetrical clipping. (A single tube is
physically incapable of accomplishing the same results.) SansAmp captures these characteristics, and does so even at low volume levels.
SansAmp gives you the most coveted trademarked sounds and the flexibility to refine and
redefine your own. Each model responds to and interacts with the dynamics of your individual
playing style, your individual musical style, and your instrument’s individual tonality. All of
these factors play an important role in the resulting sound, which will ultimately be yours
alone.
Designed & Manufactured in the U.S.A.
TECH 21, INC.
INTRODUCTION
SansAmp PSA-1 maintains its superior tone with our exclusive, 100% analog circuitry. Only
the programming and memory sections are digital. The results are easy to hear: punchy,
responsive, powerful sounds that bring out the best in an instrument—the kind of tones that
characterize the original SansAmp Classic, SansAmp Bass DI, SansAmp GT2, and SansAmp
Rackmount.
The SansAmp PSA-1 can be used for a variety of applications. In the studio, you can record
direct to tape, enhance existing tracks in mixdowns, as well as add interesting touches to any
2
instrument. For live performances, it can be used as a pre-amp direct into a power amp with
guitar or bass speaker cabinets, as a “monster direct box” to a P.A. system, (or both simultaneously), and as an outboard processor.
The SansAmp PSA-1 features MIDI capability for calling up programs and storing program
data. There are 49 factory presets and 49 memory locations to store your own custom sounds,
plus two bypass programs. When you switch between programs, there is no lag time, or “cutting out.”
The controls on the SansAmp PSA-1 work very much like those found on a sophisticated
amp. You don’t need special training or a degree in physics to operate your unit. Storing and
recalling programs is simple: set your tones and push the Save button. Like the SansAmp
Rackmount, you just turn a knob and hear the difference immediately --in real time. There
are 256 incremental steps in the rotation of each control, so increases and decreases occur in
a smooth, gradual, linear fashion.
The SansAmp PSA-1 is designed to provide you with the flexibility to find almost any conceivable tonal personality within the tube amplifier sound spectrum.
QUICK STA RT INSTRUCTIONS
Here’s how you can get your PSA-1 up and running before you read the entire manual.
1. Plug your instrument into the front-panel Input jack (on the left side).
2. Plug one end of a cord into the rear panel’s left Output jack, and plug the other end into
the input of a mixer or an amp or power amp.
3. Plug the AC cord into a wall socket. The SansAmp PSA-1 is now on.
4. Turn on your amp or mixer. (If the mixer is patched into a monitor or recorder setup, make
sure the power amp and speakers are turned on, too.)
5. Turn up the input level on your amp or mixer. If the signal is too “hot,” resulting in
unwanted distortion, or too weak, check the amp’s or mixer’s input control as well as the
Output Level Switch on the back of the SansAmp PSA-1.
6. Play your favorite riff or chord changes, and you should hear a sound coming through your system. If not, recheck your connections, and make sure your guitar’s volume control is turned up.
7. Select programs by pushing either the Up or Down buttons. The first 49 presets (01-49)
are factory settings (refer to the list on page 22), and the second 49 programs (51-99) are storage locations for you to keep your settings. Note that the unit is shipped with programs 51-99
as duplicates of presets 01-49, and that 00 and 50 are bypass settings.
If you need further guidance in setting up your SansAmp PSA-1, check out the diagrams and
information on pages 12 through 14.
3
PSA-1
MODEL
TM
PSA-1
MODEL
TM
Page 3
INSTALLATION
P
OWERING THE
SANSAMP PSA-1
The SansAmp PSA-1 is powered by potentially hazardous voltage. Therefore, observe the following safety precautions.
WARNING: To avoid the risk of shock or fire, do not expose this unit to moisture. Do not
remove the chassis from its cabinet, or remove metal covers from chassis parts. Removing the
chassis from its cabinet exposes extremely dangerous high voltages. There are no user-serviceable parts inside. Hazardous voltages are present inside the chassis. Refer all servicing to qualified personnel.
CAUTION: Never modify the AC power cord. If the original AC power cord becomes damaged, refer your SansAmp PSA-1 for servicing.
WARNING: Attempting to repair this unit is not recommended and will void its warranty.
NOTE: In the U.S. and Canada, servicing of SansAmp PSA-1 is performed at factory only.
In other countries, please refer repairs to the local Tech 21 authorized distributor.
FRONT PANEL
The SansAmp PSA-1 gives you access to specific tone-shaping characteristics within the tube
amplifier sound spectrum. Controls of this nature are traditionally inaccessible on stock amps,
and adjustments like these can ordinarily be achieved only by permanent professional modification.
Tonality, for instance, can be adjusted in a variety of ways. The individual Character
Controls, labeled Buzz, Punch, Crunch, and Drive, offer different results than the post EQ
section (the controls labeled Low and High).
The gain structure can be adjusted via the Pre-Amp control, which results in a different kind
of overdrive than the Drive control. Additionally, Buzz, Punch, and Crunch each affect the
gain structure within specific frequency bands.
As you experiment and become familiar with the controls’ interrelationships, you’ll be able to
customize your own sounds and store them in the SansAmp PSA-1’s memory.
4
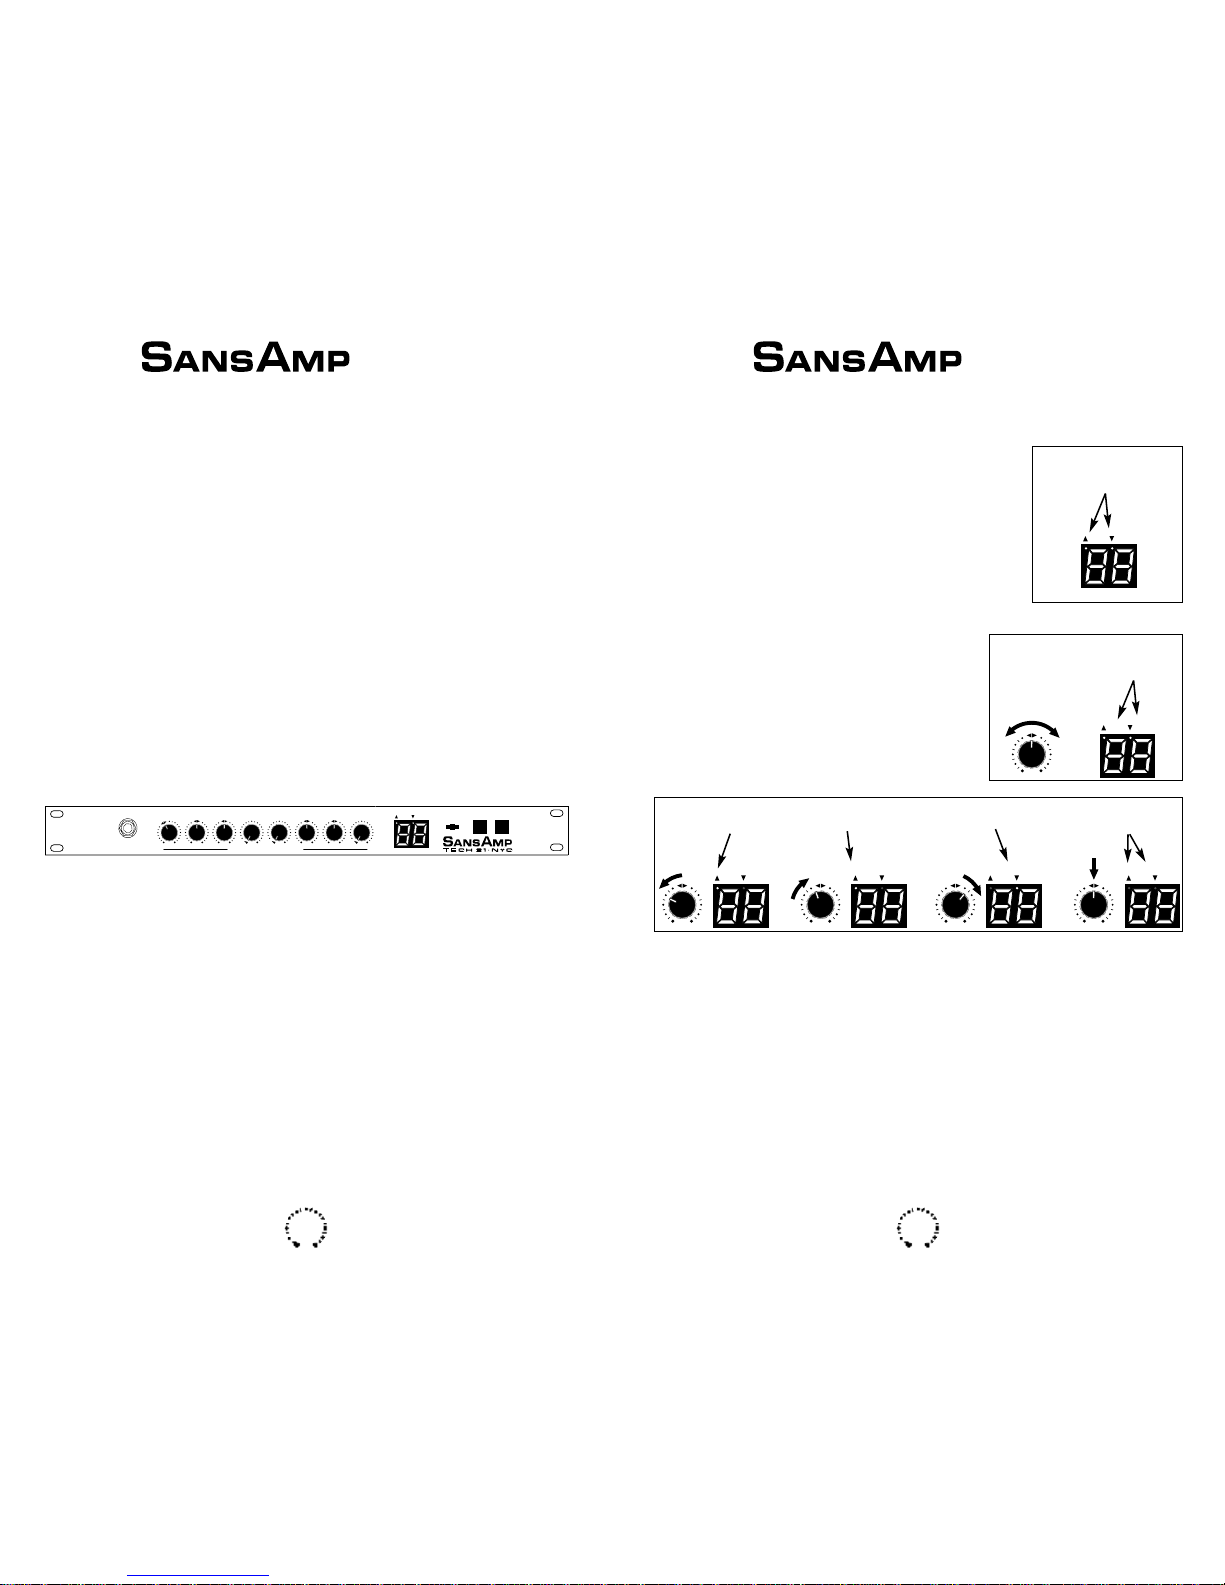
Because the SansAmp PSA-1 is fully programmable, everything you do is monitored by the
SansAmp PSA-1’s internal computer. Whenever you turn a knob from the setting stored in
memory, one of the two dots in the upper left corners of the LED
numerical display blinks.
This feature is useful when you want to know the position of each
knob’s setting in the memory. Here’s how to use it::
Assume that the preset point for a particular knob is 12 o’clock.
When you turn that knob, it “unlocks.” One of the two dots
above the digits in the LED numerical display will blink. The
arrows above the LED display tell you which direction
you need to turn the knob to find the preset point. The
up arrow tells you to increase the setting; the down arrow
tells you to decrease.
If you are far below the preset point, the left dot blinks
slowly. Follow the direction of the arrow (up) and
increase the setting. As you get closer to the preset point,
the dot blinks faster. If you turn the knob past the preset point, the right dot will first blink
fast and then slow as you turn farther clockwise away from the preset point. When you reach
the preset point, both dots stop blinking and go dark.
INPUT JACK
This 1/4" Input features an impedance buffer so that the tone from a guitar’s or bass’ pickups, or
the signal from other instruments, reaches the SansAmp PSA-1 without degradation. A second
input jack is located on the rear panel. Note: plugging into the front-panel Input jack overrides
and disconnects the rear-panel jack. This lets you set up your SansAmp PSA-1 as a permanent
part of a rack or patch-bay setup, with its usual input source plugged into the rear-panel jack.
Then, if you want to plug straight into the SansAmp PSA-1, bypassing other parts of the system,
you can use the SansAmp PSA-1’s front Input.
5
SAVE DOWN UP
PUSH 2X
TM
PRE - AMP BUZZ PUNCH CRUNCH DRIVE LOW HIGH LEVELINPUT
P R O G R A M M A B L E
PSA-1
MODEL
Dots
Blink
Dots
Blink
Left dot
blinks
Left dot
blinks faster
Right dot
blinks
Both dots
go dark
PSA-1
MODEL
TM
PSA-1
MODEL
TM
Page 4
PRE-AMP
This is the input sensitivity control. The Pre-Amp control adjusts
the signal level going into the input section of the SansAmp
PSA-1. The arrows in the surrounding circle symbolize the unitygain point (that is, no boost or cut). When clean sounds are
desired with the use of a hot-output instrument, decrease from the
unity-gain point. Increasing the position of the Pre-Amp control
produces an effect similar to putting a clean booster pedal into the input of a tube amp.
To achieve the least amount of noise, keep the Pre-Amp knob at unity gain or higher.
Experiment with the interplay between your instrument and the SansAmp PSA-1.
Note: For best results, do not set the Pre-Amp level lower than unity gain when the Drive
knob is at 9 o’clock or higher. However, if you want a crystal-clear sound and the Drive con-
trol is already near minimum and there’s still too much overdrive, decrease the Pre-Amp’s
level as needed.
Pre-Amp also influences different types of overdrive. For instance, a high setting emphasizes
pre-amp distortion (see Boogie®Lead-style setting), as opposed to when Drive is in a high
setting, which emphasizes power amp distortion (see Vintage Marshall®-style setting).
C
HARACTER C
ONTROLS
Continuously variable Character Controls offer tremendous flexibility in adjusting tonality,
gain structure, and harmonic content.
BUZZ
The knob labeled Buzz controls the low-end break-up and overdrive. You can boost the effect by
turning clockwise from the center point indicated by the arrows, and cut by turning counterclockwise. When you turn towards maximum, the sound becomes (you guessed it) buzzy. For a clean setting, increase the setting in small increments. For increased definition when using distortion, position the knob at its midpoint or towards minimum.
6
PUNCH
The Punch control sets the amount of midrange break-up and overdrive. Boost or cut from
the center point indicated by the arrows. Decreasing from the center point produces a softer,
Fender®-style break-up. Increasing its setting creates a harder, heavier distortion. At maximum, it produces a sound similar to a wah pedal at mid-boost position placed in front of a
Marshall®amp.
CRUNCH
The Crunch control brings out the upper harmonic content and pick attack. For a smoother
high end and for clean settings, decrease to taste.
DRIVE
Like the volume control on a non-master-volume tube amp, Drive increases the amount of
power amp distortion. In live applications, we recommend using less Drive than when direct
recording. This compensates for the natural sustain of high volumes.
L
OW
This active low-end tone control is specially tuned for maximum musicality when used to EQ
instruments. Boost or cut by ±12dB by turning from its center point indicated by the arrows.
HIGH
This active high-end tone control is specially tuned for maximum musicality when used to
EQ instruments. Boost or cut by ±12dB by turning from its center point indicated by the
arrows.
L
EVEL
This one control simultaneously adjusts the output level of the rear-panel XLR and 1/4" outputs.
2-DIGIT LED DISPLAY
Everything you need to know is in
these two digits. This display is readable from any angle, in daylight or
darkness. It tells you which program is
active, whether any knob’s setting has
been changed, when a program is
stored, and when MIDI functions
have been activated. Refer to the sections on programming your SansAmp PSA-1 and using
MIDI for specific information regarding the display’s functions.
7
BUZZ PUNCH CRUNCH DRIVE
SAVE DOWN UP
PUSH 2X
TM
PSA-1
MODEL
TM
PSA-1
MODEL
TM
PRE - AMPINPUT
Arrows indicate
unity-gain point
Page 5
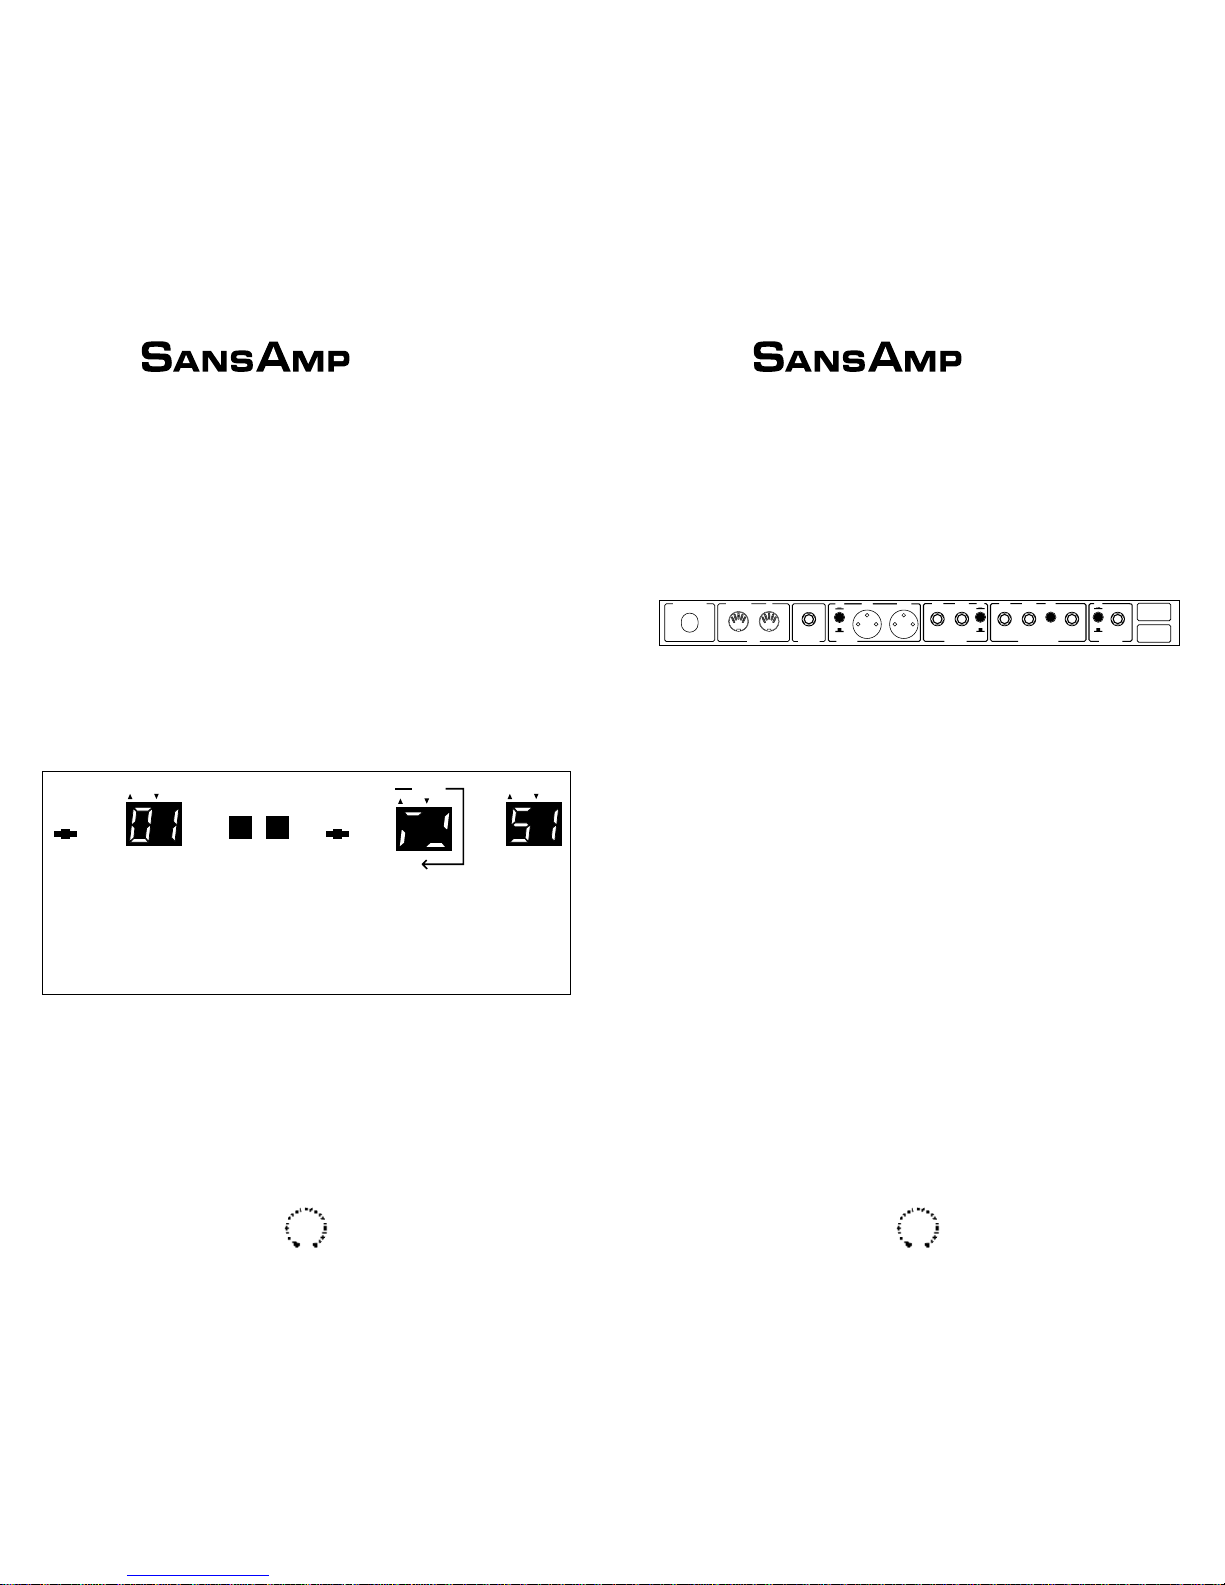
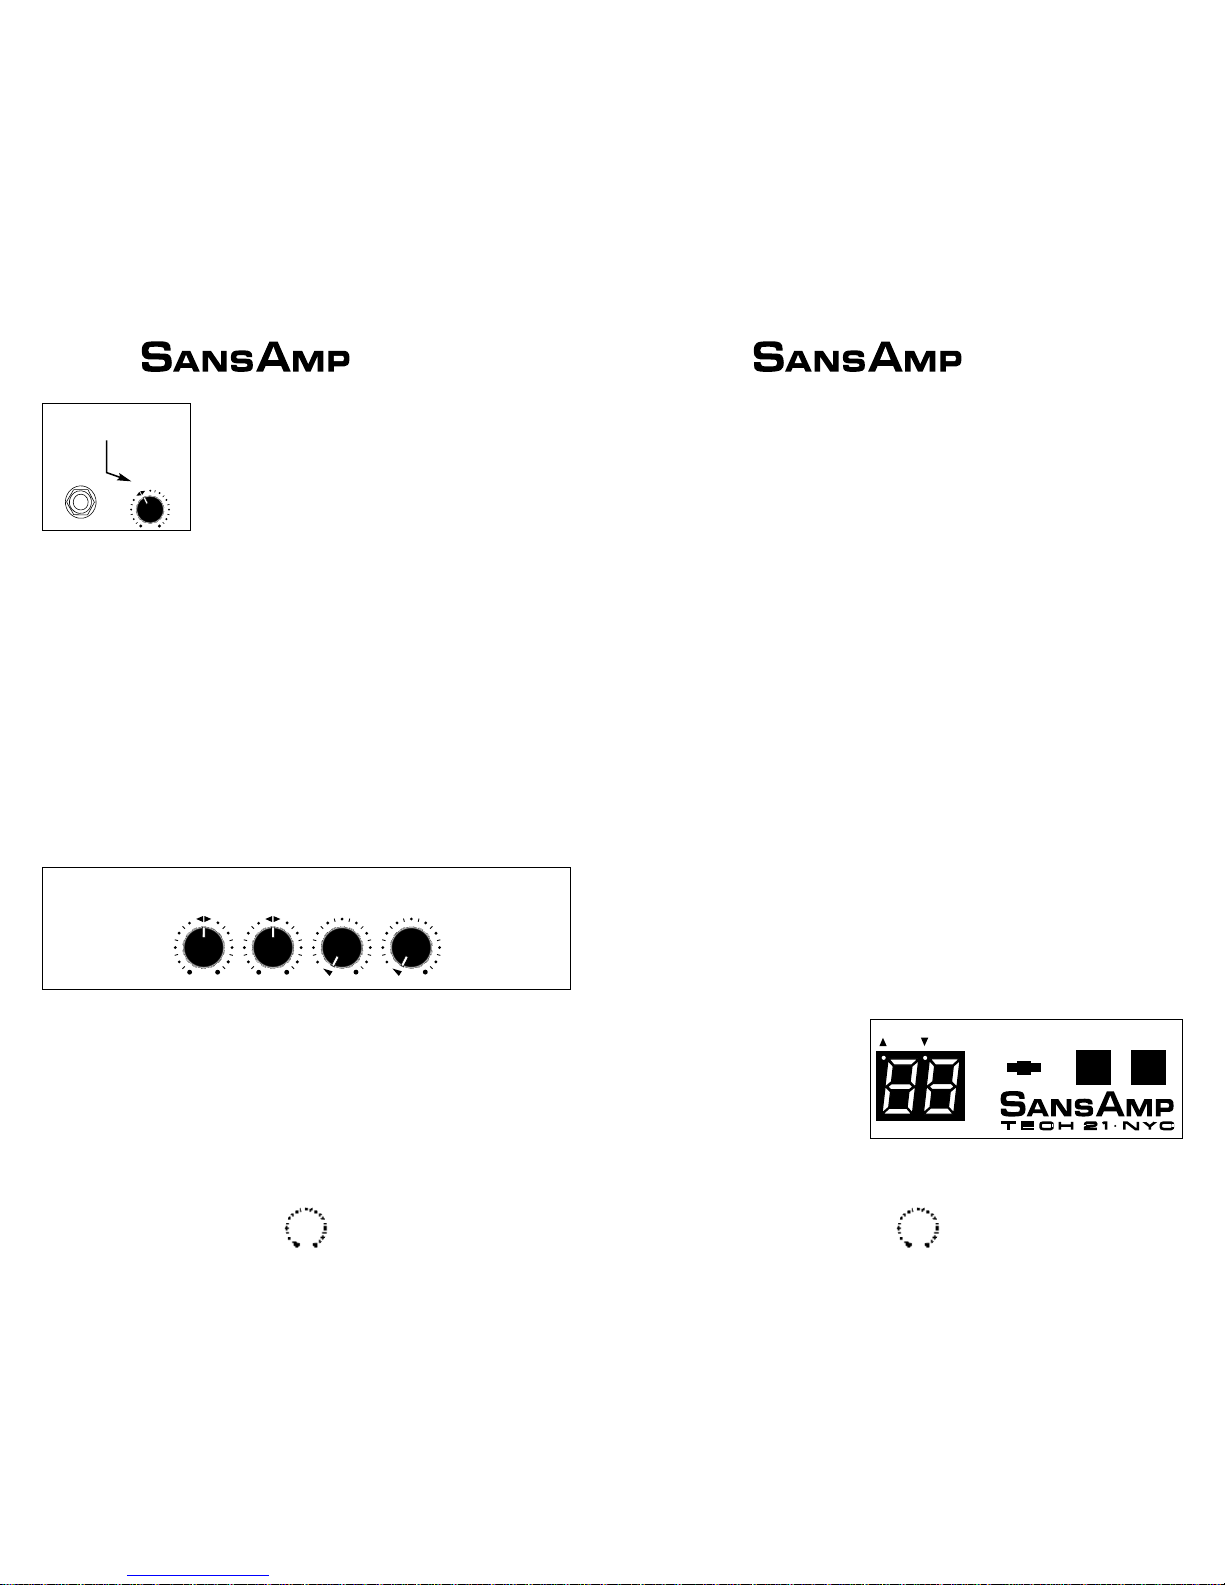
SAVE SWITCH
The Save switch stores your custom settings in the memory of the SansAmp PSA-1. It also
gives you access to the Special Page function menu. It is purposely recessed into the front
panel to make it difficult to inadvertently push. You can use a guitar pick, a pen tip, or a wellplaced fingernail to push it.
SAVING A PROGRAM
When you’ve created a sound you like and want to save the setting, follow this procedure:
1. Push the Save switch once. Both digits of the display blink on and off.
2. Use the Up or Down switches to select a program number (51-99*) where you want to
save the program.
3. Push the Save switch a second time. The display will “run around” three times and then
show the selected program number (it will stop blinking). That’s it. You’ve stored a program.
*Programs 00 - 50 are permanent factory presets and cannot be overwritten. Additionally, 00 and 50 are
permanent bypass programs for the instrument signal to pass straight through the SansAmp PSA-1.
Be careful not to overwrite a program that you wanted to keep, since the new program will
entirely wipe out the old one that was in the same memory location. Accidents can happen,
so it’s a good idea to keep track of what’s in each of your programs. Make photocopies of the
blank diagrams on pages 24-25. Each time you save a program, write in the knob settings and
give each program a name (song title, description of the tone, etc.) for easy reference later.
Remember that you can’t overwrite the factory presets. If you try to save over a factory preset,
you will get a flashing letter “E” that tells you you’re making an error.
Note: You can also off-load your custom presets to a computer, sequencer, etc., using a
Custom Preset Data Dump. For more on this, see page 16.
8
DOWN SWITCH
Pushing this switch once counts down through the programs one at a time. Holding it down
moves quickly through them.
UP SWITCH
Pushing this switch once counts up through the programs one at a time. Holding it down
advances quickly through them.
REAR PANEL
INPUT 2 SECTION
I
NPUT 2 JACK
Plugging into Input 2 lets you match the SansAmp PSA-1’s input circuitry to the signal level
being fed into it, thereby assuring the best signal-to-noise ratio and least distortion. This input is
ideal for rack and patch-bay applications, especially if you use other signal processors or multi-track
recorders before the SansAmp PSA-1. Note: Whenever you plug into the front panel’s Input,
the rear panel Input 2 is disconnected. Also, you can set the Input level selector switch to its
0dB position when you plug in extra-hot signals, such as the output from active bass guitars.
LEVEL SELECTOR SWITCH
This switch lets you connect the SansAmp PSA-1 to a wide variety of equipment with a variety of signal levels. It has two positions:
0dB position. This engages the input pad. Set the switch in this position when sending a
line-level signal into the SansAmp PSA-1. When the switch is in this position, the signal
coming into the unit is padded down by 10dB.
-10dB position. When the input pad switch is disengaged (at its -10dB setting), the rear
panel Input 2 is optimized to receive an instrument level signal. In this position, Input 2’s
sensitivity is exactly the same as the front panel’s Input.
EFFECTS LOOP
E
FFECTS SEND
This jack sends the SansAmp PSA-1’s signal to processors. When nothing is plugged into the
Effects Loop, the signal passes through from the SansAmp PSA-1 to the Output jacks, with
9
SAVE
PUSH 2X
DOWN UP
SAVE
PUSH 2X
(x 3)
Push
Save
Switch
Display
Blinks
On and
Off
Select a
Program
Number
Push
Save
Switch
Again
Both digits
“Run around”
Three times
Display
Shows
Preset
Number
RISK OF ELECTRICAL SHOCK
DO NOT OPEN
HIGH VOLTAGE
MIDI
FOOT
SWITCH OUTPUT
WARNING !
THRU / OUT
IN
LEFT
RIGHT
0dB
-10dB
EFFECTS LOOP
NOTICE:
Repairs by
factory only,
with valid S/N.
50 / 50
RETURN
OUTPUT
LEFT
RIGHT
LEFT RIGHT
MIX
SEND
0dB
-10dB
0dB
-10dB
INPUT 2
PSA-1
MODEL
TM
PSA-1
MODEL
TM
Page 6

both the left and right Output jacks receiving the same signal. Note: The Effects Loop Send
is muted in bypass programs.
MIX 50/50 SWITCH
The 1/4" Send routes 100% of the SansAmp PSA-1’s signal through your effects processor
when the 50/50 switch is disengaged. If you engage the 50/50 switch, then 50% of the
SansAmp PSA-1 signal goes through your effects processor, and the other 50% passes directly
to the 1/4" and XLR Outputs.
To preserve the signal integrity of the SansAmp PSA-1, use the Effects Loop with the 50/50
switch engaged. When the SansAmp PSA-1 is in this mode, the effects processor’s mix control
should be set at 100% wet. Your relative wet/dry mixture can then be controlled by increasing
or decreasing the effects processor’s output level.
RIGHT RETURN
When using a mono effects processor, plug the processor’s output into the SansAmp PSA-1’s
Right Return. This will route the signal to both pairs of left and right Outputs.
LEFT
RETURN
This is one of two stereo returns for the Effects Loop. If your signal processor has only one
output (mono), then plug it into the Right Return.
UNIVERSAL OUTPUT SECTION
Another aspect of the technological advancement of the SansAmp PSA-1 is that its output sections are physically compatible with any application. The outputs can be used for full range
(multi-track recorders, studio monitors, P.A. systems) as well as limited range systems (guitar
or bass speaker cabinets). Note: You can compensate for different frequency responses of
speaker enclosures by using the High control.
1/4" OUTPUT LEVEL SWITCH
This switch selects the Output level’s range. When this switch is in its 0dB position (engaged),
the Output is at line level. When the switch is in its -10dB position (disengaged), the Output is
at instrument level.
1/4” OUTPUT JACKS
These left and right 1/4" jacks carry the signal from the SansAmp PSA-1. This includes any
effects that are placed in the Effects Loop. The Output level switch (0dB/-10dB) lets you
interface the SansAmp PSA-1 with a variety of line and instrument level inputs, including
recorders and mixers requiring low-level signals, signal processors, and power amps.
10
XLR OUTPUT JACKS
The SansAmp PSA-1’s two XLR Outputs are designed without transformers to provide a
low-impedance output of extremely high quality for recording or interface with professionalquality signal processors. (It includes any effects that are placed in the Effects Loop.) XLR
and 1/4" Outputs may be used simultaneously. Minimum output impedance is 600 ohms.
XLR OUTPUT LEVEL SWITCH
This switch sets the range of the signal level sent out of the XLR Output jacks. When the
switch is in 0dB position (engaged), the Output is in the line level range. When the switch is
in its -10dB position (disengaged), the Output is in the instrument level range.
Note: The standard output level range of the SansAmp PSA-1 is 0dB due to the wide availability of digital recorders, which are unforgiving to excessive input levels. This prevents
overloading the input of a digital recorder.
FOOTSWITCH
Any momentary footswitch can be used to step through SansAmp PSA-1’s programs. Refer to
the section on page 14, “Using MIDI And Remote Footswitch,” for details on using a footswitch with the SansAmp PSA-1. Optional factory footswitch, with LED status indicator, is
available through your local Tech 21 authorized dealer.
MIDI
M
IDI IN
This jack receives MIDI signals, including Program Change commands and MIDI data dumps.
M
IDI THRU/OUT
This jack normally functions as a MIDI Thru, which lets MIDI data entering the SansAmp
PSA-1 pass through to other MIDI-controlled gear. This is useful when you employ a MIDI
footcontroller to control the SansAmp PSA-1 and an effects processor. You can disengage the
MIDI Thru by using Special Page Function 9 (see page 21).
When you off-load custom preset data or MIDI map data , this jack operates as a MIDI Out.
(See Special Page Functions 1 and 7, pages 16 and 21.)
Always use good-quality MIDI cables for connecting the SansAmp PSA-1 with other gear.
SUGGESTED SETUPS
The following three pages show you how to interface your SansAmp PSA-1 with other gear,
including MIDI equipment.
11
PSA-1
MODEL
TM
PSA-1
MODEL
TM
Page 7

USING THE SANSAMP PSA-1’S INPUTS
12
USING THE SANSAMP PSA-1’S OUTPUTS
USING THE EFFECTS LOOP
13
SAVE DOWN UP
PUSH 2X
TM
PRE - AMP BUZZ PUNCH CRUNCH DRIVE LOW HIGH LEVELINPUT
P R O G R A M M A B L E
PSA-1
MODEL
RISK OF ELECTRICAL SHOCK
DO NOT OPEN
HIGH VOLTAGE
MIDI
FOOT
SWITCH OUTPUT
WARNING !
THRU / OUT
IN
LEFT
RIGHT
0dB
-10dB
EFFECTS LOOP
NOTICE:
Repairs by
factory only,
with valid S/N.
50 / 50
RETURN
OUTPUT
LEFT
RIGHT
LEFT RIGHT
MIX
SEND
0dB
-10dB
0dB
-10dB
INPUT 2
PRESET
PRESET
RISK OF ELECTRICAL SHOCK
DO NOT OPEN
HIGH VOLTAGE
MIDI
FOOT
SWITCH
OUTPUT
WARNING !
THRU / OUT
IN
LEFT
RIGHT
0dB
-10dB
EFFECTS LOOP
NOTICE:
Repairs by
factory only,
with valid S/N.
50 / 50
RETURN
OUTPUT
LEFT
RIGHT
LEFT
RIGHT MIX
SEND
0dB
-10dB
0dB
-10dB
INPUT 2
PRESET
TO STAGE SPKRS.
TO:
P. A. SYSTEM
MONITORS
RECORDER
RISK OF ELECTRICAL SHOCK
DO NOT OPEN
HIGH VOLTAGE
MIDI
FOOT
SWITCH
OUTPUT
WARNING !
THRU / OUT
IN
LEFT
RIGHT
0dB
-10dB
EFFECTS LOOP
NOTICE:
Repairs by
factory only,
with valid S/N.
50 / 50
RETURN
OUTPUT
LEFT
RIGHT
LEFT
RIGHT
MIX
SEND
0dB
-10dB
0dB
-10dB
INPUT 2
PRESET
LEFT OUTPUT
RIGHT OUTPUT
INPUT
The SansAmp PSA-1 has dual 1/4" unbalanced and XLR balanced Outputs for interfacing
with all types of gear. XLR Outputs provide a signal for driving pro gear, including P.A. systems, mixers, signal processors. 1/4" Outputs are ideal for feeding most mixers, signal processors, and instrument amplifiers. Each set can be used simultaneously and independently.
The Effects Loop lets you patch in reverbs,
delays, and other signal processors. If your
signal processor has only one output
(mono), then plug it into the Right Return.
Note: If you engage the 50/50 switch, then
50% of the SansAmp PSA-1 signal goes
through your effects processor, and the
other 50% passes directly to the 1/4" and
XLR Outputs.
The front-panel Input jack is designed to accept signals from guitars, basses, keyboards, etc.
You can set up your SansAmp PSA-1 as a permanent part of a rack or patch-bay setup, with
its usual input source plugged into the rear-panel jack. Then, if you want to plug straight into
the SansAmp PSA-1, use the front-panel Input, which overrides the rear-panel Input 2.
PSA-1
MODEL
TM
PSA-1
MODEL
TM
Page 8

USING MIDI AND REMOTE FOOTSWITCH*
14
SPECIAL PAGE FUNCTIONS & MIDI IMPLEMENTATION
S
PECIAL
PAGE FUNCTIONS
Some very important features lurk inside your SansAmp PSA-1 and aren’t accessible through
the knobs and Up and Down switches alone. However, they’re very powerful and useful, so
take the time to check them out, especially if you are using a MIDI footcontroller or other
MIDI gear to interface with your SansAmp PSA-1.
To operate the Special Page functions, select Program 00 (zero zero) and press the Save button once. (Use a guitar pick or a pen tip.) The dots in the upper left corners of both digits in
the numerical display should now be flashing together.
Use the Up and Down keys to select any of these functions:
00 Exit Special Page
01 Custom Preset Data Dump out through the MIDI Thru/Out port
02 Define MIDI Mapping
03 Set the Loop Count for the Footswitch
04 Set Fixed/Programmable Swap Bit
05 Set MIDI Channel
06 Software Revision Number
07 MIDI Map Dump out through the MIDI Thru/Out port
08 Disengage All Pots
09 MIDI Thru Disable
When you select a function, press the Save button a second time. The dots will glow continuously.
NOTE: If you select function 00, you will exit the Special Page function menu and return to
Bypass Program 00. If you select any of the other functions, here’s what they do:
15
DOWN UP
SAVE
PUSH 2X
Push
the
Save
Switch
Both
Dots
Blink
Enter
Special
Page
Menu at
Program
00
Select
Special
Page
00 - 07
All MIDI gear, including MIDI footcontrollers, signal processors, keyboards, and computers,
can be connected to the SansAmp PSA-1. The MIDI In accepts Program Change commands,
as well as MIDI Map and Program dumps. The MIDI Thru/Out jack is usually configured as a
MIDI Thru, except when data is being transmitted from the SansAmp PSA-1. Any momentary-action footswitch can be used to cycle through the SansAmp PSA-1's presets, as well as
MIDI footcontrollers that include a momentary-action switch.
*Optional momentary-action factory footswitch, with LED status indicator, is available
through your local Tech 21 authorized dealer.
PSA-1
MODEL
TM
PSA-1
MODEL
TM
Page 9

SPECIAL PAGE FUNCTION 1: CUSTOM PRESET DATA DUMP
This lets you off-load your custom presets to another SansAmp PSA-1 or other external MIDI
gear, such as a sequencer. Connect a MIDI cable from the SansAmp PSA-1’s MIDI Thru/Out
jack, and plug the other end into a second SansAmp PSA-1, sequencer, MIDIable computer,
etc. Set up the sequencer or computer to receive the MIDI data (a second SansAmp PSA-1
automatically detects and accepts the data dump, so you don’t have to adjust anything), and
then press the SansAmp PSA-1’s Save key. The SansAmp PSA-1’s display will show two
dashes for approximately 10 seconds, and then 00, meaning that it has completed the dump.
After doing the dump, it returns to the Special Page function menu. You may now choose
either a new Special Page function, or press Save again to exit. If you don’t make a choice in
about 15 seconds, the display reverts to 00 without the dots blinking, indicating that the
SansAmp PSA-1 is in Program 00, bypass.
SPECIAL PAGE FUNCTION 2: MIDI MAPPING
This function defines internal MIDI mapping. That is, it tells your SansAmp PSA-1 which
program to call up when a MIDI Program Change command comes in. For example, if your
MIDI footcontroller sends out a Program Change command that says Program 26, and you
want your SansAmp PSA-1 to respond to that Program 26 message by calling up preset number 15, you can set the SansAmp PSA-1 to map that message to the appropriate location.
The SansAmp PSA-1 comes from the factory with its MIDI map set by default to map incoming programs to the displayed programs. That is, MIDI 01 calls up program 01, etc. The
SansAmp PSA-1 has 100 program locations; therefore, any Program Change messages with
values greater than 99 are automatically remapped. So, incoming Program Change numbers
100 through 128 are automatically remapped so that 100 calls up 00, 101 calls up 01, and so
16
on until 128 calls up program 28.
To remap a MIDI Program Change command, here’s what you do:
Select function 02. Now push Save. The display’s upper left dot glows, telling you that the
display is showing the number of the incoming program. To change that number, use the Up
and Down switches to select a new number. Now push the Save button and the right dot
glows, telling you the display is
indicating the SansAmp PSA-1
program that will be affected by the
incoming MIDI Program Change
number that you selected. To
change the program, use the Up
and Down buttons. Then push the
Save button to store your change.
The display will show two zeroes
and blinking dots to indicate that
you’re back at function 00. If you
don’t make any changes in about 15
seconds, the display will revert to 00
17
SAVE
PUSH 2X
Push
the
Save
Switch
Display
Shows
Two
Dashes
While
Dumping
MIDI
Data
Display
Shows
00
When It
Returns
To
Special
Page
Menu
Dots
Stop
Blinking
When It
Returns
To
Program
00
DOWN UP
DOWN UP
SAVE
PUSH 2X
SAVE
PUSH 2X
SAVE
PUSH 2X
Push
the
Save
Switch
Incoming
MIDI
Number
is Shown
Select
New
Incoming
Number
SansAmp
PSA-1’s
Preset
Number
is Shown
Right Dot
Glows
Left Dot
Glows
Push
the
Save
Switch
Again
Select
New
Preset
Number
Push
the
Save
Switch
Again
Display blinks the number “1”
and two-digit number to indi-
cate incoming MIDI number
is greater than 99
(MIDI program number 121 is
shown here)
PSA-1
MODEL
TM
PSA-1
MODEL
TM
Note: If you select a number above 99, the number 1, for
100, will blink in alternation with a two-digit number.
Display
Shows
00
When It
Returns
To Special
Page Menu
Dots
Stop
Blinking
When It
Returns To
Program
00
Both
Dots
Blink
Both
Dots
Blink
Both
Dots
Blink
Page 10

without blinking dots, meaning that the SansAmp PSA-1 is at program 00, or bypass. Once
you’ve remapped the programs to your satisfaction, press the Save button to exit the Special
Page menu.
SPECIAL
PAGE FUNCTION 3: SET FOOTSWITCH LOOP COUNT
With a single momentary footswitch, you can step through any number of programs you want,
and the sequence loops itself back automatically. (Your SansAmp PSA-1 is factory programmed for three steps, although you can set different numbers.) That is, if you have a four-
step footswitch loop count, and you step on the footswitch repeatedly, the programs will cycle
through like this:
00, 01, 02, 03, 00, 01, 02, 03, 00, etc. or 21, 22, 23, 24, 21, 22, 23, 24, 21, etc.
You can set up your loop to include as many as all 100 (00 to 99) programs in the unit.
However, on a more practical level, you may want to limit your loop to a smaller number. If
you have selected Special Page Function 3, the display shows the current setting of the
footswitch loop count. You may use the Up and Down keys to increase or decrease the loop
count and press Save to store your selection. The dots will then return to their previous flash
rate, the display will show zero, and you will be back at the Special Page function menu. You
may select another function, or press Save to exit.
USEFUL FOOTSWITCH TRICK
If you are using a MIDI footcontroller to call up the programs in your SansAmp PSA-1, you
can use still use your momentary footswitch to cycle through a group. For instance, if you
select a loop of four programs, as shown in the previous example, then you can step through
four programs beginning on any program number, if you use a MIDI footcontroller. Here’s
how: Use your MIDI footcontroller to call up, say, Program 25, and have your SansAmp
PSA-1 set to loop through four programs. Instead of the first program being 00 when you step
on the momentary switch, it’s 25. The sequence, then as you step on the footswitch, is 25, 26,
27, 28, 25, 26, 27, 28, etc.
18
Now, if you program the SansAmp PSA-1 to step through only two presets, you can set up
rhythm and lead programs for individual songs, and select the grouping with your MIDI footcontroller. For example, you can set up rhythm and lead sounds in Programs 22 and 23 for
one song, and rhythm and lead sounds for another song in Programs 24 and 25. Then when
you play the first song, select Program 22 using the MIDI footcontroller and step on the
momentary switch to go back and forth between Programs 22 and 23. When it’s time for the
next song, use the MIDI footcontroller to call up Program 24, and then use the momentary
switch to toggle between Programs 24 and 25.
Set up two, three, or as many presets per song or style you want, according to your needs. You
can set up blues groupings, ballad groupings, grunge groupings, metal groupings, etc., and
have them all ready to call up at any time.
SPECIAL P
AGE FUNCTION 4: F
IXED/PROGRAMMABLE SWA P BIT
This allows you to “swap” the positioning of the fixed Factory presets with user-programmable
Custom settings. When you select Function 4, the display will show either 00, 01, 02 or 03.
-00 groups Factory presets at Programs 00-49; Custom settings at 50-99 (as shipped).
-01 groups Custom settings at Programs 00-49; Factory presets at 50-99.
-02 groups Factory presets at Programs 00-49; Custom settings at 50-99 + memory protect.
-03 groups Custom settings + memory protect at Programs 00-49; Factory presets at 50-99.
The memory-protect feature in both 02 and 03 means your custom settings cannot be overwritten. Factory settings are permanently locked-in no matter which grouping you choose.
To change the setting, push the Save button. Then use the Up and Down buttons to select
00, 01, 02, or 03. Then push Save to store your selection. The display will then show 00 with
blinking dots to indicate you’re still in the Special Page menu. You may now choose either a
new Special Page function, or press Save again to exit. If you don’t make a choice in about 15
seconds, the display reverts to 00 without the dots blinking, indicating that the SansAmp
PSA-1 is in Program 00, bypass.
19
DOWN UP
SAVE
PUSH 2X
SAVE
PUSH 2X
Push
the
Save
Switch
Number
of
Steps
is
Shown
Select a
New
Number
of
Steps
Push
the
Save
Switch
Again
DOWN UP
SAVE
PUSH 2X
SAVE
PUSH 2X
Push
the
Save
Switch
Current
Setting
is
Shown
Select 00,
01, 02, or
03 to
Order
User and
Factory
Presets
Push
the
Save
Switch
Again
PSA-1
MODEL
TM
PSA-1
MODEL
TM
Display
Shows 00
When It
Returns
To Special
Page Menu
Dots Stop
Blinking
When It
Returns To
Program
00
Display
Shows 00
When It
Returns
To
Special
Page
Menu
Dots Stop
Blinking
When It
Returns
To
Program
00
Both
Dots
Blink
Both
Dots
Blink
Page 11

SPECIAL PAGE FUNCTION 5: MIDI CHANNEL SELECT
This function sets the MIDI channel on which the SansAmp PSA-1 receives MIDI data. It can
be set to Omni (receive on any or all channels), or specific channels 1 through 16. Push the Save
button, and the display shows the current setting. Press the Up or Down buttons to select either
Omni (the default value, indicated by a small “o” in the right digit), or any number between 1
and 16. Push Save to save your selection. The display shows 00 with blinking dots to indicate
that you’re in the Special Page menu. You may now choose either a new Special Page function,
or press Save again to exit. If you don’t make a choice in about 15 seconds, the display reverts to
00 without the dots blinking, indicating that the SansAmp PSA-1 is in Program 00, bypass.
S
PECIAL P
AGE FUNCTION 6: SOFTWARE REVISION NUMBER
This function tells you which software version your SansAmp PSA-1 has. You can’t alter this,
but the information may come in handy in the future if software upgrades become available.
Push the Save button and the display will show a letter or two-digit number (01, 02, etc.).
After showing you the software version, the display reverts to 00 with blinking dots to indicate you’re in the Special Page menu. You may now choose either a new Special Page function, or press Save again to exit. If you don’t make a choice in about 15 seconds, the display
reverts to 00 without the dots blinking, indicating that the SansAmp PSA-1 is in Program 00,
bypass.
20
SPECIAL PAGE FUNCTION 7: MIDI MAP DUMP
If you want to dump your MIDI mapping data only, you can use this function. Run a MIDI
cable from the MIDI Thru/Out jack on the rear of the SansAmp PSA-1 to the MIDI in jack
on a sequencer, computer, etc. Ready the other piece of gear to receive data, and then push
the Save button on the SansAmp PSA-1. The display shows two dashes as the MIDI mapping
data is sent. When it’s done, it automatically returns to showing 00 with two flashing dots to
indicate that the SansAmp PSA-1 is in Special Page menu. You may now choose either a
new Special Page function, or press Save again to exit. If you don’t make a choice in about 15
seconds, the display reverts to 00 without the dots blinking, indicating that the SansAmp
PSA-1 is in Program 00, bypass.
SPECIAL PAGE FUNCTION 8: DISENGAGE ALL POTS
This function renders all eight front panel potentiometers inactive. This advanced feature prevents accidental setting changes during performances. All presets remain in the memory and
are accessible via footswitch or MIDI, however, you cannot edit the programs while in this
mode. Select function 08 and press Save. Use the Up and Down buttons to select between
two options: 00 = All pots engaged (normal operation). Or, 01 = All pots disengaged.
Then push Save to store your selection. The display will then show 00 with blinking dots to
indicate you’re still in the Special Page menu. You may now choose either a new Special Page
function, or press Save again to exit.
S
PECIAL PAGE FUNCTION 9: MIDI THRU DISABLE
This function disables MIDI Thru on the MIDI Thru/Out port. If you are using a multi-port
MIDI interface, you should disable MIDI Thru. If you are daisy chaining your MIDI devices,
leave it enabled. Select function 09 and press Save. Use the Up and Down buttons to select:
00 = MIDI Thru enabled (normal operation). Or, 01 = MIDI Thru disabled. Then push
Save to store your selection. The display will then show 00 with blinking dots to indicate
you’re still in the Special Page menu. You may now choose either a new Special Page function, or press Save again to exit.
21
DOWN UP
SAVE
PUSH 2X
SAVE
PUSH 2X
Push
the
Save
Switch
Current
Setting
is
Shown
Select “o”
for
“Omni,”
or
Channel
1 - 16
Push
the
Save
Switch
Again
SAVE
PUSH 2X
Push
the
Save
Switch
Display
Shows
Software
Version
Automatically
Exits to
Special
Page Menu
After
15 Seconds,
or When
Save Switch
is Pushed
SAVE
PUSH 2X
Push
the
Save
Switch
Display
shows
Two dashes
as MIDI
Mapping
Data
is dumped
PSA-1
MODEL
TM
PSA-1
MODEL
TM
Display
Shows 00
When It
Returns
To Special
Page Menu
Dots Stop
Blinking
When It
Returns To
Program
00
Display
Shows 00
When It
Returns
To Special
Page Menu
Dots Stop
Blinking
When It
Returns To
Program
00
Display
Shows 00
When It
Returns
To Special
Page Menu
Dots Stop
Blinking
When It
Returns To
Program
00
Automatically
Exits to
Special
Page
Menu When
Dump
is Completed
Both
Dots
Blink
Both
Dots
Blink
Both
Dots
Blink
Page 12

LIST OF PRESETS
Note: Factory presets are based upon using the appropriate types of instruments and/or
accessories associated with each particular sound.
SOUND GROUP PRESET SOUND
00 Bypass
Marshall
®
styles 01 Plexi
02 Vintage
03 Schenker
04 JMP-1
®
05 High Gain
06 Bluesbreaker
07 Hendrix
08 Van Halen I
09 Classic Clean
Fender
®
styles 10 Stock
11 B.B. King
12 Stevie Ray
13 Funk
14 Champ
®
15 Twin
®
16 Super Bright
17 Classic Rock
18 Super Clean
19 Jazz
Mesa/Boogie
®
styles 20 Mark I
®
21 Metallica
22 Santana
23 Clean
24 Rectifier
®
25 Triaxis
®
26 Lead
27 Rhythm
28 Too Much Gain
29 Mutant
Bass styles 30 SVT
®
31 Bassman
®
32 Jazz
33 Metal
34 Slap
35 King’s X
36 Yes
37 Lead
38 Doug Wimbish
39 Crimson
Miscellaneous styles 40 Fuzz Face
®
41 Big Muff Pi
®
42 Pignose
®
43 MXR+
®
44 Tele®Simulator
45 American Woman
46 Pantera
47 Hiwatt
®
48 AC30®Queen
49 Speaker Simulator
50 Bypass
22
LIST OF CUSTOM SETTINGS
(Keep a checklist of your customized programs.)
23
Marshall®, JMP-1®, Fender®, Champ®, Twin®, Mesa/Boogie®, Mark I®, Rectifier®, Triaxis®, SVT®, Bassman®, Fuzz
Face®, Big Muff Pi®, Pignose®, MXR +®, Tele®, Hiwatt®, and AC30®are registered trademarks of their respective
companies. Names of factory presets are intended for descriptive purposes only and should not be construed as an
endorsement or affiliation with the companies, products, song titles, or persons named.
PSA-1
MODEL
TM
PSA-1
MODEL
TM
P
ROGRAM # SOUND/NAME
P
ROGRAM # SOUND/NAME
Page 13

PSA-1
MODEL
TM
PRE - AMP BUZZ PUNCH CRUNCH DRIVE LOW HIGH LEVEL
Program Number
Notes
PRE - AMP BUZZ PUNCH CRUNCH DRIVE LOW HIGH LEVEL
Program Number
Notes
PRE - AMP BUZZ PUNCH CRUNCH DRIVE LOW HIGH LEVEL
Program Number
Notes
PRE - AMP BUZZ PUNCH CRUNCH DRIVE LOW HIGH LEVEL
Program Number
Notes
PRE - AMP BUZZ PUNCH CRUNCH DRIVE LOW HIGH LEVEL
Program Number
Notes
PRE - AMP BUZZ PUNCH CRUNCH DRIVE LOW HIGH LEVEL
Program Number
Notes
PSA-1
MODEL
TM
2524
CUSTOM SETTINGS DIAGRAMS
(Photocopy these pages and keep a record of your customized programs.)
Page 14

PSA-1
MODEL
TM
GLOBAL RESET
If you want to completely reset your unit back to factory specifications, follow this procedure:
Unplug the unit’s power cord. Turn all pots all the way counter-clockwise to minimum. Push the
Up and Down buttons simultaneously, while re-plugging the power cord back into an AC outlet.
The two dots in the upper left hand corner of the display will light up. Release the Up and Down
buttons. Wait approx. 10 seconds for the dots to go dark. The display will show 00. That’s it.
You’re back to how the unit was originally shipped.
WARNINGS
•Attempting to repair this unit is not recommended and may void its warranty.
•Missing or altered serial numbers automatically void the warranty. For your own protection,
be sure that the serial number labels on the unit’s back plate and exterior box are intact.
ONE-YEAR LIMITED WARRANTY
Manufacturer warrants unit to be free from defects in materials and workmanship for a period of
one (1) year from the date of purchase. This warranty does not include damage resulting from
accident, misuse, abuse, alteration, or incorrect current or voltage. If unit becomes defective
within warranty period, Tech 21, Inc., will elect to repair or replace it free of charge. After warranty period expires, manufacturer will repair defective unit for a fee.
PROOF OF PURCHASE IS REQUIRED FOR ANY REPAIR
For residents of the U.S. and Canada, please call Tech 21’s main headquarters for shipping
instructions and a Return Authorization Number. Tech 21 will not accept packages without prior
authorization, pre-paid freight (UPS preferred), and proper insurance.
FOR PERSONAL ASSISTANCE & INQUIRIES
Contact Tech 21, Inc., any weekday from 10:00 AM to 5:00 PM, Eastern Standard Time.
MADE IN THE U.S.A.
Fill in the following information for future reference:
Model ______________________________________ Serial Number__________________
Dealer’s Name _____________________________________
Dealer’s Address ___________________________________
Date of Purchase ___________________________________
Tech 21, Inc.
333 West 52nd Street, New York, NY 10019
(212) 315-1116 / Fax: (212) 315-0825
Website: www.tech 21nyc.com
E-mail: info@tech21nyc.com
© 1993 Tech 21, Inc.
 Loading...