

Page 1
*Operable with phantom power supply, minimum 24V DC regulated,
POWER REQUIREMENTS
however, 48V DC regulated is recommended in order to illuminate LED.
*Utilizes standard 9V alkaline battery (not included). To install, simply remove
door cover. (NOTE: The Input activates battery. To conserve energy, unplug
when not in use.) Power Consumption: approx. 6mA.
*USE DC POWER SUPPLY ONLY! Failure to do so may damage the
unit and void warranty. DC Power Supply Specifications:
-9V DC regulated or unregulated, 100mA minimum;
-2.1mm female plug, center negative (-).
Optional factory power supply is available: Tech 21 Model #DC4.
WARNINGS:
* Attempting to repair unit is not recommended and may void warranty.
* Missing or altered serial numbers automatically void warranty. For your own
protection: be sure serial number labels on the unit’s back plate and exterior
box are intact, and return your warranty registration card.
ONE YEAR LIMITED WARRANTY. PROOF OF PURCHASE
REQUIRED. Manufacturer warrants unit to be free from defects in materials
and workmanship for one (1) year from date of purchase to the original purchaser and is not transferable. This warranty does not include damage resulting
from accident, misuse, abuse, alteration, or incorrect current or voltage. If unit
becomes defective within warranty period, Tech 21 will repair or replace it
free of charge. After expiration, Tech 21 will repair defective unit for a fee.
ALL REPAIRS for residents of U.S. and Canada: Call Tech 21 for Return
Authorization Number. Manufacturer will not accept packages without
prior authorization, pre-paid freight (UPS preferred) and proper insurance.
FOR PERSONAL ASSISTANCE & SERVICE:
Contact Tech 21 weekdays from 9:00 AM to 5:00 PM, EST.
Hand-built in the U.S.A. using high-quality components
sourced domestically and around the globe.
v2)
(
I
D
iver
r
D
s
as
B
mp
A
Sans
anual
M
’s
ner
w
O
T: 973-777-6996 • F : 973-777-9899
E: info@tech21nyc.com • www.tech21nyc.com
©20 16 Tech 21 USA, I nc . (Rev 01/17)
Page 2

PRODUCT OVERVIEW
The SansAmp Bass Driver DI has been an arsenal staple for players and studios
almost since the day it was introduced in 1994. This multi-function, multi-application pedal dials up big vintage tube tones, bright modern slap sounds, gnarly
distortions, and all in between. So, after all these years, why change it now?
We thought it was time for a little modernization. Since the popularity of 5and 6-string basses has gone beyond fad status and become mainstream, we
added a switch to adjust the bass frequency to extend into those lower registers. We also added a mid-range control and a switch to adjust its frequency.
The core of the SansAmp Bass Driver and all of its tones remain true to its
original design.
As with each SansAmp model, the controls are designed to give you the flexibility to customize your own sound. After all, the greatest inspiration comes
from having the sound that’s right for you.
APPLICATIONS
WITH A BASS AMP RIG:
-As a Pre-Amp: Run the 1/4” Output of the SansAmp Bass Driver DI
directly into the power amp input, a.k.a. “effects return” (if applicable), of an
amp. This will bypass the tone-coloring pre-amp section of the amp rig.
-As a Stomp Box: Run the 1/4” Output into the front input of an amp.
For best results, keep the SansAmp Bass Driver’s Level close to unity gain so
as not to overload the amp’s input, which could yield undesirable distortion.
TO DRIVE A POWER AMP: Run the 1/4” Output, or the XLR
Output to the corresponding input of a power amp, and adjust your stage vol-
ume with the Level control of the SansAmp Bass Driver DI.
NOTE: When running into the power amp input of an amp or a power amp
alone, make sure to set the Output Level Switches as follows:
If using 1/4-inch: +10dB engaged (in position).
If using XLR: -20dB disengaged (out position).
Then adjust Level as needed. If you are so inclined, this is the time to crank it!
1
TO RECORD DIRECT: Plug the XLR or 1/4” Output directly into the
input of a mixer/recorder. Work with the input trim control on the mixer/
recorder and be sure not to overload its input. If the Level on the SansAmp
Bass Driver is below 12 o’clock and is overloading the board, use the respective output level switch to reduce the output:
If using 1/4-inch: +10dB disengaged (out position).
If using XLR: -20dB engaged (in position).
Bear in mind full-range systems yield a wide frequency response. Therefore,
we suggest you start with the EQ levels at 12 o’clock and then increase/
decrease to taste.
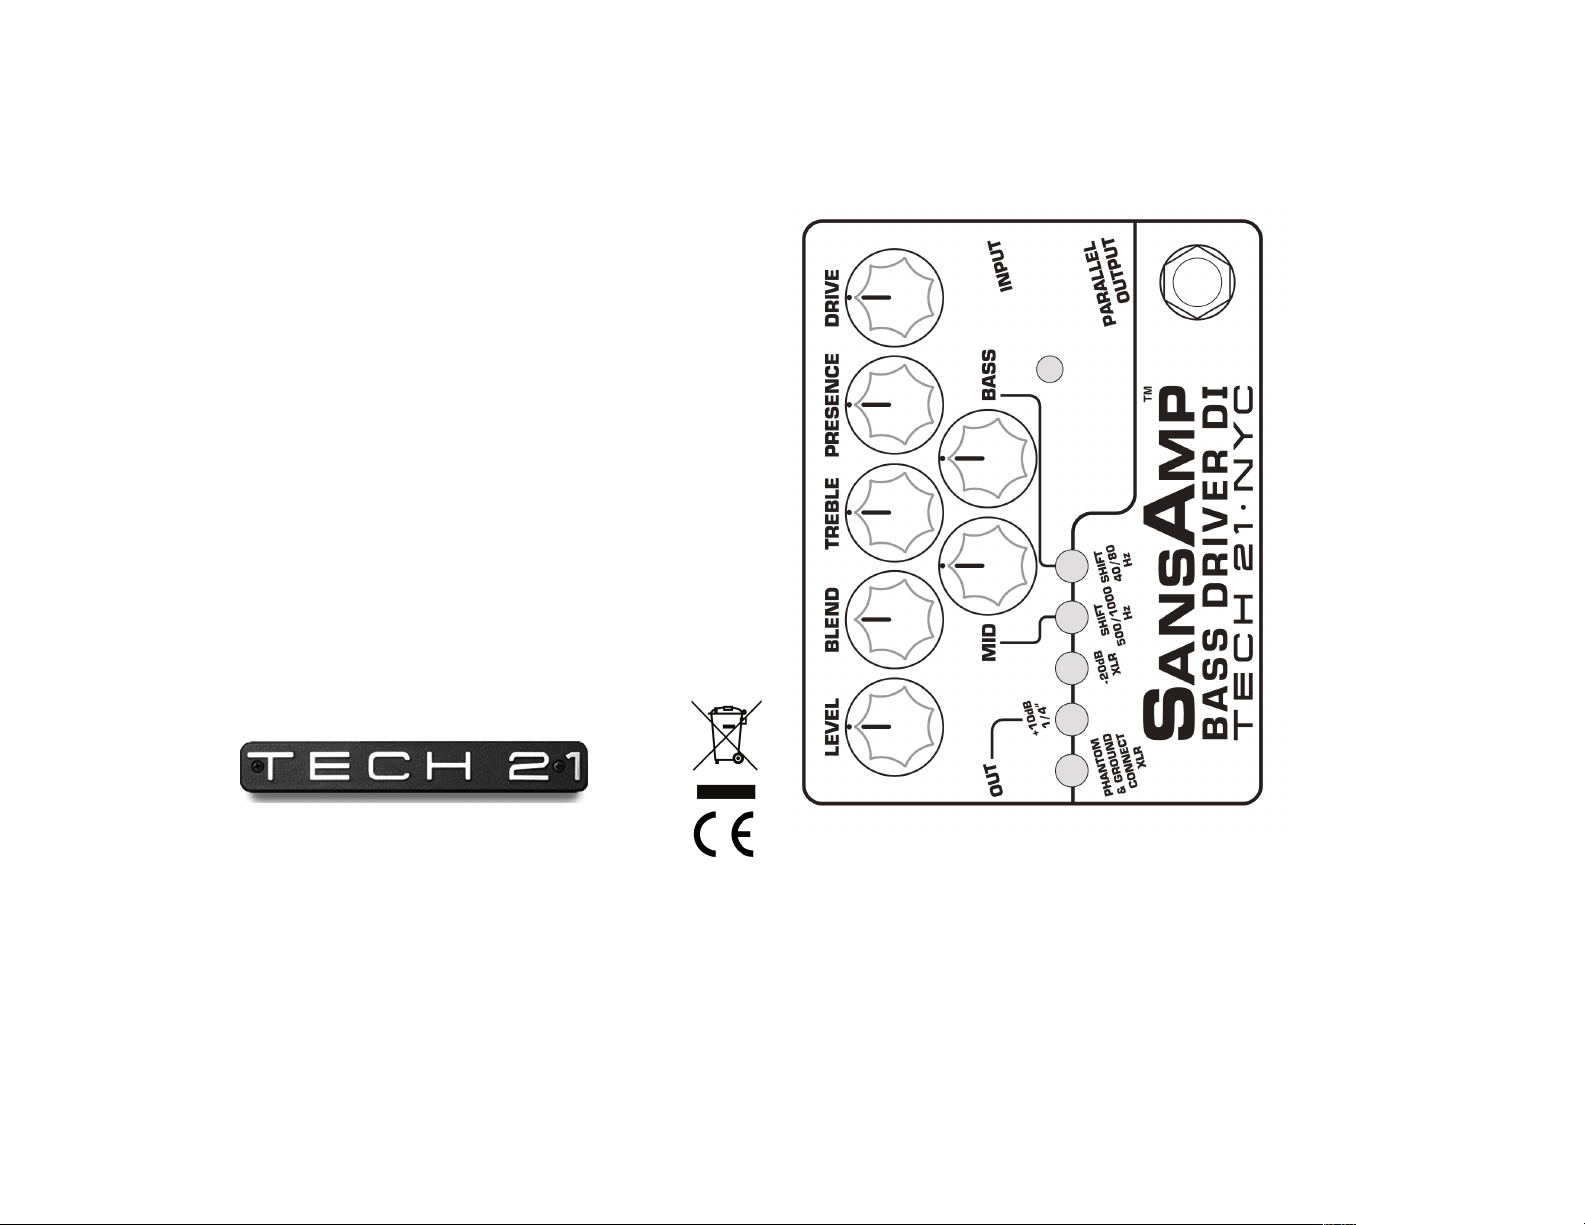
GUIDE TO CONTROLS
PRESENCE:
smoother high end and for clean settings, decrease to taste.
brings out the upper harmonic content and attack. For a
DRIVE: adjusts the input sensitivity, as well as the overall amount of gain and
overdrive, similar to when the output section of a tube amp is being pushed.
MID, BASS & TREBLE: Unlike passive controls that only cut, these
active tone controls cut or boost ±12dB from unity gain (12 o’clock).
NOTE: The overall output level will change relative to your EQ settings.
Simply adjust the Level control accordingly to compensate.
MID SHIFT switch changes the frequency from 500 Hz (up position) to 1000 Hz.
BASS SHIFT switch changes the frequency from 80 Hz (up position) to 40 Hz
to accommodate 5- and 6-string basses that extend into the lower registers.
BLEND controls the ratio of SansAmp Tube Amplifier Emulation circuitry
and your direct instrument signal. In most cases, you will probably have this
set at maximum (100% SansAmp). For certain applications, however, such as
an ultra-transparent sound or for use with piezo pickup-equipped instruments,
you may want to blend-in the direct signal to achieve your desired sound.
While the SansAmp Tube Amplifier Emulation circuitry is bypassed when Blend
is at minimum, the Mid, Bass, Treble and Level controls remain active.
LEVEL adjusts the output level of both the 1/4” and XLR outputs.
2
Page 3

THE INS AND OUTS
Follow Standard Audio Procedure to avoid unwanted and potentially speakerdamaging “pops” when connecting or disconnecting any equipment:
Always mute mixing board and/or turn down amp volume
before plugging or unplugging!
IMPORTANT: TURN ON FIRST. TURN OFF LAST.
INPUT: 1/4”, 1megOhm, instrument level. Switches battery power on/off.
To avoid battery drain, unplug when unit is not in use. AND...
DON’T FORGET TO MUTE!
PARALLEL OUTPUT: 1/4” unbalanced direct output is “hard-wired”
parallel with input jack. Instrument signal passes through, UNEFFECTED, to
the input of your stage amplification system, if desired.
BALANCED XLR OUTPUT: Balanced low Z output. Sends effected
or uneffected signal to mixing console/recorder, depending on the orientation
of the Footswitch.
XLR Output Level Switch: -20dB pad to match the output to
equipment with different input level requirements. Disengaged (out position),
the output is 0dB. Engaged (in position), the output is -20dB.
1/4” OUTPUT: Unbalanced low Z output. Sends effected or uneffected
signal to amp rig or power amp, as per the orientation of the Footswitch.
1/4” Output Level Switch: +10dB boost to match the output to
equipment with different input level requirements. Disengaged (out position),
the output is -10dB. Engaged (in position), the output is 0dB.
FOOTSWITCH, with corresponding LED indicator: Engages/dis-
engages SansAmp Tube Amplifier Emulation circuitry. Engaged, LED will be on.
Tonality and gain structure are affected as determined by the setting of the
controls. Delivers effected signal through the XLR Output and 1/4” Output.
Disgengaged, LED will be off. SansAmp Bass Driver DI functions as an active
transparent direct box and does not sonically alter the instrument signal.
3
Allows you to “tap into” the power of a suitably equipped mixer, which, today,
PHANTOM POWER
most are. As the 3-conductor XLR sends the audio signal to the input of a
mixer, the mixer sends voltage back to the unit via the same 3 wires, eliminating the need for an external power supply. Consult your mixer’s owner’s manual for set-up instructions. For live and studio use, let the engineer know your
SansAmp Bass Driver DI is phantom power operable.
PHANTOM & GROUND CONNECT SWITCH: When
engaged, the ground connects and unit will accept phantom power through the
XLR Output. Disengaged, the ground of your stage system and other interconnected gear is lifted (isolated) from the ground of the mixing console.
With a mixer only: If you are plugging your bass into the Bass Driver and
taking the XLR Output to a mixer --and do not have any other
grounded equipment connected in the setup-- you will have to
push the switch in to connect the ground and engage the phantom power.
With a mixer and bass amp: If you are going to the mixer via the XLR
and using the 1/4” Output or Parallel Output to feed a bass amp (with its own AC
ground), you should have the switch disengaged (in the up position) to be in
“Ground Lift” mode. If you experience hum and/or buzz with the switch in either
position, there may be a problem with the AC outlets you are plugging into.
NOTE: If using vintage equipment without proper grounds, take extra care
connecting it to modern grounded equipment. Any inadequacies of the ground
in vintage gear could result in damaging anything it is connected to.
NOTE: While operating under phantom power, we recommend keeping a 9V
alkaline battery installed at all times to avoid the previously mentioned “pops”
when lifting the ground (see page 3).
SPEAKER SIMULATION
Speaker simulation is an integral part of the SansAmp Tube Amplifier
Emulation circuitry. It is specifically designed for a smooth, even response as
would be achieved by a multiply-miked cabinet --without peaks, valleys, and
notches associated with single miking-- and will complement any type of bass
speaker cabinet system.
4
Page 4

NOTEWORTHY NOTES & CONSIDERATIONS
1) SansAmp Bass Driver DI is an interactive tool. It will react dif-
ferently to various signal levels, as well as your individual touch. For instance, a
hotter signal and a heavy hand will increase the gain structure and result in
more overdrive. A softer signal and a light touch decreases the gain structure
for a cleaner sound. By using Presence, Drive and the EQ controls, you can
achieve the proper mix of tonality and gain structure that best suits your style.
For instance, if you want the high end to be cleaner and smoother, increase
Treble and decrease Presence. If you want more overdrive, increase Presence and
decrease Treble. This will bring out the upper harmonic content and attack. As
you increase Treble, the high frequency content increases without changing the
harmonic content.
2) The noise level of SansAmp Bass Driver DI is exceptionally
low. However, it may amplify noise emanating from the input source. Bear in
mind that SansAmp Bass Driver DI’s controls are unusually sensitive and do
not require maximum levels of input to achieve high levels of output. To minimize noise going into SansAmp Bass Driver DI, we recommend the following:
a) Active electronic instruments should have tone controls
positioned flat. If you need to boost, do so slowly and sparingly.
b) Passive electronic instruments should have volume and
tone controls set at maximum.
3) When you push SansAmp Bass Driver DI to saturation, you get enhanced
harmonics, just as you would with an overdriven tube amplifier. Depending on
the setting, the unique circuitry limits transient peaks for an even meter reading,
so that outboard compressors or limiters may not be necessary.
4) Using effects. One of the key attributes of SansAmp is the responsive-
ness to the dynamics and nuances of your playing technique. Therefore, your
time-modifying effects should be placed after SansAmp. If placing a tone-modifying effect before SansAmp, be sure to set the output level of the effect at unity
gain with the output level of the instrument.
5
Page 5

Page 6

 Loading...