

Page 1
4/12
Page 2
2
:: Introduction
Thank you for purchasing this Team Associated product. This assembly manual contains instructions and tips for building and
maintaining your new SC10GT RTR. Please take a moment to read through this manual to help familiarize yourself with these
steps.
Now you can have Team Associated’s world class performance with true scale authenticity in a 1:10 scale nitro truck!
Team Associated is proud to bring to you the SC10GT; a 1:10 scale nitro 2WD off road short course race truck.
Based on the ROAR National Winning RC10 GT2, the engineers behind the doors in Area 51 made the SC10GT both, all show
and all go! The result is the SC10GT, an authentic scale experience at a level of performance that has never been seen before in
1:10 scale short course.
The SC10GT comes ready to run with a painted and decaled short course race truck body, KMC™ style wheels, aggressive tread
multi-terrain tires, all that have been designed to look just like the full-size race trucks that run in short course off-road series
around the country. The world of high-performance 1:10 scale Nitro R/C has never before seen this level of scale accuracy!
At first glance it’s easy to see that the SC10GT is another champion by design!
:: RTR Features
Features in the SC10GT RTR:
• V2 Dual disc slipper clutch.
• Modular radio tray that easily removes for cleaning and maintenance, and protects the receiver against fuel spills during
pit stops.
• Radio tray has optional space for a high capacity 150cc fuel tank for longer run times.
• Special tuned pipe and header, which produces a perfect balance of maximum power and efficiency.
• V2 Blue anodized aluminum shock bodies.
• All new sealed battery box keeps the receiver batteries safe.
• Blue anodized aircraft aluminum chassis. Radical new chassis design adds tremendous rigidity for the ultimate in consistency
and handling that no other truck can claim.
• Radical pre-printed body shell that any pro painter would be proud to produce.
• Our proven #2918 AE .18X engine will shock customers with its power and speed, like no other manufacturer’s pull start
engine sold in any RTR. Our Engine Replacement Policy is a win-win deal for customers and hobby shops.
• High traction JConcepts racing rear tires for consistent handling.
• Ball differential with lightweight outdrives
• Shielded bearings throughout the truck.
• Glow igniter, fuel bottle
• Rubber AE logo mud flaps
:: Additional Items Needed: :: Optional Items:
• AA-size batteries for transmitter / receiver pack (x12)
(#302, 303 recommended)
• One D-size battery (for the glow igniter)
• Model car fuel (20% - 30% nitro recommended)
• Glow plugs (#MC59 recommended)
• Slotted screwdriver (#1655, 1656, 1671, 1551)
• Battery charger (peak detection charger recommended)
(#LRP41281, LRP41555)(#604 LiPo/LiFe, #610 NiCd/NiMH)
• Rechargeable receiver battery pack (#612, 630, 638)
• Glow plugs (#MC59)
• Starter Box for non-pull start engines (#1750 recommended)
• Thread Locking compound (#1596 recommended)
• FT Glow Igniter rechargeable (#1738 recommended)
:: Other Helpful Items
• Silicone Shock Fluid (Refer to catalog for complete listings)
• Body Scissors (AE Part # 1737) • Reamer / Hole Punch • FT Turnbuckle Wrench (#1111)
• FT Hex Wrenches (AE Part # 1541, 1655) • Needle Nose Pliers • Multi Tool (AE Part #7494)
• FT Nut Drivers (AE Part #1561, 1663-1668) • Calipers or a Precision Ruler • Green Slime shock lube (AE Part # 1105)
• Soldering Iron (#LRP65800) • Hobby Knife • Wire Cutters
Associated Electrics, Inc.
26021 Commercentre Dr.
Lake Forest, CA 92630
http://www.TeamAssociated.com · http://www.RC10.com · http://twitter.com/Team_Associated · http://bit.ly/AEonFacebook
Customer Service
Tel: 949.544.7500
Fax: 949.544.7501
Page 3
:: Table of Contents
1....................Cover
3
43.................Setup Sheet “RTR Setup”
2....................Introduction
3....................Table of Contents
BAG A
4-8...............Steering, Front Shock Tower,
and Bumper Build
BAG B
9-13.............Ball Differential, Gearbox, and
Rear Shock Tower Build
Bag C
13-15..........Rear Suspension Build
Bag D
15-19..........Radio Tray Build
Bag E
19-20..........Throttle and Brake Linkage
Build
44.................1:1 Hardware “Fold Out
45.................Setup Sheet “Blank”
46.................Back Cover
Bag F
21-24..........Engine Build
Bag G
25-27..........Shocks Build
27-28.........Tire Build
28.................Body Installation
29-30.........Tuning Tips
31-40.........Catalog
41.................Contact Info
42.................Notes
:: Notes
!
This symbols indicates a
special note or instruction
in the manual.
There is a 1:1 hardware foldout page in the back
of the manual. To check the size of a part, line
up your hardware with the correct drawing until
you find the exact size. Each part in the foldout
has a number assigned to it for ordering
replacement parts.
Associated Electrics, Inc.
26021 Commercentre Dr.
Lake Forest, CA 92630
http://www.TeamAssociated.com · http://www.RC10.com · http://twitter.com/Team_Associated · http://bit.ly/AEonFacebook
Customer Service
Tel: 949.544.7500
Fax: 949.544.7501
Page 4
4
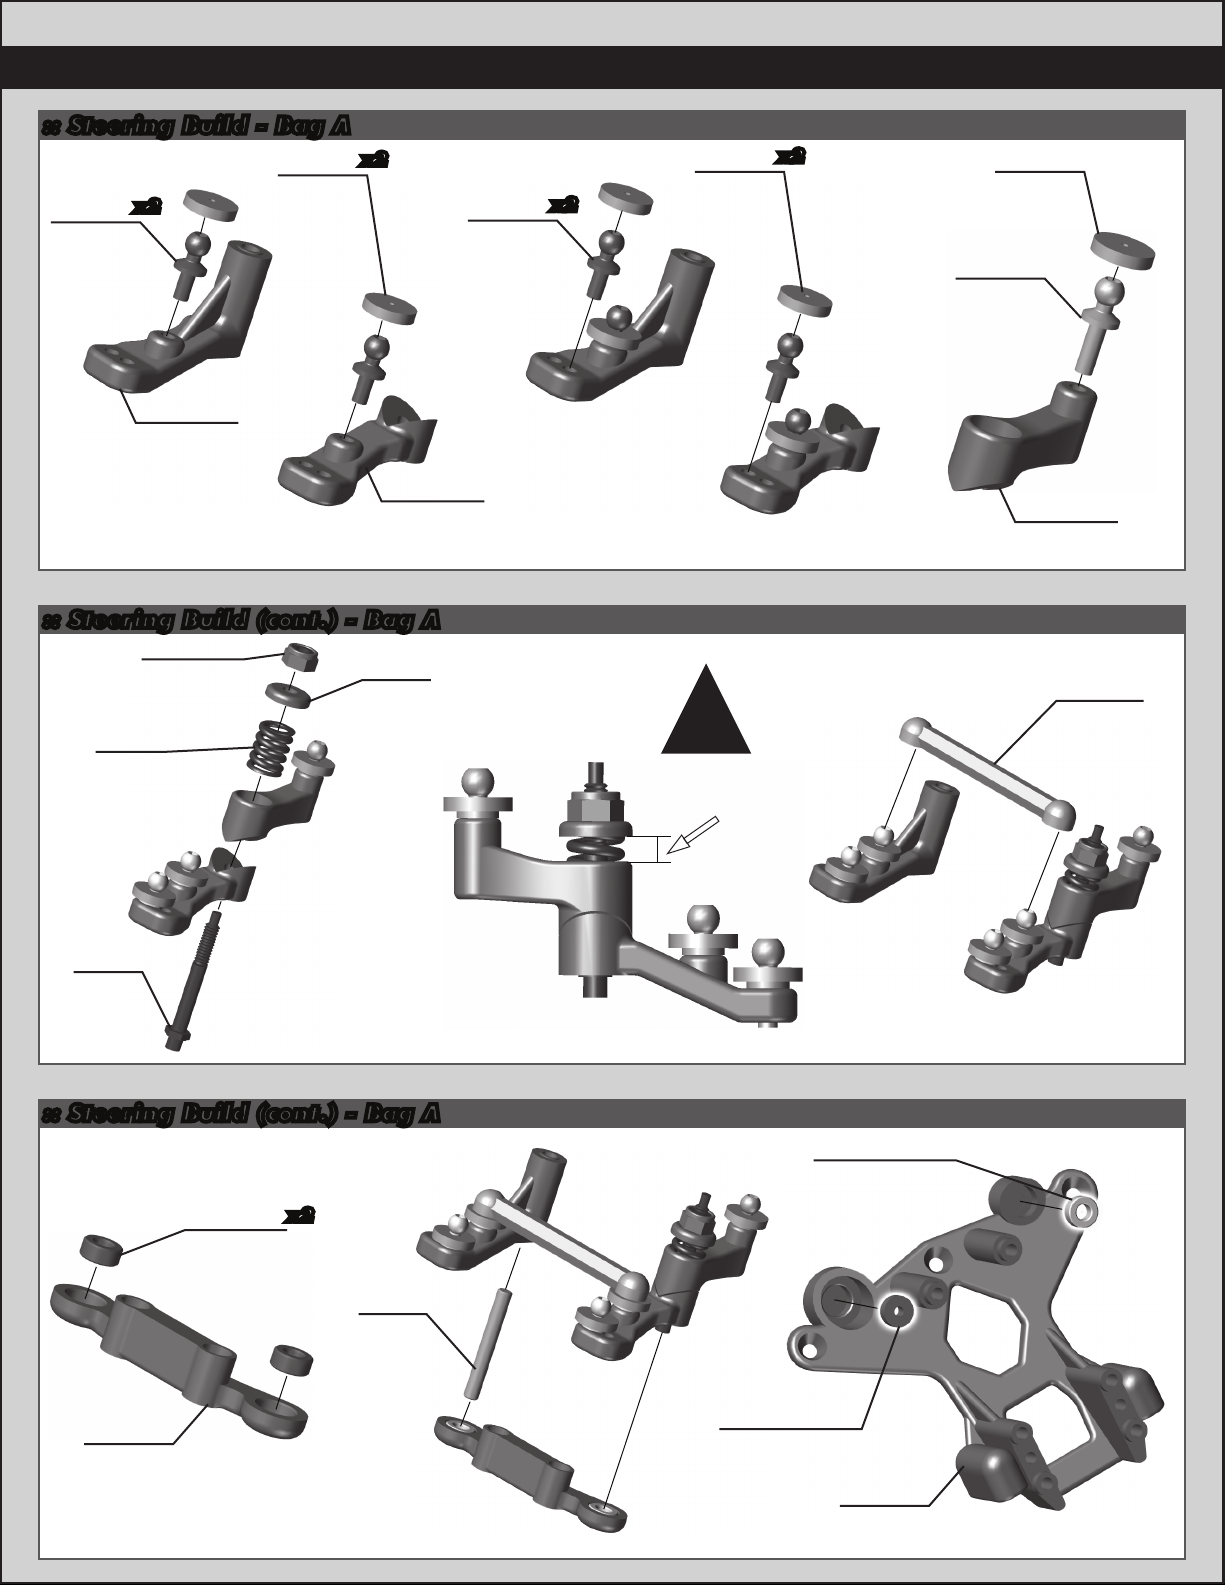
:: Steering Build - Bag A
6272
Foam
6276
Ballstud
.20 silver
(short)
x2
7908
Idler arm
dust
cover
:: Steering Build (cont.) - Bag A
6629
5-40
locknut
7908
Servo
saver
spring
x2
7908
Servo saver
arm, lower
7908
Servo
saver
spring
6276
Ballstud
.20 silver
(short)
x2
6272
Foam
dust
cover
!
Tighten to
2.5mm
(0.1”)
x2
6272
Foam
dust
cover
6277
Ballstud
.30 silver
(long)
7908
Servo saver
arm, upper
7908
Steering
draglink
7908
Servo
saver
post
:: Steering Build (cont.) - Bag A
2234
1/8” x 1/4”
bushing
7908
Lower
bearing
cap
x2
7908
Idler
post
2234
1/8” x 1/4”
bushing
7908
5/64” x 1/4”
bushing
7893
Top
plate
Page 5
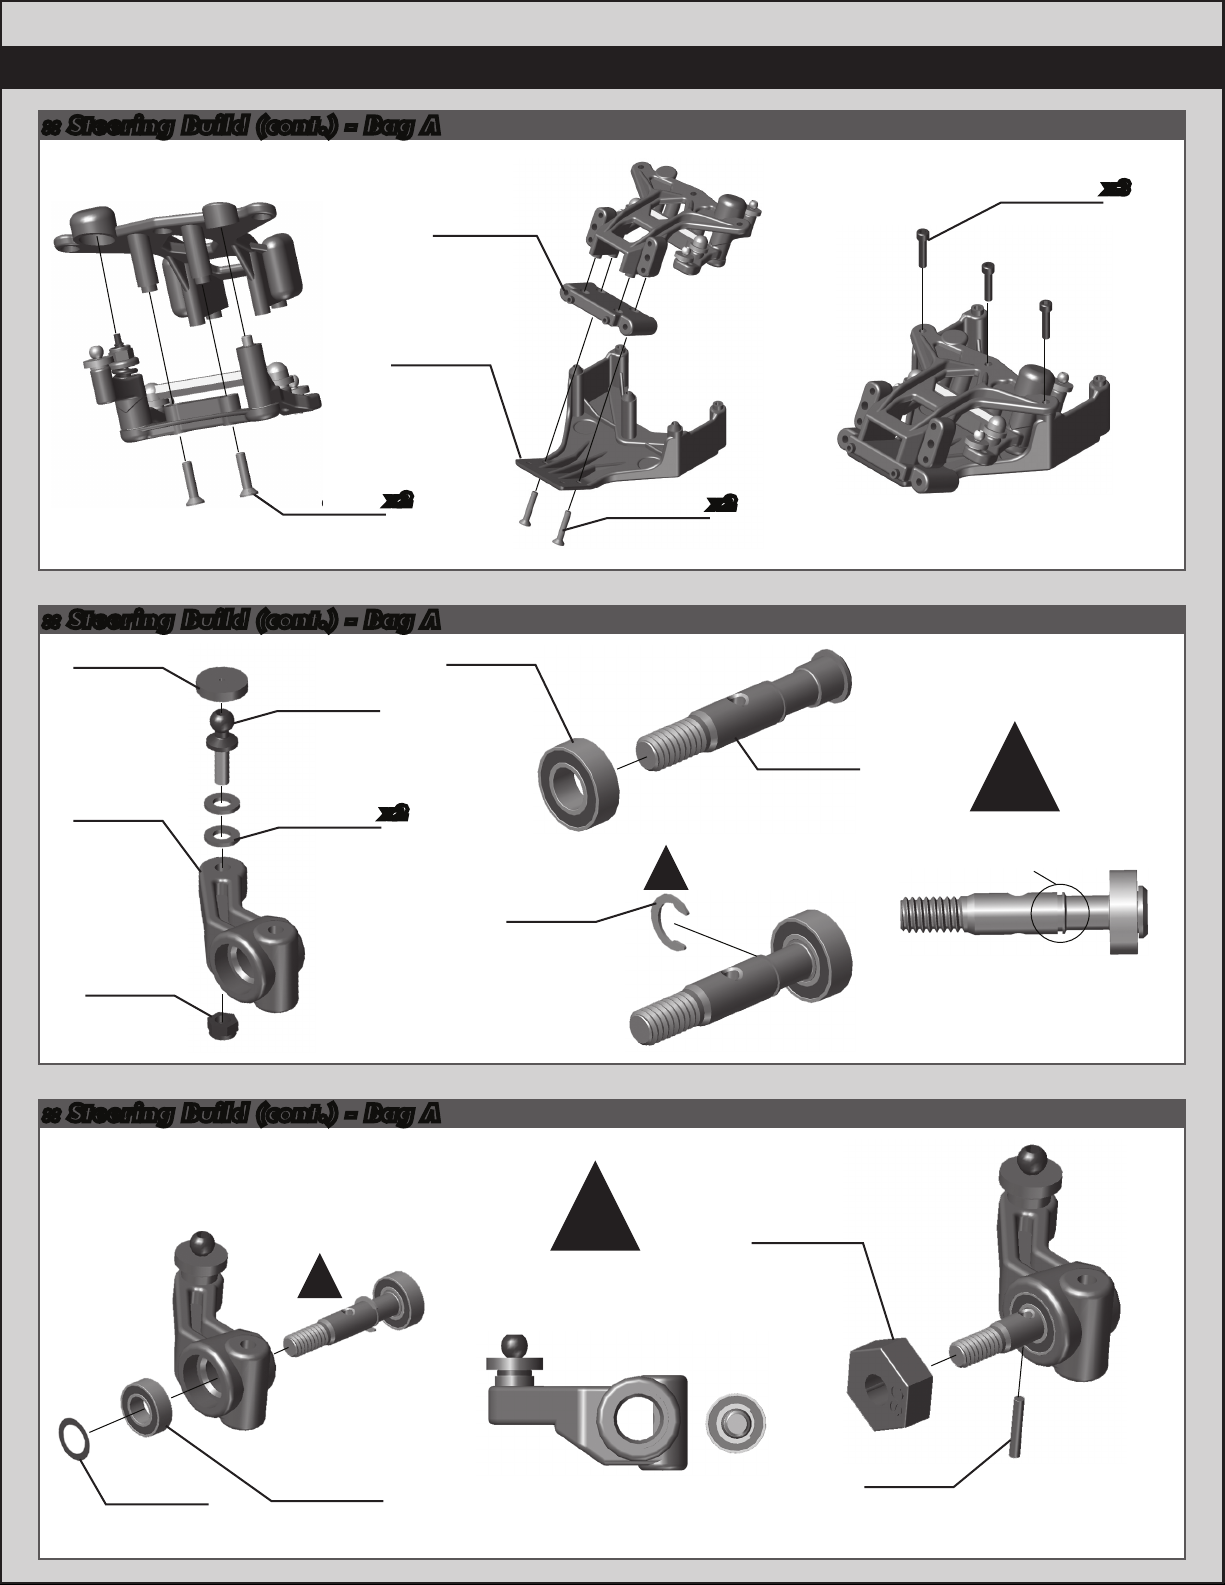
:: Steering Build (cont.) - Bag A
5
7892
Front sub
chassis
kickup
6922
4-40 x 1/2”
x2
fhcs
:: Steering Build (cont.) - Bag A
6272
Foam
dust
cover
9880
Steering
blocks
hex style
1 left &
1 right
4449
4-40 x 3/16
aluminum
locknut
6277
Ballstud
.30 silver
(long)
4187
.030 washer
(nylon)
x2
9563
Front
bulkhead
3977
3/16 x 3/8
bearing
9882
C clip
(3/16”)
6915
4-40 x 5/8”
x2
fhcs
!
9881
Front axle
(hex style)
6925
4-40 x 1/2”
shcs
!
Install the C clip on
the groove shown
below.
Build left and
right sides!
x3
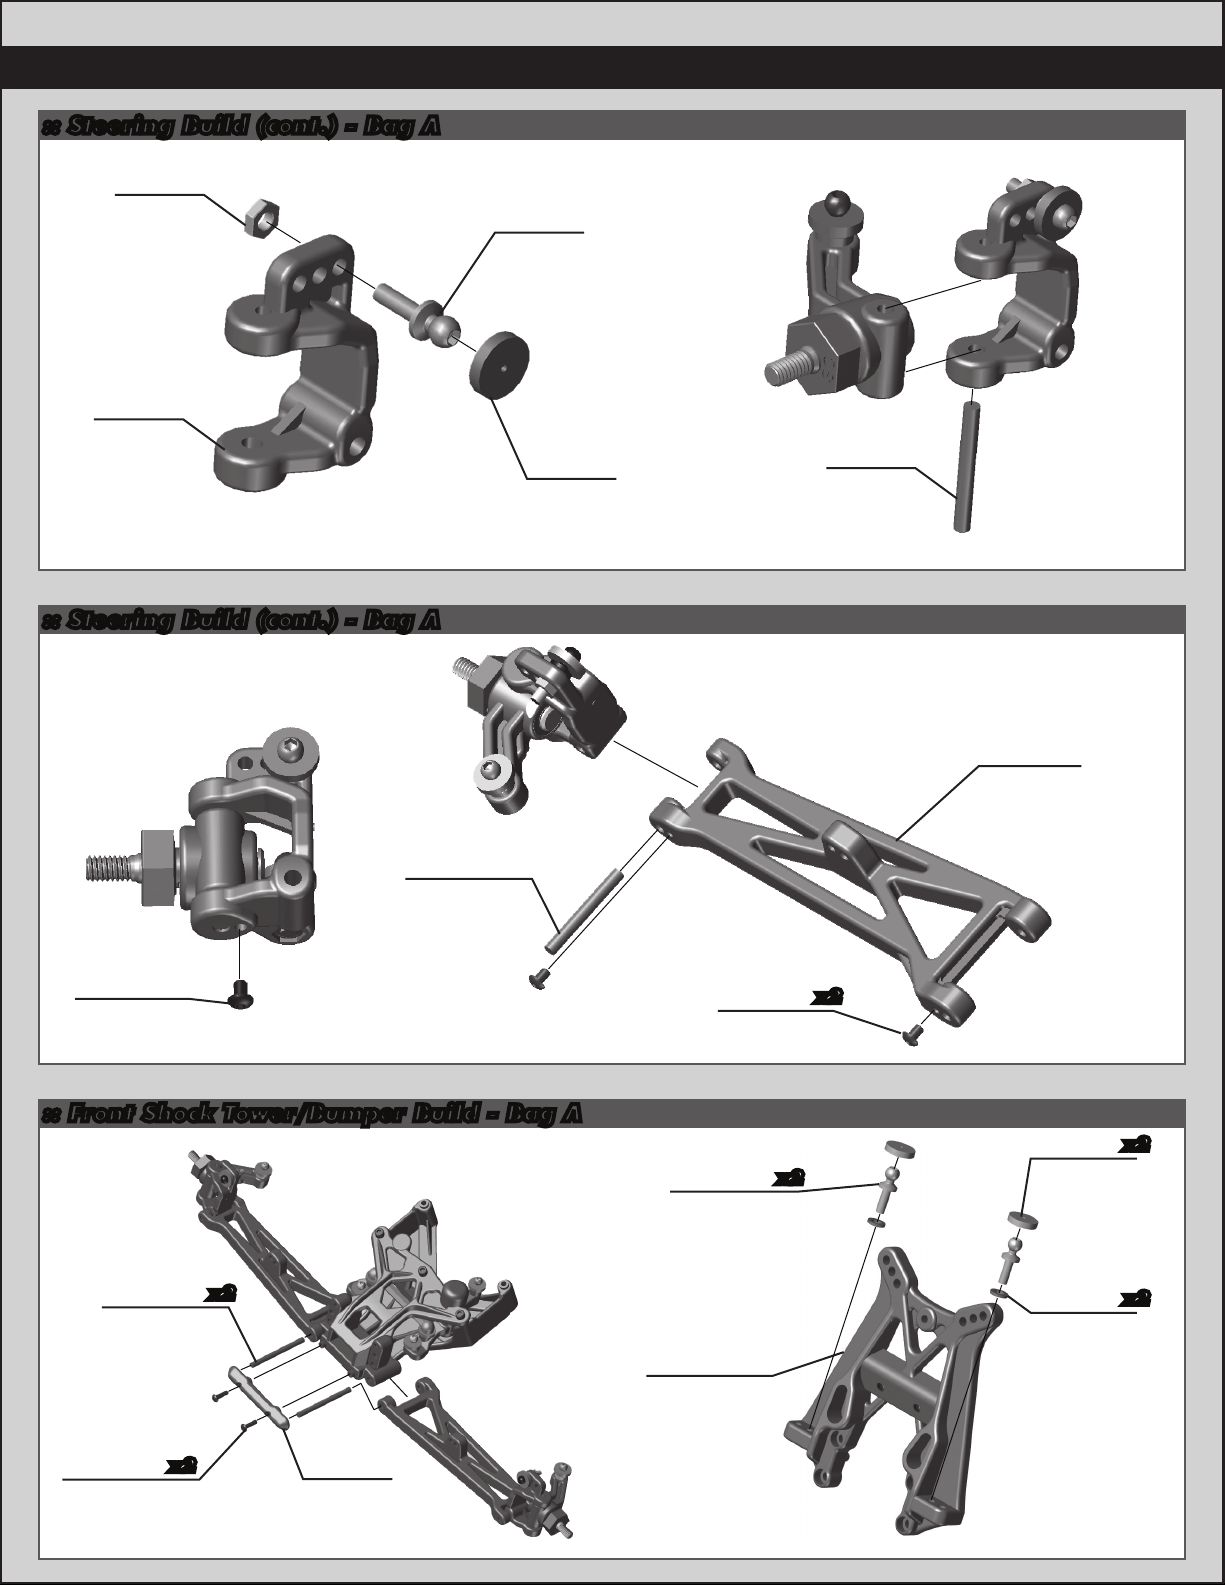
:: Steering Build (cont.) - Bag A
!
7368
3/16” axle
shim
3977
3/16 x 3/8
bearing
!
Align the C clip on
the front axles
with the D shape
inside the steering
blocks.
9883
Wheel hex
adapter
(thin)
universal
7369
1/16”
roll pin
Build left and
right sides!
Page 6
6
:: Steering Build (cont.) - Bag A
7260
4-40
small
plain nut
7922
Caster
block
(30˚)
:: Steering Build (cont.) - Bag A
3983
Ballstud
.30 black
(long)
6272
Foam
dust
cover
7927
Outer
hinge
pin
Build left and
right sides!
7927
Outer
hinge pin
9645
2-56 x 1/8
bhcs
:: Front Shock Tower/Bumper Build - Bag A
9621
Inner
hinge pin
x2
9645
2-56 x 1/8
bhcs
6277
Balstud
.30 silver
(long)
9825
Front shock
tower
x2
x2
7917
Front arm
(left &
right)
Build left and
right sides!
6272
Foam
dust
cover
9630
Ballstud
washer,
aluminum
(.030”)
x2
x2
4334
2-56 x 5/16
bhcs
x2
9564
Front
hinge pin
brace
Page 7
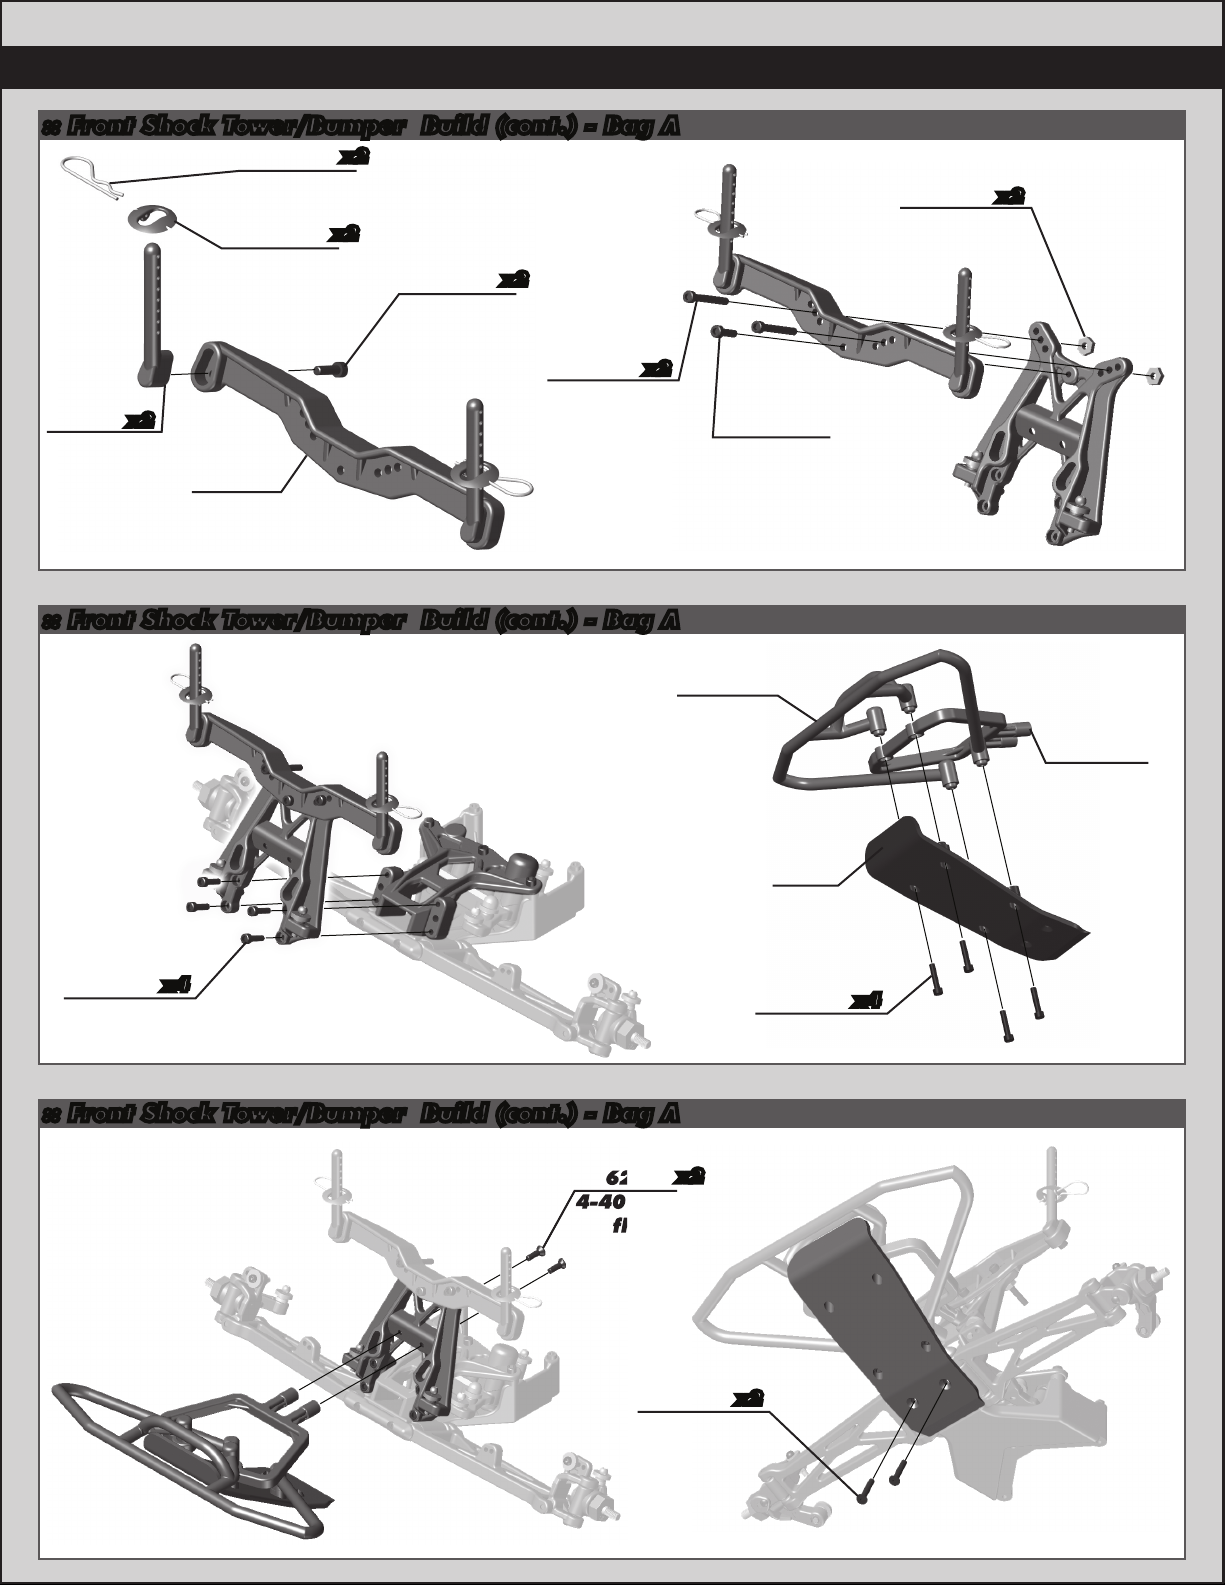
:: Front Shock Tower/Bumper Build (cont.) - Bag A
6292
4-40 x 3/8
fhcs
6332
Body clips
3897
Pivoting
body mount
x2
x2
6924
4-40 x 3/8
shcs
x2
6295
4-40 plain
nut
x2
7
7103
Front
body
post
x2
7738
4-40 x 7/8
shcs
9820
Front
body
mount
x2
:: Front Shock Tower/Bumper Build (cont.) - Bag A
6924
4-40 x 3/8
shcs
9816
Front
bumper
9816
Front
bumper
brace
9816
Skid
plate
6924
4-40 x 3/8
shcs
x4
:: Front Shock Tower/Bumper Build (cont.) - Bag A
6292
4-40 x 3/8
fhcs
4-40 x 5/8
x2
6915
fhcs
6925
4-40 x 1/2
shcs
x2
x4
Page 8
8
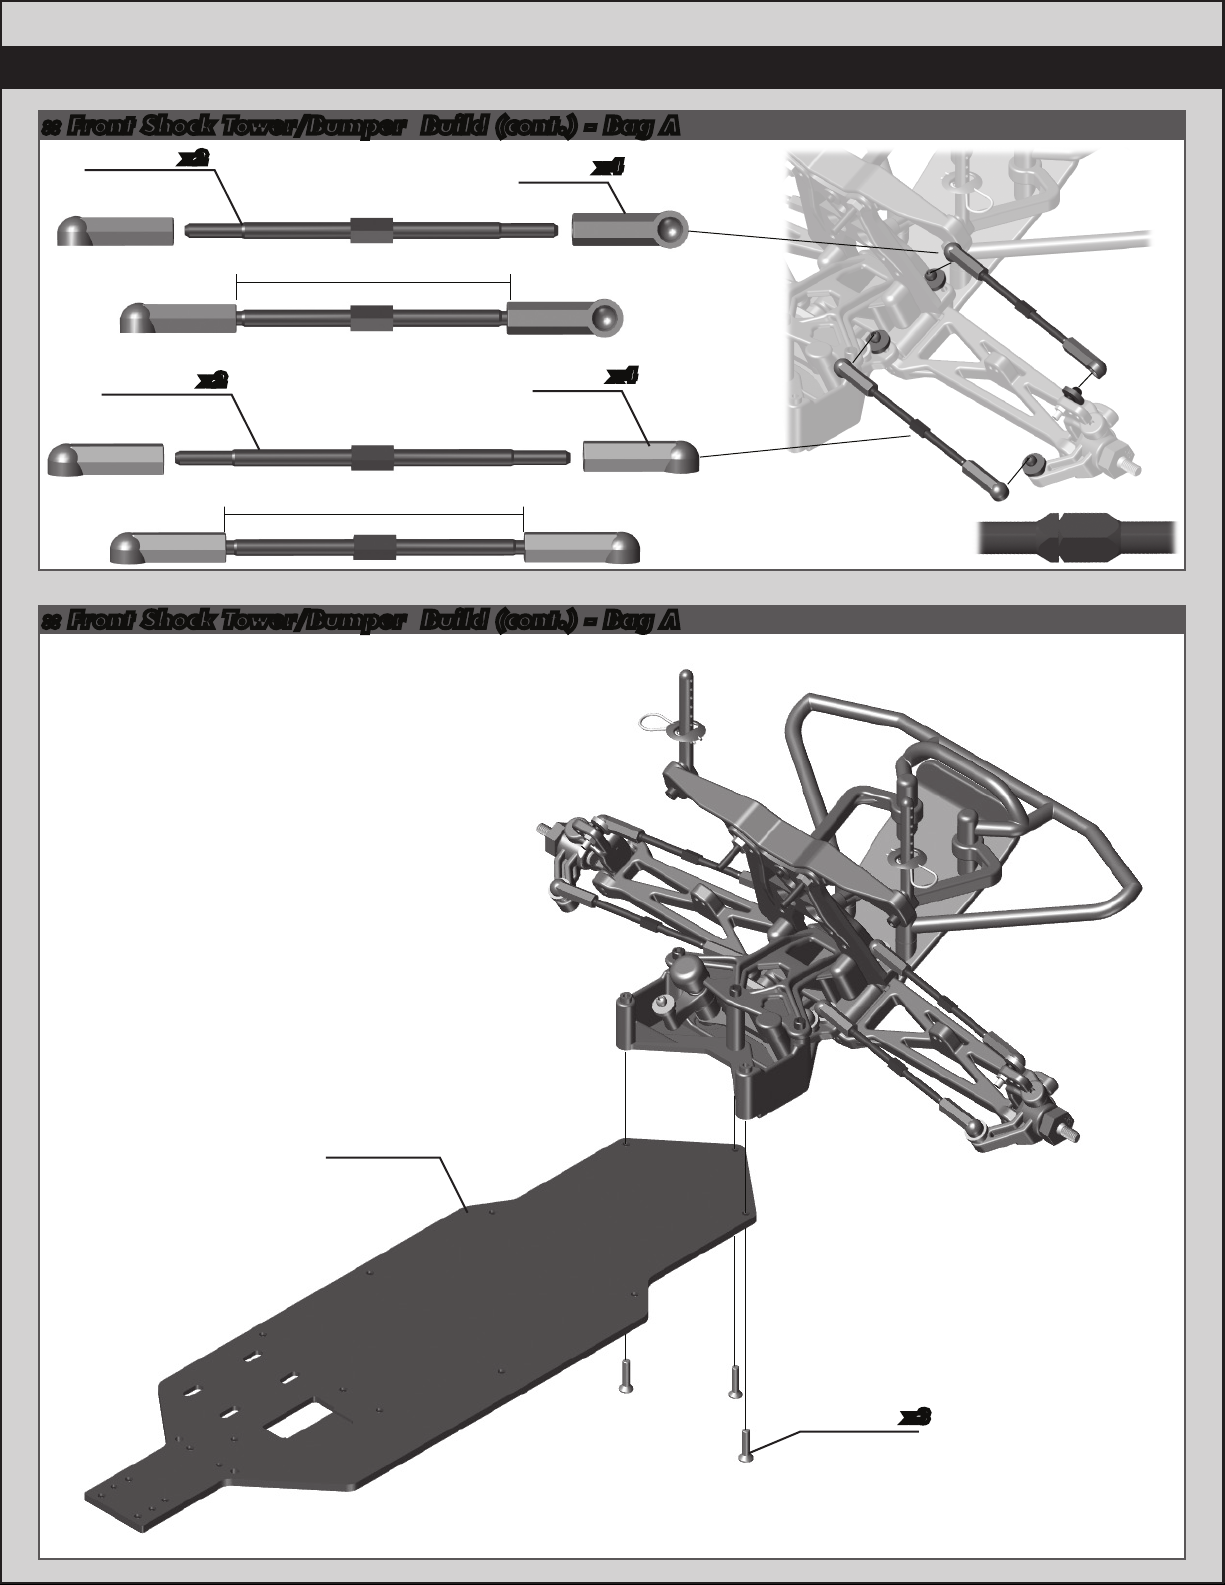
:: Front Shock Tower/Bumper Build (cont.) - Bag A
7253
2.62” steel
turnbuckle
x2
Front Camber
Turnbuckle
48.5mm
7230
Ballcup
x4
Build left and
right sides!
7101
2.80” steel
turnbuckle
x2
Steering Camber
Turnbuckle
7230
Ballcup
x4
53mm
:: Front Shock Tower/Bumper Build (cont.) - Bag A
Orient the notch
to the left throughout the
car. It indicates which end
has the left hand threads!
7107
SC10GT
chassis
6922
4-40 x 1/2
fhcs
x3
Page 9
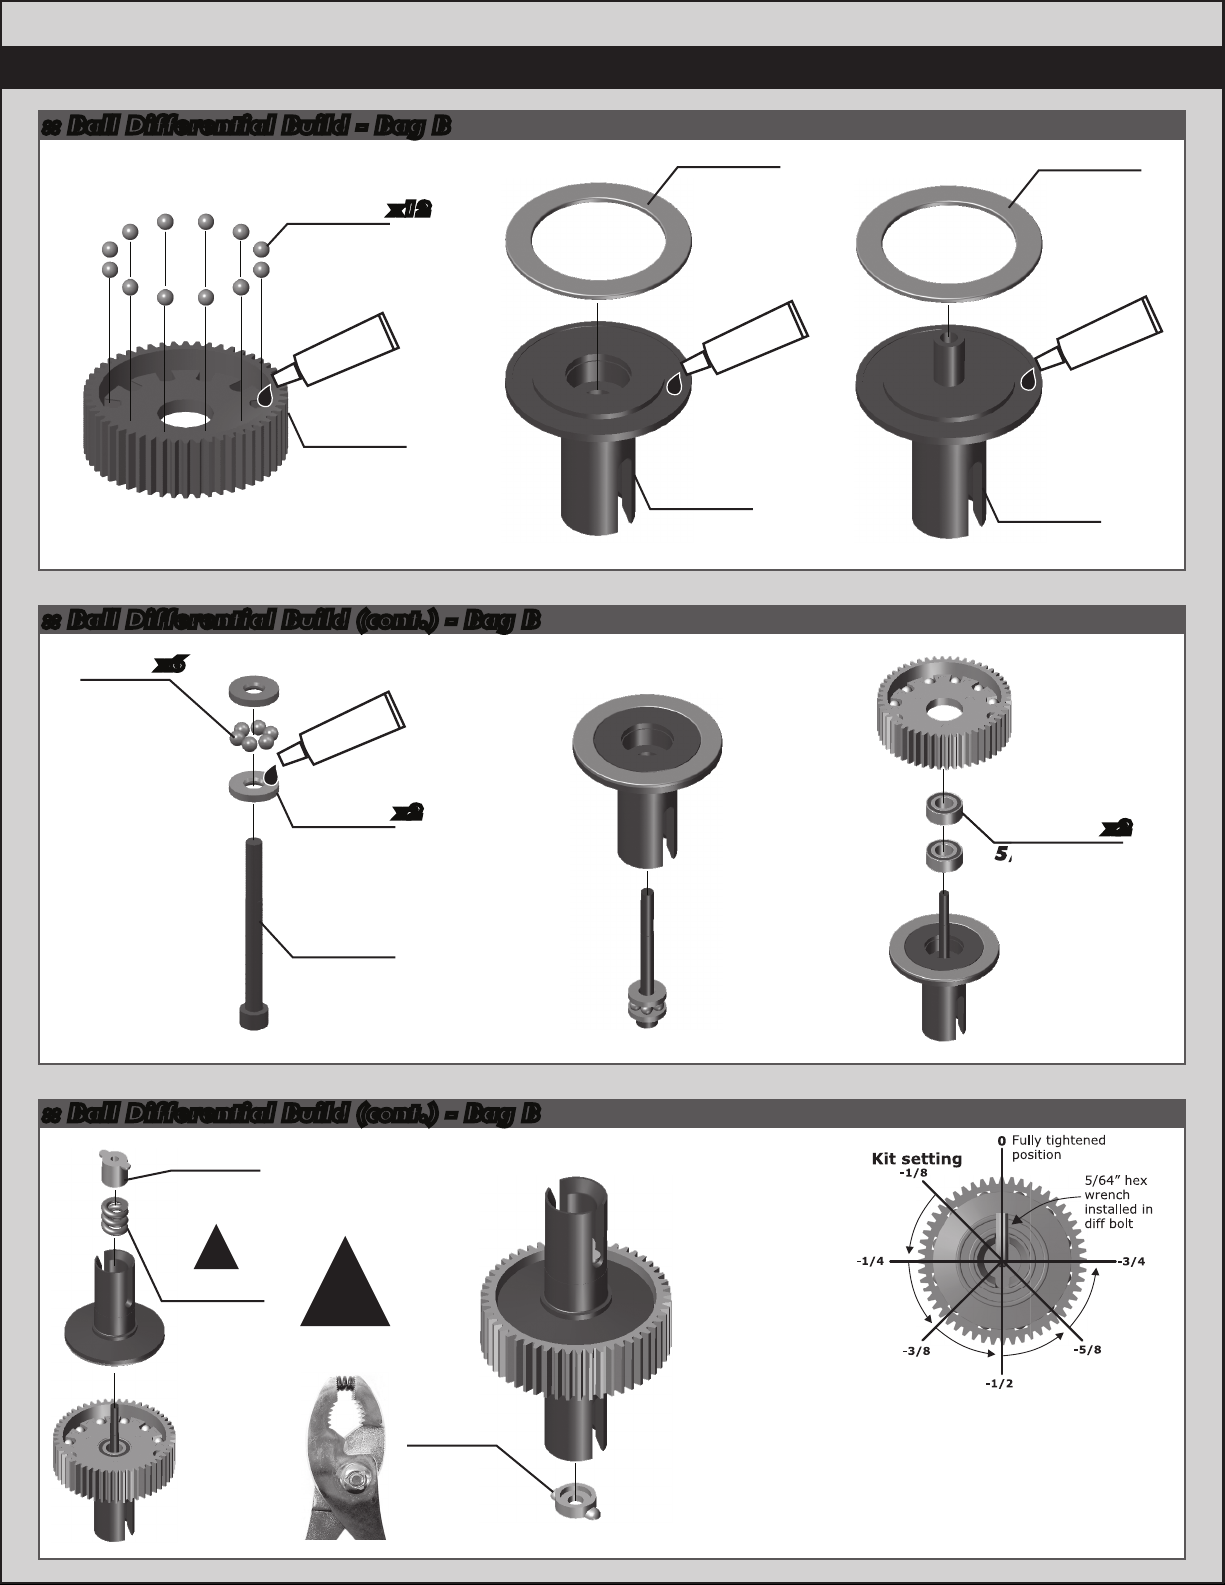
:: Ball Differential Build - Bag B
5/32 x 5/16
6581
3/32”
carbide
diff balls
x12
7666
Diff ring
9
7666
Diff ring
#6591
Diff lube
7664
Diff gear
52T
:: Ball Differential Build (cont.) - Bag B
6574
5/64
diff
thrust
ball
x6
#6588
black grease
6573
Thrust
washer
x2
#6591
Diff lube
7667
Diff outdrive
hub, right
#6591
Diff lube
7668
Diff outdrive
hub, left
6589
x2
5/32 x 5/16
bearing
6575
Diff
thrust
bolt
:: Ball Differential Build (cont.) - Bag B
6575
Locking
T-nut
!
6582
Diff
thrust
spring
!
Pre-compress
spring
6575
Diff bolt
cover
As you tighten the diff bolt, you will notice the T-nut ears moving closer
to the bottom of the outdrive slot. This compresses the spring
behind the T-nut. The spring should be completely compressed at the
same time the T-nut reaches the end of the slot.
CAUTION! Pay close attention to the feeling when the spring is
completely compressed. Do not over tighten the bolt. When you
feel the spring completely compressed, loosen the diff bolt 1/8” of
a turn. You diff should now operate smoothly with resistance as the
outdrives move in opposite directions.
After you have driven the car once, re-check the dif f setting.
Page 10
10
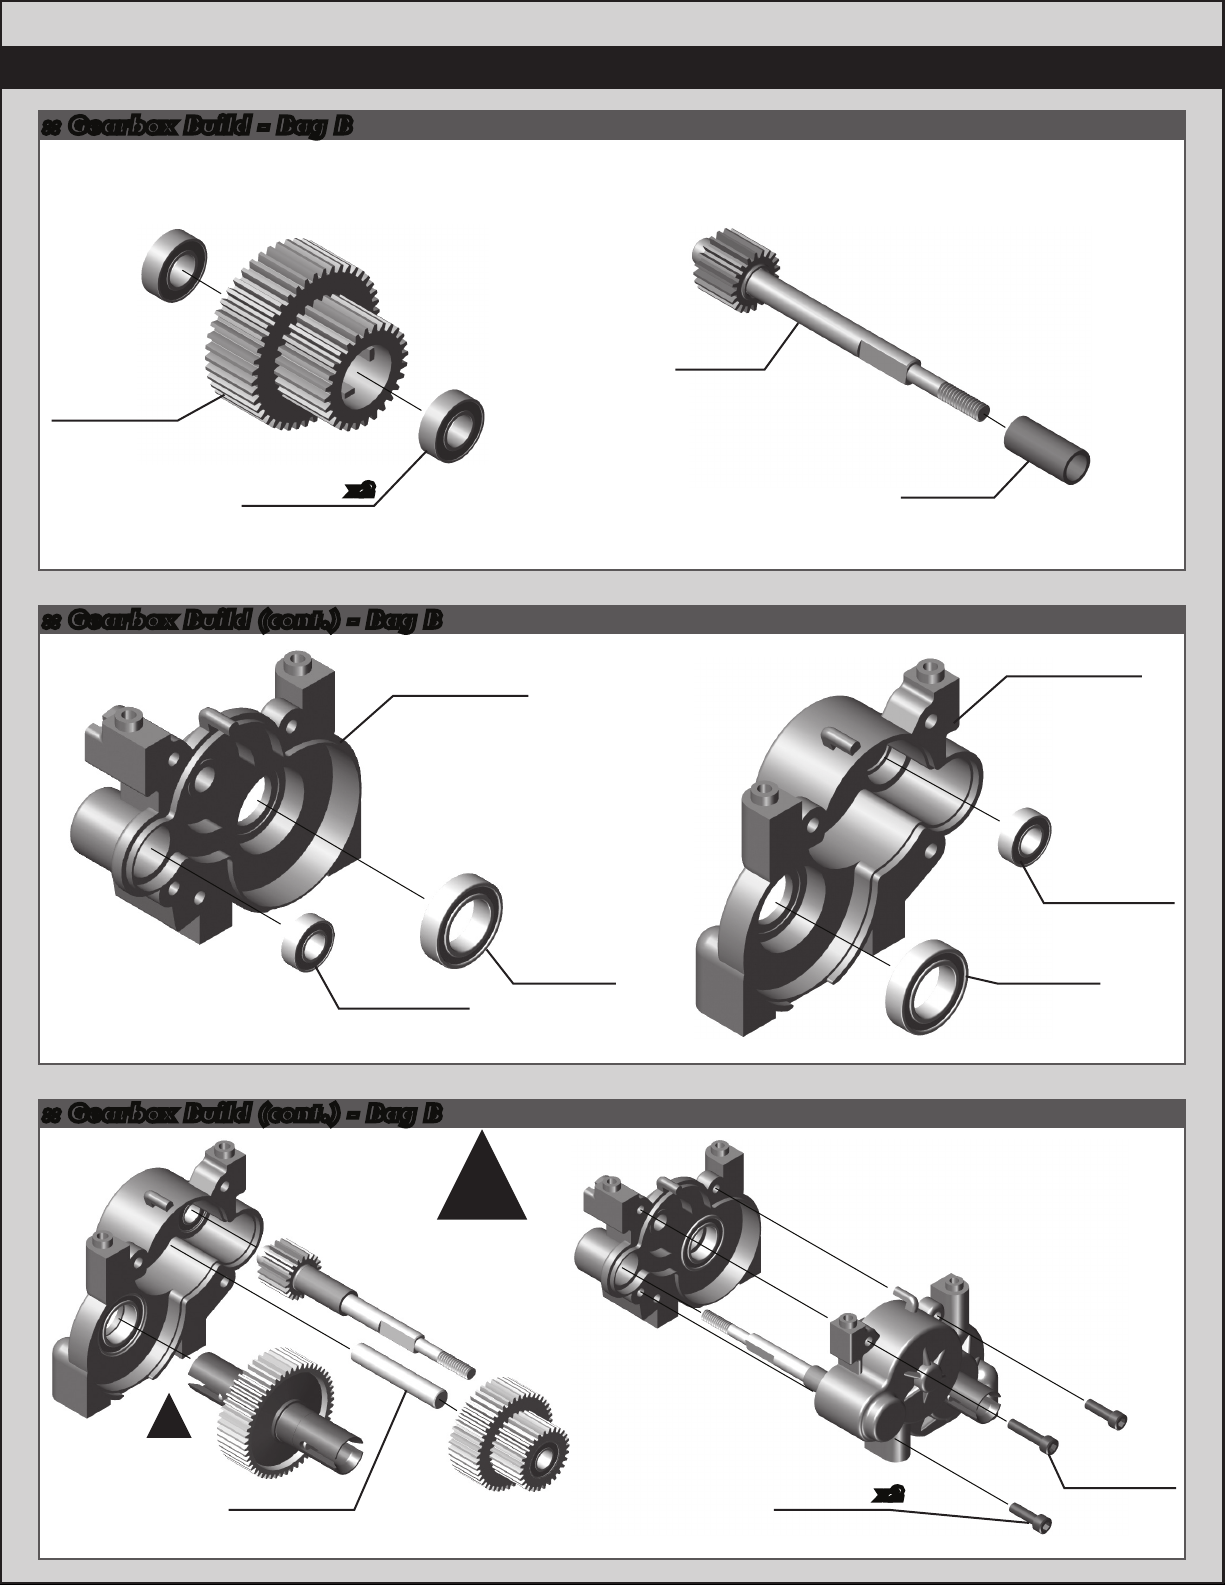
:: Gearbox Build - Bag B
7963
Idler gear
cluster 44-28T
3977
3/16 x 3/8
ball bearing
:: Gearbox Build (cont.) - Bag B
x2
7960
top
shaft
7961
top shaft
spacer
Transmission
(right side)
3977
3/16 x 3/8
ball bearing
:: Gearbox Build (cont.) - Bag B
Diff adjustment
bolt head on
same side as
7945
case
!
Note:
spur gear
3976
3/8 x 5/8
ball
bearing
7945
Transmission
case
(left side)
3977
3/16 x 3/8
ball bearing
3976
3/8 x 5/8
ball
bearing
!
7874
4-40 x 7/16
shcs
7964
Idler gear
shaft
6924
4-40 x 3/8
shcs
x2
Page 11
:: Gearbox Build (cont.) - Bag B
11
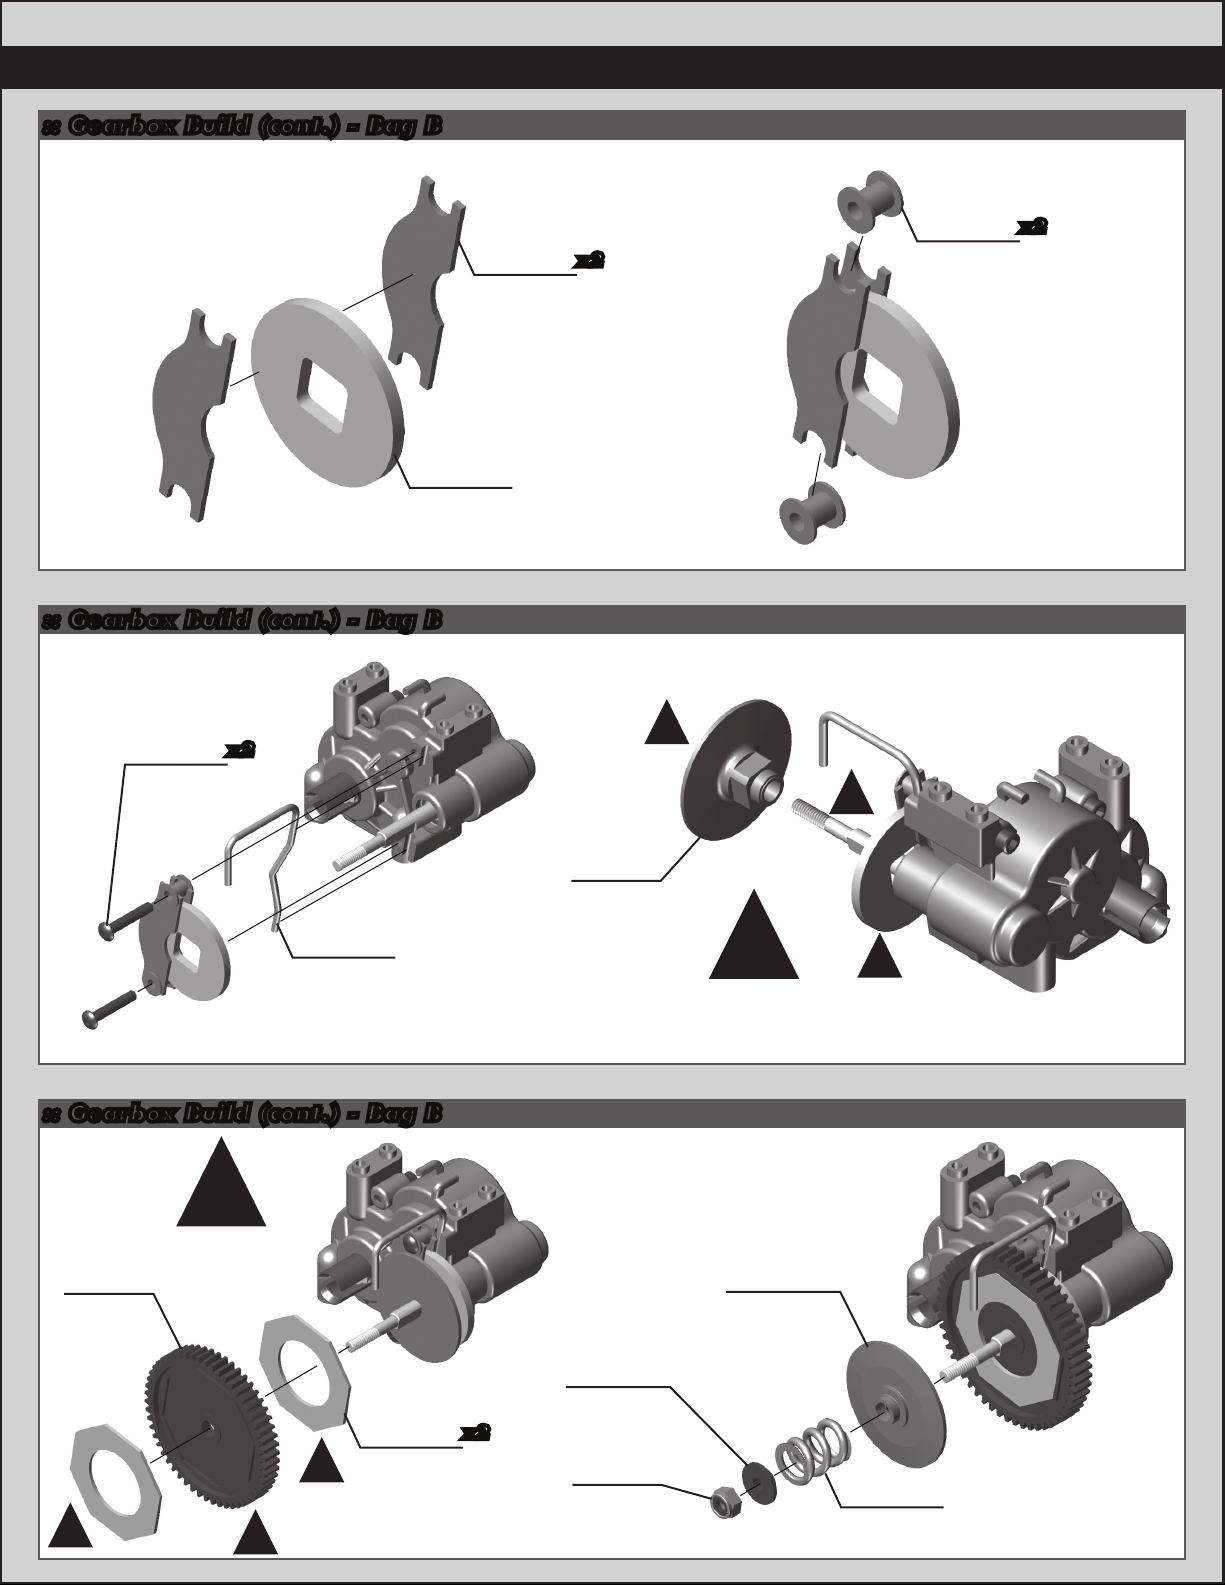
:: Gearbox Build (cont.) - Bag B
7633
4-40 x 5/8
bhcs
x2
7950
Brake
disc
7949
Brake
pad
x2
7947
Brake
top hat
bushing
x2
!
!
7948
Brake
cam
:: Gearbox Build (cont.) - Bag B
!
Align
pads into
7955
54T
spur
gear
!
spur gear.
!
9603
!
Slipper
pads
x2
7953
Slipper
plate,
inner
7486
V2 slipper
spring
6629
5-40
locknut
!
Align the flat spots
on the inner slipper
plate to the brake
disc and top shaft.
7485
V2 slipper
plate
!
7486
V2 slipper
spring
Page 12
12
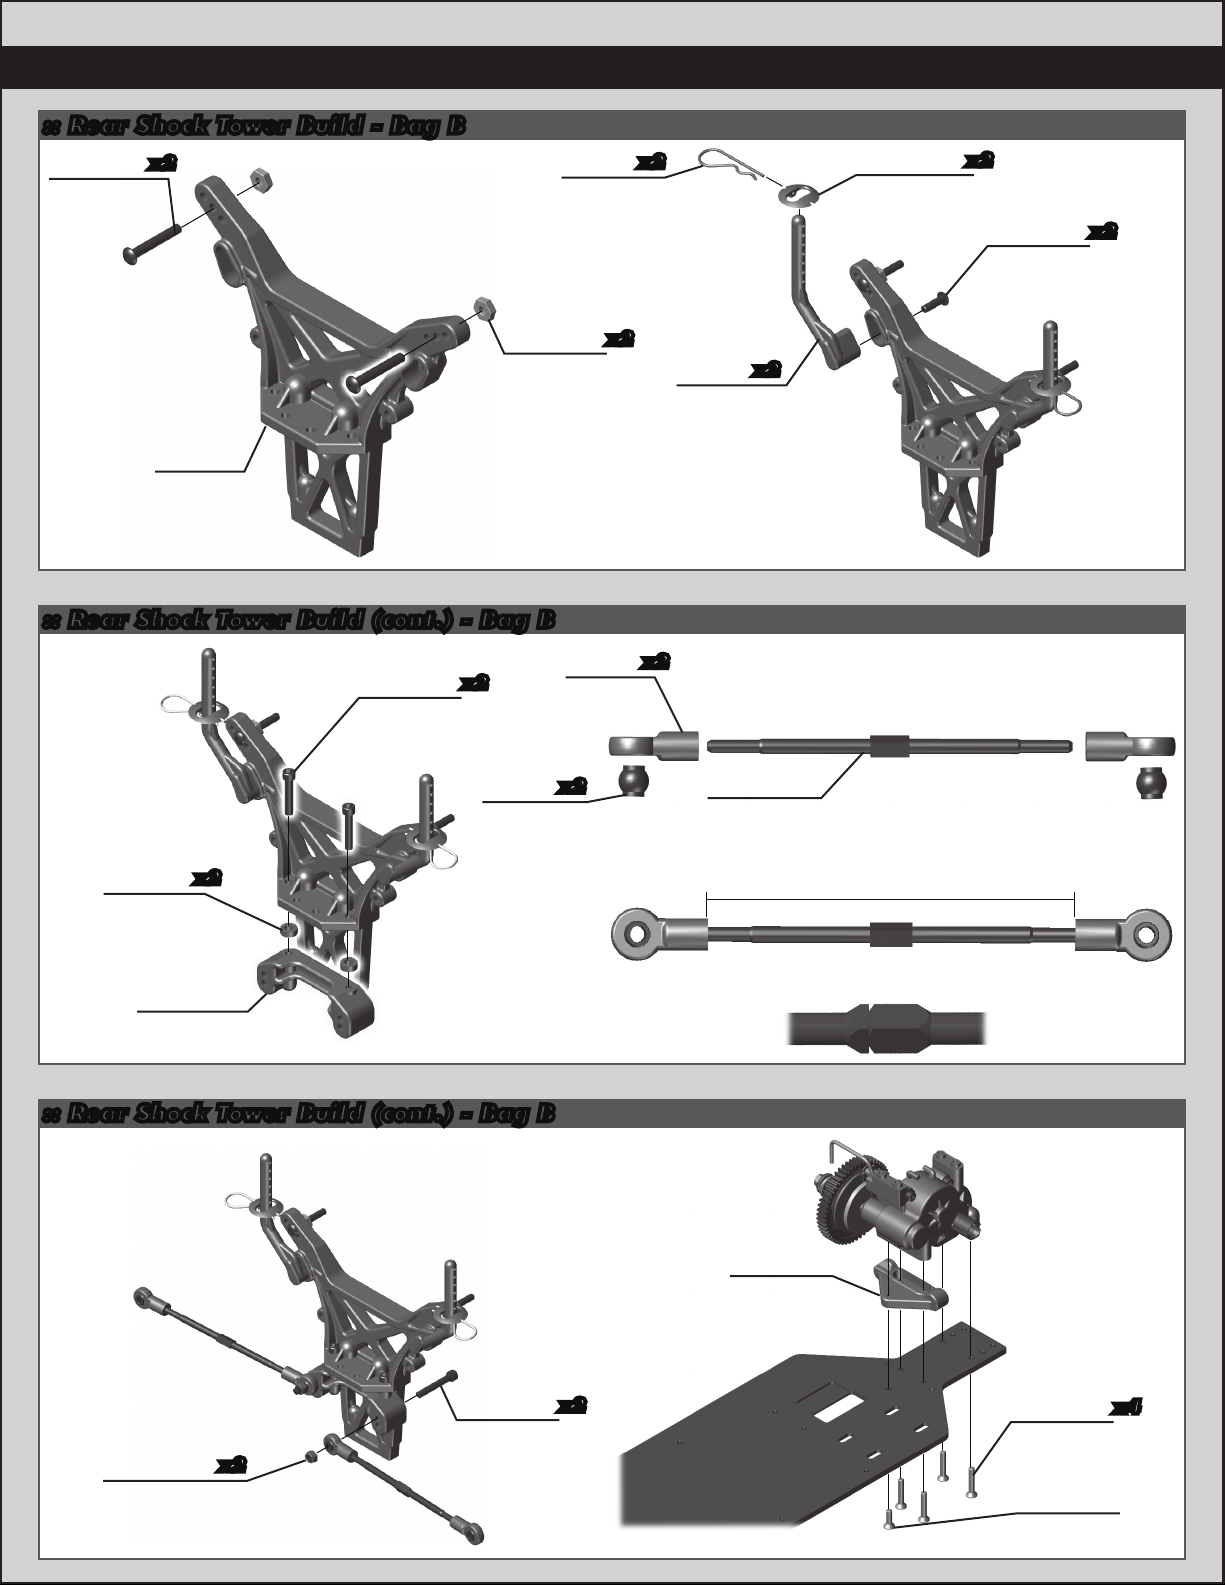
:: Rear Shock Tower Build - Bag B
7413
4-40 x 3/4
bhcs
x2
6332
Body
clips
x2
3897
Pivoting
body mount
x2
6917
4-40 x 3/8
bhcs
x2
7260
Plain nut
7102
Rear shock
tower
(SC10 GT)
:: Rear Shock Tower Build (cont.) - Bag B
x2
7217
Pivot
ball end
9273
1/8 x 1/4
spacer
6926
4-40 x 5/8
shcs
x2
7217
Shock
end
x2
x2
x2
7103
Rear
body
mounts
7937
3.0” steel
turnbuckle
x2
Rear Camber
Turnbuckle
65mm
7941
Camber
link mount
to the left throughout the
car. It indicates which end
has the left hand threads!
:: Rear Shock Tower Build (cont.) - Bag B
6927
4-40 x 3/4
4449
4-40 x 3/16
locknut
x2
shcs
Orient the notch
x2
7928
Rear arm
mount
Build left and
right sides!
6915
4-40 x 5/8
fhcs
6292
4-40 x 3/8
x4
fhcs
Page 13
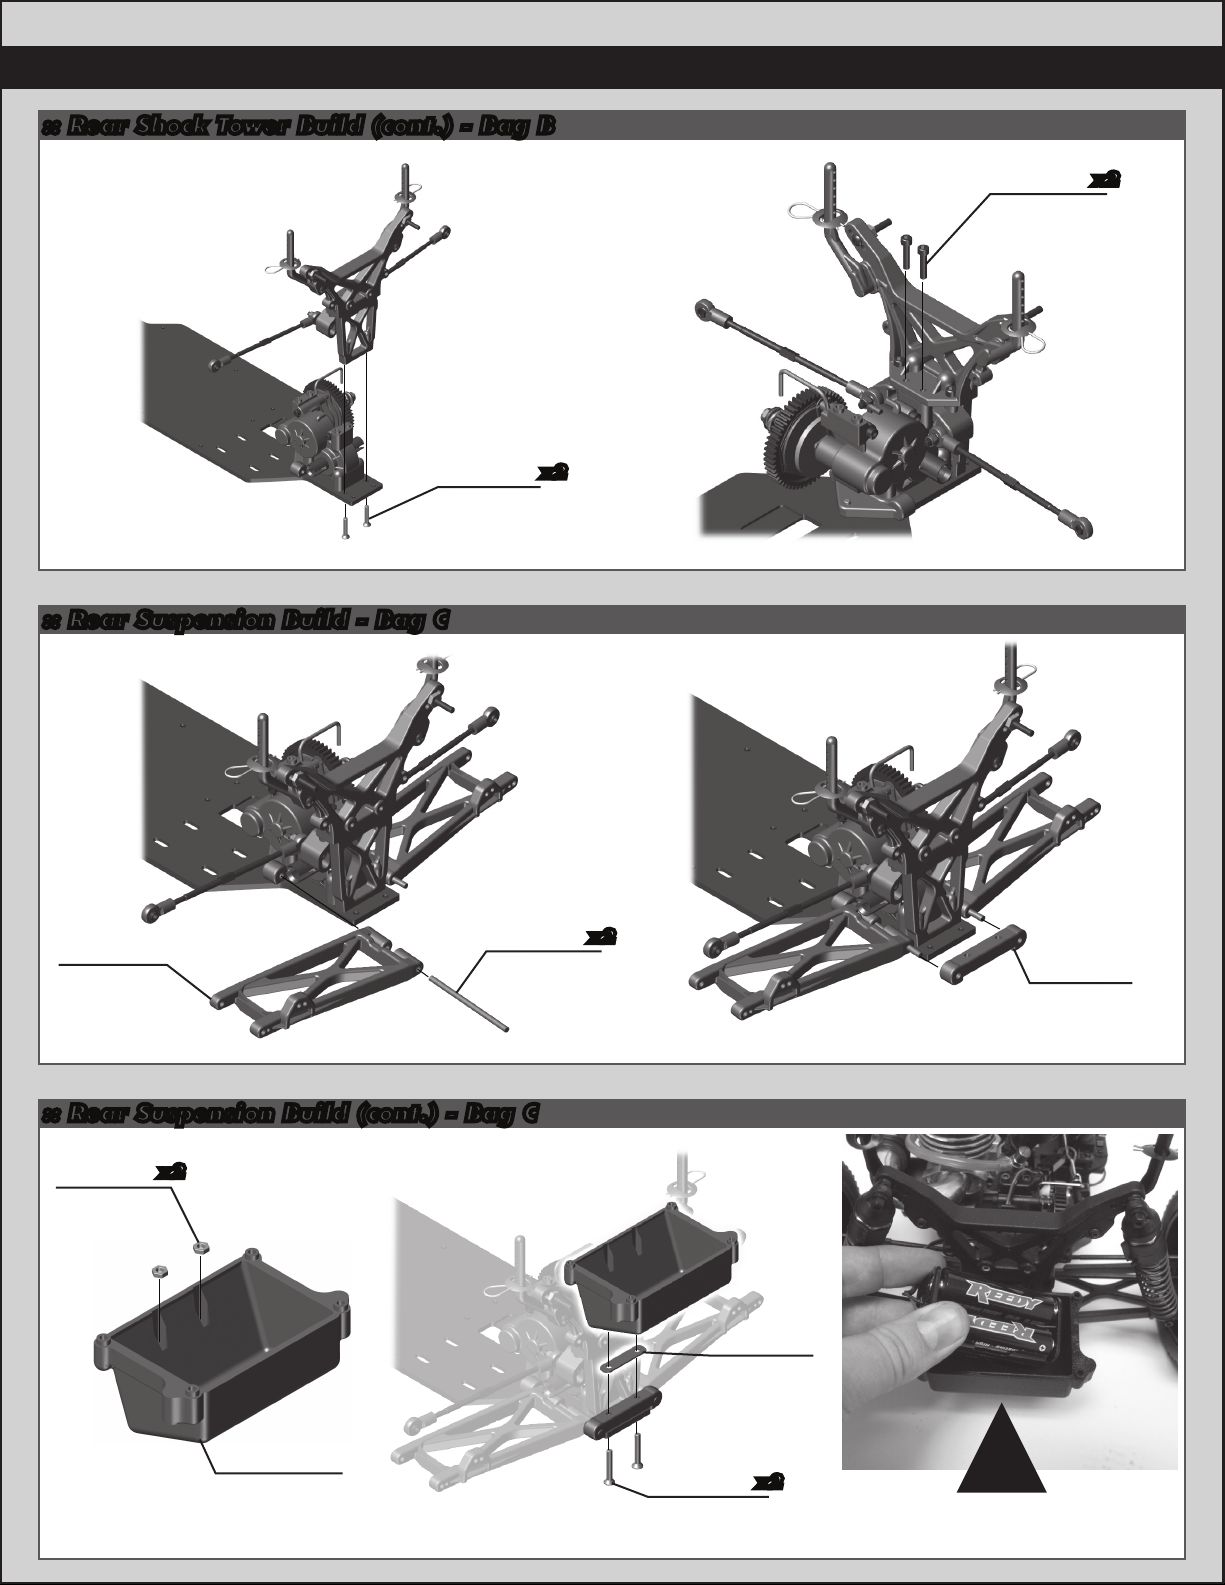
:: Rear Shock Tower Build (cont.) - Bag B
13
:: Rear Suspension Build - Bag C
6915
4-40 x 5/8
fhcs
x2
6925
4-40 x 1/2
shcs
x2
7930
Rear arms
(1 left &
1 right)
9621
Rear inner
hinge pins
:: Rear Suspension Build (cont.) - Bag C
7260
4-40 small
plain nut
x2
7904
Battery box
bottom
x2
7928
Rear arm
mount
shim
6923
4-40 x 3/4
fhcs
x2
7928
Arm
mount
(3+2)
!
Install receiver
pack.
Page 14
14
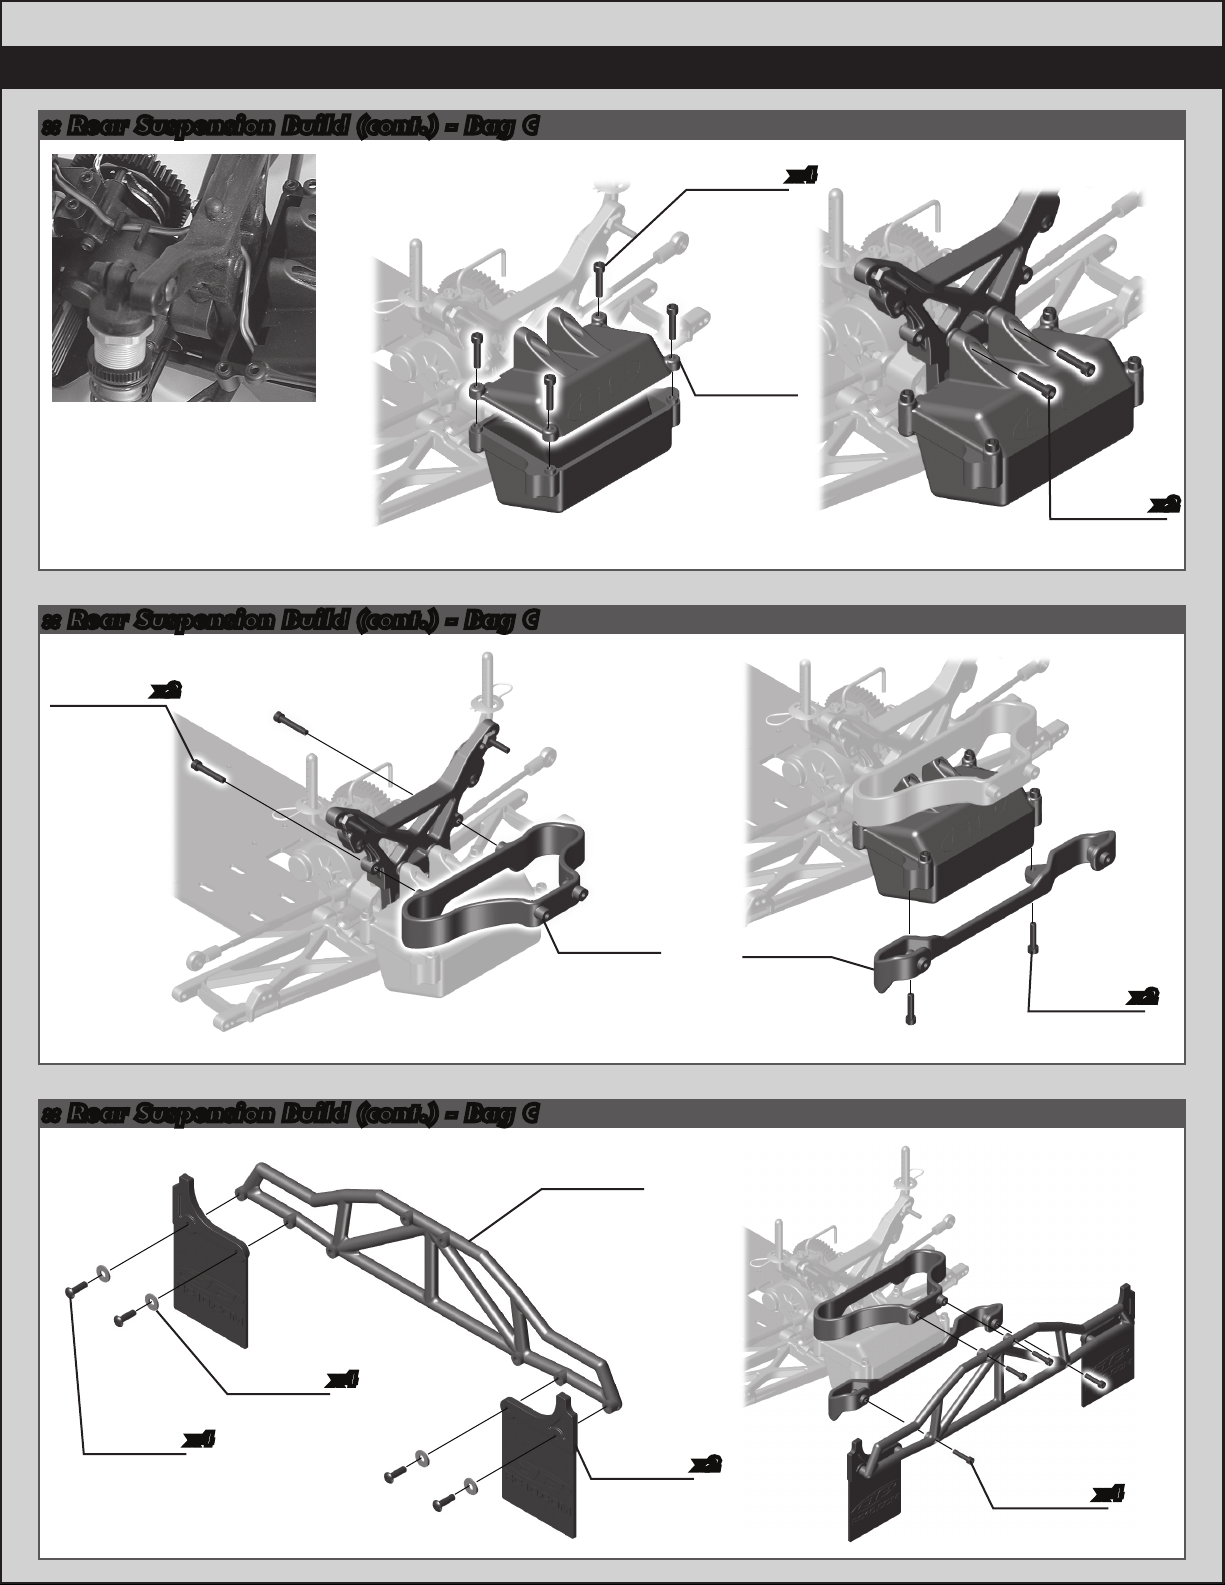
:: Rear Suspension Build (cont.) - Bag C
Note: Wire opening in receiver
pack lid and wire hooks in
transmission case.
Racer Tip: Add foam padding
(not inluded) to cushion receiver
pack.
:: Rear Suspension Build (cont.) - Bag C
6926
4-40 x 5/8
shcs
x2
6925
4-40 x 1/2
shcs
7904
Battery
box top
x4
6925
4-40 x 1/2
shcs
x2
:: Rear Suspension Build (cont.) - Bag C
x4
6917
4-40 x 3/8
bhcs
x4
89218
3x8mm
washer
7105
Rear
bumper
mount
(upper)
7104
Rear
bumper
89430
Mud flaps
x2
7105
Rear
bumper
mount
(lower)
6925
4-40 x 1/2
shcs
6925
4-40 x 1/2
shcs
x2
x4
Page 15

:: Rear Suspension Build (cont.) - Bag C
7932
1.5 degree
7462
Dogbone
5407
Red
o-ring
9670
3/16
rear
axle
Build left and
right sides!
rear hubs
(1 left &
1 right)
3977
3/16 x 3/8
bearing
7935
.187x.50x.196
bearing
7933
Crush
tube
:: Rear Suspension Build (cont.) - Bag C
6926
4-40 x 5/8
shcs
5407
Red
o-ring
9645
2-56 x 1/8
bhcs
7369
1/16”
universal
roll pin
15
7927
Outer
hinge pin
9273
1/8 x 1/4
spacer
Build left and
right sides!
x2
7260
3/16
plain
nut
:: Radio Tray Build - Bag D
Steering
servo
9630
.030
washer
3981
Ballstud
.20 black
(short)
Foam dust
6272
cover
7368
3/16
axle
shims
7336
Servo
mounts
x2
9883
Wheel hex
adapters
(thick)
7336
Servo
mount
spacers
x2
6917
4-40 x 3/8
bhcs
x2
9180
Servo
horn
Screw supplied
with servo
7337
.250 x .125 x .015
washer
x2
Page 16

16
7337
.250 x .125 x .015
Washer
:: Radio Tray Build (cont.) - Bag D
7106
Radio
tray
(SC10GT)
:: Radio Tray Build (cont.) - Bag D
6917
4-40 x 3/8
bhcs
x2
Throttle
servo
6924
4-40 x 3/8
shcs
.250 x .125 x .015
x4
Washer
7337
Receiver
x4
7896
Radio
box,
lower
9146
2-56 x 3/16
bhcs
x2
:: Radio Tray Build (cont.) - Bag D
9146
2-56 x 3/16
bhcs
x2
On/Off
switch
plate
!
Route the two servos and the
receiver pack wires into receiver
box. To avoid pinching the wires,
route them around the standoffs
as shown.
6338
Antenna
tube and
cap
7896
Radio
box lid
29115
Switch
harness
tr-404a
Page 17

:: Radio Tray Build (cont.) - Bag D
.250 x .125 x .015
17
21173
Small
body
clip
x2
:: Radio Tray Build (cont.) - Bag D
You have the option of using the larger 1/8
scale fuel tank (#89324 not included) for
longer run times. This will require the use
of red o-rings (#5407) to mount the large
tank (see page 30 for details).
For the stock fuel tank, install the
#7106 radio tray insert as seen below.
6924
4-40 x 3/8
shcs
7337
.250 x .125 x .015
Washer
7108
Muffler
wire
(SC10GT)
!
!
7724
Fuel tank
mount
!
:: Radio Tray Build (cont.) - Bag D
grommet
7899
Fuel tank
x2
Cut two 5.6mm”
pieces of fuel tubing for
fuel tank grommets.
!
6288
4-40 x 1/4
bhcs
x2
7106
Radio
tray
!
insert
6918
4-40 x 1/2
bhcs
x2
Page 18

18
:: Radio Tray Build (cont.) - Bag D
6925
4-40 x 1/2
shcs
x2
:: Radio Tray Build (cont.) - Bag D
6922
4-40 x 1/2
fhcs
x7
Page 19

:: Radio Tray Build (cont.) - Bag D
6925
4-40 x 1/2
shcs
7891
Chassis
brace
x4
:: Throttle and Brake Linkage Build - Bag E
Large
Small
7911
Ball
cup
x2
!
Use
large
hole
Steering
servo link
7911
Servo
link rod
11.5mm
7975
Throttle
pivot
19
4449
4-40 x 3/16
locknut
4187
.030 nylon
washer
!
Note: There are two
hole sizes in this servo
horn. Make sure you
use the correct set
when building.
:: Throttle and Brake Linkage Build (cont.) - Bag E
25225
M3x3
7975
Set
collar
7975
Throttle
spring
Throttle
setscrew
7975
Set
collar
7975
rod
2337
Throttle
servo horn
6918
4-40 x 1/2
bhcs
25225
M3x3
setscrew
7975
2-56
ballcup
Page 20

20
:: Throttle and Brake Linkage Build (cont.) - Bag E
8427
.018
7975
wire
spring
7975
Set
collar
7975
Throttle
pivot
!
Use
small
hole
25225
M3x3
setscrew
Brake
linkage
:: Throttle and Brake Linkage Build (cont.) - Bag E
7975
Brake
adjustment
knob
7562
Throttle
return
spring
:: Throttle and Brake Linkage Build (cont.) - Bag E
Screw
4-40 x 3/8
included
with servo
7562
Throttle
return
spring
mount
7975
Set
collar
6924
shcs
25225
M3x3
setscrew
!
Install throttlr
return spring to
throttle return
spring mount.
Page 21

:: Engine Build - Bag F
7975
2-56
plain
nut
21
Nitro
Engine
#1596
thread lock
7618
Flywheel
shim
:: Engine Build (cont.) - Bag F
7993
Flywheel
2-shoe
p/s
7975
2-56
ballstud
7618
Collet
2313
SG
clutch
nut
:: Engine Build (cont.) - Bag F
7971
0.9mm
Clutch
spring
x2
2310
Clutch
shoe
!
Assembled
example
x2
Page 22

22
:: Engine Build (cont.) - Bag F
2321
Clutch
shim
!
The amount of shims
may vary depending
on engine type.
Min. shims - 2
Max shims - 4
Shim until clutch spins
freely with minimal play.
7968
20T
clutch
bell
2320
5x9x3
flanged
bearing
:: Engine Build (cont.) - Bag F
2320
5x10x4
bearing
4-40 x 1/2
7778
3x30mm
manifold
shcs
Manifold
washer
6925
shcs
7778
x2
x2
x2
2321
3mm
bhcs
2321
4.8mm
clutch
shim
x2
#1596
thread lock
7734
Side
exhaust
manifold
gasket
Build left and
right sides!
:: Engine Build (cont.) - Bag F
7731
Tuned
muffler
7733
Exhaust
coupler
2340
Engine
mounts,
pullstart
x2
3719
6”
Nylon
wire ties
7735
Side exhaust
manifold
x2
Attach nylon wire ties to the
exhaust coupler. Attach nylon
wire tie from the pull start to
the exhaust coupler wire tie.
!
Page 23

:: Engine Build (cont.) - Bag F
!
Oil the foam pre-
filter element using
#7710 Prefilter
Treatment.
:: Engine Build (cont.) - Bag F
23
!
Attach the air filter
to the carburetor
with a nylon wire tie.
7705
Air
filter
3719
6”
Nylon
wire ties
#1596
thread lock
7773
6-32 x 3/8
bhcs
!
NOTE: Make sure to set
gear mesh (see page 24)
before tightening engine
mount screws #7773.
x4
Page 24

24
:: Engine Build (cont.) - Bag F
To correctly set the gear mesh,
follow the steps below:
Loosen engine mount screws
1.
so you can slide your engine and
mount.
Slide engine and mount until the
2.
clutchbell gear comes in contact
with the spur gear. Tighten
engine mount screws. Hold the
spur gear in place and rock the
clutchbell gear. There should be
little “free-play” between the two
gears.
Repeat Step 2 if necessary.
It is important that you have a
little gap between the two gears
without pushing them completely
together.
:: Engine Build (cont.) - Bag F
#1596
thread lock
7732
4mm
setscrew
Attach the included fuel tubing as follows:
· Top of tank lid to exhaust pipe.
· Back of tank lid to carburetor.
!
!
Snap into place.
:: Engine Build (cont.) - Bag F
To properly set your linkage, follow these steps:
Turn on your transmitter,
turn on your vehicle (DO
NOT START THE ENGINE).
Set your throttle trim (or
adjust servo horn) until it
is 90˚ with the servo.
Set throttle linkage, spring side
first, to 15mm. The throttle
should be completely closed on
the carburetor. Next, set the
throttle linklage collar gap to
0.5mm.
Fuel tubing length
= 170mm
Set brake linkage, thumbscrew
3.2.1.
side first. Turn thumbscrew
until brake cam barely touches
the brake pads and brake disc.
Next, set the brake linkage
collar gap to 0.5mm.
Pressure line length
= 78mm
Racer’s Tip:
If you need more linkage
travel, move the linkage to
hole #3 (from #2) on the
servo horn.
Throttle
link
3
2
1
Set max throttle EPA. Hold full throttle on transmitter and check carburetor.
4.
Adjust EPA so that carburetor is completely open at full throttle.
5.
Set max brake EPA. It is easiest to do this while driving the SC10GT. Start at 50% and adjust accordingly.
Lower % = less brake. Higher % = more brake.
15mm
0.5mm 0.5mm
1
2
3
Brake
link
Page 25

:: Shocks Build - Bag G
25
6469
Shock
cap
o-ring
7484
Shock
internal
spacer
Front
Shock
9884
V2 RTR
front shock
body 1.02”
stroke
(blue)
5407
Red
o-ring
7484
Lower shock
seal cap
:: Shocks Build (cont.) - Bag G
6465
Shock
piston
#3
6469
Shock
cap
o-ring
7484
Shock
internal
spacer
Rear
Shock
6299
E-clip
9885
V2 RTR
front shock
body 1.39”
stroke
(blue)
5407
Red
o-ring
7484
Lower shock
seal cap
Remove
spurs
Piston
Piston number here
Use #3 = front shocks
Use #1 = rear shocks
6465
Shock
piston
#1
6459
Shock
shaft
1.02”
stroke
6299
E-clip
Front
Shock
:: Shocks Build (cont.) - Bag G
7217
Eyelet
6466
Downstop
1/32”
x5
7217
Pivot
Front
Shock
ball
6299
E-clip
Rear
Shock
Downstop
Rear
Shock
6458
Shock
shaft
1.32”
stroke
6466
1/32”
x2
6299
E-clip
7217
Eyelet
7217
Pivot
ball
Page 26

26
I
:: Shocks Build (cont.) - Bag G
Shock fluid
30wt #5422
:: Shocks Build (cont.) - Bag G
Shock fluid
30wt #5422
6441
Shock
cap
(molded)
* Shock Bleeding Steps:
1. Pull shock shaf t down.
2. Fill shock body 3/4 full with silicone fluid.
3. Slowly move the shock shaf t up and
down to remove air from under piston.
4. Wait for bubbles to come to surface.
5. Fill shock body to top with silicone fluid.
6. Place several drops of oil in the cap and
on cap threads.
7. Install cap and tighten completely.
8. Slowly compress shaf t all the way to
the top. If there is pressure at the top
of the stroke, there is too much oil or air.
You must bleed it out.
9. Slowly pull shaft down.
10. Unscrew the cap 3/4 turn and tilt the
shock at a slight angle.
11. Slowly compress the shaft to push out
excess oil and air. You should see
bubbles coming out from under the cap.
12. With the shaft compressed, tighten the
cap and re-check for pressure at the top
Step 7Step 5-6Step 3-4Step 1-3
of the stroke. If there is still pressure,
repeat steps 9 thru11.
6475
Spring
collar
8846
7425
Front
spring
Preload
spacers
x1
(gold)
3.70lb
Front
Shock
.12
:: Shocks Build (cont.) - Bag G
6473
Shock
bushings
Front
Shock
x1
.03
4-40 x 1/2
6925
shcs
6475
Spring
collar
6480
Rear
6475
Spring
cup
spring
(green)
1.90lb
Rear
Shock
6472
Shock
mounting
nut
Build left and
right sides!
8846
Preload
spacers
x1 x1 x1
.25 .25
.06
3
O
6475
Spring
cup
2
1
I
Page 27

:: Shocks Build (cont.) - Bag G
91101
KMC Hex
Wheel
(black)
89413
tire insert
JConcepts
!
KMC Hex
Wheel
(black)
89413
tire insert
6473
Shock
bushings
6472
Shock
mounting
nut
3
2
O
27
1
I
Rear
Shock
:: Wheel and Tire Assembly
91101
KMC Hex
Wheel
(black)
6925
4-40 x 1/2
shcs
1/8th molded
tire insert
89413
Build left and
right sides!
KMC Hex
(black)
91101
Wheel
89413
1/8th molded
tire insert
!
Note: Clean the rims and tire bead
where the two will mount to each other
before you glue them together. You
can clean them with either rubbing
alchohol, or r/c electric motor spray.
Place the foam insert inside the tire.
Install the tire on the rim, and push the
tire beads inside the groves on the rim.
Use Tire glue #1597 to glue the tire
to the wheel. Glue one side at a time,
allowing enough time for the glue to dry
before continuing to the other side.
Tip: You can use a rubber band to hold
the tire tight against the wheel while
the glue is drying.
!
Build 2 Front!
!
Tire glue is
not included!
JConcepts subculture
tire, green compound
9809
SC10 Tire
w/foam
insert
JConcepts
#3042
(use on rear)
!
Build 2 Rear!
The rear tires included in this
RTR are made by JConcepts.
JConcepts tires can be
purchased at their website:
http://www.jconcepts.net
Page 28

28
:: Wheel and Tire Assembly (cont.)
:: Body Install
6332
Body clip
x4
6953
8-32
low profile
steel locknut
x2
6952
8-32
steel
locknut
x2
Page 29

29
:: Tuning Tips
Tips for Beginners:
Before making any changes to the standard setup, make sure you can get around the track without crashing. Changes
to your vehicle will not be beneficial if you can’t stay on the track. Your goal is consistent laps.
Once you can get around the track consistently, start tuning your vehicle. Make only ONE adjustment at a time, testing
it before making another change. If the result of your adjustment is a faster lap, mark the change on the included setup
sheet (make adddtional copies of the sheet before writing on it). If your adjustment results in a slower lap, revert back to
the previous setup and try another change.
When you are satisfied with your vehicle, fill in the setup sheet thoroughly and file it away. Use this as a guide for future
track days or conditions.
Recommended Gearing:
To calculate your SC10GT Final Drive Ration (a.k.a. gear ratio), use the following formula:
(spur gear # teeth) / (clutch bell # teeth) x 4.09 = Final Drive Ratio
For higher top speeds, use either a larger tooth clutch bell or a smaller tooth spur gear.
For more torque and acceleration use a smaller tooth clutch bell or larger tooth spur gear.
SC10GT gear chart
Spur Gear
54
19
11.62
11. 0 4
20
10.51
21
Clutch Bell
55 56
11. 8 4
11.25
10.71
12.05
11.45
10.91
Slipper Clutch:
The instructions provide a base setting for the slipper clutch, but depending on the surface you are running on, it may be
adjusted for better performance. The intent of the slipper clutch is to absorb shocks to the drivetrain and to improve
power delivery to the wheels. If the car is doing wheelies too easily on a high grip surface, try loosening the slipper.
In cases of excessive wheel spin on a low grip surface, try loosening the slipper for smoother acceleration. The slipper
settings will vary depending on tire grip and driving surface. Adjust the slipper in 1/8 turn increments when tuning.
Clutch Springs:
The clutch spring stiffness determines at what RPM the engine begins to engage the clutch bell. The kit comes with a
0.9mm clutch spring (#7971), this provides the smoothest power delivery. For more aggressive power delivery, try the
1.0mm clutch spring (#2306) and for most aggressive engagement try the 1.1mm clutch spring (#2307).
Caster:
The kit/ RTR comes with 30 degree caster blocks (#7922). For less aggressive steering try the optional 25 degree
caster blocks (#7919).
Front Camber Links and Vertical Adjustment:
Changing the length of the camber link is considered a bigger change than adjusting the ballstud height on the shock
tower. Shortening the camber link (or lowering the ball end) will give the front end less roll and quicken steering
response, especially on corner entry. Lengthening the camber link (or raising the ball end) will give the front more roll and
slower steering response, but can produce more corner exit steering. Longer camber links are typically used on high
grip tracks and shorter links tend to work better on medium grip and loose tracks.
Rear Camber Links and Vertical Adjustment:
Changing the length of the camber link is considered a bigger step than adjusting the ball end height on the shock tower.
The rear camber link length is adjusted on the hub and the inboard height is adjusted on the rear camber link mount.
The rear camber link mount can be shimmed up or down, and you can change the vertical hole location. From the kit
setting, lowering the inner pivot will slide more predictably and give you more entry steering, but not have as much
cornering grip.
Front Toe-In:
Zero degrees toe-in (tires pointing straight forward) is the setting that should be used in almost all track conditions.
Occasionally, adding a little bit of toe-out (tires pointing slightly out) can increase initial turn in response. A slight amount
of toe-in will increase front end stability a little, and results in less aggressive steering but this option is rarely used.
Front Camber:
Camber is the angle of the wheel when looked at from the front. The angle is measured from a line perpendicular to the
ground to the face of the wheel. Camber is used to ensure a wider tire contact patch while cornering. A good starting
point for the front is -1°. Performance will begin to decrease after -3°. Positive camber, where the top of the tire is
leaning out, is not recommended in the front. To set your camber use the included #1719 camber gauge.
Page 30

30
5407
5407
89324
6918
6918
:: Tuning Tips (cont.)
Rear Camber:
A good starting point for the rear camber setting is -1°. In loose track conditions, going to 0° camber can improve
straight-line acceleration.
Rear Hub Spacing:
There are three options for rear hub spacing, FORWARD, MIDDLE, & BACK. The kit setting provides the best possible
rear traction. The FORWARD position will provide more rear traction for low grip tracks. The BACK position will provide
more steering on high grip tracks.
Ride Height:
Ride height is the distance from the ground to the bottom of the chassis. The standard front ride height setting is with
the front arms level (referred to as “arms level”). The standard rear ride height setting is when the outdrive, driveshaft,
and axles all are on the same imaginary horizontal line (referred to as “bones level”). Check the ride height by lifting the
car about 8-12 inches off a table and drop it level. After the suspension “settles” into place, add or remove pre-load clips
on the shock bodies so that the left and right arms appear to be parallel. For precise ride height measurements, use
the Factory Team ride height gauge #1449.
Anti-Squat:
Anti-squat denotes the angle of the rear arms relative to the ground. The kit setting is 2 degrees, and can be adjust to
1 degree by removing the included shim above the rear arm mount and replacing it below the rear arm mount.
Changing to less anti-squat tends to make the truck produce more rear traction and less steering in the corners.
Optional Large Fuel Tank:
The SC10GT has a unique radio tray that allows you to install a
larger fuel tank (# 89324) for longer run times. Simply removing
the radio tray insert, and install the optional fuel tank (not included)
over the molded posts on the radio tray with red O-rings (#5407)
for vibration dampening.
89324
6918
6918
5407
5407
Shock Piston and Fluid:
The SC10 GT shocks are built with our 2 hole, #1 pistons in the front shocks, and #3 pistons in the rear shocks.
All pistons have a number molded on it.
As a rule of thumb, larger hole pistons decrease damping which can help the truck in bumpy and low-grip situations.
On smoother tracks, or for large jumps, you may want use a smaller hole piston which will increase damping and take
away some grip. [#1 large hole, #2 medium hole, #3 small hole]
Typically, your SC10 GT shocks will work best with shock fluid rates between 25 and 35 wt (275 - 425 CST).
Use the thicker fluids in the range when changing to larger hole pistons, and also use the thinner weight fluids when
changing to a smaller hole pistons.
Setup Sheets:
Most often, the best way to get your car handling right is to go to our website www.rc10.com and click on the links to
Setup Sheets, then SC10 GT setups. Our team of professional drivers help develop these setups at National events.
Also, most drivers have a “base” setup that they use as a starting point for every event. Try running some of our base
setups OR look for track conditions and tires that are similar to your local track and mimic that setup.
Remember, each adjustment has a purpose, so copy everything from the setup sheet and then make adjustments
based on the recommendations in here and in our online tuning guide.
Page 31

31
:: Shocks
5407
6299
6441
6458
6459
6465
6466
6469
6473
6475
6925
7217
7484
8846
9884
9885
9884 (F)
9885 (R)
Red O-Rings
1/8” E-Clips
Shock Cap, Molded
Shock Shaft, 1.32“ stroke
Shock Shaft, 1.02” stroke
Shock Pistons, 4 each
Shock Down Stops, Set
Black Shock Cap O-Ring
Shock Bushings
Preload Spacers, Collars & Cups
4 thicknesses, 4 sets each
4-40 x 1/2“ SHCS
Shock Rod Ends / Plastic Pivot Balls
V2 1/10 Shocks Rebuild Kit
Preload Spacers, 4 each
V2 RTR Front Shock Bodies 1.02“
V2 RTR Rear Shock Bodies 1.39”
6441
6469
(RTR)
:: Springs
1580
1582
6478
6480
6481
6482
7425
7426
7427
7428
7429
7430
7434
7435
7436
FT Truck Front Spring Kit. I pair of green,
silver, blue, gold, and red front springs
FT Truck Front Spring Kit. I pair of green,
silver, blue, gold, and red rear springs
Rear Spring Silver 2.10 lb
Rear Spring Green 1.90 lb (Kit)
Rear Spring Black 1.74 lb
Rear Spring Gray 2.33 lb
Front Spring Gold 3.70 lb (Kit)
Front Spring Black 2.765 lb
Front Spring Green 2.99 lb
Front Spring Silver 3.225 lb
Front Spring Blue 3.45 lb
Front Spring Red 3.90 lb
Rear Spring Blue 2.55 lb
Rear Spring Gold 2.75 lb
Rear Spring Red 2.95 lb
:: Shock Fluid
5420
5421
5422
5423
5424
5425
5426
5427
5428
5429
5430
5431
5432
5433
5434
5435
5436
5437
5438
10 Weight Silicone Shock Fluid
20 Weight Silicone Shock Fluid
30 Weight Silicone Shock Fluid
40 Weight Silicone Shock Fluid
22.5 Weight Silicone Shock Fluid
80 Weight Silicone Shock Fluid
27.5 Weight Silicone Shock Fluid
15 Weight Silicone Shock Fluid
25 Weight Silicone Shock Fluid
35 Weight Silicone Shock Fluid
45 Weight Silicone Shock Fluid
55 Weight Silicone Shock Fluid
32.5 Weight Silicone Shock Fluid
37.5 Weight Silicone Shock Fluid
42.5 Weight Silicone Shock Fluid
50 Weight Silicone Shock Fluid
60 Weight Silicone Shock Fluid
70 Weight Silicone Shock Fluid
47.5 Weight Silicone Shock Fluid
5407
7484
5407
7484
8846
6475
8
12
4
1
1
1
1
4
4
1
6
2
1
1
Pr.
Pr.
6459 (F)
6458 (R)
6475
7217
6925
2oz.
2oz.
2oz.
2oz.
2oz.
2oz.
2oz.
2oz.
2oz.
2oz.
2oz.
2oz.
2oz.
2oz.
2oz.
2oz.
2oz.
2oz.
2oz.
6299
6465
6299
6466
1
1
Pr.
Pr.
Pr.
Pr.
Pr.
Pr.
Pr.
Pr.
Pr.
Pr.
Pr.
Pr.
Pr.
:: Ball Differential
6573
6574
6575
6581
6582
6589
7664
7666
7667
7668
7677
7678
6575
Diff Thrust Washer & Bolt
Precision Diff Thrust Balls, 5/64”
Locking T-Nut, Diff Thrust Bolt, & Cover
3/32” Carbide Diff Balls
Diff Thrust Spring
Ball Bearing, 5/32 x 5/16” unflanged
Diff Gear 52T
Diff Drive Rings, 2.60:1
Diff Outdrive Hub, Right, 2.60:1
Diff Outdrive Hub, Left, 2.60:1
Offroad Diff Rebuild Kit
Offroad Diff Kit
6574
7667
6589
6573
7666
7664
7666
6581
6582
:: Lubes & Adhesives / Decals / Misc.
1105
1596
1597
5450
5451
5452
5453
5454
5455
5456
5457
5458
5459
6588
6591
6636
6727
7710
716
717
3816
3820
3834
7109
FT Green Slime Shock Lube
FT Locking Adhesive
FT Tire Adhesive, medium
Silicone Diff Fluid 1000cst
Silicone Diff Fluid 2000cst
Silicone Diff Fluid 3000cst
Silicone Diff Fluid 5000cst
Silicone Diff Fluid 7000cst
Silicone Diff Fluid 10000cst
Silicone Diff Fluid 20000cst
Silicone Diff Fluid 30000cst
Silicone Diff Fluid 60000cst
Silicone Diff Fluid 100000cst
Black Grease - 4cc
S.Diff Lube - 4cc
Silicone Grease - 4cc
Servo Tape
FT Filter Treatment
Reedy 2009 Sticker Set
Reedy Powered Logo Decal
American Bumper Sticker
AE Logo Decal Sheet
AE Blue Embossed Logo Sticker
SC10GT Decal Sheet
1
1
1
1
1
1
1
1
1
1
1
1
1
1
1
1
2
1
1
1
1
1
2
1
2
6
1
12
1
2
1
2
1
1
1
1
7668
6575
Page 32

32
:: Steering
2234
3981
6272
6276
6277
6629
6917
6922
7336
7337
7908
9180
Swing Rack Bushing
Ballstud .20” Black, short
Foam Ballend Dust Covers
Ballstud .20” Silver, short
Ballstud .30” Silver, short
5-40 Locknuts
4-40 x 3/8 BHCS
4-40 x 1/2 FHCS
Steering Servo Mount Kit
.250 x .125 x .015 Washer
Servo Saver & Steering Kit
Servo Horns, Set
3981
9180
6272
28
6917
7336
1
6
2234
7908
6
6
6
6
6
1
4
1
1
6276
6272
7908
6629
7908
7908
6272
6277
7908
7908
7908
6272
6276
6276
7908
2234
7908
7908
6917
7336
7337
:: Front Bumper, Front Shock Tower
3897
6272
6277
6292
6295
6332
6472
6473
6915
6924
6925
7103
7738
9630
9816
9820
9825
Pivoting Body Mounts
Foam Ballend Dust Covers
Ballstud .30” Silver, short
4-40 x 3/8 FHCS
4-40 Nuts
Body Clips
Shock Mount Nuts
Shock Bushings
4-40 x 5/8 FHCS
4-40 x 3/8 SHCS
4-40 x 1/2 SHCS
SC10 GT Body Posts, Set
4-40 x 7/8 SHCS
Ballstud Washer
SC10 Front Skid, Bumper
SC10 Body Mounts
Front Shock Tower
4
28
6
6
6ea.
6
4
4
6
6
6
1
6
10
1
1
1
6292
6922
7103
7738
6272
6277
9630
6332
6924
3897
7738
6922
6924
2234
6295
9825
9820
6473
6472
6473
6295
9816
6925
9816
6915
6924
6272
6277
9630
6924
Page 33

:: Front Bulkhead
4334
6915
6922
6925
7892
7893
9563
9564
2-56 x 5/16 BHCS
4-40 x 5/8 FHCS
4-40 x 1/2 FHCS
4-40 x 1/2 SHCS
Front Sub Chassis
Top Plate
Front Bulkhead
Front Chassis Brace
8
6
6
6
1
1
1
1
4334
33
6925
6925
6925
7893
9564
9563
6915
6915
:: Front Suspension
3977
3983
4187
4449
6272
6277
6953
7260
7368
7369
7917
7922
7927
9621
9645
9880
9881
9882
9883
3/16 x 3/8 RS Ball Bearing
Ballstud .30” Black, short
.030” Nylon Washers
4-40 x 3/16 Aluminum Locknut
Foam Ballend Dust Covers
Ballstud .30” Silver, short
8-32 Low Profile Steel Locknut
4-40 Small Plain Nut
3/16” Axle Shim
1/16” Universal Roll Pins
Front Suspension Arm
30D Caster Blocks L&R
Outer Hinge Pins, Set
Front / Rear Inner Hinge Pins
2-56 x 1/8 BHCS
SC10 Steering Blocks, Hex
SC10 Front Axle & C-Clips, Hex
C-Clips, 3/16”
SC10 Wheel Hex Adapters, Set
12
28
12
14
Pr.
Pr.
Pr.
7892
6922
6922
2
6
5
6
6
4
6272
3983
7260
6922
6272
1
1
6
2
6
1
9621
7922
7927
9645
9881
3977
9880
9882
4449
7368
6277
3977
9883
(thin)
4187
7369
6953
7917
9645
7927
Page 34

34
:: Chassis / Radio Tray
6288
6292
6338
6915
6918
6922
6923
6924
6925
7106
7107
7108
7337
7562
7724
7891
7896
7899
7928
9146
21173
4-40 x 1/4 BHCS
4-40 x 3/8 FHCS
Antenna Tube, 12” black
4-40 x 5/8 FHCS
4-40 x 1/2 BHCS
4-40 x 1/2 FHCS
4-40 x 3/4 FHCS
4-40 x 3/8 SHCS
4-40 x 1/2 SHCS
SC10GT Radio Tray
SC10GT Chassis
SC10GT Muffler Wire
.250 x .125 x .015 Washer
Throttle Return Spring
Fuel Line 15”
Chassis Brace
Receiver Box
Fuel Tank
Rear Arm Mounts
2-56 x 3/16 BHCS
Small Body Clips
6
6
1
6
6
6
6
6
6
1
1
1
4
1
1
1
1
1
1
6
12
6338
21173
7896
7896
9146
21173
6924
7562
6924
6924
7337
7106
6924
7337
6925
6925
7891
6288
7928
6292
:: Turnbuckles
7101
7217
7230
7253
7911
7937
Turnbuckle 2.80”
Shock Rod Ends with Plastic Pivot Balls
Ball Cups, Large
Turnbuckle 2.62”
Steering Servo Link
Turnbuckle 3.00”
7106
7928
6915
6288
6923
6918
7724
7899
2
2
12
2
1
2
6925
7108
7107
6922
Front Camber
Turnbuckle
72307230
7253
7911
Steering
servo link
7911
7911
Steering Camber
Turnbuckle
7230
7101
Rear Camber
Turnbuckle
7217 7217
7937
7230
72177217
Page 35

:: Slipper
6629
7485
7486
7953
7955
7956
7957
9603
5-40 Locknuts
FT V2 Slipper Hubs
FT V2 Slipper Spring and Washer
Slipper Hub Inboard
54T Spur Gear - Kit
55T Spur Gear
56T Spur Gear
Slipper Pads
:: Gearbox
3976
3977
6915
6924
7874
7945
7960
7961
7963
7964
7965
3/8 x 5/8 RS Ball Bearing
3/16 x 3/8 RS Ball Bearing
4-40 x 5/8 FHCS
4-40 x 3/8 SHCS
4-40 x 7/16 SHCS
Transmission Case
Top Shaft
Top Shaft Spacer
Idler Gear (44T-28T)
Idler Gear Shaft
Transmission (Complete) Set
35
6
2
1
1
1
1
1
2
7955
9603
9603
7485
7486
6629
2
2
6
6
8
1
1
1
1
1
1
7953
6915
3977
7945
7961
3976
7964
3977
7960
3977
7963
3977
3976
7945
6924
7874
6915
6924
Page 36

36
:: Throttle / Brake Linkage
2337
4187
4449
6918
7562
7975
8427
25225
Throttle Servo Horn, Set
.030” Nylon Washers
4-40 x 3/16 Aluminum Locknut
4-40 x 1/2 BHCS
Throttle Return Spring
Linkage Kit
.018 Springs
3x3mm Setscrew
12
20
1
5
6
1
1
2
25225
7562
8427
7975
7975
7975
:: Brakes
7633
7947
7948
7949
7950
4-40 x 5/8 BHCS
Brake Tophat Bushing
Brake Cam
Brake Pad
Brake Disk
7975
7975
6
2
1
2
1
25225
4187
7633
7633
2337
4449
6918
7975
7949
7947
7975
7947
7950
25225
7975
7975
25225
7975
7948
7949
:: Exhaust
3719
7731
7732
7733
7734
7735
6 Inch Nylon Wire Ties
RPM Muffler
4x4mm Set Screw
Exhaust Tubing Coupler
Manifold Gasket Side Exhaust
Manifold, Side Exhaust
12
1
6
1
3
1
3719
7731
7732
7733
7734
7735
Page 37

:: Engine / Clutch / Air Filter
2310
2313
2320
2321
2340
2918
6925
7618
7705
7773
7778
7967
7968
7969
7970
7971
7975
7976
7978
7993
Clutch Shoes
SG Crank Clutch Nut
Clutch Bearings, Set
Clutch Shim & Screws, Set
Pull Start Engine Mount
AE .18 Engine SG Crank
4-40 x 1/2 SHCS
Flywheel Collet & Shim
Air Filter Kit
6-32 x 3/8 BHCS
3x30mm Manifold SHCS &
Lock Washers
Clutch Bell 21T
Clutch Bell 20T - Kit
Clutch Bell 19T
Clutch Springs, 0.8mm
Clutch Springs, 0.9mm - Kit
Linkage Kit
10mm Clutch Nut Wrench
Flywheel Non -Pull Start 2-shoe
Flywheel Pull Start 2-shoe - Kit
37
2
1
1
1
2
1
6
1
1
6
2
1
1
1
2
2
1
1
1
1
2918
2340
6925
7778
7705
7975
7618
7993
2321
7971
7968
:: Rear Shock Tower
3897
4449
6332
6472
6473
6917
6925
6926
6927
7102
7103
7260
7413
7904
7941
9273
Pivoting Body Mounts
4-40 x 3/16 Locknut
Body Clips
Shock Mount Nuts
Shock Bushings
4-40 x 3/8 BHCS
4-40 x 1/2 SHCS
4-40 x 5/8 SHCS
4-40 x 3/4 SHCS
SC10GT Rear Shock Tower
SC10GT Body Posts, Set
4-40 Small Plain Nut
4-40 x 3/4 BHCS
Battery Box
Rear Camber Link Mount
Dogbone Spacer, with Spring
4
5
6
4
4
6
6
6
6
1
1
12
6
1
1
2
6332
7773
3897
7103
7260
7413
7773
6925
6926
6472
6473
6917
2313
6926
6473
7102
2310
7260
7413
2321
2320
2320
6472
6925
6925
6926
4449
9273
4449
9273
7941
6927
7260
7904
7904
Page 38

38
:: Rear Suspension
3977
5407
6926
6952
7260
7368
7369
7462
7927
7930
7932
7933
7935
9273
9621
9630
9645
9670
9883
:: Rear Bumper
6917
6925
7104
7105
89218
89430
3/16 x 3/8 RS Ball Bearing
Red O-Rings
4-40 x 5/8 SHCS
8-32 Locknut, Steel
4-40 Small Plain Nut
3/16 Axle Shim
1/16” Universal Roll Pins
T4/GT2 Dogbone
Outer Hinge Pins, Set
Rear Suspension Arms, L&R
1.5 Degree Rear Hubs L&R
Crush Tube
.187 x .50 x .196 Bearing
Dogbone Spacer, with Spring
Front & Rear Inner Hinge Pin Set
Ballstud Washer
2-56 x 1/8 BHCS
3/16 Rear Axle
SC10 Wheel Hex Adapters Set
4-40 x 3/8 BHCS
4-40 x 1/2 SHCS
SC10GT Rear Bumper
SC10GT Rear Bumper Mount Set
3x8mm Washer
Mud Flaps
12
14
Pr.
Pr.
10
10
Pr.
2
8
6
6
4
1
1
2
2
2
1
6
2
1
7462
7930
5407
5407
9621
9670
7260
3977
7932
9645
7927
9630
6926
7933
7368
7935
7369
9883
(thick)
6952
9273
6
6
1
1
89430
6925
6925
6925
89218
6925
:: Wheels, Tires, Inserts
9809
89413
91101
91102
91103
91104
91105
91106
SC10 Tires w/Foam Inserts
1/8 Molded Tire Inserts
KMC Hex Wheels, Black (Kit)
KMC Hex Wheels, Silver
KMC Hex Wheels, Chrome
KMC Hex Wheels/Tire Black
KMC Hex Wheels/Tire Silver
KMC Hex Wheels/Tire Chrome
7105
2
2
2
2
2
2
2
2
6917
7105
6925
7104
89218
89430
6917
6925
91101
89413
9809
Page 39

39
:: Factory Team and Option Parts
1408
1417
1419
1420
1654
1710
1734
1735
1736
1766
1777
1779
1780
1781
6416
6417
6937
6943
7416
7476
7477
7480
7481
7484
7485
7486
7495
7889
7989
7990
9665
9795
9796
9797
9798
9799
31286
31550
91170
91175
91176
91177
91178
91179
FT Titanium Turnbuckles, 2.65”
FT Titanium Turnbuckles, 2.8”
FT Titanium Turnbuckles, 3.0”
FT Titanium Turnbuckle Set
FT Solid Axle Pins
FT Aluminum Non Pull Start Engine Mounts, blue
FT Body Clips, 4 Long, 6 Short
FT Long Body Clips, Blue
FT Short Body Clips, Blue
FT Lightweight Outdrive Set
FT Aluminum Shock Pivot Ball with Eyelet
FT Aluminum Servo Mounts, blue
FT Aluminum Shock Bushing Standard, blue
FT Aluminum Shock Bushing Short, blue
FT Shock Shaft Gold 1.32”
FT Shock Shaft Gold 1.02”
4-40 Aluminum Locknuts, blue
FT Blue 8-32 Locknuts
Shock Collar Threaded
FT V2 1.02” Threaded Shocks, Complete Set
FT V2 1.02” Threaded Bodies, Set
FT V2 1.32” Threaded Shocks, Complete Set
FT V2 1.32” Threaded Bodies, Set
FT V2 1:10 Shock Rebuild Kit
FT V2 Slipper Hubs - Kit
FT V2 Slipper Spring and Washer
FT V2 Vented Slipper Hubs (fits front only)
Steering Bearing Set
Aluminum Chassis Brace, blue
Aluminum Front Bulkhead, blue
FT Hinge Pn Brace, blue
Ti Nitride Ballstuds 4-40x.20 - long
Ti Nitride Ballstuds 4-40x.30 - long
Ti Nitride Ballstuds 4-40x.40 - long
Ti Nitride Ballstuds 4-40x.20 - short
Ti Nitride Ballstuds 4-40x.20 - short
Aluminum Ballstud Washers, blue
M3 Aluminum Locknuts, blue
Hi -Torque Slipper Pad
VTS Slipper Conversion
VTS Slipper Housing
VTS Slipper Pads
VTS Slipper Plate
VTS Slipper Hub, Outer
:: AE Manifolds and Mufflers
1771
1772
1773
1774
7730
7731
7737
7743
7973
7974
7977
FT Torque-Tuned Side Exhaust Tuned Pipe, blue
FT Torque-Tuned Side Exhaust Tuned Pipe, natural
FT Torque-Tuned Side Exhaust Tuned Pipe, black
FT RPM-Tuned Side Exhaust Tuned Pipe, blue
Torque Muffler
RPM Muffler
GT Rear Exhaust Manifold
FT Torque-Tuned Side Exhaust Tuned Pipe, purple
Rear Exhaust Manifold, black
FT Smoothy Muffler, black
Rear Exhaust Manifold, blue
:: AE Nitro Engines and Accessories
MC59
2
2
2
1
4
Pr.
10
4
6
1
4
2
4
4
1
1
6
4
Pr.
1
1
1
1
1
Pr.
1
Pr.
1
1
1
1
2
2
2
2
2
2
6
2
1
1
2
1
1
1738
1748
1749
1750
2403
3718
3719
3720
7705
7706
7707
7708
7709
7710
7724
7725
7994
25076
29013
29016
29017
29021
29023
29025
29034
29050
29052
29053
29054
29056
29058
29092
29093
29094
29095
29096
29097
29098
:: Bodies and Decals
9836
9837
9838
9840
9842
9843
9844
9846
9847
9848
9849
9856
9857
9858
9859
9860
9861
9862
1
9863
1
9874
1
1
9875
1
9876
1
9886
1
9887
1
1
1
1
McCoy Glow Plug
FT Glow Starter
Nitro Fuel Bottle, 600cc
Nitro Fuel Bottle, 400cc
FT Starter Box
Air Filter Slide Carb
12 Inch Nylon Wire Ties
6 Inch Nylon Wire Ties
8 Inch Nylon Wire Ties
Air Filter Kit
Paper Filter Element
Foam Prefilter Element
Air Filter Boot
4 Inch Nylon Wire Ties
Pre Filter Treatment
Fuel Line 15”
Fuel Line 3’
D Size Glow Igniter
Fuel Primer Bulb
Carb Retaining Bolt
Ball Bearing 2 Pack
Engine Screw Set
.12/.15 /.18 Pull Start Handle Set
.12/.15 /.18 Pull Start Spring
.12/.15 /.18 Pull Start Wire
Backplate (converts to non pull start)
.12/.15/.18 Pull Start Oneway
.12/.15 /.18 Pull Start Starting Axle
.12/.15 /.18 Pull Start
.12/.15 /.18 Pull Start Backplate
.12/.15 /.18 Pull Start Wheel
.12/.15 /.18 Pull Start Set (no oneway included)
.18 Crankcase
.18 Wrist Pin Assembly
.18 Gasket Set
.18 Crankshaft
.18 Cylinder Head
.18 Connecting Rod
.18 Cylinder & Piston
SC10 Clear Body
SC10 ‘09 Clear Body
SC10 KMC Body, pre-painted & detailed
SC10 Bully Dog Body, pre-painted & detailed
SC10 AE Body, pre-painted & detailed
SC10 KMC Decal Sheet
SC10 Lucas Oil Decal Sheet
SC10 Pro Comp Decal Sheet
SC10 AE Decal Sheet
SC10 Ready Lift Body, pre-painted & detailed
SC10 Ready Lift Decal Sheet
SC10 ‘09 Lucas Oil Body, pre-painted & detailed
SC10 ’09 Lucas Oil Decal Sheet
SC10 ‘09 Pro Comp Body, pre-painted & detailed
SC10 ’09 Pro Comp Decal Sheet
SC10 ‘09 Speed Tech Body, pre-painted & detailed
SC10 ’09 Speed Tech Decal Sheet
SC10 ‘09 Rockstar/Makita Body,
pre-painted & detailed
SC10 ’09 Rockstar/Makita Decal Sheet
SC10 ‘09 Monster Energy Body,
pre-painted & detailed
SC10 ‘09 Monster Energy Decal Sheet
SC10 Contender Body, clear
SC10 09’ Slick Mist Body, pre-painted & detailed
SC10 Slick Mist Decal Sheet
1
1
1
1
1
1
12
12
12
1
1
1
1
12
1
1
1
1
1
1
1
1
1
1
1
1
1
1
1
1
1
1
1
1
1
1
1
1
1
1
1
1
1
1
1
1
1
1
1
1
1
1
1
1
1
1
1
1
1
1
1
1
1
Page 40

40
:: XP Electronics
29107
29125
29126
29127
29150
29156
29166
29167
29209
29210
29211
29212
29221
29222
S1903 Metal Gear Set
S1903MG Servo
S2008MG Servo
S2008MG Gear Set
XP2/XP3 RX/TX Charger, 110V
XP3D FM Radio System 75mHz
XP DS1313 Digital Servo
XP DS1015 Digital Servo
Gear Set, DS1313
Gear Set, DS1015
Servo Case , DS1313/DS1015
Accessory Pack, DS1313/DS1015
XP3SS 2.4GHz Radio System
TRS401SS 2.4GHz 4Ch Receiver
:: Reedy Batteries and Chargers
302
303
604
610
612
630
632
633
634
635
636
637
638
AA Alkaline 1.5V (4)
AA 2700mAh NiMH 1.2V Rechargeable
526-S AC/DC 2S-6S LiPo/LiFe Charger
447-S AC/DC NiMH Peak Charger
1600 Series 6.0V Hump Receiver Pack
Pro RX Battery 1600mAh 7.4V 10C
TX Lightweight Battery 1350mAh 11.1V
TX Battery - 3PK, M11 3000mAh 11.1V
TX Battery - Helios, Z1 2400mAh 11.1V
Starter Box Battery 2200mAh 14.8V 20C
6.0V 5A Voltage Regulator
TX Battery - M11X 2500mAh 7.4V
LiFe 1700mAh RX Battery
:: RePlay Cameras
1
RP001
1
RP002
1
RP021
1
RP022
1
RP023
1
RP029
1
RP030
1
RP032
1
RP033
1
RP034
1
RP036
1
RP037
1
RP038
1
RP041
RP042
RP043
RP044
RP045
1
RP046
1
RP047
1
RP048
1
RP049
1
1
1
1
1
1
1
1
1
Replay XD1080 Complete Camera System
Replay XD720 Complete Camera System
Replay XD1080 Lens Bezel Kit
Replay XD1080 Clear Lens Cover
Replay XD1080 Lens Bezel & Rear Cap O-Ring
Replay XD1080 HDMI to Mini-HDMI
Replay XD1080 Mini 8-pin USB Charge Data Cable
USB DC Car Charger 1A Stubby
USB DC Car Charger 500mAh
Micro SDHC USB Reader
3M VHB 4991 Mount Adhesive for SnapTray
3M VHB 5962 Mount Adhesive for Pro Flat Mount
3M VHB 5962 Mount Adhesive for SnapTray
Replay XD Suction Cup Arm Mini Clamp
Replay XD Suction Cup Short Arm Base
Replay XD Skateboard Mount
Replay XD VHB SnapTray, Convex
Replay XD VHB SnapTray, Flat
Au Plug for Universal DC Wall Charger
Eu Plug for Universal DC Wall Charger
Uk Plug for Universal DC Wall Charger
Universal USB DC Wall Charger 1A
1
1
1
1
1
1
1
1
1
1
1
1
1
1
1
1
1
1
1
1
1
1
:: Reedy Accessories
716
28050
SP35M
SP35L
SP35XL
SP35XXL
SP35XXXL
SP36M
SP36L
SP36XL
SP36XXL
SP36XXXL
SP37S
SP37M
SP37L
SP37XL
SP37XXL
SP37XXL
SP38
SP39
SP417
SP418
Reedy 09 Decal Set
Reedy Turbo Glow Plug Caddy
Reedy Logo T-Shirt - White M
Reedy Logo T-Shirt - White L
Reedy Logo T-Shirt - White XL
Reedy Logo T-Shirt - White XXL
Reedy Logo T-Shirt - White XXXL
Reedy Logo T-Shirt - Black M
Reedy Logo T-Shirt - Black L
Reedy Logo T-Shirt - Black XL
Reedy Logo T-Shirt - Black XXL
Reedy Logo T-Shirt - Black XXXL
Reedy Retro T-shirt - Black S
Reedy Retro T-shirt - Black M
Reedy Retro T-shirt - Black L
Reedy Retro T-shirt - Black XL
Reedy Retro T-shirt - Black XXL
Reedy Retro T-shirt - Black XXL
Reedy Trucker Hat
Reedy Patch
Factory Team 1/10 Motor Storage Bag
Factory Team 1/10 Car Carrier Bag
1
1
1
1
1
1
1
1
1
1
1
1
1
1
1
1
1
1
1
1
1
1
:: LRP Charger, Power Supply, Balancer, Iron
LRP41281
LRP41552
LRP41555
LRP42103
LRP42104
LRP42105
LRP42305
LRP43150
LRP45200
LRP65800
LRP65802
LRP65803
LRP65804
Quadra Pro 2 Charger
Pulsar Competition 3 Charger
Pulsar Touch Charger
LiPo Balance Board XH
LiPo Balance Board FP/TP
LiPo Balance Board PQ
Temp. Sensor for Pulsar Touch
Power Supply Competition
LiPo Parallel Balancer
High Power Solder Station
Soldering Tip 5mm
Soldering Tip 1.2mm
Soldering Handle
1
1
1
1
1
1
1
1
1
1
1
1
1
:: Apparel
SP35**
SP36**
SP62**
SP63**
SP64**
SP65**
SP66**
SP67**
SP69**
SP70**
SP71**
SP411S
SP411L
SP413S
SP413L
SP416
SP417
SP420**
715
110684
Reedy 09’ White T-Shirt (M, L, XL, 2XL, 3XL)
Reedy 09’ Black T-Shirt (M, L, XL, 2XL, 3XL)
AE Vertigo Long Sleeve T-Shirt (S, M, L, XL, 2XL)
AE Vertigo White T-Shirt (S, M, L, XL, 2XL, 3XL, 4XL)
AE Vertigo Blue T-Shirt (S, M, L, XL, 2XL, 3XL, 4XL)
AE Vertigo Black T-Shirt (S, M, L, XL, 2XL, 3XL, 4XL)
AE Stencil Blue T-Shirt (S, M, L, XL, 2XL, 3XL, 4XL)
AE Stencil Gray Sweatshirt (S, M, L, XL, 2XL, 3XL)
AE 26 Time World Championship T-Shirt, Black
(S, M, L, XL, 2XL, 3XL)
Associated Windbreaker (S, M, L, XL, 2XL, 3XL)
Associated Winter Jacket (S, M, L, XL, 2XL)
AE Hat 11’ Flatbill Black S/M
AE Hat 11’ Flatbill Black L/XL
26 Time World Championship Hat S/M
26 Time World Championship Hat L/XL
1/10 Car Carrier Bag Only
1/10 FT Motor Bag
AE Pit Gloves (M, L, XL)
Reedy 2009 Track Banner
Team Associated Track Banner
** Use part number plus the desired size when ordering!
1
1
1
1
1
1
1
1
1
1
1
1
1
1
1
1
1
Pr.
1
1
Page 41

41
:: 1/18 Kits and RTR’s
20103
20104
20105
20106
20108
20110
20115
20118
20121
20130
RC18B2 - RC18T2 Team Kit
RC18T2 Brushless RTR (ready-to-run)
RC18B RTR (ready-to-run)
RC18B2 2.4ghz RTR (ready-to-run)
RC18B2 Brushless RTR (ready-to-run)
RC18MT RTR (ready-to-run)
RC18R Kamino RTR (ready-to-run)
RC18R Niteline RTR (ready-to-run)
SC18 Brushless RTR (ready-to-run)
RC18LM RTR (ready-to-run)
:: 1/12, 1/10 Kits and RTR’s
2042
4019
7023
7029
7030
7032
7034
7037
7046
7047
7048
7049
7080
7092
7093
8020
8021
9039
9040
9061
30107
30111
90004
90005
90006
90007
90010
Nitro TC3 RTR Plus (ready-to-run)
FT 12R5.1 Kit
RC10T4.1 FT Kit
SC10 Associated/RC10.com Truck RTR (ready-to-run)
SC10 KMC Wheels Race Truck RTR (ready-to-run)
SC10 Ready Lift RTR (ready-to-run)
SC10 FT Kit
RC10T4.1 RTR 2.4GHz Brushless (ready-to-run)
SC10 RS RTR, 2.4ghz Brushless Lucas Oil Body
SC10 RS RTR, 2.4ghz Brushless Monster Energy Body
SC10 RS RTR, 2.4ghz Brushless Pro Comp Body
SC10 RS RTR, 2.4ghz Brushless Rockstar/Makita Body
FT GT2 Nitro Truck Kit
GT2 RS Truck Nitro RTR (ready-to-run)
SC10 GT Nitro RTR (ready-to-run)
FT RC10R5 Kit
FT RC10R5-OVAL Kit
RC10B4.1 RTR 2.4GHz Brushless (ready-to-run)
RC10B4.1 Worlds Kit
FT B44.1 4WD Buggy Kit
FT TC6.1 4WD Touring Car Kit
TC4 4WD Touring Car RTR (ready-to-run)
SC10 4x4 Kit
SC10 4x4 Lucas Oil RTR (ready-to-run)
SC10 4x4 Pro Comp RTR (ready-to-run)
SC10 4x4 Rockstar/Makita RTR (ready-to-run)
SC10 4x4 FT Kit
:: 1/8 Kits and RTR’s
20503
20504
80904
80905
80906
80907
80912
80922
80923
80924
80925
80932
Limited Edition MGT 4.60 Nitro RTR, w/flag body
(ready-to-run)
Limited Edition MGT 8.0 Nitro RTR, w/flag body
(ready-to-run)
FT RC8Be Electric Buggy Kit
RC8RS “Race Spec” Nitro Buggy RTR (ready-to-run)
RC8.2 FT Nitro Buggy Kit
RC8.2e FT Electric Buggy Kit
RC8T Championship Edition
SC8 Short Course Race Truck, KMC Wheels Nitro RTR
(ready-to-run)
SC8 Short Course Race Truck, Bully Dog Nitro RTR
(ready-to-run)
SC8 Short Course Race Truck, AE Team Nitro RTR
(ready-to-run)
SC8 Short Course Race Truck, Pro Comp Nitro RTR
(ready-to-run)
SC8e Short Course Race Truck Rockstar/Makita RTR
(ready-to-run)
1
1
1
1
1
1
1
1
1
1
1
1
1
1
1
1
1
1
1
1
1
1
1
1
1
1
1
1
1
1
1
1
1
1
1
1
1
1
1
1
1
1
1
1
1
1
1
1
1
:: Tools
1111
1112
1449
1450
1541
1542
1543
1544
1545
1546
1547
1548
1551
1553
1554
1561
1562
1563
1564
1565
1567
1589
1590
1592
1655
1656
1657
1658
1659
1660
1661
1662
1663
1664
1665
1666
1667
1668
1669
1670
1671
1672
1673
1674
1719
1737
3718
3719
3720
3987
6429
6956
7494
7709
7976
91107
electric kits, current products, new releases, setup
FT Turnbuckle Wrench
FT 4mm Turnbuckle Wrench (4x4 only)
Offroad Ride Height Gauge
FT Ride Height Gauge
FT Hex Driver Set, (7 pcs)
FT .050” Silver Hex Driver
FT 1/16” Black Hex Driver
FT 1.5mm Purple Hex Driver
FT 5/64” Blue Hex Driver
FT 3/32” Gold Hex Driver
FT 2.5mm Green Hex Driver
FT 3mm Red Hex Driver
FT Screwdriver Set
FT Phillips Silver Screwdriver
FT Silver Spring Hook Tool
FT Nut Driver Set, (6 pcs)
FT 3/16” Black Nut Driver
FT 1/4” Red Nut Driver
FT 5.5mm Red Nut Driver
FT 11/32” Green Nut Driver
FT 8mm Gold Nut Driver
FT 5/64” Blue Ball Hex Driver
FT 3/32” Gold Ball Hex Driver
FT Ball Hex Driver Set, (3 pcs)
FT 8-Piece 1/4” Hex Drive Set
FT 1/4” Hex Drive Handle, without tips
FT 1/4” Hex Drive .050” Tip
FT 1/4” Hex Drive 1/16” Tip
FT 1/4” Hex Drive 5/64” - 2.0mm Tip
FT 1/4” Hex Drive 3/32” Tip
FT 1/4” Hex Drive 1.5mm Tip
FT 1/4” Hex Drive 2.5mm Tip
FT 1/4” Hex Drive 3/16” Nut Driver Tip
FT 1/4” Hex Drive 1/4” Nut Driver Tip
FT 1/4” Hex Drive 11/32” Nut Driver Tip
FT 1/4” Hex Drive 5.5mm Nut Driver Tip
FT 1/4” Hex Drive 7.0mm Nut Driver Tip
FT 1/4” Hex Drive 8.0mm Nut Driver Tip
FT 1/4” Hex Drive 5/64” - 2.0mm Ball End Tip
FT 1/4” Hex Drive 3/32” Ball End Tip
FT 1/4” Hex Drive Flat Screwdriver Tip
FT 1/4” Hex Drive Phillips Screwdriver Tip
FT 1/4” Hex Drive 2.5mm Ball End Tip
FT 1/4” 5 Piece Power Tool Tips Set (5/64-2.0mm,
1.5mm, 2.5mm, 5/64”- 2.0mm ball, 2.5mm ball)
FT Camber + Track Width Tool
FT Body Scissors
12 Inch Nylon Wire Ties
6 Inch Nylon Wire Ties
8 Inch Nylon Wire Ties
FT Droop Gauge
Shock Building Tool
Molded Tools, Set
V2 Stamped Multi Tool
4 Inch Nylon Wire Ties
10mm Clutch Nut Wrench
13mm Shock Tools
Associated Electrics, Inc.
26021 Commercentre Drive
Lake Forest, CA 92630-8853 USA
http://www.TeamAssociated.com
http://www.RC10.com
http://twitter/Team Associated
http://bit.ly/AEonFacebook
call: (949) 544-7500 fax: (949) 544-7501
Check out the following web sites for all of our
help, tips, and racing info!
www.TeamAssociated.com. - www.RC10.com
1
1
1
1
1
1
1
1
1
1
1
1
1
1
1
1
1
1
1
1
1
1
1
1
1
1
1
1
1
1
1
1
1
1
1
1
1
1
1
1
1
1
1
1
1
1
12
12
12
1
1
1
1
12
1
1
Page 42

42
:: Notes
Page 43

Front Suspension
Long
Medium
Short
I
I
Setup Sheet
Driver: Date:
SC10GT RTR Setup
Track: Event:
Conditions: Rev.1
Rear Suspension
3
2
1
Camber:
Toe:
1 2
-1 degree
0 degree
Ballstud:
Washers:
Washers:
0.30” long
1
I I OO
A CB
2mm
2
1
Camber:
Anti-Squat:
Ride Height:
Hub Toe:
3
-1 degree
2 degree
31mm
1.5 degree
Washers:
1
2
Wheelbase:
Long
Medium
Short
A CB
1
Ride Height:
O
I
Front Shocks Rear Shocks
Spring: Piston:
Shock Fluid: Limiter:
Rebound:
Engine
Engine: Size:
Restrictor: Temp:
Muffler:
Glow Plug: Fuel:
Slipper / Gearing / Clutch
Slipper:
Clutch Bell / Spur Gear: /
Clutch Shoes:
Clutch Springs:
Front Tires
Tire: Compound:
Insert: Wheel:
Notes:
Body
Body Type: Notes:
Race and Vehicle Comments
Qualify: Main: Finish: TQ:
Comments:
32mm
Gold 3.70lb
AE .18 #2918
AE RPM Tuned Muffler
3.0mm threads exposed
#2310
0.9mm
AE #9809 JConcepts Subculture
AE #89413 JConcepts
SC10 #9836
:: For more setups, visit RC10.com and click on “Setup Sheets”
Caster:
20˚
25˚
30˚
5 230 wt 30 wt
AE .18
20T 54T
AE #91101 AE #91101
Spring: Piston:
Shock Fluid: Limiter:
Rebound:
Radio: Brake Bias:
Throttle / Steering Servos: /
Throttle / Brake e.p.a:
Throttle / Brake expo:
Steering expo:
Dual Rate:
Chassis
Chassis Brace: Plastic Aluminum
Chassis Weight:
Rear Tires
Tire: Compound:
Insert: Wheel:
Notes:
Track Info
Smooth: Bumpy: Blue Groove:
Traction: High: Medium: Low:
Soft Dirt: Grass: Clay: Wet:
Dusty: Other:
O
I
Green 1.90lb#3 #1
4mm
Green
Page 44

:: Hardware - 1:1 Scale View
44
Socket Head (shcs)
Nuts (lock/plain)
4-40 small plain nut (7260)
4-40 aluminum lock nut (4449)
Shock mount nut (6472)
8-32 lock nut, steel (6952)
8-32 low profile lock nut, steel
Ballstuds
.30” Black short (3983)
Ti Nitride .30” - short (9799)
.20” Silver short (6276)
Ti Nitride .20” - short (9798)
.30” Silver long (6277)
Ti Nitride .30” - long (9796)
4-40 x 3/8 (6924)
4-40 x 1/2 (6925)
4-40 x 5/8 (6926)
4-40 x 3/4 (6927)
4-40 x 7/8 (7738)
3x30mm (7778)
4-40 nut (6295)
5-40 lock nut (6629)
(6953)
Flat Head (fhcs)
Ball Bearings
1/8 x 1/4 bushing (2234)
5/64 x 1/4 bearing (7908)
5/32 x 5/16 x .125 bearing
3/16 x 3/8 RS bearing (3977)
.187 x .50 x .196 bearing
3/8 x 5/8 RS bearing (3976)
Setscrew
4-40 x 3/8 (6292)
4-40 x 1/2 (6922)
4-40 x 5/8 (6915)
4-40 x 3/4 (6923)
(6589)
Clutch bearings (2320)
(7935)
3x3mm (25225)
4x4mm (7732)
Button Head (bhcs)
2-56 x 1/8 (9645)
2-56 x 3/16 (9146)
2-56 x 5/16 (4334)
4-40 x 1/4 (6288)
4-40 x 3/8 (6917)
4-40 x 1/2 (6918)
4-40 x 5/8 (7633)
4-40 x 3/4 (7413)
Clutch screw (2321)
6-32 x 3/8 (7773)
Shims and Washers
Ballstud washer (9630)
Manifold lock washers (7778)
.03 nylon washer (4187)
Gold washer (7337)
Shock downstops, travel limiters
(6466)
Dogbone spacer (9273)
3/16” axle shim (7368)
Clutch shims (2321)
Washer 3x8mm (89218)
Notes:
Page 45

Front Suspension
Long
Medium
Short
I
Setup Sheet
Driver: Date:
Track: Event:
Conditions: Rev.1
Rear Suspension
3
2
1
Camber:
Toe:
1 2
Ballstud:
Washers:
I I OO
Washers:
A CB
2
1
Camber:
Anti-Squat:
Ride Height:
Hub Toe:
3
Washers:
1
2
Wheelbase:
Long
Medium
Short
A CB
Ride Height:
O
I
Front Shocks Rear Shocks
Spring: Piston:
Shock Fluid: Limiter:
Rebound:
Engine
Engine: Size:
Restrictor: Temp:
Muffler:
Glow Plug: Fuel:
Slipper / Gearing / Clutch
Slipper:
Clutch Bell / Spur Gear: /
Clutch Shoes:
Clutch Springs:
Front Tires
Tire: Compound:
Insert: Wheel:
Notes:
Body
Body Type: Notes:
Race and Vehicle Comments
Qualify: Main: Finish: TQ:
Comments:
:: For more setups, visit RC10.com and click on “Setup Sheets”
Caster:
20˚
25˚
30˚
Spring: Piston:
Shock Fluid: Limiter:
Rebound:
Radio: Brake Bias:
Throttle / Steering Servos: /
Throttle / Brake e.p.a:
Throttle / Brake expo:
Steering expo:
Dual Rate:
Chassis
Chassis Brace: Plastic Aluminum
Chassis Weight:
Rear Tires
Tire: Compound:
Insert: Wheel:
Notes:
Track Info
Smooth: Bumpy: Blue Groove:
Traction: High: Medium: Low:
Soft Dirt: Grass: Clay: Wet:
Dusty: Other:
O
I
Page 46

current products, new releases, setup help, tips, and racing info!
Check out the following web sites for all of our kits,
www.TeamAssociated.com. - www.RC10.com
call: (949) 544-7500 - fax: (949) 544-7501
http://twitter/Team_Associated
http://bit.ly/AEonFacebook
http://www.TeamAssociated.com
Lake Forest, CA 92630 USA
26021 Commercentre Dr.
http://www.RC10.com
Associated Electrics, Inc.
 Loading...