

Page 1

US-2000
USB 2.0 Audio Interface
D01088620A
OWNER'S MANUAL
Page 2

IMPORTANT SAFETY PRECAUTIONS
2
TASCAM US-2000
CAUTION: TO REDUCE THE RISK OF ELECTRIC SHOCK, DO NOT REMOVE
COVER (OR BACK). NO USER-SERVICEABLE PARTS INSIDE. REFER SERVICING
TO QUALIFIED SERVICE PERSONNEL.
The lightning flash with arrowhead symbol, within equilateral triangle, is intended
to alert the user to the presence of uninsulated “dangerous voltage” within the
product’s enclosure that may be of sufficient magnitude to constitute a risk of
electric shock to persons.
The exclamation point within an equilateral triangle is intended to alert the user to
the presence of important operating and maintenance (servicing) instructions in the
literature accompanying the appliance.
This appliance has a serial number located on the rear
panel. Ple ase record the model number and serial
number and retain them for your records.
Model number
Serial number
For U.S.A.
TO THE USER
This equipment has been tested and found to comply
with the limits for a Class A digital device, pursuant to
Part 15 of the FCC Rules. These limits are designed
to provi de reasonable protection a gainst harmful
interference when the equipment is operated in a
commercial environment. This equipment generates,
uses, and can radiate radio frequency energy and,
if not instal led a nd used i n accordan ce with the
instruction manual, may cause harmful interference to
radio communications.
Operation of this equipment in a residential area is
likely to cause harmful interference in which case the
user will be required to correct the interference at his
own expense.
WARNING: TO PREVENT FIRE
OR SHOCK HAZARD, DO
NOT EXPOSE THIS
APPLIANCE TO RAIN OR
MOISTURE.
CE Marking Information
a) Applicable electromagnetic environment: E4
b) Peak inrush current: 1.1 A
In North America use only on 120V supply.
CAUTION
Chang es or modi fications to this equipm ent not
expressly approved by TEA C CORPORATION for
compliance could void the user's authority to operate
this equipment.
Page 3

IMPORTANT SAFETY INSTRUCTIONS
TASCAM US-2000
3
1 Read these instructions.
2 Keep these instructions.
3 Heed all warnings.
4 Follow all instructions.
5 Do not use this apparatus near water.
6 Clean only with dry cloth.
7 Do not block any ventilation openings. Install in
accordance with the manufacturer's instructions.
8 Do not inst a l l near any heat sou rc e s such
as radiators, heat regis ters, stoves, or other
apparatus (including amplifiers) that produce
heat.
9 Do not defeat the safety purpose of the polarized
or grounding-type plug. A polarized plug has two
blades with one wider than the other. A grounding
type plug has two blades and a third grounding
prong. The wide blade or the third prong are
provided for your safety. If the provided plug does
not fit into your outlet, consult an electrician for
replacement of the obsolete outlet.
10 Protect the power cord from being walked on
or pinched particularly at plugs, convenience
receptacles, and the point where they exit from
the apparatus.
11 Only use attachments/accessories specified by
the manufacturer.
12 Use only with the cart, stand, tripod, bracket, or
table specified by the manufacturer, or sold with
the apparatus. When a cart is used, use caution
when moving the cart/apparatus combination to
avoid injury from tip-over.
Do not expose this apparatus to drips or splashes.
•
Do not place any objects filled with liquids, such
•
as vases, on the apparatus.
Do not install this apparatus in a confined space
•
such as a book case or similar unit.
The apparatus draws nominal non-operating
•
power from the AC outlet with it s POWER or
STANDBY/ON switch not in the ON position.
The apparatus should be located close enough
•
to the AC outlet so that you can easily grasp the
power cord plug at any time.
The mains plug is used as the disconnect device,
•
th e di s con n ect de v ic e sh al l re ma in re ad il y
operable.
Products with Class I construction are equipped
•
wi th a power supply cord that has a 3- p rong
grounding plug. The cord of such a product must
be plugged into an AC outlet that has a protective
grounding connection.
If the product uses batteries (including a battery
•
pack or installed batteries), they should not be
exposed to sunshine, fire or excessive heat.
CAUTION for products that use replaceable lithium
•
batteries: there is danger of explosion if a battery
is replaced wi th an in c orrect type of bat ter y.
Replace only with the same or equivalent type.
Caution should be taken when using earphones or
•
headphones with the product because excessive
sound pressure (volume) from earphones or headphones can cause hearing loss.
If you are experiencing problems with this product,
•
contact TEAC for a service referral. Do not use the
product until it has been repaired.
RACK-MOUNTING THE UNIT
ª
Use the supplied rack-mounting kit to mount the unit in a
standard 19-inch rack, as shown below.
13 Unplug this apparatus during lightning storms or
when unused for long periods of time.
14 Refer all servicing to qualified service personnel.
Servicing is required when the apparatus has
been damaged in any way, such as power-supply
cord or plug is damaged, liquid has been spilled
or objects have fallen into the apparatus, the
apparatus has been exposed to rain or moisture,
does not operate normally, or has been dropped.
Remove the feet of the unit before mounting.
NOTE
Leave 1U of space above the unit for ventilation.
•
Allow at least 10 cm (4 in) at the rear of the unit for
•
ventilation.
Page 4

IMPORTANT SAFETY PRECAUTIONS
Contents
1 – Introduction ..........................................5
Main features .................................................. 5
Included items ................................................. 5
About this manual .......................................... 5
Trademarks ...................................................... 6
Precautions and notes for placement
and use ............................................................ 6
Beware of condensation ................................ 6
Cleaning the unit ............................................ 6
2 − Names and Functions of Parts ............7
Front panel ...................................................... 7
Rear panel ....................................................... 8
3 − Installation ...........................................9
System requirements ...................................... 9
Windows..................................................... 9
Mac OS X .................................................... 9
Installing the driver ........................................ 9
Installing the driver for Windows ............. 9
Installing the driver for Mac OS X .......... 11
Uninstalling the driver ............................. 11
Frequently asked installation questions
and answers (FAQ) .................................. 11
Settings on your computer .......................... 11
Installing Cubase LE4 .................................... 11
Cubase LE4..................................................... 16
7 – Troubleshooting ................................. 17
8 – Specifications ......................................19
Input/output ratings ..................................... 19
Analog audio input/output ................... 19
Digital audio input/output ..................... 19
Control input/output ............................... 19
Audio performance ...................................... 19
Computer requirements ............................... 19
Windows................................................... 19
Macintosh ................................................. 20
General .......................................................... 20
Dimensional drawings .................................. 21
Block diagram ............................................... 22
Level diagram ................................................ 23
4 −
US-2000 Control panel settings ............12
Overview ....................................................... 12
Control panel settings .................................. 12
Audio Performance ................................. 12
Sample Clock Source ................................ 12
Digital Output Format ............................. 12
Digital Output Chanels ............................ 12
5 − Connections ........................................13
USB connections............................................ 14
Audio connections ........................................ 14
Mic ............................................................ 14
Guitar ........................................................ 14
Keyboard/drum machine/sound module /
cassette deck/MD/CD etc. (analog
connection) .............................................. 14
Sound Modules /MDs/CDs, etc. (digital
connection) .............................................. 14
Monitor speakers ..................................... 14
Headphones ............................................. 14
6 – Application Guide ..............................15
Windows XP and Windows Media Player ... 15
Windows Vista and Windows Media Player 15
Mac OS X and iTunes .................................... 16
TASCAM US-2000
4
Page 5

1 − Introduction
Thank you for your purchase of the TASCAM US-2000
USB 2.0 Audio Interface.
Before connecting and using the unit, please take time
to read this manual thoroughly to ensure you understand
how to properly set up and connect the unit, as well as the
operation of its many useful and convenient functions. After
you have finished reading this manual, please keep it in a
safe place for future reference.
You can also download the Owner's Manual from the
TASCAM web site (http://www.tascam.com).
Main features
Audio interface with 16 inputs and 4 outputs
•
24-bit/96-kHz audio
•
14 balanced analog inputs include 6 XLR for mics, 2
•
combined XLR/TRS and 6 line
S/PDIF digital input
•
+48V phantom power can be provided (to 8 mic inputs)
•
Inputs 1-14 can be monitored individually in mono or in
•
stereo as pairs of channels
Outputs include 4 balanced line, a balanced pair for
•
monitors, digital and headphone
S/PDIF or AES/EBU selectable digital output
•
5-dot meter for every input and output
•
Direct monitoring function allows input monitoring
•
without latency
In addition to a monitor level control, independent level
•
control is possible for the signals input from a computer
by USB and through the unit’s input jacks
Input 7 and 8 have insert jacks
•
Can be used with multiple software clients at the same
•
time even if some use ASIO and other use WDM for
audio control
USB 2.0 High speed (480 MHz) compatible
•
Cubase LE4 included
•
Included items
The included items are listed below.
Take care when opening the package not to damage the
items. Keep the package materials for transportation in the
future.
Please contact the store where you purchased this unit if
any of these items are missing or have been damaged during transportation.
Main unit• .........................................................................1
Power cord• .......................................................................1
USB cable• ........................................................................1
CD-ROM •
DVD-ROM (Cubase LE4)• ...............................................1
Cubase LE4 Quick Start Guide• .......................................1
A rack-mounting screw kit• ..............................................1
A warranty card• ..............................................................1
Owner's manual (this manual)
•
(
containing driver and manuals
........................................1
)
........................1
About this manual
In this manual, we use the following conventions:
The names of keys and controls are given in the follow-
•
ing typeface: MONO.
Messages on the unit’s display are shown with quotation
•
marks like this: “Message”
Additional information is introduced in the styles below
•
when needed:
TIP
Useful hints when using the unit.
NOTE
Explanation of actions in special situation and
supplement.
CAUTION
Instructions that should be followed to avoid injury,
damage to the unit or other equipment, and loss of data.
A note about computer operation
If you are unsure about how to perform basic computer
operations appearing in this manual, please refer to the
owner’s manual that came with your computer.
TASCAM US-2000
5
Page 6

1 − Introduction
Trademarks
TASCAM is a registered trademark of TEAC
•
Corporation.
Microsoft, Windows, and Windows Vista are either •
registered trademarks or trademarks of Microsoft
Corporation in the United States and/or other countries.
Apple, Macintosh, Mac OS and Mac OS X are trademarks •
of Apple Inc., registered in the U.S. and other countries.
Pentium and Intel are trademarks of Intel Corporation in •
the U.S. and other countries.
AMD Athlon is a trademark of Advanced Micro Devices, •
Inc.
Cubase is a registered trademark of Steinberg Media •
Technologies GmbH. ASIO is a trademark of Steinberg
Media Technologies GmbH.
Other company names, product names and logos in this •
document are the trademarks or registered trademarks of
their respective owners.
Precautions and notes for placement and use
The operating temperature should be between 5°C and
•
35°C (41°F and 95°F).
Make sure that the unit is mounted in a level position for
•
correct operation.
Do not place any object on the unit for heat dissipation.
•
Avoid installing this unit on top of any heat-generating
•
electrical device such as a power amplifier.
Beware of condensation
If the unit is moved from a cold to a warm place, or used
after a sudden temperature change, there is a danger of
condensation; vapor in the air could condense on the
internal mechanism, making correct operation impossible.
To prevent this, or if this occurs, let the player sit for one or
two hours at the new room temperature before using.
Cleaning the unit
To clean the unit, wipe it gently with a soft dry cloth. Do
not wipe with chemical cleaning cloths, benzene, paint
thinner, ethyl alcohol or other chemical agents to clean the
unit as they could damage the surface.
TASCAM US-2000
6
Page 7

TASCAM US-2000
7
2 − Names and Functions of Parts
2 − Names and Functions of Parts
Front panel
POWER switch
Use to turn the unit’s power ON and OFF.
PHONES jack and knob
Use this standard stereo phone jack to connect stereo
headphones. Use a plug adapter when connecting
headphones that have mini-plugs.
Use the PHONES knob to adjust the headphones output
level.
CAUTION
Turn the PHONES knob to the minimum volume before
connecting headphones. Failure to do so could cause
sudden loud noises and damage hearing, for example.
MONITOR knob
Use this to adjust the output level for MONITOR
OUTPUT L/R.
COMPUTER knob
For the signal input from the computer connected by
USB, use this to adjust the level of output from the
MONITOR OUTPUT and PHONES jacks.
INPUT knob
Use this to adjust the overall level of all the signals input
through this unit’s input jacks (mic, line and digital)
that is output from the MONITOR OUTPUT and PHONES
jacks.
OUTPUT meters
These show output levels for the unit’s 4 outputs.
POWER indicator
This lights when the power is ON.
INPUT SOURCE meters
These show input levels for this unit’s 16 inputs.
USB indicator
This lights when the USB connection is in use.
Input gain knobs
Use these to adjust the input levels of MIC INPUTS 1–8
independently.
NOTE
Turn all the way to the left to minimize the input level
or all the way to the right to maximize the input level.
MONITOR switches
Use these switches to set whether or not adjacent inputs
1-2, 3-4, 5-6, 7-8 are monitored in mono or as stereo
pairs with odd-numbered channels (1, 3, 5, 7) on the left
and even-numbered channels (2, 4, 6, 8) on the right.
+48V switches
Use these switches to set whether or not +48 V phantom
power is provided to the mic input jacks in pairs (1-2,
3-4, 5-6, 7-8).
CAUTION
Before turning these switches ON or OFF, turn
•
the output volume down using the PHONES and
MONITOR knobs. Depending on the mic, loud noises
might be produced and damage could be caused to
equipment and people’s hearing.
Do not connect or disconnect a mic with an input
•
when its +48V switch is ON.
Turn a switch ON only when connecting a condenser
•
microphone that requires phantom power.
Do not supply phantom power to an unbalanced
•
dynamic microphone.
Some ribbon mics can be damaged by phantom
•
power. If unsure, do not supply phantom power to a
ribbon mic.
MIC/INST IN
These are analog mic/instrument inputs that combine
XLR and phone jacks. Use the XLR connectors for
balanced mic connections and the phone jacks for
electric guitars and basses, for example.
The pin assignments of the XLR jacks are 1 = GND, 2
= HOT, and 3 = COLD.
Page 8

8
TASCAM US-2000
2 − Names and Functions of Parts
Rear panel
MIC INPUTS
These are balanced XLR-type analog mic input jacks for
connecting microphones.
The pin assignments of the XLR jacks are 1 = GND, 2 =
HOT, and 3 = COLD.
MONO/ST switches
Use these switches to set whether or not adjacent line
inputs 9-10, 11-12, 13-14 are monitored in mono or as
stereo pairs with odd-numbered channels (9, 11, 13) on
the left and even-numbered channels (10, 12, 14) on the
right.
LINE IN jacks
Use these balanced TRS phone jacks for line input
sources, including keyboards and sound modules.
The pin assignments are tip = HOT, and ring = COLD,
and sleeve = GND.
INSERTS jacks
These are analog insert jacks (unbalanced) for the MIC/
INST IN inputs on the front panel (7-8).
Use these to connect compressors, gates and other
external effects.
The pin assignments are tip = SEND, ring = RECEIVE,
and sleeve = GND.
Level selection switches
Use these to set the nominal input level of the line input
jacks to -10 dBV or +4 dBu.
MONITOR OUTPUT jacks
These TRS phone jacks are balanced analog monitoring
outputs. Connect them to monitor speakers or other
equipment.
The pin assignments are tip = HOT, ring = COLD, and
sleeve = GND.
USB port
Use the included USB cable to connect this unit to a
computer (USB 2.0 compatible).
DIGITAL OUT jack
This coaxial digital output jack conforms to IEC60958-3
(S/PDIF) or AES3-2003 (AES/EBU) specifications.
This jack outputs the same digital signal that is output
from the LINE OUTPUTS 1/2 or LINE OUTPUTS 3/4 (set
by the control panel). The digital signal format is set on
the control panel.
DIGITAL IN jack
This coaxial digital input jack conforms to IEC60958-3
(S/PDIF) specifications.
NOTE
This unit is capable of input and output through its
DIGITAL IN and OUT jacks at 24-bit/96 kHz.
~IN connector
Connect the included power cord here.
LINE OUTPUTS
These TRS phone jacks are balanced analog line
outputs. Signals output from a computer connected by
USB are output from these jacks. Set which signals are
output using an audio application, for example, on the
computer. These jacks can be connected to an external
mixer or recorder, for example.
The pin assignments are tip = HOT, and ring = COLD,
and sleeve = GND.
Page 9

TASCAM US-2000
9
3 − Installation
System requirements
See the TASCAM website for updated information about
OS compatibility.
Windows
Windows XP 32-bit SP2 or later
Windows XP 64-bit SP2 or later
Windows Vista 32-bit SP2 or later
Windows Vista 64-bit SP2 or later
Supported computer system:
Windows compatible computer with a USB 2.0 port
CPU/clock: •
Pentium 4 1.4 GHz or faster
AMD Athlon 1.4 GHz or faster
(or equivalent processor)
Memory: •
512 MB or more for Windows XP 32-bit and Windows
Vista 32-bit
1 GB or more for Windows XP 64-bit and Windows Vista
64-bit
NOTE
Although this product has been checked for use with
typical computers that meet the above operating
requirements, we cannot guarantee that it will operate
with all computers that meet these requirements.
Please be aware that even under the same conditions,
processing capability may vary depending on differences
of the design and system.
Do not connect the US-2000 to your com
puter before you
have installed the driver.
CAUTION
Handle the enclosed CD-ROM with care. If the disc
•
becomes scratched or dirty, your computer may
be unable to read it and the software cannot be
installed. If the disc becomes unreadable, a fee will
be charged for its replacement.
Never attempt to play the enclosed CD-ROM in a
•
conventional audio CD player, as the resulting noise
may damage your speakers or your hearing.
Installing the driver for Windows
NOTE
During driver installation, a warning that “this
•
software ... has not passed Windows Logo testing“
will appear. This message appears when a driver that
has not received Windows Logo testing is installed.
This message appears because the drivers for TASCAM
products have not received Windows Logo testing.
We have, however, confirmed their proper operation.
If this message appears, click Continue to proceed
with the installation.
During installation, you must connect, disconnect
•
and reconnect the unit in steps 7, 8 and 9. You should
complete each of these installation steps in less than
one minute. Installation may fail if you take too much
time.
1 Confirm that the unit and the PC are not connected
by the USB cable.
Mac OS X
Supported operating system:
Mac OS X 10.4.11 or later
Mac OS X 10.5.6 or later
Supported computer system:
Apple Macintosh series equipped with a USB port as
standard equipment
CPU/clock: •
Power PC G4 1 GHz or faster, or Intel processor
Memory: •
512 MB or more
Installing the driver
In order to use the US-2000, you must install the
appropriate driver into your computer. As described below,
this is an easy process using the CD-ROM included with
the US-2000.
Driver are updated from time to time. You can download
the most recent version of the driver from the TASCAM
website <http://www.tascam.com/>.
2 Insert the included driver installation CD-ROM into
the PC where you will install it.
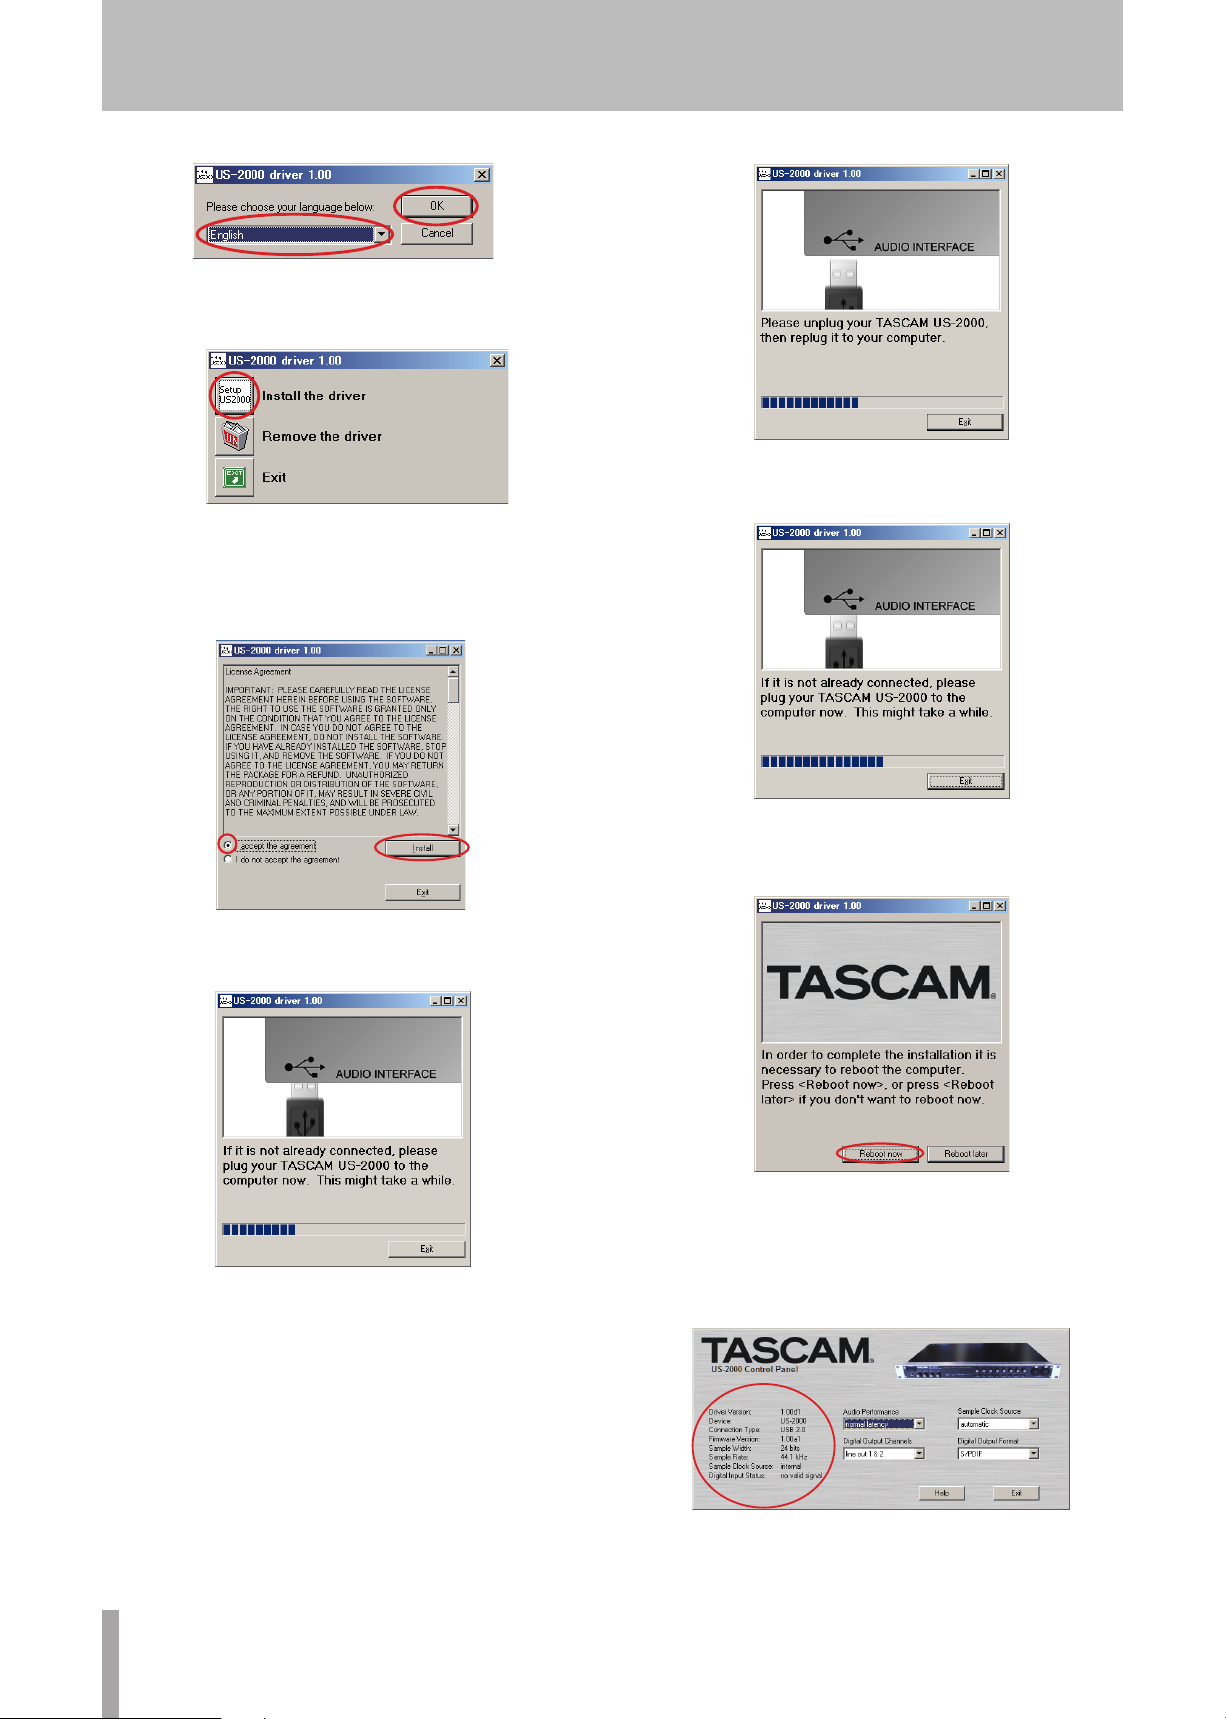
3 Click the “Install Driver” button when the screen
below appears. (If this screen does not appear
automatically, find and open the “Autorun2.exe”
program in the “Autorun” folder on the driver
CD-ROM.)
4 When the language selection screen (below) appears,
select the language you prefer and then click the
“OK” button.
Page 10
10
TASCAM US-2000
3 − Installation
5 Click the “Install the Driver” button when the screen
below appears.
6 Read the contents of the License Agreement, and
select “I accept the agreement” if you agree to the
terms. Next, click the “Install” button to start installation.
7 When the screen below appears, use the supplied
USB cable to connect the unit to the PC.
8 When the screen below appears, unplug the connect-
ing USB cable from the unit or the PC.
9 When the screen below appears once more, recon-
nect the unit and the PC with the USB cable.
10 When the screen below appears, the installation is
complete. Click the “Reboot now” button to restart
the PC to use the driver.
11 After the PC has restarted, open the “TASCAM
US-2000” (“Start > Control Panel”) or “US-2000
Control Panel” (“Start > All Programs >
TASCAM”). If the Driver Version, Device and other
data appear correctly, the installation has succeeded.
Page 11
TASCAM US-2000
11
3 − Installation
Installing the driver for Mac OS X
1
Confirm that the US-2000 is not connected to the
computer.
2
Double-click the “TASCAM_US2000_Driver_x.xx.
dmg” on the included CD-ROM. As the “TASCAM_
US-2000_x.xx” is created on the desktop, open the
folder.
3
Dboule-click the “TASCAM_US-2000_x.xx.mpkg” in
the folder to launch the installer.
4
Follow the instructions on the screen to conduct the
installation.
5
Restart the computer and then connect the unit.
Uninstalling the driver
Windows
ª
There are two ways to uninstall the driver as shown below.
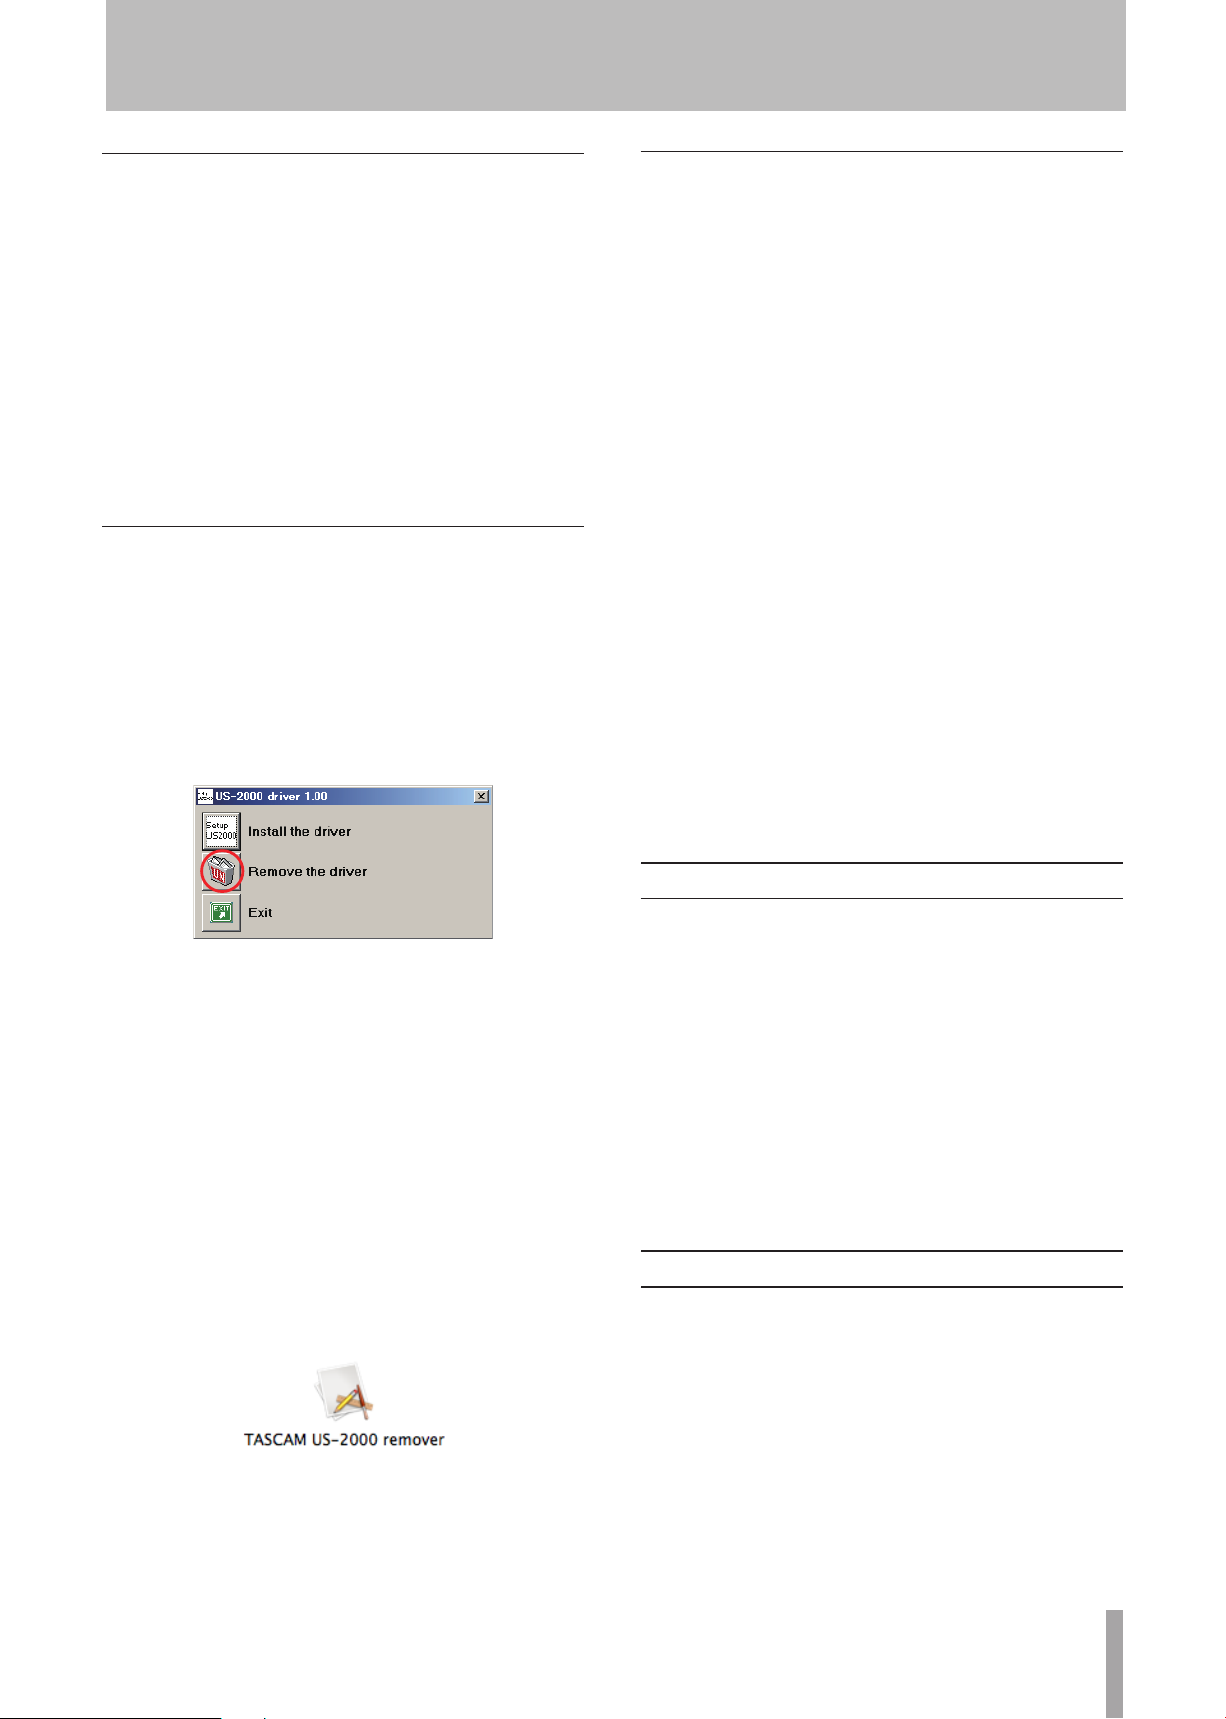
Using the Installation CD-ROM:
1
Follow steps 1 to 4 under “Installing the driver for
Windows” (See page 10.)
2
At step 5 of the procedure, click “Remove the driver”.
Frequently asked installation questions and answers (FAQ)
Windows driver installation
Q: When I connect the unit to a computer, the Windows
“Hardware Wizard” appears and I cannot install the
driver. Am I making a mistake in the installation
procedures?
A: Close the Windows “Hardware Wizard” and disconnect
the unit. You must install the driver before connecting
this unit. Insert the CD-ROM included with the product.
The menu for installing the driver appears automatically.
Select “Install Driver,” and follow the instructions
shown on the screen. If you have downloaded the driver
from the TASCAM website (htt://www.tascam.com),
expand the ZIP archive, launch the “setup.exe” file, and
follow the instructions on the screen.
Q: I loaded the installation CD-ROM into a Windows
computer, but the driver installation menu does not
appear. How can I access this menu?
A: The automatic playback settings for the disc drive might
be disabled.
Open the CD-ROM using Windows Explorer, and
double-click the “Autorun2.exe” file to manually open
the installation menu.
3
Follow the instructions on the screen for the
remaining procedure.
Using Windows “Add or Remove Programs” :
1
Open the “Control Panel” from the “Start” menu.
2
Double click on “Add or Remove programs”.
3
Select “US-2000 driver” from the list and click
“Change or Remove Programs”.
4
Follow the instructions on the screen for the
remaining procedure.
Mac OS X
ª
1
Insert the CD-ROM into the PC and double click
“TASCAM US-2000 Remover” icon.
Settings on your computer
Here are a few basic points to help you set up your
computer for best performance with audio applications.
Do not run other applications. You will probably use •
your computer for applications other than audio, but we
recommend that you avoid running other applications
at the same time you are running audio programs.
Processing digital audio places a considerable load on
your computer.
This means that if you are running other applications
(especially graphics or Internet tools) at the same time as
your audio application, the processing may not happen
fast enough.
Installing Cubase LE4
For details see the Cubase LE4 Quick Start Guide.
2
Follow the instructions on the screen for the
remaining procedure.
Page 12
12
TASCAM US-2000
4 −
US-2000 Control panel settings
Overview
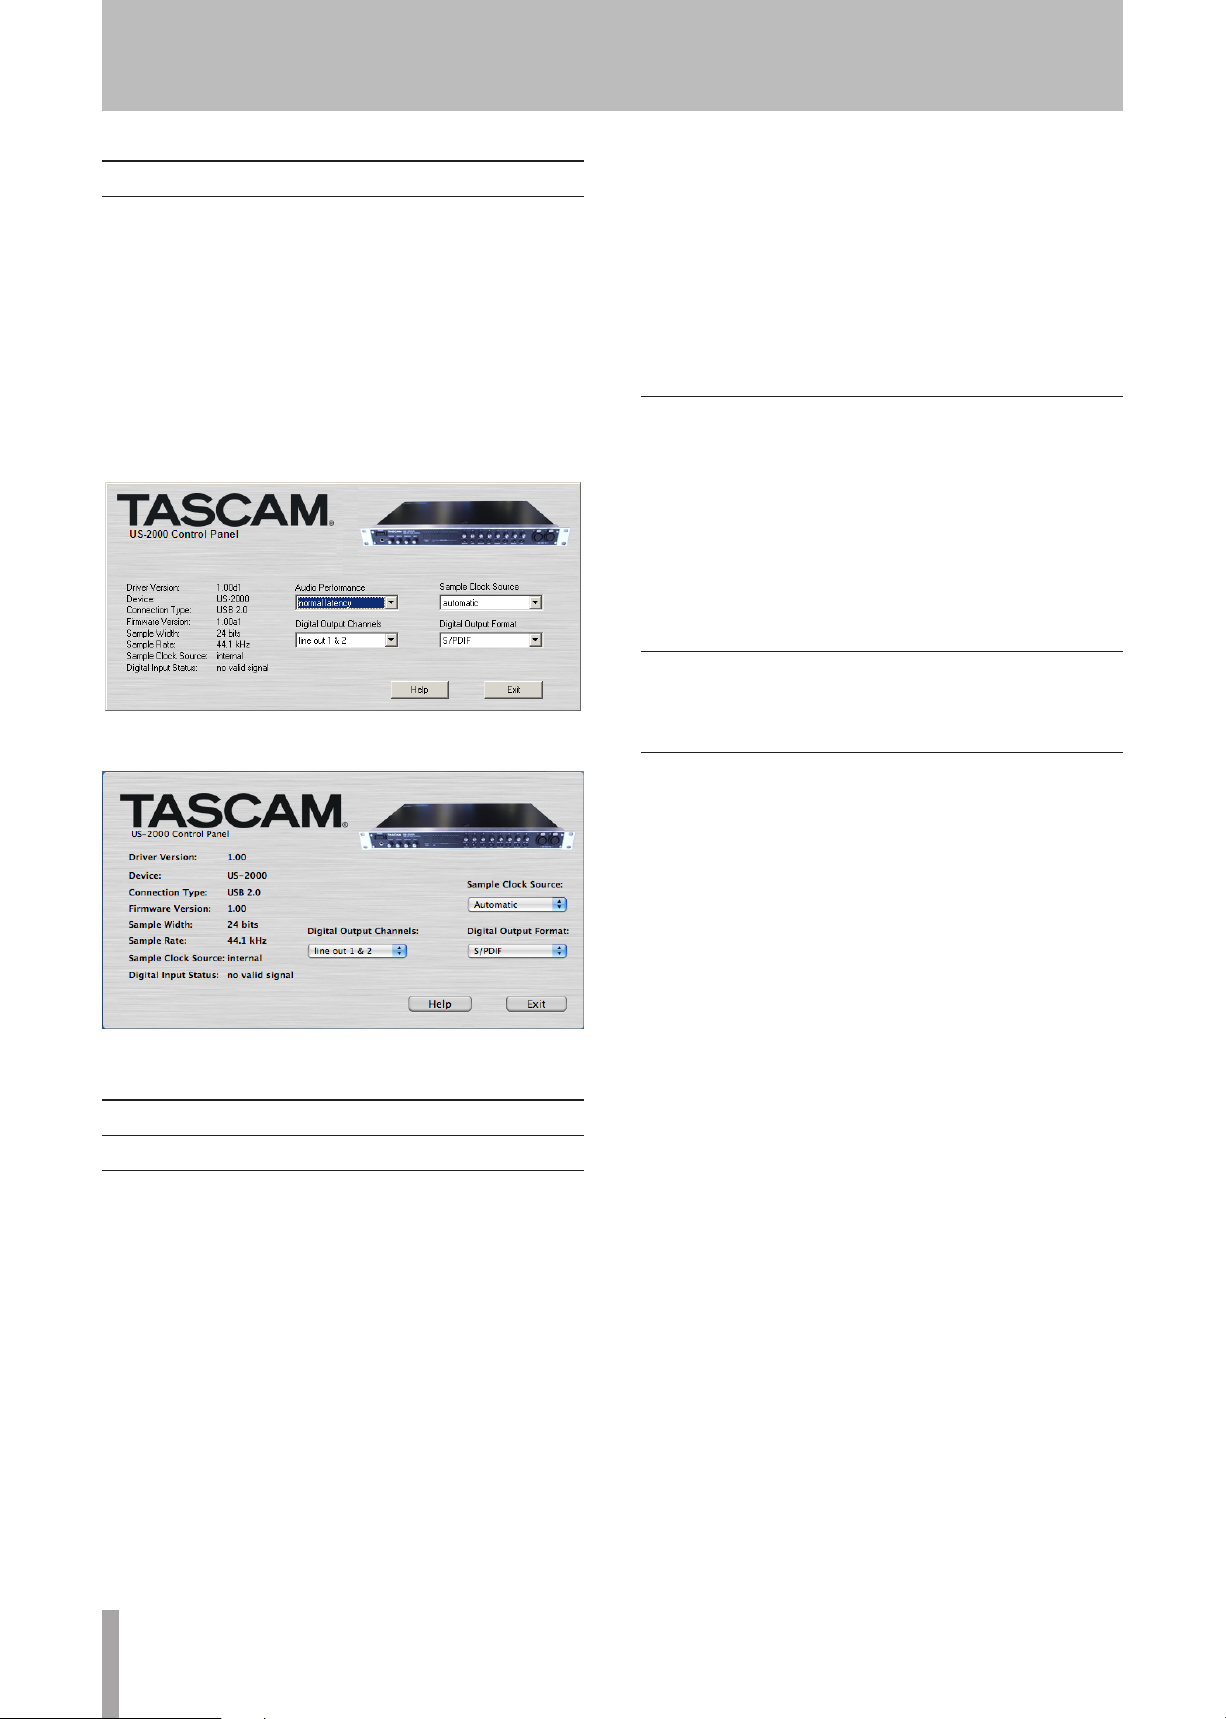
The “Control Panel” lets you make various settings for the
US-2000’s functionality.
On Windows XP and Windows Vista, the “US-2000 Control
Panel” shortcut can be found in the Windows “Start menu
> Control Panel” or the “Start menu > All Programs >
TASCAM.”
On Mac OS X, the “US-2000 Control Panel” is located
in the Applications folder. Other useful audio and MIDI
settings for Mac OS X can be found in “Applications/
Utilities/Audio MIDI Setup.”
[Windows Control Panel]
“lowest latency” setting is the minimum buffer size, and the
“highest latency” setting is the maximum buffer size.
On Mac OS X, the buffer size is determined by each audio
application. Consequently, there is no “Audio Performance”
setting on the Mac OS X version of the US-2000 Control
Panel. Some applications select the buffer size automatically
while others permit the user to select the buffer size. Please
consult your audio application’s documentation for details.
Sample Clock Source
The clock source can be set to “Automatic” or “Internal.”
Automatic (default): If a clock signal is input through the •
DIGITAL IN jack, it is used. If no signal is input through
the DIGITAL IN jack, this unit’s internal clock is used.
Internal: This unit’s internal clock is always used.•
When using digital input, set this to “Automatic.”•
Digital Output Format
Set the digital output format to “AES/EBU” or “S/PDIF.”
[Mac OS X Control Panel]
Control panel settings
Audio Performance
The US-2000 driver temporarily stores input and output
audio sample in buffers. The size of these buffers can be
adjusted. A smaller buffer size will reduce the delay when
monitoring the audio signal, but will require your computer
to perform the processing faster. If the processing does
not occur in time (e.g., if other system operations are
occurring), you may hear clicks, pops, or dropouts in the
audio signal. A larger buffer size provides more safety
against such problems caused by other system activities,
but will produce greater delay when monitoring the audio
signal. You should select the buffer size that works best for
your system.
Digital Output Chanels
The DIGITAL OUT jack outputs either digital signals of LINE
OUTPUTS 1/2 or 3/4. You select which pair of signals to
output using this item.
On the Windows version of the US-2000 Control Panel,
the “Audio Performance” setting permits you to adjust the
buffer size that will be used by all audio applications. The
Page 13
TASCAM US-2000
13
5 −
Headphones
Guitar
Bass guitar
Drum machineSound module
Keyboard
Drum
Effects unit
Powered speaker, or
amplifier and speaker
Computer
Digital recorder
USB
Connections
Page 14

14
TASCAM US-2000
5 −
Connections
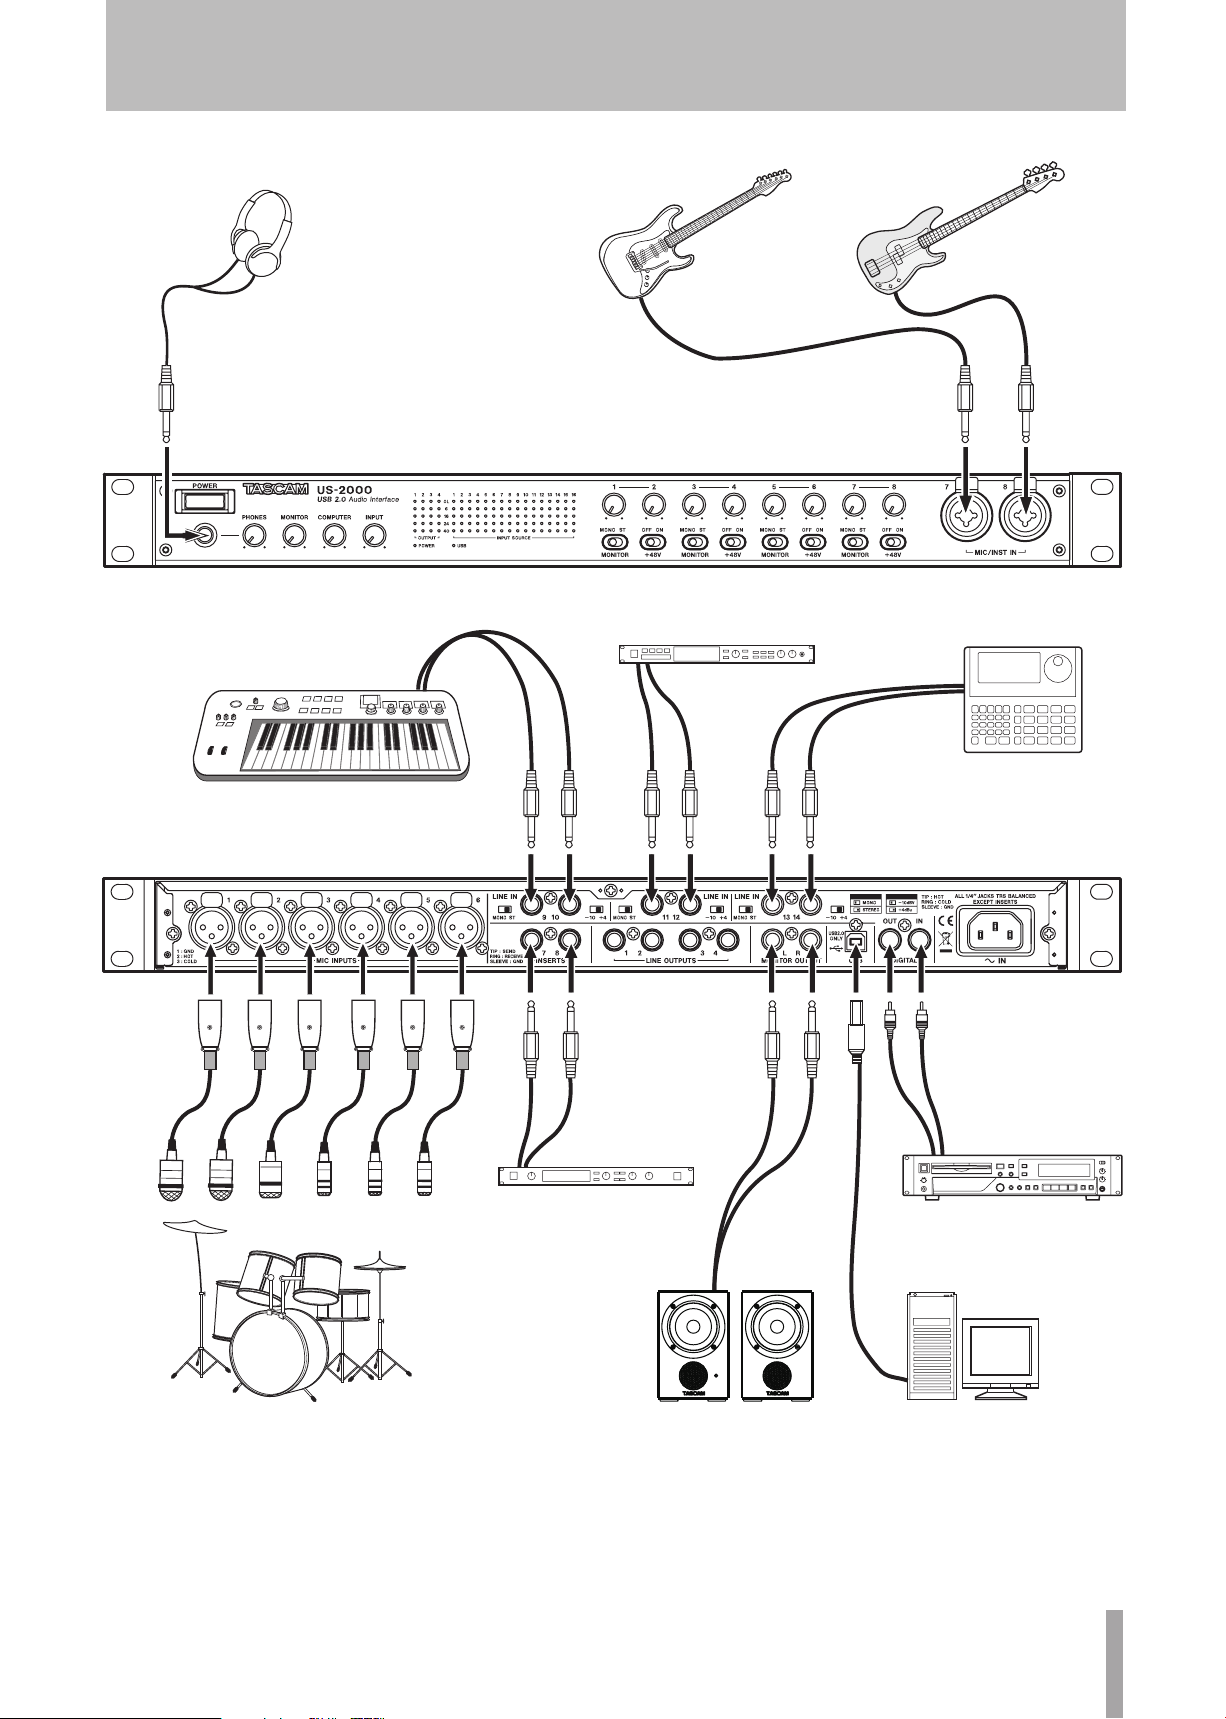
USB connections
Using the included USB cable, connect the US-2000 to your
computer as shown in the illustration.
NOTE
Some USB devices access the USB bus frequently. To
avoid dropouts and clicks in the audio signal, we strongly
recommend that you do not connect other USB devices
to the USB bus used by the US-2000. USB keyboards and
mice are exceptions to this, and will probably not cause
problems.
Audio connections
Connect the output signal of your mic, guitar, keyboard,
or other audio device to the US-2000, where it will be
converted into digital audio and sent via USB to your
computer. Connect the output of the US-2000 to your
speakers (via an amp) or headphones, so you will be able to
monitor the audio signals coming into the US-2000 or being
produced by your computer.
The balance between the input signal from the mic and
guitar and the output signal from the computer should be
adjusted by the INPUT and COMPUTER knobs.
Sound Modules/MDs/CDs, etc. (digital connection)
Connect the digital inputs and outputs of digital devices to
the DIGITAL IN/OUT jacks on the rear panel.
NOTE
This unit can output either S/PDIF or AES/EBU digital
signals. Set the type of output using the control panel.
Monitor speakers
Connect monitor speakers (powered speakers or an
amplifier and speakers) to the MONITOR OUTPUT jacks on
the rear panel.
Headphones
Connect headphones to the PHONES jack (standard stereo
phone jack) on the front panel.
Mic
Connect your mics to the MIC INPUTS (1-6) jacks (XLR)
on the rear panel or MIC/INST IN (7-8) jacks (XLR) on the
front pannel. If you are using a condenser mic that requires
phantom power, turn on the +48V switch on the front panel.
CAUTION
Connecting a dynamic mic with an unbalanced
•
connection could damage it if the +48V switch is ON.
Do not connect or disconnect mics when the +48V
•
switch is ON. Doing so could cause loud noise or
damage the equipment.
Before turning a +48V switch ON or OFF, turn
•
the output volume down using the PHONES and
MONITOR knobs on the front panel. Depending on
the mic, loud noises might be produced and damage
could be caused to equipment or to people’s hearing.
Guitar
Connect your guitar to the MIC/INST IN (7-8) jack (1/4”
phone jack) on the front panel.
Keyboard/drum machine/sound module/ cassette deck/MD/CD etc. (analog connection)
Connect the analog signal outputs of these devices to LINE
IN jacks 9-14 (TRS phone jacks) on the rear panel.
Page 15
TASCAM US-2000
15
6 – Application Guide
In this chapter, we explain how to set some audio
applications for use with this unit.
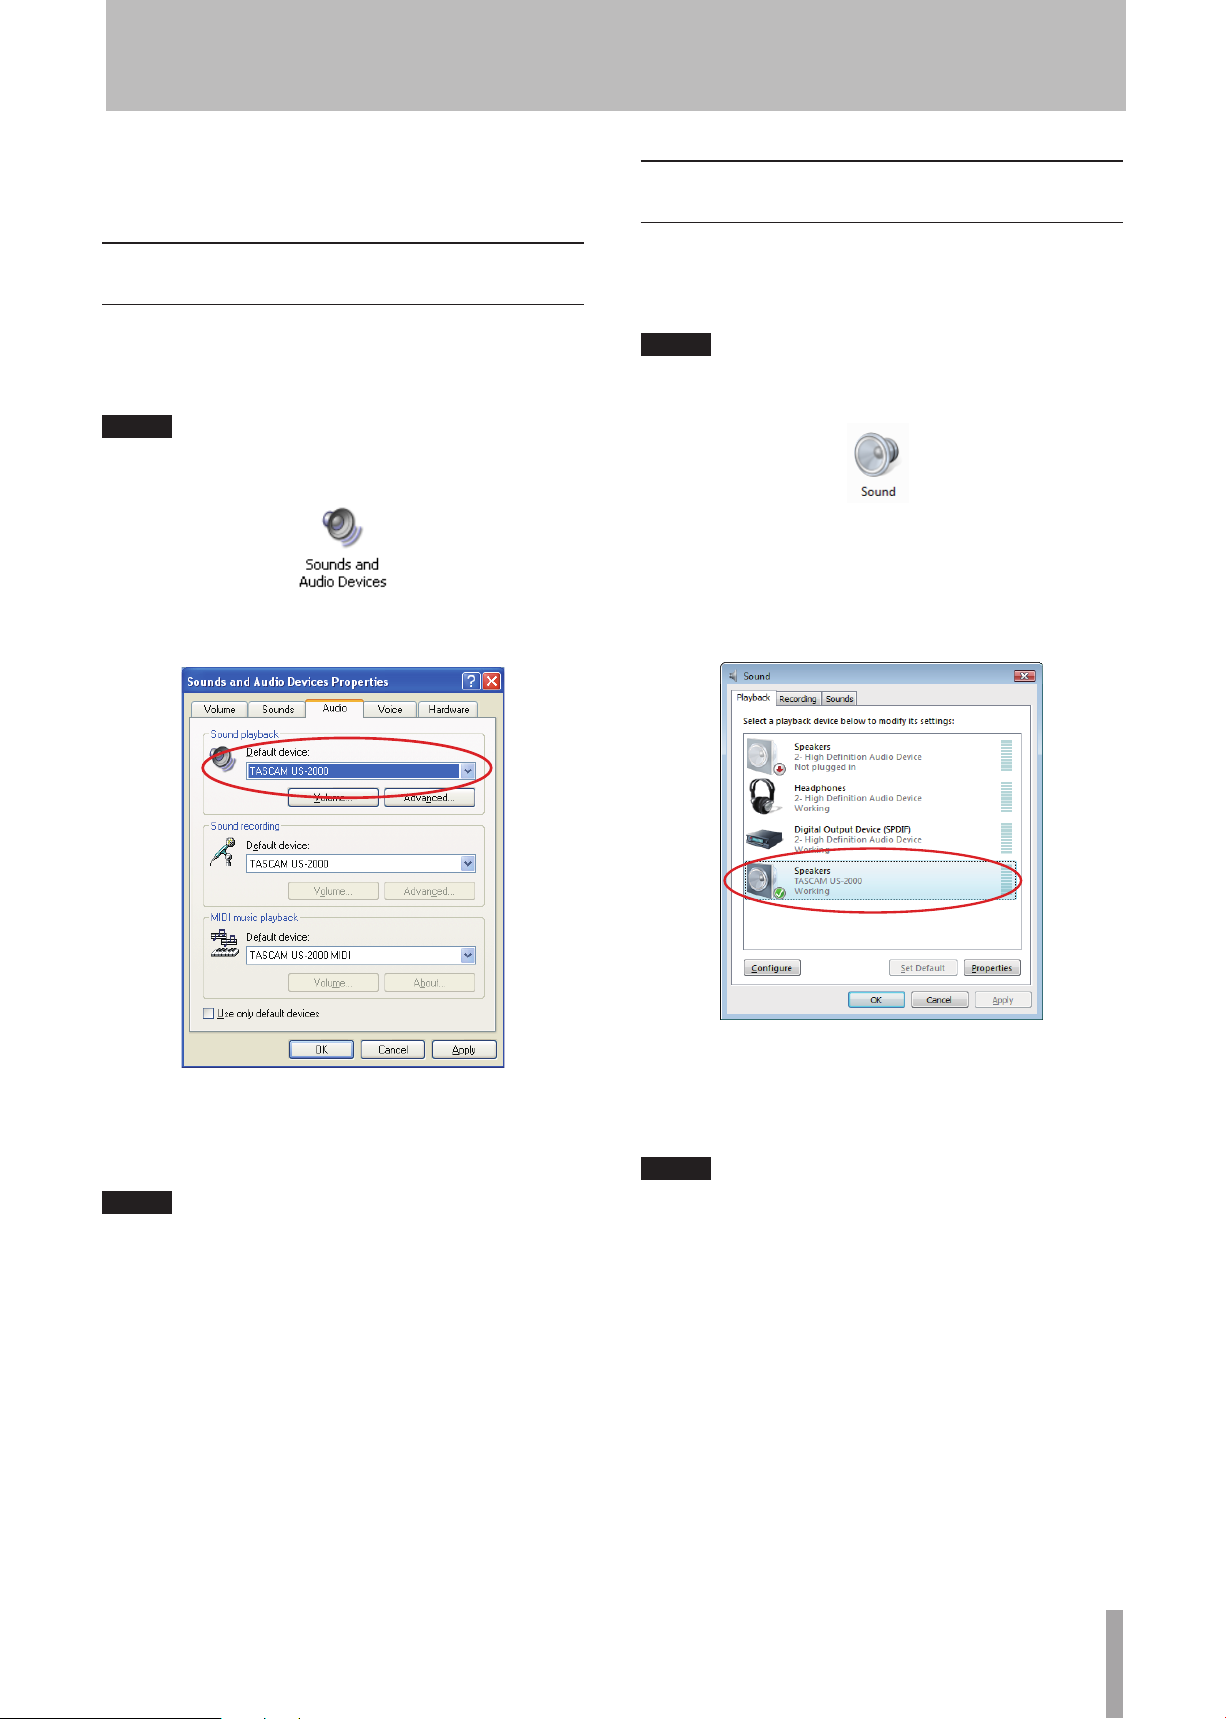
Windows XP and Windows Media Player
1
Close all applications and then open the “Control
Panel” from the “Start” menu.
2
Open “Sounds and Audio Devices.”
NOTE
If you do not see either of the items above, click “Sounds,
Speech, and Audio Devices” and one will appear.
3
Click the “Audio” tab, and set the “Default device:”
for “Sound playback” to “TASCAM US-2000.”
Windows Vista and Windows Media Player
1
Close all applications and then open the “Control
Panel” from the “Start” menu.
2
Open “Sound.”
NOTE
If the above item does not appear, click “Hardware and
Sound” and it will appear.
3
Click the “Playback” tab, click “Speakers TASCAM
US-2000” and click the “Set Default” button. This
moves the green check mark to “Speakers TASCAM
US-2000.”
4
Click “OK.”
5
Start Windows Media Player, select an audio file and
begin playback.
NOTE
If you change the setting while Windows Media
•
Player is running, the software will not recognize
that the device has been changed. In this case, restart
Windows Media Player.
If you still cannot hear sound after making the
•
settings and completing the procedures above, restart
the computer.
If you make this setting, sound will be output
•
through this unit, but no sound will be output by the
computer’s speakers or headphone jack.
4
Click “OK.”
5
Start Windows Media Player, select an audio file and
begin playback.
NOTE
If you change the setting while Windows Media
•
Player is running, the software will not recognize
that the device has been changed. In this case, restart
Windows Media Player.
If you still cannot hear sound after making the
•
settings and completing the procedures above, restart
the computer.
If you make this setting, sound will be output
•
through this unit, but no sound will be output by the
computer’s speakers or headphone jack.
Page 16
16
TASCAM US-2000
6 – Application Guide
Mac OS X and iTunes
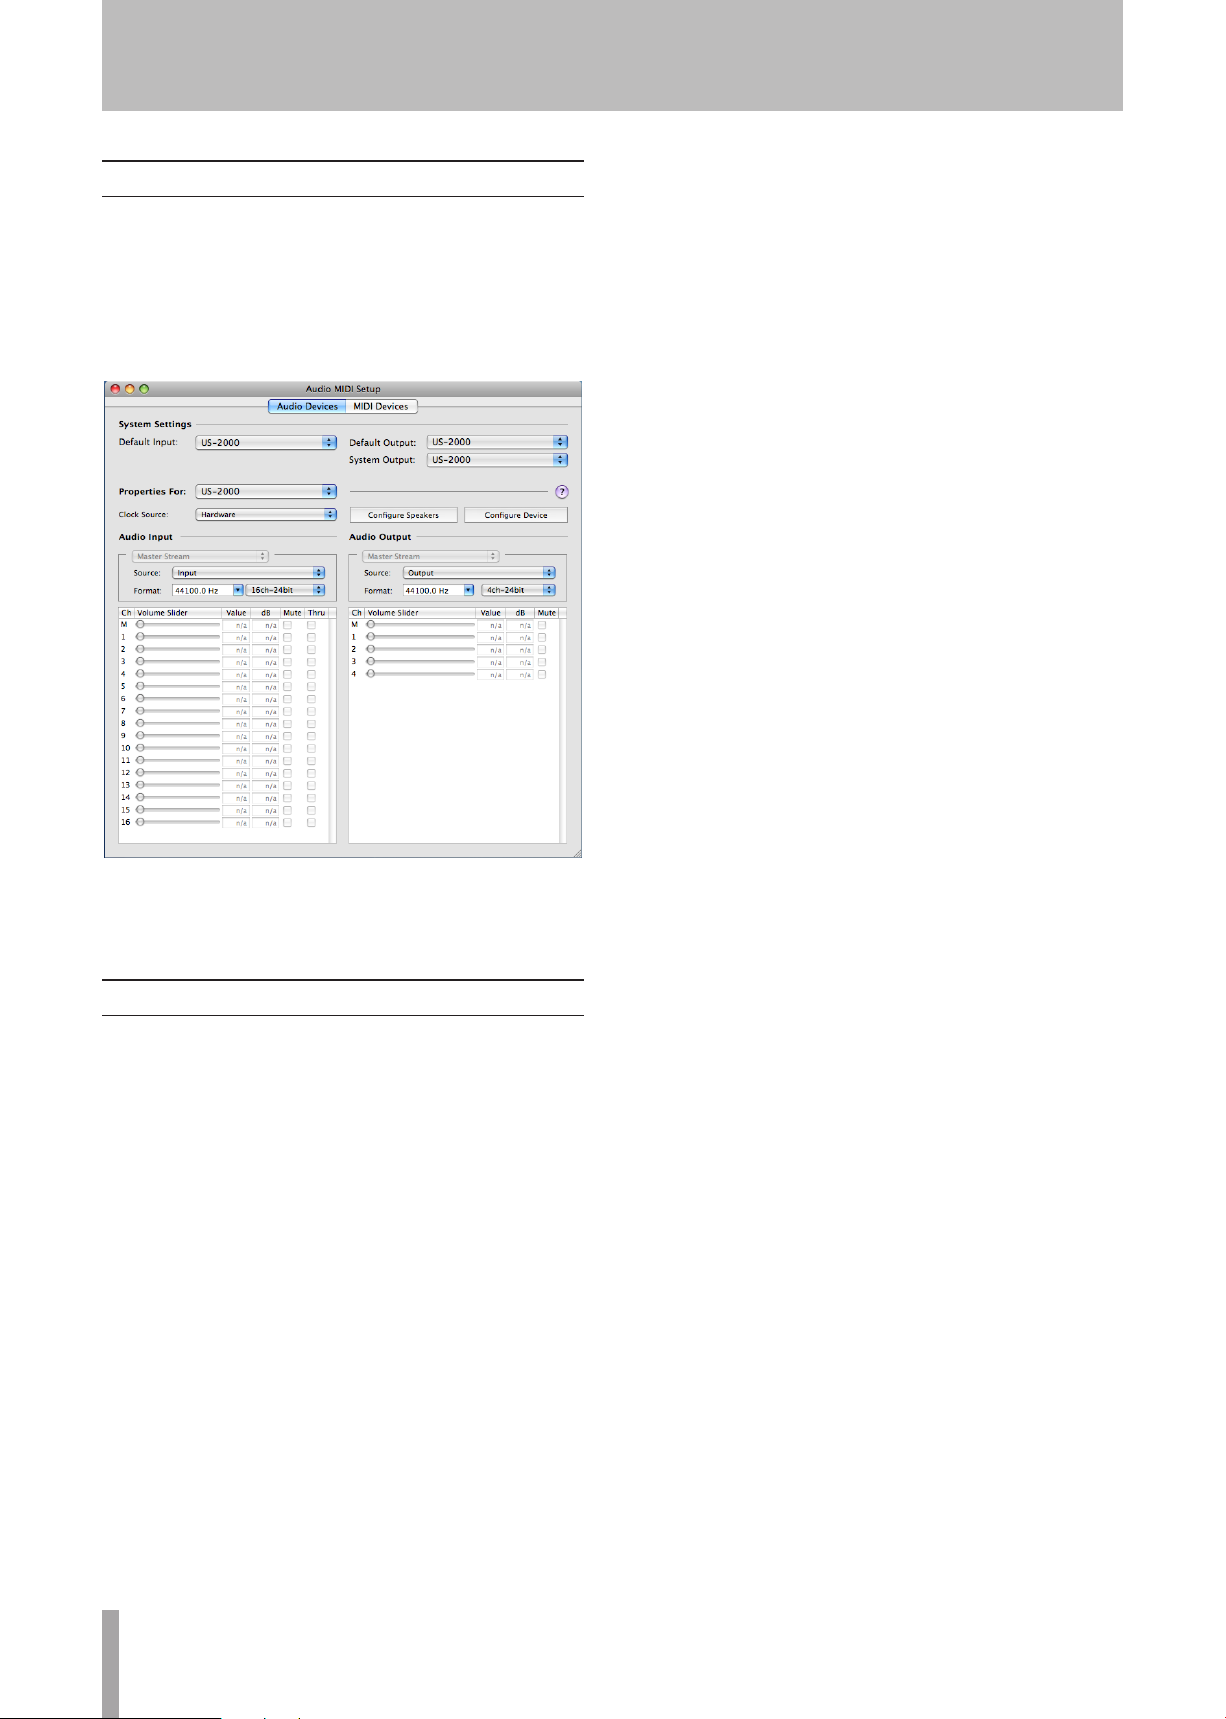
1
Open the “Utilities” folder, which is inside the
“Applications” folder, and double-click “Audio MIDI
Setup” to launch it.
2
Click the “Audio Devices” tab.
Set “Default Input,” “Properties for,” “Default
Output” and “System Output” to “US-2000.”
3
Launch iTunes, select an audio file and start
playback.
Cubase LE4
For details see the provided Cubase LE4 Quick Start Guide.
Page 17

TASCAM US-2000
17
7 – Troubleshooting
Please read this chapter if you are unable to use the unit
properly even after setting it up following the procedures in
this manual.
If you are still unable to resolve your problems please
contact TASCAM customer support with the following
information about the operating environment and details
about the trouble.
Operating environment
Computer manufacturer: •
Model: •
CPU: •
Installed memory: •
OS: •
DAW: •
Antivirus software use: •
Wireless LAN use: •
Installation is failing.
ª
Installation completed, but the computer
does not recognize it.
If some trouble is causing installation to fail, or installation
completes but the computer does not recognize the unit,
check the following.
1) Is the unit’s USB indicator lit?
If the USB indicator is not lit, confirm that the USB
cable is properly connected.
NOTE
Always use the included USB cable.
2) Change the USB port
Since the unit may not properly function with some
USB ports, try connecting to a different (built-in) USB
port, and reinstall the driver.
NOTE
Try again after disconnecting other USB devices.
•
(Keyboards and mice can be left connected.)
Do not use a USB hub. Always connect the unit
•
directly to a USB port on the computer (built-in).
3) Stop other software that is running in the background
Since antivirus software and other software that runs in
the background can interfere with installation, stop them
before beginning installation.
See page 10 of this manual for how to install and uninstall
the driver.
There is no sound even when audio is
ª
playing back.
The audio output must be set on the computer.
Please confirm the following while the unit is connected to
the computer.
If you make the following settings, sound will be output
through this unit, but no sound will be output by the
computer’s speakers or headphone jack.
Windows XP
1
Shut down all applications, and open the “Control
Panel” from the “Start Menu.”
2
Open “Sounds and Audio Devices”
NOTE
If you cannot find the above item, click “Sounds, Speech,
and Audio Devices” and it will appear.
3
Click the “Audio” tab, and set the “Default device
for “Sound playback” and “Sound recording” to
“TASCAM US-2000.”
Windows Vista
1
Shut down all applications, and open the “Control
Panel” from the “Start” menu.
2
Open “Sound.”
NOTE
If the above item does not appear, click “Hardware and
Sound” and it will appear.
3
Click the “Playback” tab, right-click “Speakers
US-2000” and click the “Set Default” button.
Mac OS X
1
Shut down all applications and open “System
Preferences” from the Apple menu.
2
Open “Sound.”
3
From the “Output” tab, select “US-2000: Output.”
After completing the settings, restart the computer and
check the playback sound.
Depending on the application you are using, it might also be
necessary to make other device settings in addition to those
above.
In particular, since DAW (Digital Audio Workstation)
software operates using audio engines that are different
from the OS settings, confirm the DAW driver settings first
after installing the driver for this unit.
Please see the manual for the application that you are using
for detailed setting procedures.
For the bundled Cubase LE4 software, see the manual on
the included CD-ROM.
The sound breaks up or there is noise.
ª
The load on the computer causes sound to break up and
noise to occur.
Methods to reduce the load on the computer are introduced
below.
1) If a wireless LAN, antivirus software and other software
that run in the background are operating, they regularly
put burdens on the computer, which can cause sound to
”
:
Page 18

18
TASCAM US-2000
7 – Troubleshooting
break up and noise.
Stop wireless LAN transmission, antivirus software and
other software running in the background when using
this unit.
2) Set the buffer size in the audio application that you are
using to a larger value.
NOTE
Consult the maker of your audio application for
•
methods to reduce its burden on your computer.
If you are not using an audio application which puts
•
burdens on the computer, try setting the “Audio
Performance” in the driver for this unit to “High
Latency.”
3) Change the settings of your computer so that they are
optimal for audio processing.
Windows XP
1
Right-click “My Computer” and select “Properties.”
2
Click the “Advanced” tab.
3
Click “Settings” in the “Performance” section.
4
On the “Performance Option” screen, select the
“Adjust for Best Performance” option.
it to “Highest.”
NOTE
Depending on the Mac OS version and model this setting
might not be available.
Questions related to Cubase LE4
ª
Since Cubase LE4 is a product provided by Steinberg Media
Technologies GmbH, it is not supported by TASCAM.
Please use the Cubase LE4 Help menu (and access the PDF
manuals) for information about how to use this software.
Windows Vista
a) Turn Aero off.
1
Right-click the desktop and select “Personalize”
to open the “Personalize appearance and sounds”
screen.
2
Choose “Window Color and Appearance” and then
click “Open classic appearance properties for more
options.”
3
Select “Windows Vista Basic” or any option other
than “Windows Aero.”
b) Performance settings
1
Right-click “Computer,” select “Properties,” and then
click “Advanced system settings.”
2
Click the “Advanced” tab.
3
Click “Settings” in the “Performance” section.
4
On the “Performance Option” screen, select the
“Adjust for Best Performance” option.
Mac OS X
1
Open “System Preferences. . .” from the Apple menu
and select “Energy Saver.”
2
Click the “Sleep” tab.
3
Set “Put the computer to sleep when it is inactive
for:” to “Never.”
4
Set “Put the display(s) to sleep when the computer is
inactive for:” to “Never.”
5
Click the “Options” tab.
If a “Processor performance” setting is available, set
Page 19

TASCAM US-2000
19
8 – Specifications
Input/output ratings
Analog audio input/output
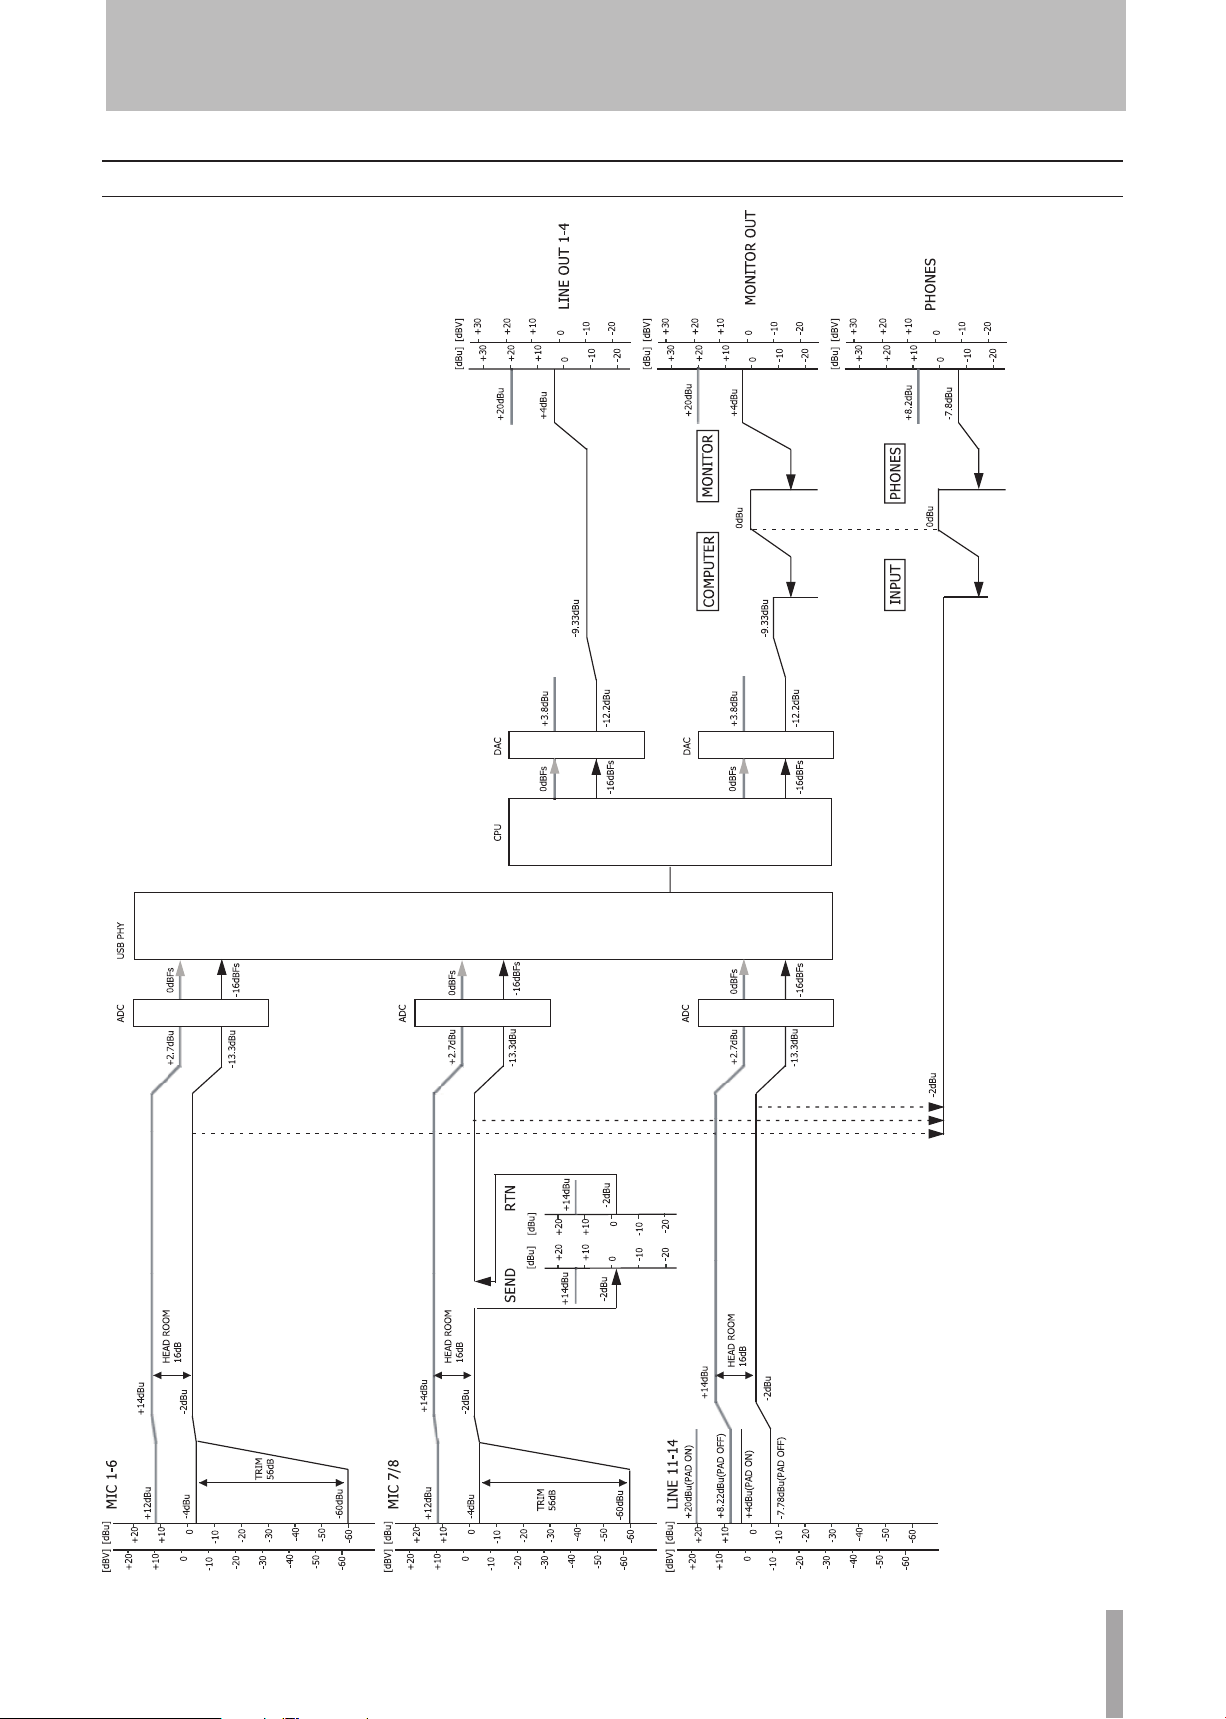
MIC INPUTS (Balanced) terminals (1-8)
Connector: XLR-3-31 (1: GND, 2: HOT, 3: COLD)
Input impedance: 2.4 kΩ
Nominal input level:
–60 dBu (When input gain konb is at maximum )
–4 dBu (When input gain knob is at minimum)
Maximum input level:
+12 dBu (When input gain knob is at minimum)
INST IN (Unbalanced) terminals (7-8)
Connector: 6.3 mm (1/4”) Standard phone jack
Input impedance: 1 MΩ
Nominal input level:
–56 dBu (When input gain konb is at maximum )
0 dBu (When input gain knob is at minimum)
Maximum input level:
+16 dBu (When input gain knob is at minimum)
LINE IN (Balanced) terminals (9-14)
Connector: 6.3 mm (1/4”) TRS Standard phone jack
(Tip: HOT, Ring: COLD, Sleeve: GND)
Input impedance: 10 kΩ
Nominal input level:
–10 dBV/+4 dBu
Maximum input level:
+6 dBV/+ 20 dBu
LINE OUTPUTS (Balanced) terminal
Connector: 6.3 mm (1/4”) TRS Standard phone jack
(Tip: HOT, Ring: COLD, Sleeve: GND)
Output impedance: 100Ω
Nominal output level:
+4 dBu
Maximum output level:
+20 dBu
MONITOR OUT (Balanced) terminal
Connector: 6.3 mm (1/4”) TRS Standard phone jack
(Tip: HOT, Ring: COLD, Sleeve: GND)
Output impedance: 100Ω
Nominal output level:
+4 dBu
Maximum output level:
+20 dBu
INSERT (Unbalanced) terminal
Connector: 6.3 mm (1/4”) TRS Standard phone jack
(Tip: SEND, Ring: RECEIVE, Sleeve: GND)
Output impedance: 100Ω
Nominal output level:
–2 dBu
Maximum output level:
+14 dBu
Input impedance: 10 kΩ
Nominal input level
–2 dBu
Maximum input level:
+14 dBu
PHONES jack
Connector: 6.3 mm (1/4”) Standard Stereo phone jack
Maximum output level:
100 mW + 100 mW or more
(THD + N less than 1%, 32Ω load)
Digital audio input/output
DIGITAL IN (COAXIAL) terminal
Connector: RCA pin jack
Compatible signal format: IEC60958-3 (S/PDIF)
DIGITAL OUT (COAXIAL) terminal
Connector: RCA pin jack
Compatible signal format: IEC60958-3 (S/PDIF) or
AES3-2003 (AES/EBU), selectable using control panel
Control input/output
USB terminal
Connector: USB B type 4 pin
Format:
USB 2.0 High speed (480 MHz)
Audio performance
Frequency response
20 Hz - 20 kHz, ±1.0 dB (44.1/48 kHz) (MIC to
MONITOR OUTPUT)
20 Hz - 40 kHz, +0.5/–2.0 dB (88.2/96 kHz) (MIC to
MONITOR OUTPUT)
Signal-to-noise ratio
90 dB (LINE IN to MONITOR OUTPUT, 20 kHz LPF +
A-weighted)
Total harmonic distortion
Less than 0.01% (LINE IN to MONITOR OUTPUT, 1 kHz,
+20 dBu input, 20 kHz LPF)
Computer requirements
Windows
Supported Operating system
Windows:
Windows XP 32 bit SP2 or later
Windows XP 64 bit SP2 or later
Windows Vista 32 bit SP2 or later
Windows Vista 64 bit SP2 or later
Page 20

20
TASCAM US-2000
8 – Specifications
Supported computer system
Windows compatible computer with a USB 2.0 port
CPU/clock: •
Pentium 4 1.4 GHz or faster
AMD Athlon 1.4 GHz or faster
(or equivalent processor)
Memory: •
512 MB or more for Windows XP 32-bit and Windows
Vista 32-bit
1 GB or more for Windows XP 64-bit and Windows Vista
64-bit
Macintosh
Supported operating system:
Mac OS X 10.4.11 or later
Mac OS X 10.5.6 or later
Supported computer system:
Apple Macintosh series equipped with a USB port as
standard equipment
CPU/clock: •
Power PC G4 1 GHz or faster, or Intel processor
Memory: •
512 MB or more
General
Sampling frequency
44.1/48/88.2/96 kHz
Sampling bit rate
16/24 bit
Power
AC 100 - 240 V, 50-60 HZ
Power consumption
14 W
Dimensions (W x H x D)
438 x 44 x 280 mm/17.24 x 1.732 x 11.02 in.
Weight
2.5 kg/5.512 lb
Operating temperature
5 to 35 °C/41 to 95 °F
Bundled software
Cubase LE4 (for Windows or Mac OS X)
Page 21
TASCAM US-2000
21
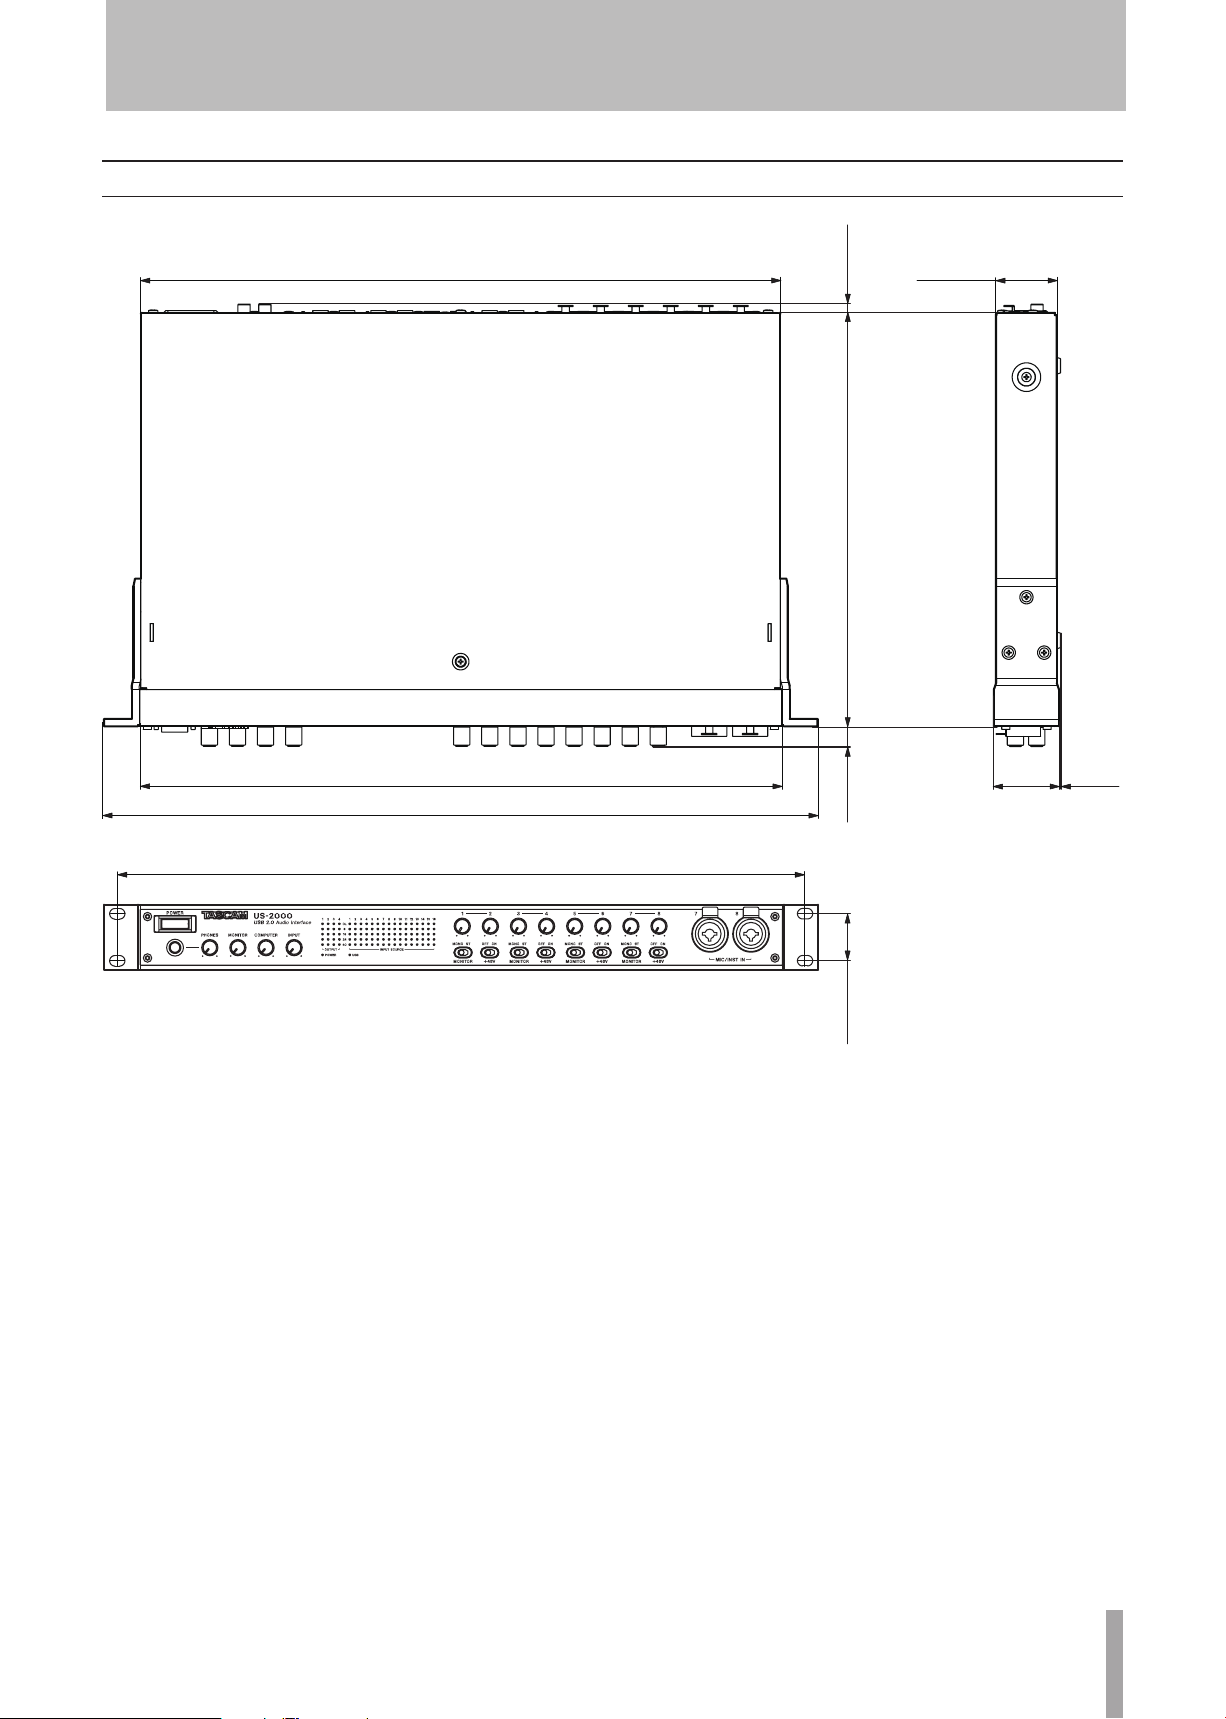
Dimensional drawings
432.6 mm
41.1 mm
44 mm
1 mm
434.2 mm
482.6 mm
465.6 mm
5.9 mm
280 mm
18 mm
31.8 mm
8 – Specifications
Illustrations and other depictions may differ in part from the actual product.•
Specifications and external appearance may be changed without notification to improve the product.•
Page 22
22
TASCAM US-2000
8 – Specifications
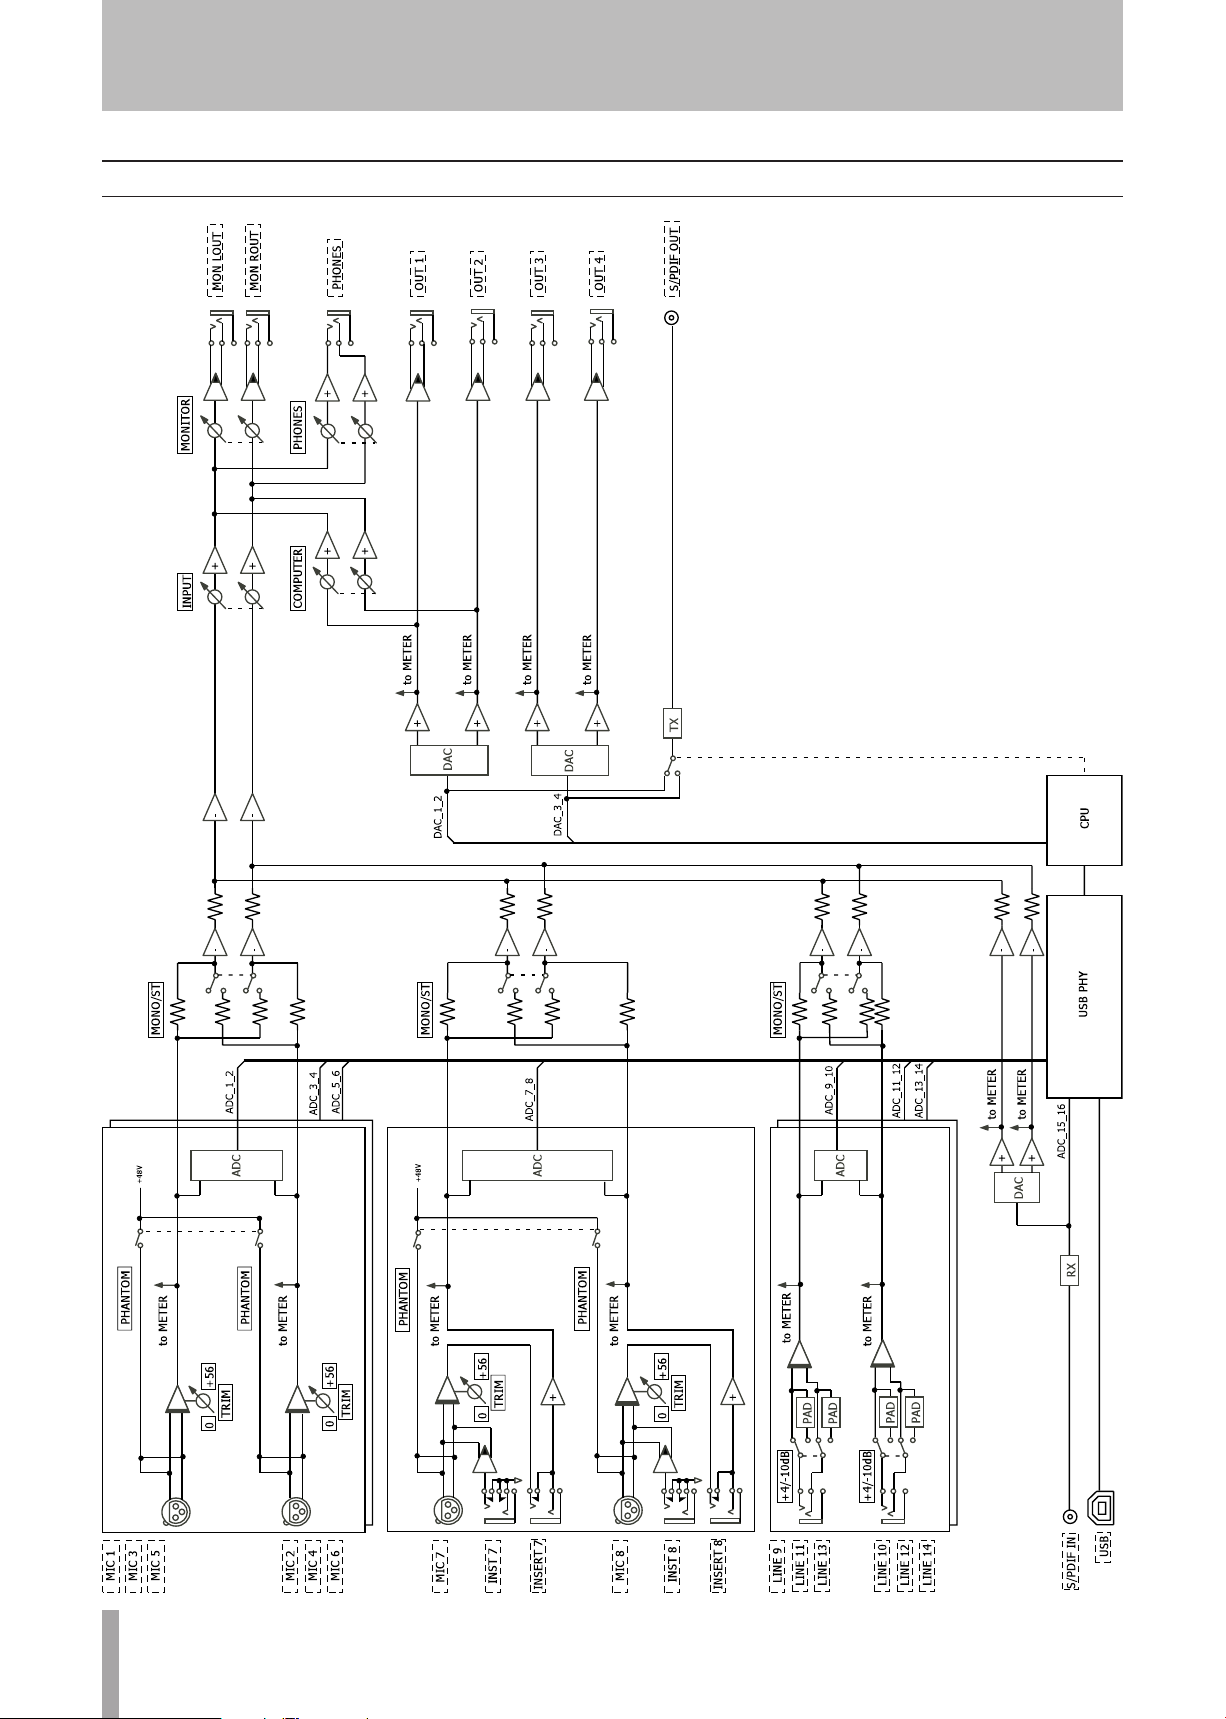
Block diagram
Page 23
TASCAM US-2000
23
Level diagram
8 – Specifications
Page 24

US-2000
TEAC CORPORATION
Phone: +81-42-356-9143
1-47 Ochiai, Tama-shi, Tokyo 206-8530, Japan
TEAC AMERICA, INC. www.tascam.com
Phone: +1-323-726-0303
7733 Telegraph Road, Montebello, California 90640 USA
TEAC CANADA LTD. www.tascam.com
Phone: +1905-890-8008 Facsimile: +1905-890-9888
5939 Wallace Street, Mississauga, Ontario L4Z 1Z8, Canada
TEAC MEXICO, S.A. de C.V. www.teacmexico.net
Phone: +52-55-5010-6000
Río Churubusco 364, Colonia Del Carmen, Delegación Coyoacán, CP 04100, México DF, México
TEAC UK LIMITED www.tascam.co.uk
Phone: +44-8451-302511
Suites 19 & 20, Building 6, Croxley Green Business Park, Hatters Lane, Watford, Hertfordshire, WD18 8TE, UK
TEAC EUROPE GmbH www.tascam.de
Phone: +49-611-71580
Bahnstrasse 12, 65205 Wiesbaden-Erbenheim, Germany
www.tascam.jp
Printed in China
 Loading...