

Page 1
ENGLISH
9A10448700
OWNER’S MANUAL
MANUEL DU PROPRIÉTAIRE
MANUAL DEL USUARIO
BEDIENUNGSANLEITUNG
MANUALE DI ISTRUZIONI
GEBRUIKSAANWIJZING
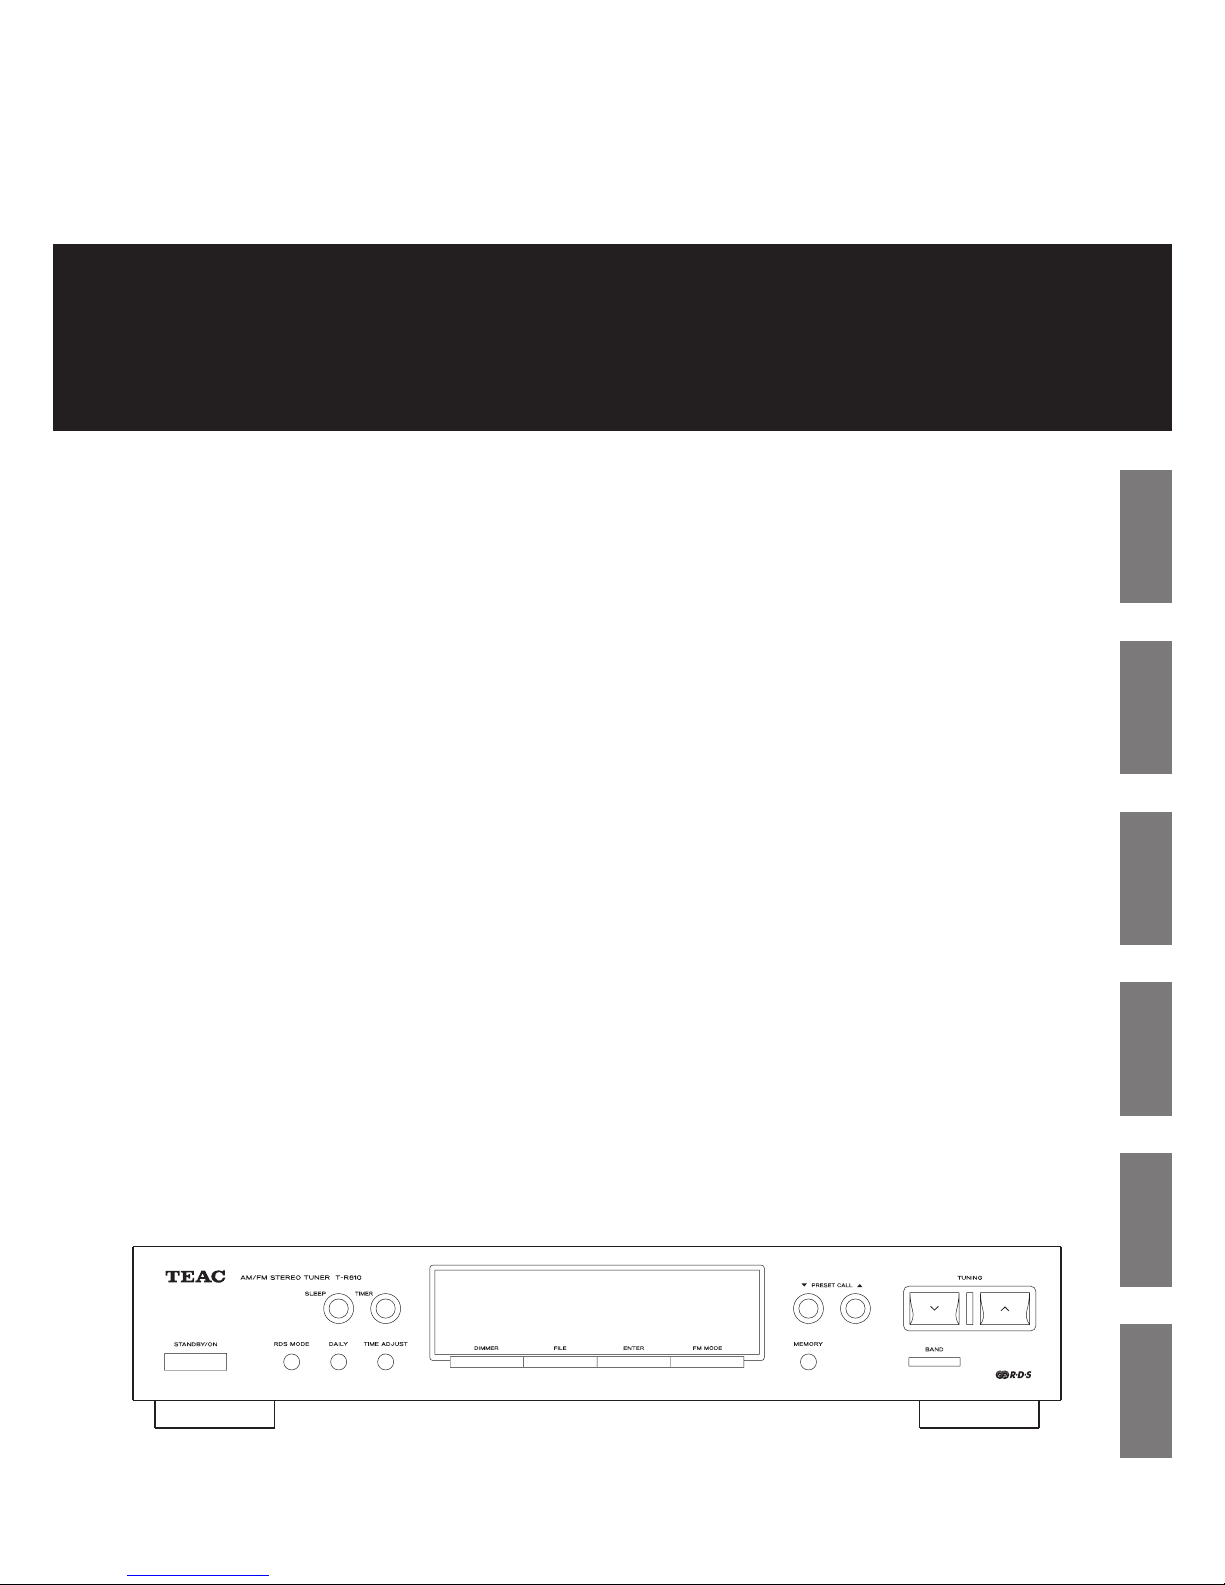
AM/FM Stereo Tuner
Z
T
-
R610
FRANÇAIS ESPAÑOL DEUTSCH
ITALIANO NEDERLANDS
Page 2
IMPORTANT SAFETY INSTRUCTIONS
1) Read these instructions.
2) Keep these instructions.
3) Heed all warnings.
4) Follow all instructions.
5) Do not use this apparatus near water.
6) Clean only with dry cloth.
7) Do not block any ventilation openings. Install in accordance
with the manufacturer’s instructions.
8) Do not install near any heat sources such as radiators, heat
registers, stoves, or other apparatus (including amplifiers) that
produce heat.
9) Do not defeat the safety purpose of the polarized or
grounding-type plug. A polarized plug has two blades with
one wider than the other. A grounding type plug has two
blades and a third grounding prong. The wide blade or the
third prong are provided for your safety. If the provided plug
does not fit into your outlet, consult an electrician for
replacement of the obsolete outlet.
10) Protect the power cord from being walked on or pinched
particularly at plugs, convenience receptacles, and the point
where they exit from the apparatus.
11) Only use attachments/accessories specified by the
manufacturer.
12) Use only with the cart, stand, tripod,
bracket, or table specified by the
manufacturer, or sold with the apparatus.
When a cart is used, use caution when
moving the cart/apparatus combination to
avoid injury from tip-over.
13) Unplug this apparatus during lightning storms or when
unused for long periods of time.
14) Refer all servicing to qualified service personnel. Servicing is
required when the apparatus has been damaged in any way,
such as power-supply cord or plug is damaged, liquid has
been spilled or objects have fallen into the apparatus, the
apparatus has been exposed to rain or moisture, does not
operate normally, or has been dropped.
< Do not expose this apparatus to drips or splashes.
< Do not place any objects filled with liquids, such as vases, on
the apparatus.
< Do not install this apparatus in a confined space such as a
book case or similar unit.
< The apparatus draws nominal non-operating power from the
AC outlet with its STANDBY/ON switch in the standby
position.
< The apparatus should be located close enough to the AC
outlet so that you can easily grasp the power cord plug at any
time.
< An apparatus with Class !construction shall be connected to
an AC outlet with a protective grounding connection.
2
CAUTION
< DO NOT REMOVE THE EXTERNAL CASES OR CABINETS TO
EXPOSE THE ELECTRONICS. NO USER SERVICEABLE PARTS
ARE WITHIN!
< IF YOU ARE EXPERIENCING PROBLEMS WITH THIS PRODUCT,
CONTACT TEAC FOR A SERVICE REFERRAL. DO NOT USE THE
PRODUCT UNTIL IT HAS BEEN REPAIRED.
CAUTION: TO REDUCE THE RISK OF ELECTRIC SHOCK,
DO NOT REMOVE COVER (OR BACK). NO USERSERVICEABLE PARTS INSIDE. REFER SERVICING TO
QUALIFIED SERVICE PERSONNEL.
The lightning flash with arrowhead symbol, within an
equilateral triangle, is intended to alert the user to the
presence of uninsulated “dangerous voltage” within the
product’s enclosure that may be of sufficient magnitude
to constitute a risk of electric shock to persons.
The exclamation point within an equilateral triangle is
intended to alert the user to the presence of important
operating and maintenance (servicing) instructions in the
literature accompanying the appliance.
WARNING: TO PREVENT FIRE OR SHOCK
HAZARD, DO NOT EXPOSE THIS APPLIANCE
TO RAIN OR MOISTURE.
Disposal of your old appliance
1. When this crossed-out wheeled bin
symbol is attached to a product it means
the product is covered by the European
Directive 2002/96/EC.
2. All electrical and electronic products
should be disposed of separately from
the municipal waste stream via designated collection
facilities appointed by the government or the local
authorities.
3. The correct disposal of your old appliance will help prevent
potential negative consequences for the environment and
human health.
4. For more detailed information about disposal of your old
appliance, please contact your city office, waste disposal
service or the shop where you purchased the product.
Page 3
3
ENGLISH
Contents
Thank you for choosing TEAC. Read this manual carefully
to get the best performance from this unit.
Before Use
Read this before operation
< As the unit may become warm during operation, always leave
sufficient space around the unit for ventilation.
< The voltage supplied to the unit should match the voltage as
printed on the rear panel. If you are in any doubt regarding
this matter, consult an electrician.
< Choose the installation location of your unit carefully. Avoid
placing it in direct sunlight or close to a source of heat. Also
avoid locations subject to vibrations and excessive dust, heat,
cold or moisture.
< Do not place the unit on the amplifier/receiver.
< Do not open the cabinet as this might result in damage to the
circuitry or electrical shock. If a foreign object should get into
the unit, contact your dealer or service company.
< When removing the power plug from the wall outlet, always
pull directly on the plug, never yank the cord.
< Do not attempt to clean the unit with chemical solvents as
this might damage the finish. Use a clean, dry cloth.
< Keep this manual in a safe place for future reference.
Before Use . . . . . . . . . . . . . . . . . . . . . . . . . . . . . . . . . . . . . . . . 3
Connection. . . . . . . . . . . . . . . . . . . . . . . . . . . . . . . . . . . . . . . . 4
Names of Each Control . . . . . . . . . . . . . . . . . . . . . . . . . . . . . . . 6
Tuning . . . . . . . . . . . . . . . . . . . . . . . . . . . . . . . . . . . . . . . . . . . 7
Preset Tuning . . . . . . . . . . . . . . . . . . . . . . . . . . . . . . . . . . . . . . 8
RDS . . . . . . . . . . . . . . . . . . . . . . . . . . . . . . . . . . . . . . . . . . . . 10
RDS (PTY Search) . . . . . . . . . . . . . . . . . . . . . . . . . . . . . . . . . . 11
Setting the Clock . . . . . . . . . . . . . . . . . . . . . . . . . . . . . . . . . . 12
Setting the Daily Timer . . . . . . . . . . . . . . . . . . . . . . . . . . . . . . 13
Sleep Timer. . . . . . . . . . . . . . . . . . . . . . . . . . . . . . . . . . . . . . . 15
Dimmer . . . . . . . . . . . . . . . . . . . . . . . . . . . . . . . . . . . . . . . . . 15
Troubleshooting . . . . . . . . . . . . . . . . . . . . . . . . . . . . . . . . . . . 16
Specificatioins. . . . . . . . . . . . . . . . . . . . . . . . . . . . . . . . . . . . . 16
Memory Backup
If the power supply is interrupted for 14 days or longer, all the
settings kept in memory (such as preset stations and timer
settings) will be erased.
It will take more than 3 days after plugging the power cord into
the outlet to charge enough electricity for the memory backup
function.
If you want to manually initialize the settings, press the RESET
switch.
All the settings will be reset to the default settings.
Page 4
4
CAUTION:
< Switch off the power to all equipment before making
connections.
< Read the instructions of each component you intend to use
with this unit.
< Be sure to insert each plug securely. To prevent hum and
noise, avoid bundling the signal interconnection cables
together with the AC power cord or speaker cables.
Connection
T-R610
C
D
E
F
A
B
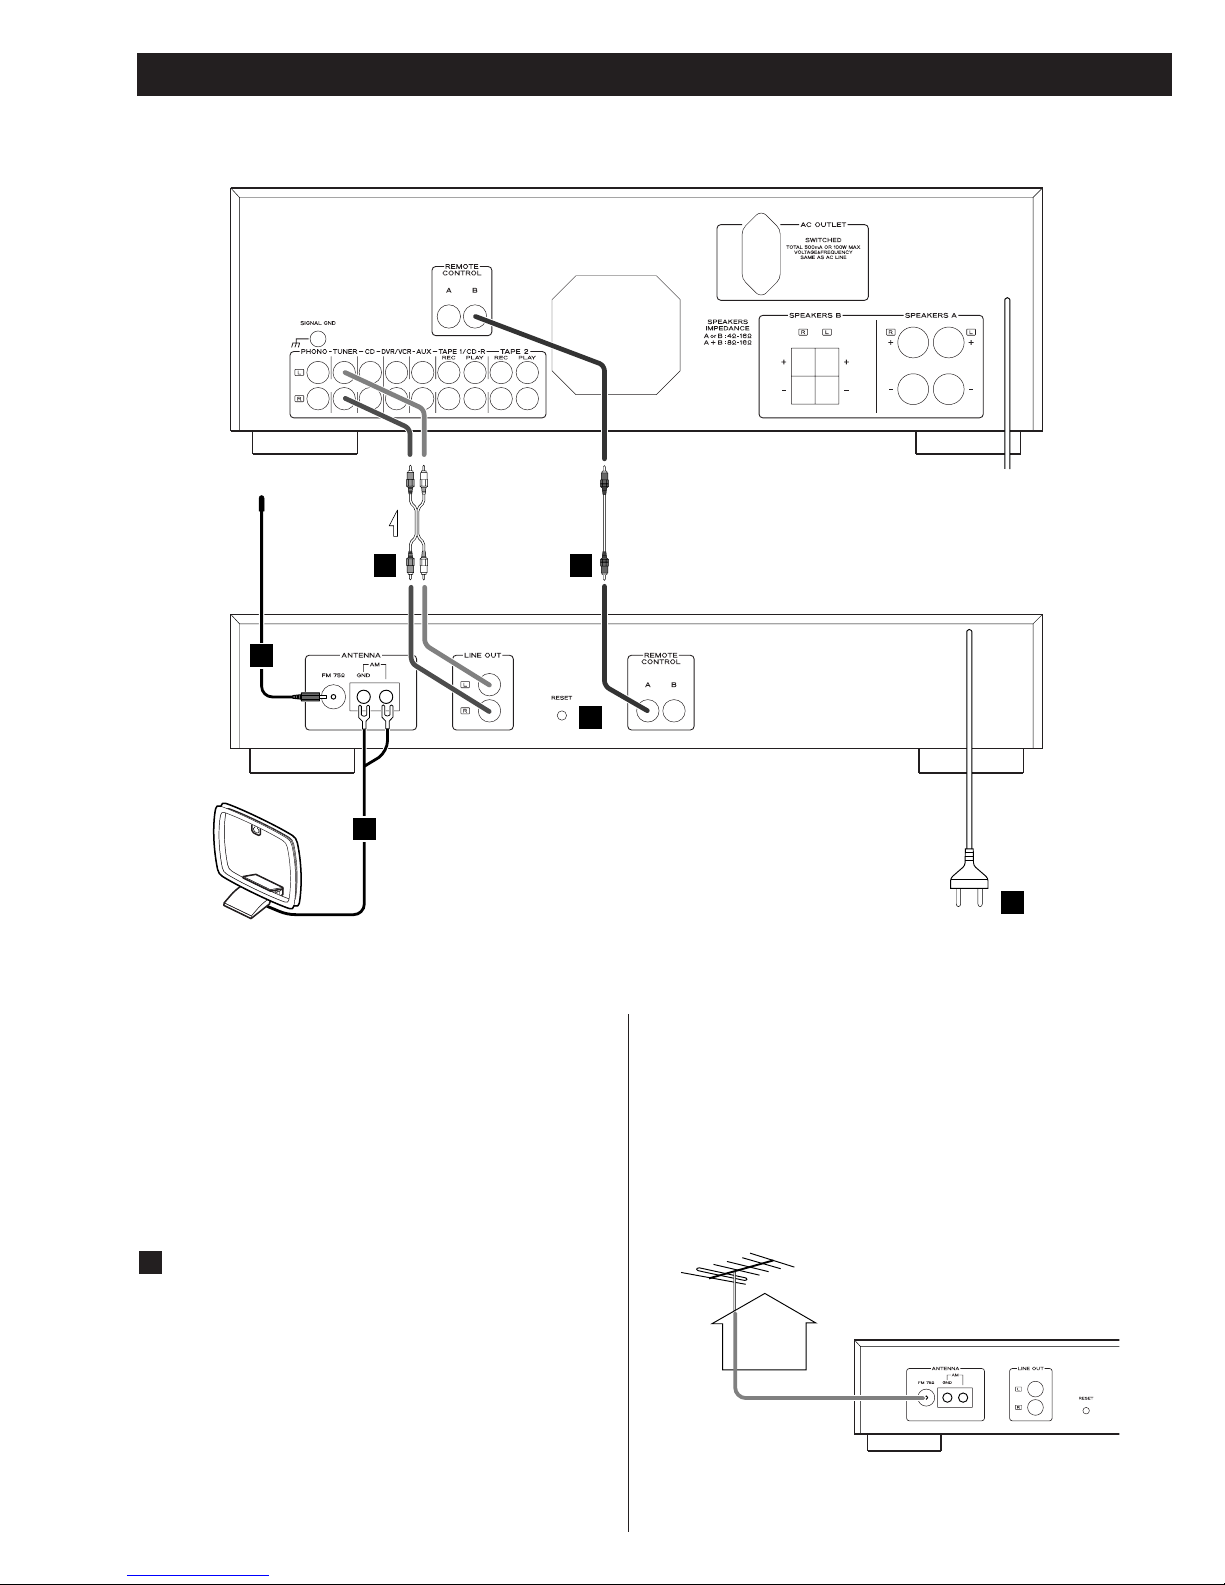
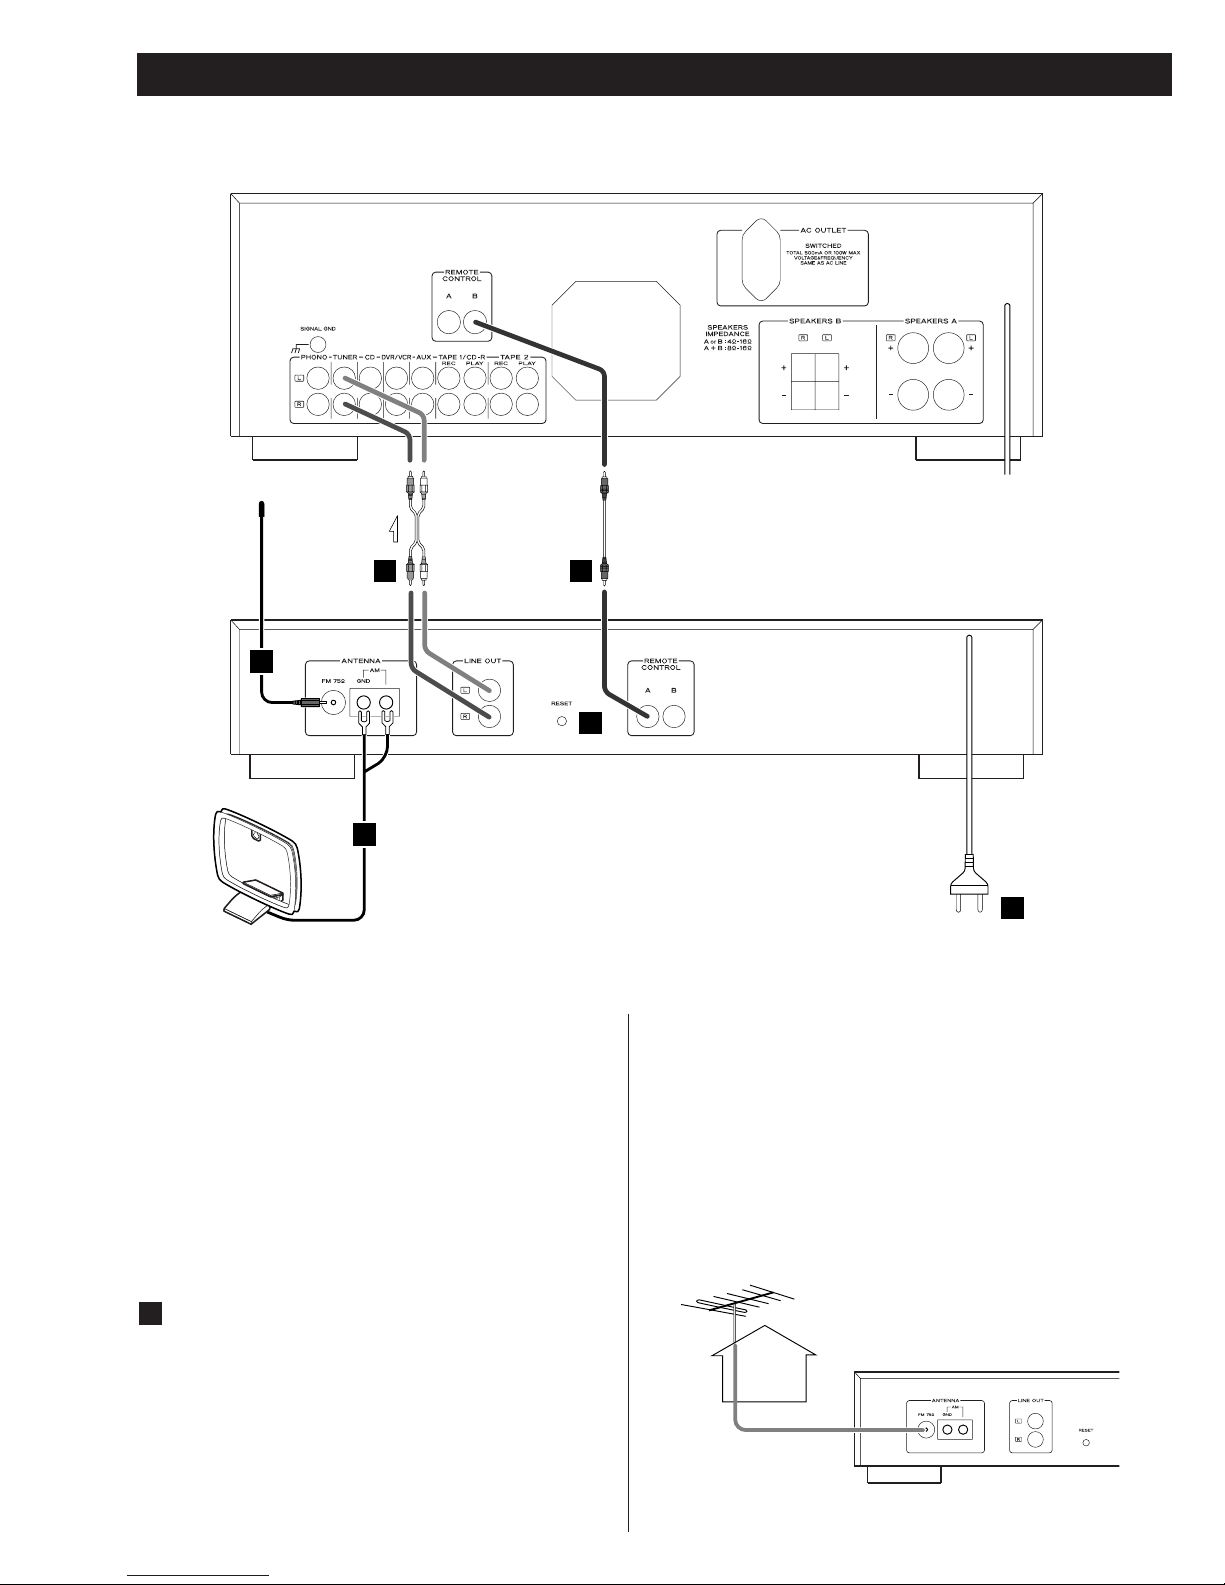
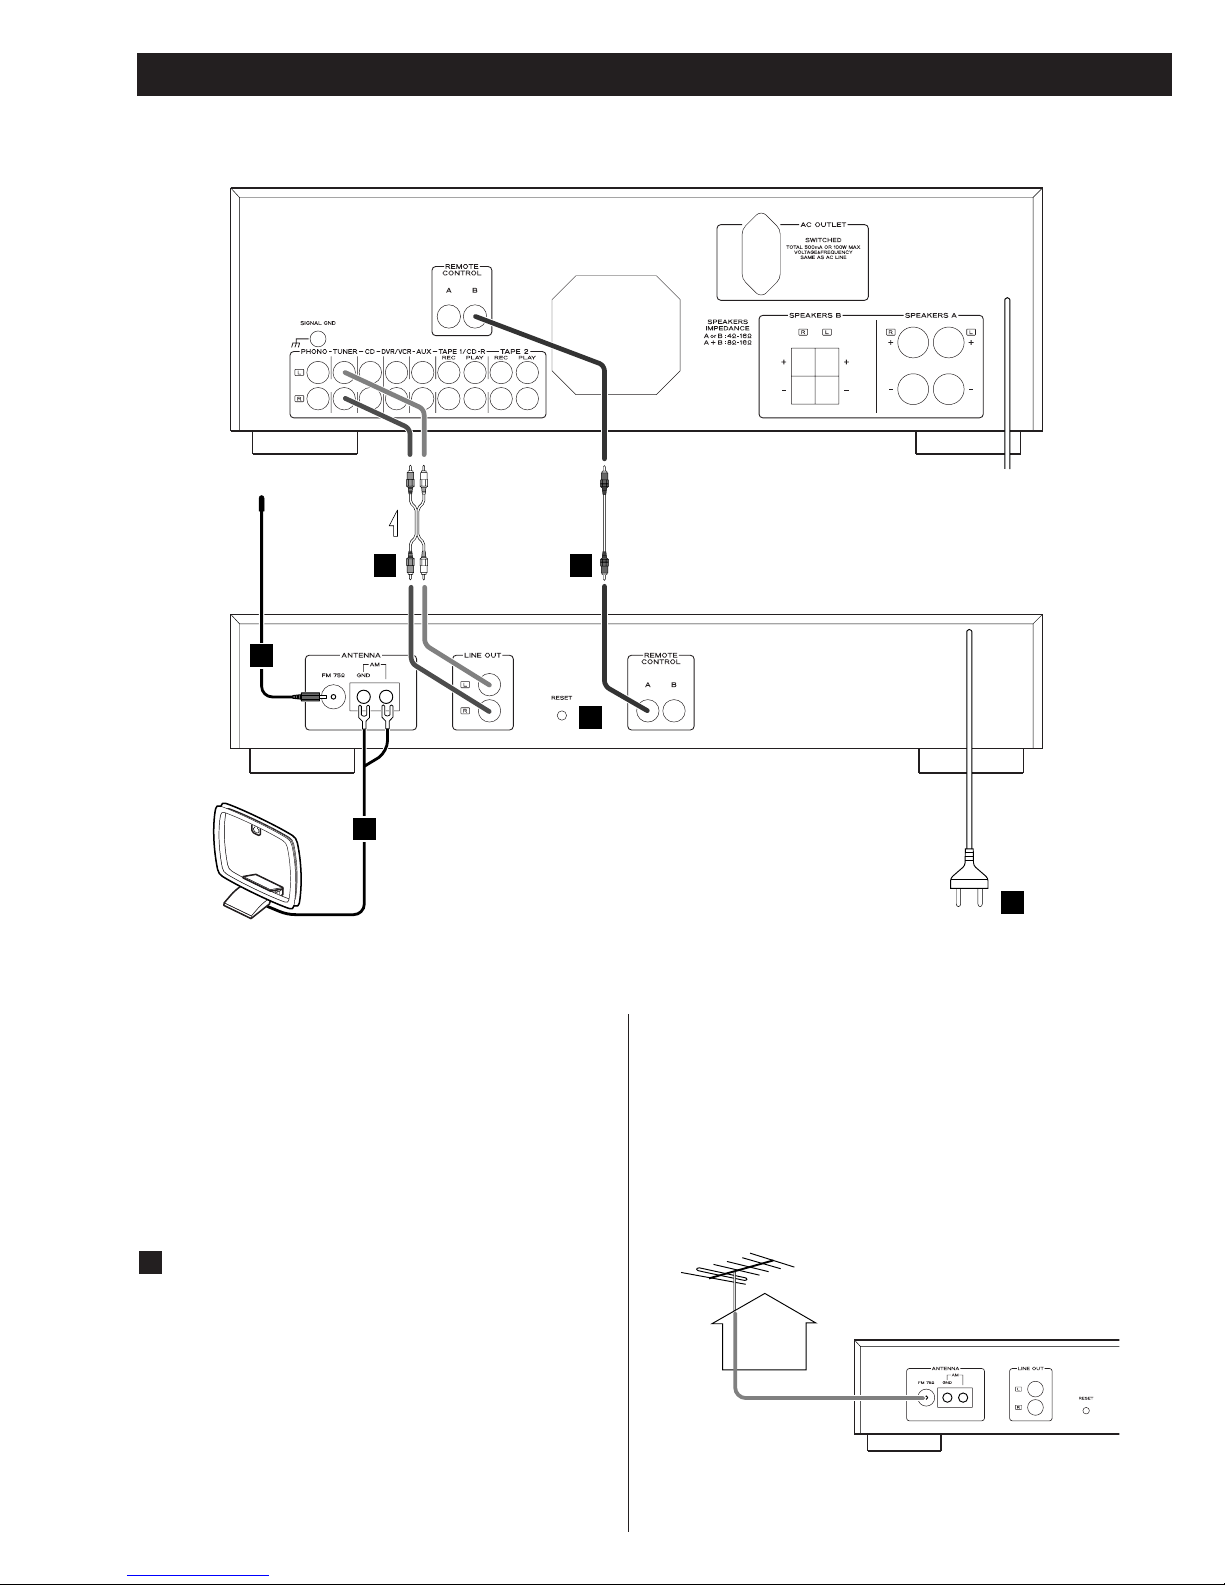
FM Indoor Antenna
Connect the lead-type FM antenna to the FM 75Ω socket,
extend the lead and tune the tuner to your favorite station
(see page 7). Adjust the antenna in a suitable location like a
window frame or wall until the reception is best and then
affix the antenna in that position using thumb tacks, push
pins or any other suitable means.
A
FM Outdoor Antenna
In an area where FM signals are weak, it will be necessary to
use an outdoor FM antenna. Generally, a 3-element antenna
will be sufficient; if you live in an area where the FM signals
are particularly weak, it may be necessary to use one with 5
or more elements.
< Disconnect the FM indoor antenna when using an outdoor
antenna.
Amplifier (A-R610)
Page 5
5
ENGLISH
LINE OUT jack
Analog 2-channel audio signal is output from this jack.
Connect this jack to the TUNER jack of the amplifier (AR610) with an RCA cable.
Make sure to connect:
white plug
q white jack (L: left channel)
red plug
q red jack (R: right channel)
REMOTE CONTROL jack
If you have TEAC A-R610, convenient system control
operations are available:
• When you tune in a station, the input selector of the AR610 is set to “TUNER” automatically.
• You can use the “UR” remote control unit RC-592B
(provided with A-R610) to operate this unit.
Connect the REMOTE CONTROL jack (A or B) to the
REMOTE CONTROL jack (A or B) of A-R610 with the
provided remote control connection cord.
Note:
The remote control unit is not provided with this unit.
RESET
In the following cases, function buttons may not work
properly.
• When the system is damaged by some electrical shock.
• When the power is irregular or has electrical noises.
In these cases, press the RESET switch once or twice with a
pencil or a ball-point pen lightly.
All the settings kept in memory (such as preset stations and
timer settings) will be erased.
AC Power Cord
After all other connections are complete, connect the plug
to the AC wall socket.
Be sure to connect the power cord to an AC outlet which
supplies the correct voltage.
Hold the power plug when plugging or unplugging the
power cord.
F
E
D
C
Note:
Even when using an outdoor AM antenna, do not
disconnect the AM loop antenna.
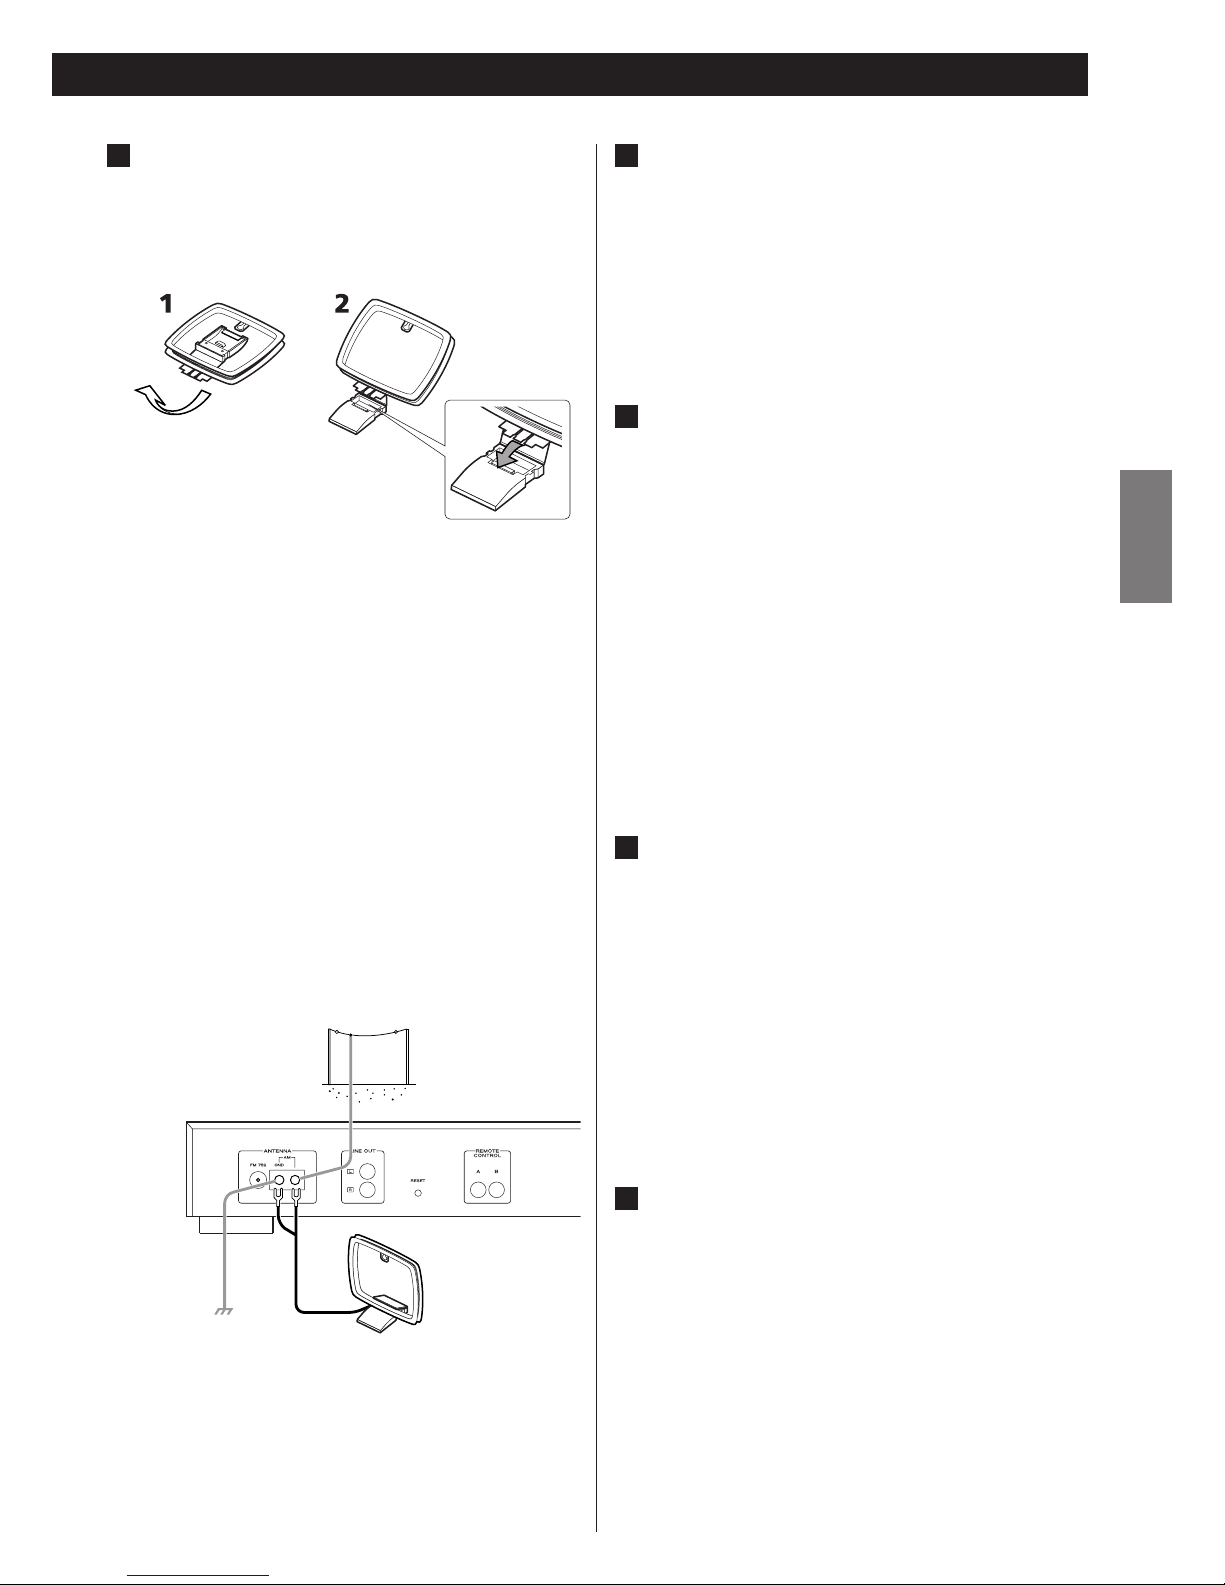
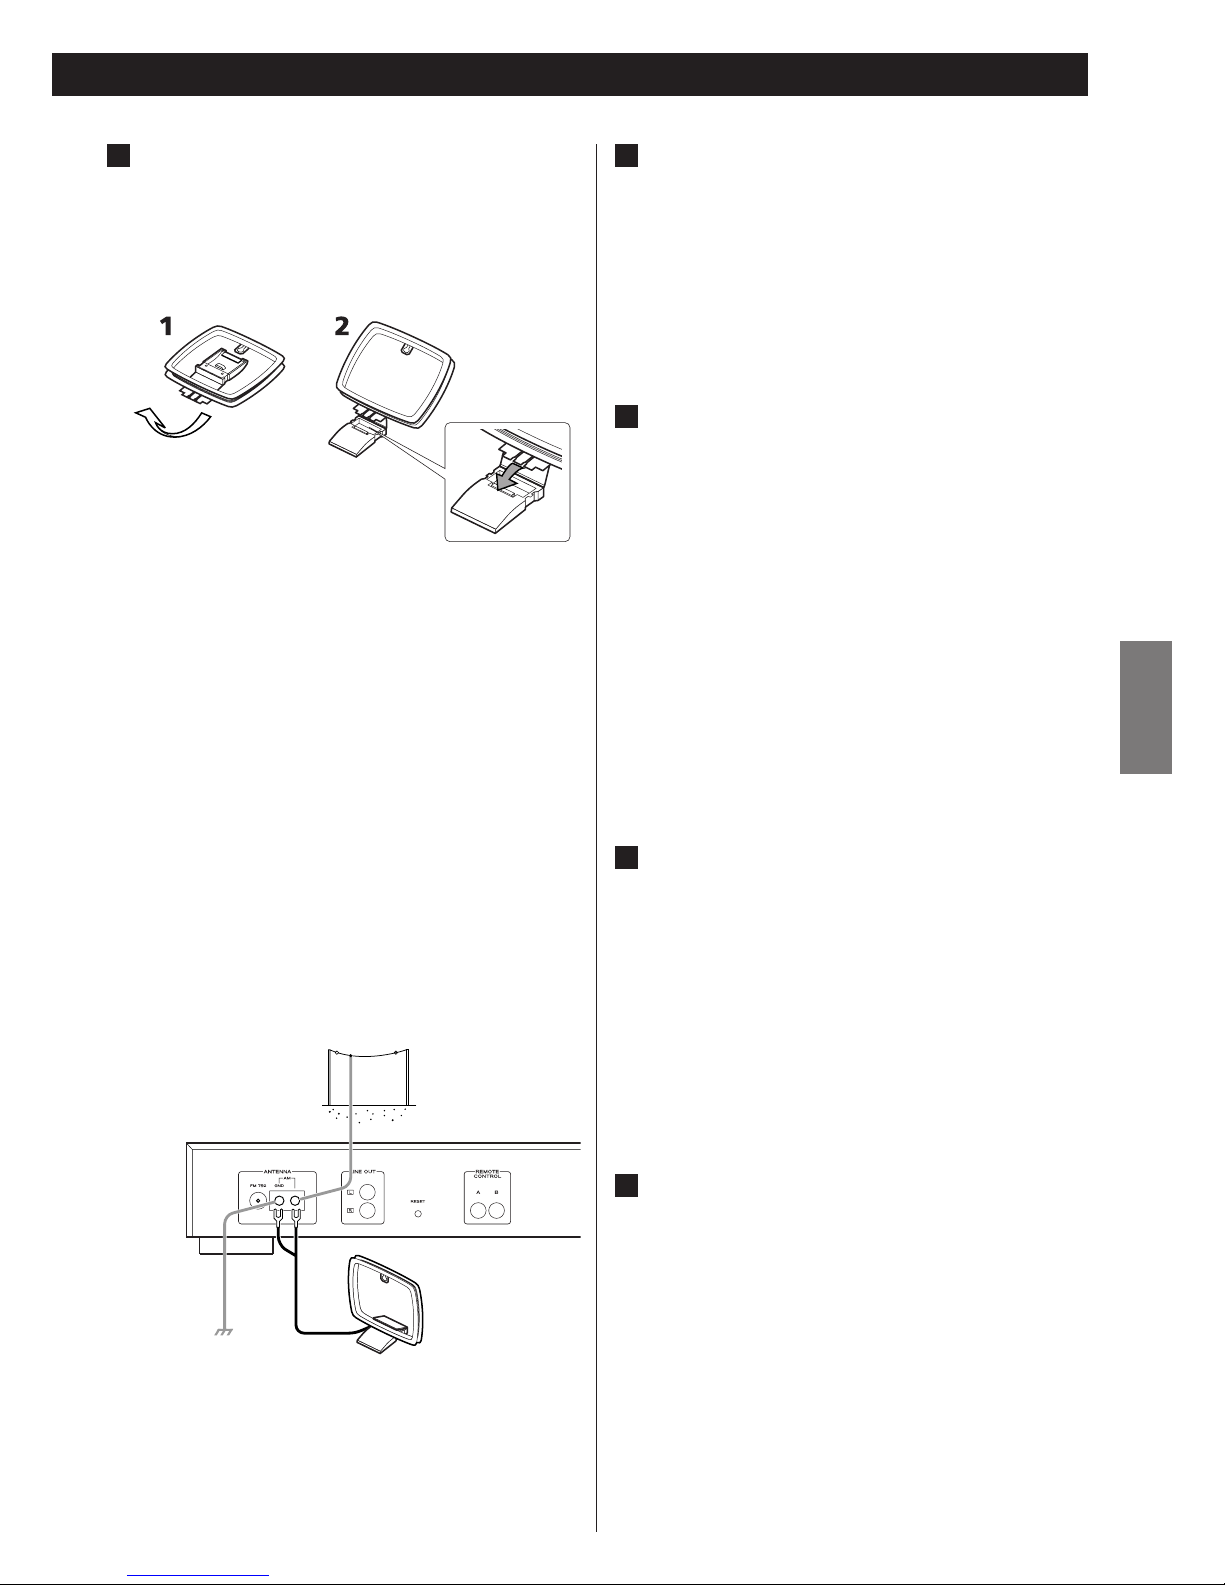
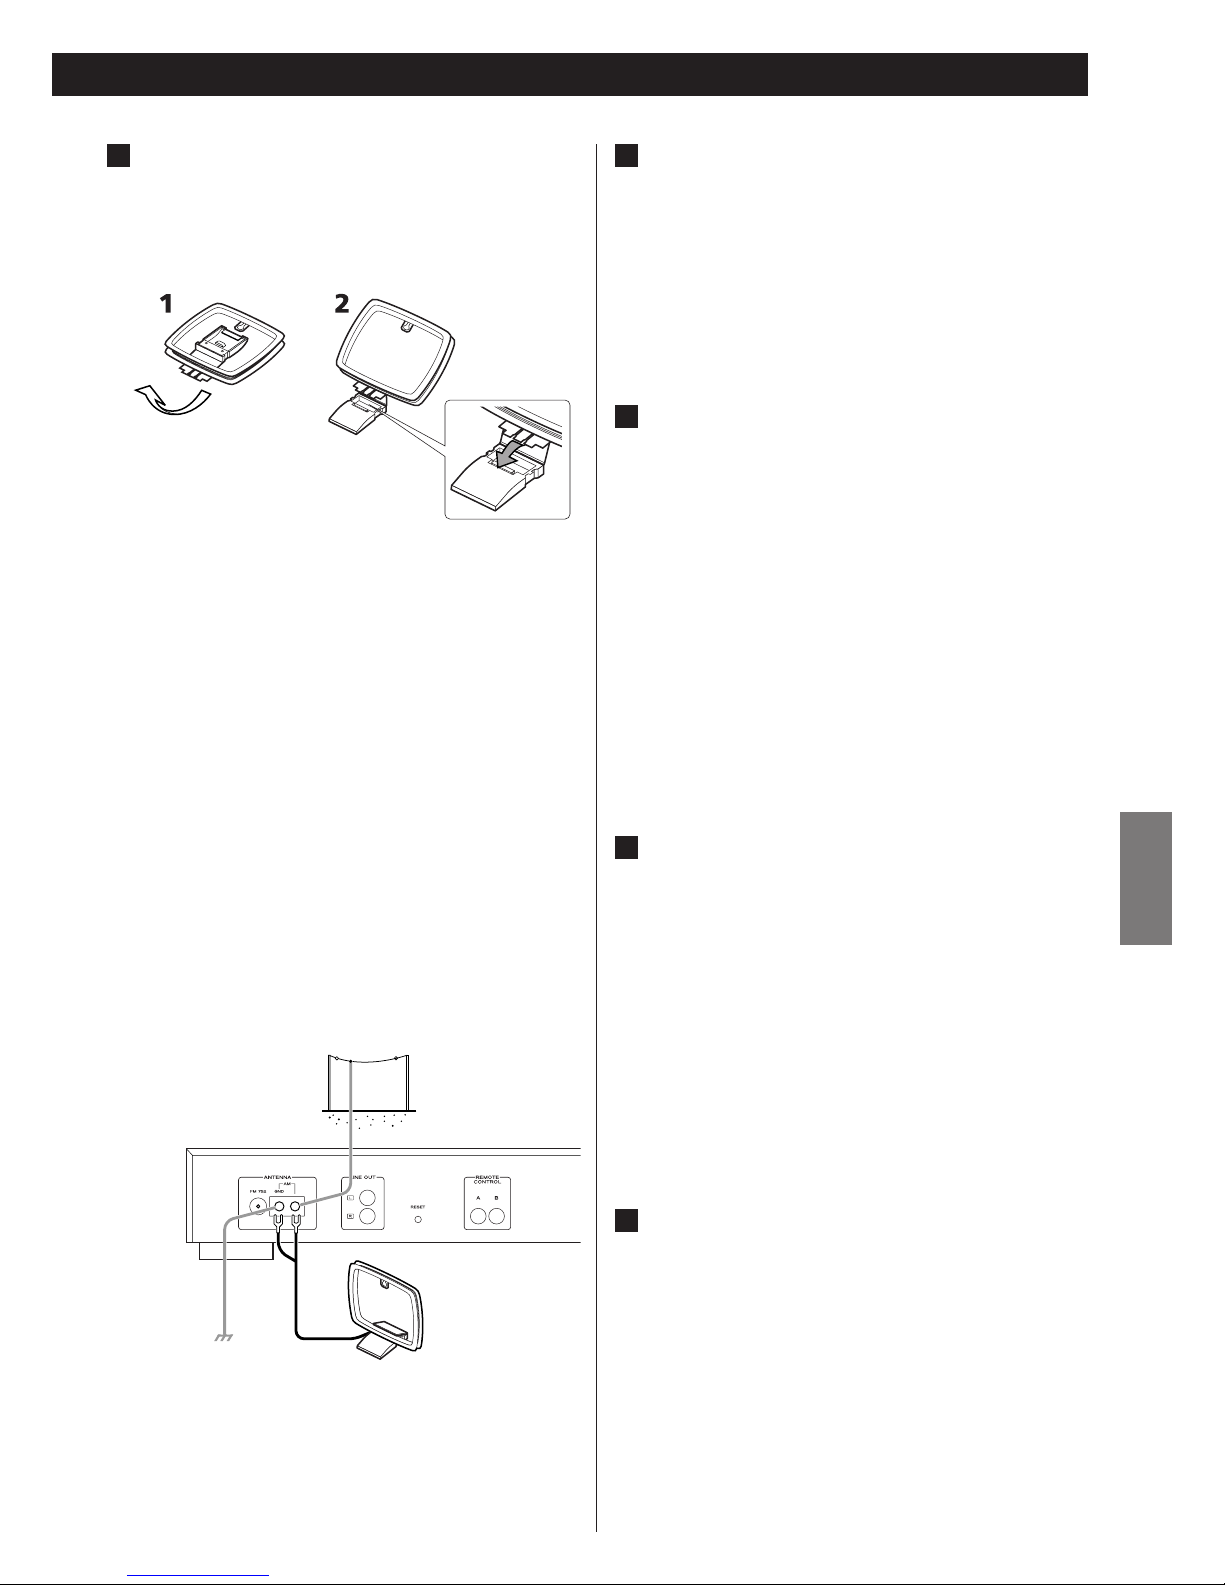
AM Indoor Loop Antenna
The high-performance AM loop antenna provided with this
unit is sufficient for good reception in most areas.
To stand the loop antenna on a surface, fix the claw to the
slot in the antenna base.
Connect the loop antenna’s wires to the AM antenna
terminals.
Place the antenna on a shelf or hang it on a window frame,
etc., in the direction which gives the best reception. Keep all
other wires such as power cords, speaker wires or
interconnect wires as far away as possible from the antenna.
< If the AM loop antenna provided does not deliver sufficient
reception (often due to being too far from the transmitter or
in a concrete building, etc.), it may be necessary to use an
outdoor AM antenna.
Use either a high quality commercial AM antenna or, if not
available, an insulated wire more than 5 m long, strip one
end, and connect this to the terminal as shown.
The antenna wire should be strung outdoors or indoors near
a window. For better reception, connect the GND terminal
to a reliable ground.
B
Page 6
6
Names of Each Control
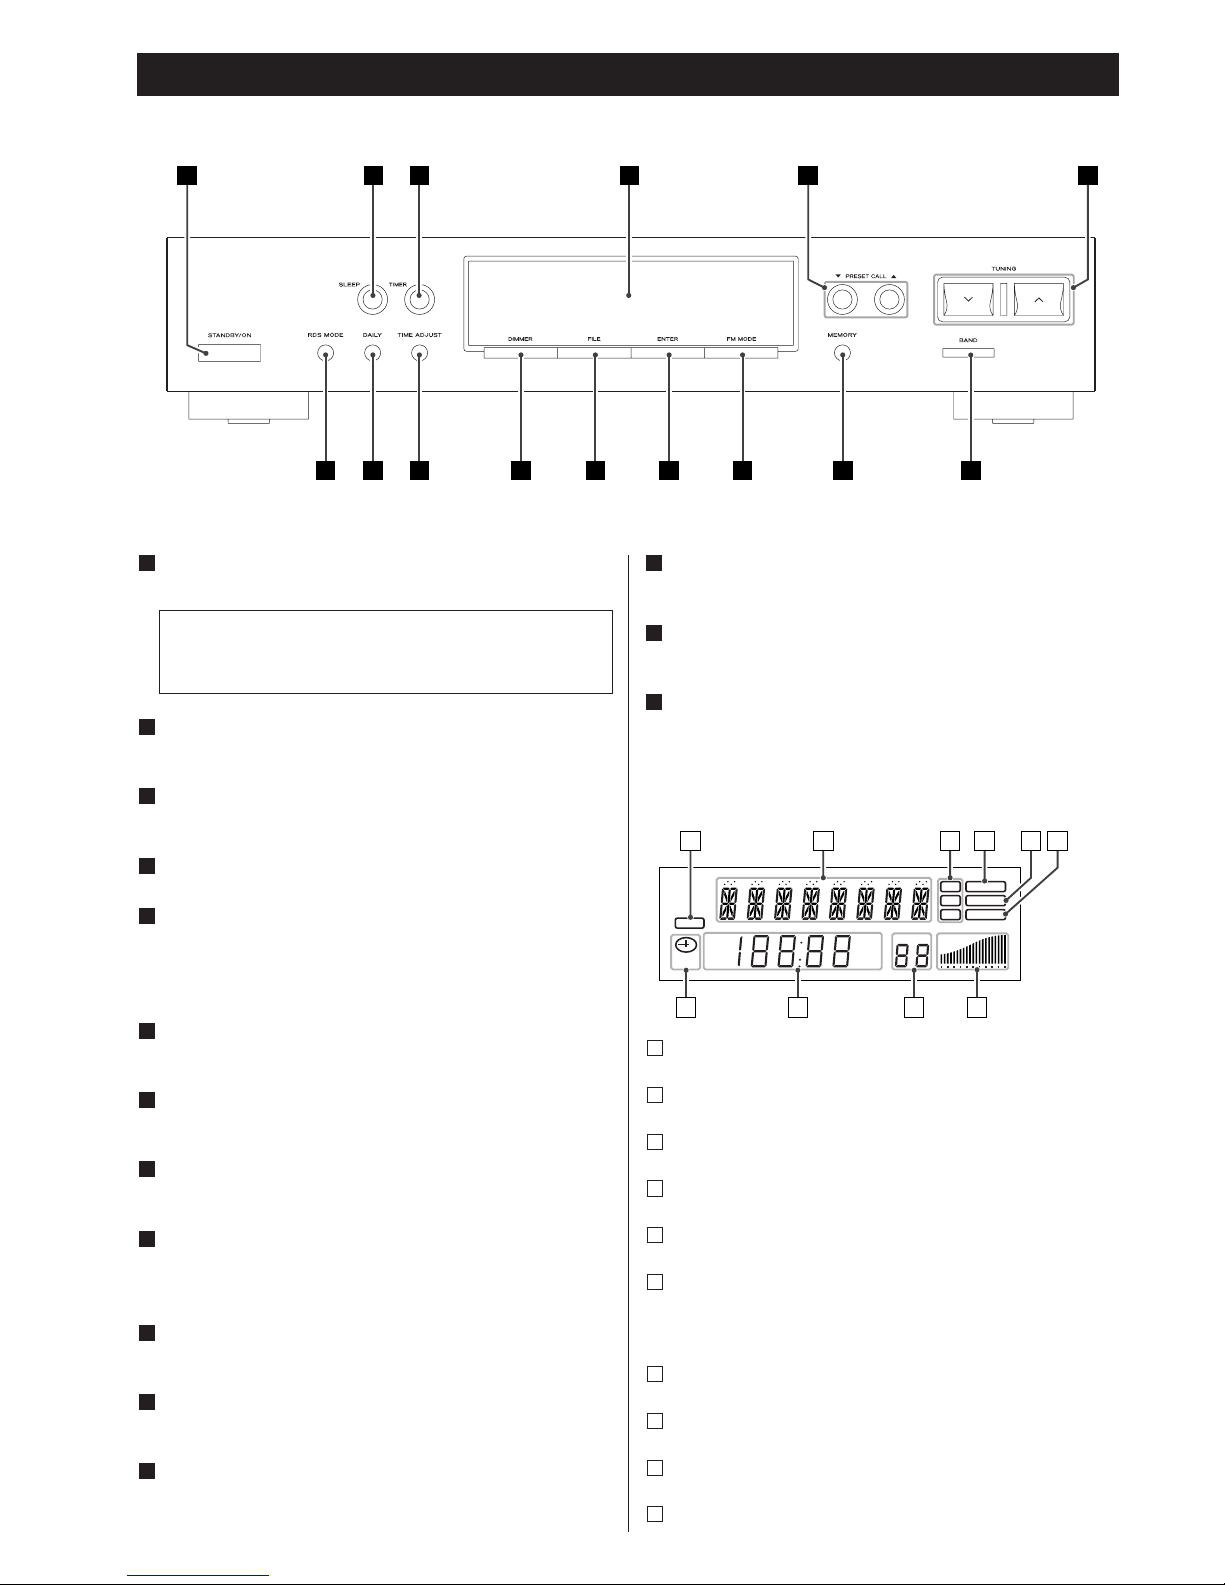
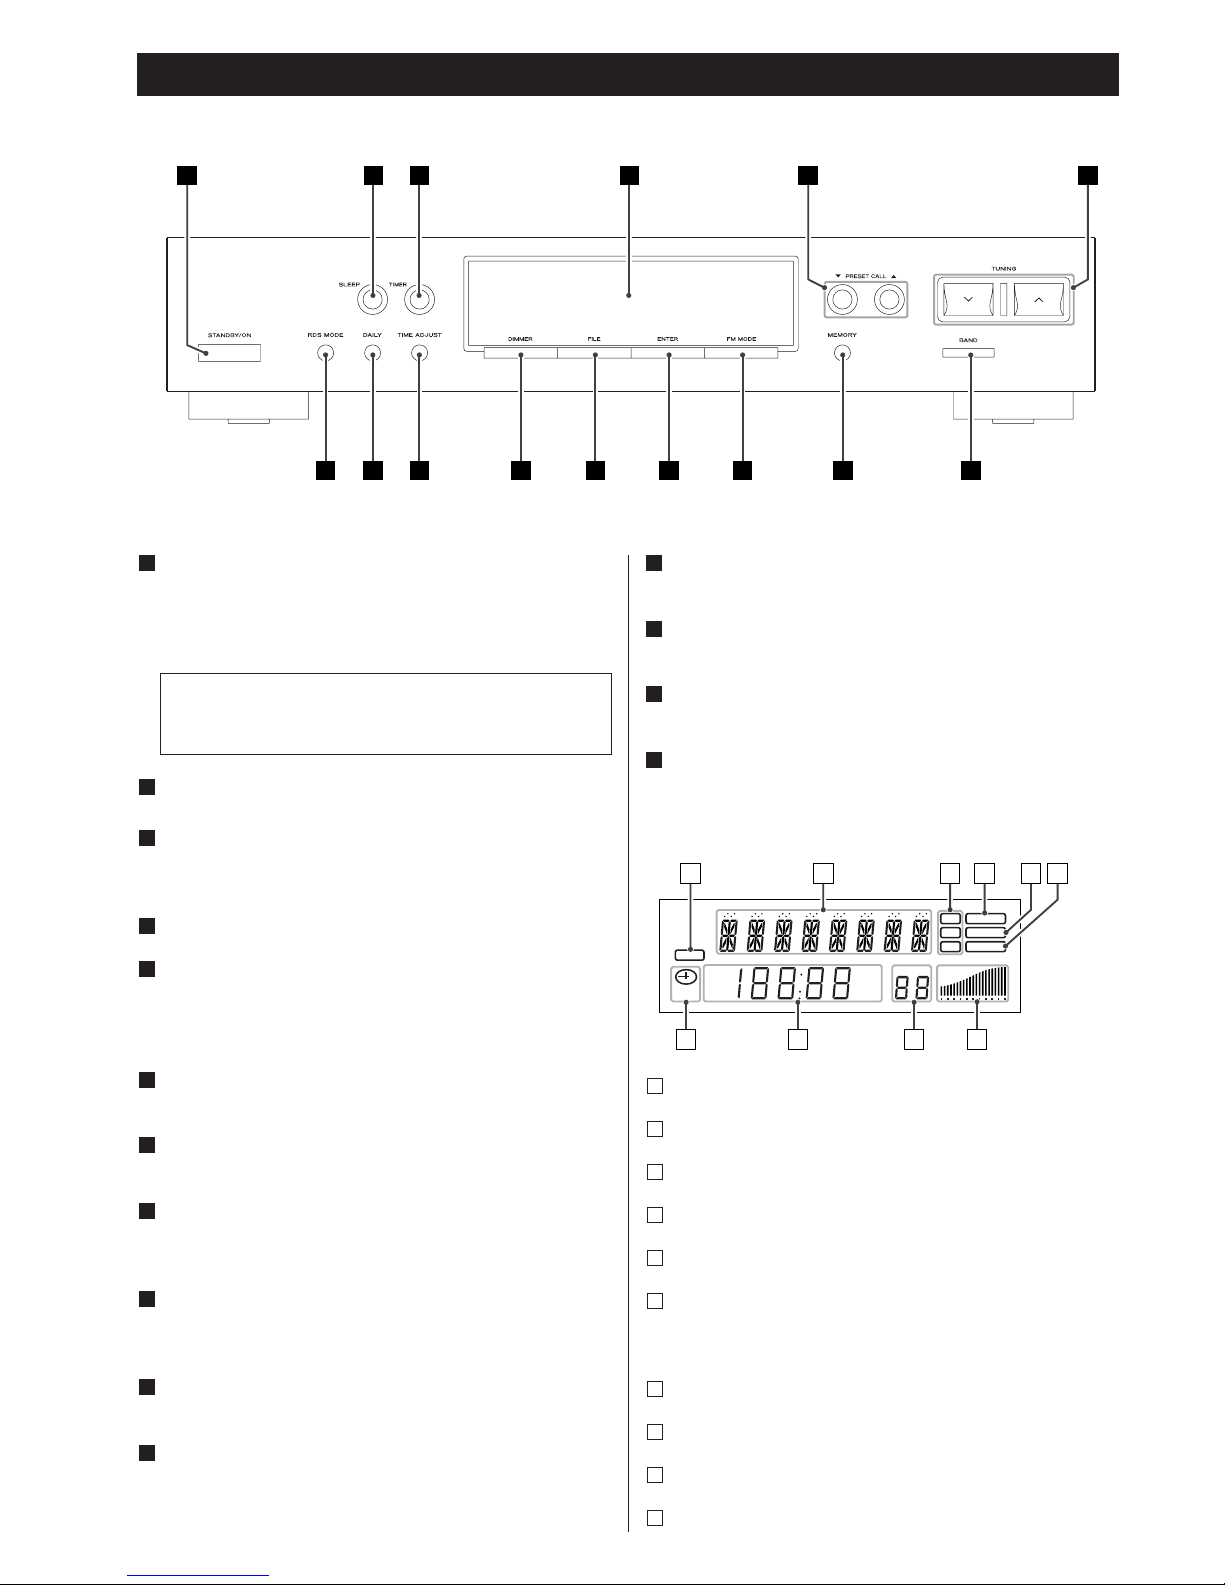
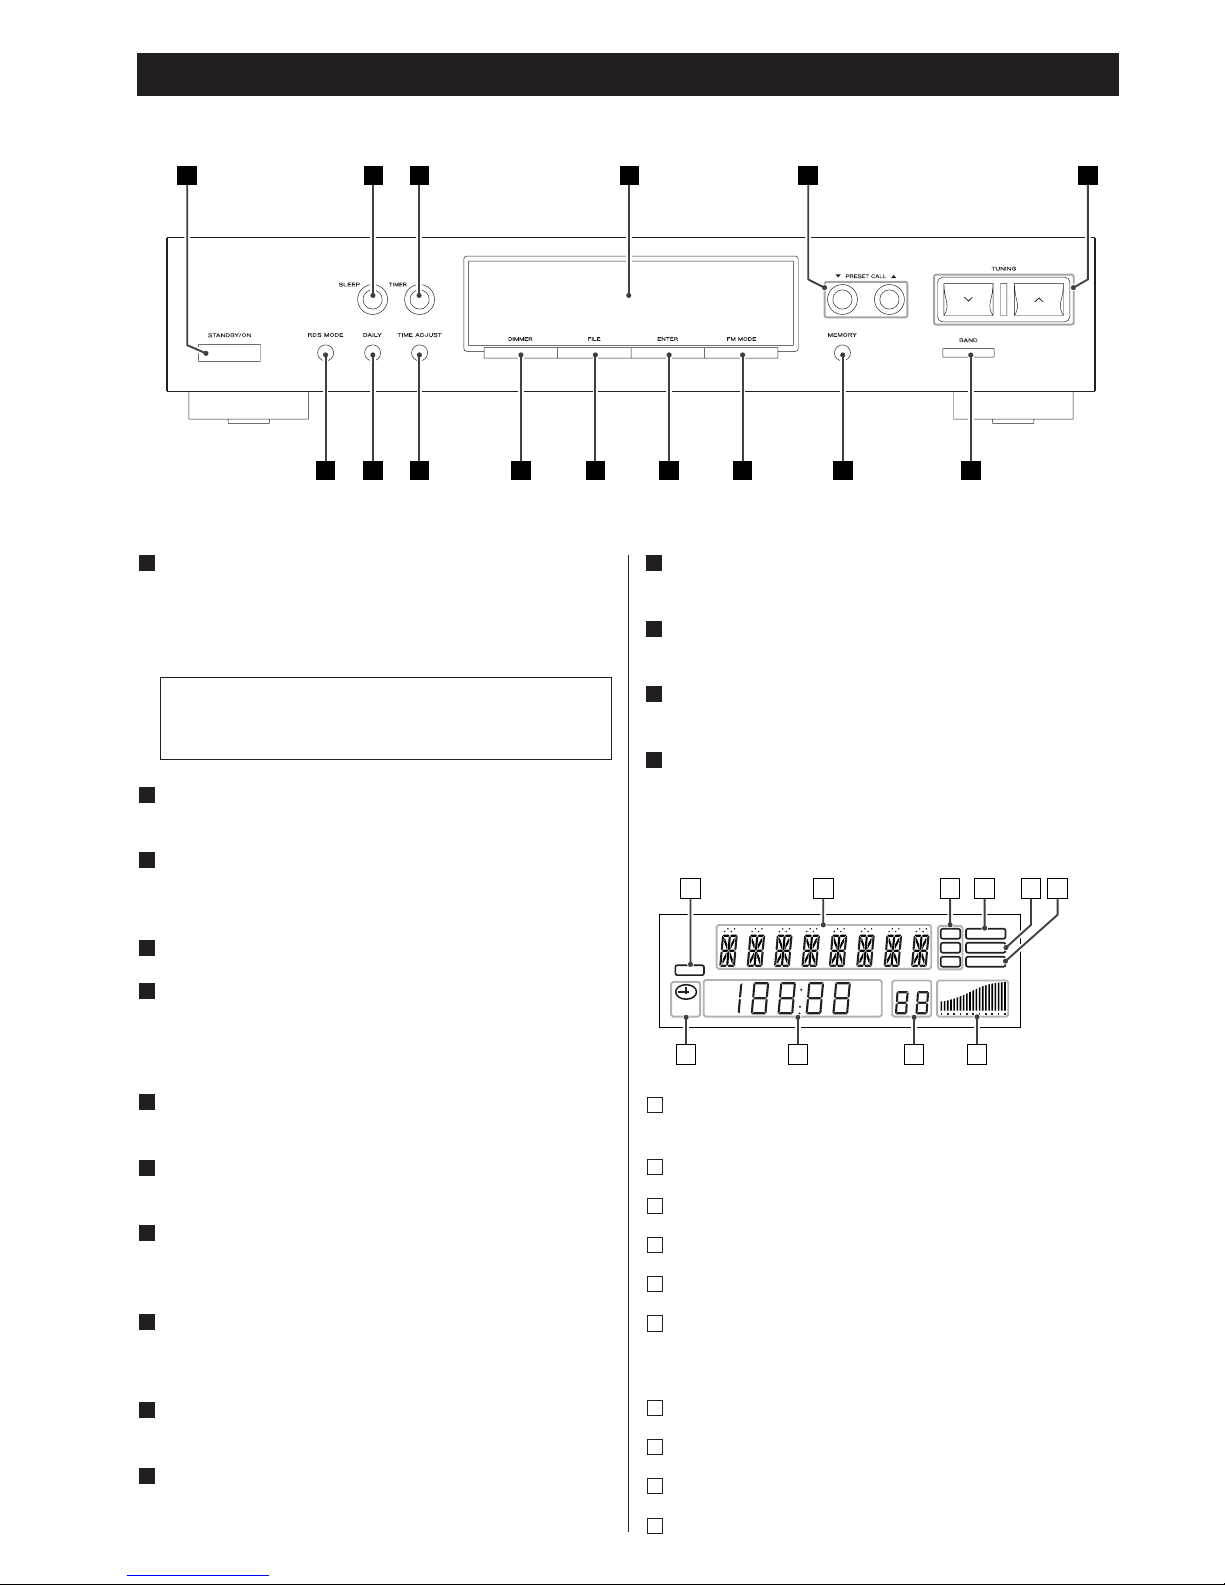
STANDBY/ON
Press this button to turn the unit on or standby.
SLEEP
Use this button to set sleep timer.
TIMER
Use this button to turn on or off the timer function.
Display
PRESET CALL
Use these buttons to select a channel preset.
When PTY search is on, use these buttons to select a
programme type.
TUNING
Use these buttons to tune in a station.
BAND
Use this button to select FM or AM.
MEMORY
Use this button to store stations in memory presets.
FM MODE
In FM tuner mode, use this button to select stereo or
monaural.
ENTER
Use this button to enter your selection.
FILE
Use this button to assign names to the preset stations.
DIMMER
Use this button to dim the display.
L
K
J
I
H
G
F
E
D
C
B
A
A B C D E F
GHO N
M
L K J I
TIME ADJUST
Use this button to adjust clock.
DAILY
Use this button to set timer.
RDS MODE
Use this button for RDS function.
Display
O
N
M
The equipment draws nominal non-operating power from the
AC outlet with its STANDBY/ON switch in the STANDBY
position.
Lights when the sleep timer function is active.
Displays RDS informations, timer status, etc.
Lights when RDS function is active.
Lights when a station is tuned.
Lights when an FM stereo broadcast is tuned.
Blinks when the MEMORY button is pressed.
While this indicator is blinking, select a channel preset to
store the station.
Displays the signal strength of the tuned station.
Displays preset number.
Displays the digital clock or frequency.
Lighs when the timer function is active.
j
i
h
g
f
e
d
c
b
a
SLEEP
RDS TUNED
RT STEREO
PTY MEMORY
TIMER
CH.
SIGNAL
FM
A
M
MHz
K
Hz
a b dc e f
g
h
j
i
Page 7
7
ENGLISH
Tuning
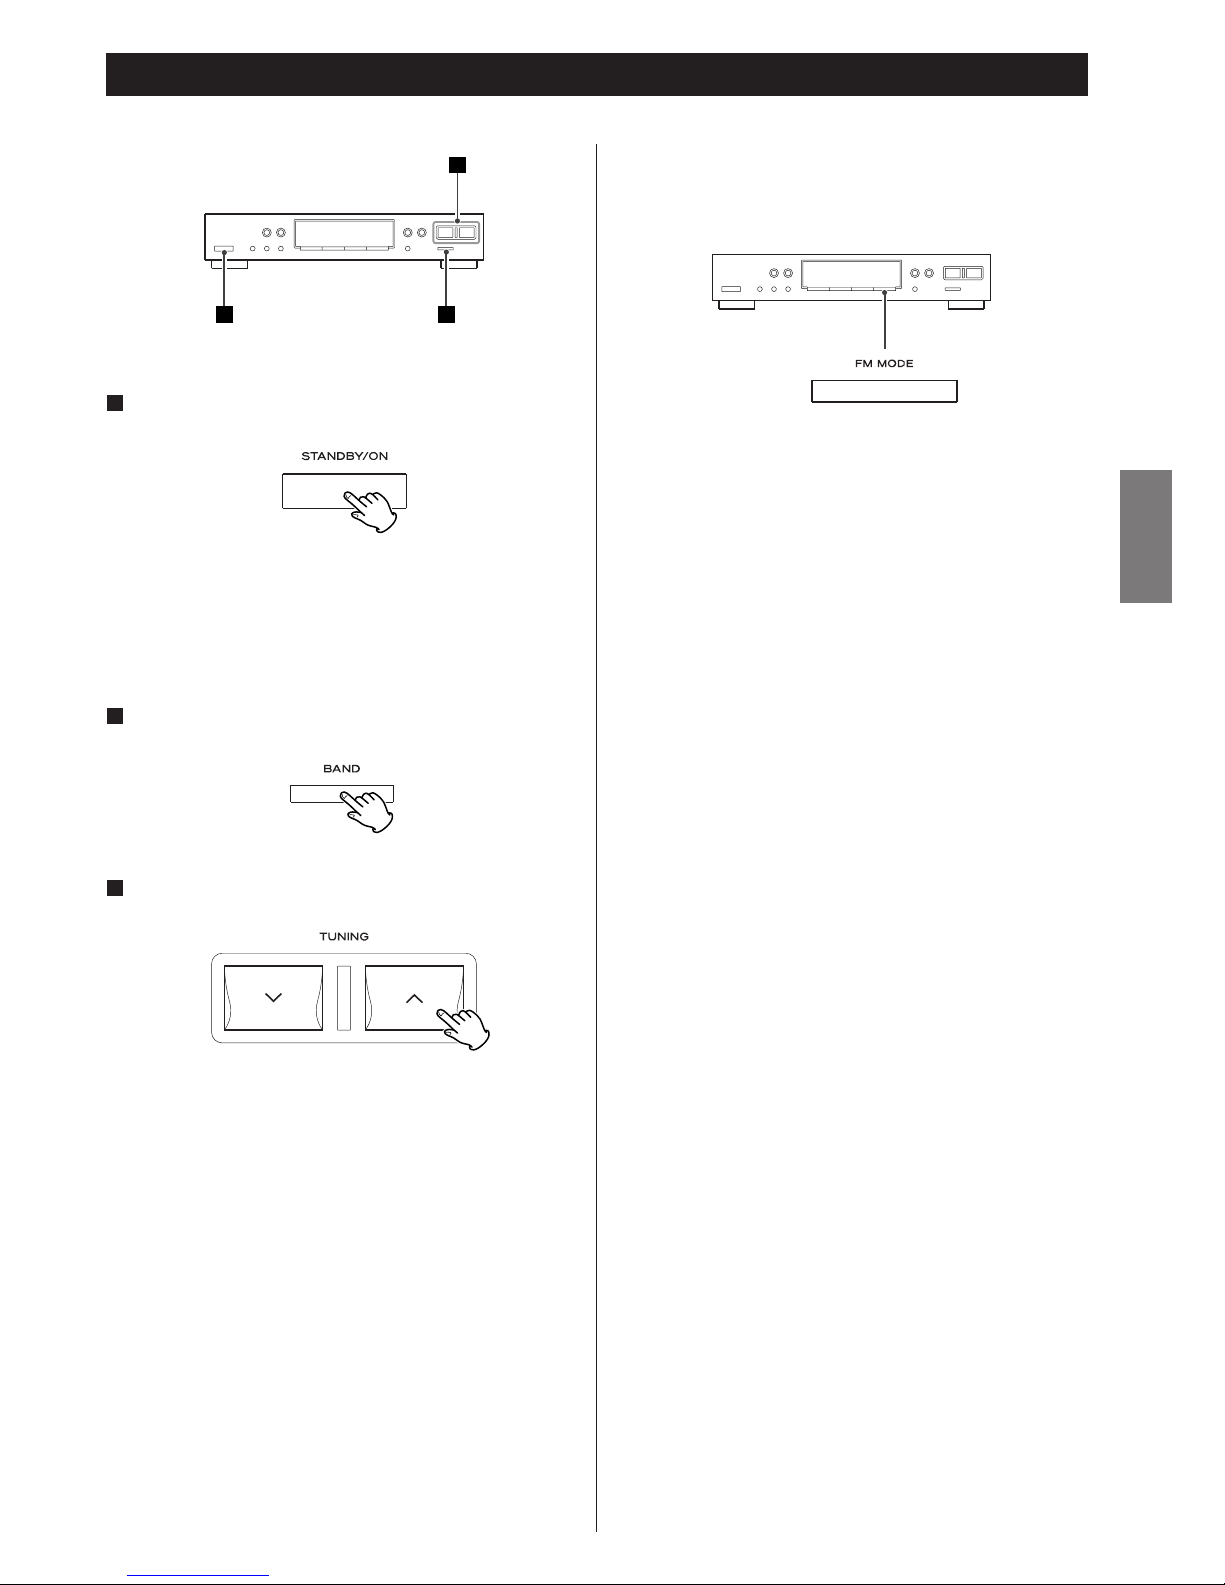
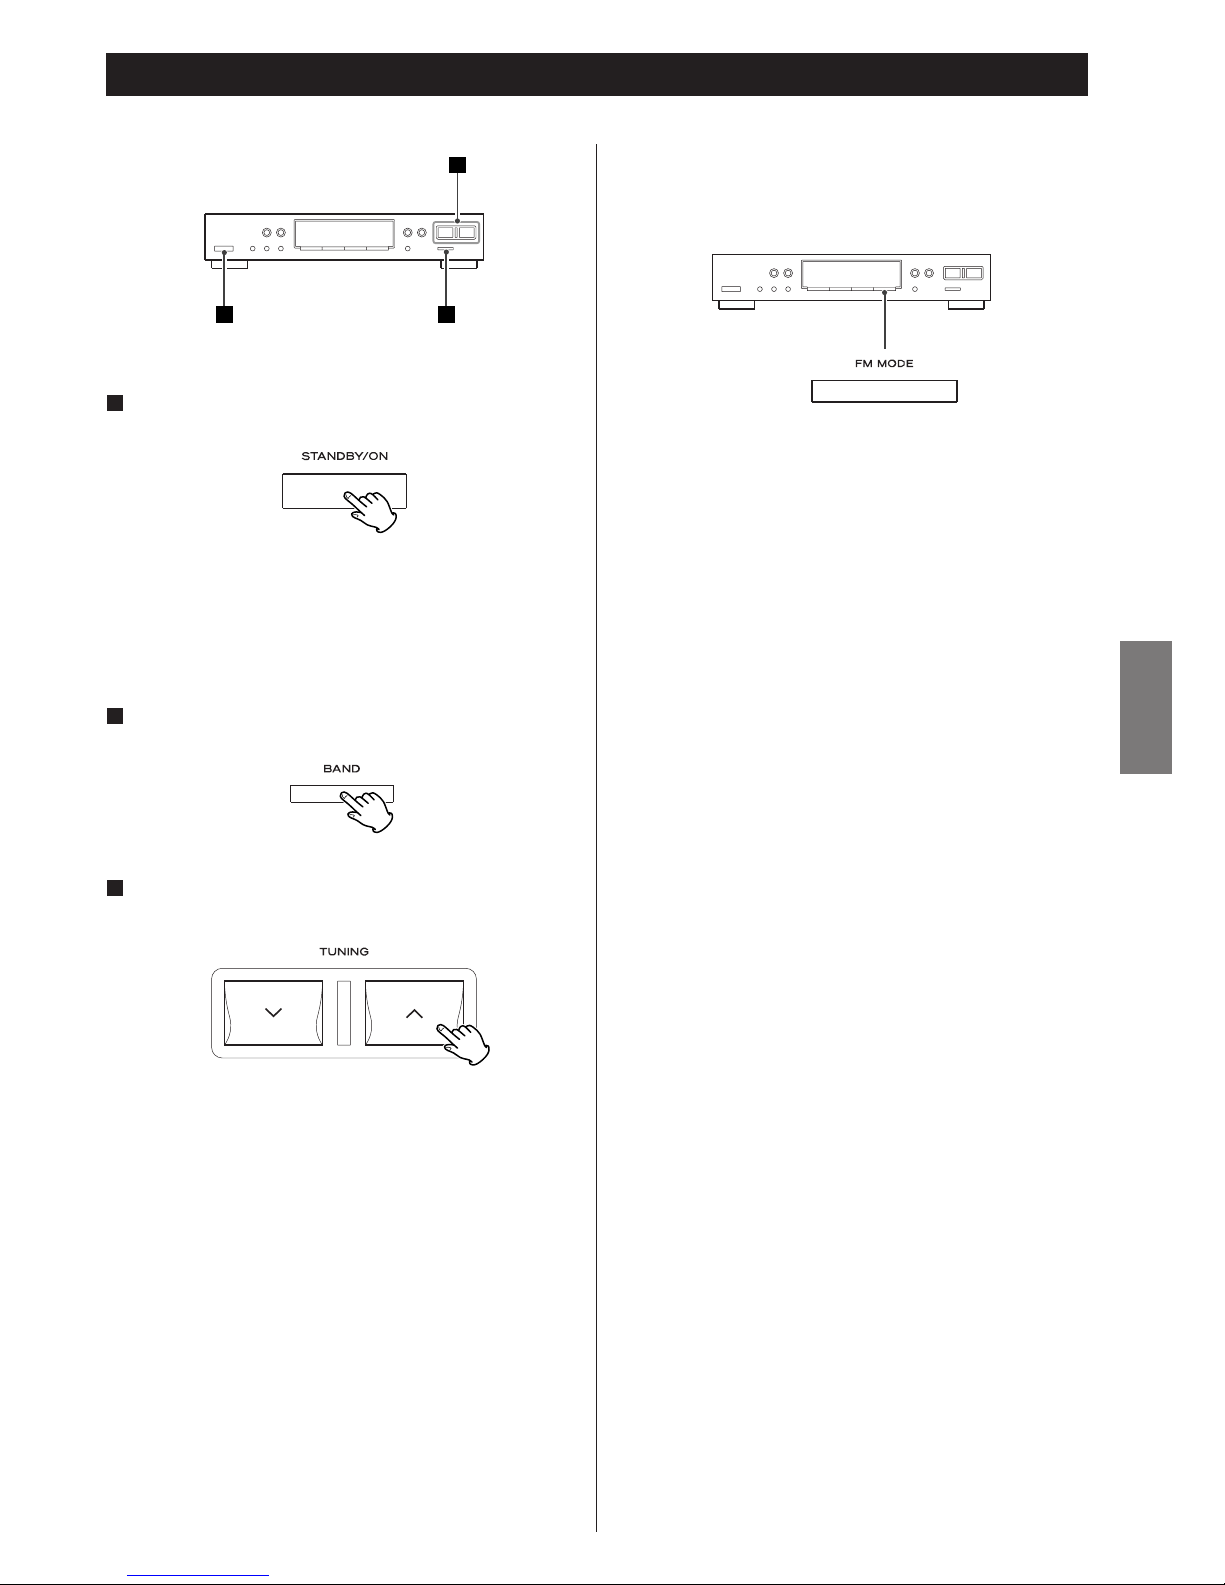
Press the STANDBY/ON button to turn the unit on.
1
1 2
3
< If the T-R610 is connected to the A-R610 with a remote
control cord, you can switch ON/standby both the A-R610
and the T-R610 by pressing the STANDBY/ON button of the
A-R610.
Select AM or FM by pressing the BAND button.
2
Select the station you want to listen to (auto selection).
3
Selecting stations which cannot be tuned automatically
(manual selection)
When the TUNING button (‡ or °) is pressed momentarily,
the frequency changes by a fixed step.
Press the TUNING button (
‡ or °) repeatedly until the
station you want to listen to is found.
Hold down the TUNING button (
‡ or °) until the frequency
display begins to change. When a station is tuned in, the
tuning process will stop automatically.
< Press the TUNING button (‡ or ° ) to stop the auto
selection.
Stereo:
FM stereo broadcasts are received in stereo and the
“STEREO” indicator lights on the display.
Mono:
To compensate for weak FM stereo reception, select this
mode. Reception will now be forced monaural, reducing
unwanted noise.
FM MODE Button
Pressing this button alternates between Stereo mode and
Mono mode.
Page 8
8
Preset Tuning
To store more stations, repeat steps through .
< If you store a new station to a channel, the station previously
stored in the channel will be overwritten.
< You cannot delete preset stations.
41
TUNINGPRESET CALL
BANDMEMORY
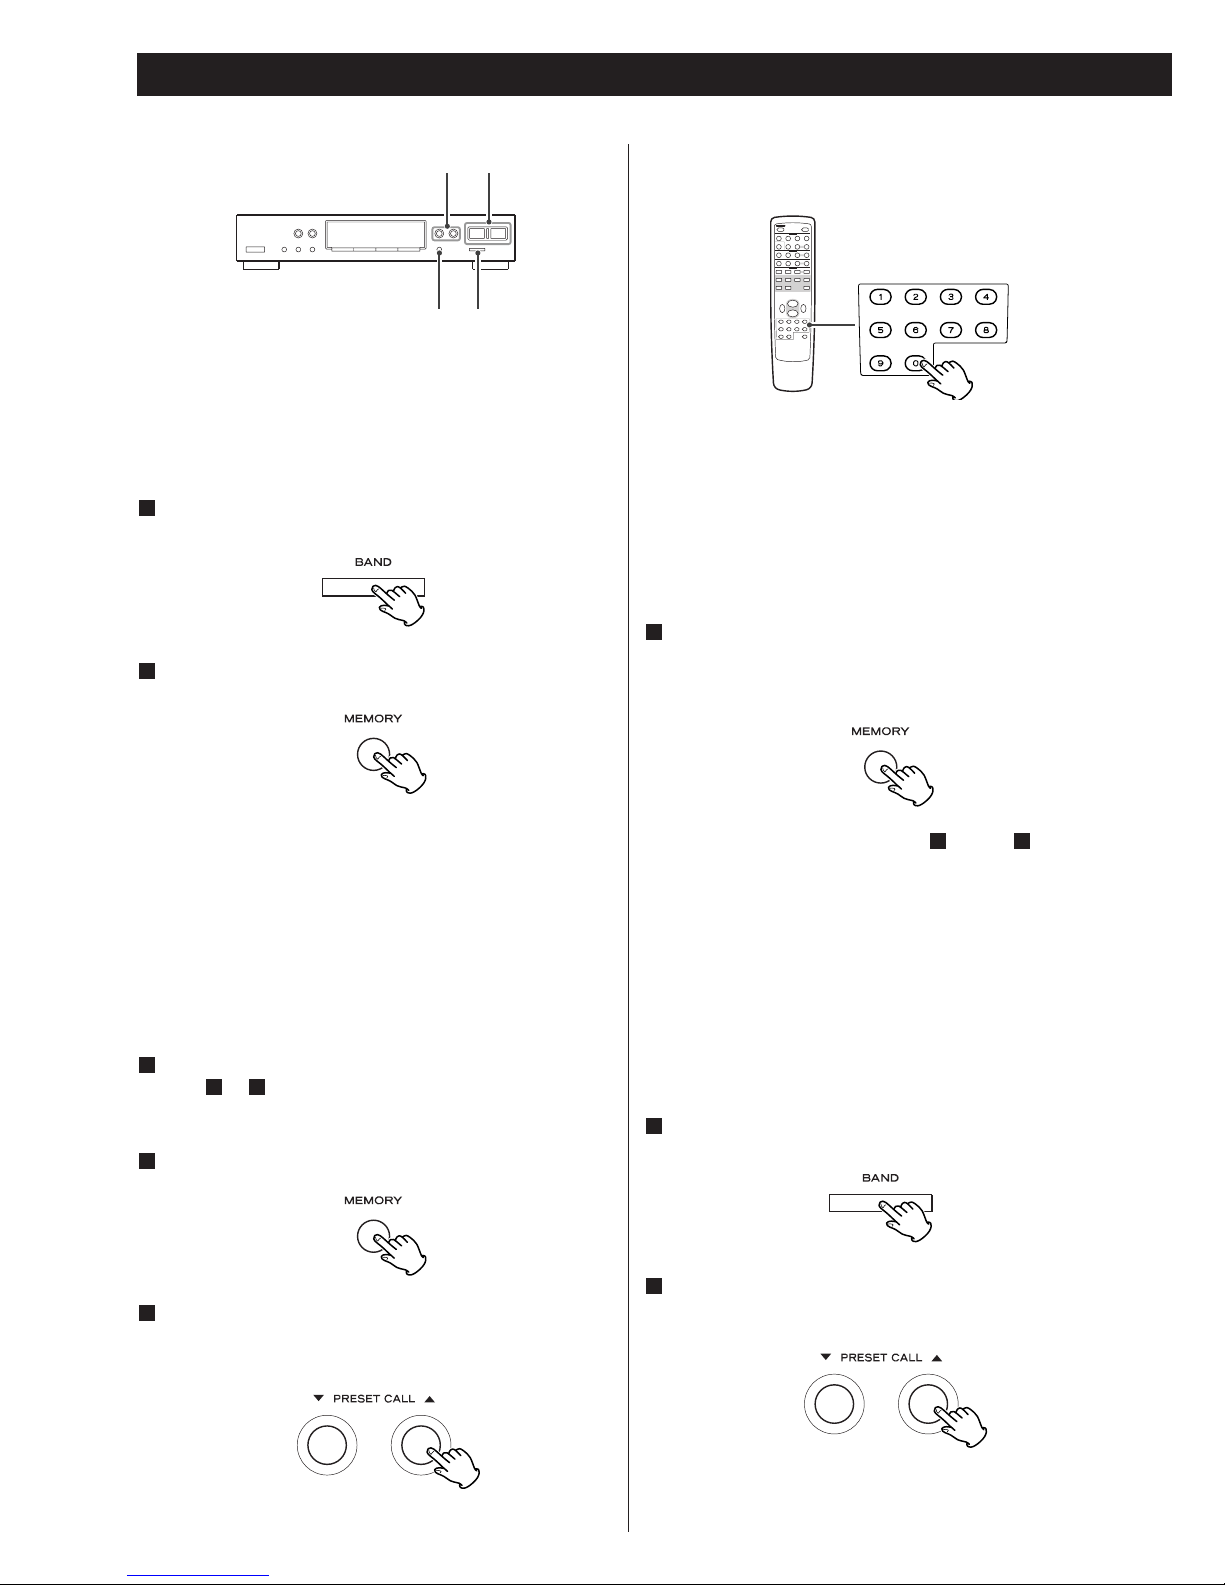
You can store 60 stations (30 FM and 30 AM) in memory
presets.
Automatic Memory Presetting
Select AM or FM by pressing the BAND button.
1
Press the MEMORY button for 1.5 seconds.
2
Up to 30 of the best received stations in your area will be
stored automatically.
< In FM automatic memory presetting, the unit will scan
frequencies twice, and the better received stations will be
stored.
Manual Memory Presetting
Tune in a station you want to listen to (by following
steps to on page 7).
Press the MEMORY button briefly.
2
31
1
While the “MEMORY” indicator is blinking, select a
channel preset to store the station using the PRESET
CALL buttons (
b/5).
3
You can also use the numeric buttons of the remote control
unit provided with the A-R610.
For instance, to select preset number 25, first press the
TUNER button, and then press “2” followed by “5”.
To select numbers less than 10, press “0” followed by an
integer 1 through 9. As an example, to select number 5, press
“0” and “5”. (Optionally, you may press just the number “5”
and then wait a few seconds.)
Press the MEMORY button.
Or leave the unit idle for 8 seconds. The station is stored in
memory, and the “MEMORY” indicator disappears from the
display.
4
Preset stations can also be selected by the numeric buttons of
the remote control unit.
How to select preset stations
Select AM or FM by pressing the BAND button.
1
Press the PRESET CALL button (b or 5) repeatedly until
the desired preset station is found.
2
Page 9
9
ENGLISH
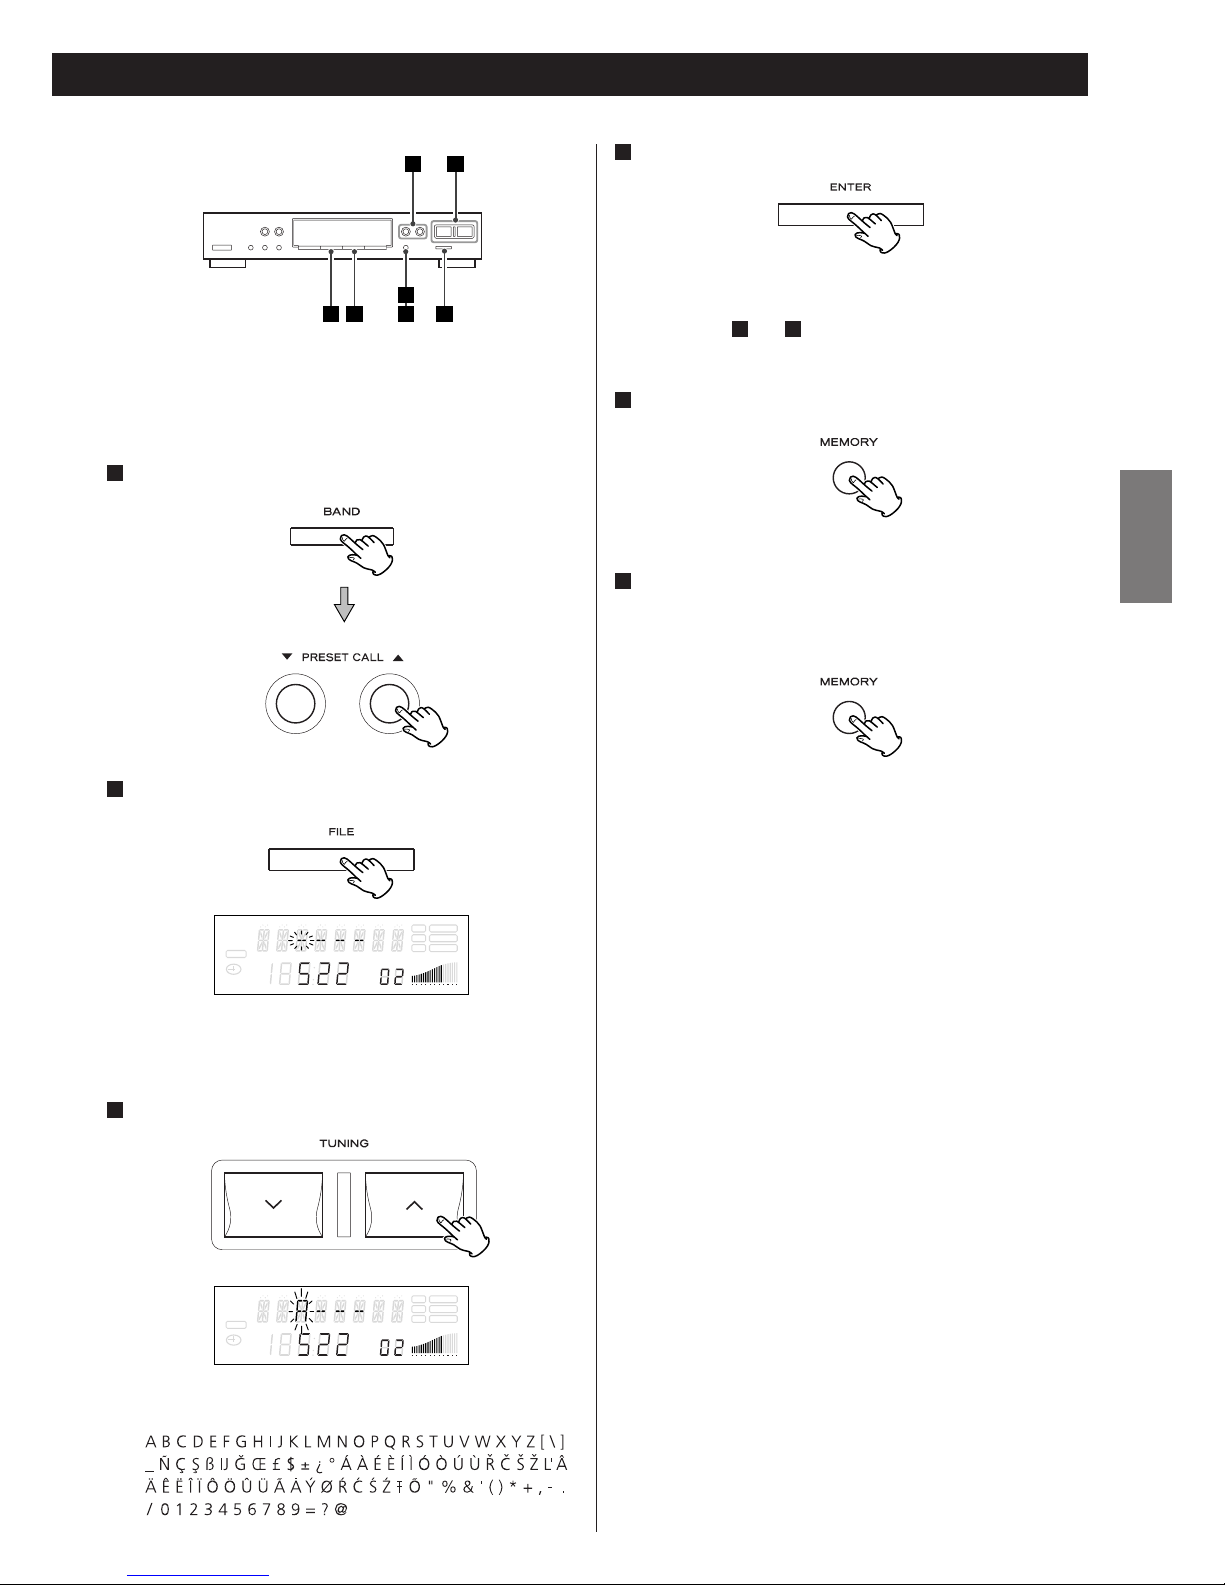
While the “MEMORY” indicator is blinking, press the
MEMORY button again.
Or leave the unit idle for 8 seconds.
The assigned name is kept in memory.
6
Select a preset channel.
1
“
----
” appears, and the first “-” blinks on the display.
Select a character using the TUNING buttons (‡/°).
3
Available characters:
The next “-” blinks.
Up to 4 characters can be used per station.
Repeat steps and to input characters.
Press the MEMORY button.
5
43
Assign the Names to the Preset Stations
You can assign names to the channel preset.
2 4 651
31
Press the ENTER button.
4
Press the FILE button.
2
SLEEP
RDS TUNED
RT STEREO
PTY MEMORY
TIMER
CH.
SIGNAL
FM
A
M
MHz
K
Hz
SLEEP
RDS TUNED
RT STEREO
PTY MEMORY
TIMER
CH.
SIGNAL
FM
A
M
MHz
K
Hz
(space)
Page 10
10
RDS
The Radio Data System(RDS) is a broadcasting service which
allows stations to send additional information along with the
regular radio programme signal.
RDS works on the FM waveband in Europe only.
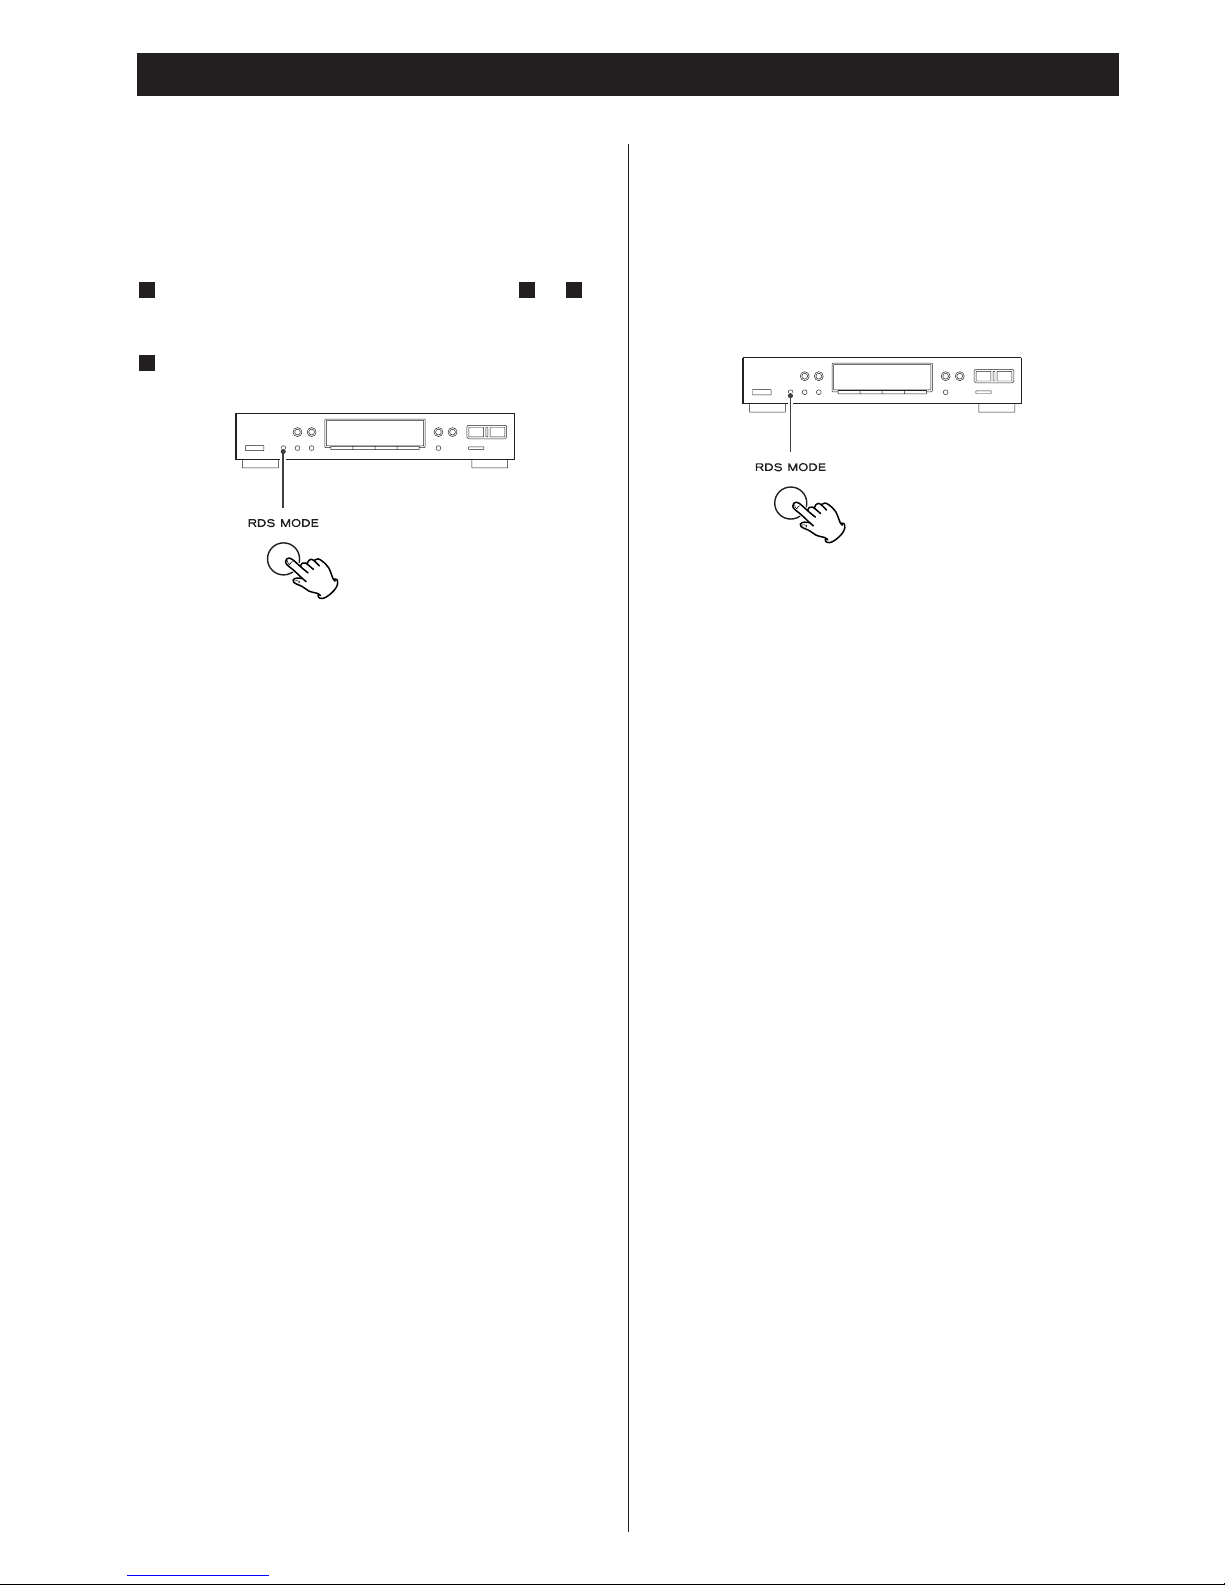
Tune in an FM station (by following steps to on
page 7).
Press the RDS MODE button.
Each time the RDS MODE button is pressed briefly, the RDS
mode is changed as follows:
PS (Programme Service name)
When you select PS, “PS” will blink for about 4 seconds and
then PS or a station’s name will be displayed. If there is no
PS data, the frequency will be displayed.
PTY (Programme Type)
When you select PTY, “PTY” will blink for about 4 seconds
and then the programme type will be displayed.
RT (Radio Text)
When you select RT, “RT” will blink for about 4 seconds and
then the news of stations composed of up to 64 symbols
will be displayed.
TA (Traffic Announcement)
When you select TA, “TA” will blink for 4 seconds and then
the unit searches for a traffic announcement.
< If the station stops broadcasting traffic announcement, the
tuner will find other stations repeatedly.
If there is no PTY/RT data, RDS mode will be switched
to PS mode automatically.
When the A-R610 and T-R610 is connected by a remote
control cord:
After selecting TA, you can select any other source by turning
the INPUT SELECTOR of the A-R610.
If a station broadcasting traffic announcement is found, the
INPUT SELECTOR of the A-R610 will be automatically
switched to “TUNER”. If the station stops broadcasting traffic
announcement, the INPUT SELECTOR will automatically return
to the previously selected source.
2
311
CT (Clock Time)
displays the information about times provided from the
station.
When you turn on the CT mode, “CT” will blink for about 4
seconds and then the clock time will be displayed.
To turn on or off the CT mode, press and hold the RDS
MODE button for more than 10 seconds.
< The clock setting will be automatically adjusted according to
the CT data.
If you tune in an RDS station broadcasting incorrect CT data,
the clock might be wrongly adjusted, and that may eventually
affect the timer operation.
Page 11
11
ENGLISH
NEWS : brief announcements, events, public opinion,
reports, actual situations.
AFFAIRS : a kind of suggestion including practical
announcements other than news, documents,
discussion, analysis and so on.
INFO : daily information or reference such as weather
forecast, consumer guide, medical assistance and
so on.
SPORT : sports related programs.
EDUCATE:educational and cultural information.
DRAMA : all kinds of radio concert and serial drama.
CULTURE : all aspects of national or local culture including
religious events, philosophy, social science,
language, theatre, and so on.
SCIENCE : programs on natural science and technology
VARIED : popular programs such as quiz, entertainment,
private interview, comedy, satire and so on.
POP M : program on commercial, practical and popular
songs, and sale volume of discs, etc.
ROCK M : practical modern music generally composed and
played by young musicians.
MORM : popular music usually lasting for less than 5
minutes.
LIGHT M : classical music, instrumental music, chorus, and
light music favored by non-professionals.
CLASSICS
: orchestra including great operas, symphony,
chamber music and so on.
OTHER M : other music styles(Rhythm & Blues, Reggae, etc.)
WEATHER : weather reports, forecast.
FINANCE : financial reports, commerce, trading.
CHILDREN : children‘s programme.
SOCIAL-A : social affairs.
RELIGION : religious programme.
PHONE-IN : programme in which the public expresses its view
by phone.
TRAVEL : travel reports.
HOBBIES : programmes concerning recreational activities.
JAZZ : jazz music.
COUNTRY : country music.
NATION-M : national music.
OLDIES : music from the so-called golden age of popular
music.
FOLK-M : folk music.
DOCUMENT : documentaries.
TEST : alarm test.
ALARM : a program notifying an emergency or a natural
disaster.
Searching will start.
< When the programme that you have selected is found,
searching will stop and the programme type will be displayed.
< The search gets back to and stops at where it started if no
programme of the selected type is found.
< If you want to stop searching, press the RDS MODE button.
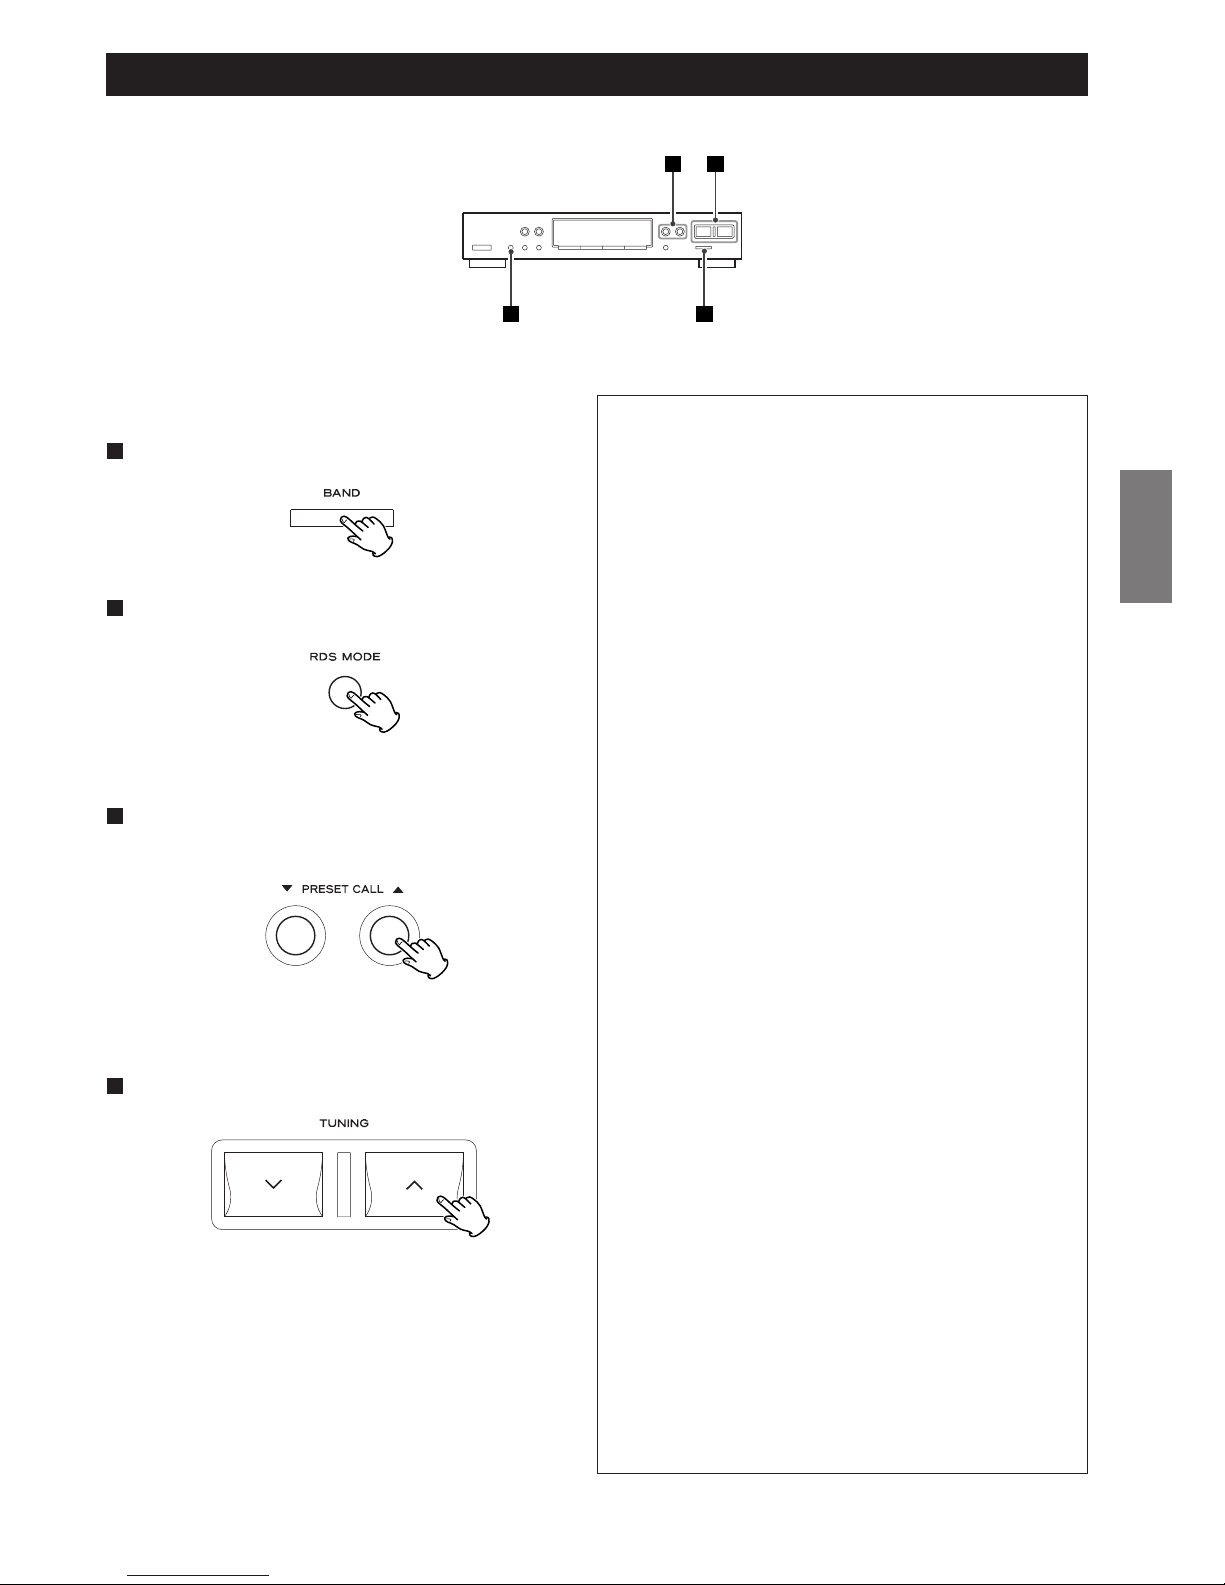
RDS (PTY Search)
A station can be searched by this function.
Select FM by pressing the BAND button.
1
Press the RDS MODE button for more than 1.5 seconds.
2
“SEARCH” blinks on the display.
Select the desired PTY programme using the PRESET
CALL button (
b or 5).
3
You can select from 31 kinds.
2 1
43
Press the TUNING button (‡ or °).
4
Page 12
12
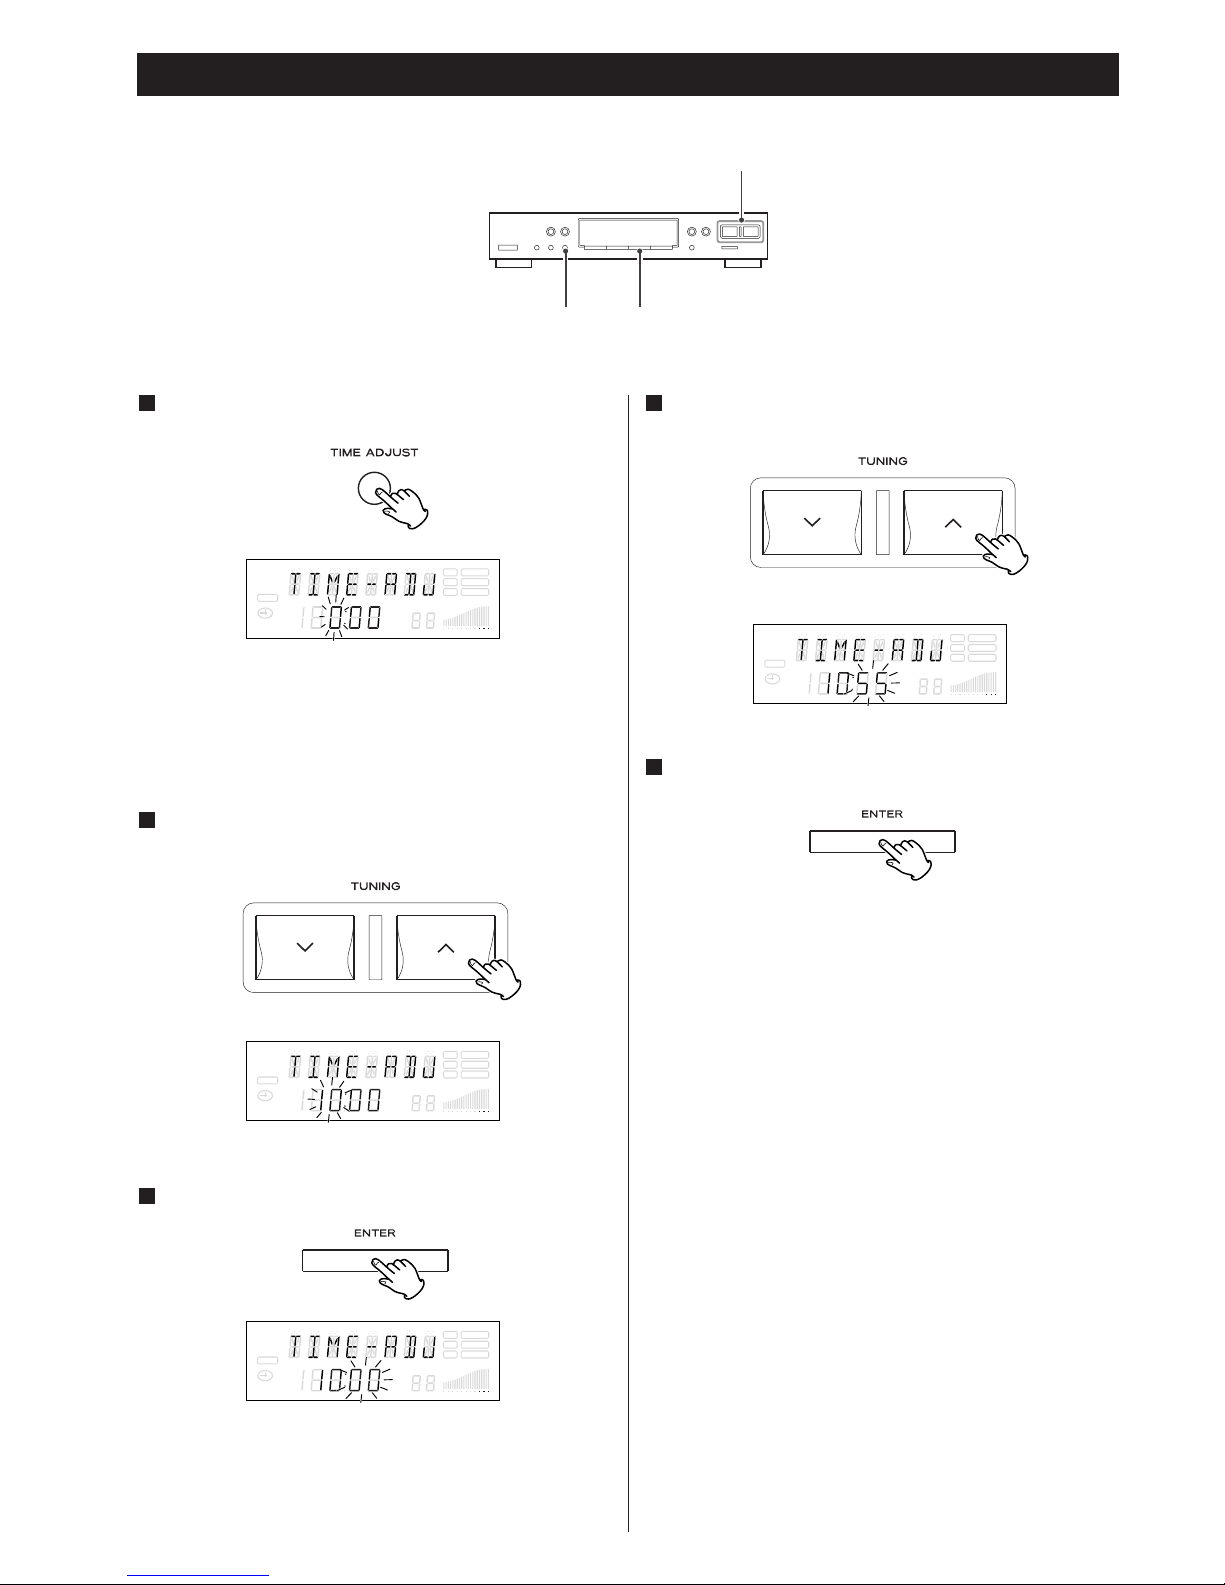
The “hour” value blinks.
< You can adjust the clock even when the unit is in the standby
mode.
< The unit uses the 24 hour “military” clock.
Within 8 seconds, set the current hour by using the
TUNING buttons (
‡/°).
2
Within 8 seconds, press the ENTER button.
3
Set the current minute by using the TUNING buttons
(
‡/°).
4
The clock starts from 00 second.
Setting the Clock
Press the TIME ADJUST button.
1
SLEEP
RDS TUNED
RT STEREO
PTY MEMORY
TIMER
CH.
SIGNAL
FM
A
M
MHz
K
Hz
SLEEP
RDS TUNED
RT STEREO
PTY MEMORY
TIMER
CH.
SIGNAL
FM
A
M
MHz
K
Hz
SLEEP
RDS TUNED
RT STEREO
PTY MEMORY
TIMER
CH.
SIGNAL
FM
A
M
MHz
K
Hz
SLEEP
RDS TUNED
RT STEREO
PTY MEMORY
TIMER
CH.
SIGNAL
FM
A
M
MHz
K
Hz
The “minute” value blinks.
Press the ENTER button.
5
TUNING
ENTERTIME ADJUST
Page 13
13
ENGLISH
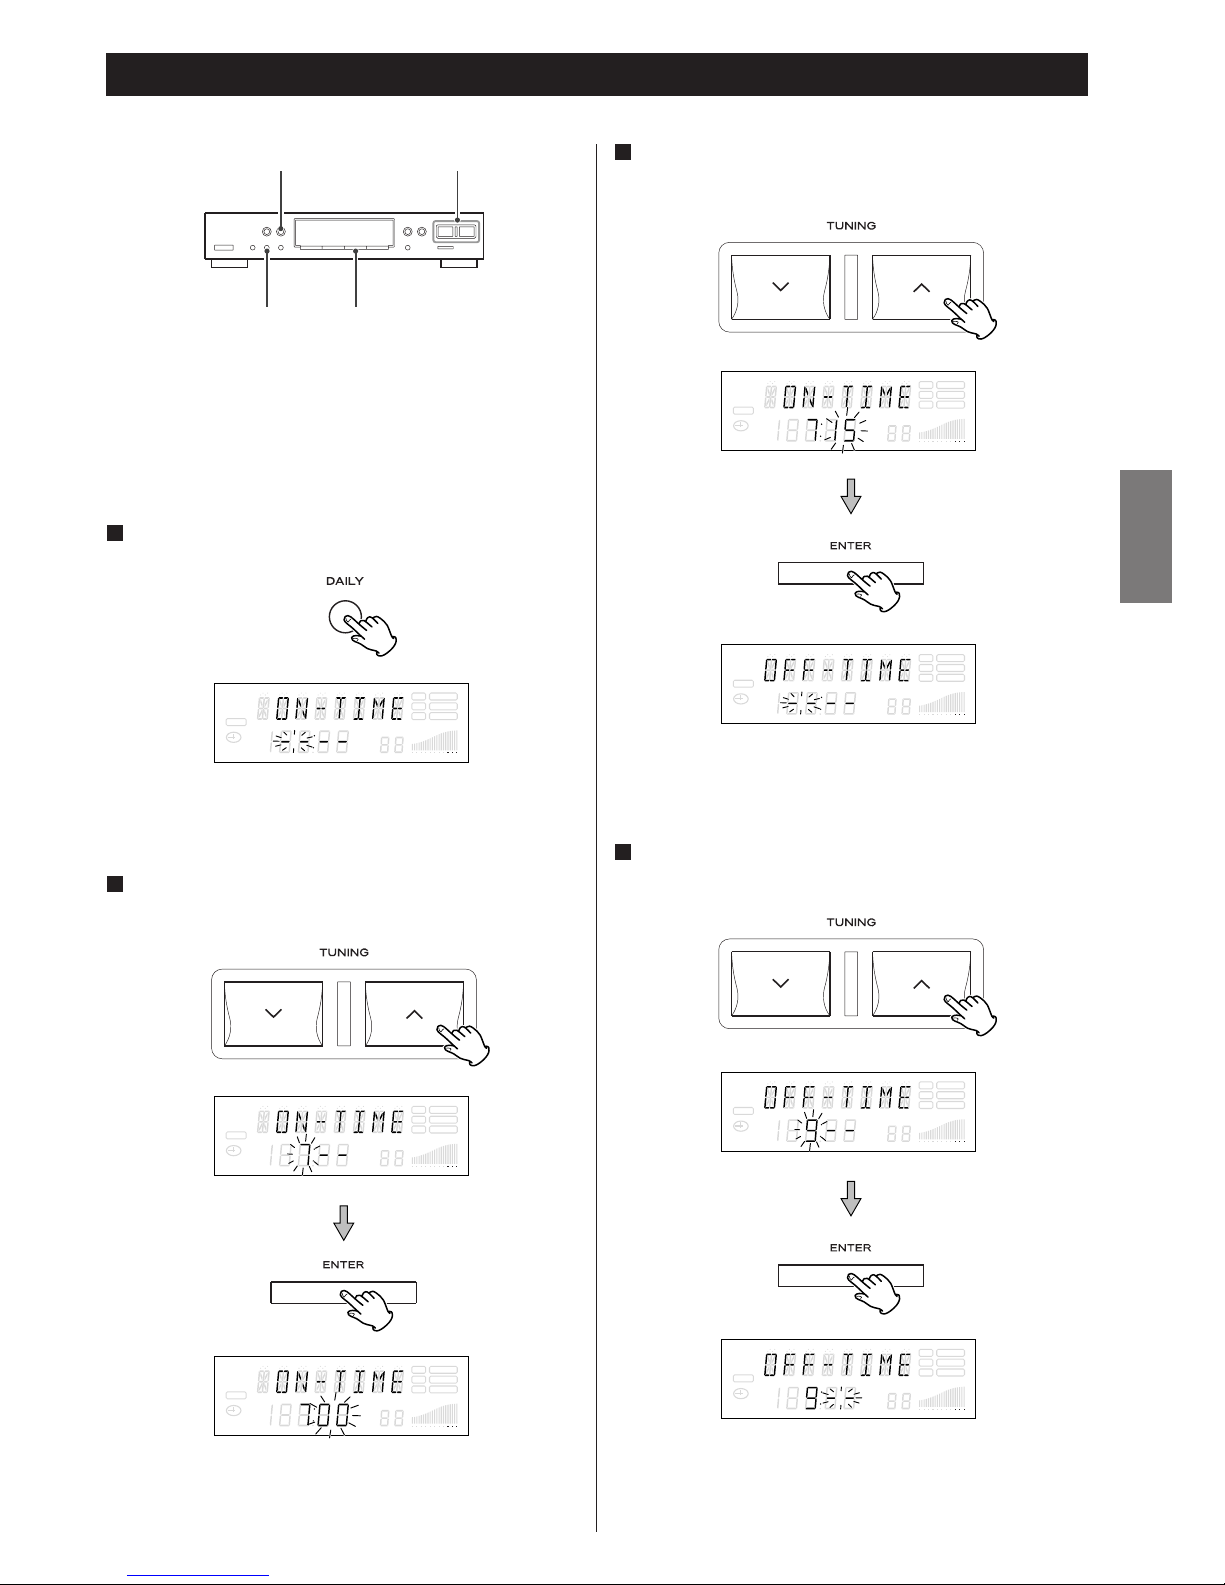
Adjust the clock before setting the timer.
Press the DAILY button.
1
The “minutes” value blinks.
“OFF TIME” appears on the display, and the “hour” value
blinks.
“ON TIME” appears on the display, and the “hour” value
blinks.
Setting the Daily Timer 1
Set the stop time hours by using the TUNING buttons
(
‡/°), and press the ENTER button.
4
TUNINGTIMER
ENTERDAILY
When the A-R610 and T-R610 are connected via remote control
cord, both units will be swtiched on and off at the same time
every day, controlled by this feature.
SLEEP
RDS TUNED
RT STEREO
PTY MEMORY
TIMER
CH.
SIGNAL
FM
A
M
MHz
K
Hz
SLEEP
RDS TUNED
RT STEREO
PTY MEMORY
TIMER
CH.
SIGNAL
FM
A
M
MHz
K
Hz
SLEEP
RDS TUNED
RT STEREO
PTY MEMORY
TIMER
CH.
SIGNAL
FM
A
M
MHz
K
Hz
Set the start time minutes by using the TUNING buttons
(
‡/°), and press the ENTER button.
3
SLEEP
RDS TUNED
RT STEREO
PTY MEMORY
TIMER
CH.
SIGNAL
FM
A
M
MHz
K
Hz
SLEEP
RDS TUNED
RT STEREO
PTY MEMORY
TIMER
CH.
SIGNAL
FM
A
M
MHz
K
Hz
SLEEP
RDS TUNED
RT STEREO
PTY MEMORY
TIMER
CH.
SIGNAL
FM
A
M
MHz
K
Hz
SLEEP
RDS TUNED
RT STEREO
PTY MEMORY
TIMER
CH.
SIGNAL
FM
A
M
MHz
K
Hz
Set the start time hours by using the TUNING buttons
(
‡/°), and press the ENTER button.
2
Page 14
14
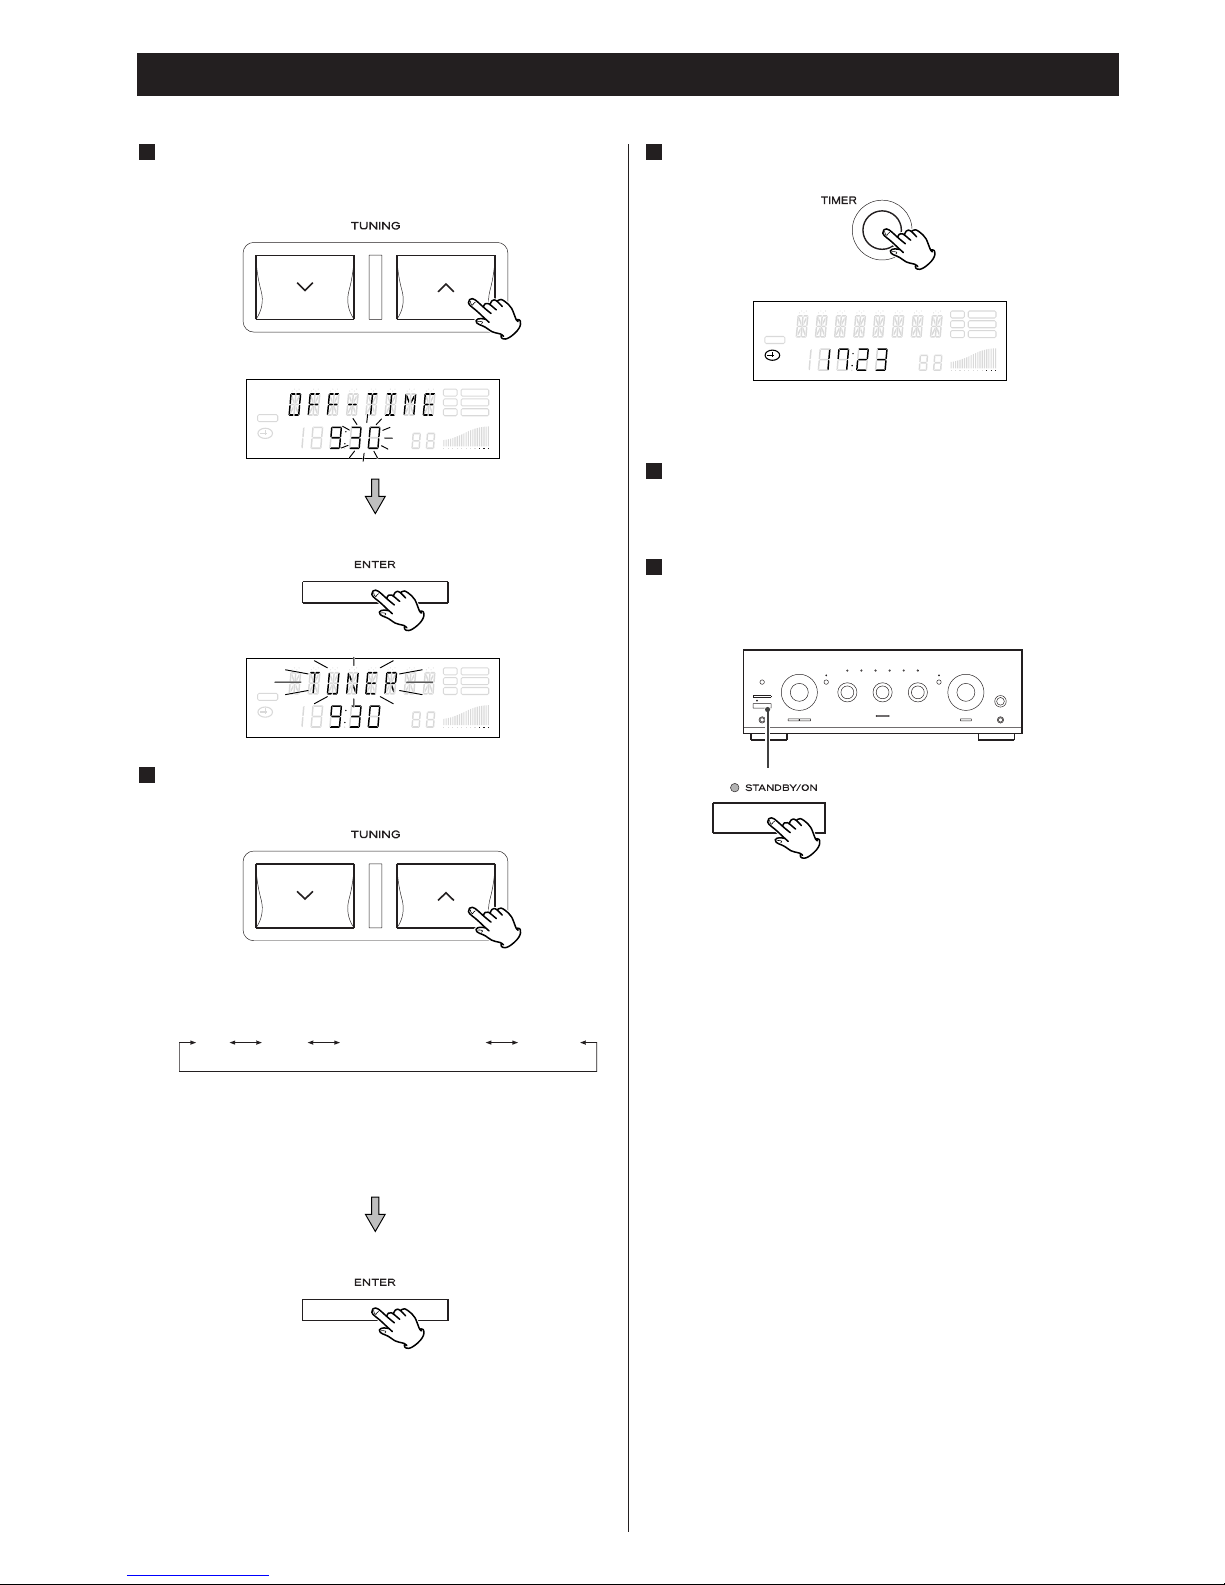
Set the stop time minutes by using the TUNING buttons
(
‡/°), and press the ENTER button.
5
Select a source by using the TUNING buttons (‡/°),
and press the ENTER button.
6
Each time the TUNING buttons (‡ or °) are pressed, the
source is changed as follows:
< Do not select “CD”, “TAPE” or ”TUNER-R”, if your CD player
or cassette tape deck connected to the A-R610 does not
support timer controlled playback/recording.
CD TAPE TUNER R(ecording) TUNER
All the units connected via remote control cords will turn on
and off at the specified time every day.
When you don’t use timer, press the TIMER button to
turn it off. (The timer indicator disappears from the
display.)
Press the TIMER button again to turn it on.
Prepare for timer operation.
Adjust the volume of the amplifier, tune in a station, etc.
8
Now the timer setting is stored in memory.
Press the TIMER button.
7
The timer indicator lights on the display.
SLEEP
RDS TUNED
RT STEREO
PTY MEMORY
TIMER
CH.
SIGNAL
FM
A
M
MHz
K
Hz
Setting the Daily Timer 2
SLEEP
RDS TUNED
RT STEREO
PTY MEMORY
TIMER
CH.
SIGNAL
FM
A
M
MHz
K
Hz
SLEEP
RDS TUNED
RT STEREO
PTY MEMORY
TIMER
CH.
SIGNAL
FM
A
M
MHz
K
Hz
Press the STANDBY/ON button of the A-R610 to turn all
the units standby.
9
Page 15
15
ENGLISH
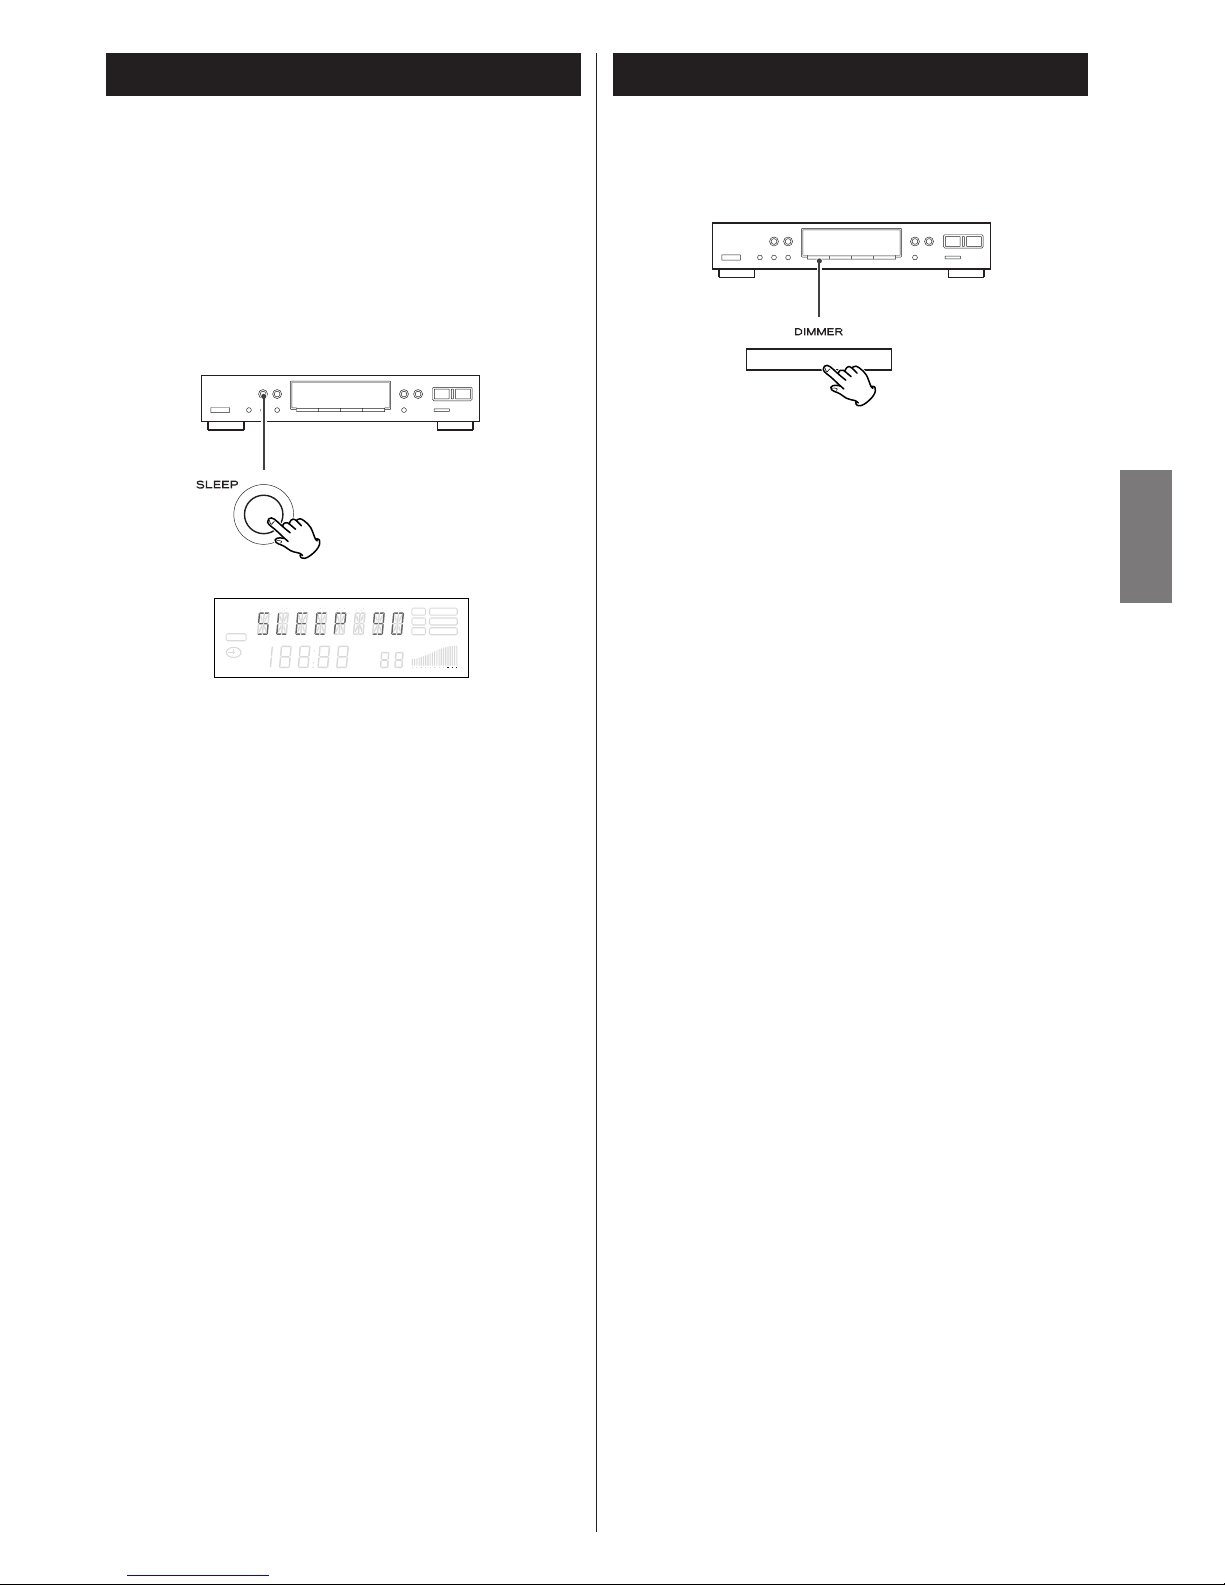
Sleep Timer
The power can be switched off after a specified amount of time.
Press the SLEEP button repeatedly until desired time appears on
the display.
When the A-R610 and T-R610 are connected via remote control
cord, both units will be switched off, controlled by this feature.
SLEEP 90 (80, 70, 60, 50, 40, 30, 20, 10)
The power will be switched off 90 (80, 70, 60, 50, 40, 30,
20 or 10) minutes later.
Normal display
The sleep timer is off.
< If you want to check the remaining time, press the SLEEP
button once. The remaining time will be displayed for 5
seconds, after which the normal display returns.
SLEEP
RDS TUNED
RT STEREO
PTY MEMORY
TIMER
CH.
SIGNAL
FM
A
M
MHz
K
Hz
< This function will be cancelled when the unit is turned off.
Dimmer
The display can be dimmed by pressing the DIMMER button.
Press the button again to cancel the dimmer function.
Page 16

16
Troubleshooting
If you experience any problems with the unit, please take a
moment to look through this chart and see if you can solve the
problem yourself before you call your dealer or a TEAC service
center.
No power
e Check the connection to the AC power supply. Check and
make sure the AC source is not a switched outlet and that,
if it is, the switch is turned on. Make sure there is power to
the AC outlet by plugging another item such as a lamp or
fan.
No sound
e Check the connection to the amplifier.
e Check the operation of the amplifier.
Cannot listen to any station, or signal is too weak.
e Make sure the antenna is properly connected.
e Tune in the station properly.
e Install the antenna again after relocating it to a better
reception position.
e An external antenna may be required.
Sound is noisy.
e Place the antenna as far away from a TV or a CD player as
possible.
e If a TV or a CD player is near the unit, turn it off.
Though the broadcast is stereo, it sounds monaural.
e Press the FM MODE button.
If normal operation cannot be recovered, unplug the
power cord from the outlet and plug it again.
Maintenance
If the surface of the unit gets dirty, wipe with a soft cloth or
use diluted neutral cleaning liquid. Be sure to remove any
fluid completely. Do not use thinner, benzine or alcohol as
they may damage the surface of the unit.
Specificatioins
FM Tuner Section
Tuning Range. . . . . . . . 87.5 MHz - 108.0 MHz (50 kHz steps)
Usable Sensitivity (IHF). . . . . . . . . . . . . . . . . . . . Mono: 10 dBf
50 dB Quieting Sensitivity . . . . . . . . . . . . . . . . . Mono: 17 dBf
Stereo: 33 dBf
Alternate Channel Selectivity (98 MHz ± 400 kHz). . . . . 65 dB
Image Response Ratio . . . . . . . . . . . . . . . . . . . . . . . . . . 70 dB
Frequency Responce. . . . . . . . 20 Hz - 15 kHz (+0.5 dB/–3 dB)
Capture Ratio. . . . . . . . . . . . . . . . . . . . . . . . 2 dB (at 98 MHz)
Distortion (at 65 dBf, 98 MHz). . . . . . . . . . . . . . Mono: 0.1 %
Stereo: 0.3 %
Signal-to-Noise Ratio (at 65 dBf, 1 kHz) . . . . . . . Mono: 70 dB
Stereo: 65 dB
AM Suppression Ratio . . . . . . . . . . . . . . . . . . . . . . . . . . 55 dB
Stereo Separation (1 kHz) . . . . . . . . . . . . . . . . . . . . . . . 40 dB
Output . . . . . . . . . . . . . . . . . . . . . . . . . . . 800 mV/2.2 k ohm
AM Tuner Section
Tuning Range . . . . . . . . . . 522 kHz - 1,620 kHz (9 kHz steps)
Usable Sensitivity. . . . . . . 55 dB/m (562 µV/m, Loop Antenna)
Selectivity . . . . . . . . . . . . . . . . . . . . . . . . . . . . 55dB (at 9 kHz)
Image Responce Ratio . . . . . . . . . . . . . . . . . . . . . . . . . . 35 dB
IF Responce Ratio . . . . . . . . . . . . . . . . . . . . . . . . . . . . . 60 dB
Distortion . . . . . . . . . . . . . . . . . . . . . . . . . . 1 % (at 85 dB/m)
Signal-to-Noise Ratio . . . . . . . . . . . . . . . . . 40 dB (at 85 dB/m)
Output . . . . . . . . . . . . . . . . . . . . . . . . . . . 220 mV/2.2 k ohm
General
Power Requirement . . . . . . . . . . . . . . . . . . . AC 230 V, 50 Hz
Power Consumption . . . . . . . . . . . . . . . . . . . . . . . . . . . . 6 W
Dimensions (W x H x D) . . . . . . . . . . . . . . 435 x 87 x 294 mm
Weight (Net). . . . . . . . . . . . . . . . . . . . . . . . . . . . . . . . . 2.9 kg
Standard Accessory. . . . . . . . . . . . . . . . . . . . . . RCA cable x 1
Remote control connection cord x 1
AM Loop Antenna x 1
FM Lead-type Antenna x 1
• Design and specifications are subject to change without
notice.
• Weight and dimensions are approximate.
• Illustrations may differ slightly from production models.
Page 17
17
FRANÇAIS
Sommaire
Nous vous remercions pour l’achat d’un appareil TEAC. Lire
ce manuel avec attention pour obtenir les meilleures
performances possibles de cet appareil.
Avant utilisation . . . . . . . . . . . . . . . . . . . . . . . . . . . . . . . . . . . 17
Raccordement. . . . . . . . . . . . . . . . . . . . . . . . . . . . . . . . . . . . . 18
Nom de chaque commande . . . . . . . . . . . . . . . . . . . . . . . . . . 20
Réglage des stations . . . . . . . . . . . . . . . . . . . . . . . . . . . . . . . . 21
Préréglage des stations . . . . . . . . . . . . . . . . . . . . . . . . . . . . . . 22
RDS . . . . . . . . . . . . . . . . . . . . . . . . . . . . . . . . . . . . . . . . . . . . 24
RDS (Recherche PTY). . . . . . . . . . . . . . . . . . . . . . . . . . . . . . . . 25
Paramétrage de l’horloge . . . . . . . . . . . . . . . . . . . . . . . . . . . . 26
Paramétrage du Daily Timer/la minuterie quotidienne . . . . . . . 27
Extinction différée. . . . . . . . . . . . . . . . . . . . . . . . . . . . . . . . . . 29
Réduction de la luminosité de l’écran . . . . . . . . . . . . . . . . . . . 29
Dépannage. . . . . . . . . . . . . . . . . . . . . . . . . . . . . . . . . . . . . . . 30
Spécifications . . . . . . . . . . . . . . . . . . . . . . . . . . . . . . . . . . . . . 30
Mise au rebut de votre ancien appareil
1. Quand ce symbole de poubelle sur roues
barrée d’une croix est joint à un produit,
cela signifie que ce produit est couvert
par la Directive Européenne 2002/96/EC.
2. Tous les produits électriques et
électroniques doivent être jetés
séparément des ordures ménagères via des collecteurs
désignés agréés par le gouvernement ou les autorités
locales.
3. La gestion correcte de l’élimination de votre ancien appareil
aide à prévenir les conséquences potentiellement négatives
pour l’environnement et la santé humaine.
4. Pour des informations plus détaillées sur la mise au rebut
de votre ancien appareil, veuillez contacter votre mairie, le
service de traitement des ordures ou le magasin dans lequel
vous avez acheté le produit.
Sauvegarde mémoire
Si l’alimentation secteur est interrompue pendant 14 jours ou
plus longtemps, tous les réglages conservés en mémoire (tels que
stations préréglées et minuterie) seront effacés.
Il faudra plus de 3 jours après la mise sous tension pour charger
suffisamment le circuit de sauvegarde de la mémoire.
Si vous voulez manuellement initialiser les réglages, appuyer sur
l’interrupteur RESET.
Tous les réglages seront réinitialisés à leur valeur par défaut.
Avant utilisation
Lire les consignes suivantes avant toute utilisation
< L'appareil pouvant éventuellement dégager de la chaleur lors
de son utilisation, veillez à toujours laisser un espace suffisant
au-dessus de celui-ci afin de garantir une ventilation correcte.
< La tension d'alimentation utilisée doit être identique à la
tension indiquée à l'arrière de l'appareil. En cas de doute,
n'hésitez pas à consulter un électricien.
< Choisir soigneusement l'endroit où vous installerez l'appareil.
Eviter de le placer dans un endroit exposé aux rayons directs
du soleil ou à proximité d'une source de chaleur. Eviter
également les endroits exposés aux vibrations et à la
poussière, à la chaleur, au froid et à l'humidité.
< Ne pas placer l'appareil sur l'amplificateur ou le récepteur.
< Ne pas ouvrir l'appareil, ceci risquant d'endommager les
circuits ou de provoquer un court-circuit. Au cas où un objet
tomberait par inadvertance dans l'appareil, contacter votre
revendeur.
< Pour débrancher le cordon de la prise murale, retirer
directement la prise, ne jamais tirer sur le cordon.
< Ne pas essayer de nettoyer l'appareil avec un détergent
chimique, ceci risquant d'abîmer le revêtement extérieur.
Utiliser toujours un chiffon propre et sec.
< Conserver ce manuel dans un endroit sûr afin de pouvoir vous
y référer ultérieurement.
ATTENTION
< N’exposez pas l’appareil à des éclaboussures ou à des
gouttes d’eau.
< Ne posez pas d’objet contenant du liquide, tel qu’un vase,
sur l’appareil.
< N’installez pas cet appareil dans un espace confiné,
dépourvu de ventilation, comme par exemple une
bibliothèque ou similaire.
< L’appareil tire un courant nominal de veille de la prise
secteur, avec son interrupteur STANDBY/ON en position
STANDBY.
< L’appareil doit être placé suffisamment près de la prise
secteur pour que vous puissiez à tout moment saisir la fiche
du cordon d’alimentation.
< Un appareil de classe ! doit être connecté à une prise
secteur via une fiche avec mise à la terre.
Page 18
18
T-R610
C
D
E
F
A
B
Antenne FM intérieure
Connectez l’antenne FM filaire à la prise FM 75Ω, déployez
la et accordez vous sur votre station préférée (voir page 21).
Positionnez l’antenne à un endroit approprié tel qu’un
encadrement de fenêtre ou mur afin d’obtenir la meilleure
réception puis fixez la en utilisant des punaises, épingles ou
tout autre fixation approprié.
A
Antenne FM extérieure
Dans les zones où les signaux FM sont faibles, il sera
nécessaire de faire appel à une antenne extérieure. En
général une antenne 3 éléments suffira ; si vous résidez à un
endroit où les signaux FM sont particulièrement faibles il
peut s’avérer nécessaire d’employer une antenne à 5
éléments ou plus.
< Débranchez l’antenne intérieure lorsque vous utilisez une
antenne extérieure.
PRÉCAUTION:
< Coupez l’alimentation de tous les appareils avant d’effectuer
les raccordements.
< Lisez les instructions qui accompagnent chaque appareil que
vous avez l’intention d’utiliser en association avec cet
appareil-ci.
< Veillez à ce que chaque fiche soit soigneusement insérée.
Pour éviter les ronflements et les bruits parasites, évitez
d’attacher les câbles d’interconnexion parcourus par les
signaux avec le cordon d’alimentation secteur ou les câbles
de liaison aux enceintes.
Raccordement
Amplificateur (A-R610)
Page 19
19
FRANÇAIS
Prise LINE OUT
Un signal analogique 2 canaux est disponible sur cette prise.
Raccordez-la à la prise d’entrée TUNER de l’amplificateur
avec un câble RCA.
Veillez à brancher:
la fiche blanche
q la prise blanche (L: voie gauche)
la fiche rouge
q la prise rouge (R: voie droite)
Prise REMOTE CONTROL
Si vous avez un TEAC A-R610, vous disposez d’un système
de contrôle cohérent:
• Lorsque vous vous réglez sur une station, le sélecteur
d’entrée (INPUT SELECTOR) de l’A-R610 se met
automatiquement en “TUNER”.
• On peut contrôler cet appareil au moyen de la
télécommande “UR” RC-592B (fournie avec l'A-R610).
Raccordez la prise REMOTE CONTROL (A ou B) à la prise
REMOTE CONTROL de l’A-R610 avec le cordon de
raccordement de télécommande fourni.
Note:
La télécommande n’est pas fournie avec cet appareil.
Réinitialisation [RESET]
Dans les cas suivants, les boutons de fonction peuvent ne
pas marcher correctement.
• Lorsque le système est endommagé par un choc électrique.
• Lorsque le secteur est irrégulier ou est perturbé.
Dans ces cas, appuyez sur légèrement l’interrupteur RESET
une fois ou deux avec un crayon ou stylo bille.
Tous les réglages conservés en mémoire (tels que les stations
préréglées et les données de minuterie) seront effacés.
Cordon Secteur
Après avoir terminé toutes les autres connexions, branchez
le câble dans une prise secteur.
Assurez-vous de raccorder le câble à une prise qui délivre
une tension correcte.
Tenez la prise lorsque vous branchez ou débranchez le câble
secteur.
F
E
D
C
Note:
Même quand vous utilisez une antenne AM extérieure, ne
déconnectez pas l’antenne cadre.
Antenne AM intérieure à cadre.
L’antenne cadre AM à haute performance fournie avec
l’appareil est suffisante pour une bonne réception dans la
plupart des régions.
Pour faire tenir l’antenne droite, fixez la griffe sur la fente à
la base de l’antenne.
Connectez les extrémités de l’antenne cadre aux bornes
antenne AM.
Placez l’antenne sur une étagère ou suspendez la dans un
encadrement de fenêtre, etc. Orientez la dans la direction
qui donne la meilleure réception. Eloignez autant que
possible tous les fils tels que câbles secteur, haut-parleurs ou
d’interconnexion de l’antenne.
< Si l’antenne cadre fournie ne fournit pas une réception
satisfaisante (souvent en raison de l’éloignement de
l’émetteur, ou dans un building en béton, etc.), il pourra
être nécessaire de recourir à une antenne AM extérieure.
Utilisez une antenne du commerce haute qualité ou, si non
disponible, un fil isolé de plus de 5m de long dénudé à une
extrémité et raccordé à l’entrée comme indiqué.
L’antenne filaire doit être tendu à l’extérieur ou à l’intérieur
près d’une fenêtre. Pour une meilleure réception, raccordez
la borne GND à une terre fiable.
B
Page 20
20
Nom de chaque commande
STANDBY/ON
Appuyez sur cet interrupteur pour allumer ou mettre en veille
l’appareil.
L’afficheur de mise en veille s’illumine lorsque l’appareil est en
mode veille. Lorsque l’appareil est en fonction, il s’éteint.
SLEEP
Utilisez ce bouton pour activer l’extinction différée.
TIMER
Utilisez ce bouton pour enclencher ou non la fonction
minuterie.
Afficheur
PRESET CALL
Utilisez ces boutons pour sélectionner les stations préréglées.
Quand le mode RDS est en PTY, ces boutons servent à
rechercher un type de programme (PTY).
TUNING
Utilisez ces boutons pour se régler sur une station.
BAND
Utilisez ce bouton pour sélectionner FM ou AM.
MEMORY
Utilisez ce bouton pour mettre en mémoire les stations
préréglées.
FM MODE
En mode tuner FM, utilisez ce bouton pour choisir une
réception stéréo ou mono.
ENTER
Utilisez ce bouton pour entrer votre sélection.
FILE
Utilisez ce bouton pour nommer les stations préréglées.
K
J
I
H
G
F
E
D
C
B
A
A B C D E F
GHO N
M
L K J I
DIMMER
Utilisez ce bouton pour régler la luminosité des afficheurs.
TIME ADJUST
Utilisez ce bouton pour ajuster l’heure.
DAILY
Utilisez ce bouton pour régler la minuterie.
RDS MODE
Utilisez ce bouton pour la fonction RDS.
Afficheur
O
N
M
L
S’allume quand la minuterie d’extinction est activeée.
Affiche les informations RDS, l'état de la minuterie, etc.
S’allume lorsque la fonction RDS est active.
S’allume lorsqu’une station est syntonisée.
S’allume lorsqu’une diffusion stéréo FM est syntonisée.
Clignote à la pression sur le bouton MEMORY.
Sélectionnez un canal préréglé pour mémoriser une station
pendant que ce témoign clignote
Indique la puissance des signaux radio reçus.
Indique les canaux préréglés.
Indique l'horloge numérique ou des fréqiences radio.
S'allume quand la minuterie est en service.
j
i
h
g
f
e
d
c
b
a
SLEEP
RDS TUNED
RT STEREO
PTY MEMORY
TIMER
CH.
SIGNAL
FM
A
M
MHz
K
Hz
a b dc e f
g
h
j
i
L’appareil tire de la prise secteur une puissance faible mais
non nulle lorsque l’interrupteur STANDBY/ON est sur la
position STANDBY.
Page 21
21
FRANÇAIS
Appuyez sur STANDBY/ON pour mettre en marche
l’appareil.
1
1 2
3
< Si le T-R610 est raccordé à l’A-R610 avec un cordon de
télécommande, vous pouvez mettre en marche ou en veille à
la fois l’A-R610 et le T-R610 en appuyant sur le bouton
STANDBY/ON de l’A-R610.
Sélectionnez AM ou FM en appuyant sur le bouton
BAND.
2
Sélectionnez la station que vous désirez écouter
(sélection automatique).
3
Maintenez enfoncée le bouton TUNING (‡ ou °) jusqu’à ce
que l’affichage des fréquences change. Lorsque l’accord est
fait sur une station, le défilement des fréquences s’arrête de
lui-même.
< Appuyez sur le bouton TUNING (‡ ou °) pour arrêter la
sélection automatique.
Stéréo:
Les transmissions en FM stéréo sont reçues en stéréo et
l’afficheur “STEREO” s’illumine.
Mono:
En cas de réception FM stéréo faible, sélectionnez ce mode.
La réception sera forcée en mono, et réduira les bruits
indésirables.
Bouton FM MODE
En appuyant sur ce bouton vous passez du mode stéréo au
mode mono ou vice versa.
Réglage des stations
Sélection des stations sur lesquels l’accord automatique
n’est pas possible (sélection manuelle)
Lorsque vous n’appuyez qu’un instant sur le bouton TUNING
(
‡ ou °), la fréquence ne change que d’une valeur fixe.
Appuyez de manière répétée sur le bouton TUNING (
‡ ou
°) jusqu’à ce que vous trouviez la station que vous désirez
écouter.
Page 22

22
Préréglage des stations
Pour mémoriser d’autres stations répétez les pas à .
< Si vous mémorisez une nouvelle station sur un canal déjà
attribué, la nouvelle station prendra la place de l’ancienne.
< Vous ne pouvez pas effacer les stations préréglées.
41
TUNINGPRESET CALL
BANDMEMORY
Vous pouvez mémoriser 60 stations (30 stations FM et 30
stations AM).
Préréglage automatique des stations
Sélectionnez AM ou FM en appuyant sur le bouton
BAND.
1
Appuyez sur le bouton MEMORY pendant 1,5 secondes.
2
Jusqu’à 30 stations parmi les mieux captées dans votre région
seront mémorisées automatiquement.
< Dans le mode de recherche automatique des stations
préréglées, l’appareil balayera les fréquences deux fois, et les
stations les mieux captées seront mémorisées.
Préréglage manuel des stations
Accordez vous sur une station que vous voulez capter
(voir pas à de la page 21).
Appuyez brièvement sur le bouton MEMORY.
2
31
1
Tandis que l’afficheur “MEMORY” clignote, sélectionnez
un canal préréglé pour mémoriser la station à l’aide des
boutons PRESET CALL (
b ou 5).
3
Vous pouvez aussi utiliser les boutons numériques de la
télécommande fournie avec l’A-R610.
Par exemple pour sélectionner la station préréglée numéro
25, appuyez sur TUNER puis sur “2” et “5”.
Pour sélectionner des nombres inférieurs à 10, appuyez sur
“0” puis entrez le chiffre désiré. Par exemple, pour choisir le
canal numéro 5, appuyez sur “0” puis “5”. (En option vous
pouvez juste appuyer sur le bouton “5” et attendre quelques
secondes.)
Appuyez sur le bouton MEMORY.
Ou laissez l’appareil inactif pendant 8 secondes. La station est
mémorisée, et l’afficheur “MEMORY” disparaît de l’écran.
4
Les stations préréglées peuvent aussi être sélectionnées par
les boutons numériques de la télécommande.
Comment sélectionner les stations préréglées
Sélectionnez AM ou FM en appuyant sur le bouton
BAND.
1
Appuyez sur le bouton PRESET CALL (b ou 5) plusieurs
fois jusqu’à ce que la station désirée soit trouvée.
2
Page 23
23
FRANÇAIS
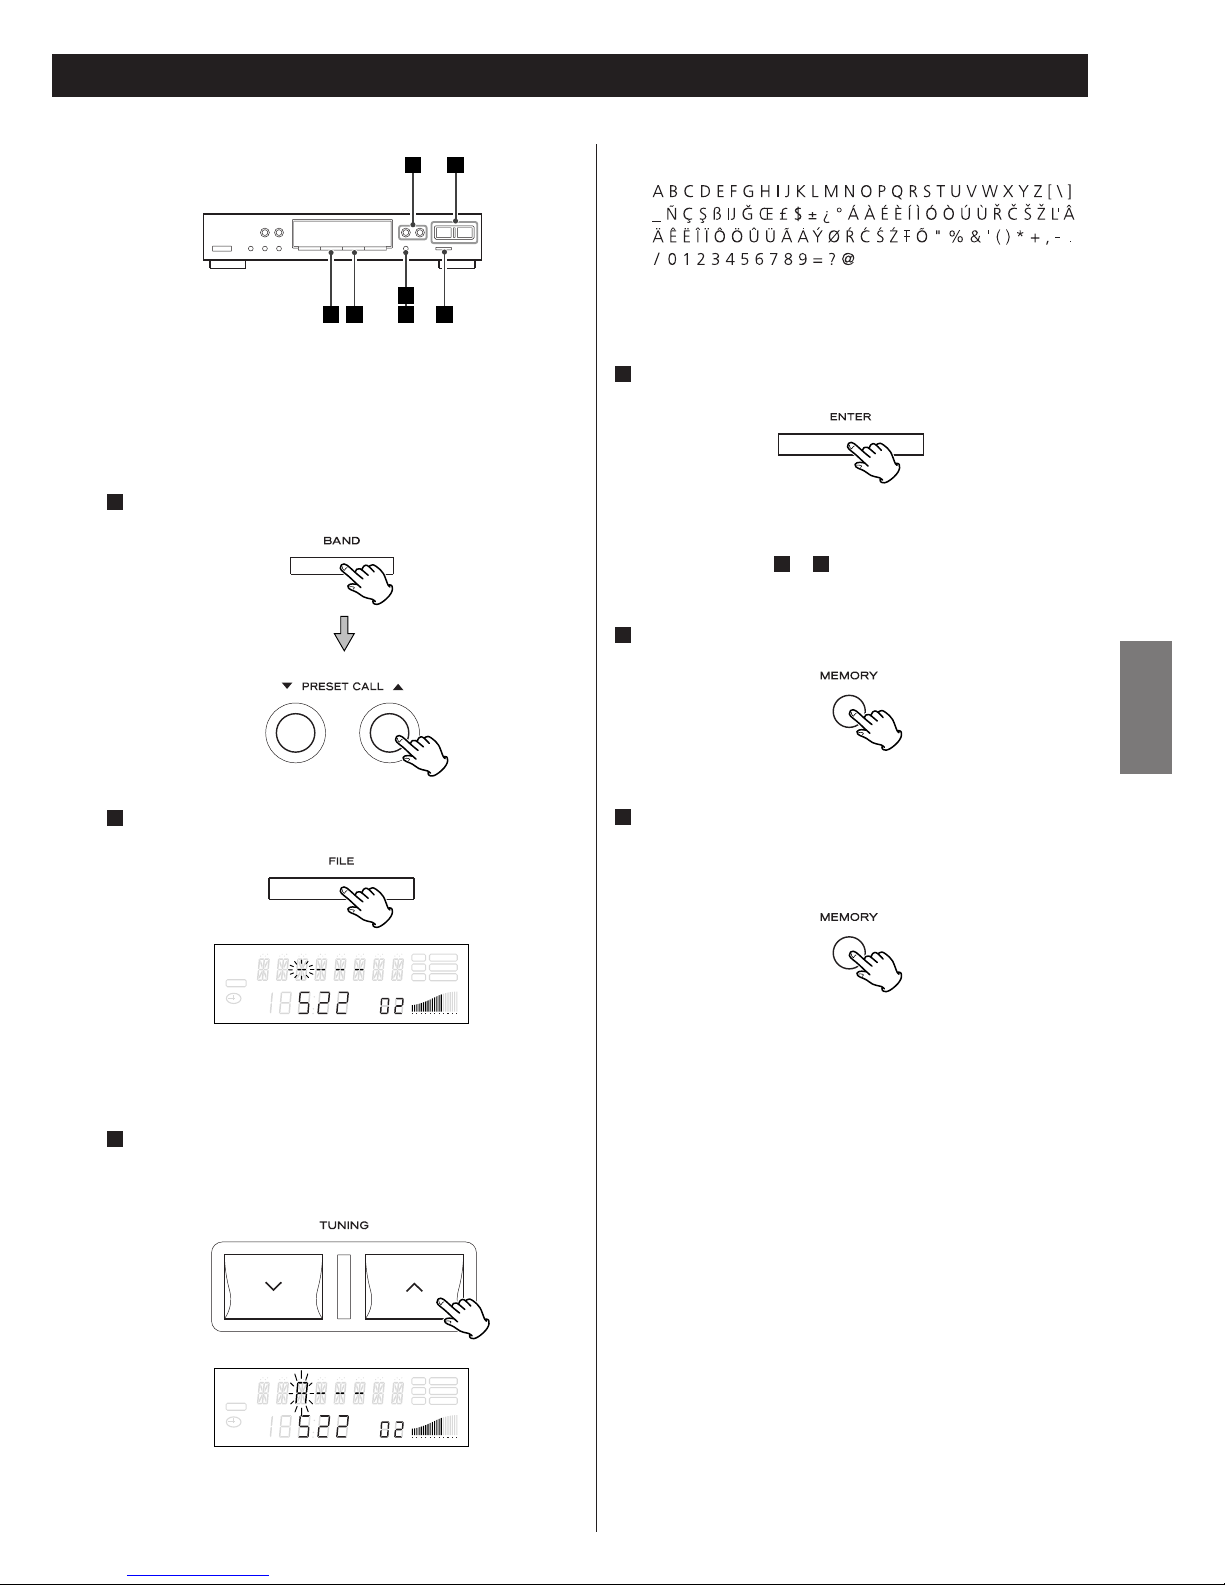
Quand le témoign MEMORY clignote, appuyez sur le
bouton MEMORY.
Ou bien, vouz pouvez attendre 8 secondes sans rien faire.
Le nom affecté est mémorisé.
6
Selectionez une station préréglée.
1
“
----
” apparaît, et le caractère “-” clignote sur l’écran.
Sélectionnez un caractère à l’aide des boutons TUNING
(
‡/°).
3
Les caractères disponibles sont:
Le “-” suivant clignote.
Jusqu’à 4 caractères peuvent être attribués par station.
Répétez les étapes et , pour entrer les caractères.
Appuyez sur le bouton MEMORY.
5
43
Affectation d’un nom aux stations
préréglées
Vous pouvez affecter un nom aux stations préréglées.
2 4 651
31
Appuyez sur le bouton ENTER
4
Appuyez sur le bouton FILE.
2
SLEEP
RDS TUNED
RT STEREO
PTY MEMORY
TIMER
CH.
SIGNAL
FM
A
M
MHz
K
Hz
SLEEP
RDS TUNED
RT STEREO
PTY MEMORY
TIMER
CH.
SIGNAL
FM
A
M
MHz
K
Hz
(espace)
Page 24
24
RDS
Le système RDS (Radio Data System) est un service de diffusion
qui permet aux stations d’envoyer des informations
supplémentaires en même temps que le programme radio
normal.
Le mode RDS fonctionne sur la bande FM en Europe
uniquement.
Réglez-vous sur une station FM (voir les étapes à à
la page 21).
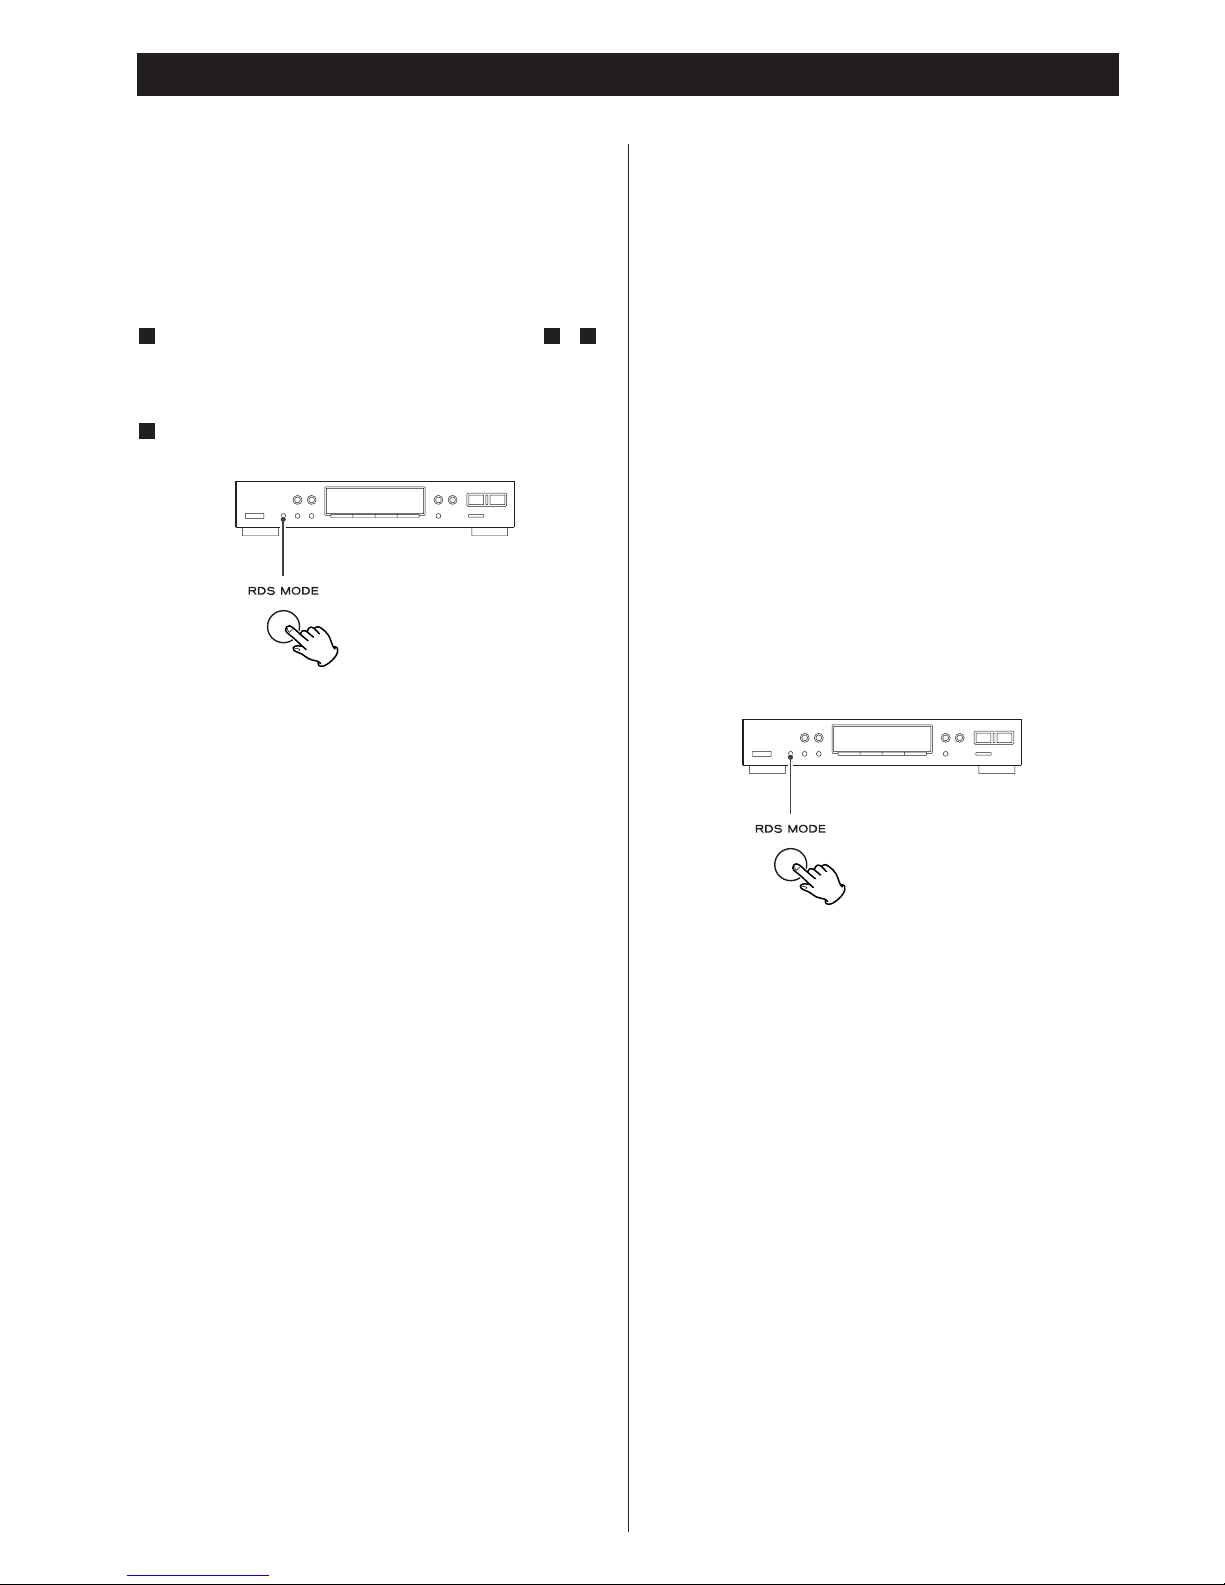
Appuyez sur le bouton RDS MODE.
Chaque fois que le bouton RDS MODE est appuyé
brièvement, le mode RDS change comme suit:
PS (Programme Service name/affichage du nom de la
station)
Lorsque vous sélectionnez PS, “PS” clignote pendant à peu
près 4 secondes, puis PS ou le nom de la station s’affiche.
S’il n’existe pas de donnée PS, la fréquence s’affichera.
PTY (Programme Type/Type de programme)
Lorsque vous sélectionnez PTY, “PTY” clignote pendant à
peu près 4 secondes puis le type de programme s’affiche.
RT (Radio Text/Texte Radio)
Lorsque vous sélectionnez RT, “RT” clignote pendant à peu
près 4 secondes, puis les informations des stations
composées au maximum de 64 symboles s’affichent.
TA (Traffic Announcement/ Infos Trafic)
Lorsque vous sélectionnez TA, “TA” clignote pendant à peu
près 4 secondes, puis l’appareil recherche les informations
sur l’état du trafic.
< Si la station interrompt sa diffusion d’informations sur le
trafic, le tuner trouvera d’autres stations jusqu’à satisfaction.
S’il n’existe pas de données CT/PTY/RT, le mode RDS se
paramètrera automatiquement en mode PS.
2
311
Quand l’A-R610 et le T-R610 sont connectés avec un
cordon de télécommande:
Après avoir sélectionné le mode TA, vous pouvez choisir
n’importe quelle autre source en tournant le SELECTEUR
D’ENTRÉE de l’A-R610.
Si une station diffusant des informations sur le trafic est
trouvée, le SELECTEUR D’ENTRÉE de l’A-R610 se met
automatiquement sur “TUNER”. Quand la station interrompt
la diffusion des informations trafic, le SELECTEUR D’ENTRÉE
se remet automatiquement sur la source préalablement
choisie.
CT (Clock Time/Horloge)
Affiche l’heure émise par la station.
Quand vous vous mettez en mode CT, “CT” clignote pendant
à peu près 4 secondes, puis l’heure s’affiche.
Pour activer ou désactiver le mode CT, appuyez sur le
bouton RDS MODE et maintenez-le plus de 10 secondes.
< Les paramètres de l’horloge seront ajustés automatiquement
sur les données CT.
Si vous vous réglez sur une station RDS aux données CT
incorrectes, l’horloge sera peut-être mal ajustée, ce qui pourra
affecter les opérations de minuterie.
Page 25
25
FRANÇAIS
NEWS (nouvelles) : communiqués, événements, sondages,
reportages, situations vécues.
AFFAIRS (informations générales) : suggestions diverses, telles
que des annonces pratiques, à l'exception des
nouvelles, documents, débats, analyses, etc.
INFO (informations pratiques) : informations pratiques du jour
ou informations de référence, notamment
prévisions météo, guide du consommateur,
informations médicales utiles, etc.
SPORT : émissions sportives.
EDUCATE (éducatif) : informations culturelles et éducatives.
DRAMA (théâtre) :concerts et séries dramatiques
radiodiffusés.
CULTURE : émissions portant sur les cultures locales ou
nationales, y compris les émissions religieuses, la
philosophie, les sciences humaines, les langues,
le théâtre, etc.
SCIENCE : émissions sur les sciences de la nature et les
techniques
VARIED (variétés) : émissions grand public telles que jeux,
variétés, interviews, émissions comiques ou
satiriques, etc.
POP M (musique de variétés) : émissions de musique, de
variété, ou indication du volume de vente des
disques
ROCK M : musique moderne, composée et interprétée
généralement par des jeunes
MORM : morceaux grand public, d'une durée
généralement inférieure à 5 minutes
LIGHT M (musique légère) :
musique classique, orchestrale ou chorale, qui
s'adresse à un public de non spécialistes
CLASSICS (musique classique) :
musique d'orchestre, notamment opéra, musique
symphonique ou musique de chambre, etc.
OTHER M (autres styles musicaux) :
autres styles, tels que reggae, rythm'n blues, etc.
WEATHER (météo) : informations et prévisions
météorologiques.
FINANCE : informations financières, commerciales,
boursières.
CHILDREN (enfants) : émissions pour enfants.
SOCIAL_A (société) : vie collective et sociale.
RELIGION : émissions à caractère religieux.
PHONE_IN : émissions au cours desquelles les auditeurs
s'expriment en direct.
TRAVEL (voyages) : émissions à caractère touristique.
HOBBIES : émissions sur les activités de loisirs (bricolage,
couture, etc.).
JAZZ : musique de jazz.
COUNTRY : musique country.
NATION_M : musique militaire et patriotique.
OLDIES : Tubes de l'âge d'or de la musique.
FOLK_M : musique folk.
DOCUMENT : émissions documentaires.
TEST (tonalité d'essai)
ALARM : avis d'alerte ou de catastrophe naturelle
La recherche commence.
< Lorsque le programme que vous avez choisi est trouvé, la
recherché s’arrête et le type de programme s’affiche.
< Si aucun programme du type de votre choix n’est pas trouvé
lors de la recherche PTY, la fréquence de départ est retrouvée.
< Si vous souhaitez interrompre la recherche, appuyez sur le
bouton RDS MODE.
RDS (Recherche PTY)
Il est possible de rechercher une station grâce à cette fonction.
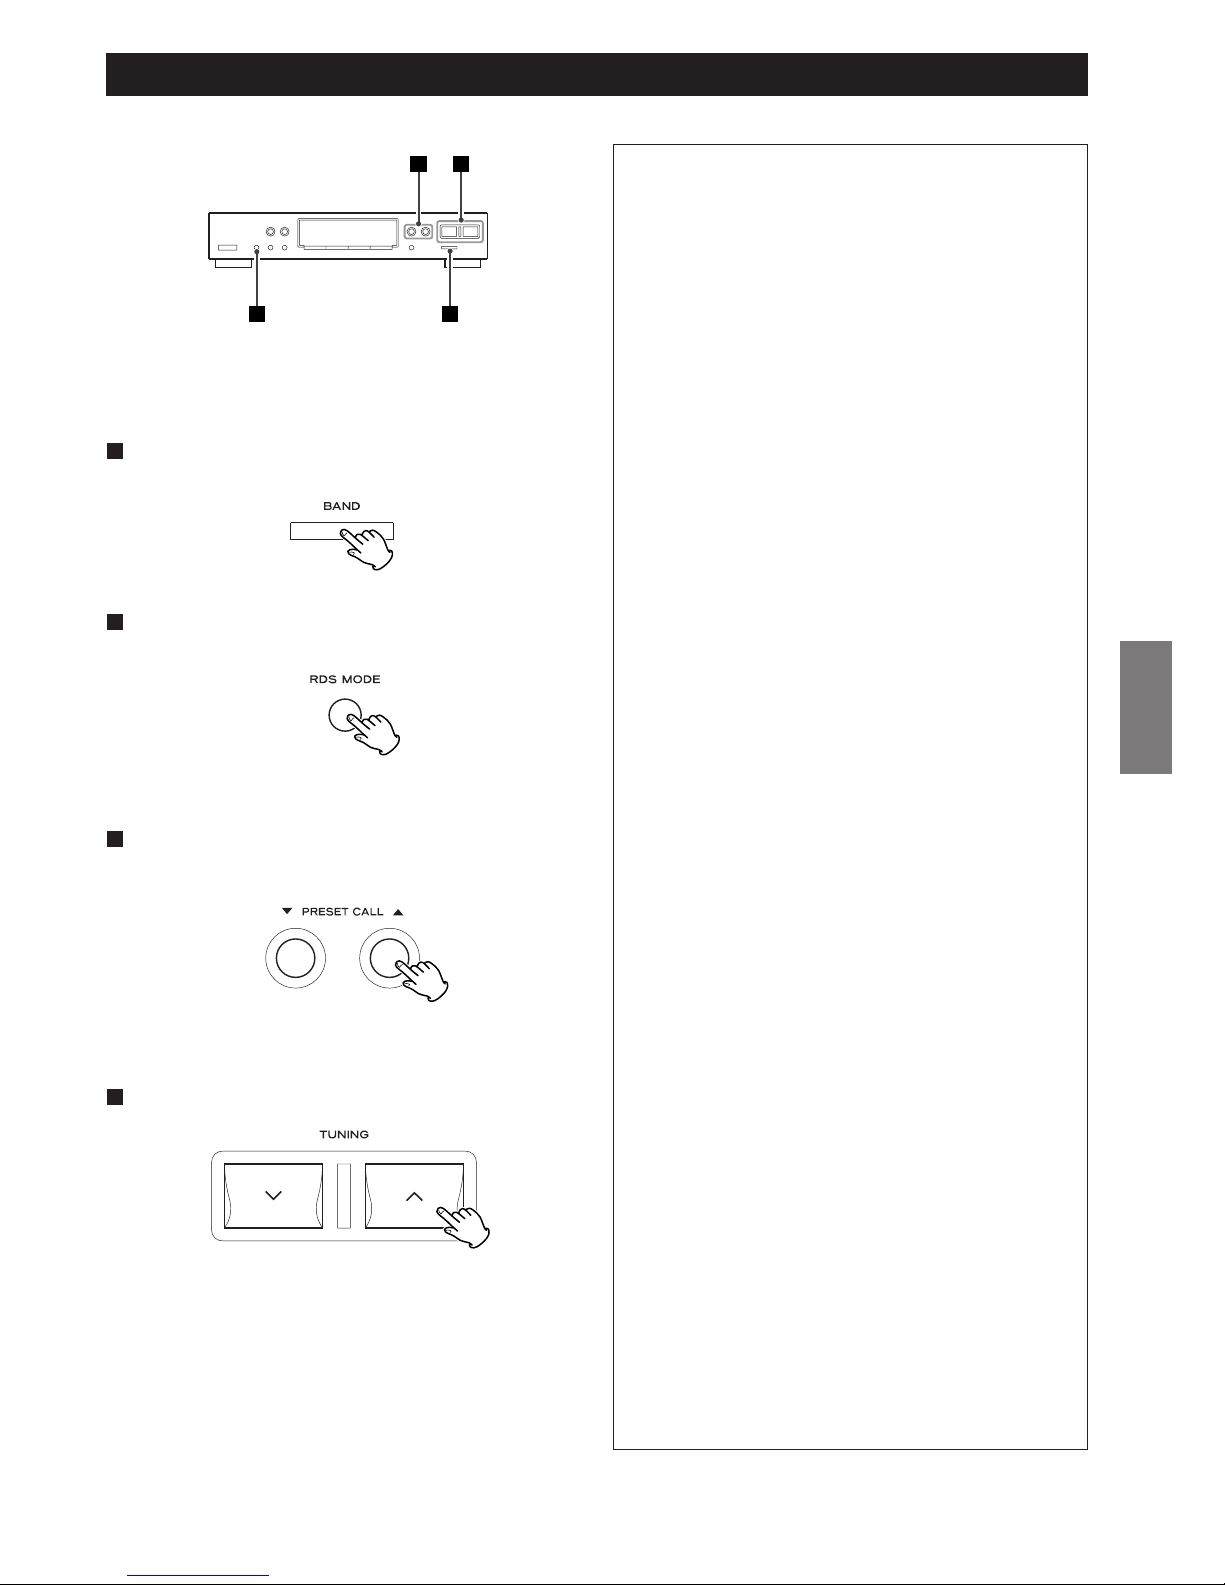
Sélectionnez le mode FM en appuyant sur le bouton
BAND.
1
Appuyez sur le bouton RDS MODE pendant plus de 1,5
secondes.
2
“SEARCH” clignote sur l’affichage.
Sélectionnez le programme PTY souhaité en utilisant les
boutons PRESET CALL (
b/5).
3
Vous pouvez choisir parmi 31 catégories.
2 1
43
Appuyez sur le bouton TUNING (‡ ou °).
4
Page 26
26
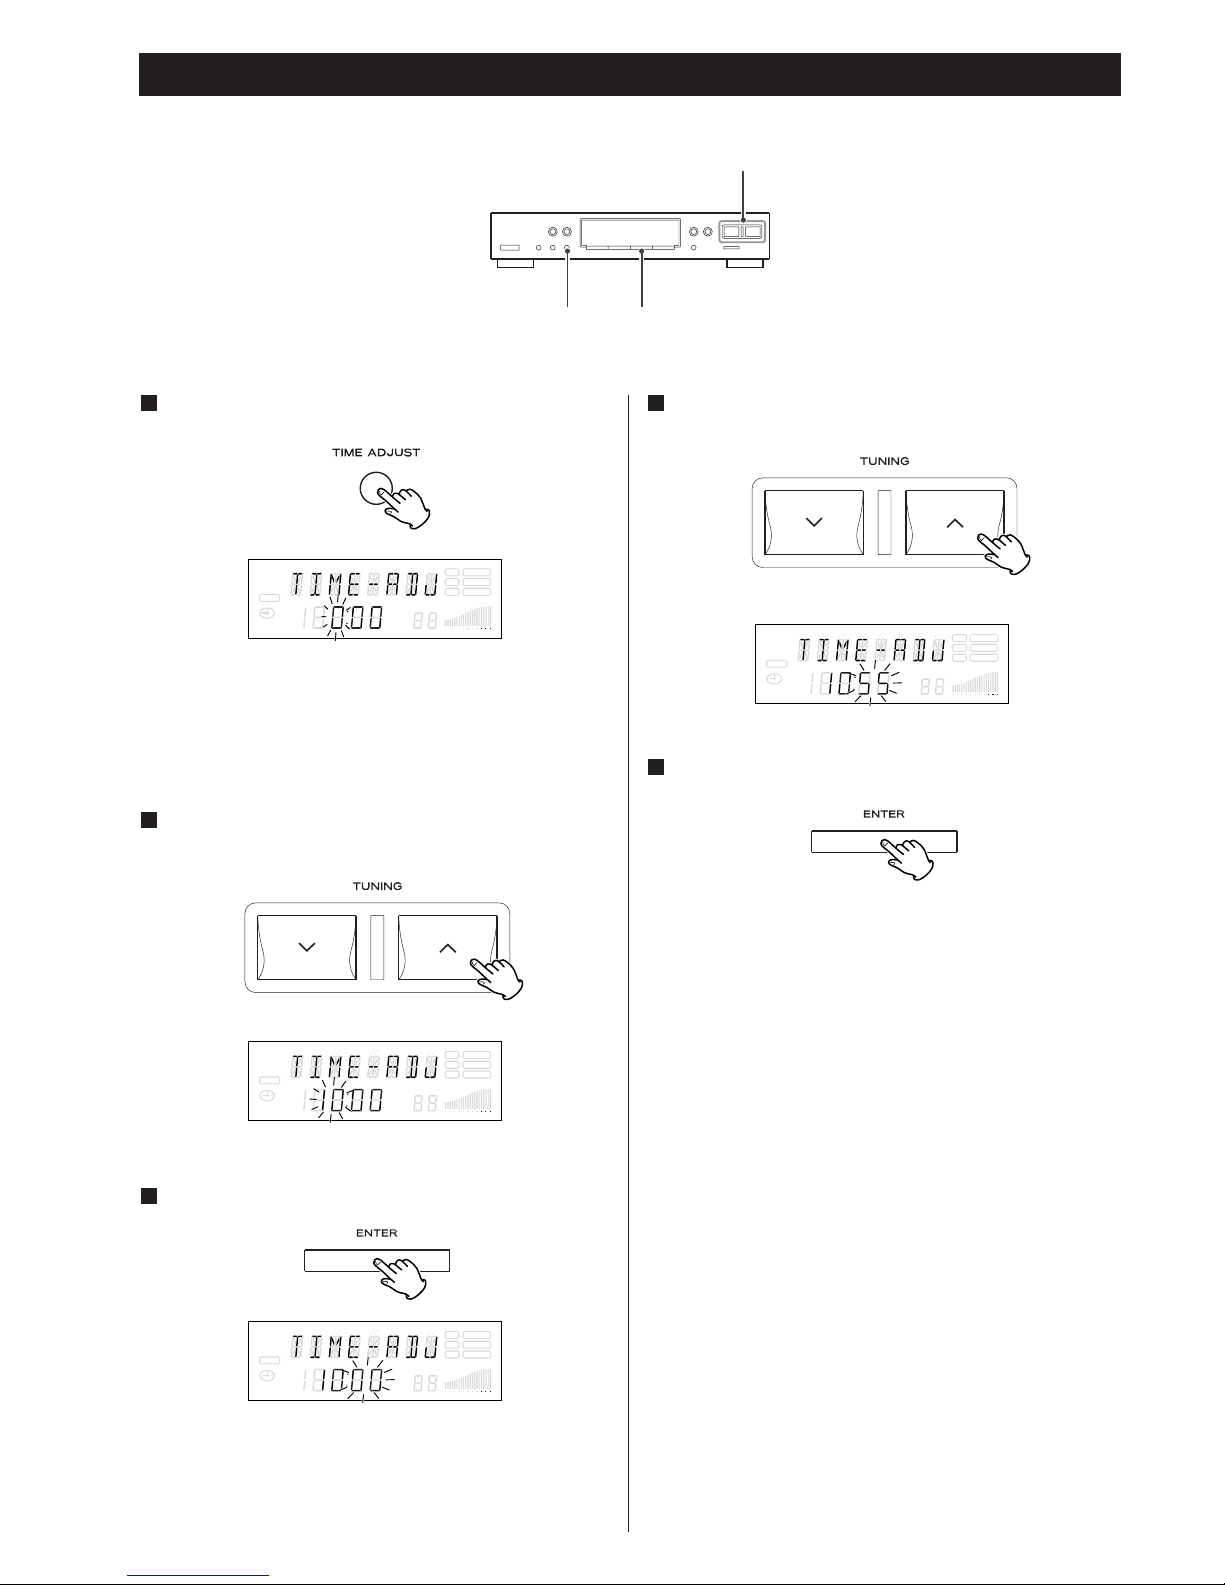
La valeur de l’heure clignote.
< Vous pouvez ajuster l’horloge même quand l’appareil est en
mode standby.
< l’appareil utilise l’horloge “militaire” de 24 heures.
En 8 secondes, entrez l'heure au moyen des boutons
TUNING (
‡/°).
2
Avant 8 secondes, appuyez sur le bouton ENTER.
3
Entrez les minutes au moyen des boutons TUNING
(
‡/°).
4
L’horloge commence à 00 secondes.
Paramétrage de l’horloge
Appuyez sur le bouton TIME ADJUST.
1
SLEEP
RDS TUNED
RT STEREO
PTY MEMORY
TIMER
CH.
SIGNAL
FM
A
M
MHz
K
Hz
SLEEP
RDS TUNED
RT STEREO
PTY MEMORY
TIMER
CH.
SIGNAL
FM
A
M
MHz
K
Hz
SLEEP
RDS TUNED
RT STEREO
PTY MEMORY
TIMER
CH.
SIGNAL
FM
A
M
MHz
K
Hz
SLEEP
RDS TUNED
RT STEREO
PTY MEMORY
TIMER
CH.
SIGNAL
FM
A
M
MHz
K
Hz
La valeur des minutes clignote.
Appuyez sur le bouton ENTER.
5
TUNING
ENTERTIME ADJUST
Page 27
27
FRANÇAIS
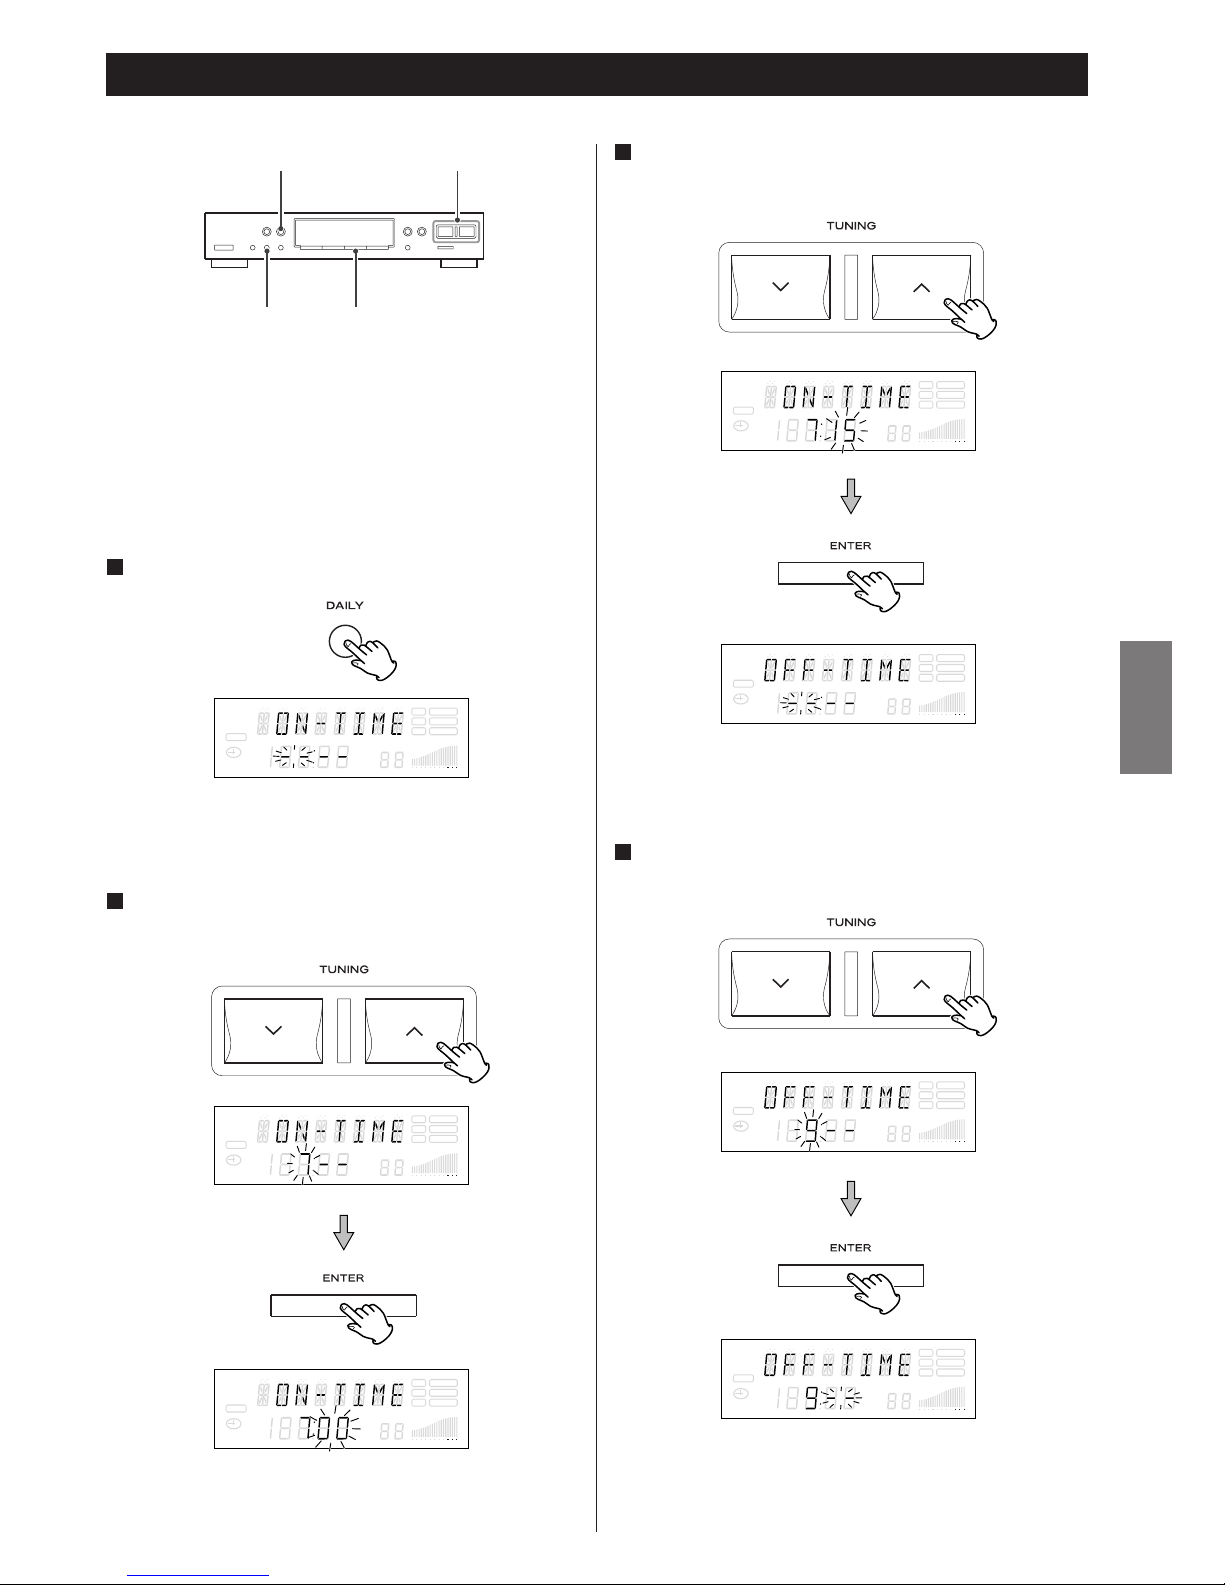
Ajustez l’horloge avant de régler la minuterie.
Appuyez sur le bouton DAILY.
1
La valeur des minutes clignote.
“OFF TIME” apparaît sur l’affichage, et la valeur des minutes
clignote.
“ON TIME” apparaît sur l’affichage, et la valeur des heures
clignote.
Paramétrage du Daily Timer/la minuterie quotidienne 1
Entrez l'heure de mise hors tension au moyen des
boutons TUNING (
‡/°), et puis appuyez sur le bouton
ENTER.
4
TUNINGTIMER
ENTERDAILY
Quand l'A-R610 et le T-R-610 sont branchés l'un sur l'autre au
moyen d'un cordon de télécommande, vouz pouvez utiliser la
minuterie quotidienne pour que ces deux appareils se mettent
sous ou hors tension à la fois.
SLEEP
RDS TUNED
RT STEREO
PTY MEMORY
TIMER
CH.
SIGNAL
FM
A
M
MHz
K
Hz
SLEEP
RDS TUNED
RT STEREO
PTY MEMORY
TIMER
CH.
SIGNAL
FM
A
M
MHz
K
Hz
SLEEP
RDS TUNED
RT STEREO
PTY MEMORY
TIMER
CH.
SIGNAL
FM
A
M
MHz
K
Hz
Entrez la minute de mise sous tension au moyen des
boutons TUNING (
‡/°), et puis appuyez sur le bouton
ENTER.
3
SLEEP
RDS TUNED
RT STEREO
PTY MEMORY
TIMER
CH.
SIGNAL
FM
A
M
MHz
K
Hz
SLEEP
RDS TUNED
RT STEREO
PTY MEMORY
TIMER
CH.
SIGNAL
FM
A
M
MHz
K
Hz
SLEEP
RDS TUNED
RT STEREO
PTY MEMORY
TIMER
CH.
SIGNAL
FM
A
M
MHz
K
Hz
SLEEP
RDS TUNED
RT STEREO
PTY MEMORY
TIMER
CH.
SIGNAL
FM
A
M
MHz
K
Hz
Entrez l'heure de mise sous tension au moyen des
boutons TUNING (
‡/°), et puis appuyez sur le bouton
ENTER.
2
Page 28
28
Paramétrage du Daily Timer/la minuterie quotidienne 2
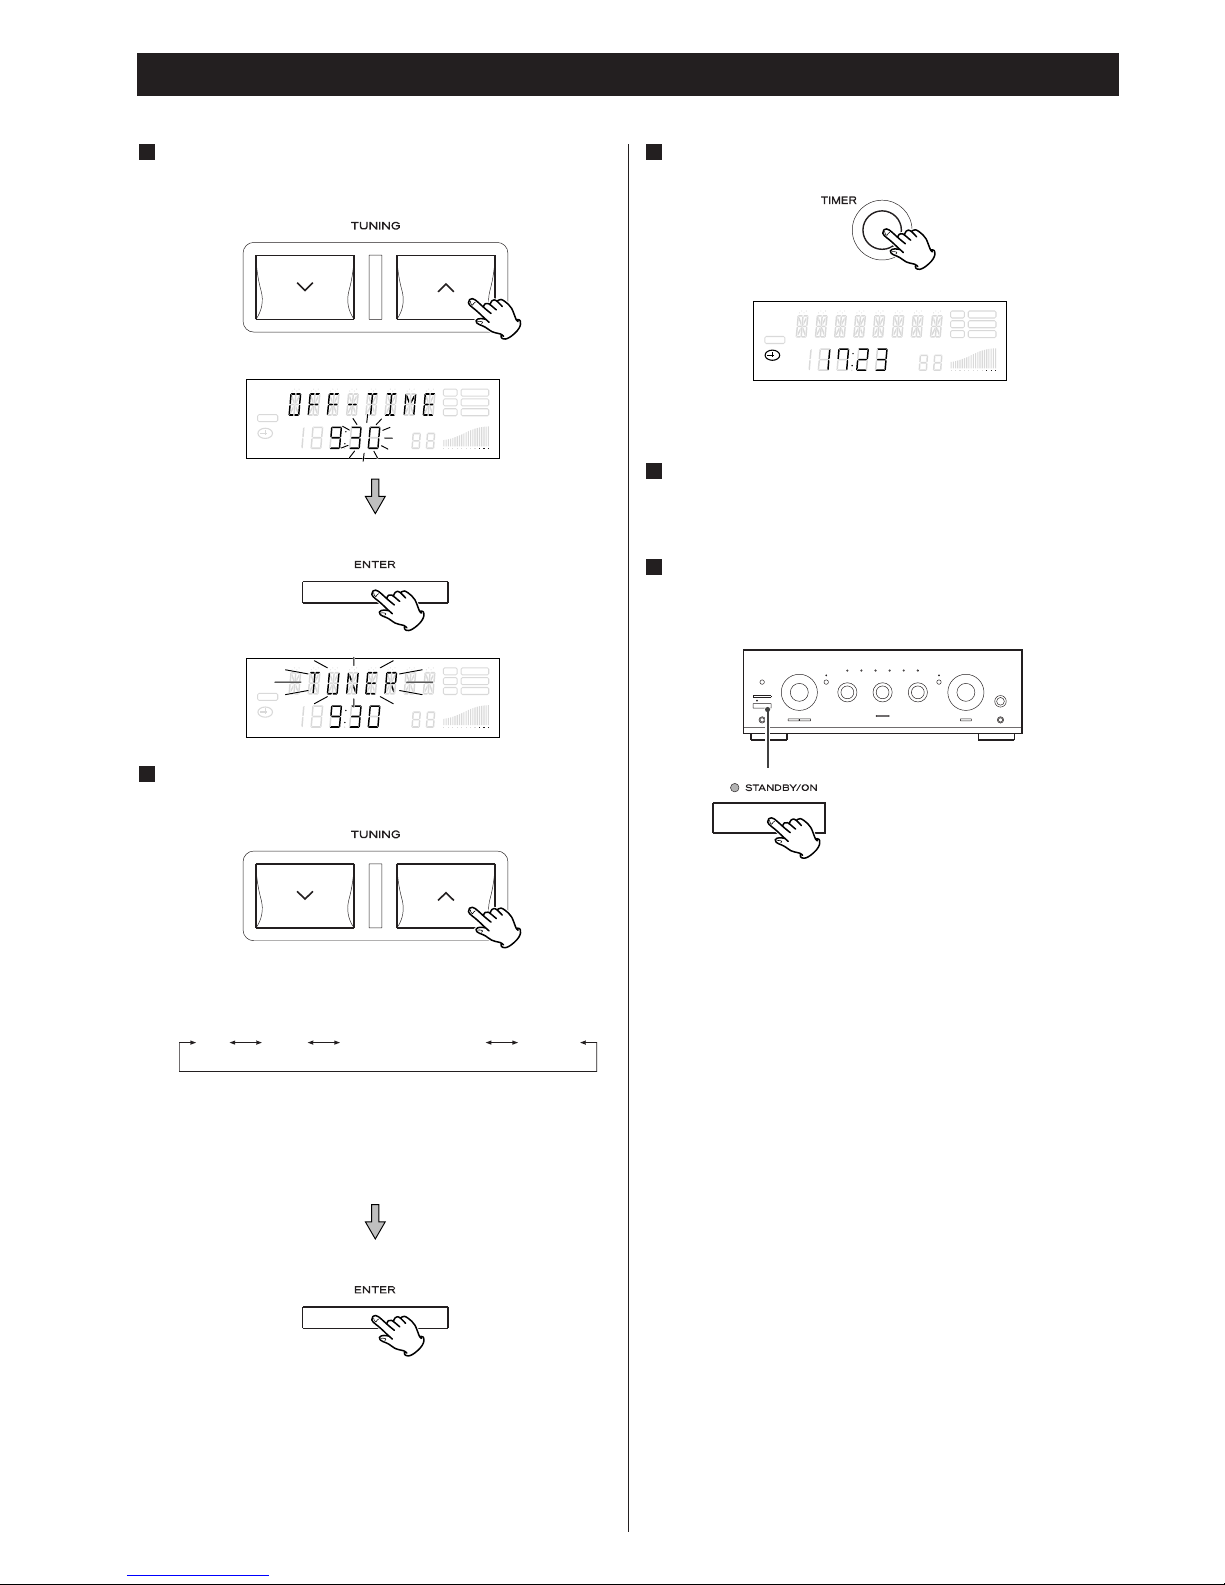
Entrez la minute de mise hors tension au moyen des
boutons TUNING (
‡/°), et puis appuyez sur le bouton
ENTER.
5
Sélectionnez une source au moyen des boutons TUNING
(
‡/°), et puis appuyez sur le bouton ENTER.
6
A chaque pression de TUNING (‡ ou °), a source change
comme suit:
< Si votre lecteur CD ou cassette branché sur l'A-R610 ne
supporte pas la lecture et l'enregistrement contrôlés par
minuterie, il sera inutile de sélectionner “CD”, “TAPE” ou
“TUNER-R”.
CD TAPE TUNER R(ecording) TUNER
Tous les appareils connectés par les cordons de la
télécommande s’allumeront et s’éteindront chaque jour aux
horaires paramétrés.
Lorsque vous n’utilisez pas la fonction de minuterie,
appuyez sur le bouton TIMER pour la désactiver.
(L’indicateur de minuterie disparaît de l’affichage.)
Appuyez sur le bouton TIMER pour la réactiver.
Préparez les opérations voulues pour la minuterie.
Ajustez le volume de l’amplificateur, sélectionnez une station,
etc.
8
Désormais les paramètres de minuterie sont mémorisés.
Appuyez sur le bouton TIMER.
7
L’indicateur de minuterie s’illumine sur l’affichage.
SLEEP
RDS TUNED
RT STEREO
PTY MEMORY
TIMER
CH.
SIGNAL
FM
A
M
MHz
K
Hz
SLEEP
RDS TUNED
RT STEREO
PTY MEMORY
TIMER
CH.
SIGNAL
FM
A
M
MHz
K
Hz
SLEEP
RDS TUNED
RT STEREO
PTY MEMORY
TIMER
CH.
SIGNAL
FM
A
M
MHz
K
Hz
Appuyez sur le bouton STANDBY/ON de l’A-R610 pour
éteindre tous les appareils.
9
Page 29
29
FRANÇAIS
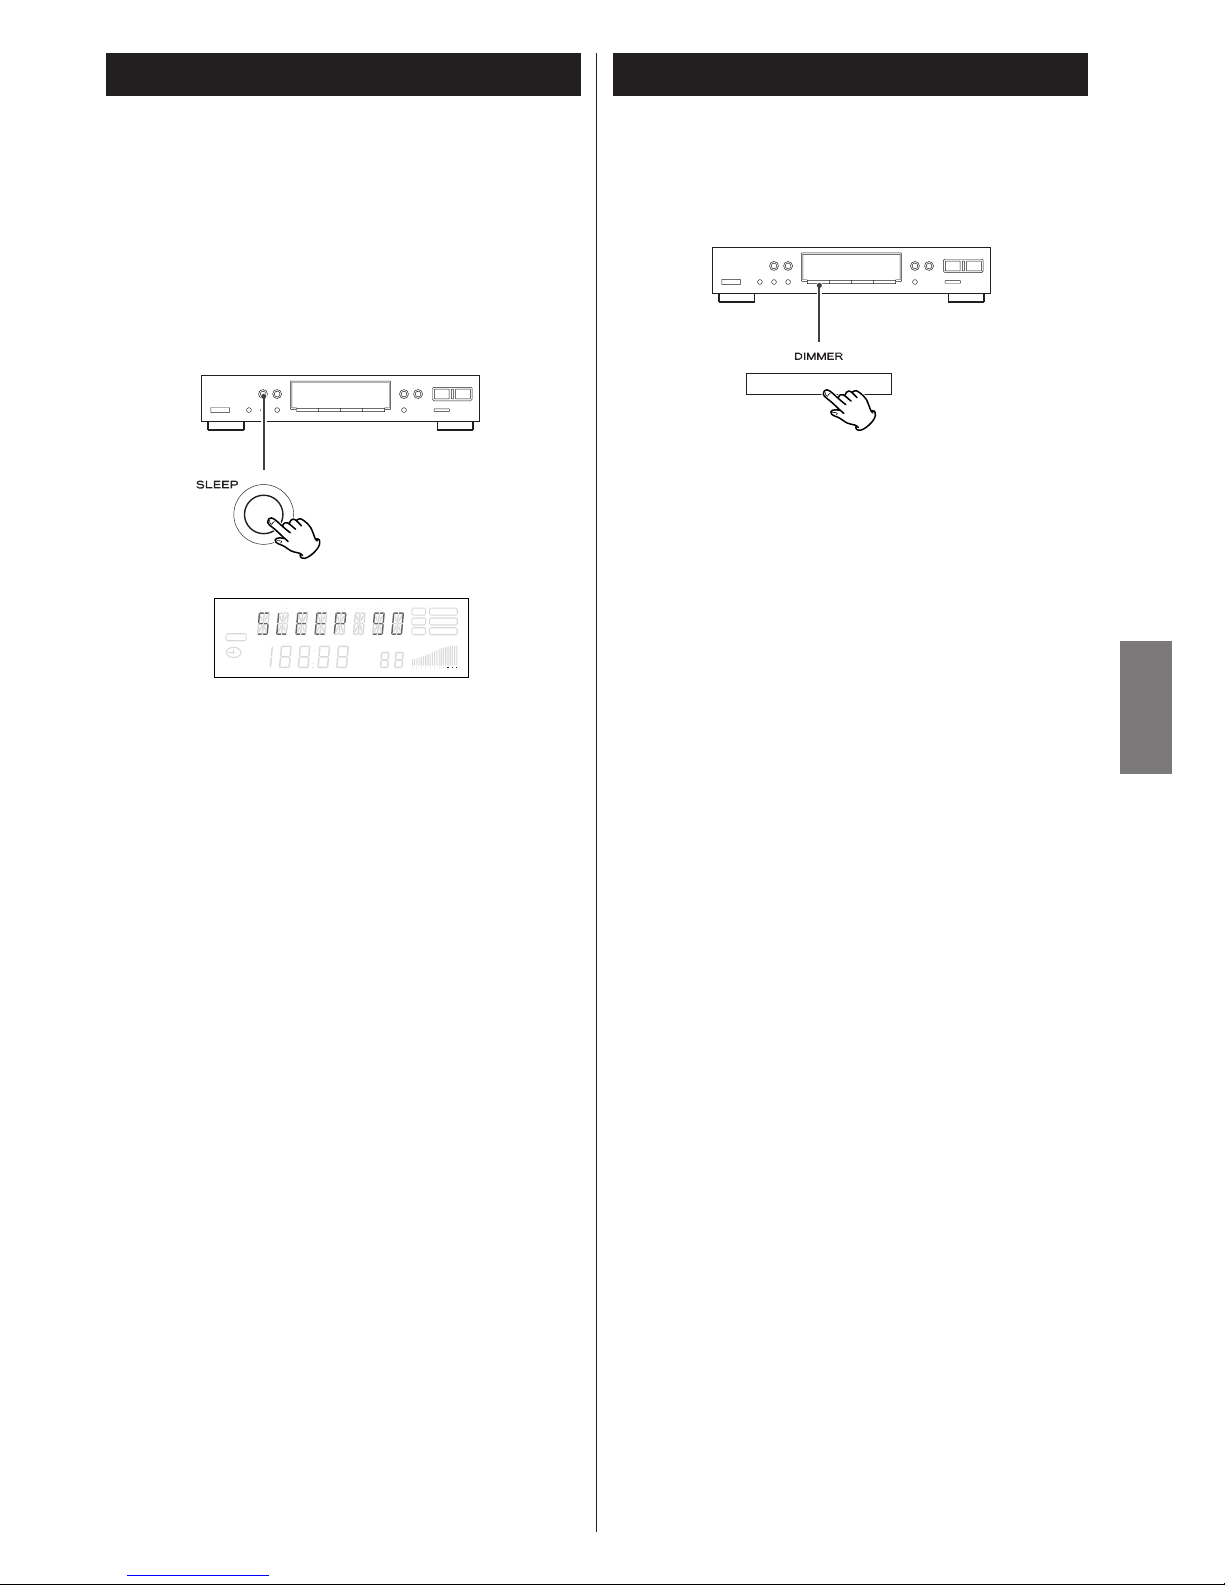
Extinction différée
L’appareil peut s’éteindre après un laps de temps déterminé.
Appuyez sur le bouton SLEEP à plusieurs reprises jusqu’à ce que
la durée désirée apparaisse sur l’affichage.
La fonction SLEEP permet à l'ensemble de l'A-R610 et du T-R610
de se mettre hors circuit si ces deux sont branchés l'un sur l'autre
au moyen d'un câble de tétécommande.
SLEEP 90 (80, 70, 60, 50, 40, 30, 20, 10)
L’appareil s’éteindra au bout de 90 (80, 70, 60, 50, 40, 30,
20 ou 10) minutes.
Affichage normal
La fonction d’extinction différée “sleep timer” est éteinte.
< Si vous voulez consulter le temps restant, appuyez sur le
bouton SLEEP une seule fois. Le temps restant apparaîtra sur
l’affichage pendant 5 secondes, puis les données initiales
réapparaîtront.
SLEEP
RDS TUNED
RT STEREO
PTY MEMORY
TIMER
CH.
SIGNAL
FM
A
M
MHz
K
Hz
Réduction de la luminosité de l’écran
La liminosité de l'afficheur sera atténuée en appuyant sur le
bouton DIMMER.
Appuyez une nouvelle fois pour désactiver la fonction dimmer.
< Cette fonction se désactive lorsque l’appareil s’éteint.
Page 30

SpécificationsDépannage
En cas de problème avec l’appareil, prenez le temps de lire ce
tableau et de voir si vous pouvez résoudre le problème tout seul
avant de faire appel à votre revendeur ou au centre d'assistance
TEAC.
L'appareil ne s'allume pas
e Vérifier que l'appareil est bien branché sur la prise secteur.
Vérifiez que la source d'alimentation CA n’est pas une prise
équipée d’un interrupteur et si tel et le cas vérifiez que
l’interrupteur est bien sur ON. Vérifiez que la prise délivre
bien du courant en branchant un autre appareil électrique,
une lampe ou un ventilateur par exemple.
Pas de son
e Vérifiez le raccordement à l’amplificateur.
e Vérifiez le fonctionnement de l’amplificateur.
Impossible d’écouter une station ou le signal est trop
faible.
e Vérifiez que l’antenne est correctement raccordée.
e Réglez correctement la station.
e Réinstallez l’antenne après l’avoir placé à un endroit
permettant une meilleure réception.
e Une antenne extérieure peut s’avérer nécessaire.
Le son est bruité.
e Placez l’antenne le plus loin possible de la télévision ou du
lecteur CD.
e Si une télévision ou un lecteur CD est près de l’appareil,
éteignez-le.
Bien que la diffusion soit en stéréo, le son sort en mono.
e Appuyez sur le bouton FM MODE.
Si malgré ces indications, vous ne parvenez pas à faire
fonctionner normalement l'appareil, débranchez le cordon
d'alimentation du secteur et rebranchez-le.
Entretien
Si la surface de l’appareil est sale, nettoyez-la avec un chiffon
doux ou utilisez une solution diluée de savon doux. Veillez à
ce qu’il ne reste pas de produit sur l’appareil. N’utilisez jamais
de diluant, de benzène ou d’alcool, ceux-ci risquant
d’endommager la surface de l’appareil.
30
Section syntoniseur FM
Gamme de syntonisation
87,5 MHz - 108,0 MHz (50 kHz steps)
Sensibilité utilisable (IHF) . . . . . . . . . . . . . . . . . . Mono: 10 dBf
Seuil de sensibilité (50 dB). . . . . . . . . . . . . . . . . Mono: 17 dBf
Stereo: 33 dBf
Selectivité (98 MHz ± 400 kHz) . . . . . . . . . . . . . . . . . . . 65 dB
Réjection image. . . . . . . . . . . . . . . . . . . . . . . . . . . . . . . 70 dB
Réponse en fréquence . . . . . . 20 Hz - 15 kHz (+0,5 dB/–3 dB)
Rapport de capture . . . . . . . . . . . . . . . . . . . . 2 dB (à 98 MHz)
Distortion (at 65 dBf, 98 MHz). . . . . . . . . . . . . . Mono: 0,1 %
Stereo: 0,3 %
Signal-to-Noise Ratio (à 65 dBf, 1 kHz) . . . . . . . . Mono: 70 dB
Stereo: 65 dB
Suppression AM . . . . . . . . . . . . . . . . . . . . . . . . . . . . . . 55 dB
Séparation stéréo (1 kHz) . . . . . . . . . . . . . . . . . . . . . . . 40 dB
Sortie . . . . . . . . . . . . . . . . . . . . . . . . . . . . 800 mV/2,2 k ohm
Section syntonisateur AM
Gamma de syntonisation . 522 kHz - 1.620 kHz (pas de 9 kHz)
Sensibilité utilisable . . . . . 55 dB/m (562 µV/m, antenna cadre)
Selectivité . . . . . . . . . . . . . . . . . . . . . . . . . . . . 55dB (at 9 kHz)
Réjection image. . . . . . . . . . . . . . . . . . . . . . . . . . . . . . . 35 dB
Réponse IF. . . . . . . . . . . . . . . . . . . . . . . . . . . . . . . . . . . 60 dB
Distorsion . . . . . . . . . . . . . . . . . . . . . . . . . . . 1 % (à 85 dB/m)
Rapport signal sur bruit . . . . . . . . . . . . . . . 40 dB (à 85 dB/m)
Sortie . . . . . . . . . . . . . . . . . . . . . . . . . . . . 220 mV/2,2 k ohm
Générales
Alimentation . . . . . . . . . . . . . . . . . . . . . . . . . 230 V ca, 50 Hz
Consommation . . . . . . . . . . . . . . . . . . . . . . . . . . . . . . . . 6 W
Dimensions (L x H x P) . . . . . . . . . . . . . . . 435 x 87 x 294 mm
Poids (net) . . . . . . . . . . . . . . . . . . . . . . . . . . . . . . . . . . 2,9 kg
Accessoires. . . . . . . . . . . . . Cordon à fiches à broche RCA x 1
Cordon de télécommande x 1
Antenne cadre AM x 1
Antenne FM x 1
Pays d'origine . . . . . . . . . . . . . . . . . . . . . . . . . . . . . . . . Chine
• Les caractéristiques et la présentation peuvent être modifiées
sans avis préalable.
• Poids et dimensions sont approximatifs.
• Les illustrations peuvent légèrement différer des modèles de
production.
Page 31
31
ESPAÑOL
Indice
Reciclaje de su producto viejo
1. Cuando se adjunta a un producto este
símbolo tachado de un contenedor con
ruedas, significa que el producto está
cubierto por la Directiva Europea
2002/96/EC.
2. Todos los productos eléctricos y electrónicos se deben
reciclar de un modo separado del sistema municipal de
basura, a través de las instalaciones de recogida señaladas
por el gobierno o las autoridades locales
3. El reciclaje correcto de su producto viejo ayudará a prevenir
las consecuencias negativas potenciales para el ambiente y
la salud humana.
4. Para una información más detallada sobre el reciclaje de su
producto viejo, contacte por favor con su ayuntamiento,
servicio de basuras o la tienda en donde usted compró el
producto.
Memoria de seguridad
Si el suministro de corriente se interrumpe durante dos semanas
o más, se borrarán los ajustes almacenados en la memoria (por
ejemplo, presintonías, temporizador).
Después de conectar la unidad a la red, tardará más de tres días
en cargar suficiente electricidad para que funcione la memoria
de seguridad.
Si desea reiniciar manualmente los ajustes, pulse el interruptor
RESET.
Todos los ajustes restablecerán sus valores estándar.
Previo al empleo
Léase antes de continuar
< La unidad puede calentarse durante su funcionamiento, por
lo que habrá que dejar espacio suficiente alrededor para su
ventilación.
< La tensión suministrada a la unidad deberá coincidir con el
valor indicado en el panel posterior. En caso de duda,
consulte a un electricista.
< Elija cuidadosamente el emplazamiento de la unidad. Evite los
lugares expuestos a la luz solar directa, fuentes de calor,
vibraciones, polvo, temperaturas extremas o humedad.
< No coloque la unidad encima del amplificador/receptor.
< No abra la carcasa de la unidad, ya que podrían dañarse los
circuitos o producirse descargas eléctricas. Si entra algún
cuerpo extraño en la unidad, póngase en contacto con su
distribuidor.
< Cuando desconecte el cable de la toma mural, sostenga
únicamente el conector y nunca el propio cable.
< No intente limpiar la unidad con disolventes químicos, ya que
podrían dañar el acabado. Utilice un paño limpio y seco.
< Conserve el manual en un lugar seguro para futuras
consultas.
Enhorabuena por la adquisición de un TEAC. Lea
detenidamente este manual a fin de obtener el mejor
rendimiento de esta unidad.
Previo al empleo . . . . . . . . . . . . . . . . . . . . . . . . . . . . . . . . . . . 31
Conexión . . . . . . . . . . . . . . . . . . . . . . . . . . . . . . . . . . . . . . . . 32
Nombres de los controles . . . . . . . . . . . . . . . . . . . . . . . . . . . . 34
Sintonización . . . . . . . . . . . . . . . . . . . . . . . . . . . . . . . . . . . . . 35
Presintonías . . . . . . . . . . . . . . . . . . . . . . . . . . . . . . . . . . . . . . 36
RDS . . . . . . . . . . . . . . . . . . . . . . . . . . . . . . . . . . . . . . . . . . . . 38
RDS (Búsqueda PTY) . . . . . . . . . . . . . . . . . . . . . . . . . . . . . . . . 39
Puesta en hora del reloj. . . . . . . . . . . . . . . . . . . . . . . . . . . . . . 40
Ajuste del temporizador diario . . . . . . . . . . . . . . . . . . . . . . . . 41
Desconexión programada . . . . . . . . . . . . . . . . . . . . . . . . . . . . 43
Intensidad luminosa . . . . . . . . . . . . . . . . . . . . . . . . . . . . . . . . 43
Solución de problemas . . . . . . . . . . . . . . . . . . . . . . . . . . . . . . 44
Especificaciones . . . . . . . . . . . . . . . . . . . . . . . . . . . . . . . . . . . 44
PRECAUCIÓN
< No permita que ningún líquido se derrame o salpique este
aparato.
< No coloque objetos que contengan líquidos, como jarrones,
encima de este aparato.
< No instale este aparato confinado en un espacio reducido,
como podría ser encastrado en una estantería o lugar
similar.
< Este aparato recibe corriente nominal no operativa de la
salida de corriente AC aun cuando su interruptor
STANDBY/ON esté en la posición STANDBY.
< El aparato debe estar colocado lo suficientemente cerca de
la salida de corriente como para poder acceder al enchufe
en cualquier momento.
< Conecte siempre los aparatos de clase ! como este a salidas
de corriente con toma de tierra.
Page 32
32
PRECAUCIÓN:
< Apague todos los equipos antes de realizar las conexiones.
< Lea las instrucciones de cada equipo que intenta utilizar con
esta unidad.
< Asegúrese de insertar firmemente cada enchufe. Para evitar
zumbidos y ruidos, evite poner los cables de conexión de
señal en haz con el cable de alimentación de CA o cables de
altavoz.
Conexión
T-R610
C
D
E
F
A
B
Antena de FM interior
Conecte la antena de FM monofilar a la toma FM 75Ω,
despliegue el cable y sintonice su emisora favorita (véase
página 35). Ajuste la antena en una posición apropiada,
como el marco de una ventana o una pared, hasta conseguir
la recepción óptima, y después asegure la antena en esa
posición con chinchetas, alfileres o fijaciones adecuadas.
A
Antena de FM exterior
Si las señales de FM son débiles en la zona, será necesario
usar una antena exterior de FM. Por lo general valdrá con
una de 3 elementos. Si la recepción de FM es especialmente
débil, quizá sea preciso utilizar una antena de 5 o más
elementos.
< Desconecte la antena de FM interior cuando utilice una
exterior.
Amplificador (A-R610)
Page 33
33
ESPAÑOL
Salida de línea (LINE OUT)
La señal de audio analógico de 2 canales se envía a través de
esta salida. Conecte este terminal a la entrada de TUNER del
amplificador por medio de un cable RCA.
Asegúrese de conectar:
Enchufe blanco
q Enchufe blanco (L: canal izquierdo)
Enchufe rojo
q Enchufe rojo (R: canal derecho)
Terminal REMOTE CONTROL
Con el modelo TEAC TEAC A-R610 se pueden usar las
prácticas funciones de control del sistema:
• Cuando sintonice una emisora, el selector de entrada del AR610 cambiará automáticamente a “TUNER”.
• Podrá utilizar el mando a distancia “UR” RC-592B
(suministrado con el A-R610) para controlare el T-R610.
Conecte el terminal REMOTE CONTROL a los terminales
REMOTE CONTROL (A o B) del A-R610, utilizando el cable
de conexión de control remoto facilitado.
Observación:
El mando a distancia no se suministra con esta unidad.
RESET (reinicio)
En los siguientes casos, es posible que los botones
operativos no funcionen correctamente:
• Si el sistema ha resultado dañado por alguna descarga
eléctrica.
• Si la alimentación es irregular o tiene interferencias
eléctricas.
En tales circunstancias, pulse levemente RESET una o dos
veces con un lapicero o bolígrafo.
Se borrarán todos los ajustes guardados en la memoria
(presintonías, temporizador).
Cable de alimentación (c.a.)
Una vez realizadas todas las conexiones restantes, conecte el
cable de alimentación a la toma mural.
Asegúrese de conectar el cable de alimentación a una toma
de red que suministre la tensión adecuada.
Sostenga siempre el cable de alimentación por el conector.
F
E
D
C
Observación:
Aunque utilice una antena de AM exterior, no desconecte la
antena de AM de cuadro.
Antena de cuadro de AM interior
En la mayoría de las zonas será suficiente con la antena de
cuadro de AM facilitada con la unidad.
Para instalar la antena de cuadro en una superficie, asegure
la horquilla a la ranura de la antena de la base.
Conecte los hilos de la antena a los terminales de AM.
Coloque la antena sobre un estante o suspendida del marco
de una ventana, etc., en la dirección que ofrezca la mejor
calidad de recepción. Mantenga lo más lejos posible de la
antena el resto de cables (alimentación, altavoz,
interconexión).
< Si la antena de cuadro de AM suministrada no ofrece una
recepción correcta (suele deberse a una distancia excesiva al
transmisor, edificios de hormigón, etc.), quizá sea preciso
usar una antena de AM de exterior.
Consiga una antena de AM de buena calidad o, en su
defecto, un cable con aislante de más de 5 m de longitud,
uno de cuyos extremos deberá pelar y conectar al terminal
como se ilustra en la figura.
El cable de antena se deberá tender hasta las proximidades
de una ventana (interior o exterior). Para mejorar la
recepción, conecte el terminal GND a un punto de toma a
tierra adecuado.
B
Page 34
34
Nombres de los controles
STANDBY/ON
Pulse este botón para encender o apagar la unidad.
El indicador de apagado se ilumina cuando la unidad se
encuentra en el modo de espera. El indicador luminoso se
apagará cuando encienda la unidad.
SLEEP
Use este botón para programar la desconexión automática.
TIMER
Use este botón para activar y desactivar la función de
temporizador.
Pantalla
PRESET CALL
Use estos botones para seleccionar emisoras presintonizadas.
Cuando el modo RDS es conmutado a PTY, use estos botones
para seleccionar un tipo de programa.
TUNING
Use estos botones para sintonizar emisoras.
BAND
Use este botón para seleccionar FM o AM.
MEMORY
Use este botón para guardar en la memoria los preajustes de
canal.
FM MODE
En el modo de sintonizador de FM, use este botón para
seleccionar estéreo o mono.
ENTER
Use este botón para introducir su selección.
FILE
Use este botón para asignar nombres a las presintonías.
K
J
I
H
G
F
E
D
C
B
A
A B C D E F
GHO N
M
L K J I
DIMMER
Use este botón para reducir la luminosidad de la pantalla.
TIME ADJUST
Use este botón para poner en hora el reloj.
DAILY
Use este botón para programar el temporizador.
RDS MODE
Use este botón para gestionar las funciones RDS.
Pantalla
O
N
M
L
Se ilumina cuando la función de desconexión programada
está activada.
Visualiza datos de RDS, el estado del temporizador, etc.
Se ilumina cuando la función RDS está activada.
Se ilumina cuando se sintonia una emisora.
Se ilumina cuando se sintonia una emisora FM en estereo.
Parpadea quando el botón MEMORY está presionado.
Durante este indicador parpadea, puede seleccionar un canal
en el que se almacena una emisora sintonizada.
Visualiza la fuerza de señal de emisoras sintonizadas.
Visualiza un número de presintonía.
Visualiza el reloj digital o la frecuancia de emisora.
Se ilumina cuando el temporizador está activado.
j
i
h
g
f
e
d
c
b
a
SLEEP
RDS TUNED
RT STEREO
PTY MEMORY
TIMER
CH.
SIGNAL
FM
A
M
MHz
K
Hz
a b dc e f
g
h
j
i
El equipo suministra una energía no operativa nominal
desde la toma de CA con su interruptor STANDBY/ON en la
posición STANDBY.
Page 35
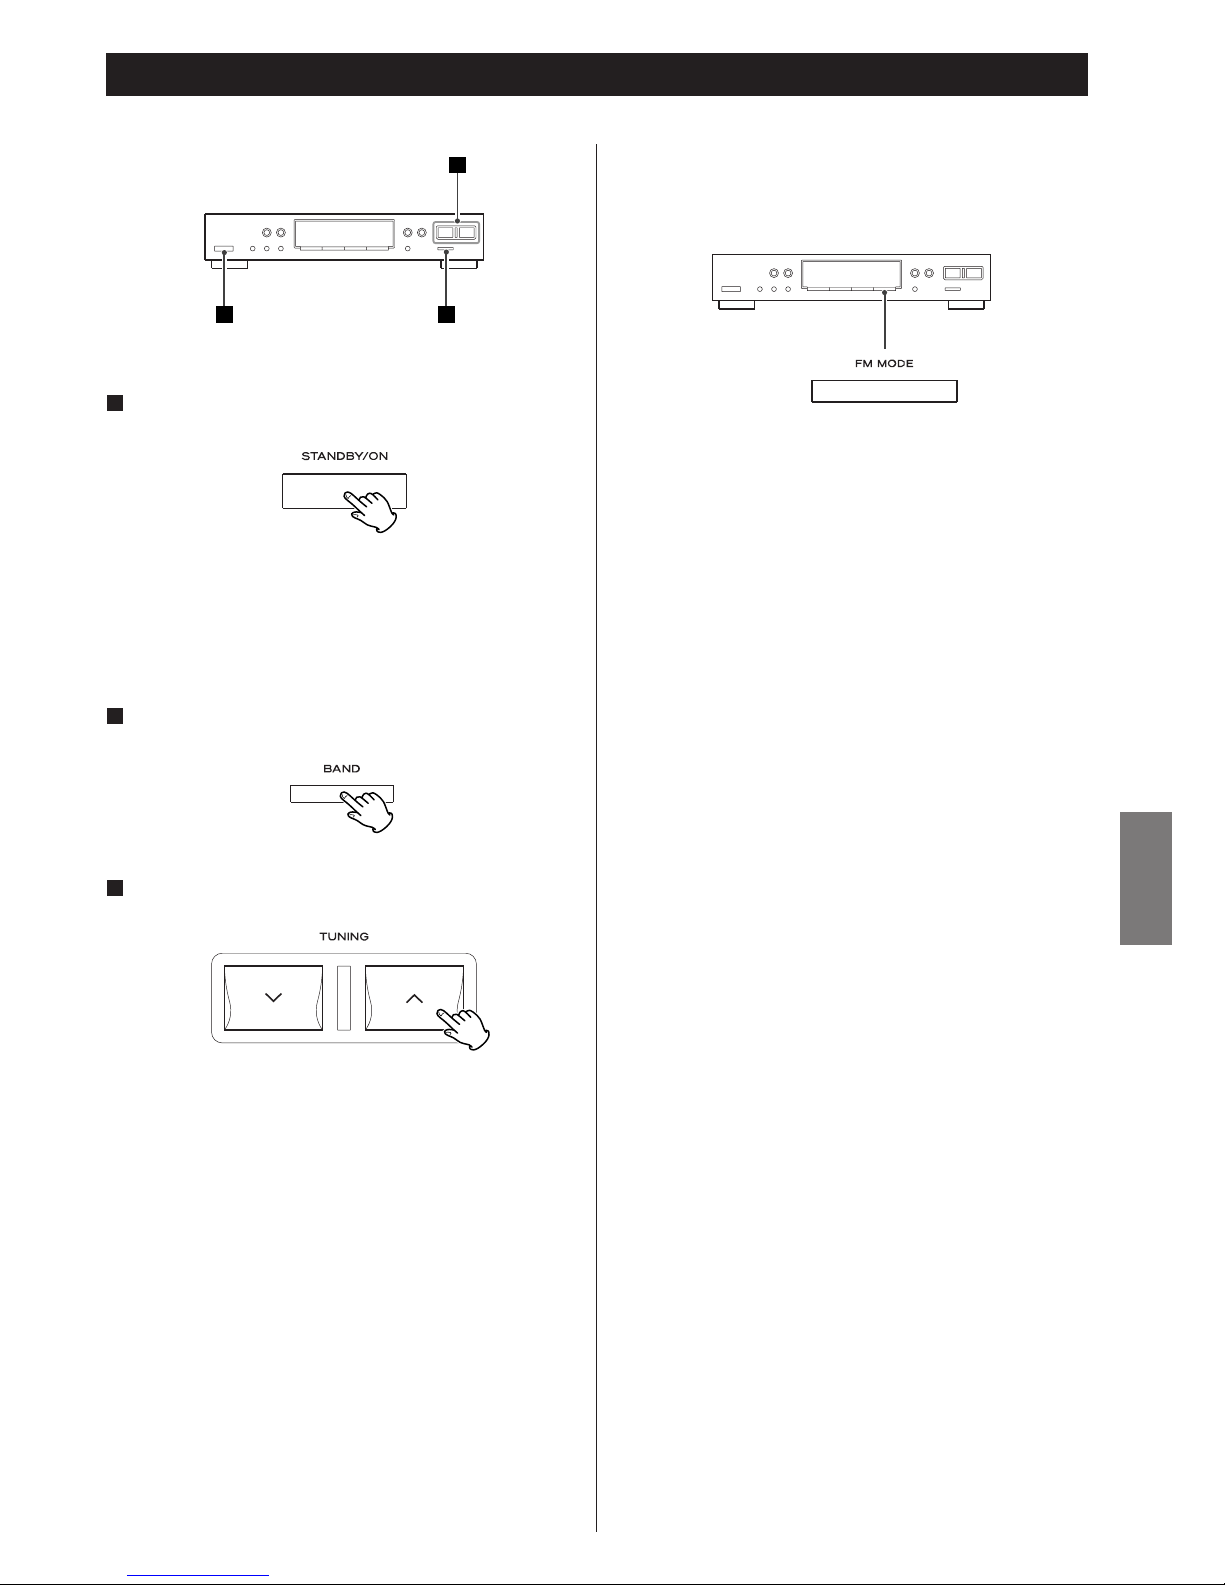
35
ESPAÑOL
Sintonización
Pulse el botón STANDBY/ON para encender la unidad.
1
1 2
3
< Si el T-R610 está conectado al A-R610 por un cable de control
remoto, podrá encender y apagar el A-R610 y el T-R610
pulsando el botón STANDBY/ON del A-R610.
Seleccione AM o FM con el botón BAND.
2
Seleccione la estación que desea escuchar (selección
automática).
3
Selección de estaciones que no se pueden sintonizar
automáticamente (selección manual)
Cuando el botón TUNING (‡ o °) se oprime
momentáneamente, la frecuencia cambia en intervalos fijos.
Oprima el botón TUNING (
‡ o °) de manera repetida hasta
que encuentre la estación que desea esuchar.
Mantenga oprimido el botón TUNING (
‡ o °) hasta que
comience a cambiar el desplegado de frecuencia. Cuando se
sintoniza una estación, el proceso de sintonización se
detendrá automáticamente.
< Oprima el botón TUNING (‡ o °) para detener la selección
automática.
Estéreo:
Las emisiones se reciben en FM estéreo y el indicador
“STEREO” se ilumina en la pantalla.
Mono:
Seleccione este modo si la recepción de FM estéreo es débil.
El sonido será monofónico y con menos ruido.
Botón FM MODE
Pulse este botón para conmutar entre los modos estéreo y
monofónico.
Page 36
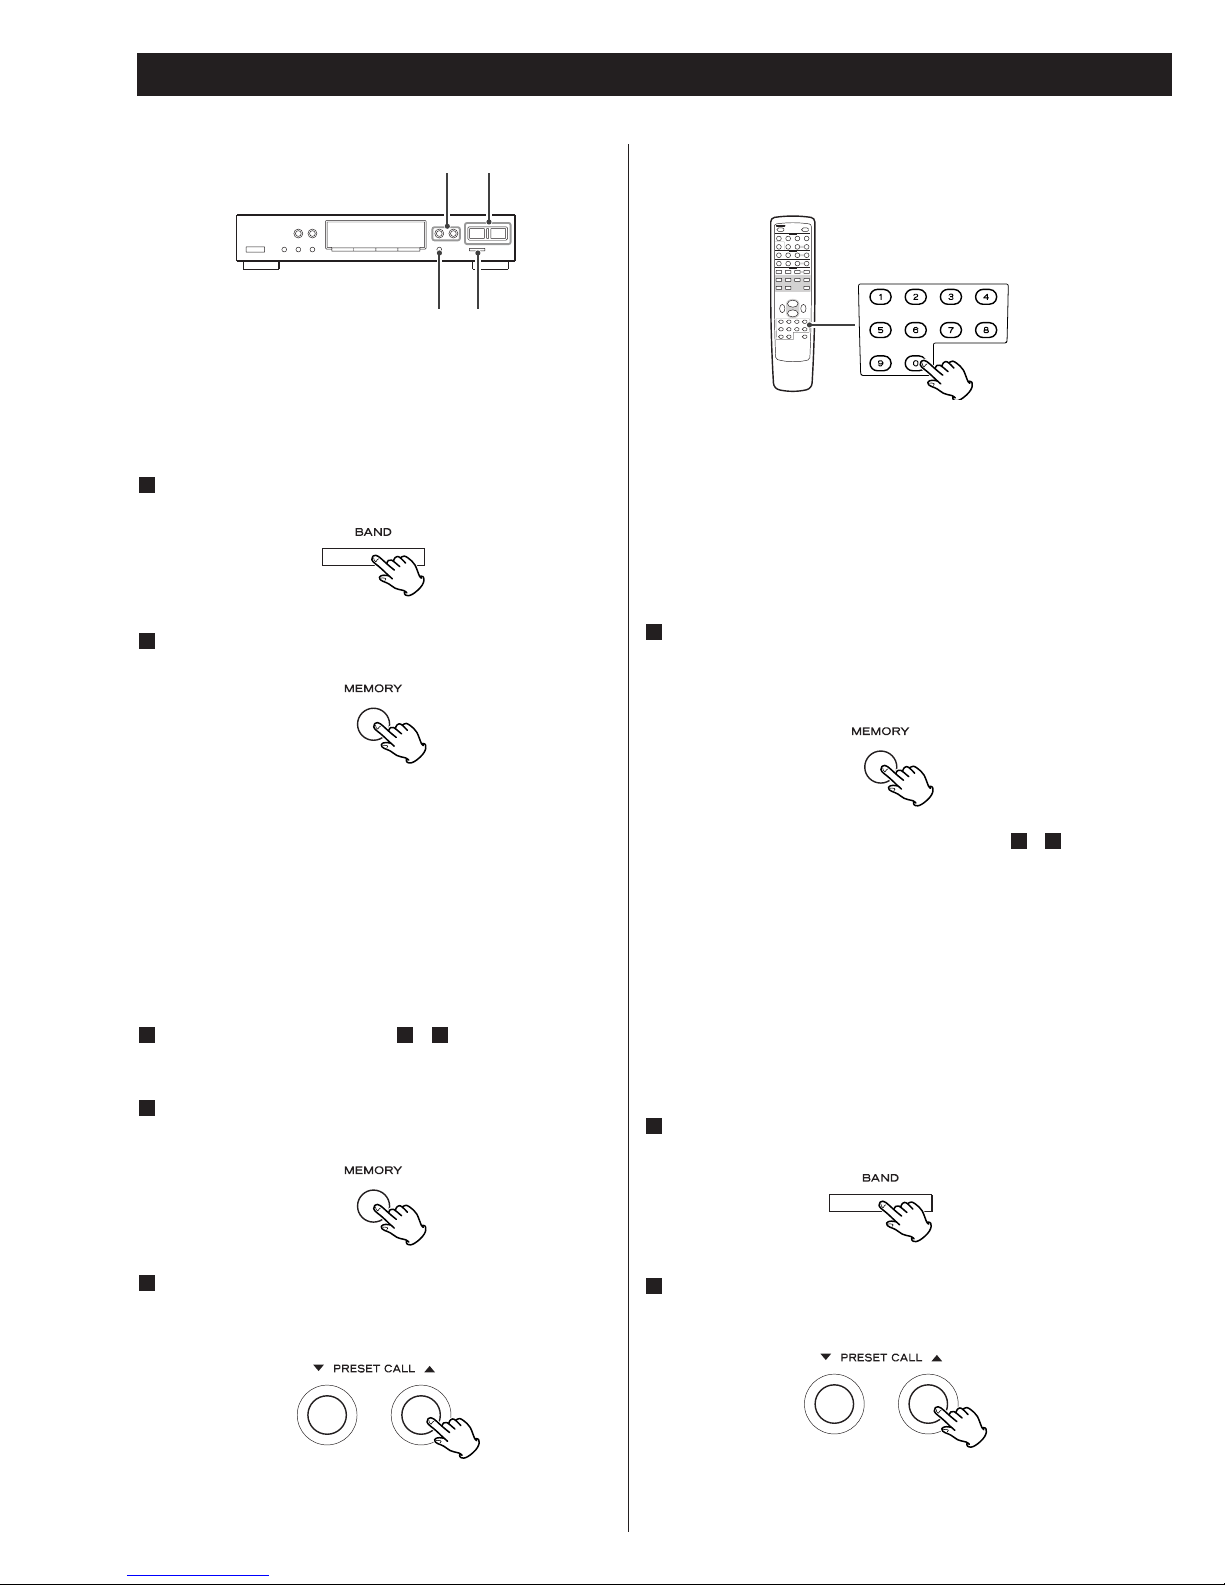
36
Presintonías
Para almacenar otras emisoras, repita los pasos a .
< Si almacena una emisora en un canal en el que ya había otra
memorizada, la nueva sustituirá a la antigua.
< Las presintonías no se pueden borrar.
41
TUNINGPRESET CALL
BANDMEMORY
Puede almacenar emisoras de FM y AM en los canales 1 a 30.
Presintonización automática
Seleccione AM o FM con el botón BAND.
1
Pulse el botón MEMORY durante 1,5 segundos.
2
Se almacenarán automáticamente hasta 30 de las emisoras
con mejor recepción de la zona.
< En la presintonización automática de FM, la unidad explorará
dos veces las frecuencias y almacenará las que mejor se
reciban.
Presintonización manual
Sintonice una emisora (pasos a en página 35).
Pulse brevemente el botón MEMORY.
2
311
Mientras parpadea el indicador “MEMORY”, seleccione
un número de presintonía y utilice los botones PRESET
CALL (
b/5) para guardar la emisora en ese canal.
3
También puede usar los botones numéricos del mando a
distancia suministrado con el A-R610.
Por ejemplo, para seleccionar el número de presintonía 25,
pulse primero el botón TUNER y después “2” y “5”.
Para seleccionar números menores de 10, pulse el “0” y
después el número correspondiente. Para seleccionar el
número 5, por ejemplo, pulse “0” y “5”. (También puede
pulsar sólo el número “5” y esperar unos segundos.)
Pulse el botón MEMORY.
O deje inactiva la unidad durante 8 segundos. La emisora
queda almacenada en la memoria, y el indicador “MEMORY”
desaparece de la pantalla.
4
Las presintonías también se pueden seleccionar con los
botones numéricos del mando a distancia.
Cómo seleccionar presintonías
Seleccione AM o FM con el botón BAND.
1
Pulse el botón PRESET CALL (b o 5) repetidas veces
hasta localizar la presintonía deseada.
2
Page 37
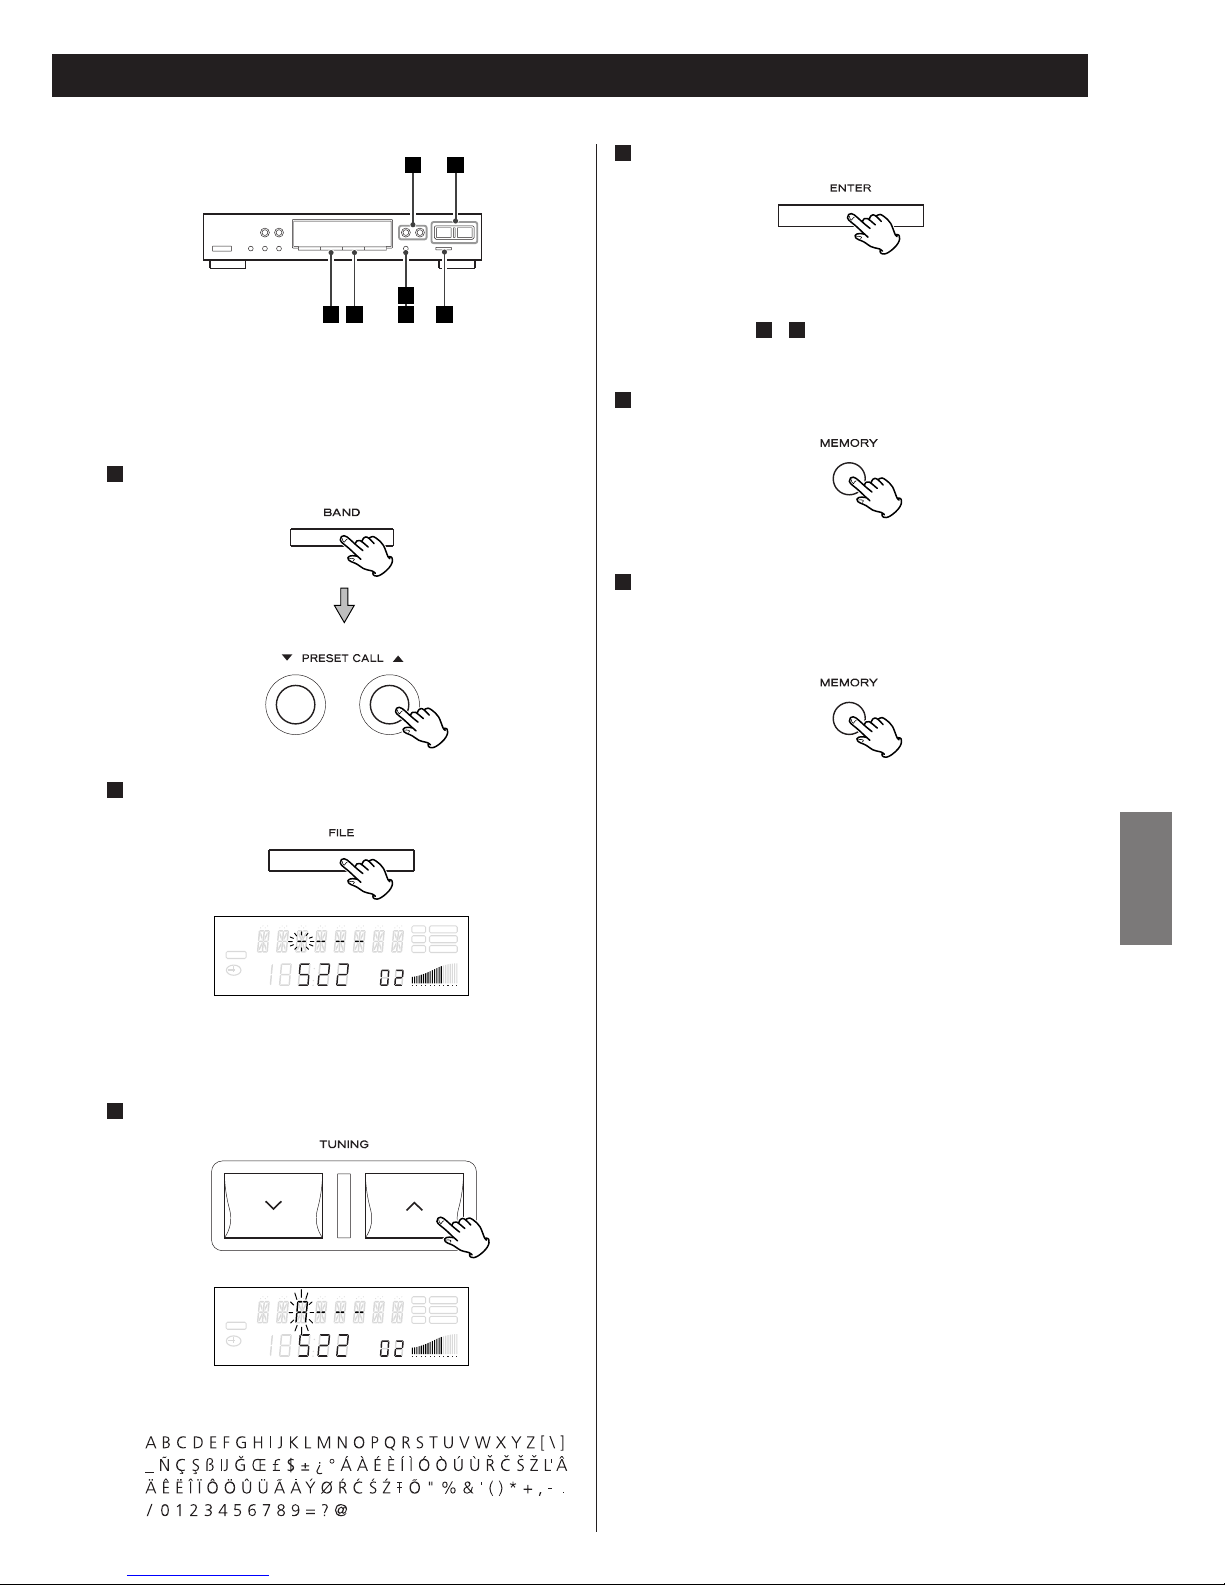
37
ESPAÑOL
Durante el indicador MEMORY parpadea, pulse el botón
MEMORY otra vez.
Otra alternativa es dejar inactiva la unidad durante 8
segundos.
El nombre asignado se guarda en la memoria.
6
Seleccione un canal en el modo de presintonías.
1
En la pantalla aparecerá “
----
”, con el primer “-”
intermitente.
Seleccione un carácter con los botones TUNING (‡/°).
3
Available characters:
El siguiente “-” aparecerá intermitente.
Se pueden usar 4 caracteres por emisora.
Repita los pasos y para introducir los caracteres.
Pulse el botón MEMORY.
5
43
Asignación de nombres a las presintonías
Puede asignar nombres a las presintonías.
2 4 651
31
Pulse el botón ENTER.
4
Pulse el botón FILE.
2
SLEEP
RDS TUNED
RT STEREO
PTY MEMORY
TIMER
CH.
SIGNAL
FM
A
M
MHz
K
Hz
SLEEP
RDS TUNED
RT STEREO
PTY MEMORY
TIMER
CH.
SIGNAL
FM
A
M
MHz
K
Hz
(espacio)
Page 38
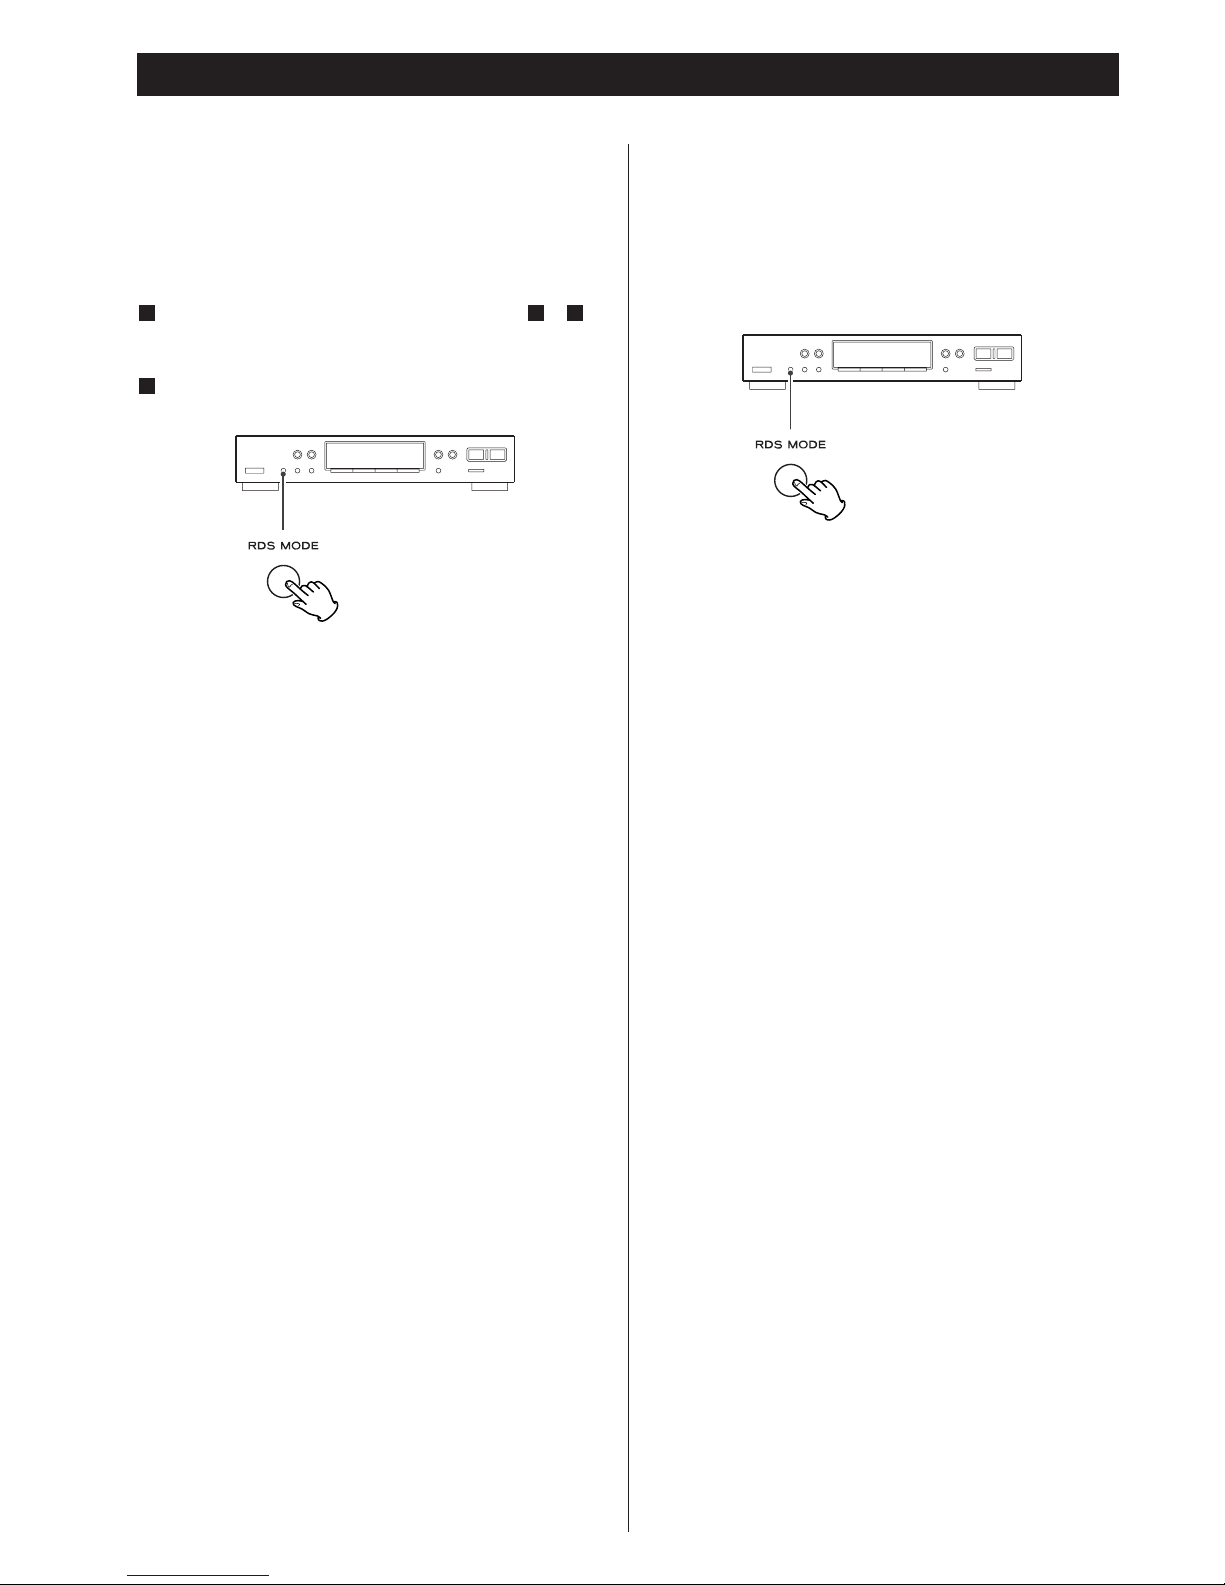
38
RDS
El sistema de datos de radio (RDS) es un servicio de radiodifusión
que permite a las emisoras enviar información adicional junto
con la señal de radio normal.
Este sistema funciona únicamente con la banda de FM
europea.
Sintonice una emisora de FM (véanse pasos a en
página 35).
Pulse el botón RDS MODE.
Cada vez que pulse el botón RDS MODE, el modo cambiará
en el siguiente orden:
PS (nombre del servicio de programación)
Cuando seleccione PS, la indicación “PS” parpadeará unos 4
segundos y aparecerá PS o el nombre de una emisora. Si no
hay datos PS, se visualizará la frecuencia.
PTY (tipo de programa)
Cuando seleccione PTY, la indicación “PTY” parpadeará
unos 4 segundos y aparecerá el tipo de programa.
RT (texto de radio)
Cuando seleccione RT, la indicación “RT” parpadeará unos 4
segundos y aparecerá la información de las emisoras en un
máximo de 64 símbolos.
TA (mensajes de tráfico)
Cuando seleccione TA, la indicación “TA” parpadeará 4
segundos y la unidad buscará un mensaje de tráfico.
< Si la emisora deja de emitir mensajes de tráfico, el
sintonizador seguirá buscando otras emisoras.
Si no hay datos PTY/RT, el modo RDS cambiará
automáticamente a PS.
Cuando las unidades A-R610 y T-R610 están conectadas
con cable de control remoto
Después de seleccionar TA, podrá cambiar de fuente de
sonido con el selector de entrada del A-R610.
Si se localiza una emisora que transmite mensajes de tráfico,
el selector de entrada del A-R610 conmutará
automáticamente a “TUNER”. Si la emisora deja de transmitir
mensajes de tráfico, el selector de entrada regresará
automáticamente a la fuente previamente seleccionada.
2
311
CT (información horaria)
ofrece la información horaria facilitada por la emisora.
Cuando el modo CT se activa, la indicación “CT” parpadeará
unos 4 segundos y aparecerá la lectura de la hora.
Mantenga pulsando el botón RDS MODE más de 10
segundos para activar el modo CT.
< El reloj de la unidad se sincronizará automáticamente con los
datos CT recibidos.
Si sintoniza una emisora RDS que transmite datos CT
incorrectos, el reloj podría ponerse mal en hora y afectar a la
programación del temporizador.
Page 39
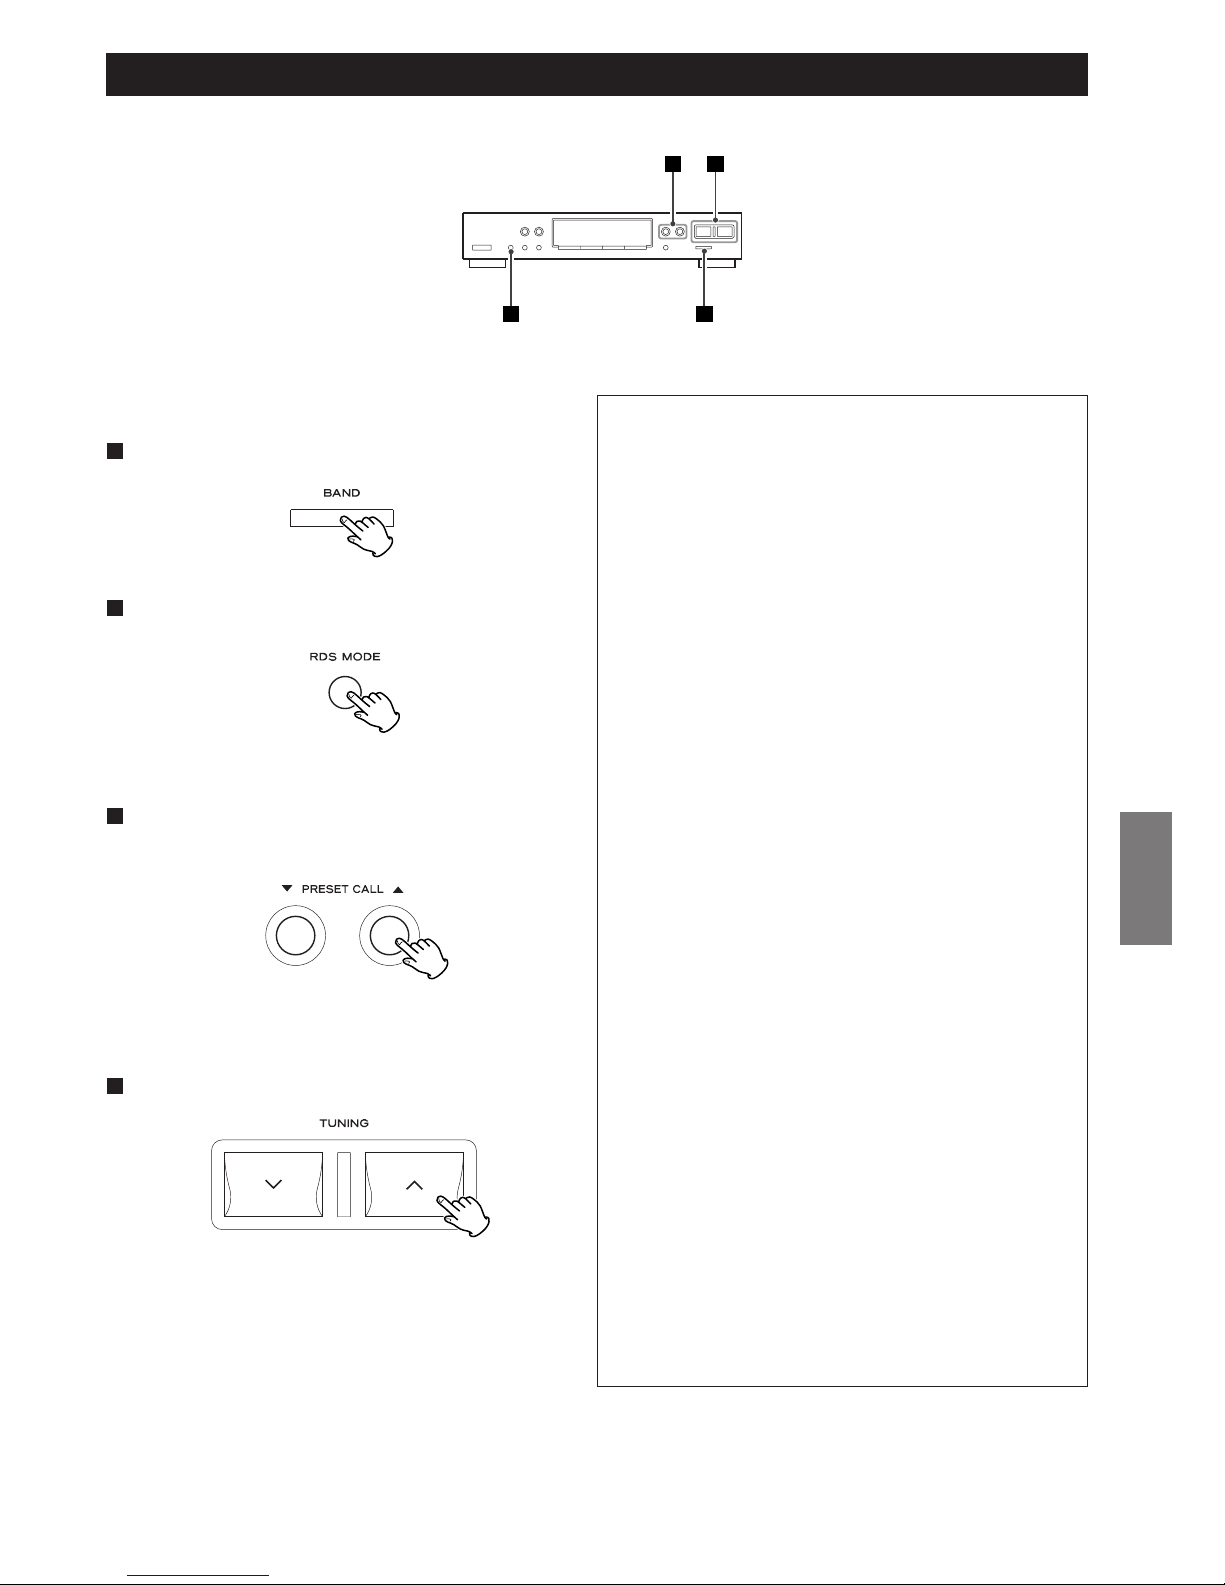
39
ESPAÑOL
NEWS : mensajes, convocatorias, opinión pública, informes.
AFFAIRS : temas de actualidad, documentos, debates,
análisis, etc.
INFO : información cotidiana, previsión meteorológica,
consumo, asistencia médica, etc.
SPORT : programas relacionados con el mundo del deporte.
EDUCATE : educación y cultura.
DRAMA : conciertos de radio, series dramáticas.
CULTURE : todos los aspectos culturales de ámbito nacional o
local, celebraciones religiosas, filosofía, ciencias
sociales, lenguaje, teatro, etc.
SCIENCE : programas sobre ciencias naturales y tecnología.
VARIED : programas populares, concursos, variedades,
entrevistas, comedia, humor, etc.
POP M : música comercial, popular, discos vendidos, etc.
ROCK M : música actual, principalmente compuesta e
interpretada por jóvenes artistas.
MORM : temas de música populares, por lo general de
menos de 5 minutos.
LIGHT M : música clásica, instrumental, coral y ligera
interpretada por artistas no profesionales.
CLASSICS: música clásica, grandes óperas, sinfónica, de cámara,
etc.
OTHER M : otros estilos musicales (Rhythm & Blues, Reggae,
etc.).
WEATHER : partes del tiempo, predicciones.
FINANCE : informes financieros, comerciales, mercantiles.
CHILDREN : programas infantiles.
SOCIAL-A : asuntos sociales.
RELIGION : progaramas religiosos.
PHONE-IN : programa de opinión pública por teléfono.
TRAVEL : informes de viaje.
HOBBIES : programas acerca de actividades recreativas.
JAZZ : música de jazz.
COUNTRY : música “country”.
NATION-M : música nacional.
OLDIES : música de la llamada era de oro de la música
popular.
FOLK-M : música filklórica.
DOCUMENT : documentales.
TEST
ALARM : mensajes urgentes, información sobre desastres
naturales, etc.
Se inicia la búsqueda.
< Cuando se localiza el programa seleccionado, la búsqueda se
interrumpe y el tipo de programa se visualiza en la pantalla.
< Si ningún programa del tipo seleccionado no se encuentra
durante la búsqueda PTY, se detendrá en la frecuencia inicial.
< Si quiere detener la búsqueda, pulse el botón RDS.
RDS (Búsqueda PTY)
Esta función permite buscar emisoras por tipo de programa.
Seleccione FM con el botón BAND.
1
Pulse el botón RDS MODE durante más de 1,5 segundos.
2
“SEARCH” parpadeará en la pantalla.
Seleccione el tipo de programa con los botones PRESET
CALL (
b/5).
3
Se pueden seleccionar 31 tipos de programa.
2 1
43
Pulse el botón TUNING (‡ o °).
4
Page 40
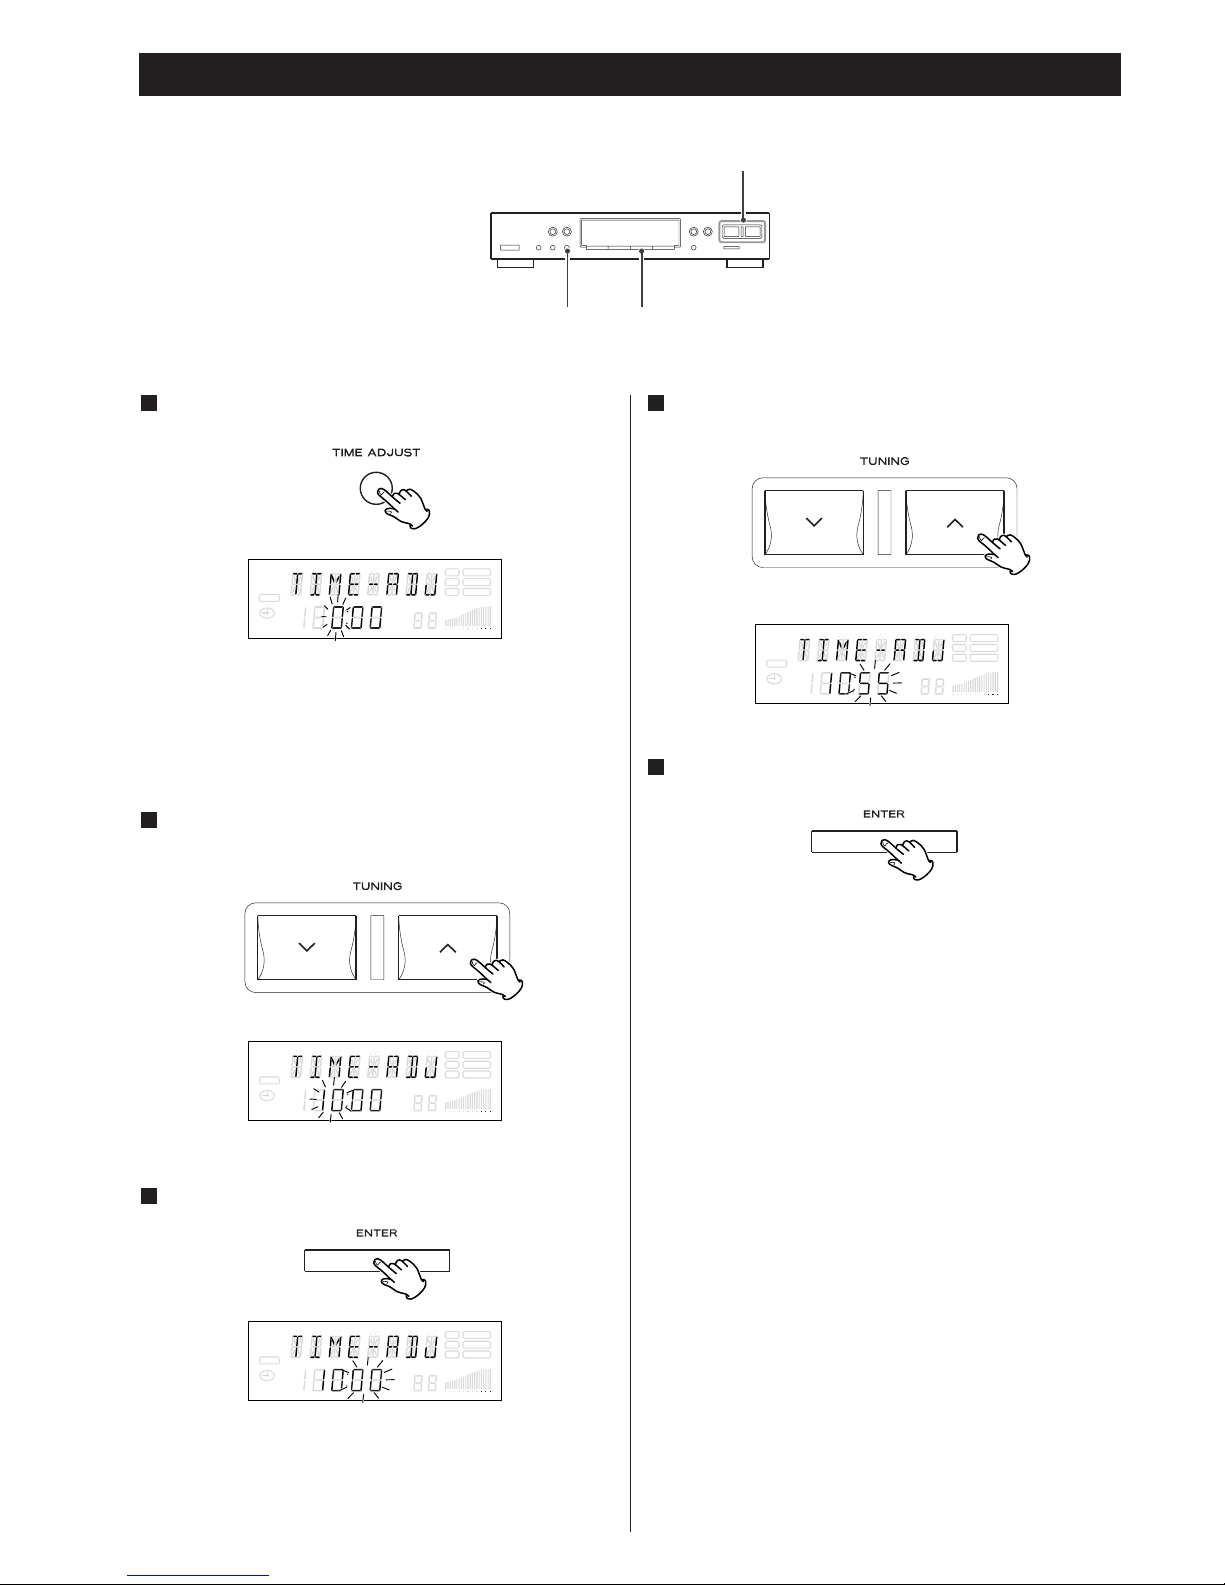
40
Parpadeará la cifra de las horas.
< Puede poner el reloj en hora incluso con la unidad en modo
de espera.
< La unidad utiliza el sistema “militar” de 24 horas.
Antes de 8 segundos, entre la hora actual pulzando los
botones TUNING (
‡/°).
2
Antes de 8 segundos, pulse el botón ENTER.
3
Entre el minuto actual pulzando los botones TUNING
(
‡/°).
4
El reloj comenzará a funcionar desde 00 segundos.
Puesta en hora del reloj
Pulse el botón TIME ADJUST.
1
SLEEP
RDS TUNED
RT STEREO
PTY MEMORY
TIMER
CH.
SIGNAL
FM
A
M
MHz
K
Hz
SLEEP
RDS TUNED
RT STEREO
PTY MEMORY
TIMER
CH.
SIGNAL
FM
A
M
MHz
K
Hz
SLEEP
RDS TUNED
RT STEREO
PTY MEMORY
TIMER
CH.
SIGNAL
FM
A
M
MHz
K
Hz
SLEEP
RDS TUNED
RT STEREO
PTY MEMORY
TIMER
CH.
SIGNAL
FM
A
M
MHz
K
Hz
Parpadeará la cifra de los minutos.
Pulse el botón ENTER.
5
TUNING
ENTERTIME ADJUST
Page 41
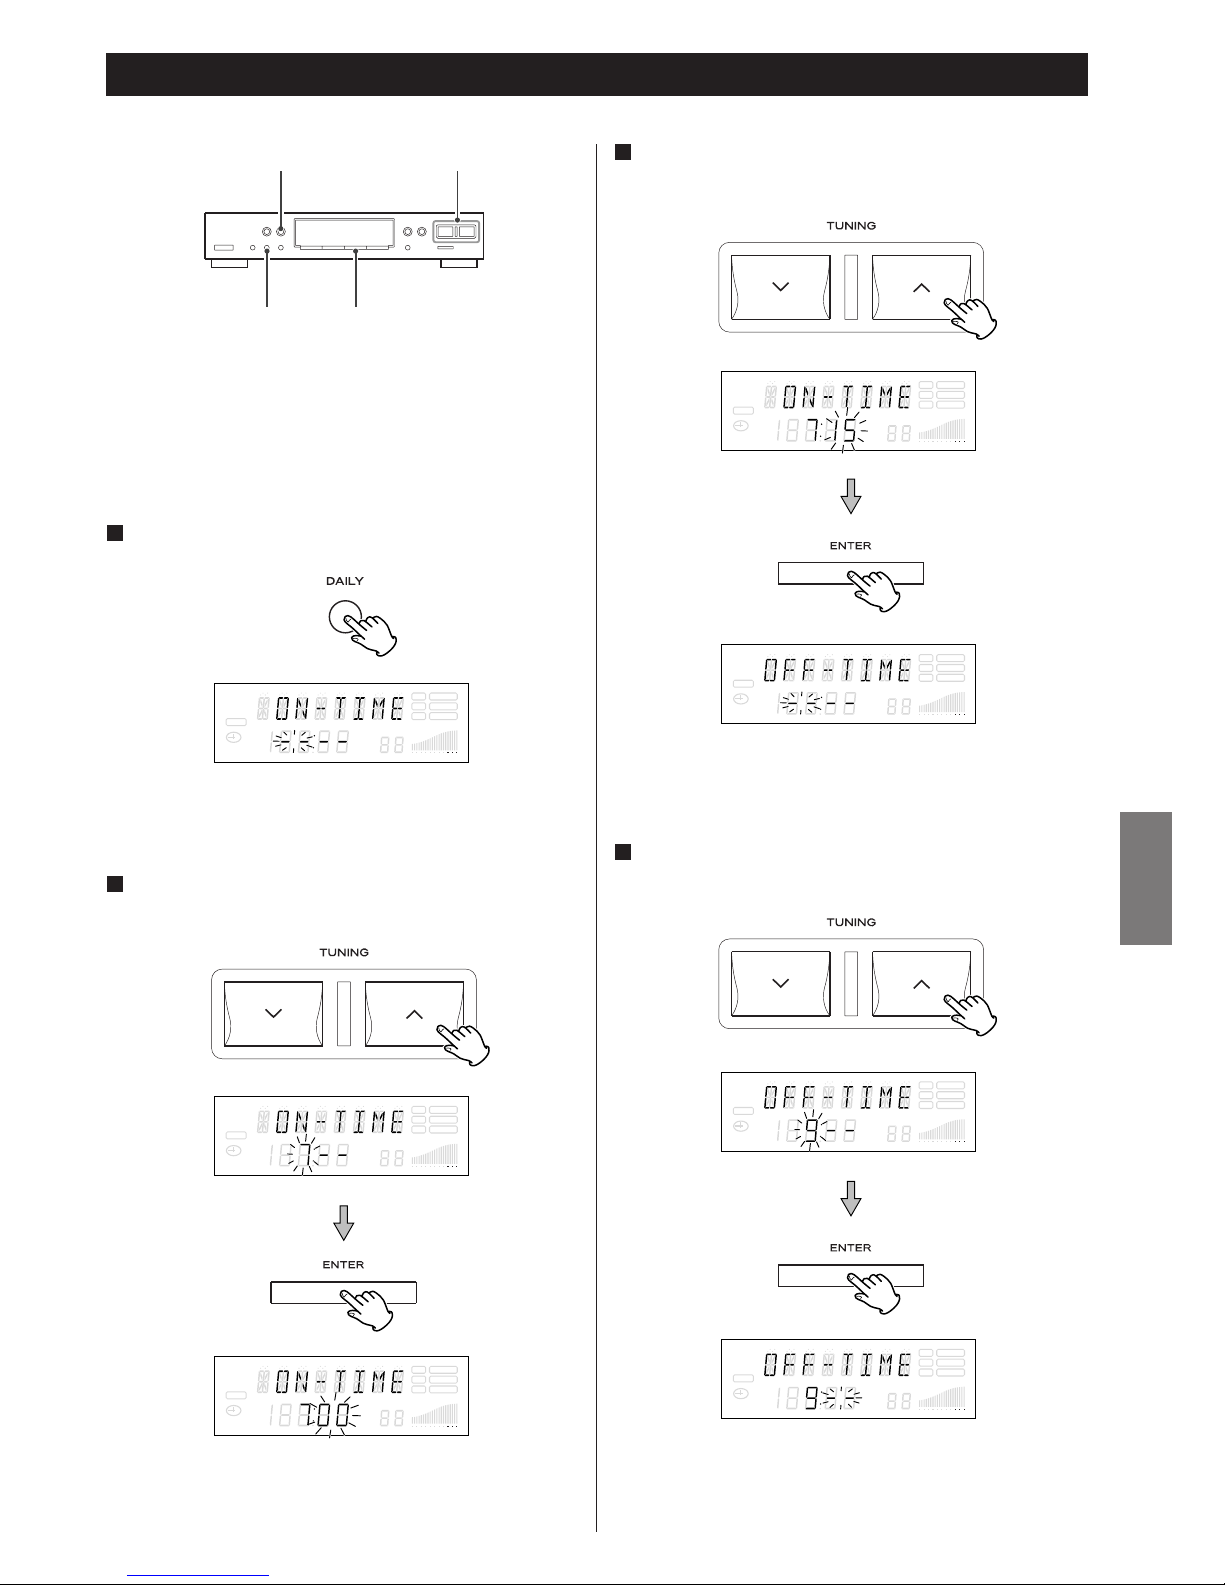
41
ESPAÑOL
Ponga el reloj en hora antes de programar el temporizador.
Pulse el botón DAILY.
1
Parpadeará la cifra de los minutos.
En la pantalla aparece “OFF TIME”, y la cifra de las horas
intermitente.
En la pantalla aparece “ON TIME”, y la cifra de las horas
intermitente.
Ajuste del temporizador diario 1
Establece las horas de apagado utilizando los botones
TUNING (
‡/°) y pues pulse el botón ENTER.
4
TUNINGTIMER
ENTERDAILY
El temporizador diario hace que las unidades A-R610 y T-R610 se
encenden y se apagan a las horas elegidas todos los dias si están
conectadas con un cable de control remoto.
SLEEP
RDS TUNED
RT STEREO
PTY MEMORY
TIMER
CH.
SIGNAL
FM
A
M
MHz
K
Hz
SLEEP
RDS TUNED
RT STEREO
PTY MEMORY
TIMER
CH.
SIGNAL
FM
A
M
MHz
K
Hz
SLEEP
RDS TUNED
RT STEREO
PTY MEMORY
TIMER
CH.
SIGNAL
FM
A
M
MHz
K
Hz
Establece los minutos de encendido utilizando los
botones TUNING (
‡/°) y pues pulse el botón ENTER.
3
SLEEP
RDS TUNED
RT STEREO
PTY MEMORY
TIMER
CH.
SIGNAL
FM
A
M
MHz
K
Hz
SLEEP
RDS TUNED
RT STEREO
PTY MEMORY
TIMER
CH.
SIGNAL
FM
A
M
MHz
K
Hz
SLEEP
RDS TUNED
RT STEREO
PTY MEMORY
TIMER
CH.
SIGNAL
FM
A
M
MHz
K
Hz
SLEEP
RDS TUNED
RT STEREO
PTY MEMORY
TIMER
CH.
SIGNAL
FM
A
M
MHz
K
Hz
Establece las horas de encendido utilizando los botones
TUNING (
‡/°) y pues pulse el botón ENTER.
2
Page 42
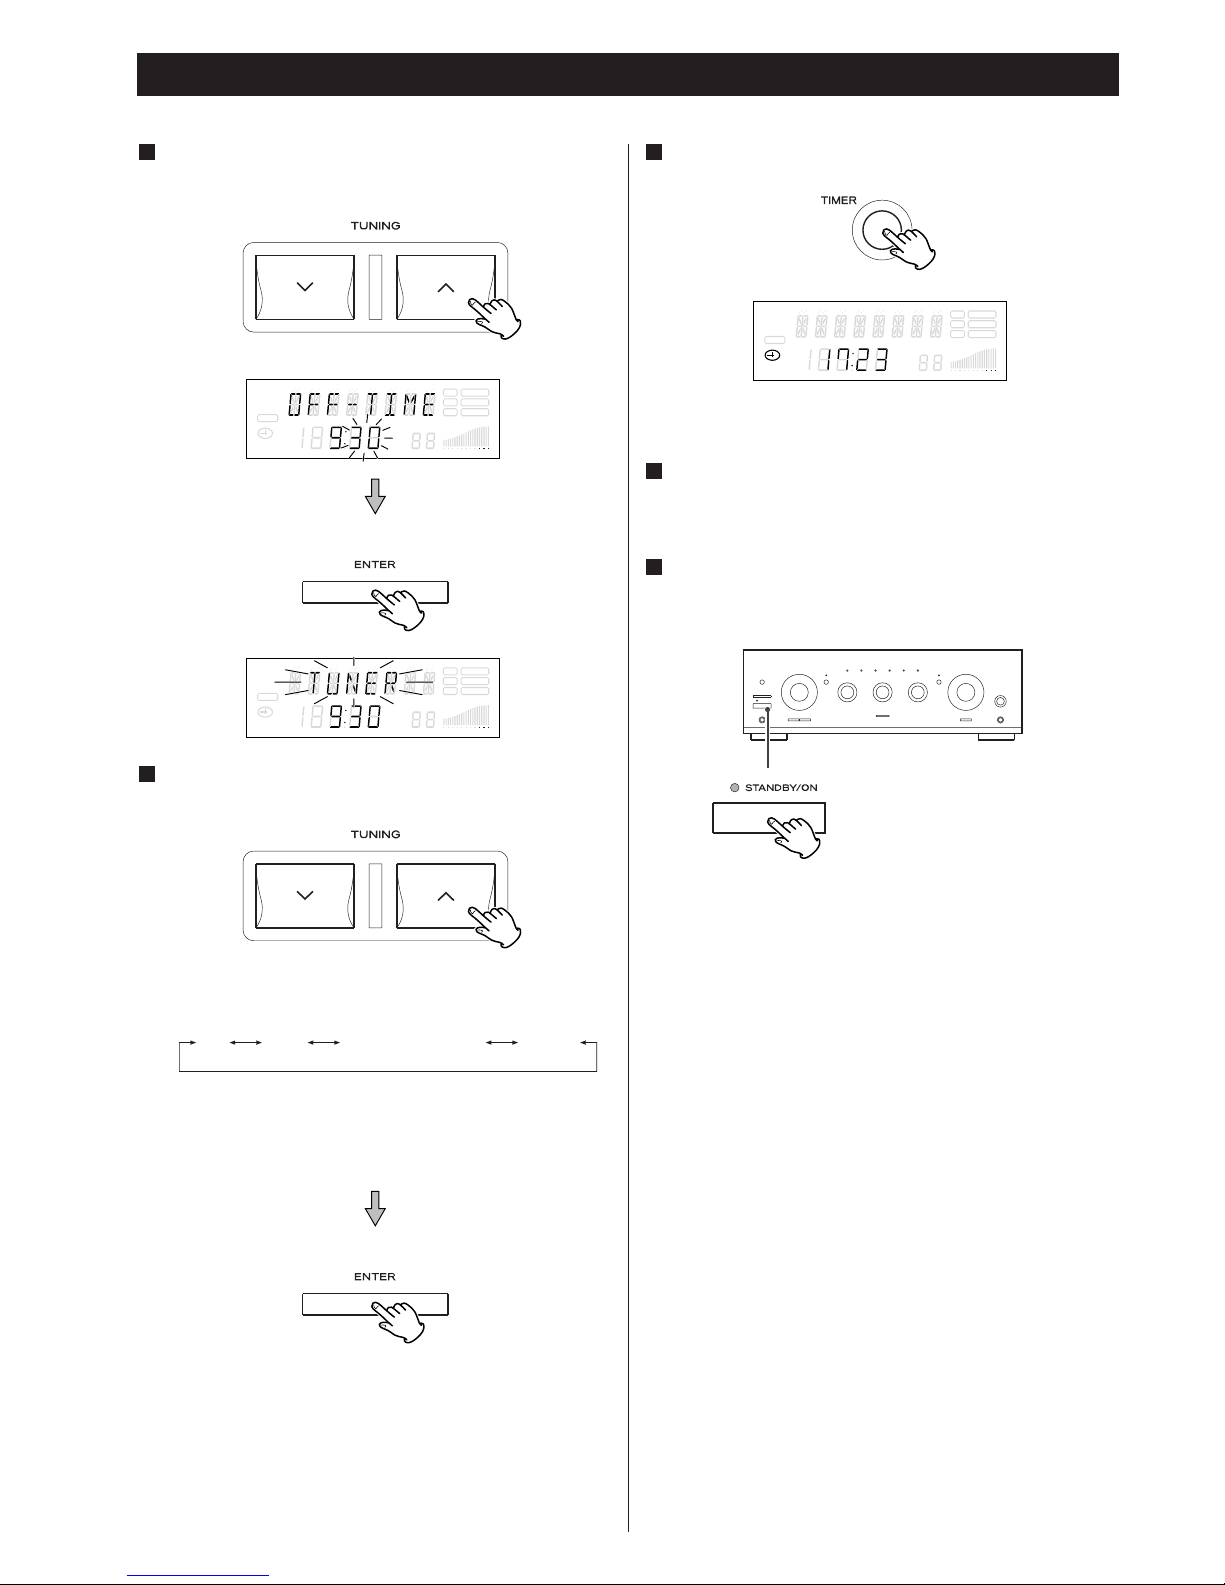
42
Ajuste del temporizador diario 2
Establece los minutos de apagado utilizando los
botones TUNING (
‡/°) y pues pulse el botón ENTER.
5
Seleccione una fuente de sonido utilizando los botones
TUNING (
‡/°) y pues pulse el botón ENTER.
6
Cada vez que pulse los botones TUNING (‡ o °) la fuente
de sonido se cambia como sigue:
< No seleccione “CD”, “TAPE” o “TUNER-R” si su lector de CD
o cassette conectado a el A-R610 no tiene la función de
lectura/grabación controlada por temporizador.
CD TAPE TUNER R(ecording) TUNER
Todas las unidades conectadas mediante cables de control
remoto se encenderán y se apagarán todos los días a las
horas programadas.
Si no utiliza el temporizador, pulse el botón TIMER para
desactivarlo. (El indicador del temporizador desaparece
de la pantalla.)
Pulse de nuevo el botón TIMER para activar el temporizador.
Prepare el sistema para el programa del temporizador.
Ajuste el volumen del amplificador, sintonice una emisora,
etc.
8
El ajuste del temporizador queda almacenado en la memoria.
Pulse el botón TIMER.
7
El ndicador del temporizador se ilumina en la pantalla
SLEEP
RDS TUNED
RT STEREO
PTY MEMORY
TIMER
CH.
SIGNAL
FM
A
M
MHz
K
Hz
SLEEP
RDS TUNED
RT STEREO
PTY MEMORY
TIMER
CH.
SIGNAL
FM
A
M
MHz
K
Hz
SLEEP
RDS TUNED
RT STEREO
PTY MEMORY
TIMER
CH.
SIGNAL
FM
A
M
MHz
K
Hz
Pulse el botón STANDBY/ON del A-R610 para apagar
todos los equipos.
9
Page 43
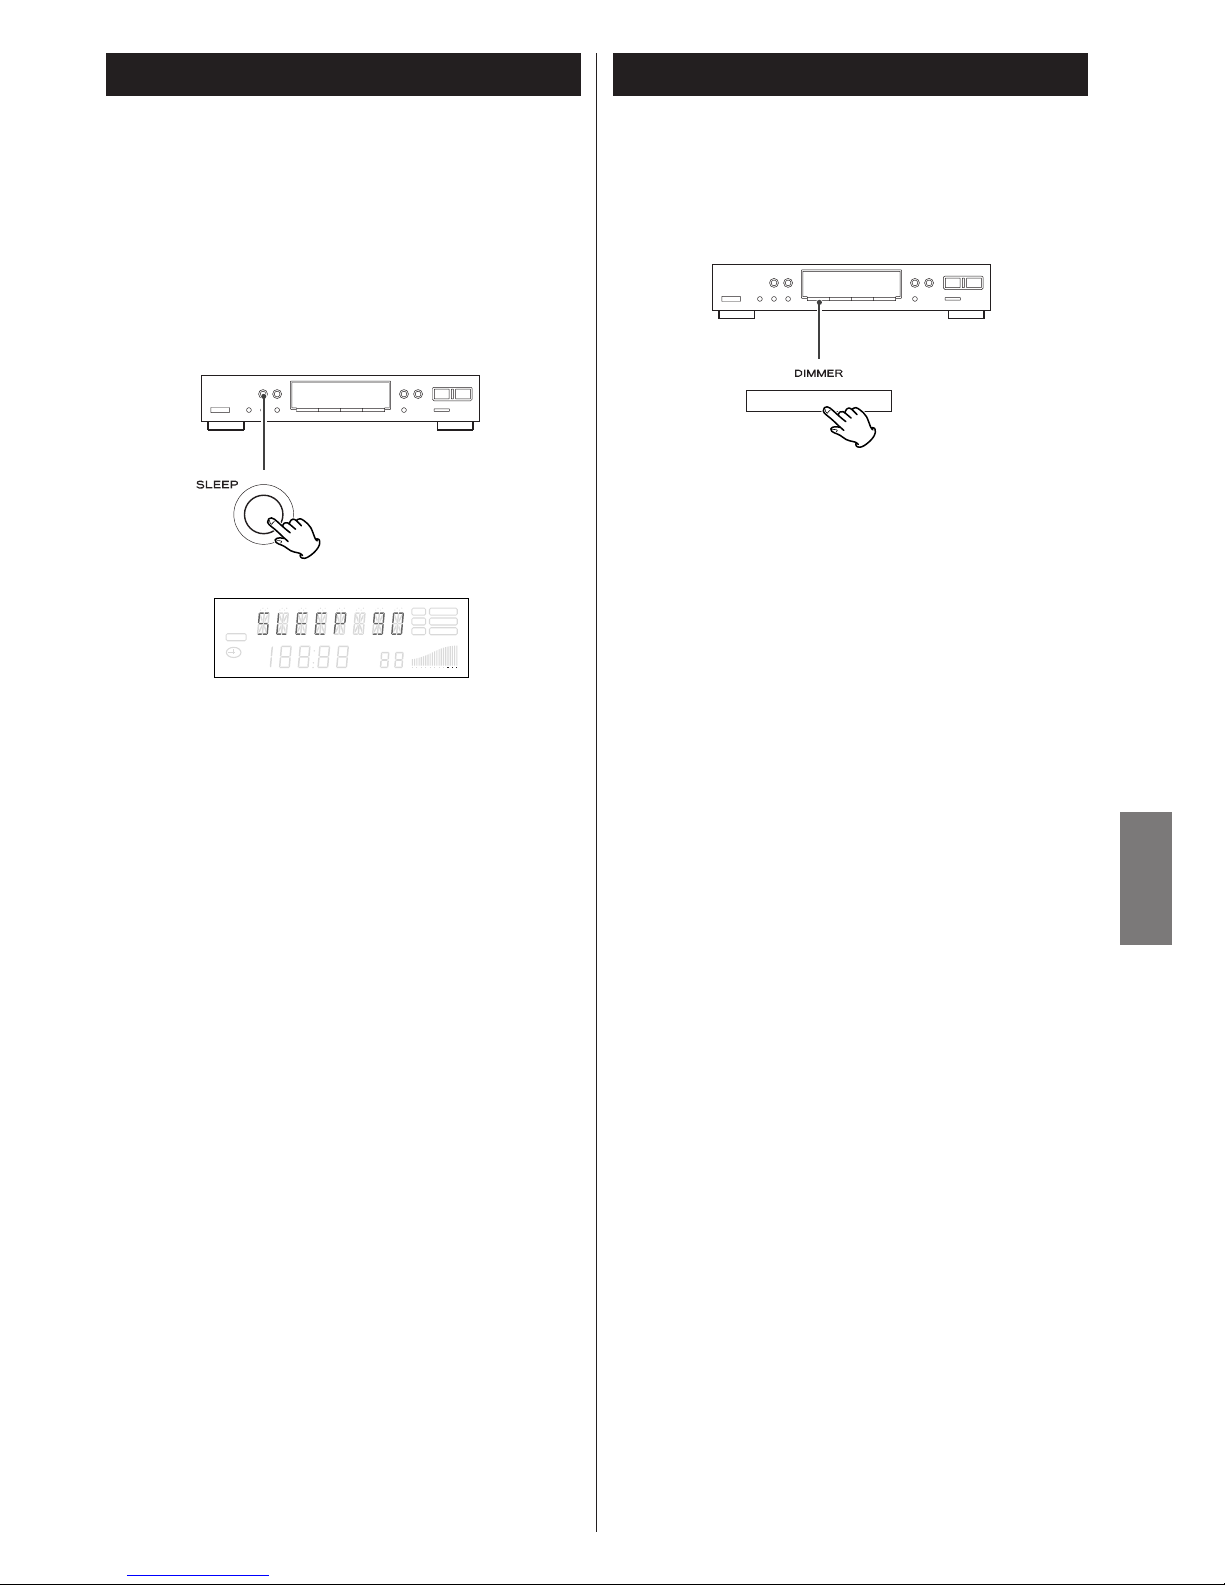
43
ESPAÑOL
Desconexión programada
El sistema se puede programar para la desconexión tras un
periodo de tiempo especificado.
Pulse el botón repetidas veces hasta que aparezca la lectura de
tiempo deseada.
La función de desconexión programada hace que las unidades AR610 y T-R610 se apagan en el mismo tiempo si están
conectadas con un cable de control remoto.
SLEEP 90 (80, 70, 60, 50, 40, 30, 20, 10)
La unidad se apagará cuando transcurran 90 (80, 70, 60,
50, 40, 30, 20 o 10) minutos, respectivamente.
En el modo de visualización normal
Desactivado el temporizador de desconexión automática.
< Si quiere saber el tiempo que falta para la desconexión, pulse
una vez el botón SLEEP. El tiempo restante se visualizará
durante 2,5 segundos, y se restablecerá la pantalla normal.
SLEEP
RDS TUNED
RT STEREO
PTY MEMORY
TIMER
CH.
SIGNAL
FM
A
M
MHz
K
Hz
< Esta función quedará cancelada cuando se apague la unidad.
Intensidad luminosa
La luminosidad de la pantalla puede ser reducida presionando el
botón DIMMER.
Pulse de nuevo el botón para cancelar la función.
Page 44

Solución de problemas
Si surge algún problema con la unidad, dedique unos instantes a
revisar los siguientes puntos por si puede solucionar el problema
sin necesidad de acudir al distribuidor o centro de servicio
técnico TEAC.
No hay corriente.
e Compruebe la conexión a la red. Compruebe que la fuente
de c.a. no es una toma conmutada y que, si lo es, el
interruptor no está activado. Compruebe que hay corriente
en la toma de c.a. conectando otro aparato como una
lámpara o un ventilador.
No hay sonido
e Compruebe la conexión del amplificador.
e Compruebe que el amplificador funciona correctamente.
No puede recibirse ninguna emisora, o la señal es
demasiado débil.
e Compruebe que la antena está conectada correctamente.
e Sintonice bien la emisora.
e Instale de nuevo la antena, colocándola en una mejor
posición de recepción.
e Puede que sea necesaria una antena externa.
Sonido con ruido.
e Aleje la antena lo máximo posible del televisor o reproductor
de CD.
e Si hay un televisor o reproductor de CD cerca de la unidad,
apáguelos.
Aunque la emisión es en estéreo, se recibe en mono.
e Pulse el botón FM MODE.
Si no se restablece el funcionamiento normal, desconecte
el cable de alimentación de la toma y vuélvalo a conectar.
Mantenimiento
Si se ensucia la superficie del equipo, pase un paño suave o
utilice jabón líquido normal diluido. Limpie cualquier resto
que pueda quedar en la unidad. No utilice aguarrás, bencina
ni alcohol, ya que podría dañar el acabado de la unidad.
Especificaciones
44
Section syntoniseur FM
Gama de sintonia . . 87,5 MHz - 108,0 MHz (pasos de 50 kHz)
Sensibilidad útil (IHF) . . . . . . . . . . . . . . . . . . . . . Mono: 10 dBf
Umbral de silienciamiento 50 dB . . . . . . . . . . . . Mono: 17 dBf
Stereo: 33 dBf
Selectividad de canal alternativo (98 MHz ± 400 kHz) . . 65 dB
Relación de recpuesta de frecuencia de imagen. . . . . . . 70 dB
Respuesta de frecuencia . . . . . 20 Hz - 15 kHz (+0,5 dB/–3 dB)
Razón de captura . . . . . . . . . . . . . . . . . . . . . 2 dB (a 98 MHz)
Distorsión (a 65 dBf, 98 MHz) . . . . . . . . . . . . . . Mono: 0,1 %
Stereo: 0,3 %
Relación señal-ruido (a 65 dBf, 1 kHz) . . . . . . . . Mono: 70 dB
Stereo: 65 dB
Relación de supresión de AM . . . . . . . . . . . . . . . . . . . . 55 dB
Separación estereofónica (1 kHz). . . . . . . . . . . . . . . . . . 40 dB
Salida . . . . . . . . . . . . . . . . . . . . . . . . . . . . 800 mV/2,2 k ohm
Sección del sintonizador AM
Gama de sintonia . . . . . 522 kHz - 1.620 kHz (pasos de 9 kHz)
Sensibilidad útil . . . . . 55 dB/m (562 µV/m, antena de cuadro)
Selectividad . . . . . . . . . . . . . . . . . . . . . . . . . . 55dB (at 9 kHz)
Relación de repuesta de frecuencia de imagen . . . . . . . 35 dB
Relación de respuesta IF . . . . . . . . . . . . . . . . . . . . . . . . 60 dB
Distorsión . . . . . . . . . . . . . . . . . . . . . . . . . . . 1 % (a 85 dB/m)
Relación señal-ruido . . . . . . . . . . . . . . . . . . 40 dB (a 85 dB/m)
Salida . . . . . . . . . . . . . . . . . . . . . . . . . . . . 220 mV/2,2 k ohm
Generalidades
Requisitos de alimentación . . . . . . . . . . . . . . 230 V CA, 50 Hz
Consumo de energía . . . . . . . . . . . . . . . . . . . . . . . . . . . . 6 W
Dimensiones (A x Alt.x P) . . . . . . . . . . . . . 435 x 87 x 294 mm
Peso (neto) . . . . . . . . . . . . . . . . . . . . . . . . . . . . . . . . . . 2,9 kg
Accesorios estándar . . . . . . . . . . . . . . . . . . . . . Cable RCA x 1
Cable de conexión de control remoto x 1
Antena de cuadro de AM x 1
Antena de FM monofilar x 1
• El diseño y las especificaciones están sujetos a cambios sin
previo aviso.
• El peso y dimensiones son aproximados.
• Las ilustraciones pueden diferir de los modelos de producción.
Page 45
45
DEUTSCH
Speicherung der Einstellungen
Falls die Spannungszufuhr länger als 14 Tage unterbrochen ist,
gehen die gespeicherten Einstellungen (wie Sender-Presets und
Timer-Zeiten) verloren.
Nach Herstellen der Netzverbindung dauert es ungefähr drei bis
vier Tage, bis die Speicherpufferung wieder einsetzbar ist.
Betätigen Sie den RESET-Schalter, um die gespeicherten
Einstellungen manuell zurückzusetzen.
Alle Einstellungen werden auf die jeweils vordefinierten Werte
zurückgestellt.
Inhalt
Vielen Dank für den Kauf dieses TEAC-Geräts. Bitte lesen
Sie diese Anleitung sorgfältig durch, um die Leistungsfähigkeit dieses Geräts optimal nutzen zu können.
Vor der ersten Inbetriebnahme . . . . . . . . . . . . . . . . . . . . . . . . 45
Anschlüsse . . . . . . . . . . . . . . . . . . . . . . . . . . . . . . . . . . . . . . . 46
Bezeichnungen der Bedienelemente . . . . . . . . . . . . . . . . . . . . 48
Senderabstimmung. . . . . . . . . . . . . . . . . . . . . . . . . . . . . . . . . 49
Preset-Senderwahl . . . . . . . . . . . . . . . . . . . . . . . . . . . . . . . . . 50
RDS . . . . . . . . . . . . . . . . . . . . . . . . . . . . . . . . . . . . . . . . . . . . 52
RDS (PTY-Suchfunktion) . . . . . . . . . . . . . . . . . . . . . . . . . . . . . 53
Einstellen der Uhrzeit . . . . . . . . . . . . . . . . . . . . . . . . . . . . . . . 54
Programmieren eines sich täglich
wiederholenden Timerereignisses . . . . . . . . . . . . . . . . . . . . 55
Einschlaftimerfunktion . . . . . . . . . . . . . . . . . . . . . . . . . . . . . . 57
Dimmer . . . . . . . . . . . . . . . . . . . . . . . . . . . . . . . . . . . . . . . . . 57
Hilfe bei Funktionsstörungen. . . . . . . . . . . . . . . . . . . . . . . . . . 58
Technische Daten . . . . . . . . . . . . . . . . . . . . . . . . . . . . . . . . . . 58
Vor der ersten Inbetriebnahme
Vor der ersten Inbetriebnahme
< Da der T-R610 sich während des Betriebs erwärmen kann,
sorgen Sie bitte dafür, daß stets ausreichend Raum zur
Belüftung oberhalb des Geräts vorhanden ist.
< Achten Sie bitte darauf, daß die Netzspannung, mit der Sie
den T-R610 betreiben möchten, mit der auf dem Label an der
Geräterückseite angegebenen Betriebsspannung
übereinstimmt. Falls Sie diesbezüglich irgendwelche Zweifel
haben, wenden Sie sich bitte umgehend an einen Elektriker.
< Achten Sie bei der Auswahl des Aufstellungsortes bitte
darauf, daß der T-R610 nicht direkter Sonneneinstrahlung
oder der unmittelbaren Einwirkung anderer Wärmequellen
ausgesetzt ist. Vermeiden Sie bitte auch Aufstellungsorte, die
Erschütterungen sowie das vermehrte Aufkommen von Staub,
Hitze, Kälte oder Feuchtigkeit aufweisen.
< Plazieren Sie den T-R610 niemals auf Verstärkern, Endstufen
oder Receivern.
< Öffnen Sie niemals das Gehäuse, da dies zur Beschädigung
der internen Bauteile führen kann oder Sie einen Stromschlag
erleiden können. Falls ein Fremdkörper ins Geräteinnere
eingedrungen ist, wenden Sie sich bitte umgehend an Ihren
Händler.
< Ziehen Sie zum Entfernen des Netzsteckers aus der
Wandsteckdose niemals am Netzkabel sondern immer am
Stecker selbst.
< Verwenden Sie zum Reinigen des T-R610 keine chemischen
Lösungsmittel, da dies zu Schäden am Gehäuse führen kann.
Verwenden Sie ausschließlich ein trockenes, weiches Tuch.
< Bewahren Sie diese Bedienungsanleitung an einem sicheren
Ort auf, so daß Sie jederzeit zur Hand haben.
Entsorgung ihrer alten elektrischen oder elektronischen
Geräte
1. Sofern ein Gerät mit dem Symbol
einer durchkreuzten Abfalltonne
gekennzeichnet ist, bedeutet dies,
dass dessen Entsorgung gemäß der
„RICHTLINIE 2002/96/EG DES
EUROPÄISCHEN PARLAMENTS UND
DES RATES vom 27. Januar2003 über
Elektro- und Elektronik-Altgeräte“
geregelt ist.
2. Sämtliche elektrischen und elektronischen Geräte müssen
dementsprechend, getrennt vom Restmüll, den von der
jeweils zuständigen städtischen oder Bundesbehörde dazu
bestimmten, gesonderten Wertstoffsammlungen zugeführt
werden.
3. Eine korrekte Entsorgung ihrer alten elektrischen oder
elektronischen Geräte trägt in hohem Maße der
Vermeidung möglicher negativer Konsequenzen für die
Umwelt und damit auch für ihre eigene sowie die
Gesundheit Anderer bei.
4. Weiterführende Informationen bezüglich der Entsorgung
ihrer alten elektrischen oder elektronischen Geräte erhalten
Sie auf Anfrage bei ihrem zuständigen Stadtbüro,
Abfallentsorgungsgesellschaft oder dem Händler, bei dem
Sie das Gerät ursprünglich erworben haben.
ACHTUNG
< Vermeiden Sie Aufstellungsorte, an denen diese
Komponente Tropf- oder Spritzwasser ausgesetzt ist.
< Platzieren Sie keine mit Flüssigkeiten gefüllten Objekte, wie
etwa Vasen, auf der Komponente.
< Installieren Sie diese Komponente nicht in geschlossenen
Möbeln, wie etwa einem Bücherschrank oder einem
geschlossenen Regalsystem.
< Auch im Bereitschaftsmodus - der STANDBY/ON-Schalter
befindet sich in der Stellung „Standby“ - bezieht diese
Komponente einen geringen Ruhestrom aus dem
Stromnetz.
< Platzieren Sie diese Komponente so, dass die
Wandsteckdose, an der Sie das Gerät angeschlossen haben,
jederzeit leicht zugänglich ist.
< Achten Sie darauf, dass die Wandsteckdose, an der Sie die
Komponente anschließen, geerdet ist
(Schutzkontaktsteckdose).
Page 46
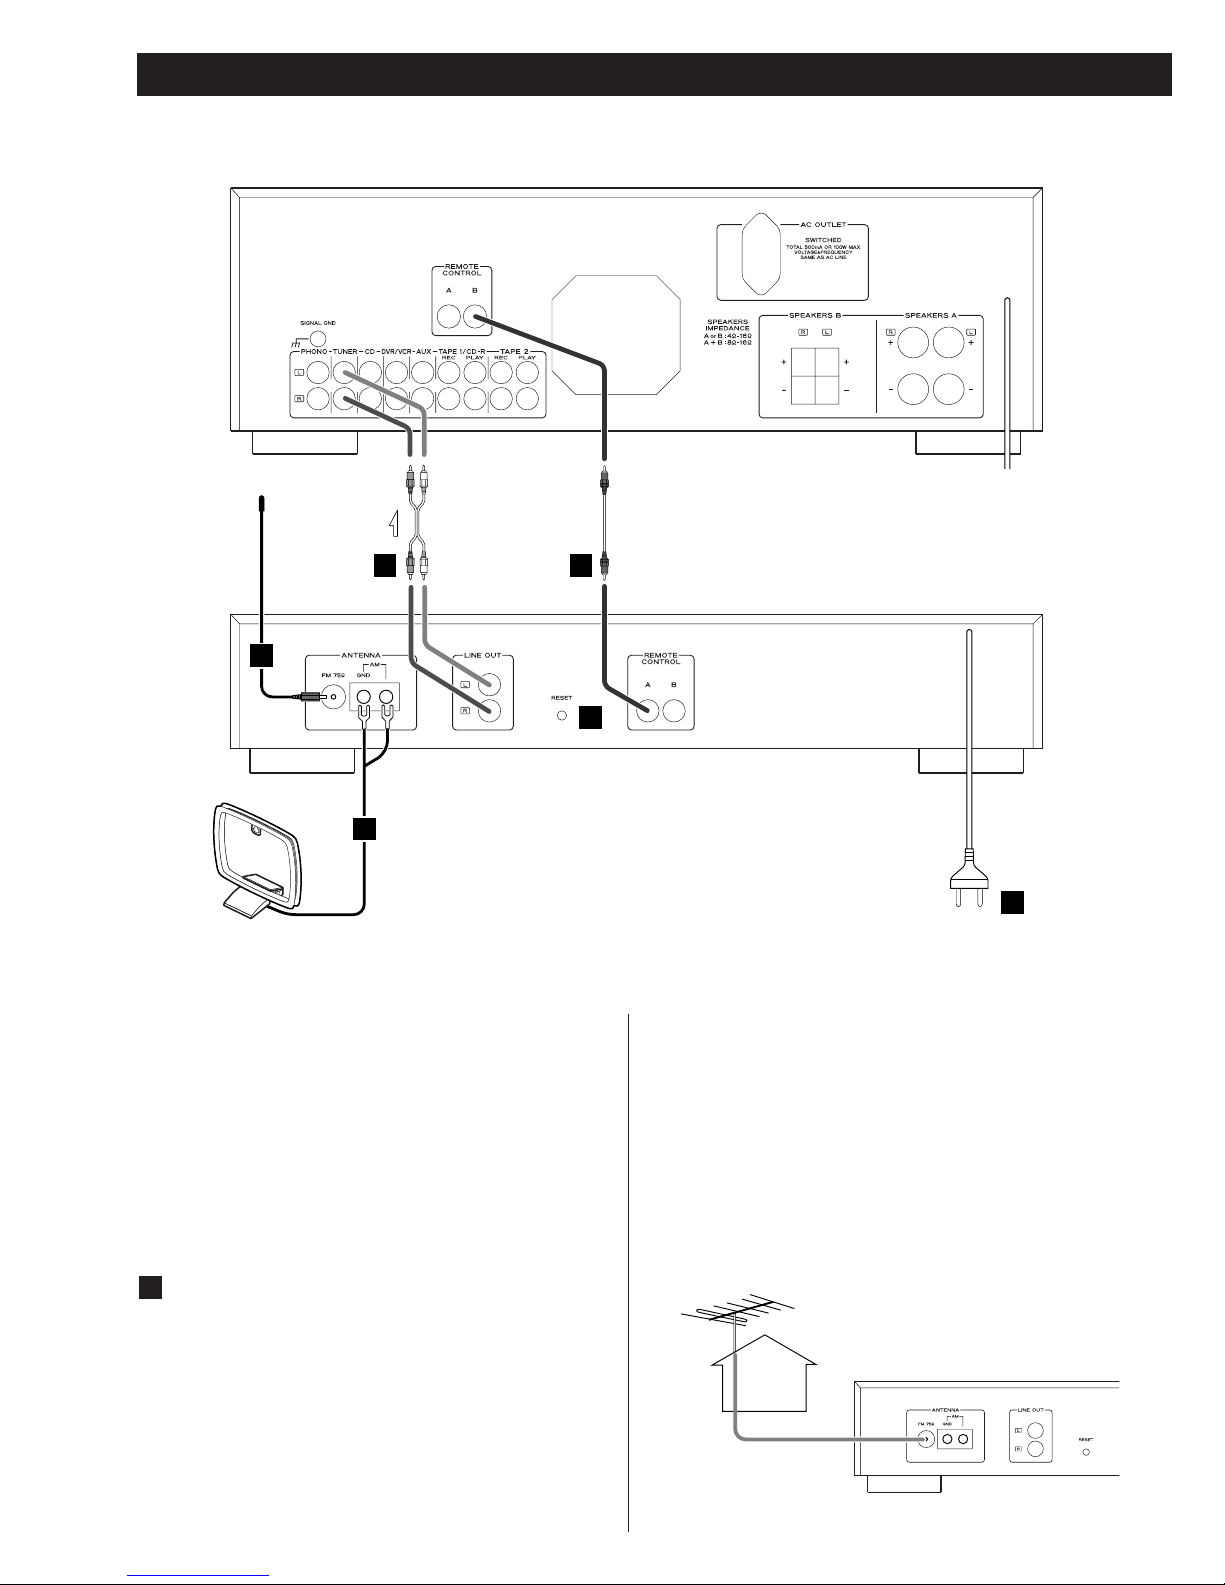
46
VORSICHT:
< Schalten Sie alle Geräte aus, bevor Sie Anschlüsse
vornehmen.
< Lesen Sie bitte die Bedienungsanleitung für jede
Komponente, die Sie mit diesem Gerät zu verwenden
beabsichtigen.
< Achten Sie darauf, jeden Stecker sicher einzuschieben.
Signalverbindungskabel sollten nicht zusammen mit dem
Netzkabel oder den Lautsprecherkabeln gebündelt werden,
da anderenfalls Interferenzen auftreten können.
Anschlüsse
T-R610
C
D
E
F
A
B
UKW-Zimmerantenne
Schließen Sie die UKW-Zimmerantenne am 75Ω-
Antennenanschluss an. Spannen Sie das Antennenkabel und
stellen Sie am Tuner den gewünschten Sender ein (siehe
Seite 49). Befestigen Sie die Antenne mittels Reißzwecken,
Stecknadeln oder Klebeband an einem Fenster oder der
Wand, und richten Sie sie auf beste Empfangsqualität aus.
A
UKW-Außenantenne
In Gebieten mit verminderter UKW-Empfangsqualität kann
die Verwendung einer Außenantenne erforderlich sein.
Normalerweise verbessert eine Dreielementantenne die
Empfangsqualität ausreichend. Sehr ungünstige
Empfangsbedingungen können allerdings die Verwendung
von Fünf-, Sieben- oder Antennen mit mehr Elementen
erforderlich machen.
< Trennen Sie bei Verwendung einer UKW-Außenantenne die
Zimmerantenne vom Tuner.
Verstärker (A-R610)
Page 47
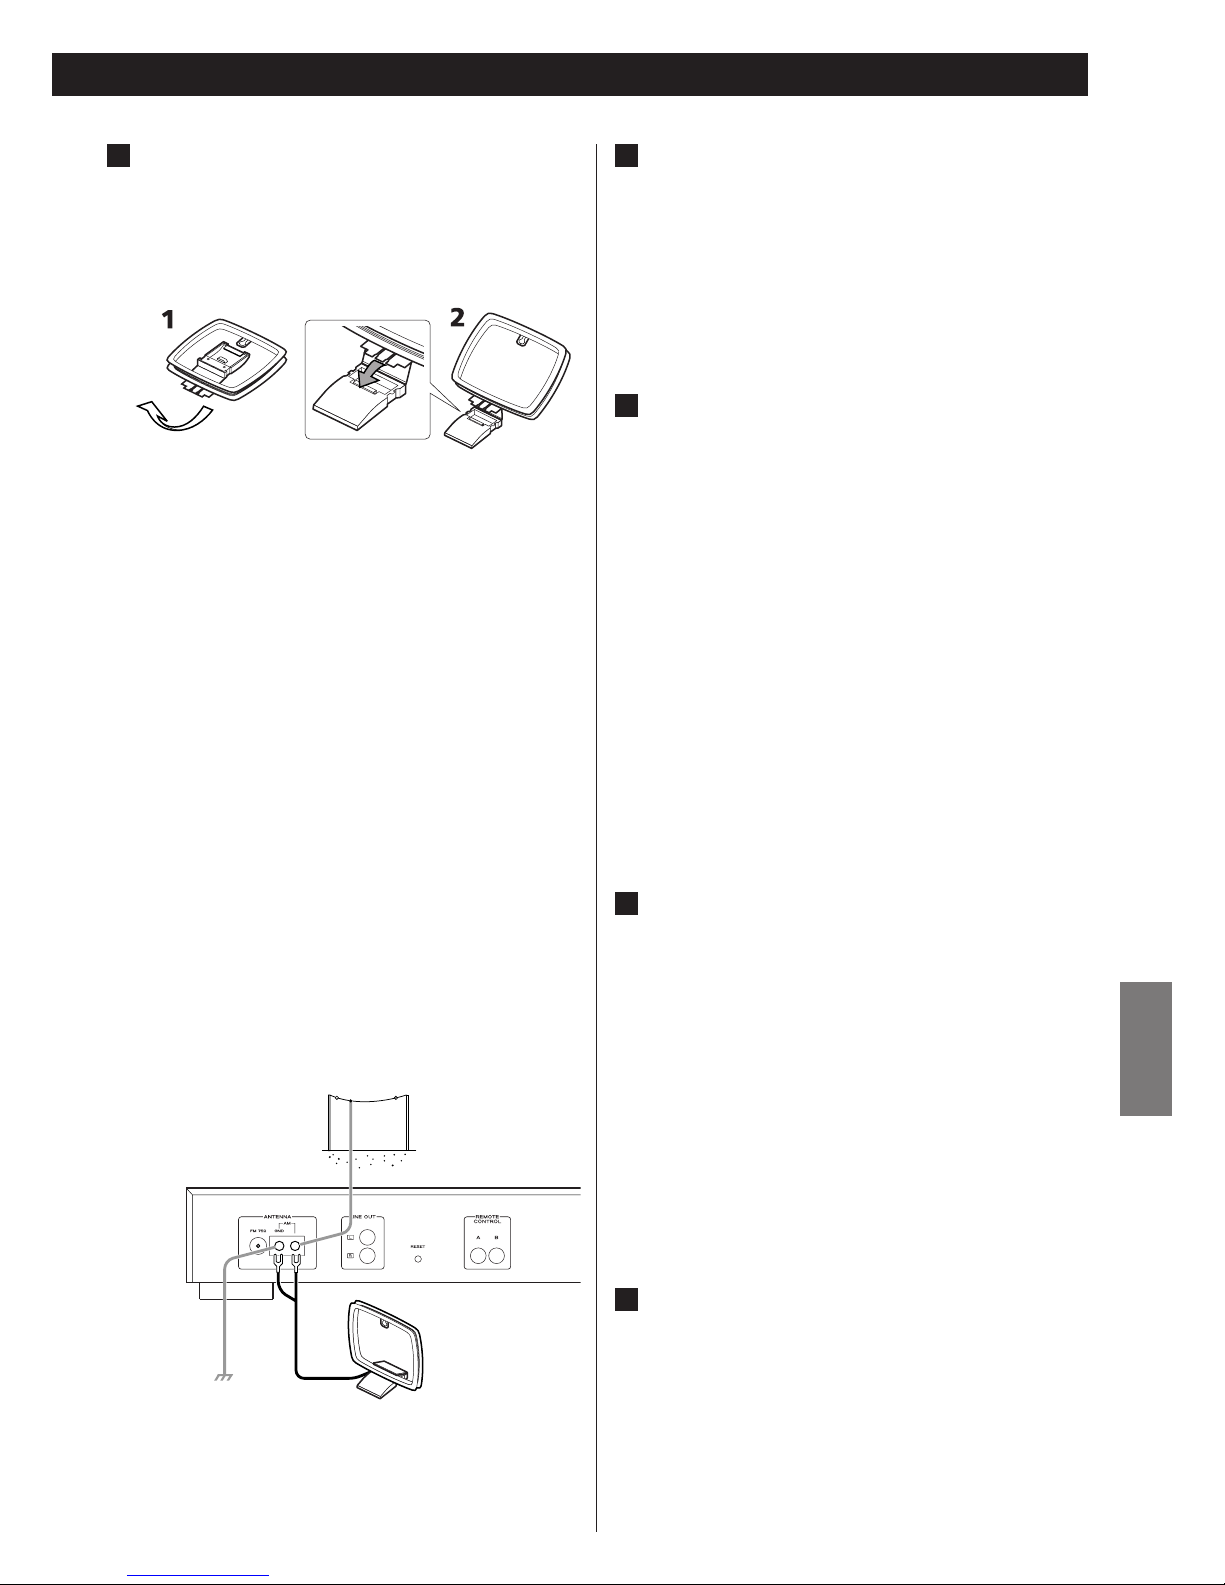
47
DEUTSCH
LINE OUT-Buchsen
Das analoge zweikanalige Audiosignal wird über diese
Buchsen ausgegeben. Verbinden Sie diese Buchsen mittels
Cinchkabel mit den TUNER-Eingängen der
Verstärkerkomponente (A-R610).
Anschluss:
weißer Stecker
q weiße Buchse (L: linker Kanal)
roter Stecker
q rote Buchse (R: rechter Kanal)
REMOTE CONTROL-Buchse
Sofern Sie einen TEAC A-R610 besitzen, können Sie die
Möglichkeiten, die Ihnen eine Systemfernbedienung bietet,
nutzen:
• Während des Einstellens von Radioempfangsfrequenzen
wird als Eingangssignal am A-R610 automatisch „TUNER“
ausgewählt.
• Sie können den T-R610 steurn, indem die
Universalfernbedienung RC-592B verwenden, die zum
Lieferumfang des A-R610 gehört.
Verbinden Sie die REMOTE CONTROL-Buchse mittels
mitgeliefertem Fernbedienungskabel mit der REMOTE
CONTROL-Buchse (A oder B) des A-R610.
Hinweis:
Die Fernbedienung gehört nicht zum Lieferumfang dieser
Komponente.
RESET
In den nachfolgend beschriebenen Fällen kann es bei
Verwendung der Funktionstasten zu Fehlfunktionen
kommen:
• Sofern das System durch Überspannung beschädigt wurde.
• Sofern starke Spannungs- und/oder Frequenzschwankungen
in der Netzversorgung auftreten.
Betätigen Sie in solch einem Fall ein- oder zweimal den
RESET-Schalter. Verwenden Sie hierzu die Spitze eines
Bleistifts oder eines Kugelschreibers.
Alle gespeicherten Einstellungen (wie Sender-Presets und
Timer-Zeiten) gehen hierbei allerdings verloren.
Netzkabel
Nachdem Sie sämtliche Kabelverbindungen zwischen den
Komponenten Ihres Systems hergestellt haben, verbinden
Sie das Netzkabel mit einer Wandsteckdose.
Vergewissern Sie sich bitte, dass die Wandsteckdose, an der
Sie das Audiosystem anschließen möchten, die korrekte
Netzversorgung zur Verfügung stellt.
Ziehen Sie bitte nicht am Netzkabel. Verbinden oder ziehen
Sie stets den Stecker des Netzkabels.
F
E
D
C
Hinweis:
Lassen Sie die MW-Zimmerantenne auch bei Verwendung
einer MW-Außenantenne am Tuner angeschlossen.
MW-Zimmerantenne
Die im Lieferumfang dieser Komponente befindliche
Hochleistungs-MW-Zimmerantenne liefert in den meisten
Fällen eine gute Empfangsqualität.
Zur Aufstellung befestigen Sie die MW-Zimmerantenne in
der dafür vorgesehenen Klammer des Antennenstandfußes.
Schließen Sie die Kabel der MW-Zimmerantenne an den mit
„AM“ bezeichneten Antennenanschlüssen des Tuners an.
Stellen Sie die Antenne in einem Regal auf oder befestigen
Sie sie an einem Fensterrahmen, und richten Sie sie auf
beste Empfangsqualität aus. Achten Sie bitte darauf, dass
alle anderen Kabel, wie Netz-, Lautsprecher-, und
Verbindungskabel, mit größtmöglichem Abstand zum
Antennenkabel und zur Antenne verlegt sind.
< Falls die MW-Zimmerantenne nicht die gewünschte
Empfangsqualität liefert (oftmals aufgrund von ungünstigen
Gebäudeeigenschaften), kann die Verwendung einer MWAußenantenne erforderlich sein.
Verwenden Sie hierzu eine handelsübliche MWAußenantenne oder, falls eine solche nicht erhältlich sein
sollte, ein mindestens fünf Meter langes, isoliertes Kabel.
Entfernen Sie die Isolierung an einem Ende des Kabels und
verbinden Sie dieses mit den entsprechenden Anschlüssen,
wie in der Abbildung beschrieben.
Spannen Sie das Antennenkabel im Außenbereich Ihrer
Wohnung oder im Zimmer, in der Nähe eines Fensters. Zur
weiteren Verbesserung der Empfangsqualität können Sie die
Antennenerdungsbuchse (GND) mit der Hauserde
(Heizkörper, Wasserrohr, usw.) verbinden.
B
Page 48
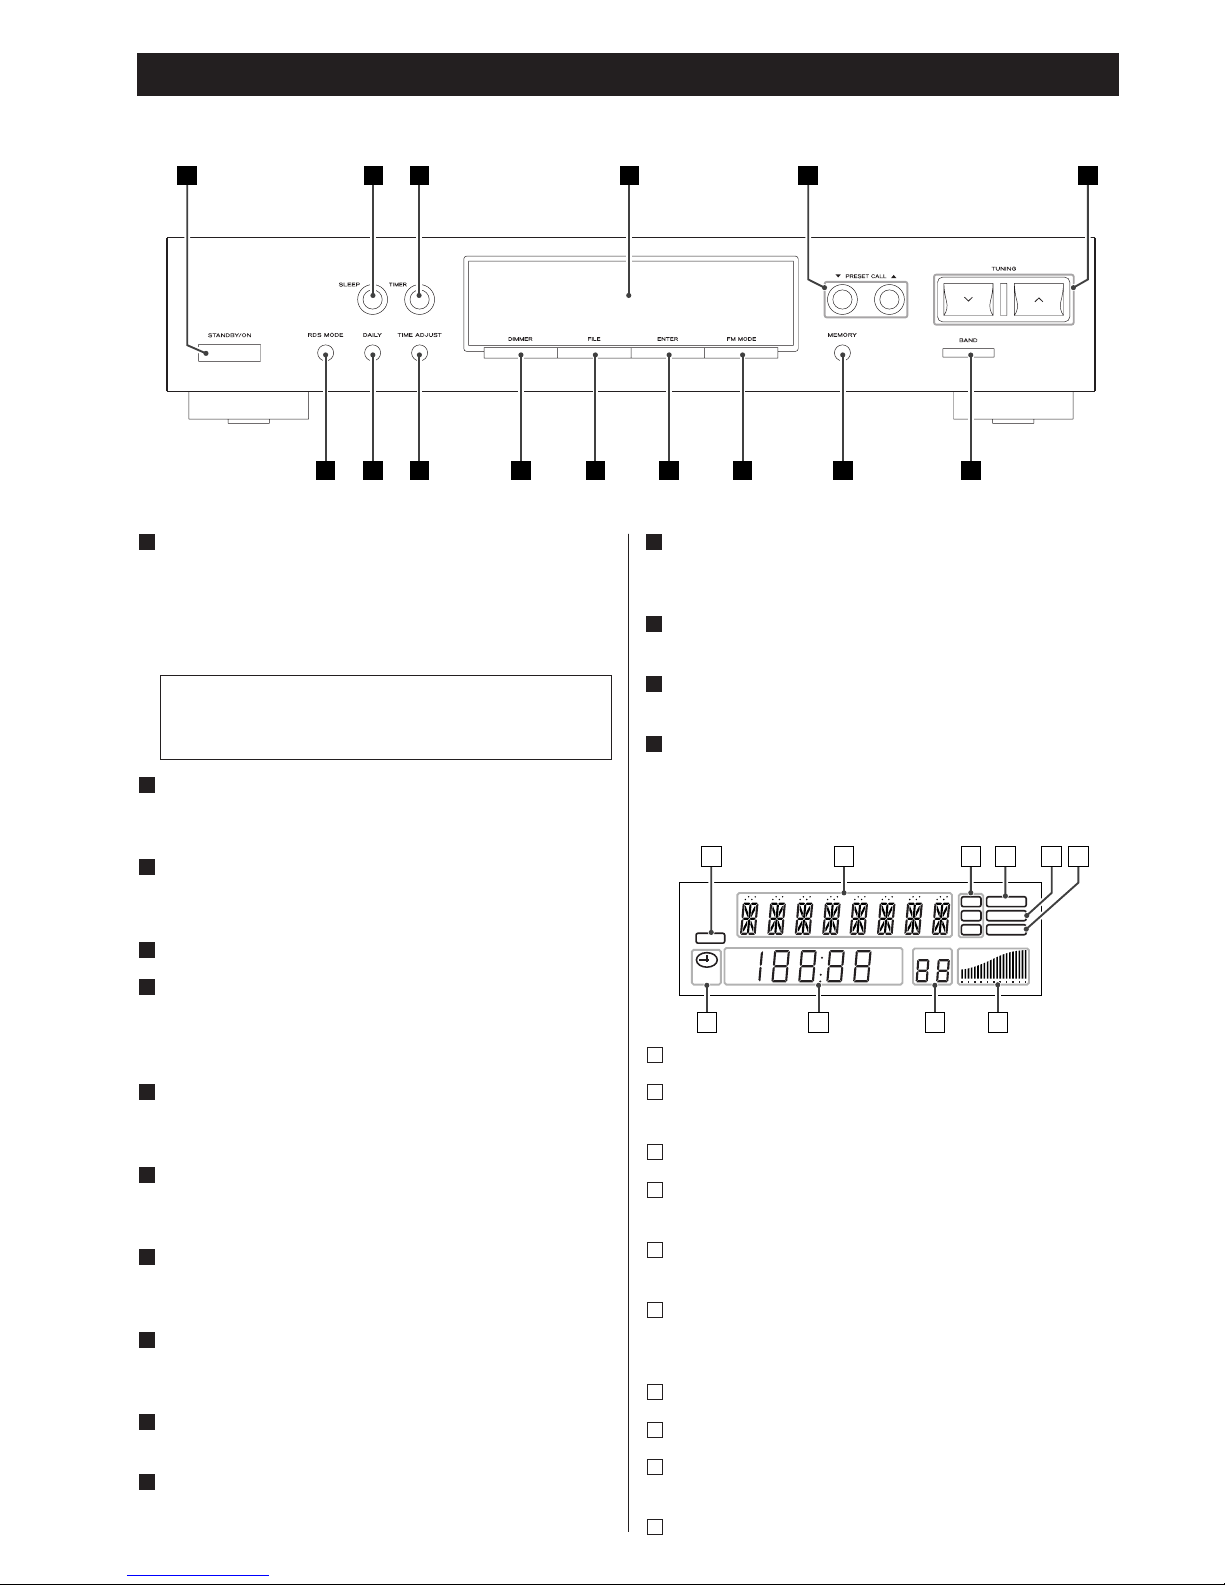
48
Bezeichnungen der Bedienelemente
STANDBY/ON
Betätigen Sie diese Taste, um die Komponente ein- oder in
den Bereitschaftsmodus zu schalten.
Sofern sich die Komponente im Bereitschaftsbetrieb befindet,
leuchtet die Standby-Anzeige. Sobald die Komponente
eingeschaltet wird, erlischt die Anzeige.
SLEEP
Verwenden Sie diese Taste, um den Einschlaftimer zu
einstellen.
TIMER
Verwenden Sie zum Ein- oder Ausschalten der Timerfunktion
diese Taste.
Display
PRESET CALL
Verwenden Sie diese Tasten, um ein Preset auszuwählen.
Wenn die PTY-Suchfunktion activiert wird, verwenden Sie
diese Tasten, um ein PTY-Programm auszuwählen.
TUNING
Verwenden Sie diese Tasten, um auf einen Sender
abzustimmen.
BAND
Verwenden Sie zum Umschalten zwischen UKW- und MWEmpfang diese Taste.
MEMORY
Verwenden Sie diese Taste, um Senderempfangsfrequenzen
im jeweiligen Preset zu speichern.
FM MODE
Verwenden Sie diese Taste im UKW-Betrieb, um zwischen
Mono- und Stereoempfang umzuschalten.
ENTER
Verwenden Sie zur Bestätigung Ihrer Auswahl diese Taste.
FILE
Verwenden Sie diese Taste, um Sender-Presets mit Namen zu
versehen.
K
J
I
H
G
F
E
D
C
B
A
A B C D E F
GHO N
M
L K J I
DIMMER
Verwenden Sie diese Taste, um die Displayhelligkeit zu
verringern.
TIME ADJUST
Verwenden Sie zum Einstellen der Uhrzeit diese Taste.
DAILY
Verwenden Sie zum Einstellen des Timers diese Taste.
RDS MODE
Verwenden Sie für die RDS-Funktion diese Taste.
Display
O
N
M
L
Diese Anzeige erscheint, wenn der Shlaftimer activert wird.
In diesem Display-Fenster werden RDS-Daten, der TimerStatus, usw. gezeigt.
Diese Anzeigen erscheinen abhängig von der RDS-Funktion.
Diese Anzeige erscheint, wenn der Tuner auf einen Sender
abstimmt.
Diese Anzeige erscheint, wenn der Tuner auf einen FMStereo-Sender abstimmt.
Diese Anzeige blinkt, wenn die MEMOY-Taste betätigt wird.
Während diese Anzeige blinkt, Sie können ein Preset
auswählen, in dem die Empfangsfrequenz speichern.
In diesem Display-Fenster zeigt die Empfangssignalstärke.
In diesem Display-Fenster zeigen Presetspeicher Zahlen.
In diesem Display-Fenster wird die Digitaluhr oder werden die
Empfangsfrequenzen gezeigt.
Diese Anzeige erscheint, wenn der Timer activert wird.
j
i
h
g
f
e
d
c
b
a
SLEEP
RDS TUNED
RT STEREO
PTY MEMORY
TIMER
CH.
SIGNAL
FM
A
M
MHz
K
Hz
a b dc e f
g
h
j
i
Auch wenn der STANDBY/ON-Schalter auf STANDBY
gestellt ist, d.h., die Ausrüstung nicht in Betrieb ist,
verbraucht sie eine kleine Strommenge.
Page 49
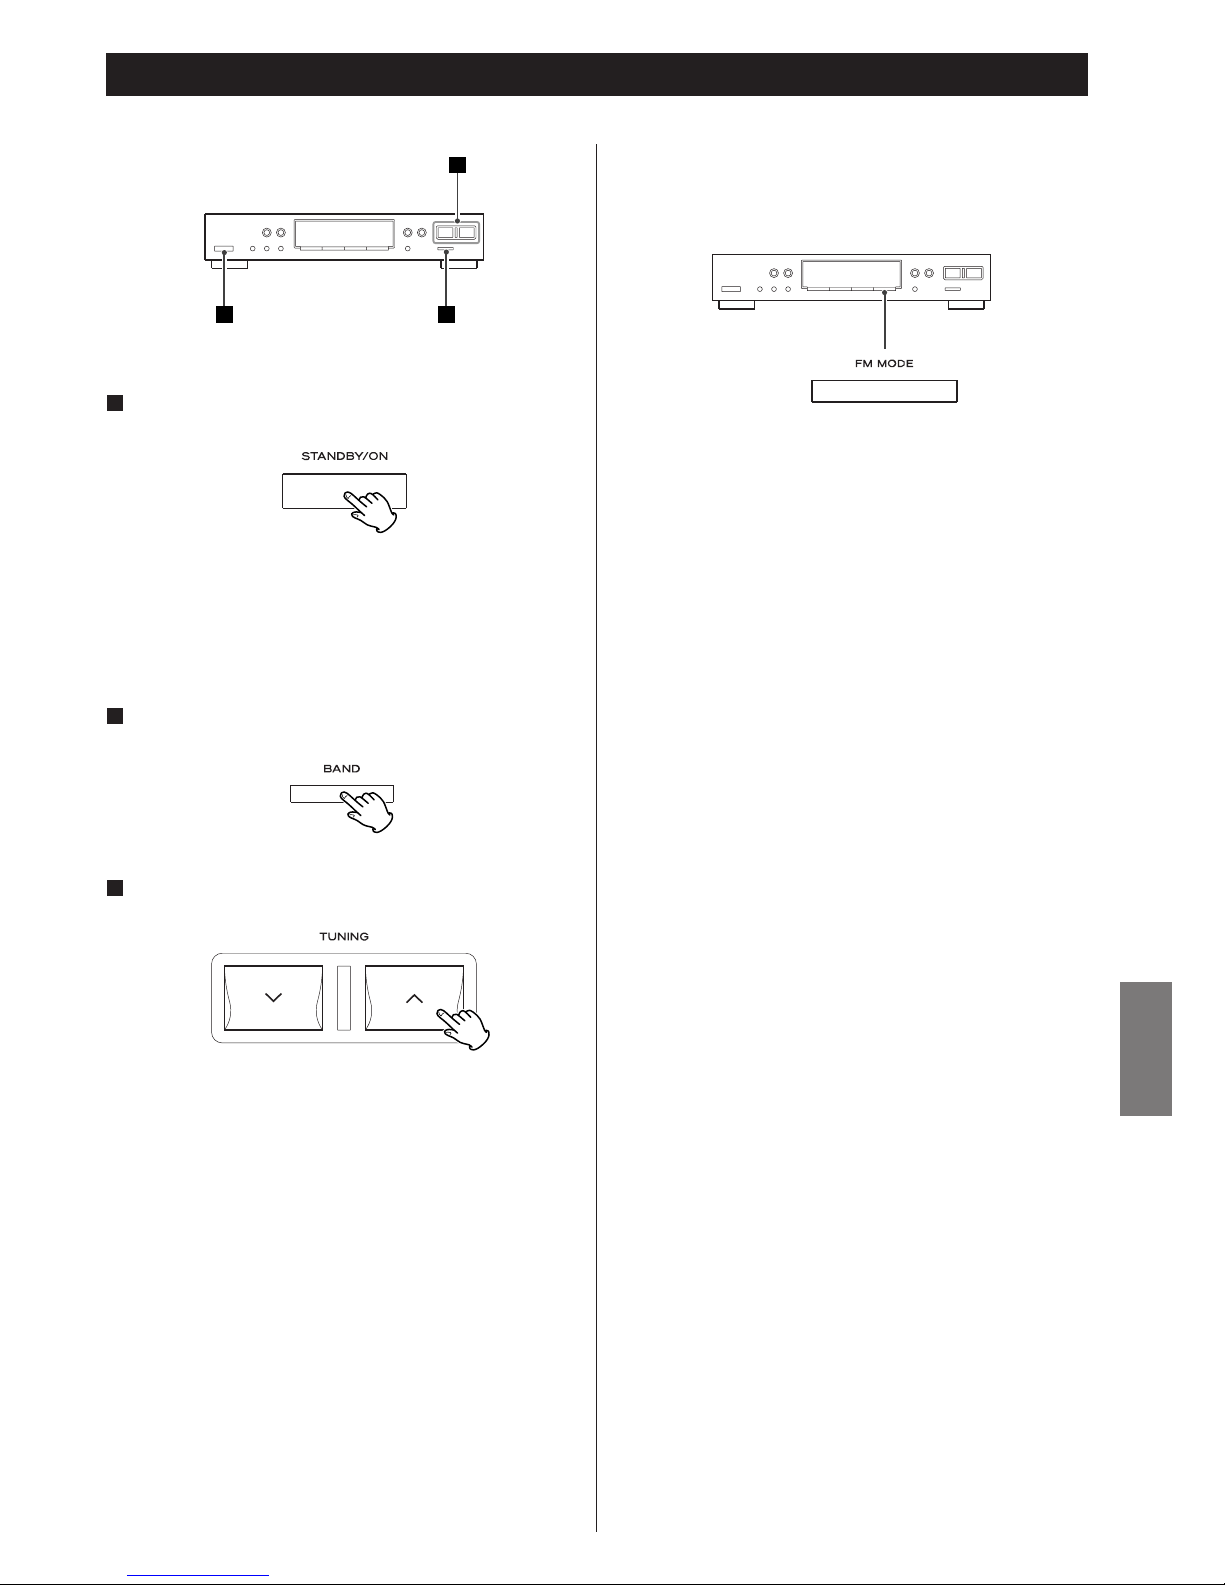
49
DEUTSCH
Senderabstimmung
Betätigen Sie zum Einschalten der Komponente die
STANDBY/ON-Taste.
1
1 2
3
< Sofern der T-R610 mittels Fernbedienungskabel mit dem A-
R610 verbunden ist, können Sie durch Betätigen der
STANDBY/ON-Taste des A-R610 beide Komponenten – den
A-R610 und den T-R610 – ein- sowie in den
Bereitschaftsmodus schalten.
Wählen Sie UKW- oder MW-Betrieb, indem Sie die
BAND-Taste betätigen.
2
Wählen Sie die Station, die Sie hören möchten
(Wahlautomatik).
3
Wahl von Stationen, die nicht automatisch abgestimmt
werden können (manuelle Wahl)
Bei kurzem Betätigen der TUNING-taste (‡ oder °) ändert
sich der angezeigte Frequenzwert um eine feste Schrittgröße.
Durch wiederholtes Betätigen der TUNING-taste (
‡ oder °)
können Sie die Empfangsfrequenz des gewünschten Senders
einstellen.
Betätigen und halten Sie die TUNING-taste (
‡ oder °)
solange nieder gedrückt, bis sich die Frequenzanzeige
automatisch ändert. Lassen Sie die entsprechende Taste los.
Wenn der T-R610 eine empfangswürdige Radiostation
gefunden hat, stoppt der Frequenzabstimmprozess
automatisch.
< Betätigen Sie zum Beenden der automatischen Senderwahl
die TUNING-taste (
‡ oder °).
Stereo:
UKW-Aussendungen in Stereoqualität werden in
Stereoqualität wiedergegeben und die „STEREO“-Anzeige
leuchtet im Display.
Mono:
Verwenden Sie diesen Modus bei UKW-Sendern, deren Signal
Sie nur mit eingeschränkter Qualität empfangen können. Das
Sendesignal wird nun in Monoqualität wiedergegeben,
wodurch das Rauschen reduziert wird.
FM MODE-Taste
Durch Betätigen dieser Taste wird jeweils zwischen Stereound Monoempfangsqualität umgeschaltet.
Page 50
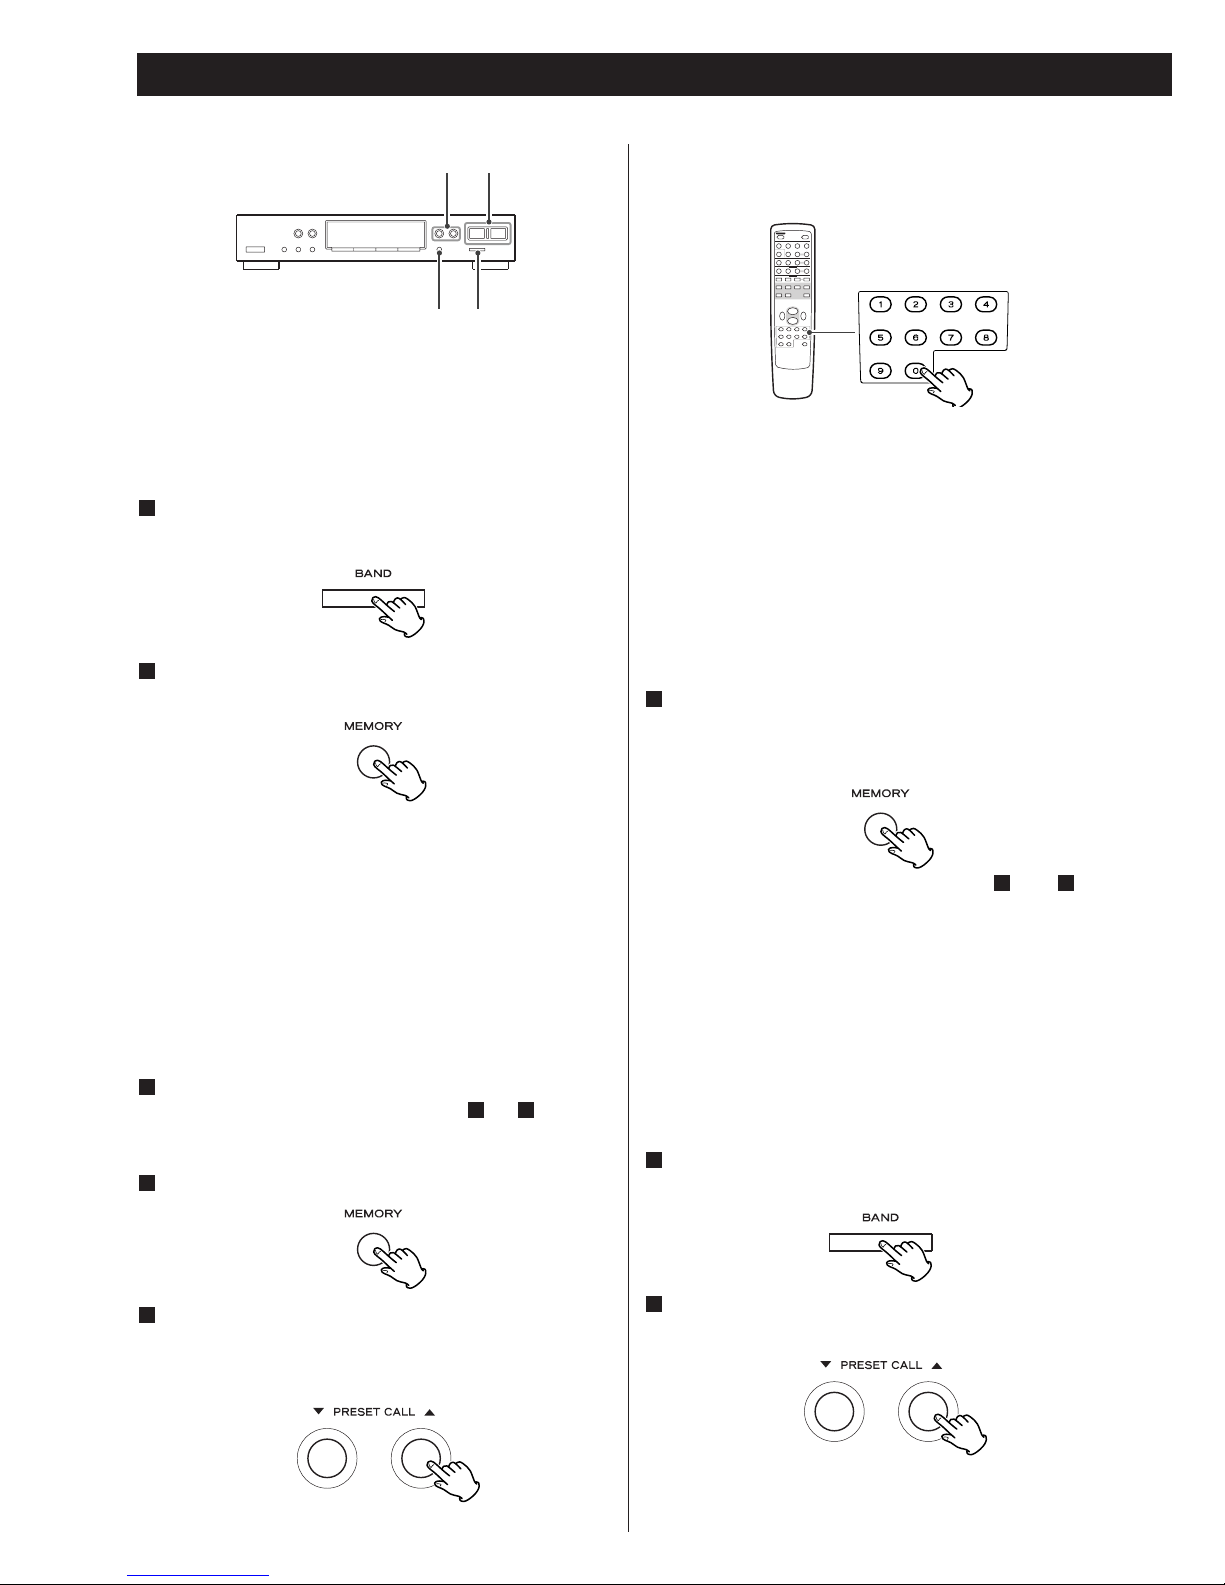
50
Preset-Senderwahl
Wiederholen Sie die Bedienschritte bis , um
Empfangsfrequenzen weiterer Sender in Presets abzulegen.
< Beim Speichern einer neuen Empfangsfrequenz in einem
Preset, das bereits zuvor belegt war, wird der gespeicherte
Frequenzwert überschrieben.
< Senderpresets können nicht gelöscht werden.
41
TUNINGPRESET CALL
BANDMEMORY
UKW- und MW-Empfangsfrequenzen können in den Presets 1 –
30 gespeichert werden.
Automatische Belegung der Presetspeicher
Betätigen Sie zur Auswahl von UKW- oder MWEmpfang die BAND-Taste.
1
Betätigen Sie die MEMORY-Taste und halten Sie diese
für 1,5 Sekunden nieder gedrückt.
2
Die Empfangsfrequenzen von 30 lokalen UKW- oder MWSendern mit den besten Empfangseigenschaften werden
automatisch gespeichert.
< Bei der automatischen Presetbelegung mit UKW-
Empfangsfrequenzen wird der UKW-Frequenzbereich zweimal
durchlaufen, und die jeweils qualitativ bessere
Empfangsfrequenz eines Senders wird gespeichert.
Manuelle Belegung der Presetspeicher
Stellen Sie die Empfangsfrequenz der gewünschten
Radiostation ein (siehe Bedienschritte bis auf Seite
49).
Betätigen Sie kurz die MEMORY-Taste.
2
31
1
Während die „MEMORY“-Anzeige blinkt, wählen Sie ein
Preset aus, in dem die Empfangsfrequenz speichern,
indem Sie die PRESET CALL-Taste (
b oder 5 )
verwenden.
3
Alternativ können Sie die Zifferntasten auf der
Fernbedienung, die Sie zusammen mit Ihrem A-R610 erhalten
haben, benutzen.
Um beispielsweise das Preset 25 auszuwählen, betätigen Sie
zuerst die TUNER-Taste und dann die Zifferntasten „2“ und
„5“.
Zur Eingabe von Zahlen, die kleiner als 10 sind, betätigen Sie
bitte zuerst die Zifferntaste „0“ und danach die der
gewünschten Nummer. Zur Eingabe der Nummer 5 betätigen
Sie bitte die „0“ und danach die „5“. (Alternativ hierzu
können Sie auch nur die Zifferntaste „5“ betätigen und
danach einige Sekunden warten.)
Betätigen Sie die MEMORY-Taste.
Alternativ hierzu können Sie auch acht Sekunden warten. Die
Empfangsfrequenz wurde gespeichert, und die „MEMORY“Anzeige im Display erlischt.
4
Senderpresets können ebenfalls über die Zifferntasten auf der
Fernbedienung aufgerufen werden.
Auswahl von Senderpresets
Betätigen Sie zur Auswahl von UKW- oder MWEmpfang die BAND-Taste.
1
Betätigen Sie wiederholt die PRESET CALL-taste (b oder
5), bis das gewünschte Senderpreset gefunden wurde.
2
Page 51
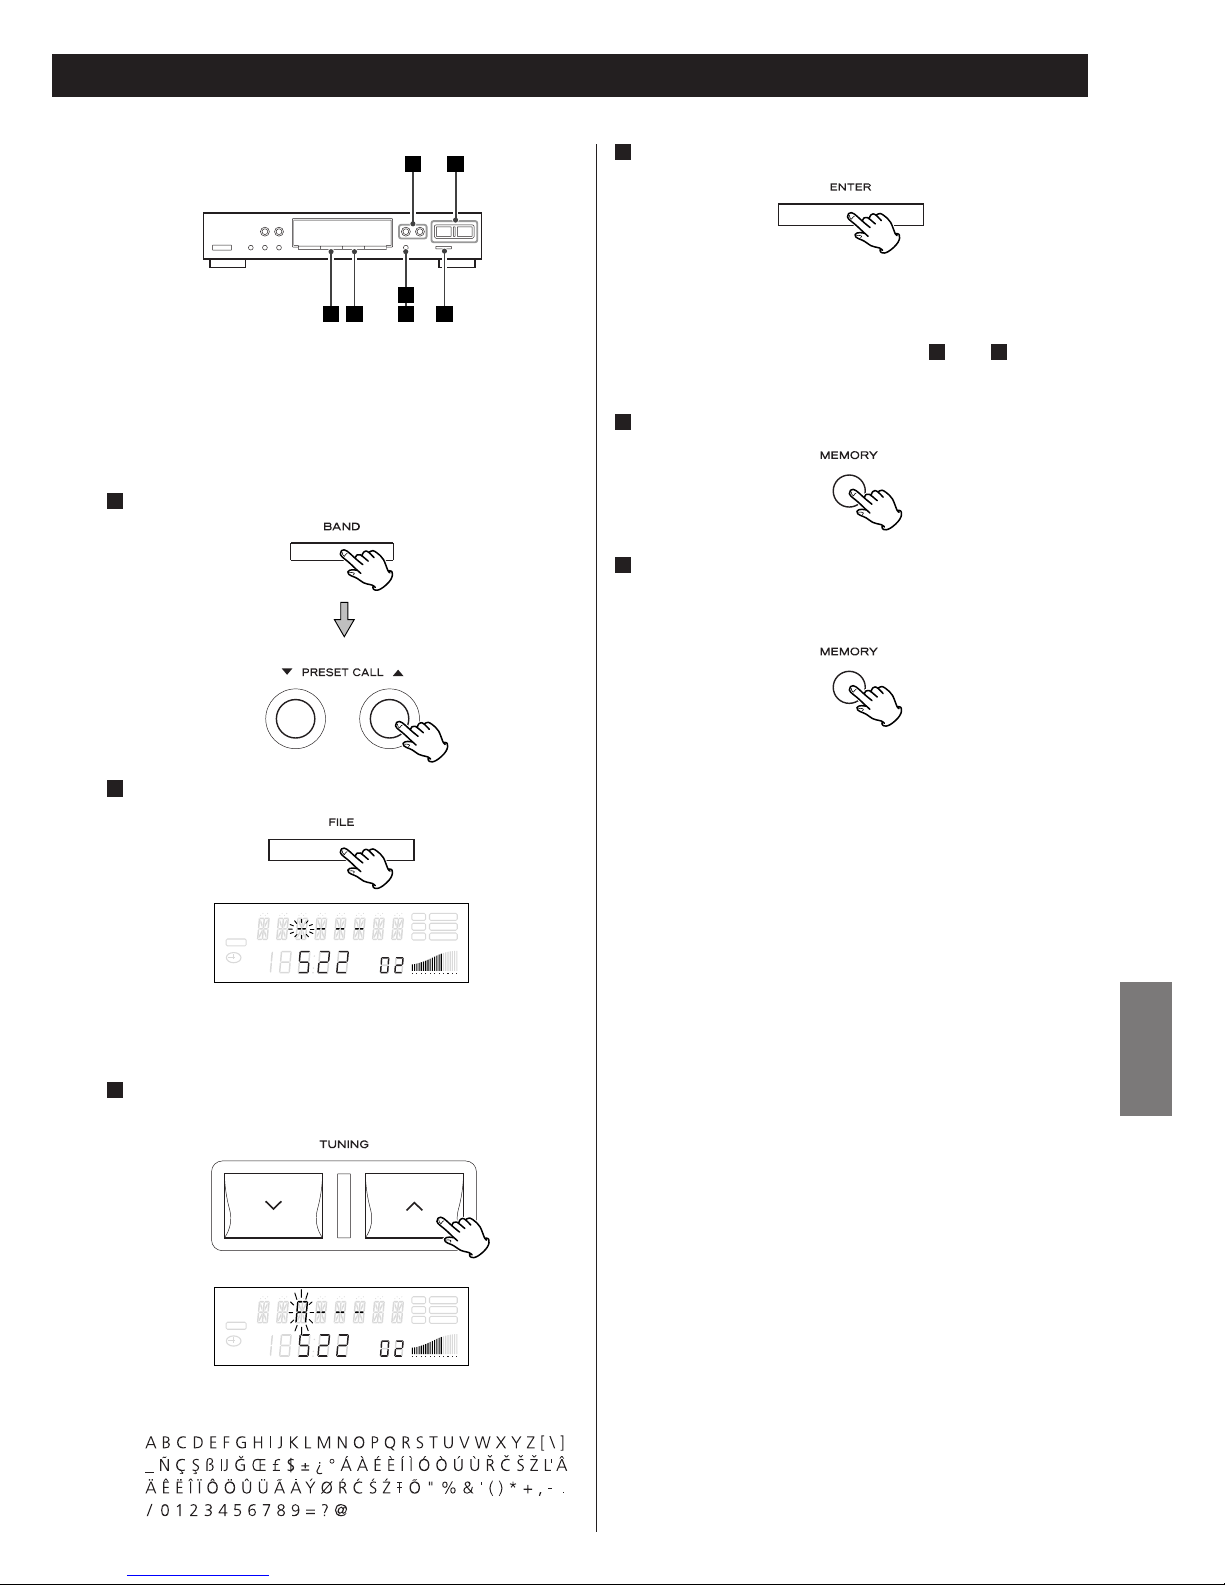
51
DEUTSCH
Betätigen Sie die MEMORY-Taste, während die
„MEMORY“-Anzeige blinkt.
Alternativ hierzu können Sie auch acht Sekunden warten.
Danach ist der zugeordnete Name gespeichert.
6
Wählen Sie ein Senderpreset aus.
1
Die Meldung „
----
“ erscheint, wobei der erste „-“ im
Display blinkt.
Wählen Sie einen Buchstaben aus, indem Sie die
TUNING-Taste (
‡ oder °) verwenden.
3
Zur Verfügung stehen:
Der nächste „-“ blinkt.
Für die Namensgebung können jeweils bis zu vier Zeichen
verwendet werden.
Wiederholen Sie die Bedienschritte und für jedes
Zeichen.
Betätigen Sie die MEMORY-Taste.
5
43
Senderpresets mit Namen versehen
Sie können jedem Senderpreset einen individuellen Namen
zuordnen.
2 4 651
31
Betätigen Sie die ENTER-Taste.
4
Betätigen Sie die FILE-Taste.
2
SLEEP
RDS TUNED
RT STEREO
PTY MEMORY
TIMER
CH.
SIGNAL
FM
A
M
MHz
K
Hz
SLEEP
RDS TUNED
RT STEREO
PTY MEMORY
TIMER
CH.
SIGNAL
FM
A
M
MHz
K
Hz
(Leerschritt)
Page 52
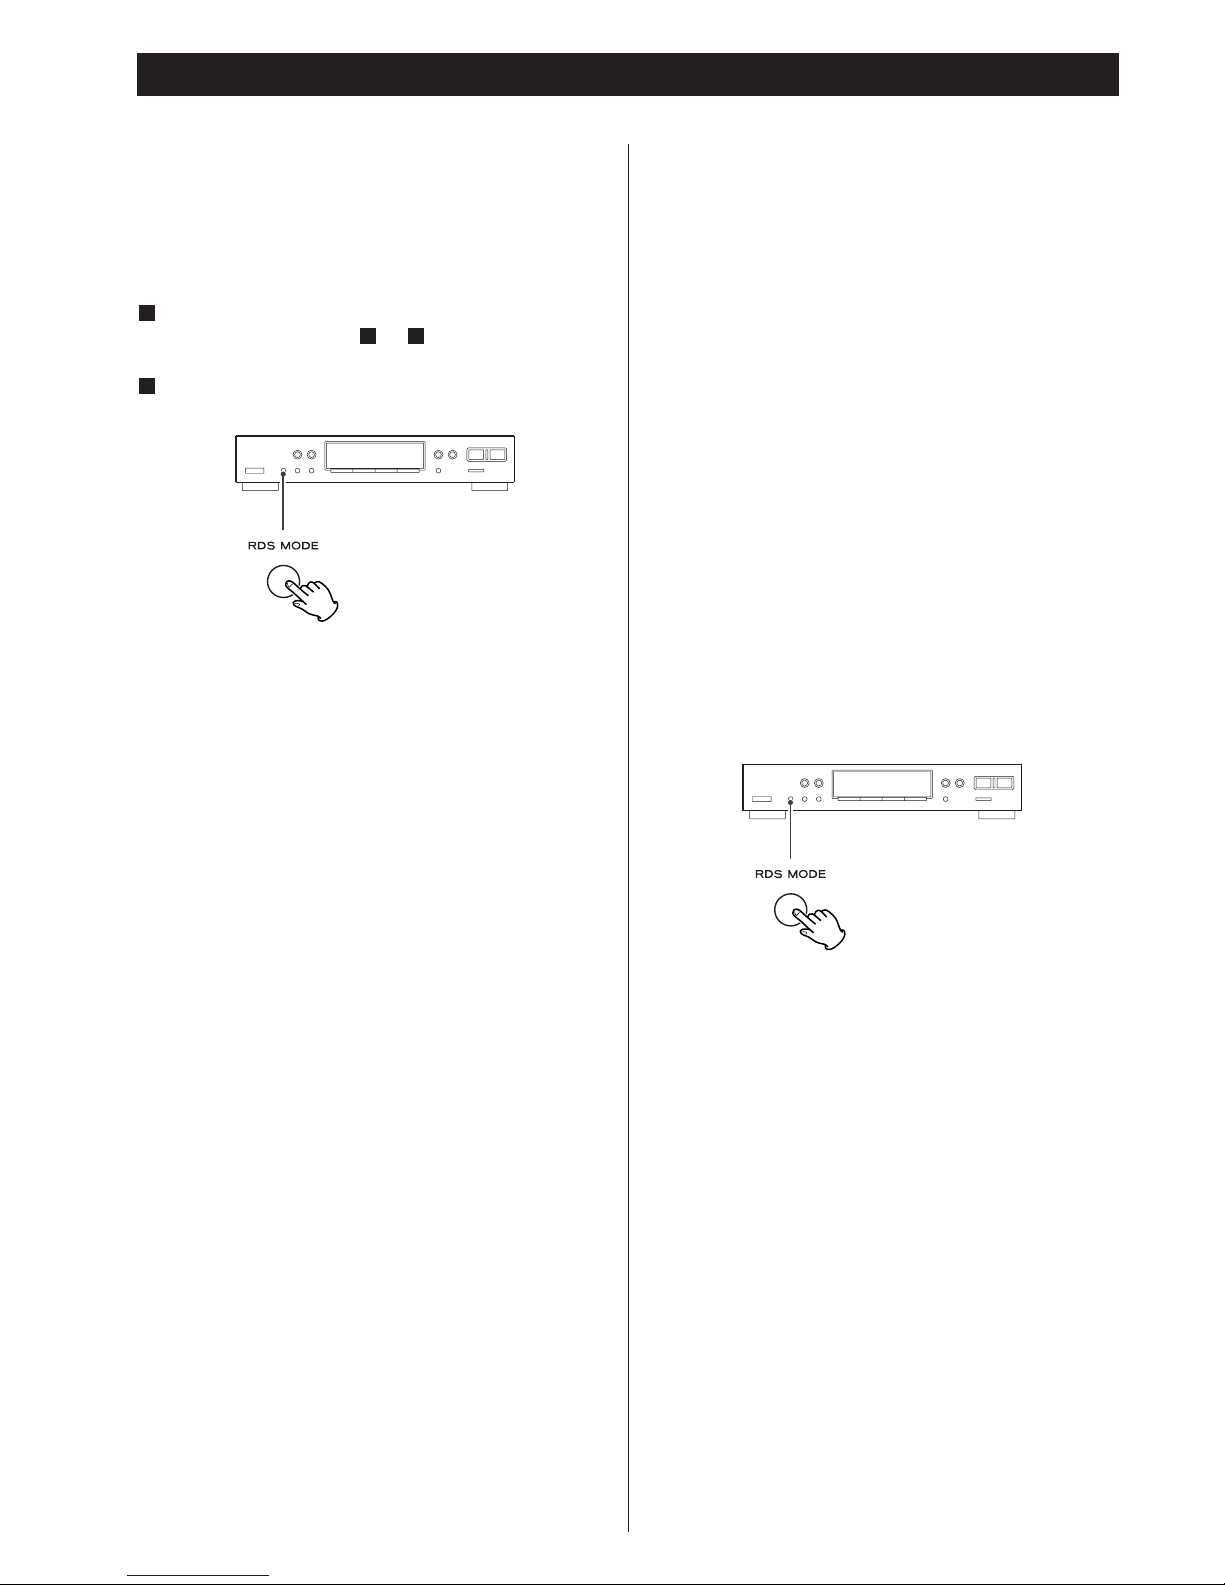
52
RDS
RDS (Radio Data System) ist ein Service der Rundfunkanstalten,
der neben dem normalen Radioprogramm die Ausstrahlung
zusätzlicher Textinformationen ermöglicht.
Der RDS-Dienst steht ausschließlich bei UKW-Empfang in
Europa zur Verfügung.
Stellen Sie die Empfangsfrequenz eines UKW-Senders
ein (siehe Bedienschritte bis auf Seite 49).
Betätigen Sie die RDS-Taste.
Bei jedem Betätigen der RDS MODE-Taste ändert sich der
RDS-Modus, wie folgt:
PS (Programm-Service Name)
Nach Auswahl von PS blinkt die Meldung „PS“ zuerst
ungefähr vier Sekunden lang im Display. Danach erscheint
PS oder der Name des ausgewählten Radiosenders. Falls der
eingestellte Sender keine PS-Daten übermittelt, wird dessen
Empfangsfrequenz angezeigt.
PTY (Programm-Typ)
Nach Auswahl von PTY blinkt die Meldung „PTY“ zuerst
ungefähr vier Sekunden lang im Display. Danach erscheint
der ausgestrahlte Programmtyp.
RT (Radio-Text)
Nach Auswahl von RT blinkt die Meldung „RT“ zuerst
ungefähr vier Sekunden lang im Display. Danach erscheinen
Nachrichten des Senders, die sich aus bis zu 64 Zeichen
zusammensetzen können.
TA (Traffic Announcement – Verkehrsmeldungen)
Nach Auswahl von TA blinkt die Meldung „TA“ zuerst
ungefähr vier Sekunden lang im Display. Danach sucht der
Tuner nach aktuellen Verkehrsmeldungen.
< Falls der eingestellte Sender keine Verkehrsmeldungen
ausstrahlt, stellt der Tuner automatisch andere Sender ein,
die diesen Dienst unterstützen.
Falls der eingestellte Sender keine PTY-/RT-Daten
überträgt, wird automatisch vom RDS- zum PS-Modus
gewechselt.
2
31
1
Sofern A-R610 und T-R610 imittels Fernbedienungskabel
miteinander verbunden sind
Nach Auswahl von TA können Sie mittels INPUT SELECTORRegler des A-R610 jede beliebige Audiosignalquelle
auswählen.
Sobald ein Sender, der Verkehrsmeldungen überträgt,
gefunden wurde, wird der INPUT SELECTOR des A-R610
automatisch auf „TUNER“ gesetzt. Falls der eingestellt Sender
keine TA-Daten übermittelt oder den Dienst einstellt, wird der
INPUT SELECTOR automatisch wieder auf die zuvor
ausgewählte Audiosignalquelle gesetzt.
CT (Clock Time – Uhrzeit)
Die vom jeweiligen Sender ausgestrahlte aktuelle Uhrzeit wird
im Display angezeigt.
Nach Auswahl von CD-Modus, „CT“ zuerst ungefähr vier
Sekunden lang im Display. Danach erscheint die aktuelle
Uhrzeit.
Um den CT-Modus ein- oder auszuschalten, halten Sie
bitte die RDS MODE Taste minderstens 10 Sekunden
gedückt.
< Die Uhrzeitanzeige wird automatisch mit den vom jeweiligen
Sender empfangenen CT-Daten synchronisiert.
Falls Sie einen Sender eingestellt haben, der RDS-Daten
überträgt, die übertragenen CT-Werte allerdings von der
tatsächlichen, aktuellen Uhrzeit abweichen, kann dies zu
falschen Ein- und Ausschaltzeiten beim Timerbetrieb führen.
Page 53
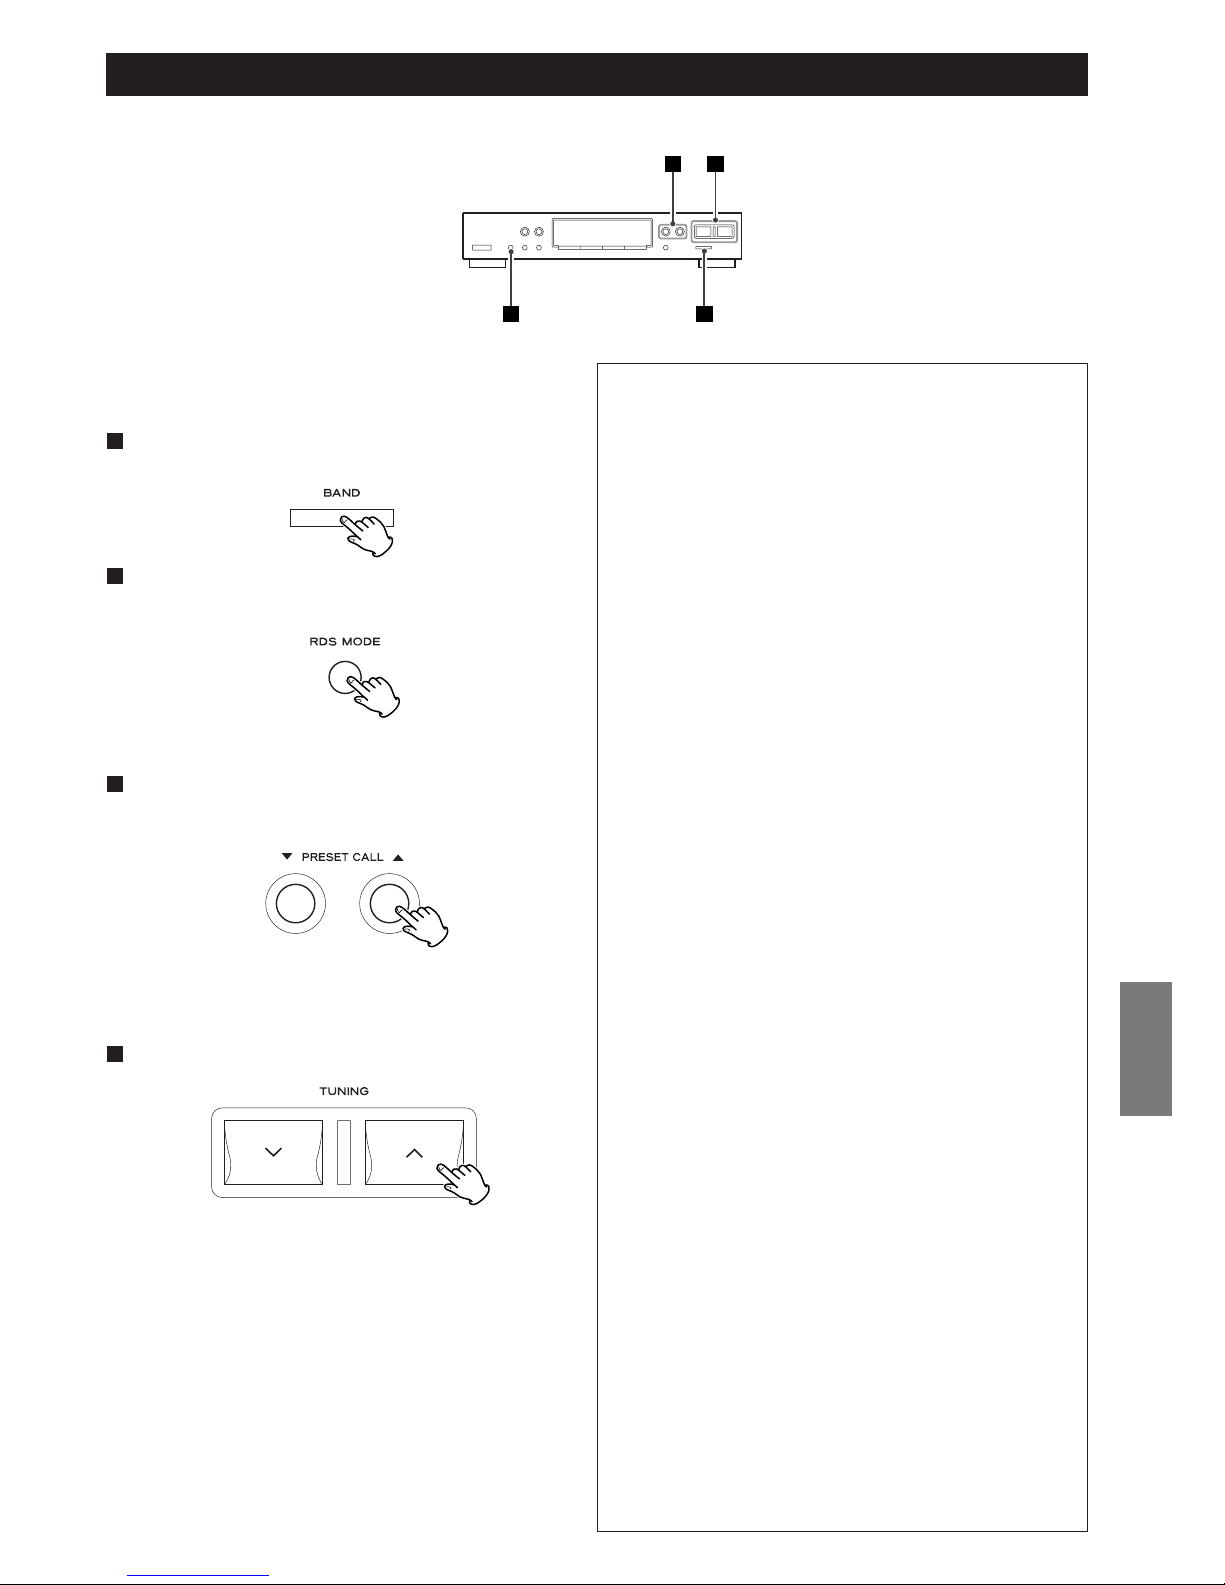
53
DEUTSCH
NEWS : kurze Ansagen, Ereignisse, öffentliche Meinungen,
Reportagen, aktuelle Situationen.
AFFAIRS : Stellungnahmen, Nachrichten, die nicht nicht unter
NEWS fallen, Anregungen, Dokumentationen,
Diskussionen, Analysen, usw.
INFO : tägliche Informationen oder Berichte, wie etwa
Wetterbericht, Verbraucher-Empfehlungen,
medizinische Hinweise, usw.
SPORT : Sport-Programme.
EDUCATE : Bildungs- und Informationsprogramme.
DRAMA : alle Arten von Hörspiel, Konzert, Kinderfunk oder
Comedy-Serien.
CULTURE : alle Arten von nationalen oder regionalen
kulturellen Belangen, inklusive religiöser Themen,
Philosophie, Sozialwissenschaften,
fremdsprachliche Programme, Theater, usw.
SCIENCE : Naturwissenschaften und Technologie.
VARIED : Unterhaltungsprogramme, Quiz, Interviews,
Comedy, Satire, usw.
POP M : Pop Musik, Kommerzielle Programme,
Werbesendungen, usw.
ROCK M : Rock Musik.
MORM. : Pop Musik, normalerweise Titel mit Laufzeiten von
weniger als 5 Minuten.
LIGHT M : klassische Musik, instrumentale Stücke, Chor sowie
leichte Unterhaltungsmusik.
CLASSICS : klassische Werke, Orchester, Oper, Symphonien,
Kammermusik, usw.
OTHER M : Stilrichtungen der Musik, die nicht bereits
kategorisiert wurden, Folk, Schlager, Jazz, Rhythm
& Blues, Country, usw.
WEATHER : Wetterbericht, Wettervorhersage.
FINANCE :
Nachrichten aus der Finanz- und Wirtschaftswelt,
Börsenmeldungen
.
CHILDREN :
Kinder- und Jugendprogramm.
SOCIAL-A :
Soziale Belange.
RELIGION :
Programme mit religiösen Inhalten.
PHONE-IN :
so genannte Call-In-Shows, telefonische
Meinungsumfragen und -äußerungen
.
TRAVEL :
Reiseberichte.
HOBBIES :
Programme, die sich mit verschiedenen Hobbys
befassen
.
JAZZ :
Jazz Musik.
COUNTRY : Country Musik.
NATION-M :
jeweils nationale Musik (Schlager, Chansons, usw.).
OLDIES :
Musik aus der so genannten „Guten Alten Zeit“.
FOLK-M :
Folk Musik.
DOCUMENT : Dokumentationen.
TEST
ALARM : Eine Sendung, die über einen Notzustand oder eine
Naturkatastrophe informiert.
Die Suchfunktion beginnt.
< Sobald ein Sender, der den ausgewählten Programmtyp
ausstrahlt, gefunden wurde, endet der Suchlauf, und der
Programmtyp wird im Display angezeigt.
< Falls der gesuchte Programmtyp von der PTY-Suchfunktion
nicht gefunden wird, stoppt die Suchfunktion, und die
Default-Frequenz wieder angezeigt.
< Betätigen Sie die RDS MODE-Taste, um die Suchfunktion
vorzeitig abzubrechen.
RDS (PTY-Suchfunktion)
Diese Funktion ermöglicht die direkte Suche nach einem Sender,
der diesen RDS-Dienst unterstützt.
Wählen Sie mittels BAND-Taste den UKWFrequenzbereich aus.
1
Betätigen Sie die RDS MODE-Taste und halten Sie diese
länger als 1,5 Sekunden nieder gedrückt.
2
Die Meldung „SEARCH“ blinkt im Display.
Wählen Sie ein gewünschtes PTY-Programm aus, indem
Sie die PRESET CALL-Tasten (
b/5) verwenden.
3
Sie können zwischen 31 verschiedenen Programmtypen
wählen.
2 1
43
Betätigen Sie die TUNING-taste (‡ oder °).
4
Page 54
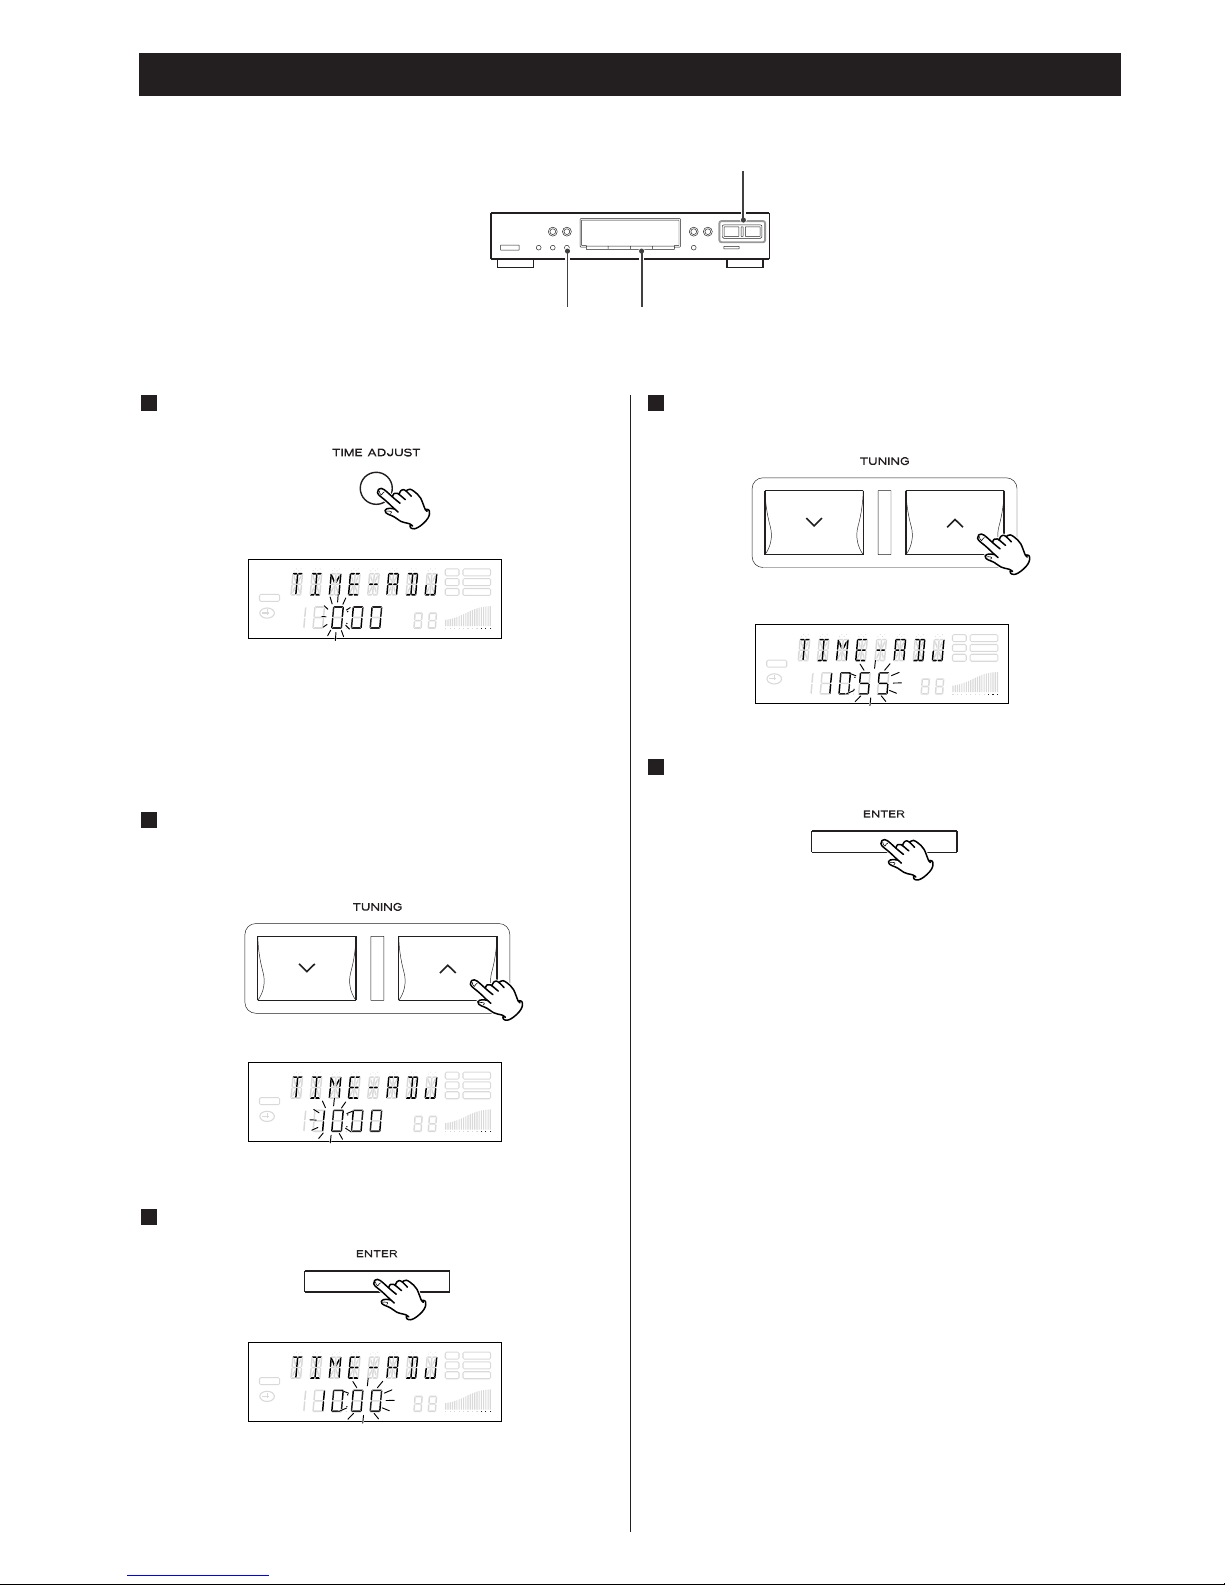
54
Die Stundenanzeige beginnt zu blinken.
< Die Uhrzeit kann auch dann eingestellt werden, wenn sich
das System im Bereitschaftsmodus befindet.
< Die Uhrzeit wird im 24-Stundenformat angezeigt.
Einstellen Sie innerhalb von acht Sekunden die
gegenwärtige Stunde, indem Sie die TUNING-Tasten
(
‡/°) verwenden.
2
Betätigen Sie innerhalb von acht Sekunden die ENTERTaste.
3
Einstellen Sie die gegenwärtige Minute, indem Sie die
TUNING-Tasten (
‡/°) verwenden.
4
Die Anzeige der eingestellten Uhrzeit beginnt stets mit einem
Sekundenwert von „00“.
Einstellen der Uhrzeit
Betätigen Sie die TIME ADJUST-Taste.
1
SLEEP
RDS TUNED
RT STEREO
PTY MEMORY
TIMER
CH.
SIGNAL
FM
A
M
MHz
K
Hz
SLEEP
RDS TUNED
RT STEREO
PTY MEMORY
TIMER
CH.
SIGNAL
FM
A
M
MHz
K
Hz
SLEEP
RDS TUNED
RT STEREO
PTY MEMORY
TIMER
CH.
SIGNAL
FM
A
M
MHz
K
Hz
SLEEP
RDS TUNED
RT STEREO
PTY MEMORY
TIMER
CH.
SIGNAL
FM
A
M
MHz
K
Hz
Die Minutenanzeige beginnt zu blinken.
Betätigen Sie die ENTER-Taste.
5
TUNING
ENTERTIME ADJUST
Page 55
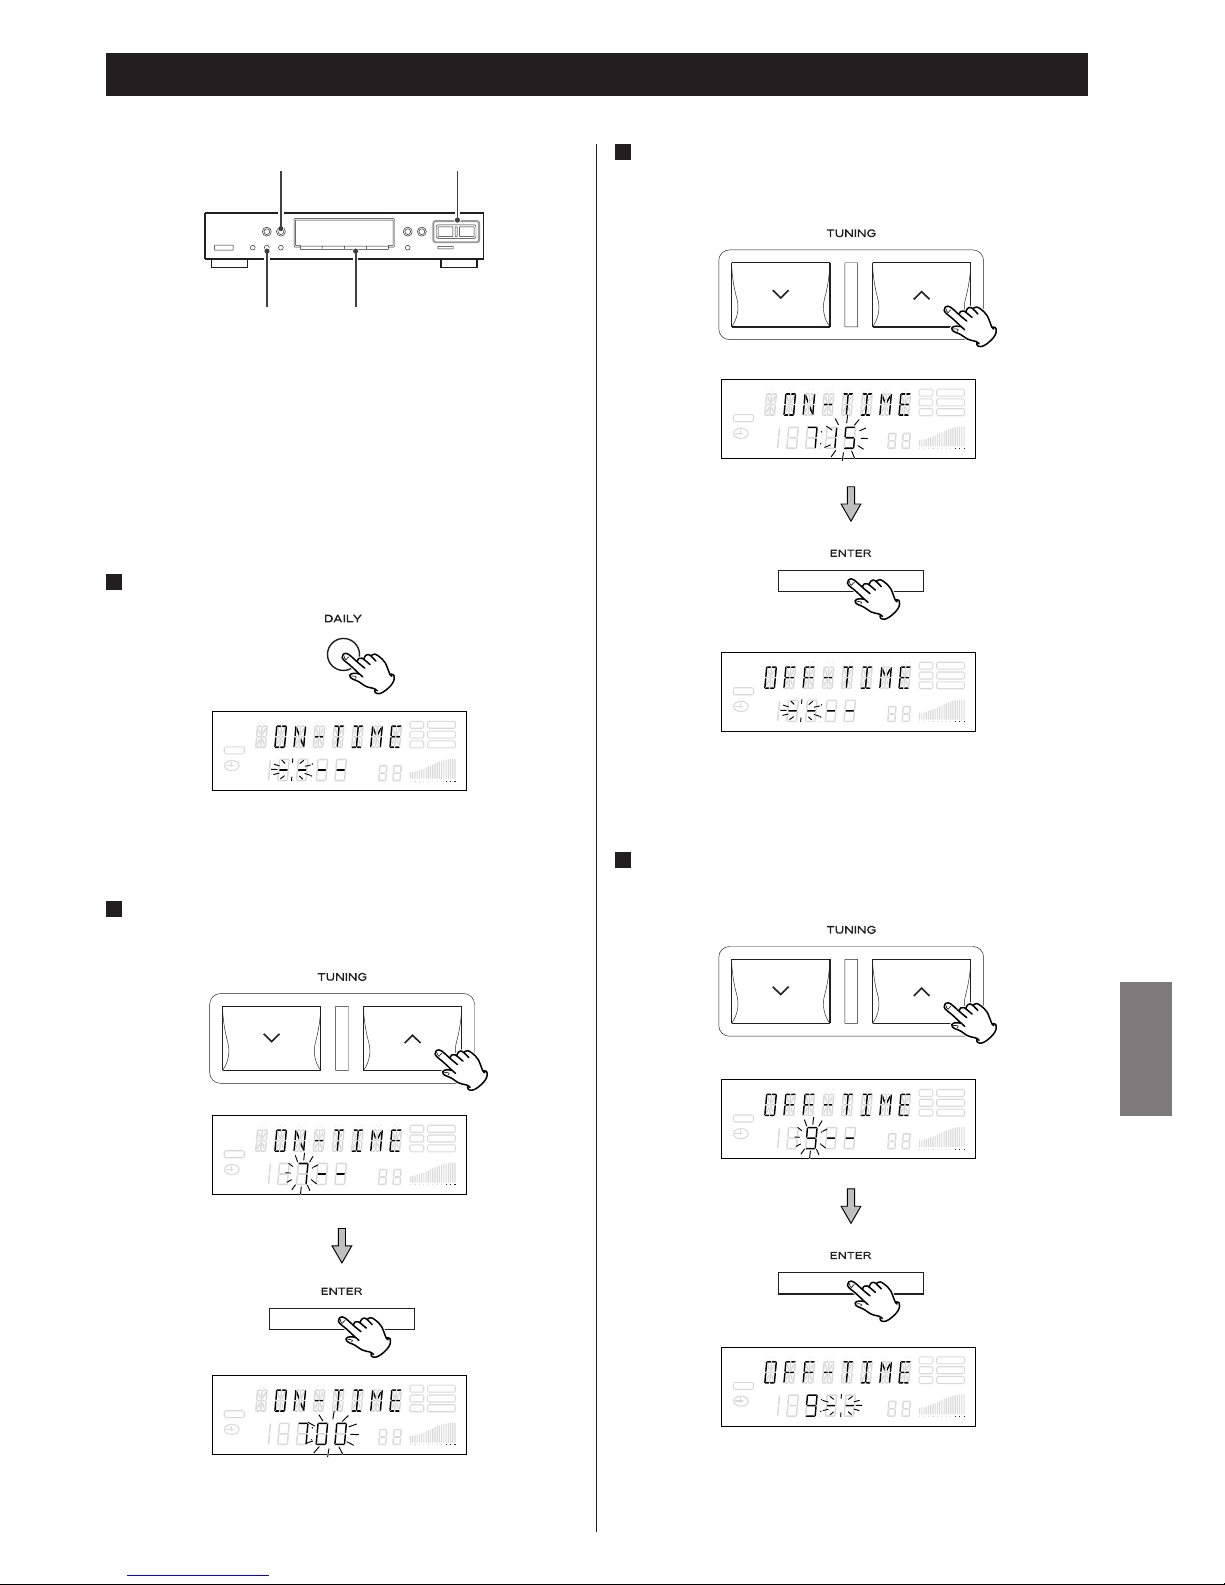
55
DEUTSCH
Bevor Sie mit der Timerprogrammierung beginnen, vergewissern
Sie sich bitte, dass die korrekte Uhrzeit eingestellt ist.
Betätigen Sie die DAILY-Taste.
1
Die Minutenanzeige beginnt zu blinken.
Die Meldung „OFF TIME“ (Ende Zeit) erscheint Display, und
die Stundenanzeige beginnt zu blinken.
Die Meldung „ON TIME“ (Anlasszeit) erscheint im Display,
und die Stundenanzeige beginnt zu blinken.
Programmieren eines sich täglich wiederholenden Timerereignisses 1
Stellen Sie die Stunden ein, indem Sie die TUNINGTasten (
‡/° ) verwenden, und betätigen Sie die
ENTER-Taste.
4
TUNINGTIMER
ENTERDAILY
Sofern der T-R610 mittels Fernbedienungskabel mit dem AR-610
verbunden ist, können Sie beide Komponenten – den A-R610
und den T-R610 – ein- sowie in den Bereitschaftsmodus
schalten.
SLEEP
RDS TUNED
RT STEREO
PTY MEMORY
TIMER
CH.
SIGNAL
FM
A
M
MHz
K
Hz
SLEEP
RDS TUNED
RT STEREO
PTY MEMORY
TIMER
CH.
SIGNAL
FM
A
M
MHz
K
Hz
SLEEP
RDS TUNED
RT STEREO
PTY MEMORY
TIMER
CH.
SIGNAL
FM
A
M
MHz
K
Hz
Stellen Sie die Minuten ein, indem Sie die TUNINGTasten (
‡/° ) verwenden, und betätigen Sie die
ENTER-Taste.
3
SLEEP
RDS TUNED
RT STEREO
PTY MEMORY
TIMER
CH.
SIGNAL
FM
A
M
MHz
K
Hz
SLEEP
RDS TUNED
RT STEREO
PTY MEMORY
TIMER
CH.
SIGNAL
FM
A
M
MHz
K
Hz
SLEEP
RDS TUNED
RT STEREO
PTY MEMORY
TIMER
CH.
SIGNAL
FM
A
M
MHz
K
Hz
SLEEP
RDS TUNED
RT STEREO
PTY MEMORY
TIMER
CH.
SIGNAL
FM
A
M
MHz
K
Hz
Stellen Sie die Stunden ein, indem Sie die TUNINGTasten (
‡/° ) verwenden, und betätigen Sie die
ENTER-Taste.
2
Page 56
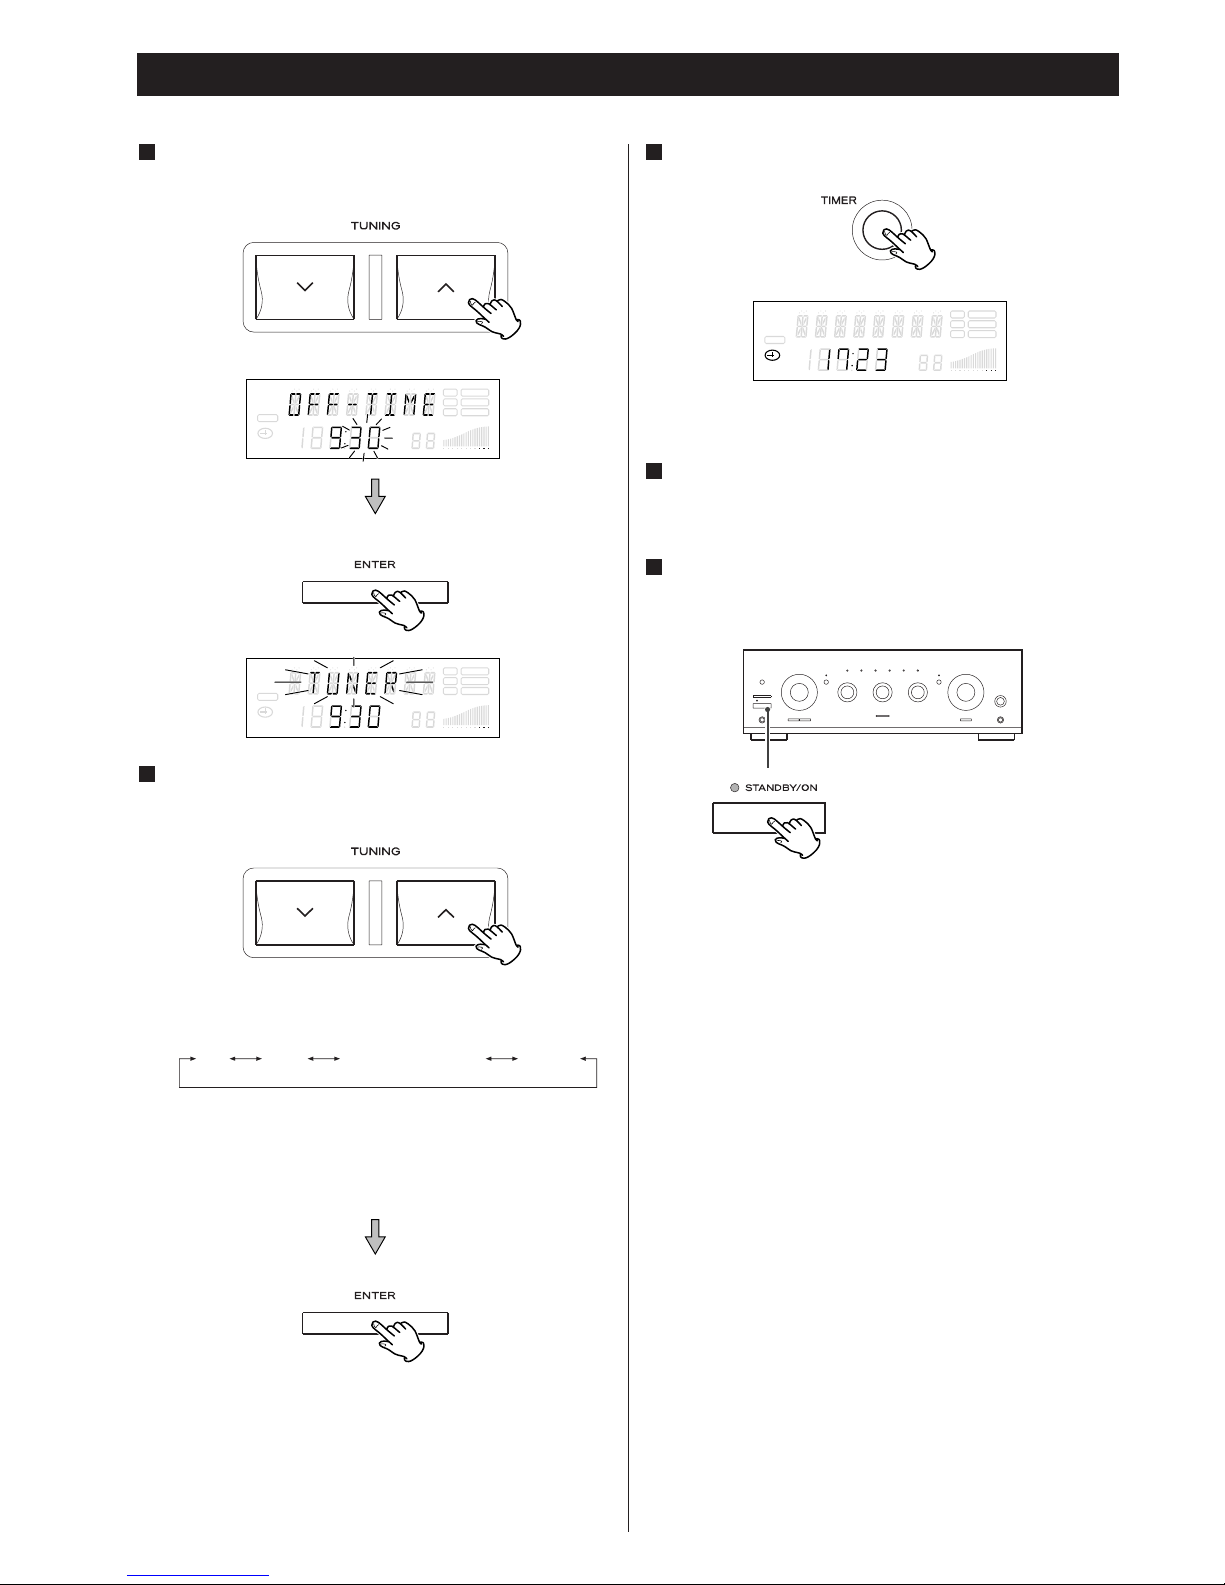
56
Stellen Sie die Minuten ein, indem Sie die TUNINGTasten (
‡/° ) verwenden, und betätigen Sie die
ENTER-Taste.
5
Wählen Sie eine Audiosignalquelle aus, indem Sie die
TUNING-Tasten (
‡/°) verwenden, und betätigen Sie
die ENTER-Taste.
6
Das Betätigen dieser Tasten ändert die Audiosignalquelle, wie
folgt:
< Das Auswählen von CD, TAPE oder TUNER-R hat keinen
Effekt, wenn Ihre CD- oder Kassetten-Player, der an das AR610 angeschlossen wird, nicht die Timer-ausgelösten
Funktionen haben.
CD TAPE TUNER R(ecording) TUNER
Alle mittels Fernbedienungskabel miteinander verbundenen
Komponenten werden fortan täglich zu den programmierten
Zeiten ein- und ausgeschaltet.
Schalten Sie die Timerfunktion bei Nichtverwendung
mittels TIMER-Taste aus. (Die Timeranzeige im Display
erlischt.)
Erneutes Betätigen der TIMER-Taste schaltet die Funktion
wieder ein.
Vorbereitung des Timer-gesteuerten Betriebs.
Stellen Sie die gewünschte Wiedergabelautstärke,
Empfangsfrequenz, usw. ein.
8
Ihre Timereinstellungen sind nun abgespeichert.
Betätigen Sie die TIMER-Taste.
7
Die Timeranzeige erscheint im Display.
SLEEP
RDS TUNED
RT STEREO
PTY MEMORY
TIMER
CH.
SIGNAL
FM
A
M
MHz
K
Hz
Programmieren eines sich täglich wiederholenden Timerereignisses 2
SLEEP
RDS TUNED
RT STEREO
PTY MEMORY
TIMER
CH.
SIGNAL
FM
A
M
MHz
K
Hz
SLEEP
RDS TUNED
RT STEREO
PTY MEMORY
TIMER
CH.
SIGNAL
FM
A
M
MHz
K
Hz
Betätigen Sie die STANDBY/ON-Taste des A-R610, um
alle Komponenten in den Bereitschaftsmodus zu
schalten.
9
Page 57
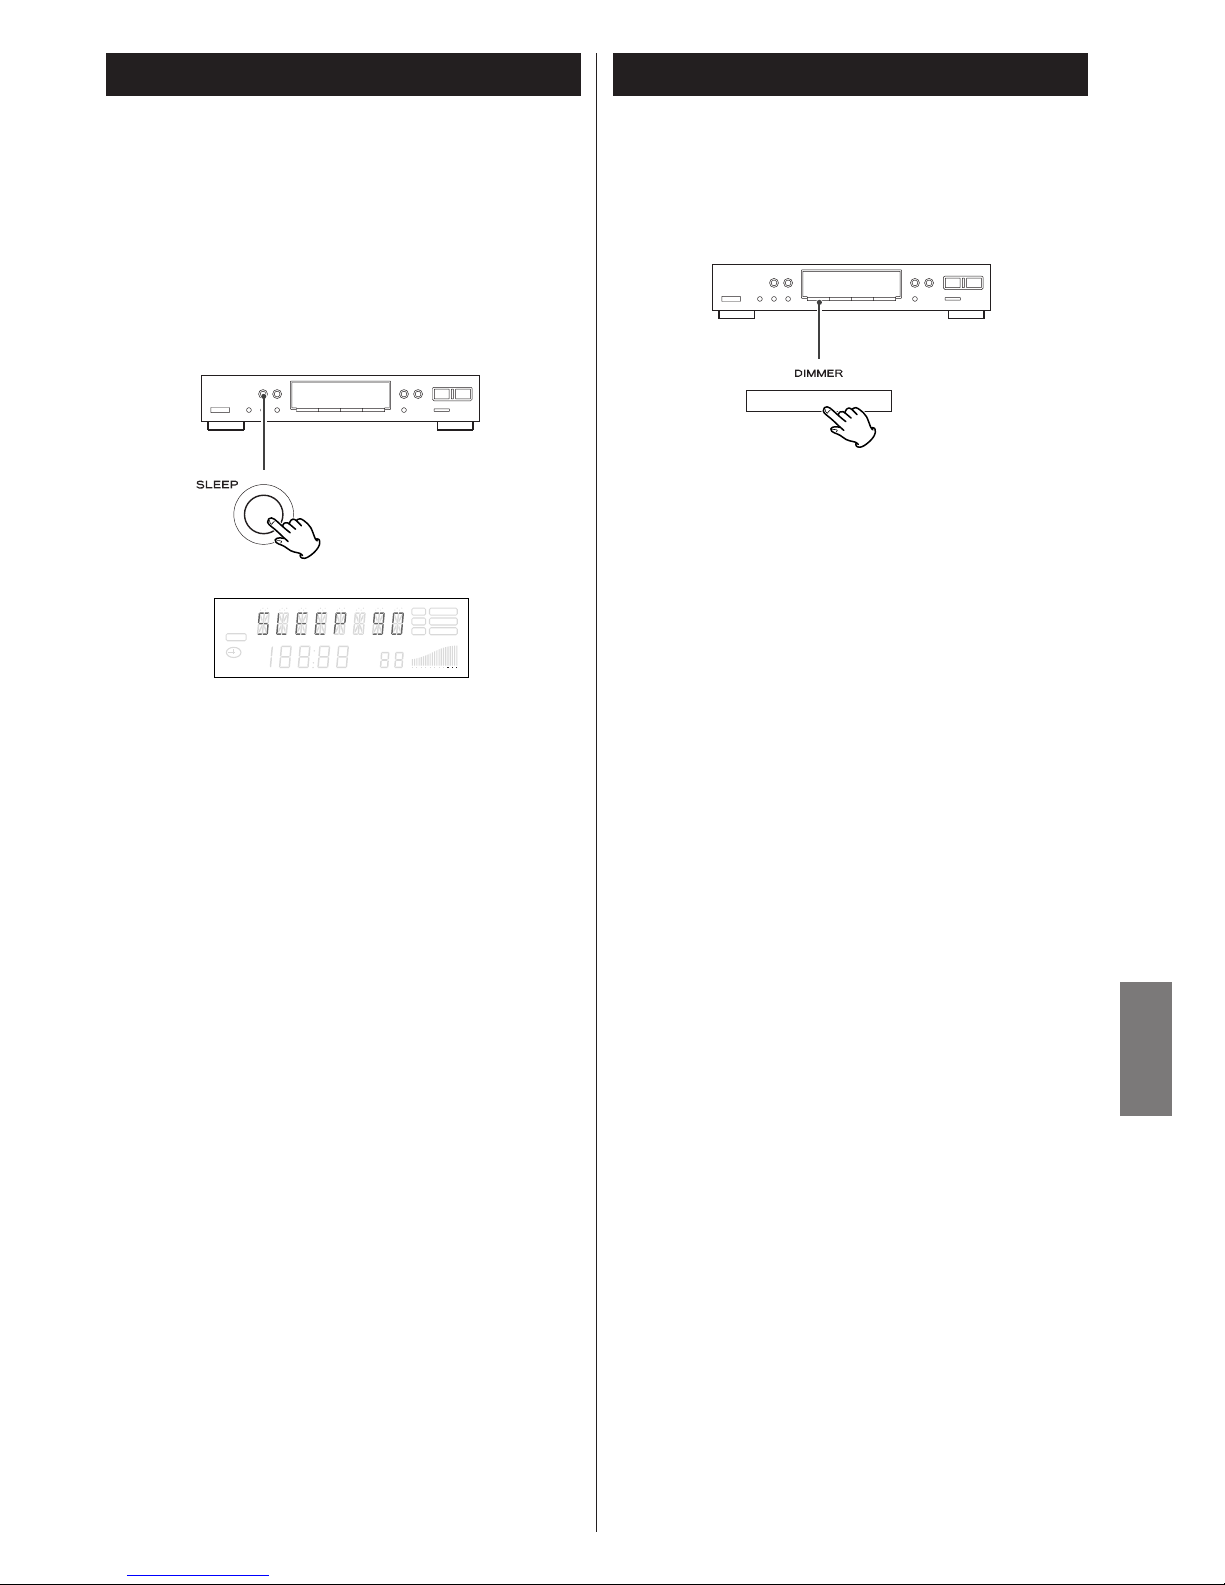
57
DEUTSCH
Einschlaftimerfunktion
Das System kann nach einer vorprogrammierten Zeitdauer
ausgeschaltet werden.
Betätigen Sie wiederholt die SLEEP-Taste, bis der gewünschte
Zeitwert im Display angezeigt wird.
Sofern der T-R610 mittels Fernbedienungskabel mit dem AR-610
verbunden ist, können Sie beide Komponenten – den A-R610
und den T-R610 – in den Bereitschaftsmodus schalten.
SLEEP 90 (80, 70, 60, 50, 40, 30, 20, 10)
Das System wird nach 90 (80, 70, 60, 50, 40, 30, 20 oder
10) Minuten abgeschaltet.
Im normalen Anzeigemodus
Die Einschlaftimerfunktion ist deaktiviert.
< Zum Überprüfen der noch verbleibenden Zeitspanne
betätigen Sie bitte die SLEEP-Taste. Die noch verbleibende
Zeitspanne wird 2,5 Sekunden lang im Display angezeigt.
Danach erscheint im Display automatisch wieder die vorherige
Anzeige.
SLEEP
RDS TUNED
RT STEREO
PTY MEMORY
TIMER
CH.
SIGNAL
FM
A
M
MHz
K
Hz
< Beim Ausschalten des Systems wird diese Funktion
automatisch beendet.
Dimmer
Sie können die Displayhelligkeit verringern, indem die DIMMERTaste betätigen.
Zum Abschalten der Dimmerfunktion betätigen Sie bitte
nochmals diese Taste.
Page 58

Technische DatenHilfe bei Funktionsstörungen
Die folgende Tabelle dient als Hilfe bei der Fehlerbeseitigung,
falls während des Betriebes des T-R610 Störungen oder
Fehlfunktionen auftreten sollten. Anhand der hier beschriebenen
Problemlösungen lassen sich viele Fehlfunktionen beseitigen,
ohne dass Sie Ihren HiFi-Händler oder ein TEAC-Servicecenter
aufsuchen müssen.
Keine Strom-/Spannungsversorgung
e Überprüfen Sie bitte die korrekte Netzverbindung zwischen
dem T-R610 und der Wandsteckdose. Vergewissern Sie sich
bitte, dass der Steckkontakt, an dem Sie den T-R610
angeschlossen haben, nicht über einen Schalter
ausgeschaltet ist. Falls dies der Fall ist, schalten Sie den
Schalter ein. Überprüfen Sie die einwandfreie Funktion der
Wandsteckdose, indem Sie ein anderes elektrisches Gerät,
von dem Sie wissen, dass es einwandfrei funktioniert, wie
beispielsweise einen Fön oder eine Lampe, an der
betreffenden Steckdose anschließen.
Kein Ton
e Überprüfen Sie bitte den Anschluss des Verstärkers
e Überprüfen Sie die ordnungsgemäße Funktion des
Verstärkers
Radioempfang ist nicht möglich oder das Signal ist nur
sehr schwach zu empfangen
e Vergewissern Sie sich, dass die jeweilige Antenne korrekt
angeschlossen ist.
e Stellen Sie die Empfangsfrequenz des gewünschten Senders
optimal ein.
e Positionieren Sie die jeweilige Antenne an einem Ort, der
bessere Empfangseigenschaften bietet.
e Möglicherweise ist die Verwendung einer Außenantenne
unabdingbar.
Die Wiedergabe ist verrauscht
e Platzieren Sie die Antenne soweit wie möglich entfernt von
Fernsehgeräten und CD-Playern
e Falls sich der Tuner in unmittelbarer Nähe eines
Fernsehgeräts oder CD-Players befindet, schalten Sie diese
Geräte bitte aus.
Obwohl die empfange Sendung in Stereoqualität
ausgestrahlt wird, klingt die Wiedergabe monaural.
e Betätigen Sie die FM MODE-Taste.
In einigen Fällen können Fehlfunktionen, die sich
anderweitig nicht beseitigen lassen, durch Ziehen des
Netzsteckers behoben werden. Hierdurch führen Sie einen
Reset des internen Mikroprozessors durch. Warten Sie
ungefähr zwanzig Sekunden, bevor Sie den Netzstecker
wieder anschließen.
Pflege und Wartung
Wenn die Geräteoberfläche verschmutzt sein sollte, wischen Sie
diese mit einem weichen Tuch ab oder verwenden Sie eine
verdünnte, neutrale Reinigungsflüssigkeit. Reinigen Sie sie
gründlich. Verwenden Sie keinen Verdünner, Benzin oder
Alkohol, da dies die Geräteoberfläche beschädigen kann.
58
UKW-Empfangsteil
Abstimmbereich. . . . 87,5 MHz - 108,0 MHz (50 kHz-Schritte)
Nutzbare Empfindlichkeit (IHF) . . . . . . . . . . . . . Mono: 10 dBf
50 dB-Geräuschberuhigung . . . . . . . . . . . . . . . Mono: 17 dBf
Stereo: 33 dBf
Nachbarkanaltrennung (98 MHz ± 400 kHz) . . . . . . . . . 65 dB
Spiegelfrequenzdzuampfung. . . . . . . . . . . . . . . . . . . . . 70 dB
Frequenzgang . . . . . . . . . . . . 20 Hz - 15 kHz (+0,5 dB/–3 dB)
Einfangverhältnis . . . . . . . . . . . . . . . . . . . . 2 dB (bei 98 MHz)
Störspannungsabstand (bei 65 dBf, 98 MHz) . . . Mono: 0,1 %
Stereo: 0,3 %
Relación señal-ruido (a 65 dBf, 1 kHz) . . . . . . . . Mono: 70 dB
Stereo: 65 dB
AM-Unterdrückung . . . . . . . . . . . . . . . . . . . . . . . . . . . . 55 dB
Stereokanaltrennung (1 kHz) . . . . . . . . . . . . . . . . . . . . . 40 dB
Ausgang . . . . . . . . . . . . . . . . . . . . . . . . . . 800 mV/2,2 k ohm
MW-Empfangsteil
Abstimmbereich. . . . . . . 522 kHz - 1.620 kHz (9 kHz-Schritte)
Nutzbare Empfindlichkeit
55 dB/m (562 µV/m, Rahmenantenne)
Empfindlichkeit . . . . . . . . . . . . . . . . . . . . . . . 55dB (bei 9 kHz)
Spiegelfrequenzdämpfung . . . . . . . . . . . . . . . . . . . . . . 35 dB
ZF-Frequenz . . . . . . . . . . . . . . . . . . . . . . . . . . . . . . . . . 60 dB
Klirrfaktor . . . . . . . . . . . . . . . . . . . . . . . . . 1 % (bei 85 dB/m)
Störspannungsverhältnis . . . . . . . . . . . . . 40 dB (bei 85 dB/m)
Ausgang . . . . . . . . . . . . . . . . . . . . . . . . . . 220 mV/2,2 k ohm
Allgemein
Spannungsversorgung. . . . . . 230 V Wechselspannung, 50 Hz
Leistungsaufnahme . . . . . . . . . . . . . . . . . . . . . . . . . . . . . 6 W
Abmessungen (B x H x T) . . . . . . . . . . . . . 435 x 87 x 294 mm
Gewicht (netto) . . . . . . . . . . . . . . . . . . . . . . . . . . . . . . 2,9 kg
Mitgeliefertes Zubehör. . . . . . . . . . . . . . . . . . . Cinchkabel x 1
Fernbedienungskabel x1
MW-Rahmenantenne x 1
UKW-Zimmerantenne x 1
• Änderungen des Designs und der technischen Daten bleiben
jederzeit vorbehalten.
• Bei den Angaben für Gewicht und Abmessungen handelt es
sich um Näherungswerte.
• Die Abbildungen stellen die Produktionsmodelle nicht
unbedingt in jedem Detail genau dar.
Page 59
59
ITALIANO
Grazie per aver acquistato un prodotto TEAC. Leggere
attentamente questo manuale per ottenere le migliori
prestazioni da questo apparecchio.
Istruzioni preliminari . . . . . . . . . . . . . . . . . . . . . . . . . . . . . . . . 59
Collegamenti . . . . . . . . . . . . . . . . . . . . . . . . . . . . . . . . . . . . . 60
Posizione e funzione dei controlli . . . . . . . . . . . . . . . . . . . . . . 62
Sintonia . . . . . . . . . . . . . . . . . . . . . . . . . . . . . . . . . . . . . . . . . 63
Sintonia preset . . . . . . . . . . . . . . . . . . . . . . . . . . . . . . . . . . . . 64
RDS (Radio Data System). . . . . . . . . . . . . . . . . . . . . . . . . . . . . 66
RDS (Ricerca PTY) . . . . . . . . . . . . . . . . . . . . . . . . . . . . . . . . . . 67
Regolazione dell’orologio . . . . . . . . . . . . . . . . . . . . . . . . . . . . 68
Impostazione della funzione Daily Timer
(temporizzazione giornaliera) . . . . . . . . . . . . . . . . . . . . . . . 69
Sleep Timer (spegnimento ritardato) . . . . . . . . . . . . . . . . . . . . 71
Funzione Dimmer (attenuazione luminosità display) . . . . . . . . 71
Ricerca guasti . . . . . . . . . . . . . . . . . . . . . . . . . . . . . . . . . . . . . 72
Dati tecnici . . . . . . . . . . . . . . . . . . . . . . . . . . . . . . . . . . . . . . . 72
Indice Istruzioni preliminari
Si prega di leggere con attenzione prima dell’utilizzo
< Dato che l’apparecchio può scaldarsi durante il
funzionamento, si deve lasciare intorno ad esso spazio
sufficiente alla dovuta ventilazione.
< Verificare che la tensione della corrente d’alimentazione, il cui
valore è stampato sul pannello posteriore, sia uguale a quella
d’utilizzo. Se ci fossero dubbi in proposito, consultare un
elettricista qualificato.
< Scegliere con cura il luogo dove installare l’apparecchio,
evitando che sia esposto alla luce solare diretta o troppo
vicino ad una sorgente di calore. Evitare anche luoghi soggetti
a vibrazioni, sbalzi di temperatura o condizioni eccessive di
polvere od umidità.
< Se possibile, non collocare l’apparecchio sopra il
sintoamplificatore, ma di fianco.
< Non aprire il mobiletto, per non danneggiare i circuiti interni o
provocare fenomeni di folgorazione. Se un oggetto estraneo
dovesse penetrare nell’apparecchio, rivolgersi al proprio
rivenditore.
< Dovendo staccare il cavo d’alimentazione dalla presa di rete,
non tirare direttamente il cavo ma afferrarlo per la spina.
< Per la pulizia dell’apparecchio non usare solventi chimici, che
potrebbero danneggiare la finitura esterna. Basta passare un
panno morbido, asciutto.
< Conservare questo Manuale d’istruzioni in un luogo sicuro, in
vista di futuri possibili utilizzi.
Memoria di backup
Se l’apparecchio rimane senza alimentazione per 14 giorni o
più, verranno cancellate tutte le regolazioni memorizzate
(emittenti preselezionate, predisposizioni del timer, eccetera).
Dopo aver inserito il cavo d’alimentazione nella presa di rete
dovranno passare più di 3 giorni prima che venga accumulata
l’elettricità sufficiente ad attivare la memoria di backup.
Volendo azzerare manualmente tutte le regolazioni
memorizzate, ripristinando i valori originali predisposti in
fabbrica, basta premere l’interruttore RESET.
Smaltimento di apparecchi usati
1. Quando questo simbolo con il bidone
della spazzatura attraversato da una
croce viene apposto su un prodotto
significa che questo è conforme alle
direttive Europe 2002/96/EC.
2. Tutti i prodotti elettrici ed elettronici devono essere smaltiti
separatamente dagli altri tramite canali specifici indicati
dalle autorità Comunali locali.
3. Per ottenere le necessarie informazioni relative allo
smaltimento dei Vostri apparecchi elettrici usati Vi invitiamo
a contattare gli uffici Comunali a ciò preposti od il
Rivenditore ove avete appena acquistato questo prodotto.
ATTENZIONE
< Non esporre questo apparecchio a schizzi nè permettere
che vi entrino acqua o altri liquidi.
< Non mettere vasi o altri contenitori di liquidi sopra
l'apparecchio.
< Utilizzare questo apparecchio solo in spazi aperti. Non
metterlo in funzione se si trova all'interno di mobili chiusi
ove non possa circolare liberamente l'aria
< Nella posizione di STAND-BY e di OFF il consumo di
corrente di questo apparecchio è del tutto irrisorio.
< L'apparecchio deve essere posizionato nei pressi della presa
di corrente in modo che Vi sia sempre facile raggiungere il
cavo di alimentazione.
< Apparecchi appartenenti alla Classe ! devono essere sempre
collegati a prese di corrente dotate di messa a terra.
Page 60
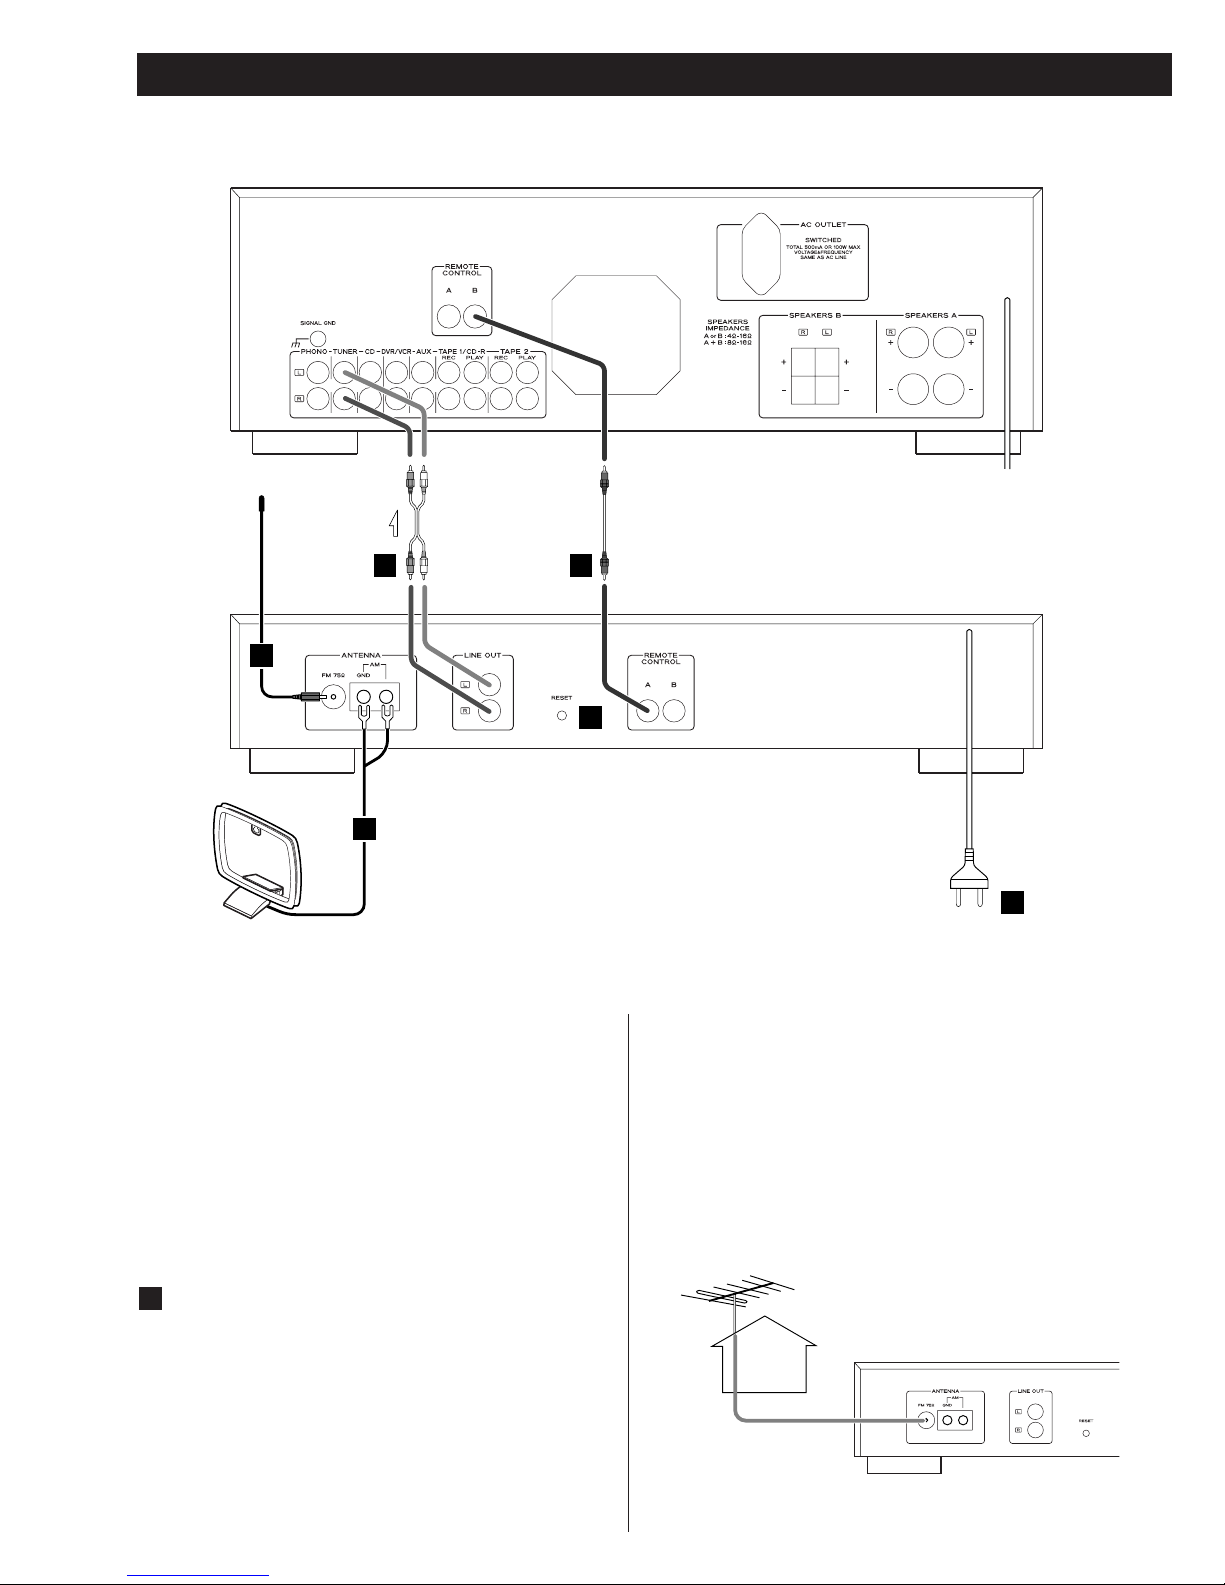
60
ATTENZIONE:
< Prima di eseguire i collegamenti, spegnete tutti gli
apparecchi.
< Leggete le istruzioni relative a ciascun componente che
intendete utilizzare con questa unità.
< Accertatevi quindi di inserire saldamente nella presa di rete
le relative spine. Al fine di prevenire ronzii e rumore, evitate
di raggruppare i cavi dei segnali di interconnessione con
quello di alimentazione CA ovvero con i cavi degli
altoparlanti.
Collegamenti
T-R610
C
D
E
F
A
B
Antenna FM interna
Collegare l’antenna FM a filo alla presa FM 75Ω, stendere il
filo e sintonizzare l’apparecchio sulla propria emittente
preferita (vedi pagina 63). Installare l’antenna a parete o sul
telaio di una finestra e spostarla fino a trovare la posizione
che consente la migliore ricezione: fissare allora l’antenna in
quel punto con puntine da disegno, chiodini o qualcosa di
simile.
A
Antenna FM esterna
Nelle zone in cui i segnali FM arrivano deboli, sarà necessario
installare un’antenna FM esterna. Di solito, dovrebbe essere
sufficiente un’antenna a 3 elementi; quando però si vive un
una località nella quale i segnali FM sono particolarmente
deboli, sarà opportuno scegliere un’antenna a 5 o più
elementi.
< Quando si utilizza un’antenna esterna, ricordarsi di staccare
l’antenna FM interna.
Amplificatore (A-R610)
Page 61
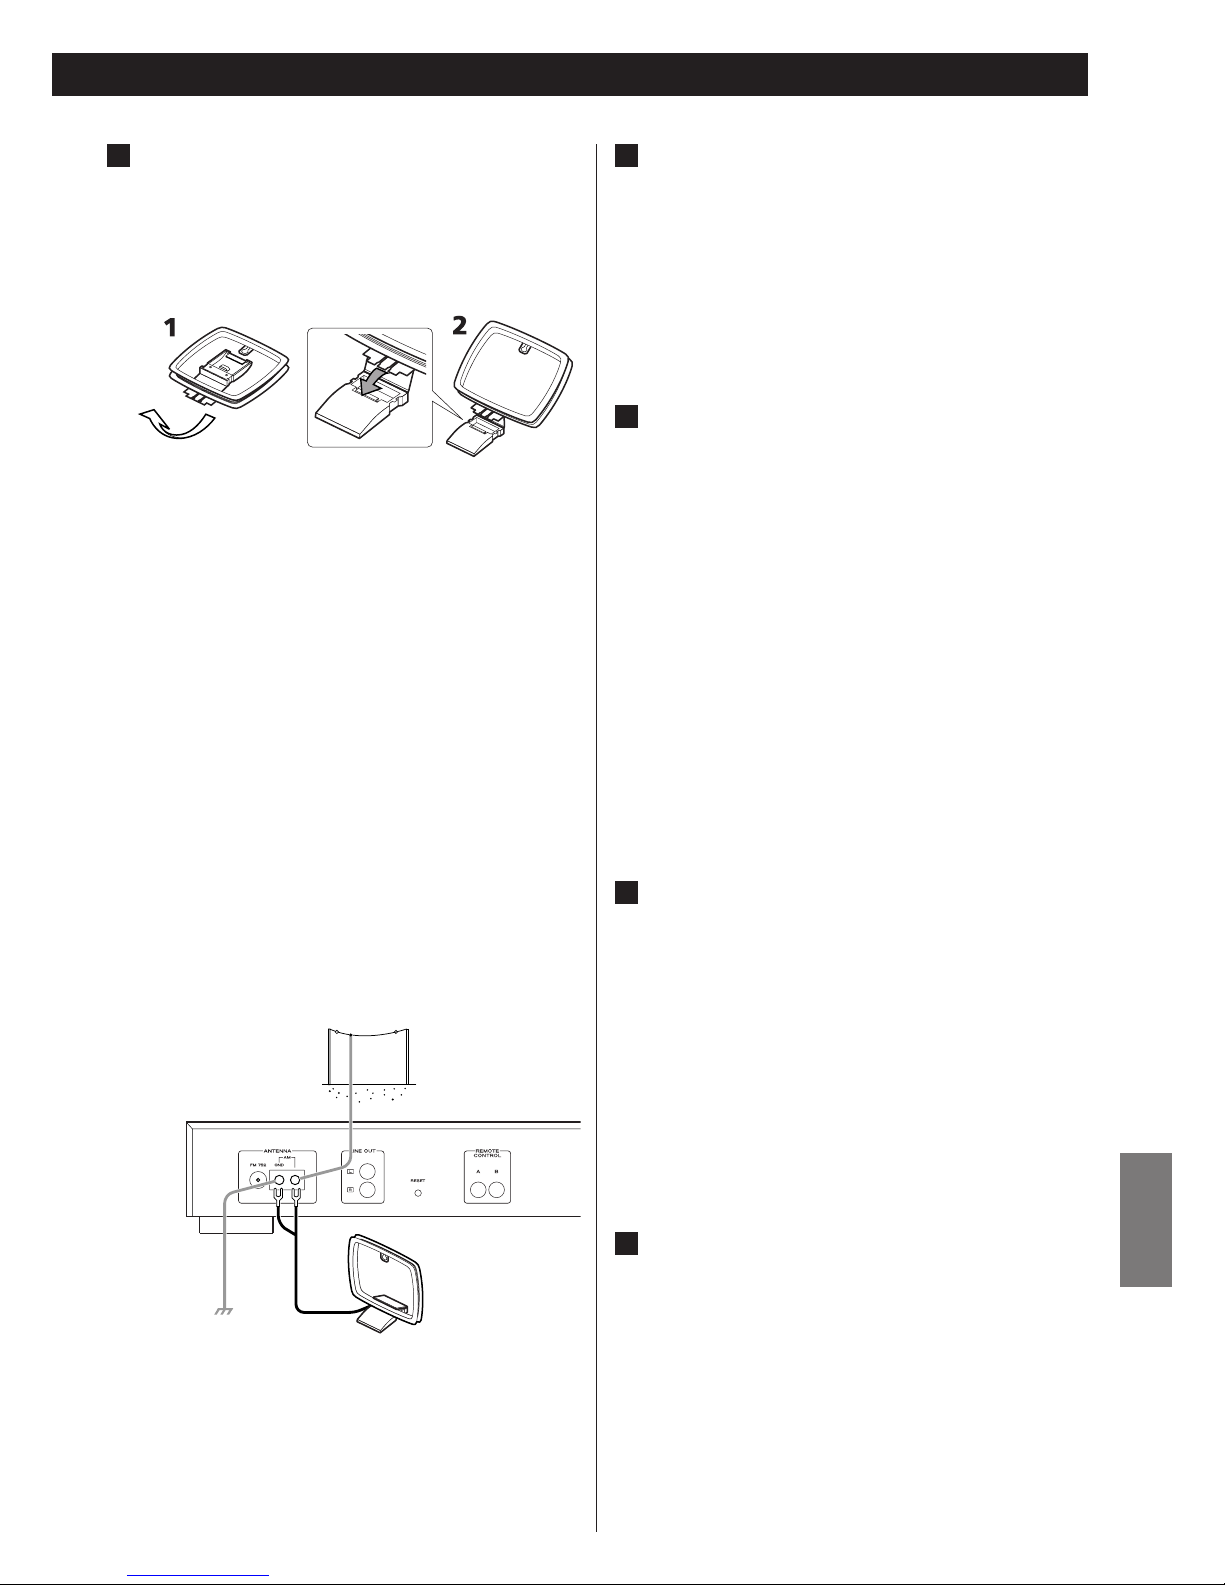
ITALIANO
61
Presa LINE OUT
Questa presa, da cui escono segnali audio analogici a 2canali, va collegata alla presa d’ingresso TUNER
dell’amplificatore (A-R610), tramite un cavo RCA.
Eseguite i collegamenti nel seguente modo:
spinotto bianco
q presa bianca (L: canale sinistro)
spinotto rosso
q presa rossa (R: canale destro)
Presa REMOTE CONTROL
Avendo a disposizione un TEAC A-R610, si potranno
effettuare utili operazioni di controllo del sistema:
• Quando si vuole sintonizzare un’emittente radio, il selettore
INPUT dell’amplificatore A-R610 si predispone
automaticamente su “TUNER”.
• Può utilizzare il RC-592B, un telecomando universale in
dotazione all'amplificatore A-R610, per controllare il T-R610.
Collegare la presa REMOTE CONTROL del sintonizzatore alla
presa REMOTE CONTROL (A o B) di un apparecchio A-R610
tramite il cavetto del telecomando in dotazione
all’amplificatore.
Nota:
Il T-R610 non è fornito di un proprio telecomando.
RESET
Nei seguenti casi, i tasti potrebbero funzionare in modo
improprio:
• quando il sistema ha subito danni dovuti a sovratensioni.
• quando l’alimentazione è instabile o disturbata.
In tali condizioni, premere leggermente l’interruttore RESET
una o due volte con una matita o una penna a sfera.
Tutte le regolazioni memorizzate (emittenti preselezionate,
predisposizioni del timer, eccetera) verranno così cancellate.
Cavo d’alimentazione
Dopo aver eseguito tutti i collegamenti necessari, inserire la
spina del cavo d’alimentazione in una presa di corrente.
Accertarsi che il cavo d’alimentazione venga inserito in una
presa che eroghi la corretta tensione.
Per inserire od estrarre il cavo d’alimentazione afferrarlo
sempre per la spina.
F
E
D
C
Nota:
Anche quando si usa un’antenna AM esterna, non è
consigliabile scollegare l’antenna AM interna a telaio.
Antenna AM a telaio interna
L’antenna a telaio AM di elevate prestazioni, compresa nella
fornitura di quest’apparecchio, garantisce un’ottima
ricezione in quasi tutte le località.
Affinché l’antenna a telaio possa rimanere diritta, inserire la
parte sporgente nell’incavo praticato nella base.
Collegare i cavi dell’antenna a telaio agli appositi terminali
AM del sintonizzatore.
Appoggiare l’antenna su uno scaffale oppure fissarla al
telaio di una finestra, od altro, scegliendo la direzione che
garantisce la migliore ricezione. Installare l’antenna lontano
quanto possibile da altri conduttori d’elettricità (cavi
d’alimentazione, cavetti dei diffusori, cavi di collegamento, e
simili).
< Se l’antenna AM fornita non garantisce una buona ricezione
(spesso perché si trova troppo lontano dal trasmettitore,
oppure in un edifico di cemento, od altro), potrebbe essere
necessario installare un’antenna AM esterna.
Si può acquistare un’antenna AM di buona qualità oppure,
se non fosse disponibile, si può usare un filo isolato lungo
più di 5 metri e collegarne un’estremità, dopo averla privata
del rivestimento, all’apposito terminale, come qui illustrato.
Il filo dell’antenna dovrà essere steso all’esterno, oppure
all’interno vicino a una finestra. Per migliorare la qualità
della ricezione, collegare il terminale GND ad una presa di
terra affidabile.
B
Page 62
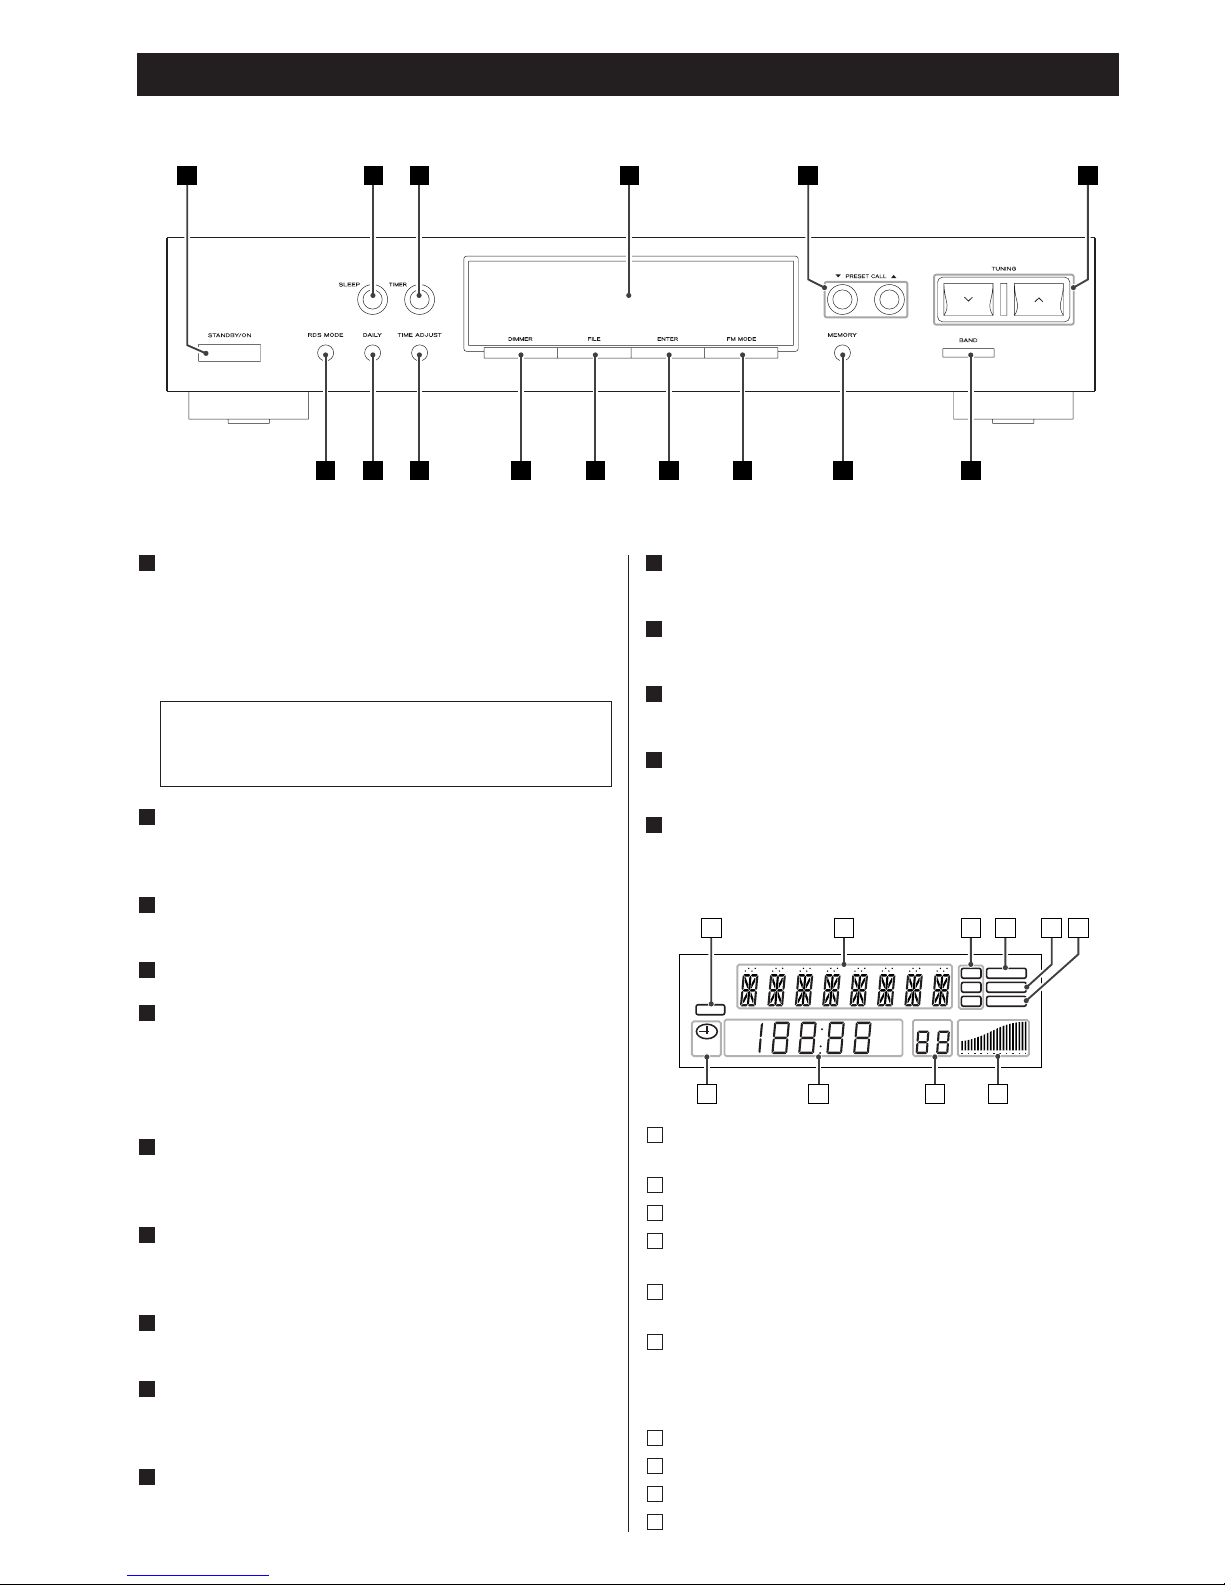
62
Posizione e funzione dei controlli
OWER (STANDBY/ON)
Premere questo tasto per accendere l’apparecchio o
commutarlo in standby.
Quando l’apparecchio è in condizione di attesa, l’indicatore
Standby rimane acceso. Quando l’apparecchio entra in
funzione, l’indicatore Standby si spegne.
SLEEP
Questo tasto permette di regolare il temporizzatore per lo
spegnimento ritardato del sintonizzatore.
TIMER
Questo tasto attiva o disattiva il funzionamento del timer.
Display
PRESET CALL
Questi tasti sono utilizati per selezionare emittenti
memorizzate.
Quando si attiva la funzione PTY, questi tasti sarrano utilizati
per selezionare un tipo di programma.
TUNING
Questi tasti sono utilizati per sintonizzare emittenti
radiofoniche.
BAND
Questo tasto seleziona la gamma di frequenza FM oppure
AM.
MEMORY
Questo tasto memorizza i canali preset.
FM MODE
IQuando il sintonizzatore è commutato nel modo FM,
premere questo tasto per scegliere l’ascolto stereo o mono.
ENTER
Premere questo tasto per confermare la scelta effettuata.
J
I
H
G
F
E
D
C
B
A
A B C D E F
GHO N
M
L K J I
FILE
Questo tasto assegna un nome alle emittenti preselezionate.
DIMMER
Questo tasto permette di diminuire la luminosità del display.
TIME ADJUST
Questo tasto permette di regolare l’ora esatta.
DAILY
Questo tasto predispone l’orario di attivazione del timer
RDS MODE
Questo tasto attiva la funzione RDS.
Display
O
N
M
L
K
Si illumina quando il Sleep Timer (spegnimento ritardato) è
attivato.
Visualizza i dati RDS, lo stato del timer, etc.
Si ilumina quando la funzione RDS è attivata.
Si ilumina quando l'apparecchio viene messo in sintonia su
una emittente.
Si ilumina quando l'apparecchio viene messo in sintonia su
una emittente FM stereo.
Lampeggia nel premere il tasto MEMORY.
Pottete selezionare un canale preset per memorizzarvi una
emittente sintonizzata mentre questo indicatore sta
lampeggiando.
Visualizza la forza di segnale della emittente sintonizzata.
Visualizza i numeri di preselezioni.
Visualizza l'orologio digital o le frequenze.
Si ilumina quando il timer è attivato.
j
i
h
g
f
e
d
c
b
a
SLEEP
RDS TUNED
RT STEREO
PTY MEMORY
TIMER
CH.
SIGNAL
FM
A
M
MHz
K
Hz
a b dc e f
g
h
j
i
Quando l’interruttore STANDBY/ON si trova in posizione
STANDBY, l’apparecchio assorbe dalla presa CA potenza
nominale di non utilizzo.
Page 63
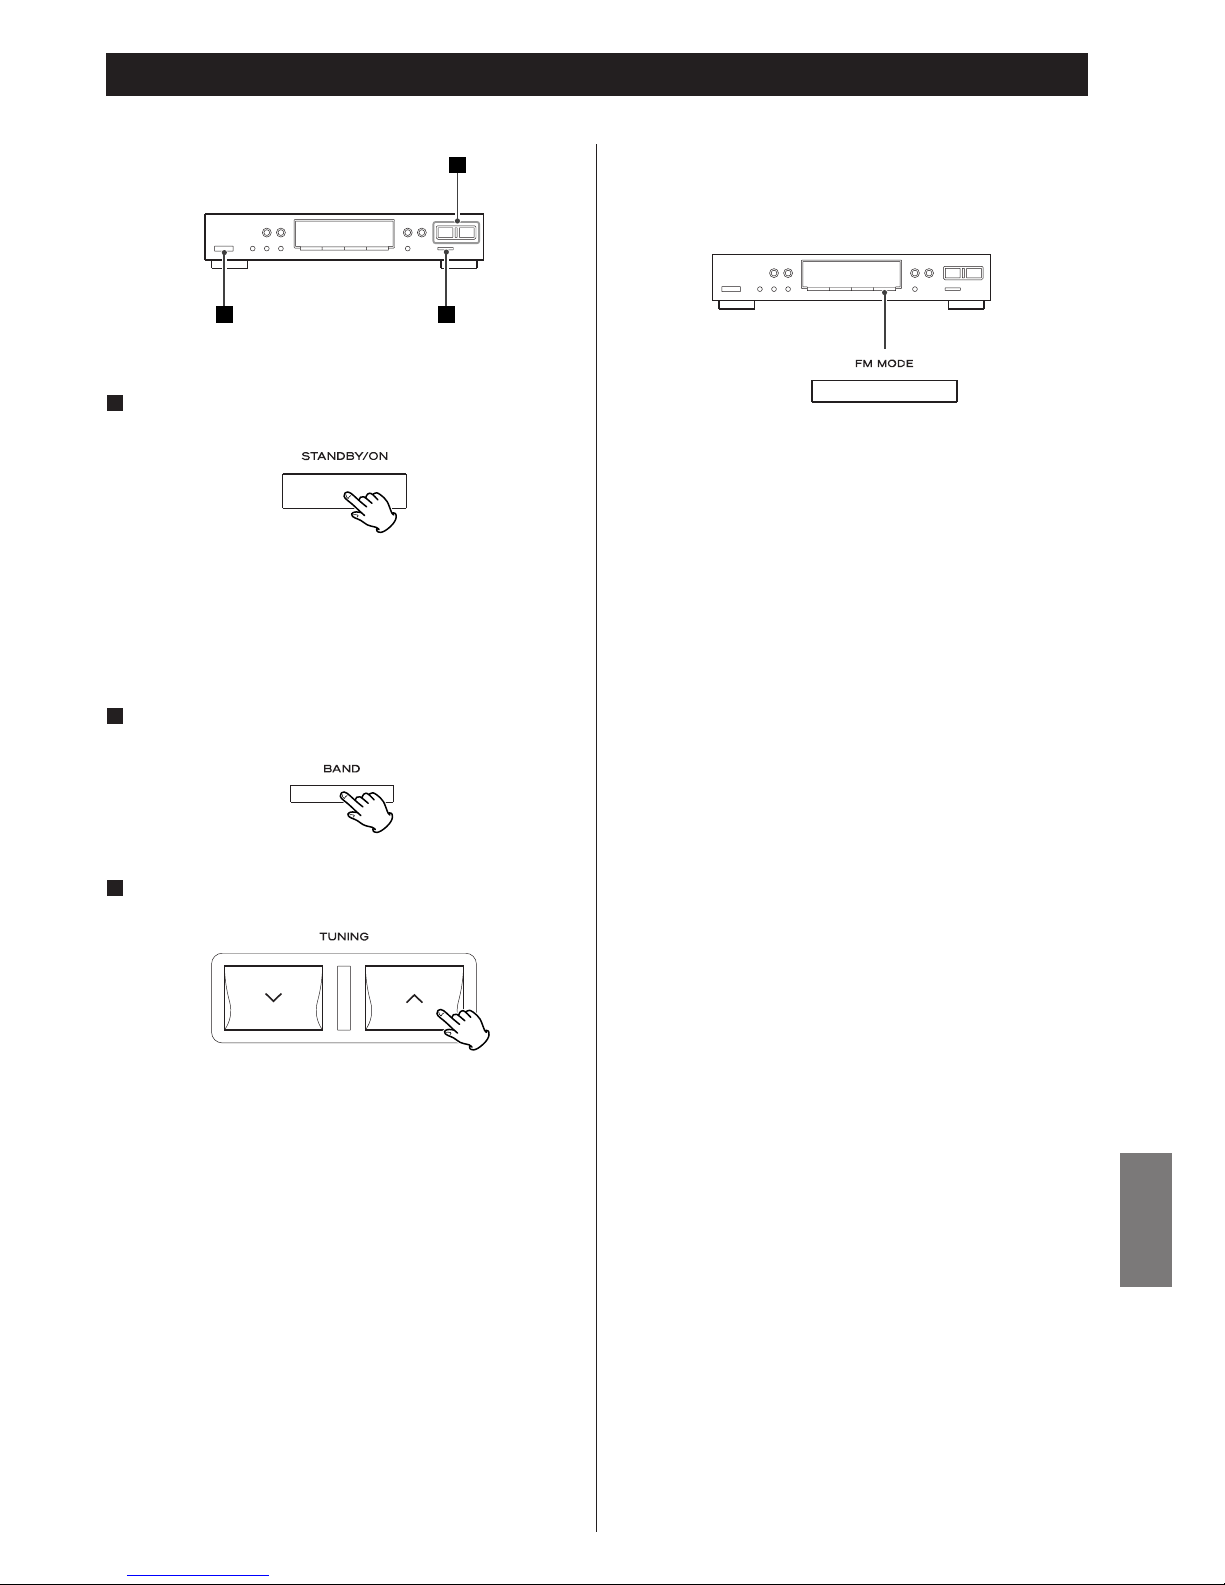
ITALIANO
63
Sintonia
Premere il tasto STANDBY/ON per accendere
l’apparecchio.
1
1 2
3
< Quando il T-R610 è collegato all’A-R610 con il cavetto del
telecomando, entrambi gli apparecchi possono essere accesi o
commutati in standby premendo il tasto STANDBY/ON dell’AR610.
Selezionare la gamma di frequenza AM o FM, con il
tasto BAND.
2
Selezionate la stazione che desiderate ascoltare
(selezione automatica).
3
Selezione di stazioni non automaticamente sintonizzabili
(selezione manuale)
Quando si preme brevemente il tasto TUNING (‡ o °), la
frequenza si sposta di un intervallo prefissato.
Premendo invece in continuità il tasto TUNING (
‡ o °), la
scansione della frequenza prosegue fino a trovare l’emittente
desiderata.
Tenere abbassato il tasto TUNING (
‡ o ° ) finché la
frequenza visualizzata comincia a cambiare. Quando
un’emittente viene sintonizzata, il processo si ferma
automaticamente.
< Per interrompere il processo di selezione automatica, premere
il tasto TUNING (
‡ o °).
Stereo:
Le trasmissioni FM stereo si ascoltano in stereofonia (sul
display è acceso l’indicatore “STEREO”.
Mono:
Quando i segnali FM stereo risultano troppo deboli, è
opportuno scegliere quest’opzione. La ricezione diventerà
ovviamente monoaurale, riducendo però i rumori
indesiderati.
Tasto FM MODE
Permette di commutare alternativamente fra l’ascolto Stereo e
Mono.
Page 64
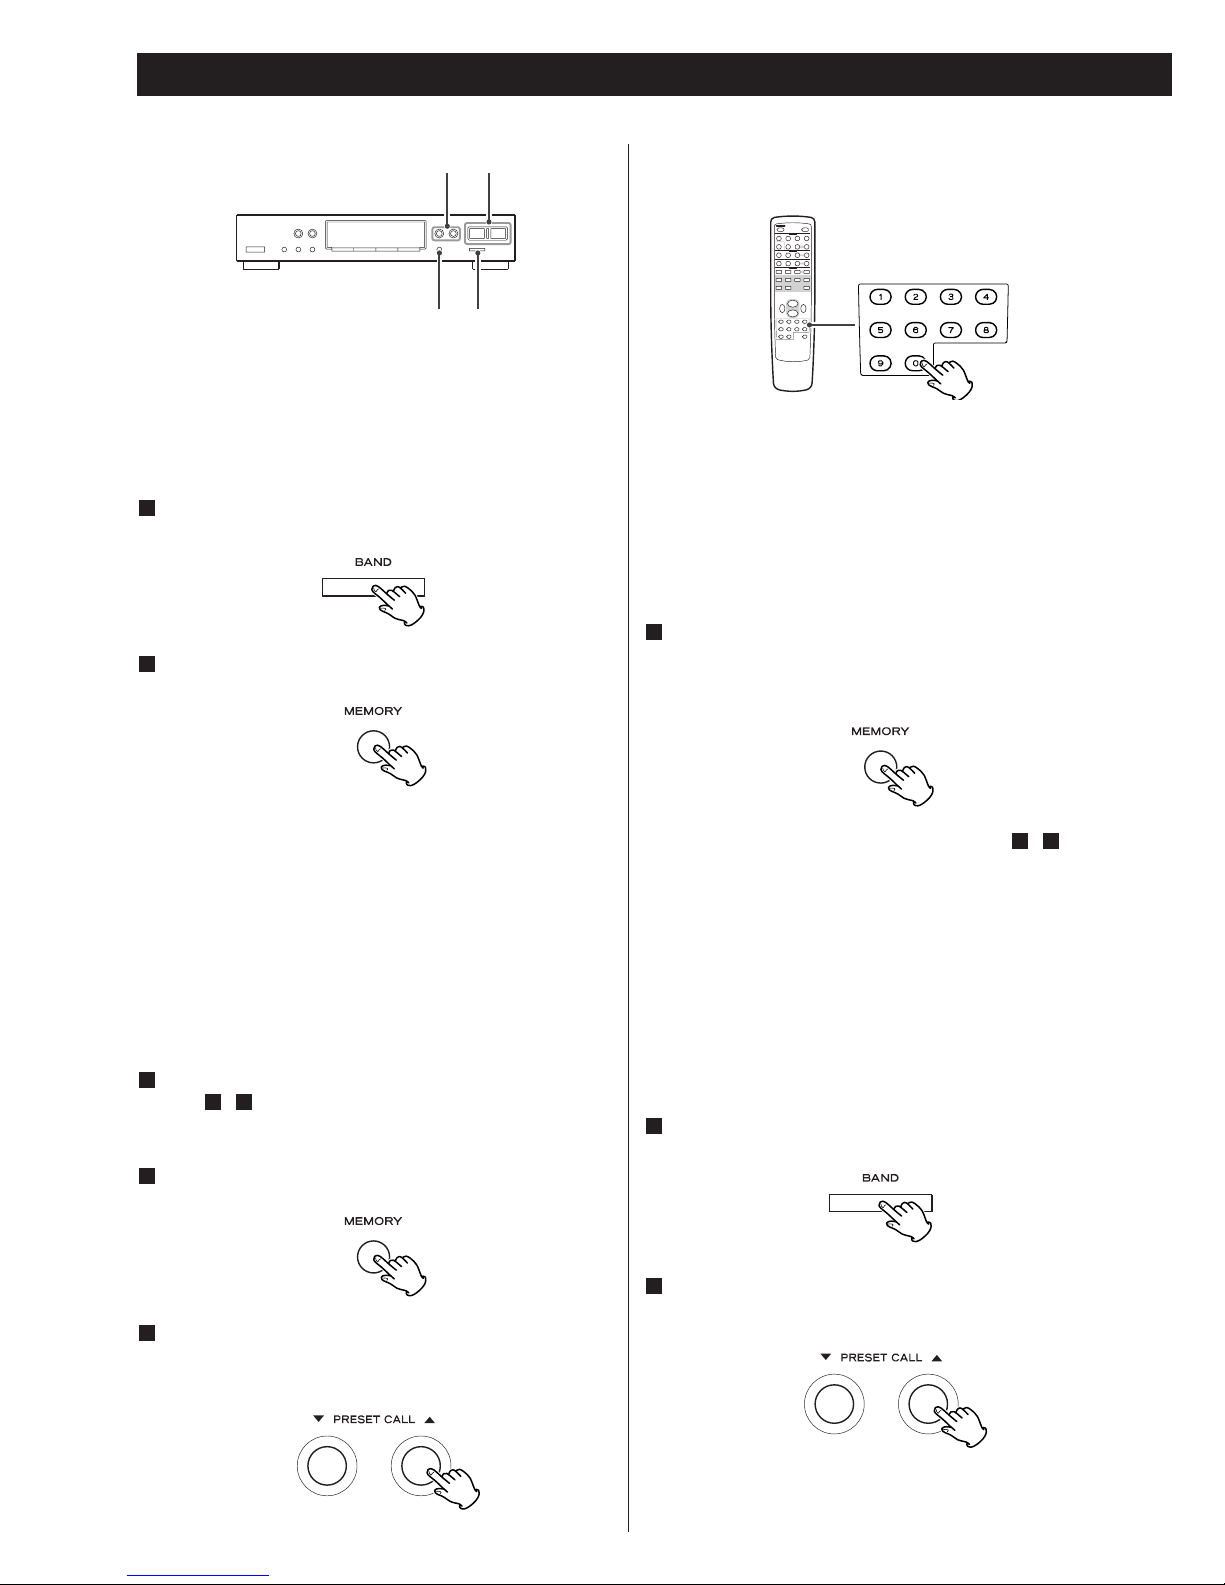
64
Sintonia preset
Per memorizzare altre emittenti, ripetere i passi - .
< Se capita di memorizzare una nuova emittente su un canale
che ne conteneva già un’altra, quest’ultima verrà cancellata
per sovrascrittura.
< Le emittenti preselezionate non si possono cancellare.
41
TUNINGPRESET CALL
BANDMEMORY
Si possono preselezionare fino a 30 emittenti per ciascuna delle
gamme FM e AM.
Preselezione/memorizzazione automatica
Scegliere la gamma di frequenza AM o FM, con il tasto
BAND.
1
Premere il tasto MEMORY per 1,5 secondi.
2
Verranno memorizzate automaticamente fino a 30 emittenti,
fra quelle che godono delle migliori condizioni locali di
ricezione.
< Nella gamma FM, l’apparecchio effettua una doppia
scansione delle frequenze di ogni emittente e memorizza
quella che permette una migliore ricezione.
Preselezione/memorizzazione manuale
Sintonizzare l’emittente che si desidera ascoltare (vedi
passi - a pagina 63).
Premere per un istante il tasto MEMORY.
2
41
1
Mentre l’indicatore “MEMORY” sta lampeggiando, con i
tasti PRESET CALL (
b o 5) selezionare un canale preset
per memorizzarvi l’emittente.
3
Per quest’operazione si possono anche usare i tasti numerici
del telecomando in dotazione all'amplificatore A-R610.
Esempio, per selezionare il canale 25, premere il tasto TUNER,
e poi i tasti “2” e “5”.
Per selezionare numeri minori di 10, premere “0” e poi il
numero. Esempio:, per selezionare il numero 5, premere “0”
e “5”. (In alternativa, si può premere solo il tasto “5” e poi
aspettare qualche secondo)
Premere il tasto MEMORY.
Oppure non toccare nessun comando per 8 secondi.
L’emittente viene memorizzata e l’indicatore “MEMORY”
scompare dal display.
4
Si può anche utilizzare le chiave numeriche sull'unità di
comando a distanza per scegliere una preselezionale.
Per sintonizzare emittenti preselezionate
Selezionare la gamma di frequenza AM o FM, con il
tasto BAND.
1
Premere ripetutamente PRESET CALL (b o 5) fino a
trovare l’emittente desiderata.
2
Page 65
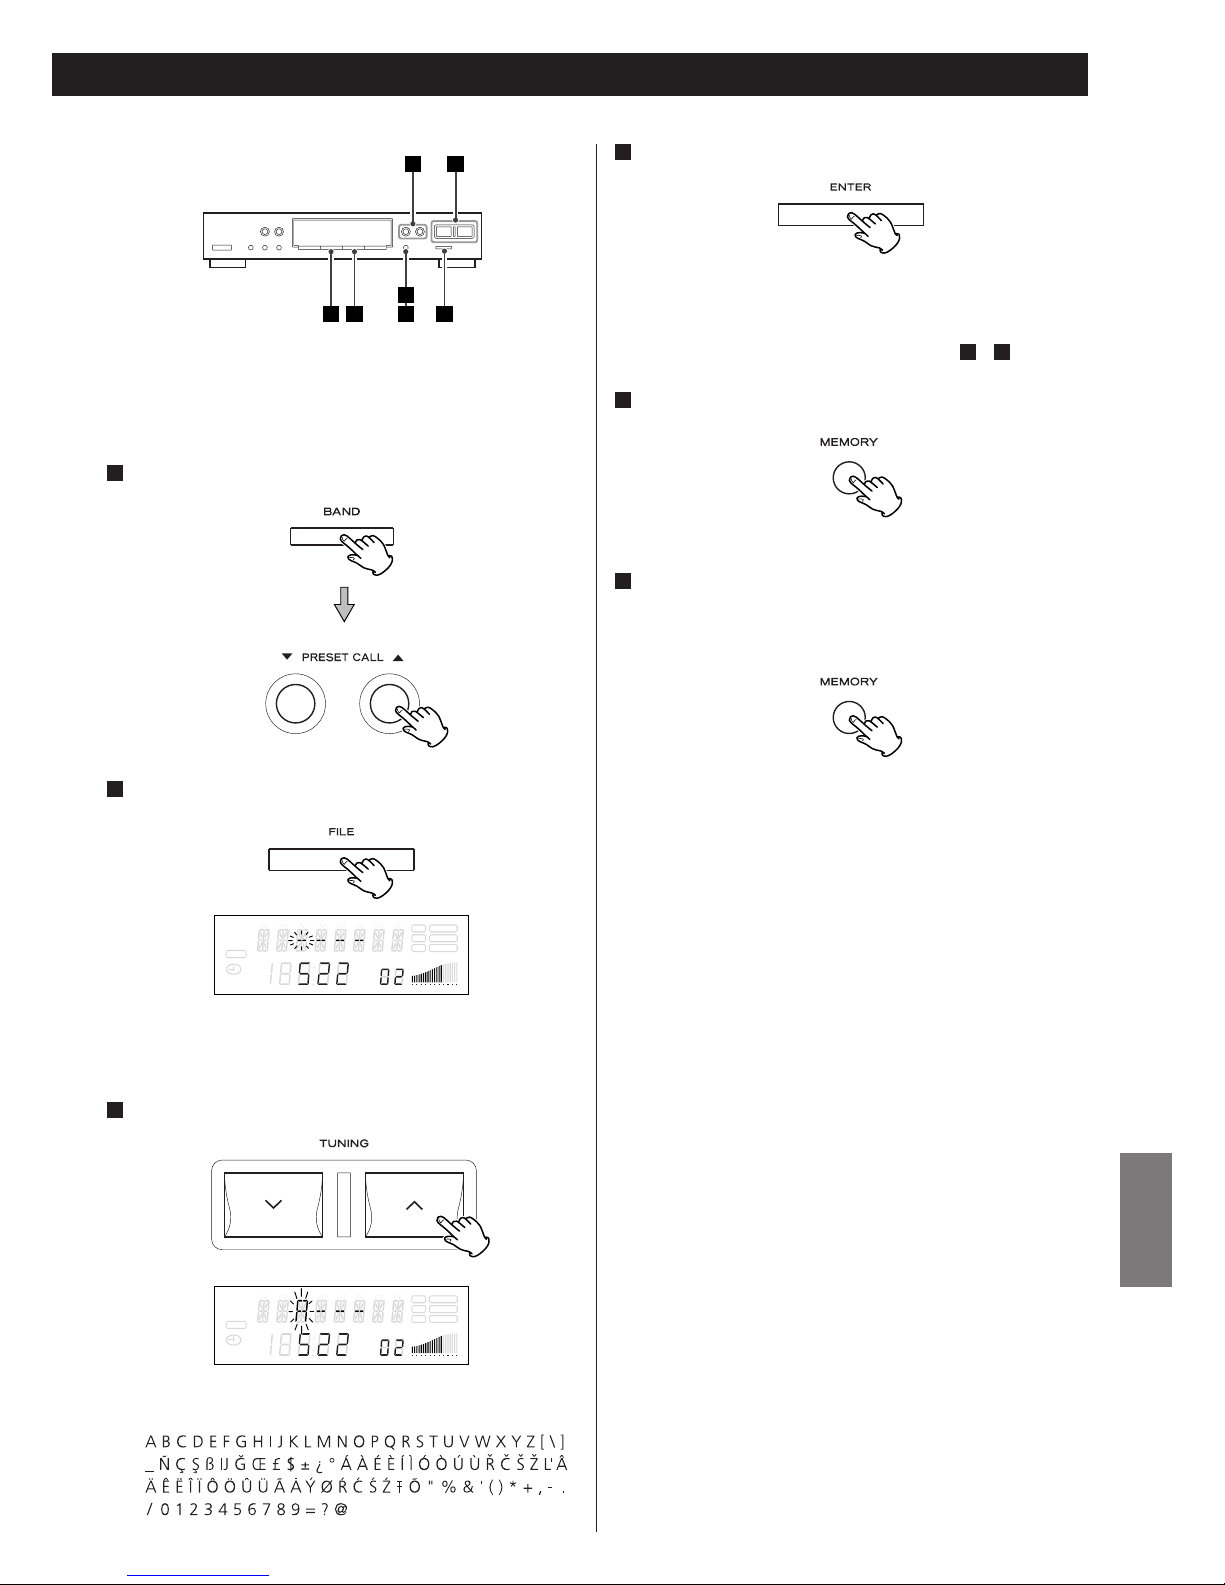
ITALIANO
65
Premere ancora il tasto MEMORY mentre l’indicatore
“MEMORY” sta lampeggiando.
In alternativa non toccare nessun comando per 8 secondi.
Il nome assegnato viene così memorizzato.
6
Selezionare un canale.
1
Sul display compare l’indicazione “
----
”, nella quale il primo
“
-
” lampeggia.
Scegliere un carattere, con i tasti TUNING (‡/°).
3
Sono disponibili i caratteri:
Diventa lampeggiante l’indicazione “-” successivo.
Per il nome di ciascun’emittente si possono usare fino a 4
caratteri.
Per impostare tutti i caratteri, ripetere i passi e .
Premere il tasto MEMORY.
5
43
Assegnazione del nome alle emittenti preset
Si può assegnare un nome alle emittenti preset.
2 4 651
31
Premere il tasto ENTER.
4
Premere il tasto FILE.
2
SLEEP
RDS TUNED
RT STEREO
PTY MEMORY
TIMER
CH.
SIGNAL
FM
A
M
MHz
K
Hz
SLEEP
RDS TUNED
RT STEREO
PTY MEMORY
TIMER
CH.
SIGNAL
FM
A
M
MHz
K
Hz
(spazio)
Page 66
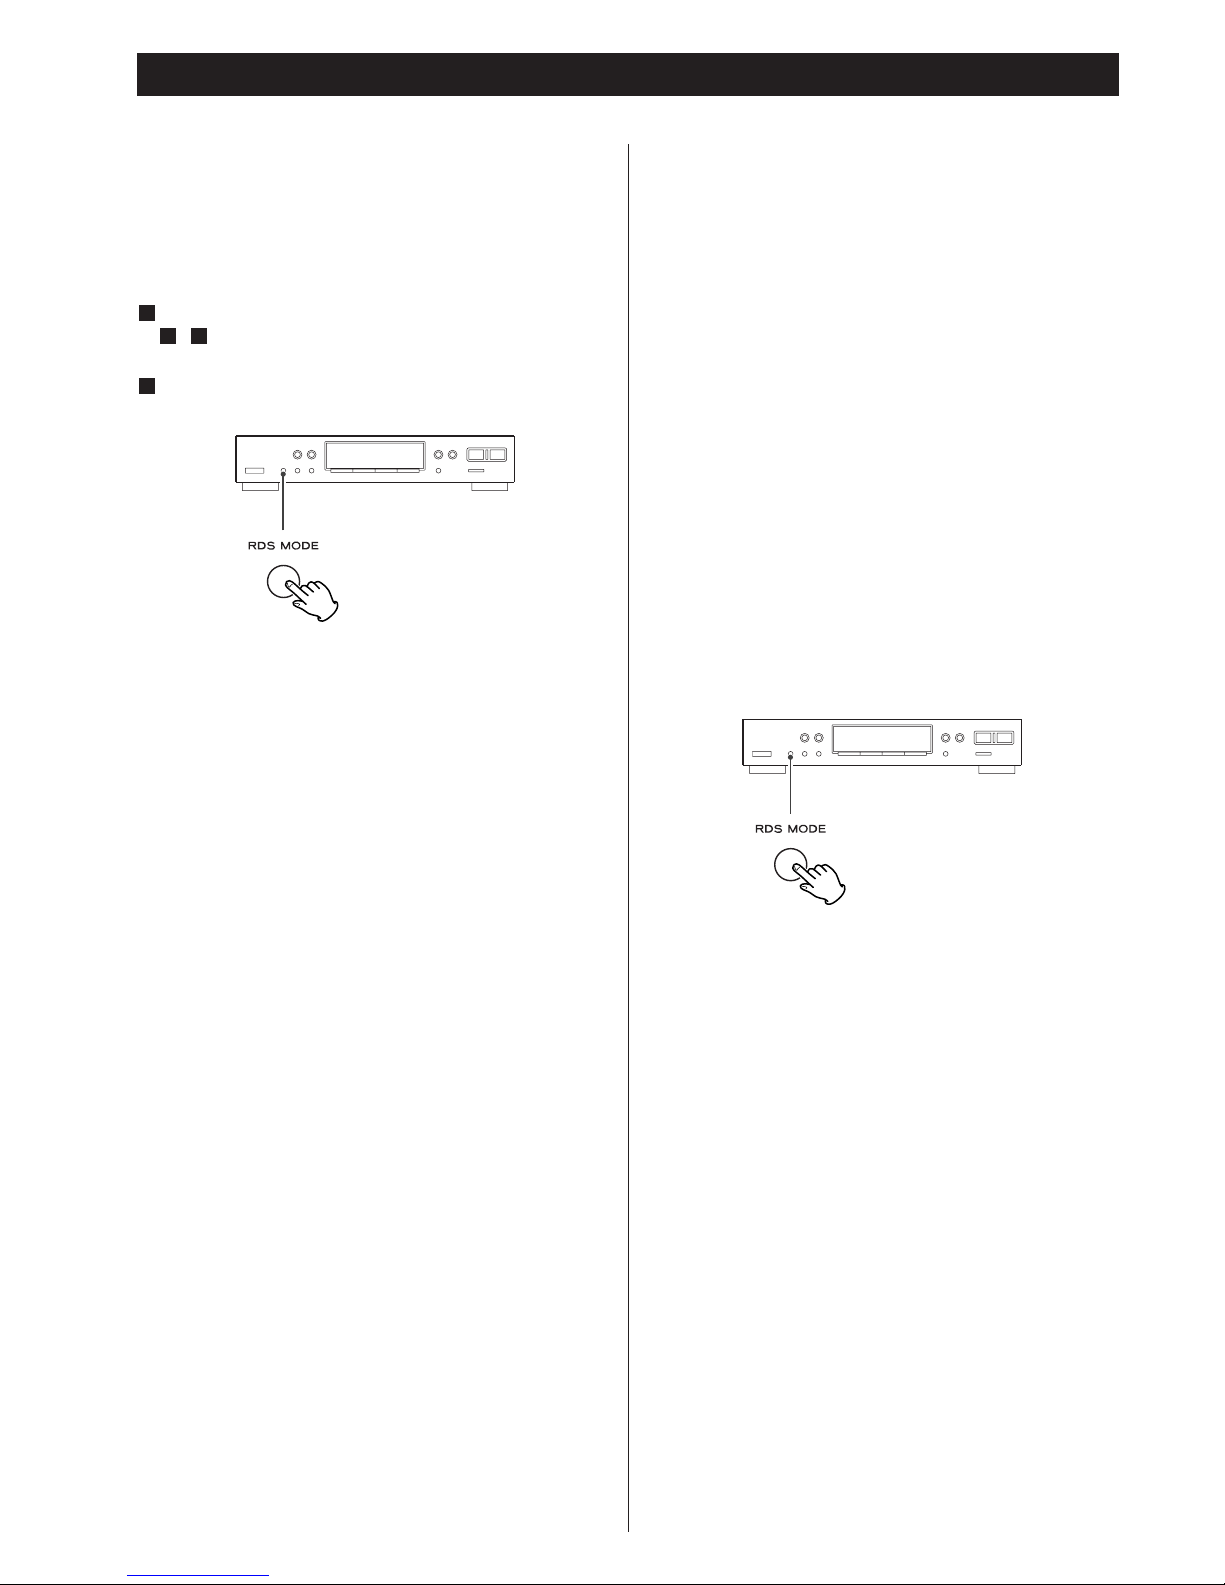
66
RDS (Radio Data System)
Radio Data System (RDS) è un servizio radiofonico che permette
alle emittenti di trasmettere informazioni supplementari insieme
alla normale programmazione.
I segnali RDS si possono ricevere solo in Europa, nella
gamma FM.
Sintonizzare un’emittente FM (come descritto nei passi
- a pagina 63).
Premere il tasto RDS MODE.
Ogni volta che si preme brevemente il tasto RDS MODE,
vengono visualizzate le varie opzioni del sistema, nel seguente
ordine:
PS (Programme Service name)
Quando si seleziona PS, lampeggia per 4 secondi l’indicatore
“PS”, poi vengono visualizzati i dati PS o il nome
dell’emittente. In assenza di dati PS, sul display comparirà la
frequenza.
PTY (Programme Type)
Quando si seleziona PTY, lampeggia per 4 secondi
l’indicatore “PTY”, poi viene visualizzato il tipo del
programma.
RT (Radio Text)
Quando si seleziona RT, lampeggia per 4 secondi l’indicatore
“RT”, poi vengono visualizzate le ultime notizie
dell’emittente sintonizzata (64 simboli al massimo).
TA (Traffic Announcement)
Quando si seleziona TA, lampeggia per 4 secondi
l’indicatore “TA”, poi il sistema cerca un’emittente che
trasmetta informazioni sul traffico.
< Quando l’emittente trovata smette di trasmettere
informazioni sul traffico, il sistema ne cerca subito un’altra, e
così via.
In assenza di dati PTY/RT, il sistema commuta
automaticamente sull’opzione PS.
2
31
1
Quando l’amplificatore A-R610 e il sintonizzatore T-R610
sono collegati tramite il cavetto del telecomando
Nell’opzione TA, per selezionare un’altra sorgente si può
ruotare il selettore INPUT dell’amplificatore A-R610.
Quando è stata trovata un’emittente che trasmette
informazioni sul traffico, il selettore INPUT dell’A-R610
commuta automaticamente su “TUNER”. Se poi l’emittente
interrompe la trasmissione di quelle informazioni, il selettore
torna automaticamente sulla sorgente selezionata in
precedenza.
CT (Clock Time)
Visualizza l'ora che una stazione trasmette.
Quando va in modo CT, l'indicatore “CT” lampeggia per 4
secondi e poi viene visualizzata l'ora.
Premere e tenere premuto il tasto RDA MODE per 10
secondi per attivare/disattivare la funzione CT.
< La regolazione dell’ora verrà automaticamente modificata in
base ai dati CT.
Quando è sintonizzata un’emittente con RDS che trasmette
dati CT non esatti, la regolazione dell’ora potrebbe risultare
errata, alterando così il funzionamento delle operazione
temporizzate.
Page 67
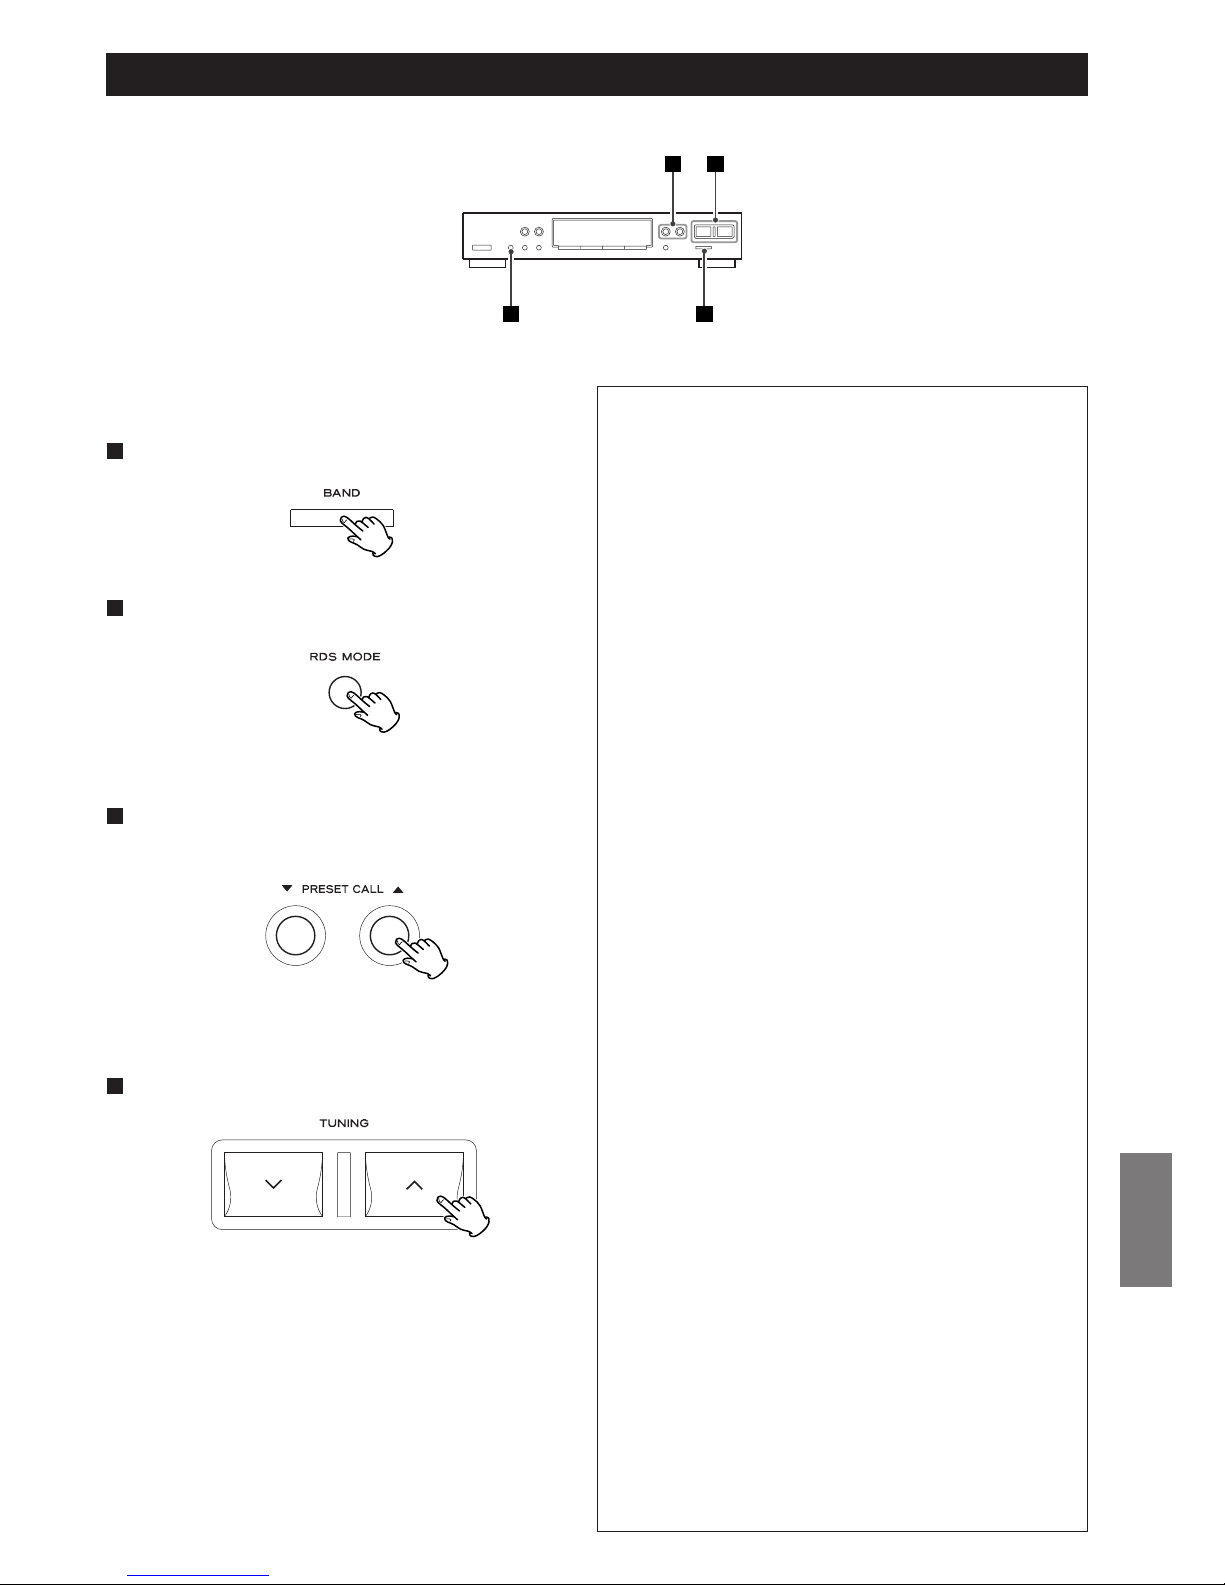
ITALIANO
67
NEWS : annunci brevi, eventi, interviste, resoconti,
cronache dal vivo.
AFFAIRS : proposte che comprendono annunci diversi dalle
notizie, documenti, discussioni, analisi e così via
INFO : informazioni giornaliere o di utilità quali previsioni
meteo, consigli ai consumatori, assistenza medica,
eccetera
SPORT : servizi dedicati a tutti gli sport
EDUCATE : informazioni didattiche e culturali
DRAMA : concerti di ogni tipo e adattamenti teatrali a
puntate
CULTURE : tutti gli aspetti della cultura nazionale o locale,
comprese funzioni religiose, filosofia, sociologia,
teatro, eccetera
SCIENCE : programmi sulle scienze naturali e sulla tecnologia
VARIED : programmi per il grande pubblico, come quiz,
intrattenimento, interviste, commedie, satira,
eccetera.
POP M : programmi di musica commerciale e popolare, hit
parade di dischi, eccetera
ROCK M. : musica moderna, di solito composta ed eseguita da
giovani musicisti
MORM : musica pop, con brani che durano in genere meno
di 5 minuti
LIGHT M : musica classica, strumentale, corale, e musica
leggera preferita dai non professionisti
CLASSICS : orchestre che eseguono opere liriche, musica
sinfonica, da camera, eccetera
OTHER M : generi musicali diversi (Rhythm & Blues, Reggae,
eccetera)
WEATHER :
condizioni e previsioni del tempo.
FINANCE :
resoconti finanziari, commerciali, quotazioni dei
cambi
.
CHILDREN :
programmi per i bambini.
SOCIAL-A :
programmi di argomento sociologico.
RELIGION :
programmi di argomento religioso.
PHONE-IN :
programmi nei quali il pubblico può intervenire
telefonicamente
.
TRAVEL :
esoconti di viaggio.
HOBBIES :
programmi sulle attività ricreative.
JAZZ : musica jazz.
COUNTRY :
musica country.
NATION-M :
musica caratteristica delle varie nazioni.
OLDIES :
canzoni dei cosiddetti “tempi d’oro” della musica
pop
.
FOLK-M :
musica folcloristica.
DOCUMENT :
documentari.
TEST
ALARM : programma riservato alle comunicazioni riguardanti
situazioni d’emergenza o disastri naturali
Inizia l’operazione di ricerca.
< Quando il programma scelto è stato trovato, la ricerca si
ferma e viene visualizzato il tipo del programma.
< Se la ricerca PTY non riesce a trovare il tipo di programma
scelto, l’operazione para e viene ripristinata la frequenza
iniziale.
< Per fermare l’operazione di ricerca, premere il tasto RDS
MODE.
RDS (Ricerca PTY)
Questa funzione permette di ricercare una data emittente.
Selezionare la gamma FM premendo il tasto BAND.
1
Premere il tasto RDS MODE per più di 1,5 secondi.
2
Sul display lampeggia l’indicatore “SEARCH”.
Selezionare un programma PTY utilizzando i tasti
PRESET CALL (
b/5).
3
You can select from 31 kinds.
2 1
43
Premere il tasto TUNING (‡ o °).
4
Page 68
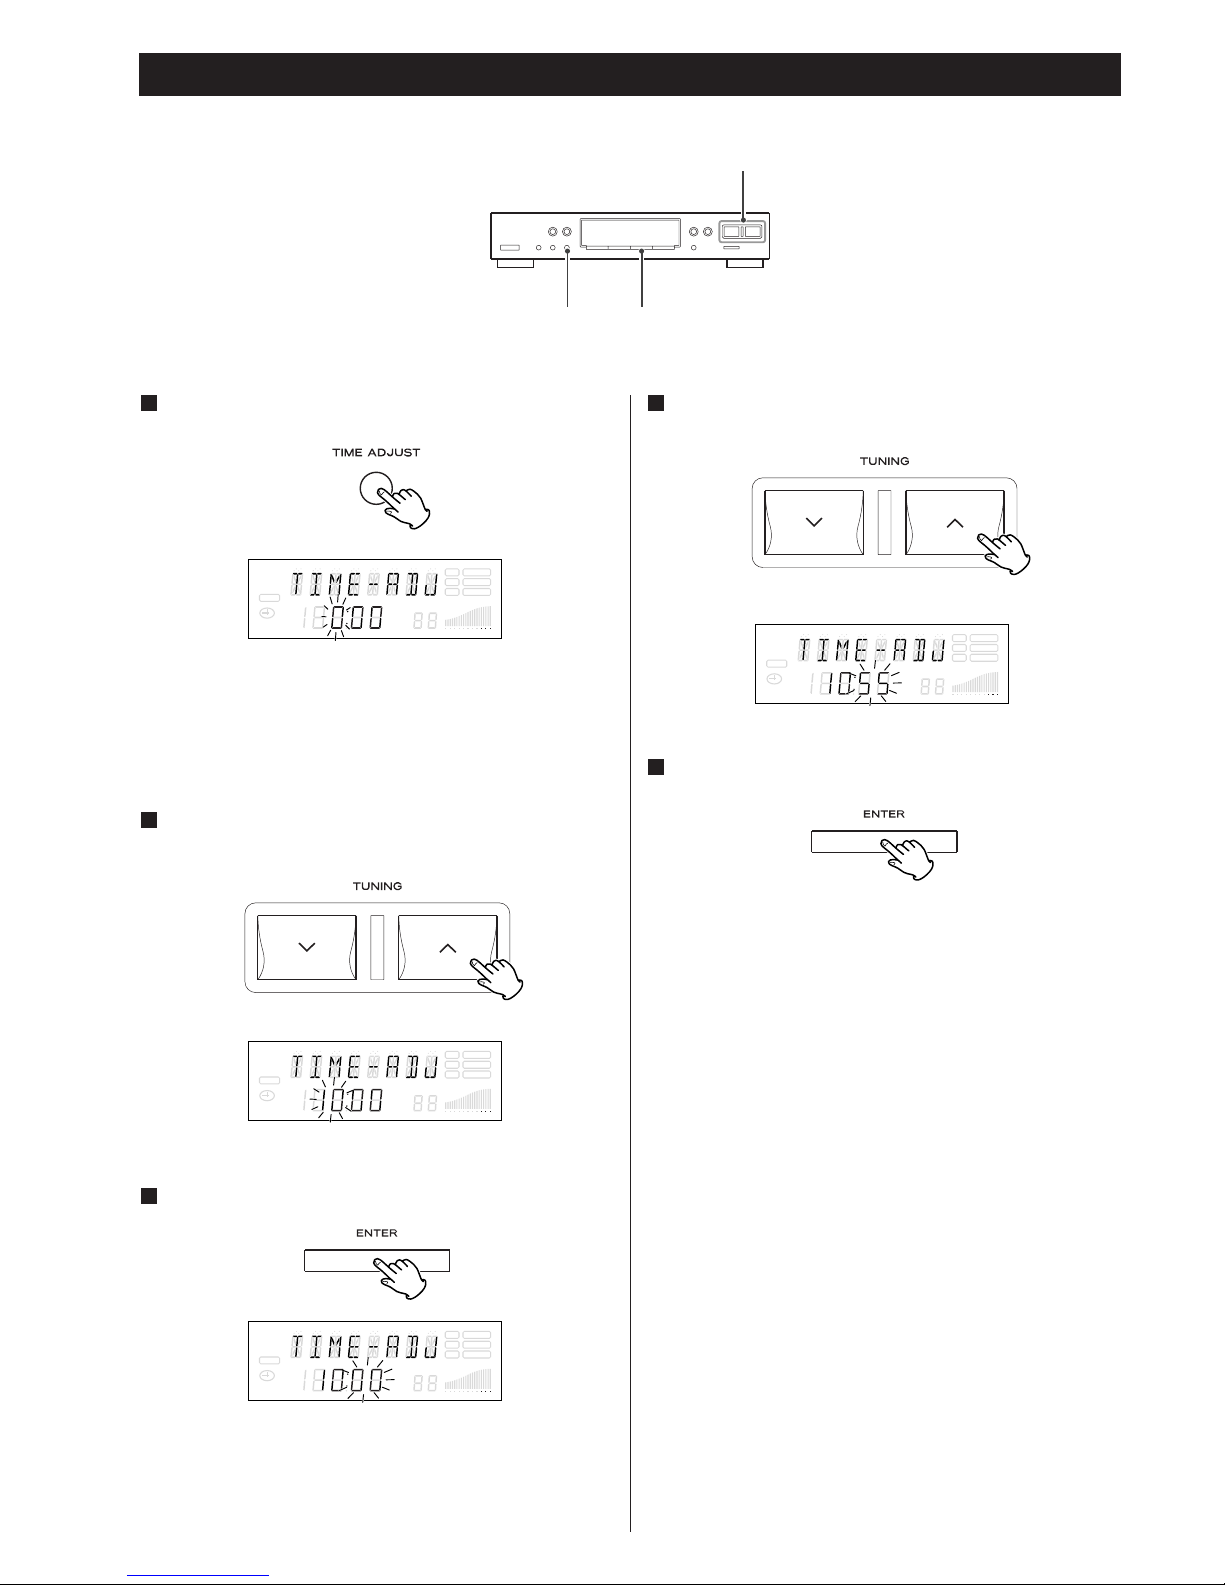
68
Sul display lampeggia le ore.
< Si può regolare l’orologio anche quando l’apparecchio è
commutato in standby.
< L’orologio utilizza il formato a 24 ore.
Entro 8 secondi, impostare le ore correnti utilizzando i
tasti TUNING (
‡/°).
2
Entro 8 secondi, premere il tasto ENTER.
3
Impostare i minuti correnti utilizzando i tasti TUNING
(
‡/°).
4
L’orologio comincia a funzionare partendo da 00 secondi.
Regolazione dell’orologio
Premere il tasto TIME ADJUST.
1
SLEEP
RDS TUNED
RT STEREO
PTY MEMORY
TIMER
CH.
SIGNAL
FM
A
M
MHz
K
Hz
SLEEP
RDS TUNED
RT STEREO
PTY MEMORY
TIMER
CH.
SIGNAL
FM
A
M
MHz
K
Hz
SLEEP
RDS TUNED
RT STEREO
PTY MEMORY
TIMER
CH.
SIGNAL
FM
A
M
MHz
K
Hz
SLEEP
RDS TUNED
RT STEREO
PTY MEMORY
TIMER
CH.
SIGNAL
FM
A
M
MHz
K
Hz
Sul display lampeggia adesso i minuti.
Premere il tasto ENTER.
5
TUNING
ENTERTIME ADJUST
Page 69
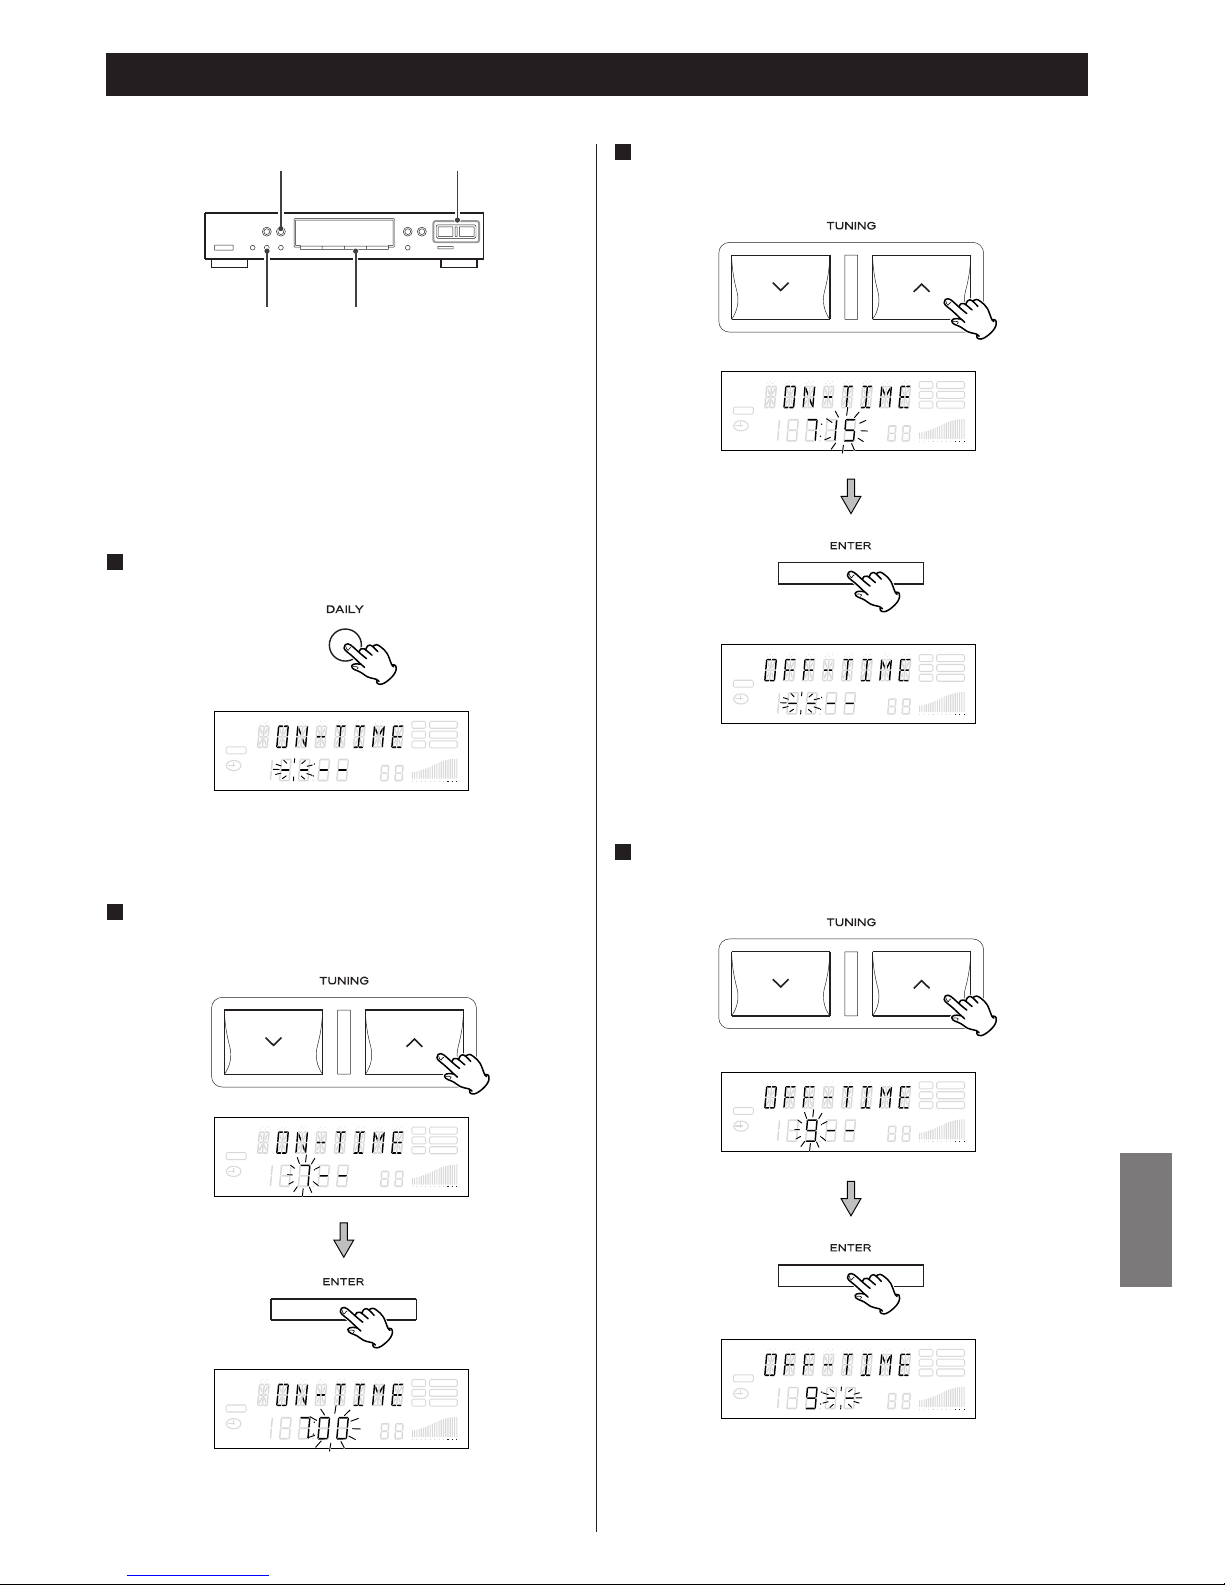
ITALIANO
69
Prima di impostare il timer, regolare esattamente l’orologio.
Premere il tasto DAILY.
1
Lampeggia adesso il valore dei “minuti”.
Viene visualizzata la scritta “OFF TIME”, e lampeggia di nuovo
il valore delle “ore”.
Viene visualizzata la scritta “ON TIME”, ed il valore delle
“ore” lampeggia.
Impostazione della funzione Daily Timer (temporizzazione giornaliera) 1
Impostare le ore de spegnimento utilizzando i tasti
TUNING (
‡/°) e poi premere il tasto ENTER.
4
TUNINGTIMER
ENTERDAILY
Quando l’amplificatore A-R610 e il sintonizzatore T-R610 sono
collegati tramite il cavetto del telecomando, il timer accende e
spegne entrambi gli apparecchi simultaneamente ai tiempi
specificati ogni giorno.
SLEEP
RDS TUNED
RT STEREO
PTY MEMORY
TIMER
CH.
SIGNAL
FM
A
M
MHz
K
Hz
SLEEP
RDS TUNED
RT STEREO
PTY MEMORY
TIMER
CH.
SIGNAL
FM
A
M
MHz
K
Hz
SLEEP
RDS TUNED
RT STEREO
PTY MEMORY
TIMER
CH.
SIGNAL
FM
A
M
MHz
K
Hz
Impostare i minuti de accensione utilizzando i tasti
TUNING (
‡/°) e poi premere il tasto ENTER.
3
SLEEP
RDS TUNED
RT STEREO
PTY MEMORY
TIMER
CH.
SIGNAL
FM
A
M
MHz
K
Hz
SLEEP
RDS TUNED
RT STEREO
PTY MEMORY
TIMER
CH.
SIGNAL
FM
A
M
MHz
K
Hz
SLEEP
RDS TUNED
RT STEREO
PTY MEMORY
TIMER
CH.
SIGNAL
FM
A
M
MHz
K
Hz
SLEEP
RDS TUNED
RT STEREO
PTY MEMORY
TIMER
CH.
SIGNAL
FM
A
M
MHz
K
Hz
Impostare le ore de accensione utilizzando i tasti
TUNING (
‡/°) e poi premere il tasto ENTER.
2
Page 70
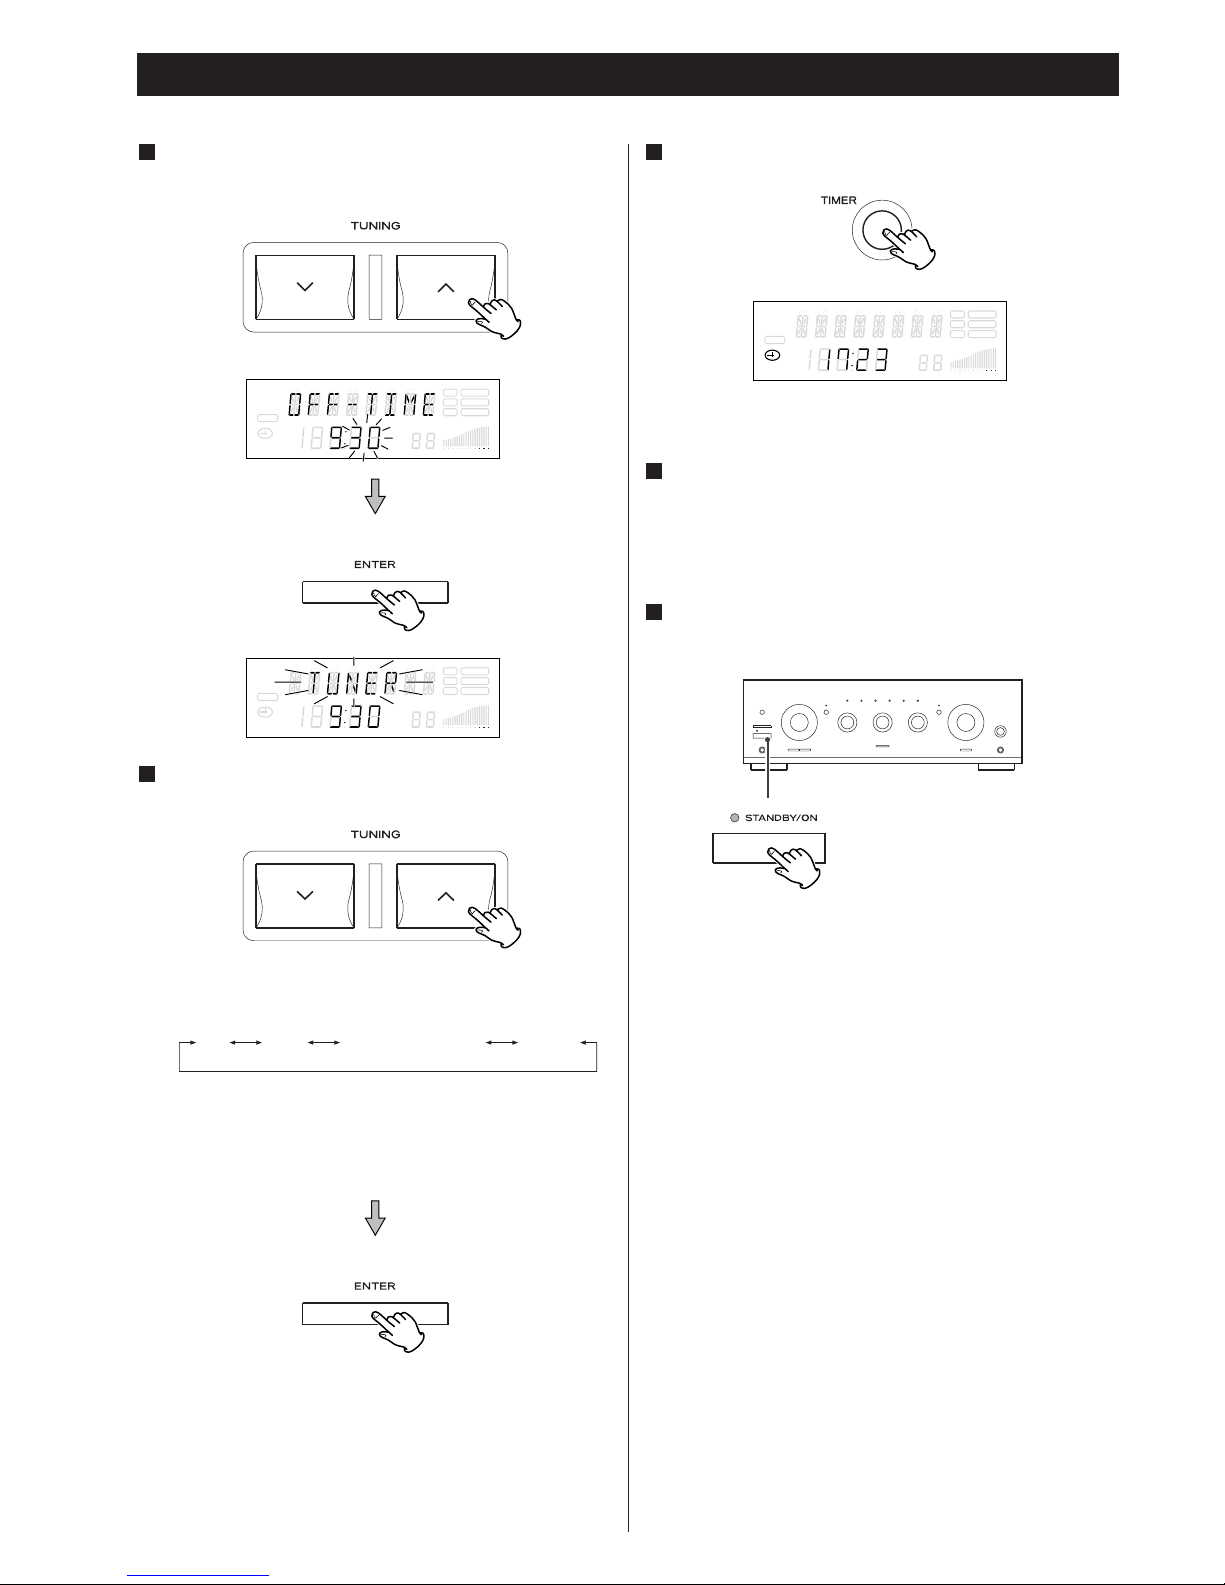
70
Impostazione della funzione Daily Timer (temporizzazione giornaliera) 2
Impostare i minuti de spegnimento utilizzando i tasti
TUNING (
‡/°) e poi premere il tasto ENTER.
5
Selezionare una sorgente sonora utilizzando i tasti
TUNING (
‡/°) e poi premere il tasto ENTER.
6
Ogni volta i tasti TUNING (‡/°) ono premuti, la selezione
cambia come segue.
< È inutile selezionare “CD”, “TAPE” o “TUNER-R” se il suo
lettore CD/cassetta, che è collegato al A-R610, non è
equipaggiato per la registrazione/riproduzione controllata da
timer.
CD TAPE TUNER R(ecording) TUNER
L’operazione è conclusa: tutti gli apparecchi collegati tramite il
cavetto del telecomando si accenderanno e spegneranno,
ogni giorno, negli orari predefiniti.
Quando il timer non viene utilizzato, premere il tasto
TIMER per disattivarlo. (Scompare allora dal display
l’indicatore del timer.)
Per riattivare il temporizzatore, premere ancora il tasto TIMER.
Preliminari all’azionamento temporizzato del
sintonizzatore.
Regolare il volume dell’amplificatore, sintonizzare
un’emittente station, e così via.
8
L’impostazione del timer è così conclusa e viene memorizzata.
Premere il tasto TIMER.
7
Sul display si accende l’indicatore del timer.
SLEEP
RDS TUNED
RT STEREO
PTY MEMORY
TIMER
CH.
SIGNAL
FM
A
M
MHz
K
Hz
SLEEP
RDS TUNED
RT STEREO
PTY MEMORY
TIMER
CH.
SIGNAL
FM
A
M
MHz
K
Hz
SLEEP
RDS TUNED
RT STEREO
PTY MEMORY
TIMER
CH.
SIGNAL
FM
A
M
MHz
K
Hz
Premere il tasto STANDBY/ON dell’amplificatore A-R610
per commutare in standby gli apparecchi interessati.
9
Page 71
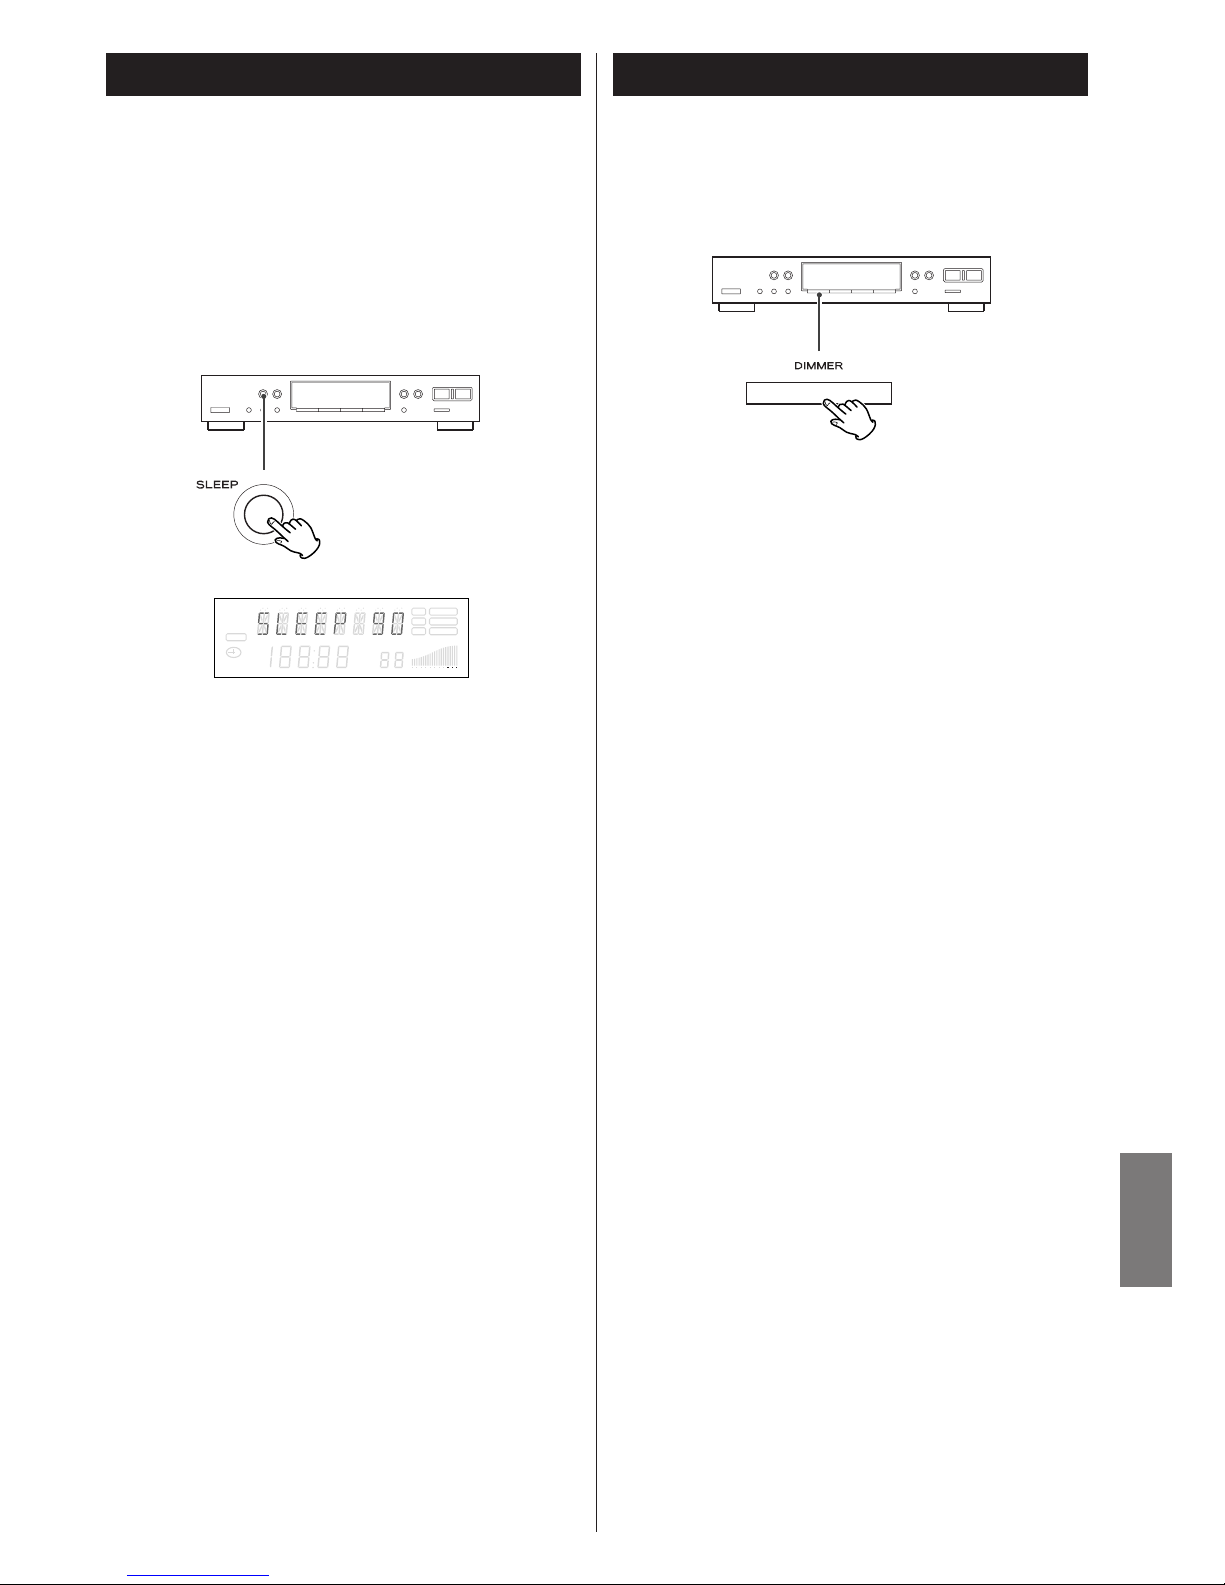
71
ITALIANO
Sleep Timer (spegnimento ritardato)
L’alimentazione può essere tolta dopo un intervallo predefinito.
Premere ripetutamente il tasto SLEEP finché compare sul display
l’intervallo desiderato.
Quando l’amplificatore A-R610 e il sintonizzatore T-R610 sono
collegati tramite il cavetto del telecomando, lo Sleep Timer
spegne entrambi gli apparecchi simultaneamente dopo un
tempo programmato.
SLEEP 90 (80, 70, 60, 50, 40, 30, 20, 10)
L’alimentazione verrà tolta dopo 90 (80, 70, 60, 50, 40, 30,
20 o 10) minuti.
Al normale display
La funzione Sleep Timer è disattivata.
< Volendo controllare quanto tempo manca allo spegnimento,
premere una volta il tasto SLEEP. Il tempo restante verrà
visualizzato per 2,5 secondi, poi verrà ripristinato il normale
display.
SLEEP
RDS TUNED
RT STEREO
PTY MEMORY
TIMER
CH.
SIGNAL
FM
A
M
MHz
K
Hz
< Questa funzione viene annullata quando si toglie
l’alimentazione.
Funzione Dimmer (attenuazione luminosità display)
Il tasto DIMMER attenua la luminosità del display.
Premendo il tasto una seconda volta si ripristina la luminosità
originale.
Page 72

Nell’eventualità di un comportamento difettoso di
quest’apparecchio, prima di rivolgersi al rivenditore dove è stato
acquistato oppure a un Centro assistenza TEAC, verificare se il
difetto compare nell’elenco che segue e provare a risolverlo
come consigliato.
Non arriva la corrente
e Verificare che la spina del cavo d’alimentazione sia inserita a
fondo nella presa di rete. Per verificare se c’è corrente nella
presa di rete, provare ad inserirvi un altro apparecchio, come
un ventilatore o un phon.
Assenza totale di suono
e Verificare i collegamenti all’amplificatore.
e Verificare il funzionamento dell’amplificatore.
Impossibile ascoltare un’emittente radio, oppure il segnale
è troppo debole.
e Verificare che l’antenna sia correttamente collegata.
e Sintonizzare l’emittente in modo corretto.
e Spostare l’antenna in una nuova posizione che garantisca
una migliore ricezione.
e Può darsi che sia necessaria un’antenna esterna.
Suono disturbato.
e Installare l’antenna il più lontano possibile dal televisore o
dal lettore di CD.
e Se, vicino al sintonizzatore, fossero in funzione un televisore
un lettore di CD, spegnerli.
Si riceve un segnale mono anche se la trasmissione è
stereofonica.
e Premere il tasto FM MODE.
Se non si riuscisse a ripristinare il normale funzionamento,
provare a staccare il cavo d’alimentazione dalla presa di
rete, e poi inserirlo di nuovo.
Manutenzione
Se la superficie esterna si sporcasse, strofinarla con un panno
soffice, inumidito con una blanda soluzione di sapone.
Accertarsi poi di togliere tutto il liquido in eccesso. Non usare
mai solventi, benzina oppure alcool perché potrebbero
danneggiare la finitura superficiale.
Ricerca guasti Dati tecnici
72
Sezione del sintonizzatore FM
Gamma sintonizzazione
87,5 MHz - 108,0 MHz (passi da 50 kHz)
Sensibilità utilizzabile (IHF). . . . . . . . . . . . . . . . . Mono: 10 dBf
Sensibilità di smorzamento 50 dB . . . . . . . . . . . Mono: 17 dBf
Stereo: 33 dBf
Selettività canali alternati (98 MHz ± 400 kHz). . . . . . . . 65 dB
Rapporto risposta immagine . . . . . . . . . . . . . . . . . . . . . 70 dB
Risposta in frequenza . . . . . . . 20 Hz - 15 kHz (+0,5 dB/–3 dB)
Rapporto cattura . . . . . . . . . . . . . . . . . . . . . . 2 dB (a 98 MHz)
Distorsione (a 65 dBf, 98 MHz) . . . . . . . . . . . . . Mono: 0.1 %
Stereo: 0.3 %
Rapporto segnale/rumore (at 65 dBf, 1 kHz). . . . Mono: 70 dB
Stereo: 65 dB
Rapporto soppressione AM . . . . . . . . . . . . . . . . . . . . . . 55 dB
Separazione Stereo (1 kHz) . . . . . . . . . . . . . . . . . . . . . . 40 dB
Uscita . . . . . . . . . . . . . . . . . . . . . . . . . . . . 800 mV/2,2 k ohm
Sezione del sintonizzatore AM
Gamma sintonizzazione. 522 kHz - 1.620 kHz (passi da 9 kHz)
Sensibilità utilizzabile . . 55 dB/m (562 µV/m, antenna a teraio)
Selettività. . . . . . . . . . . . . . . . . . . . . . . . . . . . . 55dB (a 9 kHz)
Rapporto risposta immagine . . . . . . . . . . . . . . . . . . . . . 35 dB
Rapporto rispesta IF. . . . . . . . . . . . . . . . . . . . . . . . . . . . 60 dB
Distorsione . . . . . . . . . . . . . . . . . . . . . . . . . . 1 % (a 85 dB/m)
Rapporto segnale/rumore . . . . . . . . . . . . . . 40 dB (a 85 dB/m)
Uscita . . . . . . . . . . . . . . . . . . . . . . . . . . . . 220 mV/2,2 k ohm
Generalità
Alimentazione . . . . . . . . . A corrente alternata a 230 V, 50 Hz
Consumo. . . . . . . . . . . . . . . . . . . . . . . . . . . . . . . . . . . . . 6 W
Dimensioni (largh. x alt. x prof.) . . . . . . . . 435 x 87 x 294 mm
Peso (netto) . . . . . . . . . . . . . . . . . . . . . . . . . . . . . . . . . 2,9 kg
Accessori in dotazione. . . . . . . . . . . . . . . . . . . . Cavo RCA x 1
Cavo del telecomando x 1
Antenna circolare AM x 1
Antenna FM x 1
• L’aspetto e le caratteristiche sono soggetti a modifiche senza
preavviso.
• Il peso e le dimensioni sono approssimati.
• Le illustrazioni possono lievemente differire dai modelli di
produzione.
Page 73
73
NEDERLANDS
Backup geheugenfunctie
Als de stroomvoorziening gedurende 14 dagen of langer
onderbroken wordt dan worden de instellingen opgeslagen in
het geheugen (zoals voorgeprogrammeerde stations en
timerinstellingen) automatisch gewist.
Als de T-R610 opnieuw op de netstroom aangesloten wordt zal
het meer dan 3 dagen duren voordat er voldoende vermogen
opgebouwd is voor het functioneren van de backupmode.
Als u de instellingen handmatig in wilt voeren drukt dan op de
RESET schakelaar.
Alle instellingen worden naar de fabrieksinstellingen teruggezet.
Hartelijk dank dat u voor een TEAC product heeft gekozen.
Lees deze gebruiksaanwijzing zorgvuldig door om
optimaal te kunnen profiteren van de mogelijkheden en
prestaties van dit apparaat.
Voor gebruik. . . . . . . . . . . . . . . . . . . . . . . . . . . . . . . . . . . . . . 73
Aansluiting . . . . . . . . . . . . . . . . . . . . . . . . . . . . . . . . . . . . . . . 74
Beschrijving van de bedieningselementen . . . . . . . . . . . . . . . . 76
Afstemmen. . . . . . . . . . . . . . . . . . . . . . . . . . . . . . . . . . . . . . . 77
Geprogrammeerde afstemfunctie . . . . . . . . . . . . . . . . . . . . . . 78
RDS (Radio Data Systeem). . . . . . . . . . . . . . . . . . . . . . . . . . . . 80
RDS (PTY zoekfunctie). . . . . . . . . . . . . . . . . . . . . . . . . . . . . . . 81
Instellen van de klok . . . . . . . . . . . . . . . . . . . . . . . . . . . . . . . . 82
De dag-timer instellen. . . . . . . . . . . . . . . . . . . . . . . . . . . . . . . 83
Sleeptimer functie. . . . . . . . . . . . . . . . . . . . . . . . . . . . . . . . . . 85
Dimmer functie. . . . . . . . . . . . . . . . . . . . . . . . . . . . . . . . . . . . 85
Foutmeldingen . . . . . . . . . . . . . . . . . . . . . . . . . . . . . . . . . . . . 86
Technische gegevens . . . . . . . . . . . . . . . . . . . . . . . . . . . . . . . 86
Inhoud Voor gebruik
Lees dit gedeelte aandachtig door voordat u uw T-R610 in
gebruik neemt
< Daar de speler tijdens gebruik opwarmt is het belangrijk enige
ruimte boven de speler vrij te laten voor ventilatie.
< De netspanning ter plaatse dient overeen te komen met die
welke is aangegeven op de achterzijde. Twijfelt u, neem dan
contact op met uw leverancier.
< Kies een goede plaats voor het apparaat. Vermijd opstelling in
direct zonlicht of in de nabijheid van een warmtebron.
Vermijd ook plaatsen die blootgesteld kunnen worden aan
trillingen, stof, hitte, koude of vocht.
< Plaats het apparaat ook niet op een versterker/receiver.
< Maakt de behuizing niet open daar dit tot schade aan de
elektronica of tot schokken kan leiden. Zou ooit een
voorwerp in het apparaat terechtkomen, neem dan direct
contact op met uw leverancier.
< Trek bij het uitnemen van de stekker uit het stopcontact aan
de stekker en niet aan het snoer.
< Maak het apparaat nooit schoon met chemische stoffen daar
deze het materiaal kunnen aantasten. Gebruik uitsluitend een
schone, droge doek.
< Bewaar deze handleiding voor later gebruik.
Verwijdering van uw oude elektrische of elektronische
apparaten
1. Als op een apparaat een symbool
staat met een kruis door een afvalton
dan betekent dit dat de verwijdering
ervan volgens de „RICHTLIJN
2002/96/EG VAN HET EUROPESCHE
PARLEMENT EN DE RAAD van 27
januari 2003 met betrekking tot
elektrische en elektronische
apparaten“ geregeld is.
2. Al dit soort elektrische en elektronische apparaten moeten
dientengevolge, gescheiden van ander restafval, op een
door de staatsoverheid of de betreffende locale autoriteiten
te bepalen inzamelplaats ingeleverd worden.
3. Een correcte verwijdering/afvoer van uw oude elektrische of
elektronische apparaten draagt in hoge mate bij tot het
voorkomen van een negatieve invloed op het milieu en
levert daarmee ook een positieve bijdrage aan uw eigen
gezondheid en die van anderen.
4. Verdere informatie over de afvoer van uw oude elektrische
of elektronische apparaten kunt u op aanvraag verkrijgen
bij het betreffende gemeentehuis, de
afvalverwerkingorganisatie of bij de handelaar/winkel waar
u het apparaat oorspronkelijk gekocht heeft.
Waarschuwing
< Stel deze component niet bloot aan vocht of spatwater.
< Zet geen met vloeistof gevulde objecten, zoals bijvoorbeeld
vazen, op deze component.
< Zet deze component niet in een gesloten meubel zoals
bijvoorbeeld een boekenkast of een soortgelijk gesloten
opbergsysteem.
< In de standby-stand - de STANDBY/ON-schakelaar staat op
“Standby” - verbruikt deze component een geringe
hoeveelheid netstroom.
< Plaats deze component zodanig dat het wandstopcontact
waarop u de netstroomkabel aangesloten heeft makkelijk
bereikbaar is.
< Let er op dat het wandstopcontact waarop u deze
component aansluit geaard is (randaardestopcontact).
Page 74
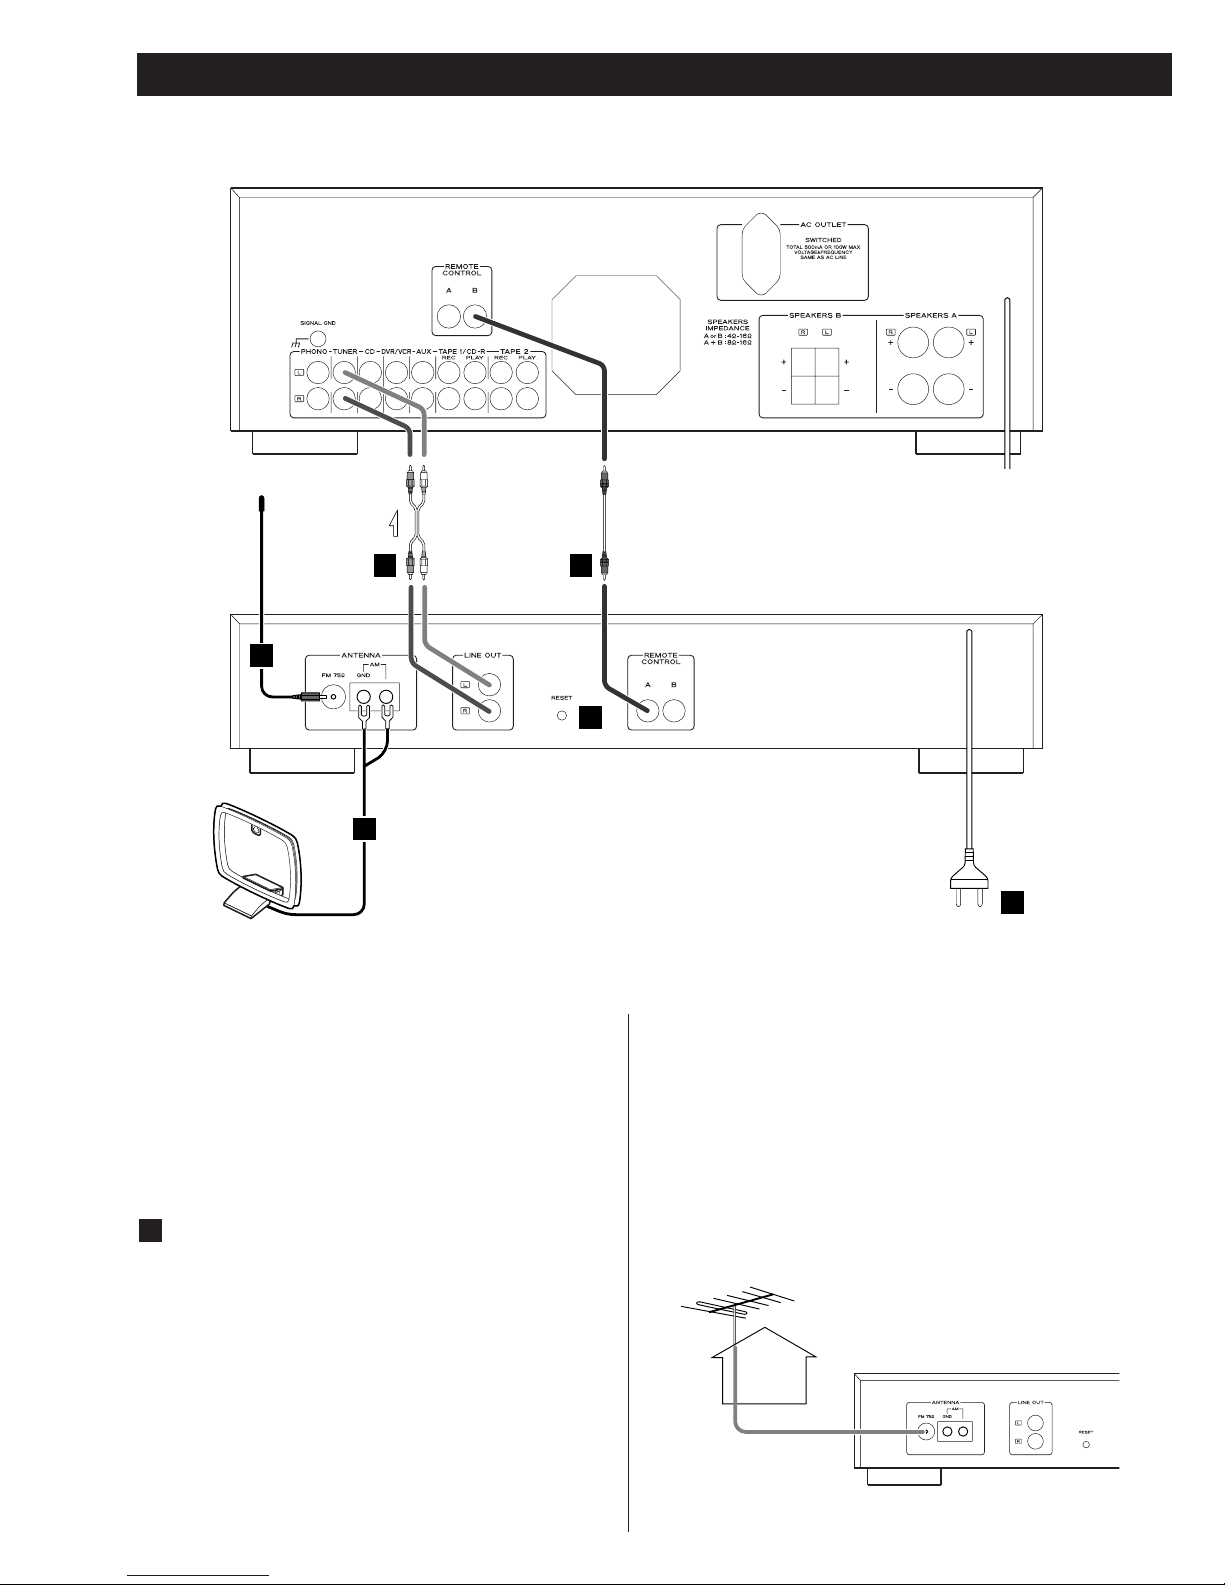
74
LET OP:
< Zet alle apparaten uit voordat u begint met aansluiten. Lees
de handleiding bij elke component die u met de T-R610 wilt
gaan gebruiken.
< Zorg ervoor dat alle kabels goed zijn aangesloten.
< Om storing en ruis te voorkomen, dient u de signaalkabels
niet te bundelen met de stroom- of speakerkabels.
Aansluiting
T-R610
C
D
E
F
A
B
FM binnenantenne
Sluit de draadvormige FM antenne direct aan op de FM 75
Ω aansluiting, rol de kabel uit en selecteer uw favoriete
zender (zie pagina 77). Bevestig de antenne met
bijvoorbeeld punaises of iets dergelijks op een muur of
raamkozijn waar de ontvangst optimaal is.
A
FM buitenantenne
Als u in een gebied woont waar de FM-signalen bijzonder
zwak zijn kan het nodig zijn een FM buitenantenne aan te
sluiten. Over het algemeen is een 3-elements antenne
voldoende maar als de FM signalen erg zwak zijn dan kan
het nodig zijn om een antenne met 5 of meer elementen te
gebruiken.
< Maak de FM binnenantenne los als u een buitenantenne
gebruikt.
Versterker (A-R610)
Page 75
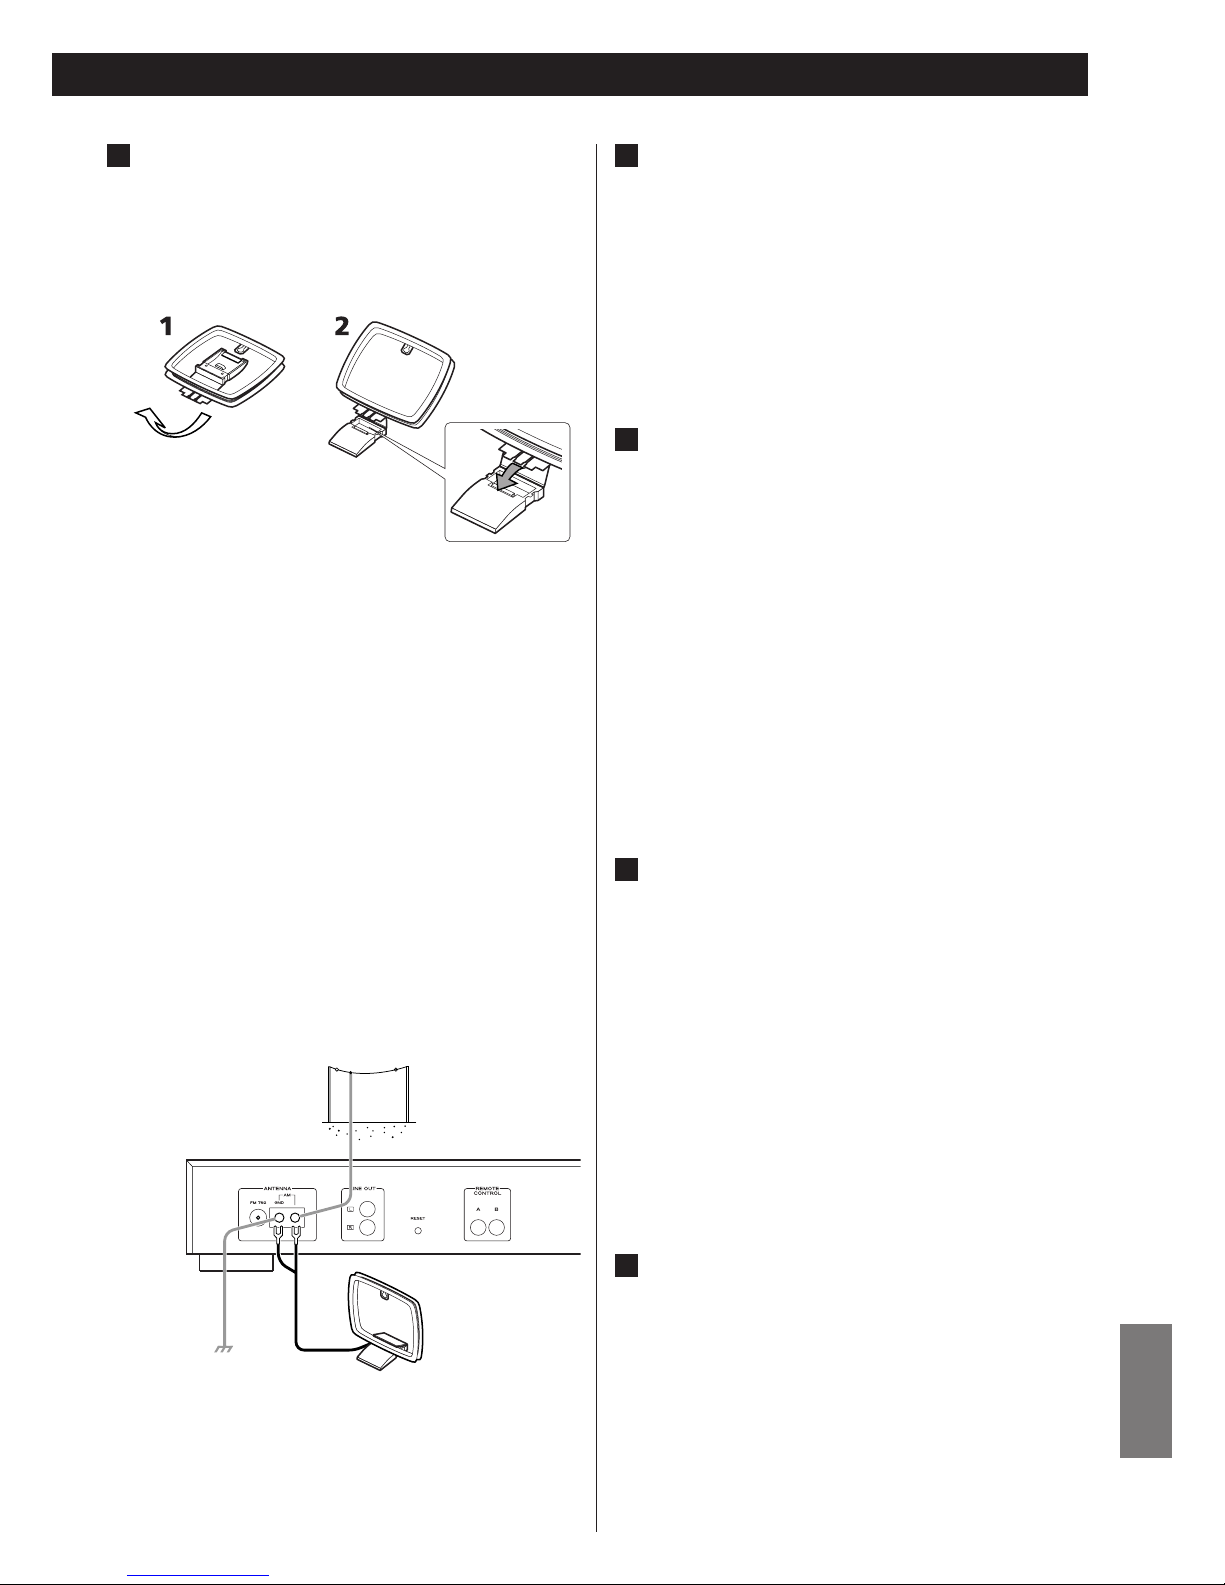
75
NEDERLANDS
LINE OUT aansluiting
Een analoog 2-kanalen audiosignaal wordt via deze
aansluiting weergegeven. Verbind deze aansluiting met met
de TUNER ingangsaansluiting van de versterker met een
RCA kabel.
Let op, aansluiten als volgt:
witte stekker
q witte aansluiting (L: linkerkanaal)
rode stekker
q rode aansluiting (R: rechterkanaal)
Aansluiting van de afstandsbediening
Als u in het bezit bent van een TEAC A-R610 dan kunt u
deze eenvoudig via de systeem-afstandsbediening besturen.
• Als u een station selecteert dan zal de input selector van de
A-R610 automatisch de “TUNER“ mode inschakelen.
•U kunt een universele afstandsbediening RC-592B
(meegeleverd bij de A-R610) om de T-R610 te controleren.
Sluit met de meegeleverde afstandsbedieningskabels de
REMOTE CONTROL aansluiting aan op de REMOTE
CONTROL aansluiting (A of B) van de A-R610.
Note:
De afstandsbediening wordt bij de T-R610 niet meegeleverd.
RESET
In de volgende gevallen kan het voorkomen dat de
functietoetsen niet goed werken:
• Als het systeem door een elektrische schok beschadigd is.
• Als de stroomvoorziening hapert of als er elektrische
storingen plaatsvinden.
Druk in dit geval een of twee keer zachtjes met een potlood
of met de punt van een balpen op de RESET schakelaar.
Alle instellingen opgeslagen in het geheugen (zoals
voorgeprogrammeerde stations en timerinstellingen) worden
gewist.
AC Netsnoer
Als alle andere aansluitingen gemaakt zijn sluit dan pas de
netstroomkabel aan op de wandcontactdoos.
Let er op dat het netsnoer op een stopcontact met de juiste
spanning, die overeenkomt met de spanning van het
apparaat, wordt aangesloten.
Gebruik altijd de stekker om het netsnoer in het stopcontact
te doen of om het netsnoer uit het stopcontact te halen.
F
E
D
C
Opmerking:
Zelfs als de AM buitenantenne wordt gebruikt dient de AM
raamantenne aangesloten te blijven.
AM raamantenne
De meegeleverde hoogwaardige AM raamantenne is
voldoende voor een goede ontvangst in vrijwel iedere
omgeving.
Bevestig om de antenne neer te kunnen zetten het voetje in
de aansluiting aan de onderkant.
luit de kabel van de raamantenne aan op de AM antenneaansluitingen.
Plaats de antenne bijvoorbeeld op een boekenkast of hang
deze aan een raam of dergelijke in de richting van waar u de
beste ontvangst krijgt, maar let er op dat de antenne zo ver
mogelijk van het gehele systeem en van de luidspreker- en
netstroomkabels verwijdert is om mogelijke storingen te
vermijden.
< Als de meegeleverde AM raamantenne niet genoeg
ontvangst biedt (omdat u bijvoorbeeld te ver van een zender
verwijdert bent of omdat u zich in een betonnen gebouw
bevindt enz.) kan het voorkomen dat u een AM
buitenantenne moet gebruiken. Gebruik een aan een kant
afgestripte geïsoleerde kabel van minimaal 5 meter en sluit
deze zoals afgebeeld aan.
De antenne kunt u buiten ophangen of binnen in de buurt
van een raam bevestigen. Voor een betere ontvangst sluit u
de GND aansluiting op een goed geaarde ondergrond aan.
B
Page 76
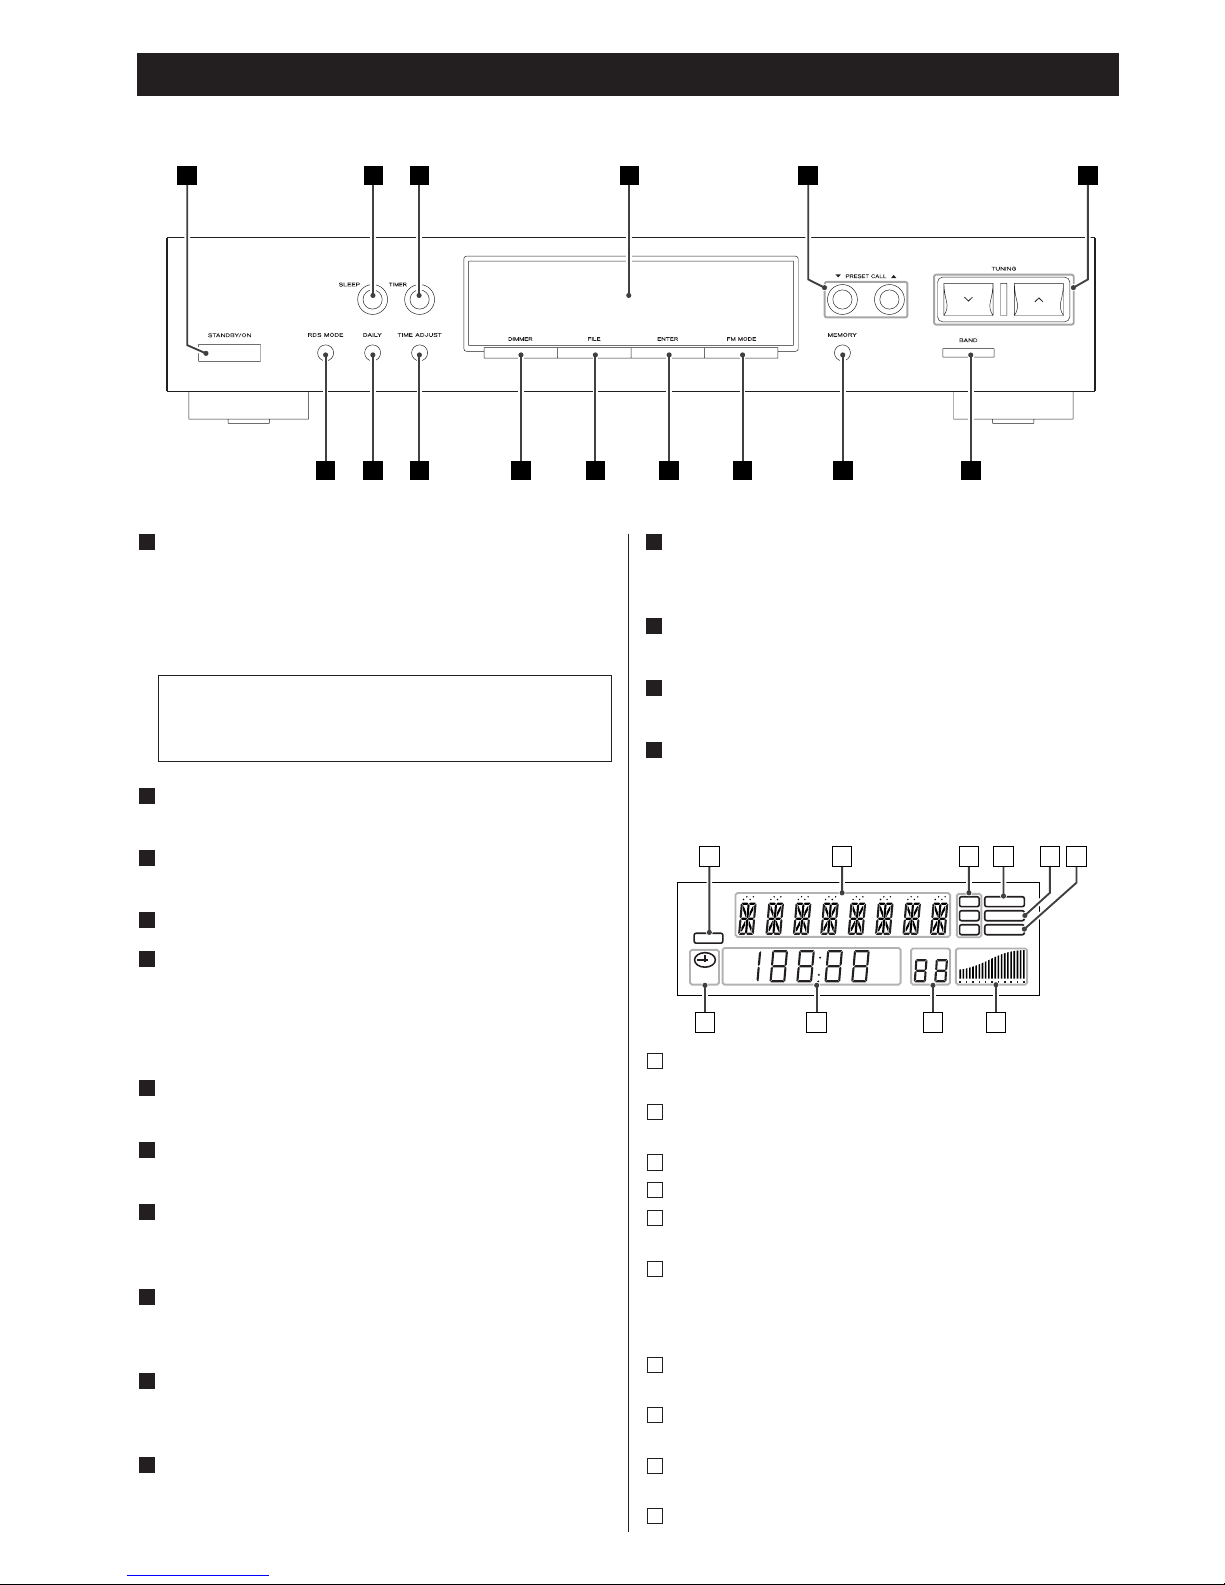
SLEEP
RDS TUNED
RT STEREO
PTY MEMORY
TIMER
CH.
SIGNAL
FM
A
M
MHz
K
Hz
a b dc e f
g
h
j
i
76
Beschrijving van de bedieningselementen
STANDBY/ON
Druk op de STANDBY/ON-toets om de T-R610 in de standby
mode te zetten of in te schakelen. Het indicatielampje brandt
als de T-R610 in de power standby mode staat. Het
indicatielampje gaat automatisch uit als het apparaat wordt
ingeschakeld.
SLEEP
Gebruik deze toets om de sleep timer in te schakelen.
TIMER
Gebruik deze toets om de timerfunctie in of uit te schakelen.
Display
PRESET CALL
Gebruik deze toetsen om een geprogrammerde zender te
selecteren.
Wanneer de PTY zoekfunctie geactiveerd is, gebruik deze
toetsen om een Programma Type te selecteren.
TUNING
Gebruik deze toetsen om op een zender te afstemmen.
BAND
Gebruik deze toets om FM of AM te selecteren.
MEMORY
Gebruik deze toets om voorgeprogrammeerde zenders in het
geheugen op te slaan.
FM MODE
Gebruik in de FM tuner mode deze toets om stereo of mono
te selecteren.
ENTER
Gebruik deze toets om uw selectie in het geheugen op te
slaan.
FILE
Gebruik deze toets om een voorgeprogrammeerde zender
een naam te geven.
K
J
I
H
G
F
E
D
C
B
A
A B C D E F
GHO N
M
L K J I
DIMMER
Gebruik deze toets om de helderheid van het display te
verzwakken.
TIME ADJUST
Gebruik deze toets om de klok in te stellen.
DAILY
Met deze toets kunt u de timer instellen.
RDS MODE
Gebruik deze toets om de RDS mode te selecteren.
Display
O
N
M
L
Deze indicator brandt wanneer de Sleep Timer functie
geactiveerd is.
Op het displayvenster verschijnen de informatien over RDS, de
status van de timer, etc.
Deze indicatoren verlichten, afhankelijk van de RDS functie.
Deze indicator brandt wanneer een zender afgestemd is.
Deze indicator brandt wanneer een FM stereo zender
afgestemd is.
Deze indicator knippert wanneer de MEMORY-toets gebruikt
is.
Teiwijl deze indicator knippert, kan u een zender selectere om
in het geheugn te worden bewaard.
Op het displayvenster verschijnt de sterkte van het ontvangen
signaal.
Op het displayvenster verschijnen de geprogrammeerde
kanaalnummeren.
Op het displayvenster verschijnt de digitale klok of verschijnen
de frequenties.
Deze indicator brandt wanneer de timer geactiveerd is.
j
i
h
g
f
e
d
c
b
a
De apparatuur verbruikt nominale non-actieve stroom via
de stroomkabel als de STANDBY/ON-toets in de positie
STANDBY (stand-by) staat.
Page 77
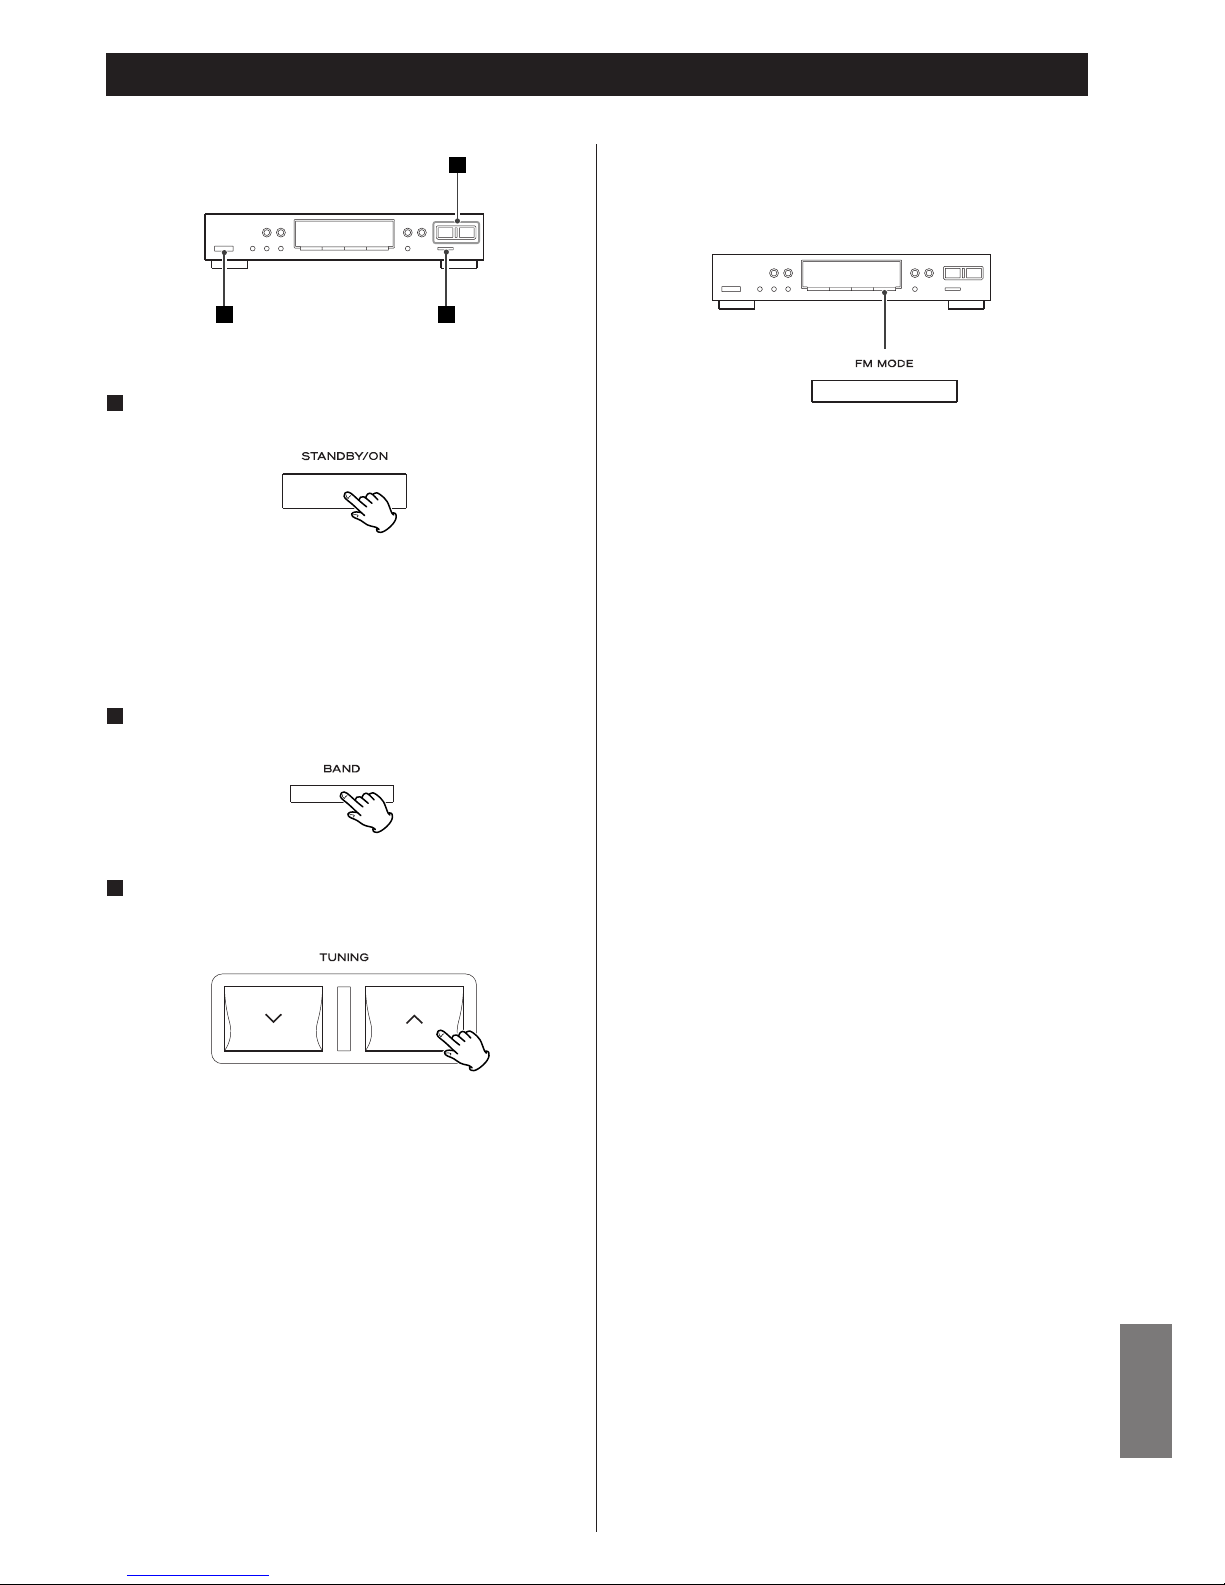
77
NEDERLANDS
Afstemmen
Druk op de STANDBY/ON-toets om de T-R610 in te
schakelen.
1
1 2
3
< Als de T-R610 met een afstandsbedieningskabel op de A-
R610 aangesloten is dan kunt u zowel de A-R610 als de TR610 tegelijk naar ON/standby schakelen door op de
STANDBY/ON-toets van de A-R610 te drukken.
Selecteer AM of FM met de BAND-toets.
2
Selecteer het station waar u naar wilt luisteren
(automatische selectie).
3
Zenders selecteren die niet automatisch kunnen worden
ingesteld (handmatige selectie)
Als u kort op de TUNING-toets (‡ of °) drukt verandert de
aangegeven frequentiewaarde in gelijke stappen.
Door meerdere keren op de TUNING-toets (
‡ of °) te
drukken kunt u op de frequentie van het gewenste
radiostation afstemmen.
Houd de TUNING-toets (
‡ of ° ) ingedrukt totdat de
frequentie-aanduiding in het display begint te veranderen. Als
een radiostation met een goede ontvangst gevonden wordt
zal het afstemmen automatisch stoppen.
< Druk op de TUNING-toets (‡ of ° ) het automatisch
afstemmen te beëindigen.
Stereo:
FM stereo-uitzendingen worden in stereo ontvangen en het
“STEREO” indicatielampje brandt in het display.
Mono:
Selecteer deze instelling om een zwakke stereo FM-ontvangst
te compenseren. De ontvangst wordt nu in mono
weergegeven waarmee een betere klank wordt bereikt.
FM MODE toets
Deze toets wordt gebruikt voor het schakelen tussen monoof stereo-ontvangst.
Page 78
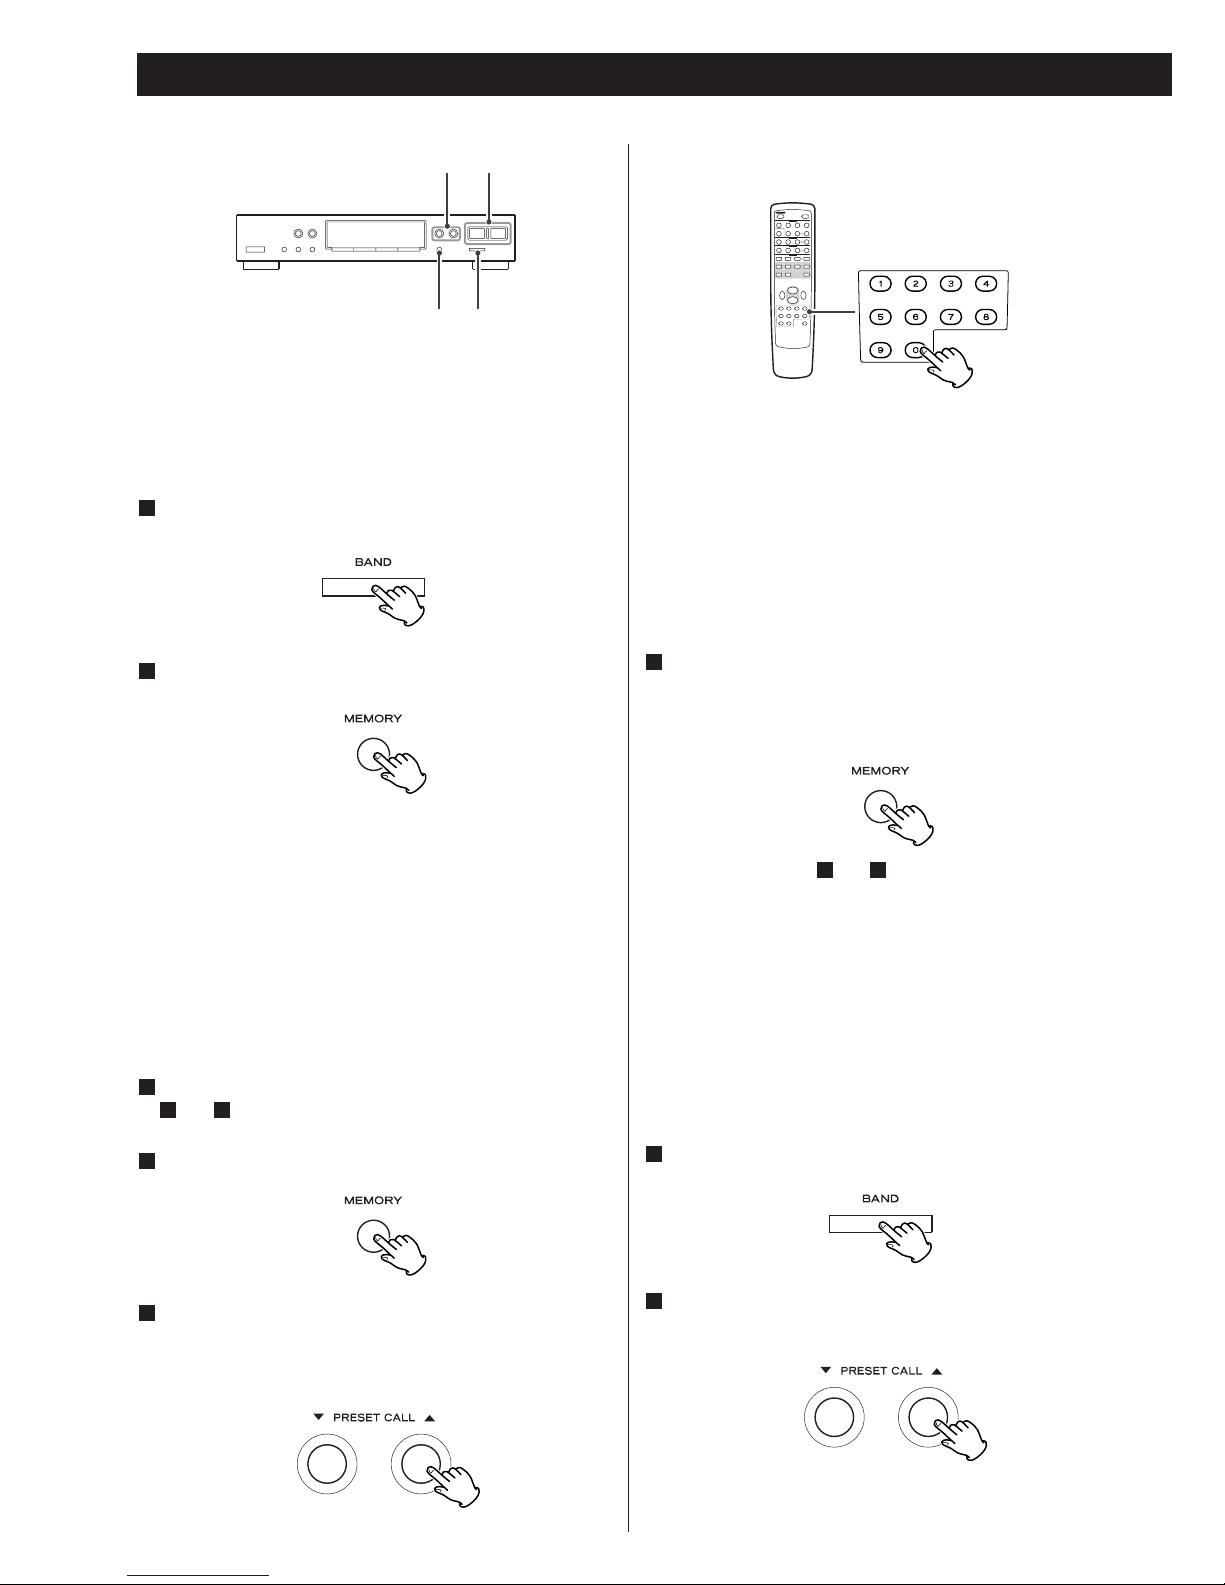
Geprogrammeerde afstemfunctie
78
Herhaal de stappen t/m om meer gewenste zenders te
programmeren.
< Als u een nieuwe zender op een kanaal opslaat dan wordt het
bestaande kanaalnummer overschreven.
< Voorgeprogrammeerde zenders kunnen niet gewist worden.
41
TUNINGPRESET CALL
BANDMEMORY
U kunt FM en/of AM zenders op kanaal 1 tot 30 programmeren
en in het geheugen opslaan.
Automatische geheugenafstemming
Selecteer AM of FM door het indrukken van de BANDtoets.
1
Druk de MEMORY-toets 1,5 seconde in.
2
De 30 zenders die het beste ontvangen worden in uw regio
worden nu automatisch in het geheugen opgeslagen.
< In de FM afstemfunctie zal het systeem de frequenties twee
keer afzoeken. De best ontvangen zenders worden
opgeslagen.
Handmatige geheugenafstemming
Selecteer de zender waar u naar wilt luisteren (zie stap
t/m op pagina 77)
Druk kort op de MEMORY-toets.
2
41
1
Terwijl het “MEMORY” indicatielampje knippert
selecteert u door op de PRESET CALL-toetsen (
b of 5)
te drukken een kanaal om de ontvangen zender in het
geheugen op te slaan.
3
U kunt ook de cijfertoetsen van de bij de A-R610
meegeleverde afstandsbediening gebruiken.
Bijvoorbeeld: Om het geprogrammeerde kanaalnummer 25 te
selecteren drukt u op de TUNER-toets, daarna op de “2” en
vervolgens op de “5”.
Om een kanaalnummer onder de 10 te selecteren drukt u op
de “0” en daarna op de corresponderende cijfertoets. Om
bijvoorbeeld nummer “5 “ te selecteren drukt u op de “0” en
op de “5”. (Als alternatief kunt u ook alleen de “5”
indrukken en een paar seconden wachten).
Druk op de MEMORY-toets. Of laat het systeem 8
seconden ongebruikt.
De zender wordt in het geheugen opgeslagen en het
“MEMORY” indicatielampje in het display gaat uit.
4
Geprogrammeerde zenders kunnen ook met de cijfertoetsen
geselecteerd worden.
Selecteren van voorgeprogrammeerde
zenders
Selecteer AM of FM door op de BAND-toets te drukken.
1
Druk herhaald op de PRESET CALL-toets (b of 5) totdat
de gewenste geprogrammeerde zender gevonden is.
2
Page 79
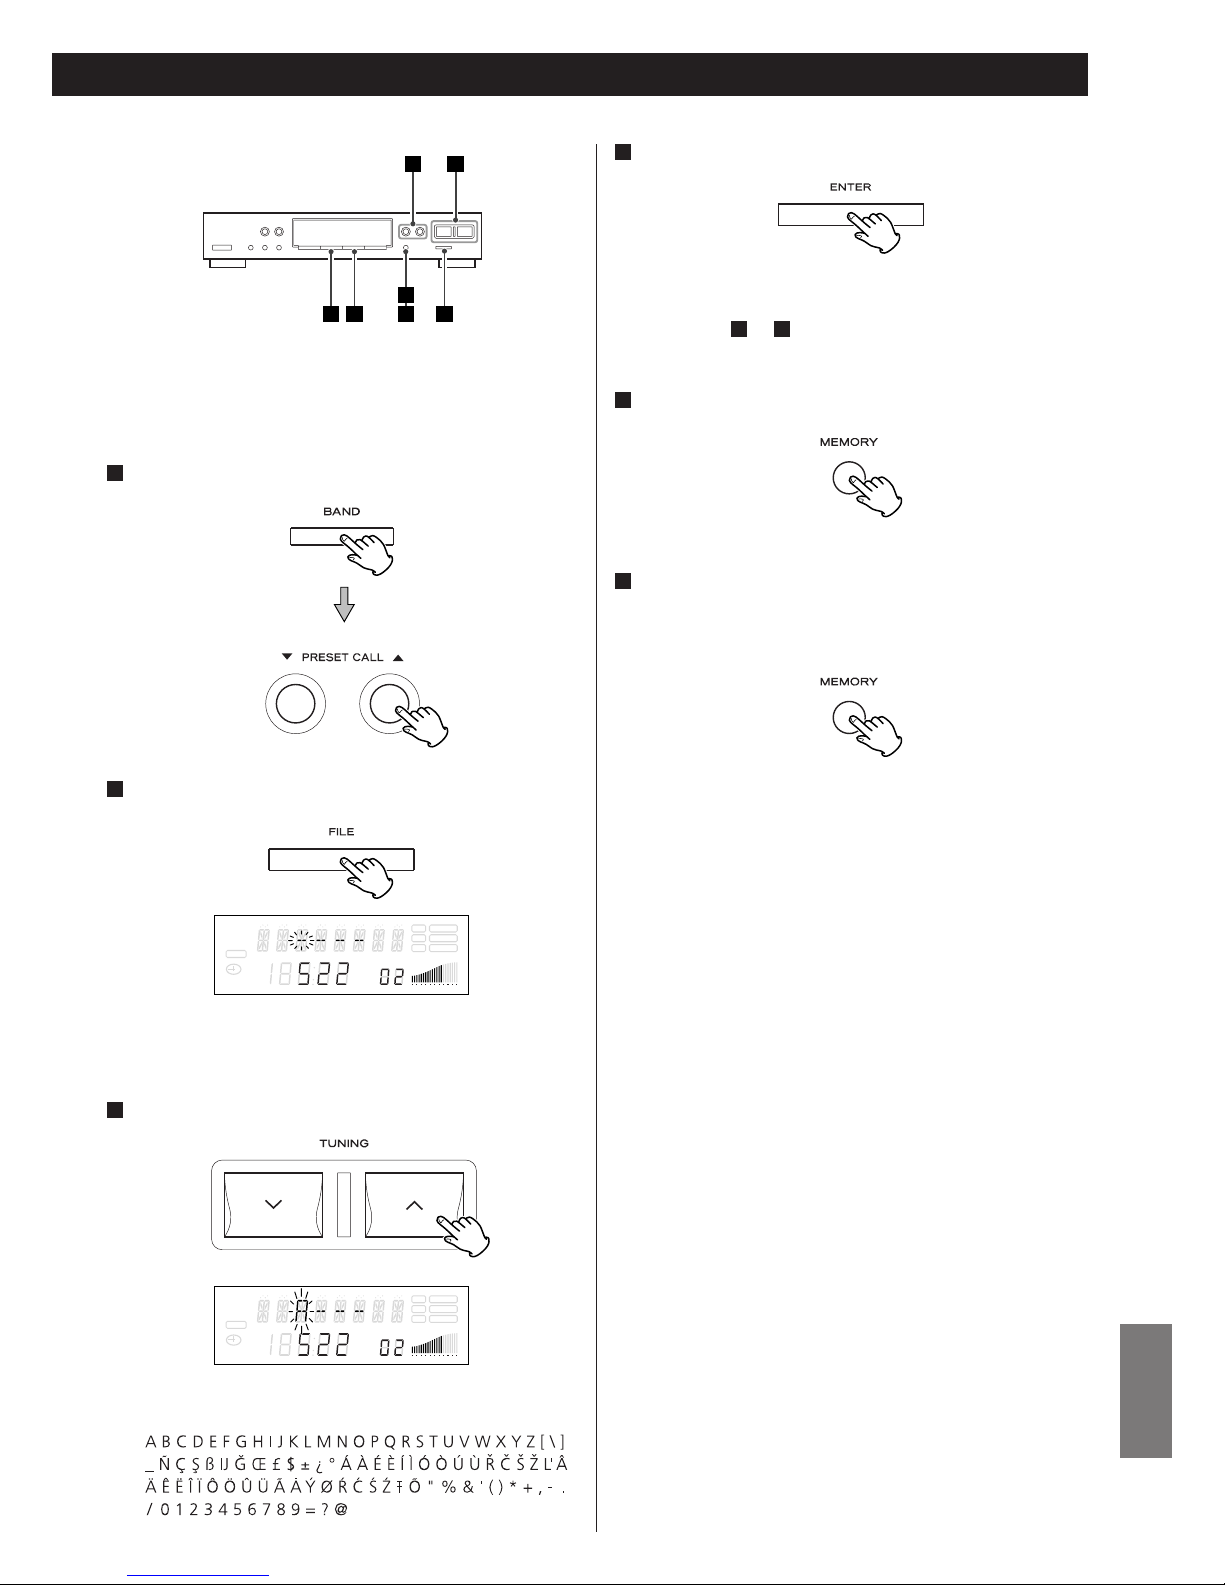
79
NEDERLANDS
Terwijl de indicator “MEMORY” knippert, druk opnieuw
op de MEMORY-toets.
Of laat het systeem 8 seconden ongebruikt.
De naam die u aan de zender gaf, is bewaard worden in het
geheugen.
6
Selecteer een geprogrammerde zender.
1
“
----
” verschijnt en het eerste “-” knippert in het display.
Selecteer een karakter met de TUNING-toetsen (‡/°).
3
Beschikbare tekens:
De volgende “-“ knippert.
Tot en met 4 karakters kunnen per zender gebruikt worden.
Herhaal stap en om de karakters in te voeren.
Druk op de MEMORY-toets.
5
43
Geprogrammeerde zenders een naam geven
U kunt geprogrammeerde zenders een naam geven.
2 4 651
31
Druk op de ENTER-toets.
4
Druk de FILE-toets.
2
SLEEP
RDS TUNED
RT STEREO
PTY MEMORY
TIMER
CH.
SIGNAL
FM
A
M
MHz
K
Hz
SLEEP
RDS TUNED
RT STEREO
PTY MEMORY
TIMER
CH.
SIGNAL
FM
A
M
MHz
K
Hz
(spatie)
Page 80
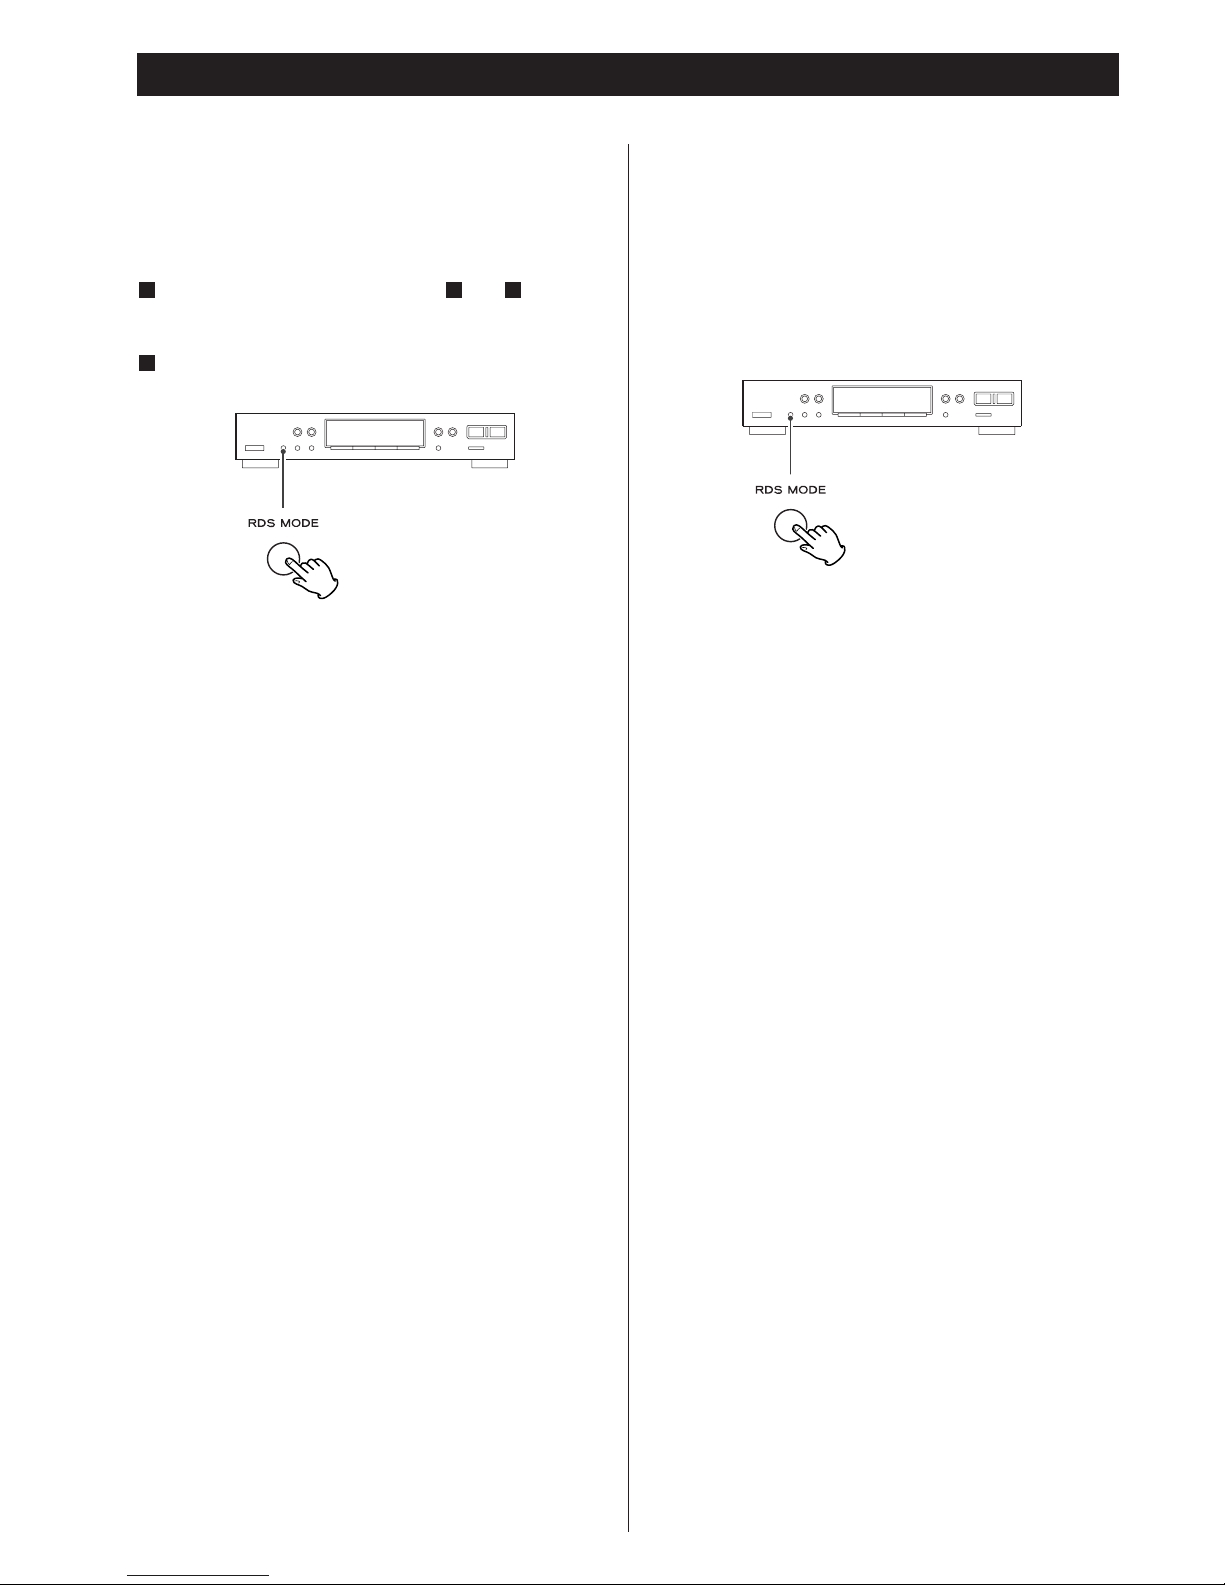
80
RDS (Radio Data Systeem)
RDS (Radio Data Systeem) is een zenderservice die ervoor zorgt
dat u naast een normaal radiosignaal ook nog extra informatie
kunt ontvangen.
De RDS zenderservice kan alleen op FM en alleen in
Europa worden ontvangen.
Selecteer een FM zender (zie stap t/m op pagina
77).
Druk op de RDS MODE-toets.
Elke keer als u kort op de RDS MODE-toets drukt verandert de
RDS mode als volgt:
PS (Naam programma service)
Als u PS selecteert knippert ongeveer 4 seconden “PS”,
daarna verschijnt PS of de zendernaam in het display. Als er
geen PS informatie is verschijnt de zenderfrequentie in het
display.
PTY (Programma type)
Als u PTY selecteert knippert ongeveer 4 seconden “PTY” in
het display.
RT (Radio tekst)
Als u RT selecteert knippert ongeveer 4 seconden “RT” in
het display. De RT mode geeft zendernieuws weer
samengesteld uit maximaal 64 symbolen.
TA (Verkeersinformatie)
Als u TA selecteert knippert ongeveer 4 seconden “TA” in
het display, het systeem zoekt nu een zender die
verkeersinformatie doorgeeft.
< Als de gevonden zender geen TA meldingen
(vekeersinformatie) meer doorgeeft dan zoekt het systeem
herhaald naar andere zenders.
Als er geen PTY/RT data beschikbaar is schakelt het
systeem automatisch van RDS naar PS.
Als de A-R610 en de T-R610 aangesloten zijn met
afstandsbedieningskabel
Als u TA geselecteerd heeft kunt u iedere andere bron
selecteren met de INPUT SELECTOR van de A-R610.
Als een zender met verkeersinformatie gevonden is schakelt
de INPUT SELECTOR van de A-R610 autmatisch over naar
“TUNER”. Als de verkeersinformatie op de zender afgelopen
is schakelt de INPUT SELECTOR automatisch terug naar de
vorige geselecteerde bron.
2
311
CT (Tijdinformatie over zenders)
Geeft informatie over de tijden dat de zender weergegeven
wordt.
Als u CT selecteert knippert ongeveer 4 seconden “CT”,
daarna verschijnt de tijd in het display.
Druk op de RDS MODE-toets en houd deze langer dan
10 seconden ingedrukt om de CT-functie aan of uit te
zetten.
< De tijd wordt automatisch in overeenstemming met de CT
data ingesteld.
Als u afstemt op een RDS zender die geen correcte CT data
weergeeft dan kan de tijd mogelijk verkeerd vermeld worden,
dit kan eventeel de werking van de timerfunctie beïnvloeden.
Page 81
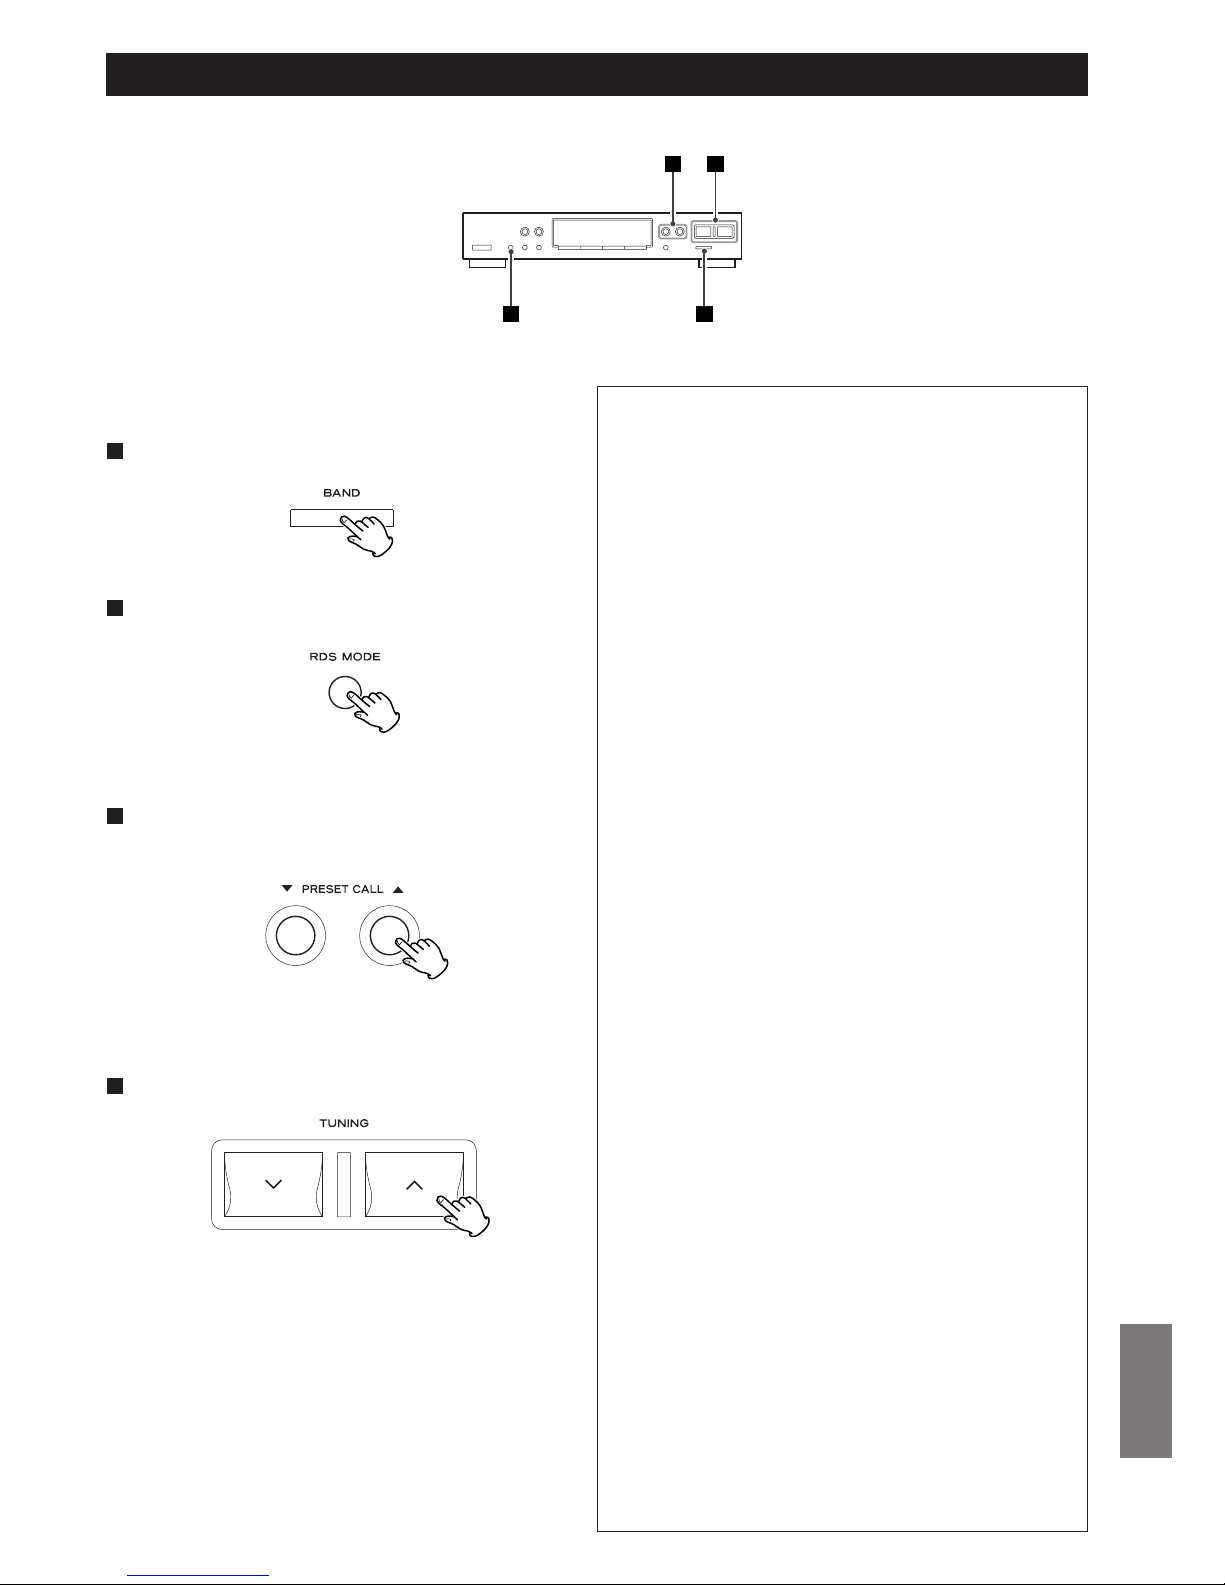
81
NEDERLANDS
NEWS : korte berichten, evenementen, publieke opinie,
verslagen, actualiteiten.
AFFAIRS : algemene informatie, o.a. praktische mededelingen
anders dan nieuws, documentaires, discussies,
analyses, enzovoorts.
INFO : alledaagse informatie of referentiemateriaal zoals
weerberichten, consumenten informatie, medische
assistentie, enzovoorts.
SPORT : programma's over sport.
EDUCATE : educatieve en culturele informatie.
DRAMA : allerlei radioconcerten en radioseries.
CULTURE : alle aspecten van de nationale of locale cultuur,
inclusief religieuze evenementen, filosofie, sociale
wetenschappen, taal, theater, enzovoorts.
SCIENCE : programma's over natuurwetenschappen en
technologie.
VARIED : populaire programma's zoals kwissen, amusement,
persoonlijke vraaggesprekken, komedie, satire,
enzovoorts.
POP M : programma's over commerciële en populaire
muziek, het aantal verkochte discs, enzovoorts.
ROCK M : moderne muziek, doorgaans gecomponeerd en
uitgevoerd door jonge muzikanten.
MORM : populaire muziek, gewoonlijk korter dan 5
minuten.
LIGHT M : klassieke muziek, instrumentale muziek, koorzang
en lichte muziek voor liefhebbers.
CLASSICS : orkestmuziek, inclusief opera's, symphonieën,
kamermuziek, enzovoorts.
OTHER M : andere stijlen muziek (Rhythm & Blues, Reggae,
enzovoorts).
WEATHER : weerberichten en voorspellingen.
FINANCE : financiële informatie, handelsnieuws,
beursberichten.
CHILDREN : kinderprogramma’s.
SOCIAL-A : sociale aangelegenheden.
RELIGION : religieuze programma’s.
PHONE-IN : programma’s waarin luisteraars telefonisch hun
mening kunnen geven.
TRAVEL : reisberichten/informatie.
HOBBIES : programma’s over recreatieve activiteiten.
JAZZ : jazzmuziek.
COUNTRY : countrymuziek.
NATION-M : nationale muziek.
OLDIES : populaire muziek uit het verleden.
FOLK-M : folkloristische muziek.
DOCUMENT : documentaires.
TEST
ALARM : programma dat voor een noodtoestand of een
natuurramp waarschuwt.
Het zoeken start.
< Als het door u geselecteerde PTY programma gevonden is
stopt het zoeken en het programma-type wordt in het display
weergegeven.
< Als hetzelfde programma tijdens het PTY zoeken niet wordt
gevonden dan stopt de zoekfunctie automatisch bij de eerste
frequentie.
< Als u het zoeken wilt stoppen drukt u op de RDS MODE-
toets.
RDS (PTY zoekfunctie)
U kunt met deze functie een zender zoeken.
Selecteer FM met de BAND-toets.
1
Druk de RDS MODE toets langer dan 1,5 seconde in.
2
“SEARCH” knippert in het display.
Selecteer het gewenste PTY programma met de
TUNING-toetsen (
b/5).
3
U kunt 31 soorten selecteren.
2 1
43
Druk op de TUNING-toets (‡ of °).
4
Page 82
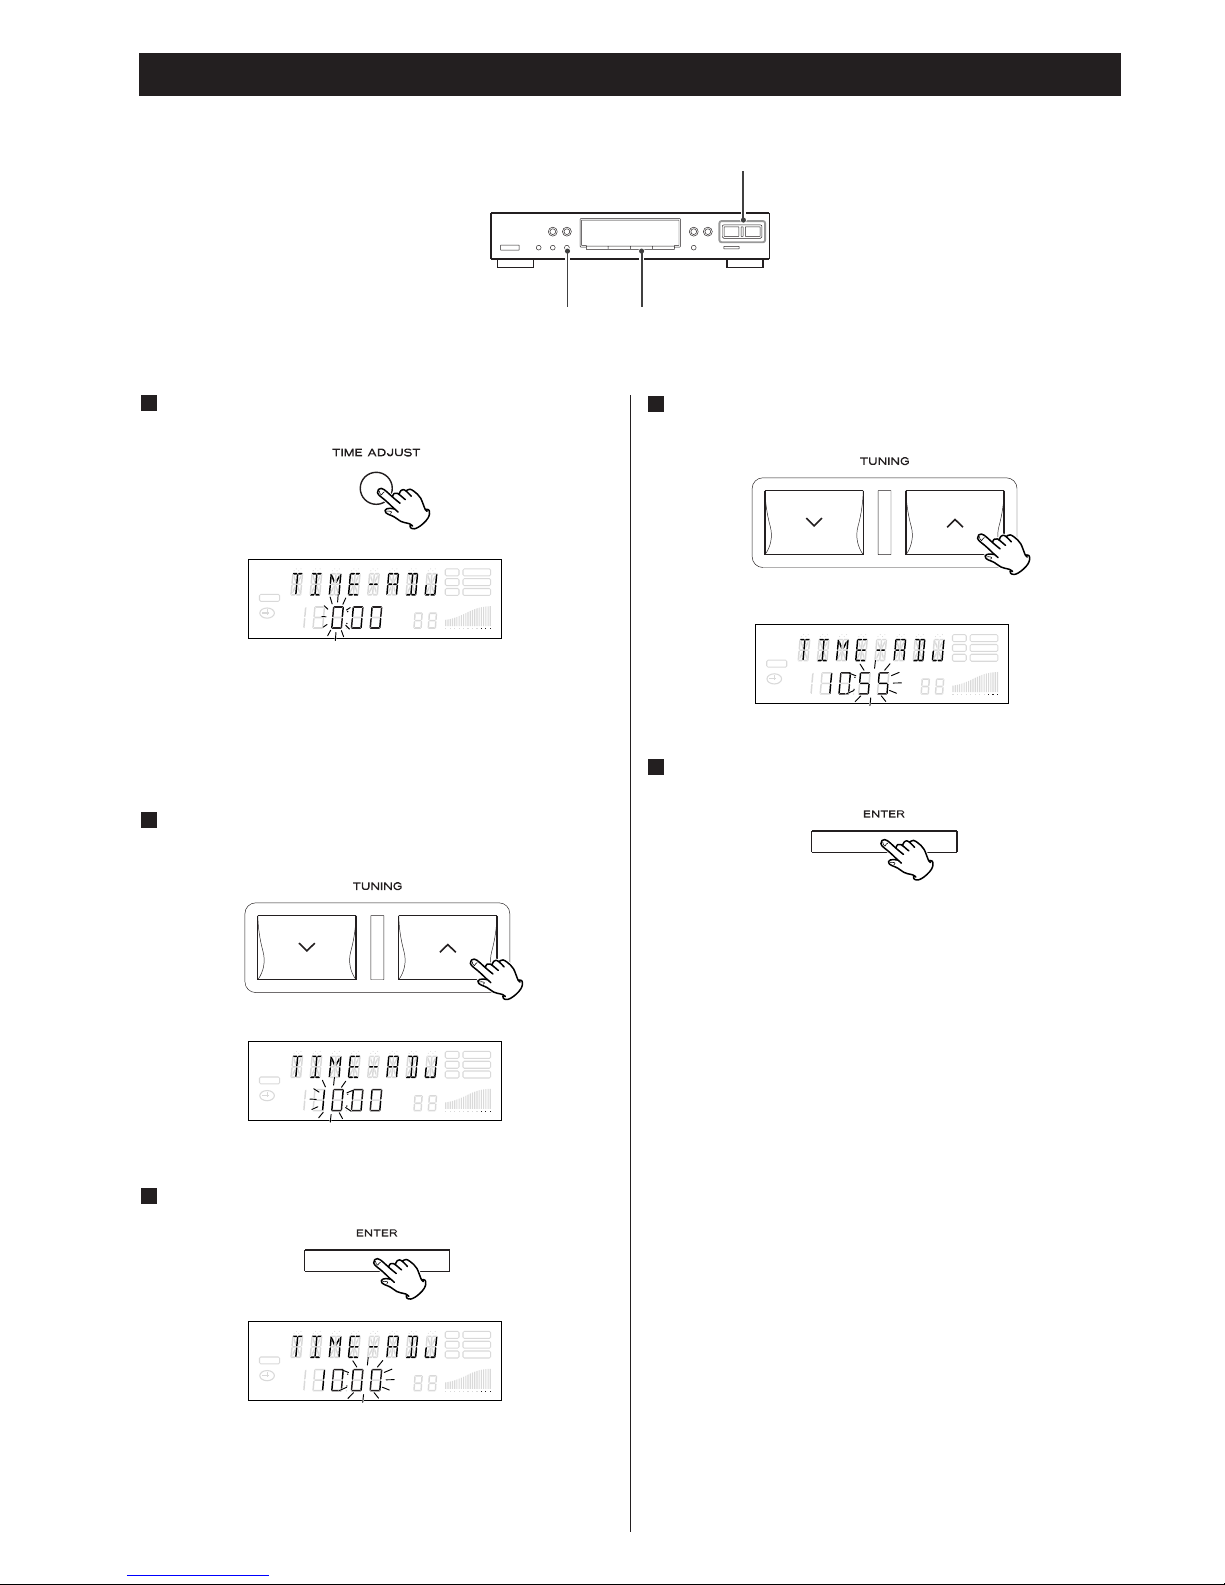
82
De “uur” indicatie knippert in het display.
< U kunt de klok ook instellen als de T-R610 in de standby
mode staat.
< Het systeem werkt volgens de 24 uurs “military” klok.
Instel binnen 8 seconden de uren van de actuele tijd
met de TUNING-toetsen (
‡/°).
2
Druk binnen 8 seconden op de ENTER-toets.
3
Met de TUNING-toetsen (‡/° ) de minuten van de
actuele tijd instellen.
4
De klok start bij 00 seconde.
Instellen van de klok
Druk op de TIME ADJUST-toets.
1
SLEEP
RDS TUNED
RT STEREO
PTY MEMORY
TIMER
CH.
SIGNAL
FM
A
M
MHz
K
Hz
SLEEP
RDS TUNED
RT STEREO
PTY MEMORY
TIMER
CH.
SIGNAL
FM
A
M
MHz
K
Hz
SLEEP
RDS TUNED
RT STEREO
PTY MEMORY
TIMER
CH.
SIGNAL
FM
A
M
MHz
K
Hz
SLEEP
RDS TUNED
RT STEREO
PTY MEMORY
TIMER
CH.
SIGNAL
FM
A
M
MHz
K
Hz
De “minuten” indicatie knippert in het display.
Druk op de ENTER-toets.
5
TUNING
ENTERTIME ADJUST
Page 83
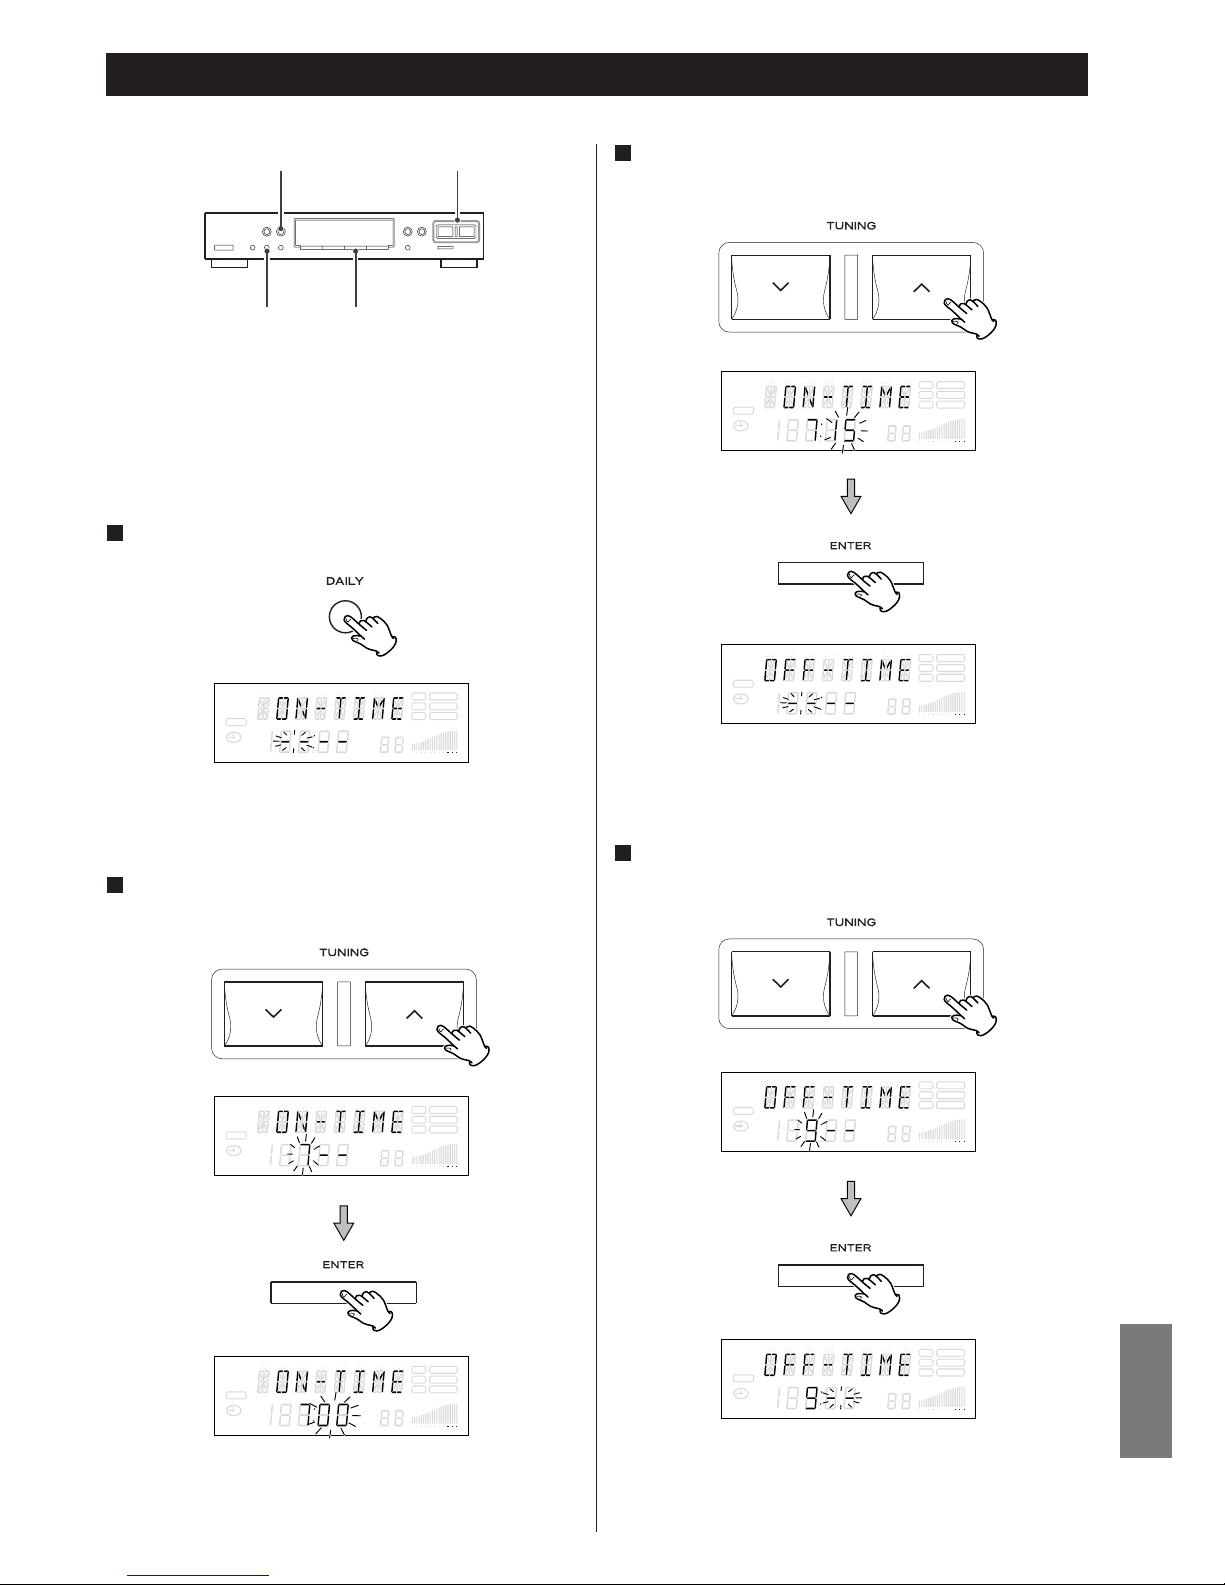
83
NEDERLANDS
Zet voor het instellen van de timer de klok gelijk.
Druk op de DAILY-toets.
1
“OFF TIME” verschijnt in het display en de “uur” indicatie
knippert.
“ON TIME” verschijnt in het display en de “uur” indicatie
knippert in het display.
De dag-timer instellen 1
Met de TUNING-toetsen (‡/ ° ) de uren van de
uitschakeltijd instellen. Met de ENTER-toets de uuringave bevestigen.
4
TUNINGTIMER
ENTERDAILY
Als de T-R610 met een afstandsbedieningskabel op de AR-610
aangesloten is dan kunt u zowel de A-R610 als de TR-610
tegelijk naar ON/standby schakelen door de dag-timer.
SLEEP
RDS TUNED
RT STEREO
PTY MEMORY
TIMER
CH.
SIGNAL
FM
A
M
MHz
K
Hz
SLEEP
RDS TUNED
RT STEREO
PTY MEMORY
TIMER
CH.
SIGNAL
FM
A
M
MHz
K
Hz
SLEEP
RDS TUNED
RT STEREO
PTY MEMORY
TIMER
CH.
SIGNAL
FM
A
M
MHz
K
Hz
Met de TUNING-toetsen (‡/° ) de minuten van de
inschakeltijd instellen. Met de ENTER-toets de minuteningave bevestigen.
3
SLEEP
RDS TUNED
RT STEREO
PTY MEMORY
TIMER
CH.
SIGNAL
FM
A
M
MHz
K
Hz
SLEEP
RDS TUNED
RT STEREO
PTY MEMORY
TIMER
CH.
SIGNAL
FM
A
M
MHz
K
Hz
SLEEP
RDS TUNED
RT STEREO
PTY MEMORY
TIMER
CH.
SIGNAL
FM
A
M
MHz
K
Hz
SLEEP
RDS TUNED
RT STEREO
PTY MEMORY
TIMER
CH.
SIGNAL
FM
A
M
MHz
K
Hz
Met de TUNING-toetsen (‡/ ° ) de uren van de
inschakeltijd instellen. Met de ENTER-toets de uuringave bevestigen.
2
Page 84
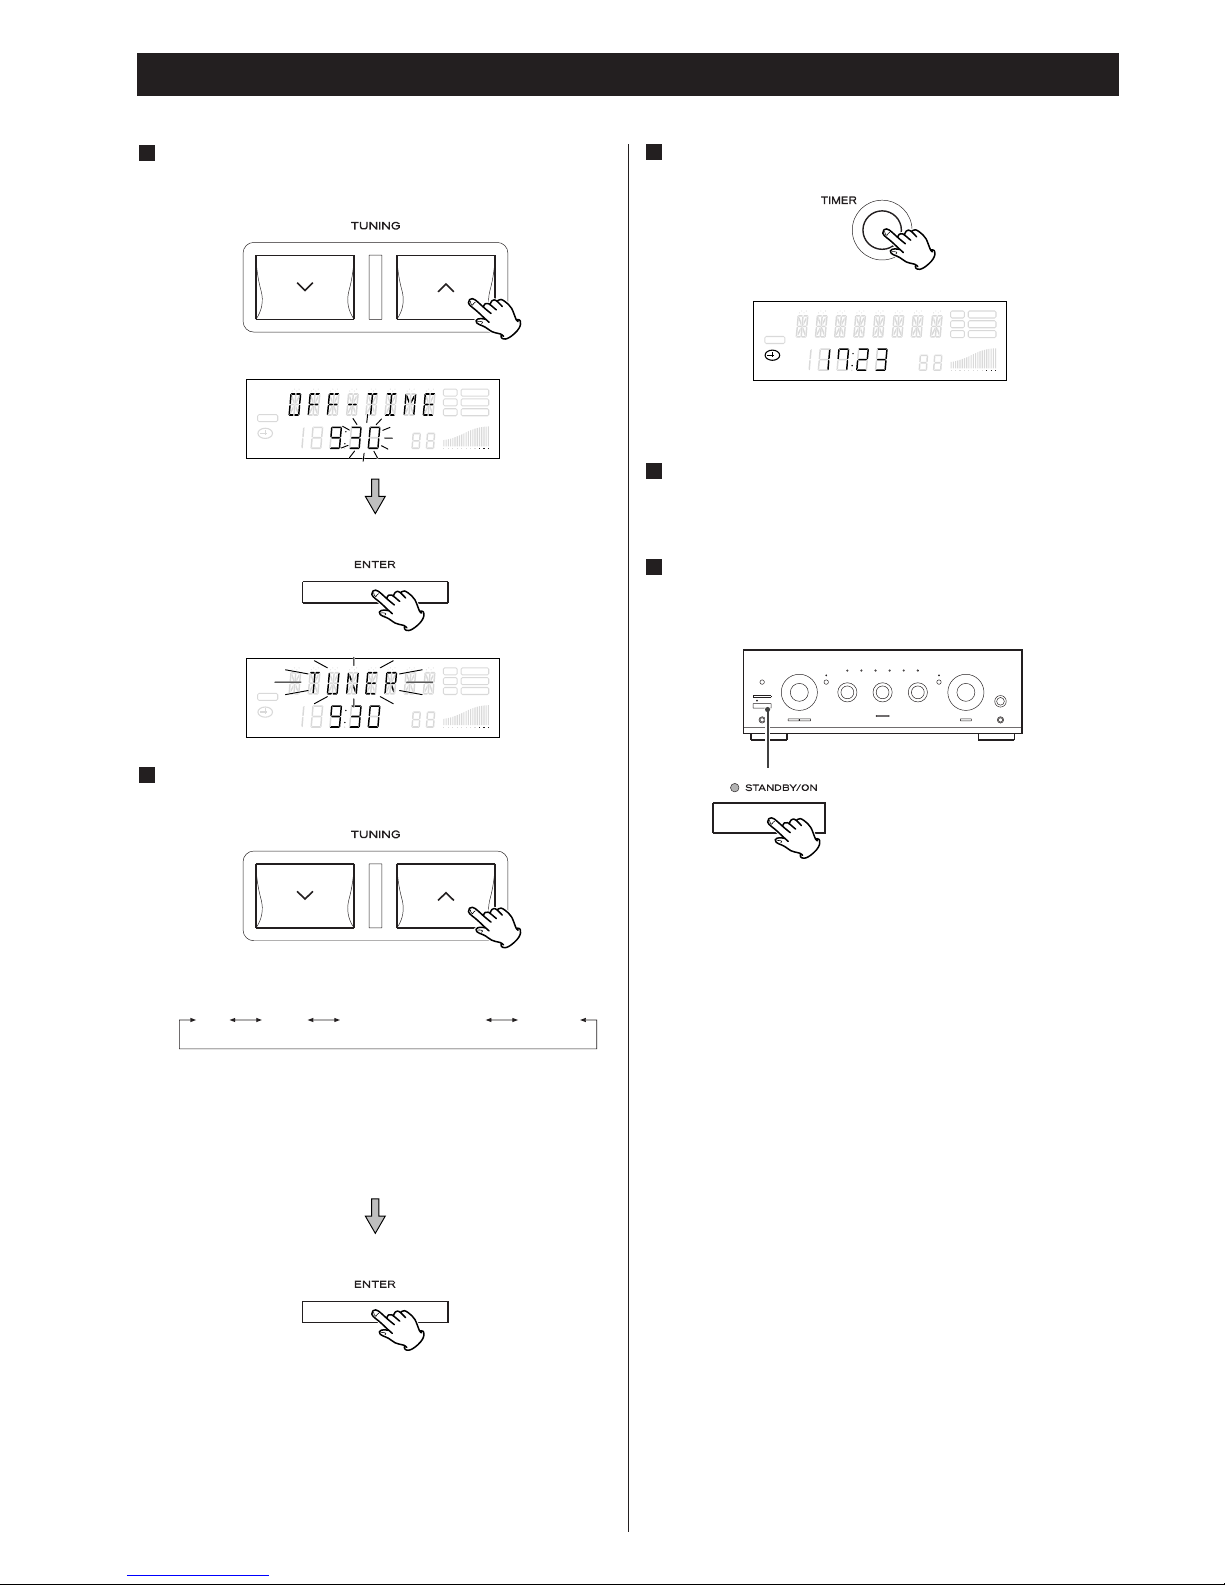
84
Met de TUNING-toetsen (‡/° ) de minuten van de
uitschakeltijd instellen. Met de ENTER-toets de uuringave bevestigen.
5
Met de TUNING-toetsen (‡/°) een bron selecteren.
Met de ENTER-toets uw keuze bevestigen.
6
De TUNING-toetsen (‡ of °) veranderen de bron als volgt:
< Het is nutteloos om “CD”, “TAPE” of “TUNER-R” te
selecteren indien uw CD of cassette speler die aan de A-R610
aangsluit wordt met de timer-gecontroleerd
weergave/opname functie niet is uitgerust.
CD TAPE TUNER R(ecording) TUNER
Alle door middel van afstandsbedieningskabels aangesloten
componenten zullen nu elke dag op dezelfde tijd in- en
uitschakelen.
Druk op de TIMER-toets om de timer uit te schakelen.
(De indicator “TIMER” verdwijnt van het display.)
Druk nogmaals op de TIMER-toets om de timer weer in te
schakelen.
Bereid de timerinstellingen voor.
Pas het volume van de versterker aan, selecteer een zender
enz.
8
De timer instelling wordt nu opgeslagen in het geheugen.
Druk op de TIMER-toets.
7
Op het display verschijnt de indicator “TIMER”.
SLEEP
RDS TUNED
RT STEREO
PTY MEMORY
TIMER
CH.
SIGNAL
FM
A
M
MHz
K
Hz
De dag-timer instellen 2
SLEEP
RDS TUNED
RT STEREO
PTY MEMORY
TIMER
CH.
SIGNAL
FM
A
M
MHz
K
Hz
SLEEP
RDS TUNED
RT STEREO
PTY MEMORY
TIMER
CH.
SIGNAL
FM
A
M
MHz
K
Hz
Druk op de STANDBY/ON-toets van de A-R610 om alle
componenten in de standby mode te zetten.
9
Page 85
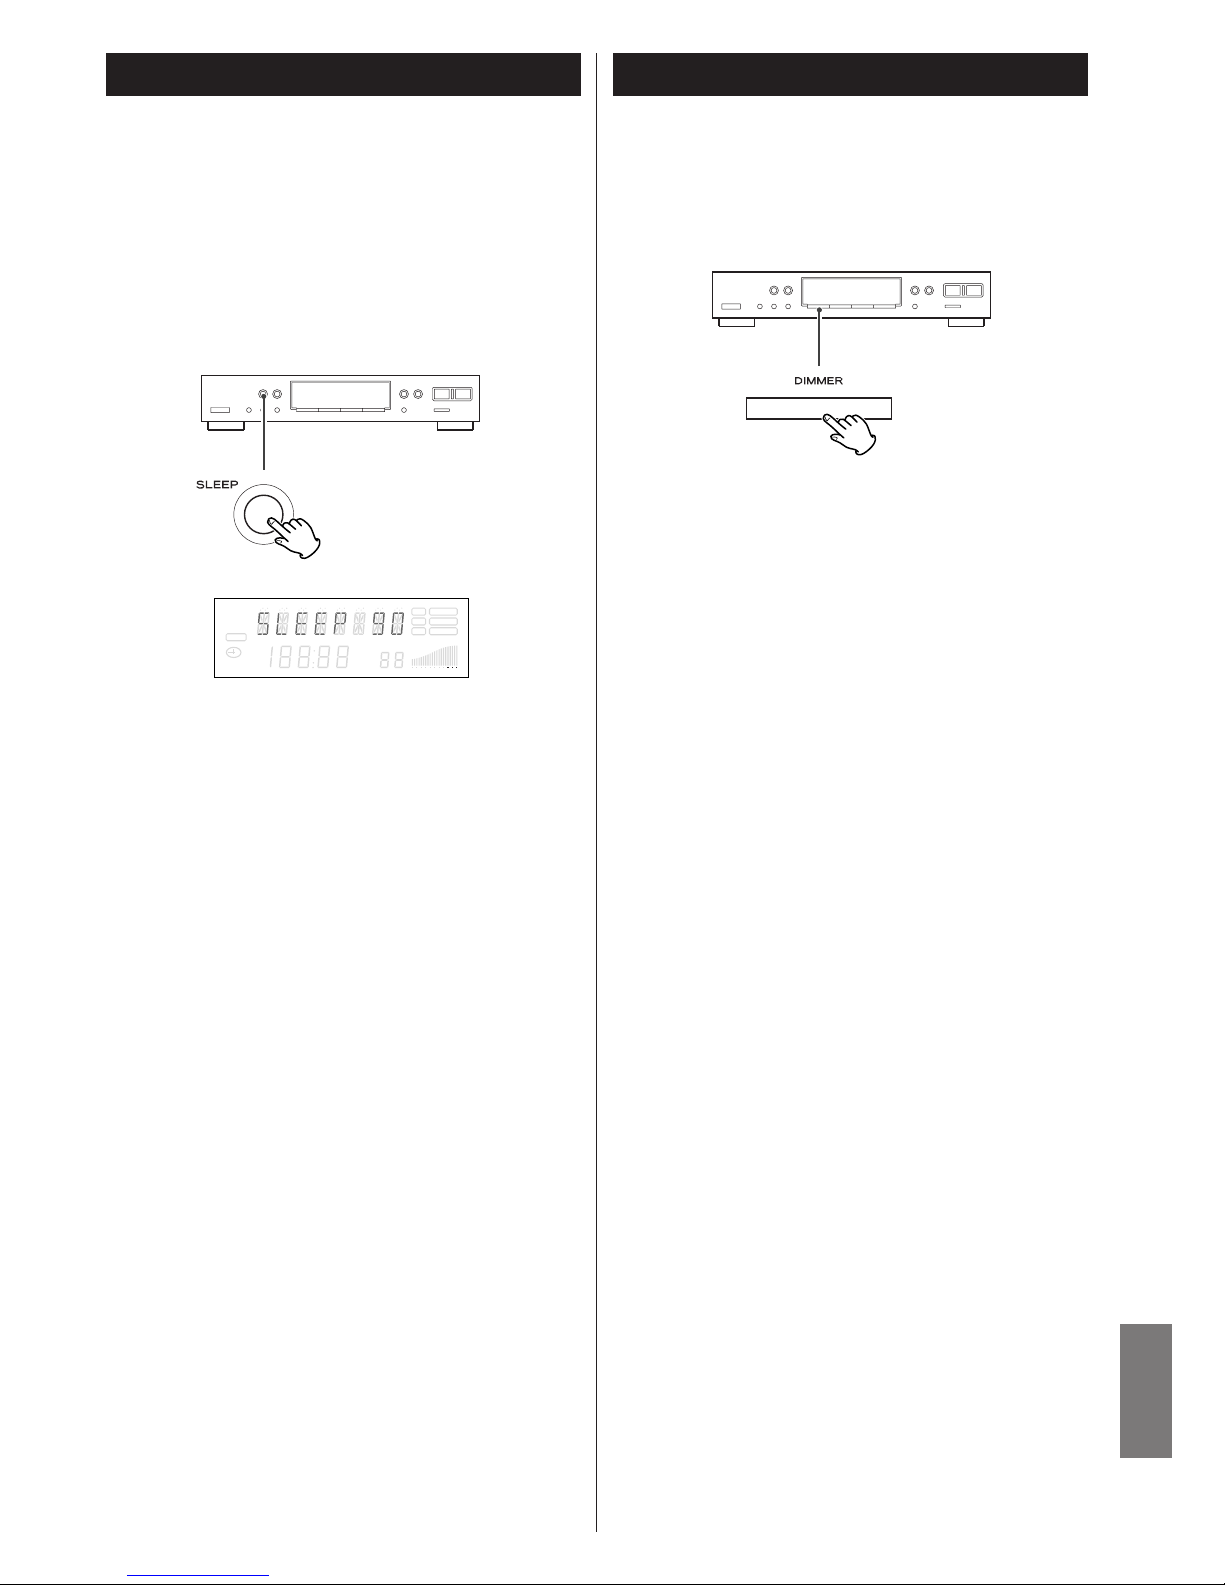
85
NEDERLANDS
Na enige tijd kan de stroom uitgeschakeld worden.
Druk meerdere keren op de SLEEP-toets totdat de gewenste tijd
in het display verschijnt.
Als de T-R610 met een afstandsbedieningskabel op de AR610
aangesloten is dan kunt u zowel de A-R610 als de TR-610
uitschakelen door de sleeptimer functie.
SLEEP 90 (80, 70, 60, 50, 40, 30, 20, 10)
De T-R610 schakelt na90 (80, 70, 60, 50, 40, 30, 20 oF 10)
minuten automatisch uit.
In de normale display mode
De sleeptimer staat uit.
< Als u de resterende tijd wilt controleren drukt u een keer op
de SLEEP-toets. De resterende tijd verschijnt 2,5 seconde in
het display waarna het display naar de normale stand terug
gaat.
SLEEP
RDS TUNED
RT STEREO
PTY MEMORY
TIMER
CH.
SIGNAL
FM
A
M
MHz
K
Hz
< Deze functie wordt uitgeschakeld als u de T-R610 uitzet.
De helderheid van het display kan met de DIMMER-toets
verzwakt worden.
Druk nogmaals op deze toets om de dimmerfunctie uit te
schakelen.
Sleeptimer functie Dimmer functie
Page 86

Technische gegevensFoutmeldingen
Neem bij problemen met de T-R610 alstublieft de moeite aan de
hand van de onderstaande lijst te kijken of u het probleem
wellicht zelf op kunt lossen. Als het probleem blijft bestaan
neem dan contact op met een HiFi vakman of het TEACServicecenter.
Geen netspanning
e Controleer het stopcontact waarop u het apparaat heeft
aangesloten. Controleer of het stopcontact schakelbaar is,
zoja zorg er dan voor dat deze schakelaar aan staat.
Controleer met een lamp, een ventilator of dergelijke of er
netstroom op het stopcontact staat.
Geen geluid
e Controleer de aansluiting op de versterker.
e Controleer de instellingen/werking van de versterker.
Geen zender kan ontvangen worden of het signaal is te
zwak.
e Controleer of de antenne(s) correct aangesloten zijn.
e Stel het radiostation correct in.
e Installeer de antenne opnieuw nadat u mogelijk een plaats
met een betere ontvangst gevonden heeft.
e Het aansluiten van een externe antenne kan noodzakelijk
zijn.
Het geluid vervormt/ruist.
e Plaats de antenne zo ver mogelijk van een TV of CD speler
af.
e Schakel een eventueel in de buurt staande TV of CD speler
uit.
De ontvangst is stereo, het geluid is mono.
e Druk op de FM MODE toets.
Als normale bediening niet meer mogelijk is trek dan de
stekker uit het stopcontact en steek hem vervolgens na 20
seconden weer terug in het stopcontact.
Onderhoud
Als het apparaat vuil wordt, gebruik dan voor het
schoonmaken een zachte, schone, droge doek of een milde
zeep. Zorg ervoor dat al het vuil wordt verwijderd. Gebruik
nooit chemische reinigingsmiddelen zoals spuitbussen,
antistatische spray’s of vloeistof, benzine of verdunner. De
chemicaliën beschadigen het oppervlak van het apparaat.
86
FM Tuner gedeelte
Afstembereik. 87,5 MHz - 108,0 MHz (in stappen van 50 kHz)
Bruikbare gevoeligheid (IHF) . . . . . . . . . . . . . . . Mono: 10 dBf
50 dB laag gevoeligheid . . . . . . . . . . . . . . . . . . Mono: 17 dBf
Stereo: 33 dBf
Wisselende kanaalselektiviteit (98 MHz ± 400 kHz) . . . . 65 dB
Responsratio . . . . . . . . . . . . . . . . . . . . . . . . . . . . . . . . . 70 dB
Frekwentiebereik . . . . . . . . . . 20 Hz - 15 kHz (+0,5 dB/–3 dB)
Ontvangstverhouding . . . . . . . . . . . . . . . . 2 dB (met 98 MHz)
Vervorming (met 65 dBf, 98 MHz) . . . . . . . . . . . Mono: 0,1 %
Stereo: 0,3 %
Signaal-tot-ruisverhouding (met 65 dBf, 1 kHz) . Mono: 70 dB
Stereo: 65 dB
AM onderdrukkingsratio . . . . . . . . . . . . . . . . . . . . . . . . 55 dB
Stereo-scheiding (1 kHz) . . . . . . . . . . . . . . . . . . . . . . . . 40 dB
Uitgang. . . . . . . . . . . . . . . . . . . . . . . . . . . 800 mV/2,2 k ohm
AM Tuner gedeelte
Afstembereik. . . . 522 kHz - 1.620 kHz (in stappen van 9 kHz)
Bruikbare gevoeligheid . . . 55 dB/m (562 µV/m, raamantenne)
Selektiviteit . . . . . . . . . . . . . . . . . . . . . . . . . 55dB (met 9 kHz)
Responsratio . . . . . . . . . . . . . . . . . . . . . . . . . . . . . . . . . 35 dB
IF responsratio. . . . . . . . . . . . . . . . . . . . . . . . . . . . . . . . 60 dB
Vervorming. . . . . . . . . . . . . . . . . . . . . . . . 1 % (met 85 dB/m)
Signaal-tot-ruisverhouding . . . . . . . . . . . 40 dB (met 85 dB/m)
Uitgang. . . . . . . . . . . . . . . . . . . . . . . . . . . 220 mV/2,2 k ohm
Algemene gegevens
Netspanning. . . . . . . . . . . . . . . . . . . . . . . . . AC 230 V, 50 Hz
Stroomverbruik . . . . . . . . . . . . . . . . . . . . . . . . . . . . . . . . 6 W
Afmetingen (B x H x D). . . . . . . . . . . . . . . 435 x 87 x 294 mm
Gewicht (netto) . . . . . . . . . . . . . . . . . . . . . . . . . . . . . . 2,9 kg
Standaard accessoires . . . . . . . . . . . . . . . . . . . . RCA kable x 1
Afstandsbedieningskabel x 1
AM Raamantenne x 1
FM-antenne x 1
• Het ontwerp en de specificaties kunnen worden gewijzigd
zonder aankondiging vooraf.
• Gewicht en afmetingen zijn approximatief.
•
De illustraties kunnen licht afwijken van de productiemodellen.
Page 87

87
Page 88

0406.MA-1076A
Z
This appliance has a serial number located on the rear panel. Please record
the model number and serial number and retain them for your records.
Model number Serial number
TEAC CORPORATION
3-7-3, Nakacho, Musashino-shi, Tokyo 180-8550, Japan Phone: (0422) 52-5081
TEAC AMERICA, INC. 7733 Telegraph Road, Montebello, California 90640 Phone: (323) 726-0303
TEAC CANADA LTD. 5939 Wallace Street, Mississauga, Ontario L4Z 1Z8, Canada Phone: (905) 890-8008
TEAC MEXICO, S.A. De C.V Campesinos N°184, Colonia Granjas Esmeralda, Delegacion Iztapalapa, CP 09810, México DF Phone: (525) 581-5500
TEAC UK LIMITED Unit 19 & 20, The Courtyards, Hatters Lane, Watford, Hertfordshire, WD18 8TE, U.K. Phone: (0845) 130-2511
TEAC EUROPE GmbH Bahnstrasse 12, 65205 Wiesbaden-Erbenheim, Germany Phone: 0611-71580
TEAC AUSTRALIA PTY., LTD. 30 Tullamarine Park Road, Tullamarine, VIC 3043, Australia Phone: (03) 8336-6500
A.B.N. 11 113 998 048
 Loading...