

Page 1

PDP4220EU
USER'S MANUAL
PDP COLOUR TV
Part No:
Page 2

WARRANTY REGISTRATION
Keep your purchase receipt to enable you to proceed quickly in the event of a Warranty Service.
Please read this warranty card.
Warranty Terms & Conditions
1. TEAC warrants to the original retail purchaser only, that this product is free from defects in material and
workmanship under normal domestic use and authorises f r ee service during the warranty period at any TEAC
Authorised Centre only. TEAC warranty only applies to products purchased, used and serviced in Australia.
2. Subject to the terms herein, this warranty effectively covers the equipment as sp ecified in the Warranty Periods
Table from the date of purchase.
3. All parts, except the external cabinet, are warranted as specified in Warranty Periods Table, and will be repaired or
replaced at the sole judgement of TEAC.
4. Normal customer maintenance as described in the owner’s manual is not covered by this warranty (such as cleaning
VCR heads etc.)
5. This warranty does not apply to equipment showing abuse, damage or that it may have been tampered with, altered
or repaired outside any TEAC Authorised Service Centre. If s o, the warranty will be void.
*Your nearest Authorised TEAC Service Centre is listed in your Owners Manual
6. In the event that this unit or any defective parts must b e returned to TEAC Service Centres, a copy of this warranty
certificate and of your purchase receipt must be enclosed to be a valid warranty. Such equipment or parts must be
sent freight prepaid to the nearest authorised TEAC Service Centre. After the repair, the unit will be available f or
collection by the owner or it will be returned to the owner. The warranty does not cover freight or insurance. In all
cases of in-transit damages or loss, a claim must be filed against the carrier by the purchaser.
7. In home service will only be provided as part of this warranty if all the following conditions are met;
a) The product is a Colour Television of 51cm screen size or over.
b) The product is within the warranty period.
c) The product is located within the normal service area of the local TEAC Service Provider.
In any other situation or circumstance, where an in home service call is made, a service fee will be charged by the
Service Provider.
8. TEAC Total Care in home service and installation is available at competitive rates.
9. No one is authorised to assume any liability on behalf of TEAC or impose any obligation on it, in connection with
the sale of any equipment other than as stated in this warranty and outli ned above.
10. In no event will TEAC be responsible or liable for indirect or consequential damages from interrupted operations or
other causes.
11. Warranty is not transferable to any subsequent purchaser if the product is sold during the warranty period,
TEAC PRODUCT
Televisions / Plasma 106 cm and
above
LCD televisions 56cm and above 1 Year (In-Home Service Included)
Televisions – 51cm and above 1 Year (In-Home Service Included)
Televisions under 51 cm 1 Year (No In-Home Service)
Digital Set Top Boxes 1 Year (No In-Home Service)
VCR 1 Year (No In-Home Service)
DVD 1 Year (No In-Home Service)
DVD Recorder 1 Year (No In-Home Service)
Audio Systems 1 Year (No In-Home Service)
WARRANTY PERIOD
1 Year (In-Home Service Included)
Page 3

WARRANTY PROCEDURES
Please keep this information for your own records.
Please refer to the owner’s manual to ensure that you have followed the correct installation and operating procedures.
1. Read owner’s manual carefully
2. If you require Warranty Service, please contact the TEAC Service Centre
3. Please have your purchase receipt as your proof of purchase and the following details completed for a valid
Warranty.
Owner’s Name
Owner’s Address
Postcode
Model Name/No. Serial No.
Dealer’s Name
Dealer’s Address
Postcode
4. Please ensure that your product is packed appropriately upon return to the service centre.
If you have any other queries regarding service or warranty pleas e contact the TEAC Service below:
www.teac.com.au
Page 4

CONTENTS
This is an IEC safety class I product and must be grounded for safety.
This is a safety requirement that the product must be grounded.
SAFETY CLASS
Important safeguard . . . . . . . . . . . . . . . . . . . . . . . . . . . . . . . . . . . . . . . . . . . . . . . . . . . . .. . . . . . . . . . . . . . . . . . . . . . . . . . . . . . . . . . . . . . . . . . . . . . . . . . . . . . . . . . . . . . . . . . . . 7
Stand installation. . . . . . . . . . . . . . . . . . . . . . . . . . . . . . . . . . . . . . . . . . . . . . . . . . . . .. . . . . . . . . . . . . . . . . . . . . . . . . . . . . . . . . . . . . . . . . . . . . . . . . . . . . . . . . . . . . . . . . . . . 8
Preparation
Installing your new TV ....... ......................... .......... .......... .......... .......... ............ ....... 9
Selecting a location for the TV .......................... .......... .......... .......... .................... ..... 9
Learning about your TV................................. .......... .................... .......... .......... ..... 9
Connecting your TV .................................... .................... .................... .......... ..... 11
Connecting to A / V equipments ...................... .......... .......... .......... .......... .......... .....11
Connecting to a computer ........................... .......... .................... .................... ..... 11
Connecting to an antenna ........................... .......... .................... .................... .....12
Using the remote control .................................... .......... .......... .......... .......... .......... .....13
Preparing the remote control for use.................... .......... .................... .......... .......... .....13
Learning about the remote control ...................... .......... .......... .......... .......... ...............14
Using the TV features ....................................... .......... .......... .......... .......... .......... .....15
Understanding the TV features ........................ .................... .................... .......... .....15
Basic operations ....................................... .......... .......... .......... .......... .......... .....15
Using the TV settings menu ........................... .......... .......... .......... .......... .......... .....17
Using the Picture menu................................ .......... .......... .......... .......... .......... .....18
Using the Audio settings menu ........................ .......... .......... .......... .......... .......... .....18
Using the PIP menu ................................... .......... .......... .......... .......... .......... .....18
Using the OSD settings menu ......................... .......... .......... .......... .......... .......... .....19
Using the General settings menu ..................... .......... .......... .......... .......... .......... .....20
Appendix ................................................. .......... .................... .......... .......... .....21
Cleaning and Care ...................................... .......... .......... .......... .......... .......... ..... 21
Trouble shooting ....................................... .......... .......... .......... .......... .......... ..... 22
Specifications .......................................... .................... .......... .......... .......... ..... 23
Optional PDP wall-mounting bracket installation guide ...... .......... .......... .......... .......... .......... 25
CONTENTS
Design and specifications are subject to change without notice.
Page 5

Important User Guidance Information
In order to obtain maximum enjoyment from this TEAC Plasma Display System, please first
read this information carefully. With the TEAC, you can be assured of a high quality Plasma
Display System with long-life and high reliability. To achieve images of exceptional quality,
this TEAC Plasma Display System incorporates state-of-the-art design and construction, as
well as very precise and highly advanced technology. To enjoy beautiful and bright images
on your TEAC Plasma Display System for a long time, please carefully read and follow the
usage guidance below:
Usage guidelines
All phosphor-based screens (including conventional tube-type televisions) can be affected by
displaying static images for a prolonged period. Plasma Display System’s are no exception to
this rule. After-image and permanent effects on the screen can be avoided by taking some
basic precautions. By following the recommendations listed below, you can ensure longer
and satisfactory results from your plasma:
•Whenever possible, avoid frequently displaying the same image or virtually still moving
pictures (e.g. closed-captioned images or video game images which have static portions).
•Do not display Teletext for extended period of time.
•Avoid viewing the On Screen Display for extended periods, from a decoder, DVD player,
VCR and all other components.
•Do not leave the same picture freeze-framed or paused continuously over a long period of
time, when using the still picture mode from a TV, VCR, DVD player, or any other
component.
•Images which have both very bright areas and very dark areas side by side should not be
displayed for a prolonged period of time.
•When playing a game, the “Soft” mode setting within “P mode” is strongly recommended.
However, please do not playing game for prolong period of time.
•After playing a game, or displaying a PC image or any still image, it is best to view a normal
moving picture in the “16:9” mode screen setting for more than 3 times the length of the
previous still moving image.
•After using the Plasma Display System, always switch the display to “STANDBY” mode.
Page 6

Installation guidelines
The TEAC Plasma Display System incorporates a very thin design. To ensure safety, please
take the proper measures to mount or install the Plasma Display with the recommend wall
mounting bracket, in order to prevent the unit from tipping over in the event of vibration or
accidental movement. This product should be installed by using only parts and accessories
designed by TEAC. Use of accessories other than the TEAC stand or installation bracket may
result in instability, and could cause injury. For custom installation, please consult the dealer
where the unit was purchased. To ensure correct installation, experienced and qualified
experts must install the unit. TEAC will not be held responsible for accident or damage
caused by the use of parts and accessories manufactured by other companies. To avoid
malfunction and overheating, make sure that the vents on the main unit are not blocked when
installing to ensure proper heat emission:
• Distance the unit slightly from other equipment.
• Do not mount the unit flush against the walls, etc. As shows below.
• Do not fit the unit inside narrow spaces where ventilation is poor.
• Do not cover with a cloth, etc.
• Clean the vents on the sides and rear of the unit to remove dust build-up, by using a vacuum
cleaner set to its lowest suction setting.
• Do not place the product on a carpet or blanket.
• Using the unit without proper ventilation may cause the internal temperature to rise, and
could result in possible malfunction. Any malfunction may occur due to:
An inappropriate installation site, improper assembly, installation, mounting. However,
TEAC cannot be held responsible for such accidents or malfunction.
• CAUTION regarding Placement
To maintain proper ventilation, be sure to leave a space around the unit (from the largest
outer dimensions including projections) equal to or greater than:
Left and right side of Panels: 10cm
Rear of Panel: 50cm
Top of Panel: 50cm
The ventilation should not be impeded by covering the ventilation slots with items, such as
newspapers, table-cloths, curtains, etc. No naked flame sources, such as lighted candles,
should be placed on or near the apparatus.
Page 7

- 7 -
WARNING: TO PREVENT FIRE OR SHOCK HAZARD, DO NOT EXPOSE THIS APPLIANCE TO RAIN OR MOISTURE.
IMPORTANT SAFEGUARD
FIRE AND SHOCK PRECAUTIONS
Adequate ventilation must be provided to prevent heat build up inside unit. Keep the inside of unit free
from foreign objects, such as hairpins, nails, paper, etc. Do not build the set into a bookcase or other
enclosures in which it would be poorly ventilated. Do not place it on carpet or a bed as low ventilation
boles could become obstructed.
Do not set liquids, including flower vases and vessels filled with chemicals or water etc., On top of the
unit as liquid could get inside the unit. If a hazardous object falls inside the TV set, unplug it immediately
and call a qualified technician for removal.
When placing or moving the TV set, take care to insure that the power cord is fitted into the allocated slot.
To avoid damage to the power cord, never allow heavy objects such as the TV set itself to be placed on
the power cord. Keep cord away from radiating appliances. Do not allow cord to become knotted or
tangled. Do not lengthen the cord. When removing the power plug from the socket, always hold onto the
plug, never pull by the cord.
WARNING
Do not remove the back cover of the TV set. Accidental contact with high voltage components could result
in electric shock. When internal adjustment is necessary, please contact your distributor.
If your set produces sound but no picture, or it emits smoke or produces a strange sound or smell, continue
operation is dangerous. Immediately turn off power and remove the power plug from the socket and
contact your distributor.
During vacation or other occasions when you will not be using the set for an extended period, remove the
power plug from the socket.
This TV set shall be connected to a main socket outlet with a protective earthing contact
The main plug and main switch should be remain readily operable after installation
No naked flame sources, such as lighted candles, should be placed on the apparatus
Minimum distances around the apparatus for sufficient ventilation
The use of apparatus in moderate climates
CAUTION
CAUTION: TO REDUCE THE RISK OF ELEC-
TRIC SHOCK, DO NOT REMOVE
COVER(OR BACK).NO USER SERVICEABLE PARTS INSIDE.
REFER SERVICING TO QUALIFIED
SERVICE PERSONNEL.
The lightning flash with arrowhead symbol, within an
equilateral triangle is intended to alert the user to the
presence of uninsulated dangerous voltage within the
product s enclosure that may be of sufficient magnitude
to constitute a risk of electric shock.
'
The exclamation point within an equilateral triangle is
intended to alert the user to the presence of important
operating and maintenance( servicing ) instructions in
the literature accompanying the set.
Page 8

- 8 -
Assemble instructionAssemble instruction
WARNING: TO PREVENT FIRE OR SHOCK HAZARD, DO NOT EXPOSE THIS APPLIANCE TO RAIN OR MOISTURE.
STAND IN STALLATION
base subassembly
screw A
12mm
screw A
screw A
base subassembly
Fig.1
Mount Installation
Mount Preparation
1. Take the mounting components out of the box.
2. Inspect and become familiar with all hardware before beginning installation.
3. Invert the plasma and place screen side down on a soft and flat surface.
NOTE: Failure to do so may result in breaking, denting, and scratching the plasma display.
4. Locate the six (6x M5X12) screw A and mounting points found on the base of the plasma stand and plasma bracket (see Figure 1).
5. Tighten the six (6) screws with a Phillip head screwdriver and ensure it firmly tighten (Figure 1).
6. Locate the four screw A and mounting points found on the back of the plasma TV (see figure 2).
7. Affix and tighten the four (4x M5X12) screw A according the fig. 2 and ensure that screws are tighten firmly.
CAUTION: Do not over tighten the (M5) screws.
Mount Installation
Mount Preparation
1. Take the mounting components out of the box.
2. Inspect and become familiar with all hardware before beginning installation.
3. Invert the plasma and place screen side down on a soft and flat surface.
NOTE: Failure to do so may result in breaking, denting, and scratching the plasma display.
4. Locate the six (6x M5X12) screw A and mounting points found on the base of the plasma stand and plasma bracket (see Figure 1).
5. Tighten the six (6) screws with a Phillip head screwdriver and ensure it firmly tighten (Figure 1).
6. Locate the four screw A and mounting points found on the back of the plasma TV (see figure 2).
7. Affix and tighten the four (4x M5X12) screw A according the fig. 2 and ensure that screws are tighten firmly.
CAUTION: Do not over tighten the (M5) screws.
Page 9

- 9 -
Selecting a location for your Plasma TV
1)Place the TV on the floor or on a sturdy platform in a location where light does not directly hit the screen.
2)Place the TV far enough from the walls to allow proper ventilation. Inadequate ventilation may cause
overheating, which may damage the TV.
NOTE: Please contact local dealer for wall mounting.
Preparation for Using your new TV
Learning about your TV
You can operate your TV by using the buttons on the front panel or the remote control. The terminals on the
back panel provide all the connections you will need to connect other equipment to your TV.
Front Controls
MENU
SOURCE
VOL
CH
Page 10
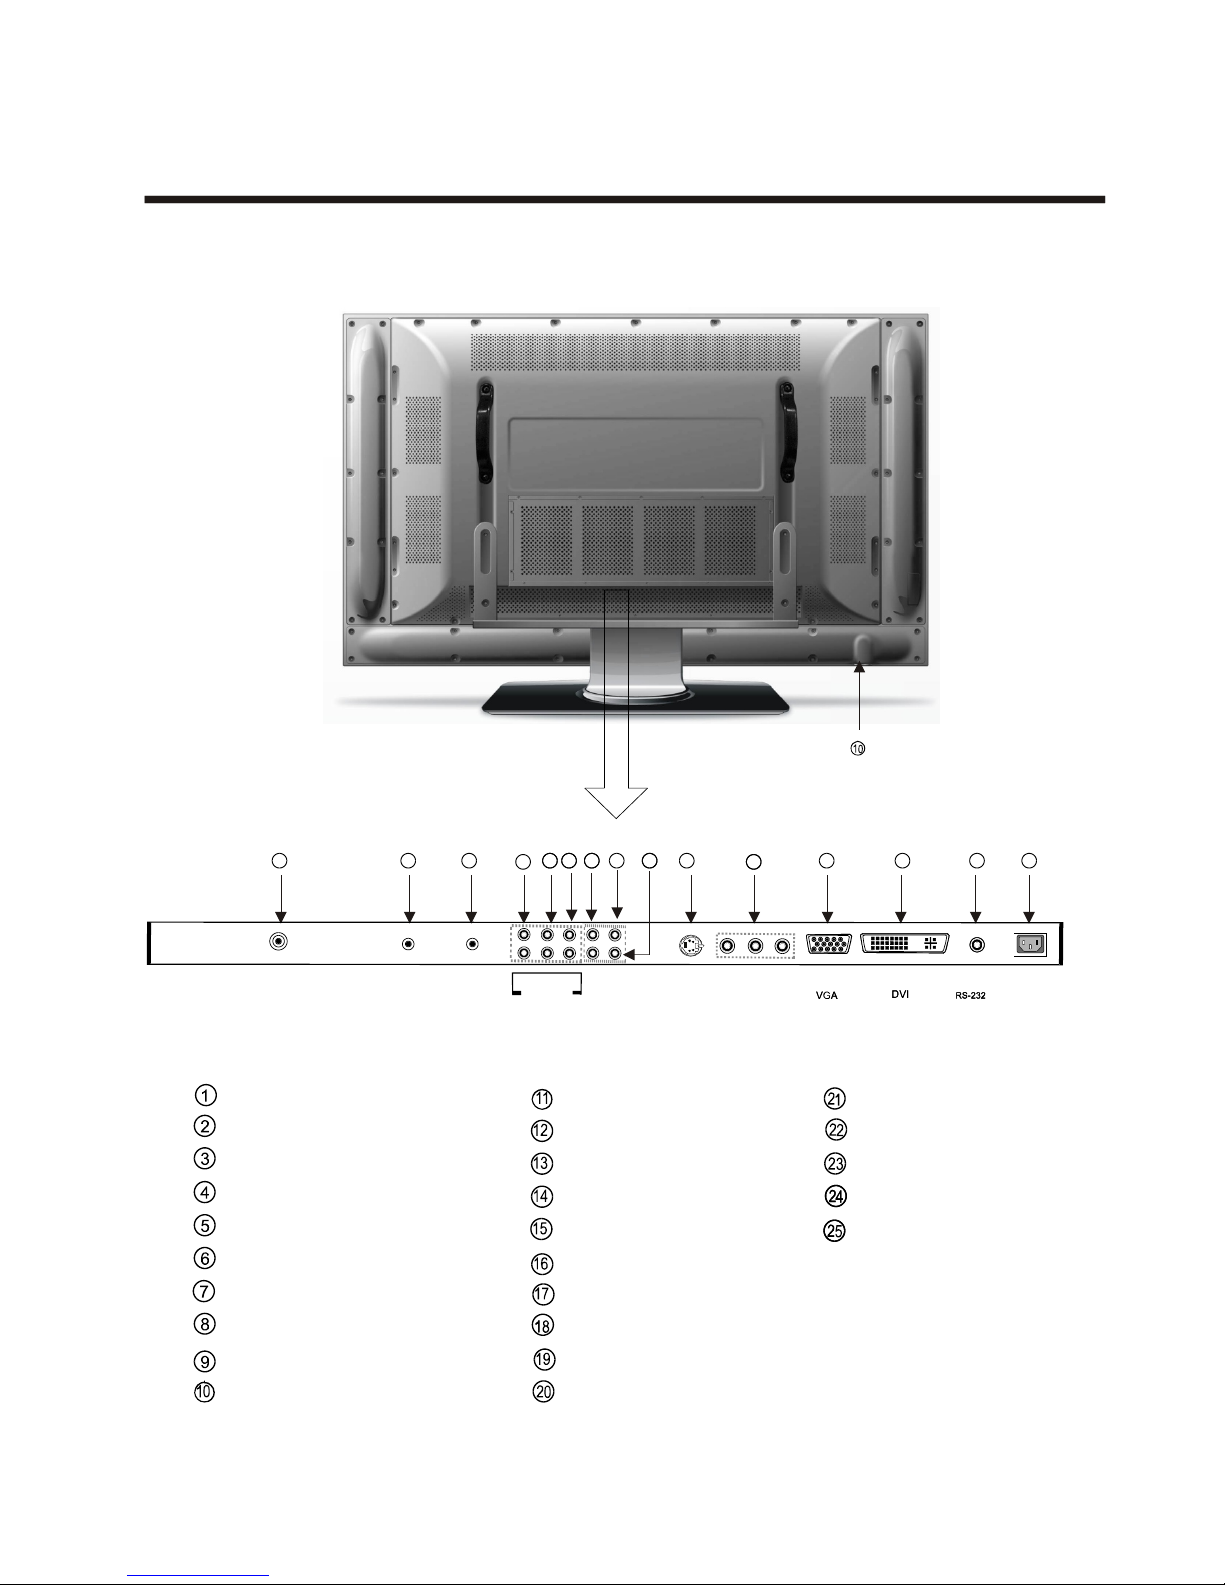
Note: The above figures are for reference only, please refer to the actual units to determine their appearance.
- 10 -
13
14
1
1
1616
17171515
18
19 20
22
Preparation for Using your new TV
Remote Sensing Window
Power indicator
DVI input
RS232C DEBUG input
AC Power Socket
Power button (standby)
Channel up / cursor up
Power Switch
Volume up / cursor right
Volume down / cursor left
Source
Menu button
YPBPR/ YCBCR AUDIO input
VGA input
CATV antenna input
(ON/OFF)
Channel down / cursor down
1211
21
PC/DVI audio input
Video input
AV audio input
23
24
Audio output
S-video input
PIP headphone output
Power
R
R
R
R
L
L
L
L
AUDIO IN
AUDIO 3 AUDIO 2 AUDIO 1
S
-
VIDEO
Y
Y
P
B
C
B
P
R
C
R
OUT IN
AUDIO
AUDIO
¦¸
ANT
75
C
PIP
PC
VIDEO IN
VIDEO OUT
AUDIO OUT
25
S-VIDEO AUDIO INPUT
VIDEO OUTPUT
YPBPR/ YCBCR input
Page 11
PB
PR
Y
1
STB
ANT
LEFT
CENTER
S.L
RIGHT
SUBWOOFER
S.R
S/PDIF
VGA
PR
CV
Y
PB
S-VIDEO
VCD, DVD
Preparation for Using your new TV
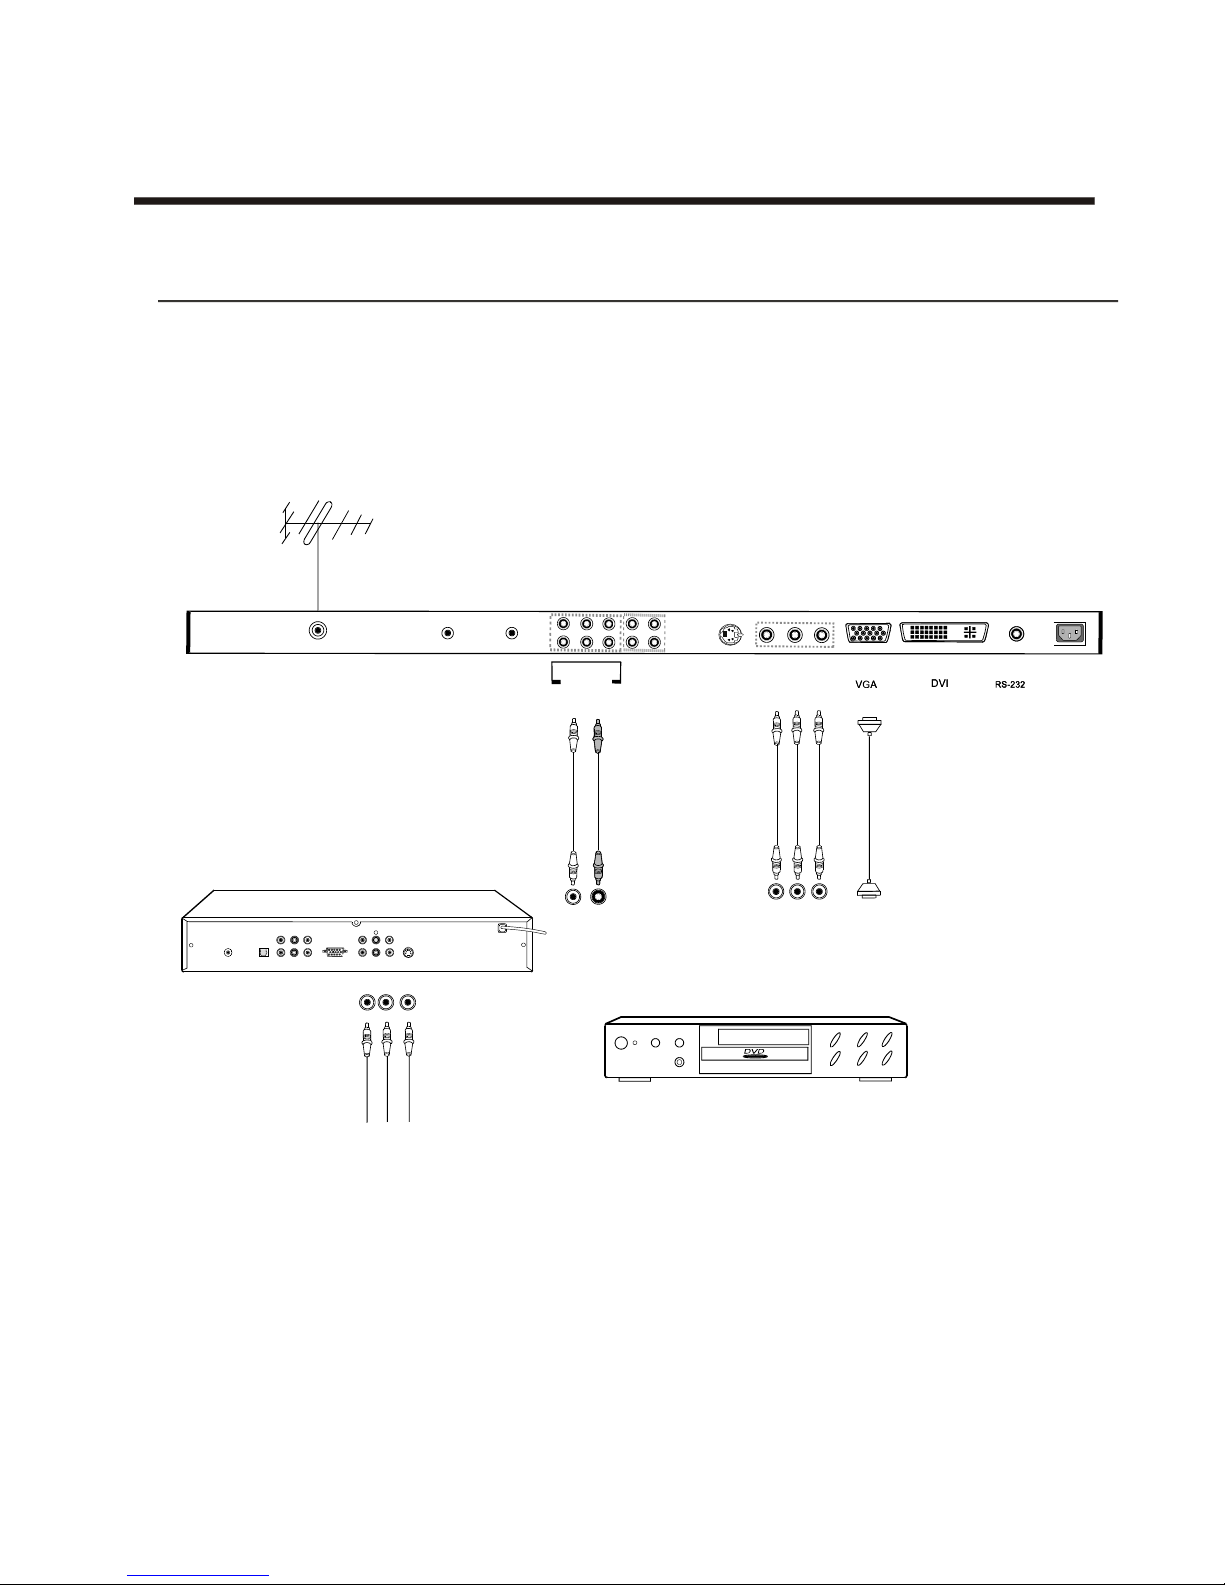
Caution: Do not plug the main AC power into the TV until you have finished connecting all of your
equipment.
Connecting your TV
To enjoy its multimedia features, you can connect your to A/V equipments such as VCR, DVD, STB, Satellite
receiver, Camcorder, Audio amplifier etc., and select signal sources using your remote control.
TV
Connect the
devices as shown below.
Connecting to A/V equipments
- 11 -
1
Notes: Modes that YPBPR/ YCB CR can display include: 480P/60Hz, 480I/60Hz, 576P/50Hz, 576I/50Hz
720P/50Hz, 720P/60Hz, 1080I/50Hz, 1080I/60Hz
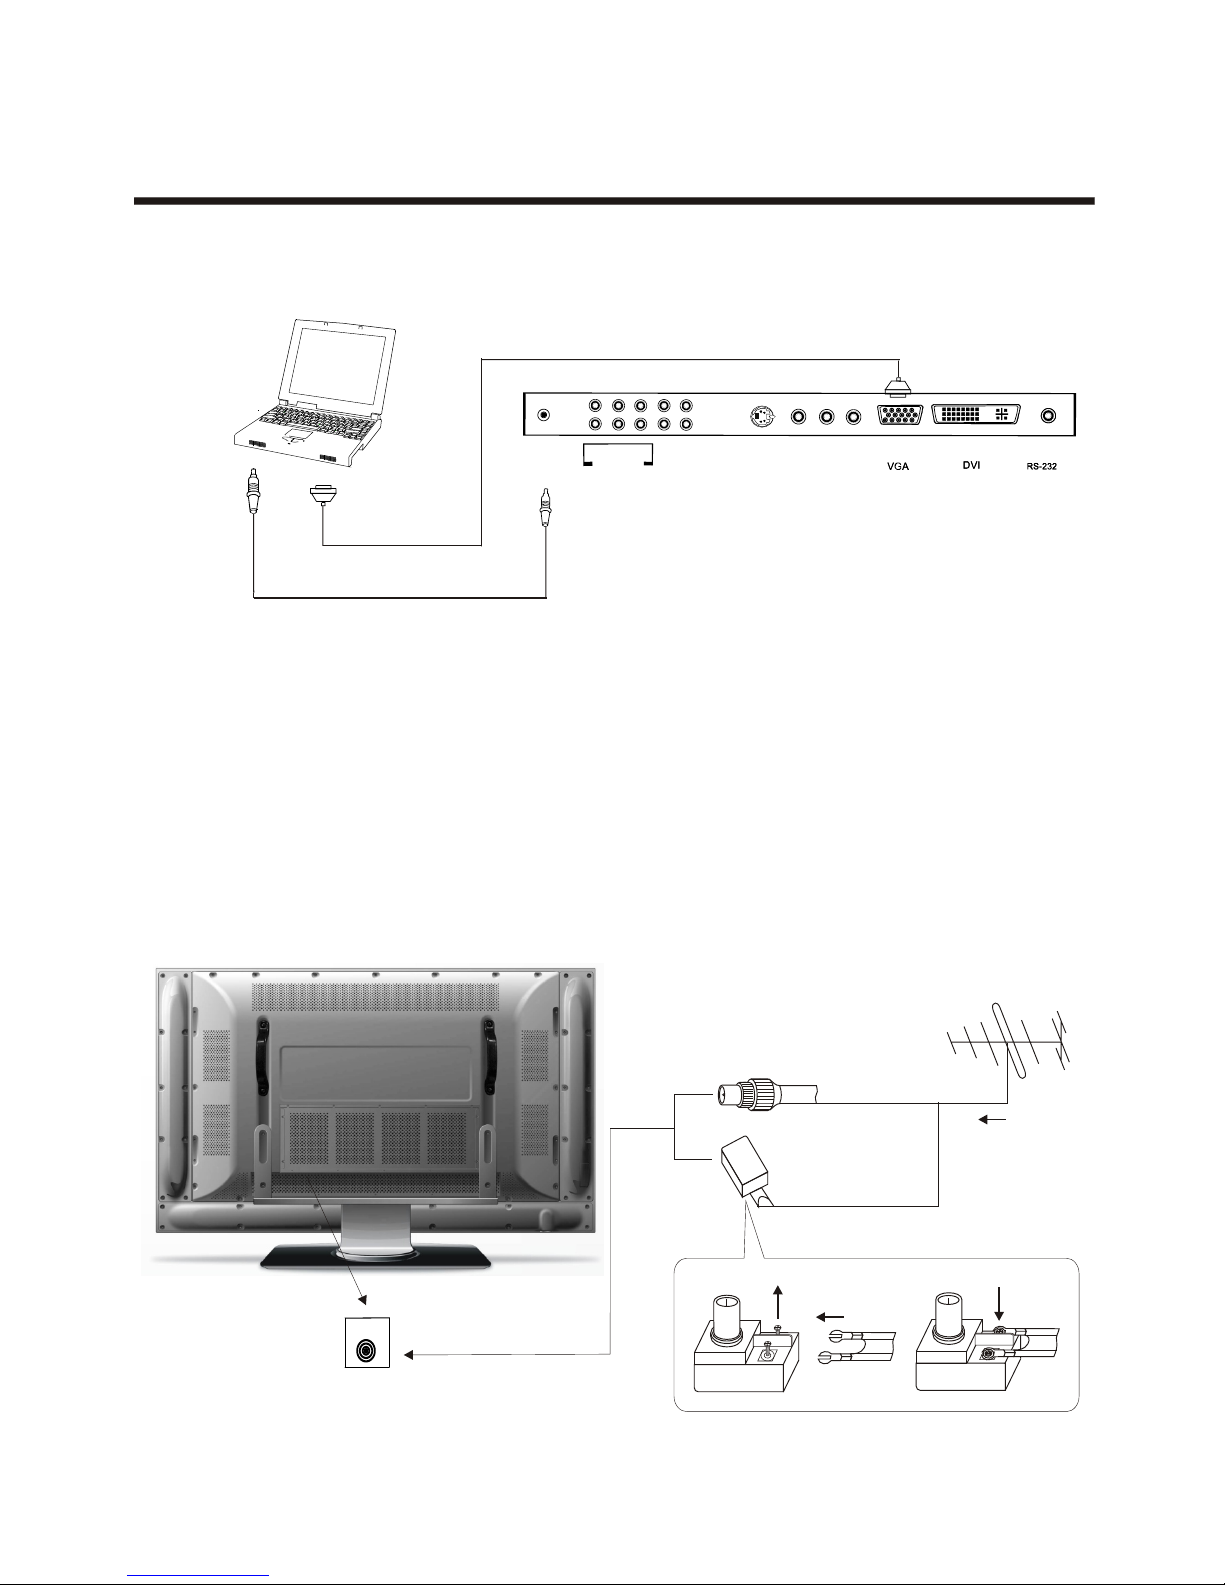
You can use your TV as a monitor/ speakers for connecting through its 15 pin standard RGB
interface and PC audio interface.
your computer by
Connect the devices as shown below.
Connecting to a Computer
W
hi t e
Lef t
Red
Ri ght
Y
Y
CB
PB
C
R
PR
Power
R
R
R
R
L
L
L
L
AUDIO IN
AUDIO 3 AUDIO 2 AUDIO 1
S
-
VID
EO
Y
Y
P
B
C
B
P
R
C
R
OUT IN
AUDIO
AUDIO
¦¸
ANT IN
75
C
PIP
PC
VIDEO IN
VIDEO OUT
AUDIO OUT
Page 12
Preparation for Using your new TV
To enjoy the terrestrial signal transmitted by your local TV station, you need an indoor or outdoor antenna
(not supplied). Perfect picture quality requires a good signal and generally means that an outdoor antenna
must be used. The exact type and location of the antenna will depend on your particular area. Consult your
local dealer or service personnel for best advice. If you are a subscriber of your local CATV net, the outdoor
or indoor antenna is not needed. Connect the equipments as the following figure.
Connecting to an antenna
- 12 -
PC/NB
To VGA
To speaker
RGB line
Audio line
ANTENNA SOCKET
ANT 75 ¦¸W
Loosen the screw
Insert the feeder in
Tighten the screw
Plug(not supplied)
Adaptor (not supplied)
The signal comes from:
An outdoor antenna
An indoor antenna
CATV net
TWIN-LEAD FEEDER(300W )
COAXIAL CABLE (75W )
AUDIO
C
PC
VIDEO IN
VIDEO OUT
AUDIO OUT
R
R
R
R
L
L
L
L
AUDIO IN
AUDIO 3 AUDIO 2 AUDIO 1
S
-
VID
EO
Y
Y
P
B
C
B
P
R
C
R
IN
Page 13
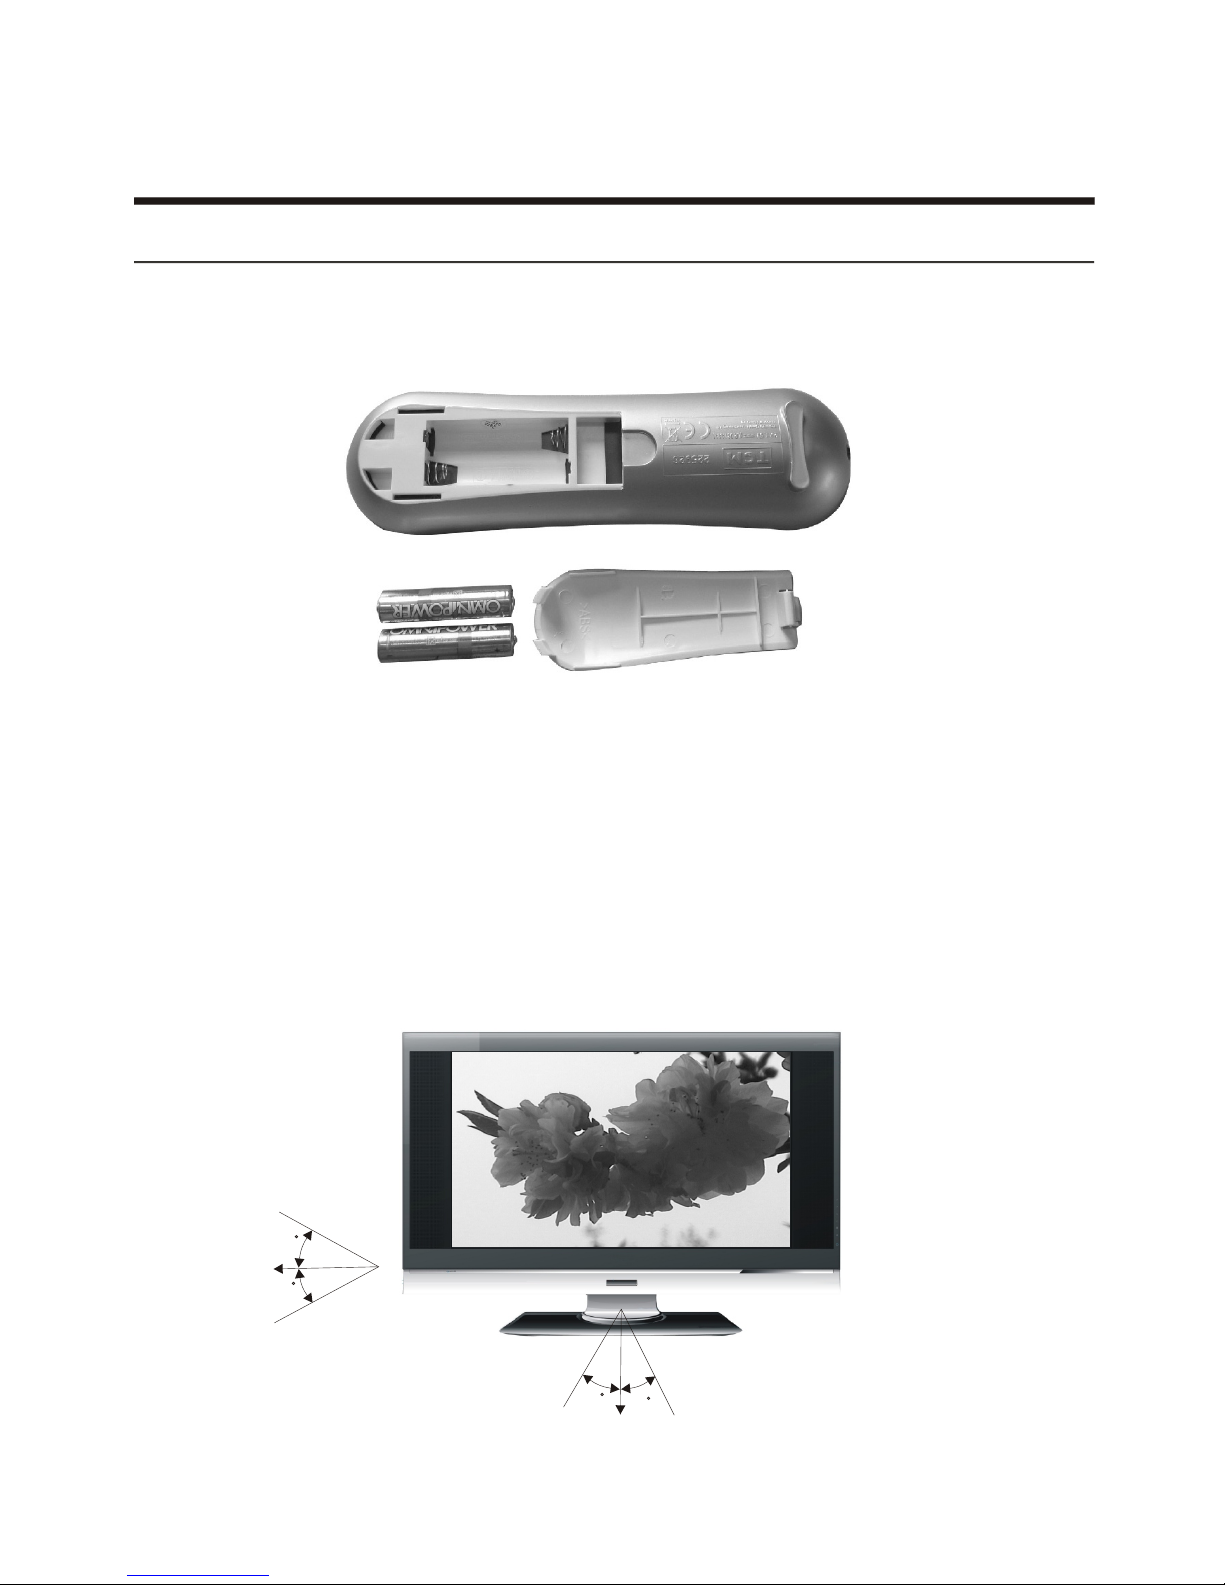
Preparing the remote control for use
Installing the remote control batteries
1. Open the battery cover on the back of the remote control.
2. Install two AAA size(1.5V) batteries. Match the + and - signs on the batteries to the signs on the battery
compartment.
3. Close the battery cover.
Note:
1.Dispose of your batteries in a designated disposal area. Do not throw batteries into fire.
2.Do not mix battery types or combine used batteries with new ones.
3.Remove dead batteries immediately to prevent battery acid from leaking into the battery compartment.
4.If you do not intend to use the remote control for a long time, remove the batteries.
5.The effective range of remote control is suggested in the figure.
Using the remote control
- 13 -
8m
30
30
M8
30
30
3m 3m
M1
M1
Page 14
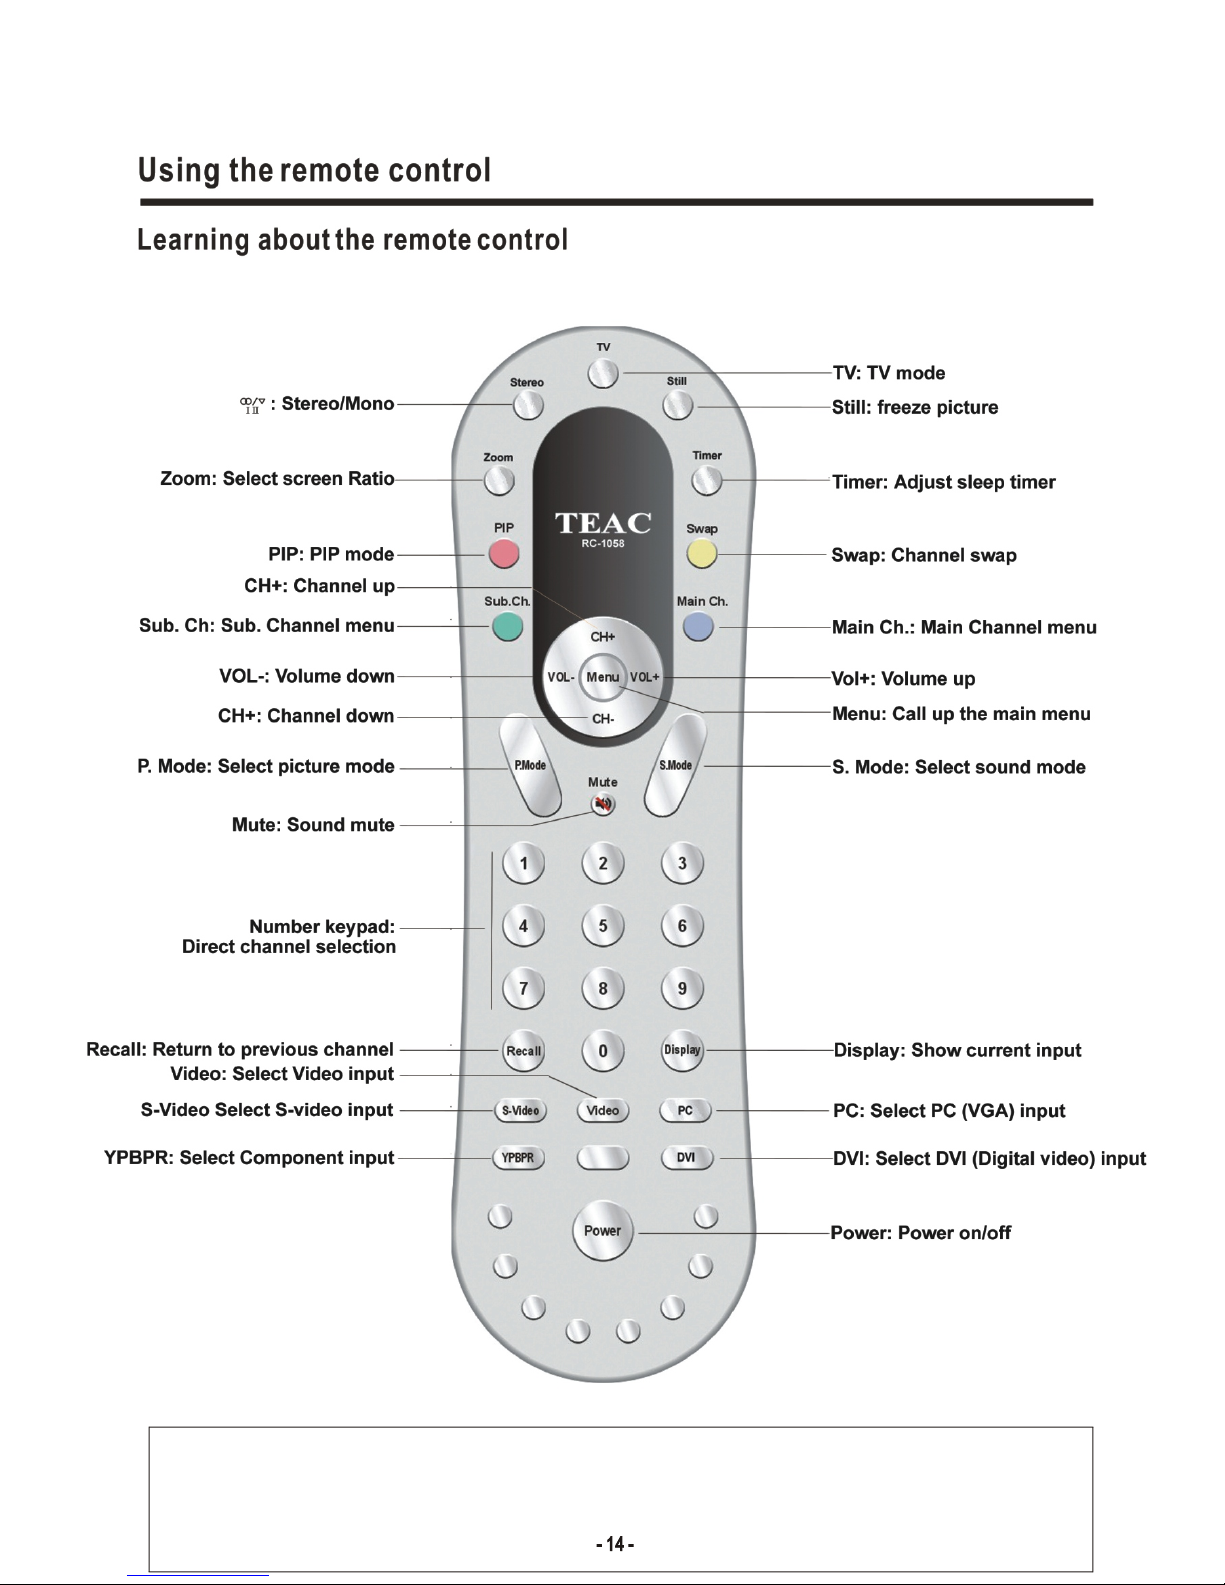
- 14 -
Page 15
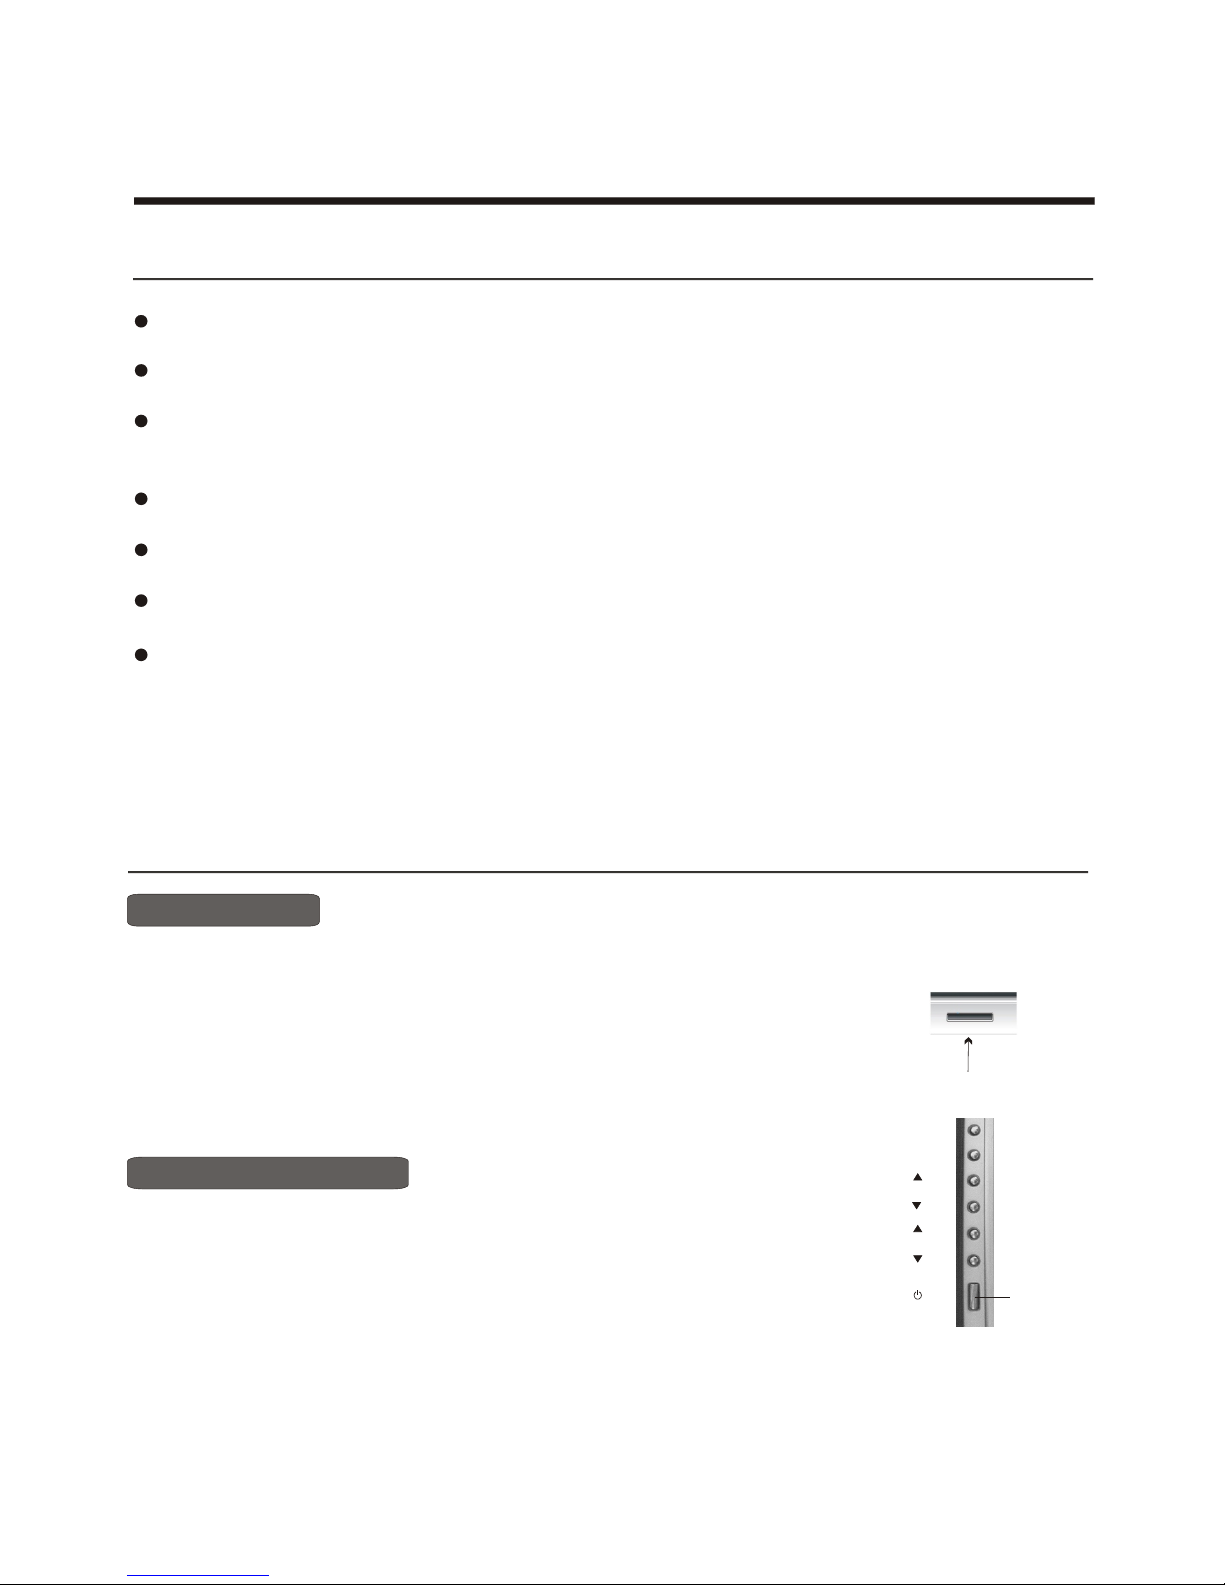
MENU
SOURCE
VOL
CH
Using the TV features
Basic Operations
Multimedia - TV receiver, Video monitor and PC display, all in one.
Wider viewing angle, 16:9 display - 160 viewing angle a typical value.
Digital display device - truthfully reproducing the images, without distortion or blurring, irrespective
of magnetic or geomagnetic effect.
200 channels storage
Sleep timer
A2 STEREO/ NICAM
Multi-language OSD
Understanding the TV features
1) Connect the TV to the main AC power outlet and turn on the power switch, the power
indicator will be red
2) Press Power button on the front control or on the
the TV on standby. Press the power switch to turn off power.
3) If you decide to shut off the TV for a long time, it is recommended
that you unplug the power from the outlet.
and then turn blue. Several seconds later, TV picture
will display on the screen.
remote control to make
Power ON/OFF
- 15 -
Signal source selection
Select channels by [CH+/CH-]
Press [CH+/CH- ] button to return to TV input and select TV channel;
Press the desire input buttons to select TV , YPBPR , Video, S-video,VGA, DVI input.
Press [PIP SOURCE] button to select TV ,YPBPR , Video, VGA, DVI input of pip source input;
Press [PIP CH+/CH- ] button to select TV input;
Press [SWAP] button to swap main source input and pip source input.
POWER BUTTON
(STANDBY)
POWER
INDICATOR
Page 16

Using the TV features
Power ON/OFF
Select channels by [CH+/CH-]
You can also use[CH+ / CH-] to select channels. ndicates channel number increase; indicates channel
number decrease.
[CH+] i [CH-]
Press [Display] button to display the present channel number, but it will also disappear 3 seconds after your pressing.
Display channel number
Press [ Still ] button to snapshot the present picture, and press again to return to normal watching.
Use [Still] button
Press [Recall ] button repeatedly to alternate between the present channel and the previous channel.
Use [Recall] button
You can select the picture mode from among three preset modes and one user-set
mode. Press [ P. Mode ] button repeatedly to select the desired picture mode.
Select picture modes
You can select the sound mode from among three preset modes and one user-set
mode. Press [ S. Mode ] button repeatedly to select the desired sound mode.
Select sound modes
Adjust Volume
When menu is not displayed on the screen, press to adjust the volume.[VOL+ or VOL-]
To select a channel : Press the channel numbers in series to select channel directly.
Press the button 1, and 1 will display on the top right corner of the screen,
then press the button 2, 12 will display, press the button zero, you can enjoy the program of channel 120.
For example, to seclect channel 120,
Select channels by numbers
Normal
User
Soft
Bright
Speech
Nomal
Music
User
NOTE:
1) After changing the channels, the sound mode will be displayed for a few seconds next to the channel number. There
are 2 sound modes. Mono ,stereo
- 16 -
Press [ Zoom ] button to adjust the screen aspect ratio and zoom ratio
Use [ Zoom ] button
Press [Mute ] button repeatedly to switch between mute and unmute mode.
Mute function
Page 17
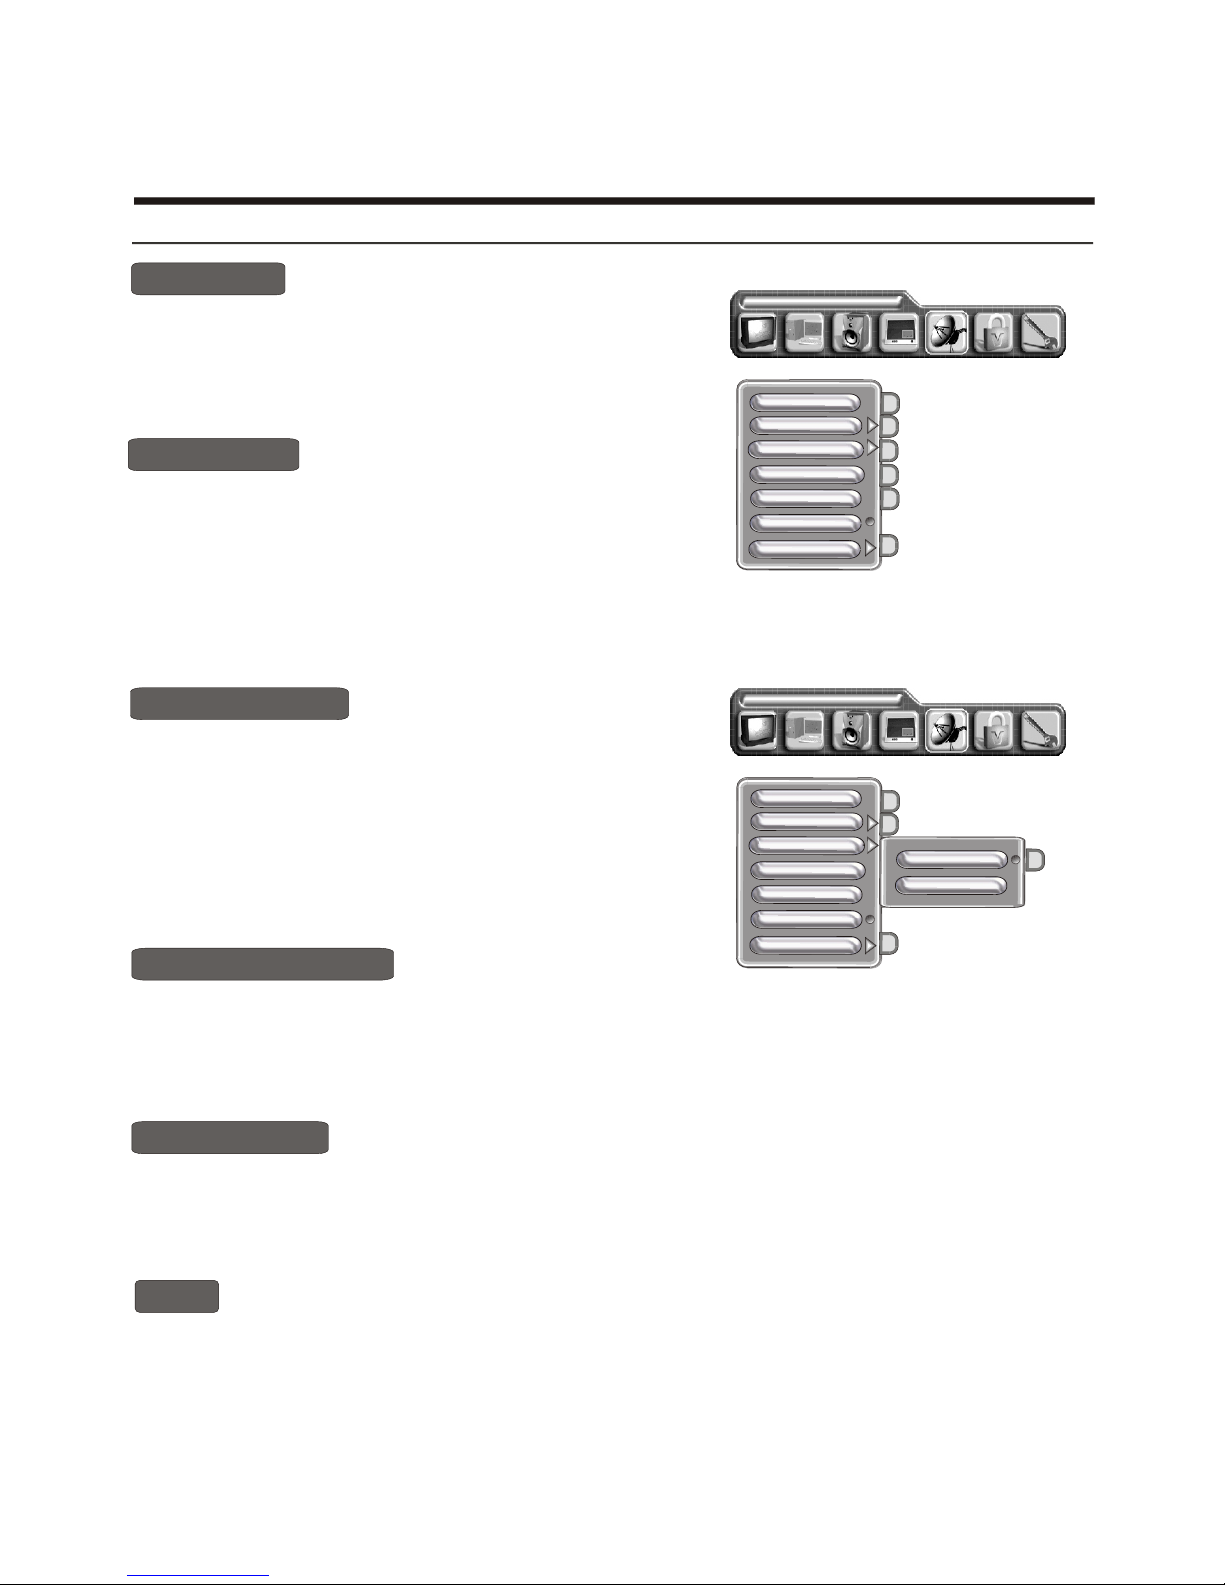
Using the TV features
- 17 -
Using the TV settings menu
1) Press MENU button to enter the main menu.
2) Press [VOL+ or VOL-] button to select the item TV settings.
3) Press [CH+ or CH-] button to select Auto search and press
the [ VOL+ ] button to enter Auto search .
4) Press [ VOL+ ] button to switch among Normal and Auto +L/L`.
AUTO-Search
You can set sound system.
1) Press [MENU] button to enter the main menu.
2) Press button to select the item
3) Press button to select sound system. and press
[VOL+] button to enter sound system
4) Press button to switch among different sound systems¡¢¡¢¡¢
[VOL+ or VOL-] TV settings
[VOL+ ]I ¡¢
[CH+ or CH-]
Sound system
Skip
1) Press [MENU] button to enter the main menu.
2) Press the button to select the item .
3) Press the button to select Program.
4) Press the button to select the present channel.
[VOL+ or VOL-] TV settings
[VOL+ or VOL-]
[CH+ or CH-]
Program
1) Press [MENU] button to enter the main menu.
2) Press button to select the item
3) Press button to select Skip.
4) Press button to skip or unskip the present channel.
NOTE: 'Skipped' channels cannot be accessed by , only by direct numbers digit key .
[VOL+ or VOL-] TV settings
[VOL+]
[CH+ or CH-]
[CH+ or CH-]
1) Press MENU button to enter the main menu.
2) Press [VOL+ or VOL-] button to select the item TV settings.
3) Press [CH+ or CH-] button to select Manual search.
4) Press [ VOL+ or VOL-] button to start Manual searching.
Manual search
1) Press MENU button to enter the main menu.
2) Press [VOL+ or VOL-] button to select the item TV settings.
3) Press [CH+ or CH-] button to select Fine tune.
4) Press [ VOL+ or VOL-] button to start Fine searching.
Fine tune
Tv settings
Notes: Auto+L/L' does not apply to Australia.
,
Tv settings
Program
Sound system
Auto search
Manual search
Skip
Fine tune
Program edit
Normal
Auto +L/L`
Program
Sound system
Auto search
Manual search
Skip
Fine tune
Program edit
Page 18
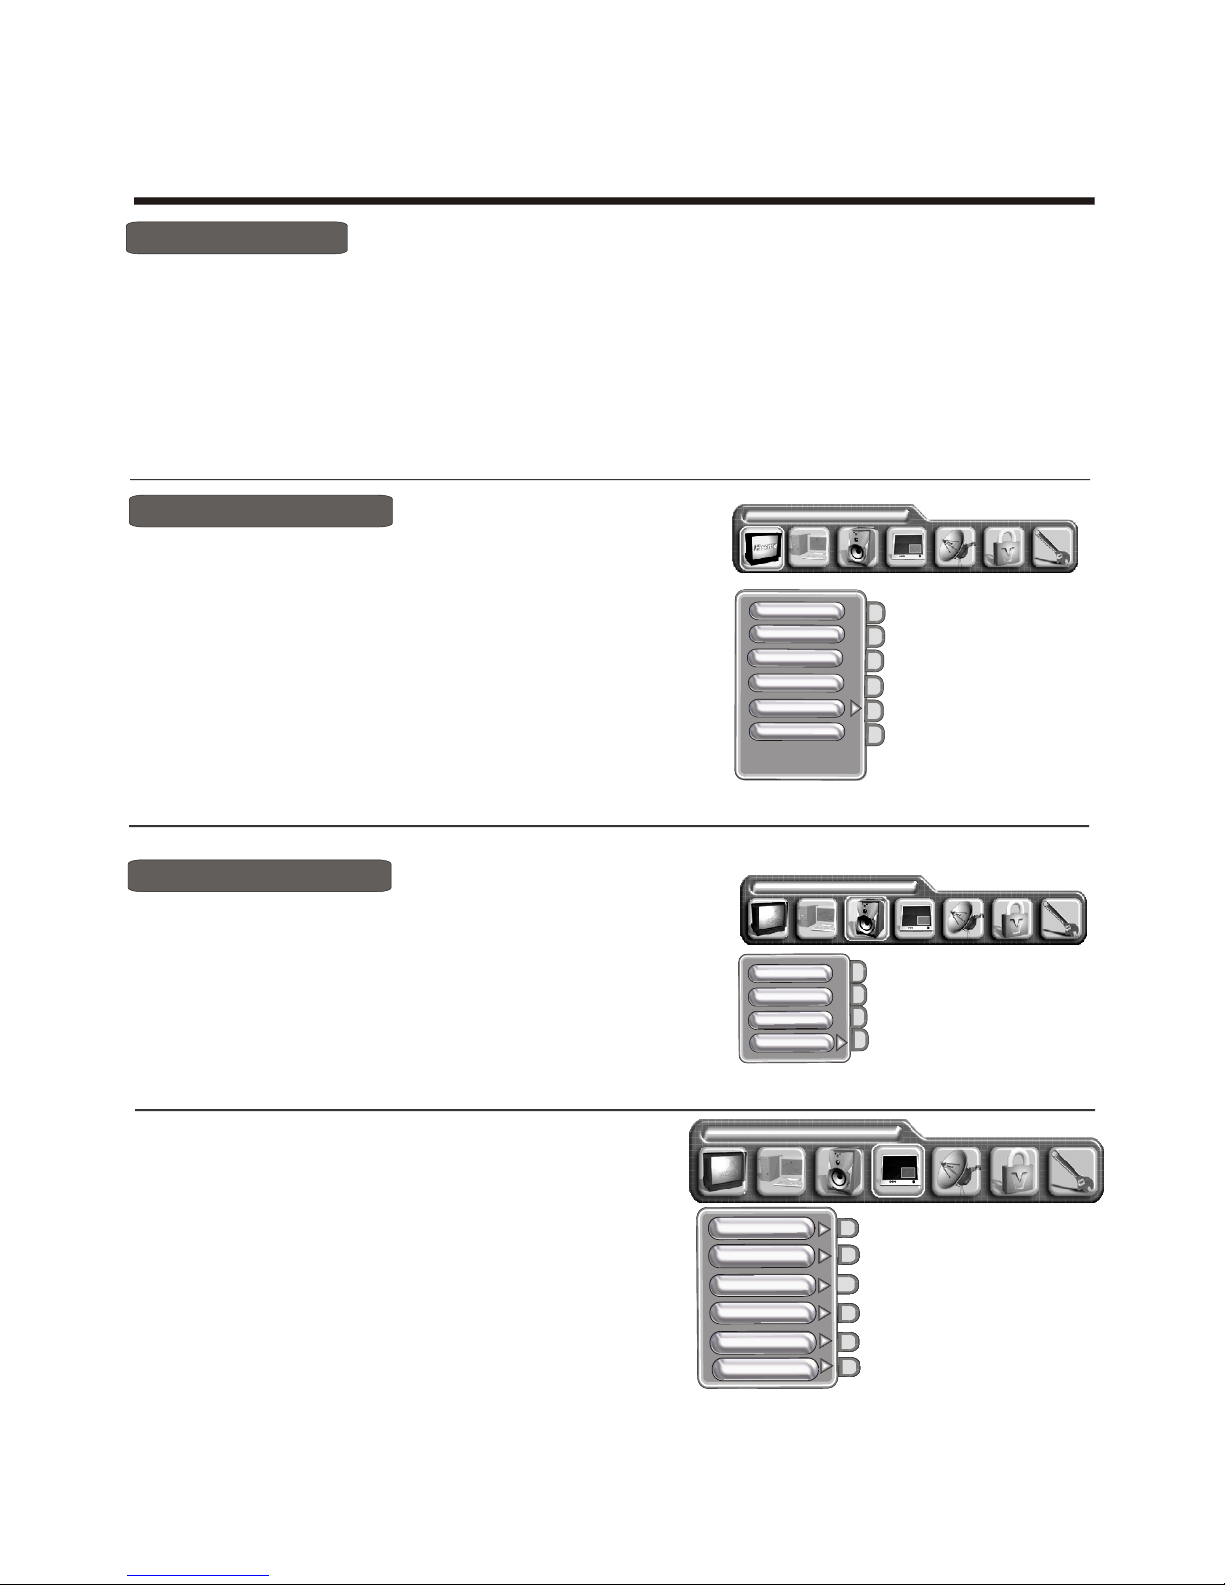
- 18 -
Using the Picture menu
Using the TV features
PROGRAM
Picture parameters
Brightness
Contrast
Colour
Colour temp
Sharpness
1) Press [MENU] button to enter the main menu.
2) Press button to select the item Picture
Parameters.
3) Press button to select the item you want to adjust.
4) Press button to adjust the level.
5) The adjusted data is stored automatically in the user mode.
NOTE : The Colour temp is only to adjust in the PC mode.
.
[VOL+ or VOL-]
[VOL+ or VOL-]
[CH+ or CH-]
Adjust picture settings
Using the Audio settings menu
Adjust audio settings
1) Press [MENU] button to enter the main menu.
2) Press button to select the item Audio settings.
3) Press button to select the item you want to adjust.
4) Press button to adjust the level.
5) The adjusted data is stored automatically in the user mode.
[VOL+ or VOL-]
[VOL+ or VOL-]
[CH+ or CH-]
Audio settings
1) Press MENU button to enter the main menu ,press the
select the Picture in picture.
2) Press
button to enter the PIP size,
[VOL+ or VOL-]
button to select the PIP size, and
press Press the
button to select the Off/Small/Medium/Large/PBP .
3) Press button to select the PIP source or press
the [Main Ch.] button to select main picture source.
4) Press button to select the PIP position or PIP
brightness, contrast or colour, press [VOL+ or VOL-] button to adjust the value.
to
[CH+ or CH-]
[ VOL+]
[CH+ or CH-]
[Sub Ch.]
[CH+ or CH-]
Note: 1) When main picture is TV/ VIDEO/S-VIDEO. pip picture is HDTV/VGA.
2) When main picture is HDTV/VGA. PIP picture is TV/ VIDEO.
Using the PIP menu
Picture in picture
PIP position
PIP size
PIP colour
PIP brightness
PIP contrast
Hue
Bass
Treble
Balance
Sorround
Volume
1) Press MENU button to enter the main menu.
2) Press [VOL+ or VOL-] button to select the item TV settings.
3) Press [CH+ or CH-] button to select Channel edit.
4) Press [ VOL+] button to start Program edit.
5) Program edit can carry out program 1 and program 2 to be interchanged by the button [SWAP],or copy program1 to
program 2 by the button [COPY].
Program edit
Page 19
- 19 -
Using the TV features
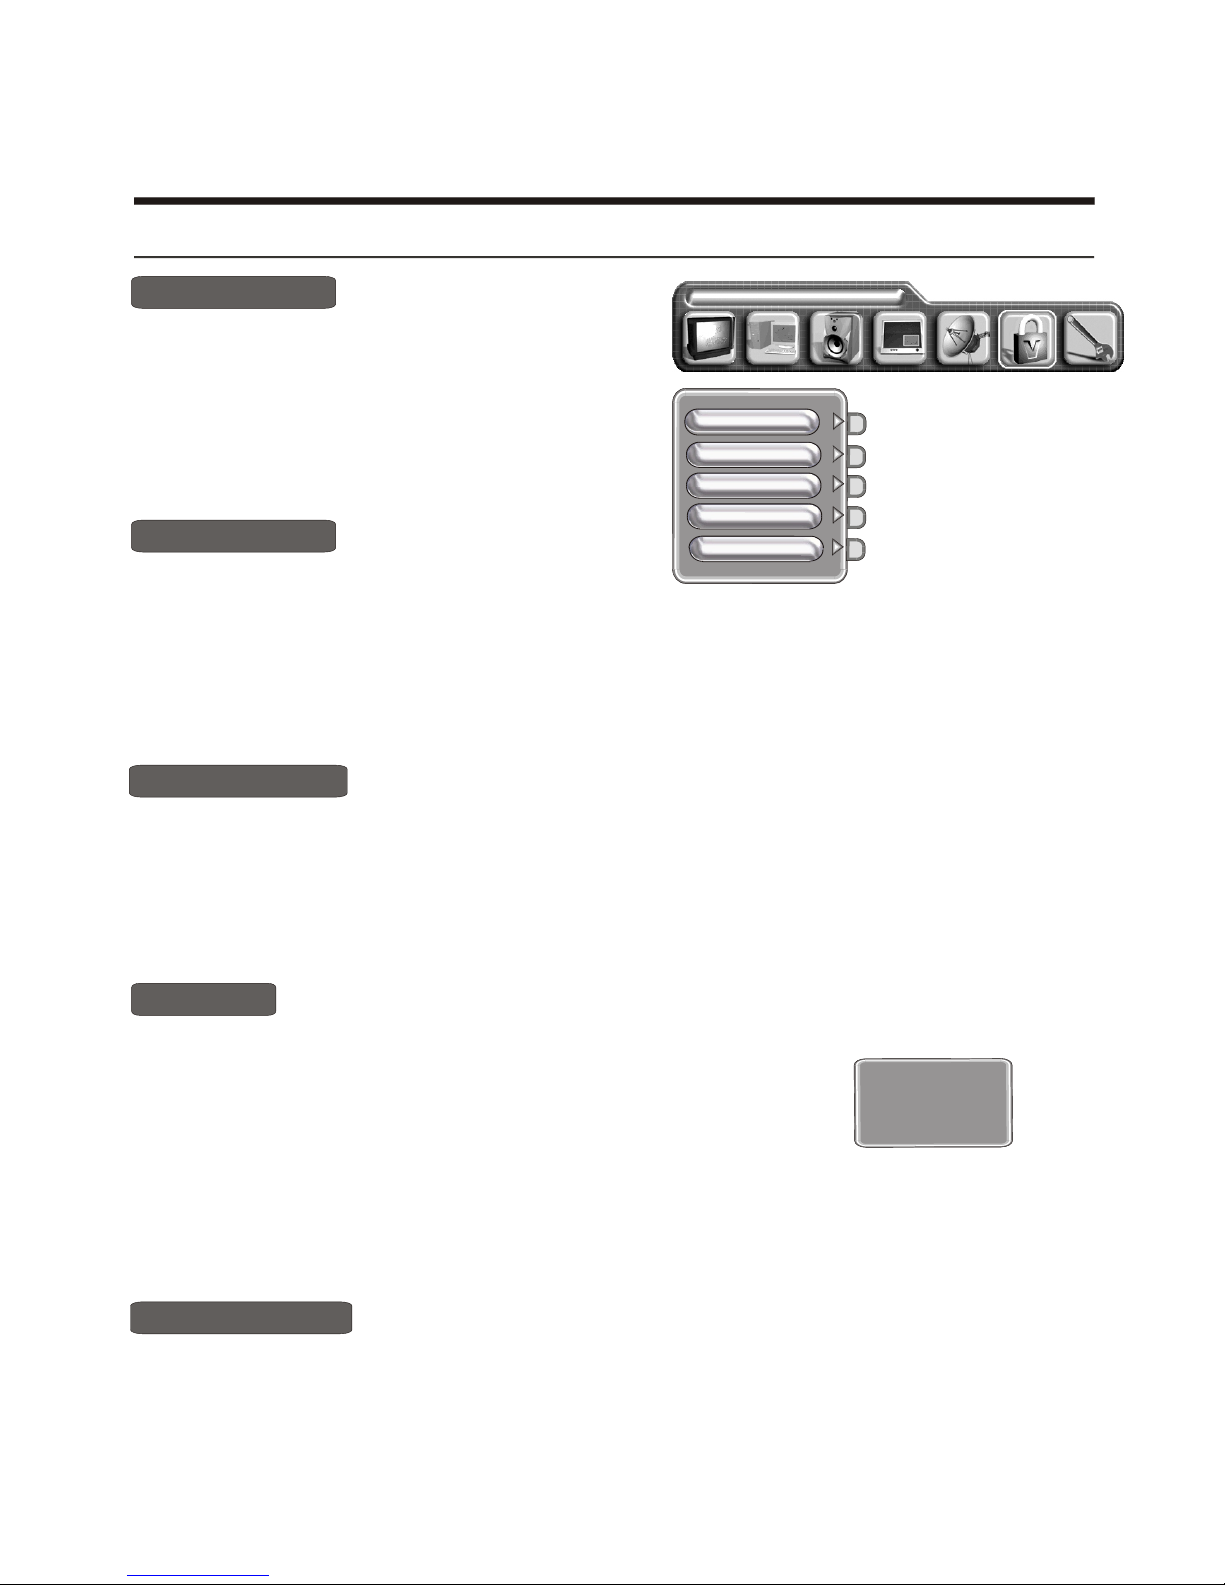
OSD settings
Using the OSD settings menu
OSD position
OSD timeout
OSD language
OSD lock
Transparency
1) Press [MENU] button to enter the main menu.
2) Press button to select the item OSD
settings.
3) Press
adjust the OSD POSITION
[VOL+ or VOL-]
[ -] button to select OSD position
4) Press [VOL+ or VOL- ] button to
CH+ or CH
OSD position
CHANGE PASSWORD
1) Press MENU button to enter the main menu.
2) Press [VOL+ or VOL-] button to select the item OSD settings.
3) Press [CH+ or CH-] button to select OSD language, and press the [VOL+]]button
to enter the OSD language
4) Press [ VOL+] button to select the language what you want use.
OSD language
1) Press [MENU] button to enter the main menu.
2) Press button to select the item OSD
3) Press button to select OSD timeout
4) Press button to
adjust the OSD TIMEOUT
[VOL+ or VOL-]
settings.
[VOL+ or VOL- or CH+ or CH-]
[CH+ or CH-]
OSD timeout
CHANGE PASSWORD
1) Press MENU button to enter the main menu.
2) Press [VOL+ or VOL-] button to select the item OSD settings.
3) Press [CH+ or CH-] button to select OSD lock ,and press the [VOL+]button
to enter the OSD lock
4) Press [ VOL+] button to select Yes, then OSD locked.
OSD lock
5) [9]To unlock, press MENU then, number .
OSD locked!
1) Press MENU button to enter the main menu.
2) Press [VOL+ or VOL-] button to select the item OSD settings
3) Press [CH+ or CH-] button to select Transparency
4) Press [ VOL+ or VOL-] button to adjust the ITEM
Transparency
Page 20
1) Press MENU button to enter the main menu.
2) Press [VOL+ or VOL-] button to select the item General settings
3) Press [CH+ or CH-] button to select Factory reset.
4) Press [ VOL+-] button to select Yes or No .
Factory reset
1) Press MENU button to enter the main menu.
2) Press [VOL+ or VOL-] button to select the item General settings
3) Press [CH+ or CH-] button to select Noise reduce.
4) Press [ VOL+ ] button to enter the Noise reduce.
5) Press [ CH+ or CH-] button to select Low / Middle / High .
Noise reduce
1) Press MENU button to enter the main menu.
2) Press [VOL+ or VOL-] button to select the item General settings
3) Press [CH+ or CH-] button to select Sleep timer
4) Press [ VOL+-] button to adjust the Sleep timer
Sleep timer
1) Press MENU button to enter the main menu.
2) Press [VOL+ or VOL-] button to select the item General settings
3) Press [CH+ or CH-] button to select Advance
4) Press [ VOL+ ] button to enter the Advance
5) Press [ CH+ or CH-] button to select the feature
Advance
- 20 -
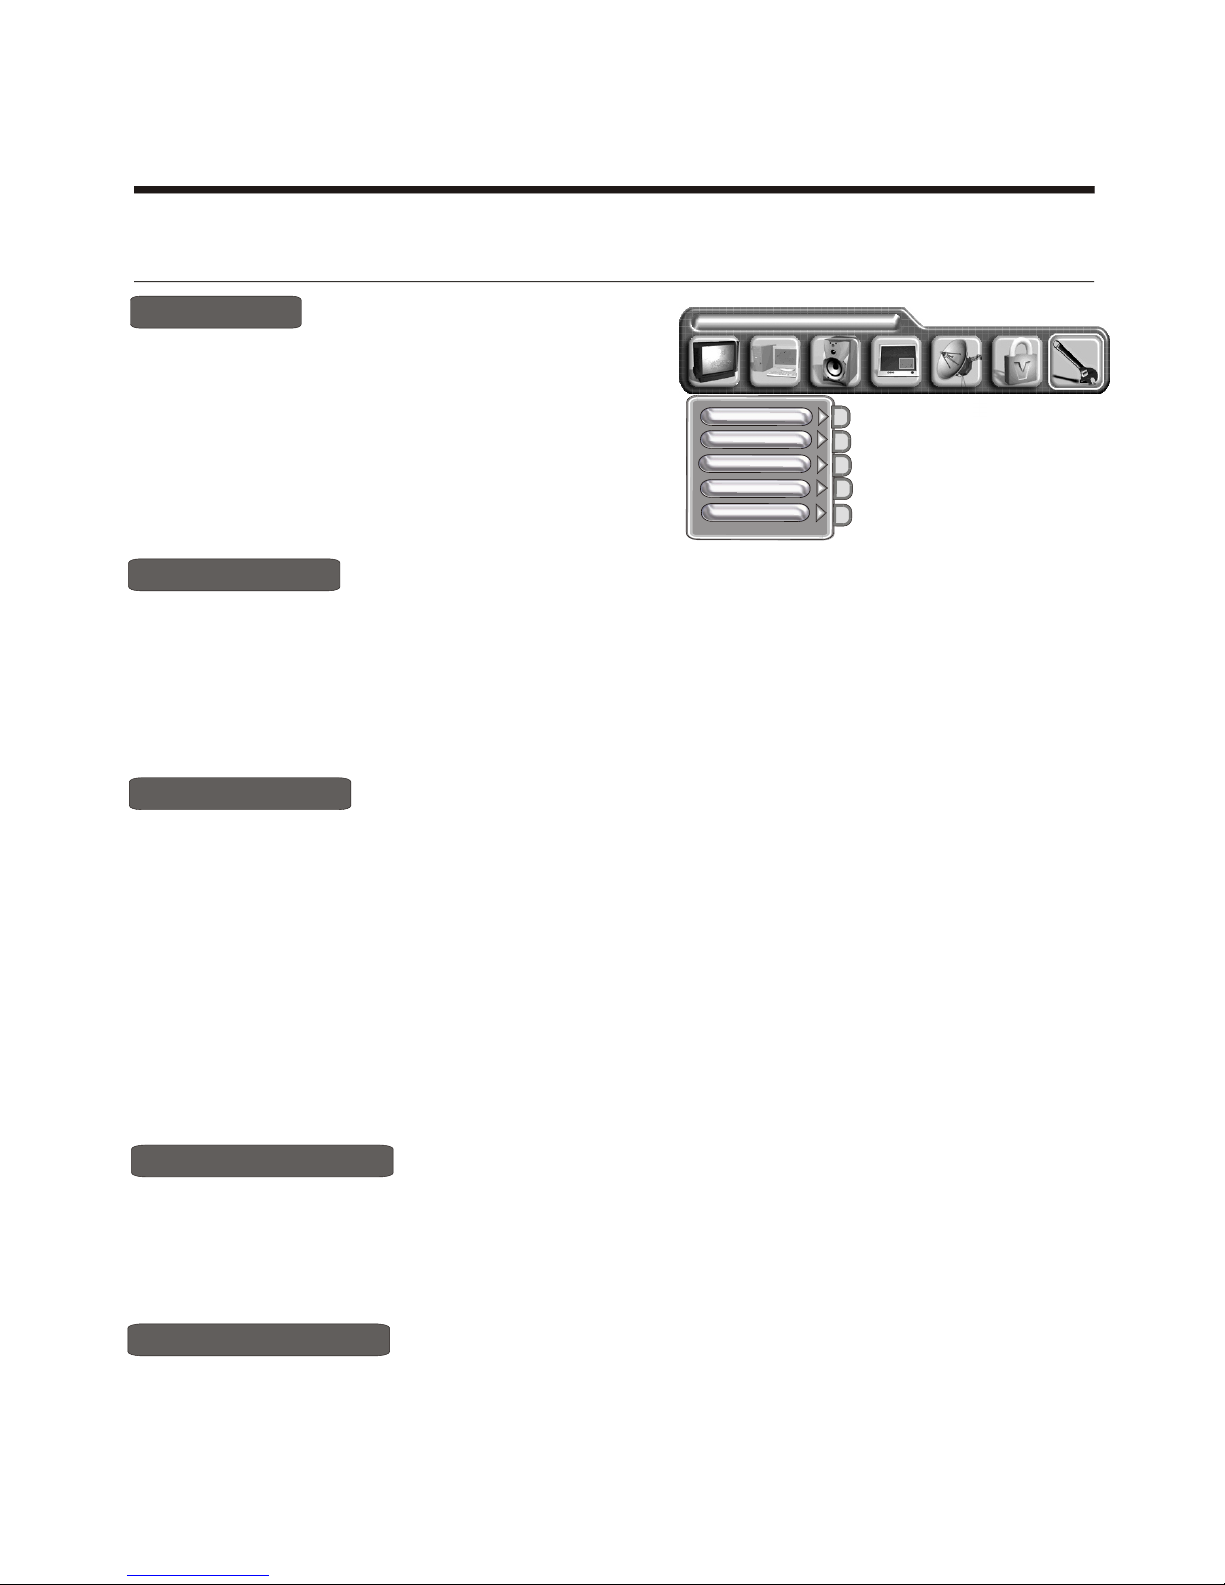
Using the General settings menu
Language english
General settings
Colour system
Noise reduce
Factory reset
Sleep timer
Advance
You can set colour syetem.
1) Press the [MENU] button to enter the main menu.
2) Press the button to select the item
General settings
3) Press the button to select colour system and press
the [VOL+] button to enter colour system
4) Press the button to switch among Auto, Pal ,Secam.
[VOL+ or VOL-]
[VOL+ ]
[CH+ or CH-]
Colour system
Using the TV features
Page 21
- 21 -
Using the TV features
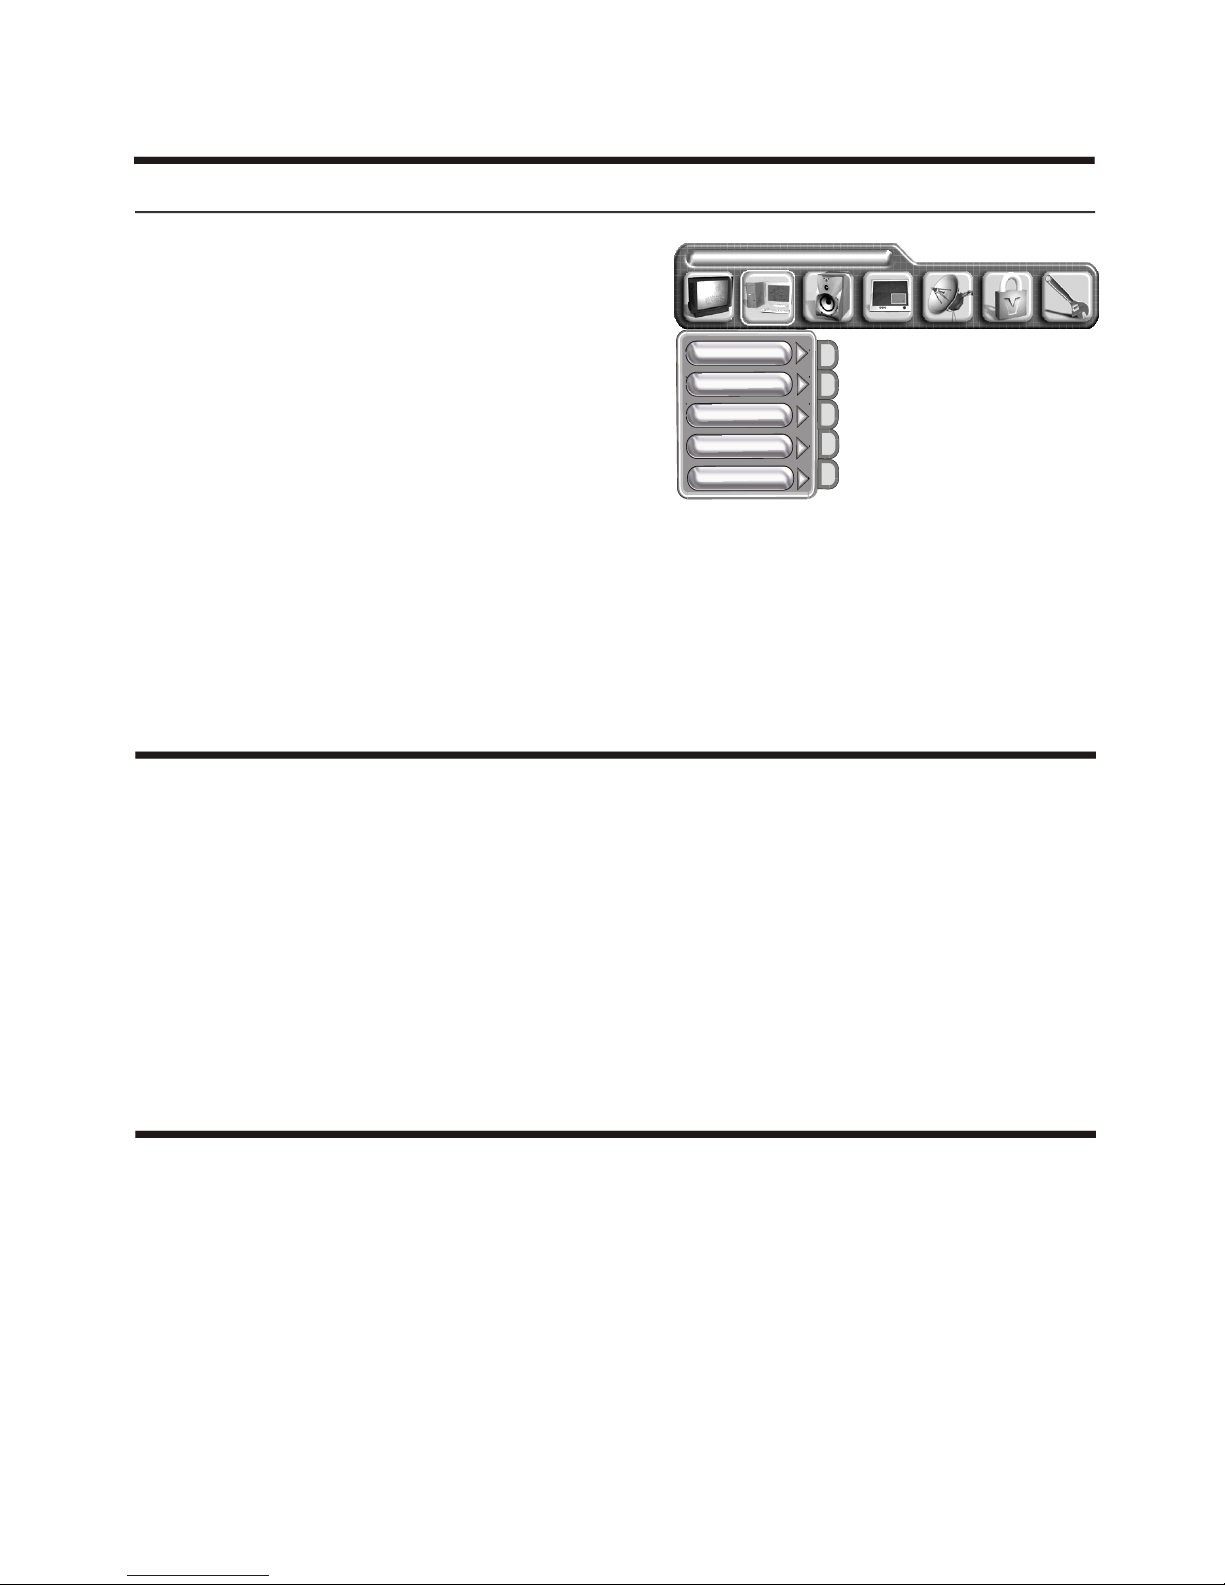
Using the PC menu
1) Press MENU button to enter the main menu.
2) Press [VOL+ or VOL-] button to select the item
PC Parameters.
3) Press [CH+ or CH-] button to select the item you
want to adjust.
NOTE: 1)The menu is useful only on VGA/DVI and HDTV mode.
It is useless in others mode.
2)
The button [AUTO] is used to adjust position of picture
automatic and it is effective
The button [
The button [CLOCK] and [PHASE] can be use to adjust for best
only on VGA/DVI mode.
AUTO COLOUR] is used to adjust quality
of picture manually when signal is not good sometimes.
The button [POSITION] is used to adjust the position of
picture.
quality picture.
LANGUAGE ENGLISH
Auto
Clock
Phase
Position
PC Parameters
I/p info
3) In HDTV mode ,Clock can not be select.
4) In DVI mode, I/P info can be select only.
WARNING: Do not try to remove the cabinet back. Refer servicing to qualified service technicians.
To clean the TV screen:
1) Unplug the TV to avoid possible shock hazard.
2) Use a clean cellulose sponge or chamois cloth dampened with a solution of mild detergent and warm
water to clean the TV screen and trim. Do not use too much water as water spilled into the cabinet
can cause damage to the TV.
3) Wipe off any excess moisture with a clean dry cloth.
4) Polish the cabinet with a quality furniture polish to maintain the finish and appearance of the cabinet.
Caution: Never use strong solvents such as thinner, benzene, or other chemicals on or near the cabinet.
These chemicals can damage the finish of the cabinet.
Cleaning and care
Appendix
MADI: (Motion Adaptive De-Interlacing)The areas that are not moving in an image will be fully static (flicker free) and the
objects that are moving will have smooth edge.
DCDi: Edge correction, to reduce jagged edge and visible artifact which result in a smooth and nature looking image.
Interpolation: (LADI: Low Angle Diagonal Interpolation) further enhancement for diagonal moving image.
CCS: Cross Colour Suppressor: removes cross colour artifacts in composite video signals due to poor Y/C separation in
Standard 2D video decoder, enable 3D-type performance.
Page 22
Troubleshooting
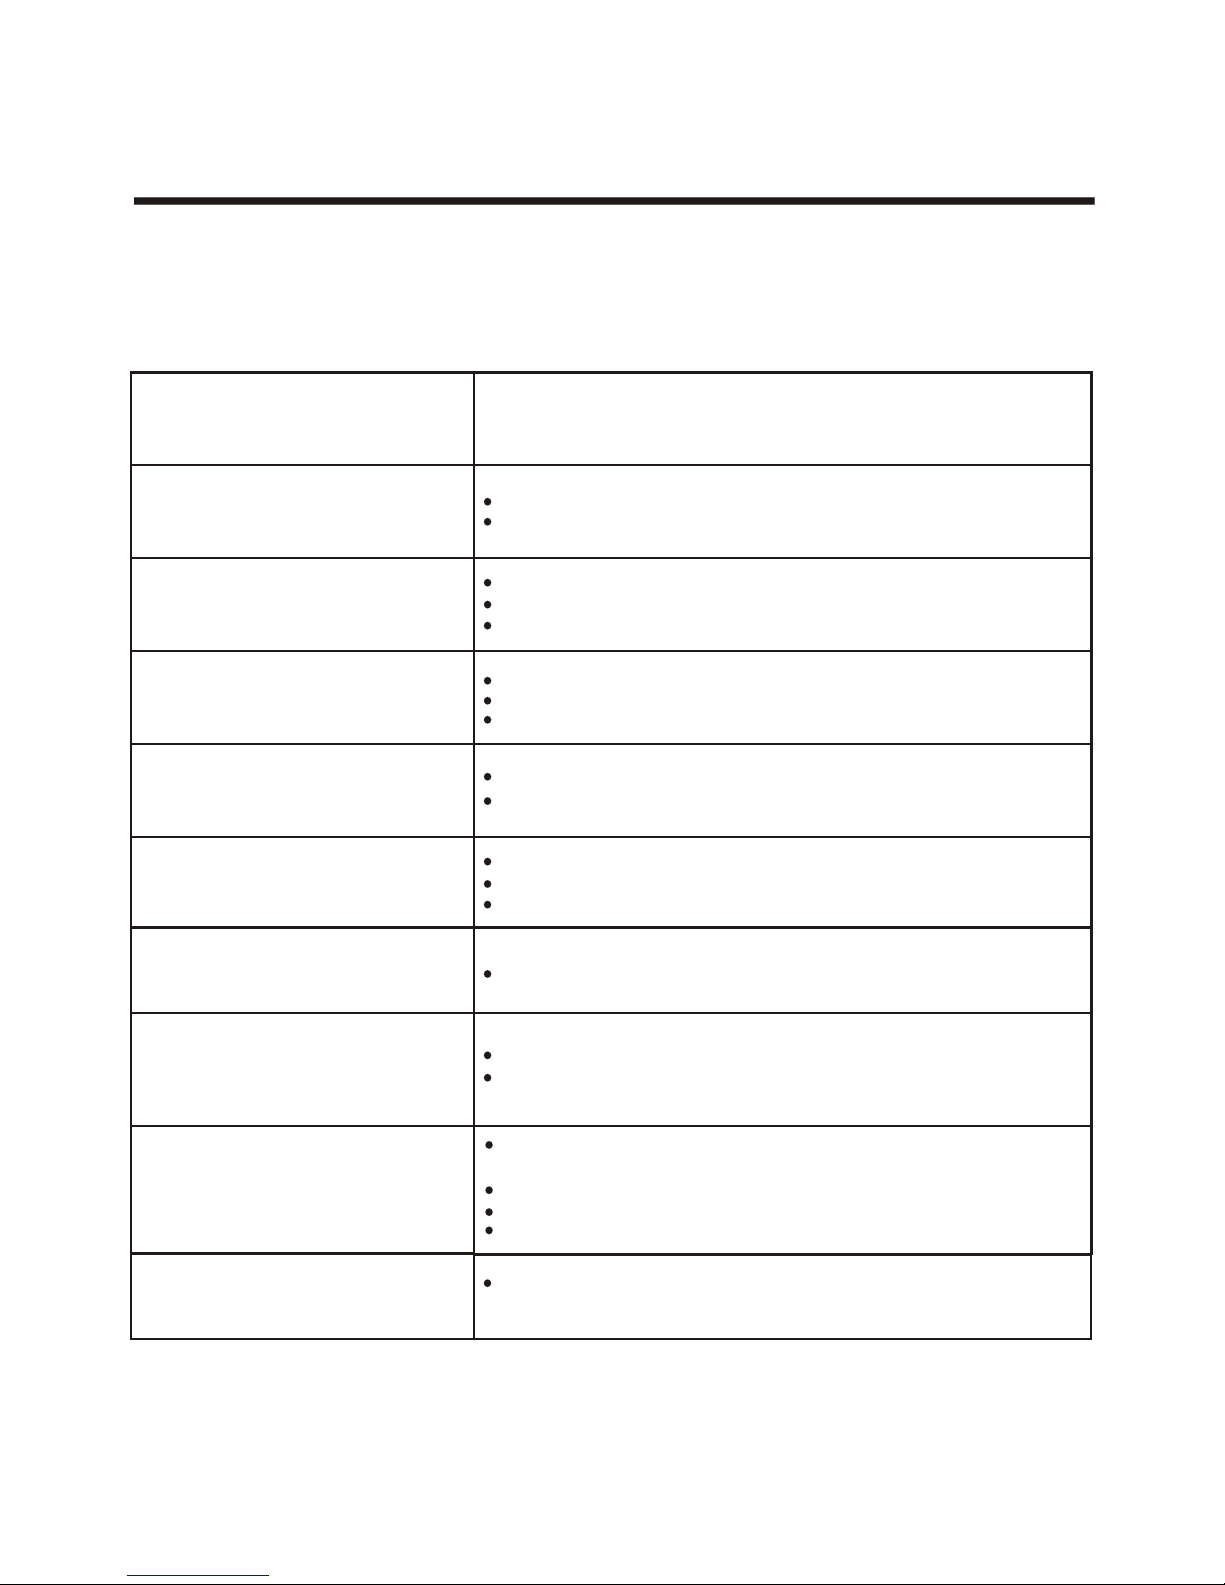
Before calling a service technician, please check the following table for a possible cause of the problem and
some solutions.
Symptoms
Possible Solutions
TV will not turn on
No picture, no sound
No sound, picture OK
Poor sound, picture OK
Poor picture, sound OK
Unable to select a certain channel
Poor colour or no colour
The remote control does not operate
Make sure the power cord is plugged in, then press [Power].
The remote control batteries may be dead. Replace the batteries.
Check if you have set the off timer.
Check the antenna/cable connections.
Press [Display] to see if you have select the right signal source.
The sound may be muted. Press on the remote control or .
The station may have broadcast difficulties. Try another channel.
[ >]
The station may have broadcast difficulties. Try another channel
Check the antenna connections.
The station may have broadcast difficulties. Try another channel.
Adjust the picture from the menu.
The channel may be skipped. See SKIP on page 11.
The station may have broadcast difficulties. Try another channel.
Adjust the HUE and COLOUR in the menu.
There may be an obstruction between the remote control and the
remote control sensor.
The batteries may be installed with a wrong polarity.
The remote control batteries may be dead. Replace the batteries.
Appendix
Check the speakers cable connections.
Check the speakers cable connections.
Disorder display at power on
This may be caused by too short interval between power off and on.
Unplug the power and restart.
Check if you have entered Teletext mode. Press [ Text ] to quit.
- 22 -
Important notice: If for some reason the TV becomes none functional, please turn off the main power and restart.
Page 23
- 23 -
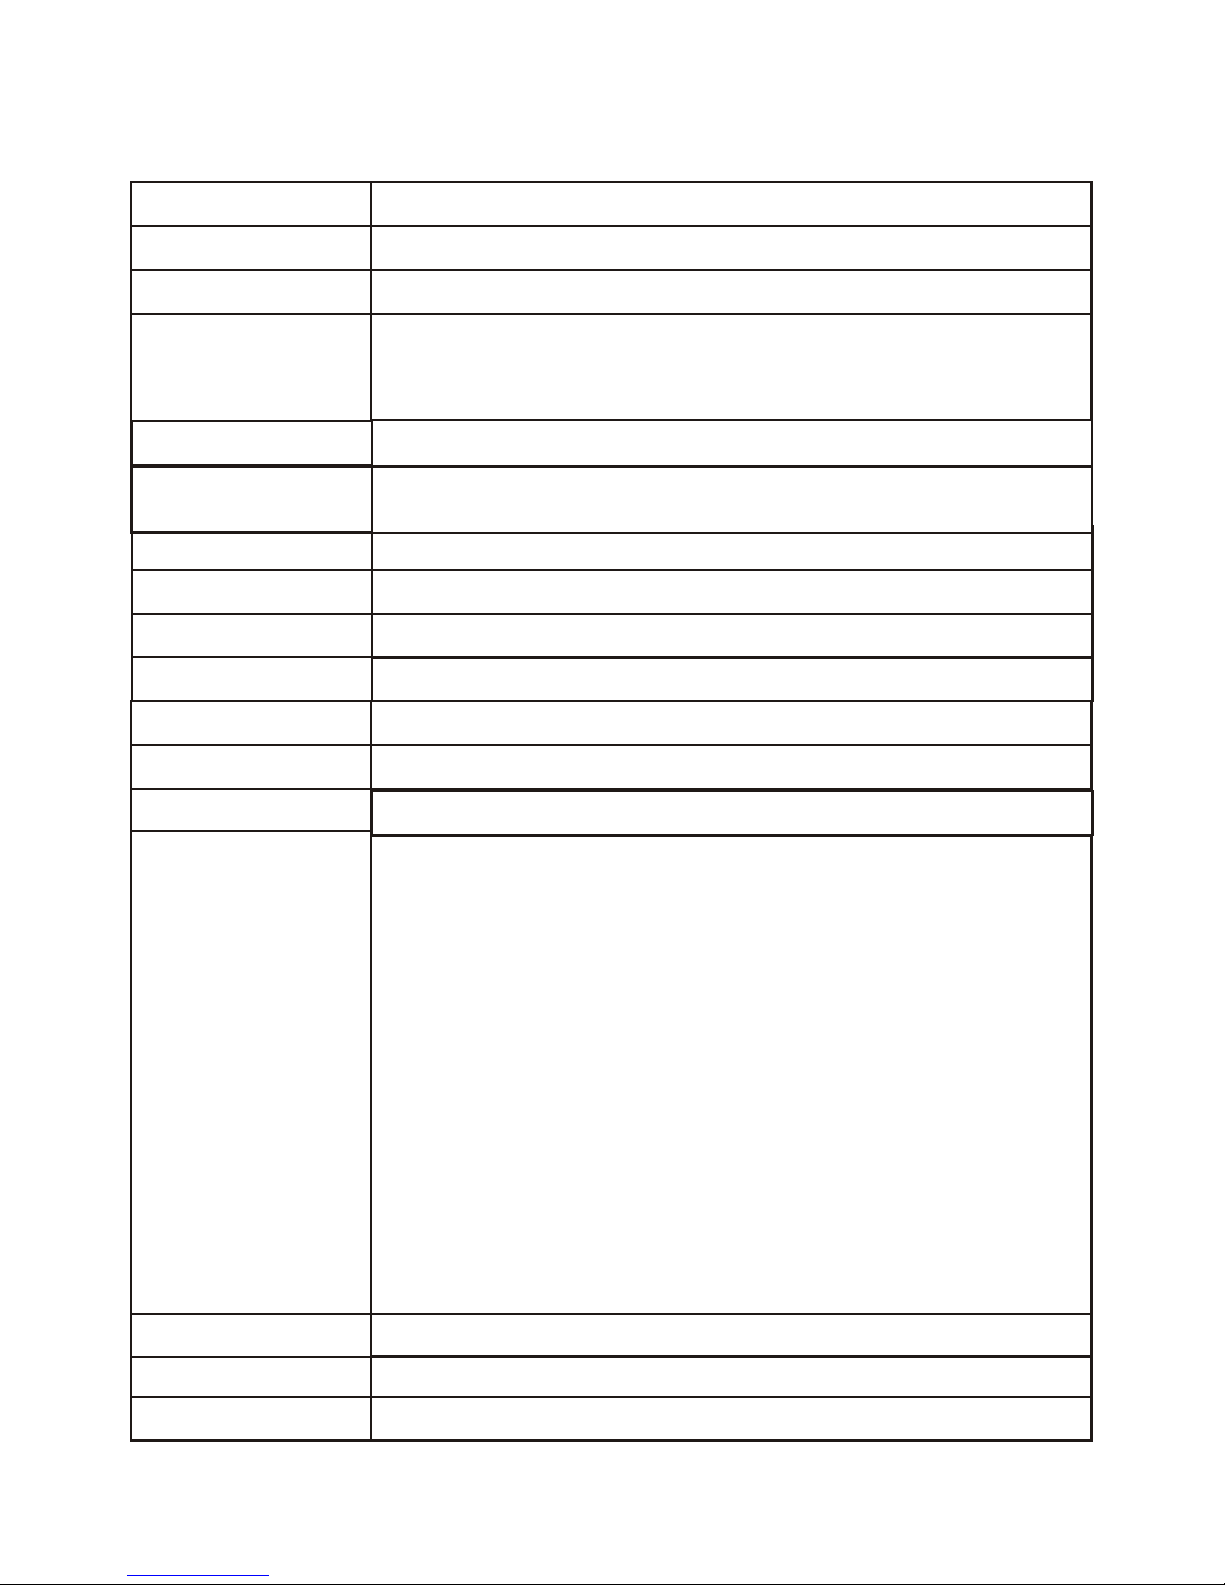
Specifications
Television system
Channel coverage
Multi- system(PAL,SECAM)
VHF-L: E2-S8
VHF-H: S9-S37
UHF: S38-E69
PLH4220SD
PDP panel
42 inch PDP
Power source
Power consumption
Audio output
Connection interface
Dimensions
AC100V--240V, 50/60Hz
280W
5W+5W
1242mm W, x 750mm H, X92mm D
Design and specifications are subject to change without notice.
Contrast
10000:1
Resolution
852x480
Brightness
2
1500cd/m
Viewing angle
oo
160 (H)/160 (V)
RF input: 1x 75 Ohms RF antenna input
VIDEO input: 1x AV input
1x S-Video input
1x Y PB PR input
GRAPHIC input: 1x Analog RGB 15pin(VGA) input
1x Digital RGB(DVI-D) input
AUDIO input: 1x AV audio
1x
PC/DVI audio
1x
S-video audio
1x Y PB PR audio
AUDIO output: 1x audio output
1x PIP audio output
Video output 1x video output
OTHER: 1x RS232C (for software updating )
Weight
35 kg
Supplied accessories
Remote control, AC Power cord, Batteries
Analog RGB mode
640x480/60Hz, 800x600/60Hz, 1024x768/60Hz, 1280x1024/60Hz
Y PB/CB PR/CR mode
480I/60Hz, 480P/60Hz, 576P/50Hz, 720P/50Hz, 720P/60Hz,
1080I/50Hz, 1080I/60Hz
7W+7W
Page 24

Warning Statements
WARNING: THE WALL STRUCTURE MUST BE CAPABLE OF
SUPPORTING AT LEAST FIVE (5) TIMES THE WEIGHT OF THE
PDPTV. IF NOT, THE WALL MUST BE REINFORCED. PROPER
INSTALLATION PROCEDURE BY A QUALIFIED INSTALLER, AS
OUTLINED IN THE INSTALLATION INSTRUCTIONS, MUST BE
ADHERED TO. FAILURE TO DO SO COULD RESULT IN SERIOUS
PERSONAL INJURY.
WARNING: SAFETY MEASURES MUST BE PRACTICED AT ALL
TIMES DURING THE INSTALLATION OF THIS PRODUCT. USE
PROPER SAFETY GEAR AND TOOLS FOR THE INSTALLATION
PROCEDURE TO PREVENT PERSONAL INJURY.
WARNING: PRIOR TO THE INSTALLATION OF THIS PRODUCT, THE
INSTALLATION INSTRUCTIONS SHOULD BE READ AND
COMPLETELY UNDERSTOOD. THE INSTALLATION INSTRUCTIONS
MUST BE READ TO PREVENT PERSONAL INJURY AND PROPERTY
DAMAGE. KEEP THESE INSTALLATION INSTRUCTIONS IN AN
EASILY ACCESSIBLE LOCATION FOR FUTURE REFERENCE.
Safety precautions must be taken at all times.
- Drill for installation environment only -
do not use a drill on the PDPTV or
the
PDPTV mount -and drill bit to match the hardware for your installation
environment (not included).
- A secure structure must support the weight, or load, of the
PDPTV. When
mounting to a wall that contains wooden studs, dead center of the wooden
stud must be confirmed prior to installation.
- Do not install on a structure that is prone to vibration, movement or chance
of impact. Failure to do so could result in damage to the
PDPTV and/or
damage to the mounting surface.
- Do not install near heater, fireplace, direct sunlight, air conditioning or any
other source of direct heat energy. Failure to do so may result in damage to the
PDPTV.
- At least two qualified people should perform the installation procedure.
Injury and/or damage can result from dropping or mishandling the
PDPTV.
- 24 -
Page 25

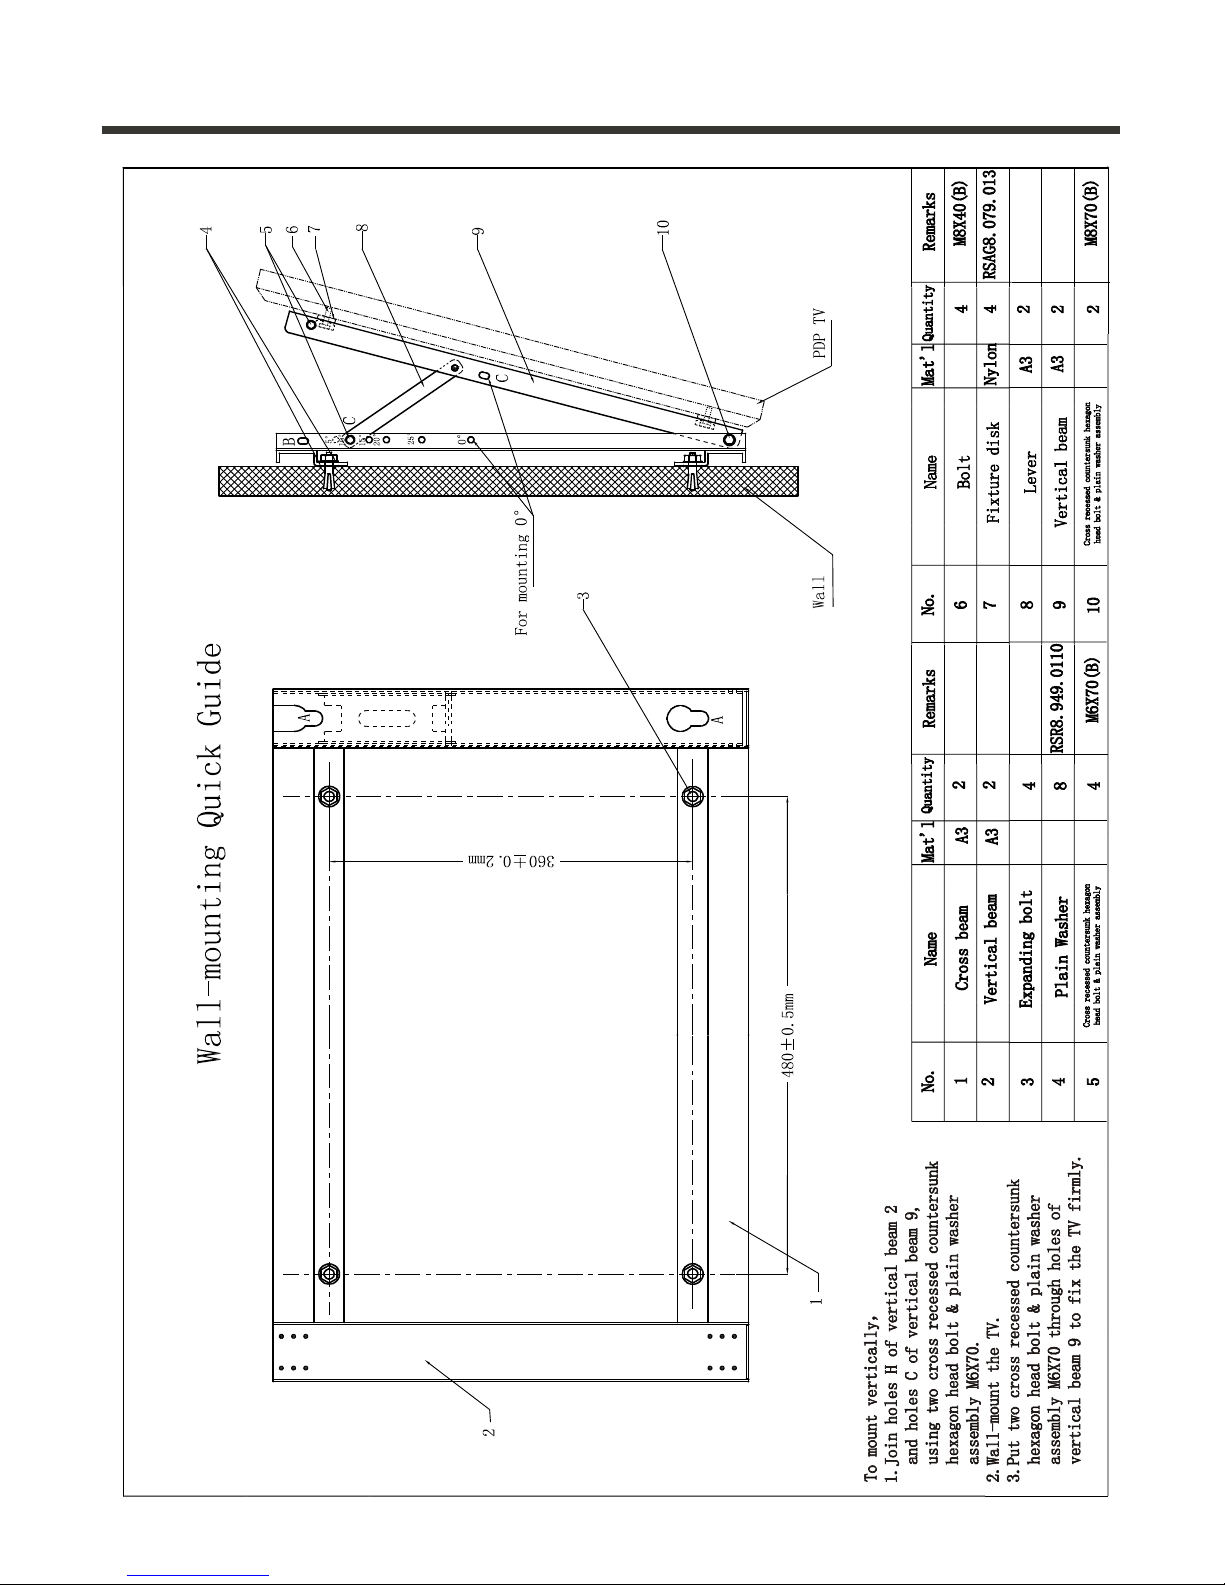
Optional PDP Wall-mounting Bracket Installation Guide
Read carefully before installation!
The installation guide should be retained for future reference.
Caution:
1. To avoid mistakes or hazards, do NOT attempt to install the TV by yourself. Refer all installation
to qualified servicing personnel.
2. Do NOT install the TV on a sloping wall that makes the TV screen slant over 25 degrees from the
vertical or it may tumble or cause injury.
3. The instructions in this guide must be followed to correctly install the TV.
4. It requires more than one person to install the TV.
5. Before installation, examine whether the wall conforms to the specifications and whether the
supplied parts can be fixed to it. The wall for mounting should sustain the weight of TV and
speakers, e.g. cement wall or brick wall. Do NOT attempt to install the TV on a flexible wall such
as sheetrock wall or plaster wall, unless the bolts are fixed on an area with standard building
rigidity which sustains the weight of the TV and speakers. If the rigidity of the wall can not be
measured, every mounting hole should sustain a frontal force of over 100N and a shearing force
of over 200N.
6. Use the specified electric drill and drill bit for drilling. The drilling holes should conform to the
specifications.
7. To avoid fire and shock, do NOT place a radiator, heater or humidifier below the installed TV.
8. The TV should be kept away from moisture, sensors and power line. The TV should be kept
away from impact and vibration.
9. Be sure that the power supply is disconnected before installation for fear of fire and shock.
Wall-mounting Installation Steps:
1. Take the brackets from the package, and check if there are serious defects (e.g. defective
junctures).
2. Adjust the bracket to the desired angle. Use the (bolt 5) to adjust the angle by joining the holes of
column beam 2 and holes of lever 8.
3. Drill locating holes of the specified dimension in a vertical wall of concrete or brick. The hole
size should be 11mm. The hole depth should accommodate the expanding tube of the bolt.
4. Fix the bolts into the drilled holes in step 3, and then cover each bolt with a metal washer. Join
the four mounting holes in the bracket to the four bolts in the wall, cover each bolt with a metal
washer, and then fasten with a screw nut. Check its rigidity by pulling the bracket.
5. Fix the fixture disk to the back cover of the TV using (bolt 6) 4x M8*40 bolts.
6. Wall-mount the TV by putting the four fixture disk into the four mounting holes A.
7. If the customer is not satisfied with the mounting angle, take down the TV and adjust the angle
before re-mounting.
8. After wall-mounting the TV, use bolts 5 to fix the fixture disk to avoid accidental slide.
Appendix
Page 26
Appendix
Page 27
TEAC CORPORATION
3-7-3, Nakacho, Musashino-shi, Tokyo 180-8550, Japan Phone: (0422) 52-5081
TEAC AUSTRALIA PTY.,
LTD.
A.B.N.: 11 113 998 048
HEAD OFFICE 30 Tullamarine Park Road, Tullamarine, VIC 3043 Phone : (03)8336 6500
SERVICE DIVISION
MELBOURNE, VIC 30 Tullamarine Park Road, Tullamarine, VIC 3043 Phone : (03)8336 6544
DANDENONG, VIC
32 Lonsdale Street, Dandenong, VIC 3175 Phone : (03)9791 9139
SYDNEY, NSW Unit 8, 20-22 Foundry Rd., Seven Hills, NSW 2147. Phone : (02)8811 4000
BRISBANE, QLD
335 Montague Road, West End, QLD 4101. Phone : (07)3010 0100
PERTH, WA 273 Great Eastern Highway, Belmont, WA 6104. Phone : (08)9479 6522
ADELAIDE, SA
Cnr. Sir D. Bradman & Marion Roads, Cowandilla, SA 5033. Phone : (08)8234 1044
E-mail
Website
http://www.teac.com.au
 Loading...