

Page 1

DVD/DVB-T Combo Player
DVS1000HD
Page 2

Page 3

WARRANTY PROCEDUR E
v1.5.2: DEC 2011
Please read the owner’s manual carefully and ens ure that you have followed the correct inst allation and operating
procedures.
1. Please read this warrant y card.
2. Keep your purc hase receipt to enable you t o proceed quickly in the event of a Warranty Service.
3. If you require Warrant y Service, please contact t he TEAC Customer Support H otline at 1300 553 31 5 for
assistance. Please ens ure that you have the mod el number, serial number and purch as
e receipt ready when
you call.
Please complete the secti on below and keep t his information for your own records.
Owner’s Name
Owner’s Address
Postcode
Model Name/No. S erial No.
Dealer’s Name
Dealer’s Address
Postcode
NSW
151 Arthur Street
Homebush West, NSW 2140
Queen slan d
Unit 1, 320 Curtin Ave W est
Eagle Farm, QLD 4009
Wester n Aus tr ali a
Unit 2, 50 Pilbara Str eet
Welshpool, W A 6106
Sout h Aus tr ali a
11 McInnes Street
Ridleyton, SA 5008
Vict or ia
282 Normanby Road
South Melbourne, VIC 3205
Thank you for selecting a TEAC product
.
If you should require assistance with your product regarding its setup
or operation, or if any difficulties arise, please call us directly for advice
between Monday to Friday at 8.30AM – 6PM AEST at the
TEAC Custom er Support Hotline
1300 553 315
www.teac.com.au
Page 4

WARRANTY INFOR MATION
v1.5.2: DEC 2011
Our go od s come wit h guaran tees th at canno t be e xclud ed under t he Aust ral ian Cons um er Law. You are
ent it led to a rep lac emen t or ref und for a maj or failu r e and for comp ensati on for any other reaso nably
for eseeable lo ss or dam age. You are als o ent it led t o have t he go ods r ep aire d o r rep laced if t he goo ds f ail
to be of accept able qu ali ty and th e fai lu re d oes no t am ount to a maj or fai lur e.
Warranty Terms & Conditi ons
1. TEAC warrants that this product is free f rom defects in material and workmanship under normal domestic us e with
reasonable care and skill. Maintenance and cleaning (i.e. laser head) is not covered by this warranty. The TEAC
warranty only applies to TEAC products purchased, us ed and serviced in Austr alia.
2. The benefits to the c onsumer given by this Warranty are in addit ion t o other rights and r emedie
s of the consumer
under a law in relation to goods or ser vices to which the warranty r elates, being the Australian Consumer Law.
3. Refund or r eplacement via your retailer is available for a p eriod of 14 days after purchase f or goods that have been
inspected and determined t o have a major failure. Refund and exchange is not applicable f or change of mind.
4. Subject to the terms herein, this warranty effectively c overs the equipment as sp
ecified in the Warranty Periods
Table below from the date of purchase.
TEAC PRODUCT
WARRA NTY PERIOD
LED/LCD TV 32” (80 cm) and above
1 Year (In-Home Service/ P ick up Available)*
All other TEAC products
1 Year (Carry-in Servic e)
5.
This service will only be provided as part of this warr anty if all the following conditions ar e met;
In Home Service/Pick up* Ser vice
a) The product is indicated in the Warranty P eriod Table.
b) The product is within th e warranty period.
c) The product is located within the n ormal service area of the local TEAC Authorised Servic e Centre.
If TEAC determines th at the product is not repairable on s ite, TEAC can c omplete the repair by taking the product to
a TEAC Authorised Service C entre.
Where In-Home servic e/Pick up* is not available, the purchaser is required to send th
e product to th e nearest TEAC
Authorised Ser vice Centr e for repair. In this event, proof of purchase is required to support a warranty claim. After
the repair, the product will be available for collection by or return t o the purchaser at a fee upon request. TEAC inhome service can be m ade available at a fee upon request.
Carry-in Service
6. A 12-month replacement w arranty is applic able to all Accessories su ch as Remote, Power Adapt ors and Cables.
7. TEAC will ensure to t he best of its abilities that all required parts are made available for any required service/r epair.
8. TEAC Australia Pty Ltd and its Authorised Service Centres will u se their b est endeavours t o complete p roduct
repairs within a reasonable p eriod based on a vailable res ources and workload during the time when
service is
requested and performed.
9. Refurbished parts may be used to r epair th e product. In the c ase of a replacement, the pr oduct m ay be replaced,
with a refurbish ed unit of the same type or, if one is unavailable, a similar refurbished model with equal or better
features & specific ations.
10. Please be ad vised that if the product present ed for r epair is capable of retaining user-gen erated data, the data may
be lost duri
ng servicing. Customers are strongly encour aged to back up all important information/data before
sending the product in f or service/repair.
11. Service will be provided only during normal business hours and under safety c onditions and circumstances. T EAC
and its authoris ed service agents can refuse any repair if safety, in relation to OH&S, b ecomes a conc ern to its staff
or authorised s ervice agents’ personnel.
12. The warranty is vo
id and warranty clai ms may be refused, s ubject to the Australian Cons umer Law, if:
a) The product was not tr ansported, installed, operat ed or maintained according to man ufacturer instruction, or
b) The product was abus ed, damaged, tamper ed, altered or repair ed by any unauthorised p ersons, or
c) Product f ailure is due t o accidents dur ing use, inst allation or transit, power surges, use of def ective or
incompatible external devices, e
xposure to abnormal c onditions suc h as excessive temperatur es or humidity, or
entry of liquids, objects or creatures int o the product.
13. No one is authorised to assume any liability on behalf of TEAC or imp ose any obligation on it, in c onnection with the
sale of any equipment other than as stated in this warranty and ou tlined above.
14. TEAC reserves the right to inspect and verify whether the product is exhibiting a major failure as c
laimed by
customers/retailers.
15. LCD dead pixel policy, please cont act TEAC Customer Support H otline on 1300 553 315 for assistance.
Page 5

TABLE O F CONTENT S
IMPORTANT SAFETY INSTRUCTIO NS -- -- -- -- -- -- -- -- -- -- -- -- -- -- -- -- -- -- -- -- -- -- -- -- -- -- -- -- -- -- -- -- - 1
ACCESSORIES-------------- -- -- -- -- -- -- -- -- -- -- -- -- -- -- -- -- -- -- -- -- -- -- -- -- -- -- -- -- -- -- -- -- -- -- -- -- -- -- ---- 2
FRONT AND REAR PANEL OVERVIEW---- -- -- -- -- -- -- -- -- -- -- -- -- -- -- -- -- -- -- -- -- -- -- -- -- -- -- -- -- -- -- -3
CONNECTION SETUP----------- -- -- -- -- -- -- -- -- -- -- -- -- -- -- -- -- -- -- -- -- -- -- -- -- -- -- -- -- -- -- -- -- -- -- -- -- -- 4
REMOTE CONTROL------------- -- -- -- -- -- -- -- -- -- -- -- -- -- -- -- -- -- -- -- -- -- -- -- -- -- -- -- -- -- -- -- -- -- -- -- -- -- - 5
Inserting Batteries-------- -- -- -- -- -- -- -- -- -- -- -- -- -- -- -- -- -- -- -- -- -- -- -- -- -- -- -- -- -- -- -- -- -- -- -- -- -- -- ---- 7
Using the Remote Control--------- -- -- -- -- -- -- -- -- -- -- -- -- -- -- -- -- -- -- -- -- -- -- -- -- -- -- -- -- -- -- -- -- -- -- -- 7
DVB (DI GITAL TV) MODE------- ------- ----------------- ------- ---------7
BASIC OPERATION AND SETTINGS- -- -- -- -- -- -- -- -- -- -- -- -- -- -- -- -- -- -- -- -- -- -- -- -- -- -- -- -- -- -- -- -- -- -7
Initial Setup and Channel Tuning----- -- -- -- -- -- -- -- -- -- -- -- -- -- -- -- -- -- -- -- -- -- -- -- -- -- -- -- -- -- -- -- -- -- 7
Program Settings----------- -- -- -- -- -- -- -- -- -- -- -- -- -- -- -- -- -- -- -- -- -- -- -- -- -- -- -- -- -- -- -- -- -- -- -- -- -- -- ---7
1. Program Edit------------ -- -- -- -- -- -- -- -- -- -- -- -- -- -- -- -- -- -- -- -- -- -- -- -- -- -- -- -- -- -- -- -- -- -- -- -- -- -- --7
2. Electronic Program Guide (EPG) -- -- -- -- -- -- -- -- -- -- -- -- -- -- -- -- -- -- -- -- -- -- -- -- -- -- -- -- -- -- -- -- - 9
3. Sort------------------ -- -- -- -- -- -- -- -- -- -- -- -- -- -- -- -- -- -- -- -- -- -- -- -- -- -- -- -- -- -- -- -- -- -- -- -- -- -- -------9
4. LCN (Logical Channel Number)---- -- -- -- -- -- -- -- -- -- -- -- -- -- -- -- -- -- -- -- -- -- -- -- -- -- -- -- -- -- -- -- 10
Picture Setting------------ -- -- -- -- -- -- -- -- -- -- -- -- -- -- -- -- -- -- -- -- -- -- -- -- -- -- -- -- -- -- -- -- -- -- -- -- -- -- --- 10
1. Aspect Ratio------------ -- -- -- -- -- -- -- -- -- -- -- -- -- -- -- -- -- -- -- -- -- -- -- -- -- -- -- -- -- -- -- -- -- -- -- -- -- -- -10
2. Resolution-------------- -- -- -- -- -- -- -- -- -- -- -- -- -- -- -- -- -- -- -- -- -- -- -- -- -- -- -- -- -- -- -- -- -- -- -- -- -- -- - 10
3. TV format------------- -- -- -- -- -- -- -- -- -- -- -- -- -- -- -- -- -- -- -- -- -- -- -- -- -- -- -- -- -- -- -- -- -- -- -- -- -- -- --- 10
Channel Search--------------- -- -- -- -- -- -- -- -- -- -- -- -- -- -- -- -- -- -- -- -- -- -- -- -- -- -- -- -- -- -- -- -- -- -- -- -- -- -1 0
1. Auto Search------------- -- -- -- -- -- -- -- -- -- -- -- -- -- -- -- -- -- -- -- -- -- -- -- -- -- -- -- -- -- -- -- -- -- -- -- -- -- -- -1 1
2. Manual Search------------- -- -- -- -- -- -- -- -- -- -- -- -- -- -- -- -- -- -- -- -- -- -- -- -- -- -- -- -- -- -- -- -- -- -- -- -- - 11
3. Country--------------- -- -- -- -- -- -- -- -- -- -- -- -- -- -- -- -- -- -- -- -- -- -- -- -- -- -- -- -- -- -- -- -- -- -- -- -- -- -- ---- 11
4. Antenna power------------- -- -- -- -- -- -- -- -- -- -- -- -- -- -- -- -- -- -- -- -- -- -- -- -- -- -- -- -- -- -- -- -- -- -- -- -- - 11
Time Setting--------------- -- -- -- -- -- -- -- -- -- -- -- -- -- -- -- -- -- -- -- -- -- -- -- -- -- -- -- -- -- -- -- -- -- -- -- -- -- -- --- 11
1. Time Offset----------- -- -- -- -- -- -- -- -- -- -- -- -- -- -- -- -- -- -- -- -- -- -- -- -- -- -- -- -- -- -- -- -- -- -- -- -- -- -- --- 11
2. Country Region------------ -- -- -- -- -- -- -- -- -- -- -- -- -- -- -- -- -- -- -- -- -- -- -- -- -- -- -- -- -- -- -- -- -- -- -- -- - 11
3. Time Zone--------------- -- -- -- -- -- -- -- -- -- -- -- -- -- -- -- -- -- -- -- -- -- -- -- -- -- -- -- -- -- -- -- -- -- -- -- -- -- -- 1 2
4. Sleep----------------- -- -- -- -- -- -- -- -- -- -- -- -- -- -- -- -- -- -- -- -- -- -- -- -- -- -- -- -- -- -- -- -- -- -- -- -- -- -- -- -- 12
Option Menu---------------- -- -- -- -- -- -- -- -- -- -- -- -- -- -- -- -- -- -- -- -- -- -- -- -- -- -- -- -- -- -- -- -- -- -- -- -- -- -- --12
1. OSD Language-------------- -- -- -- -- -- -- -- -- -- -- -- -- -- -- -- -- -- -- -- -- -- -- -- -- -- -- -- -- -- -- -- -- -- -- -- -- 12
2. Audio Language------------ -- -- -- -- -- -- -- -- -- -- -- -- -- -- -- -- -- -- -- -- -- -- -- -- -- -- -- -- -- -- -- -- -- -- -- -- 1 2
3. Subtitle Language--------- -- -- -- -- -- -- -- -- -- -- -- -- -- -- -- -- -- -- -- -- -- -- -- -- -- -- -- -- -- -- -- -- -- -- -- -- -1 2
4. Digital Audio------------- -- -- -- -- -- -- -- -- -- -- -- -- -- -- -- -- -- -- -- -- -- -- -- -- -- -- -- -- -- -- -- -- -- -- -- -- -- -- 12
System Menu---------------- -- -- -- -- -- -- -- -- -- -- -- -- -- -- -- -- -- -- -- -- -- -- -- -- -- -- -- -- -- -- -- -- -- -- -- -- -- -- -12
1. Parental Guidance--------- -- -- -- -- -- -- -- -- -- -- -- -- -- -- -- -- -- -- -- -- -- -- -- -- -- -- -- -- -- -- -- -- -- -- -- -- 1 2
2. Set Password------------ -- -- -- -- -- -- -- -- -- -- -- -- -- -- -- -- -- -- -- -- -- -- -- -- -- -- -- -- -- -- -- -- -- -- -- -- -- - 13
3. Factory Default--------- -- -- -- -- -- -- -- -- -- -- -- -- -- -- -- -- -- -- -- -- -- -- -- -- -- -- -- -- -- -- -- -- -- -- -- -- -- -- 1 3
4. Information----------- -- -- -- -- -- -- -- -- -- -- -- -- -- -- -- -- -- -- -- -- -- -- -- -- -- -- -- -- -- -- -- -- -- -- -- -- -- -- --- 13
PERSONAL VIDEO RECORDING (PVR) OP ER AT IO N- -- -- -- -- -- -- -- -- -- -- -- -- -- -- -- -- -- -- -- -- -- -- 1 3
PVR Configure-------------- -- -- -- -- -- -- -- -- -- -- -- -- -- -- -- -- -- -- -- -- -- -- -- -- -- -- -- -- -- -- -- -- -- -- -- -- -- -- - 13
Scheduled Recording/Viewing Using the E PG -- -- -- -- -- -- -- -- -- -- -- -- -- -- -- -- -- -- -- -- -- -- -- -- -- -- - 14
Schedule List-------------- -- -- -- -- -- -- -- -- -- -- -- -- -- -- -- -- -- -- -- -- -- -- -- -- -- -- -- -- -- -- -- -- -- -- -- -- -- -- -- -14
Time shift--------------- -- -- -- -- -- -- -- -- -- -- -- -- -- -- -- -- -- -- -- -- -- -- -- -- -- -- -- -- -- -- -- -- -- -- -- -- -- -- -------15
Playback/Recorded File List---- -- -- -- -- -- -- -- -- -- -- -- -- -- -- -- -- -- -- -- -- -- -- -- -- -- -- -- -- -- -- -- -- -- -- -- -1 5
USB MULTIMEDIA PLAYBACK AND SETTI NG S- -- -- -- -- -- -- -- -- -- -- -- -- -- -- -- -- -- -- -- -- -- -- -- -- -- -- 16
1.Music Playback------------ -- -- -- -- -- -- -- -- -- -- -- -- -- -- -- -- -- -- -- -- -- -- -- -- -- -- -- -- -- -- -- -- -- -- -- -- -- 16
2.Picture slide show---------- -- -- -- -- -- -- -- -- -- -- -- -- -- -- -- -- -- -- -- -- -- -- -- -- -- -- -- -- -- -- -- -- -- -- -- -- -1 6
3.Movie Playback------------ -- -- -- -- -- -- -- -- -- -- -- -- -- -- -- -- -- -- -- -- -- -- -- -- -- -- -- -- -- -- -- -- -- -- -- -- -- 17
Photo Setting------------ -- -- -- -- -- -- -- -- -- -- -- -- -- -- -- -- -- -- -- -- -- -- -- -- -- -- -- -- -- -- -- -- -- -- -- -- -- -- -- -17
Movie Configure------------ -- -- -- -- -- -- -- -- -- -- -- -- -- -- -- -- -- -- -- -- -- -- -- -- -- -- -- -- -- -- -- -- -- -- -- -- -- - 17
Page 6

DVD MOD E---------------- ------- ----------------- ------- ----------------- -18
SWITCHING BETWEEN DVB AND DVD MOD ES -- -- -- -- -- -- -- -- -- -- -- -- -- -- -- -- -- -- -- -- -- -- -- -- -- -- -- -1 8
DVD PLAYBACK--------------- -- -- -- -- -- -- -- -- -- -- -- -- -- -- -- -- -- -- -- -- -- -- -- -- -- -- -- -- -- -- -- -- -- -- -- -- -- -- -- -18
DVD MENU OPERATION----------- -- -- -- -- -- -- -- -- -- -- -- -- -- -- -- -- -- -- -- -- -- -- -- -- -- -- -- -- -- -- -- -- -- -- -- -- 1 8
Language Setup--------------- -- -- -- -- -- -- -- -- -- -- -- -- -- -- -- -- -- -- -- -- -- -- -- -- -- -- -- -- -- -- -- -- -- -- -- -- -- -- 1 8
Video Setup ----------------- -- -- -- -- -- -- -- -- -- -- -- -- -- -- -- -- -- -- -- -- -- -- -- -- -- -- -- -- -- -- -- -- -- -- -- -- -- -- --- 19
Audio Setup---------------- -- -- -- -- -- -- -- -- -- -- -- -- -- -- -- -- -- -- -- -- -- -- -- -- -- -- -- -- -- -- -- -- -- -- -- -- -- -- -----19
Rating Setup--------------- -- -- -- -- -- -- -- -- -- -- -- -- -- -- -- -- -- -- -- -- -- -- -- -- -- -- -- -- -- -- -- -- -- -- -- -- -- -- -- ---20
Misc Setup----------------- -- -- -- -- -- -- -- -- -- -- -- -- -- -- -- -- -- -- -- -- -- -- -- -- -- -- -- -- -- -- -- -- -- -- -- -- -- -- -------- 20
MP3/WMA/JPEG/MPEG4 DISC PLA YB AC K- -- -- -- -- -- -- -- -- -- -- -- -- -- -- -- -- -- -- -- -- -- -- -- -- -- -- -- -- -- -- 21
Edit Playlist-------------- -- -- -- -- -- -- -- -- -- -- -- -- -- -- -- -- -- -- -- -- -- -- -- -- -- -- -- -- -- -- -- -- -- -- -- -- -- -- ------- 21
PICTURE CD PLAYBACK---------- -- -- -- -- -- -- -- -- -- -- -- -- -- -- -- -- -- -- -- -- -- -- -- -- -- -- -- -- -- -- -- -- -- -- -- -- - 22
------------------------- -- -- -- -- -- -- -- -- -- -- -- -- -- -- -- -- -- -- -- -- -- -- -- -- -- -- -- -- -- -- -- 23TROUBLESHOOTI NG
SPE CI FICATIONS--------- -- -- -- -- -- -- -- -- -- -- -- -- -- -- -- -- -- -- -- -- -- -- -- -- -- -- -- -- -- -- -- -- -- -- -- -- -- -- -- -----24
Page 7

IMPOR TANT SAFE TY INSTR UCTIONS
1) Read these instructions.
2) Keep these instructions.
3) Heed all warnings.
4) Follow all instructions.
5) Do not use this device near water.
6) Clean only with dry cloth.
7) Do not block any ventilation openings, ins ta ll i n ac co rd an ce w it h th e in st ru ct io ns .
8) Do not install near any heat sources such as r ad ia to rs , he at r eg is te rs , st ov es , or o th er d ev ic es
(including amplifiers) that produ ce h ea t.
9) Do not defeat the safety purpose of th e po la ri ze d pl ug . If t he p ro vi de d pl ug d oe s no t fi t in to y ou r
outlet, consult an electrician for re pl ac em en t of t he o bs ol et e ou tl et . Pr ot ec t th e po we r co rd
from being walked on or pinched particu la rl y at p lu gs , co nv en ie nc e re ce pt ac le s, a nd t he p oi nt
where they exit from the device.
10) Only use attachments/accessor ie s sp ec if ie d by t he m an uf ac tu re r.
11) Unplug this device during lightning sto rm s or w he n un us ed f or l on g pe ri od s of t im e.
12) Refer all servicing to qualified serv ic e pe rs on ne l. S er vi ci ng i s re qu ir ed w he n th e de vi ce h as
been damaged in any way, such as when the power s up pl y co rd o r pl ug i s da ma ge d, l iq ui d ha s
been spilled or objects have fallen into th e de vi ce , th e de vi ce h as b ee n ex po se d to r ai n or
moisture, does not operate normal ly , or h as b ee n dr op pe d.
13) The AC power plug is used to disconnect the d ev ic e co mp le te ly f ro m po we r an d mu st b e
easily accessible at all times.
14) The ventilation should not be impeded b y co ve ri ng t he v en ti la ti on o pe ni ng s wi th i te ms , su ch
as newspapers, tablecloths, cur ta in s, e tc .
15) No naked flame sources, such as lighted c an dl es , sh ou ld b e pl ac ed o n th e de vi ce .
16) Take notice of the environmental aspe ct s of b at te ry d is po sa l.
17) Use this device in moderate climates.
18) The device shall not be exposed to dripping o r sp la sh in g an d th at n o ob je ct s fi ll ed w it h
liquids, such as vases, shall be placed o n th e de vi ce .
WAR NI NG : To reduce the risk of fire or electri c sh oc k, d o no t ex po se t hi s de vi ce t o ra in o r mo is tu re .
WAR NI NG : Do n ot e xp os e th e ba tt er ie s to e xc essive heat such as sunshine, fire or the like.
This symbol indicates that da ng er ou s vo lt ag es c on st it ut in g a ri sk o f el ec tr ic s ho ck a re
present within this unit.
This symbol indicates that th is p ro du ct u se s do ub le i ns ul at io n be tw ee n ha za rd ou s ma in s
voltage and user accessible par ts .
When servicing use only identical replace me nt p ar ts .
Plug the USB memory stick directly into t he u ni t in st ea d of u si ng U SB e xt en si on c ab le s in o rd er t o
avoid interference and failure during d at a tr an sf er .
The electrostatic loads may cause the d ev ic e to m al fu nc ti on . If t hi s ha pp en s, r es et t he d ev ic e.
1
Page 8

ACCES SORIES
Before installing the unit, please chec k th e co nt en ts o f th e pa ck ag e. T he p ac ka ge s ho ul d co nt ai n
the following items:
Remote Control User Manual
AAA Battery
Serial Number label
TEAC contact card
AV cables
Cables Brochure
1
2
3
4
5
6
7
Remote Control X1 p c
AAA Battery for the Remote Control X1 p ai r
User Manual X1p c
Serial Number label X 2 pcs
AV cables X 1pc
Cables Brochure X 1pc
TEAC contact card X 1pc
2
Page 9

FRONT A ND REAR PANEL OVERVIEW
Front panel
1
4
3
2
5
6
7
Rear panel
1. CABIN DOOR
2. POWER BUTTON
3. OPEN/CLOSE BUTTON
4. PLAY/PAUSE BUTTON
5.SENSOR
6.USB JACK
7. POWER
1
2
3
4
5
6
7
8
4
INRF
LOOPR
F
THROUGH
HDMI OUT
100-240 V~
50/60Hz
DVD/DVB- T COMBO PL AYER
MODEL: DVS 1000H D
100-240V ~ 50/60 HZ 15W
Made in Chin a
APN:
S/ N:
1. RF IN
2. RF LOOP THROUGH
3. HDMI OUT
4. VIDEO JACK(RCA)
5. Pr,Pb,Y JACK(RCA)
6. L/R AUDIO
7. COAXIAL
8. MAINS CABLE
3
Page 10

CONNE CTION SETUP
TV Ae rial
VCR
Pr
Pb
Com posit e
HDM I
YELL OW
VIDE O IN
(Audi o) (Vide o)
BASS
TREBLE
ECHO
DOWN UP
VOLUME
INPUT SELECTOR
MUTE
KARAOKE
CHANNEL
TEST
MODE
3 STEREO
PRO LOGIC
BYPASS
EXCITE
POWER
MIC
211
MIC VOL
2
MIC
Coaxial
4
INRF
LOOPR
F
THROUGH
HDMI OUT
100-240V~
50/60Hz
DVD/DVB-T COMB O PLAYER
MODEL: DVS1000 HD
100-240V~ 50/6 0HZ 15W
Madein Chi na
APN:
S/ N:
Please ensure that the power is completel y di sc on ne ct ed b ef or e ma ki ng o r ch an gi ng c ab le
connections. To connect the Set Top Box u ni t to y ou r te le vi si on , pl ea se u se a ny o ne o f th e me th od s
below:
a. For a basic connection from your S et T op B ox t o th e te le vi si on s et , us e th e Co mp os it e
Connection.
b. For a higher quality connectio n, u se t he C om po ne nt V id eo C on ne ct io n, c om bi ne d wi th
the Audio Connection.
c. For the highest quality connec ti on , us e a HD MI c on ne ct io n.
To connect to an amplifier, plug one end of a coa xi al a ud io c ab le i nt o th e co ax ia l di gi ta l au di o
socket on the unit and plug the other end into th e ma tc hi ng s oc ke t on y ou r au di o re ce iv er . Th is
feature is only available for amplifier s eq ui pp ed w it h co ax ia l di gi ta l au di o in pu t co nn ec to rs .
To connect to a DVD recorder or VCR, use the AV c ab le s to c on ne ct t he e xt er na l DV D re co rd er o r
VCR to the AV output jacks on the rear panel of t he u ni t.
Note:
· While HDMI is connected, the Compos it e Co nn ec ti on w il l no t be a ct iv e.
4
Page 11

REMOT E CONTROL
5
1 2 3
4 5 6
7 8 9
0
VOL
+
VOL
-
CH+
CH-
GOTO
STANDBY
SLOW
RETURN/EXIT
TIMER LIST
RECOR D LIST
SETUP SOURCE
INFO
TV/RADIO
FAVORITEEPG
REPEAT A-B
MENU ANGLE
TITLE/TTX AUDIO
SUBTITLE
OK
P/N
DVS1000HD
MUTE
SCAN/S KIP FO RWARD
STOP
REC
SCAN/SKIP BAC K
EJECT
1
2
3
4
5
6
7
8
9
10
11
12
13
14
15
16
17
18
19
20
21
22
23
24
25
26
27
28
29
30
31
32
1. RECORD LIST
2. MUTE
3. PLAY/PAUSE
4. SCAN/SKIP FORWARD
5. STOP
6. EJECT
7. SOURCE
8. CH+/- or UP/DOWN
9. COL+/- or LEFT/RIGHT
10. RETURN/EXIT
11. SLOW
12. GOTO
13. Number Keys
14. AUDIO
15. SUBTITLE
16. MENU
17. ANGLE
18. P/N
19. TV/RADIO
20. STANDBY
21. TIMER LIST
22. SCAN/SKIP BACK
23. REC
24. SETUP
25. OK
26. INFO
27. TITLE/TTX
28. PROGRAM
29. A-B
30. REPEAT
31. EPG
32. FAVOURITE
Page 12
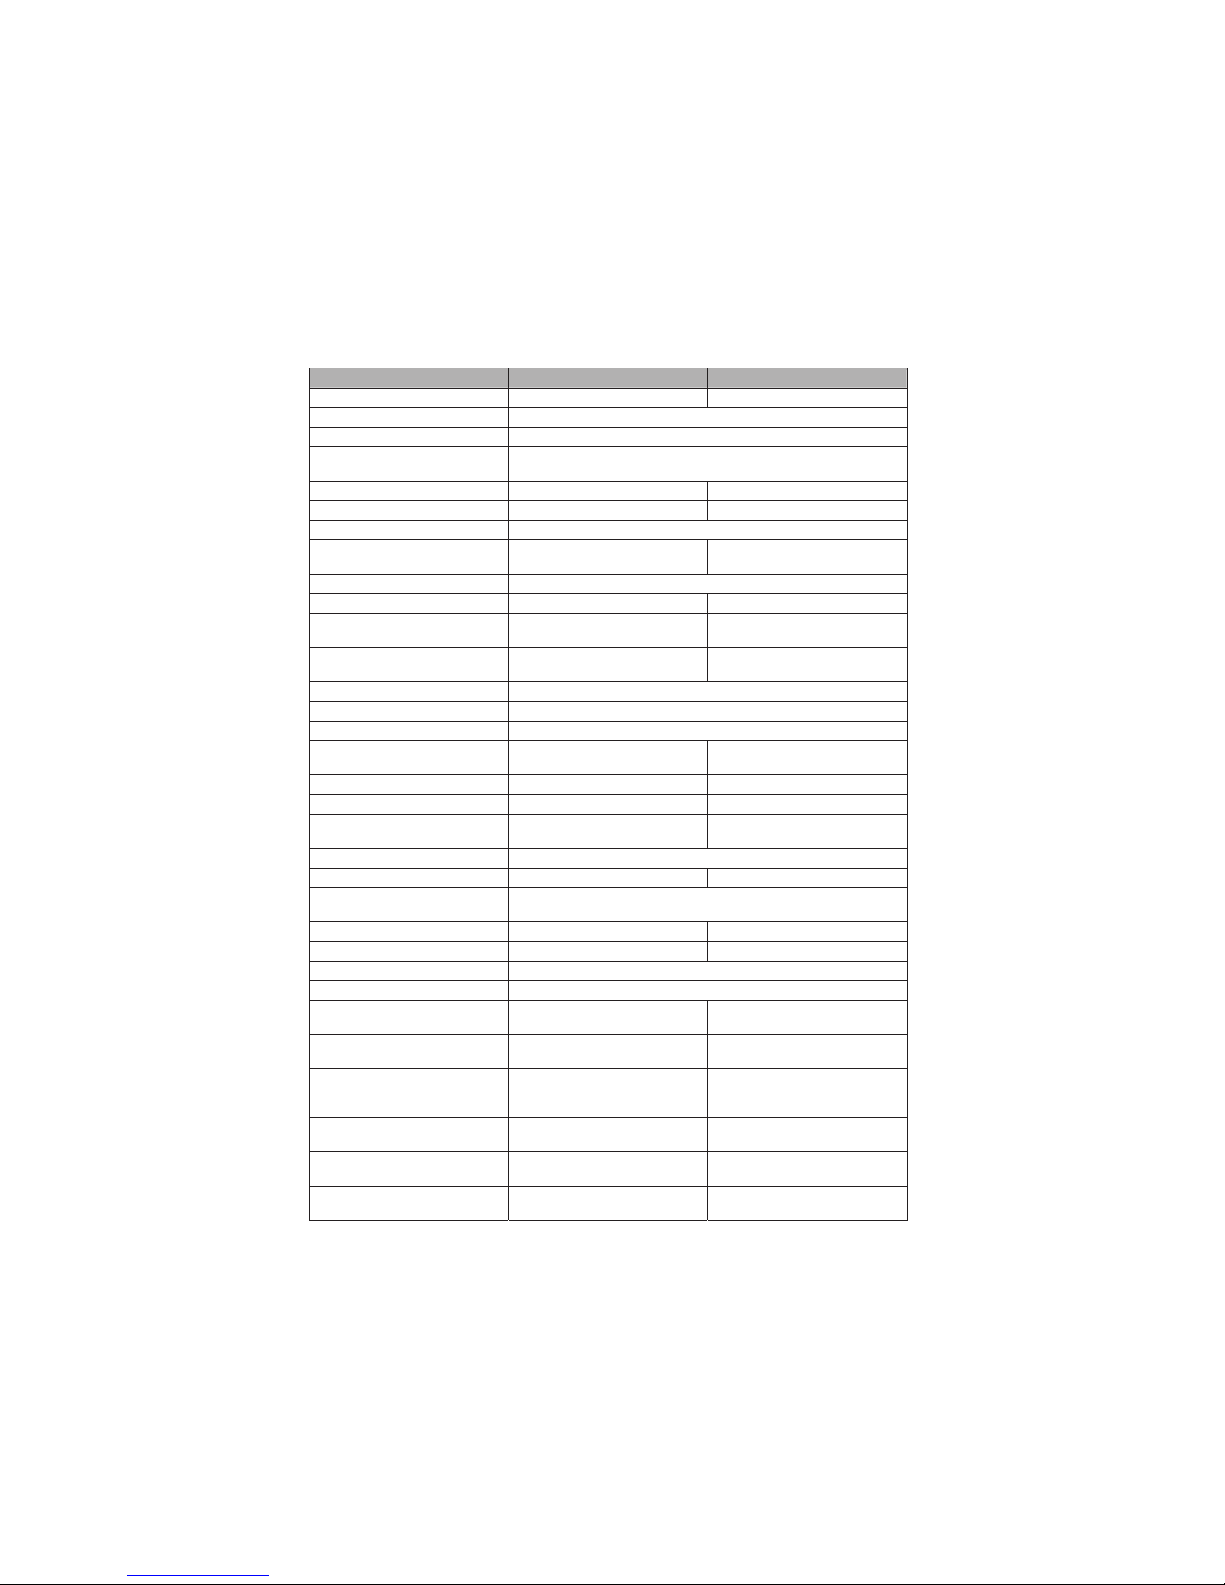
Button Functions
BUTTON DVB MODE DVD MODE
1. RECORD LIST
Display Recorded File List -
2. MUTE
Silence audio output. Press again or press Vol+/- to unmute
3. PLAY/PAUSE
Start or pause file/DVD playback
4. SCAN/SKIP FWD
Tap once to skip to next track. Press and hold to fast forward. For
different speeds up to 16x, repeat this motion.
5. STOP
Stop recording or playback Stop playback
6. EJECT
- Open/close disc tray
7. SOURCE
Switch between DVB and DVD mode
8. CH+/- or UP/DOWN
Change TV channels or
navigate menus
Navigate menus
9. VOL+/- or LEFT/RIGHT
Change volume or navigate menus
10. RETURN/EXIT
Exit menus -
11. SLOW
- Slow motion video playback,
Press again for different speeds
12. GOTO
Jump to a specified time in the
current video/audio track
Jump to a specific track in the
disc
13. Number Keys
Key in numbers for channel changing or certain menu settings
14. AUDIO
Select available audio tracks
15. SUBTITLE
Select available subtitles
16. MENU
- Display last DVD submenu or
file browser
17. ANGLE
- Select available camera angles
18. P/N
Select picture resolutions Zoom in/out
19. TV/RADIO
Switch between TV and Radio
channels
-
20. STANDBY
Turn the unit on/off Standby Mode
21. TIMER LIST
Display Schedule List -
22. SCAN/SKIP BACK
Tap once to skip to previous track. Press and hold to fast rewind.
For different speeds up to 16x, repeat this motion.
23. REC
Start recording TV program -
24. SETUP
Access DVB settings menu Access DVD settings menu
25. OK
Confirm a selected setting, or play a selected channel/file
26. INFO
Show/hide detailed information on currently playing media
27. TITLE/TTX
Display Teletext (subject to
availability from broadcaster)
Display main (root) DVD menu
(subject to availability on DVD)
28. PROGRAM
- Program a playlist for DVD
tracks by Title and Chapter
29. A-B
- Press during playback to set
points A and B for looping
playback
30. REPEAT
- Toggle Repeat modes: Single,
Folder, Off
31. EPG
Display the Electronic Program
Guide (EPG)
-
32. FAVOURITE
Display your Favourite Channel
List
-
6
Page 13

Note:
· In order to operate any of the remote con tr ol f un ct io ns , th e Se t To p Bo x mu st b e po we re d on .
· When changing between DVB and DVD modes, th e Se t To p Bo x wi ll t ak e a fe w se co nd s to r eb oo t.
Inserting Batteries
Remove the battery cover from the rear of t he R em ot e Co nt ro l an d pl ac e tw o AA A si ze b at te ri es
inside the compartment. Please make s ur e th at t he b at te ry p ol ar it ie s ma tc h th e po la ri ty m ar ki ng s as
marked in the compartment.
Using the Remote Control
To use the Remote Control, point it towar ds t he f ro nt o f th e Di gi ta l Se t To p Bo x as i ll us tr at ed i n th e
image below. The Remote Control has a range of up t o 7 me te rs f ro m th e Se t To p Bo x at a n an gl e of
up to 60 degrees.
Note:
· The Remote Control will not operate if it s pa th i s bl oc ke d.
· Direct sunlight or very bright light wi ll d ec re as e th e se ns it iv it y of t he R em ot e Co nt ro l.
DVB (DI GITAL TV) MODE
BASI C OP ERATI ON A ND SETTIN GS
Initial Setup and Channel Tun in g
After ensuring all connections are corr ec t an d se cu re , sw it ch o n th e po we r su pp ly a nd s wi tc h on t he
TV. Press the Power button to switch on t he D ig it al S et T op B ox . If y ou a re u si ng t he r ec ei ve r fo r th e
first time or have restored the unit sett in gs t o Fa ct or y De fa ul t, t he I NS TA LL AT IO N GU ID E wi ll a pp ea r
on your TV screen.
OSD Language: Press the RIGHT /L EF T ke y to s el ec t a la ng ua ge
Country: Press the RIGHT/LE FT k ey t o se le ct y ou r co un tr y of r es id en ce
Channel: Search Press the RIGHT o r OK k ey t o be gi n Au to ma ti c ch an ne l se ar ch
Once channel tuning is complete, you can st ar t wa tc hi ng T V. I f no c ha nn el s we re f ou nd , pl ea se
check your external antenna setup. Fo r de ta il ed i ns tr uc ti on s on A ut o or M an ua l Ch an ne l Tu ni ng ,
please see the Channel Search section.
Note:
· Enable Antenna Power if an external act iv e an te nn a is c on ne ct ed b y ac ce ss in g th e Ch an ne l
Search menu.
Program Settings
First, press the SETUP button. To m an ag e yo ur T V ch an ne ls , ac ce ss t he P ro gr am t ab a nd n av ig at e
with the directional buttons. Select an o pt io n an d pr es s OK o r RI GH T to a dj us t th at s et ti ng . Pr es s th e
EXIT button to exit the Menu.
1. Program Edit
To edit channel preferences, enter th e Pr og ra m Ed it M en u. T hi s Me nu r eq ui re s a pa ss wo rd t o be
accessed. The default password is '0000 00 '. I f yo u ha ve l os t yo ur p as sw or d, u se t he M as te r un lo ck
password '888888'.
7
Page 14
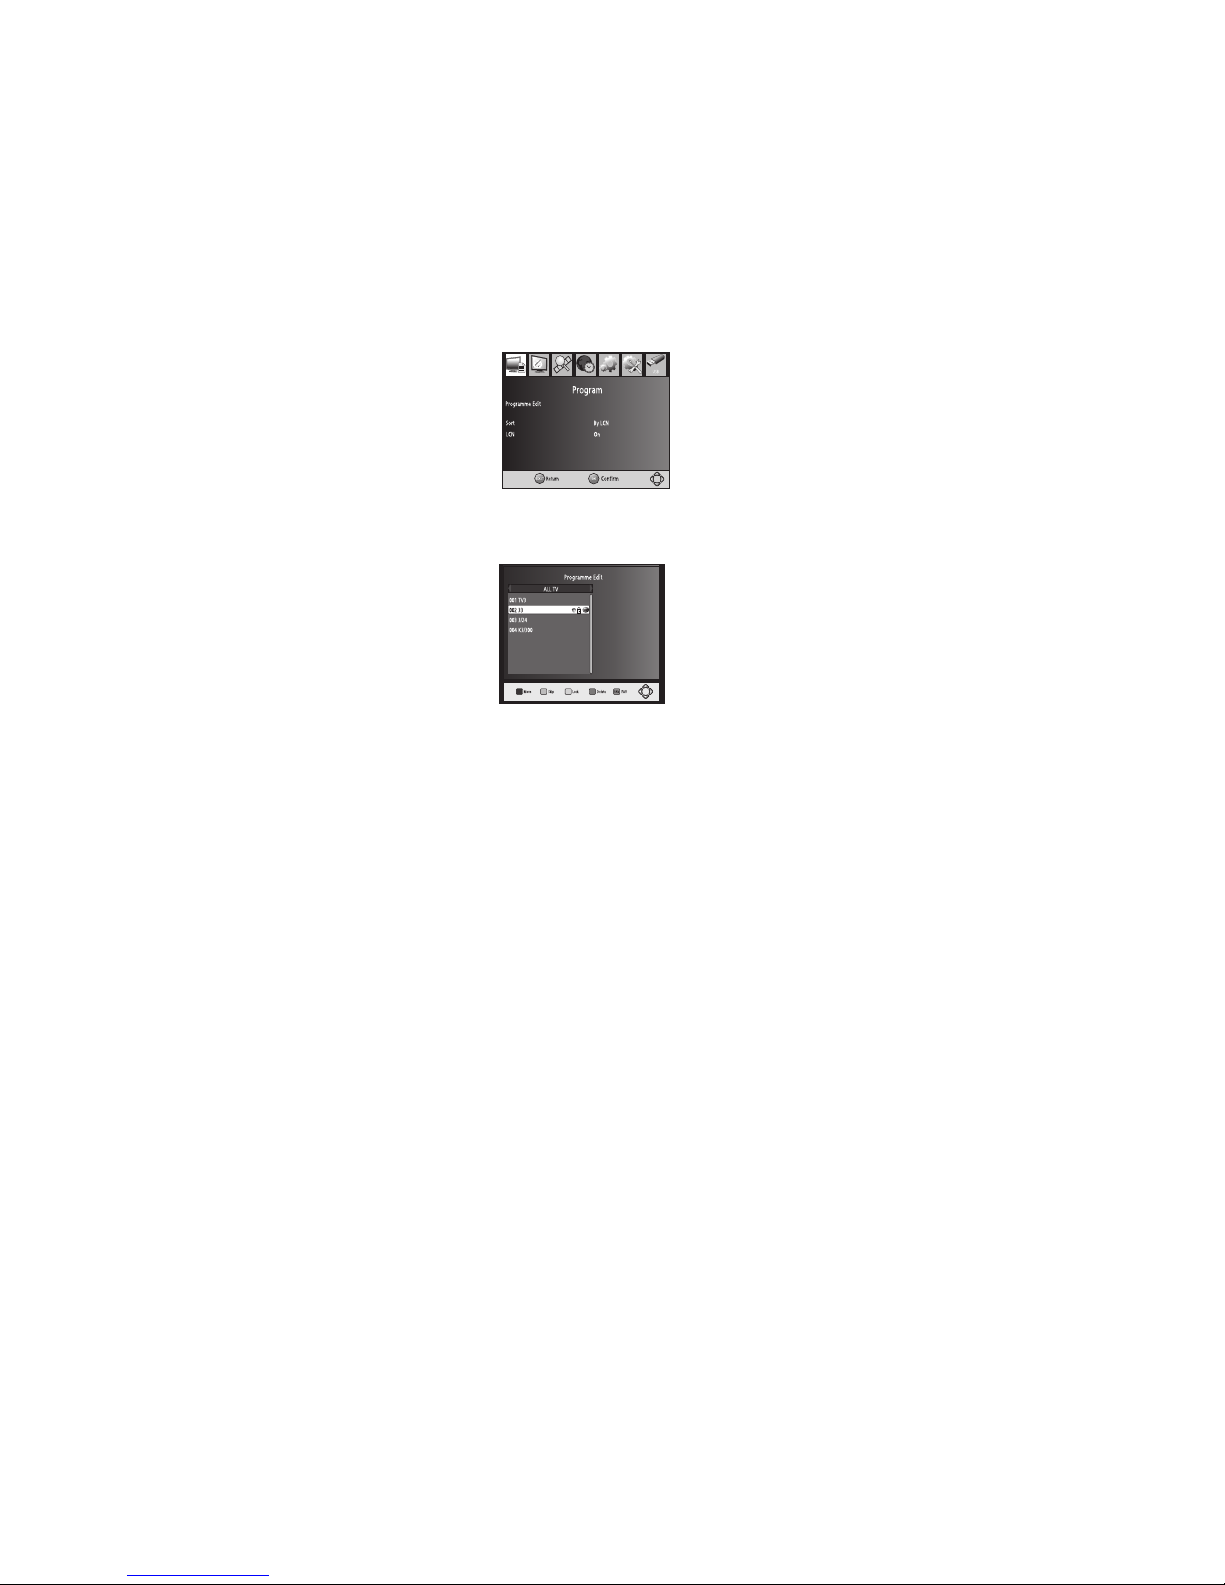
While in the Program Edit menu, follow th e hi nt s on t he b ot to m of t he s cr ee n to s el ec t ac ti on s fo r a
currently highlighted channel. Afte r yo u ha ve f in is he d ma ki ng c ha ng es , pr es s EX IT t o sa ve a nd q ui t
the menu. Available actions are describ ed b el ow .
EPG
Set a Favourite Channel:
Create a shortlist of favourite chann el s fo r ea sy a cc es s wi th t he se s te ps :
1. Select a preferred channel, and then pre ss t he F AV OU RI TE b ut to n.
2. A heart-shaped symbol will appear and th e ch an ne l is m ar ke d as a f av ou ri te .
3. Repeat the previous steps to list more F av ou ri te c ha nn el s.
To unlist a channel as a Favourite, selec t th at c ha nn el a nd p re ss t he F AV OU RI TE b ut to n ag ai n.
Press the FAVOURITE button while watc hi ng T V to s ho w th e Fa vo ur it e ch an ne l li st .
Delete a TV or Radio Channel:
1. Select the channel to delete, and then pre ss t he B LU E bu tt on . A co nf ir ma ti on m es sa ge w il l ap pe ar .
2. Press OK to delete or EXIT to cancel the d el et io n.
3. Repeat the previous steps to delete mo re c ha nn el s.
Skip a TV or Radio Channel:
1. Select the channel to be skipped, and then p re ss t he G RE EN b ut to n. T hi s ch an ne l is m ar ke d wi th a
skip symbol and will be skipped during channel br ow si ng .
2. Repeat the previous step to skip more ch an ne ls .
To unlist a channel as a skipped channel, sel ec t th at c ha nn el a nd p re ss t he G RE EN b ut to n ag ai n.
Move a TV or Radio Channel:
1. Select the channel to be moved, and then pre ss t he R ED b ut to n. A m ov e sy mb ol w il l ap pe ar .
2. Press UP/DOWN to move the channel's po si ti on .
3. Press OK to confirm the new position .
4. Repeat the previous steps to move more c ha nn el s.
Lock a Channel:
Restrict access to specific channel s by s et ti ng a p as sw or d lo ck .
1. Select the preferred channel, and th en p re ss t he Y EL LO W bu tt on . A lo ck s ym bo l wi ll a pp ea r an d
the channel is now locked.
2.Repeat the previous steps to lock mor e ch an ne ls .
8
Page 15
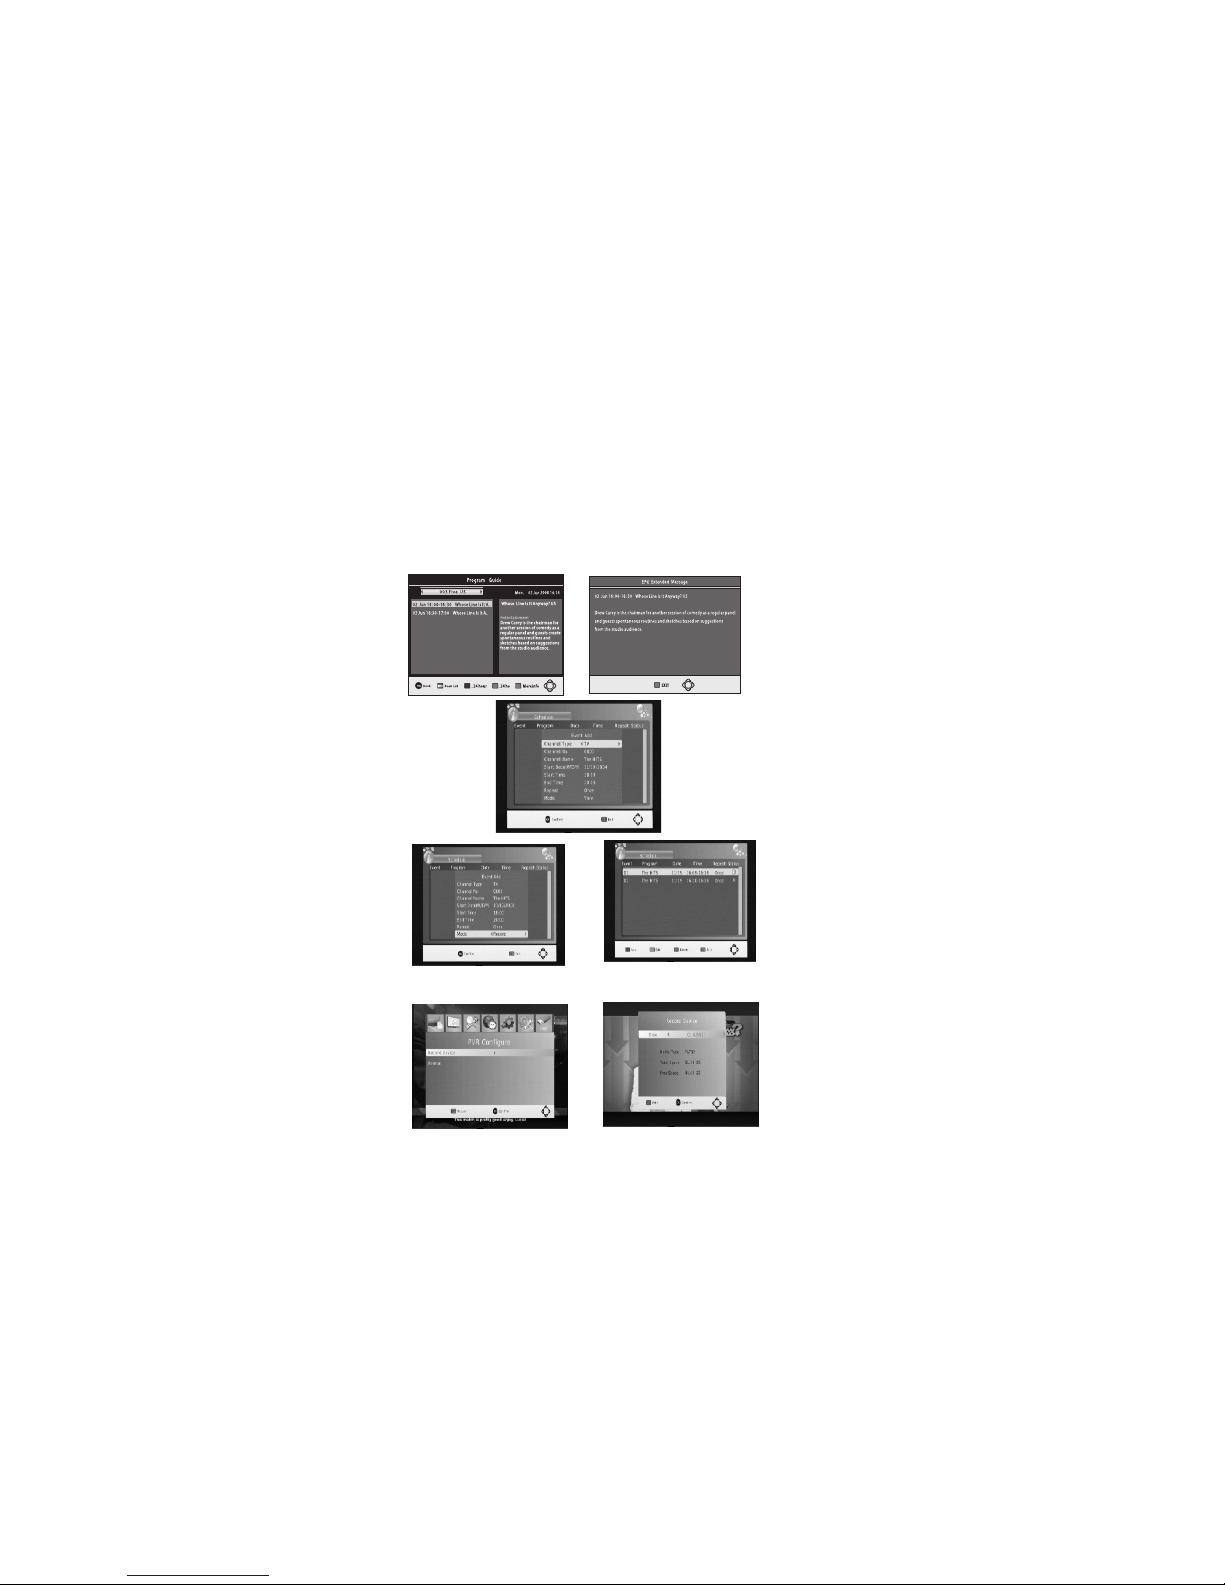
To remove a lock, select the locked chann el a nd p re ss t he Y EL LO W bu tt on a ga in .
The current password is required to view lo ck ed p ro gr am s. T he d ef au lt p as sw or d is ' 00 00 00 '. I f yo u
have lost your password, the Master unl oc k pa ss wo rd i s '8 88 88 8' .
2. Electronic Program Guide (EP G)
The EPG is an on-screen TV guide that shows s ch ed ul ed p ro gr am s se ve n da ys i n ad va nc e. P re ss t he
EPG button on the Remote Control while watc hi ng T V to a cc es s th e gu id e di re ct ly . EP G co nt ro ls w it h
the Remote Control are as follows:
LEFT/RIGHT button: Browse pre vi ou s/ ne xt c ha nn el s ch ed ul e
UP/DOWN button: Browse previous /n ex t pr og ra m on t he s ch ed ul e
GREEN button: Browse next day's sch ed ul e
RED button: Browse previous day's s ch ed ul e
BLUE button: View detailed program in fo rm at io n in f ul l sc re en
For instructions on recording from th e EP G, p le as e se e th e PV R se ct io n.
3. Sort
Sort channels using the following options :
LCN: Sort channels in ascending order
Name: Sort channels in alphabetical ord er
Service ID: Sort channels according t o th e st at io n ID
ONID: Sort channels according to ONID .
9
Page 16
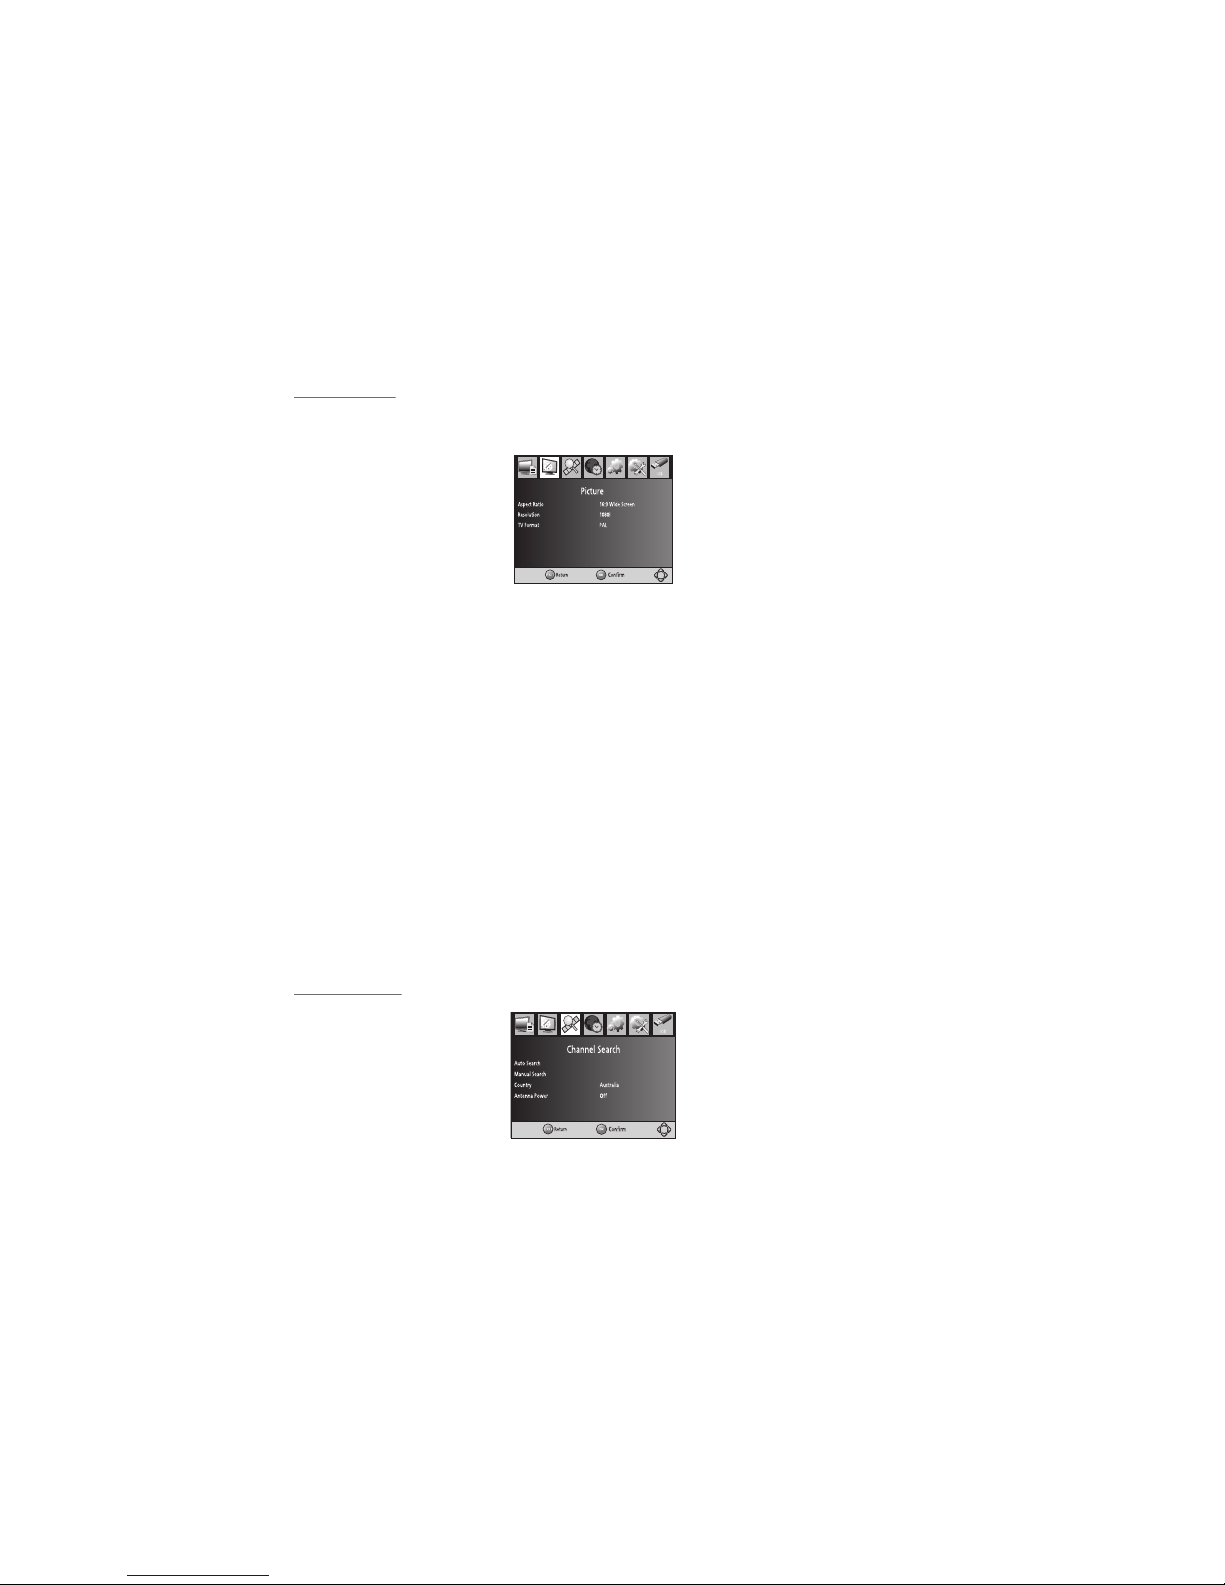
4. LCN (Logical Channel Number)
Set LCN on or off.
Picture Setting
First, press the SETUP button. Acce ss t he P ic tu re S et ti ng m en u by n av ig at in g to t he P ic tu re t ab w it h
the LEFT/RIGHT buttons. Press U P/ DO WN t o se le ct a n op ti on a nd p re ss O K or R IG HT t o ad ju st t ha t
setting. Press the EXIT button to e xi t th e Me nu .
1. Aspect Ratio
Change this setting if the picture does not a pp ea r to f it t he s cr ee n co rr ec tl y.
AUTO: This setting will automat ic al ly s el ec t th e be st r at io t o ma tc h th e br oa dc as t
picture with your TV.
The following choices are also availabl e: 4 :3 F ul l, 4 :3 P an & Sc an , 4: 3 Le tt er B ox ,
16:9 Wide Screen.
Note: Press the YELLOW button in TV vie wi ng m od e to c yc le t hr ou gh a sp ec t ra ti o.
2. Resolution
Change this setting if the picture reso lu ti on d oe s no t ap pe ar t o be c or re ct .
This setting is to match the most commo n se tt in gs i f a HD MI c or d is u se d.
480P: for NTSC system TV.
576i: for PAL system TV.
576P: for PAL system TV.
720P: for NTSC or PAL system TV.
1080i: for NTSC or PAL system TV.
3. TV format
If the picture does not appear correctl y, y ou n ee d to c ha ng e th e se tt in gs . Th is s ho ul d ma tc h th e mo st
common setting for TVs in your country.
NTSC: for NTSC system TV.
PAL: for PAL system TV.
Channel Search
First, press the SETUP button. Acce ss t he C ha nn el S ea rc h me nu b y na vi ga ti ng t o th e Ch an ne l
Search tab with the LEFT/RIGHT butt on s. P re ss U P/ DO WN t o se le ct a n op ti on a nd p re ss O K or
RIGHT to adjust that setting. Press t he E XI T bu tt on t o ex it t he M en u.
10
Page 17
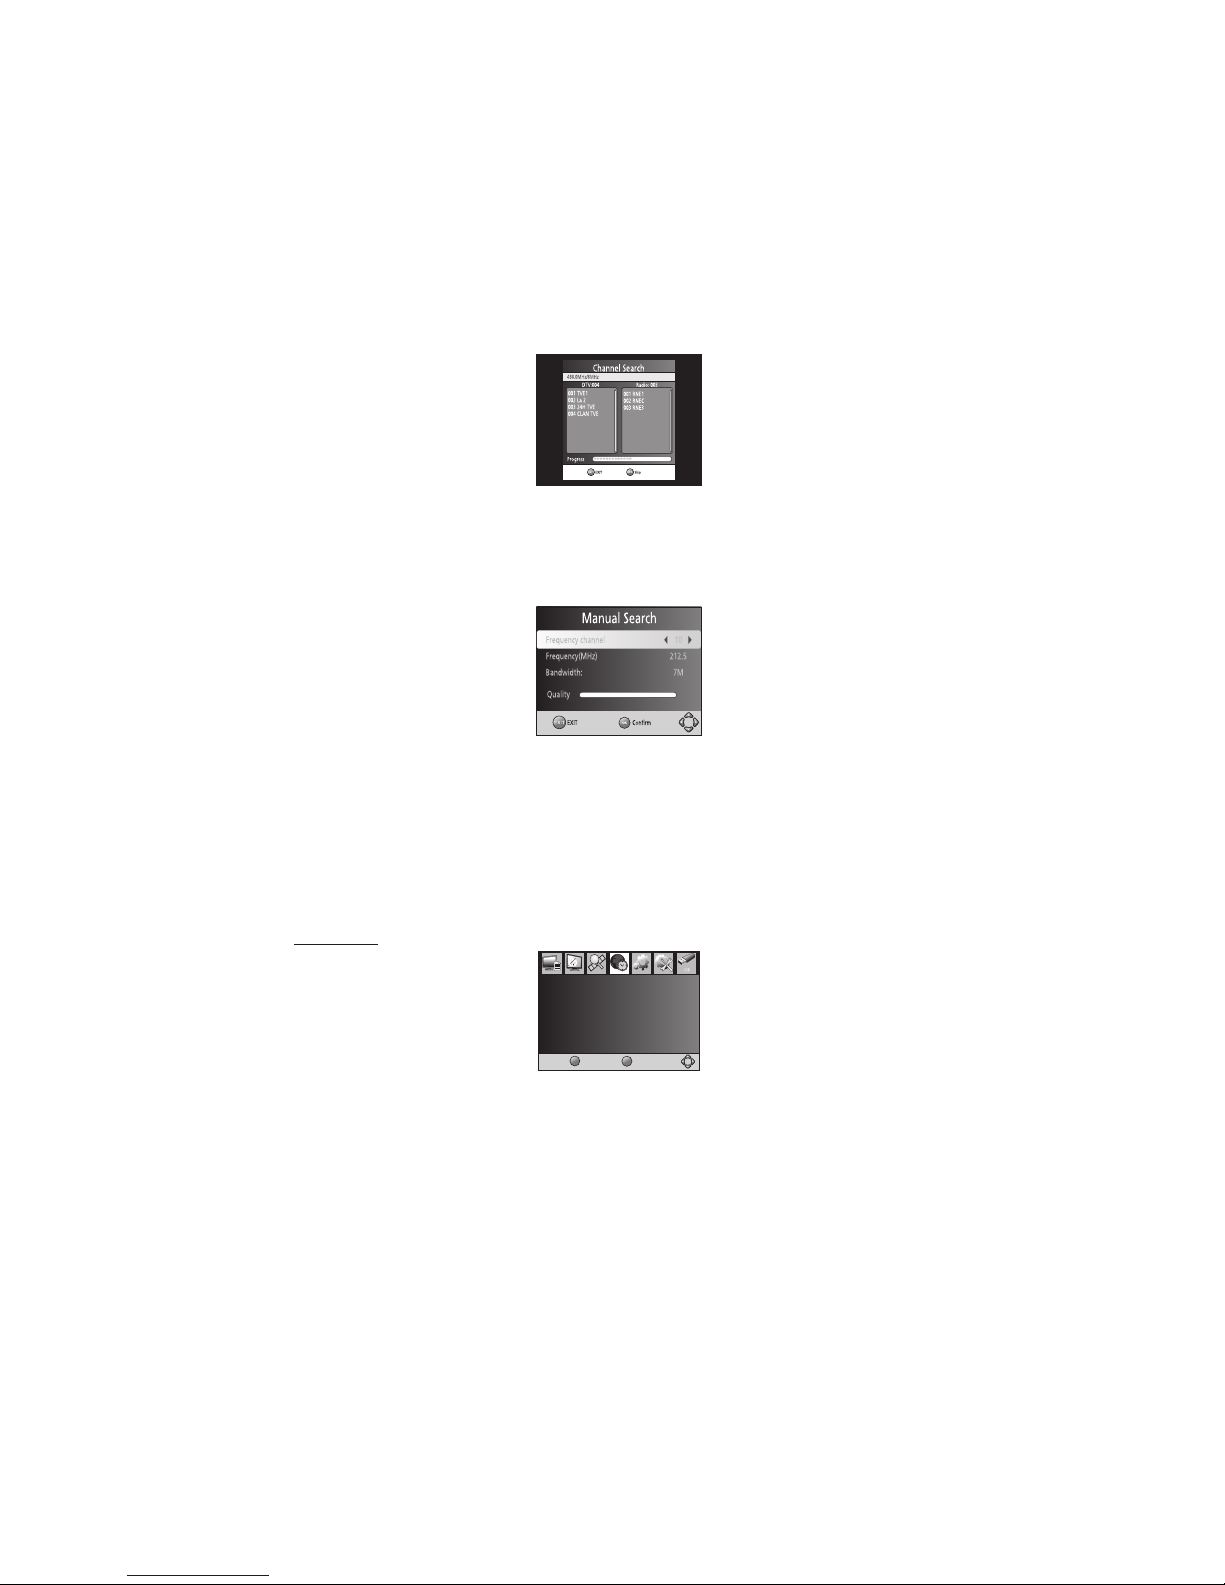
1 . Auto Search
Automatically search for and save cha nn el s. A ll p re vi ou sl y sa ve d ch an ne ls a nd c ha nn el s et ti ng s wi ll
be overwritten.
1. Select [Auto Search] and press OK or R IG HT t o st ar t th e ch an ne l se ar ch .
2. To cancel the channel search, press EX IT .
2. Manual Search
Add new channels manually with this option wi th ou t ch an gi ng t he c ur re nt c ha nn el l is t.
1. Select [Manual Search] then press OK o r RI GH T. T he c ha nn el s ea rc h sc re en w il l ap pe ar .
2. Press the RIGHT/LEFT key to sele ct t he c ha nn el f re qu en cy .
3. Press OK to start searching. Detec te d ch an ne ls w il l be s av ed a nd a dd ed t o th e ch an ne l li st .
3. Country
Select your country of residence.
4. Antenna power
Enable Antenna Power if an external activ e an te nn a is c on ne ct ed .
setting. Press the EXIT button to e xi t th e Me nu .
Time Setting
First, press th e SE TU P bu tt on . Ac ce ss t he T im e Se tt in g me nu by navigating to the Time ta b wi th t he
LEFT/RIGHT bu tt on s. P re ss U P/ DO WN t o se le ct a n op ti on a nd p ress OK or RIGHT to adjus t th at
setting. Pres s th e EX IT b ut to n to e xi t th e Me nu .
1. Time Offset
Select auto or ma nu al f or G MT o ff se t ad ju st me nt s.
2. Country Regi on
Select the Coun tr y Re gi on w he n [T im e Of fs et ] is s et t o Au to .
Time
Time Offset
Country Region
Sleep
Time Zone
Return
Confirm
EXIT
OK
Auto
western Australia
off
GMT +1
11
Page 18
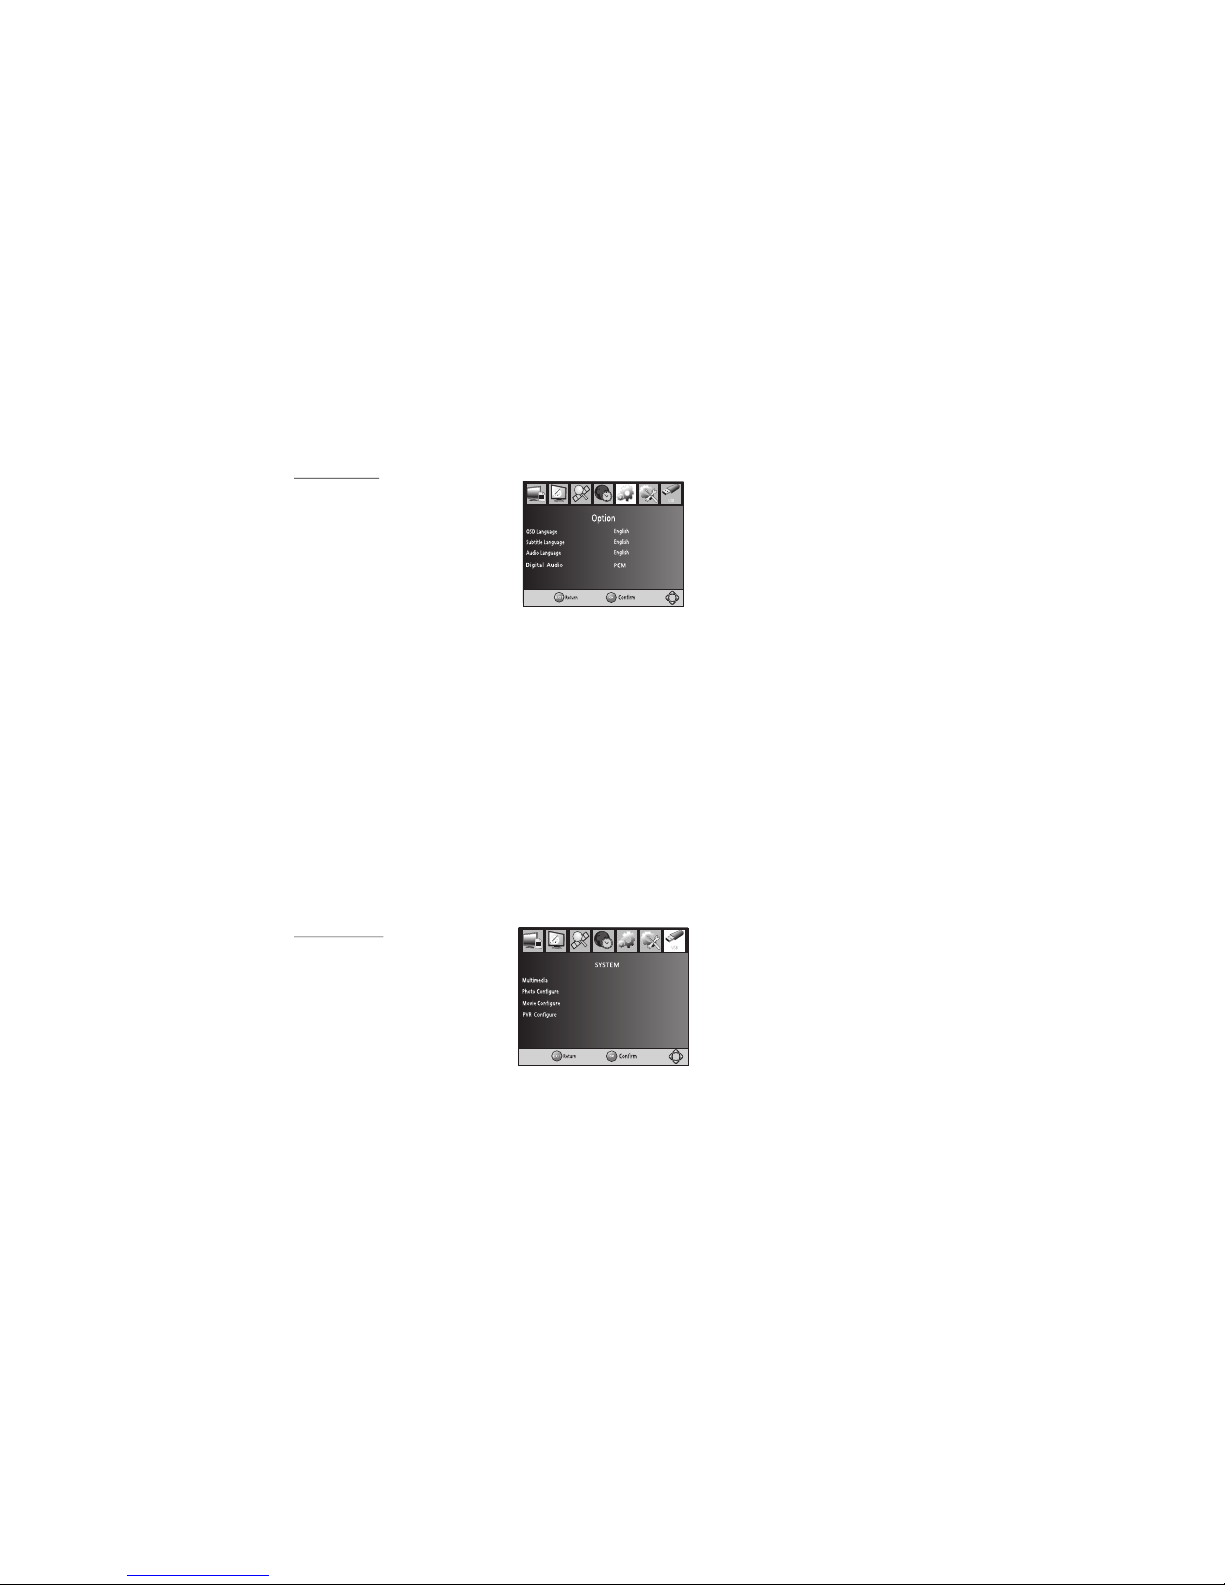
3. Time Zone
Select the Time Z on e Of fs et w he n [T im e Of fs et ] is s et t o Ma nu al.
4. Sleep
If this setting is off, this functi on d oe s no t wo rk . If t hi s se tt in g is n ot o ff , a me ss ag e wi ll p op u p
after your preferred time to inform you , th at t he d ev ic e wi ll g o in t o sl ee p mo de .T hi s me ss ag e wi ll
appear under no any operation. Standard set ti ng i s 3 ho ur s. P re ss S TA ND BY b ut to n to e xi t sl ee p
/ auto-off mode.
Option Menu
First, press th e SE TU P bu tt on . Ac ce ss t he O pt io n me nu b y na vi gating to the Time tab with t he
LEFT/RIGHT bu tt on s. T he m en u pr ov id es o pt io ns t o ad ju st t he OSD Language, Subtit le L an gu ag e
and Audio Langu ag e. P re ss U P/ DO WN t o se le ct a n op ti on a nd p re ss OK or RIGHT to adjust that
setting. Pres s th e EX IT b ut to n to e xi t th e Me nu .
1. OSD Language
Select a langua ge f or t he d ev ic e' s OS D me nu .
2. Audio Lang ua ge
Select the pref er re d au di o la ng ua ge f or w at ch in g TV c ha nn el s. If the language is not ava il ab le , th e
default progr am l an gu ag e wi ll b e us ed . Av ai la bi li ty o f th is f eature is dependent on th e br oa dc as te d
service.
3. Subtitle Lan gu ag e
Select the pref er re d su bt it le l an gu ag e. A va il ab il it y of this feature is dependen t on t he b ro ad ca st ed
service.
4. Digital Audi o
Select digita l au di o ou tp ut m od e.
System Menu
First, press th e SE TU P bu tt on . Ac ce ss t he S ys te m me nu b y na vigating to the System ta b wi th t he
LEFT/RIGHT bu tt on s. T he m en u pr ov id es o pt io ns t o ad ju st t he system settings. Pre ss t he
UP/DOWN key to se le ct a n op ti on a nd p re ss R IG HT /L EF T to a dj us t the setting. Press EX IT t o ex it
the Menu.
1. Parental Gui da nc e
You can restric t ac ce ss t o ch an ne ls t ha t ar e un su it ab le f or c hildren according to th e ch an ne l ra ti ng .
All channels an d re co rd in gs t ha t ha ve r at in gs h ig he r th an t he s et limit will be locked and r eq ui re
password acce ss u si ng t he c ur re nt o r Ma st er p as sw or d. S ch eduled recordings for a loc ke d ch an ne l
will record nor ma ll y, b ut a ls o re qu ir e pa ss wo rd a cc es s as l on g as the restriction is in pl ac e.
Auto
12
Page 19
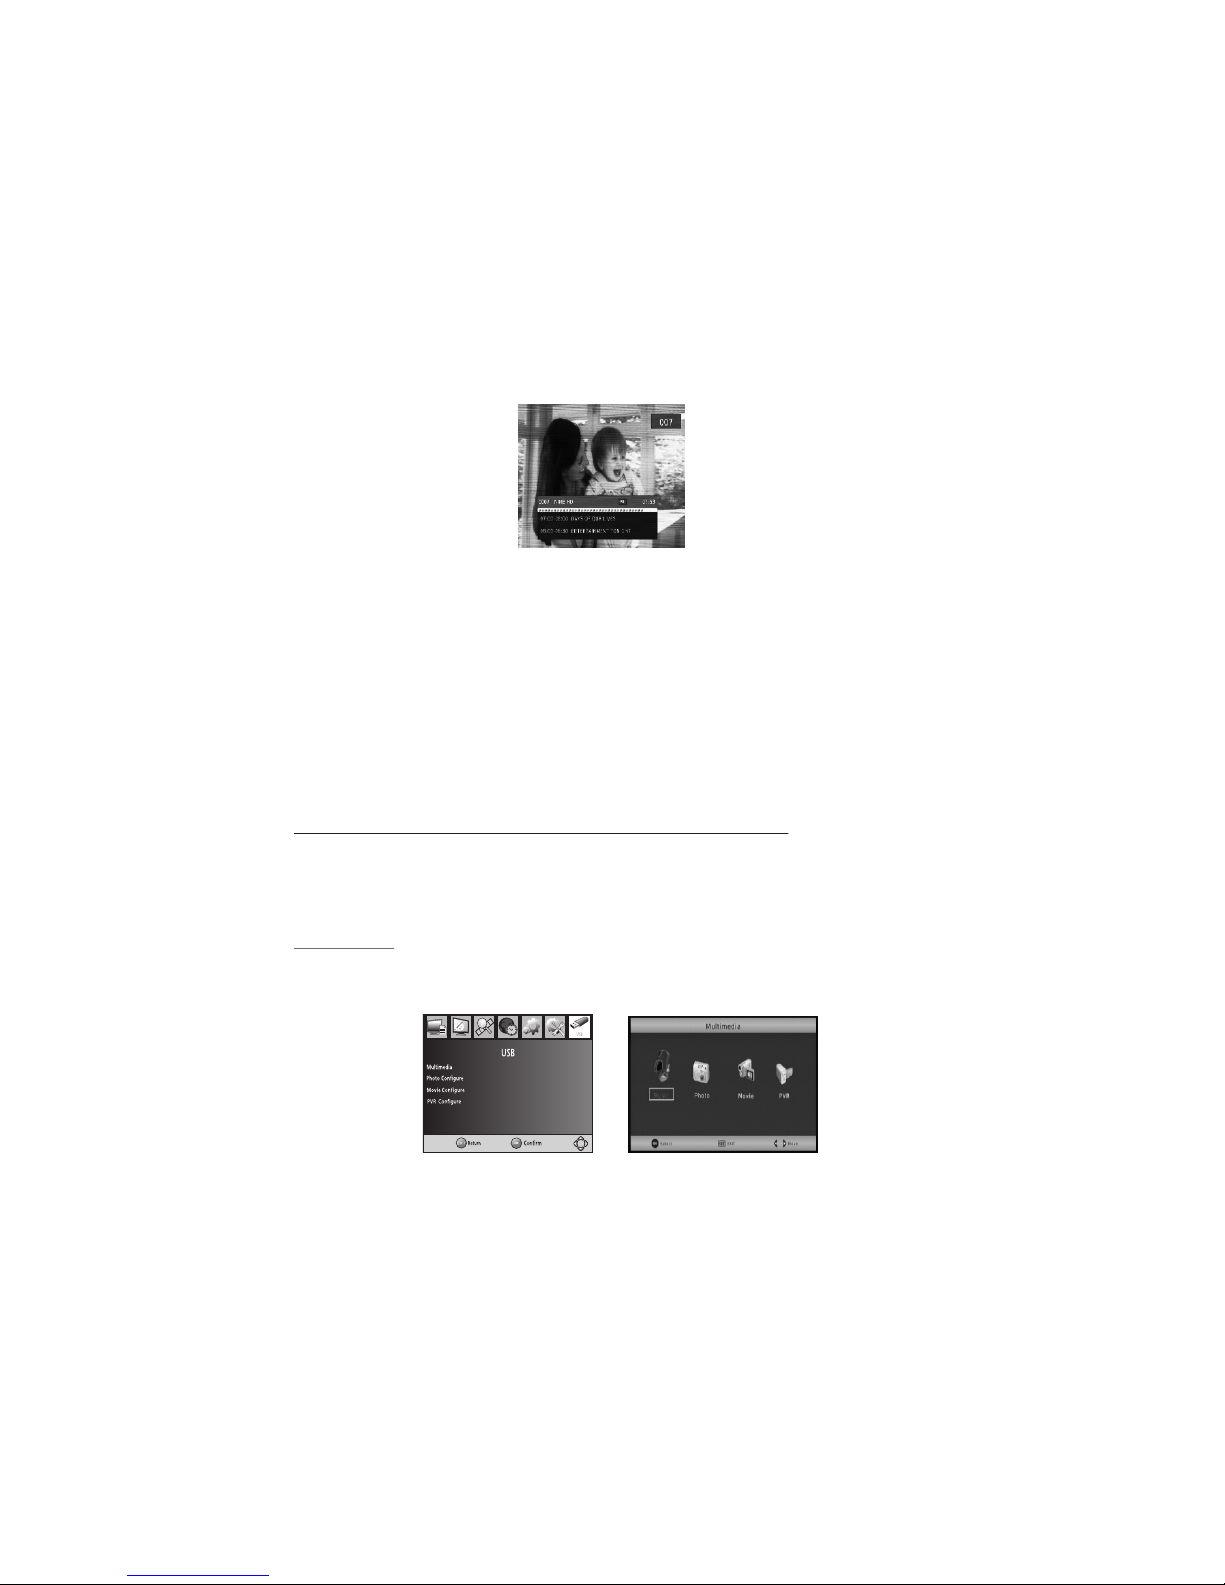
2. Set Password
Set or change the p as sw or d fo r lo ck ed c ha nn el s.
1. Enter your old password or the default pas sw or d '0 00 00 0' .
2. Enter your new password.
3. Re-enter your new password to confirm. A ft er t ha t, p re ss E XI T to e xi t th e Me nu .
3. Factory Default
Reset your Set Top Box to the Default Fac to ry S et ti ng s.
1. In the System Menu, select [Factor y De fa ul t] a nd p re ss O K or R IG HT t o se le ct .
2. Enter the current password and press O K to c on fi rm .
No te :
· This action will delete all saved channel s an d se tt in gs .
4. Information
View model, hardware and software infor ma ti on .
PERSO NAL VIDEO RECORDING (PV R) OPERAT ION
Press the REC button to record TV program s di re ct ly f ro m th e cu rr en t vi ew ed T V ch an ne l. S ub channels from the same frequency are stil l av ai la bl e fo r vi ew in g wh il e re co rd in g is i n pr og re ss , bu t
recording must be stopped in order to chang e to c ha nn el s fr om a d if fe re nt f re qu en cy . Fu nc ti on s
including MENU and EPG are also not available w hi le r ec or di ng i s st il l in p ro gr es s.
PVR Configure
Select or format the connected USB devi ce f or r ec or di ng . To a cc es s th is m en u, p re ss t he S ET UP
button, navigate to the USB tab with th e LE FT /R IG HT b ut to ns , an d en te r th e PV R Co nf ig ur e me nu
with the OK button.
13
Page 20

1. Record Device
Select the disk for the record.
2. Format
Format the selected disk.
WARNING: This will erase all data on the disk . Pl ea se b ac k up a ll v al ua bl e in fo rm at io n be fo re
reformatting a disk.
No te :
· TEAC cannot guarantee compatibili ty ( op er at io n an d/ or b us p ow er ) wi th a ll U SB s to ra ge d ev ic es
and holds no responsibility for any loss of d at a on s to ra ge d ev ic es t ha t ma y oc cu r wh en c on ne ct ed
to this unit.
· It may take longer for the system to re ad t he c on te nt s of a U SB d ev ic e if i t co nt ai ns l ar ge a mo un ts
of data.
· Some USB devices and external hard driv es m ay n ot b e pr op er ly r ec og ni se d.
· Even when they are in a supported format, s om e fi le s ma y no t pl ay o r di sp la y de pe nd in g on t he
content.
14
Scheduled Recording/Vie wi ng U si ng t he E PG
Automatically record or switch to a spe ci fi c pr og ra m at a s et t im e by s et ti ng a s ch ed ul e.
1. Access the EPG by pressing the EPG butt on o n th e re mo te c on tr ol .
2. Select the desired TV pr og ra m an d pr es s OK .
3. In the pop-up window, you can adjust the chan ne l ty pe , ch an ne l nu mb er, s ta rt a nd e nd t im e, r ep ea t
mode, and Record/Vi ew m od e if n ee de d.
4. Press OK to confirm the scheduling. Th e Sc he du le L is t wi ll b e di sp la ye d.
5. Press EXIT to re tu rn t o wa tc hi ng T V.
Note:
· Ensure that a USB storage device is con ne ct ed a nd f or ma tt ed c or re ct ly b ef or e re co rd in g a
program. Please see PVR Configure ins tr uc ti on s ab ov e fo r de ta il s.
Schedule List
All scheduled recordings and viewing events a re l is te d in t he S ch ed ul e Li st . To v ie w th e Sc he du le
List, press the TIMER LIST button whi le w at ch in g TV . Re co rd in g ev en ts a re m ar ke d in o ra ng e, a nd
viewing events are marked in green.
Page 21

Time shift
If a USB device is connected and ready for re co rd in g, y ou c an p au se l iv e br oa dc as ts i f yo u ar e
interrupted while watching TV.
1. Press the PAUSE key during live TV broad ca st t o st ar t Ti me S hi ft . A pr og re ss b ar w il l ap pe ar
displaying the length of time the program h as b ee n ti me s hi ft ed .
2. To resume watching from the paused poi nt , pr es s th e PL AY b ut to n. T he u ni t co nt in ue s to r ec or d
the current broadcast during Time Shi ft p la yb ac k.
To exit Time Shift and return to the live T V br oa dc as t, p re ss t he S TO P bu tt on .
Note:
· If you Fast Forward and catch up to the c ur re nt l iv e br oa dc as t, t he u ni t wi ll e xi t Ti me S hi ft
automatically and resume real time vi ew in g.
· If the live broadcast is paused for a lon ge r pe ri od t ha n wa s se t in t he P VR m en u an d Ti me S hi ft
recording reaches its limit, the un it w il l re tu rn t o li ve T V vi ew in g.
· During Time Shifting, Scan Forwar d/ Ba ck a nd G OT O fu nc ti on s ar e av ai la bl e. O th er a ct io ns
including channel change, MENU and EPG ar e no t av ai la bl e.
Playback/Recorded File List
To view a list of recorded programs, pres s th e RE CO RD L IS T ke y on t he r em ot e co nt ro l. U se t he
UP/DOWN keys to highlight a program and a cc es s th e fo ll ow in g op ti on s:
Play File: Press PLAY or OK while the d es ir ed f il e is h ig hl ig ht ed . Du ri ng p la yb ac k yo u ca n us e th e
PAUSE/STOP/SCAN FORWARD/S CA N BA CK k ey s.
Preview File: Press the RED butto n du ri ng p la yb ac k to g o ba ck t o a th um bn ai l vi ew . Pr es s
repeatedly to switch between previe w an d fu ll s cr ee n pl ay ba ck .
Delete File: Press the YELLOW but to n. A m es sa ge w il l ap pe ar o n th e sc re en a sk in g yo u to c on fi rm
or exit.
Rename File: Press the GREEN butt on . An o n- sc re en a lp ha nu me ri c ke yp ad w il l ap pe ar . Us e th e
ARROW buttons to navigate around th e ke yp ad a nd p re ss O K to s el ec t th e ke ys y ou d es ir e. S el ec t
“OK" on the keypad to save and exit.
15
Page 22
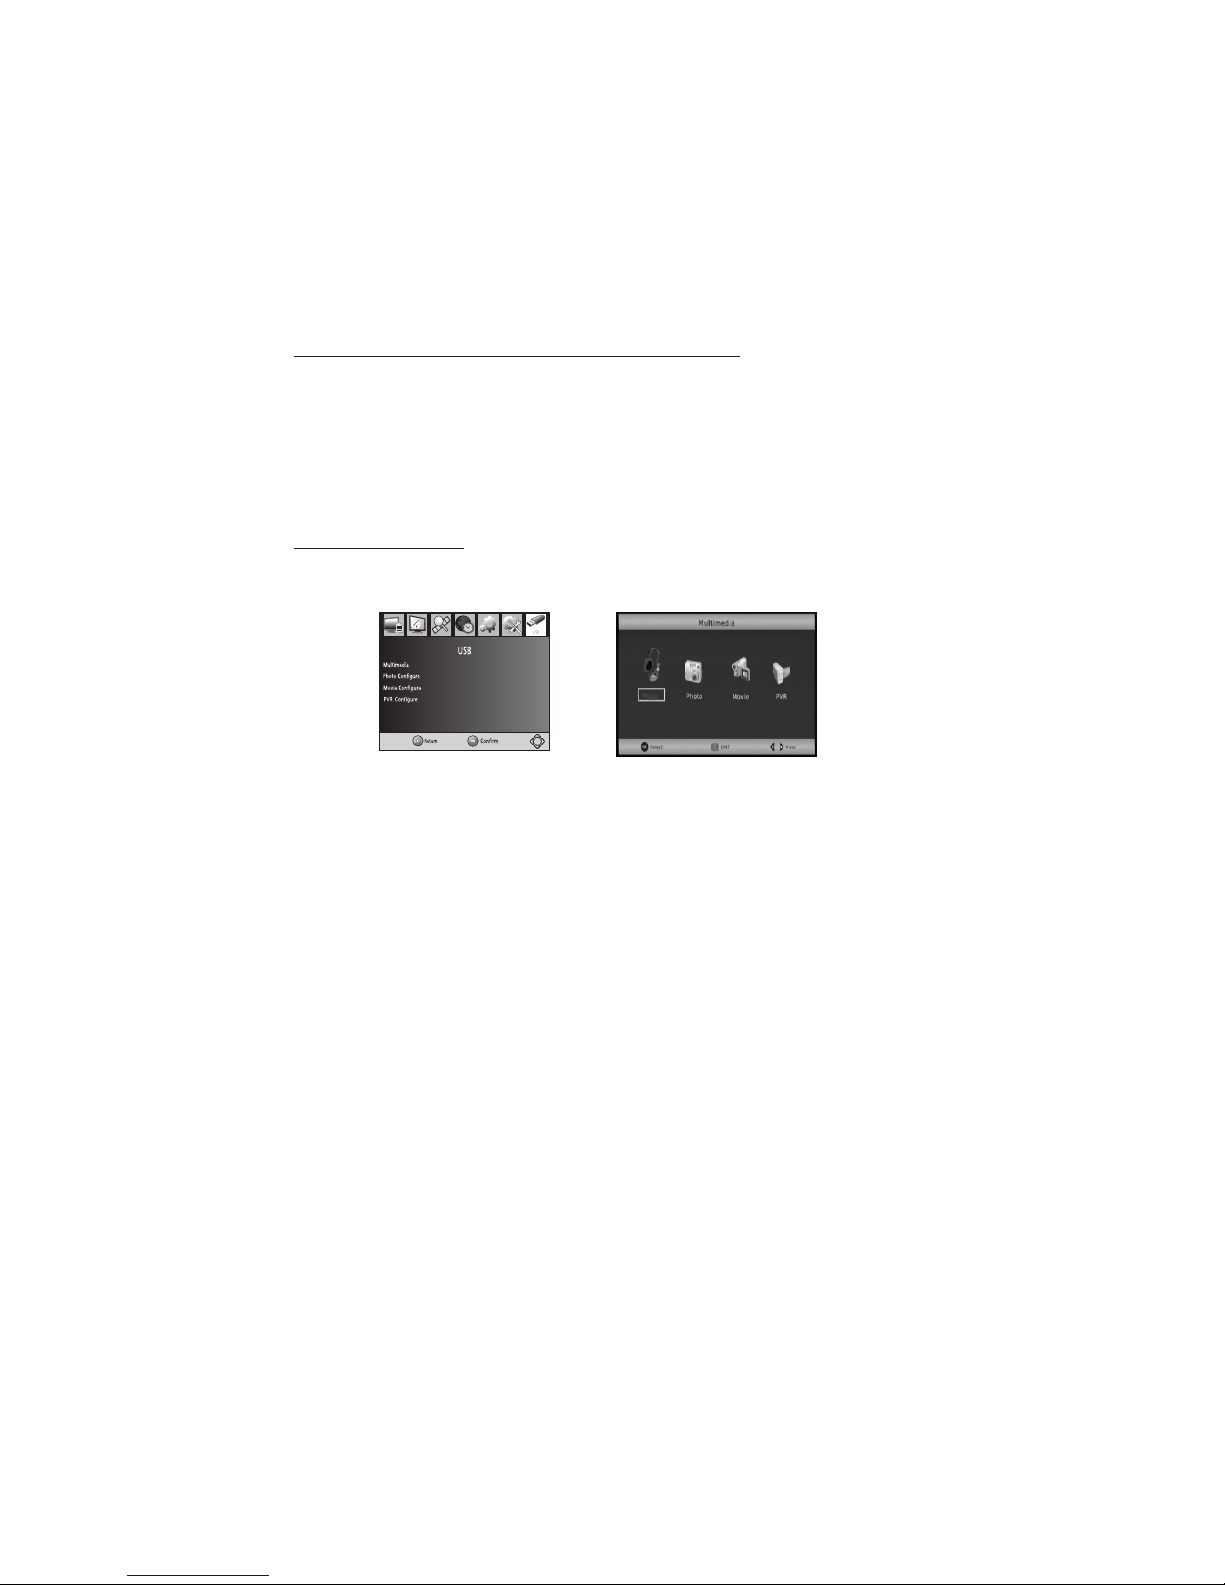
USB MUL TIMEDIA PLAYBACK AND SE TTINGS
This feature is only available in D VB M od e. T o pl ay m ul ti me di a fi le s, a c om pa ti bl e US B de vi ce
must be attached. If no compatible USB de vi ce i s co nn ec te d, t he m es sa ge ' No U SB d ev ic e is F ou nd '
will appear.
Note:
· This unit only supports USB devices w it h a FA T3 2 fi le s ys te m. I t wi ll n ot s up po rt N TF S fi le s ys te ms .
· This unit supports AVI, Mp3, JPEG a nd B MP f il e pl ay ba ck . Ho we ve r, d ue t o ot he r va ri at io ns
in file formats, some files may not p la y ev en t ho ug h th ey a re t he s up po rt ed f il e ty pe s.
Multimedia File Playback
First, press the SETUP button. Sele ct t he U SB t ab u si ng t he L EF T/ RI GH T bu tt on s to e nt er t he U SB
Menu. Select the Multimedia option and pr es s OK t o en te r th e Mu lt im ed ia M en u. I n th e Mu lt im ed ia
Menu, choose from the different multi me di a pl ay ba ck o pt io ns : Mu si c, P ho to , Mo vi e an d PV R.
1. Music Playback
In the Multimedia Menu, select the Musi c op ti on a nd p re ss t he O K bu tt on . Lo ca te y ou r mu si c fi le s by
navigating with the arrow keys. Press O K to e nt er a f ol de r, a nd t he B LU E bu tt on t o re tu rn t o th e
previous folder.
When a music file is highlighted, press PLA Y to s ta rt m us ic p la yb ac k. A ll m us ic f il es l is te d in t he
folder will be played in sequence. During mus ic p la yb ac k, t he f ol lo wi ng a ct io ns a re a va il ab le .
Pause: Press the PAUSE button to pa us e pl ay ba ck . Pr es s ag ai n or p re ss P LA Y to r es um e pl ay in g.
Stop: Press the STOP button to st op p la yb ac k. E xi ti ng t o th e ma in U SB m en u or t he T V mo de w il l
also stop playback.
Forward/Rewind: Press and hol d th e << /> > bu tt on s to f as t fo rw ar d/ re wi nd . Re pe at t hi s mo ti on t o
increase the speed. The max speed is 32x. P re ss P LA Y to r es um e pl ay in g.
Previous/Next track: Tap the <</> > bu tt on s fo r pr ev io us /n ex t tr ac k.
GOTO: Press the GOTO button and e nt er a s pe ci fi c ti me t o ju mp t o in t he c ur re nt t ra ck i n HH :M M: SS
format.
Tip: To play music and a picture slide show sim ul ta ne ou sl y, s ta rt t he m us ic p la yb ac k fi rs t. P re ss
RETURN to go to the Multimedia Menu, and navi ga te t o th e im ag e fi le s pe r th e in st ru ct io ns b el ow .
The music will continue playing while the sli de s ho w is r un ni ng .
16
2. Picture slide show
In the Multimedia Menu, select the Phot o op ti on a nd p re ss t he O K bu tt on . Lo ca te y ou r pi ct ur e fi le s by
navigating with the arrow keys. Press O K to e nt er a f ol de r, a nd t he B LU E bu tt on t o re tu rn t o th e
previous folder.
When a picture file is selected, press PL AY t o st ar t th e sl id e sh ow a nd a ll p ic tu re f il es l is te d in t he
folder will be played in sequence. If OK is pre ss ed , th e se le ct ed p ic tu re i s di sp la ye d wi th ou t th e sl id e
show function. During the slide show, the f ol lo wi ng a ct io ns a re a va il ab le .
Page 23

During movie playback, the following acti on s ar e av ai la bl e.
Pause: Press the PAUSE button to pa us e pl ay ba ck . Pr es s ag ai n or p re ss P LA Y to r es um e pl ay in g.
Stop: Press the STOP button to st op p la yb ac k. E xi ti ng t o th e ma in U SB m en u or t he T V mo de w il l
also stop playback.
Forward/Rewind: Press and hol d th e << /> > bu tt on s to f as t fo rw ar d/ re wi nd . Re pe at t hi s mo ti on t o
Previous/Next track: Tap the << /> > bu tt on s fo r pr ev io us /n ex t tr ac k.
GOTO: Press the GOTO button and e nt er a s pe ci fi c ti me t o ju mp t o in t he c ur re nt t ra ck i n HH :M M: SS
format.
Subtitle: Press SUBTITLE to c ho os e su bt it le s (s ub je ct t o av ai la bi li ty f ro m th e mo vi e fi le )
Photo Setting
Select and set preferences for the pict ur e di sp la y an d sl id e sh ow f un ct io n wi th t he d ir ec ti on al
buttons.
Slide Time: Set slide show interv al b et we en 1 ~8 s ec on ds .
Slide Mode: Set slide show transi ti on e ff ec ts f ro m mo de s 0- 59 o r ra nd om .
Aspect Ratio: Display pictures in the ir o ri gi na l as pe ct s (K ee p) o r in f ul l sc re en ( Di sc ar d) .
Movie Configure
Select and set preferences for USB movi e pl ay ba ck w it h th e di re ct io na l bu tt on s.
Aspect Ratio: Play movies in their or ig in al a sp ec ts ( Ke ep ) or i n fu ll s cr ee n (D is ca rd ).
Subtitle Font: Choose the sub ti tl e fo nt s iz e fr om N or ma l, B ig , Sm al l.
Subtitle BG: Choose the subtitl e fo nt b ac kg ro un d fr om T ra ns pa re nt , Gr ey , Ye ll ow gr ee n, W hi te .
Subtitle Color: Choose the subt it le f on t co lo r fr om W hi te , Bl ac k, R ed , Bl ue , Gr ee n.
17
3. Movie Playback
In the Multimedia Menu, select the Movi e op ti on a nd p re ss t he O K bu tt on . Se le ct y ou r de si re d mo vi e
file by navigating with the arrow keys. Pre ss O K to e nt er a f ol de r, a nd t he B LU E bu tt on t o re tu rn t o
the previous folder. When a movie file is hig hl ig ht ed , pr es s PL AY t o st ar t mo vi e pl ay ba ck . Wh en t he
movie ends, the next movie file will play aut om at ic al ly i f th er e ar e ot he r co mp at ib le m ov ie f il es i n th e
folder.
Pause: Press the PAUSE button to paus e pl ay ba ck . Pr es s ag ai n or p re ss P LA Y to r es um e pl ay in g.
Stop: Press the STOP or EXIT butt on t o st op p la yb ac k.
Previous/Next track: Tap the <</> > bu tt on s fo r pr ev io us /n ex t tr ac k.
Page 24

DVD MOD E
SWITCHING BETWEEN DVB AND DVD MODES
Press the SOURCE button on the remote con tr ol t o sw it ch b et we en D VB a nd D VD M od es . Th e Se t
Top Box will take a few seconds to reboot whi le i t ch an ge s fu nc ti on s.
Note:
·Settings and passwords used in DVB and D VD M od es a re m ut ua ll y ex cl us iv e an d do n ot a ff ec t
each other. The default settings an d pa ss wo rd s ma y be d if fe re nt f ro m ea ch o th er .
DVD PLAYBACK
Press the EJECT button to open the disk tra y an d pl ac e a DV D wi th t he l ab el s id e fa ci ng u p on t he
tray. Press EJECT again to close. The D VD w il l lo ad a ut om at ic al ly a nd d is pl ay i ts m ai n (r oo t) m en u
on the screen. These menus vary for each DV D. U se t he d ir ec ti on al b ut to ns t o na vi ga te t he m en u an d
the OK button to select.
During DVD movie playback, the following pl ay ba ck o pt io ns a re a va il ab le .
Pause/Play: Pause or resume playback wi th t he P LA Y bu tt on
Scan/Skip Forward: Tap once to sk ip t o ne xt t ra ck . Pr es s an d ho ld t o fa st f or wa rd . Fo r di ff er en t fa st
forward speeds up to 16x, repeat this mot io n.
Scan/Skip Back: Tap once to skip to pre vi ou s tr ac k. P re ss a nd h ol d to f as t re wi nd . Fo r di ff er en t fa st
rewind speeds up to 16x, repeat this moti on .
Slow motion: Press the SLOW but to n fo r sl ow m ot io n vi de o pl ay ba ck . Pr es s re pe at ed ly f or d if fe re nt
speeds.
A-B Looping: Press once to set Poin t A, a nd a s ec on d ti me t o se t Po in t B. P la yb ac k wi ll s ta rt l oo pi ng
from Points A-B. To exit looping playba ck , pr es s PL AY o r ST OP .
Camera Angle: Press the ANGLE butto n to s wi tc h an gl es ( su bj ec t to a va il ab il it y on t he D VD )
Subtitles: Press to choose a subtit le ( su bj ec t to a va il ab il it y on t he D VD )
Zoom: Press the P/N button repeated ly f or d if fe re nt z oo me d vi ew s.
Menu: Press the MENU buttons to retur n to t he l as t us ed D VD s ub me nu .
Title Menu: Press the TITLE butto n to r et ur n to t he m ai n (r oo t) D VD m en u.
In DVD Mode, press the SETUP button on th e re mo te c on tr ol t o ac ce ss t he S et up M en u. U se t he
UP/DOWN buttons to select a desired t ab , an d th e OK b ut to n to a cc es s th e su bm en u. P re ss t he L EF T
button to return to the previous menu. To e xi t th e Se tu p Me nu , pr es s th e SE TU P bu tt on a ga in .
The options available in the Setup Menu are d es cr ib ed b el ow .
DVD MENU OPERATION
18
Language Setup
Select the Language tab in the Setup Menu to ac ce ss t hi s su bm en u.
OSD Language: Set a language for th e Se tu p Me nu a nd O n Sc re en D is pl ay .
Subtitle: Set the default subti tl e la ng ua ge .
Page 25
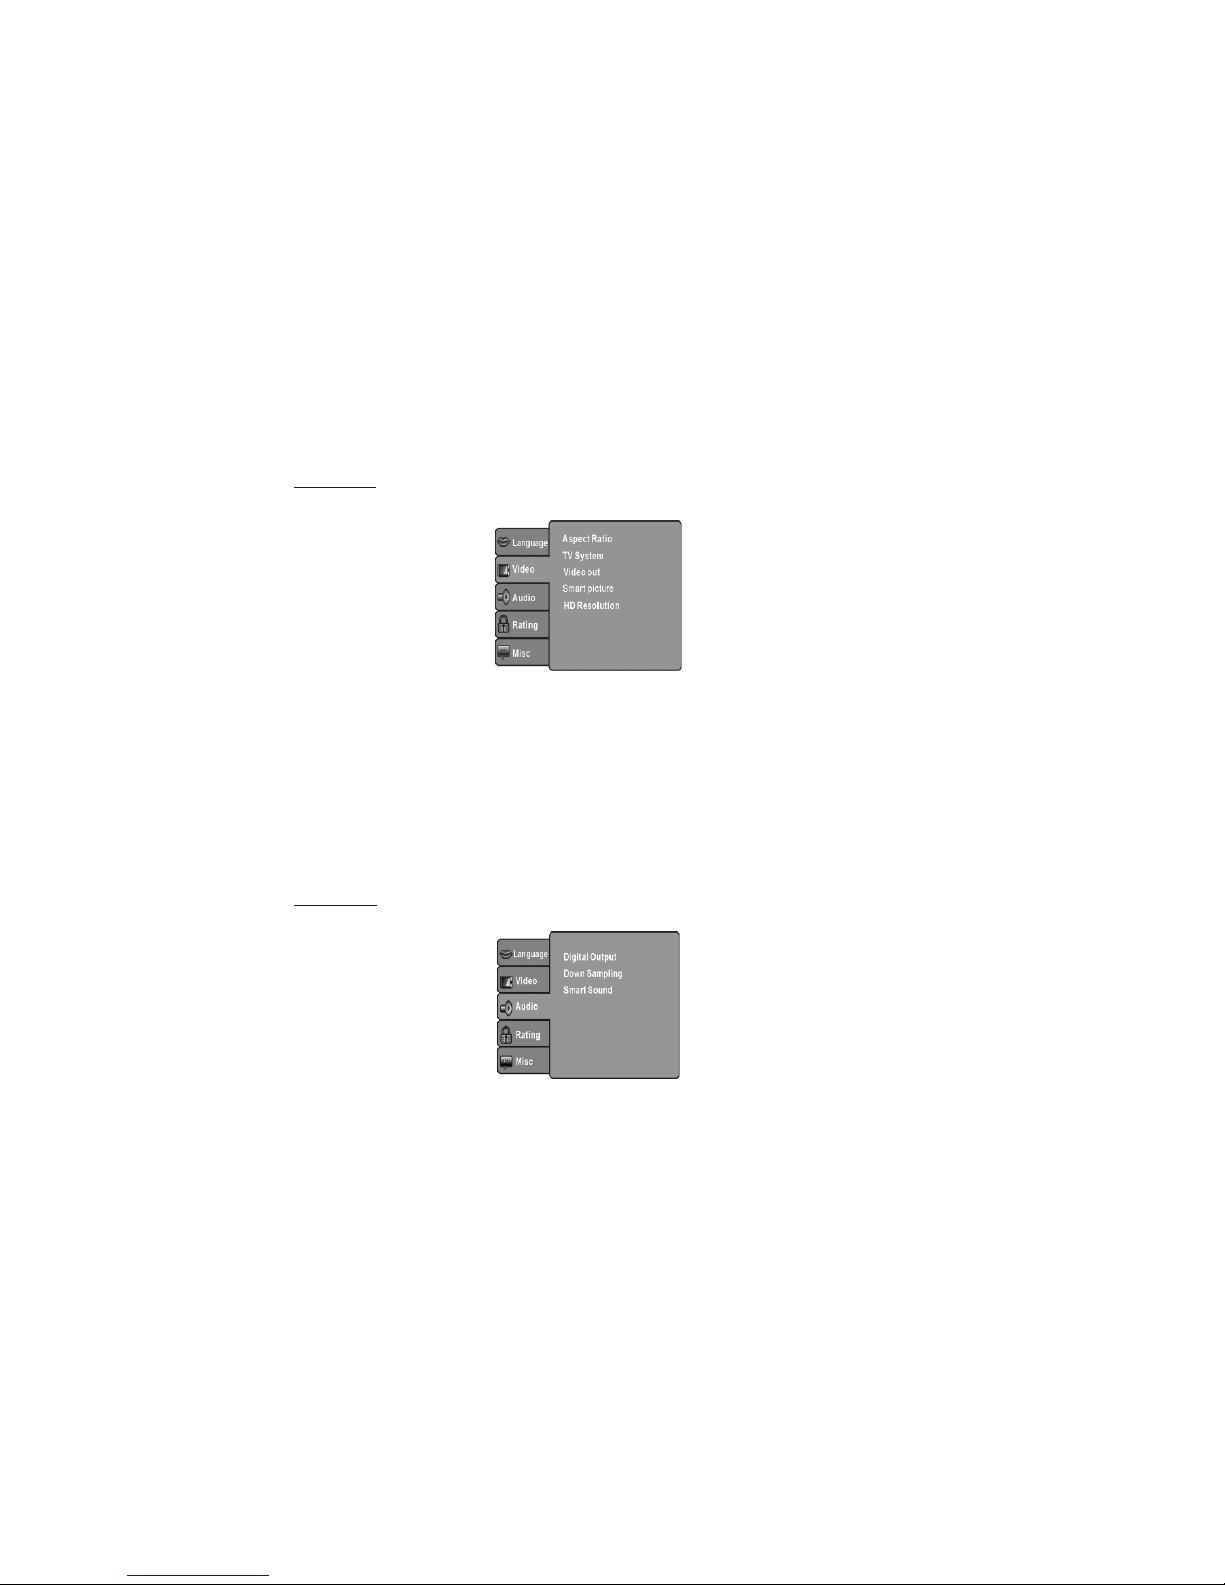
MPEG4 Subtitle: Set the MPEG4 s ub ti tl e en co di ng .
Audio: Set the default built-in a ud io l an gu ag e.
DVD Menu: Set the default DVD menu langua ge .
Note:
·All DVD language features are subject to a va il ab il it y on t he D VD u se d.
Video Setup
Select the Video tab in the Setup Menu to acc es s th is s ub me nu .
Aspect Ratio: Set the picture's a sp ec t ra ti o to 4 :3 L et te r Bo x, 4 :3 P an S ca n or 1 6: 9.
TV System: Set the TV format to Aut o, P AL o r NT SC .
Video Out: Set the video output for ma t.
Smart picture: Set picture displa y se tt in gs t o St an da rd , Br ig ht , So ft o r Dy na mi c.
HD Resolution: After you set th e vi de o ou tp ut t o HD o ut pu t, y ou c an c ho os e th e
resolution of HDMI output.
Notes:
·As DVD picture aspect ratios are sub je ct t o th e re co rd ed d is c fo rm at , so me D VD s ma y no t
display images correctly in the aspec t ra ti o se t on t he S et T op B ox .
·If a disc recorded in 4:3 format is pl ay ed o n a wi de s cr ee n TV , bl ac k ba rs w il l ap pe ar o n th e le ft
and right side of the screen.
·Please adjust the video settings dep en di ng o n th e ty pe o f DV D an d TV u se d.
Audio Setup
Select the Audio tab in the Setup Menu to acc es s th is s ub me nu .
Digital output: Adjust the co ax ia l au di o ou tp ut t o su it a n ex te rn al a ud io d ev ic e co nn ec te d to t he
player.
Down sampling: Turn the down samp li ng f un ct io n On o r Of f.
Smart sound: Set audio output setti ng s to O ff , Cl as si ca l, R oc k, J az z or P op .
19
Page 26
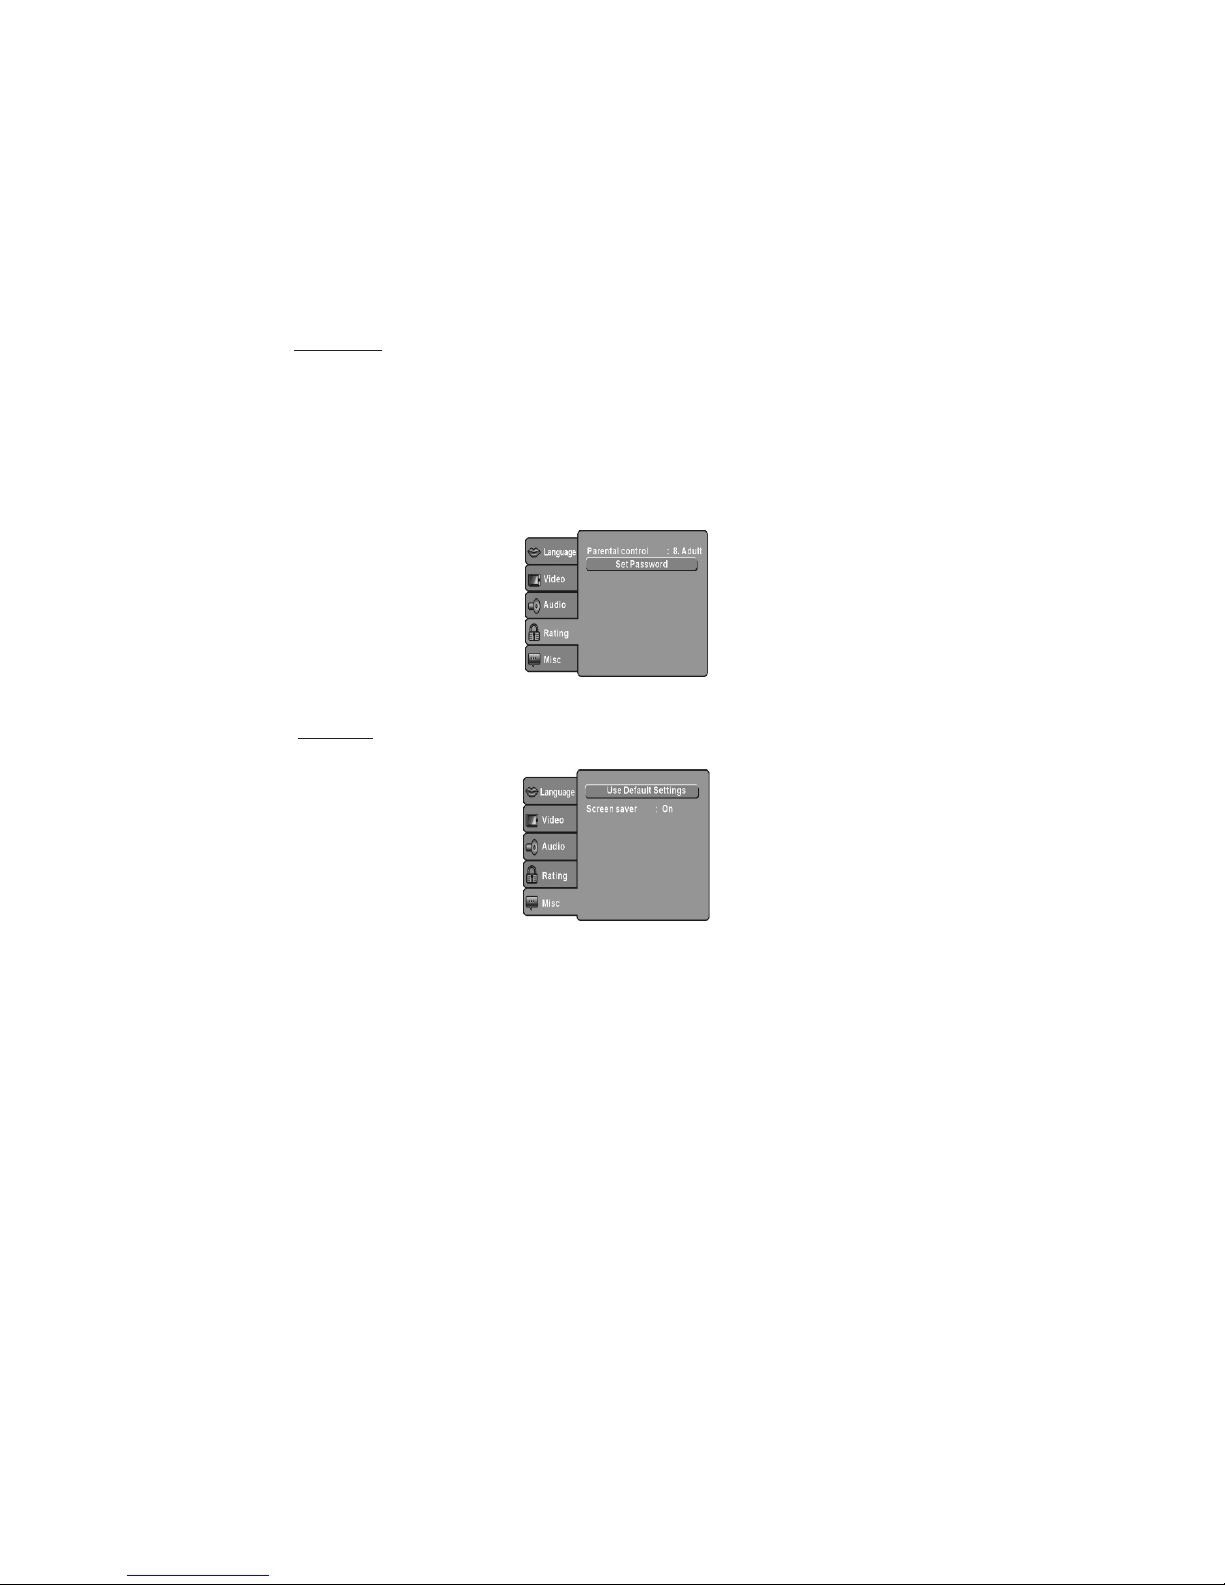
Rating Setup
Select the Rating tab in the Setup Menu to ac ce ss t hi s su bm en u.
Parental Control: Set a rating li mi t fo r re st ri ct ed v ie wi ng . DV Ds a bo ve t he l im it w il l re qu ir e a
password to be played. This feature is de pe nd en t on t he D VD s us ed . Be fo re u si ng t hi s fe at ur e,
please set a password.
Set Password: Set or change a custom pa ss wo rd w it h th e fo ll ow in g st ep s:
1. Key in the current password and press th e OK b ut to n. I f th is i s th e fi rs t ti me a p as sw or d is b ei ng
set, use the Master Password '6666' .
2. Press OK again to start keying in your n ew p as sw or d. P re ss O K.
3. Key in the new password again to confirm . Pr es s OK . Th e ne w pa ss wo rd i s sa ve d wh en a S uc ce ss
message is displayed.
Note: If you have lost your password, ple as e us e th e Ma st er P as sw or d '6 66 6' t o un lo ck .
Misc Setup
Select the MISC tab in the Setup Menu to acce ss t hi s su bm en u.
Use Default Settings: Reset DVD pla ye r se tt in gs t o fa ct or y de fa ul t va lu es . Th is w il l no t re se t yo ur
custom password.
Screen Saver: Enable/disable the sc re en s av er f un ct io n.
20
Page 27
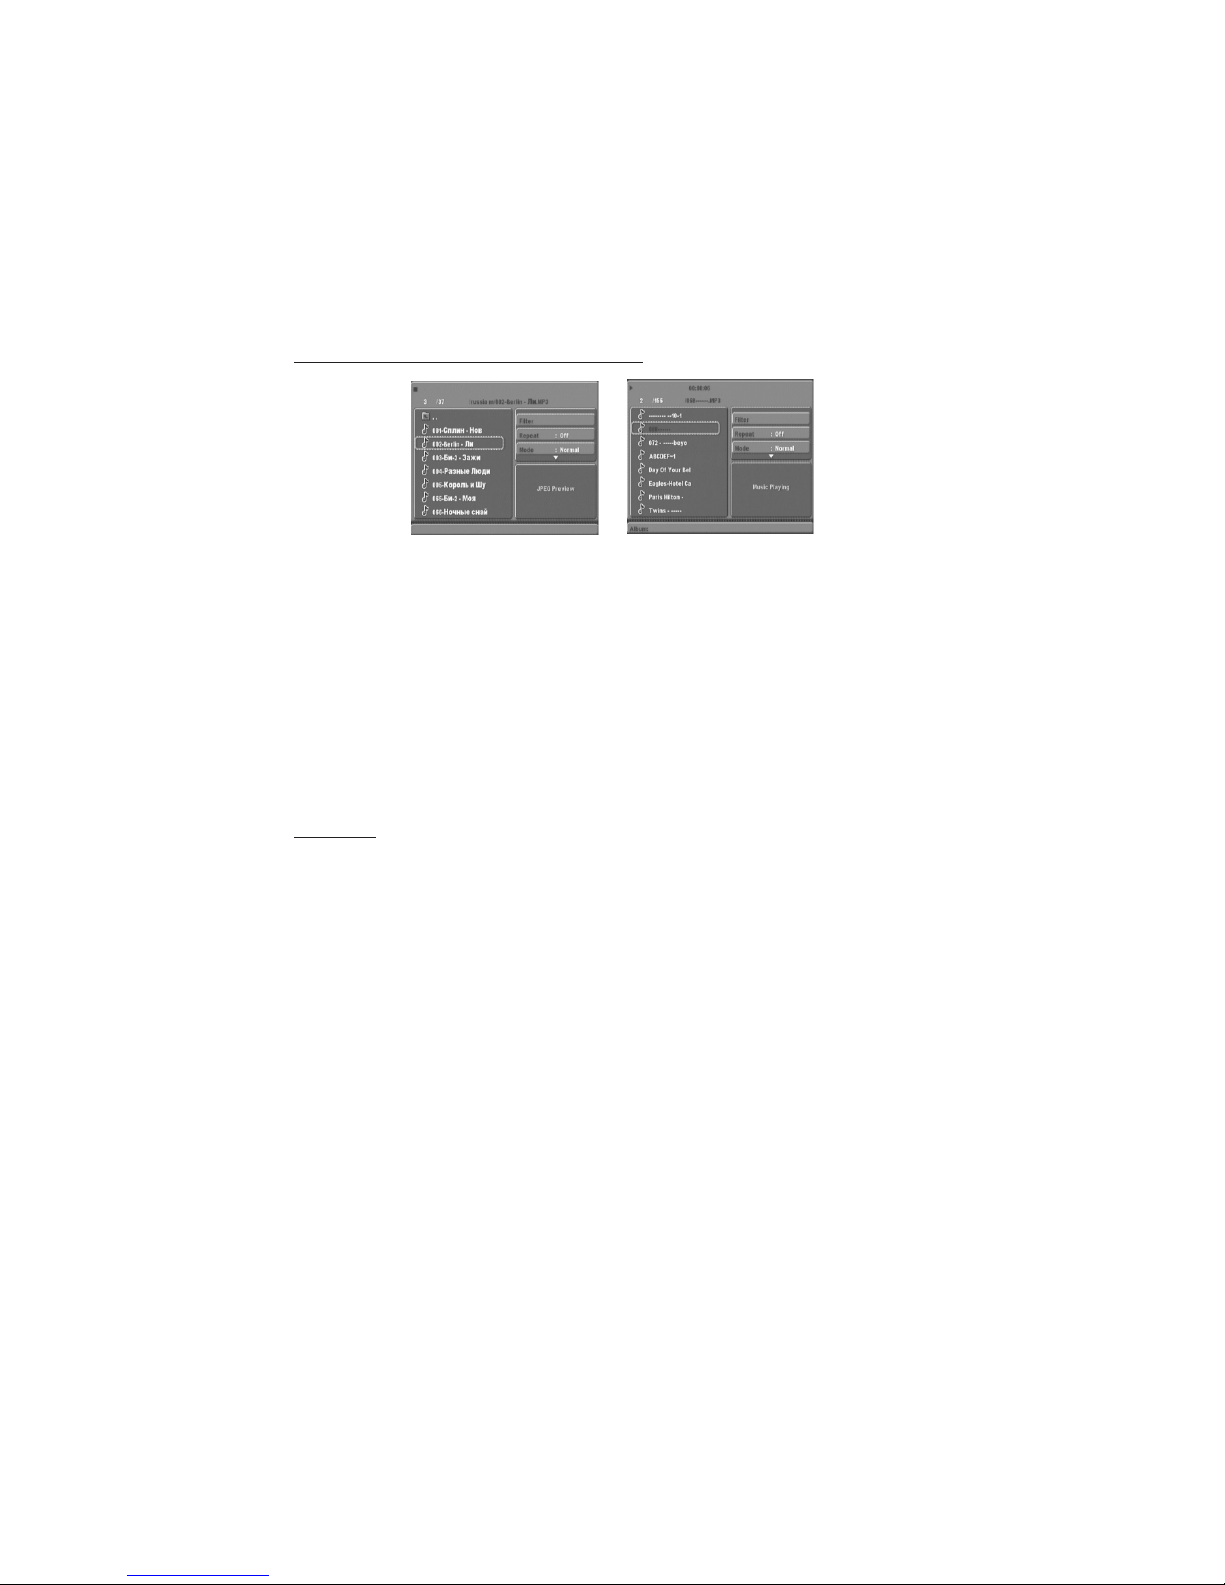
After the MP3/WMA/AVI/JPEG CD i s lo ad ed , th e CD c on te nt s wi ll b e di sp la ye d in a f il e br ow se r as
shown above. Navigate folders and files usi ng t he d ir ec ti on al b ut to ns . Pr es s OK o n a fo ld er t o en te r
the folder. Press OK on the 'Up Folder' i co n on t he t op t o re tu rn t o th e pr ev io us d ir ec to ry . Pr es s OK o r
PLAY on a selected music or movie file to pla y it .
Filter: Choose different file typ es t o be d is pl ay ed i n th e fi le b ro ws er .
Repeat: Toggle between different re pe at m od es .
Mode: Choose from different playb ac k mo de s, l is te d be lo w.
a. Normal: Play files from the folder i n a no rm al s eq ue nc e.
b. Shuffle: Play files in shuffle mod e. A ll t ra ck s wi ll b e pl ay ed o nc e in a r an do m se qu en ce .
c. Music Intro: Play only the first 1 0 se co nd s of e ac h tr ac k.
Edit Mode: Program a playlist by foll ow in g th e in st ru ct io ns b el ow .
Program View: Display playlist.
Browser View: Display file director y.
Add to Program: Add a track to the prog ra mm ed p la yl is t.
Clear Program: When playback is stopp ed c om pl et el y (p re ss t he S TO P bu tt on t wi ce ), u se t hi s op ti on
to delete tracks from the programme d pl ay li st .
Edit Playlist
Enter Edit Mode to program a playlist fro m av ai la bl e tr ac ks . Ex it E di t Mo de t o pl ay f ro m th e pl ay li st .
1. Select the Edit Mode option and press OK t o en te r Ed it M od e.
2. Press the LEFT button to start bro ws in g fi le s.
3. Press OK on desired tracks in the desire d pl ay ba ck s eq ue nc e.
4. Select Add to Program to save the sele ct ed f il es i nt o th e pl ay li st .
5. Select the Program View option and press O K to v ie w th e pl ay li st .
6. Before starting playback, exit Edi t Mo de b y se le ct in g th e Ed it M od e op ti on a nd p re ss in g OK a ga in .
To remove tracks from the playlist, s el ec t tr ac ks w hi le i n Ed it M od e, t he n ch oo se C le ar P ro gr am .
MP3/W MA/AVI/JPEG CD PLAYBA CK
21
Page 28

After the Picture CD is loaded, the CD cont en ts w il l be d is pl ay ed i n a fi le b ro ws er a s sh ow n ab ov e.
Navigate folders and files using the direct io na l bu tt on s. P re ss O K on a f ol de r to e nt er t he f ol de r.
Press OK on the 'Up Folder' icon on the top to re tu rn t o th e pr ev io us d ir ec to ry . Pr es s OK o r PL AY o n a
selected picture file to view it.
Picture Rotation: Press the dir ec ti on al b ut to ns t o ro ta te t he p ic tu re .
Picture Scan: Press the ANGLE butto n to c ha ng e pi ct ur e sc an m od e.
PICTU RE CD PLAYBACK
22
Page 29
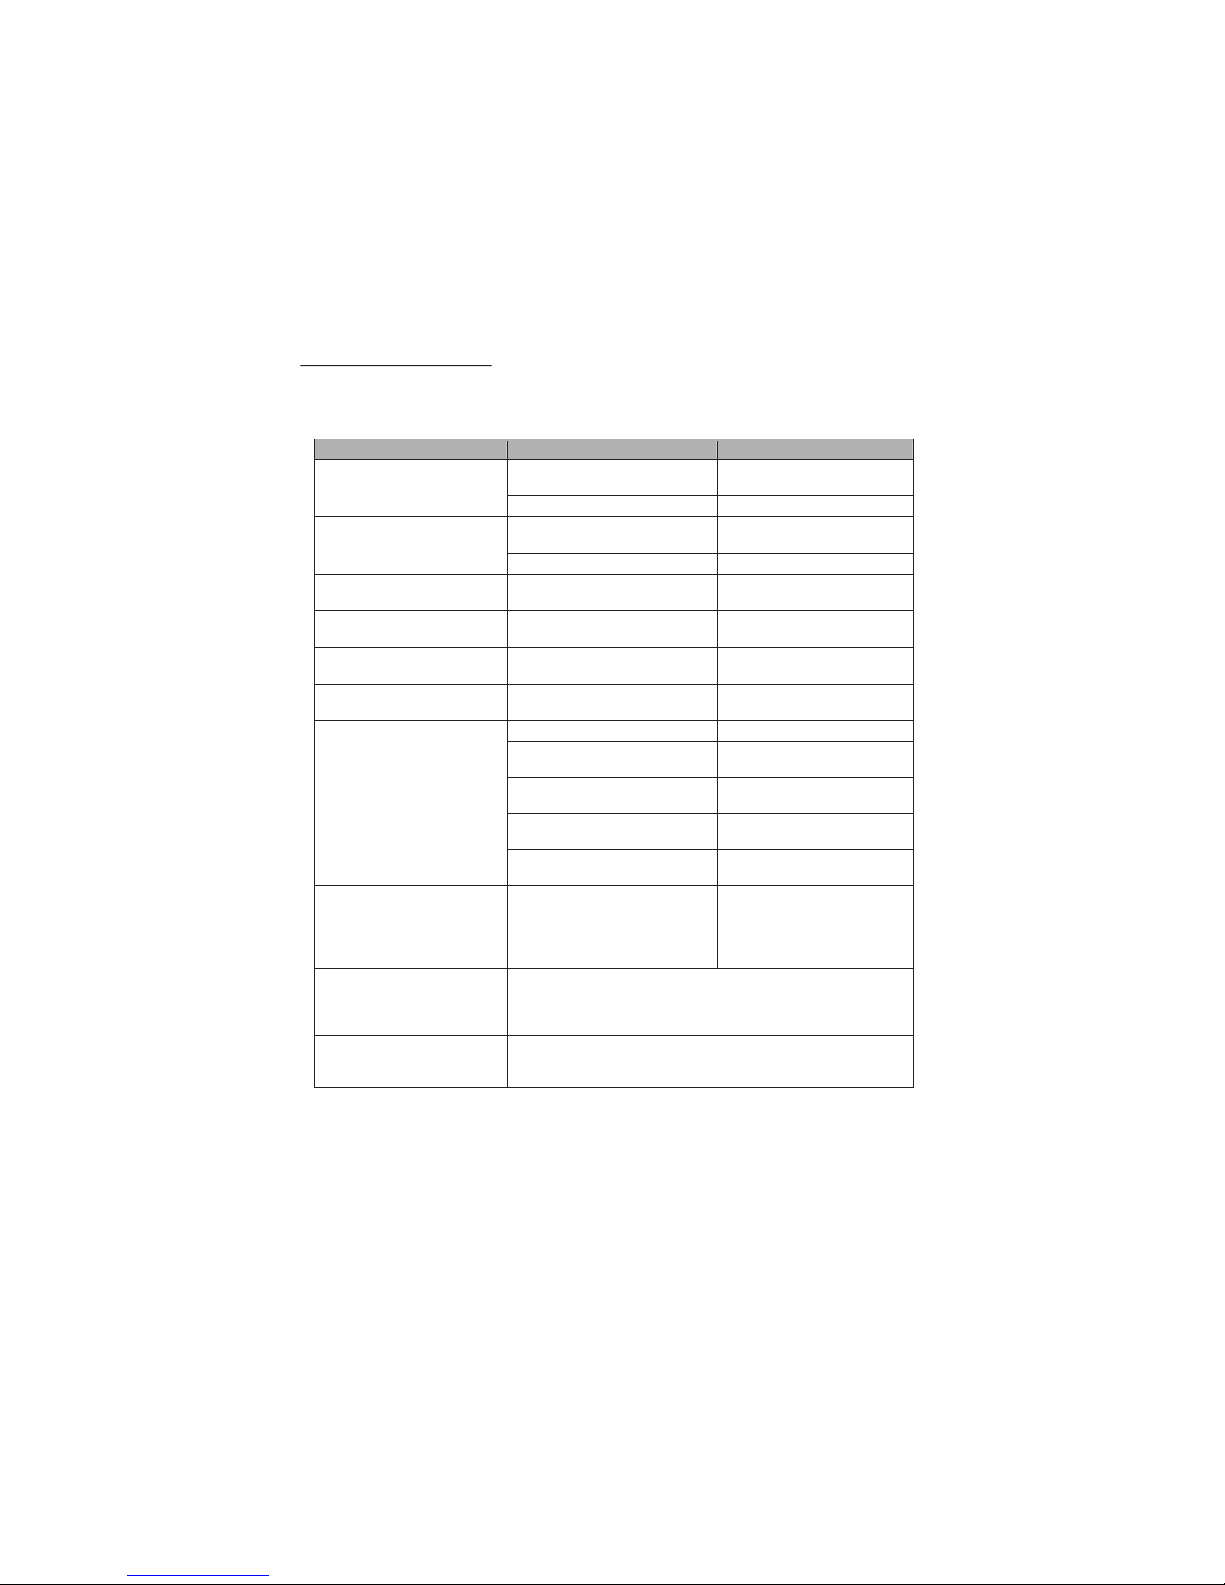
TROUBLESHOOTING
If you experience problems with this Set Top Box or its installation, please read the relevant sections of this
and this Troubleshooting section carefully. User Manual
Problem Possible cause What to do
Standby light is not lit
Power cable is unplugged Check the AC power
connection
Power fuse is blown Check fuse
No signal or channels
found
Aerial is disconnected
Aerial is damaged/misaligned
Check aerial connection and
condition
Out of digital signal area Check with dealer
Sound but no picture
Tuned to digital Teletext
channel
Retune to another channel
Distorted or freezing
picture
Aerial may not be compatible Check aerial
Scrambled channel
message
Channel is scrambled Select an alternative channel
Forgotten channel lock
password
Retune channels to erase
channel lock
Unit is turned off Plug in power and turn unit on
Remote control not aimed
correctly
Aim remote control at the unit
Obstructions between remote
control and front panel receiver
Remove obstructions
Remote control batteries are
incorrectly inserted
Reinstall batteries according
to correct polarities
No response to remote
control
Remote control batteries are flat Replace remote control
batteries
Lost channel reception
after moving the unit to
another room
The aerial feed may come
through a distribution system
which may reduce the digital
signal now received by the
receiver
Try a direct feed from the
antenna
'Bad disc' is displayed
Ensure the disc is not warped, damaged, stained or deformed.
Ensure the disc format is compatible with the player.
Please check whether you have tried to play a software CD, If
so, please restart the player.
'No disc' is displayed
Ensure that you have inserted the disc correctly with the right
side up.
Ensure the disc is not distorted, stained or scratched.
23
Page 30
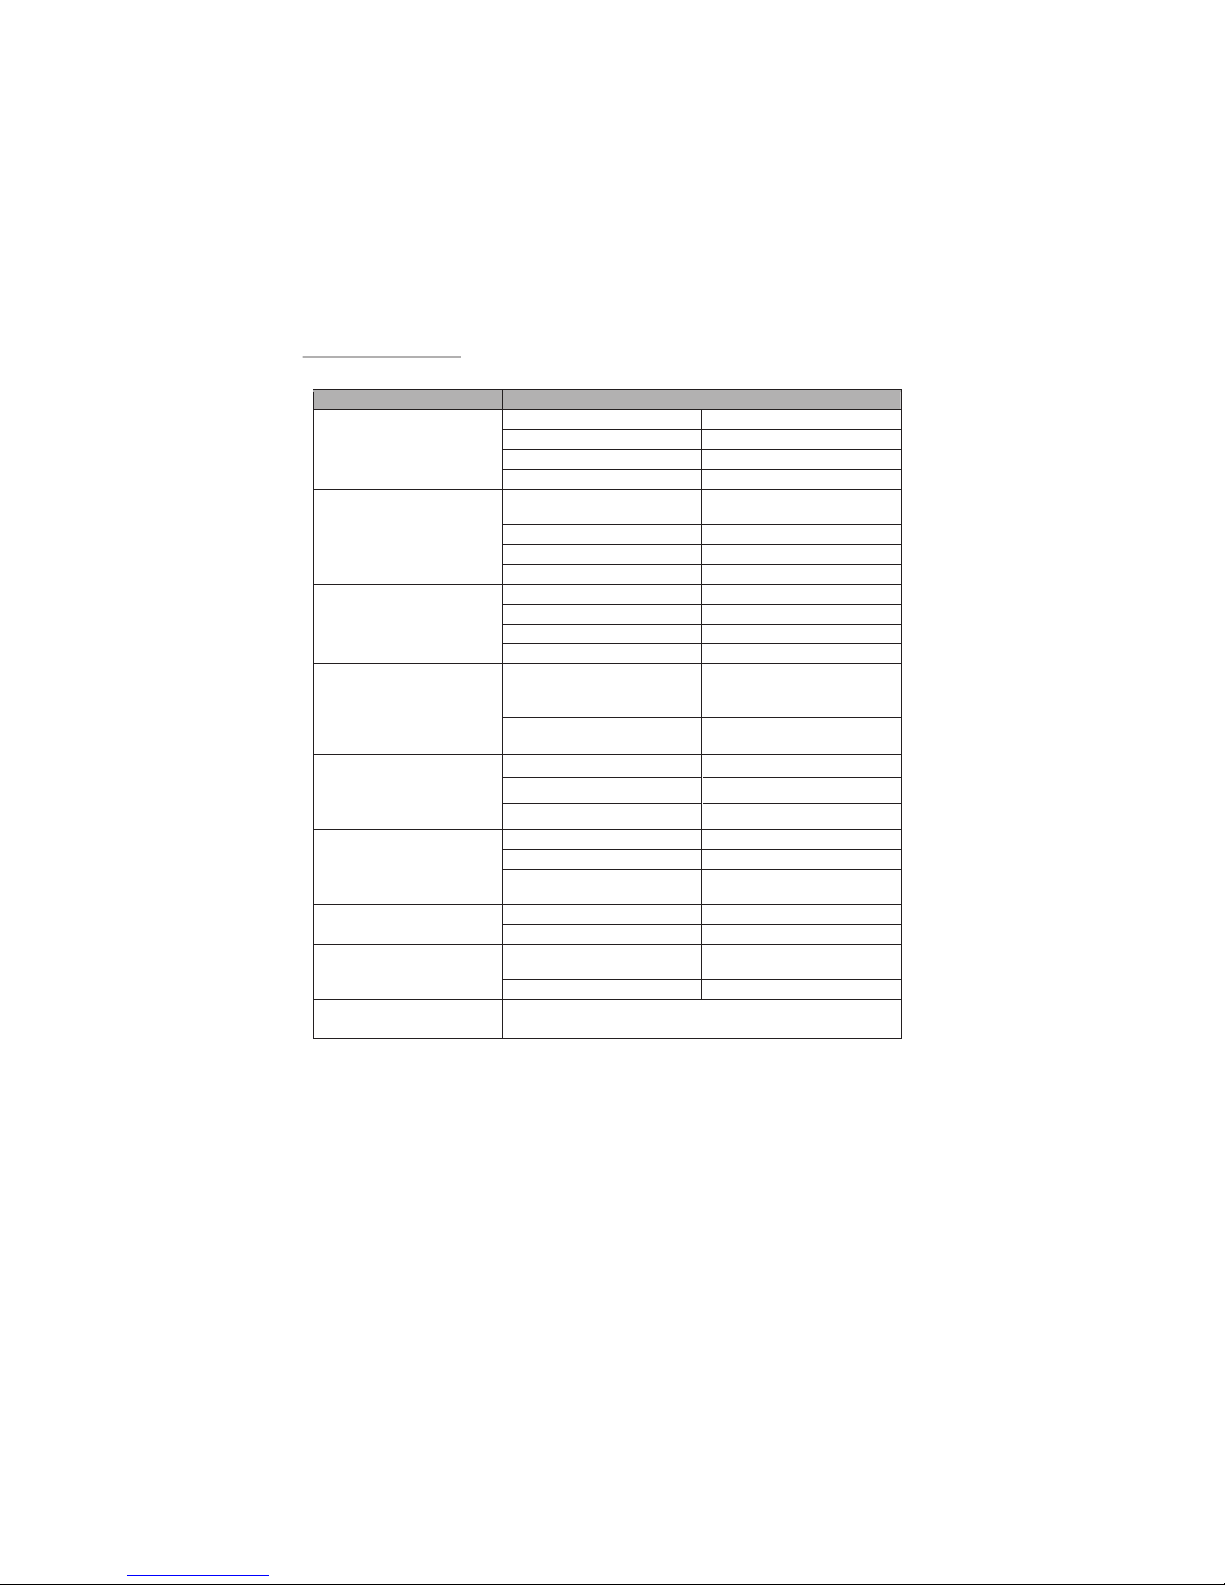
SPECIFICATIONS
Item Specification
Power Requirement 100-240V~ 50/60Hz
Max Power Consumption 15W
Weight
General
Dimensions
Frequency Range VHF: 174MHz to 230MHz
UHF: 470MHz to 862 MHZ
Input impedance 75 Ohms unbalanced
Signal Input Level -78 ~ -25DBM
Tuner
Bandwidth 7/8MHz
Demodulator COFDM
OFDM Modulation 2K, 8K FFT, SFN and MFN
Packet Carries 2K/8K
Demodulation
Guard interval 1/4, 1/8, 1/16, 1/32
Output
Decoder module PAL, NTSC
Resolution
Display
Aspect Ratio
Video
Decoding
Audio MPEG2 Audio layer I&II
Compliance ETSI EN 300 744 DVB-T
Compliance
Others
Sound Mode Right, Left, Stereo
<CT1106>
* Specifications are subject to change without notice.
* Weight and dimensions are approximate.
MPEG2 Transport MP@M
4:3(Letterbox, Pan & Scan),
16:9
576P, 720P, 1080i
24
1.3KG
320x38x200mm
Compos it e (A na lo gu e)
Compon en t (P r/ Pb /Y ),
HDMI
VIDEO
AUDIO
Audio L/R (Analogue) Coaxial
RCA for SPDIF digital audio
Input
RF IN IEC 169-2 female connector
RF LOOPTHROUGH IEC 165-2 male connector
USB USB2.0
DVD Player S up po rt ed
Formats
DVD/VC D/ CD -R /C D- RW /D VD ±RW/ AVI/MP3/JPE G
Page 31

Page 32

 Loading...