

Page 1

Portable DVD Player
DVP705
Page 2

Page 3

Page 4

Page 5

Contents.......................................................................................1
Foreword......................................................................................2
Precaution ................................................................................3-4
Unit Overview................................................................................5
Remote Control Overview...............................................................6
Key Function Introduction...........................................................7-8
Charging......................................................................................9
Connection.................................................................................10
System Setup.........................................................................11-14
Playback................................................................................15-16
Specifications.............................................................................17
Troubleshooting..........................................................................18
CONTENTS
-1-
Page 6

-2-
FOREWORD
Thanks for your purchase of our product. Please read through this
manual before making connections and operation and retain it for
future reference.
This product
designed with easy installation, light weight and small size so that it is
very convenient for you to take it with you and use it anywhere for
example in the hotel, office, home, etc.
incorporates the latest digital audio/video technologies
giving you the ultimate in listening and viewing pleasure and it is
Accessory List
Instruction Manual
Earphone
Audio/Video Cable
AC/DC Adapter
Cigarette LighterAdapter
Features
7 inch 16:9 TFT Swivel Screen
Built in Electronic Anti-shock
PAL/NTSC compatible
Lithium-polymer rechargeable battery
Multi Media USB & 3 in 1 SD/MMC/MS Card Reader
Play DVD / CD / HDCD / CD-R / CD-RW / AVI / Picture CD
Built in stereo speakers
2 hours playback after fully charged battery
AV and Coaxial Output
Remote Control
USB/CARD
Page 7

PRECAUTION
-3-
1 Placement:
To prevent fire or shock hazard, do not expose this unit to rain or moisture.
Do not expose this unit to direct sunlight.
Keep this unit away from strong magnets, heat sources and excessive dust.
Do not place this unit on any unstable surface.
If the unit is brought directly from a cold place to a warm one, moisture may
condense inside the unit which will cause malfunction. Should this occur,
leave the unit turned on for a few hours until the moisture evaporates.
2 Installation:
Ensure that the 7" portable DVD player is installed according to the
instructions and illustrations provided in this manual.
Do not drop any objects into the unit through the openings.
Do not spill or spray liquid of any kind on or in the unit. It may result in a fire
or electric shock.
Do not place anything heavy on the unit.
To ensure proper ventilation and proper operation, never cover or block the
slots and opening with a cloth or other materials.
Keep the unit away from an open flame such as fire, candle, etc.
Install the batteries correctly.
Please dispose the batteries according to the local rule and law.
The maximum working temperature is 95 degrees Fahrenheit or 35 degrees
Celsius.
4 No Disassembling:
Never attempt to disassemble the unit. There probably would be a risk of
electric shock and/or harm by exposure to laser radiation.
Please consult qualified service professionals for maintenance.
3 Precaution:
Page 8
-4-
PRECAUTION
5 Cleaning unit:
1) When cleaning, please make sure the unit is unplugged from the power
source.
2) No chemicals or detergent is recommended for cleaning.
3) Use a soft cloth lightly dampened with water to clean the exterior of the
unit only.
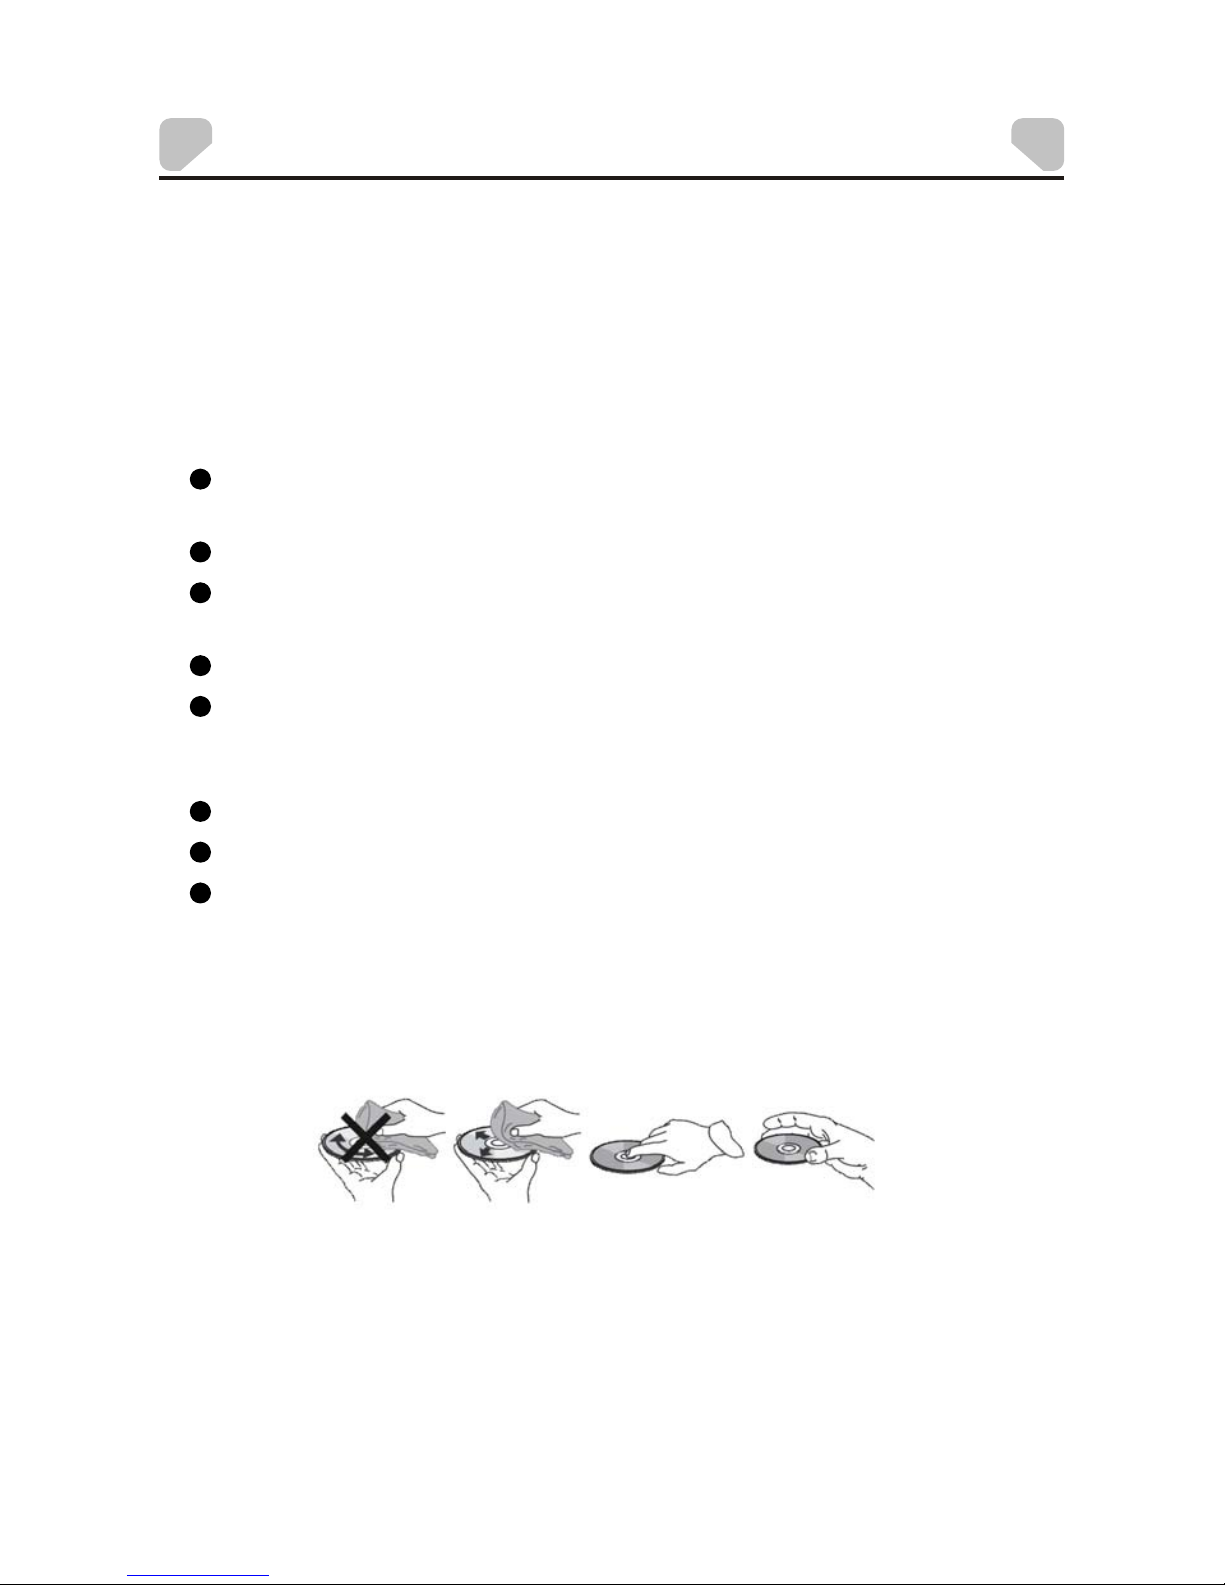
6 Disc handling
Do not leave the discs near heat sources, in direct sunlight, or in high
humidity.
Store discs in their cases when they are not being used.
Stacking discs or standing them at an angle without putting them in the
case can cause the disc to warp.
Do not touch the disc surface when holding a disc; hold it by the edges.
Fingerprints, dust, dirt or scratches on the disc can distort the picture or
reduce sound quality. Always handle carefully and make sure discs are
clean before use.
Do not stick paper or tape onto the disc.
Clean discs using a soft cloth, lightly wiping from the center outwards.
Do not use solvents such as benzine, commercially available cleaners
not intended for CDs or anti-static spray intended for viny1 LPs as these
may damage your disc.
Cleaning and handling the disc
Page 9
-5-
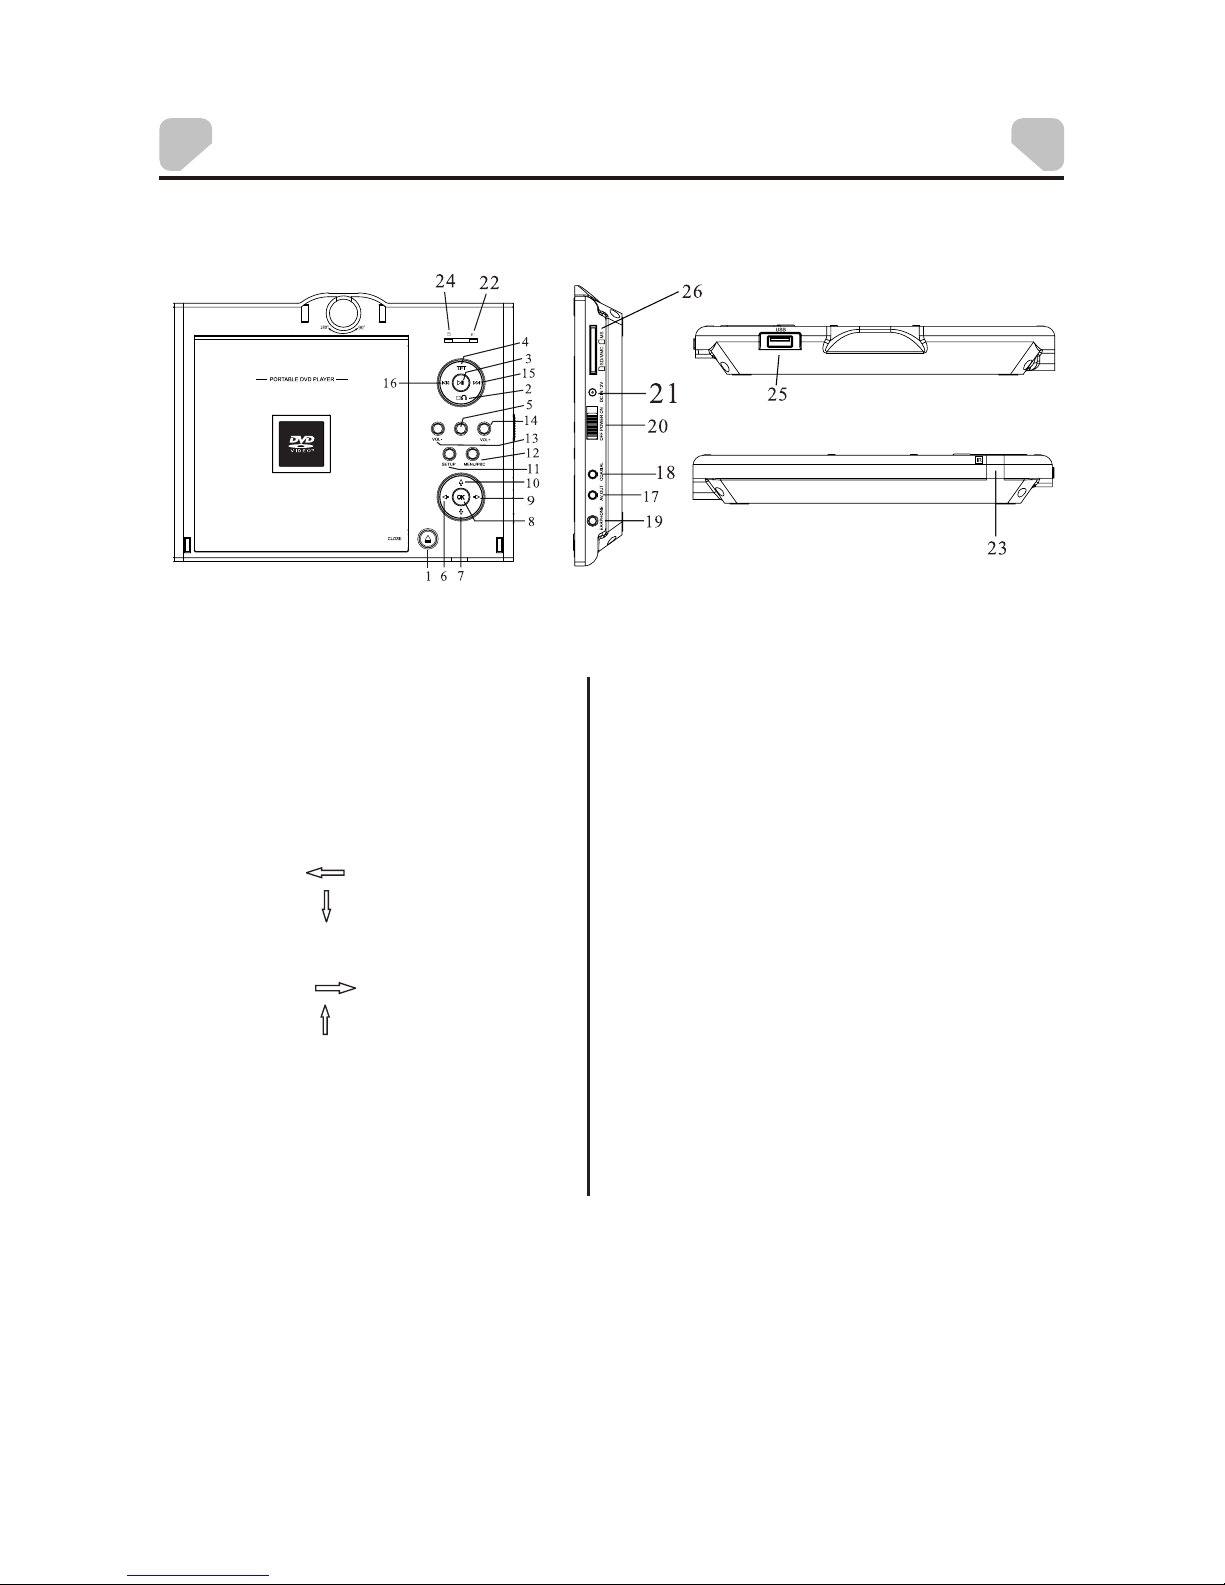
UNIT OVERVIEW
USB/CARD
1. OPEN DISC COVER
2. STOP/RETURN
3. PLAY/PAUSE
4. TFT
5. USB/CARD
6.
7.
8. ENTER
9.
10.
11. SETUP
12. MENU/PBC
13. VOL-
14. VOL+
15. NEXT
16. PREV
17. AV OUT
18. COAXIAL
19. EARPHONE
20. POWER(OFF/ON)
21. DC IN 12V
22. BAT TERY LED
23. IR
24. POWER LED
25. USB
26. SD/MMC/MS
Page 10
-6-
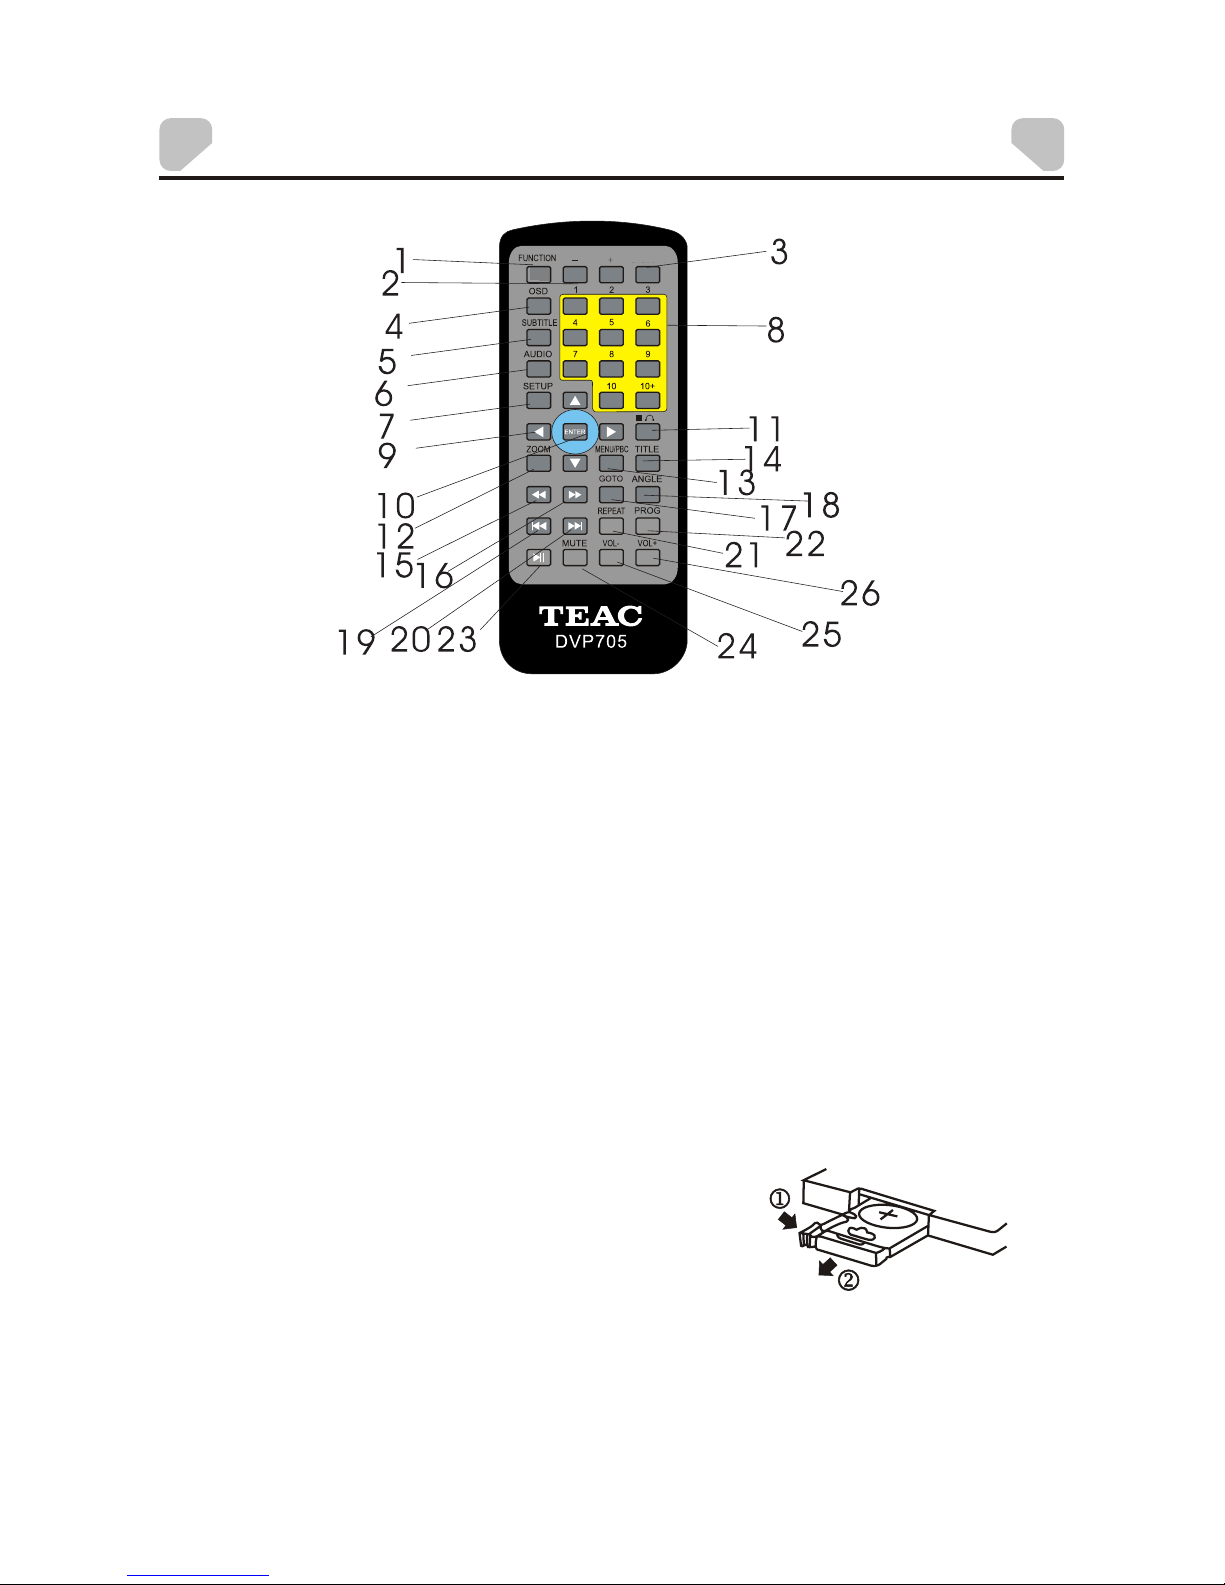
REMOTE CONTROL OVERVIEW
Battery installation
Remove thecover of the battery compartment of
the remotecontrol according to thediagram on the
right.
Step 1:Press the ridged area to the right.
Step 2:At the sametime, pull thebattery tray out.
Step 3:Place a CR2025 lithium battery on the tray
with thepositive side facing upward.
Step 4:Replace the cover.
Remote control
USB/CARD
1. FUNCTION
2. -/+
3. USB/CARD
4. OSD
5. SUBTITLE
6. AUDIO
7. SETUP
8. 0-9/10+NUMBER
9.DIRECTION BOTTON
10. ENTER
11. STOP/RETURN
12. ZOOM
13. MENU/PBC
14. TITLE
15. FAST REVERSE
16. FAST FORWARD
17. GOTO
18. ANGLE
19. PERV
20. NEXT
21. REPEAT
22. PROG
23. PLAY/PAUSE
24. MUTE
25. VOL-
26. VOL+
Page 11

KEY FUNCTION INTRODUCTION
Function Keys
1.FUNCTION
The FUNCTION button is used to adjust Brightness,Contrast Hue,Color,TV Display
2.+/-
Press “FUNCTION” to toggle through the settings, you can press “+/-“ to increase or
decrease the Brightness, Contrast, Hue, Saturation.
3. USB/CARD
Press this button to select USB or memory card pla yback. It allows you to playback
music, video and picture files.
4. OSD
Press repeatedly to switch or hide relative information of the playback.
5. SUBTITLE
Press SUBTITLE repeated until the desired language is sele cted.
Note: This function only works with discs which ar e encoded with subtitles. For USB/
Card video playback, this function will only works if the subtitle file is in the same
folder a nd has the same name as the video file.
6.AUDIO/LANGUAGE
Press repeatedly to select the available audio languages provided by the disc (DVD).
Press repeatedly to select the available audio channels provided by the disc (VCD).
7. SETUP
Press to enter/exit the setup menu
8. 0-9 / 10+ NUMBER
Press nu mber buttons to select tracks after the unit finishes reading the disc.
1>.If the track number is over 9,just push button 1-9,Example:push 8 to select track 8.
2>.If the track number is over 9,press 10+ once and a button among 1-10.Example:If
you select track 12,press 10+ once and button 2.
9. ARROW S( UP / DOWN / LEFT / RIGHT)
Directional button used for navigation within a selection menu.
10. ENTER
Confirm your selection or start playback.
11 STOP/RETURN
Press this button to enter pre-stop mode, you can press Play button to resume
playback. Press it twice to stop playback.
12.ZOOM
Press to zoom in/out t he scene. The available zoom ratios are: 2X, 3X, 4X,1/2, 1/3
and 1/4. In zoomed-in mode, the direction keys can be used to.(view the rest of the
picture.(Note: Applies to DVD, VCD, AVI, etc.)
13.MENU/PBC
Press to return to the DVD me nu when playing DVD.
When pla ying disc encoded with PBC function, press to display the PBCmenu. Press
it again to disable the PBC function. (Note: VCD2.0, SVCDhave PBC functi on whil e
DVD, VCD1.1, CD-DA and MP3 disc have noPBC function.)
Note: Some of the following buttons are on the remote control only, and some are on the
unit only. And the others are on both of the unit and the remote control.
-7--7-
Page 12

-8-
KEY FUNCTION INTRODUCTION
14. TITLE
Press Title button to return to the title menu of a DVD disc.
15. FAST REVERSE
Fast reverse playback. The available speeds are 2X, 4X, 8X, 16X and 32X.
16. FAST FORWARD
Fast forward playback. The available speeds are 2X, 4X, 8X, 16X and 32X.
17. GOTO
During playback, press to enter the GOTO menu. In the menu, use the direction key
[UP]/[DOWN] to select a setting item, then with the digit keys input a specific track,
disc time, track time, chapter, title, chapter time or title time to go to directly. Press
it again to exit the GOTO menu.
18.ANGLE
Press to switch the vi ewing angles.
(Note: This function only works with those discs encoded with multiple camera
angles.)
19 PREV
When PREV is pressed, the unit will automatically j ump to the previous chapter or
track.
20.NEXT
When NEXT is pressed, the unit will automatically jump to the next chapter or track.
21.REPEAT
Press this button to repeatedly play a title, chapter, track, disc.
22.PROGA M
Program playback allows you to enter the order in which yo u want the disc to play.
Press the PRGRAM button to display the program menu. Input the tracks in the order you desired.
Select PLAY PROGRAM to enter program play mode. Select CLEAR ALL to erase program list.
You can program up to 20 tracks in Program function. While in program play mode, press
PROGRAM button to exit program play and return to normal playback mode.
23. PLAY/PAUSE
Press to start a playba ck or resume the normal playback from fast forward, fast reverse,
frame-by-frame playback , etc.
Press to temporarily pa use a playback; press it again or to resume the pla yback.
24. MUTE
Press to switch off vol ume output. Press again to return to normal volume output.
25. VOL-
Decrease the volume output.
26.VOL+
Increase the volume output.
FRONT PANEL FUNCTION KEY
1>.TFT:
Press this key, screen power off, press again, it restores.
2>.Left/Right keys also with Backward/Forward function
3>.Down: This key with multi function, it is DOWN during setup status.
4>.UP: this key with m ulti function, it is UP during setup status.
NOTE: Main keys on the front panel have the same function as remote control.
This section only indicate keys which are not found on the remote control.
Page 13

The playeris powered by alithium-polymer battery that features a high
energy toweight ratio. It has no memory effect andthus it can be recharged
at anytime regardless of whetherit is fully or partially discharged. It takes
about 3~4hours to fully chargethe battery, and when charged, it canbe
used for abouttwo hours.
1.By AC/DCadapter
Connect the attachedAC/DC adapterto the DC INPUT jackon the unit,
then plug theadapter into a100V 240V ACoutlet.
2.By CigaretteLighter Adapter
Plug oneend of the cigarettelighter adapter into the DC INPUT jack on the
unit, thenplug the other endinto the cigarette lighter socket of a car.
NOTE: Make sureto switch off theunit before charging. The chargingindicator LEDchanging from red to green indicates that the battery has
been fullycharged.
CHARGING THE UNIT
CHARGING
Usage andMaintenance of the Rechargeable Battery
1.The working temperatureof the rechargeable battery ranges from0 to
45 .
2. Always unplug the unit when it is notbeing used or charged.
3.Heat isinevitably produced during theplayback, which is normal.
4.Do not subjectthe unit to strong impacts.
5. Keep itaway from humidityand overheat.
-9-
It need be full charged more than 3 times,then the battery will run the
best status.
Page 14
CONNECTIONS
-10-
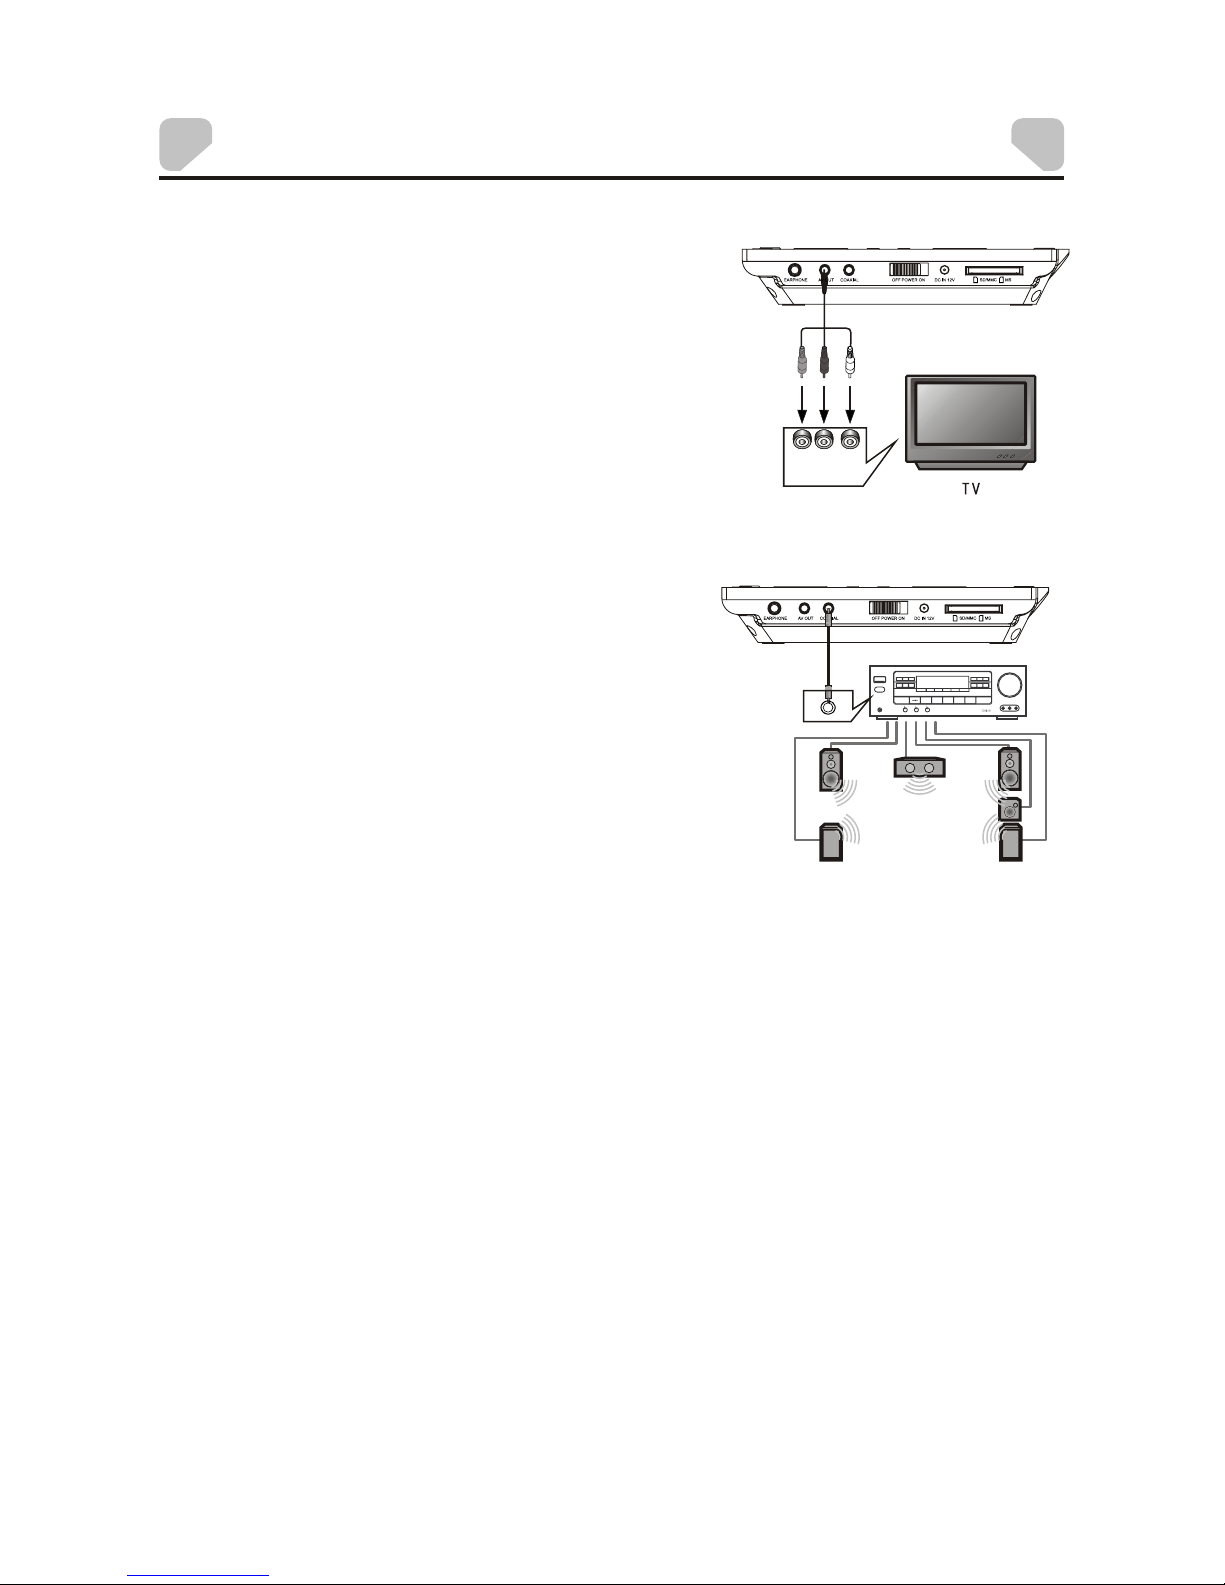
Connecting to Power Amplifier
This playerhas a coaxial digitalaudio
output terminal sothat you can connect
it toa power amplifier forhigher sound
quality.
Use a to
connect thecoaxial digital audio output
to thecoaxial digital audio inputof a
power amplifier.
coaxial cable(Not Included)
Connecting to TV
Yellow WhiteRed
RL
9,'(2
,QSXW
$8',2
,QSXW
This playerhas an AV OUT jack. You can
connect itto a TV forviewing.
U connect theAV OUT
jack to
se anAV cable to
the video inputterminal, L/R
channel audio inputterminals of aTV.
AMPLIFIER
COAXIAL DIGITAL
AUDIO INPUT
6XUURXQG/HIW
6SHDNHU
6XUURXQG5LJKW
6SHDNHU
6XEZRRIHU
)URQW5LJKW
6SHDNHU
)URQW/HIW
6SHDNHU
&HQWHU6SHDNHU
Page 15
-11-
SYSTEM SETUP
Menu Operation
1. Press [SETUP] on the remote control or on the unit to show the setup menu.
2. Press [LEFT]/[RIGHT] to select an item. The submenu of the selected item will be
displayed.
3. Press [UP]/[DOWN] to select an item you desire to set in the submenu, then press
ENTER]/[RIGHT]/[OK] to enter. Use [UP]/[DOWN] to select an option, then press
[ENTER]/[OK] to confirm, or press [LEFT] to cancel.
4. Then you can press [UP]/[DOWN] to continue to set other items in the submenu.
5. Press [LEFT] to go back to the previous menu of th e current one.
6. Press [SETUP] again to exit the setup menu. You can also move the highlight to ,
then press [ENTER]/[OK] to exit.
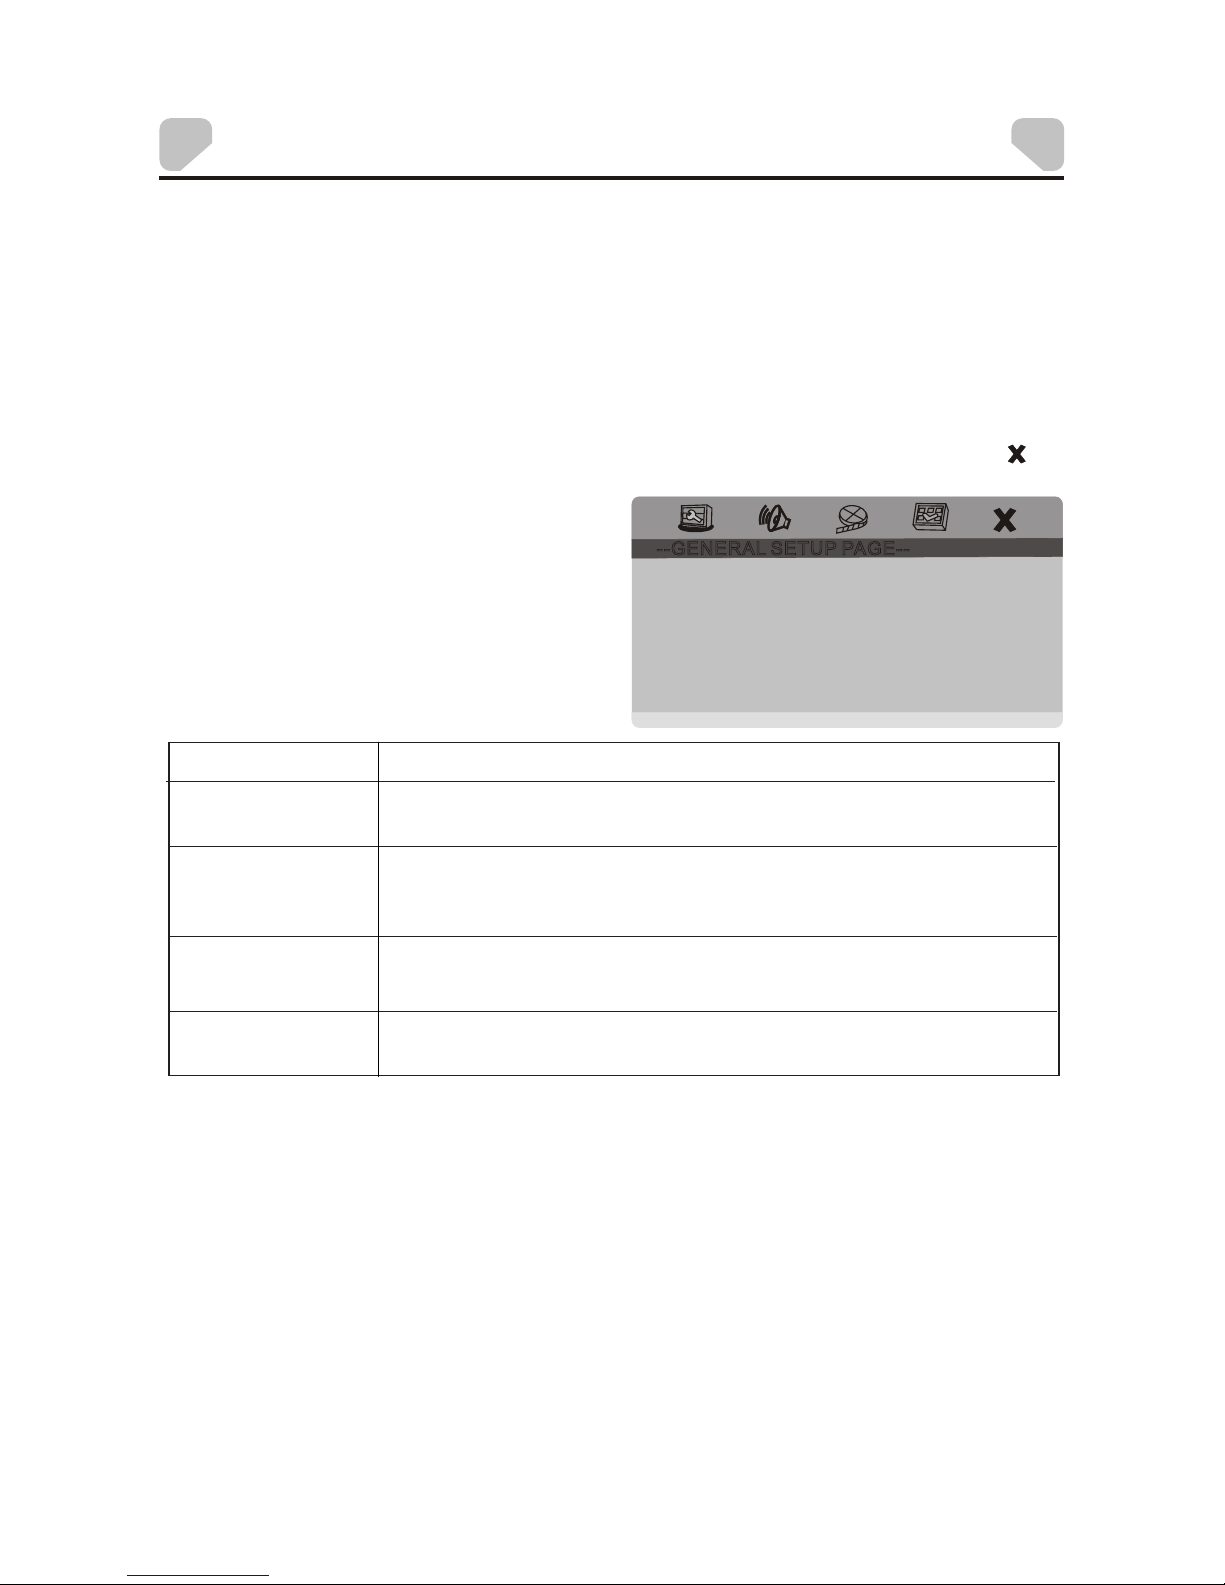
1 GENERAL SETUP PAGE
There are six items in the GENERAL
SETUP PAGE. They are TV DISPLAY,
ANGLE MARK, OSD LANGUAGE,
CLOSED CAPTIONS, SCREEN SAVER
and LAST MEMORY.
1.1 TV DISPLAY
1.2 ANGLE MARK
Select the TV screen format
Set this item to ON. When a disc with multiple camera angles is playing, an angle mark
will display on the screen. Then you can view the video of different camera angles by
pressing [ANGLE] on the remote control.
Set this item to OFF to hide the ang le mark.
--GEN ERAL SETUP PAGE--
TV DI SPLAY PS NORMAL / PS
NORMOL / LB
WIDE
WIDE SGUEEZE
ANGLE MARK ON ON
OFF
OSD LANG ENG ENGLISH
CAPTIONS OFF ON
OFF
SCREEN SAVER ON ON
OFF
LAST MEMORY OFF ON
OFF
GO TO G ENERA L SE TUP PAGE
Choo sin g this s ett ing i f y our DVD con nec t to nor mal rati o T V, you c an fill the
movi e t o the en tir e scr een of your TV . T his m igh t m ean t he par ts of th e pictur e
(the le ft and r igh t edg e) won ’t be se en.
ITEM
DESCRIPTION
Choo sin g t his setting if yo ur DVD conn ect to no rmal rat io TV, yo u will s ee the
movi es in the ir origi nal as pec t ratio. Yo u w ill see the en tir e f rame of the mo vie s,
but it wil l t ake up a sm all er portion of the sc reen ver tic all y.
The mov ie mig ht appea r w ith bl ack bars at th e t op and t he bot tom of the scr een .
Choo sin g t his s ett ing if your DV D p lay er is co nne cted to a w ide scre en TV. If y ou
choo se thi s set tin g a nd you d on’ t h ave a wi de scr een T V, the Imag es on the
scre en may appe ar dis torted d ue to verti cal co mpressio n.
Choo sin g t his s ett ing , the di spl ay of scree n w ill be comp res s to 4:3 ra te, but it
won’ t e ffe ct th e d isp lay of T V w hen conn ect ing AV out.
(4:3 )No rma l/PS
(4:3 )No rma l/LB
(16: 9)W ide
Wide Sg uee ze
1.4 CAPTTONS
Set this item to ON. When a disc encoded with closed captions, the closed captions will
be shown on the screen. Set this item to OFF to hide it.
You can also press [SUBTITLE] on the remote control to show or hide the closed
captions.
NOTE: This function only works with those discs encoded with closed captions.
1.3 OSD LANGUAGE
Set the on-screen display language in this item.
Page 16
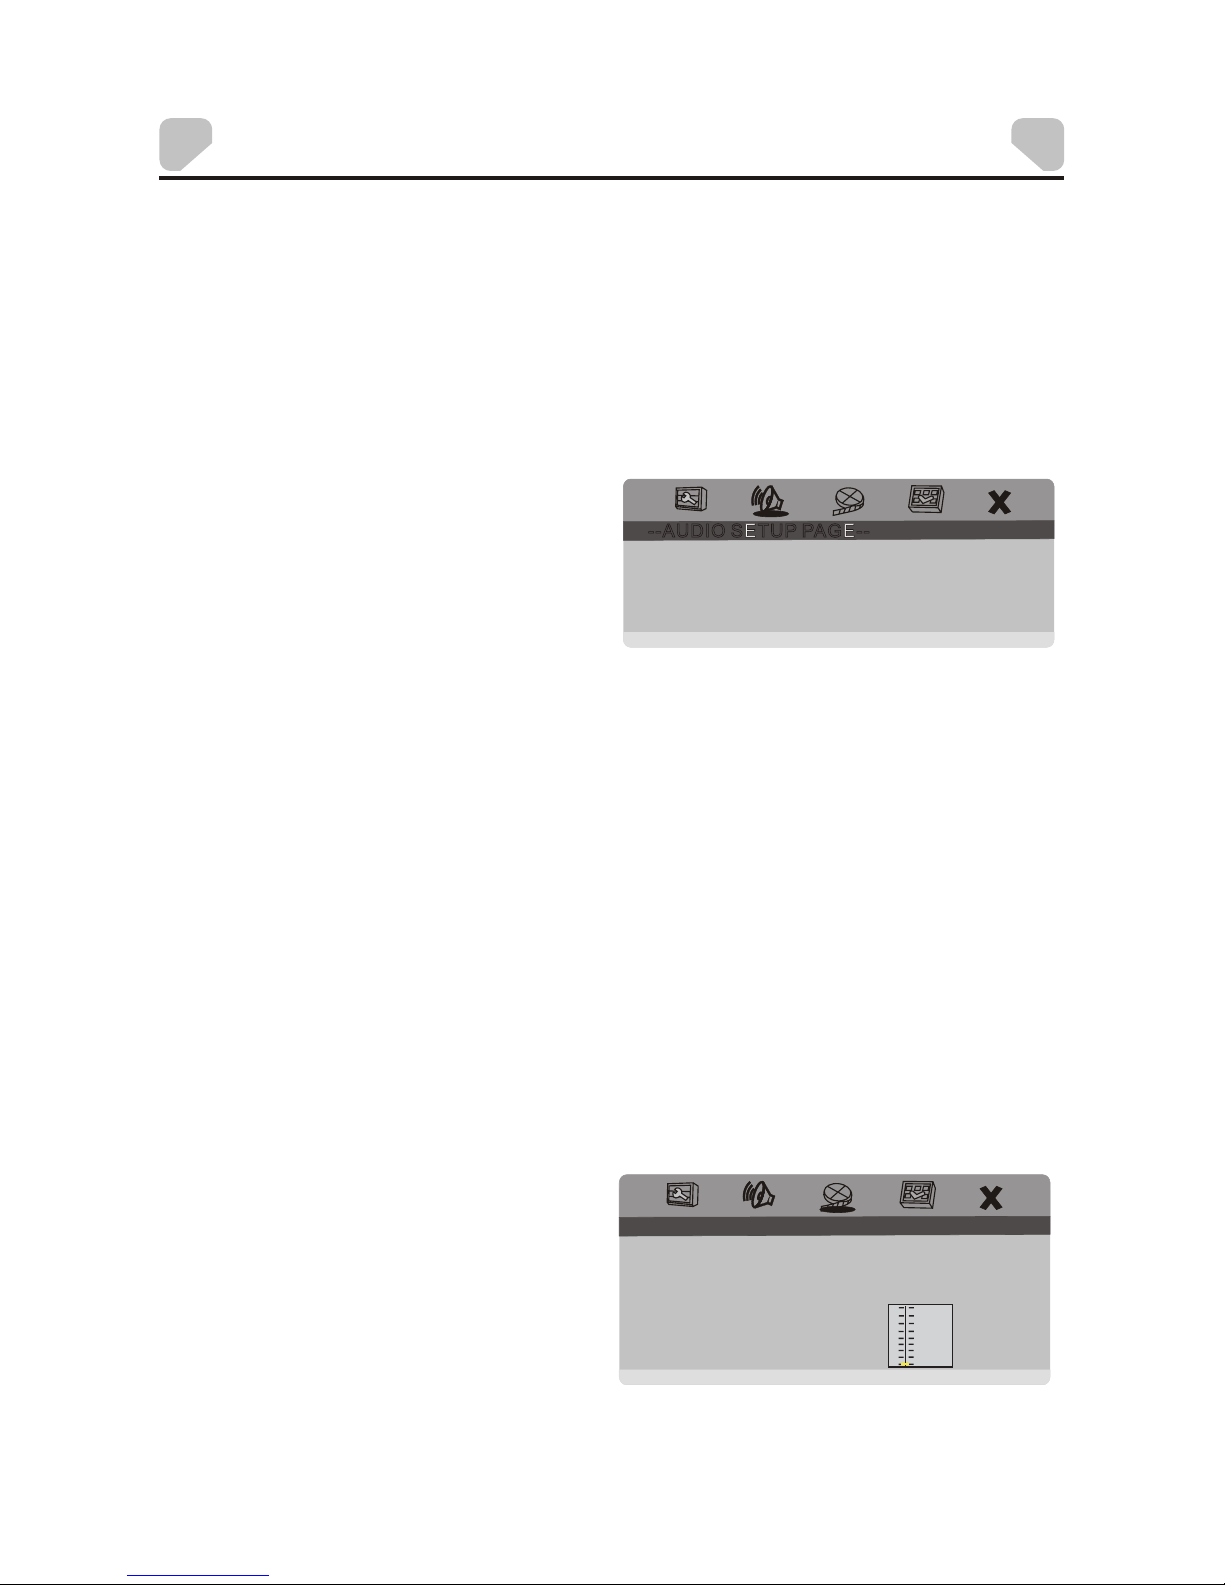
2. AUDIO SETUP
There are three items in the AUDIO
SETUP PAGE. They are ANALOG
AUDIO, DIGITAL AUDIO and DOLBY
DIGITAL .
-12-
SYSTEM SETUP
--AUDIO SETUP PAGE--
SPEAKER SETUP
SPDIF SETUP
DOLBY DIGITAL SETUP
EQUALLZER
GO TOAUDIO SETUPPAGE
1.5 SCREEN SAVER
ON: If the image remains motionless on the screen, for example the disc is paused,
stopped etc, for several minutes, a screen saver will appear on the screen. You can
press any key or button to wake it up.
OFF: Disable the screen saver function.
1.6 LAST MEMORY
ON: Each time you turn off the unit or stop the disc, it will memorize the last play time.
Next time you turn on the unit and play the same disc, the unit will play from that
memorized point.
OFF: Disable the last memory function.
2.1 SPEAKER SETUP
2.1.1 DOWNMIX MODE
LT/RT: The 5.1-channel audio is mixed into left channel and right channel and
is output via the FR and FR speaker respectively.
STEREO: The 5.1-channel audio is mixed into stereo signal and is output via
the FR and FL speaker.
NOTE: This function only applies to the Dolby AC -3 encoded 5.1-channel discs.
2.1.2 OUTPUT DYNAMIC COMPRESS
This function can compress audio signal with wide dynamic range proportionally to
reduce intense impact to speaker.
2.2 SPDIF SETUP
2.2.1 DIGITAL OUTPUT
SPDIF/ OFF: There will be no digital audio signal output. (Coaxial off)
SPDIF/RAW: The digital audio signal output will be in raw format.
SPDIF/PCM: The digital audio signal output will be in PCM format.
--DOLBY DIGITAL SETUP PAGE--
DUALL MONO STR STEREO
L-MONO
R-MONO
MIX-MONO
DYNAMIC
GO TO DOLBY DIGITAL SETUP PAGE
FULL
3 / 4
1 / 2
1 / 4
OFF
2.3 DOLBY DIGITAL SETUP
2.3.1 DUAL MONO
STEREO: The player outputs the leftchannel audio and right-channel audio
via the FL and FR speaker respectively.
L-MONO: The player outputs the leftchannel audio only via both the FL and
FR speaker.
2.2.2 LPCM OUTPUT
When DIGITAL OUTPUT is set to SPDIF/PCM, this item is available.
Select a sample rating for the analog audio output. There are two options, 48KHz
and96KHz.
NOTE: Some amplifiers don't support 96KHz sampling which will affect the coaxial
output.
Page 17
-13-
SYSTEM SETUP
2.3.2 DYNAMIC
When you watch films with large dynamic scope in low volume, for example at
night,you can adjust the dynamic val ue up to avoid losing sound details resulting
from thelow volume.
2.4 EQUALIZER SETUP
The Equalizer S etup help you select
your interested music style.
--EQU ALIZER PAGE --
EQ TYP E NO NE NONE
RO CK
PO P
LI VE
DA NCE
TE CHNO
CL ASSIC
SO FT
GO TO E QU AL IZ ER P AGE
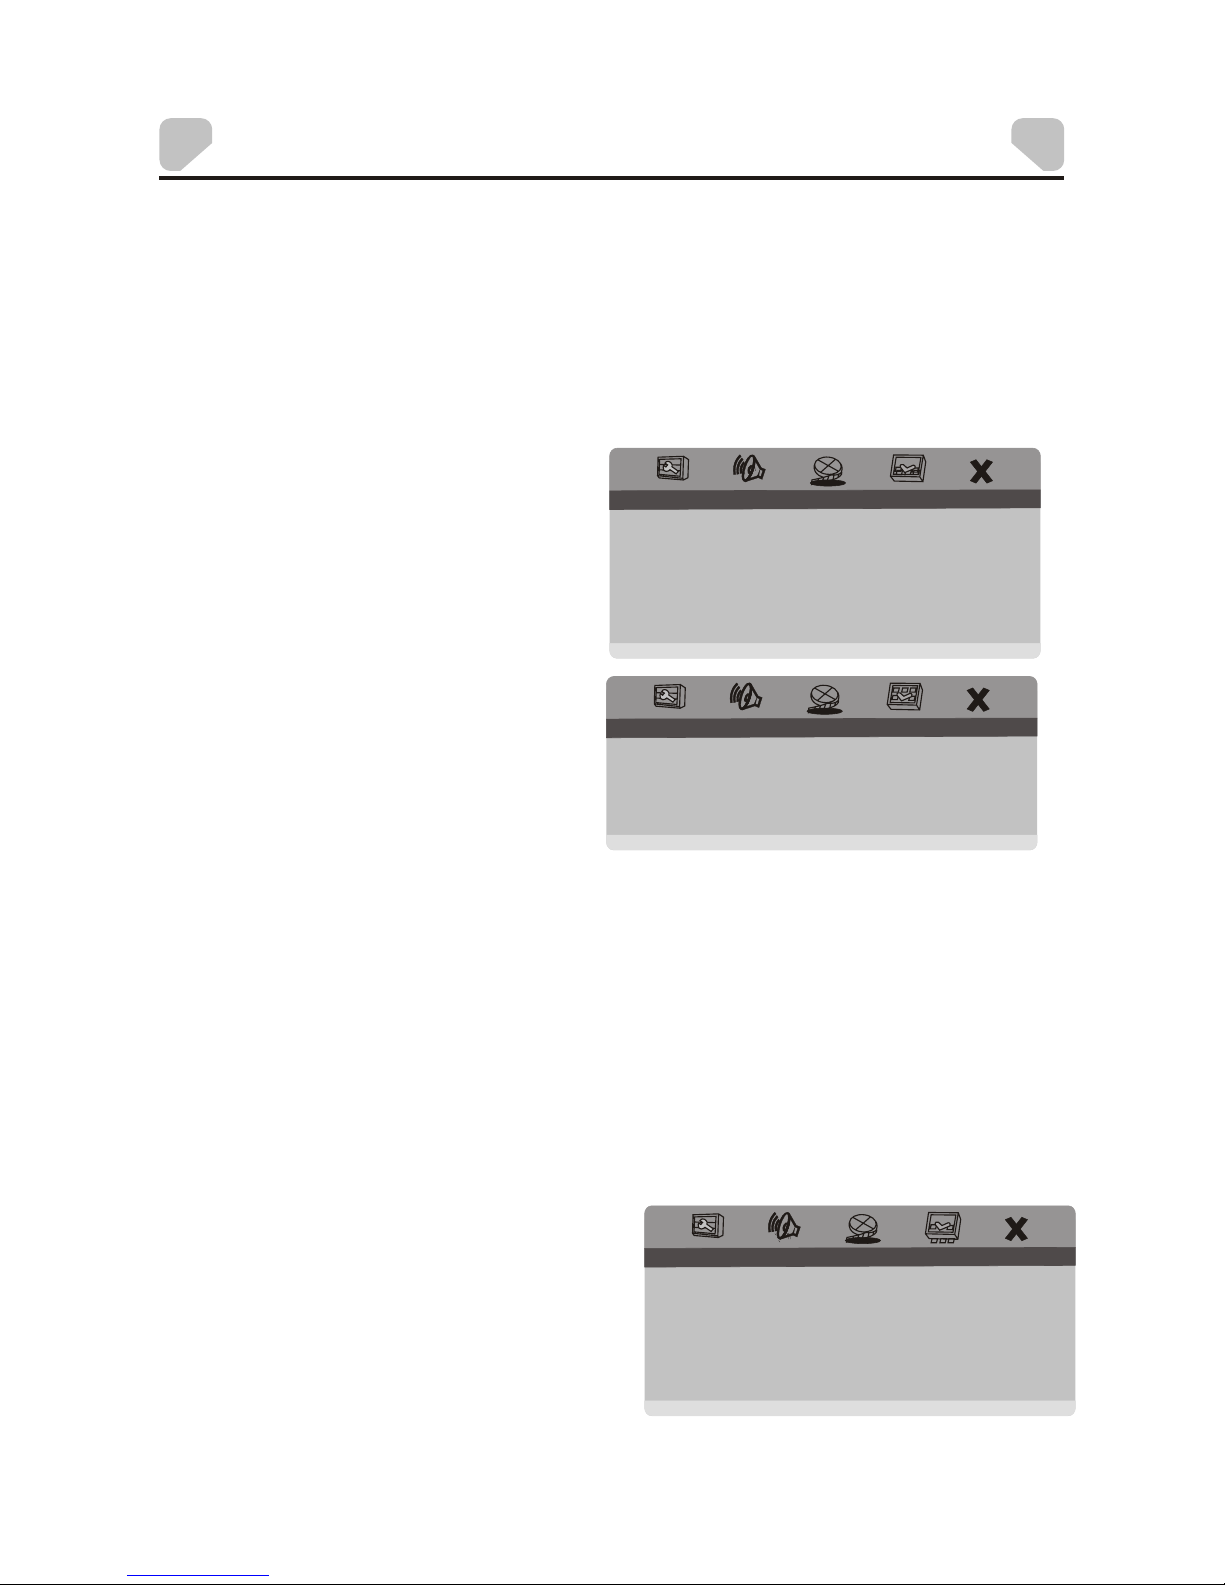
3.0 VIDEO SETUP
There are two items in the VIDEO
SETUP PAGE.
The COLOR SETTING menu is used to
setup the picture quality of the
connected TV set, while the PANEL
QUALITY menu is used to setup the
picture quality of the LCD of the unit.
--VID EO S ETUP PAGE--
COLOR SE TT IN G
PANE L QU AL IT Y
GO TO V ID EO S ET UP PAGE
3.1 COLOR SETTING
3.1.1 SHARPNESS
There are three options (HIGH, MEDIUM and LOW) for you to choose in this item.
R- MONO: The player ou tputs the right-channel audio only via both the FL and FR
speaker.
MIX- MONO: The player outputs the average signal of the left-channel and
rightchannel audio via the FL speaker and the FR speaker.
NOTE: This function only applies to the Dolby AC -3 encoded 2-channel discs.
4.0 PREFERENCE SETUP
If there's no disc in the disc tray, the
disc tray is open or the disc in the disc
tray is stopped, this item is available.
There are seven items in the
PREFERENCE SETUP PAGE. They are
TV TYPE, PBC, AUDIO, SUBTITLE,
DISC MENU and DEFAULT.
--VID EO S ETUP PAGE--
TV TYP E PAL
PBC O FF
AUDIO ENG
SUBTIT LE ENG
DISC M EN U ENG
DEFU LT
R ES ET
GO TO V ID EO S ET UP PAGE
3.1.2 BRIGHTNESS, CONTRAST, HUE and SATURATION
Enter these items respectively, use direction key [LEFT]/[RIGHT] to adjust the value,
then pre ss [OK] to confirm it.
3.1.3 GAMMA
There are four options (HIGH, MEDIUM, LOW and NONE) for you to choose in this item.
3.1.4 LUMA DELAY
There are two options (0T and 1T) for you to choose in this item.
3.2 PANEL QUALITY
Please refer to the COLOR SETTING menu.
Page 18

-14-
SYSTEM SETUP
4.1 TV TYPE
This product supports both NTSC (National Television System Committee) and PAL
(Phase Alternating Line) television broadcasting standards.
PAL: If the connected TV is PAL system, select this mode. It will change the video
signal of a NTSC disc and output in PAL format.
AUTO: If the connected TV is multi system, select this mode. The output format video
signal of the disc will be in accordance with the video signal of the disc.
NTSC: If the connected TV is NTSC system, select this mode. It will change the video
signal of a PAL disc and output in NTSC format.
NOTE: If a wrong selection is made, the viewing image will be very poor. In such
case,you are supposed to change the option in this item to fix the error.
4.2 PBC
ON: Activate the PBC function.
OFF: Disable the PBC function .
NOTE:
This function only works with those discs encoded with PBC function such as
VCD 2.0, etc. DVD, VCD1.1, CD-DA and MP3 disc have no PBC menu.
4.3 AUDIO,SUBTITLE and DISC MENU
Select a preferred audio language, subtitle language and disc menu language in
these items.
You can also change the audio language by pressing [AUDIO] and the subtitle
language by pressing [SUBTITLE] on the remote control.
NOTE: If the selected languages in these items are not available for the currently
playing disc, the disc's default settings work.
4.4 DEFAULT
Restore all setting to factory default setting.
5.0 PASSWORD SETUP
PASSWORD ON/OFF
Password mode on: You need to input password to revise the parent class
Password mode off: No need input password to revise the parent class.
Choosing this option, press ENTER button, revise password.
Note: factory default code is 8888
Page 19
-15-
PLAYBACK
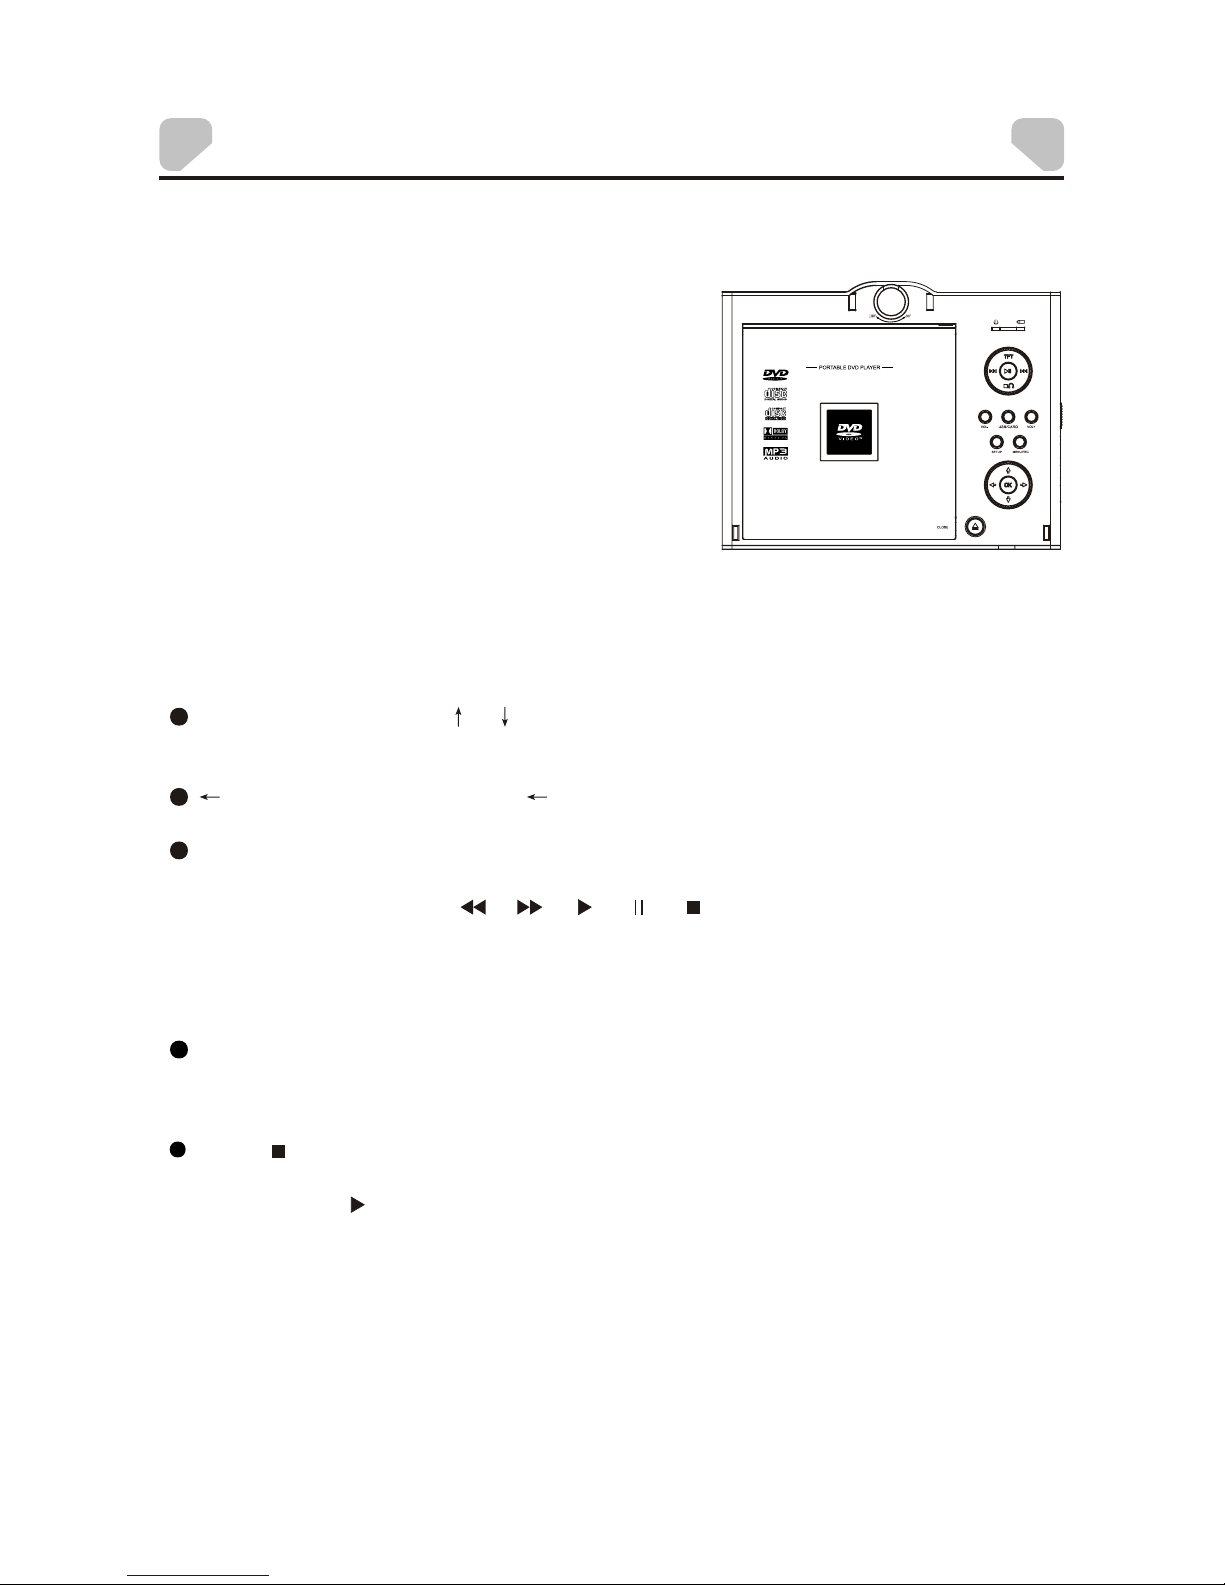
After allthe connections was madecorrectly.Switch on the unit. Now, itis
ready toservice!
Loading and Playing a Disc
A. After connectingpower to the unit, set the
power switchto the ON position .
B. Press[OPEN] to open the discdoor. Placea
disc init with the label side facing up.
C. Closethe disc tray. The unit will load the
disc andstart playing.
JPEG PLAYBACK
Place aJPEG disc, USB or Card into the unit,the content menu will
Press [ ] to enter the thumbnailmode to preview the pictures.
In the thumbnail mode, use the direction keysto select a picture, then press
[ENTER]/[OK]/[ ] to startthe playback from theselected picture.
In the thumbnail mode, use the direction keysand [ENTER]/[OK] to make
selection of Slide Show, Menu, Prev or Next at the bottom of the screen.
Slide Show: Start slide show playback.
Menu: Enterthe instruction menu for remote key function. In the menu,
press [ENTER]/[OK]to turn over tothe next menu page and again to exit the
instruction menu.
display onthe screen. Select a JPEG file and press ENTER/OK to view
picture infull screen. For moreinfo on operating the disc content menu,
please referto MP3/AVI Playbackabove.
MP3/AVI PLAYBACK
After theunit loads a MP3/AVI disc, USB or Card, the content menu will
display on the screen.
Use the directionkey [ ]/[ ] to select a folderor a file,then press
[ENTER]/[OK] to enter the selected folderor play the selected file. You can
also usethe digit keys to make selection of a folder to enter or a file to play.
[ ] :Press the direction key[ ] to return to the previous menu. During a
playback, to returnto the previousmenu, you needto stop theplayback first.
[REPEAT]: Press to selecta repeat mode, SINGLE, REPEAT ONE,
REPEAT FOLDER or FOLDER.
NOTE: During playback,[ ], [ ], [ ], [ ], [ ](press to stop the playback),
[VOLUME+/-], [MUTE], etc. are also active.Please refer to the KEY
FUNCTION chapter for details.
Page 20
-16-
PLAYBACK
[ZOOM]: During the playback, press [ZOOM]repeatedly to zoom in/out the
picture orreturn to its originalsize. When the picture is zoomed in, the
direction keyscan be used to move the picture.
[ ]/[ ]: Pressto skip tothe previous/ nextpicture during playback.
Digit Keys: Duringplayback, the digitkeys can beused to inputa photo
number togo to directly.
[ ]/[ ]: Press to rotate the picture counterclockwise/ clockwiseduring the
playback.
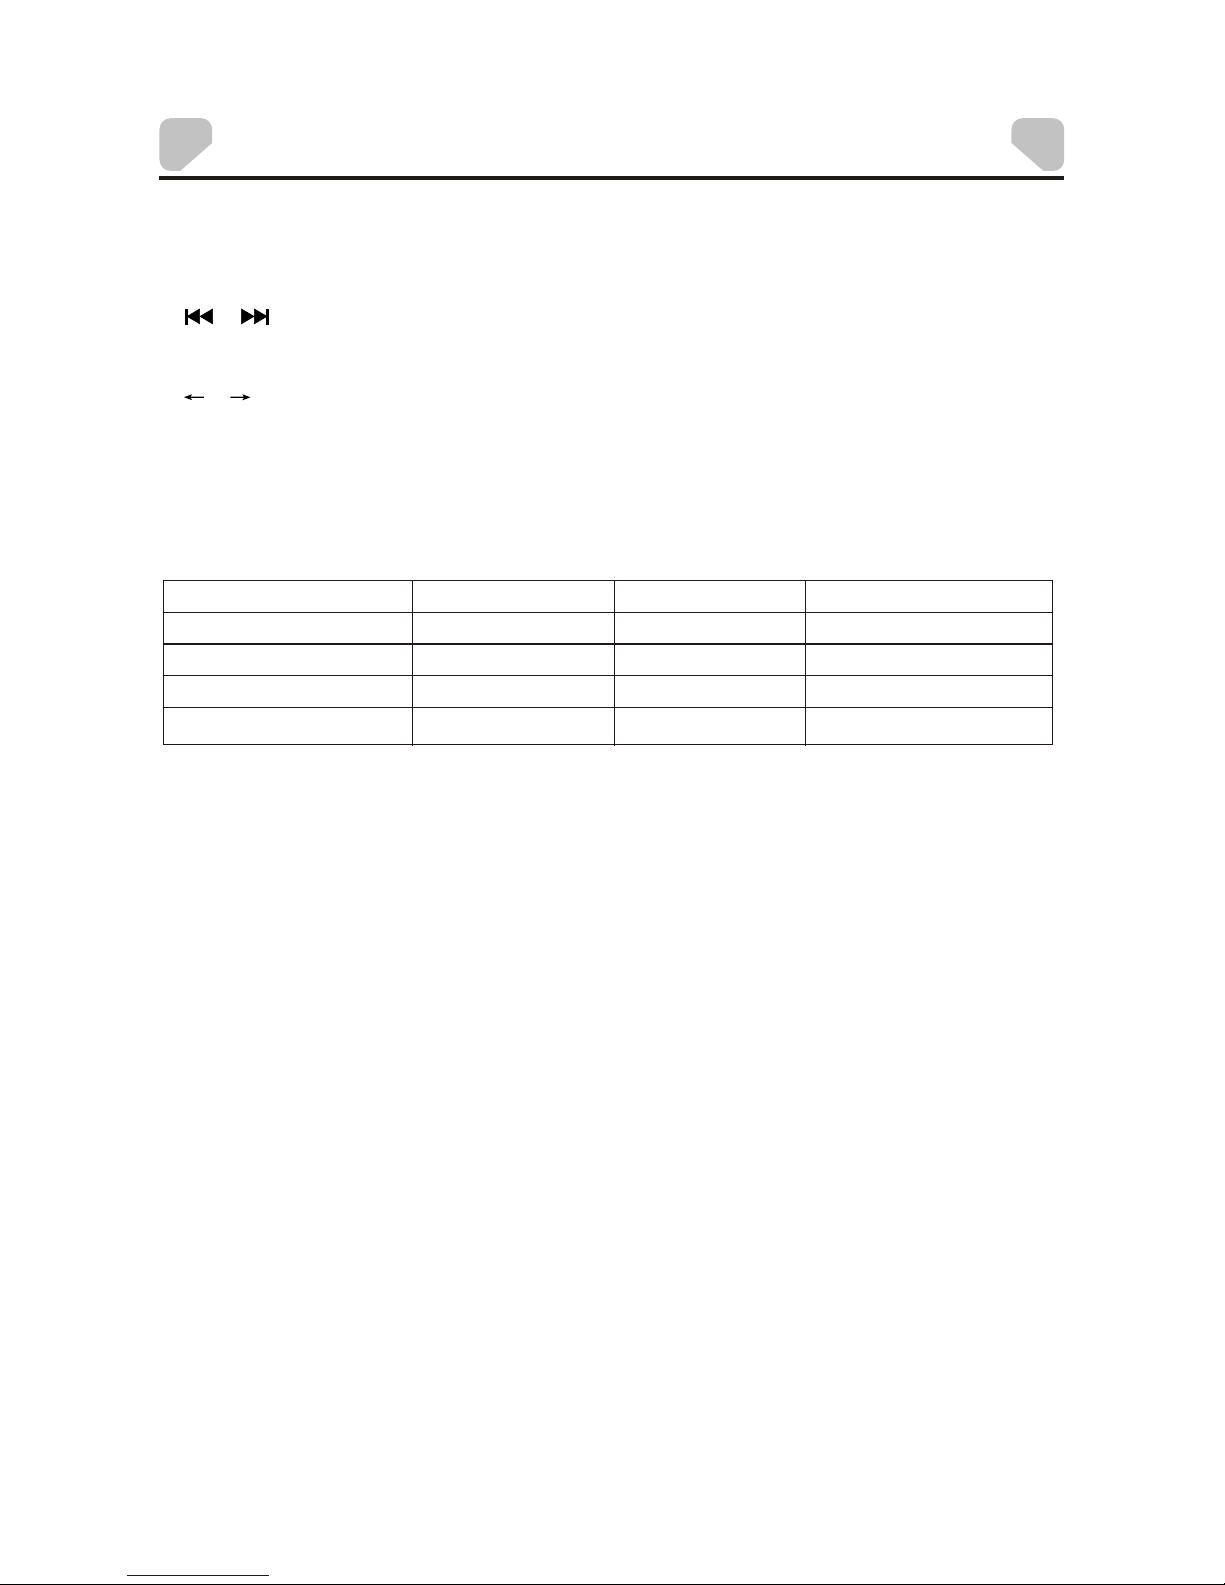
AVI Playback
AVI disc featureshigh quality that is comparable withthe DVD's with
larger capacity. For example:
Capacity (1.5H movie)
About 800MB - 1GB
About 1.5GB - 2GB
About 600MB - 800MB
1.38 Mb/s (352x288)
6.5Mb/s
0.88Mb/s(720x576)
Speed (Mb/s)
Quality
Good
Excellent
Excellent
VCD(MPEG-1) DVD(MPEG-2) AVI
Hardware Requirement Low Medium High
Note:
• we cannot guarantee compatibility (operation and/or bus power) with
all USB mass storage devices and assumes no responsibility for any
loss of data that may occur when connected to this unit.
• With large amounts of data, it may take longer for the system to read
the contents of a USB device.
• Some USB devices may not be properly recognized.
• Even when they are in a supported format, some files may not play or
display depending on the content.
Page 21
TROUBLESHOOTING
-18-
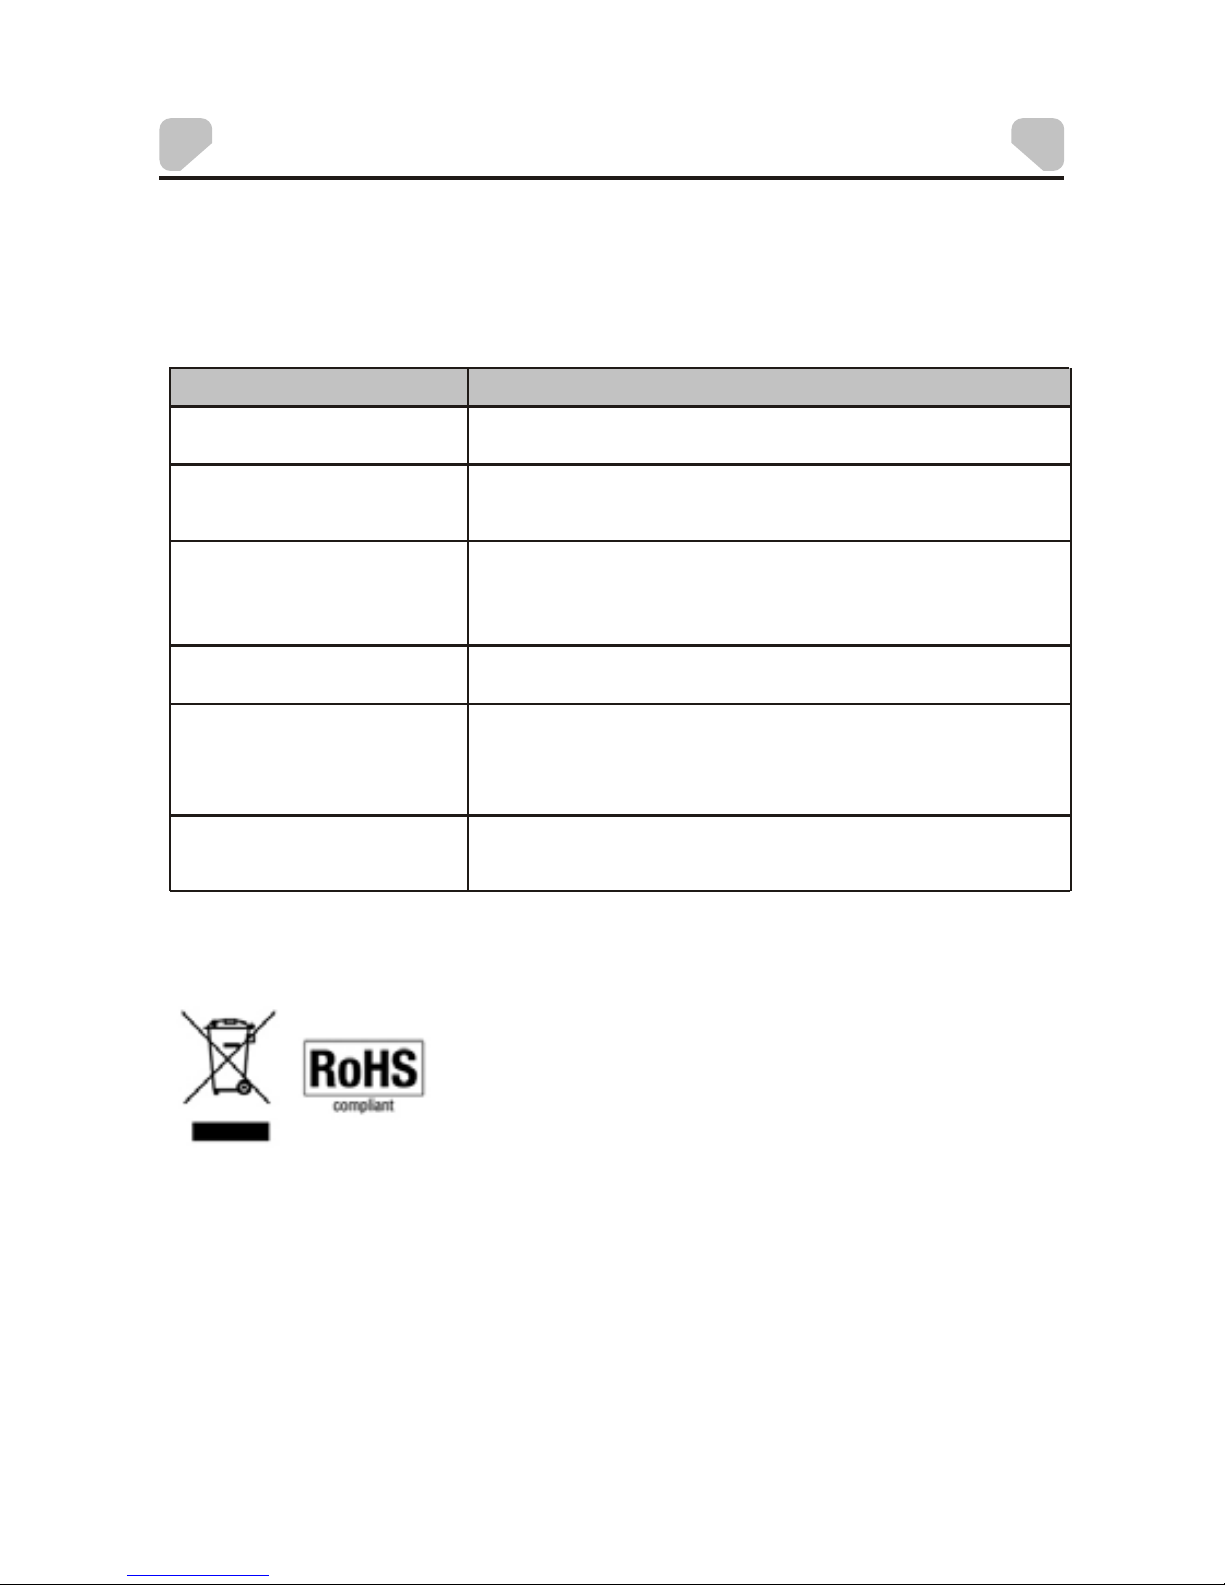
Before resorting to maintenance service, please kindly check by yourself with the
following chart.
No Power supply
PROBLEM
POSSIBLE SOLUTION
Check the connection berween DVD player and TV set, And
check that the TV set is working properly
No picture
No sound
The disc is not played
Doesnot react to signals
from the remote control
Picture interference
Check that the plug has been inserted properly into the sockek
Check the connection between DVD player and any other
connected units,And check that TV set and amplifier are
working properly and adjusted correctly.
Check that the disc has been inserted correctly,And clean the disc.
Remove any objects blocking the signal between remote control
and DVD player.And check that the remote control is aimed at
the front panel sensor And check batteries and replace as required
Check the disc for dust and scratches
Clean or replace the disc
Environment friendly disposal
You can help protect the environment!
Please remember to respect the local regulations:
Hand in the non-working electrical equipments to
Appropriate waste disposal centre.
Page 22
-17-
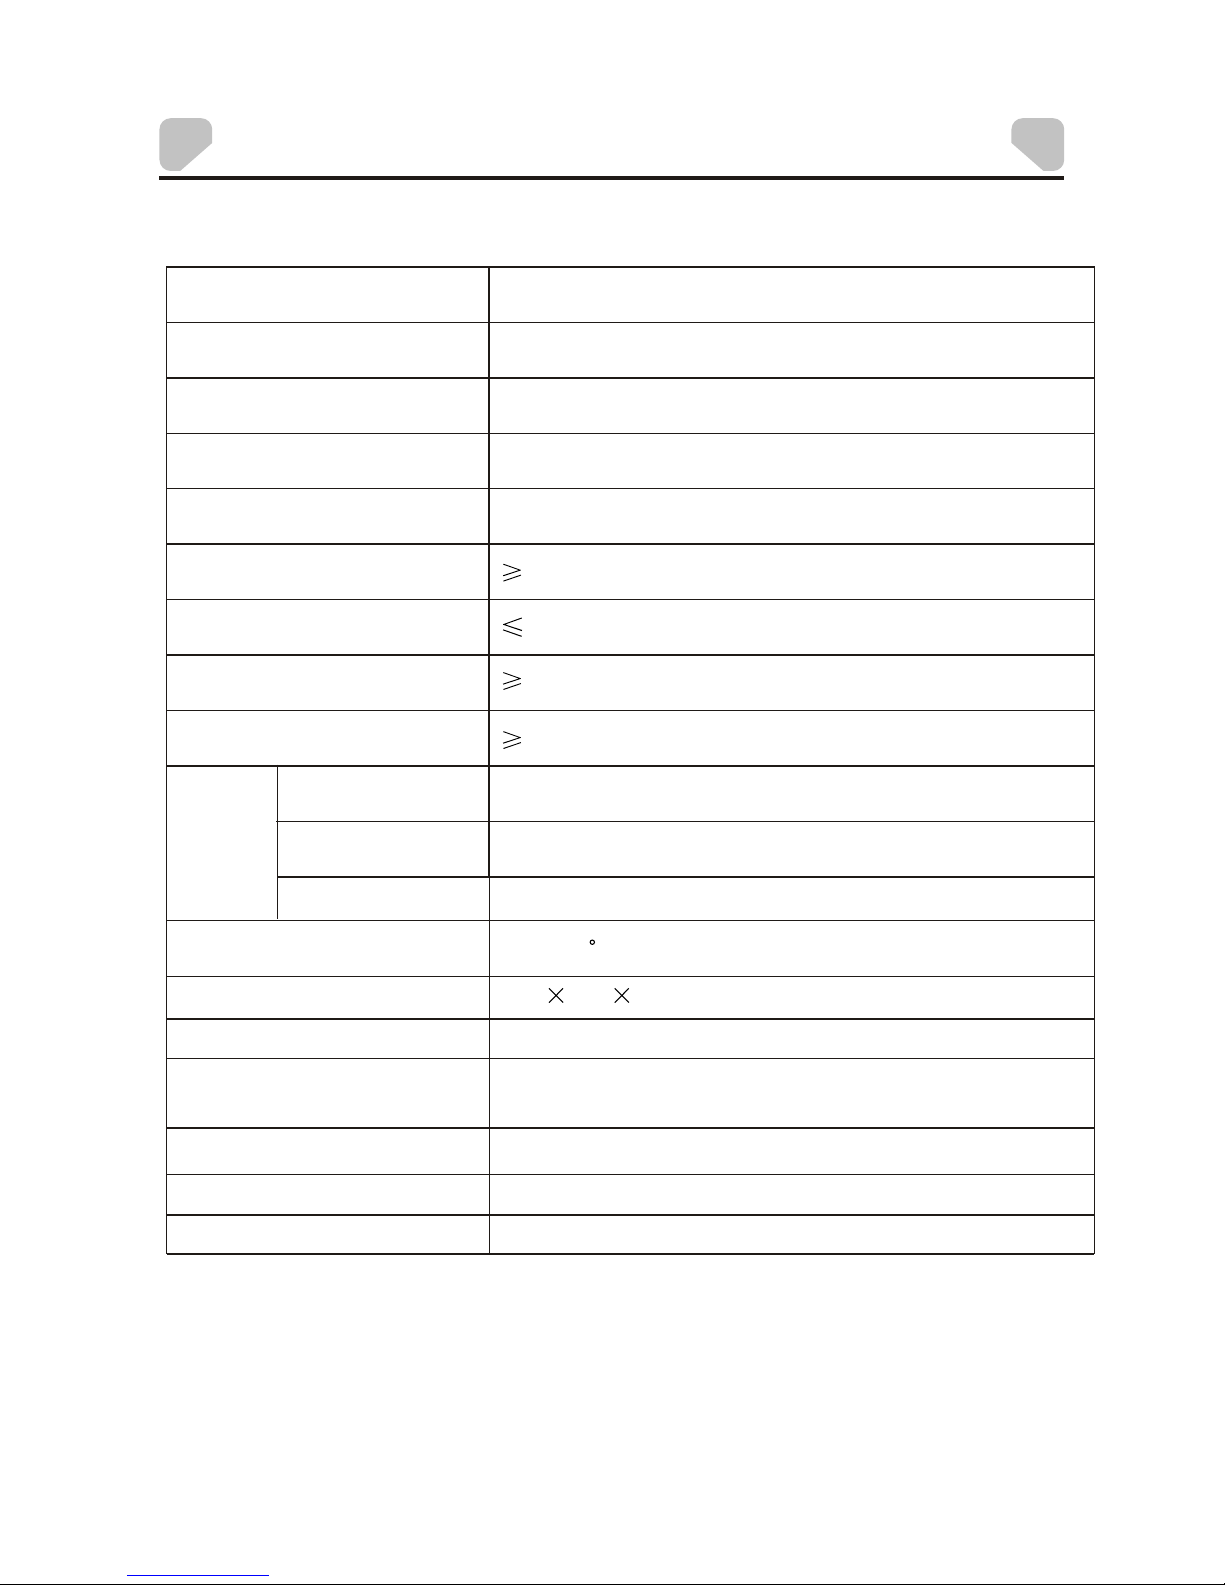
Power Consumption
< 12W
Laser
Semiconductor laser,Wavelength 650mm/780mm
Video Signal System
NTSC/PAL/AUTO
Audio Frequency Response
20HZ to 20KHZ ± 3db
Audio S/N Radio
Audio THD + Noise
85db
Channel Separation
Dynamic Range
Analogy Audio Output
2Vms ± 10%(Impedance 10Kohm)
Digital Audio Output
1.6Vp-p ± 20%
SPECIFICATIONS
Power Supply
DC 12V:1A
Video Output
1.0Vp-p ± 20%(750ohm Unbalanced)Sync Negative
Operating Temperature
Dimension(W x L x D)
MASS(approx)
5 to 35 C
206 163 42(mm)
800g
80db(1KHZ)
70db(1KHZ)
80db
Output level
Supported Disc Type
Supported Media Type
Supported USB capacity
Duration operate time
on battery mode
2 hours
DVD / CD / HDCD / CD-R / CD-RW / Picture CD
AVI, MP3 and JPEG
16 GB
Page 23
 Loading...