

Page 1
USER MANUAL
WARRANTY INFORMATION INSIDE. PLEASE READ
www.teac.com.au
IMPORTANT !
DAB450
Trademark of TEAC Corporation JAPAN
DAB+/FM digital radio
Page 2

WARRANTY PROCEDURE
v1.5.2: DEC 2011
Please read th e ow n er ’s m anu al caref ul l y and ensure that you have followed the correct installation and operating
procedures.
1. Please read this warranty card.
2. Keep your pur chase r ec eip t t o en abl e you t o pr oc eed qui ckly in th e even t of a Warranty Servic e.
3. If you require Warranty Service, please contact the TEAC Customer Support Hotline at 1300 553 315 for
assistance. Pl eas e ens u re that you h ave th e m odel number, serial number an d purchas e r ec eipt ready when
you call.
Please complete the section below and keep this information for your own records.
Owner’s Name
Owner’s Address
Postcode
Model Name/No. Serial No.
Dealer’s Name
Dealer’s Address
Postcode
Authorised Service Centr es in Major A ustralian Cities
NSW
151 Arthur Street
Homebush West, NSW 2140
Queensland
Unit 1, 320 Curtin Ave West
Eagle Farm, QL D 4009
Western A ust r alia
Unit 2, 50 Pilbara Street
Welshpool, WA 6106
South Australia
11 McInnes Street
Ridleyt on, SA 5008
Victoria
282 Normanby Road
South Mel b our n e, V IC 32 05
Thank you for selecting a TEAC product
.
If you should r equire assistance with your product regarding its setup
or operati on, or if any difficulties ari se , please call us directly for advice
between Monday to Fri day at 8.30AM – 6PM AEST at the
TEAC Customer Support Hotline
1300 553 315
teacservicesupport@awa.com.au
www.teac.com.au
Page 3
WARRANTY INFORMATION
v1.5.2: DEC 2011
Our g oods com e with guarantees that cannot be excluded under the Australian Consum er Law. You are
entitled to a replacement or refund for a major failure and for compensation for any other reasonably
fo re se eable l os s or damag e. You ar e al s o e n t i t l e d t o h av e the goods repaired or replaced if the goods f ail
to be of acceptable quality and the failure does not amount to a major failure.
Warranty Terms & Conditions
1. TEAC war rant s t hat t his pr oduct is f r ee fr om def ects in mat eri al an d wor km ans hip u nder n ormal dom estic use with
reason able care and skill. Mainten ance and c leaning ( i.e. las er head) is not cover ed by this warrant y. The TEAC
warrant y on l y applies to TEAC products purchased, used and serviced in Australia.
2. The ben efits to t he c onsum er given b y this W arrant y ar e in addit ion to other r ights and r emedies of the c onsum er
under a law in rel at i on t o goods or s er vices to whic h th e w arranty rel ates, b ein g the Austral ian Consu m er Law.
3. Refund or replac emen t via y our r etail er is av ail able f or a peri od of 14 da ys after purch ase f or goods that h ave been
inspected and det ermined t o ha ve a m aj or failure. R efu nd and exch ange is not app licable f or ch an g e of mi nd.
4. Subject to the terms herein, this warran ty effecti vely covers the equip ment as sp ecified i n the Warr anty Periods
Table below from the date of purchase.
TEAC PRODUCT
WARRANTY PERIOD
LED/LCD TV 32” (80 cm) and above
1 Year (In-Home Service/ Pick up Available)*
All other TEAC products
1 Year (Carry-in Service)
5.
Th is s ervice will onl y b e provided as part of this w arranty if all the following conditions ar e met;
In Home Service/Pick up* Service
a) The produc t is in dicated in th e Warranty Period T able.
b) The product is within the warranty period.
c) The product is located within the normal service area of the local TEAC Authorised Service Centre.
If TEAC determines that the product is not repairable on site, TEAC can complete the repair by taking the product to
a TEAC Authorised Service Centre.
Where In-Home service/Pick up* is not available, the purchaser is required to send the product to the nearest TEAC
Author is ed Ser vic e C entr e f or r epair . In this e vent , pr o of of pur ch ase is r equir ed to s upp ort a warr ant y cl aim. Aft er
the rep air, t he pr od uct will be avail abl e for c oll ecti on by or retur n to the pur chas er at a fee upon req uest. TE AC inhome service can be made available at a fee upon request.
Carry-in Service
6. A 12-month replacement warranty is applicable to all Accessories such as Remote, Power Adaptors and Cables.
7. TEAC will ensure to t he best of its ab il it i es th at all req uired parts are mad e avai l ab le for any required s ervice/r ep air.
8. TEAC Aus tralia Pt y Ltd and its Auth orised Servic e Centres will use their best end eavours to c omplete pr oduct
repairs within a reasonable period based on available resources and workload during the time when service is
request ed an d perform ed.
9. Refurbis hed p arts m ay be us ed to r epair t he prod uct. I n the c ase of a replac ement, the pr oduct may be r eplac ed,
with a ref urbished unit of the s ame type or , if one is unavailab le, a si milar refur bished m odel with equal or b etter
features & specifications.
10. Please b e advised that if th e prod uc t presented f or repair is capab le of r etainin g user-g en erated d at a, the d at a m ay
be lost during servicing. Customers are strongly encouraged to back up all important information/data before
sending the product in for service/repair.
11. Servic e will be pr ovided on ly dur ing norm al busin ess hour s and under saf ety condi tions and circ umstanc es. TEA C
and its aut h or ised ser vice agents can r efuse any r ep ai r if saf ety, i n relati on t o O H &S, bec om es a c oncern t o its s t af f
or author ised service agents ’ p ersonnel.
12. The warranty is void and warranty claims may be refused, subject to the Australian Consumer Law, if:
a) The product was not transported, ins talled, op erated or m aint ained a c c ordin g t o m an uf acturer ins tr uc t ion, or
b) The produc t w as abused, dam ag ed, tamp ered, alt ered or rep aired by any un au thoris ed p ersons, or
c) Product failure is due to accidents during use, installation or transit, power surges, use of defective or
incompat ib le exter nal devic es, exp os ure to abn orm al cond itions suc h as excess iv e temp erat ur es or humi dity, or
entry of liqu ids, obj ects or creatur es in to the produc t.
13. No one is au thoris ed t o ass u m e any liability on b eh alf of TEAC or impose any ob ligati on on it, in connecti on with the
sale of any eq ui p m ent other than as stated in th is w arr an t y and ou t l in ed ab ove.
14. TEAC reserves the right to inspect and verify whether the product is exhibiting a major failure as claimed by
customers/retailers.
15. LCD dead pixel policy, please contact TEAC Customer Support Hotline on 1300 553 315 for assistance.
Page 4
Safety Precautions
DANGEROUS VOLTAGE
ATTENTION
To achieve the utmost in enjoyment and performance, and in order to become familiar with its
features, please read this manual carefully before attempting to operate the unit, this will assure
you years of faithful, trouble free performance and listening pleasure.
Important Notes
• This safety and operating instruction should be retained for future reference.
• The apparatus shall not be exposed to dripping or splashing and that no objects filled
with liquids, such as vases, shall be placed on apparatus.
• Avoid installing the unit in locations described below:
o Places exposed to direct sunlight or close to heat radiating appliances such as
electric heaters.
o On top of other stereo equipment that radiate too much heat.
o Places blocking ventilation or dusty places.
o Places subject to constant vibration.
o Humid or moist places.
• No naked flame sources such as lighted candles should be placed on or near the unit.
• The use of apparatus in moderate climates.
• Operate turning controls and switches as instructed in the manual.
• Before turning on the power for the first time, make sure the power cord is properly
installed.
For safety reasons, do not remove any covers or attempt to gain access to the inside of the
product. Refer any servicing to qualified personnel.
Do not attempt to remove any screws, or open the casing of the unit; there are no user
serviceable parts inside, refer all servicing to qualified service personnel.
CAUTION: TO REDUCE THE RISK OF ELECTRIC SHOCK DO NOT REMOVE COVER (OR
BACK), NO USER SERVICEABLE PARTS INSIDE, REFER SERVICING TO QUALIFIED
SERVICE PERSONNEL.
Dangerous Voltages, that may be of sufficient magnitude to constitute a risk
of electric shock to persons is present within this product’s enclosure.
The owner’s manual contains important operating and maintenance
instructions, for your safety, it is necessary to refer to the manual.
WARNING: TO PREVENT FIRE OR SHOCK HAZARD, DO NOT EXPOSE THIS APPLIANCE
TO DRIPPING OR SPLASHING.
NOTE: This unit will become warm when used for a long period of time. This is normal and
does not indicate a problem with the unit.
ii
Page 5

Safety Information
Some Do’s And Don’ts On the Safe Use Of Equipment
This equipment has been designed and manufactured to meet international safety standards but,
like any electrical equipment, care must be taken if you are to obtain the best results and safety
is to be assured.
DO read the operating instructions before you attempt to use the equipment.
DO ensure that all electrical connections (including the mains plug, extension leads and inter-
connections between the pieces of equipment) are properly made and in accordance with the
manufacturer’s instructions. Switch off and withdraw the mains plug before making or changing
connections.
DO consult your dealer if you are ever in doubt about the installation, operation or safety of your
equipment.
DON’T remove any fixed cover as this may expose dangerous voltages.
Overheating will cause damage and shorten the life of the equipment.
DON’T allow electrical equipment to be exposed to dripping or splashing, or objects filled with
liquids, such as vases, to be placed on the equipment.
DON’T place hot objects or naked flame sources such as lighted candles or nightlights on, or
close to equipment. High temperatures can melt plastic and lead to fires.
DON’T use equipment such as personal stereos or radios so that you are distracted from the
requirements of traffic safety.
DON’T listen to headphones at high volume level, do so may damage your hearing.
DON’T leave equipment switched on when it is unattended unless it is specifically stated that it
is designed for unattended operation. Switch off using the switch on the equipment and make
sure that your family knows how to do this. Special arrangements may need to be made for
infirm or handicapped people.
DON’T continue to operate the equipment if you are in any doubt about if it’s working normally
or if it’s damaged in any way. Switch it off and withdraw the mains plug and consult your dealer.
ESD Remark: In case of malfunction due to electrostatic discharge just reset the product
(reconnection of power source may be required) to resume normal operation.
NOTE: Do not open any covers and do not repair by yourself. Qualified personnel must carry
out repair work.
iii
Page 6

Table of Contents
Safety Precautions ii
Safety Information iii
Package Content 2
Overview (a) .................................................................................................................. 3
Overview (b) .................................................................................................................. 4
DAB Mode 5
How to Get Start? ........................................................................................................... 5
How to Display the Signal Strength?............................................................................... 5
DAB Menu Tree............................................................................................................. 6
How to View Station Information? ................................................................................. 7
How to Update Station list? ............................................................................................ 7
How to Set DRC (Dynamic Range Control) Value? ........................................................ 8
FM Mode 9
How to Change to FM Mode? ......................................................................................... 9
How to View Station Information? ................................................................................. 9
How to Get the Best Signal Available? ........................................................................... 9
How to Change Audio to ‘ Forced Mono’? .................................................................... 10
FM Menu Tree ............................................................................................................. 10
Setting Station Presets (DAB+ and FM Mode) .............................................................. 11
Recalling a Preset Station (DAB+ and FM Mode) ......................................................... 11
Volume Control ........................................................................................................... 11
System setup 12
How to Enter System Setup? ........................................................................................ 12
How to Set Sleep? ........................................................................................................ 12
How to Set Time?......................................................................................................... 13
How to Set Backlight? .................................................................................................. 13
How to Set Alarm? ....................................................................................................... 14
How to Set Language?.................................................................................................. 14
How to Factory Reset? ................................................................................................. 15
How to Get SW Version? ............................................................................................. 15
Specification 15
Contents page
Page 7
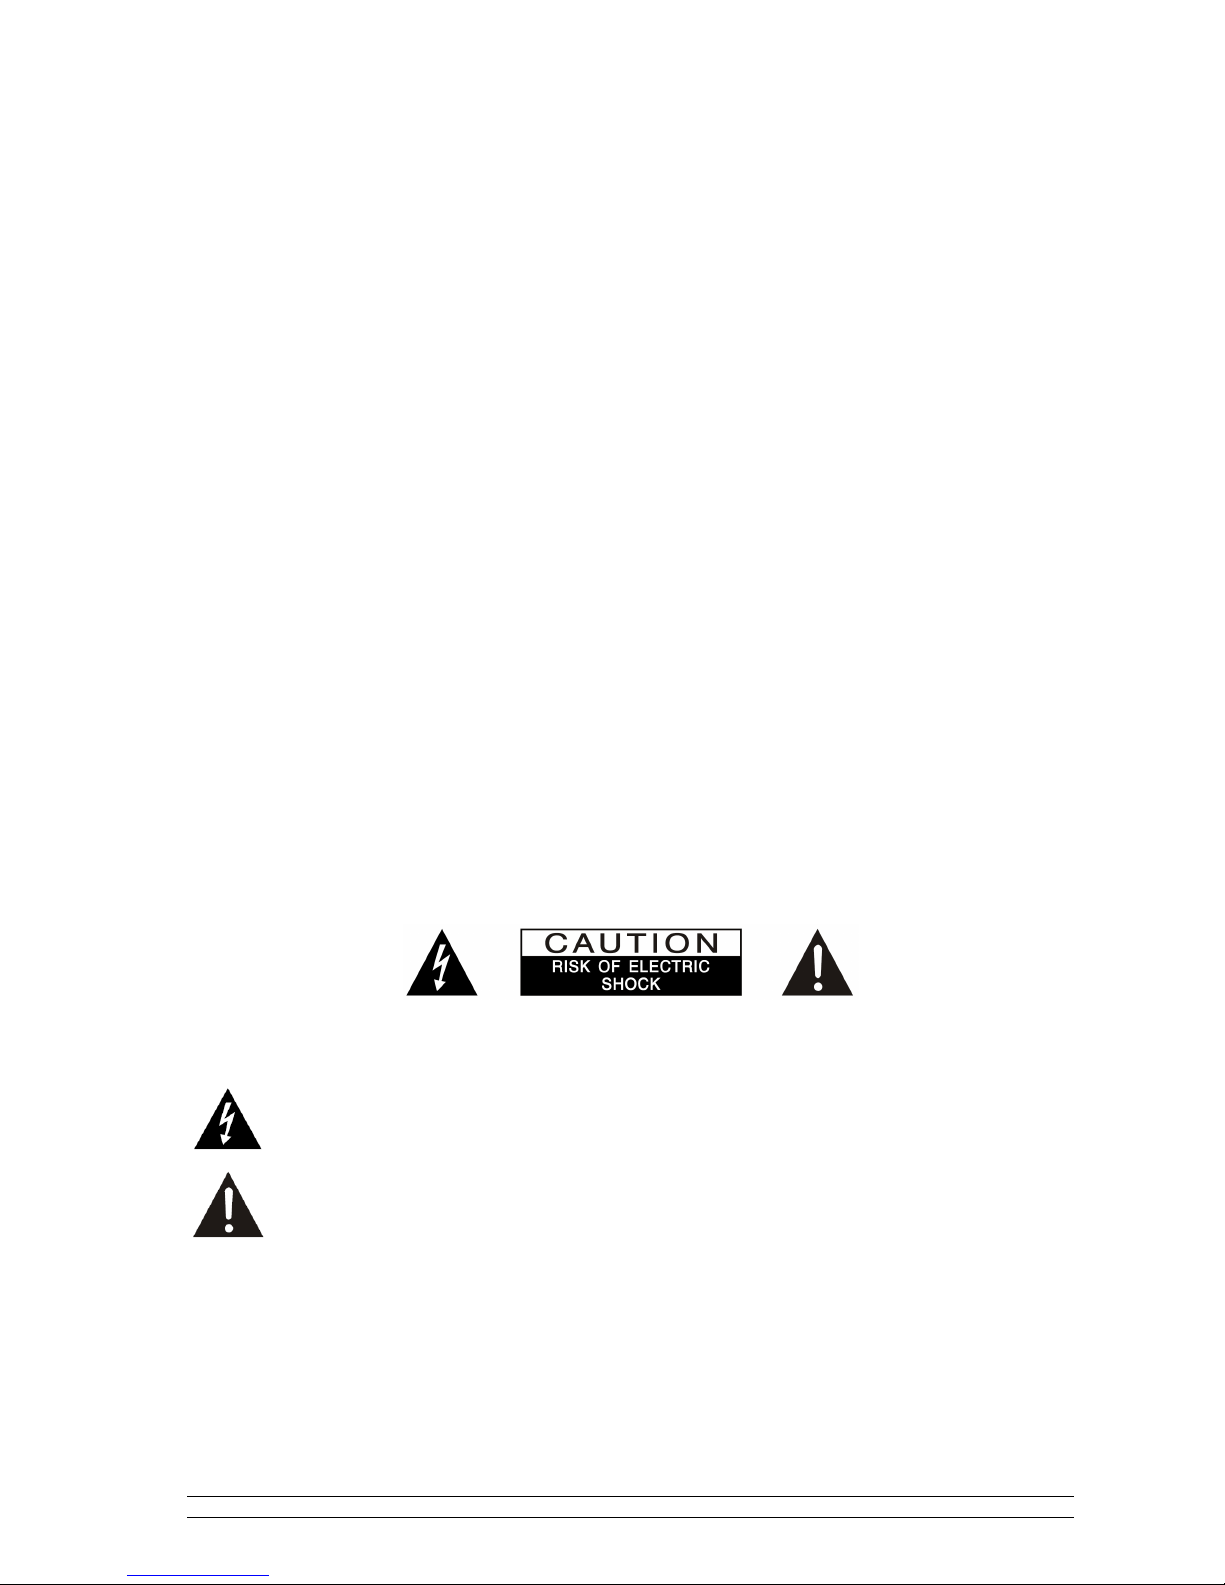
Package Content
Digital Radio
Adapter
Instruction
manual
(To prolong your radio's lifespan, please use the adaptor provided only.)
2
Page 8

Overview (a)
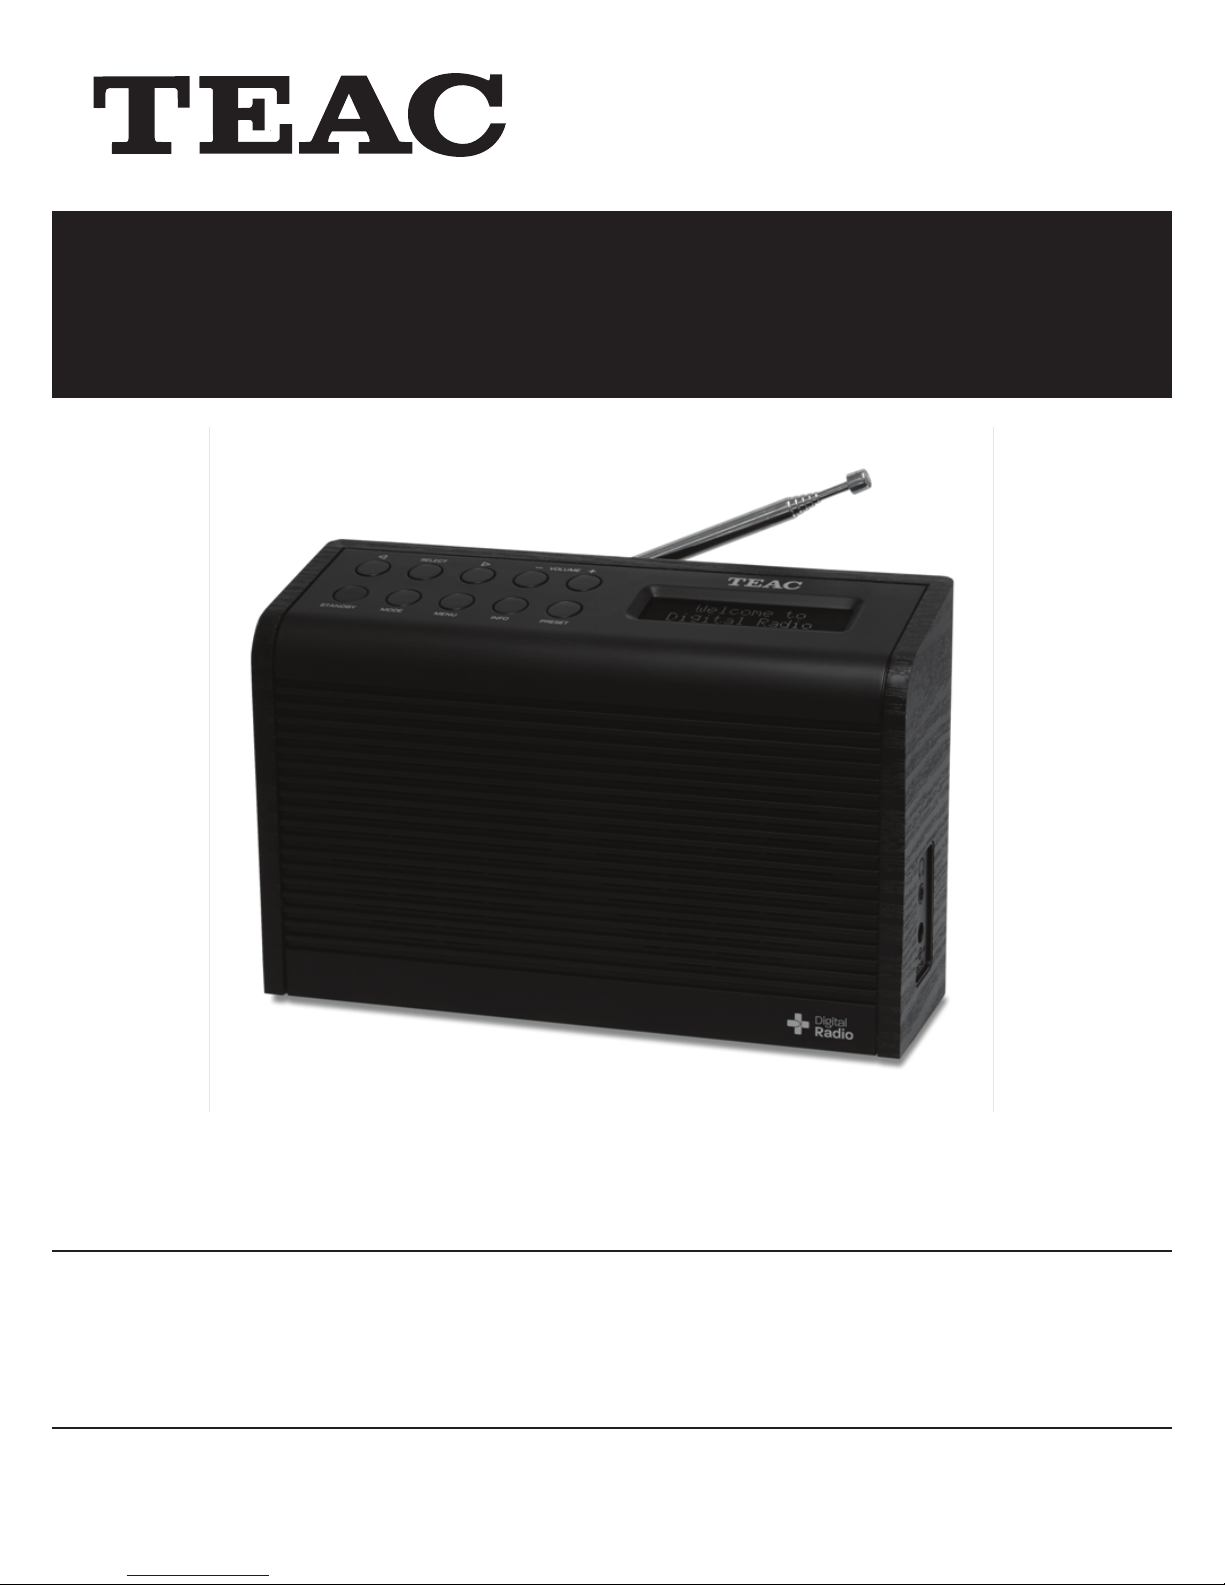
DIGITAL RADIO FRONT VIEW
DIGITAL RADIO SIDE VIEW
3
Page 9

Control
DAB
+
and FM
mode
+
Overview (b)
DIGITAL RADIO TOP VIEW
STANDBY
MODE
MENU
INFO
PRESET
SELECT
Press to turn on/off the digital radio
Press to convert between DAB+ and FM mode
Press to enter main menu and select other menus
DAB+/FM mode:
Press to browse broadcast station information
DAB+/FM mode:
Press and hold store Preset station1-10
Press to recall Preset station 1-10
DAB+/FM mode:
Press or to browse, press SELECT to confirm
VOLUME -
Press to adjust volume level
4
Page 10

DAB Mode
How to Get Start?
1. Place the unit on a flat stable surface and extend the telescopic aerial to ensure best reception in both
DAB+ and FM modes. Connect the power adaptor to the DC Jack on the side of the unit, and press
STANDBY to switch it on.
2. For initial use, it will automatically run a full scan and save all the detected stations into its memory,
perhaps this will need one or two minutes.
3. Once the scanning is finished, the DAB+ stations will be displayed in alphanumeric order. The first
station in the list would be selected.
4. If no station detected, press MENU, and then press to ‘Full scan’à press SELECT to confirm.
5. Want to change to another station? While playing a DAB+ program, you can cycle through stations list
by pressing or , and press the SELECT to confirm the station preferred.
@ Note: If no DAB+ signal found in your area, relocate your radio and perform another scan.
How to Display the Signal Strength?
1. While playing a DAB+ program, press INFO, the display will show a line of signal bars, which
indicates the strength of the current station.
@ Note: Stations with signal strength below the minimum signal level will not provide a stable streaming of audio.
5
Page 11

DAB Menu Tree
6
Page 12

How to View Station Information?
1. While playing a DAB+ program, press INFO repeatedly to cycle through info options, such as station
signal strength, program type, multiple name, program frequency, signal error rate, time and date, etc.
2. While your target option shows up, stop pressing INFO.
How to Update Station list?
@ Note: It is recommended to do a full scan now and then to add any new stations to the station list.
1. Press MENU, and then press to < Full scan >, press SELECT to confirm.
The radio will scan all the DAB+ channels and add any new stations available into the station list.
How to Start Manual Tune?
1. Press MENU, and then press or to < Manual tune >.
2. Press SELECT to confirm, the display will show the channel number and frequency list.
3. Press or to scroll through the channels and press SELECT to select perfected radio channel.
@ Note: If there is a multiplex corresponding to this channel and frequency, then the display will show a tuning
meter with the signal strength and the multiplex name after a few seconds.
4. Press SELECT to exit this order.
7
Page 13

How to Set DRC (Dynamic Range Control) Value?
The DRC makes quieter sounds easier to hear when your radio is used in a noisy environment
1. Press MENU, and then press or to < DRC >, press SELECT to confirm.
2. Press or to browse options: off/low/high.
@ Note: a. Set DRC to off means no compression;
b. Set DRC to low indicates little compression;
c. Set DRC to high shows maximum compression.
3. Press SELECT to confirm your preferred option.
How to Prune Inactive Stations?
@ Note: Pruning removes inactive stations from the station list..
1. Press MENU, and then press twice to < Prune >, press SELECT to confirm
2. Press or to ‘Yes’, press SELECT to confirm.
8
Page 14

FM Mode
How to Change to FM Mode?
1. Press MODE to switch from DAB to FM Mode.
2. Once in FM mode, it will start at the beginning of the FM frequency range (87.50MHz). Otherwise,
the last FM station you were listening to will be selected.
3. Manually Scan
To manually scan FM frequency, press or to change frequency by 0.05MHz per step. Press
and hold or to scan lower or higher stations.
4. Automatic Scan
To automatic scan, press or or press SELECT
How to View Station Information?
@ Note: You want watch radio text of your station, or its program type, Audio type, time, date etc. come on,
follow below two steps.
1. While playing a FM program, press INFO repeatedly to cycle through info options, such as Audio type,
time, date, radio text etc.
2. While your target option shows up, stop pressing INFO.
How to Get the Best Signal Available?
1. By default, FM scans stop at any available station. This may result in a poor signal-to-noise ratio (hiss)
from weak stations.
2. To change the scan settings to stop only at stations with good signal strength, please follow 2 steps:
a. Press MENU, and then press SELECT to confirm while it says < Scan setting >,.
b. Press to ‘Strong stations only’àpress SELECT to confirm.
9
Page 15

How to Change Audio to ‘Forced Mono ’?
1. By default, all stereo stations are reproduced in stereo. For weak stations, this may result in a poor
signal-to-noise ratio (hiss).
2. To play weak stations in mono, follow below 2 steps:
a. Press MENU, press to < Audio setting >, press SELECT to confirm.
b. Press to ‘Forced mono’, and then press SELECT to confirm.
FM Menu Tree
10
Page 16

Setting Station Presets (DAB+ and FM Mode)
Your radio can store 10 DAB+ and 10 FM presets.
1. Press and hold PRESET until it shows as below.
2. Press or to browse options 1-10, press SELECT to confirm, and it will tell you “”Preset XX
stored”.
Recalling a Preset Station (DAB+ and FM Mode)
To recall a stored DAB+ or FM station:
1. Press MODE repeatedly to switch DAB+/FM mode à press PRESET to recall preset stations.
2. Press or to select 1 of 10 stations, press SELECT to confirm.
Volume Control
Adjust the radio volume to the desired level by pressing VOLUME + or VOLUME -.
11
Page 17

System setup
How to Enter System Setup?
1. Press MENU, and then press to < System >, press SELECT to confirm.
2. Press or to cycle through options: ‘Sleep’, ‘Alarms’, ‘Time’, ‘Backlight’, ‘Language’, ‘Factory
Reset’ and ‘SW version’ available.
J The following will provide you more details.
How to Set Sleep?
@ Note: Your radio can be set to turn off after reaching a pre-define time.
1. Press MENU, and then press to < System >, press SELECT to confirm.
2. While cursor point to < Sleep >, press SELECT to confirm.
3. Press or to define the sleep period: off/15/30/45/60/90 minutes, press SELECT to confirm the
one you preferred.
4. Select < Sleep > option again, and then press SELECT to check how long it will be elapsed.
5. Radio will turn off after reaching this pre-defined time.
6. To continue listening to your program, press STANDBY button.
12
Page 18

How to Set Time?
• Manually Set Time
1. It can be activated from < System > à < Time >, and then press SELECT to confirm.
2. Press or to enter a range of time settings:
n <Set 12/24 hour format>: ‘Set 24 hour’ and ‘Set 12 hour’
n <Set Time/Date>: Manually set-up both Time and Date
n <Auto update>: ‘Update from DAB’, and ‘No update’
n <Set date format>: DD-MM-YYYY’ and ‘MM-DD-YYYY’
• To browse time setting
1. Simply press STANDBY button.
How to Set Backlight?
@ Note: adjust the backlight level of panel display to suit your personal preference.
A. For ‘Power On’ condition
1. It can be activated from < System > à < Backlight >, press SELECT to confirm.
2. While cursor point to ‘Power On’, press SELECT to confirm.
3. Press or to cycle through options: ‘High’, ‘Medium’ and ‘Low’ , then press SELECT to confirm the
one you want, setting to ‘High’ is recommending for ‘Power On’ condition.
B. For ‘Standby’ condition
For Standby ‘Power on’ condition, setting to ‘Low’ is recommended.
.
13
Page 19

How to Set Alarm?
@ Note: Ensure that time is set correctly before setting the Alarm.
1. Press Menu to enter < System > à< Alarms >, press SELECT to confirm.
2. Press or to select ‘Alarm 1’ or ‘Alarm 2’, press SELECT to confirm your Alarm #,
Let’s take Alarm1 setup for example.
3. Press SELECT to confirm ‘Alarm 1 Setup’ to enter ‘Alarm 1 Wizard’, then follow the display’s
instruction to configure the following parameters:
∗ Alarm states: Off/ On, press or to ‘On’, press SELECT to confirm.
∗ On time: 06: 00 (alarm sounding time)
∗ Duration time: 15/30/45/60/90minutes (alarm sounding lasting time)
∗ Source: Buzzer/DAB/FM
∗ Alarm sounds frequency: Daily, Once, Weekends or weekdays
∗ Alarm volume: press or to your desired alarm volume, and then press SELECT to confirm
until it displays ’Alarm saved’.
Repeat above 3 steps for Alarm 2 Setup settings.
To Turn Off Alarm
1. To turn alarm off temporarily, press STANDBY button.
2. To turn alarm off permanently, enter alarm settings, press to OFF, press SELECT to confirm until it
displays "Alarm saved".
How to Set Language?
The default language is English. To change, please follow below 2 steps:
1. Press Menu to enter < System > à < Language >, press SELECT to confirm.
2. Press or to select your preferred language option, and then press SELECT to confirm.
14
Page 20

How to Factory Reset?
Performing a factory reset will reset all settings including alarms and preset stations to return to its factory
default settings.
1. Press Menu to enter < System > à < Factory Reset >, press SELECT to confirm.
2. Press to < Yes >, press SELECT to confirm.
How to Get SW Version?
@ Note: Software cannot be change. It is for your reference
1. Press Menu to enter < System > à < SW version >, press SELECT to confirm.
Specification
ITEMS DESCRIPTION
Specifications: DAB+,FM
AC/DC Adapter: Input: 240Vac, 50Hz
Power Requirements:
DC Output: 9V/600mA
(FM) 87.5-108MHz
Frequency Range
(DAB+) 174 – 240MHz
Rated Output Power: 2.0Wrms x 2
Speaker: 4ohm
Headphone Jack: 32ohm
Dimension: 200 x 63 x 132mm
Net Weight: 749g
Note: Specifications subject to change without notice.
Weight and dimensions are approximate.
15
Page 21

TEAC CUSTOMER SUPPORT HOTLINE (TCS)
1300 553 315
Between Monday to Friday – AEST 8.30AM to 6PM
 Loading...