

Page 1
DAB400
DAB+ / RDS FM Radio
Page 2
WARRANTY REGISTRATION
Please read this warranty card.
Keep your purchase receipt to enable you to proceed quickly in the event of a Warranty Service.
Warranty Terms & Conditions
1. TEAC warrants to the original retail purchaser only, that this product is free from defects in material and
workmanship under normal domestic use and authorises free service during the warranty period at any TEAC
Authorised Service Centre only. TEAC warranty only applies to products purchased, used and serviced in
Australia.
2. Subject to the terms herein, this warranty effectively covers the equipment as specified in the Warranty Periods
Table below from the date of purchase.
TEAC PRODUCT WARRANTY PERIOD
Plasma TV 106 cm and above 1 Year (In-Home Service/ Pick up Available)*
LCD Televisions 80 cm and above 1 Year (In-Home Service/Pick up Available)*
Televisions – 59cm and above 1 Year (In-Home Service/ Pick up Available)*
All Televisions under 59 cm 1 Year (No In-Home Service)
Digital Set Top Boxes & Module 1 Year (No In-Home Service)
VCR 1 Year (No In-Home Service)
DVD & Module 1 Year (No In-Home Service)
DVD Recorder & PVR Module 1 Year (No In-Home Service)
Audio Systems 1 Year (No In-Home Service)
3. In Home Service/Pick up* will only be provided as part of this warranty if all the following conditions are met;
a) The product as indicated in the Warranty Period Table.
b) The product is within the warranty period.
c) The product is located within the normal service area of the local TEAC Authorised Service Centre.
In any other situation or circumstance, where an In Home Service/Pick up* call is made, a service fee will be
charged by the Service Provider including a travel fee if outside normal service area.
If TEAC determines that the product is not repairable on site, TEAC can complete the repair by taking the product
to a TEAC Authorised Service Centre.
Where In-Home
service/Pick up* is not available, the purchaser is required to send the product to the nearest TEAC
Authorised Service Centre for repair. In this event, a copy of this warranty card and a copy of your receipt of
purchase must be enclosed to be a valid warranty. Such equipment or part must be sent freight prepaid to your
nearest TEAC Authorised Service Centre. After the repair, the product will be available for collection by or return to
the purchaser at purchaser’s cost. The warranty does not cover freight or insurance. In all cases of transit damage or
lost, a claim must be filed against the carrier by the purc
haser, even if shipment is arranged by TEAC. TEAC in-
home service may also be available at a fee upon request.
4. Accessories, Remote, including power adaptors, AV box, TV tuners, etc, are warranted to be defect free for 1 year.
5. Replacement of spare parts under normal usage; except cabinet, front panel, knob, removable accessories, battery,
consumable, AC cord, connecting cord and other accessories, are warranted as specified in Warranty Periods Table,
and will be repaired or replaced at the sole judgement of TEAC.
6. The warranties hereby conferred do not extend to, and exclude, any cost associated with the installation, deinstallation or re-installation of a product (be it in-home or otherwise), including costs related to the mounting,
demounting or r
emounting of any screen, (and any other ancillary activities), delivery, handling, freighting,
transportation or insurance of the product or any part thereof or replacement of and do not extend to, and exclude,
any damage or loss occurring by reason of, during, associated with, or related to such installation, de-installation,
re-installation or transit.
7. Normal customer maintenance as described in the owner’s manual is not covered by this warranty (such as cleaning
VCR heads etc.)
8. Service will be provided only during normal business hours and under safety conditions and circumstances.
ii
Page 3

9. This warranty does not apply to equipment showing abuse, damage or that it may have been tampered with, altered
or repaired outside any TEAC Authorised Service Centre. If so, the warranty will be void.
*Your nearest Authorised TEAC Service Centre is listed in your Owner’s Manual, please refer to TEAC
website for up to date list.
10. No one is authorised to assume any liability on behalf of TEAC or impose any obligation on it, in connection with
the sale of any equipment other than as stated in this warranty and outlined above.
11. In no event will TEAC be responsible or liable for indirect or consequential damages from interrupted operations or
other causes.
12. Warranty is not transferable to any subsequent purchaser if the product is sold during the warranty period.
13. LCD dead
pixel policy, please contact TEAC Customer Care Centre on 1800 656 700 for assistance.
* Extended promotional warranty may apply to certain products (for more info please contact: service@teac.com.au
)
In home service administration fee is applied after 1
st
year of warranty.
iii
Page 4

WARRANTY PROCEDURES
Please keep this information for your own records.
Please refer to the owner’s manual to ensure that you have followed the correct installation and operating procedures.
1. Read owner’s manual carefully
2. If you require Warranty Service, please contact the TEAC Authorised Service Centre
3. Please have your purchase receipt as your proof of purchase and the following details completed for a valid
Warranty.
Owner’s Name
Owner’s Address
Postcode
Model Name/No. Serial No.
Dealer’s Name
Dealer’s Address
Postcode
4. Please ensure that your product is packed appropriately upon return to the service centre.
If you have any other queries regarding service or warranty please contact the TEAC Customer Care Centre below:
service@teac.com.au
www.teac.com.au
1800 656 700
iv
Page 5
v
Safety Precautions
To achieve the utmost in enjoyment and performance, and in order to become familiar with its
features, please read this manual carefully before attempting to operate the unit. This will assure
you years of faithful, trouble free performance and listening pleasure.
Important Notes
• This safety and operating instruction should be retained for future reference.
• The apparatus shall not be exposed to dripping or splashing and that no objects filled
with liquids, such as vases, shall be placed on apparatus.
• Avoid installing the unit in locations described below:
o Places exposed to direct sunlight or close to heat radiating appliances such as
electric heaters.
o On top of other stereo equipment that radiate too much heat.
o Places blocking ventilation or dusty places.
o Places subject to constant vibration.
o Humid or moist places.
• No naked flame sources such as lighted candles should be placed on or near the unit.
• The use of apparatus in moderate climates.
• Operate turning controls and switches as instructed in the manual.
• Before turning on the power for the first time, make sure the power cord is properly
installed.
For safety reasons, do not remove any covers or attempt to gain access to the inside of the
product. Refer any servicing to qualified personnel.
Do not attempt to remove any screws, or open the casing of the unit; there are no user
serviceable parts inside, refer all servicing to qualified service personnel.
CAUTION: TO REDUCE THE RISK OF ELECTRIC SHOCK DO NOT REMOVE COVER (OR
BACK), NO USER SERVICEABLE PARTS INSIDE, REFER SERVICING TO QUALIFIED
SERVICE PERSONNEL.
DANGEROUS VOLTAGE
Dangerous Voltages, that may be of sufficient magnitude to constitute a risk
of electric shock to persons is present within this product’s enclosure.
ATTENTION
The owner’s manual contains important operating and maintenance
instructions, for your safety, it is necessary to refer to the manual.
WARNING: TO PREVENT FIRE OR SHOCK HAZARD, DO NOT EXPOSE THIS APPLIANCE
TO DRIPPING OR SPLASHING.
NOTE: This unit will become warm when used for a long period of time. This is normal and
does not indicate a problem with the unit.
Page 6

vi
Safety Information
Some Do’s And Don’ts On the Safe Use Of Equipment
This equipment has been designed and manufactured to meet international safety standards but,
like any electrical equipment, care must be taken if you are to obtain the best results and safety
is to be assured.
DO read the operating instructions before you attempt to use the equipment.
DO ensure that all electrical connections (including the mains plug, extension leads and inter-
connections between the pieces of equipment) are properly made and in accordance with the
manufacturer’s instructions. Switch off and withdraw the mains plug before making or changing
connections.
DO consult your dealer if you are ever in doubt about the installation, operation or safety of your
equipment.
DON’T remove any fixed cover as this may expose dangerous voltages.
Overheating will cause damage and shorten the life of the equipment.
DON’T allow electrical equipment to be exposed to dripping or splashing, or objects filled with
liquids, such as vases, to be placed on the equipment.
DON’T place hot objects or naked flame sources such as lighted candles or nightlights on, or
close to equipment. High temperatures can melt plastic and lead to fires.
DON’T use equipment such as personal stereos or radios so that you are distracted from the
requirements of traffic safety.
DON’T listen to headphones at high volume, as such use can permanently damage your
hearing.
DON’T leave equipment switched on when it is unattended unless it is specifically stated that it
is designed for unattended operation. Switch off using the switch on the equipment and make
sure that your family knows how to do this. Special arrangements may need to be made for
infirm or handicapped people.
DON’T continue to operate the equipment if you are in any doubt about if it’s working normally
or if it’s damaged in any way. Switch it off and withdraw the mains plug and consult your dealer.
ESD Remark: In case of malfunction due to electrostatic discharge just reset the product
(reconnection of power source may be required) to resume normal operation.
NOTE: Do not open any covers and do not repair yourself. Qualified personnel must carry out
repair work.
Page 7

Contents page
Contents
Package Content 1
Controls Overview (a) .................................................................................................... 2
Controls Overview (b) .................................................................................................... 3
Getting Started 4
DAB+, DAB mode 5
Scanning DAB+, DAB stations ....................................................................................... 5
How to Show Signal Strength ......................................................................................... 6
How to Browse Station Information ................................................................................ 7
DAB Menu Options ....................................................................................................... 8
How to Shift to Other Program ....................................................................................... 9
How to Find and Add New Stations ................................................................................ 9
Manual Tune ................................................................................................................ 10
DRC (Dynamic Range Control) value ........................................................................... 10
To change station order ................................................................................................ 11
FM Mode 12
Prime Operation ........................................................................................................... 12
FM Menu Options ........................................................................................................ 13
Displaying FM Station Information .............................................................................. 14
Common Operation 16
Setting Station Presets .................................................................................................. 16
Selecting a Preset Station.............................................................................................. 16
Volume Control ........................................................................................................... 16
System setup 17
Enter system setup........................................................................................................ 17
Set Sleep ...................................................................................................................... 17
Set Time ...................................................................................................................... 18
Setting Alarm ............................................................................................................... 19
Set Backlight ................................................................................................................ 21
Factory Reset ............................................................................................................... 21
SW Version.................................................................................................................. 21
Specification 22
Page 8
1
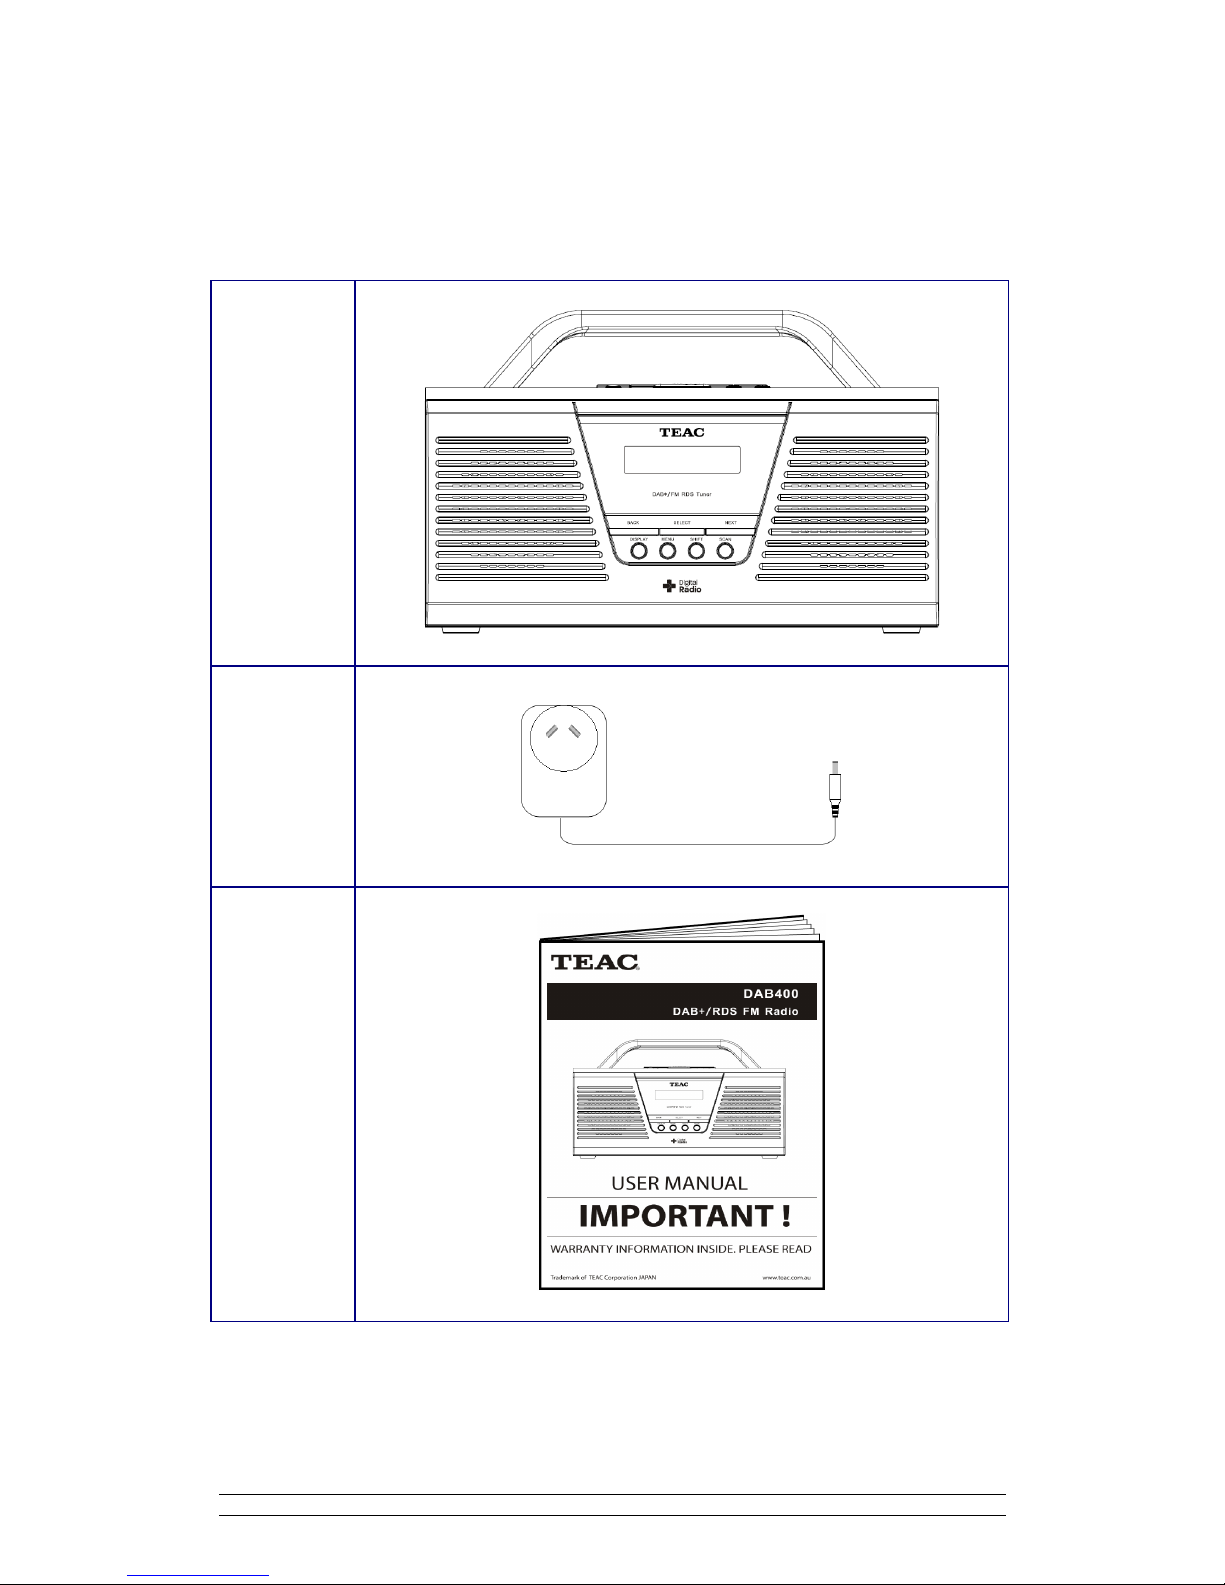
Package Content
Digital Radio
DC Adapter
Instruction
manual
Page 9
2
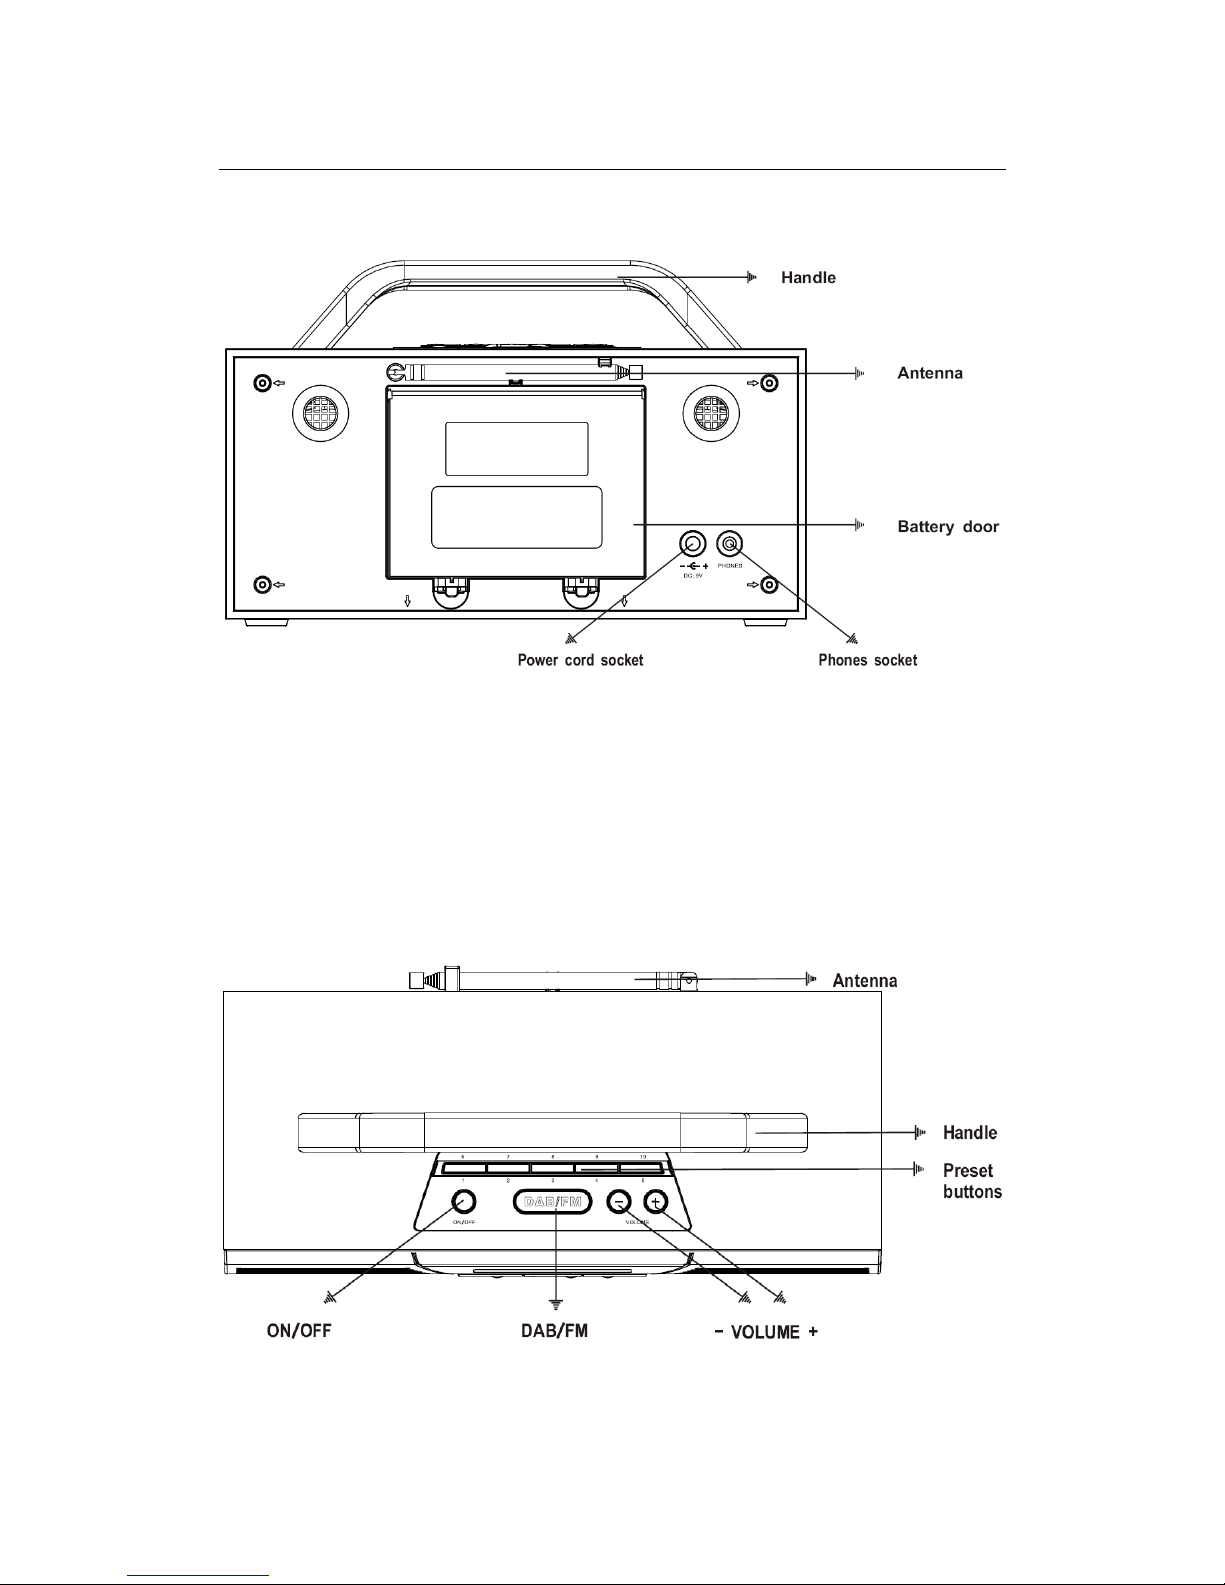
Controls Overview (a)
DIGITAL RADIO BACK VIEW
@ Note: While operating via batteries only, alarm will not function if unit is in standby mode.
@ Note: The 3.5mm headphone jack is provided to use with either headphones or an earpiece.
Inserting a plug automatically mutes the internal loudspeaker.
DIGITAL RADIO TOP VIEW
Page 10
3
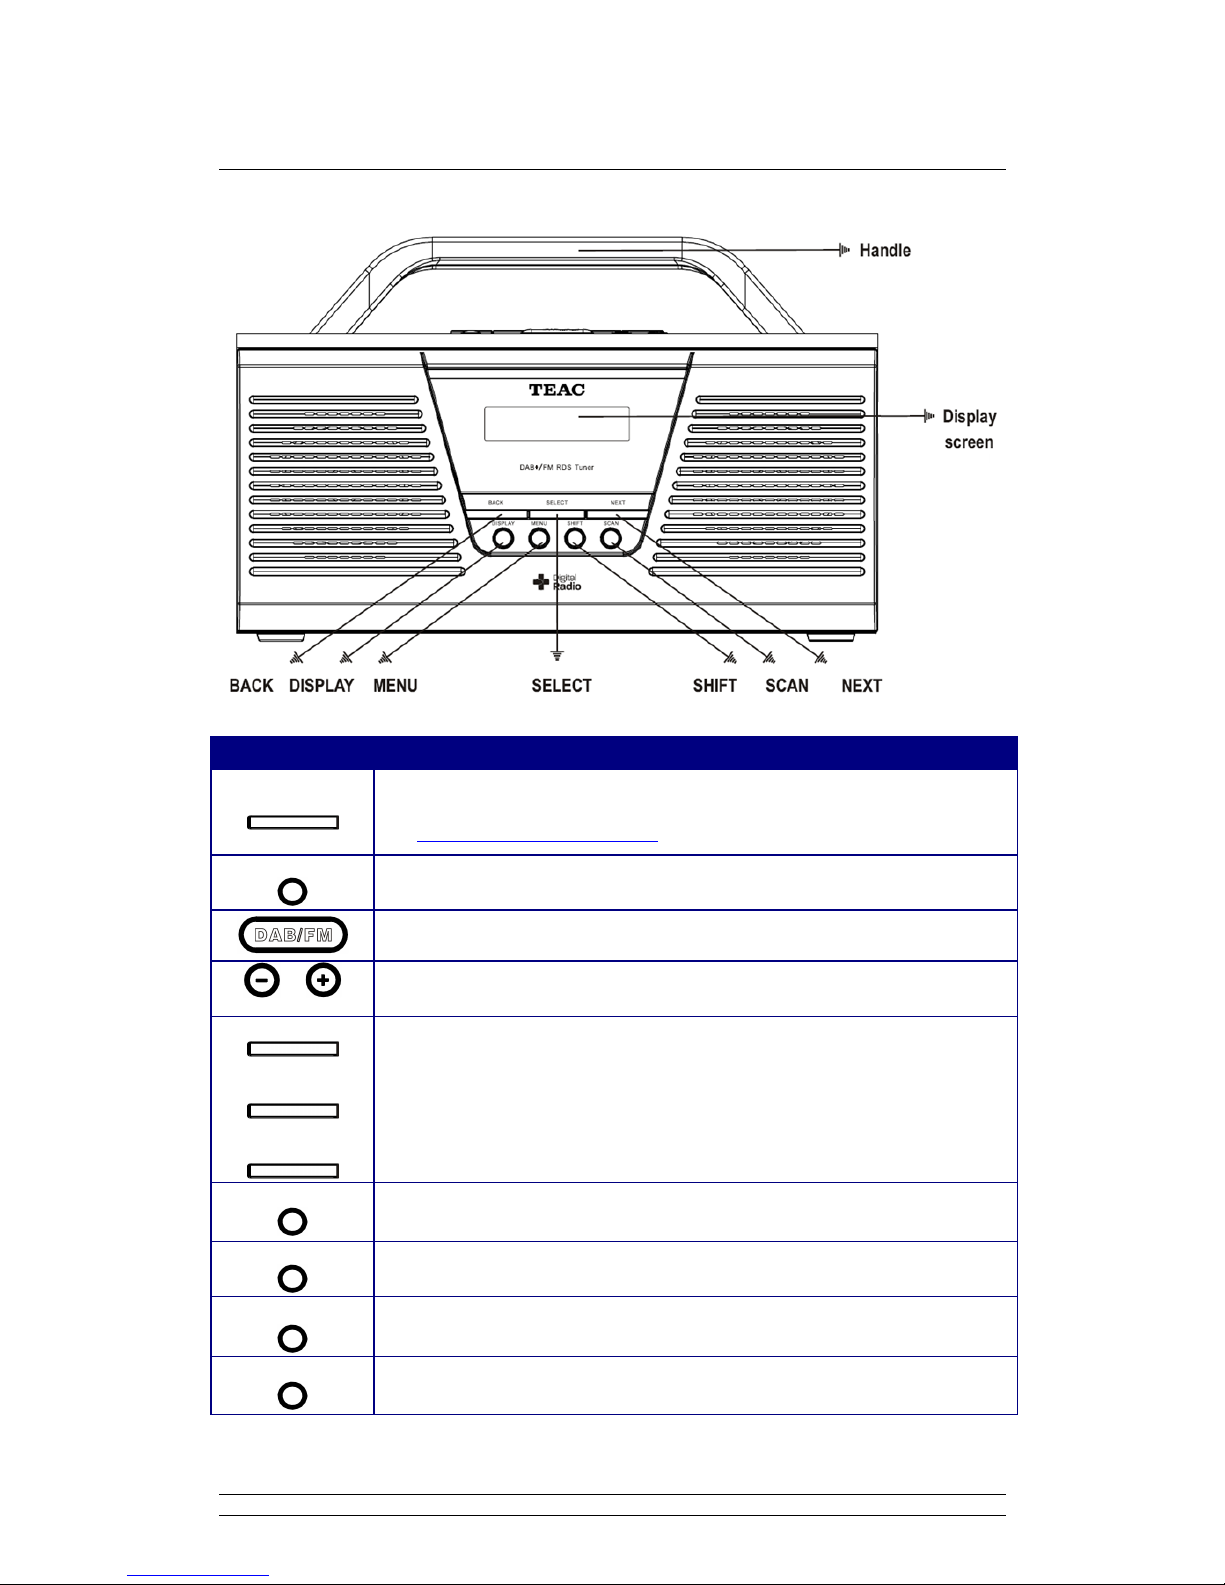
Controls Overview (b)
DIGITAL RADIO TOP VIEW
Control DAB +, DAB and FM MODE
Preset 1-10
a. Press and hold one of the Preset buttons to store preset to 1-5,
b. Press one of the Preset buttons to loading.
(for detail, please refer page16 )
ON/OFF
a. Press to on/off the digital radio
b. When alarm is sound, press to turn it off.
Press to switch between DAB+ and FM mode
VOLUME
Press to decrease or increase volume level
BACK
NEXT
SELECT
a. Press the BACK or NEXT button to browse options, and press the SELECT
button to confirm.
b. FM MODE: Press the BACK or NEXT button to manually search, and press
the SELECT button to autoscan.
c. When alarm is sound, press the SELECT button to activate SNOOZE.
DISPLAY
Press to browse station information
MENU
Press to enter menu options
SHIFT
Unique designed for store or loading preset station 6-10
SCAN
DAB MODE: press to perform a full scan
FM MODE: press to autoscan
Page 11

4
Getting Started
• Battery Operation (Batteries Not Included)
@ Note: Before installing batteries, ensure that the radio is disconnected from the mains supply.
Never mix old and new batteries.
1. Remove the battery compartment cover at the back of the radio, refer below picture 1.
2. Fit 6 new C-size batteries, referring to the markings inside the battery compartment, refer
below picture 2.
3. Switch off the mains supply and remove the cable from the power socket. Battery
operation will be selected automatically.
4. If you are not going to use the radio for an extended period, please remove the batteries
to avoid damage.
Picture 1
Picture 2 (batteries arrangement drawing)
Page 12

5
DAB+, DAB mode
Scanning DAB+, DAB stations
1. Extend the antenna on the rear of radio, press the ON/OFF button to switch it on.
2. For initial use, it will automatically run a full scan and save the stations in its memory.
The tuning process may require a few minutes. Please be patient.
3. Once the scanning is completed, the DAB stations will be displayed in alphanumeric order.
The first station in the list would be selected.
4. If there is no station found, press the MENU button, and then press the BACK or NEXT
button to select ‘Full scan’, and then press the SELECT button to confirm.
@ Note: Note: In the main menu, there are sub menus such as 'Station List', 'Full Scan', ‘Manual
tune’, ‘DRC’, ‘Station order’, ‘Prune’ and 'System'.
5. Once the scanning is completed, press the BACK or NEXT button to cycle through
stations list, and then press SELECT to confirm.
@ Note: a. if no DAB signal is found in your area, you may need to relocate the unit.
b. The DAB+ stations will be displayed in alphanumeric order. The first station in the list
will be selected.
Page 13

6
How to Show Signal Strength
1. Signal Strength Display will only function in DAB. Please switch to DAB mode by pressing
the DAB/FM button
2. Press the DISPLAY button repeatedly until a signal bar shows up.
The signal bar indicates the signal strength, and the indicator on the signal bar shows the
minimum acceptable signal level.
Stations with signal strength below the minimum signal level will not provide a steady
stream of audio.
Page 14

7
How to Browse Station Information
To view station information, just need simply press the DISPLAY button repeatedly, and this
is a circularly switched order.
Signal Strength:
Show a signal bar with the strength of the current
station.
Program Type (PTY):
This is a description of the type of program provided by
the DAB station or by broadcaster.
Multiplex Name:
This will show the multiplex that is broadcasting the
program you are listening to.
Frequency:
This displays station transmission frequency.
Signal Error:
This displays the signal error rate being received from 0
to 100.
a. 0 means no error signal being detected,
b. while 100 means it is a bad signal.
Signal Information:
This shows the digital bit rate and the signal mode.
Time:
This displays the time is provided by the broadcaster, so
will be accurate.
Date:
This displays the date is provided by the broadcaster, so
will be accurate.
Dynamic Label Segment (DLS):
This is scrolling text information supplied by the DAB
station or by broadcaster.
Page 15

8
DAB Menu Options
Page 16

9
How to Shift to Other Program
1. Press the MENU button.
2. While cursor point to ‘Station list’, press the SELECT button to confirm.
3. Press the BACK or NEXT button to the program you preferred, press the SELECT button to confirm.
How to Find and Add New Stations
1. Press the MENU button, and then press the BACK or NEXT button to ‘Full scan’.
2. Press the SELECT button to confirm.
The radio will now scan all the DAB+ channels and add any new stations available to the station list.
Page 17

10
Manual Tune
It allows you to manually tune in the DAB station.
1. Press the MENU button, and then press the BACK or NEXT button until Manual tune is display on
the unit.
2. Press the SELECT button to confirm, display will show the channel number and frequency as follow:
3. Press the BACK or NEXT button to cycle through channels and press the SELECT button to access
to current channel.
@ Note: If there is a multiplex corresponding to this channel and frequency, then the display will show a
tuning meter with the signal strength and the multiplex name after a few seconds.
4. Press the SELECT button again to exit Manual tune.
DRC (Dynamic Range Control) value
You can set the level of compression of stations to eliminate the differences in dynamic range or sound
level between radio stations.
1. Press the MENU button, and then press the BACK or NEXT button to this option.
2. Press the SELECT button to confirm, and then press the BACK or NEXT button to view.
@ Note: a. Set DRC to off means no compression.
b. Set DRC to low indicates little compression.
c. Set DRC to high shows maximum compression.
3. Press the SELECT button to confirm your setting.
Page 18

11
To change station order
1. Press the MENU button, and then press the BACK or NEXT button to this option.
2. Press the SELECT button to confirm.
3. Press the BACK or NEXT button to cycle through station order options.
@ Note: there are Alphanumeric, Ensemble and Valid available.
Station order Description
Alphanumeric
Display all stations in alphanumeric order.
Ensemble List both active stations and inactive ones.
Valid Only list active stations
4. While the ideal one is shows up, press the SELECT button to confirm.
Prune order
@ Note: This operation will remove inactive stations from the station list.
1. Press the MENU button, and then press the BACK or NEXT button to < Prune >.
2. Press the SELECT button to confirm.
3. Press the BACK or NEXT button to ‘Yes’, press the SELECT button to confirm, then it is done!
Page 19

12
FM Mode
Prime Operation
1. To listen to FM radio stations switch radio on and press the DAB/FM button to switch to FM Mode.
2. Once in FM mode, it will start at the beginning of the FM frequency range (87.50MHz) or it will
play the last FM station you were listening to.
3. To manually change FM frequency, press the BACK or NEXT button to change it by 0.05MHz.
4. To Auto-scan, press the SELECT button, or press the SCAN button directly.
5. To automatically ‘SEEK’ the next active station, repeat above step (4) once more.
6. The display will shows that the unit is searching through the frequency range until a station is
found.
7. When unit reached the end of the frequency range, it will start searching from the beginning of the
frequency range again.
Page 20

13
FM Menu Options
Page 21

14
Displaying FM Station Information
To view station information, need simply press the DISPLAY button repeatedly, and this is a circularly
switched order.
Program Type:
This is a description of the type of program provided by the FM
station and it is provided by the broadcaster.
Station name:
This displays the transmission station name of current listening to.
Audio type:
There are ‘Stereo allowed’ and ‘Forced mono’ two options.
Time:
It displays the time provided by the broadcaster.
Date:
It displays the date provided by the broadcaster.
Radio text:
It is scrolling text information supplied by the FM station. It may
comprise information on music titles or details of the program and is
provided by the broadcaster.
Page 22

15
Scan Setting
1. Press the MENU button, and then press the BACK or NEXT button to ‘Scan Setting’.
2. Press the SELECT button to confirm.
@ Note: you can choose between Strong stations only and All Stations,
a. if you choose Strong Stations only, it will show only the stations with strong signal strength.
b. If you choose All Stations, all detected stations will be shown.
3. Press the BACK or NEXT button to select your preferred setting method.
4. Press the SELECT button to confirm.
Audio Setting
1. Press the MENU button, and then press the BACK or NEXT button to ‘Audio Setting’.
2. Press the SELECT button to confirm.
@ Note: You can choose between Stereo allowed and Forced Mono audio setting.
a. if you choose Stereo Allowed, the sound output is stereo.
b. if you choose Forced Mono, the sound output is Mono.
3. Press the BACK or NEXT button to your preferred one
4. Press the SELECT button to confirm.
Page 23

16
Common Operation
Setting Station Presets
Your radio can store 10 DAB+ & 10 FM station presets.
To store presets 1-5:
1. While playing your favourite station, press and hold one of the PRESET buttons, and it will say:
“Preset # stored”.
To store presets 6-10:
While playing your favourite station, press the SHIFT button, and then press and hold one of the
PRESET buttons, and it will say: “Preset # stored”.
Selecting a Preset Station
To select a stored station:
1. Press the DAB/FM button to shift to relative mode.
2. Press one of the PRESET buttons to load preset 1-5, or
3. Press the SHIFT button first, and then press one of the PRESET buttons to load 6-10, it is done!
Volume Control
Adjust the radio volume to the desired level by pressing volume button on top of radio.
Page 24

17
System setup
Enter system setup
1. Press the MENU button, then press the BACK or NEXT button to < System >, press the SELECT
button to confirm.
2. Press the BACK or NEXT button to cycle through options, in which you can find ‘Sleep’, ‘Alarm’,
‘Time’, ‘Backlight’, ‘Factory Reset’, ‘SW version’ available.
J The following instructions will provide you more details.
Set Sleep
1. While cursor point to ‘sleep’, press the SELECT button to confirm.
2. Press the BACK or NEXT button to adjust the sleep period between 0 – 90 minutes.
3. Press the SELECT button to confirm.
@ Note: The interval time is off, 15, 30, 45, 60, 90 minutes in turn.
4. Select <Sleep> option again, and then press the SELECT button to show the remaining time before
Sleep time elapsed.
5. Unit will automatically switch to standby mode when the sleep time elapsed.
6 Press ON/OFF button to switch on the unit.
Page 25

18
Set Time
• Manually set time
1. It can be activated from < System > à < Time >, and then press the SELECT button to confirm.
@ Note: Press the BACK or NEXT button to switch between <Set 12/24 hour format>, <Set Time/date>, <Auto
update>, and <Set date format>.
2. Press the BACK or NEXT button to ‘Set Time/Date’, press the SELECT button to confirm.
3. Press the BACK or NEXT button to change the hour, press the SELECT button to confirm.
4. Press the BACK or NEXT button to change the minutes, press the SELECT button to confirm.
5. Then, apply the same method to set the date.
• Auto update
1. It can be activated from < System > à < Time > à < Auto update >, press the SELECT button to
confirm
2. Press the BACK or NEXT button to ‘Update from DAB’, press the SELECT button to confirm.
• To browse time setting
1. Simply press ON/OFF button.
Page 26

19
Setting Alarm
@ Note: a. Please set the time before setting the alarm.
b. While operating via batteries only, alarm will not function if unit is in standby mode.
1. It can be activate from < System > à< Alarm >, press the SELECT button to confirm.
2. Press the BACK or NEXT button to view ‘Alarm 1’ or ‘Alarm 2’, press the SELECT button to select
between the two alarms.
Let’s take setting alarm 1 for example.
3. Press the BACK or NEXT button to ‘on’, press the SELECT button to confirm.
4. Press the BACK or NEXT button to adjust the hours, press SELECT button to confirm.
@ Note: Adjust the minute using the same method as adjusting the hour. Then, you are required to set the duration
of the alarm.
5. Press the BACK or NEXT button to your required duration time, press the SELECT button to confirm.
@ Note: If alarm is not switch off when it is ringing, it will continue to ring until it reach the preset duration..
6. Press the BACK or NEXT button to your desire alarm source. You can select Buzzer, DAB or FM,
and then press the SELECT button to confirm.
7. After that, you are required to set the frequency of the alarm. You can select between Daily, Once,
Weekends or Weekdays.
Page 27

20
8. Press the BACK or NEXT button to adjust the alarm volume level, press the SELECT button to
confirm.
In standby mode, the Alarm icon ( ) will shown on-screen.
• To cancel Alarm temporarily and snooze operation
When alarm is ringing, press ON/OFF to switch off alarm.
You may press the SELECT button repeatedly to postpone it, by which the interval time is 5, 10, 15,
30 minutes in turn.
@ Note: a. You cannot set the duration of the Snooze time more or equal to the duration of the Alarm time.
b. The alarm will be sound again after the predefined period of time elapsed.
• To cancel Alarm permanently
Besides performing a ‘factory reset’, you can also cancel alarm such as below instructions:
Enter alarm setting mode, and then convert alarm status from ‘On’ to ‘Off’.
Page 28

21
Set Backlight
A. Setting for ‘On level’ ------------- (for power on condition)
1. It can be activated from < System > à < Backlight >, press the SELECT button to confirm.
2. While cursor point to ‘On level’, press the SELECT button to confirm.
3. Press the BACK or NEXT button to cycle through ‘High’, ‘Medium’ and ‘Low’ 3 options.
4. When your required option is display, press the SELECT button to confirm, normally setting to ‘High’
is ideal.
B. Setting for ‘Dim level’ ------------- (for standby condition)
1. Continue above step4, press the BACK or NEXT button to ‘Dim level’, and then press the SELECT
button to confirm.
2. Press the BACK or NEXT button to select your required setting, ‘High’, ‘Medium’ or ‘Low’, press the
SELECT button to confirm. The ideal setting will be 'Low'.
Factory Reset
You can delete all of the preset stations and return the radio to its factory settings as following:
1. It can be activated from < System > à < Factory Reset >, press the SELECT button to confirm.
2. Press the BACK or NEXT button to < Yes >, press the SELECT button to confirm.
SW Version
1. It can be activated from < System > à < SW version >, press the SELECT button to confirm.
Page 29

22
Specification
ITEMS DESCRIPTION
Specifications: FM, DAB and DAB+ Digital Radio
Power Requirements:
DC Adapter: Input: 100-240 VAC, 50-60Hz
Output: 9V/1000mA
FM Frequency Range
(FM) 87.5-108MHz
(DAB, DAB+) 174 – 240MHz
Speaker Output Power: 2Wrms x 2
Impedance: 8 ohm
Headphone Jack: 32 ohm
Dimension: 267 x 123 x 168mm
Net Weight: 1.2 kg
@ Note: Specifications are subject to change without prior notice. Weight and Dimension are approximate.
This symbol on the product or in the instructions means that your electrical and electronic equipment
should be disposed at the end of its life separately from your household waste. There are separate
collection systems for recycling in the EU.
For more information, please contact the local authority or your retailer where you purchased the product.
Page 30

TEAC CUSTOMER CARE CENTRE (TCCC)
Free call: 1800 656 700
Between Monday to Friday – EST 9AM to 5PM
 Loading...