

Page 1

OPERATION MANUAL
LED TV
L32S4690S/L40S4690FS
L50S5610FS/L50S5600FS
L55S4690FS
For use with models:
Figures and illustrations in this User’s Guide are
actual product appearance. Product design and
Page 2

Table of Contents
2
Chapter 1: Introduction
Chapter 2: Connections and Setup
3
3
3
3
3
3
3
3
Precautions ................................................................................................................................................................
Product ...................................................................................................................................................................
Power and Plug ......................................................................................................................................................
Power Cord and Signal Cable ...............................................................................................................................
Use Environment ....................................................................................................................................................
Cleaning .................................................................................................................................................................
Hanging the TV Set on the Wall .............................................................................................................................
.............................................................................................................................................Important Information
4
4
6
7
7
7
Buttons on the TV .......................................................................................................................................................
Sockets .......................................................................................................................................................................
Remote Control Functions ..........................................................................................................................................
Switching on ...............................................................................................................................................................
Switching off ...............................................................................................................................................................
Initial Set-up ................................................................................................................................................................
8
Menu display .............................................................................................................................................................
Chapter 3: Menu Operation
Chapter 4: Advanced Functions
10
10
10
10
11
12
12
14
14
15
15
16
16
16
Using Menu System ..................................................................................................................................................
Picture Menu........... ...................................................................................................................................................
Sound Menu....................... .......................................................................................................................................
PAP Function........ .....................................................................................................................................................
Installation .................................................................................................................................................................
Timer Menu ......... .......................................................................................................................................................
Option Menu .......... ...................................................................................................................................................
13
13
13
Customising the input settings ..................................................................................................................................
Diagnostics on digital TV channels ............................................................................................................................
Time shift ................ ...................................................................................................................................................
11
Lock Menu ...... ...........................................................................................................................................................
13
Reset shop ............. ...................................................................................................................................................
16
15
Network Connection ...................................................................................................................................................
DLNA ........................ ................................................................................................................................................
Energy saving.............................................................................................................................................................
V ...............................................................................................................................iewing TV using the 3D fucntion
Smart TV ...................................................................................................................................................................
YouTube ................ ....................................................................................................................................................
Skype .........................................................................................................................................................................
T-Link .........................................................................................................................................................................
Setting up your favourite channels ...... ............. ......................................................................................................
Chapter 5: Other Information
19
Troubleshooting ...........................................................................................................................................................
17
Using electronic programme guide .............................................................................................................................
18
PVR .............................................................................................................................................................................
18
16
16
Schedule list .................................... .........................................................................................................................
MHEG function ................ ..........................................................................................................................................
Viewing photos, playing m usic an d watch ing vid eos fro m a USB stora ge device .......... ..... ..... ..... ..... ..... .
TV Controller ............................................................................................................................................................. 9
Page 3

Introduction
3
Chapter 1
Precautions
Product
Read all of the instructions before operating the set.
Keep these instructions well for future use.
Do not block or cover the ventilation openings on the
back cover.
Cleaning
Dust the set by wiping the screen and the cabinet with
a soft, clean cloth or some special liquid cleaner.
Unplug the set under the following conditions:
Power and Plug
Do not allow anything to rest on or roll over the power
cord and the signal cable.
Power Cord and Signal Cable
Hanging the TV Set on the Wall
Warning: This operation requires two persons.
Do not push objects of any kind into this unit through
the cabinet slots as they could touch current carrying
parts or short-circuit parts, resulting in fire, electric
shock, or damage to the unit.
Do not attempt to open the cabinet
. There are no parts inside you can service by
yourself. Refer all servicing to qualified personnel.
as this may cause
damage
Do not touch the screen surface with fingers as this
may scratch or mark the TV screen.
Do not impact the TV screen with hard pressure as
this may damage the TV screen severely.
The appliance is not intended for use by young children
or infirm persons without supervision. Young children
should be supervised to ensure that they do not play
with the appliance.
- If the set will not be used for a long period of time.
- If the power cord or the power outlet/plug is damaged.
- Follow the instructions to install and adjust the
product. Adjust those controls that are covered in these
operating instructions as improper adjustment of other
controls may result in damage. If this happens, unplug
the set and refer to the service personnel.
- If the set has been subjected to impact or dropped
and the cabinet is damaged.
Where the mains plug or an appliance coupler is
used as disconnect device, the disconnect device
shall remain readily operable.
Protect the power cord and the signal cable from being
trampled.
Do not overload the power cord or the power outlet.
Do not expose the power cord and the signal cable to
moisture.
Do not place the set on an unstable cart, stand, or table.
Use Environment
Place the set in an area that allows good ventilation.
Do not use the set near damp, and cold areas. Protect
the set from overheating.
Keep the set away from direct sunlight.
The set shall not be exposed to drips or splashes
and no objects filled with liquids, such as vases, shall be
placed on the set.
Do not use the set in dusty environments.
Do not apply excessive force to the screen when
cleaning.
Do not use water or other chemical cleaners to clean the
screen as this may damage the surface of the TV
screen.
Check that the wall can support the weight of the TV
set and wall mount assembly.
All other safety instructions about our TV sets are also
applicable here. Wall Mount Bracket not included.
Follow the mounting instructions provided with the wall
mount.
The TV set must be installed on a vertical wall.
Make sure to use only screws suitable for the material
of the wall.
Make sure that the TV set cables are placed so that
there is no danger of tripping over them.
To ensure a safe installation, observe the following safety
notes:
Important Information
Using cabinets or stands recommended by the
manufacturer of the television.
If a television is not positioned in a sufficiently stable
location, it can be potentially hazardous due to falling.
Many injuries, particularly to children, can be avoided by
taking simple precautions such as:
Note: Graphics contained within this publication
are presentation only.
Only using furniture that can safely support the television.
Ensuring the television is not overhanging the edge of
the supporting furniture.
Not placing the television on tall furniture (for example,
cupboards or bookcases) without anchoring both the
furniture and the television to a suitable support.
Not standing the televisions on cloth or other materials
placed between the television and supporting furniture.
Educating children about the dangers of climbing on
furniture to reach the television or its controls.
Operating Temperature: 5℃ to 35℃(41°F to 95°F)
Operating Humidity: 20% to 80%, non-condensing
Storage Temperature: -15℃ to 45℃(5°F to 113°F)
Storage Humidity: 10% to 90%, non-condensing
Page 4

Buttons on the TV
1. PR-/+ (PROGRAM UP) buttonDOWN/
Scans up through the channel list. In the menu system,
button on the remote and adjusts menu; acts like the up direction buttons on the remote and
adjusts menu controls.
down/ PROGRAM DOWN acts like the down direction
PROGRAM UP
2
. MENU ( ) button
Brings up the menu system.
5. POWER ( )button
Turns the TV on or to standby. (Note: for some models, the POWER button turns the TV on or off.)
. VOL-/+ (VOLUME UP) buttonDOWN/
increases the volume. In the menu system, they act like the left direction buttons on the remote
and adjusts menu controls.
Decreases/ /right
3
. OK/SOURCE ( ) button
4
In the menu system, confirms your selection or changes settings.
Note:
The location and names of the function buttons and power button on the TV may vary according to TV model.
4
SPDIF
SPDIF socket (output)
The SPDIF socket can be used to connect a compatible digital audio receiver.
or
Sockets
Note: the location and names of the sockets on the TV may vary according to
TV model, and not all sockets available on all models.
Headphone socket (output)
This socket can be used to connect headphones or stereo earphones.
Warning: excessive sound pressure from earphones and headphones can
cause hearing loss.
HEADPHONE
or
USB socket (input)
These sockets can be used to connect a USB device.
Note: the number of USB sockets on the TV may vary according to TV model.
USB
LAN
Chapter 2
Connections and Setup
3D
This socket can be used to connect the local area network.
Note: For some TV models, the socket is called Service instead, and has no function.
LAN
Page 5
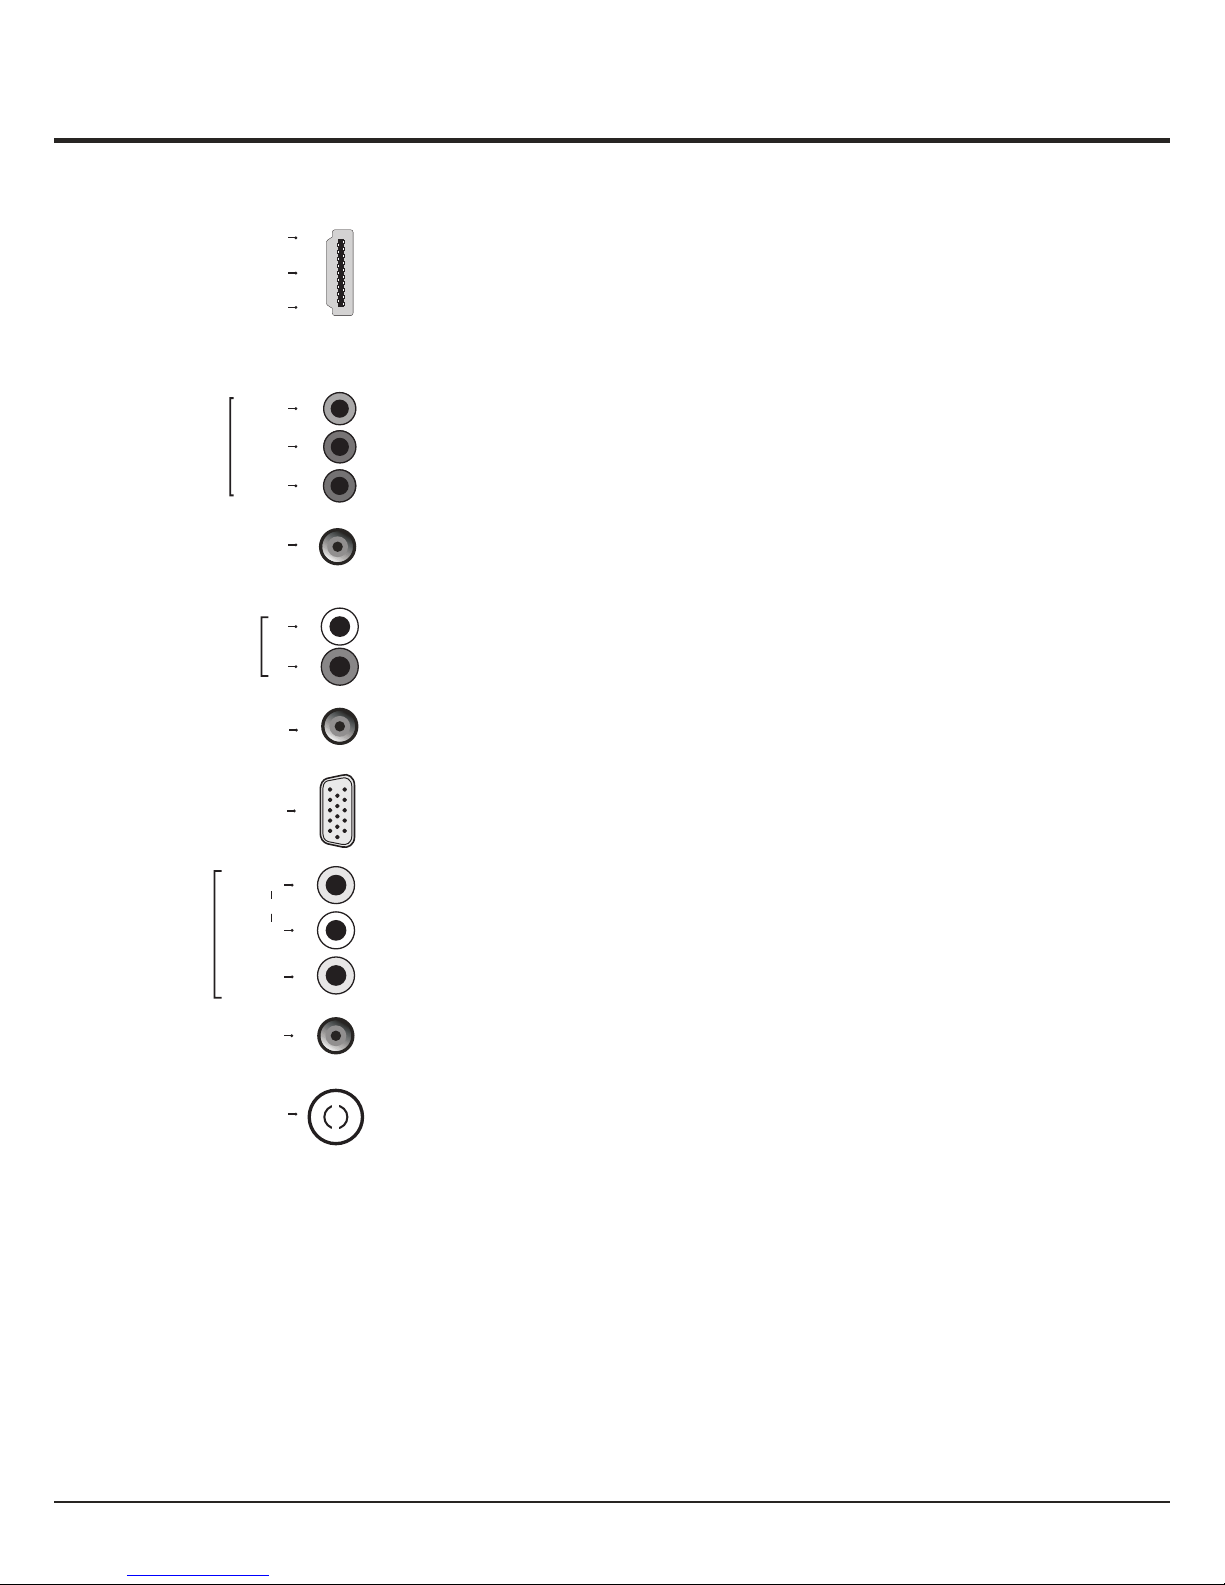
AV RCA audio + video sockets (input) or AV IN adapter socket
Note: AV IN adapter
The AV IN sockets can be used to connect a range of equipment, including video
recorders, camcorders, decoders, satellite receivers, DVD players, or games
consoles. The VIDEO IN socket provides
the socket can be used to connect the attached AV adapter
cable with VIDEO and AUDIO L & R IN sockets.
composite video connection.
L
AUDIO
VIDEO
AV IN
R
AV IN adapter
5
VGA socket (input)
This socket can be used to connect a computer.
VGA
ANTENNA IN
ANTENNA IN socket (input)
This socket can be used to connect the outside aerial or cable network.
YPbPr component sockets (input) or CMP adapter
CMP adapter
socket (input)
Note: The socket can be used to connect the attached CMP adapter
cable with YPbPr component sockets
Y
Pb/Cb
Pr/Cr
COMPONENT
IN
These YPbPr sockets can be used to connect a device that has component video
sockets, such as a DVD player. The component sockets can recognize if the device
you're connecting to is Y Pb Pr compatible or Y Cb Cr compatible. The component
sockets provide excellent picture quality because the video is separated into three
separate parts.
CMP IN
adapter
or
R
L
AUDIO IN
AUDIO IN or AUDIO IN adapter sockets (input)
Note: T AUDIO in adapter
and
he socket can be used to connect the attached AUDIO
in adapter cable with audio L & R sockets, be used to obtain sound.
AUDIO IN
adapter
or
These AUDIO IN L & R sockets can be used to connect a range of equipment,
including video recorders, camcorders, satellite receivers, DVD players, or games
consoles. AUDIO IN sockets (or AUDIO in adapter) are shared by VGA and YPbPr
(or CMP adapter) sockets.
HDMI1 or HDMI2 or HDMI3 socket (input)
The HDMI can be used to connect a
blu ray, PC with a compatible video card installed, certain DVD players or a
high-definition compatible digital satellite decoder. This socket p
(High-Definition Multimedia Interface) socket
rovides an
uncompressed digital connection that carries both video and audio data by way of
an integrated mini-plug cable.
HDMI 1
HDMI 2
or
HDMI 3
or
Connections and Setup
or
Page 6
6
Connections and Setup
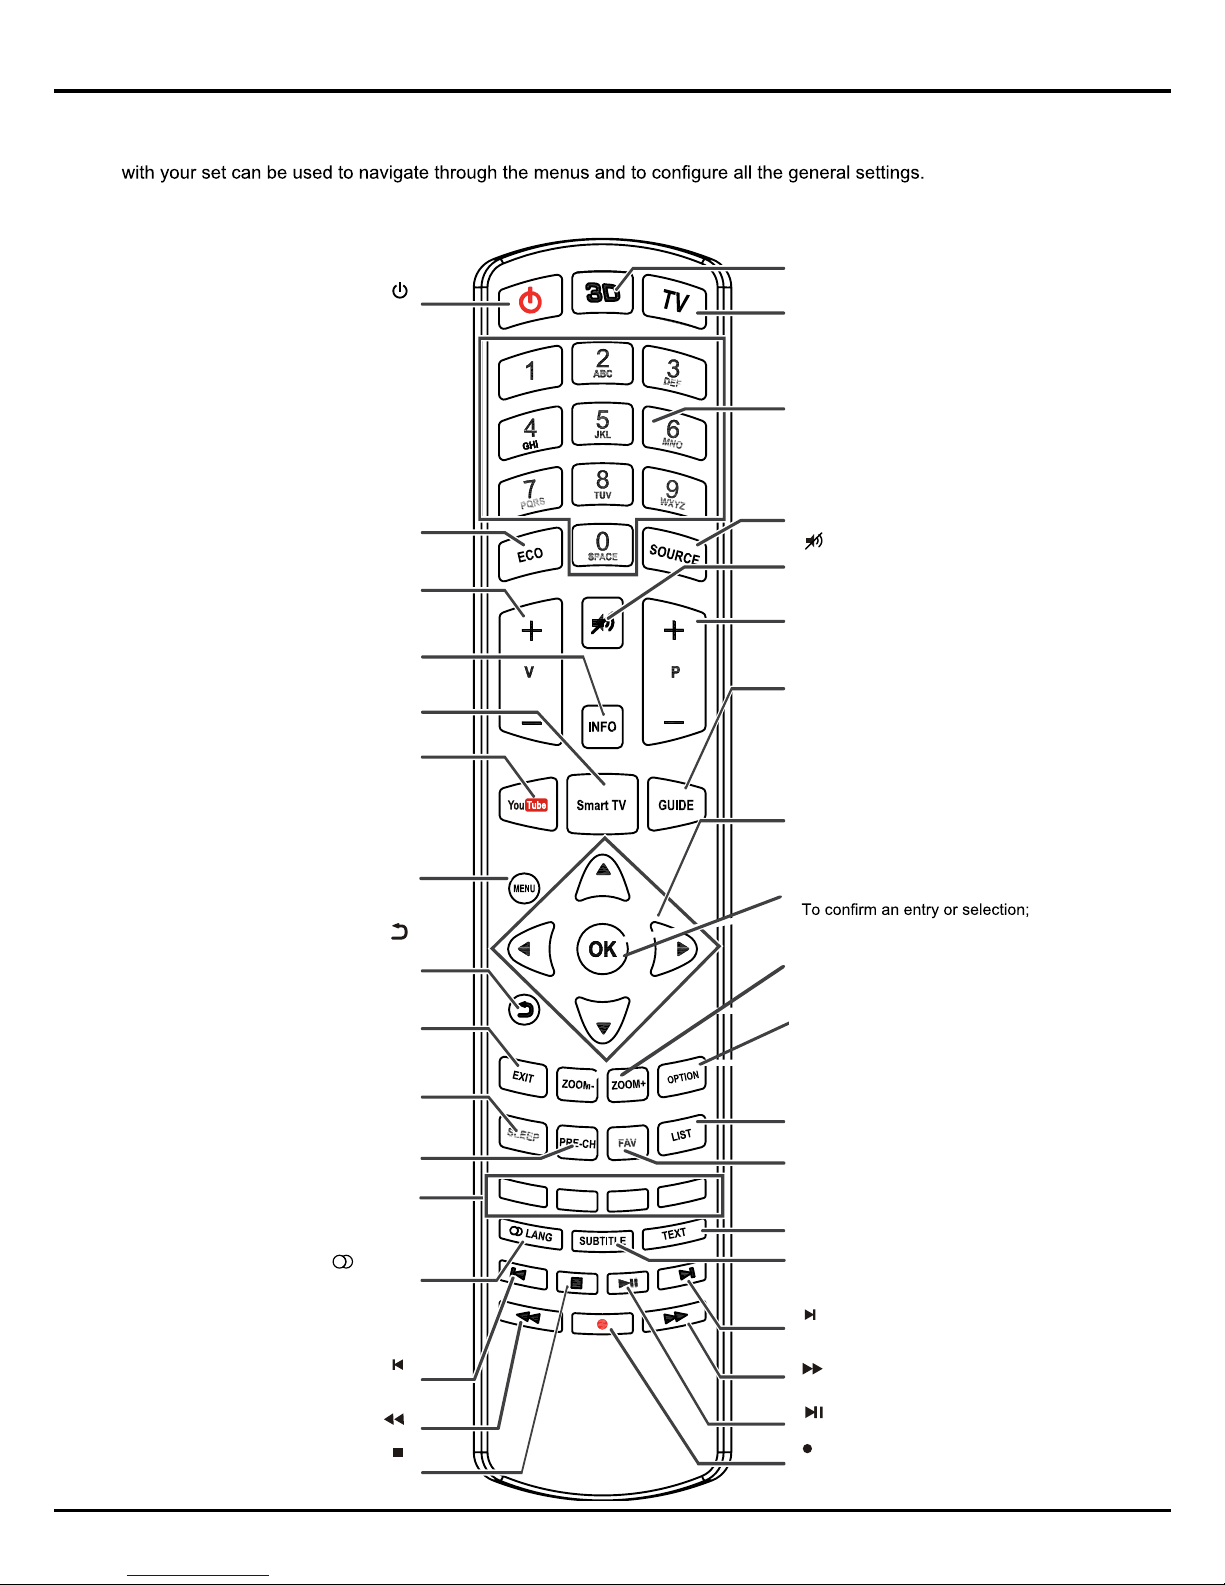
Remote control functions
Most of your television's functions are available via the menus that appear on the screen. The remote control supplied
Note: You are recommended to use the full screen mode. Do not use the display mode with black bars on both sides of the picture (such
as 4:3) for a long time; otherwise the TV screen may be damaged permanently.
ECO
To select desired power saving mode.
V+/-
To control the volume.
INFO
To display programme information, if
available.
SMART TV
To display the Smart TV homepage.
YouTube
To display YouTube homepage.
MENU
To access the main menu; to return to
the previous menu;
To return to the previous menu
EXIT
To exit the menu structure or Teletext.
ZOOM-/ZOOM+
To select the picture format.
PRE-CH
To return to the previous channel.
LANG
To select a sound type available for
selected analogue TV programme; to
select an audio language available for
selected digital TV programme.
SLEEP
To toggle among the sleep timer
options.
Colour buttons
To select tasks or Teletext pages. The
red button can also be used for MHEG
and HbbTV function.
Standby / quit standby.
To select the previous photo, music
or video.
To start or pause playback.
To stop playback.
To select the next photo, music or video.
To start fast forward.
Recording button.
To start fast reverse.
TEXT
To toggle Teletext on or off.
TV
To access TV mode.
GUIDE
To toggle the Electronic Programme
Guide on or off (only available for digital
channels).
To navigate through the menus; to set
functions and change values.
To navigate through the menus; to select
menu options; to switch to the previous or
next photo, song or video in USB function.
SUBTITLE
To select a subtitle language available for
selected digital TV programme.
P+/-
To change channels.
To switch the sound off and back on.
SOURCE
To select connected devices.
OK
LIST
To display the channel list.
FAV
To bring up the Channel list selection
menu.
3D
To toggle among the 3D input format
options.
Alphanumeric buttons
To enter channel numbers; to enter
a letter, a digit or a symbol in some
functions.
◄/►
▲/▼
OPTION
To display the function menu to
perform certain operations; to display
the Teletext page in different modes.
Page 7

7
Switching on
Follow the instructions on this page on how to switch on your TV set and the remote control before going on to following
pages describing how to use the channel set-up procedure.
1. Insert two AAA batteries in the remote control.
Precautions on using batteries:
- Only use the battery types specified.
- Make sure you use the correct polarity.
- Do not mix new and used batteries.
- Do not use rechargeable batteries.
-
- Remove the batteries from the remote control if you are not using it for a long period of time.
Do not expose batteries to excessive heat such as sunshine, fire or the like, throw them in a fire, recharge them or
try to open them, as this could cause them to leak or explode.
3. Connect an outside aerial to the ANTENNA IN socket at the back of the TV set.
The aerial socket (75 OHM - VHF / UHF / cable) can be used for connecting
an external aerial or other equipment fitted.
4. When powered on, the TV will be turned on directly or be in standby mode.
If the TV set is in standby mode, press the button on the remote control or
on the TV set to turn on the TV.
Note: the location and name of the power button on the TV may vary according
to TV models.
2. Connect the power cable FIRST to the television, THEN to a mains socket.
Your TV set should only be connected to an AC supply. It must not be connected
to a DC supply. If the plug is detached from the cable, do not, under any
circumstances, connect it to a mains socket, as there is a risk of electric shock.
Note: the figures are for representation only. The location of the power socket at
the back of the television might differ depending on the model.
Switching off
To put the TV set into standby mode, press the button on the remote control
or on the TV, the TV set remains powered up, but with low energy consumption.
To switch off the TV set, unplug the mains socket from the mains outlet.
Initial Set-up
Initial set-up involves selecting all the settings required to be able to search for and store all the channels you can
receive. Make sure that the television is switched on and follow all the steps in turn specified hereafter.
The first time you switch the set on, the Initial setup wizard opens, which guides you through the initial setup
process. Press OK to start your initial setup.(See figure 1)
In this step, you can also select Skip Scan to skip the channel search progress. But when you turn the TV on next time,
the prompt on the screen will remind you to do the channel scan first.
2. During the setup, you can follow the hints available at the bottom of the screen to return to the last step by pressing .
4. - In this step, you can press OK to exit the initial setup. The channels are arranged in a preset order. If you wish to skip
channels, modify the preset order or rename channels, select Setup > Organiser for these operations.
- In this step, you can also press to return to the previous step.
1. Press to select Scan and press OK/ to start the search automatically. All available TV programmes are stored.
This operation takes a few minutes. The display shows the progress of the search and the number of programs found.
Note: to prevent the channel setup process from being interrupted, wait for the message indicating that the setup is
complete.
/
3. Once the automatic search ends, the set enters the next step automatically. You can press to select your location
Shop or Home. Press OK/ to confirm your selection and enter the next step.
Note: the Shop mode does not meet the MEPS requirements, we would like to suggest selecting Home.
/
Connections and Setup
Page 8

Chapter 3
Menu Operation
Menu Display
Initial setup
Welcome to the Wizard for Initial Setup !!
Please press [OK] to start the wizard.
Welcome
Picture Sound
PAP
Options
Setup
LockInstallationTimer
Picture
Picture preset
Standard
Brightness
Contrast
Saturation
Sharpness
Screen mode
Auto format
Advanced settings
60
50
50
8
16:9 format
On
Color Temperature
Normal
Back
Exit
Select
Menu
Exit
...
CEC
Version Info
Sound
Sound preset
Balance
Audio delay
0
Auto volume control
Sound type
Off
Stereo
...
Back
Exit
Select
Enter
Menu
Exit
OK
500
Audio Description
...
PAP
PAP
Off
Back
Exit
Select
Menu
Exit
Options
Teletext
SPDIF type PCM
SPDIF delay
T-Link Off
Location Home
140
Subtitle
Back
Exit
Select
Enter
Menu
Exit
OK
Network update
On
Software update
Timer
Time zone
Clock
Sleep timer
As per broadcast
Off
...
Back
Exit
Select
Menu
Exit
NSW/ACT
Country region
Channel install
Automatic update
Analogue manual scan
Antenna manual installation
Clean channel list
Automatic search
Back
Exit
Select
Enter
Menu
Exit
OK
Setup
Organiser
Input settings
Diagnostics
Time shift On
Reset shop
ECO settings
Back
Exit
Select
Enter
Menu
Exit
OK
Network
Figure 1
Figure 2
Figure 3
Figure 4
Figure 5
Figure 6
Figure 7
Figure 8
Figure 9 Figure 10
8
Off
Wide Stereo
Tvitter
Page 9

Smart TV
Press to select Smart TV source.
Press the TV up. When the highlight cursor
moves to Smart TV on TV screen
Controller
icon , click the TV Controller.
(* not availible for some models)
Page 10

Menu Operation
Using Menu System
10
a setting. Use OK/ to open the corresponding submenu.
1. Press Menu to display the main menu.
2. Press to select the desired item, then press
OK button to open the corresponding submenu.
3. In submenus, use to select menu options, use
to set functions or change values. Press OK to activate
4. Press Menu to return to the previous menu or press
Exit to close the menu.
Picture Menu
The menus for adjusting the picture are used to obtain
the best picture settings according to your preference,
the type of program you are watching and the ambient
lighting. (see figure 3.)
Display the main menu by pressing Menu and select
Picture, then press OK to confirm. The Picture options
are as below:
Note: some options may not be available for certain
signal sources.
Picture preset: use to scroll through the picture
preset settings: Personal, Movie, Standard, Dynamic
and Studio.
This section explores the menus of your TV. Each menu
is outlined and detailed to help you get the most from
your TV. To access the menu system:
// /
/
/
/
Brightness: adjusts the brightness of the picture.
Contrast: adjusts the difference between light and
dark areas of the picture.
Saturation: adjusts the richness of colour.
Note: this function is not available in VGA mode.
Sharpness: adjusts the crispness of the edges in the
picture.
Note: this function is not available in VGA mode.
Color temperature: adjusts the color temperature of
the picture. Use to scroll through the color settings:
Cool for a more blue palette of picture colors; Normal;
Custom; Warm for a more red palette of picture colors.
Screen mode: use to select the picture size.
(Note: You are recommended to use the full screen
mode. Do not use the display mode with black bars
on both sides of the picture (such as 4:3) for a long time,
otherwise the TV screen may be damaged permanently.)
Auto format: use to select On or Off, when On is
selected, the TV will display the picture according to
HD Signal's format.
Note: Auto format is available only in part of TV and AV
mode.
Advanced settings: press to display its submenu.
Use to select the items such as Noise reduction
to obtain a clearer picture.
/
/
/
OK/
/
Note: some options may appear in the next page of
Picture menu, you can press to switch.
/
Sound Menu
Display the main menu by pressing the Menu button and
select Sound, then press OK to confirm. The Sound
menu appears with the following options(see figure 4):
Sound preset: press to display its submenus:
- Sound preset: use to select a sound type(e.g.
Rock, Pop) directly.
Use to select the desired
frequency range(e.g. 100Hz, 300Hz), use to
adjust the level.
Balance: use to balance the sound between the
left and right speakers.
Audio delay: if the sound output does not match the
picture, press to adjust the delay time to
synchronize the sound with the picture.
Wide stereo: use to switch On or Off.
Auto volume control: select On mode to reduce
the annoying blasts in volume during commercial
breaks, this also amplifies softer sounds in program
material. Eliminates the need to constantly adjust
the volume.
Audio description: it refers to an additional narration
track for the blind and visually impaired viewers of
visual media, including television programmes and
movies. The description narrator talks through the
presentation description what is happening on the
screen during the natural pauses in the audio(and
during dialogue if deemed necessary).
1. You can use this function if the current broadcast
contains audio description.
2. You can turn on the audio description on or off in
the Audio Description menu.
/
/
/
Sound type: use to select a sound type from the list.
Note: the options offered depend on the programme
you are watching.
/
OK/
/
/
To display the pictures from different source inputs side
by side. Note that one window is for both analog and
digital TV inputs, the other is for HDMI and CMP inputs.
See figure 5. (Note: AV input is not available for AV on
both windows.)
1. Display main menu by pressing Menu. Select PAP
and press OK to confirm.
2. Select the PAP item, and press to turn on/off
PAP function.
3. When On is selected, select TV position, press
to reposition the TV window.
PAP Function
/
/
/
Page 11

11
Automatic Channel Set-up
.
2. Select Digital & Analogue (or Digital or Analogue),
then press to start the automatic search process.
The search may take a few minutes. During the process,
you can press Menu or Exit to abort halfway.
3. Once the automatic search ends, press the Menu
button to return to the last step or press OK to restart
your channel search.
4. After the automatic search, channels are arranged in a
preset order. You can skip channels, modify the preset
order or rename channels, select Setup >Organiser
and press to enter.
Channel skip: if a channel was stored twice or
its reception is poor, you can simply skip it. The
skipped channels no longer be selected by pressing the
PROGRAM UP /DOWN button.
Select the Channel skip option and press to
display Channel skip menu.
Press to select a channel and press OK to check
the box.
Channel sort: swaps two channels position/inserts one
channel to where you want it be.
1. Select the Channel sort option and press
to display Channel swap/Channel insert menu.
2. Press to select a channel, and press OK to
confirm.
3. Press to select the second channel, and
press OK to swap the two channels/to insert the
first channel you choose.
Channel edit: select the Channel edit option and
press to display Channel edit menu. Press
to select a channel you want to edit, then press
OK to enter. Press to select Channel number
or Channel name, use the digit keys to edit the
channel number or channel name, finally press OK
to confirm.
When you have finished, press Menu/ to return,
or press Exit to close the menu.
Channel delete: Select it and press the green button
on the remote control to delete the channel you want.
1. Press the Menu button to display the main menu,
and select Installation > Automatic search, then press
to enter
This option allows the TV to search for, find and store
all the available analogue and digital channels. (See
figure 8). Follow all the steps in turn specified hereafter.
OK/
OK/
OK/
OK/
/
OK/
/
/
OK/
/
/
This allows you to update all available channels, without
Automatic Update
altering the sorting of existing channels.
1. Select Installation > Automatic update menu
2. Press to start to update the channels. To stop
the update process, press the Menu button.
3. When the search is completed, press Menu/ to
return, or press OK to restart.
OK/
Antenna Manual Installation
Allows you to start manual searching the available
channels from the current frequency or any frequency
you input.(Only for digital channels)
1. Select Installation > Antenna manual installation,
and press to enter.
2. Press OK to start search from the current frequency,
or use digit keys to input a frequency, then press OK
to start search.
3. When the search is completed, press Menu/ to
return, or press OK to restart.
Clean Channel List
Allows you to remove all the searched channels from the
channel list.
1. Display the Installation menu, press to highlight
Clean channel list, press to enter.
2. Press to select OK, then press OK to confirm the
the cleaning of the channel list.
Analogue Manual scan
1. Select
press to enter.
2. Press and number or OK to search, fine tune
or store the channel.
3. Press Menu/ to return to the previous menu or press
Exit to close the menu.
Installation > Analogue manual scan, and
OK/
// /
OK/
/
OK/
/
Note: press to toggle the focus window. When the
focus is on the TV window, digit keys and PROGRAM
UP/DOWN work in TV mode. When the focus is on the
other window, PROGRAM UP/DOWN switches
available external sources.
/
Lock Menu
This menu allows you to control special functions for TV
channels.
Note: you must enter your personal code before
entering the Lock menu.
Display the main menu by pressing Menu and select
Lock, then press OK to confirm. Then press the digit
buttons to enter the password to enter the Lock menu.
The factory default code is 1234. And the super
password is 0423. If you forget your code, enter the
super password to override any existing codes.
The Lock options are as below:
Channel Lock: this option allows you to lock a certain
TV channel. Highlight Channel lock, press to
display Channel lock menu. Use to select a
certain TV channel you want to lock, then press OK
to lock. To unlock, use the same operation.
Parental rating: this option allows you to set a rating
to a program. Highlight Parental rating, press to
display Parental rating menu. Then use to adjust.
OK/
/
OK/
/
Menu Operation
Installation
Page 12

12
external source. Press to displ ay Inpu t lock
Front panel lock: press to select On to loc k the
Timer Menu
The Timer menu allows you to set the time zone on your
TV set, to programme an automatic turn-off or wake-up
timer. Display main menu by pressing Menu. Select
Timer and press OK to confirm. The Timer options
are as below:
Time zone: use to select the local time zone.
Country region: use to select your region.
Clock: press to display its options:
Auto-synchronization: use to select On or
Off. If On is selected, the TV will get the time
automatically from DTV signals, and the Time
item cannot be adjusted. If you select Off, you
should set time at Time item. Highlight Time, use
to select input space, enter the Power on timer
using the digit keys.
Note: If Off is selected, the time set in Time option
will not be memorized when turning on the
TV next time, and the TV 's time will start
from the default.
Power on timer: use to select Once, Daily
or Off. If you select Once or Daily, you should
set a time period after which the TV automatically
switches to on- go to Timer below this item. Highlight
Timer, use to select input space, enter the
current time using the digit keys.
Power on Channel: this option is available when
Power on timer is chosen to Once or Daily.
Press to display its submenu. Highlight
Select mode, use to select Last status, the
power on channel will be the last channel you
/
OK/
/
/
/
/
OK/
/
/
access to the Installation men u and pre vent an y
Input lock: this option allows y ou to loc k a certa in
menu, external then press ▲/▼ to select a certain
source, and To unlock, use th e samepress OK to lock.
same operation.
Note: when the current in put is lo cked, y ou can pr ess
OK and enter the password t o enter.
set's buttons.
Max volume: press to set the max vol ume whe n
watching programme.
Change password: this option a llows y ou to cha nge
the password.Press to enter, the n press t he
number button to enter th e new pas sword t wice.
Clean all: this option allows yo u to unlo ck all lo cked
channels. Press OK to enter, use to s elect O K,
press OK to confirm.
OK/
/
Installation lock: press to select On t o block
channels from being set u p witho ut your c onsen t.
/
/
OK/
/
watched before power-off, or you can select
User select, then press to select the channel
you want to watch when the TV is turned on
automatically next time, and press OK to confirm.
Power off timer: use to select Once, Daily or
Off. If you select Once or Daily, you should set a
time period after which the TV automatically
switches to off - go to Time item. Highlight Time,
use to select input space, enter the current time
using the digit keys.
Sleep timer: sets a period of time after which the
TV set goes into standby mode. Use to set the
period (120 minutes maximum). To disable this
function, select Off.
Display main menu by pressing Menu. Select Options
and press OK to confirm.
The Options options are as below:
Subtitle: this enables subtitles for digital TV channels.
Select Subtitle option, press to display its
submenus:
Subtitle: press to turn On or off the subtitles.
Subtitle type: When Subtitle is set to be On, press
to select a subtitle type. You can select Hearing
impaired to display the hearing impaired subtitles
with your selected language.
Teletext > Decoding page language: Select Options
>Teletext > Decoding page language. Select a proper
type of language in which Teletext will display.
Teletext > Digital teletext language: On digital TV
channels, depending on the broadcaster, you may be
able to enjoy a service with multiple initial Teletext
pages in different languages. This function allows you to
select an available language as primary language which
relates to different initial Teletext pages. Select Options
> Teletext > Digital teletext language. Press to
select.
SPDIF type: connect the TV to an audio device through
the SPDIF output. To select a proper sound type for
your SPDIF output, press MENU on the remote control
and select Options > SPDIF type.
- If you select PCM, the SPDIF output format is PCM,
regardless of the programme’s sound format.
- If you select Dolby D, the SPDIF output format is
●Dolby Digital when the programme’s sound format
is Dolby Digital or Dolby Digital Plus or HE-AAC.
●PCM when the programme’s sound format is
MPEG.
- If you select Off, this turns off the audio output from
the audio device connected to the SPDIF output.
Note: the options you may choose depend on the
programme you are watching. If you select PCM and
the sound is ahead of the picture, you can select
SPDIF delay from the Options menu and press
to adjust the delay time to synchronize the sound with
the picture.
Options Menu
/
/
/
/
/
OK/
OK/
/
/
Menu Operation
Page 13

OK/
/
13
Network update: press MENU, then select Options >
Network update. Select On/Off to enable or disable the
network update function.
- When this function is on, the TV will automatically
update channels if your DTV service provider updates
their DTV network.
- When this function is off, you need to run the channel
Search again to get new channels or remove
unavailable channels if your DTV service provider adds
or removes channels from their DTV network.
Location: use to select Home or Shop mode. Home
mode is the default. If Shop mode is selected, the picture
will be displayed in Dynamic mode. In Shop mode, you
can adjust the picture mode, but when turning on the TV
next time, the Picture preset will restore to Dynamic
mode, and a prompt about Shop mode will appear.
Software update: press MENU, the select Options >
Software update. Press to enter.
- By network: enables you to download and install the
latest software version from the internet. Make sure to
set up a wired or wireless network connection first
then select By network and press to enter. When
new-version software is available, a progress bar
appears. When the download finishes, the TV will go
black and upgrade the software.
Note: Do not switch off or unplug the TV until the
upgrade is completed. Keep successful network
connection during upgrade.
- By channel: enables you to install the latest version of
the software if available from the broadcast. Use to
select By channel and press to enter.
1. Use to select Yes under Auto download to
automatically download the latest software if
available. After the software has been downloaded
successfully, you will be prompted to decide if you
want to install it right now. If yes, follow the on-screen
instructions to complete your installation. You can
also select to ignore the installation here.
2. Use to select No under Auto download to
decline the automatic download.
3. Use to select Manual Download and press
if you wish to search manually for the latest
software. Follow the on-screen instructions to
complete. During the search, press OK/EXIT to
cancel or exit the process.
Customising the input settings
You can configure your TV according to the equipment
you connect to it.
1. Select Setup > Input settings.
2. Press to enter Input settings.
3. Press to select a connector your equipment is
connected to.
4. Press to select the type of apparatus attached to
/
OK/
OK/
OK/
/
/
/
OK/
/
this connector.
5. Press Menu to return to the Setup menu. After
configuring, the selected source label will be
displayed after the name of the related connector in
the source list when pressing Source on the remote
control or OK on the TV set.
Diagnostics on digital TV channels
1. Select Setup > Diagnostics.
2. Press to display some signal information on
current digital channel, e.g. signal strength, freq.(KHz).
Time shift
Allows you to record the TV programme so that you won't
miss the favourite part even if you go out. Before you use
the function, connect a USB drive to the TV first. For the
first time, you should do the disk setup for the USB drive.
1. Select Setup > Time shift.
2. Press to select On to switch on the time shift
function, then press Exit to close the menu.
3. Press Option on the remote control and select Time
shift, then press OK to confirm.
4. Follow the directions on the screen to do the setup.
5. After the disk setup is done, press Option and select
Time shift.
6. Press OK to display the time shift menu. Press and
OK to control the time shift process.
- When the time shift menu disappears and only the
timing of the time shift remains on the screen, you
can press OK to call out the time shift menu.
Notes:
- Before you plug the USB drive to TV, make sure you
have backed up the data on the drive to avoid
unforeseen malfunction and data loss.
- We recommend that you use a USB drive with at
least 1GB free space and a disk speed faster than
5.0MB/sec.
- The bigger the USB drive free space for time shift, the
bigger the recording length.
- If you attempt to change channel during time shift, a
message prompts you to select Yes or No. You can
select Yes to exit the time shift function and execute
the channel change.
Reset shop
Allows you to reset the TV to factory default settings.
1. Select Setup, then press OK to confirm.
2. Select Reset shop and press to enter.
3. Use the digit buttons to enter the password.
4. Press to select OK and press OK to confirm.
5. The Initial setup menu appears. Follow the related
Instructions.
OK/
/
Menu Operation
OK/
/
/
/
Page 14

Advanced Functions
Chapter 4
14
You can set up your TV so that it can access the
Internet thro ugh your local area network (LAN)
using a wired or wireless connection.
Connecting to a wi red network
You can attach you r TV to your LAN usin g cable
in three ways:
- You can attac h your TV to your LAN by connecting
the LAN por t on your TV to an ext ernal mod em using
a Cat 5 cable.
- You can atta ch your TV to your LA N by conne cting
the LAN por t on your TV to an IP Sharer, which is
connec ted to an external modem. Use Cat 5 cable
for the con necti on.
- Depending on how yo ur networ k is confi gured ,
you may be able to attach your TV to your LAN by
connec ting the LAN port on you r TV di rectl y to a
networ k wall out let using a Ca t 5 cable. Note that
the wall ou tlet is at tache d to a mo dem or rou ter
elsewh ere in you r house.
1. Press MENU on the re mote control and se lect Setup
> Network > Settings > Internet conn ection. Press
to select On.
2. Press to select Interface, the n se t to
Ethern et to sele ct wired- mode connection.
3. Press to select Connection tes t, then press
to check th e Internet conn ectiv ity. If it does
not work, follow step 4 below.
4. Selec t Setup> Networ k > Settings > IP set ting, then
press to en ter the IP setting men u. You can set
Addres s type to Auto or Manual.
- Select Au to if you want the TV to acquir e and ente r
the needed IP address automatically.
- Select Ma nual if yo u want to enter your IP address
manual ly, then:
- Press to go to the first entry fie ld.
- Enter the IP add ress, Subnet ma sk, Defau lt
gatewa y, Primary DNS and Secondary DNS values.
Use the alp hanum eric butt ons to ent er numbers and
the arrow button s to move from one entry field to
anothe r.
- Once Auto or Manual IP set ting is co mplet ed,
press Menu to go back , press to select
Connec tion test, then press to check the
Intern et connectivity again.
5. If you wan t to see the in forma tion on current
connec tion, such as Inter face, Address ty pe, IP
addres s, etc., Select Setup> Network > Se tting s
> Information, then press .
Connecting to a wireless network
To connect your TV to your network wi reles sly, yo u need
a wirele ss router or modem and a Wireless LAN adapter
(some TV mode ls are equ ipped wit h an integ rated LAN
Adapter ). Connect your Wir eless High-Gain USB Adapter
(USB don gle) delivered with your TV to your TV’s
USB 1 port.
1. Press MENU on the re mote cont rol and se lect
Setup> Network > Settings > Interne t connection.
Press to se lect On.
Network connection
/
/
/
/
OK/
OK/
/
OK/
OK/
/
2. Press ▲/▼ to select Interface, then set to
Wireless to select wireless-mode connection.
3. Press ▲/▼to select Wireless setting and press
to enter.
4. You can set up the wireless network connection in 3
ways: A or B or C.
A. Scan
- Press ▲/▼ to select Scan, then press
The TV will search all access points within range,
access points found by the TV will be displayed.
- Press ▲/▼ to select an available access point,
then press to connect the TV.
Notes:
- If you select a protected access point, you will
have to enter the corresponding password. Press
OK on the remote control to display the virtual
keyboard to enable you to enter the password.
- This set is able to memorize the available access
point, which enables it to connect to the network
even if you switch on your TV after power-off.
B. Manual
Press ▲/▼ to select Manual, then press , you
will be prompted to enter the correct SSID of an
available wireless router to set up the connection.
C. Auto
If your AP (Access Point) supports WPS (Wi-Fi
Protected Setup), you can connect to the network via
PIN (Personal Identification Number) or PBC (Push
Button Configuration). WPS will automatically
configure the SSID and WPA key in either mode.
Press ▲/▼ to select Auto, then press OK/. to enter. .
- PIN: Select PIN and press to enter. Choose a
random PIN code. Make sure this code is installed
on the AP. (For the procedures, refer to your router
manual.) Press again to set up the
connection.
- PBC: If your router has a PBC push button, select
PBC, then press to enter. Press the PBC
push button on your router within 2 minutes after
you press again. Your TV will automatically
acquire all the network setting values it needs and
connect to your network.
5. To check the Internet connectivity, follow the
instructions in steps 3 and 4 of the preceding section
Connecting to a wired network.
6. To see the information on current connection, follow
the instructions in step 5 of the preceding section
Connecting to a wired network.
Connecting to your PC
Make sure to set up a wired or wireless connection from
your TV to a router first. Then connect your PC to your
router either through a network cable or wirelessly. Also
make sure to select Setup > Network > Settings >
Internet Connection, then On, and that your computer
firewall won’t block the connection.
OK/
/
OK/
OK/
OK/
OK/
OK/
OK/
OK/
DLNA
Page 15

Enabling DLNA function
Select Setup > Network >Applications > DLNA, and set
it to On.
Follow the steps in turn specified hereafter, then you can
enjoy recorded video, image and music saved on your
PC.
Adding media from your PC for sharing
Install a DLNA media server on your PC. The simple and
familiar server you may install is Microsoft Windows
Media Player 11 and 11 above. Follow the instructions
below to allow your TV to access the designated files on
your PC.
1. Open the Microsoft Windows Media Player 11.
- Select Library > Media sharing.
- Check the checkbox Share my media to.
- Select the icon of the TV set connected to your PC.
- Select Allow to allow the TV set to access your PC,
and select OK to enable the access.
Note: Use the Settings button to customize your
desired settings.
2. - Select Library > Add to Library.
- Select your personal folders or folders of other users
that you can access for sharing.
- Select Add and press OK to enable the addition.
DLNA application
Select Smart TV > Media and press OK to enter media
center. Then you can view photos, listen to music or
watch videos, which are stored on your PC.
Notes:
- If DLNA is switched on, the TV will display the list of
available DLNA servers which are available in local
network.
- Supported file formats:
Photo: JPEG Music: LPCM Video: MPEG2
1. Press MENU on the remote control and select Setup >
ECO Settings > Energy Saving.
2. Press to select a desired power saving mode to
achieve the desired power saving effect.
3. Press EXIT to close the menu.
Shortcut operation: Press ECO on the remote control to
select a desired power saving mode directly.
Note: You could select Setup > ECO Settings > Light
sensor > On to save power and can automatically adjust
the backlight according to the intensity of ambient light.
For some models, this option is not available.
Advanced Functions
Viewing TV using the 3D function
(* not available for some m odels )
WARNING:
- Some viewers may experi ence di scomf ort
while viewing 3D TV such as diz zines s, nausea
Setting up your favourite channels
You can create a list of your f avour ite TV chan nels.
1. Press LIST.
2. Press the yellow butto n to ente r Chann el list
selection. Press ▲/▼ to select fav ourit e list
and press OK to enter.
3. Press the blue button to s tart ed iting y our fav ourite
list. Press ▲/▼ to scroll through th e chann el list
press OK to select or desele ct it.and
4. Repeat this procedur e to set up o ther fa vouri te
channels.
5. Press LIST/EXIT to exit.
Shortcut operation: Press FAV on the r emote
to direc tly ent er Chan nel lis t selec tion.control
15
a hea dache s. If you e xperi ence any nd
stop viewing 3D TV, remove
your 3D glasses and rest.
such symptom,
- Watching 3D videos too closel y or for a lo ng
o f time ma y harm yo ur eyes ight. period
- A respon sible adult should frequently c heck
children who are using th e 3D func tion.on
- Do not use the 3D glasses for a ny othe r
than v iewin g 3D videos on a 3D TV. purpose
- Do not use the 3D function or 3 D glass es whil e
walking or moving aroun d, othe rwise t his may
in injuries due to runnin g into ob jects , r esult
or falling.tripping, and/
Notes:
- 3D glasses from other man ufact urers m ay
upported.not be s
- All photo functions are di sable d in 3D mod e.
- If you change to a different si gnal so urce
or access Smart TV, the 3D mode w ill be
automatically disab led.
- Some 3D modes may not be available
on th e input f ormat of the 3D video
source.
depending
- Supported 3D modes:
Analogue TV, AV, CMP: 2D-to-3D
Digital TV, HDMI, USB, Videos f rom the I ntern et
Side-by-Side, 2D-to-3D,
Line Interleave, etc.
Top and Bottom,
deactivated when 3D Mode is s et to
2D-to-3D or Off.
is
4. Depth of Field: Achieve a good 3D effe ct with
image converted from th e 2D imag e.the
5. 3D-to-2D: Select Lef t or Righ t to disp lay the
in 2D mode (no 3 D effect) . Th is func tion
image
6. Press EXIT to close the menu.
between the left and righ t eyes fo r
better 3D viewing.
3D video
1. Press MENU on the remote c ontro l and sel ect
Picture > 3D navigation, then pr ess to
3D na vigat ion to Ma nual.adjust
2. 3D Mode: Wear the 3D glasses f irst, t hen
p to select the right 3D input for mat
ress
Bottom, Side-by-Side,
among Top and
2D-to-3D, Line interleave, e tc for 3D v ideos .
3. L-R Switch: Select On or Off to adj ust the
/
/
of a selected video fro m USB, playback
- 3D function in USB mode: Du ring th e
the video menu in press MENU to display
3D Mode. the browser mode, then se lect
above related descrip tions .
For more detail informa tion, r efer to t he
Energy saving
/
Page 16

16
Advanced Functions
Allows you to enjoy Inter net Appl icati ons (Ap ps),
specially adapted Int ernet w ebsit es for yo ur TV.
You can control the Apps wit h the TV remo te cont rol.
Smart TV
WARNING:
- Configure the network s ettin gs befo re usin g
Smart TV.
Note: Since the connect ion wit h inter net tak es
time, it’s recommended that you wa it a
few minutes to use the smart TV feature
after activation of TV from standby.
- According to circumsta nces of t he cont ent pro vider,
- Slow responses and/or i nterr uptio ns may oc cur,
depending on your netwo rk cond ition s.
- If you experience a probl em usin g an appl icati on,
please contact the cont ent pro vider.
an application update o r the app licat ion its elf
may be discontinued.
- Depending on your count ry's re gulat ions, s ome
applications may have l imite d servi ce or not b e
supported.
Access Smart TV Application s (Apps )
1. Press Smart TV on the remote cont rol to
display the smart TV home pag e direc tly.
2. Use to select an App and press OK to
enter.
3. Internet browsing is a vaila ble wit h Smart TV
portal application. I t can be ac cesse d via the
icon in the portal or via the g reen bu tton wh en
TV portal page is displayed .
// /
To use this function you need t o purch ase the
TCL ICAM-H01A TV webcam, wh ich is so ld
seperately. This software ap plica tion al lows
users to make voicecall s over th e Inter net.
Besides this, this software ha s also be come
popular for its additio nal fea tures w hich in clude
instant messaging, fi le tran sfer, vi deo
conferencing, etc.
Select Smart TV > Skype, and press O K to
enter, then follow the opt ions an d hints
displayed on screen to us e the app licat ion.
Skype
Press YouTube on the remote contr ol (or pr ess
Smart TV > YouTube) to enter YouTube m ain
page, then follow the opt ions an d hint di splay ed
on screen to search and wat ch the vi deos.
YouTube is a video-sha ring we bsite w here yo u can
discover and watch vide os uplo aded by i ndivi duals
or some companies.
YouTube
Enable or disable T-Link
1. Press MENU on the remote contro l, then s elect
Options > T-Link.
2. Press to select On or Off, if this functio n is turn ed
on, T-Link option will be availab le in the Q uick
access menu which you ent er by pre ssing t he Opti on
button on the remote control.
Use one-touch play
With one-touch play, pressi ng the pl ay butt on on (fo r
example) your DVD remot e contr ol star ts play back on
your DVD device and autom atica lly swi tches y our TV
to the correct source, display ing DVD c onten t.
Use System standby
With system standby, press ing the b utton o n (for
example) your TV remote con trol sw itche s your TV
and all connected HDMI de vices t o stand by mode .
Note: The CEC functions d epend o n the dev ices
connected and it is possi ble tha t some de vices m ay
not interoperate corr ectly w hen con necte d to this TV.
The user manual or the manu factu rer of th e
problematic devices s hould b e consu lted fo r further
information.
/
Use this function to sear ch for CE C devic es conn ected
to the HDMI sockets in your TV an d enabl e one-t ouch
play and one-touch stan dby bet ween CE C devic es.
T-Link
Some digital TV broadcast ers offer d edica ted
digital text or interac tive se rvice s (for ex ample ,
BBC1). These services wor k like no rmal Telete xt
with the addition of numb er, colo ur and
navigation buttons.
Note: MHEG and subtitles are mut ually
exclusive and cannot coexist o n the
same screen. If Subtitle is set to On,
MHEG will not appear. Please follow th e
instructions in the section Turn ingon /off
subtitles to set Subtitle to OFF.
1. Press the red button or TEXT on the r emote
control.
2. Press to select or highlight items.
3. Press OK to confirm or activate .
4. Press one of the colour bu ttons t o selec t an
option.
5. Press TEXT or EXIT to exit.
Viewing photos, playing music and
watching videos from a USB storage
device
Your TV is fitted with a USB conn ector t hat
enables you to view photo s, list en to mus ic or
watch videos stored on a US B drive .
MHEG function
// /
Supported file format s:
Photo JPEG
Music Mp3
Video AVI, MPG, MPEG, TS, MKV
Notes: Some USB keys and USB produ cts lik e
digital cameras or mobile phon es are
not fully compatible with USB 2. 0
standard so they may not work with the
TV multimedia player. Not all USB keys
or devices are compatible with t he USB
function. Not all above formats are
recognised. The encoding for mats of
your files will determine whet her or no t
they can be used.
Page 17

Advanced Functions
17
PVR (Personal Video Recorder)
Allows you to record your f avour ite TV prog ramme s.
Before you use the functi on, con nect a US B drive t o
the set first.
Note: Feature is availa ble onl y in sele cted pr oducts
and, due to specific TV netwo rk limi tatio ns and
country technical req uirem ents, m ight no t be
available in product or p lace of i nstal latio n.
Feature might also be blo cked by TV ne twork
due to copyright protec tion (H D conte nt,
recording protectio n). Ple ase use O PTION
on the remote control to ch eck if fe ature i s avail able
in your product.
1. Press OPTION on the remote cont rol and s elect
Quick access > PVR.
2. Press to enter.
3. Press:
- the red button to start recordin g, the re cord fi le is
put into a folder named after the ch annel n umber
under the PVR folder in Media > Video;
- to adj ust the recording duration.
- the green button to stop recordi ng manu ally;
in normal operation, the recor ding wi ll stop
OK/
// /
When a USB drive is detecte d, the TV ent ers the
Media center menu direc tly. To ent er the Me dia
center menu manually, pres s Smart T V on the
remote control and sele ct Medi a and pre ss OK to
enter.
Photo
Use this function to disp lay pho tos, if a vaila ble.
1. Select Smart TV > Media > Photo, th en pres s OK
to enter the main file content bro wser.
2. In the main file content browse r, use to
select a photo or an inner fi le fold er.
3. Select an inner file fol der, pre ss OK to en ter a sub
file content browser.
4. Use to select a photo in either mai n or
sub file content browser, press M ENU to di splay
the photo menu in folder mo de.
- Sort: Sort folders and photos by m odifi catio n Date
or Name.
- Edit: Copy, paste or delete a selecte d photo .
- Parser: You can select Recu rsive t o displ ay
photos from all sub file folders .
5. Select a photo, press OK to watch , and a sli de
show begins from the sele cted ph oto. Pr ess OK to
pause the photo. Press MENU to dis play th e photo
menu in the browser mode. You c an play, pau se or
rotate the photo, select differe nt play m odes an d
display effects, etc.
6. Press the related buttons on th e remot e contr ol to
perform the available f uncti ons sho wn on the
function bar at the bottom of the TV scr een. Pr ess
the INFO button to show or remove th e funct ion
Bar.
Music
Use this function to play b ack mus ic, if av ailab le.
1. Select Smart TV > Media > Music, th en pres s OK
to enter the main file content bro wser.
2. Use to select a song in either main o r sub
file content browser in the same w ay as in ph oto
display function, pre ss MENU t o displ ay the mu sic
menu in folder mode.
- Sort: Sort folders and songs by Na me, Gen re,
Artist or Album.
- Edit: Copy, paste or delete a selecte d song.
- Parser: You can select Recu rsive t o displ ay
songs from all sub file folders.
// /
// /
Video
Use this function to watc h video s, if ava ilabl e.
1. Select Smart TV > Media > Vide o, then p ress
OK to enter the main file content br owser.
2. Use to select a video in either mai n or
sub file content browse r in the sa me way as i n
photo display functio n, pres s MENU to d ispla y
The video menu in folder mode .
- Sort: Sort folders and videos by Type ,
modification Date or Name.
- Edit: Copy, paste or delete a selecte d video .
- Parser: You can select Recu rsive t o displ ay
videos from all sub file folders .
3. Select a video, press OK to watch , and
automatic playback be gins fr om the se lecte d
video. Press MENU to display the v ideo me nu in
the browser mode. You can pla y or paus e the
video, select different p lay mod es, scr een
modes and preset pictur e setti ngs, et c.
4. Press the related buttons on th e remot e contr ol
to perform the available funct ions sh own on th e
function bar at the bottom of the TV scr een.
Press the INFO button to show or rem ove the
function bar.
// /
/
// /
3. Select a song, press OK to play, and aut omati c
playback begins from the selec ted son g. Pres s
MENU to display the music menu in th e brows er
mode. You can play or pause the s ong, se lect
different play modes, etc .
- Show lyrics: This option is availa ble for t he
Songs with lyrics. Select it and u se to tur n
on/off lyrics synchroni zed dis play.
- Audio only: Select and press OK to listen t o the
music with the screen turned off. Any k ey pres s
will turn the screen on.
4. Press the related buttons on th e remot e contr ol to
perform the available functi ons sho wn on the
function bar at the bottom of the TV scr een.
automatically when the recor ding du ratio n has
passed.
4. In recording, PVR mini p ane wil l also sh ow on the
screen to indicate the recordi ng prog ress.
5. To watch the recorded progra mme, ex it PVR mo de
first and go to Media > Video. Select th e folde r
PVR, then select the related rec ord fil e. Pres s OK
to play. (It is the same if you record a digi tal rad io
programme).
Page 18

18
Advanced Functions
- Channel number: use to select the chann el
number.
- Start date: use the alphanumer ic butt ons to se t
the recording date.
- Start time: set the starting tim e of the re cordi ng.
- Stop time: set the stopping time o f the rec ordin g.
- Schedule type:
a. Set Reminder to be reminded tha t you can
switch to the scheduled progra mme whe n
the time you have set comes. When ti me is
out and you do not execute any opera tion,
the dialogue box will dis appea r and no fu rther
operation will be executed.
b. Set Record, if you really want to s tart yo ur
scheduled recording when the t ime you h ave
set comes. When time is out and you do n ot
execute any operation, sched uled re cordi ng
will start automatically.
- Repeat type: set differen t repea t modes f or
the recording.
4. Press to select Add, then press OK to
add the schedule you set in to your s chedu le list .
5. Press the red button to repeat ab ove pro cedur es
to add another schedule .
6. If you wish to edit or delete a sched ule, se lect it
and press OK to enter.
7. Press EXIT to close the menu.
EPG is an on-screen guide that displays scheduled
TV programmes. You can navigate, select, view and
record programmes.
1. Press GUIDE on the remote control, the Now
and Next EPG menu will appear, which allows
you to get information about the current or next
programme playing on each channel. Navigate
through the different programmes using the
navigation buttons on the remote control.
2. Use the colour buttons to view the 8 Days EPG.
- Prev day (Red): List the previous day’s EPG.
- Next day (Green): List the next day’s EPG.
- View detail (Yellow): Display the description of
this programme if available.
- Type filter (Blue): Programme guide filter for
digital TV programmes.
- Press the blue button to display the
programmes’type and subtype lists.
- Navigate through the different types and
subtypes using the navigation buttons on the
remote control.
- Select one or more types, which you want to
highlight from the Type list, press OK to select
(or deselect). A checkmark will appear to the
left of the type when selected. When you
select a type, all its subtypes will be selected
accordingly.
- Also, you can select some desired subtypes
without selecting any type first.
- Press the blue button to exit the type and
subtype list.
- After filtering, all your desired digital TV
programmes will be highlighted.
- Add schedule (Option): Press OPTION on the
remote control to bring up the Schedule list
menu. For details on scheduled recording, refer
to the Schedule list section.
3. Press GUIDE/EXIT to exit the EPG and switch to
the selected channel.
Using electronic programme guide
Schedule list
This function is used to pe rform s chedu led
recording.
1. Press OPTION on the remote cont rol and
select Quick access > Schedule l ist.
2. Press OK to display the schedul e list.
3. To add a schedule into yo ur sche dule li st,
press the red button first to disp lay Sch edule
info. Then,
// /
Notes:
- Feature available onl y for dig ital no n encry pted
channels. Even when CIC AM (CI or C I+) is in serte d,
feature is not available on encr ypted c hanne ls.
- Before you connect the USB drive t o the set ,
make sure you have backed up the dat a in the
drive to avoid the loss of your impo rtant d ata due
to unforeseen malfunction
- The bigger the USB drive free memo ry for th e
PVR function, the bigger the rec ordin g lengt h.
- If you want to change channel or sig nal sou rce
during recording, store the re cordi ng data b efore
changing the channel or s ource .
- The set cannot play files normal ly if the
parameters of the file exceed th e limit ation s of
the system, the file format is not s uppor ted, th e
file is damaged, or the file canno t be deco ded.
- Do not disconnect the USB drive wh en the sy s
-tem is reading a file or transmit ting da ta, oth er wise the system or the drive may be da maged .
/
Page 19

Troubleshooting
Most problems you encounter with your TV can be
corrected by consulting the following troubleshooting list.
No picture, no sound
1. Check if the fuse or circuit breaker is working.
2. Plug another electrical device into the outlet to make
sure it is working or turned on.
3. Power plug is in a bad contact with the outlet.
4. Check the signal source.
No color
1. Change the color system.
2. Adjust the saturation.
3. Try another channel. Black-white program may be
received.
Remote control does not work
1. Change the batteries.
2. Batteries are not installed correctly.
3. Main power is not connected.
No picture, normal sound
1. Adjust the brightness and contrast.
2. Broadcasting failure may happen.
Normal picture, no sound
1. Press the VOLUME UP button to increase volume.
2. Volume is set to mute, press the Mute button to
restore sound.
3. Change the sound system.
4. Broadcasting failure may happen.
Erratic ripples on the picture
They are usually caused by local interference, such as
cars, daylight lamps and hair driers. Adjust the antenna
to minimize the interference.
Blank screen in VGA mode
Perhaps the TV can not recognize the resolution set by
the PC. We would suggest changing to the best resolution
or other standard resolutions of the Windows system.
Snowy dots and interference
If the antenna is located in the fringe area of a television
signal where the signal is weak, the picture may be marred
by dots. When the signal is extremely weak, it may be
necessary to install a special antenna to improve the
reception.
1. Adjust the position and orientation of the indoor/outdoor
antenna.
2. Check the connection of antenna.
3. Fine tune the channel.
4. Try another channel. Broadcasting failure may happen.
Ignition
Black spots or horizontal streaks appear, or the picture
flutters or drifts. This is usually caused by interference
from car ignition system, neon lamps, electric drills, or
other electrical appliance.
Ghost
Ghosts are caused by the television signal following two
paths. One is the direct path, the other is reflected from
tall buildings, hills, or other objects. Changing the direction
or position of the antenna may improve the reception.
Radio frequency interference
This interference produces moving ripples or diagonal
streaks, and in some case, loss of contrast in the picture.
Find out and remove the radio interference source.
Chapter 5
Other Information
19
*Figures and illustrations in this User Manual are provided
for reference only and may differ from actual product
appearance. Product design and specifications may
be changed without notice.
Page 20

72-MMT51A-EAUBB
 Loading...