

Page 1

40S4800FS/50S4800FS/
55S4800FS/48E4900FS
Page 2

Chapter 1: Introduction
Precautions ............................................................... 3
Product .................................................................... 3
Power and Plug ....................................................... 3
Power Cord and Signal Cable ................................. 3
Use Environment ..................................................... 3
Cleaning................................................................... 3
Hanging the TV Set on the Wall...............................3
Important Information............................................... 3
TV Controller ............................................................. 4
Sockets ...................................................................... 5
Remote Control Functions ...................................... 6
Chapter 2: Connections and Setup
Switching on ............................................................. 7
Switching off ............................................................. 7
Network Connection ................................................. 8
Network Conguration ............................................. 9
Initial Setup ............................................................. 10
Chapter 3: Homepage
Using Homepage - System .................................... 11
Multimedia ............................................................. 11
Source ................................................................... 11
Preference ............................................................. 11
Using Homepage - Application .............................. 12
Netix ..................................................................... 12
Facebook ............................................................... 12
Twitter .................................................................... 12
Wireless Display .................................................... 12
Opera TV Store ...................................................... 12
Opera TV Browser ................................................. 12
YouTube ................................................................. 12
Picasa .................................................................... 12
GoLive ................................................................... 12
Using Homepage - GoLive ..................................... 13
Multimedia ............................................................... 14
My Movie ............................................................... 14
My Music................................................................ 14
My Picture .............................................................. 14
My Browser ............................................................ 14
Chapter 4: System Settings Menu
Channel ................................................................... 15
Auto Tuning............................................................ 15
DTV Manual Tuning ............................................... 15
ATV Manual Tuning ............................................... 15
Country .................................................................. 15
Bandwidth Switch .................................................. 15
Table of Contents
Program Edit .......................................................... 15
Signal Information .................................................. 16
Software Update (OAD) ......................................... 16
Picture ..................................................................... 16
Picture Mode.......................................................... 16
Color Temperature ................................................. 16
Aspect Ratio .......................................................... 16
Noise Reduction .................................................... 16
Dynamic Contrast .................................................. 16
Screen ................................................................... 16
Sound ...................................................................... 16
Sound Mode .......................................................... 17
Audio Language..................................................... 17
Balance .................................................................. 17
Surround Sound..................................................... 17
Audio Type ............................................................. 17
AD Switch .............................................................. 17
SPDIF Mode .......................................................... 17
Time ......................................................................... 17
Auto Sync .............................................................. 17
Clock ...................................................................... 17
Off Time ................................................................. 17
Sleep Timer............................................................ 17
Time Zone .............................................................. 17
Option ...................................................................... 18
OSD Language ...................................................... 18
Location ................................................................. 18
Subtitle Hearing Impaired ...................................... 18
Subtitle Language .................................................. 18
PVR File System.................................................... 18
Network Conguration ........................................... 18
Restore Factory Default ......................................... 18
Software Update .................................................... 18
Lock ......................................................................... 18
Lock System .......................................................... 18
Set Password......................................................... 18
Block Program ....................................................... 18
Parental Guidance ................................................. 18
Chapter 5: Special Function
PVR ..........................................................................19
EPG ..........................................................................20
Chapter 6: Other Information
Problems & Solutions ............................................ 21
Troubleshooting .....................................................22
Base
Installation
Legal Statement ...................................................... 23
..................................................... 22
2
Page 3

Chapter 1 Introduction
Precautions
Read all of the instructions before operating the set.
Keep these instructions well for future use.
Product
• Do not block or cover the ventilation openings on the
back cover.
• Do not push objects of any kind into this unit through
the cabinet slots as they could touch the current
electric shock, or damage to the unit.
• Do not attempt to open the cabinet as this may cause
damage. There are no parts inside you can service by
•
may scratch or mar the TV screen.
•• Do not impact the TV screen with hard pressure as
this may damage the TV screen severely.
The appliance is not intended for use by young children
or infirm persons without supervision. Young children
should be supervised to ensure that they do not play
with the appliance.
Power and Plug
• Unplug the set under the following conditions:
- If the set will not be used for a long period of time.
- If the power cord or the power outlet/plug is
damaged.
- Follow the instructions to install and adjust the
product. Adjust those controls that are covered in
these operating instructions as improper adjustment
of other controls may result in damage. If this
happens, unplug the set and refer to the service
personnel.
- If the set is subject to impact or has been dropped
and the cabinet has been damaged.
• Where the mains plug or an appliance coupler is used
as disconnect device, the disconnect device shall
remain readily operable.
(*Where an all-pole mains switch is used as the
disconnect device, the switch shall remain readily
operable.)
Power Cord and Signal Cable
• Do not allow anything to rest on or roll over the power
cord and the signal cable.
• Protect the power cord and the signal cable from
being trampled.
• Do not overload the power cord or the power outlet.
• Do not expose the power cord and the signal cable to
moisture.
Use Environment
• Do not place the set on an unstable cart, stand, or
table.
• Place the set on a place that allows good ventilation.
• Do not use the set near damp, and cold areas. Protect
the set from overheating.
• Keep the set away from direct sunlight.
• The apparatus shall not be exposed to dripping or
vases, shall be placed on the apparatus.
• Do not use the set in dusty environments.
• Operating Temperature: 5°C to 35°C (41°F to 95°F)
Operating Humidity: 20% to 80%, non-condensing
Storage Temperature: -15°C to 45°C (5°F to 113°F)
Storage Humidity: 10% to 90%, non-condensing
Cleaning
• Dust the set by wiping the screen and the cabinet with
a soft, clean cloth or some special liquid cleaner.
• Do not apply excessive force to the screen when
cleaning.
• Do not use water or other chemical cleaner to clean
the screen as this may damage the surface of the TV
screen.
Hanging the TV Set on the Wall
Warning: This operation requires two people.
To ensure a safe installation, observe the following
safety notes:
• Check that the wall can support the weight of the TV
set and wall mount assembly.
• Follow the mounting instructions provided with the
wall mount.
• The TV set must be installed on a vertical wall.
• Make sure to use only screws suitable for the material
of the wall.
• Make sure that the TV set cables are placed so that
there is no danger of tripping over them.
All other safety instructions about our TV sets are also
applicable here.
Wall mount not included.
Important Information
location, it can be potentially hazardous due to falling.
Many injuries, particularly to children, can be avoided by
taking simple precautions such as:
• Using cabinets or stands recommended by the
manufacturer of the television.
• Only using furniture that can safely support the
television.
• Ensuring the television is not overhanging the edge of
the supporting furniture.
• Not placing the television on tall furniture (for example,
cupboards or bookcases) without anchoring both the
furniture and the television to a suitable support.
• Not standing the television on cloth or other materials
placed between the television and supporting furniture.
• Educating children about the dangers of climbing on
furniture to reach the television or its controls.
3
Page 4
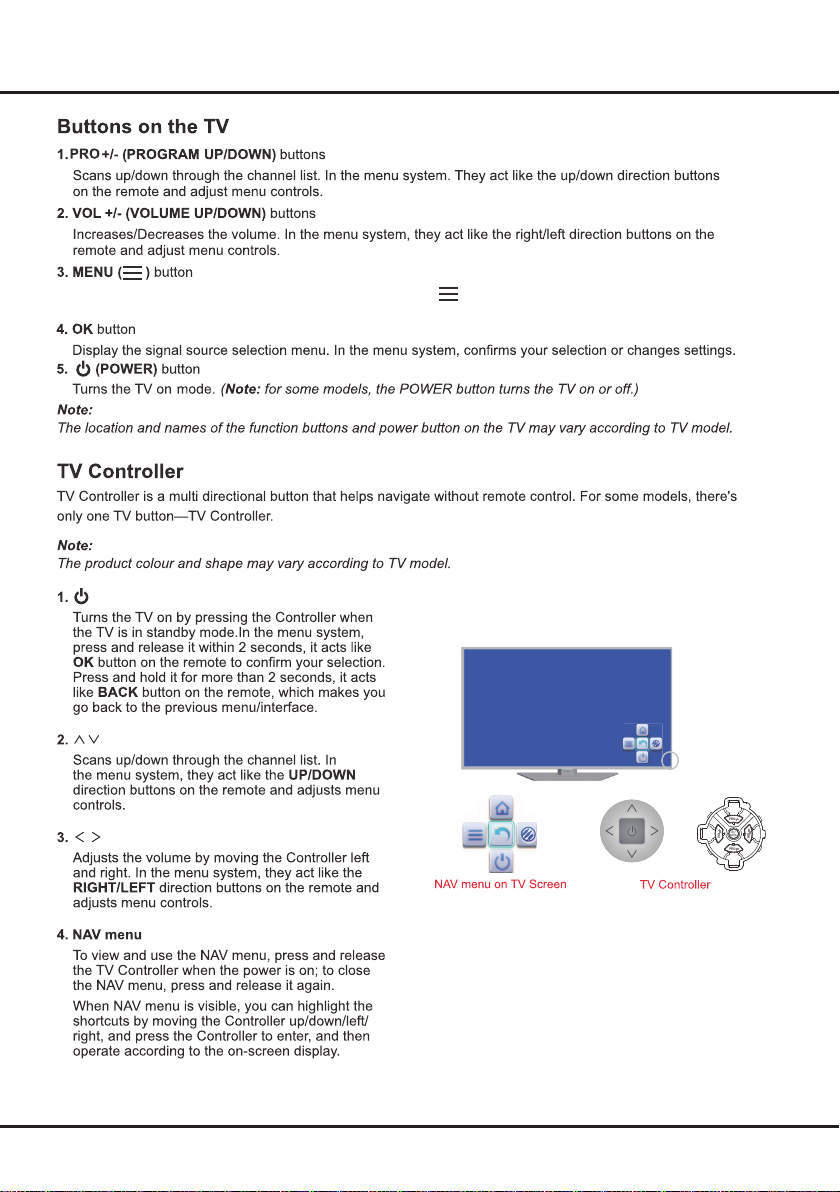
Introduction
Press M ENU b utt on to bring up t he NAV menu , sel ect t o bring up the m ain m enu . Long press
MENU bu tto n to re turn to the pr evi ous m enu.
4
Page 5
Introduction
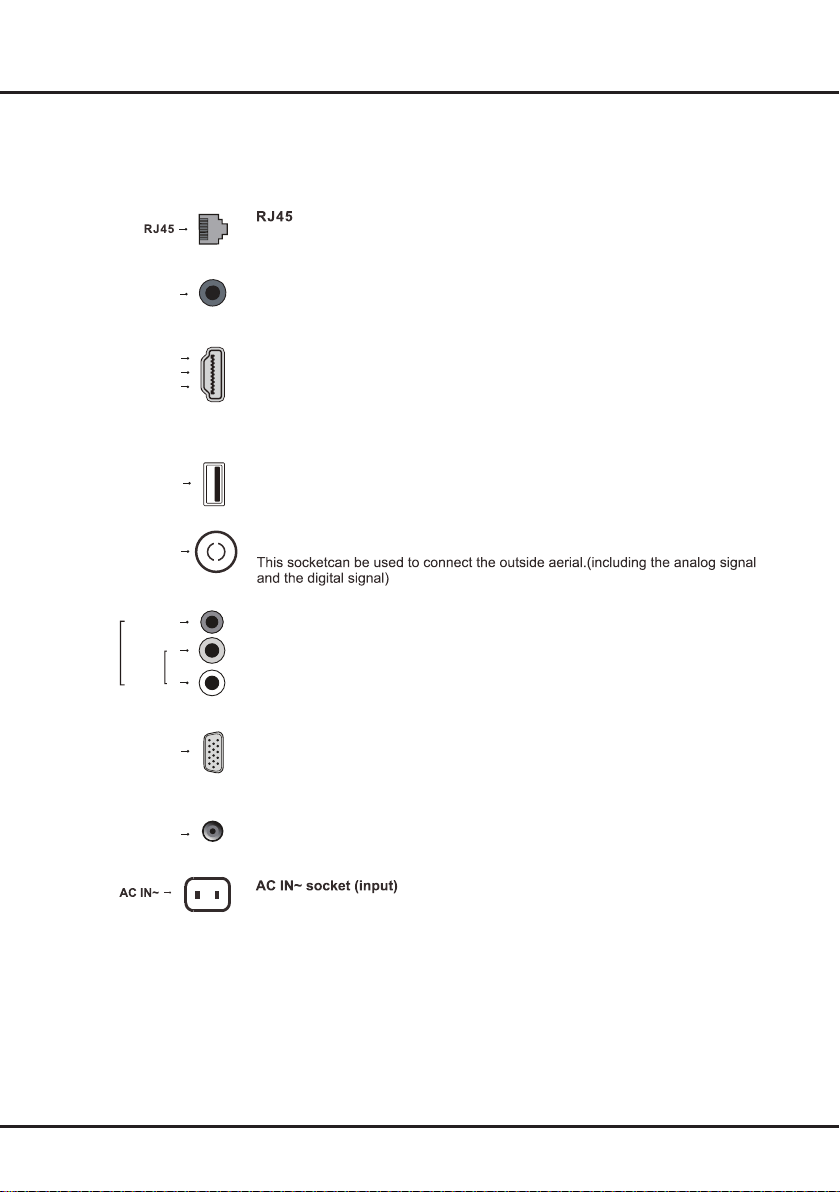
Sockets
Note:
The location and names of the sockets on the TV may vary according to TV model, and not all sockets
available on all models.
This socket can be used to connect to external modem or network access equipment.
SPDIF
HDMI 1
or HDMI 2
or HDMI 3
USB 2.0
ANTENNA IN
VIDEO
AV IN
AUDIO
IN
VGA IN
AUDIO OUT adapter
SPDIF socket (output)
This socket can be used to connect a compatible digital audio receiver.
HDMI1/HDMI2/HDMI3 socket (input)
The HDMI (High-Denition Multimedia Interface) socket lets you connect a device,
such as a Blu-ray player, with a HDMI output for best picture quality. It also provides
an uncompressed digital connection that carries both video and audio data by way of
an integrated mini-plug cable.
USB 2.0 socket (input)
This socket can be used to connect a USB device.
ANTENNA IN socket (input)
AV RCA audio + video sockets (input)
R
L
The AV IN sockets can be used to connect a range of equipment, including video
recorders, camcorders, decoders, satellite receivers, DVD players, or games
consoles.
The VIDEO socket provides composite video connection.
VGA IN socket (input)
This socket can be used to connect a computer.
Note
: VGA IN shares the same audio sockets with AV IN.
AUDIO OUT adapter socket (output)
Use an RCA audio cable to connect your TV to a compatible audio receiver.
This socket can be used to connect an AC supply.
5
Page 6
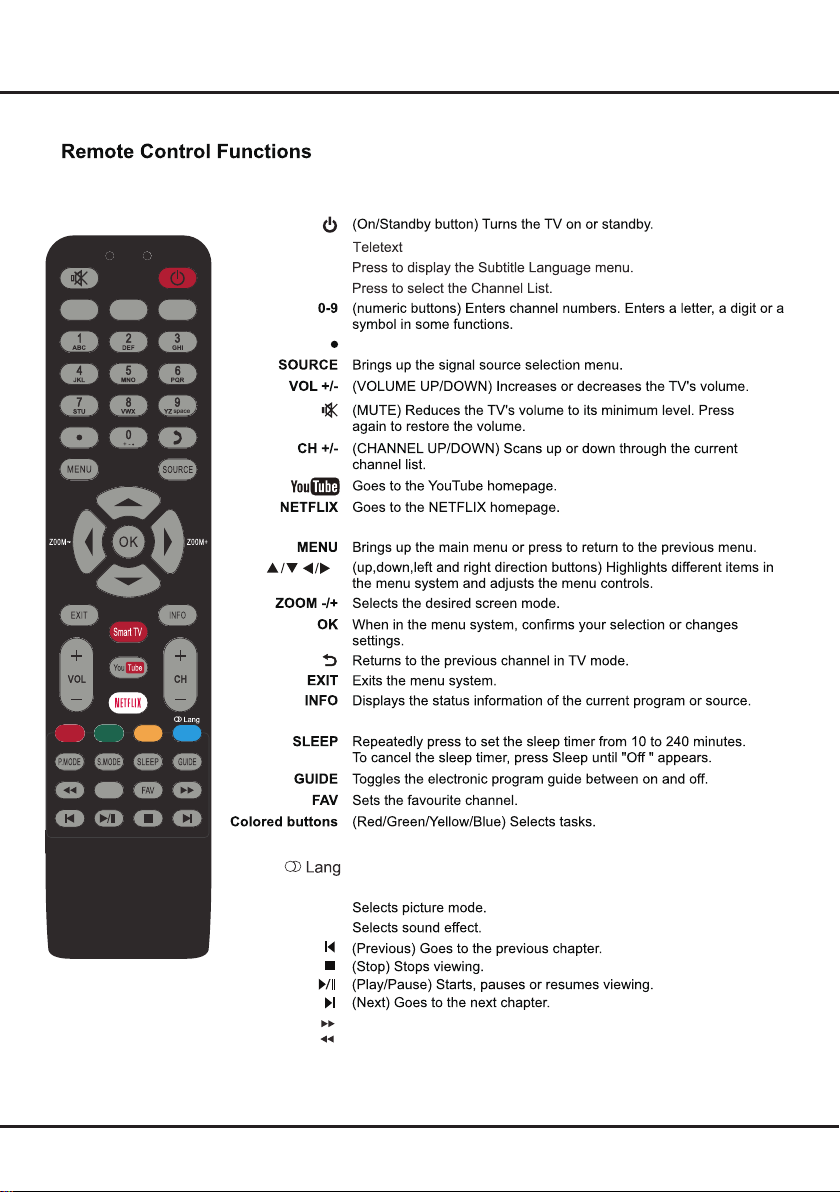
Introduction
TEXT
SUBTITLE
LIST
TEXT SUBTITLE LIST
Not use(for some model use)
OPTION
Smart T V
OPTION
P.MOD E
S.MOD E
Note: The above six buttons can be used for playing music, pictures and
videos in the USB menu.
Goes to the smart TV homepage.
Shortcut to Freeze Off, PVR DISK , PVR.
In DTV mode,Turns on or off the audio description function Yellow buttons
In DTV mode, pree to select audio language.
to select sound track mode
Searches forward.
Searches backward.
In USB mode,Press
6
Page 7
Chapter 2 Connections and Setup
Switching on
Follow the instructions on this page on how to switch on your TV set
and the remote control before going on to following pages describing
how to use the channel set-up procedure.
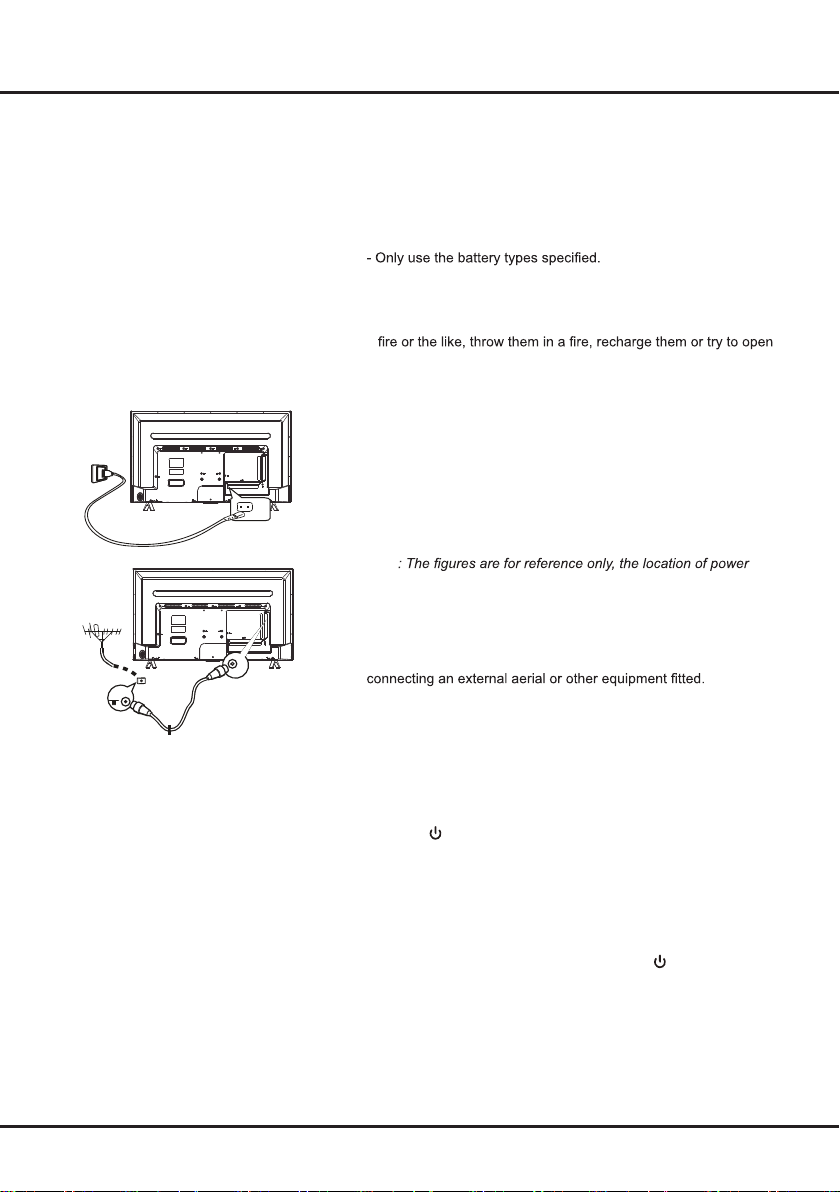
1. Insert two AAA batteries in the remote control.
Precautions on using batteries:
- Make sure you use the correct polarity.
- Do not mix new and used batteries.
- Do not use rechargeable batteries.
- Do not expose batteries to excessive heat such as sunshine,
them, as this could cause them to leak or explode.
- Remove the batteries from the remote control if you are not using
it for a long period of time.
2. Connect the power cable FIRST to the television, THEN to a mains
socket. (Note: If the power cable is connected to the television,
please only connect the power cable to the mains socket.)
Your TV set should only be connected to an AC supply. It must not
be connected to a DC supply. If the plug is detached from the cable, do not, under any circumstances, connect it to a mains socket,
as there is a risk of electric shock.
Note
socket of the television may differ depending on the model.
3. Connect an outside aerial to the ANTENNA IN socket at the back
of the TV set.
The aerial socket (75 OHM - VHF / UHF / cable) can be used for
Note: If you want to receive the signal from your cable or cable
box, please connect a coaxial cable to the CABLE IN socket at the
back of the TV set, On certain models only.
4. When powered on, the TV will be turned on directly or be in
standby mode.
If the power indicator lights up, the TV set is in standby mode.
Press the
on the TV.
button on the remote control or on the TV set to turn
Switching off
- To put the TV set into standby mode, press the button on the
remote control. The TV set remains powered up, but with low
energy consumption.
- To switch off the TV set, unplug the mains socket from the mains
outlet.
7
Page 8
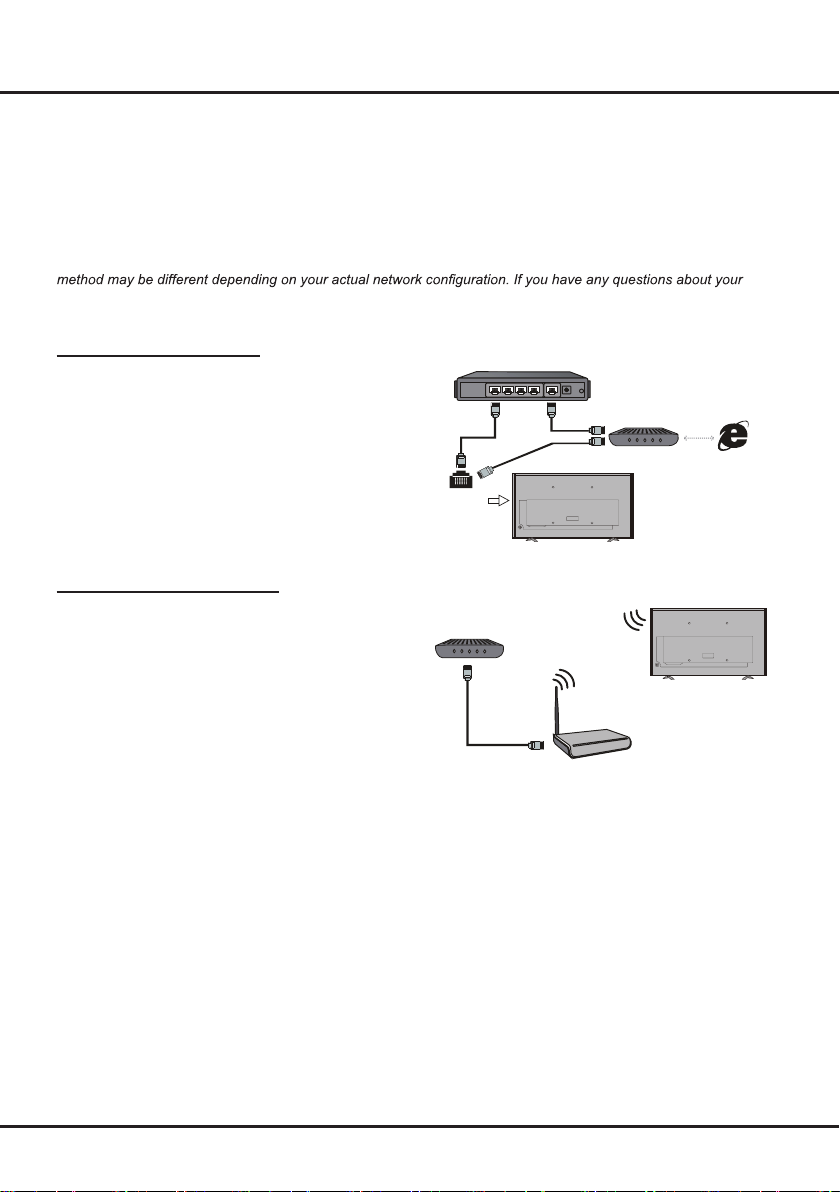
Connections and Setup
Network Connection
To access the Internet, you must subscribe to high speed broadband Internet service with your Internet service
provider (ISP).
Your TV can be connected to your home network in two ways:
- Wired, using the RJ45 (LAN) connector on the back panel.
- Wireless, using the internal wireless your home wireless network.
Note: Instructions below are just the usual ways to connect your TV to the wired or wireless network. The connection
home network, please refer to your ISP.
Connecting to a wired network
To connect to a wired network:
1. Ensure you have:
- An Ethernet cable long enough to reach your TV
- A router or modem with an available Ethernet port
- A high-speed Internet connection
- An Ethernet (LAN) port on the back of the TV
2. Connect your Ethernet cable to the router and to
the Ethernet port on the back of the TV.
3. Use the Network Configuration menu to
configure the TV.
Connecting to a wireless network
To connect to a wireless network
1. Ensure you have:
- A router broadcasting a high-speed wireless
signal
- A high-speed Internet connection
2. Use the Network Configuration menu to
configure the TV.
Ethernet
Port on the
back panel
Modem
Route r
or
TV Set
Wireless R outer
Modem Internet
TV Set
Built-in wireless
connection
8
Page 9

Connections and Setup
Network Configuration
After you connect your home network to the TV, follow
the steps below to congure the network settings of your
TV.
Your TV set supports both wired and wireless network
connection.
Network
Wired Network
Wi-Fi Network
MENU
Note
: For wired network connection, you need to insert
your Ethernet cable into the Ethernet port rst.
- Wired Network
Configuration
◄/► to select
Static
:
: Press OK to enter, and then press
Static
DHCP
or
.
Wired Network
Configuration
MAC Address
MENU
Static
: In
mode, you should input right IP
address, Netmask, Gateway and DNS to access
network. Press ▲/▼ to select an option, press OK
to enter, and then press the numeric buttons to input
numbers or press ◄/► to select numbers.
Netwrok Configuration Static
IP 0.0.0.0
Netmask 0.0.0.0
Gateway 0.0.0.0
DNS 0.0.0.0
OK
DHCP
address, Netmask, Gateway and DNS automatically.
Press to OK to start.
MAC Address
of your TV set. Then press
EXIT
- Wireless Network
In wireless menu, press ◄/► to turn wireless
network on or off.
WIFI NETWORKS
On
wireless networks. This may take a few seconds.
After the searching is complete, select an accessible
WIFI network to connect. For some WIFI network,
you need to input the right password to access.
Select
virtual keyboard appears. Input the password, and
then press OK to connect.
MAC Address
of your TV set. Then press
EXIT
DHCP
: In
mode, your TV set will get IP
: Press OK to see the MAC address
MENU
to return or press
to exit the menu.
:
Wi-Fi Network On
WIFI NETWORKS
MAC Address
MENU
Wi-Fi Network
: After
is set to
, press OK to start searching for all available
Password
and press OK, then press ►. A
WIFI NETWORKS
HiWiFi 1
FAST_WiFi
AU_WiFi
PUB_WiFi
Home
HelloWiFi
SmileWiFi
Disconnect Refresh View Detail
MENUOK
: Press OK to see the MAC address
MENU
to return or press
to exit menu.
MENU
9
Page 10

Connections and Setup
Initial Setup
Initial setup involves selecting all the settings required to
be able to search for and store all the channels you can
receive. Make sure that the television is switched on
and follow all the steps in turn specied hereafter.
1.
The first time you switch the set on, the
menu appears. Press / to select your language
and press
2.
Select your location:
OK
to enter the next step
Please Select an OSD Language
English
Spanish
Vietnamese
French
Russian
Arabian
OK MENU
Home
or
Shop
Initial Setup
.
, and press
OK
to enter the next step.
Location
Home
Shop
4.
Press / to select
start the search automatically. All available TV
programmes will be searched. This operation takes
a few minutes. The display shows the progress of
the search and the number of programmes found.
Country
Country
South Africa
Australia
Austria
Belgium
Bulgaria
Croatia
OK MENU
Channel Tuning
ATV: 4 Programme(s)
DTV: 0 Programme(s)
Radio: 0 Programme(s)
Data: 0 Programme(s)
19 %... 202.25 MHz ATV
and press
OK
to
OK MENU
3.
Select the tuning type, and press
next step.
DVB Tuning Type
DVB-T
OK MENU
OK
to enter the
MENU
Note
: To prevent the channel setup process from
being interrupted, wait for the message indicating
that the setup is complete.
5.
During the setup, user can follow the hint available
at the bottom of the screen to return to the last step
by pressing
MENU
, or press
EXIT
to interrupt the
search halfway.
6.
After the initial setup is complete, the channels
are arranged in a preset order. If you wish to skip
channels, or organize channels, select
Edit
and press
OK
to enter.
Channel
10
Page 11

on each item.
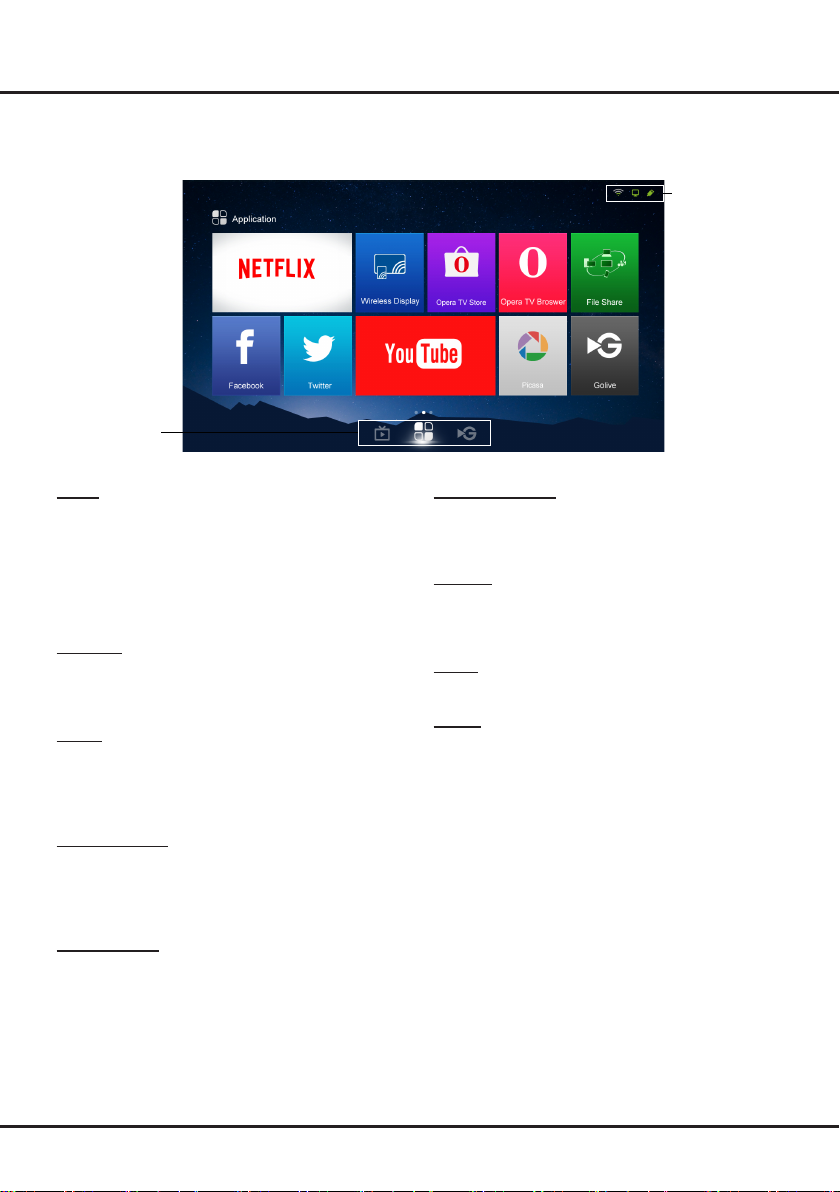
Chapter 3 Homepage
Note: This manual is for common use. Figures and illustrations in this User Manual are provided for reference only
and may differ from actual product appearance. And for some models, certain options are not available.
You can select all the features from homepage.
1.
2.
Press ▲/▼/◄/► to select icons from the screen list.
3. Press OK to enter each option.
4. To exit the menu, press EXIT.
WARNING:
• Configure the network settings before using Smart TV.
• Slow responses and/or interruptions may occur, depending on your network conditions.
• If you experience a problem using an application, please contact the content provider.
• According to circumstances of the contents provider, an application’s updates or the application itself may be
discontinued.
• Unsupported fonts within the provider's content will not display normally.
• Depending on your country’s regulations, some applications may have limited service or not be supported.
Using Homepage - System
Note: The actual screen may differ from the image below.
Status:
Notifications /
Network Status
Multimedia
System / App /
GoLive:
Use ◄/► to focus
Multimedia
You can enjoy picture/music/video content via USB
devices. For details, refer to
Note
: For the function of
Multimedia
Multimedia
on page 14.
, rst the TV set
should be equipped with a USB storage device (mobile
hard disk, U-disk, etc.).
Source
Press ▲/▼/◄/► to select the signal source from
ATV, PC, HDMI 1, HDMI 2, HDMI 3
Note
: The available source may differ depending on the
, and AV.
model.
DTV
Preference
Contains all of the necessary congurations to
customize your TV settings. For details, refer to
4: System Settings Menu
.
,
11
Source
Preference
Chapter
Page 12
on each item.
Homepage
Using Homepage - Application
Note: The actual screen may differ from the image below.
Status:
Notifications /
Network Status
System / App /
GoLive:
Use ◄/► to focus
Netflix
With a Netix unlimited membership, you can instantly
watch TV episodes & movies streamed over the Internet
from Netix right to your TV.
Note
: Netix is available in certain countries. Unlimited
membership required. More information at www.netix.
com.
Facebook
TV client of Facebook social networking application.
After clicking the icon to enter the application, users can
browse contents and communicate online via the TV.
Twitter
Twitter is a social networking and micro-blogging site.
Via TV Twitter client, you can interact with friends by
posting and updating blogs, and by following others’
blogs.
Wireless Display
You can use the screen mirroring function and enjoy
sharing the content of your device (computer, smart
phone, pad, etc.) on the large screen and high denition
TV.
Opera TV Store
A one-stop shop for a collection of web apps displayed
in a layout optimized for wild screen television
.
Opera TV Browser
TV browser specially developed by Opera for smart TV.
It enables users to browse the Internet on the TV and
via set-top boxes while watching programmes.
YouTube
The world's most popular online video-sharing site. After
you click the icon and enter the site, you can enjoy a
variety of videos.
Picasa
Picasa is a software to search, edit and manage photos.
GoLive
GoLive is an international video entertainment platform
that delivers a diverse selection of content from all over
the world to virtually any connected TV, phone, tablet, or
box.
Notes
:
- The pre-installed apps or items cannot be deleted.
And the apps (regardless of order) listed in the above
figure may differ from actual product. For some
models, certain apps are not available.
- You may need a webcam to achieve some of the
above functions. Webcam is not a standard accessory,
you may need to buy separately. Some external
devices like webcam, smart phone, game handle and
external wireless adapter may not be supported.
12
Page 13

Homepage
on each item.
Using Homepage - GoLive
Note: The actual screen may differ from the image below.
Status:
Notifications /
Network Status
System / App /
GoLive:
Use ◄/► to focus
GoLive
GoLive
GoLive
Recommendation
MoreGoLiveGoLiveGoLive
GoLive is a revolutionary international video entertainment platform that delivers a diverse selection of content from
all over the world to virtually any connected TV, phone, tablet, or box. Our unique technology ensures an optimized
viewing experience that is adapted to suit a range of Internet speeds, broadcasting high-quality streams of the
programmes and events you want on whatever device you choose, whichever country you’re in.
13
Page 14

Homepage
Multimedia
Your TV is tted with a USB socket that enables you to
view photos, listen to music or watch videos stored on a
USB storage device.
Support le formats:
Picture: JPG/JPEG
Music: MP3
Video coding format: H.264 / MPEG 4 / MPEG 2 /
MPEG 1
Note
: Some USB keys and USB products like digital
cameras or mobile phones are not fully compatible
with USB 2.0 standard so it may not work with the TV
multimedia player.
1.
Connect a USB device containing photo, music and/
or movie files to the USB port on the back or side
panel of the TV.
2.
Press
Smart TV
Multimedia
on the remote
Multimedia
The
Movie, My Music, My Picture
My Movie
1.
2.
3.
4.
Multimedia
Select
confirm. Press ▲/▼/◄/► to select a disk and press
OK
.
Press ▲/▼/◄/► to highlight one piece of video and
press OK to play it. When the video is playing, press
VOL+/-
the
to go to the previous or next video.
MENU
Press
bottom of the screen. Press ◄/► to select buttons
on the control menu, and press OK to confirm.
The control menu includes
Previous, Next, Mode, Picture
Volume, Sound
To exit the current video and return to the previous
menu, press .
, press ▲/▼/◄/► to select
and then press OK. Or press
control.
menu contains four submenus:
button to adjust the volume, press ▲/▼
to show or hide a control menu at the
, and
, and My
My Movie
>
Play/Pause, FB., FF.
Return
, and press OK to
,
.
Browser
Zoom
USB
My
.
,
Info
,
,
My Music
1.
2.
3.
4.
My Picture
1.
2.
3.
4.
My Browser
My Browser
and pictures available in your connected USB device.
Select
conrm. Press ▲/▼/◄/► to select folders or les. Press
OK
menu.
Multimedia
Select
confirm. Press ▲/▼/◄/► to select a disk and press
OK
.
Press ▲/▼/◄/► to highlight one piece of music and
press OK to play it. The list of music is displayed on
the left. When the music is playing, press the
button to adjust the volume, press
the control menu and then press ▲/▼ to go to the
previous or next music and press OK to play it.
MENU
Press
bottom of the screen. Press ◄/► to select buttons
on the control menu, and press OK to confirm. The
control menu includes
Next, Sound, Mode, Info
To exit the current music and return to the previous
menu, press .
Multimedia
Select
confirm. Press ▲/▼/◄/► to select a disk and press
OK
.
Press ▲/▼/◄/► to highlight one piece of picture
and press OK to display it. When the picture slide
shows, press ▲/▼ to switch to the previous or next
picture.
MENU
Press
bottom of the screen. Press ◄/► to select buttons
on the control menu, and press OK to confirm. The
control menu includes
Rotate, Zoom, Volume
is turned on),
To exit the current picture and return to the previous
menu, press .
shows all les, including movies, music
Multimedia
to conrm. Press
My Music
>
to show or hide a control menu at the
My Picture
>
to show or hide a control menu at the
Picture, Music, Mode
My Browser
>
EXIT
, and press OK to
, and
VOL+/-
to hide
Music
Return
MENU
Play/Pause, FB., FF., Prev
Return.
, and
, and press OK to
Play/Pause, Previous, Next
(only available when
, and press OK to
to return to the previous
,
.
,
14
Page 15

Chapter 4 System Settings Menu
3.
This section explores the system settings menu of your
TV. Each menu is outlined and detailed to help you get
the most from your TV. Please note that some function
might be unavailable in certain input source. To access
the menu system
1.
Press , press ▲/▼/◄/► to select
and then press OK to display the main menu. Or,
after you enter an input source, press
:
Smart TV
MENU
Preference
on
remote control to display the main menu.
2.
Press ◄/► to select
SOUND, TIME, OPTION, LOCK
CHANNEL, PICTURE
, then press OK to
,
enter the submenu.
3.
In the submenu, press ▲/▼ to select menu options,
press ◄/► to set functions or change values, press
OK
to open the corresponding submenu or activate
a setting.
4.
To return the previous menu, press
the menu, press
Note
: Figures and illustrations in this User Manual are
EXIT
.
MENU
. To close
provided for reference only and may differ from actual
product appearance. And for some models, certain
options are not available.
The search process may take a few minutes. During
the process, you can press
MENU
or
EXIT
halfway.
4.
Once the scan ends, the TV automatically goes to
the first channel searched, and all channels are
arranged in a preset order. You can press
display the channel list.
DTV Manual Tuning
This allows you scan for digital channels from a specic
frequency range you select.
1.
2.
Select
Tuning
Preference
, and then press
Channel
>
OK
DTV Manual
>
to enter.
Press ▲/▼/◄/► to select the country, and then
press OK.
3.
Press ◄/► to select a channel range and press
OK
to start channel scan.
4.
Press
MENU
to return or
EXIT
to close the menu.
ATV Manual Tuning
This allows you scan, ne tune and store analogue
channels manually. Operations are similar to that of
Manual Tuning.
Channel
CHANNEL
1.
2.
Preference
Select
Tuning
, and then press
Press ▲/▼ to highlight
Channel
>
ATV Manual
>
OK
to enter.
System BG
(the system
displayed may vary), press ◄/► to select the PAL
Auto Tuning
DTV Manual Tuning
ATV Manual Tuning
Country Australia
Bandwidth Switch
Program Edit
Signal Information
Software Update(OAD)
CHANNEL
The
menu allows you to select all the
settings required to be able to search for and store all
the channels you can receive. You also may edit those
channels.
The options are as follows:
Auto Tuning
1.
Select
Preference
Channel
>
Auto Tuning
>
, and
then press OK to enter.
2.
Press ◄/► to select
ATV, DTV
ATV + DTV
or
as
desired, press ▲/▼/◄/► to select the country, and
then press OK.
Note
: When
ATV
is selected, only analogue channels
will be searched for, and the original analogue channels
DTV
will be overwritten. The same applies to
DTV
.
and
ATV +
system, and then press OK.
3.
Press ▲/▼ to highlight
Search
and press ◄/►
to start channel scan. To fine tune the channel
searched, highlight
Fine Tune
and press ◄/►. To
store the channel to your preferred channel number,
Storage to 1
highlight
(the number displayed may
vary) and press ◄/► to select a channel number.
4.
Press the red button to save the setting, and then
press
MENU
to return or
EXIT
to close the menu.
Country
This option shows the state for DTV tuning, the country
showed varies according to the country you select in
Auto Tuning
DTV Manual Tuning
and
.
Bandwidth Switch
This allows you to switch between different bandwidths,
if available, for DTV tuning. The availability and
adjustability of this option varies according to the
country you select for DTV tuning. For some countries,
this option is not available; and for some conutries, this
opiton is not adjustable.
Program Edit
1.
Select
Preference
Channel
>
Program Edit
>
press OK to enter.
to abort
LIST
to
DTV
and
15
Page 16

System Settings Menu
2.
Press ▲/▼ to select the a channel you want to edit.
FAV
Press
on the remote control to set the channel
as your favourite channel. Press the corresponding
colour button to delete, rename, move or skip a
channel.
3.
Note
Press
MENU
to return or
EXIT
to close the menu.
: Only ATV channels can be renamed.
Signal Information
Press OK to display the signal information on current digital
channel, such as signal strength, frequency (KHz), etc.
Software Update (OAD)
OAD (Over the Air Download) enables you to download
the most current software through the air. When set to
On
, the TV will automatically download the most current
software if available. To disable this function, select
Off
Picture
PICTURE
Picture Mode Normal
Color Temperature
Aspect Ratio
Noise Reduction
Dynamic Contrast
Screen
PICTURE
The
to obtain the best picture setting according to your
preference, the type of programme of you are watching
and the ambient lighting.
The options are as follows:
Picture Mode
Press
through the picture mode options:
User
and
Note
following ve picture options be available.
- Contrast
dark areas of the picture.
- Brightness
- Tint
levels.
Note
- Sharpness
picture.
menu allows you to adjust each option
OK
to enter, and then press ◄/► to scroll
Vivid, Normal, Mild
.
: Only when
Picture Mode
is set to
User
will the
: Adjusts the difference between light and
: Adjusts the brightness of the picture.
: Adjusts the balance between the red and green
: This option is only available in NTSC mode.
: Adjusts the crispness of the edges in the
- Color
: Adjusts the colour strength of the picture.
Color Temperature
Adjusts the colour temperature of the picture. Press
OK
to enter, and then press ▲/▼ to scroll through
the colour temperature options:
palette of picture colours;
of picture colours
Note
: For some models, this option is not available.
Normal
;
Cool
Warm
for a more blue
for a more red palette
is between the two.
Aspect Ratio
OK
Press
the aspect ratio options:
Note: Just scan
to enter, and then press ▲/▼ to scroll through
Auto, 4:3, 16:9, Just Scan
mode is for HDMI and PC source
modes.
Noise Reduction
.
Improves the quality of the picture in case of poor
reception. Press
toggle among
Note
: This option is available in DTV, ATV, AV and
OK
to enter, and then press ▲/▼ to
Off, Low, Middle, High
, and
HDMI modes.
Dynamic Contrast
Turns on this option to adjust the contrast automatically.
OK
Press
Off
to enter, and then press ▲/▼ to select On or
.
Screen
Adjusts the picture in PC mode. You can adjust the
horizontal position, vertical position, size and phase.
Sound
SOUND
Sound Mode Normal
Audio Language
Balance
Surround Sound
Audio Type
AD Switch
SPDIF Mode
Auto
.
.
16
Page 17

System Settings Menu
SOUND
The
your listening pleasure.
The options are as follows:
Sound Mode
Press
Normal, Music, Movie, News
Note
sound options (
KHz
frequency levels desired.
Audio Language
Press
Secondary, and then press ▲/▼/◄/► to select your
desired audio language.
Note
Balance
Press
volume between the left and right speakers. Set to “50”
in the normal condition.
Surround Sound
Press
the simulated surround sound feature to be
Surround
Audio Type
Press OK to select the sound type mode to be
Impaired
Note
AD Switch
Press OK to enter, and then press ◄/► to select the
audio description (AD) to be On or
On
, you can press ▲/▼ to select
press ◄/► to adjust the volume for audio description.
Note
set to
SPDIF Mode
This option controls the type of audio stream sent
to the
audio device connected to the SPDIF socket is only
compatible with linear PCM signal. Otherwise, select
Auto
menu allows you to adjust each option for
OK
to enter, and then press ◄/► to select among
Sound Mode
: When
120 Hz, 500 Hz, 1.5 KHz, 5 KHz
, and
is set to
User
User
.
, ve more
, and 10
) will be available, which enable you to adjust the
OK
to enter, press ◄/► to select Primary or
: This option is only available for digital channels.
OK
to enter, and then press ◄/► to balance the
OK
to enter, and then press ▲/▼ to select
Off
or
.
Visual
Normal
or
.
: This option is only available for digital channels.
Off
. When set to
AD Volume
: This option is only available when
Visual Impaired
SPDIF
socket. Press OK to select
.
, and then
Audio Type
PCM
if the
.
Time
TIME
Auto Sync On
Clock 03:47
Off Time
Sleep Timer
Time Zone
TIME
The
turn off time.
Note
minutes if no signal is being displayed on the screen.
Auto Sync
Press OK to select On or
TV will get the date and time automatically from DTV
signals, and the
select
Note
not be memorized when turning on the TV next time,
and the TV’s time will start from the default.
Clock
Sets the current time. Press OK to access the interface
for setting clock, and then enter the current date or time
by pressing ▲/▼/◄/►.
Note
set to
Off Time
Sets a specic time at which the TV automatically turns
off. Press
the repeat mode among
is
select
the TV automatically switches off at
options by pressing ▲/▼/◄/►.
Sleep Timer
Sets a period of time after which the TV automatically
goes into standby mode. Press
press ▲/▼ to select among
min, 60 min, 90 min, 120 min, 180 min, 240 min
Time Zone
Press
your time zone.
Note
set to On.
menu allows you to set the sleep time and
: The TV is set by default to turn off after 15
Off
. If On is selected, the
Clock
Off
, you should manually set the
Off
: If
is selected, the time set in
option is not available. If you
: This option is only available when
Off
.
OK
to enter, and then press ◄/► to select
Once
or
Every Day
Off, Once
, or
, you should set a time when
Minute
OK
to enter, and then
Off, 10 min, 20 min, 30
OK
to enter, and then press ▲/▼/◄/► to select
: This option is only available when
Clock
Clock
option will
Auto Sync
Every Day
and
Auto Sync
.
Hour
is
. If you
.
is
17
Page 18

System Settings Menu
Option
OPTION
OSD Language English
Location
Subtitle Hearing Impaired
Subtitle Language
PVR File System
Network Configuration
HDMI_CEC
Restore Factory Default
The OPTION menu allows you to set some special
functions of the TV.
OSD Language
Press OK to enter, and then press ▲/▼/◄/► to select
the on-screen display language.
Location
Press OK to select Home or Shop.
Subtitle Hearing Impaired
Press OK to select On or Off.
Note: This option is only available for digital channels.
Subtitle Language
Press OK to enter, press ◄/► to select Primary or
Secondary, and then press ▲/▼/◄/► to select your
preferred subtitle language.
Note: This option is only available for digital channels.
PVR File System
You can set the time shift size, format a disk, check the
speed and the remaining bytes and seconds, and set
the start and end padding time. For details of how to use
the PVR function, see PVR Function on page 19 .
Note: This option is only available for digital channels.
Network Configuration
Press OK to enter, press ▲/▼ to select Wired Network
or Wi-Fi Network, and then press OK to enter. (For
details, please refer to the above descriptions of
Network Configuration on page 9.)
HDMI_CEC
Press OK to select Off/On
Restore Factory Default
Press OK to enter. Select Yes and press OK to restore
all the settings to factory defaults, or select No and
press OK to return to the previous menu.
Note: If you have set Lock System to On, and you have
to enter the password by using the numeric buttons.
Software Update
You can check the software version and update the
software by USB or by network.
Lock
LOCK
Lock system Off
Set Password
Block Program
Parental Guidance
The LOCK menu allows you to effectively stop anyone
without the correct password from watching TV.
Note: You must enter the password before entering the
Lock menu.
Lock System
Use the numeric buttons to enter the default password
"0000", and then press OK select On or Off.
Notes:
- If you forget the password, enter the super password
"0812" to override any existing codes.
- The options below are only available when Lock
System is set to On.
Set Password
This option allows you to change the password. Press
OK to enter, and then press the numeric buttons to enter
the old password and then the new password twice.
Block Program
This option allows you to lock a certain TV channel.
Press OK to enter, and then press ▲/▼ to select a
certain TV channel you want to lock, and then press the
red button. To unlock, use the same operation.
Parental Guidance
This option allows you to block TV programmes by
limiting the age. If the age limit of a programme exceeds
the age set, the system password must be entered
before watching the programme. Options include Off, 4,
5, 6, 7, 8, 9, 10, 11, 12, 13, 14, 15, 16, 17 and 18.
Note: This option is only available for digital channels.
18
Page 19

Chapter 5 Special Function
PVR
PVR (Personal Video Recorder) allows you to record
your favourite TV programmes. The time shift function
is integrated with the PVR function, and it allows you
to pause, fast forward and rewind live TV, so you don't
have to miss any part of your favourite programmes.
Before you use PVR, connect a USB drive to the TV
rst.
Note
: The feature is available only in selected products
and, due to specic TV network limitations and country
technical requirements, might not be available in
product or place of installation. Feature might also be
blocked by TV network due to copyright protection (HD
content, recording protection). Please use
the remote control to check if the feature is available in
your product.
1.
2.
3.
4.
Time Shift
While you are recording, you can view the recording
from the start, from a specic time point, or from time
point A to time point B. You can also fast forward or
rewind the recording, or play the recording in slow
motion.
OPTION
Press
PVR
.
Press OK to enter. The recording automatically
starts.
-A mini panel (for you to control recording) appears
at the bottom of the screen at rst. While recording,
the panel also indicates the recording progress and
the percentage of free memory on the USB drive.
It disappears seconds after the recording starts. To
bring it up again, press OK or the red button.
-During the recording, you can turn off the TV, and
the recording goes on in the standby mode. The
indicator on the TV flashes.
-The record le is put into a PVR folder in
My Movie
>
To stop the recording, press ◄/► to highlight
and press OK to conrm. A dialog box appears in
upper middle of screen. Press ◄/► to select
and press OK to stop recording; in normal operation,
the recording will stop automatically when the
recording duration expires.
To watch the recorded programme, press
to >
Smart TV
-MTSPVR
>
Press
digital radio programme).
on the remote control and select
and named after the channel number.
System
, and then select the related record file.
OK
to play. (It is the same if you record a
Multimedia
>
OPTION
Multimedia
USB
, select
on
Stop
YES
or go
My Browser
1.
2.
3.
4.
5.
Notes
OPTION
Press
PVR
.
Press OK to enter.
-A mini panel appears at the bottom of the screen.
Press OK or the red button to show or hide the
panel.
Press ◄/► to select
the recording from where it starts and enter the time
shift mode, and the original recording goes on in the
background.
Press:
-◄/► to select
shift start point. And
a time shift stop point, press ◄/► to select
and then press OK. And
Press ◄/► to select
to play the recording from where the time shift start
point to the stop point.
-◄/► to select
play the recording in slow speed.
-◄/► to select
dialog box appears in upper middle of screen. Press
▲/▼
to select a specific time point from where to
play the recording and press OK.
Press ◄/► to select
shift.
:
- The PVR function is only available for digital nonencrypted channels.
- Before you connect the USB drive to the TV, make
sure you have backed up the data in the drive
to avoid the loss of your important data due to
unforeseen malfunction.
- We recommend that you use a USB drive with at
least 1GB free space and a disk speed faster than
5.0MB/sec.
- The bigger the USB drive’s free memory is for the
PVR function, the longer the recording length will be.
- If you want to change channel or signal source
during recording, store the recording data rst.
- The TV cannot play les normally if the parameters
of the le exceed the limitations of the system, the
le format is not supported, the le is damaged, or
the le cannot be decoded.
- Do not disconnect the USB drive when the system
is reading a le or transmitting data, otherwise the
system or the drive may be damaged.
on the remote control and select
Play
and then press OK to play
Play
and then press OK to set a time
Play
Play A
Play A-B
SlowMotion
TimePlay
Stop
changes to
and then press OK to
and then press OK. A
and press
Play A
OK
to exit time
Play A-B
changes to
and then press OK
. To set
Play A
.
19
Page 20

Special Function
EPG
EPG (Electronic programme guide) is an on-screen
guide that displays the program information of all
searched digital channels.
Note
: The feature is only available for digital channels.
Program information is only available after channel scan
is implemented.
1.
2.
3.
GUIDE
Press
After entering the EPG interface, press ▲/▼ to
select
to sort the programme information by time or by
channel.
-If you sort the programme information by time, press
▲/▼
GUIDE
programme information of the current date and the
upcoming 7 days.
-If you sort the programme information by channel,
press
PROGRAMME GUIDE
toggle among the programme information of different
channels.
Press:
-the red button, and press
channel and set the start time and end time to
schedule a recording. You can also set the record
mode. Press ▲/▼ to select
to select
schedule is set, the TV will automatically switches
to the selected channel and start recording at the
time set. If the TV is in standby mode, the TV will
automatically turns on and then off a few seconds
ahead of the schedule and then start recording at
the standby mode. The indicator on the TV flashes
until the recording ends.
Note
function, connect a USB drive to the TV rst. For
details of how to control the recording, see
page 19.
-the green button to display detailed program
information, if any.
-the yellow button to display the schedule list.
-the blue button, and press
channel and set the time for a reminder. You can
also set the reminder mode. Press ▲/▼ to select
Mode
Weekly
or
automatically switches to the selected channel at
the time set. If the TV is in standby mode, the TV
will automatically turns on and switches to selected
channel.
on the remote control.
PROGRAMME GUIDE
to select the time (right below
) and then press ◄/► to toggle among the
▲/▼
to select the channel (right below
Once, Every Day
: Before you use the schedule recording
and press ◄/► to select
. Once a reminder is set, the TV will
(on top of the screen)
PROGRAMME
) and then press ◄/► to
▲/▼/
◄/► to select the
Mode
and press ◄/►
Weekly
or
▲/▼/
. Once a
PVR
◄/► to select the
Once, Every Day
on
20
Page 21

Chapter 6 Other Information
Problems & Solutions
Note: Problems & solutions 1 to 3 are for the TV models which have network functions, so users of non-connected
TV models can disregard them.
6.
1. Fail to link to the network.
- Check if your TV is connected with the network;
- Reboot your TV;
if access of your router is supported. Refer to the
operation manual of your router, and activate its
DHCP function after linking the network to your TV.
- Make sure your TV is connected to a router, and
make sure your router is powered on. Check that
your router/modem has an internet connection, and
that your Ethernet cables/wireless connection is OK.
Test your connection with a computer to make sure it
is OK. Should the problem persist, contact customer
service.
The video could not be played smoothly.
2.
-
the supported formats of this TV set.
- Videos downloaded from internet, or online videos.
a. It may be caused by the lower bandwidth of your
network. A high network speed is required to
handle online videos.
b. Peak internet usage times may affect the
bandwidth.
c. Check if any other computers on the same
network are also operating, as they may be using
up bandwidth. Especially if they are downloading
or displaying on-line videos.
3.
When two mobile hard disks are connected
with the TV at the same time, they will not be
recognized some times.
- All mobile hard disks consume a lot of power,
which may result in power supply problems. We
recommend inserting only one hard disk, or a low
power consumption mobile hard disk.
The video from a mobile hard disk (USB) is
4.
playing with no sound.
- The audio format of the video in your mobile hard
disk is not supported by the TV player.
5.
Some videos fail to play.
-
The formats of the videos may not be supported
by the TV, especially videos shot by certain kinds
of cameras, generally with their private protocol of
formats, which are not compatible with your TV.
Video stops playing midway.
- Mistakes may occur when videos are copied or
compressed, so they may automatically stop playing
during playback.
7.
What should I pay attention to, when I do SW
updating?
- No power cuts when SW updating;
- Avoid any operations with your remote control when
SW updating;
- Depending on your internet connection speed, the
software updating process may take some time.
8.
There are no distinct changes of TV interface
after SW updating.
- Under certain conditions, SW updating may not only
update or add new functions but also improve the
performance of the TV set, without distinct changes
of interface. Also, there may be no changes to the
user interface at all.
9.
What should I do when SW updating process
stops due to a sudden power-off?
- If you do SW updating by USB, do not pluck the
USB from your TV, and restart your TV to continue
SW updating; If you do SW updating by Network,
also restart your TV and check if it is well functioned.
With a USB device being inserted into the TV in
10.
advance, I am prompted that no USB devices are
detected after I access Multimedia, why?
- There may be something wrong with your mobile
hard disk(s), damaged or with low voltage. You could
increase power supply by inserting the two plugs
on one end on the USB wire into TV's USB port
simultaneously.
11.
External device cannot be recognized.
- Some external devices (e.g. webcam, smart phone,
tablet, game handle, and external wireless adapter)
may not be compatible with the TV and cannot be
supported for certain functions (nScreen, wireless
display, gesture control, face recognition, if any).
Please try a similar device. If it does not work,
contact your local dealer.
21
Page 22

Other Information
Troubleshooting
Most problems you encounter with your TV can be corrected by consulting the following troubleshooting list.
No picture, no sound
1.
Check if the fuse or circuit breaker is working.
2.
Plug another electrical device into the outlet to make
sure it is working or turned on.
3.
Power plug is in a bad contact with the outlet.
4.
Check the signal source.
No colour
1.
Change the colour system.
2.
Adjust the saturation.
3.
Try another channel. Black-white programme may
be received.
Remote control does not work
1.
Change the batteries.
2.
Batteries are not installed correctly.
No picture, normal sound
1.
Adjust the brightness and contrast.
2.
Broadcasting failure may happen.
Normal picture, no sound
1.
Press the VOLUME UP button to increase volume.
2.
Volume is set to mute, press the MUTE button to
restore sound.
3.
Change the sound system.
4.
Broadcasting failure may happen.
1.
Adjust the position and orientation of the indoor/
outdoor antenna.
2.
Check the connection of antenna.
3.
Fine tune the channel.
4.
Try another channel. Broadcasting failure may
happen.
Ignition
Black spots or horizontal streaks appear, or the picture
utters or drifts. This is usually caused by interference
from car ignition system, neon lamps, electric drills, or
other electrical appliance.
Ghost
Ghosts are caused by the television signal following
two paths. One is the direct path, the other is reected
from tall buildings, hills, or other objects. Changing the
direction or position of the antenna may improve the
reception.
Radio frequency interference
This interference produces moving ripples or diagonal
streaks, and in some case, loss of contrast in the
picture. Find out and remove the radio interference
source.
Base Installation
Unorderly ripples on the picture
It is usually caused by local interference, such as cars,
daylight lamps and hair driers. Adjust the antenna to
minimize the interference.
Blank screen in VGA mode
Perhaps the TV cannot recognize the resolution set
by the PC. Suggest to change to the best resolution or
other standard resolutions of the Windows system.
Snowy dots and interference
If the antenna is located in the fringe area of a television
signal where the signal is weak, the picture may be
marred by dots. When the signal is extremely weak,
it may be necessary to install a special antenna to
improve the reception.
To fix the double support base on the unit by
screws, the installation is completed.
* To bring you better visual experience, please remove
all labels from TV front panel and screen before use.
* Figures and illustrations in this User Manual are
provided for reference only and may differ from actual
product appearance. Product design and specications
may be changed without notice.
22
Page 23

Other Information
Legal Statement
Legal Statement] of TCL - manufacturer of this TV set
[
Due to the various capabilities of products featuring
the SmartTV - Service s, as well as limitation s in the
available content, certain features, applications, and
services may not be available
territories. Some features on SmartTV may also require
additional peripheral devices or membership fees that
are sold separately. Please visit our website for more
availabilit y. T he services and a vailability of content
through SmartTV are subject to change from time to
time without prior notice.
All content and services accessible through this device
belong to third parties and are protected by copyright,
patent, t rademark and/or other i ntellec tual property
laws. Such content and services are provided solely
for your personal noncommercial use. You may not
use any content or services in a manner t hat ha s
not been authorized by the content owner or service
provider. Without limiting the foregoing, unless expressly
authorized by the applicable content owner or
provider, you may not modify, copy, republish, upload,
post, transmit, translate, sell, create derivative works,
exploit , or distribut e in any manner or medium any
content or services displayed through this device.
on all devices or in all
service
Thi rd part y services may b e changed, suspended,
removed, terminated or interrupted, or access may be
disabled at any time, without notice, and TCL makes no
representation or warranty that any content or service
will remain available for any period of time. Content
and services are transmitted by third parties by means
of networks and transmission facilities over which TCL
has no control. Without limiting the generality of this
disclaimer, TCL expressly disclaims any responsibility or
liability for any change, interruption, disabling, removal
of or suspension of any cont ent or service made
available through this device. TCL may impose limits
on the use of or access to certain services or content,
in any case and without notice or liability. TCL is neither
responsible nor liable for customer service related to
the content and services. A
service relating to the content or services should be
made directly to the respective content and service
providers.
ny question or request for
You expressly acknowledge and agree that use of the
device is at your sole risk and that the entire
satisfactory quality, performance and accuracy is with
you. The device and all third party content and services
are provided “as is” without warranty of any kind,
either express or implied. TCL expressly disclaims all
warranties and conditions with respect to the device and
any content and ser vices, either express or, implied,
including but not limited to, warranties of merchantability,
cy, of quiet enjoyment, and non-infringement of
accura
third party rights. TCL does not guarantee the accuracy,
validity, timeliness, legality, or completeness of any
content or service made available through this device
and does not warrant that the device, content or services
will meet your requirements, or that operation of the
device or services will be unin terrupted or error-free.
Under no circumstances, in cluding negligence, shall
TCL be liable, whether in contract or tort, for any
indirect, incidental, special or consequential damages,
attorney fees, expenses, or any other damages arising
out of, or in connection with, any information contained
in, or as a result of the use of the device, or
or service accessed by you or any third party, even if
advised of the possibility of such damages.
risk as to
direct,
any content
TCL Electronics Australia Pty Ltd.
ABN 83 111 032 896
Address: 797 Springvale Road, Mulgrave, VIC 3170, Australia
Telephone: 1300 738 149
service.au@tcl.com
www.tclelectronics.com.au
72-KD27PB-E089E
23
 Loading...