


Quick Start Guide
21 3 4
Mic
Music Chat System
GoXLR
Revolutionary Online Broadcaster Platform with 4-Channel Mixer,
Motorized Faders, Sound Board and Vocal Eects
V 0.0

2 3Quick Start GuideGoXLR
1. Read these instructions.
15. T he apparatus shall be conne cted
your coopera tion in the correct di sposal
more information about where you can
are subjec t to change without notice.
Atención
contacto s: dos polos y la puesta a
contacto, respectivamente, son los que
mesa especicados
tormentas o s i no va a utilizarlo durante
Important Safety
Instructions
Terminals marked with
this symbol carry
electr ical current of
sucient magnitude to constitute risk
of elect ric shock. Use only high- quality
professio nal speaker cables with ¼" TS
or twist-locking plugs pre -installed.
Allother installation or modication
should be performed only by
qualiedpersonnel.
This symbo l, wherever it
appears, ale rts you to the
presence of uninsulated
dangerous voltage inside the enclosure
- voltage that may b e sucient to
constitu te a risk ofshock.
This symbo l, wherever it
appears, ale rts you to
important operating and
maintenance instructions in the
accompanying literature. Please read
themanual.
Caution
To reduce the risk of
electr ic shock, do not
remove the top cover (or the r ear
section). No user serviceable parts inside.
Refer servicing to qualiedpersonnel.
Caution
To reduce the risk of
re or elec tric shock, do
not expos e this appliance to rain and
moisture. Th eapparatus shall not
be expose d to dripping or splashing
liquids and no ob jects lled with
liquids, such as v ases, shall be placed
on the apparatus.
Caution
These service instruc tions
are for use by qua lied
service p ersonnel only. Toreduce
the risk of ele ctric shock do not
perform any servicing other than that
contained in the operation instructions.
Repairshave to b e performed by
qualied servicepersonnel.
2. Keep these instructions.
3. Heed all warnings.
4. Follow all instruc tions.
5. Do not use this apparatus
near water.
6. Clean only w ith dry cloth.
7. Do not block any ve ntilation
openings. Install in accordance with the
manufacturer ’s instructions.
8. Do not ins tall near any heat
sources such a s radiators, heat regis ters,
stoves, or othe r apparatus (including
ampliers) that produce heat.
9. Do not defeat the sa fety purpose
of the polari zed or grounding-typ e
plug. A polari zed plug has two blades
with one wider than the other.
A grounding -type plug has two blad es
and a third grounding prong. The wide
blade or the third prong are provided
for your saf ety. Ifthe provided plug
does not t into y our outlet, consult
an elect rician for replacement of th e
obsolete outlet.
10. Protect the power cord f rom being
walked on or pinc hed particularly
at plugs, convenience receptacles,
and the point wh ere they exit from
the apparatus.
11. Use only attachments/accessories
specie d by themanufacturer.
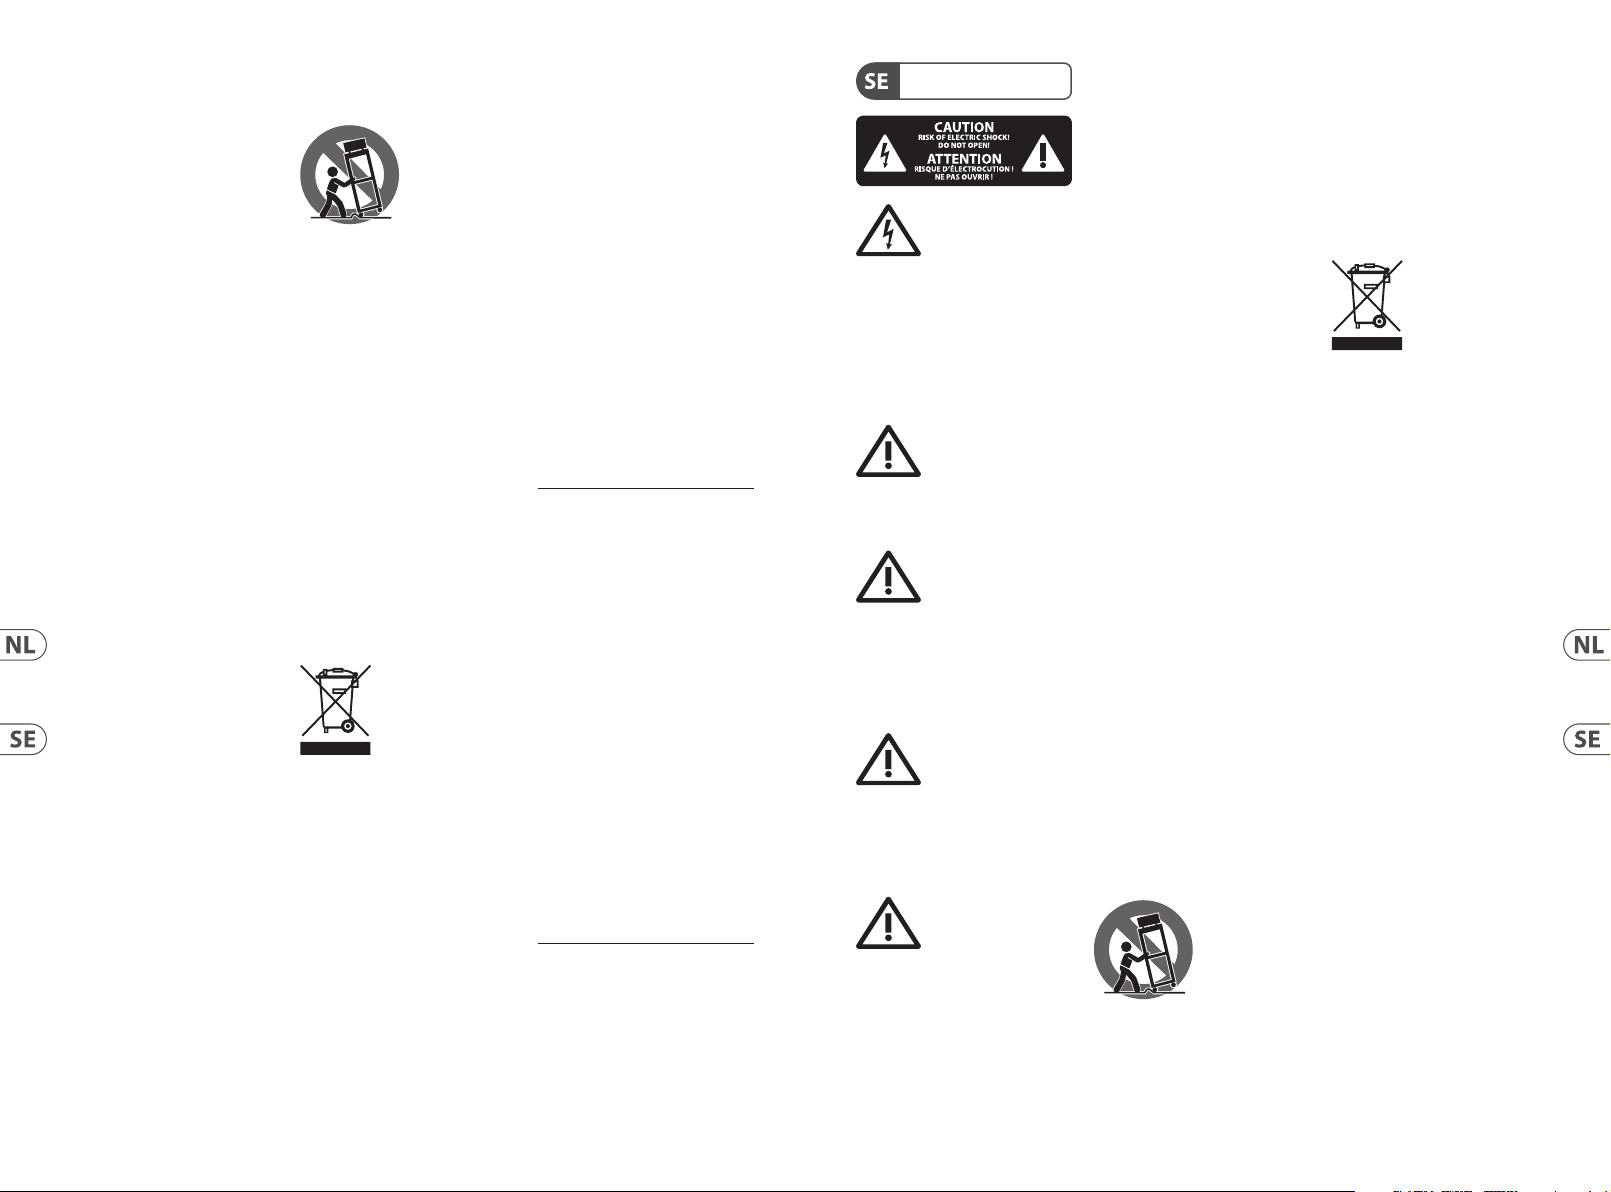
12. Use only with
the cart , stand,
tripod, bracket, or
table spec ied by
the manufacturer,
orsold with
the apparat us. When a cart is used,
use caution when moving the cart/
apparatus combination to avoid injury
from tip -over.
13. Unplug this apparatus during
lightning storms or when unused for
long periods of time.
14. Refer all servicing to qualied
service personnel. Servicing is require d
when the appa ratus has been damaged
in any way, such as power suppl y cord
or plug is damage d, liquid has been
spilled or obje cts have fallen into the
apparatus, t he apparatus has been
expose d to rain or moisture, does not
operate nor mally, or has beendro pped.
to a MAINS socket ou tlet with a
protective earthing connection.
16. Wher e the MAINS plug or an
appliance coup ler is used as the
disconnect device, the disconnect
device shall remain readily operable.
17. Corre ct disposal of
this product: This
symbol indicates that
this product must not
be disposed of with
household waste, according to the
WEEE Direc tive (2012/19/EU) and your
national law. This prod uct should be
taken to a collec tion center licensed for
the recyc ling of waste electr ical and
electronic equipment (EEE).
The mishandlin g of this type of waste
could have a possib le negative impact
on the environment and human health
due to potentially hazardous
substances that are generally
associate d with EEE. At the same time,
of this produc t will contribute to the
ecient use of natural resources. For
take your waste equipment for
recycli ng, please contact your lo cal city
oce, or your household waste
collection se rvice.
18. Do not i nstall in a conned space,
such as a book c ase or similar unit.
19. Do not place naked ame
sources, suc h as lighted candles,
on the apparatus.
20. Please keep the environmental
aspect s of battery dispo sal in mind.
Batteri es must be disposed- of at a
battery collection point.
21. This apparatus may be used i n
tropical an d moderate climates up
to 45°C.
LEGAL DISCLAIMER
Music Tribe accepts n o liability for
any loss which may b e suered by
any person who relies either wholly
or in part u pon any description,
photograph, or statement contained
herein. Technical specications,
appearances and other information
All trademar ks are the propert y
of their respective owners. Midas,
Klark Teknik, Lab G ruppen, Lake,
Tannoy, Turbosound, TC Electronic,
TC Helicon, Behringer, Bugera, Aston
Microphones and Coolaudio are
trademarks or registered trad emarks
of Music Tribe Global B rands Ltd.
© Music Tribe Global B rands Ltd.
2022 All rights re served.
LIMITED WARRANTY
For the applic able warranty terms a nd
conditions and additional information
regarding Music Tribe’s Limited
Warranty, please see complete details
online at community.musictribe.com/
pages/support#warranty.
Instrucciones de
seguridad
Las terminales marcadas
con este símb olo
transportan corr iente
eléctr ica de magnitud sucie nte como
para const ituir un riesgo de desc arga
eléctr ica. Utilicesolo cable s de altavoz
profesionales y de alta calidad con
conecto res TS de 6,3 mm o de bayoneta
prejados. Cualquier otra instalación o
modicación debe ser realizada
únicamente p or un técnicocualicado.
Este símbolo, siempre que
aparece, leadv ierte de la
presencia de voltaje
peligroso si n aislar dentro de la caja;
estevoltaj e puede ser suciente par a
constitu ir un riesgo dedescarga .
Este símbolo, siempre que
aparece, leadv ierte sobre
instrucciones operativas y
de mantenimiento que aparecen en la
documentación adjunta. Por favor,
leaelmanual.
Para reducir e l riesgo de
descarga e léctrica, no
quite la tapa (olapar te posterior).
Nohay piezas en e l interior del equipo
que puedan ser r eparadas por el
usuario. Sies ne cesario, póngase en
contacto con personal cuali cado.
Atención
Para reducir e l riesgo
de incendio o des carga
eléctr ica, no exponga este ap arato a la
lluvia, humeda d o alguna otra fuente
que pueda sal picar o derramar algún
líquido sobr e el aparato. Nocoloque
ningún tipo de recipiente para líquidos
sobre elapar ato.
Atención
Las instrucciones
de servicio deben
llevarlas a cabo exclusivamente
personal c ualicado. Paraevitar el
riesgo de una d escarga eléctr ica,
no realice reparaciones que no se
encuentren d escritas en el manual de
operaciones. Lasreparaciones deben
ser realizadas exclusivamente por
personalcualicado.
1. Lea las instrucciones.
2. Conserve e stas instruccion es.
3. Pres te atención a todas
las advertencias.
4. Siga todas las instrucciones.
5. No use e ste aparato cerca
del agua.
6. Limpie es te aparato con un
paño seco.
7. No bloquee las aberturas
de ventilación . Instale el equipo
de acuerdo con las instrucciones
del fabricante.
8. No instal e este equipo cerca de
fuentes de calor tales como radiadores,
acumuladore s de calor, estufas u otros
aparatos (incluyendo amplicadores)
que puedan producir calor.
9. No elimine o deshabilite nunca
la conexión a ti erra del aparato o del
cable de alimentación de corriente.
Unenchufe po larizado tiene dos polo s,
uno de los cuale s tiene un contacto
más ancho que el ot ro. Una clavija
con puest a a tierra dispone de tres
tierra. El con tacto ancho y el tercer
garantizan una mayor seguridad. Si el
enchufe suministrado con el equipo
no concuerda co n la toma de corriente,
consulte con un el ectricista par a
cambiar la toma d e corriente obsoleta.
10. Coloque el cable de suminis tro de
energía de manera que no pueda ser
pisado y que es té protegido de objetos
alados. As egúrese de que el cable de
suministro de energía esté protegido,
especialm ente en la zona de la clavija y
en el punto dond e sale del aparato.
11. Use únicamente los dispositivos
o accesorio s especicados por
el fabricante.
12. Use
únicamente la
carretilla,
plataforma,
trípode, soporte o
por el fabricante o suministrados junto
con el equipo. Alt ransportar el equi po,
tenga cuidado p ara evitar daños y
caídas al tropezar con algún obstác ulo.
13. Desenchufe el equipo durante
un periodo largo.
14. Confíe las reparaciones
únicamente a servicios técnicos
cualicados. La unidad requiere
mantenimiento siempre que haya
sufrido al gún daño, si el cable de
suministro de energía o el enchufe
presenta ran daños, sehubiera
derramado un líquido o hubieran caído
objetos dent ro del equipo, si el aparato
hubiera es tado expuesto a la hume dad
o la lluvia, si ha dejado d e funcionar de
manera norma l o si ha sufrido algún
golpe o caída.
15. A l conectar la unidad a la toma d e
corriente el éctrica asegúr ese de que
la conexión disponga de una unión
atierra.
16. Si el enc hufe o conector
de red sirve c omo único medio
de desconexión, éste debe ser
accesiblefácilmente.

4 5Quick Start GuideGoXLR
17. Cómo debe
de sus respectivos dueños. Midas,
Attention
contact s plus une mise à la terre
17. Mise au re but
Lab Grupp en, Lake, Tannoy,
Global Brands Ltd. © Music Tribe Global
Pour connaître les termes et conditions
deshacers e de este
aparato: Es te símbolo
indica que es te aparato
no debe ser tratado
como basura or gánica, según lo
indicado en la D irectiva WEEE (2012/19/
EU) y a las normativa s aplicables en su
país. En lugar de el lo deberá llevarlo al
punto limpio más cercano para el
reciclaje de s us elementos eléctr icos/
electr ónicos (EEE). Al hacer esto estar á
ayudando a preve nir las posibles
consecuencias negativas para el medio
ambiente y la salu d que podrían ser
provocadas por una gestión inadecuada
de este tipo d e aparatos. Además,
el reciclaje d e materiales ayudará a
conservar los recur sos naturales. Para
más informa ción acerca del reciclaj e de
este aparat o, póngase en con tacto con
el Ayuntamiento d e su ciudad o con el
punto limpio local.
18. No instale esta unidad en un
espacio muy r educido, tal como
encastrada en una librería o similar.
19. No coloque objetos con
llama, como una vela ence ndida,
sobre este aparato.
20. Tenga presente s todas las
advertenc ias relativas al reciclaj e
y correcta eliminación de las pilas.
Las pilas deben ser siempre eliminadas
en un punto limpio y n unca con el resto
de la basura org ánica.
21. Puede usar este aparato e n
lugares con cli mas tropicales y
moderados que soporten temperaturas
de hasta 45°C.
NEGACIÓN LEGAL
Music Tribe no admite ningún tipo
de responsabilidad por cualquier
daño o pérdida que pudiera sufrir
cualquier persona por conar total
o parcialmente en la descripciones,
fotografías o armaciones
contenidas en este documento.
Las especicaciones técnicas,
imágenes y otras informaciones
contenidas en este documento están
sujetas a modicaciones sin previo
aviso. Todas las marcas comerciales
que aparecen aquí son propiedad
Klark Teknik, Lab G ruppen, Lake,
Tannoy, Turbosound, TC Electronic,
TC Helicon, Behringer, Bugera, Aston
Microphones y Coolaudio son marcas
comerciales o marcas registradas
de Music Tribe Global B rands Ltd.
© Music Tribe Global B rands Ltd.
2022 Reservados todos los derechos.
GARANTÍA LIMITADA
Si quiere conocer los detalles y
condiciones aplicables de la garantía
así como información adicional sobre
la Garantía limi tada de Music Tribe,
consulte online toda la información en
la web community.musictribe.com/
pages/support#warranty.
Consignes de sécurité
Les points r epérés par ce
symbole portent une
tension électrique
susante po ur constituer un risque
d’électrocution. Utilisez uniquement
des câbles d’enceintes professionnels
de haute qualité ave c ches Jack mono
6,35 mm ou ches à verr ouillages déjà
installée s. Touteautre ins tallation ou
modication doit être eectuée
uniquement par un personnel qualié.
Ce symbole aver tit de la
présence d’une tension
dangereuse e t non isolée à
l’intérieu r de l’appareil - elle p eut
provoquer des chocs électriques.
Attention
Ce symbol signale les
consignes d’utilisation
et d’entre ! Tienimp ortantes dans
la document ation fournie. Lisez les
consignes de sécurité du manuel
d’utilisatio n del’appareil.
Pour éviter tout r isque
ne pas ouvri r le capot de l’appareil
de choc électrique,
ni démonter le panneau arrière.
L’intérieur de l’appareil ne possède
aucun élément réparable par
l’utilisateur. Lais sertoute réparation à
un professionnelqualié.
Attention
Pour réduire le s risques
de feu et de cho c
électrique, n’exposez pas cet appareil
à la pluie, à la moisissu re, auxgouttes
ou aux éclabo ussures. Ne posez pas
de récipient contenant un liquide sur
l’appareil (unvase par e xemple).
Attention
Ces consignes de
sécurité et d’entretien
sont destinées à un personnel
qualié. Pour évi ter tout risque de
choc électrique, n’eectuez aucune
réparation sur l’appareil qui ne soit
décrite p ar le manuel d’utilisation.
Les éventuelle s réparations doivent
être eectuées uniquement par un
technicienspécialisé.
1. Lisez ces consignes.
2. Conserve z ces consignes.
3. Respe ctez tous les aver tissements.
4. Respectez toutes les
consignes d’utilisation.
5. N’utilisez jamais l’appareil à
proximité d’un liquide.
6. Nettoy ez l’appareil avec u n
chion sec.
7. Veillez à ne pas empêcher la
bonne ventilat ion de l’appareil via ses
ouïes de ventila tion. Respectezles
consignes du fabricant concernant
l’install ation del’appareil.
8. Ne placez pas l ’appareil à
proximité d ’une source de chale ur telle
qu’un chauage, une cuisinière ou
tout appareil dégageant de la chaleur
(y compris un am pli depuissance).
9. Ne supprimez jamai s la sécurité
des prise s bipolaires ou des prise s
terre. Les pri ses bipolaires possè dent
deux contacts de largeur diérente.
Leplus large es t le contact de sécur ité.
Les prises te rre possèdent deux
servant d e sécurité. Si la prise du blo c
d’alimentation o u du cordon d’alimentation f ourni ne correspond pa s à
celles de votre i nstallation élect rique,
faites app el à un électricien po ur
eect uer le changement de prise.
10. Installez le cordon d’alimentation
de telle façon qu e personne ne puisse
marcher dess us et qu’il soit protégé
d’arêtes coupantes. Assurez-vous
que le cordon d’alimentation est
sufsamment protégé, notamment
au niveau de sa pr ise électrique et
de l’endroit où il es t relié à l’appareil;
cela est égale ment valable pour une
éventuelle rallonge électrique.
11. Utilisez exclusivement
des accessoi res et des appareils
supplémentaires recommandés par
lefabricant.
12. Utilisez
exclusivement des
chariots, des
diables,
desprésentoirs,
despieds et d es
surface s de travail recommandés p ar le
fabrica nt ou livrés avec le produit.
Déplacezprécautionneusement tout
chariot ou dia ble chargé pour éviter
d’éventuelles bles sures en cas dechute.
13. Débranchez l’appareil de la
tension sec teur en cas d’orage ou si
l’appareil reste inutilisé pendant une
longue période de temps.
14. Les travaux d’entretien de
l’appareil doiven t être eectués
uniquement par du personnel qualié.
Aucunentret ien n’est nécess aire sauf si
l’appareil est endommagé de quelque
façon que ce soi t (dommagessur le
cordon d’aliment ation ou la prise par
exemple), siun liquide ou un objet
a pénétré à l ’intérieur du châssis, si
l’appareil a été ex posé à la pluie ou
à l’humidité, s’il ne fonctionne pas
correc tement ou à la suite d’une chute.
15. L’appareil doit êt re connecté à une
prise secteur dotée d’une protection
par mise à la terr e.
16. La p rise électrique o u la prise
IEC de tout appar eil dénué de bouton
marche/arrêt doit rester accessible
enpermanence.
appropriée de ce
produit: Ce symbole
indique qu’en accord
avec la direc tive DEEE
(2012/19/EU) et les lois en vigu eur dans
votre pays, ce pro duit ne doit pas être
jeté avec les déc hets ménagers.
Ce produit doi t être déposé dans un
point de collec te agréé pour le
recyclage des déchets d’équipements
électriques et élect roniques (EEE).
Une mauvaise man ipulation de ce type
de déchets pourrait avoir un impact
négatif sur l’environnement et la santé
à cause des su bstances potentiellem ent
dangereuses généralement associées à
ces équipements. En même temps,
votre coopér ation dans la mise au rebut
de ce produit contribuera à l’utilisation
ecace des ressources naturelles.
Pour plus d’informations sur l’endroit
où vous pouvez d époser vos déchets
d’équipements pour le recyclage,
veuillez conta cter votre mairie ou votr e
centre loca l de collecte des déche ts.
18. N’inst allez pas l’appareil dans un
espace conné tel qu’une bibliothèque
ou meuble similaire.
19. Ne placez jamais d’objets
enammés, tels que des bougies
allumées, sur l’appareil.
20. Gardez à l ’esprit l’imp act
environnemental lorsque vous mettez
des piles au reb us. Les piles usées
doivent être d éposées dans un point de
collecte adapté.
21. Cet appareil peut être utilisé sous
un climat trop ical ou modéré avec des
températures de 45°C maximum.
DÉNI LÉGAL
Music Tribe ne peut êt re tenu pour
responsable pour toute perte pouvant
être subie pa r toute personne se
ant en part ie ou en totalité à
toute description, photographie
ou armatio n contenue dans ce
document. Les caractéristiques,
l’apparence et d’autres informations
peuvent fair e l’objet de modi cations
sans notic ation. Toutes les marques
appartiennent à leurs propriétaires
respec tifs. Midas, Klark Teknik,
Turbosound, TC Elec tronic, TC Helicon,
Behringer, Bugera, Aston Microphones
et Coolaudio so nt des marques ou
marques dép osées de Music Tribe
Brands Ltd. 2022 Tous droit s réservés.
GARANTIE LIMITÉE
de garantie applicables, ainsi que
les informations supplémentaires et
détaillée s sur la Garantie Limitée de
Music Tribe, consultez l e site Internet
community.musictribe.com/pages/
support#warranty.
Wichtige
Sicherheitshinweise
Vorsicht
Die mit dem Symbo l
markierten Anschlüsse
führen so vi el Spannung, dassdie
Gefahr eines Stromschlags besteht.
Verwenden Sie nur hochwertige,
professionelle Lautsprecherkabel
mit vorinstallierten 6,35 mm
MONO-Klinkensteckern oder
Lautsprecherstec ker mit
Drehverriegelung. Alle anderen
Installationen oder Modikationen
sollten nur von qualiziertem
Fachpersonal ausgeführt werden.
Achtung
Um eine Gefährdung
durch Stromschlag
auszuschließen, darf die
Geräteabdeckung bzw.
Geräterückwandnicht abgenommen
werden. ImInnern des Geräts benden
sich keine vom Benutzer reparierbaren
Teile. Reparaturarbeiten dürfen
nur von qualiziertem Personal
ausgeführtwerden.

6 7Quick Start GuideGoXLR
Atenção
12. Se utilizar uma cha de
dispositivo para evitar danos provocados
terem caído pa ra dentro do dispositivo;
Direct iva REEE (2012/19/EU) e a legislação
para um centr o de recolha licenciado para
Achtung
10. Verlegen Sie das N etzkabel so,
einer autorisierten Sammelstelle für
Stellen Sie keine Gegenstände mit
Um eine Gefährdung
durch Feuer bzw.
Stromschlag auszuschließen, darf
dieses Gerät weder Regen oder
Feuchtigkeit ausgesetzt werden
noch sollten Spritzwasser oder
tropfende Flüssigkeiten in das Gerät
gelangen können. Stellen Sie keine
mit Flüssigkeit gefüllten Gegenstände,
wie z. B. Vasen, aufdasG erät.
Achtung
Die Service-Hinweise sind
nur durch qualiziertes
Personal zu b efolgen. Umeine
Gefährdung durch Stromschlag zu
vermeiden, führen Sie bitte keinerlei
Reparatur en an dem Gerät durch,
dienicht in der Bedienungsanleitung
beschrieben sind. Reparaturen
sind nur von qualiziertem
Fachpersonaldurchzuführen.
1. Lesen Sie diese Hinweise.
2. Bewahren Sie diese Hinweise auf.
3. Beachten Sie alle Warnhinweise.
4. Befolgen Sie alle
Bedienungshinweise.
5. Bet reiben Sie das Gerät nicht in
der Nähe vonWasser.
6. Reinigen Sie das Gerät mit einem
trockenen Tuch.
7. Blockieren Sie nicht die
Belüftungsschlitze. Beachten
Sie beim Einbau de s Gerätes die
Herstellerhinweise.
8. Stellen Sie das Ger ät nicht in der
Nähe von Wärmeq uellen auf. Solche
Wärmequellen sind z. B. Heizkörper,
Herde oder andere Wärme erzeugende
Geräte (auch Verstärker).
9. Entfernen Sie in keinem Fall
die Sicherheitsvorrichtung von
Zweipol- oder geerdeten Steckern. Ein
Zweipolstecker hat zwei unterschiedlich
breite Steckkontak te. Ein geerdeter
Stecker hat zwei Steckkontakte
und einen dritten Erdungskontakt.
Derbreitere Ste ckkontakt oder der
zusätzliche Erdungskontakt dient
Ihrer Sicherheit. Falls das mitgelieferte
Steckerformat nicht zu Ihrer Steckdose
passt, wend en Sie sich bitte an
einen Elektriker, damit die Steckdose
entsprechend ausgetauscht wird.
dass es vor Tritte n und scharfen Kanten
geschützt ist und nicht beschädigt
werden kann. Ach ten Sie bitte
insbesondere im Bereich der Stecker,
Verlängerungskabel und an der Stelle,
an der das Net zkabel das Gerät verläss t,
aufausreichendenSchutz.
11. Das Gerät muss jede rzeit mit
intaktem Schutzlei ter an das Stromnetz
angeschlossen sein.
12. Sollte der Hauptnetz stecker
oder eine Gerätesteckdose die
Funktionseinheit zum Abschalten sein,
muss diese immer zugänglich sein.
13. Verwenden Sie nur Zusatzgeräte/
Zubehörteile, dielaut Hersteller
geeignet sind.
14. Verwenden
Sie nur Wagen,
Standvorrichtungen, Stative,
Halter oder Tische,
die vom Hersteller
benannt oder im Lieferumfang des
Geräts enthalten sind. Falls Sie einen
Wagen benutzen, seien Sie vorsichtig
beim Bewegen der
Wagen- Gerätkombination,
umVerletzungen durch Stolpern
zuvermeiden.
15. Zie hen Sie den Netzstecker bei
Gewitter oder wenn Sie das Gerät
längere Zeit nicht benutzen.
16. Lassen Sie alle Wartungsarbeiten
nur von qualiziertem ServicePersonal ausführen. EineWartung
ist notwendig, wenn das Gerät in
irgendeiner Weise beschädigt wurde
(z. B. Beschädigung des Netzkabels
oder Steckers), Gegenstände oder
Flüssigkeit in das Geräteinnere gelangt
sind, das Gerät Regen oder Feuchtigkeit
ausgesetzt wurde, das Gerät nicht
ordnungsgemäß funktioniert oder auf
den Boden gefallen ist.
17. Korrekte
Entsorgung dieses
Produkts: Dieses Symbol
weist darauf h in, das
Produkt entsprechend
der WEEE Direk tive (2012/19/EU) und
der jeweiligen nationalen Gesetze nicht
zusammen mit Ihren Haushaltsabf ällen
zu entsorg en. DiesesProdukt s ollte bei
Recycling elektrischer und
elektronischer Geräte (EEE) abgegeben
werden. Wegen bedenklicher
Substanzen, diegenerell mit
elektrischen und elektronischen
Geräten in Verbindung stehen, könnte
eine unsachgemäße Behandlung dieser
Abfallart eine negative Auswirkung auf
Umwelt und Gesundheit haben.
Gleichzeitig gewährleistet Ihr Beitr ag
zur richtigen Entsorgung dieses
Produkt s die eektive Nut zung
natürliche r Ressourcen. Fürweitere
Informationen zur Entsorgung Ihrer
Geräte bei einer Recycling-Stelle
nehmen Sie bitte Kontakt zum
zuständigen städtischen Büro,
Entsorgungsamt oder zu Ihrem
Haushaltsabfallentsorgerauf.
18. Installieren Sie das Gerät nicht
in einer beengten Umgebung, zum
Beispiel Bücherregal oder ähnliches.
19.
oenen Flammen, etwa brennende
Kerzen, auf das Ge rät.
20. Beachten Sie bei der Entsorgung
von Batter ien den UmweltschutzAspekt. Batterien müssen bei einer
Batterie -Sammelstelle entso rgt
werden.
21. Dieses Gerät ist in tropischen
und gemäßigten Klimazonen bis
45° C einsetzbar.
HAFTUNGSAUSSCHLUSS
Music Tribe übernimmt keine Haftung
für Verluste, die Personen entstanden
sind, die sich gan z oder teilweise auf
hier enthaltene Beschreibungen,
Fotos oder Aussagen verlassen haben.
Technische Daten, Erscheinungsbild
und andere Informationen können
ohne vorherige Ankündigung
geändert werden. Alle Warenzeichen
sind Eigentum der jeweiligen
Inhaber. Midas, Klark Teknik, Lab
Gruppen, L ake, Tannoy, Turbosound,
TC Electron ic, TC Helicon, Behringer,
Bugera
, Aston Microphones
und
Coolaudio sind Warenzeichen oder
eingetragene Warenzeichen der
Music Tribe Global Brands Ltd.
© Music Tribe Global B rands Ltd.
2022 Alle Rechte vorbehalten.
BESCHRÄNKTE GARANTIE
Die geltenden Garantiebedingungen
und zusätzliche Informationen
bezüglich der von Music Tribe
gewährten beschränkten
Garantie nden Sie online unter
community.musictribe.com/pages/
support#warranty.
Instruções de
Segurança Importantes
Aviso!
Terminais marcados
com o símbolo c arregam
corrente elétrica de magnitude
suciente pa ra constituir um risco d e
choque elétrico. Use apenas cabos
de alto-falantes de alta qualidade
com plugues TS de ¼" ou plugues
com trava de torção pré-instalados.
Todas as outras ins talações e
modicaçõ es devem ser efetuadas p or
pessoasqualicadas.
Este símbo lo, onde quer
que o encontre, ale rta-o
para a leitur a das
instruções de manuseamento que
acompanham o equipamento. Por favor
leia o manual deinstruções.
Atenção
De forma a dimi nuir
o risco de choq ue
eléctr ico, nãoremover a cobertur a
(ouasecção de trá s). Não existem peç as
substitu íveis por parte do utili zador no
seu interior. Para es se efeito recorrer a
um técnicoqualicado.
Atenção
Para reduzir o r isco de
incêndios ou choques
eléctr icos o aparelho não deve ser
exposto à c huva nem à humidade.
Alémdisso, não deve s er sujeito a
salpicos, nem d evem ser colocados em
cima do aparel ho objectos contendo
líquidos, taiscomojarras.
Estas ins truções de
operação devem ser
utilizada s, emexclusivo, por técnicos
de assistência qualicados. Para evitar
choques elé ctricos não proce da a
reparações ou intervenções, que
não as indicad as nas instruções
de operaçã o, salvo se poss uir as
quali-cações necess árias. Para evitar
choques elé ctricos não proce da a
reparações ou intervenções, que
não as indicad as nas instruções de
operação. S ó o deverá fazer se possuir
as qualicaçõesnecessárias.
1. Leia estas in struções.
2. Guarde estas instruções.
3. Pres te atenção a todos os avisos.
4. Siga todas as in struções.
5. Não utilize este dispositivo perto
de água.
6. Limpe ape nas com um pano seco.
7. Não obstr ua as entradas de
ventilação. Ins tale de acordo com as
instruções do fabricante.
8. Não instale perto de quaisquer
fontes de cal or tais como radiadores,
bocas de ar qu ente, fogões de sala
ou outros aparelhos (incluindo
amplicadores) que produzam calor.
9. Não anule o object ivo de
seguranç a das chas polarizadas ou
do tipo de ligaç ão à terra. Uma cha
polariza da dispõe de duas palhetas
sendo uma mais lar ga do que a outra.
Uma cha do tipo li gação à terra dispõe
de duas palhet as e um terceiro dente
de ligação à ter ra. A palheta larga ou
o terceiro dente são fornecidos para
sua seguranç a. Se a cha fornecida
não encaixar na sua tomada, consulte
um elect ricista para a subst ituição da
tomada obsoleta.
10. Proteja o cabo de alimentaç ão de
pisadelas ou apertos, especialmente
nas chas, ex tensões, e no local de
saída da unidade. Certique-se de
que o cabo elé ctrico está prote gido.
Verique particularmente nas chas,
nos receptá culos e no ponto em que o
cabo sai doap arelho.
11. O aparelho tem de est ar sempre
conect ado à rede eléctric a com o
condutor de pr otecção intacto.
rede princ ipal ou uma tomada de
aparelhos para desligar a unidade
de funciona mento, esta deve estar
sempre acessível.
13. Utilize apenas ligações/acessórios
especic ados pelofabrican te.
14. Utilize apenas
com o carrin ho,
estrutura, tripé,
suporte, ou m esa
especicados pelo
fabricante ou
vendidos com o dis positivo.
Quandoutili zar um carrinho, tenha
cuidado ao mover o conjunto carrinho/
pela terpidação.
15. Desligue este dispositivo durante
as trovoadas ou q uando não for
utilizado durante longos períodos
detempo.
16. Qualquer tipo de reparação
deve ser sempr e efectuado por
pessoal qualicado. É necessária uma
reparação sempre que a unidade tiver
sido de alguma forma danicada,
como por exemp lo: no caso do cabo de
alimentação ou cha se encontrarem
danicados; naeventualidade de
líquido ter sido derramado ou objectos
no caso da unid ade ter estado expos ta
à chuva ou à humid ade; seesta
não funcionar normalmente, ou se
tiver caído.
17. Correcta eliminação
deste prod uto: este
símbolo indi ca que o
produto não de ve ser
eliminado juntamente
com os resíduos domésticos, segundo a
nacional. Es te produto deverá ser lev ado
a reciclage m de resíduos de
equipamentos eléctricos e elec trónicos
(EEE). O tratamento inc orrecto deste ti po
de resíduos po de ter um eventual
impacto negativo no ambiente e na
saúde humana devido a substâncias
potencialmente perigosas que estão
geralmente associadas aos EEE. Ao
mesmo tempo, a sua col aboração para a
eliminação co rrecta deste p roduto irá

8 9Quick Start GuideGoXLR
contribuir para a utilização eciente dos
elettr iche, non esporre ques to
esclusivamente a personale qualic ato.
lame, una più larga dell'altra. Una spina
12. Utilizzare
eciente del le risorse naturali. Per
Aansluitingen die gemerkt
op belangrijke bedienings
recurs os naturais. Paramais info rmação
acerca dos loc ais onde poderá deixa r o
seu equipamento usado para reciclagem,
é favor contactar os serviços municip ais
locais, a enti dade de gestão de resídu os
ou os serv iços de recolha de
resíduosdomésticos.
18. Não ins tale em lugares
connados, ta is como estantes ou
unidades similares.
19. Não coloque fontes de
chama, tais como ve las acesas,
sobre o aparelho.
20. Favor, obedecer os asp ectos
ambientais de d escarte de bateria.
Baterias deve m ser descartadas e m um
ponto de coletas de baterias.
21. Esse aparelho pode se r usado em
climas tropi cais e moderados até 45°C.
LEGAL RENUNCIANTE
O Music Tribe não se resp onsabiliza
por perda algu ma que possa ser
sofrida por qualquer pessoa que
dependa, seja de maneira completa
ou parcial, de qualquer descrição,
fotograa, ou declaração aqui
contidas. Dados técnicos, aparências
e outras informações est ão sujeitas
a modicações sem aviso prévio.
Todas as marcas são p ropriedade
de seus respectivos donos. Midas,
Klark Teknik, Lab G ruppen, Lake, Tannoy,
Turbosound, TC Elec tronic, TC Helicon,
Behringer, Bugera
, Aston Microphones
e Coolaudio são marcas ou marcas
registr adas do Music Tribe Global Brands
Ltd. © Music Tribe Global B rands Ltd.
2022 Todos direitos reservados.
GARANTIA LIMITADA
Para obter os ter mos de garantia
aplicáveis e cond ições e informações
adicionais a respeito da garantia
limitada do Mus ic Tribe, favor veri car
detalhes na í ntegra através do website
community.musictribe.com/pages/
support#warranty.
Informazioni importanti
Attenzione
I terminali contrassegnati
con il simbolo conducono
una corrente el ettrica sucien te a
costitui re un rischio di scossa el ettrica.
Usareunicam ente cavi per altoparlanti
(Speaker) d’elevata qualità con
connetto ri jack TS da ¼"pre-installati.
Ognialtra in stallazione o modic a deve
essere eett uata esclusivamente da
personale tecnico qualicato.
Attenzione
Questo simbolo, ovunque
appaia, avver te della
presenza di una tensione pericolosa
non isolata all'i nterno dello chassis,
tensione che può essere suciente per
costitui re un rischio di scossa el ettrica.
Attenzione
Questo simbolo,
ovunque appaia, segnala
import anti istruzioni oper ative e di
manutenzione nella documentazione
allegata. Si invita a leggere il manuale.
Attenzione
Per ridurre il r ischio di
scosse elettriche, non
rimuovere il coperchio superiore (o la
sezione posteriore). All'interno non ci
sono par ti riparabili dall'utente. Per la
manutenzione rivolgersi a perso nale
qualicato.
Attenzione
Per ridurre il rischio
di incendi o scos se
apparecch io a pioggia e umidità.
L'apparecch io non deve essere espost o
a gocciolio o schizzi di liquidi e nessun
oggetto contenente liquidi, come vasi,
deve essere co llocato sull'apparecchio.
Attenzione
Queste istruzioni di
servizio sono destinate
Per ridurre il r ischio di scosse
elettriche non eseguire interventi
di manutenzione diversi da quelli
contenuti nel manuale di istruzioni. Le
riparazioni devono essere eseguite da
personale di assistenza qualic ato.
1. Leggere queste istruzioni.
2. Conservare queste istruz ioni.
3. Pres tare attenzione a tut ti gli
avvisi.
4. Applicare tutte le istru zioni.
5. Non utilizzare questo dispositivo
vicino l'acqua.
6. Pulire esclusivamente con un
panno asciutto.
7. Non bloccar e le aperture di
ventilazione. Installare in conformità
con le istru zioni del produttor e.
8. Non installare vicino a fonti di
calore come radiatori, termoregolatori,
stufe o alt ri apparecchi (inclusi
amplicatori) che producono calore.
9. Non escludere la sic urezza fornit a
dalla spina polar izzata o con messa
a terra. Una spina p olarizzata ha due
con messa a ter ra ha due lame e un
terzo polo di m essa a terra. La lama
larga o il terzo p olo sono forniti per
la vostra sic urezza. Se la spina for nita
non si adatt a alla presa, consultare un
elettr icista per la sostit uzione della
presa obsoleta.
10. Proteggere il cavo di
alimentazione dal calpestio o essere
schiacciato in particolare alle spine,
prese di cor rente e il punto in cui esce
dall'apparecchio.
11. Utilizzare esclusi vamente
dispositivi/accessori specic ati dal
produttore.
solo carrelli,
supporti, treppiedi,
stae o tavo li
indicati dal
produttore o
venduti con l'apparecchio. Utilizzando
un carrello, prestare attenzione quando
si sposta la combinazione carrello/
apparecchio per evitare lesioni dovute
al ribaltamento.
13. Scollegare questo apparecchio
durante i tempo rali o se non è utilizzato
per lunghi periodi di tempo.
14. Per tutte le rip arazioni rivolgersi a
personale qualicato. La manutenzione
è necessaria quando l'apparecchio
è danneggiato in qualsiasi modo,
come danneggiamento del cavo
di alimentazione o della spina,
versamento di liquido o oggetti caduti
nell'apparecchio, se l'apparecchio è
stato espo sto a pioggia o umidità, se
non funziona normalmente o è caduto.
15. L'apparecchio deve essere
collegato a una pr esa di corrente
elettr ica con messa a terra di
protezione.
16. e la spin a o una presa del
dispositivo è utilizzata come dispositivo
di disconnessione, deve essere
facilmente utilizzabile.
17. Smaltimento
corretto di ques to
prodotto: questo
simbolo indica che
questo dispositivo non
deve essere sma ltito
insieme ai riuti domestici, secondo la
Dirett iva RAEE (2012/19 / UE) e la vostra
legislazione nazionale. Questo prodot to
deve essere p ortato in un centro di
raccolta autorizzato per il riciclaggio di
riuti di apparecchiature elettriche ed
elettroniche (RAEE). La cattiva gestione
di questo tip o di riuti potrebbe aver e
un possibile impatto negativo
sull'ambiente e sulla salute umana a
causa di so stanze potenzialmente
pericolose che sono generalmente
associate alle apparecchiature
elettriche ed elettroniche. Nello stesso
tempo la vostra collaborazione al
corretto smaltimen to di questo
prodotto contribuirà all'utilizzo
ulteriori informazioni su dove è
possibile trasportare le apparecchiature
per il ricic laggio vi invitiamo a
contattare l'ucio comunale locale o il
servizio di raccolta dei riuti domestici.
18. Non installare in uno spazio
ristret to, come in una libreria o in una
struttura simile.
19. Non collocare sul dispositivo fonti
di amme libere, co me candele accese.
20. Per lo smaltimento delle batterie,
tenere in considerazione gli aspetti
ambientali. Le batterie devono essere
smaltite in un pu nto di raccolta delle
batterie es auste.
21. Questo apparecchio può essere
usato in climi t ropicali e temperati
no a 45°C.
DISCLAIMER LEGALE
Music Tribe non si assum e alcuna
responsabilità per eventuali danni
che posson o essere subiti da chiunq ue
si adi in tut to o in parte a qualsiasi
descrizione, fotograa o dichiarazione
contenuta qui. Speciche tecniche,
aspetti e altre informazioni sono
soggette a modiche senza preavviso.
Tutti i marchi son o di proprietà
dei rispet tivi titolari. Midas, K lark
Teknik, Lab Grup pen, Lake, Tannoy,
Turbosound, TC Elec tronic, TC Helicon,
Behringer, Bugera, Aston Microphones
e Coolaudio sono marchi o marchi
registr ati di Music Tribe Global Brands
Ltd. © Music Tribe Global B rands Ltd.
2022 Tutti i dirit ti riservati .
GARANZIA LIMITATA
Per i termini e le cond izioni di garanzia
applicabili e le informazioni aggiuntive
relative alla gar anzia limitata di Music
Tribe, consultare online i dettagli
completi su community.musictribe.
com/pages/support#warranty.
Belangrijke
veiligheidsvoorschriften
Waarschuwing
zijn met het s ymbool
voeren een zodanig hoge spanning dat
ze een risico vor men voor elektrisc he
schokken. Gebruikuitsluitend
kwalitatief hoogwaardige, in de
handel verkrijgbare luidsprekerkabels
die voorzie n zijn van ¼"TS stekkers.
Laatuitsluitend gekwaliceerd
persone el alleoverige installatie - of
modicatiehandelingenuitvoeren.
Dit symbo ol wijst u altijd
- en
onderhoudsvoorschrif ten in de
bijbehorende documenten. Wijvragen
u dringend de handleiding te lezen.
Attentie
Verwijder in geen
geval de bovens te
afdekking (vanhet achterste gedeelte)
anders be staat er gevaar voor een
elektrische schok. Hetapparaat bevat
geen te onderhouden onderdelen.
Reparatiewerkzaamheden mogen
uitsluitend door gekwaliceerd
personeel uitgevoerdworden.
Attentie
Om het risico o p brand
of elektrische schokken
te beperken, dient u te voorkomen
dat dit apparaat wordt blootgesteld
aan regen en voc ht. Hetapparaat
mag niet worden b lootgesteld aan
neerdruppelend of opspattend water
en er mogen geen met water gevulde
voorwer pen – zoals een vaas – op het
apparaat wordengezet.
Attentie
Deze
onderhoudsinstructies
zijn uitsluitend bedoeld voor
gekwaliceerd onderhoudspersoneel.
Omelektrische schokken te
voorkomen, mag u g een andere
10 11Quick Start GuideGoXLR
onderhoudshandelingen verrichten dan
13. Gebruik uitsluitend door de
bij aan een doelmatiger gebruik van de
1. Läs dessa anvisningar.
15. Dr a ur anslutningskontakten und
kommit in i appar aten, eller när den har
människors hälsa, påverkas negativt på
Placera inte källo r med öppen eld,
in de bedieningsinstructies vermeld
staan. Reparatiewerkzaamheden
mogen alleen uitgevoerd worden door
gekwaliceerd onderhoudspersoneel.
1. Lees deze voorschriften.
2. Bewaar deze voorschriften.
3. Neem alle waarschuwingen
in acht.
4. Volg alle voor schriften op.
5. Gebr uik dit apparaat niet in de
buurt vanw ater.
6. Reinig het uitsluitend met een
drogedoek.
7. Let erop geen v an de ventilatieopeningen te bedekken. Plaats en
installee r het volgens de voor- schriften
van de fabrikant.
8. Het appar aat mag niet worden
geplaats t in de buurt van radiatore n,
warmte-uitlaten, kachels of andere
zaken (ook verste rkers) diewarmte
afgeven.
9. Maak de veiligheid waarin door
de polarisatie- of aardingsstekker
wordt voorzien, niet ongedaan.
Eenpolarisa tiestekker heef t twee
bladen, waar vaner een breder is dan
het andere. Een aardingsstekker heeft
twee blade n en een derde uitsteek sel
voor de aarding . Het bredere blad of
het derde uit steeksel zijn er vo or uw
veiligheid. Moc htde geleverde stekker
niet in uw stop contact passen, laat
het contac t dan door een elektr icien
vervangen.
10. Om beschadiging te voorkomen,
moetde str oomleiding zo gelegd
worden dat er nie t kan worden over
gelopen en dat ze b eschermd is
tegen scherpe kanten. Zorg zeker
voor voldoende bescherming aan de
stekkers, d everlengkabels en het punt
waar het netsnoer het apparaat verlaat.
11. Het toestel met al tijd met een
intacte aarddraad aan het stro omnet
aangeslotenzijn.
12. Wanneer de stekker
van het hoofdnetwerk of een
apparaatstopcontac t de functionele
eenheid voor het uitschakelen is,
dientdeze alti jd toegankelijk te zijn.
producent gespeci- ceerd toebehoren
c.q. onderdelen.
14. Gebruik
het apparaat
uitsluitend in
combinatie met de
wagen, hetstatief,
dedriepoot , de
beugel of taf el die door de producent
is aangegeven, of die in combinatie
met het appar aat wordt verkocht. Bij
gebruik van een wagen dient men
voorzich tig te zijn bij het verrijden va n
de combinatie wagen/apparaat en
letsel do or vallen tevoorkomen.
15. B ij onweer en als u het apparaat
langere tijd niet gebruikt, haalt u de
stekker uit he tstopcontact.
16. Laat alle voorkomende rep araties
door vakkundig en bevoegd personeel
uitvoeren. Reparatiewerk-zaamheden
zijn nodig als he t toestel op enige wijze
beschadigd is geraakt, bijvoorbeeld
als de hoofd-stroomkabel of -stekker
is beschadi gd, als er vloeistof of
voorwerpen in terecht zijn gekomen,
als het aan regen o f vochtigheid
heeft bloot-ges taan, niet normaal
functioneer t of wanneer het
isgevallen.
17. Correc te afvoer van
dit product: dit symbool
geef t aan dat u dit
produc t op grond van de
AEEA-richtlijn
(2012/19/EU) en d e
nationale wetgeving van uw land niet
met het gewone huishoudelijke afval
mag weggooie n. Dit product moet na
aoop van de nut tige levensduur naar
een ociële inzamelpost voor
afgedankte elektrische en elektronische
apparatuur (AEEA) worden gebracht,
zodat het kan wor den gerecycleerd .
Vanwegede potentieel gevaarlijke
stoen die in elektrische en
elektronische apparatuur kunnen
voorkomen, kane en onjuiste afvoer va n
afval van h et onderhavige typ e een
negatieve invl oed op het milieu en de
menselijke gezondheid hebben.
Eenjuiste af voer van dit produc t is
echter niet alleen beter voor het milieu
en de gezondhe id, maardraagt tevens
natuurlijke hul pbronnen. Voormeer
informati e over de plaatsen waar u uw
afgedankte apparatuur kunt inleveren,
kunt u contac t opnemen met uw
gemeente of de
plaatselijkereinigingsdienst.
18. Installeer niet in een kleine
ruimte, zoals ee n boekenkast of iets
dergelijks.
19. Plaats geen open vlamme n, zoals
brandende kaarsen, op het apparaat.
20. Houd rekening met de
milieuaspecten van het afvoeren van
batterijen. Batterijen moeten bij een
inzamelpunt voor batterijen worden
ingeleverd.
21. Dit apparaat kan worden geb ruikt
in tropische en gematigde klimaten
tot 45 ° C.
WETTELIJKE ONTKENNING
Music Tribe aanvaardt geen
aansprakelijkheid voor enig verlies
dat kan worden geleden door een
persoon die geheel of gedeeltelijk
vertrouwt op enige beschrijving,
foto of verklaring hierin. Technische
specicaties, verschijningen en
andere informatie kunnen zonder
voorafgaande kennisgeving worden
gewijzigd. Alle handelsmerken zijn
eigendom van hun respectievelijke
eigenaren. Midas, Klark Teknik, Lab
Gruppen, Lake, Tannoy, Turb osound,
TC Electronic, TC Helicon, Behringer,
Bugera, Aston Microphones en
Coolaudio zijn handelsmerken of
gedeponeerde handelsmerken
van Music Tribe Global Brands Ltd.
© Music Tribe Global Brands Ltd.
2022 Alle rechten voorbehouden.
BEPERKTE GARANTIE
Voor de toepasselijke
garantievoorwaarden en aanvullende
informatie met betrekk ing tot de
beperkte garantie van Music Tribe,
zie de volledige details online op
community.musictribe.com/pages/
support#warranty.
Viktiga
säkerhetsanvisningar
Varning
Uttag markerade med
symbolen leder elekt risk
strömst yrka som är tillräck ligt stark för
att utgör a en risk för elchock. Anv änd
endast högkvalitativa, kommersiellt
tillgängliga högtalarkablar med
förhandsinstallerade ¼"TSkontakter. Allannan installering eller
modikation bör endast utföras av
kompetentpersonal.
Den här symbolen
hänvisar till viktiga
punkter om användning
och underhå ll i den medfölljande
dokumentationen. Varvänlig och läs
bruksanvisningen.
Försiktighet
Minska risken för
elektriska stötar genom
att aldri g ta av höljet upptill på
apparaten (ellerta av b aksidan).
Inuti appar aten nns det inga delar
som kan repar eras av användaren.
Endastkvalicerad pers onal får
genomföra reparationer.
Försiktighet
För att minsk a risken
för brand och elektriska
stötar ska apparaten skyddas mot
regn och f ukt. Apparaten går inte
utsät tas för dropp eller spill o ch
inga vattenbehållare som vaser etc.
fårplaceras p å den.
Försiktighet
Serviceinstruktionen
är enbart avsedd
för kvalicerad serviceper sonal.
Föratt undvika risker genom
elektriska stötar, genomför inga
reparationer på apparaten, vilka inte
är beskriv na i bruksanvisninge n.
Endast kvalicerad fack personal får
genomförareparationerna.
2. Spara dessa anvisningar.
3. Beakt a alla varningar.
4. Följ alla anvisningar.
5. Använd i nte apparaten i närheten
av vatten.
6. Rengör end ast med torr trasa.
7. Blockera inte
ventilationsöppningarna.
Installeraenligt tillverkarens
anvisningar.
8. Installera aldrig intill värmek ällor
som värme- element, varmluft sintag,
spisareller an nan utrustning som avger
värme (inklus iveförstärkare).
9. Ändra aldrig en polariserad
eller jordad kon takt. Enpolariserad
kontakt har t vå blad – det ena bredare
än det andra. En j ordad kontakt har
två blad oc h ett tredje jords tift. Det
breda blade t eller jordstifte t är till för
din säkerhet . Omden medföljande
kontakten i nte passar i ditt ut tag,
skadu kontak ta en elektriker fö r att få
uttaget bytt.
10. Förlägg elkabeln så, at t det inte
är möjligt at t trampa på den och att
den är skydda d mot skarpa kanter och
inte kan skadas . Ge i synnerhet akt på
områdena omkring stickkontakterna,
förlängningskablarna och på det
ställe, där elkabeln lämnar apparaten,
ärtillräckligtskyddade.
11. Apparaten måste alltid
vara ansluten till elnätet med
intaktskyddsledare.
12. Om huvudkontak ten, ellerett
apparatuttag, fungerar som
avstängningsenhet måste denna alltid
varatillgänglig.
13. Använd endast tillkopplingar och
tillbehör som angetts av tillverkaren.
14. Använd
endast med vagn,
stativ, trefot,
hållareeller bor d
som angetts
av tillverkaren,
ellersom sål ts till-sammans med
apparaten. O m du använder en
vagn, var för siktig, när du för yttar
kombinationen vagn-apparat, för att
förhindra olycksfall genomsnubbling.
åskväder e ller när apparaten inte ska
användas under någon längre tid.
16. Låt k valicerad personal utföra
all servi ce. Serviceär nödvändig
när apparaten har skadats, t.ex.när
en elkabel elle r kontakt är skadad,
vätskaeller främmande föremål har
fallit i golve t.
17. Kassera produkten
på rätt s ätt: den här
symbolen indikerar att
produkten inte ska
kastas i
hushållssoporna,
enligtWEEE dire ktivet (2012/19/EU)
ochgällande, nationell lagstiftning.
Produkte n ska lämnas till ett
auktoriserat återvinningsställe för
elektronisk och elektrisk utrustning
(EEE). Om den här sor tens avfall
hanteras på fe l sätt kan miljön, och
grund av potentiella risksubstanser
som ofta associeras med EEE.
Avfallshanteras pro dukten däremot på
rätt sät t bidrar detta til l att naturens
resurse r används på ett bra sät t.
Kontakta kommun, ansvarig
förvaltning eller
avfallshanteringsföretag för mer
information om återvinningscentral
där produk ten kanlämnas.
18. Ins tallera inte i ett trång t
utrym me, t.ex. i en bokhylsa eller
liknande enhet.
19.
t.ex. tända lju s, på apparaten.
20. Tänk på miljöaspekterna
vid kassering av batterier.
Batteri er måste kasseras på et t
batteriuppsamlingsställe.
21. Denna apparat kan användas
i tropiska och måttliga klimat
upp till 45 ° C.

12 13Quick Start GuideGoXLR
prądem nie należy wykony wać
uziemieniem. Wtyczka dwubiegunowa
posiada dwa w tyki kontakto we o różnej
urządzenia nie odpowiada standardowi
wktór ym kabel sieciowy pr zymocowany
12. Jeżeli wtyk sie ciowy lub gniazdo
człowie ka z powodu potencjalnych
zapoznaj się ze w szystkimi szc zegółami
FRISKRIVNINGSKLAUSUL
Music Tribe tar inget ansvar för någon
förlust som kan drabbas av någon
person som helt eller delvis f örlitar
sig på någon beskrivning, fotogra
eller uttalande som nns här.
Tekniska specikationer, utseenden
och annan information kan ändras
utan föregående meddelande. Alla
varumärken tillhör respektive ägare.
Midas, Klark Teknik, Lab Gruppen,
Lake, Tannoy, Turbosound, TC
Electronic, TC Helicon, Behringer,
Bugera, Aston Microphones och
Coolaudio är var umärken eller
registrerade varumärken som tillhör
Music Tribe Global Brands Ltd.
© Music Tribe Global Brands Ltd.
2022 Alla Rättigheter reserverade.
BEGRÄNSAD GARANTI
För tillämpliga garantivillkor och
ytterligare information om Music
Tribes begräns ade garanti, se
fullständig information online på
community.musictribe.com/pages/
support#warranty.
Ważne informacje o
bezpieczeństwie
Uwaga
Terminale oznaczone
symbolem przenoszą
wystarczająco wysokie napięcie
elektr yczne, aby stwor zyć ryzyko
porażenia prądem. Uż ywaj
wyłącznie wysokiej jakości
fabryc znie przygotowanyc h kabli
z zainstalowanymi wt yczkami
¼"TS. Wszystkie i nne instalacje lub
modyk acje powinny być wykonyw ane
wyłąc znie przez wykwalikowany
personel techniczny.
Ten symbol informuje o
ważnych wskazówkach
dotycz ących obsługi i
konserwacji urządzenia w dołączonej
dokumentacji. Proszę przeczytać
stosowne informacje w instrukcji
obsługi.
Uwaga
W celu wyeliminowania
zagrożenia por ażenia
prądem zabrania się zdejmowania
obudowy lu b tylnej ścianki urz ądzenia.
Elementyz najdujące się we wnętrzu
urządzen ia nie mogą być naprawiane
przez uż ytkownika. Napraw ymogą
być wykony wane jedynie przez
wykwalikowanypersonel.
Uwaga
W celu wyeliminowania
zagrożenia por ażenia
prądem lub za palenia się urządzenia
nie wolno wy stawiać go na działanie
deszczu i wilgotności oraz dopuszczać
do tego, aby do wnęt rza dostała się
woda lub inna ciecz. Nie należy st awiać
na urządze niu napełnionych cie czą
przedmiotów takich jak np. wazony lub
szklanki.
Uwaga
Prace serwisowe mogą
być wykony wane jedynie
przez wykwalikowany personel.
Wcelu uniknięcia zagrożenia porażenia
żadnych manipulacji, które nie
są opisane w instrukcji obsługi.
Naprawyw ykonywane mogą być
jedynie przez wykwalikowany
personeltechniczny.
1. Proszę przeczytać
poniższewskazówki.
2. Proszę przechowywać
niniejsząinstrukcję.
3. Należy pr zestrzegać wszystkich
wskazówek os trzegawczych.
4. Należy p ostępować zgodnie z
instrukcjąobsługi.
5. Urz ądzenia nie wolno uży wać w
pobliżuwody.
6. Urządzenie można cz yścić
wyłąc znie suchąszmatką.
7. Nie zasłaniać otworów
wentylac yjnych. Wczasie pod łączania
urządzenia należy pr zestrzegać
zaleceńproducenta.
8. Nie stawia ć urządzenia w pobliżu
źródeł c iepła takich, jak gr zejniki,
piecelub urz ądzenia produkujące
ciepło (np.wz macniacze).
9. W żadnym wypa dku nie należy
usuwać zabe zpieczeń z wtyc zek
dwubiegun owych oraz wtyc zek z
szerokości. Wtyczkaz uziemieniem ma
dwa wt yki kontaktowe i trzec i wtyk
uziemienia. Szerszy wtyk kontak towy
lub dodatkowy wtyk uziemienia służą
do zapewnienia bezpieczeńst wa
użyt kownikowi. Jeśli format w tyczki
gniazdka, proszę zwrócić się do
elektryka z prośbą o wy mienienie
gniazda.
10. Kabel sieciow y należy ułożyć
tak, aby nie by ł narażony na deptanie i
działanie o strych krawędzi, c o mogłoby
doprowadzić do jego uszkodzenia.
Szczególną uwagę zwró cić należy na
odpowiednią ochronę miejsc w pobliżu
wtyc zek i przedłużac zy oraz miejsce,
jest dour ządzenia.
11. Urządzenie musi być z awsze
podłąc zone do sieci sprawnym
przewodem z uziemieniem.
sieciowe w urządzeniu pełnią funkcję
wyłąc znika, tomuszą one być zawsze
łatwodos tępne.
13. Używać w yłącznie sprzęt u
dodatkowego i akce soriów zgodnie z
zaleceniami producenta.
14. Uży wać
jedynie zalecanych
przez producenta
lub znajdujących
się w zestawi e
wóz ków,
stojaków, stat ywów, uchwytów i
stołów. Wprzypadku posługiwania
się wózkiem należy zachować
szczególną ostrożność w trakcie
przewożenia zes tawu, abyuniknąć
niebezpieczeńst wa potknięcia się i
zranienia.
15. W trakcie burzy oraz na
czas dłuż szego nieużywania
urządzen ia należy wyjąć wt yczkę z
gniazdkasieciowego.
16. Wykonywanie ws zelkich
napraw należy zlecać jedynie
wykwali kowanym pracownikom
serwisu. Przeprowadzenie przeglądu
technicznego staje się konieczne, jeśli
urządzenie zostało uszkodzone w
jakikolwiek s posób (dotyczy to tak że
kabla siecio wego lub wtyczki), jeś li
do wnętrz a urządzenia dost ały się
przedmioty lub ciecz, jeśli urządzenie
wyst awione było na działanie d eszczu
lub wilgoci, jeśli urządzenie nie
funkcjonuje poprawnie oraz kiedy
spadło napodłogę.
17. Prawidłowa
utylizacja produktu:
Tensymbol wskaz uje,
żetego produk tu nie
należy wyr zucać razem
ze zwykłymi odpadami
domowymi, tylko zgodnie z dyrektywą
w sprawie zuż ytego sprzętu
elektrycznego i elektr onicznego
(WEEE) (2012/19/EU) oraz przepisami
krajowymi. Niniejsz y produkt należy
przekazać do autoryzowanego punktu
zbiórki zużytego sprzętu elektr ycznego
i elektronicznego. Niewłaściwe
postępowa nie z tego typu odpadami
może wywo łać szkodliwe dział anie na
środowisko naturalnej i zdrowie
substanc ji niebezpiecznych z aliczanych
jako zuży ty sprzęt elekt ryczny i
elektroniczny. Jednocześnie, Twój
wkład w prawidłową utylizację
niniejszego p roduktu przyc zynia się do
oszczędn ego wykorzyst ywania
zasobów naturalnych. Szczegółowych
informacj i o miejscach, w któr ych
można oddawać zu żyty sprzęt d o
recyklingu, udzielają urzędy miejskie,
przedsiębiorstwa uty lizacji odpadów
lub najbliższ y zakład utylizacji
odpadów.
18. Nie instaluj w ograniczonej
przestrzeni, takiej jak półka na książki
lub podobny zes taw.
19. Nie stawiaj na urządzeniu źródeł
otwartego ognia, takich jak zapalone
świece.
20. Należy pamiętać o
środowiskowych aspektach utylizacji
baterii. Baterie należy utylizować w
punkcie zbiórki baterii.
21. To urządzenie może być
używane w klimacie tropikalnym i
umiarkowanym do 45 ° C.
ZASTRZEŻENIA PRAWNE
Music Tribe nie ponosi
odpowiedzialności za jakiekolwiek
straty, które mogą ponieść osoby,
które polegają w całośc i lub w
części na jakimkolwiek opisie,
fotograi lub oświadczeniu
zawartym w niniejszym dokumencie.
Specy kacje techniczne, w ygląd i
inne informacje mogą ulec zmianie
bez powiadomienia. Wszystkie
znaki towarowe s ą własnością ich
odpowiednich właścicieli. Midas,
Klark Teknik, Lab Gruppen, Lake,
Tannoy, Turbosound, TC Electronic,
TC Helicon, Behringer, Bugera, Aston
Microphones i Coolaudio są znakami
towarowymi lub zas trzeżonymi
znakami towarowymi rmy Music
Tribe Global Brands Ltd. © Music Tribe
Global Brands Ltd. 2022 Wszystkie
prawa zastrzeżone.
OGRANICZONA GWARANCJA
Aby zapoznać si ę z obowiązującymi
warunkami gwarancji i dodatkowymi
informacjami dotyc zącymi
ograniczonej gwarancji Music Tribe,
w trybie online pod adresem
community.musictribe.com/pages/
support#warranty.
14 15Quick Start GuideGoXL R
Welcome
About this document
This Quic k Start Guide will he lp you set up, connec t and begin
operating your GoXLR.
GoXLR App
The GoXLR app i s REQUIRED to operate yo ur GoXLR.
GoXLR app key features include:
• • E Q, Compress, Gate an d De-ess your mic
• • S etup and adjust mi xer controls
• • Change but ton/screen colors
• • Cr eate and manage samples
• • S ave voice FX settings
• • D irect access to pr oduct manuals
• • Ac cess to TC Helicon suppo rt
Minimum Hardware:
PC-based Hardware
Recommended Operating Systems:
Windows*
* Wi ndows is eit her a regis tered trad emark or tra demark of Mi crosof t Corporat ion in the
United St ates and/or ot her countr ies.
* Legac y Windows ver sions, Win dows 7 and Win dows 8, 32-bit o r 64-bit , requires d river
v4.67.0. Applic ation supp ort may sto p at a partic ular versi on, downloa d will be availa ble
and label ed if this occ urs.
Please Register your GoXLR
To register you r GoXLR using the GoXLR ap p, go to the
SYSTEM ta b click "Help & Suppo rt", then click "Regis ter GoXLR" to
be direc ted to the regist ration webpage. Re gister your device a nd
see "Warr anty Terms & Conditio n" for specics.
Regist ration of your prod uct is REQUIRED to app ly for EXTENDED
WARRANTY in supported countries.
Regist ration of your prod uct is NOT require d to use GoXLR,
update rmware, or contact support.
-Core 2 DU O CPU
-Internet connection
-1 GB RAM
-Window s 10, 32-bit or 64-bi t
-Window s 11, 64-bi t
Get the Reference Manual
A full ref erence manual is availa ble on the GoXLR produ ct page,
tc-helicon.com/gaming, under the "Documentation" heading or in
the GoXLR app o n the SYSTEM tab in "He lp & Support".
Getting Support
If you still h ave questions abo ut your GoXLR after r eading
this Quic k Start Guide and th e Reference Manual, p lease join our
Discord f or the latest FAQs and comm unity assist ance:
HeliconGaming
https://discord.gg/helicongaming
https://discord.gg/tchelicongaming
Find tuto rials on our Youtube chan nel,
HeliconGamingYT:
https://www.youtube.com/helicongamingyt
Follow us!
@helicongaming
@tchelicongaming
@tcheliconoicial
@tchelicon
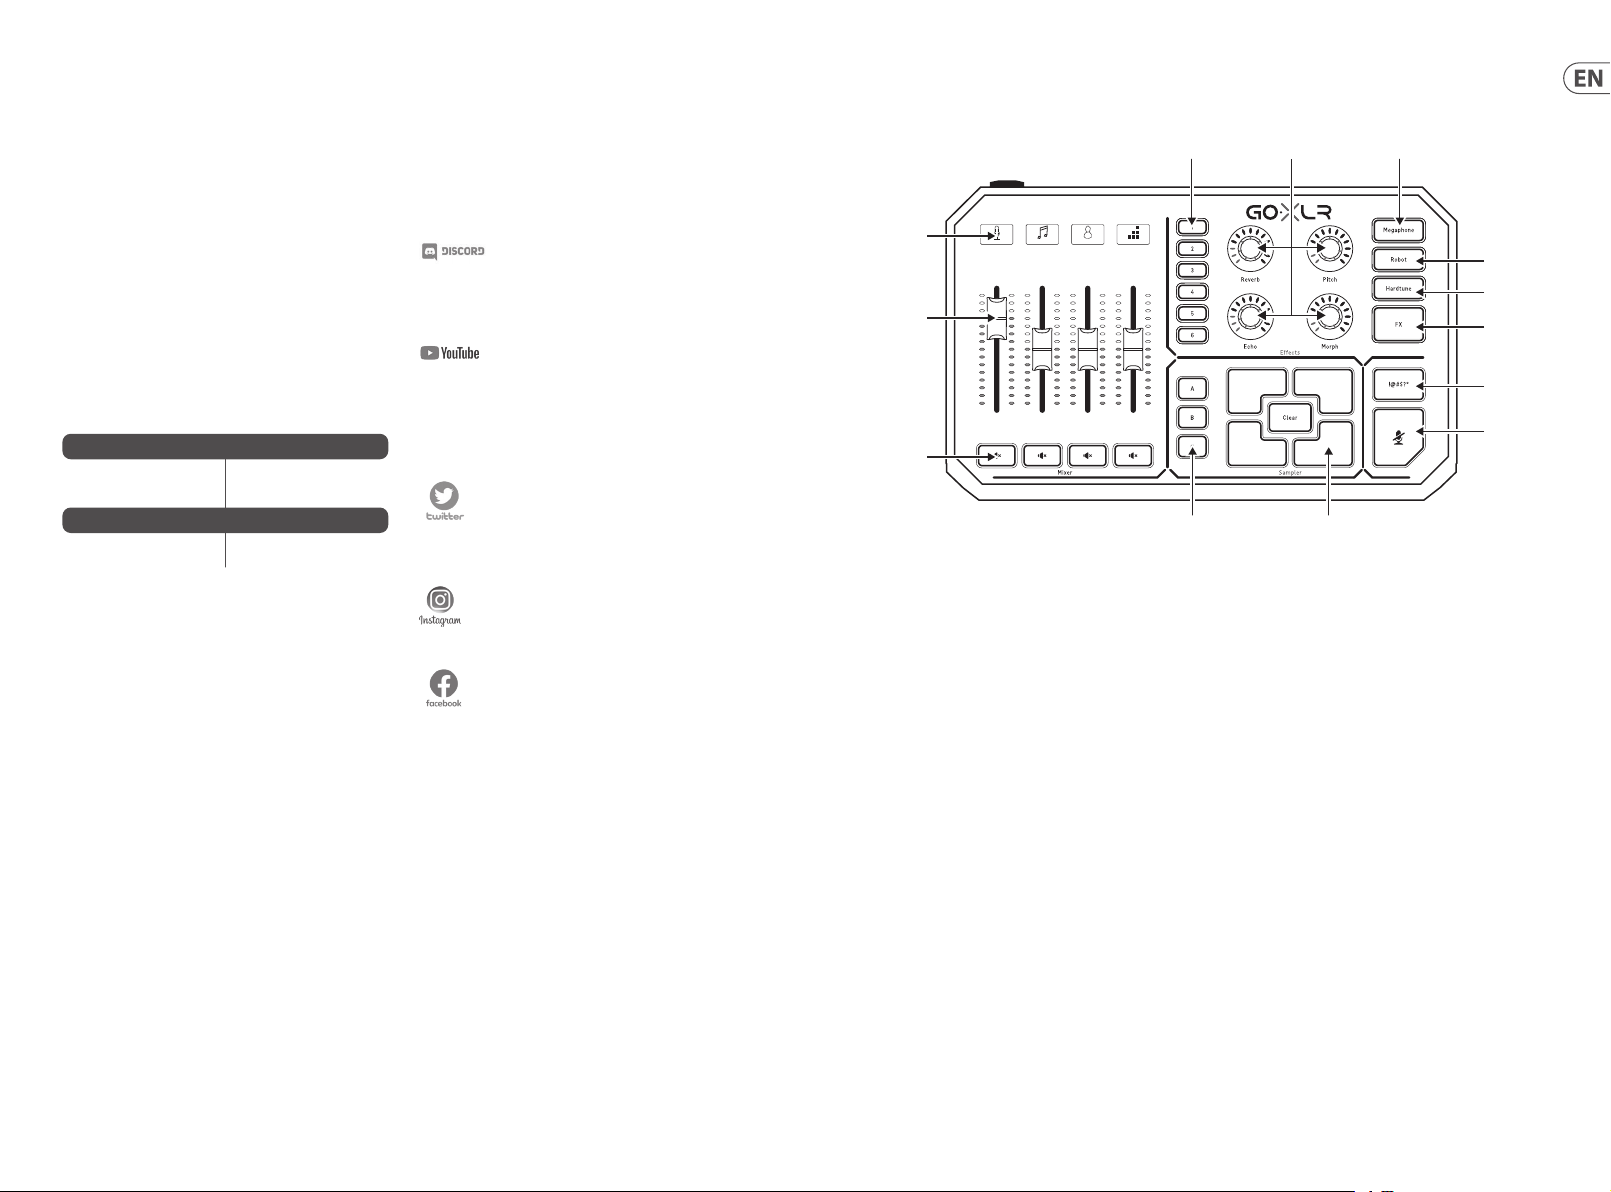
Controls
21 3 4
Mic
(1)
(2)
(3)
(1) SCRIBBLE STRIPS - for naming channels.
(2 ) CHANNEL FADERS - Reassigna ble faders to cont rol
individual channel levels in your mix.
(3 ) CHANNEL MUTE - switc hes of the matching c hannel
in the mixer.
(4 ) VOICE FX PRESETS - allow you to s tore up to six
eects presets.
(5 ) VOICE FX CON TROLS - allow real-tim e control of the
assigned eects parameter.
(6 ) MEGAPHONE - butto n adds distorti on to your voice like
a megapho ne.
(7 ) ROBOT - but ton transform s your voice into a
machine-like robot.
Music Chat System
(4) (5) (6)
(12)(13)
(8 ) HARDTUNE - tunes y our voice to the sound of y our music
or game.
(9 ) FX - turns o n or of all voice FX.
(10) !@#$* - but ton lets you inst antly censor and “b leep out”
your mic.
(11) “COUGH” - mutes yo ur microphone whi le the button
is held or ca n be congured to tog gle mute.
(12 ) SAMPL E PADS - hold se lected sample s and bumpers for
instant r ecall. Hold a but ton to record a new sam ple, and
then pres s to play back. Press CL EAR and then one of the
four samp le pads to clear that s ample.
SAMPLE BANK - organize s samples and bump ers into
(13)
groups for instant recall.
(7)
(8)
(9)
(10)
(11)

16 17Quick Start GuideGoXL R
Controls
(14) (15) (16) (17) (18) (19) (21)(20)
XLR MIC INPUT - for au dio input from pr ofessional
(14)
microphones. For condenser-style microphones that
require “ph antom power”, go to the MIC tab in t he GoXLR
App, open "Mic S etup", and activate the "Con denser"
setting under MIC TYPE.
LINE IN - for audio in put from devices s uch as phones,
(15)
tablets, computers, etc.
MIC - input for connection to headset microphones.
(16)
Typically, this headset connection will be a pink connector.
NOTE: If you int end to use the popular B lue Yeti*
microphone, which has its own built-in headphone
output, you should run that built-in headphone output
into the GoXL R’s MIC input. For Blue Yeti mic s powered
via USB, plug th e USB connector dire ctly into your
computer f or power, but do not selec t the Blue Yeti as an
audio sou rce on the computer. Inst ead, the Blue Yeti’s
headphon e output will be the a udio source for mix ing
inside GoXLR.
PHONES - output jac k for your headphon es. Typically, the
(17)
headphone connector will be a green connector.
LINE OUT - allows sending audio to streaming or gaming
(18)
computer s for dual PC setup o r other devices like sp eakers.
USB - for PC conn ection, rmwa re updates and remot e
(19)
control w ith GoXLR App.
OPTICAL - Inpu t connection f or previous gen SON Y
(20)
PlayStati on or Micorosof t Xbox or HDMI audio ex tractors .
DC IN - accept s power connecti on through the incl uded
(21)
12 V adapter.
*Yeti is a registered trademark of Blue Microphones.
†PlaySt ation is a reg istered t rademar k or tradema rk of Sony Int eractiv e Enterta inment
Inc. SONY is a registered trademark of Sony Corporation.
‡Xbox is ei ther a regi stered tr ademark or t rademar k of Micros oft Corp oration in t he
United States and/or other countries.
Setup Steps
1. Downloa d and install the dri ver/application pac kage.
You may be asked to reb oot during this pr ocess:
a. Go to tc-helicon.com/gam ing and nd the
GoXLR prod uct page.
b. Click the "Sof tware" heading an d download the
latest ver sion of GoXLR app.
c. Run in stallation pack age and follow
on screen instructions.
2. When the driver a nd app install has co mpleted,
close the application.
3. Connect GoX LR to audio peripher als. Make sure to
route anal og audio cables away f rom power cables
and power sup plies. See the Conn ection Diagr am for
possible congurations.
Please note a G LI (Ground Loop Isolat or) may be needed for
analog aud io connections t o/from other power ed devices.
4. Connect GoXL R via USB to your computer.
5. Connect GoX LR power supply and wai t for GoXLR
to power up ( just a few second s).
6. Re-open the G oXLR app.
7. The bottom co rner of the GoXLR app wi ndow should say
“GoXLR conne cted via USB”.
8. Open the Windows “Sound Settings” panel:
a. Under “Choos e your output devic e”,
choose “System (TC-HELICON GoXLR)”.
b. Under “Choose you r input device”,
choose “Ch at Mic (TC-HELICON GoXL R)”.
c. The se actions set yo ur main Windows soun d output
to the “Syst em” fader (slider) on GoXL R and designate
your XLR MIC INP UT or 3.5 mm MIC input as
your main mic input.
9. For any chat a pplications like D iscord, Skype, TeamSp eak,
In-game chat, etc.:
a. Pick “Chat Mic ( TC-HELICON G oXLR)”
as your INPUT d evice.
b. Pick “Chat (TC-HELICON GoXLR)”
as your OUTPU T device.
c. The se actions set yo ur chat program’s volum e
control to t he “Chat” fader (sl ider) on GoXLR.
10. For m usic, games or other a pplications:
a. On the Window s “Sound Setti ngs” panel, click on
“App Volume and Dev ice Preferences" un der
"Advanced Sou nd Options" at the bot tom.
b. Make sure your game, mus ic player, etc. is playing
audio. You won’t se e your program lis ted if it’s not
currently making any sound.
c. Find t he program you’d like to assi gn to a fader
(slider) in the list.
d. Click the dropdo wn list to the right of t he program
name, and cho ose the slider you’d like tha t program
to appear on . For example, you migh t pick
“Music (TC-HELICON GoXLR)” f or Spotify.
11. In you r broadcast pro gram, choose GoXLR 's Stream Mix,
either ”Br oadcast Stream M ix (TC-H ELICON GoXLR)”
or ”Stream Mi x (TC-HE LICON GoXLR)”, as your ONLY
incoming audio device:
a. In OBS, go to File → Set tings → Audio:
i. Choo se GoXLR's Stream Mix as yo ur
Mic/Auxiliary Audio Device.
ii. For ALL other devices, pick DISABLED.
b. In Streamlabs, clic k on the cog wheel in th e
top right corner:
i. Click o n Audio.
ii. Choose GoXLR 's Stream Mix as your
Mic/Auxiliarly Device 1.
iii. For ALL othe r audio devices, pic k DISABLED.
c. In XSp lit choose Tools → Settings → Au dio:
i. Under Microphone, choose GoXLR's Stream Mix.
ii. For Audio Prev iew and System Sound
choose NONE.
iii. You may get a warni ng popup. Click ok!
12. These steps should get you up and running. For all other
feature s, we have a great series o f Yo uTube v ideos, an active
Discord co mmunity, full use r manual and wonder ful support
team. Pleas e use the links in the G etting Suppo rt section to
connect with us.

18 19Quick Start GuideGoXLR
Connection Diagram
Studio Vocal Mic
Stream
broadcast
External Audio Device
(if applicable)
Stream alerts
Gaming Headset with Mic
Gaming Console
Troubleshooting
Problem Possible Solution
Excessi ve hum and noise • • Check t o make sure all outlet s are properly gro unded.
• • Make sure a udio cables are away f rom power adapter s and power supplies .
• • If nece ssary, purchase a “G round Loop Isolato r” device (available f rom Amazon and othe r retailers)
for analog a udio connecti ons to/from other p owered devices.
I can’t hear my m ic • • Ensure t hat you’ve gone throu gh the Mic Setup ste ps, including pick ing “Condenser (48 V)” i f your
The App won’t c onnect
to my device
mic requir es “phantom power”.
• • Check t o see that your mic mute b utton hasn’t bee n activated.
• • Connec t EITHER an XLR or a 3.5 mm mic . The XLR jack is automa tically disable d when you connec t
a 3.5 mm mic.
• • Close t he GoXLR app by clicki ng on the “X” in the upp er right corner.
• • Selec t “Exit” f rom the “Close App” p op-up window.
• • Unplug GoXLR power.
• • Plug powe r back into GoXLR.
• • Rest art the GoXLR app.
Audio out to GoXLR
via headphone output
Blue Yeti Mic Recommended Connection
Dedicated Streaming
Computer (if applicable)
Power via
USB (no audio)
Gaming/Streaming
Computer
ComputerBlue Yeti Microphone
21 3 4
Mic
Music Chat System

20 21Quick Start GuideGoXL R
Bienvenidos
Acerca de Este Documento
Esta Gu ía de inicio rápido lo ay udará a congurar, cone ctar y
comenza r a operar su GoXLR.
GoXLR App
Se REQUIERE la a plicación GoXLR p ara operar su GoXLR.
Las cara cterística s clave de la aplicació n GoXLR incluyen:
• • E Q, compresión, pue rta de ruidos y de -esser de su mic ro
• • Conguración y ajuste de controles del mezclador
• • C ambiar colores de b otón / pantalla
• • Crear y administr ar muestras
• • G uardar la congurac ión de efecto s de voz
• • Ac ceso directo a man uales de produc tos
• • Ac ceso al soporte d e TC Helicon
Mínimas de Hardware:
Hardwar e con base en PC
Sistemas operativos recomendados:
Windows*
* Window s es una marca co mercial re gistrada o u na marca com ercial de Mic rosoft Co rporati on
en los Es tados Unid os y / o en otros pa íses.
* Las vers iones de Win dows Legac y, Windows 7 y W indows 8, 32 o 64 b its, requi eren el driv er
o contro lador v4.67.0. El sop orte de la ap licación e s posible qu e se detenga en a lguna vers ión
concreta, en cuyo caso habrá disponible una descarga identificada para ese caso.
Registre su GoXLR
Para regis trar su GoXLR usan do la app GoXLR, vaya a la pe staña
SYSTEM, ha ga clic en "Help & Suppo rt" y después en " Register
GoXLR" par a llegar a la web de regis tro. Registre su di spositivo y
lea los térm inos que aparecen e n "Warranty Terms & Cond ition".
El regist ro de este produc to es OBLIGATORIO para q ue se
pueda apli car la GARANTÍA AMPL IADA en los países en los
que sea aplicable.
El regist ro de este produc to NO es necesar io para usar el GoXLR ,
ni para ac tualizar el rmwa re o para obtener sop orte técnico.
-Core 2 CP U DUO
-Internet connection
-1 GB de RAM
-Window s 10, 32 bits o 64 bits
-Window s 11, 64-bi t
Descarga del Manual de Referencia
En la página d e producto del GoXL R hay disponible un man ual
de refere ncia completo. Para a cceder a él, vaya a la web tc-helicon .
com/gaming, de ntro de "Documen tation" o en la pestañ a SYSTEM
de la app GoXLR d entro de "Help & Suppo rt".
Soporte Técnico
Si sigue teniendo cualquier duda o pregunta acerca del GoXLR
después d e leer esta Guía de p uesta en marcha y el M anual de
referen cia, acceda a la opción D iscord para consu ltar la sección de
pregunt as frecuentes (FAQs) y par a obtener asisten cia de otros
miembro s y de técnicos:
HeliconGaming
https://discord.gg/helicongaming
https://discord.gg/tchelicongaming
También puede e ncontrar tutori ales en nuestro c anal de YouTub e,
HeliconGamingYT:
https://www.youtube.com/helicongamingyt
¡Síganos!
@helicongaming
@tchelicongaming
@tcheliconoicial
@tchelicon
Controles
21 3 4
Mic
(1)
(2)
(3)
(1) SCRIBBLE STRIPS - para nombrar canales.
(2 ) CHANNEL FADERS - Faders reasi gnables para el con trol
del nivel de l os canales indivi duales en su mezcla.
(3 ) CHANNEL MUTE - conmut a el canal corresp ondiente
en el mezcla dor.
(4 ) VOICE FX PRESETS - le permi te almacenar hasta se is
presets de efectos.
(5 ) VOICE FX CON TROLS - permiten el co ntrol en tiempo rea l
del parámetro de efectos asignado.
(6 ) MEGAPHONE - El botón agr ega distorsió n a su voz como
un megáfo no.
(7 ) ROBOT - El botón t ransforma su voz e n un robot parecid o
a una máquina.
Music Chat System
(4) (5) (6)
(7)
(8)
(9)
(10)
(11)
(12)(13)
(8 ) HARDTUNE - sintoni za su voz con el sonido d e su música
o juego.
(9 ) FX - encien de o de todos los efec tos de voz.
(10) !@ # $* - El botón te per mite censurar ins tantáneamente y
“apagar” tu micrófono.
(11) “COUGH” - esto an ula la señal de su micróf ono mientras
mantiene pulsado este botón, aunque también
puede con gurarlo para que s ea una anulación de
tipo conmu tador.
(12 ) SAMPL E PADS - Manteng a las muestras se leccionadas
y los parachoques para una recuperación instantánea.
Mantenga pr esionado un botón p ara grabar una nueva
muestr a y luego presione p ara reproducir. Pre sione
CLEAR y lue go uno de los cuatro pa ds de muestra par a
borrar esa muestra.
(13 ) SAMPLE BANK - organiz a muestras y prote ctores en
grupos para recuperarlos instantáneamente.

22 23Quick Start GuideGoXLR
Controles
(14) (15) (16) (17) (18) (19) (21)(20)
(14) XLR MIC INPUT - Entrad a de audio para micró fonos
profesionales. Para micros de tipo de condensador que
necesite n “alimentación fan tasma”, vaya a la pestaña
MIC de la app GoXL R, abra “Mic Setup” y a ctive el
ajuste “Con denser” dentr o de MIC TYPE para ac tivar la
alimenta ción fantasma de 24 V del G oXLR.
(15) LINE IN - para la entr ada de audio de dispos itivos como
teléfonos, tabletas, computadoras, etc.
(16) MIC - entrada par a conexión a micróf onos de diadema.
Normalme nte, esta conexi ón de auriculares s erá un
conector rosa.
NOTA : Si tiene la intenc ión de utilizar el p opular micrófon o
Blue Yeti *, que tiene su pr opia salida de auri culares
incorpo rada, debe ejecut ar esa salida de aur iculares
incorpo rada en la entrada MIC d el GoXLR. Para los
micrófo nos Blue Yeti alimentad os a través de USB, conec te
el conec tor USB directam ente a su computado ra para
obtener energía, pero no seleccione el Blue Yeti como
fuente de a udio en la computado ra. En cambio, la salid a
de auricu lares del Blue Yeti será la f uente de audio par a
mezclar de ntro del GoXLR.
(17) PHONES - toma de salida p ara sus auricular es.
Normalme nte, el conector de a uriculares ser á un
conec tor verde.
(18) LINE OUT - Est a toma permite el enví o de la señal audio
a ordenado res que estén usa ndo apps de streami ng o de
juegos pa ra conseguir una co nguración dual de P C o de
otros dispositivos como altavoces.
(19 ) USB - Para la conex ión a un PC, actuali zaciones de
rmware y co ntrol remoto a travé s de la app GoXLR.
(20) OPTICAL - Conex ión de entrada par a extractor es de
audio SONY P layStation o Micro soft Xbox o HDMI de
generación anterior.
(21 ) DC IN - acepta la con exión de energía a tr avés del
adaptado r de 12 V incluido.
*Yeti is a registered trademark of Blue Microphones.
†PlaySt ation es una m arca comer cial regi strada o una m arca come rcial de
Sony Inte ractiv e Enterta inment Inc . SONY es una ma rca comerc ial regis trada de
Sony Corporation.
‡Xbox is ei ther a regi stered tr ademark or t rademar k of Micros oft Corp oration in t he
United States and/or other countries.
Pasos de Configuración
1. Descar gue e instale el paq uete de controlado r / aplicación.
Es posib le que se le solicite qu e reinicie durante e ste proceso:
a. Vaya a la web tc-helicon.com /gaming y allí a la
página de p roducto GoXLR.
b. Haga clic en "Sof tware" y descár guese la última
versión d e la app GoXLR.
c. Ejec ute el paquete de ins talación y siga las
instrucciones que aparecerán en pantalla.
2. Cuando se haya comp letado la instala ción del controla dor
y la aplicac ión, cierre la aplic ación.
3. Conecte el G oXLR a los periféri cos audio. Asegúr ese de
colocar los cables de señal audio analógica lejos de los cables
y fuentes de alimentación. Vea posibles conguraciones en
la sección de Diagramas de conexión.
Tenga en cuenta q ue el GLI (aislante de bucle a t ierra) es
para la seña l audio analógica a /desde ot ros dispositivo s con
alimentación eléctrica.
4. Conecte el GoX LR a través de USB a su comput adora.
5. Conecte la f uente de alimentac ión GoXLR y espere has ta que
el GoXLR se encienda (solo unos segundos).
6. Vuelva a abrir la apl icación GoXLR.
7. En la esquina inf erior de la ventana de la a pp GoXLR debería
aparecer “G oXLR connected v ia USB”.
8. Abra el panel "Conguración de sonido" de Windows:
a. En "Elija su disp ositivo de salida",
elija "Sistema (TC-HELICON GoXLR)".
b. En "Elija su dispositivo de entrada",
elija "Chat Mi c (TC-HEL ICON GoXLR)".
c. Es tas acciones con guran la salida de son ido principal
de Windows e n el fader (control des lizante) del
“Sistema ” en el GoXLR y designan su en trada XLR MIC
INPUT o 3.5 mm MIC co mo su entrada princ ipal
de micróf ono.
9. Para cual quier aplicació n de chat como Discord , Skype,
TeamSpeak, cha t en el juego, etc.
a. Elija “Chat Mic ( TC-HELICON G oXLR)” como su
dispositivo de ENTRADA.
b. Elija "Chat (TC-HELICON GoXLR)" como su
dispositivo de SALIDA.
c. Estas acciones conguran el control de volumen
de su progr ama de chat en el desliz ador (deslizador)
"Chat" en el G oXLR.
10. Para música, juegos u otras aplicaciones:
a. En el panel “Ajuste s de sonido” de Windo ws, haga clic
en “App Volume and Dev ice Preferences" d entro de
"Advanced Sou nd Options" en la par te inferior.
b. Asegúrese de q ue su juego, reprodu ctor de música, etc .
esté repr oduciendo audio. N o verá su programa en la
lista si actualmente no emite ningún sonido.
c. Busq ue el programa que le g ustaría asigna r a un fader
(deslizad or) en la lista.
d. Haga clic en la lista d esplegable a la der echa
del nombr e del programa y elija e l control desliz ante
en el que des ea que aparezca es e programa. Por
ejemplo, pue de elegir "Música ( TC-HELI CON
GoXLR)" para Spotify.
11. En su pr ograma broadca st, elija la mezcla de s tream del
GoXLR, sea ” Broadcast Strea m Mix (TC- HELICON GoXLR)”
o ”Stream Mix ( TC-HELI CON GoXLR)”, como su ÚNICO
disposit ivo de entrada de aud io:
a. En el OBS, vaya a File → Se ttings → Audio:
i. Elija GoXLR's St ream Mix como su
micrófo no / dispositivo de au dio auxiliar.
ii. Para TODOS los de más dispositivos ,
elija DISABLED.
b. En Streamlabs, haga c lic en la rueda denta da en la
esquina superior derecha:
i. Haga cli c en Audio.
ii. Elija GoXLR's Stream M ix como su disposit ivo
de micróf ono / auxiliar 1.
iii. Para TODOS lo s demás dispositi vos de audio,
elija DISABLED.
c. En XSp lit, vaya a Tools → Settings → Audio:
i. En Micr ófono, elija GoXLR's St ream Mix.
ii. Para Vista p revia de audio y Sonid o del sistema,
elija NINGUNO.
iii. Es posib le que aparezca una ve ntana emergente
de advertencia. ¡Haga clic en Aceptar!
12. Estos p asos deberían ayu darle a empezar a tr abajar. Para
todas las demás funciones, tenemos una gran serie de videos
de YouTube, una comunidad Di scord activa, un m anual de
usuario co mpleto y un maravillo so equipo de sopo rte. Utilice
los enlaces d e la sección ¡ Get ting Support se cción para
conectar con nosotros.

24 25Quick Start GuideGoXLR
Diagrama de Conexión
Studio Vocal Mic
Stream
broadcast
External Audio Device
(if applicable)
Stream alerts
Gaming Headset with Mic
Gaming Console
Solución de Problemas
Problema Solución Posible
Zumbido y ruido excesivos • • Verique que todos los tomacorrientes estén debidamente conectados a tierra.
• • Aseg úrese de que los cab les de audio estén a lejados de adaptad ores y fuentes de ali mentación.
• • Si es nec esario, adquiera u n dispositivo de “aisla nte de bucle a tierra ” o GLI (disponibles en Ama zon
y otros dis tribuidores) par a las conexiones d e audio analógico a/des de otros disposi tivos con
alimentación eléctrica.
No puedo es cuchar
mi micrófono
La aplic ación no se
conec ta a mi dispositivo
• • Asegúrese de haber seguido los pasos de conguración del micrófono, incluida la selección de
"Condensador (48 V)" si su micrófono requiere "alimentación fantasma".
• • Veric a que el botón de silenc io del micrófono no e sté activado.
• • Conec te ya sea un XLR O un micr ófono de 3,5 mm. El conec tor XLR se desac tiva automátic amente
cuando con ecta un micróf ono de 3,5 mm.
• • Cierr e la aplicación GoXL R haciendo clic en la "X " en la esquina super ior derecha.
• • Seleccione "Salir" en la ventana emergente "Cerrar aplicación".
• • Desenchufe el GoXLR.
• • Vuelva a co nectar el GoXLR .
• • Reinicie la aplicación GoXLR.
Audio out to GoXLR
via headphone output
Conexió n recomenda da de Blue Yeti Mic
Dedicated Streaming
Computer (if applicable)
Power via
USB (no audio)
Gaming/Streaming
Computer
ComputerBlue Yeti Microphone
21 3 4
Mic
Music Chat System
26 27Quick Start GuideGoXLR
Bienvenue
À propos de ce Document
Ce guide de démarrage rapide vous aidera à congurer, connecter
et commencer à utiliser votre GoXLR.
GoXLR App
L’applica tion GoXLR est REQUIS E pour utiliser votr e GoXLR.
Les principales fonctionnalités de l’application GoXLR
comprennent:
• • A ppliquer de l’EQ, d e la compression,
du Gate et du De -esser au signa l du micro
• • Modi er les réglages de la console de mixage
• • C hanger les couleur s des boutons / écr ans
• • C réer et gérer des éc hantillons
• • Enregistrer les paramètres des eets vocaux
• • Ac cès direct aux ma nuels des produit s
• • Ac cès au support TC Hel icon
Conguration minimale:
Utilis ation avec un PC
Systèmes d'exploitation recommandés:
Windows*
* Window s est une marq ue déposé e ou une marque c ommercial e de Microso ft Corpo ration
aux État s-Unis et / ou d ans d’autre s pays.
* Pour les an ciennes ve rsions de Wi ndows, Win dows 7 et Wind ows 8, 32 bits ou 6 4 bits, le
pilote v4.6 7.0. Le support de l ’applicati on peut êtr e arrêté à une c ertaine ve rsion ; dans c e cas,
le téléchargement sera toujours disponible et la version sera indiquée.
Merci d’enregistrer votre GoXLR
Pour enreg istrer votre GoXLR av ec l’application GoX LR, ouvrez
l’onglet SYS TEM, cliquez sur "He lp & Support" pu is sur "Register
GoXLR" an d’être redirigé vers la page d’enregis trement.
Enregis trez votre appar eil et consultez les te rmes et conditi ons de
la garanti e pour plus d’info rmations.
Il est OBLI GATOIRE d’enregi strer votre prod uit an de bénéci er de
la GARANTI E ÉTENDUE dans les pays c oncernés.
L’enregis trement n’est PAS nécess aire pour utilis er le GoXLR,
mettr e à jour le rmware ou con tacter l’assist ance.
-Core 2 DU O CPU
-Internet connection
-1 GB RAM
-Window s 10, 32 bits ou 64 bit s
-Window s 11, 64-bi t
Mode d’emploi
Un mode d’emplo i complet est disp onible sur la page pro duit du
GoXLR, tc-helicon.com/gaming, dans la section "Documentation"
ou dans l’ongle t SYSTEM de l’applicat ion GoXLR, sect ion
"Help & Supp ort".
Assistance
Si vous avez de s questions sur le G oXLR après avoir lu ce guid e
de démarr age rapide et le mode d ’emploi, vou s pouvez vous
connec ter à notre Discord p our obtenir les der niers FAQ et
communiqués de l’assistance:
HeliconGaming
https://discord.gg/helicongaming
https://discord.gg/tchelicongaming
Vous trouver ez des tutoriels s ur notre chaine Youtub e,
HeliconGamingYT:
https://www.youtube.com/helicongamingyt
Suivez-nous !
@helicongaming
@tchelicongaming
@tcheliconoicial
@tchelicon
Réglages
21 3 4
Mic
(1)
(2)
(3)
(1) SCRIBBLE STRIPS - pour n ommer les canaux .
(2 ) CHANNEL FADERS - Ces fader s réassignables p ermettent
de régler le n iveau des voies de vot re mixage.
(3 ) CHANNEL MUTE - Commut ateurs MUTE du canal
corresp ondant dans la conso le de mixage.
(4 ) VOICE FX PRESETS - vous perm et de stocker jusq u’à six
préréglages d’eets.
(5 ) VOICE FX CON TROLS - permette nt le contrôle en temp s
réel du par amètre d’eets a ecté.
(6 ) MEGAPHONE - Le bouton aj oute une distor sion à votre
voix comme u n mégaphone.
(7 ) ROBOT - Le bouto n transforme vo tre voix en un robot
semblable à une machine.
Music Chat System
(4) (5) (6)
(7)
(8)
(9)
(10)
(11)
(12)(13)
(8 ) HARDTUNE - ajuste v otre voix au son de votr e musique
ou de votre je u.
(9 ) FX - acti ve ou de tous les eet s vocaux.
(10) !@#$* - Le bou ton vous permet de ce nsurer
instantanément et de «biper» votre micro.
(11) “COUGH” - perme t de couper le signal du m icro lorsqu’il
est maint enu (peut être con guré pour active r/désact iver
le micro sans être maintenu).
(12 ) SAMPL E PADS - maintenez les échantillons et les
bumpers sélectionnés pour un rappel instantané.
Maintenez un bouton enfoncé pour enregistrer un nouvel
échanti llon, puis appuyez su r pour le lire. Appuyez s ur
CLEAR puis s ur l’un des quatre pads d ’échanti llons pour
eacer cet échantillon.
(13 ) SAMPLE BANK - organise les échantillons et les
pare- chocs en groupe s pour un rappel ins tantané.
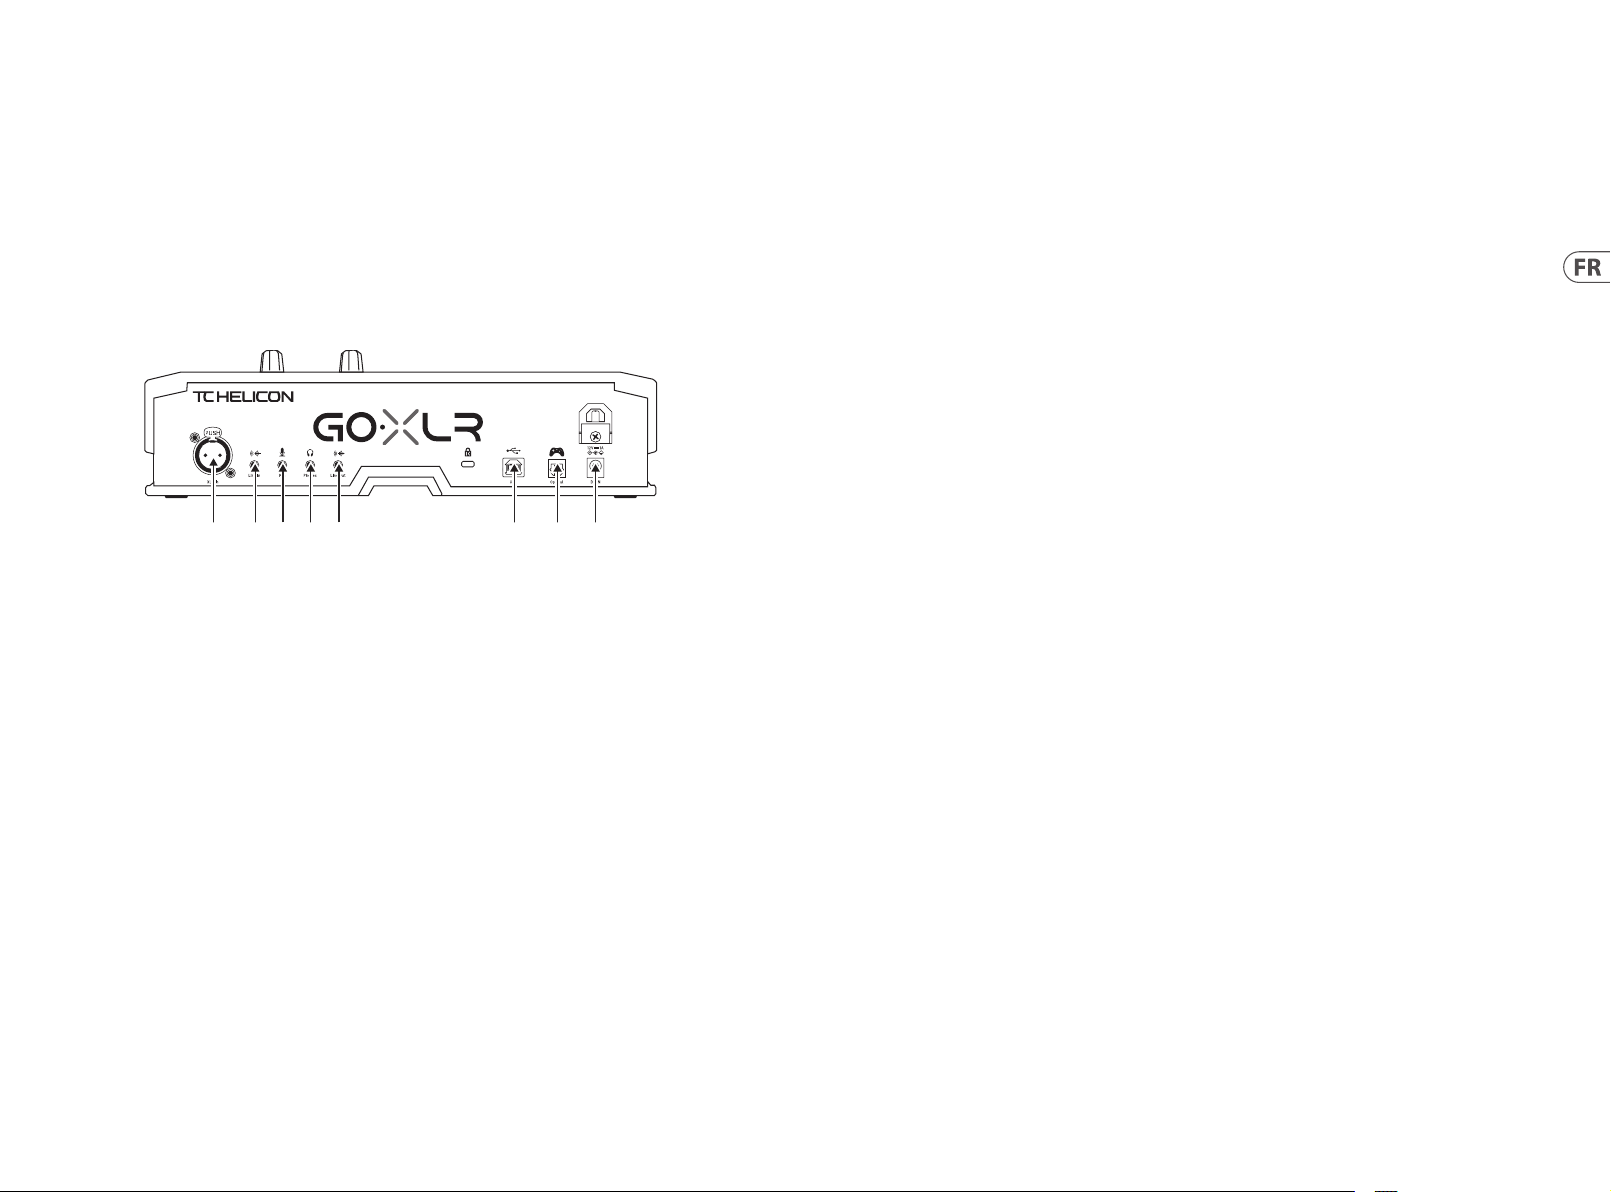
28 29Quick Start GuideGoXLR
Réglages
(14) (15) (16) (17) (18) (19) (21)(20)
(14) XLR MIC INPUT - Permet d e connecter un mic ro
profes sionnel. Pour les mic ros à électret n écessitant une
alimentation fantôme, ouvrez l’onglet MIC de l’application
GoXLR app, ouv rez “Mic Setup” et a ctivez la fonc tion
“Condense r” dans la secti on MIC TYPE an d’act iver la
tension fa ntôme de 24 V du GoXLR.
(15) LINE IN - pour l’entrée a udio d’appareils tels q ue
téléphones, tablettes, ordinateurs, etc.
(16) MIC - entrée pour l a connexion aux mic rophones du
casque. En r ègle générale, cet te connexion ca sque sera un
connec teur rose.
REMARQUE: Si vous avez l’in tention d’utiliser l e populaire
microph one Blue Yeti *, qui possède sa p ropre sortie
casque in tégrée, vous devez e xécuter cette s ortie casque
intégré e dans l’entrée MIC du GoXLR . Pour les micros
Blue Yeti alimen tés via USB, branchez l e connecteur USB
directement sur votre ordinateur pour l’alimentation, mais
ne sélec tionnez pas le Blu e Ye ti comme source aud io sur
l’ordinateu r. Au l ieu de cela, la sorti e casque du Blue Yeti
sera la sou rce audio pour le mixa ge à l’intérieur de G oXLR.
(17) PHONES - Sprise de so rtie pour vos éco uteurs. En règle
générale, le connecteur du casque sera un connecteur vert.
(18) LINE OUT - Permet d e transmettr e des signaux audios à
des ordin ateurs dans une con guration à 2 ordinat eurs ou
à d’autres ap pareils, par exemp le des enceintes.
(19 ) USB - Permet la conn exion à un PC, la mis e à jour du
rmware et le contrôle à distance avec l’application GoXLR.
(20) OPTICAL - Conne xion d’entrée pour le s extracteu rs
audio SONY P layStation ou Micr osoft Xbox ou HDM I de
génération précédente.
(21 ) DC IN - accepte une connexion électrique via l’adaptateur
12 V inclus.
* Yeti est une marque déposée de Blue Microphones.
† PlayStation est une marque déposée ou une marque commerciale de Sony Interactive
Entertainment Inc. SONY est une marque déposée de Sony Corporation.
‡ Xbox est une marque déposée ou une marque commerciale de Microsoft Corporation
aux État s-Unis et / o u dans d’autr es pays.
Étapes de Configuration
1. Téléchargez et installez le package pilote / application.
Vous pouvez ê tre invité à redémar rer pendant ce proc essus:
a. Allez sur tc-helicon .com/gaming et cherch ez la page
produit d u GoXLR.
b. Cliquez sur l’onglet "Software" et téléchargez la
dernière version de l’application GoXLR.
c. Lan cez l’installat ion et suivez les ins tructions à l’écr an.
2. Une fois l'installation du pilote et de l'application terminée,
fermez l'application.
3. Connectez le GoXLR à vos périphériques audios. Veillez à bien
éloigner vos câbles analogiques des sources d’alimentation.
Consultez l e schéma de connex ion pour prendre
connaissance des diverses congurations possibles.
Notez bien q u’un isolateur de bouc les de masse est con çu
pour les co nnexions analogi ques avec les appar eils externes
dotés d’une alimentation.
4. Co nnectez GoXLR vi a USB à votre ordinateur.
5. Connecte z le GoXLR à une source d’alim entation et
patientez jusqu’à ce qu’il se mette sous tension (quelques
secondes seulement).
6. Rouv rez l'applic ation GoXLR.
7. Le message “GoXL R connected via USB ” doit apparaitre
au bas de la fen être de l’applicati on GoXLR.
8. O uvrez le panneau "Pa ramètres audio" de W indows:
a. Sous «Choisissez votre périphérique de sortie»,
choisissez «Système (TC-HELICON GoXLR )».
b. Sous «Choisissez votre périphérique d'entrée»,
choisiss ez «Chat Mic (TC-HELICON GoXLR)».
c. Ces ac tions déniss ent votre sorti e audio principal e de
Windows su r le fader «Système » (curseu r) sur GoXLR
et désign ent votre entrée MIC X LR ou entrée MIC
3.5 mm comme entrée micro principale.
9. Pour toute s les applicatio ns de chat telles que Dis cord,
Skype, TeamSp eak, le chat en jeu, etc .:
a. Choisisse z «Chat Mic (TC-HELICON GoXLR)»
comme périphérique INPUT.
b. Cho isissez «Chat (TC-HELICON GoXLR)»
comme périphérique de SORTIE.
c. Ces actions dénissent le contrôle du volume
de votre pro gramme de chat sur le f ader «Chat»
(curseur) sur GoXLR.
10. Pour la m usique, les jeux ou d'aut res applicatio ns:
a. Dans la fenêt re “Réglages audio ”, cliq uez sur “Volume
et préfé rences" dans "Optio ns sonores avancée s" en
bas de la fen être.
b. As surez-vous que votr e jeu, lecteur de mu sique, etc.
joue de l'audi o. Vous ne verr ez pas votre progr amme
répertorié s'il n'émet actuellement aucun son.
c. Recherchez le programme que vous souhaitez attribuer
à un fader (cur seur) dans la liste.
d. Cli quez sur la liste déro ulante à droite du nom du
program me et choisissez le c urseur sur lequ el vous
souhaite z que ce programme ap paraisse. Par exem ple,
vous pouvez choisir «Musique (TC-HELICON
GoXLR)» pour Spotify.
11. Dans vo tre programme de s treaming, sélec tionnez le ux
du GoXLR, ”Br oadcast Stream M ix (TC-H ELICON GoXLR)”
ou ”Stream Mi x (TC-HE LICON GoXLR)”, comme UNIQUE
périphérique d’entrée audio:
a. Dans OBS, allez da ns Fichier → Réglages → Audio:
i. Choisissez GoXLR 's Stream Mix comme
micro / périphérique audio auxiliaire.
ii. Pour TOUS les autr es appareils,
sélectionnez DÉSACTIVÉ.
b. Dan s Streamlabs, clique z sur la roue dentée dan s
le coin supérieur droit:
i. Cliquez sur Audio.
ii. Choisissez GoXLR's Strea m Mix comme
micro / périphérique auxiliaire 1.
iii. Pour TOUS les au tres appareils au dio,
choisissez DÉSACTIVÉ.
c. Dans X Split allez dans Tools → Set tings → Audio:
i. Sous Microphone, choisissez GoXLR's St ream Mix.
ii. Pour l'aperçu aud io et le son du systèm e,
choisissez AUCUN.
iii. Vous pouvez o btenir une fenêtr e contextuelle
d'avertissement. Cliquez sur OK!
12. Ces étape s devraient vous pe rmettre d'être o pérationnel.
Pour toute s les autres fonc tionnalités, nou s avons une
superbe s érie de vidéos YouTube, une commu nauté Discord
active, u n manuel d'utilisati on complet et une mer veilleuse
équipe d'as sistance. Veuillez ut iliser les liens dan s la rubrique
Getti ng Support sec tion pour se conn ecter avec nous.

30 31Quick Start GuideGoXL R
Diagramme de Connexion
Studio Vocal Mic
Stream
broadcast
External Audio Device
(if applicable)
Stream alerts
Gaming Headset with Mic
Gaming Console
Dépannage
Problème Solution Possible
Bourdonnement
et bruit e xcessifs
Je n'entends pas
mon micro
L'application ne se
connec te pas à mon
appareil
• • Assu rez-vous que toutes l es prises sont cor rectement mis es à la terre.
• • Assu rez-vous que les câb les audio sont éloi gnés des adaptateu rs secteur
et des blo cs d'alimentation .
• • Si néce ssaire, procure z-vous un isolateur d e boucles de masse (disp onible sur Amazon e t chez
d’autres re vendeurs) pour vos con nexions analogi ques avec d’autres app areils.
• • Assu rez-vous que vous avez su ivi les étapes de c onguration du mic ro, y compris la sélec tion
de «Conden seur (48 V)» si votre mic ro nécessite une « alimentation fa ntôme».
• • Vériez q ue le bouton de coupu re du micro n’a pas été act ivé.
• • Conn ectez SOIT un XL R OU un micro 3.5 mm. La p rise XLR est auto matiquement dé sactivée
lorsqu e vous connecte z un micro 3.5 mm.
• • Ferme z l'application GoXL R en cliquant sur le «X» d ans le coin supérieu r droit.
• • Sélectionnez «Quit ter» dans la fenêtre contextuelle «Fermer l'application».
• • Débranchez le GoXLR.
• • Rebranchez GoXLR.
• • Redémarrez l'application GoXLR.
Audio out to GoXLR
via headphone output
Connexion recommandée du Blue Yeti Mic
Dedicated Streaming
Computer (if applicable)
Power via
USB (no audio)
Gaming/Streaming
Computer
ComputerBlue Yeti Microphone
21 3 4
Mic
Music Chat System

32 33Quick Start GuideGoXLR
Willkommen
Über dieses Dokument
Diese Kurzanleitung hilft Ihnen beim Einrichten, Anschließen
und Bedienen Ihres GoXLR.
GoXLR App
Die GoXLR-Ap p ist erforde rlich, um Ihre GoXLR zu b etreiben.
Zu den Hauptfunktionen der GoXLR-App gehören:
• • EQ, Kompression, Gate und De-Essing von Mikrofonen
• • Einric htung und Einstellung der Mixer-Regler
• • Änder n Sie die Farben der Schaltächen / Bildschirme
• • Er stellen und verwalten Sie Beispiele
• • Speicher n Sie die Sprach-FX-Einstellungen
• • Direk ter Zugri auf Produkthandbücher
• • Zugri auf TC Helicon-Unterstützung
Minimale Hardware:
PC-basierte Hardware
Empfohlene Betriebssysteme:
Windows*
* Window s ist entwe der eine eing etragen e Marke oder e ine Marke der M icrosof t Corpora tion
in den USA un d / oder andere n Ländern .
* Ältere Windows-Versionen, Windows 7 und Windows 8, 32-Bit oder 64-Bit erfordern den
Treiber v4.6 7.0. Die Unterst ützung d er Anwendun g kann bei ein er besti mmten Versio n
aufhören. Gegebenenfalls wird der Download verfügbar und entspre chend gekennzeichnet sein
Bitte registrieren Sie Ihren GoXLR
Um Ihren GoXLR m it der GoXLR App zu regi strieren, gehe n Sie zum
SYSTEM Tab, klic ken auf "Help & Suppor t" und dann auf "Reg ister
GoXLR", um zur Registrierungswebseite zu gelangen. Registrieren
Sie Ihr Gerä t und lesen Sie die "War ranty Terms & Conditi on" für
weitere Informationen.
Die Registrierung Ihres Produkts ist ERFORDERLICH, um eine
VERLÄNGERTE GARANTIE in unterstützten Ländern zu beantragen.
Die Regis trierung Ihres P rodukts ist NI CHT erforder lich, um GoXLR
zu verwenden, die Firmware zu aktualisieren oder den Support
zu kontaktieren.
-Kern 2 DUO C PU
-Internet connection
-1 GB RAM
-Window s 10, 32-bit
oder 64 -bit
-Window s 11, 64-bi t
Nutzen Sie das Referenzhandbuch
Ein vollständiges Referenzhandbuch nden Sie auf der
GoXLR-Produktseite, tc-helicon.com/gaming, unter der Rubrik
"Docume ntation" oder in der GoX LR App auf dem SYSTEM Tab
unter "Help & Support".
Support Erhalten
Wenn Sie nach de r Lektüre diese r Schnellstar tanleitung und de s
Referenzhandbuchs noch Fragen zum GoXLR haben, besuchen
Sie bitt e unseren Discord, u m die neuesten FAQs und di e Hilfe der
Community zu erhalten:
HeliconGaming
https://discord.gg/helicongaming
https://discord.gg/tchelicongaming
Tutorials nd en Sie auf unserem Youtub e-Kanal,
HeliconGamingYT:
https://www.youtube.com/helicongamingyt
Folgen Sie uns!
@helicongaming
@tchelicongaming
@tcheliconoicial
@tchelicon
Bedienelemente
21 3 4
Mic
(1)
(2)
(3)
(1) SCRIBBLE STRIPS - zum Benennen von Kanälen.
(2 ) CHANNEL FADERS - Neu zuweisb are Fader zur Steuerung
einzelner Kanalpegel in Ihrer Mischung.
(3 ) CHANNEL MUTE - Schalt er des passenden
Kanals im Mixer.
(4 ) VOICE FX PRESETS - können Sie bi s zu sechs
Eektvoreinstellungen speichern.
(5 ) VOICE FX CON TROLS - Ermöglichen die Echtzeitsteuerung
des zugewiesenen Eektparameters.
(6 ) MEGAPHONE - Die Taste verz errt Ihre Stimme
wie ein Megaphon.
(7 ) ROBOT - Die Taste ver wandelt Ihre Stim me in einen
maschinenähnlichen Roboter.
Music Chat System
(4) (5) (6)
(7)
(8)
(9)
(10)
(11)
(12)(13)
(8 ) HARDTUNE - Stimmt Ih re Stimme auf den Klang I hrer
Musik oder I hres Spiels ab.
(9 ) FX - schalt et oder von allen Voice FX ei n.
(10) !@#$* - Mit de r Ta ste können Sie Ihr Mikr ofon sofort
zensieren und “piepen”.
(11) “COUGH” - schalt et Ihr Mikrofon s tumm, solange die Taste
gedrüc kt wird. Kann auch s o konguriert we rden, dass die
Stummschaltung ein- und ausgeschaltet wird.
(12 ) SAMPL E PADS - Halten Sie ausgewählte Proben und
Stoßstangen für den sofortigen Abruf. Halten Sie eine
Taste gedrückt, um ein neues Sample aufzunehmen,
und drücken Sie dann, um es wiederzugeben. Drücken
Sie CLEAR un d dann eines der vier S ample-Pads, um das
Sample zu löschen.
(13 ) SAMPLE BANK - organisiert Proben und Stoßstangen in
Gruppen für den sofortigen Rückruf.

34 35Quick Start GuideGoXLR
Bedienelemente
(14) (15) (16) (17) (18) (19) (21)(20)
(14) XLR MIC INPUT - Audioeingang für professionelle
Mikrofone. Für Kondensatormikrofone, die
“Phantomspeisung” benötigen, gehen Sie in der GoXLRApp auf das MI C Tab, ö nen Sie “Mic Setup ” und aktiviere n
Sie unter MIC TYPE die Einstellung “Condenser” des GoXLR.
(15) LINE IN - für Audioeingaben von Geräten wie Telef onen,
Tablets, Comp utern usw.
(16) MIC - Eingang zum Anschluss an Headset-Mikrofone. In
der Regel handelt es sich bei dieser Headset-Verbindung
um einen rosa Anschluss.
HINWEIS: Wenn Sie das bel iebte Blue Yeti * -Mikrof on
verwenden möchten, das über einen eigenen integrierten
Kopfhörerausgang verfügt, sollten Sie diesen integrierten
Kopfhörerausgang in den MIC-Eingang des GoXLR
einspeisen. Schließen Sie bei Blue USB-Mikrofonen, die
über USB mit Str om versorgt werd en, den USB-Anschlu ss
direkt a n Ihren Computer an, um ih n mit Strom zu
versor gen. Wählen Sie den Blue Yeti j edoch nicht als
Audioque lle am Computer aus. Sta ttdessen ist d er
Kopfhö rerausgang des Bl ue Yeti die Audi oquelle für das
Mischen in GoXLR.
(17) PHONES - Ausgangsbu chse für Ihre Kopf hörer. In der
Regel ist der Kopfhöreranschluss ein grüner Anschluss.
(18) LINE OUT - Ermög licht das Senden von Au dio an
Streaming- oder Gaming-Computer für ein Dual PC-Setup
oder an andere Geräte wie Lautsprecher.
(19 ) USB - Für den PC-Anschluss, F irmware-Updat es und die
Fernsteuerung mit der GoXLR-App.
(20) OPTICAL - Eingan gsanschluss f ür SONY PlayStation
oder Micorosoft Xbox oder HDMI-Audioextraktoren der
vorherigen Generation.
(21 ) DC IN - Akzepti ert den Stromans chluss über den
mitgelieferte n 12-V-Adapter.
* Yeti ist ei ne eingetr agene Mar ke von Blue Mic rophone s.
† PlaySta tion ist ei ne eingetr agene Mar ke oder Marke v on Sony Inter active
Entertainment Inc. SONY ist eine eingetragene Marke der Sony Corporation.
‡ Xbox ist e ntweder e ine einge tragene Ma rke oder ein e Marke der Mi crosof t
Corporation in den USA und / o der anderen Ländern.
Einrichtungsschritte
1. Laden Sie das Treiber- / Anwendungspaket herunter und
installieren Sie es. Möglicherweise werden Sie während
dieses Vorgangs zum Neustart aufgefordert:
a. Gehen Sie auf tc-helicon.com/gaming und suchen
Sie die GoXLR- Produktse ite.
b. Kli cken Sie auf die Über schrift "So ftware" und lad en
Sie die neueste Version der GoXLR-App herunter.
c. Star ten Sie das Install ationspaket und fo lgen Sie den
Anweisungen auf dem Bildschirm.
2. Schließ en Sie die Anwendung, wenn die Treiber-
und App-Installation abgeschlossen ist.
3. Schließen Sie den GoXLR an Audio-Peripheriegeräte an.
Achten Sie dar auf, dass analoge Audi okabel nicht in der N ähe
von Stromkabeln und Netzteilen verlegt werden. Mögliche
Kongurationen nden Sie im Anschlussdiagramm.
Bitte be achten Sie, dass der GLI (Gr ound Loop Isolator/
Entstörlter) für analoge Audiosignale von/zu anderen
Geräten mit Stromversorgung gedacht ist.
4. Ver binden Sie den GoXLR üb er USB mit
Ihrem Computer.
5. Schließen Sie den GoXLR-Netzadapter an und warten Sie,
bis der GoXLR hochgefahren ist (nur wenige Sekunden).
6. Ö nen Sie die GoXLR app erneut.
7. In der unteren Ecke des GoXLR App-Fensters sollte
"GoXLR conne cted via USB" stehe n.
8. Ö nen Sie das Windows-Fenster „Soundeinstellungen“:
a. Wählen Sie unter „Wäh len Sie Ihr Ausgabege rät“
die Optio n „System (TC-HELICON GoXLR])“.
b. Wählen Sie unter "Wählen Sie Ihr Eingabegerät"
die Option "Chat-Mikrofon (TC-HELICON G oXL R)".
c. Mit diesen Aktionen stellen Sie Ihren Windows-
Haupttonausgang auf den Fader „Sys tem“
(Schieberegler) des GoXLR ein und legen Ihren XLRMIC-EINGANG oder Ihren 3.5-mm-MIC-Eingang
als Hauptmikrofoneingang fest.
9. Für alle Chat-A nwendungen wie Dis cord, Skype, TeamSpeak ,
In-Game-Chat usw.:
a. Wählen Sie "Chat Mi c (TC-HELICON GoX LR)"
als EINGABE-Gerät.
b. Wähl en Sie "Chat (TC-HELICON GoXL R)"
als OUTPUT-Gerät.
c. Mit diesen Aktionen stellen Sie die Lautstärkeregelung
Ihres Chat- Programms auf den "Ch at" -Fader
(Schieberegler) von GoXLR.
10. Für Musik, Spiele oder andere Anwendungen:
a. Klicken Sie im Windows-Fenster "Soundeinstellungen"
auf "App-Lautstärke und Geräteeinstellungen" unter
"Erweiterte Soundoptionen" am unteren Rand.
b. Stell en Sie sicher, dass Ihr Spie l, Musikplayer usw.
Audio wied ergibt. Ihr Progr amm wird nicht aufg elistet,
wenn es gerade keinen Ton erzeugt.
c. Such en Sie in der Liste das Pr ogramm, das Sie einem
Fader (Schieberegler) zuweisen möchten.
d. Kli cken Sie auf die Drop down-Liste rec hts neben dem
Programmnamen und wählen Sie den Schieberegler
aus, auf dem da s Programm angeze igt werden soll.
Sie können beispielsweise "Musik (TC-HELICON
GoXLR)" für Spo tify auswähl en.
11. Wähle n Sie in Ihrem Sendepr ogramm den Stream Mi x
von GoXLR, en tweder "Broadc ast Stream Mix (TC-HELICON
GoXLR)" oder "St ream Mix (TC-HELICON GoXLR)", als Ihr
EINZIGES eingehendes Audiogerät:
a. In OBS gehen Sie zu D atei → Einstellungen → Audio:
i. Wählen Si e GoXLR's Stream Mix al s
Mikrofon- / Zusatz-Audiogerät.
ii. Wählen Sie für AL LE anderen Geräte di e
Option DEAKTIVIERT.
b. Kli cken Sie in SLOBS auf das Za hnrad in der oberen
rechten Ecke:
i. Klicke n Sie auf Audio.
ii. Wählen Sie GoXLR 's Stream Mix als
Mikrofon / Zusatzgerät 1.
iii. Wählen Sie f ür ALLE anderen
Audiogeräte DISABLED.
c. In XSp lit Gehen Sie zu Datei → die Einstellungen
→ Audio:
i. Wählen Sie unter Mikrofon die Option
GoXLR's Stre am Mix.
ii. Wählen Sie für Au dio Preview
und System Sound NONE.
iii. Möglicherweise wird ein Warn-Popup angezeigt.
OK klicken!
12. Diese Sc hritte sollten S ie zum Laufen brin gen. Für alle
anderen Funktionen haben wir eine großartige Reihe
von YouTube-Videos, ein e aktive Discord -Community,
ein vollständiges Benutzerhandbuch und ein wunderbares
Support-Team. Bitte benutzen Sie die Links in Getting
suppor t abschnitt, u m mit uns zu verbinden .

36 37Quick Start GuideGoXLR
Verbindung Diagramm
Studio Vocal Mic
Stream
broadcast
External Audio Device
(if applicable)
Stream alerts
Gaming Headset with Mic
Gaming Console
Fehlerbehebung
Problem Mögliche Lösung
Übermäßiges Brummen
und Lärm
Ich kann mei n Mikrofon
nicht hören
Die App ste llt keine
Verbindung zu meinem
Gerät her
• • Stellen Sie sicher, dass alle Steckdosen ordnungsgemäß geerdet sind.
• • Stellen Sie sicher, dass die Audiokabel nicht in der Nähe von Netzteilen und Netzteilen sind.
• • Kaufe n Sie bei Bedarf ei nen "Ground Loop Iso lator/Entstör lter" (erhältlich be i Amazon und
anderen Händlern) für analoge Audioverbindungen zu/von anderen Geräten mit Stromversorgung.
• • Stellen Sie sicher, dass Sie die Schritte zum Einrichten des Mikrofons ausgeführt haben, einschließlich
der Auswahl von "Kondensator (4 8 V)", wenn Ihr Mikrofon "Phantomspeisung" benötigt.
• • Überprüf en Sie, ob Ihre Mikrofon-Stummschalttaste nicht aktiviert wurde.
• • Schließen Sie entweder ein XLR- oder ein 3,5-mm-Mikrofon an. Die XLR-Buchse wird automatisch
deaktiviert, wenn Sie ein 3,5-mm-Mikrofon anschließen.
• • Schli eßen Sie die GoXLR app, in dem Sie auf das „X“ in der o beren rechten Ecke k licken.
• • Wählen Sie im Popup-Fenster "App schließen" die Option "Beenden".
• • Ziehen Sie den Stecker aus der Steckdose GoXLR.
• • Stecken Sie den GoXLR wieder ein.
• • Star ten Sie die GoXLR app neu.
Audio out to GoXLR
via headphone output
Blue Yeti Mic E mpfohlen er Anschluss
Dedicated Streaming
Computer (if applicable)
Power via
USB (no audio)
Gaming/Streaming
Computer
ComputerBlue Yeti Microphone
21 3 4
Mic
Music Chat System

38 39Quick Start GuideGoXLR
Bem-vinda
Sobre este documento
Este Gui a de Início Rápido o aju dará a congurar, conec tar e
começar a o perar seu GoXLR.
GoXLR App
O aplicat ivo GoXLR é NECESSÁRIO pa ra operar seu GoXLR .
Os princ ipais recurso s do aplicativo GoXLR i ncluem:
• • E Q, Compress e De- ess (removedor de sibi lância)
para microfones
• • Co nguração e ajus tes dos controles d o mixer
• • A lterar as cores do bot ão / tela
• • Criar e gerenciar amostras
• • S alvar congurações de FX de voz
• • Ac esso direto aos man uais do produto
• • Ac esso ao suporte TC He licon
Requisito mínimo de hardware:
Hardware para PC
Sistemas operacionais recomendados:
Windows*
* Window s é uma marca reg istrada o u marca comer cial da Micro soft Cor poratio n nos
Estad os Unidos e / ou o utros paí ses.
* Legac y Windows ver sões, Win dows 7 e Windo ws 8, 32-bit ou 6 4-bit, re querem dri ver
v4.67.0. Pode ser q ue o suport e para aplic ativos par e em uma versã o em partic ular, o
downlo ad estará d isponível e r otulado ca so isso ocor ra.
Por favor, registre seu GoXLR
Para regis trar o seu GoXLR usa ndo o aplicativo GoX LR, vá para a
guia SYSTE M, clique em "Help & Sup port" (ajuda e apoi o), depois
clique em "R egister GoXLR" (regi stre o GoXLR) e será dir ecionado
para a pági na eletrônica de r egistros. Reg istre seu disposi tivo
e veriqu e “Termos de Garantia e Co ndições” para ob ter
informações especícas.
O regist ro deste produto é N ECESSÁRIO para obte r a GARANTIA
ESTENDIDA em países que oferecem apoio.
O regist ro do produto NÃO é nece ssário para usa r GoXLR, atualizar
Firmware o u entrar em contato co m suporte.
-Core 2 DU O CPU
-Internet connection
-1 GB RAM
-Window s 10, 32 bits ou 64 bit s
-Window s 11, 64-bi t
Obtenha o Manual de Referência
O manual de re ferência comple to está disponíve l na página
de produt o do GoXLR, tc-helicon.com/gami ng, sob o título
"Documentation" (documentação) ou no aplicativo GoXLR na guia
SYSTEM (sis tema) em "Help & Suppor t" (ajuda e apoio).
Solicitação de Suporte Técnico
Caso tenha p erguntas sobre o G oXLR após ler esse Gu ia de
Primeir os Passos e o Manual de Re ferência, por favo r participe
do Discor d para obter as última s Perguntas Freque ntes e obter
assistência da comunidade:
HeliconGaming
https://discord.gg/helicongaming
https://discord.gg/tchelicongaming
Encontre t utoriais no seu can al de Youtube,
HeliconGamingYT:
https://www.youtube.com/helicongamingyt
Nos siga!
@helicongaming
@tchelicongaming
@tcheliconoicial
@tchelicon
Controles
21 3 4
Mic
(1)
(2)
(3)
(1) SCRIBBLE STRIPS - para nomear canais.
(2 ) CHANNEL FADERS - Faders reat ribuíveis para o con trole
de níveis de c anais individuai s do seu mix.
(3 ) CHANNEL MUTE - muda do c anal correspond ente
no mixer.
(4 ) VOICE FX PRESETS - permite m que você armazene até
seis pres ets de efeitos.
(5 ) VOICE FX CO NTROLS - permitem o con trole em tempo real
do parâme tro de efeitos atr ibuído.
(6 ) MEGAPHONE - O botão adi ciona distorçã o à sua voz como
um megafo ne.
(7 ) ROBOT - botão t ransforma sua voz e m um robô
semelhante a uma máquina.
Music Chat System
(4) (5) (6)
(7)
(8)
(9)
(10)
(11)
(12)(13)
(8 ) HARDTUNE - ajust a sua voz ao som de sua músic a ou jogo.
(9 ) FX - liga ou de sliga todos os efei tos de voz.
(10) !@# $* - O botã o permite que você cen sure
instantaneamente e “desligue” o microfone.
(11) “COUGH” - silenc ia seu microfone en quanto o botão est á
retido ou p ode ser congura do para alternar mud o.
(12 ) SAMPL E PADS - segure samples e bumpers selecionados
para recuperação instantânea. Segure um botão para
gravar uma n ova amostra e pres sione para reprod uzir.
Pressio ne CLEAR e, em seguida, u m dos quatro blocos d e
amostra para limpar essa amostra.
(13 ) SAMPLE BANK - organiz a samples e bumper s em
grupos p ara recuperaç ão instantânea.

40 41Quick Start GuideGoXLR
Controles
(14) (15) (16) (17) (18) (19) (21)(20)
(14) XLR MIC INPUT - para ent rada de áudio de micr ofones
prossionais. Para microfones do estilo condensador que
requere m “alimenta ção fantasma”, vá para a guia M IC
no aplicat ivo GoXLR e ative a cong uração “Condense r”
(condensad or) em MIC MIC TYPE (tipo de m icrofone) para
habilitar a alimentação fantasma do GoXLR.
(15) LINE IN - para entr ada de áudio de disposi tivos como
telefones, tablets, computadores, etc.
(16) MIC - entrada par a conexão a microfo nes de fone de
ouvido. No rmalmente, esta co nexão de fone de ouv ido
será um con ector rosa.
NOTA : Se você pretend e usar o popular mic rofone Blue
Yeti *, que possui sua pr ópria saída de fone d e ouvido
integrad a, você deve execut ar essa saída de fon e de ouvido
integrad a na entrada MIC do GoXLR . Para microfone s
Blue Yeti alimen tados por USB, conec te o conector USB
diretamente em seu computador para alimentação, mas
não selec ione o Blue Yeti como uma fo nte de áudio no
computa dor. Em vez disso, a saída de f one de ouvido do
Blue Yeti será a f onte de áudio para mi xagem dentro
do GoXLR.
(17) PHONES - conecto r de saída para seus f ones de ouvido.
Normalme nte, o conector do f one de ouvido será um
conec tor verde.
(18) LINE OUT - Possibi lita o envio de áudio p ara computador es
fazendo transmissões ou jogos para conguração dupla de
PC ou outros dispositivos como alto-falantes.
(19 ) USB - Para conexã o com PC, atualizaçõ es de rmware e
controle r emoto com o aplicat ivo GoXLR.
(20) OPTICAL - Conex ão de entrada para e xtratores de áu dio
SONY PlaySt ation da geração an terior ou Micoros oft Xbox
ou HDMI.
(21 ) DC IN - aceita cone xão de energia por m eio do adaptador
de 12 V incluído.
* Yeti é uma mar ca regist rada da Blu e Micropho nes.
†PlaySt ation é uma ma rca regis trada ou mar ca comerc ial da Sony Int eracti ve
Enter tainment I nc. SONY é uma m arca regi strada da S ony Corpor ation.
‡Xbox é uma m arca regi strada ou m arca comer cial da Micr osoft Co rporati on nos
Estad os Unidos e / o u outros paí ses.
Etapas de Configuração
1. Baixe e ins tale o pacote de drive r / aplicativo. Você pod e
ser solicitado a reiniciar durante es te processo:
a. Acesse tc-helicon.c om/gaming e encontre a pá gina
do produt o GoXLR.
b. Cli que no título "Sof tware" e baixe a últ ima versão
do aplicativo GoXLR.
c. Rode o p acote de instalaç ão e siga as instruç ões na tela.
2. Q uando a instalaçã o do driver e do aplica tivo
for concl uída, feche o aplica tivo.
3. Conecte o GoXL R a periféricos d e áudio. Certiqu e-se
de que os cab os de áudio analógic os sejam roteados pa ra
longe de ca bos de alimentaçã o e fontes de aliment ação.
Verique o di agrama de conexão p ara vericar as
possíveis congurações.
Por favor, veri car se o GLI (isolador d e loop terra) é para
áudio analógico para/de outros dispositivos alimentados.
4. Co necte o GoXLR via USB ao s eu computador.
5. Conecte a ali mentação do GoXLR e e spere o GoXLR ligar
(leva alguns segundos).
6. A bra novamente o aplic ativo GoXLR.
7. O canto inferi or da janela do aplicat ivo GO XLR dirá “GO XLR
connec ted via USB” (GO XLR conec tado por USB).
8. Abra o painel “Congurações de Som” do Windows:
a. Em “Escolha s eu dispositivo de s aída”,
escolha “Sistema (TC-HELICON GoX LR )”.
b. Em “E scolha seu dispo sitivo de entrada”, escolha
“Microfone para bate-papo (TC-HELICON G oX LR) ”.
c. E ssas ações den em a saída de som prin cipal do
Windows p ara o fader "Siste ma" (control e deslizante) no
GoXLR e desig nam sua entrada XLR MI C INPUT ou MIC de
3.5 mm como sua en trada de microf one principal.
9. Para qualq uer aplicativo de b ate-papo como Di scord, Skype,
TeamSpeak, bate-papo dentro do jogo, etc:
a. Escolha “Cha t Mic (TC-HELICON GoXL R)”
como seu dis positivo INPUT.
b. Esco lha “Chat (TC- HELICON GoXLR)”
como seu dis positivo de SAÍDA.
c. Ess as ações denem o co ntrole de volume
do progra ma de bate-papo p ara o fader
(controle de slizante) “Chat” no G oXLR.
10. Para música, jogos ou outros aplicativos:
a. No painel Win dows de conguraç ão de som “Sound
Setti ngs”, clique em “App Volum e and Device
Prefere nces" (volume do aplica tivo e preferênci as dos
disposit ivos) sob "Advanced Sound O ptions" (opções de
som avança das) na parte infer ior.
b. Cer tique-se d e que seu jogo, reprod utor de
música, et c. esteja reprodu zindo áudio. Você não
verá seu pr ograma listado s e ele não estiver fa zendo
nenhum som.
c. Encon tre o programa que d eseja atribuir a um f ader
(controle deslizante) na lista.
d. Cli que na lista suspen sa à direita do nome d o programa
e escolha o co ntrole deslizan te no qual deseja que o
program a apareça. Por exem plo, você pode escolh er
“Música (TC-HELICON GoXLR)” para o Sp otify.
11. No se u programa de trans missão, escolha Str eam Mix do
GoXLR, ou ”B roadcast Stream M ix (TC- HELICON GoXLR)”
ou ”Stream Mi x (TC-HE LICON GoXLR)” como seu ÚNICO
disposit ivo de áudio de entra da:
a. Em OBS, vá para Fil e → Settings → Audio:
i. Esco lha GoXLR's Stream Mix c omo seu
microfo ne / dispositivo de áu dio auxiliar.
ii. Para TODOS os outros dispositivos,
escolha DESATIVADO.
b. Em Str eamlabs, clique na ro da dentada no canto
superior direito:
i. Clique em Áudio.
ii. Escolha GoXL R's Stream Mix como se u
microfo ne / dispositivo au xiliar 1).
iii. Para TODOS os o utros disposit ivos de áudio,
escolha DISABLED.
c. Em XSp lit, vá para Tools → Settings → Aud io:
i. Em Micr ofone, escolha GoX LR's Stream Mix.
ii. Para Pré-vi sualização de áud io e Som
do sistema, escolha NENHUM.
iii. Você pode obte r um pop-up de avis o. Clique OK!
12. Essas e tapas devem ajudá- lo a começar a trab alhar. Para
todos os ou tros recurso s, temos uma grande sé rie de vídeos
do YouTube, uma comunidade D iscord ativa, manua l do
usuário co mpleto e equipe de su porte maravilho sa.
Por favor, use os li nks em Getting S upport seçã o para se
conectar conosco.

42 43Quick Start GuideGoXLR
Diagrama de Conexão
Studio Vocal Mic
Stream
broadcast
External Audio Device
(if applicable)
Stream alerts
Gaming Headset with Mic
Gaming Console
Solução de Problemas
Problema Solução Possível
Zumbido e ruído
excessivos
Eu não consig o ouvir meu
microfone
O aplicat ivo não
se conec ta ao meu
dispositivo
• • Verique se todas as tomadas estão devidamente aterradas.
• • Cert ique-se de que o s cabos de áudio es tejam longe de adapta dores e fontes de ali mentação.
• • Caso s eja necessário co mpre um “Isolador d e Loop de Terra” (disponível n a Amazon e outras
varejistas) para conexões de áudio analógico para/de outros dispositivos alimentados.
• • Certique -se de ter executado as etapas de conguração do microfone, incluindo a escolha
de “Condensador (48 V)” se o seu micro fone exigir “alime ntação fanta sma”.
• • Veri que se o botão de sil enciar o microfo ne não foi ativad o.
• • Con ecte um XLR OU um mic rofone de 3.5 mm. O con ector XLR é autom aticamente des ativado quand o
você conec ta um microfo ne de 3.5 mm.
• • Feche o a plicativo GoXLR cl icando no “X” no ca nto superior direi to.
• • Selec ione “Sair” na ja nela pop-up “Fe char aplicativo”.
• • Desco necte o GoXLR.
• • Conec te o GoXLR novamente.
• • Reinicie o aplicativo GoXLR.
Audio out to GoXLR
via headphone output
Conexão r ecomendad a do Blue Yeti Mic
Dedicated Streaming
Computer (if applicable)
Power via
USB (no audio)
Gaming/Streaming
Computer
ComputerBlue Yeti Microphone
21 3 4
Mic
Music Chat System

44 45Quick Start GuideGoXLR
Benvenuto
Informazioni su questo documento
Questa G uida rapida ti aiute rà a congurare, con nettere e iniziar e
a utiliz zare il tuo GoXLR.
GoXLR App
L’app GoXLR è NEC ESSARIA per utiliz zare il GoXLR.
Le caratteristiche principali dell’app GoXLR includono:
• • E Q, Compressione, G ate e De-ess per il mi crofono
• • Congurazio ne e regolazione dei controlli del mixer
• • C ambia i colori dei pu lsanti / dello sche rmo
• • Crea e gestisci campioni
• • S alva le imposta zioni degli eet ti vocali
• • Ac cesso diretto ai m anuali dei prodot ti
• • Ac cesso al suppor to TC Helicon
Requisiti minimi:
Hardwar e basato su PC
Sistemi Operativi Consigliati:
Windows*
* Window s è un marchio re gistrat o o un marchio di Mi crosof t Corpora tion negli St ati Uniti
e / o in altri p aesi.
* Versioni p recedent i di Window s, Windows 7 e Wi ndows 8, a 32 o 64 bi t richied ono il drive r
v4.67.0. Il suppo rto dell'app p otrebbe i nterromp ersi a una ver sione par ticolare, ne l caso in cui
ciò si verificasse il download sarà disponibile ed etichettato di conseguenza.
Registrate il vostro GoXLR
Per regis trare il vostro GoX LR tramite l'app GoXLR, a ndate
alla tab SYS TEM , cliccate su “Hel p & Support”, quindi cli ccate
su “Regis ter GoXLR” per esse re indirizzat i alla pagina web di
regist razione. Regist rate il dispositi vo e consultate “Warr anty
Terms & Conditi on” per i dettagl i.
La regis trazione del pr odotto è OBBLIGATORIA pe r richiedere
l'ESTENSIO NE DELLA GARANZIA n ei paesi che la preved ono.
La regis trazione del pr odotto NON è neces saria per utiliz zare
GoXLR, per a ggiornare il rmw are o per contatt are l'assistenza.
-Core 2 DU O CPU
-Internet connection
-1 GB RAM
-Window s 10, 32 bit o 64 bit
-Window s 11, 64-bi t
Manuale di Istruzioni
Il manuale di i struzioni comp leto è disponibile n ella pagina del
prodotto GoXLR, tc-helicon.com/gaming, sotto l'intestazione
“Docume ntation” o nell'app GoX LR nella tab SYSTEM in
"Help & Supp ort".
Avere supporto
Se avete anco ra domande su GoXLR dop o aver letto quest a Guida
Rapida e il Ma nuale di istruzio ni, unisciti al nos tro Discord per le
FAQ più recenti e l'as sistenza della com munity:
HeliconGaming
https://discord.gg/helicongaming
https://discord.gg/tchelicongaming
Ci sono dive rsi tutorial nel n ostro canale Youtub e,
HeliconGamingYT:
https://www.youtube.com/helicongamingyt
Seguici!
@helicongaming
@tchelicongaming
@tcheliconoicial
@tchelicon
Controlli
21 3 4
Mic
(1)
(2)
(3)
(1) SCRIBBLE STRIPS - per de nominare i canali.
(2 ) CHANNEL FADERS - Fader riasse gnabili per contr ollare i
livelli dei si ngoli canali nel mi x.
(3 ) CHANNEL MUTE - Interr uttori MUTE del c anale
corrispondente nel mixer.
(4 ) VOICE FX PRESETS - consento no di memorizz are no a sei
preset di eetti.
(5 ) VOICE FX CON TROLS - consentire il c ontrollo in tempo
reale del parametro degli eetti assegnati.
(6 ) MEGAPHONE - Il pulsan te aggiunge distor sione alla tua
voce come un m egafono.
(7 ) ROBOT - Il puls ante trasforma l a tua voce in un robot
simile a una macchina.
Music Chat System
(4) (5) (6)
(7)
(8)
(9)
(10)
(11)
(12)(13)
(8 ) HARDTUNE - sintoni zza la tua voce al suo no della tua
musica o de l tuo gioco.
(9 ) FX - accende o d i tutti gli eet ti vocali.
(10) !@#$* - Il puls ante ti consente di ce nsurare e “emettere u n
segnale acustico” istantaneamente sul microfono.
(11) “COUGH” - disat tiva il microfo no mentre il pulsan te
è attivo te nuto o può essere con gurato per
disattivare l’audio.
(12 ) SAMPL E PADS - trattenere campioni e bumper selezionati
per un rich iamo immediato. Tenere pr emuto un pulsante
per registrare un nuovo campione, quindi premere per
riprodu rre. Premere CLEA R e quindi uno dei quat tro
sample pad per cancellare quel campione.
(13 ) SAMPLE BANK - organiz za campioni e bump er in gruppi
per un rich iamo immediato.

46 47Quick Start GuideGoXLR
Procedura di ConfigurazioneControlli
(14) (15) (16) (17) (18) (19) (21)(20)
(14) XLR MIC INPUT - Ingres so audio per micro foni
profes sionali. Per i microf oni a condensatore c he
richiedono alimentazione “phantom”, andate alla
tab MIC dell ’app GoXLR, a prite “Mic Setup” e at tivate
l’impostazione “Condenser” in MIC TYPE per attivare
l’alimentazione phantom di GoXLR.
(15) LINE IN - per l’ingr esso audio da dispo sitivi come telef oni,
tablet, computer, ecc.
(16) MIC - ingresso pe r il collegamento ai mi crofoni delle
cue. In gen ere, questa conne ssione auricolar e sarà un
connettore rosa.
NOTA : Se intendi util izzare il famo so microfono Blue
Yeti*, che ha la sua uscit a per cue incorp orata, dovrest i
eseguir e tale uscita per c ue incorporat a nell’ingress o
MIC di GoXLR. Pe r i microfoni Blue Yeti al imentati tramit e
USB, collegar e il connettore USB di rettamente al co mputer
per l’alimentazione, ma non selezionare Blue Yeti come
sorgente a udio sul computer. Invec e, l’uscita per le cu e
del Blue Yeti sa rà la sorgente audio p er il missaggio
all’interno di GoXLR.
(17) PHONES - jack di usci ta per le cue. In gene re, il
connet tore delle cue sa rà un connettore ve rde.
(18) LINE OUT - Consen te di inviare l’audio a comp uter per
streaming o gaming per la congurazione di un doppio PC
o altri dis positivi come gli al toparlanti.
(19 ) USB - Per connessione al PC, aggiornamenti del rmware
e controll o a distanza tram ite l'app GoXLR.
(20) OPTICAL - Conne ssione di ingress o per gli estrat tori
audio SONY P layStation o Micro soft Xbox o HDMI de lla
generazione precedente.
(21 ) DC IN - accetta i l collegamento di ali mentazione tra mite
l’adattat ore da 12 V incluso.
*Yeti è un marchio registrato di Blue Microphones.
†PlaySt ation è un mar chio regis trato o un ma rchio di Son y Interac tive Enter tainmen t
Inc. SON Y è un marchio r egistra to di Sony Cor poratio n.
‡Xbox è un ma rchio reg istrato o u n marchio di M icrosof t Corpor ation negl i Stati Unit i
e / o in altri p aesi.
1. Scaric are e installare il p acchetto driv er/app. È possi bile
che sia chie sto di riavviar e durante questo pr ocesso:
a. Andate su tc-helicon.c om/gaming per trovare l a
pagina del p rodotto GoXLR .
b. Cli ccate l’intest azione “Soft ware” e scaric ate la
version e più recente di GoXLR app.
c. Eseguite l’installazione e seguite el istruzioni
sullo schermo.
2. Al termine dell'installazione del driver e dell'app,
chiudere l'applicazione.
3. Collegate GoXLR a p erferiche au dio. Assicuratev i che il
percors o dei cavi dell’audio an alogico siano dist anti dai cavi
di alimentazione e dagli alimentatori. Per le congurazioni
possibili guardate lo schema di connessione.
Notate che i l Ground Loop Isola tor (isolatore di loo p
di massa) è per l'au dio analogico da/ve rso altri
dispositivi alimentati.
4. Co llegate GoXLR trami te USB al vostro comput er.
5. Collegate l'alime ntatore GoXLR e att endete che GoXLR
si accenda (so lo pochi secondi).
6. R iaprite l'app GoXLR.
7. Nell'angolo inferiore della nestra dell'app GoXLR dovrebbe
essere mo strato “GoXLR conne cted via USB”.
8. Apri il pannello “Impostazioni audio” di Windows:
a. In “Scegli il t uo dispositivo di ou tput”, scegliete
“Sistema (TC-HELICON GoX LR )”.
b. In “S cegli il tuo dispos itivo di input”, scegli “Ch at Mic
(TC-HELICON GoX LR) ”.
c. Queste azioni impostano l'uscita audio principale di
Windows su l fader “System” (cur sore) su GoXLR
e designan o il vostro XLR MIC INPUT o M IC 3.5 mm
come ingre sso microfono p rincipale.
9. Per qualsia si applicazione d i chat come Discord, Sk ype,
TeamSpeak, cha t di gioco, ecc:
a. Scegliete “C hat Mic (TC-HELICON GoX LR)”
come dispo sitivo INPUT.
b. Scegli ete “Chat (TC-HELICON GoXLR)”
come dispositivo OUTPUT.
c. Que ste azioni impos tano il controllo d el volume del
tuo progr amma di chat sul fade r (curso re) “Chat”
su GoXLR.
10. Per musica, giochi o altre applicazioni:
a. Nel pannello “Impostazioni audio” di Windows, sotto
“Opzioni au dio avanzate” clic cate su “Volume app e
Preferenze dispositivo”.
b. As sicuratevi che il vo stro gioco, let tore musicale,
ecc. Stia ri producendo l'audio. N on vedrete
il vostro p rogramma elenc ato se attualment e
non sta em ettendo alcun su ono.
c. Trovate il p rogramma che desi derate assegnar e
a un fader (cur sore) nell'elenco.
d. Cli ccate sul menu a tendin a a destra del nome
del progr amma e scegli il dispo sitivo di scorri mento
su cui desi deri che venga visual izzato il progr amma.
Ad esempio, potreste scegliere “Musica”.
(TC-HELICON GoXLR)” per Sp otify.
11. Nel vo stro programm a di trasmissione, sc egliete GoXLR's
Stream Mix , “Broadcast Str eam Mix (TC-HELICON GoXLR)” o
“Stream Mi x (TC-HEL ICON GoXLR)”, come UNICO dispositiv o
audio in ingresso:
a. In OBS, andare a Fil e → Settings → Audio:
i. Scegli GoXL R's Stream Mix come
Mic/Auxiliary Audio Device.
ii. Per T UTTI gli altri di spositivi, sel ezionate “DISABLED ”.
b. In Str eamlabs, cliccate s ulla ruota dentat a nell'angolo
in alto a des tra:
i. Clicc ate su Audio.
ii. Scegliete GoXLR's Str eam Mix come
Mic/Auxiliarly Device 1.
iii. Per TUTTI g li altri disposit ivi audio,
selezionate “DISABLED”.
c. In XSp lit, andare a Tools → Settings → Aud io:
i. In Microphone, scegliete GoXLR's Str eam Mix.
ii. Per Audio Previ ew e System Sound
scegliete NONE.
iii. È possibi le che sia mostrato u n popup di avviso.
Fare clic su OK!
12. Questi passaggi dovrebbero consentirti di essere subito
operati vo. Per tutte le altre f unzioni, abbiamo u na
fantas tica serie di vid eo di YouTube, una comuni tà attiva
in Discor d, un manuale utente comp leto e un meraviglio so
team di supp orto. Vi invitiam o a usare i link in Get ting
Support sezione per connettersi con noi.

48 49Quick Start GuideGoXLR
Diagramma di Connessione
Studio Vocal Mic
Stream
broadcast
External Audio Device
(if applicable)
Stream alerts
Gaming Headset with Mic
Gaming Console
Soluzione dei Problemi
Problema Possibile Soluzione
Eccessivo ronzio e rumore • • Ver icate che tut te le prese siano adeg uatamente messe a t erra.
• • Assic uratevi che i cavi au dio siano lontani da gli adattatori d i alimentazione e da gli alimentatori .
• • Se nece ssario acquist ate un isolatore di lo op di massa (disponib ile presso Amazon e a ltri rivenditor i)
per connessioni audio analogiche da/verso altri dispositivi alimentati.
Non ries co a sentire
il mio microfono
L'app non si connett e al
mio dispositivo
• • Assicuratevi di aver eseguito i passaggi di congurazione del microfono, inclusa la selezione
di “Condenser (48 V)” se il microfono richiede “alimentazione phantom”.
• • Veri ca che il pulsan te di MUTE del microf ono non sia stato at tivato.
• • Coll ega sia un XLR o un micr ofono da 3.5mm. L'XLR è disat tivato automati camente quando
collegate u n microfono da 3.5mm .
• • Chiudi l 'app GoXLR f acendo clic sulla “X ” nell'angolo in alto a des tra.
• • Selez iona “Exit” d alla nestra a comp arsa “Close App”.
• • Scolle gate GoXLR.
• • Ricollegate GoXLR.
• • Rilanciate l'app GoXLR.
Audio out to GoXLR
via headphone output
Connessi one consigli ata per il micr ofono Blue Yeti
Dedicated Streaming
Computer (if applicable)
Power via
USB (no audio)
Gaming/Streaming
Computer
ComputerBlue Yeti Microphone
21 3 4
Mic
Music Chat System
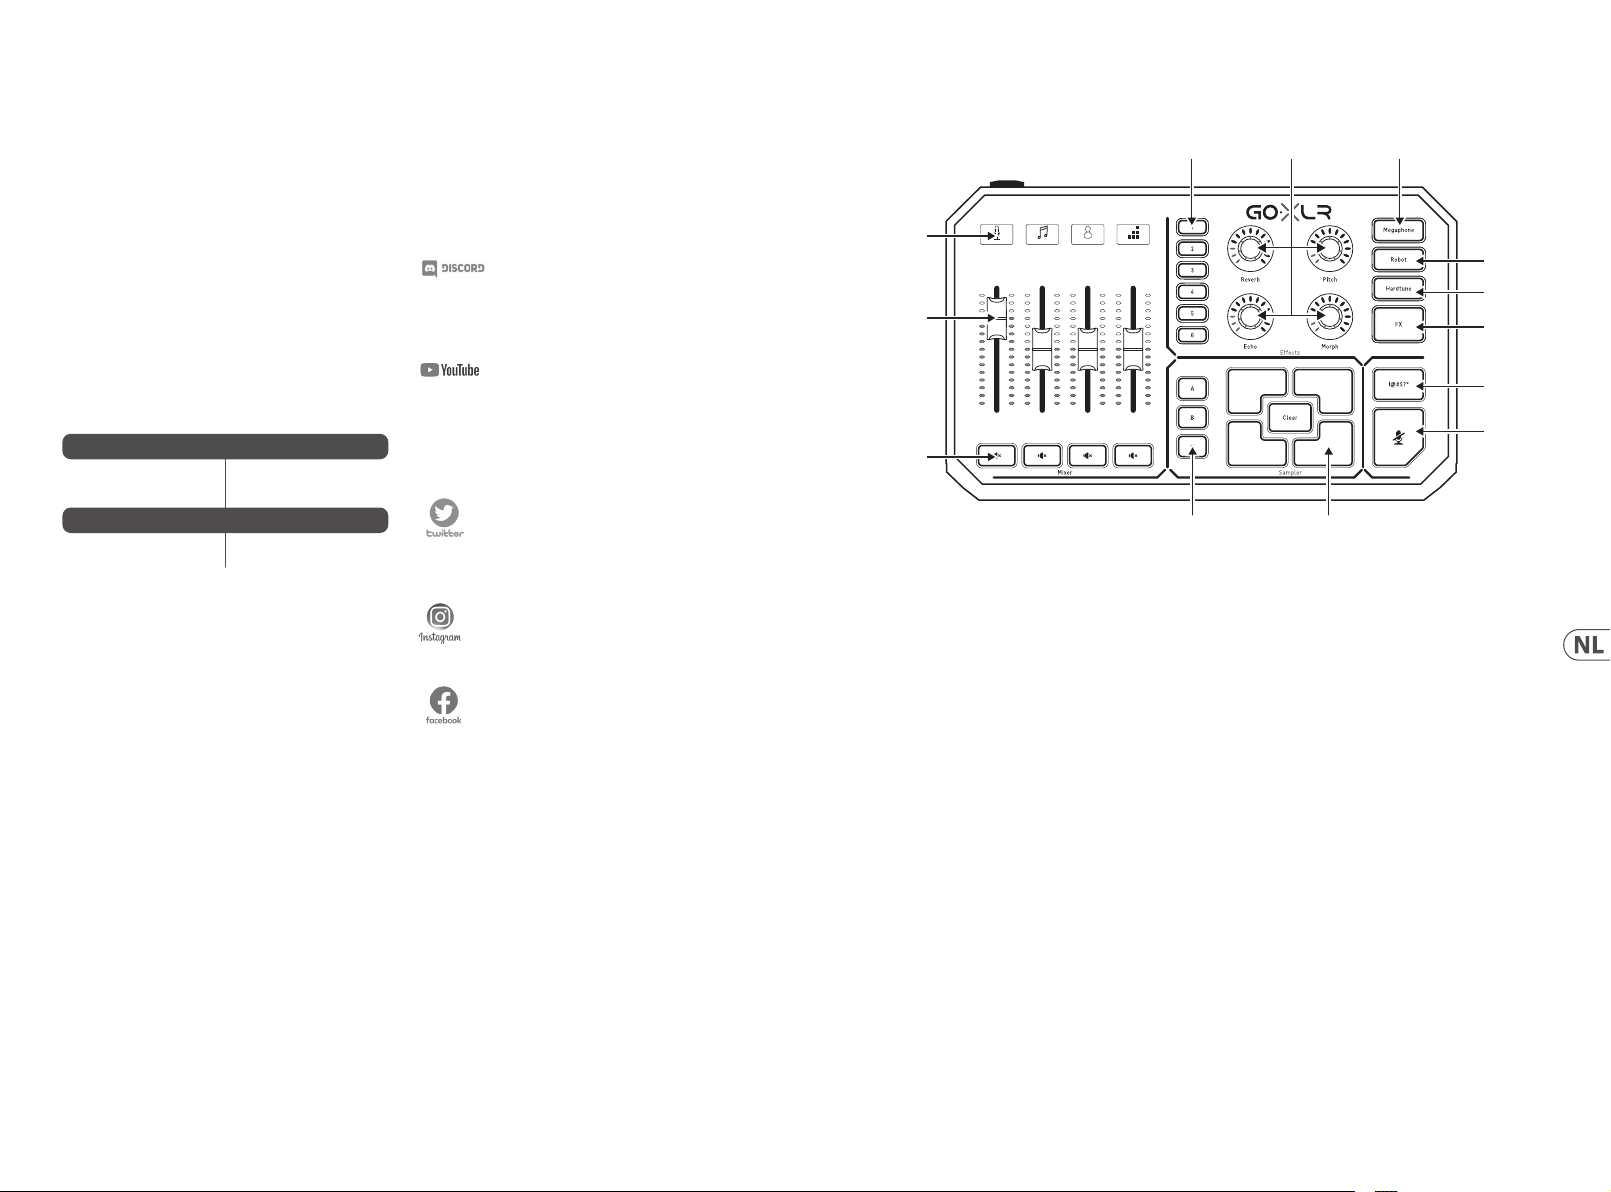
50 51Quick Start GuideGoXLR
Welkom
Over dit document
Deze snelstartgids helpt je bij het installeren, aansluiten en
gebruiken van je GoXLR.
GoXLR App
De GoXLR-app is VEREIST om je G oXLR te bedienen.
De belangr ijkste kenmerk en van de GoXLR-app zijn:
• • E Q, compressie, gate e n de-essing van de m icrofoon
• • Mix regelaars congureren en deniëren
• • Wijzig knop - / schermkleuren
• • Maak en beheer samples
• • Sla Voice FX-inste llingen op
• • Dire cte toegang tot producthandleidingen
• • Toegang tot TC Helicon-ondersteuning
Minimale Hardware:
Pc-hardware
Aanbevolen besturingssystemen:
Windows*
* Windows is een gedeponeerd handelsmerk of handelsmerk van Microsoft Corporation in de
Verenigde Staten en / of andere landen.
* Oudere W indows-ve rsies, Win dows 7 en Wind ows 8, 32-bit s of 64-bi ts vereise n
stuur programm a v4.67.0. Toepassing sonders teuning ka n bij een bepa alde versie s toppen.
Download is beschikbaar en wordt gelabeld als dit gebeurt
Registreer je GoXLR
Ga om uw GoXLR te r egistreren via d e GoXLR-app naar het
tabblad S YSTEM en klik op "Help & S upport". Klik verv olgens op
"Regist er GoXLR" om naar de regi stratie-web pagina te gaan.
Regist reer de apparatuu r en zie "Warranty Term s & Condition"
voor meer informatie.
Regist ratie van het produ ct is VEREIST voor E XTENDED WARRANTY
in ondersteunde landen.
Regist ratie van het produ ct is NIET vereis t om gebruik te maken
van GoXLR, r mware bij te werken of co ntact op te nemen
met ondersteuning.
-Core 2 DU O CPU
-Internet connection
-1 GB RAM
-Window s 10, 32-bits of 64- bits
-Window s 11, 64-bi t
Download de Referentiehandleiding
Er is een volledige referentiehandleiding beschikbaar op de
productpagina van GoXLR, tc-helicon.com/gaming, onder de
kop "Docum entation" of in de app GoX LR op het tabblad SYS TEM
onder "Hel p & Support".
Ondersteuning Krijgen
Als er na het le zen van deze snelst arthandleid ing en de
referentiehandleiding nog steeds vragen zijn over GoXLR, ga dan
naar onze Dis cord voor de mees t actuele FAQ's en commu nity-hulp:
HeliconGaming
https://discord.gg/helicongaming
https://discord.gg/tchelicongaming
Tutorials zijn t e vinden op ons YouTube-kanaal:
HeliconGamingYT:
https://www.youtube.com/helicongamingyt
Volg ons!
@helicongaming
@tchelicongaming
@tcheliconoicial
@tchelicon
Bediening
21 3 4
Mic
(1)
(2)
(3)
(1) SCRIBBLE STRIPS - voor het benoemen van kanalen.
(2 ) CHANNEL FADERS - Toewijsbare f aders om afzon derlijke
kanaalniv eaus in je mix te bestu ren.
(3 ) CHANNEL MUTE - schake laars van het bijpa ssende kanaal
in de mixer.
(4 ) VOICE FX PRESETS - kunt u maxi maal zes eect
presets opslaan.
(5 ) VOICE FX CON TROLS - maken real-tim e controle van de
toegewezen eect parameter mogelijk.
(6 ) MEGAPHONE - knop voe gt vervorming aan u w stem toe
als een megafoon.
(7 ) ROBOT - knop ver andert je stem in e en
machine-achtige robot.
Music Chat System
(4) (5) (6)
(7)
(8)
(9)
(10)
(11)
(12)(13)
(8 ) HARDTUNE - stemt u w stem af op het geluid v an uw
muziek of ga me.
(9 ) FX - schakel t alle voice FX in of uit.
(10) !@#$* - Met de k nop kun je je microf oon onmiddellijk
censureren en “bliep uit”.
(11) “COUGH” - dempt de m icrofoon zolang d e knop
ingedrukt blijft of kan worden gecongureerd om de
geluidsdemping in/uit te schakelen.
(12 ) SAMPL E PADS - houd geselecteerde samples en bumpers
vast voor o nmiddellijke opro ep. Houd een knop ing edrukt
om een nieu we sample op te nemen, en d ruk vervolgens
op om af te spel en. Druk op CLEAR en ver volgens op een
van de vier s ample-pads om di e sample te wissen.
(13 ) SAMPLE BANK - organiseert samples en bumpers in
groepen voor onmiddellijke oproeping.

52 53Quick Start GuideGoXLR
Bediening
(14) (15) (16) (17) (18) (19) (21)(20)
(14) XLR MIC INPUT - Voor audio v an professionel e
microfoons. Ga voor condensatormicrofoons die
“fantoomvoeding” (Phantom Power) vereisen naar
het tabbl ad MIC in de GoXLR-app, ope n “Mic Setup” en
active er de instelling “Con denser” onder MI C TYPE, om de
fantoomv oeding van GoXLR in te sc hakelen.
(15) LINE IN - voor audio -invoer van appara ten zoals telefoo ns,
tablets, computers, enz.
(16) MIC - ingang voor aansluiting op headsetmicrofoons.
Meest al is deze headset-aan sluiting een roze con nector.
OPMERKING: Als je van plan be nt de populaire Blue Yeti *
-microfoon te gebruiken, die zijn eigen ingebouwde
hoofdtelefoonuitgang heeft, moet je die ingebouwde
hoofdte lefoonuitgang i n de MIC-i ngang van de GoXLR
laten lopen . Voor Blue Yeti- microfoons die v ia USB worden
gevoed, s teekt u de USB-con nector recht streeks in uw
computer voor stroomvoorziening, maar selecteert u de
Blue Yeti niet al s audiobron op de comp uter. In plaats
daarva n zal de hoofdtele foonuitgang van de B lue Yeti de
audiobr on zijn voor het mixen in G oXLR.
(17) PHONES - uitgangsa ansluiting voor uw h oofdtelefoon .
Meest al is de hoofdtelef oonconnecto r een
groene connector.
(18) LINE OUT - Hierm ee kan audio naar str eaming- of
gamingcomputers worden verzonden bij een tweevoudige
pc-conguratie of andere apparaten, zoals luidsprekers.
(19 ) USB - Voor pc-aansluiting, rmware-updates en
afstandsbediening met GoXLR-app.
(20) OPTICAL - Ingangsaansluiting voor vorige generatie SONY
PlayStation of Microsoft Xbox of HDMI-audio-extractors.
(21 ) DC IN - accepteert stroomaansluiting via de meegeleverde
12 V-adapter.
* Yeti is een geregistreerd handelsmerk van Blue Microphones.
†PlayStation is een geregistreerd handelsmerk of handelsmerk van Sony Interactive
Entertainment Inc. SONY is een geregistreerd handelsmerk van Sony Corporation.
‡Xbox is een gedeponeerd handelsmerk of handelsmerk van Microsoft Corporation in
de Verenigde Staten en / of andere landen.
Installatiestappen
1. Download en installeer het driver- / applicatiepakket.
Mogelijk wo rdt u tijdens dit pr oces gevraagd om op nieuw
op te star ten:
a. Ga naar tc-helicon.co m/gaming en zoek de
produc tpagina van GoXLR .
b. Kli k op de kop "Soft ware" en download de ni euwste
versie van G oXLR-app.
c. Voer het i nstallatiepak ket uit en volg de inst ructies
op het scherm.
2. Sl uit de applicatie w anneer de install atie van het
stuurp rogramma en de app is vo ltooid.
3. Sluit GoXLR aan op d e audiorandappar atuur. Zorg
ervoor d at de analoge audiok abels uit de buur t van
netsnoeren en voedingen liggen. Zie het aansluitschema
voor mogelijke conguraties.
Merk op dat de G LI (Ground Loop Isolat or) bedoeld
is voor analo ge audio naar/van ander e apparatuur
met netvoedingen.
4. Ver bind GoXLR via USB met je co mputer.
5. Sluit de GoXLR-vo eding aan en wacht to tdat GoXLR is
ingesch akeld (duurt slecht s een paar second en).
6. O pen de GoXLR app opnie uw.
7. Onder in het GoXLR-appvenster moet "GoXLR connected
via USB" te lezen z ijn.
8. Open het venster "Geluidsinstellingen" van Windows:
a. Kies onder 'K ies uw uitvoer apparaat' de opt ie
'Syst eem (TC-HELICON Go XLR )'.
b. Kies onder "Kies uw invoerapparaat"
voor "Chat Mic ( TC-HELICON Go XLR )".
c. Deze ac ties stellen je belangrijkste Window s-
geluidsuitvoer in op de "System" -fader (schuifregelaar)
op GoXLR en wij zen je XLR MIC INPUT of 3.5 mm MI Cingang aan als je belangrijkste microfooningang.
9. Voor alle cha ttoepassinge n zoals Discord, Sk ype, TeamSpeak,
In-game chat, enz .:
a. Kies "Chat Mic ( TC-HELICON GoXL R)"
als uw INPUT-apparaat.
b. Ki es "Chat (TC- HELICON GoXL R)"
als uw OUTPUT-apparaat.
c. Deze a cties stellen d e volumeregeling v an
je chatpr ogramma in op de "Chat "
-fader (sc huifregelaar) op G oXLR.
10. Voor muziek, games of andere toepassingen:
a. Op het paneel "Geluidsinstellingen” van Windows klikt
u onder "Geavanceerde geluidsopties" onderaan op
"Volume- e n apparaatvoor keuren van app".
b. Zor g ervoor dat uw game, m uziekspeler, enz. Au dio
afspee lt. Je programma wo rdt niet vermeld al s het
momenteel geen geluid maakt.
c. Zoek i n de lijst het progr amma dat u aan een fader
(schuifregelaar) wilt toewijzen.
d. Kli k op de vervolgkeuz elijst rechts va n de
programmanaam en kies de schuifregelaar waarop
u dat progr amma wilt laten vers chijnen. U kunt
bijvoorbeeld "Muziek (TC-HELICON GoXLR )"
kiezen voor Spotify.
11. Kie s in het broadcas tprogramma GoXL R's Stream Mix voor
"Broadc ast Stream Mix (TC-HELICON GoXLR)" of " Stream
Mix (TC-HELICON GoXLR)" als E XCLUSIEF binnenkomend
audioapparaat:
a. Ga in OBS naar Fi le → Settings → Audio:
i. Kies GoXLR's Str eam Mix als uw
microfoon / hulpaudioapparaat.
ii. Kies voor ALLE a ndere apparaten
UITGESCHAKELD.
b. Kli k in SLOBS op het tandwi el in de rechterbove nhoek:
i. Klik op Au dio.
ii. Kies GoXLR's Stream Mi x als uw
microfoon / hulpapparaat 1.
iii. Voor ALLE ander e audioapparate n kiest
u UITGESCHAKELD.
c. Ga XS plit naar Tools → Settings → Audio:
i. Kies onder Microfoon GoXLR's St ream Mix.
ii. Kies GEEN voor Au diovoorbeeld
en Systeemgeluid.
iii. U krijgt m ogelijk een waars chuwingspop -up.
Klik OK!
12. Met deze s tappen kunt u aan de sla g. Voor alle
andere functies hebben we een geweldige reeks
YouTube-v ideo's, een actieve Discord-community,
een volledige gebruikershandleiding en een geweldig
ondersteuningsteam. Gebruik de links in de Getting Support
secti e om met ons in contac t te komen.

54 55Quick Start GuideGoXLR
Verbindingsdiagram
Studio Vocal Mic
Stream
broadcast
External Audio Device
(if applicable)
Stream alerts
Gaming Headset with Mic
Gaming Console
Probleemoplossen
Probleem Mogelijke Oplossing
Overmatig gezoem
en lawaai
Ik kan mijn mic rofoon
niet horen
De app maak t geen
verbinding met mijn
apparaat
• • Controleer of alle stopcontacten goed zijn geaard.
• • Zorg ervoor dat audiokabels uit de buurt zijn van voedingsadapters en voedingen.
• • Koop even tueel een "Ground L oop Isolator" (verk rijgbaar via Amazo n en andere verkoopk analen)
voor analoge audioverbindingen met/van andere apparatuur met netvoeding.
• • Zor g ervoor dat je de s tappen voor het i nstellen van de mic rofoon hebt do orlopen, inclus ief het kiezen
van "Condenser (48 V)" als je microfoo n "fantoomvoe ding" nodig heef t.
• • Cont roleer of de kno p voor het dempen va n de microfoon ni et is geactive erd.
• • Slui t OF een XLR OF een 3.5 mm mi crofoon aan. De X LR-aansluiting w ordt automatis ch uitgeschake ld
wanneer u e en microfoon va n 3.5 mm aansluit.
• • Sluit de G oXLR app door op de "X" in d e rechterbovenho ek te klikken.
• • Selecteer "Afsluiten" in het pop-upvenster "App sluiten".
• • Koppel d e GoXLR los.
• • Sluit de G oXLR weer aan.
• • Start de GoXLR app opnieuw.
Audio out to GoXLR
via headphone output
Blue Yeti Mic aanbevolen verbinding
Dedicated Streaming
Computer (if applicable)
Power via
USB (no audio)
Gaming/Streaming
Computer
ComputerBlue Yeti Microphone
21 3 4
Mic
Music Chat System

56 57Quick Start GuideGoXLR
Välkommen
Om detta Dokument
Denna snabb startsgu ide hjälper dig att s tälla in,
ansluta och börja använda din GoXLR.
GoXLR App
GoXLR-app en krävs för att a nvända din GoXLR.
GoXLR-appens nyckelfunktioner inkluderar:
• • EQ:a, komprimera, gate-behandla och de-essa din mikrofon
• • Ställ in och justera mixerns kontroller
• • Ändr a knappar / skärmfärger
• • Skapa och hantera prover
• • Spar a röst FX-inställningar
• • Direk t åtkomst till produkthandböcker
• • Tillgång till TC Helicon-stöd
Minimikrav för hårdvara:
PC-baserad hårdvara
Rekommenderade operativsystem:
Windows*
* Window s är antingen e tt regis trerat var umärke elle r varumärke s om tillhör M icrosof t
Corpor ation i USA oc h / eller andra l änder.
* Gamla Win dows-ver sioner, Windo ws 7 och Wind ows 8, 32-bita rs eller 64 -bitars , kräver
drivr utin v4.67.0. Stöde t för progr ammet kan upp höra vid en v iss versio n, nedladdn ingen
kommer at t vara tillg änglig och b etecknad o m detta in träff ar
Registrera din GoXLR
Om du vill re gistrera din GoXL R med GoXLR-appen går d u till iken
SYSTEM oc h klickar på "Help & Su pport" och se dan på "Register
GoXLR" fö r att komma till webbs idan för regist rering. Regist rera
din enhet o ch se "Warranty Terms & C ondition" för det aljer.
Regist rering av din produk t krävs för at t ansöka om förlän gd
garanti i länder som omfattas.
Regist rering av din produk t behövs inte fö r att använda GoXLR,
uppdatera rmware eller kontakta supporten.
-Core 2 DU O CPU
-Internet connection
-1 GB RAM
-Window s 10, 32-bitars elle r
64-bitars
-Window s 11, 64-bi t
Skaa Referenshandledningen
En fullständig referenshandledning nns på GoXLR:s produktsida,
tc-helicon.com/gaming, under rubriken "Documentation" eller i
GoXLR-appen på iken SYSTEM i "Help & Support".
Få support
Om du for tfarande har f rågor om GoXLR ef ter att ha läst den hä r
snabbstartshandledningen och referenshandledningen kan du gå
med i vår Dis cord för att få de s enaste vanliga f rågorna och hjälp
från gemenskapen:
HeliconGaming
https://discord.gg/helicongaming
https://discord.gg/tchelicongaming
Du hittar handledningar på vår YouTube -kanal
HeliconGamingYT:
https://www.youtube.com/helicongamingyt
Följ oss!
@helicongaming
@tchelicongaming
@tcheliconoicial
@tchelicon
Kontroller
21 3 4
Mic
(1)
(2)
(3)
(1) SCRIBBLE STRIPS - för n amngivning av kanal er.
(2 ) CHANNEL FADERS - Tilldelningsbara skjutreglage som
styr en skilda kanalnivå er i din mix.
(3 ) CHANNEL MUTE - växlar f ör matchande kana l i mixern.
(4 ) VOICE FX PRESETS - Med FX PRE SETS kan du lagra upp t ill
sex förinställningar för eek ter.
(5 ) VOICE FX CON TROLS - tillåta realtidsstyrning av den
tilldelade eektparametern.
(6 ) MEGAPHONE - knappen ger din röst snedvridning som
en megafon.
(7 ) ROBOT - knapp en förvandlar d in röst till en
maskinliknande robot.
Music Chat System
(4) (5) (6)
(7)
(8)
(9)
(10)
(11)
(12)(13)
(8 ) HARDTUNE - ställ er in din röst ef ter ljudet av din musik
eller dit t spel.
(9 ) FX - slår på ell er av alla röst FX.
(10) !@#$* - knap pen låter dig omedel bart censurer a och “pipa
ut” din mikrofon.
(11) “COUGH” - stäng er av mikrofonen me dan knappen hålls
intryc kt eller kan kongu reras för att sl å på och av ljudet.
(12 ) SAMPL E PADS - hålla val da prover och stöt fångare för
omedelb ar återkallelse. Hål l ned en knapp för at t spela
in ett ny tt exempel och t ryck sedan på f ör att spela upp.
Tryck på CLE AR och sedan på en av de f yra provkudda rna
för att r ensa provet.
(13 ) SAMPLE BANK - organise rar prover och stöt fångare i
grupper f ör omedelbar åte rkallelse.
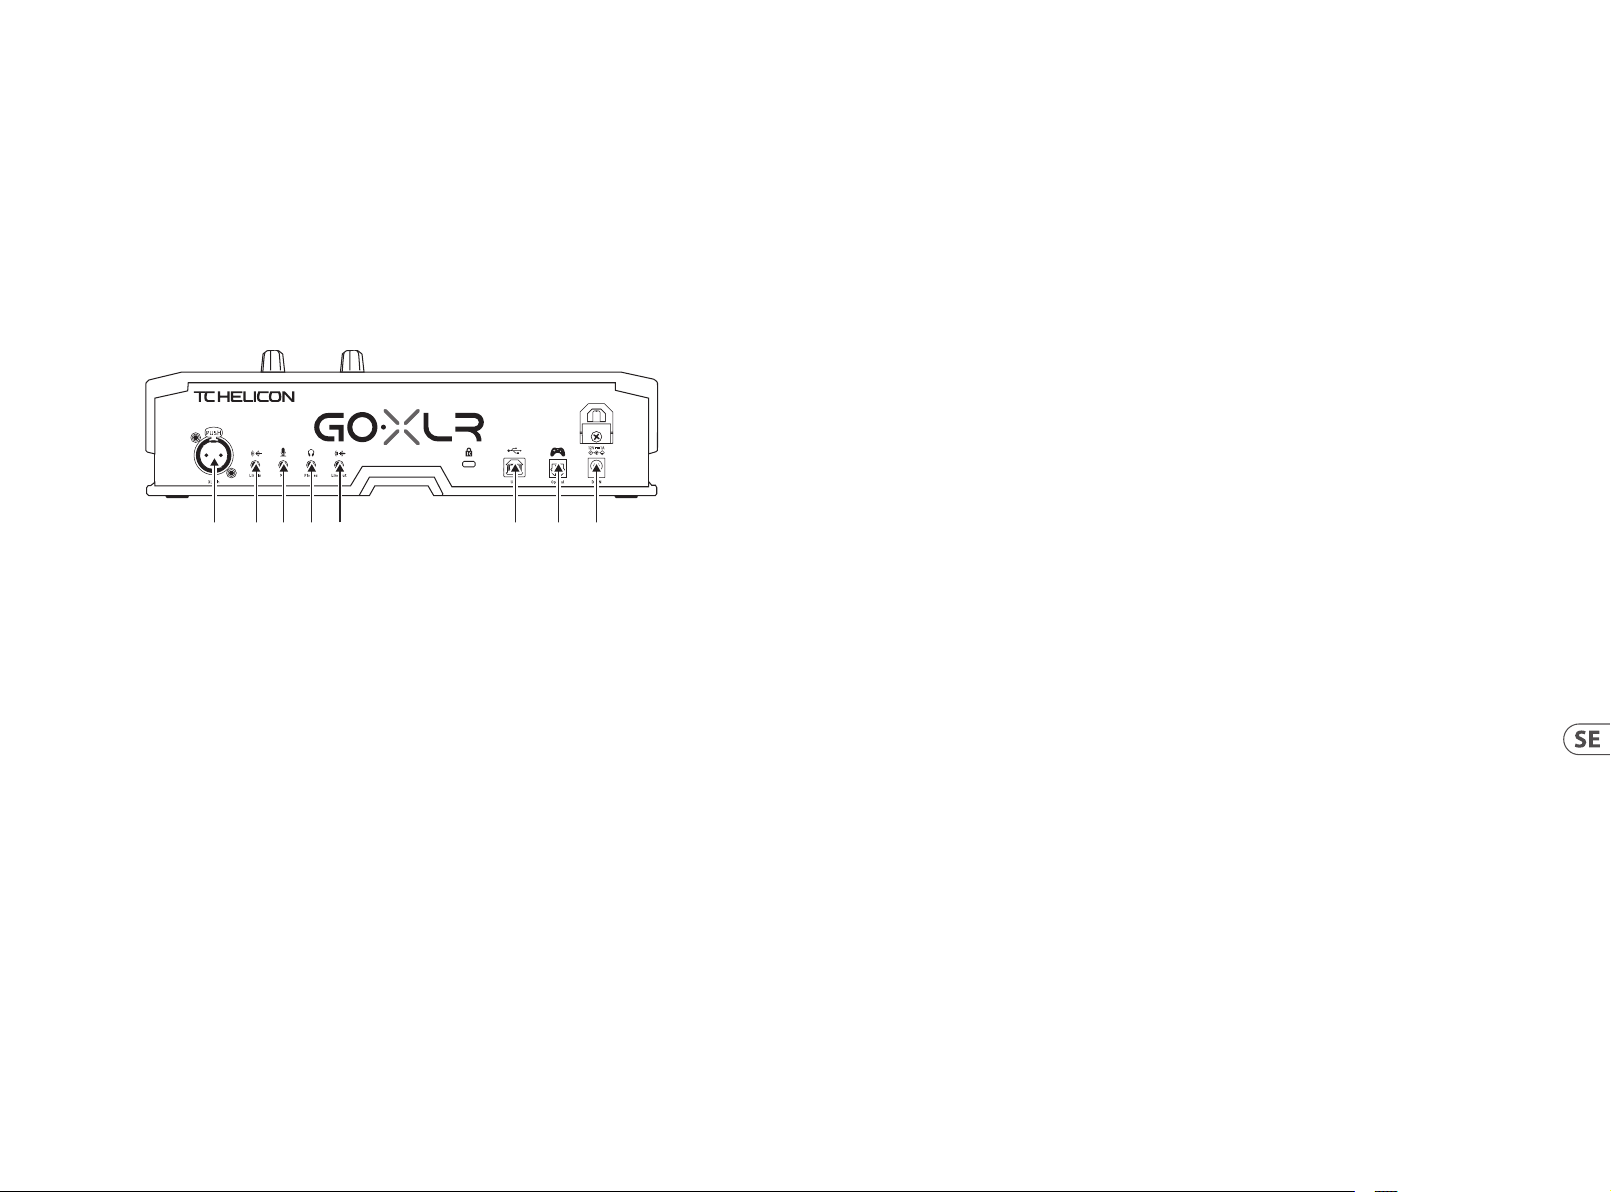
58 59Quick Start GuideGoXLR
Kontroller
(14) (15) (16) (17) (18) (19) (21)(20)
(14) XLR MIC INPUT - För ljudinsignaler från professionella
mikrofoner. För kondensatormikrofoner som kräver
fantomma tning går du till iken MI C i GoXLR-appen,
öppnar “Mic Setup” och aktiverar inställningen
“Condense r” under MIC TYPE f ör att aktive ra GoXLR:s
fantommatning.
(15) LINE IN - för ljudingång från enheter som telefoner,
surfplattor, datorer etc.
(16) MIC - ingång för anslutning till headsetmikrofoner.
Vanligtvis blir denna headsetanslutning en rosa kontakt.
NOTERA: Om d u tänker använda den pop ulära Blue Yeti *
-mikrofonen, som har sin egen inbyggda hörlursutgång,
bör du köra de n inbyggda hörlur sutgången till GoXLR : s
MIC-ingång. För Blue Yeti -mikrofoner so m drivs via USB,
anslut USB- kontakten dire kt till din dator fö r ström, men
välj inte Blu e Ye ti som en ljudkälla på d atorn. Istället
kommer Blue Yeti s hörlursutgång a tt vara ljudkälla n för
att blanda inuti GoXLR.
(17) PHONES - utgång för d ina hörlurar. Vanligt vis blir
hörlursuttaget en grön kontakt.
(18) LINE OUT - Gör det m öjligt att skick a ljud till streami ng-
eller speldatorer för dubbla PC-inst allationer eller andra
enheter som högtalare.
(19 ) USB - För PC-anslutning, rmware-uppdateringar och
ärrstyrning med GoXLR-appen.
(20) OPTICAL - Ingångsanslutning för tidigare generationens
SONY PlaySt ation eller Micro rosoft Xbox ell er HDMI
ljudextraktorer.
(21 ) DC IN - accepterar s trömanslutni ng via den medfölj ande
12 V-adaptern.
*Yeti är ett registrerat varumärke som tillhör Blue Microphones.
†PlaySt ation är et t registr erat varu märke eller v arumärke s om tillhör S ony Intera ctive
Entertainment Inc. SONY är ett registrerat varumärke s om tillhör Sony Corpor ation.
‡Xbox är an tingen et t regist rerat varu märke elle r varumärk e som tillhö r Microso ft
Corpor ation i USA oc h / eller andr a länder.
Installationssteg
1. Ladda ner och installera drivrutinen / applikationspaketet.
Du kan bli omb edd att star ta om under denna pr ocess:
a. Gå till tc-helicon.co m/gaming och leta upp
produk tsidan för GoXLR .
b. Kli cka på rubriken "S oftware" oc h hämta den senaste
versionen av GoXLR-appen.
c. Kör installationspaketet och följ instruktionerna
på skärme n.
2. Nä r drivrutinen o ch appen har slutf örts stän ger du appen.
3. Anslut GoXLR till ljudutrustning. Dra analoga ljudkablar så
att de inte ä r i närheten av ström kablar och nätagg regat.
Se anslutningsdiagrammet för möjliga kongurationer.
Obser vera att GLI (Ground Lo op Isolator) är avsed d för
analogt ljud till/från andra strömförsörjda enheter.
4. An slut GoXLR via USB till din d ator.
5. Anslut GoXLR: s strömförs örjning och vänta t ills GoXLR
är igång (ba ra några sekunder).
6. Öppna GoXLR-appen igen.
7. I det nedre hör net i GoXLR-appens f önster ska det st å "GoXLR
connec ted via USB".
8. Öppna Windows-ljudpanelen:
a. Välj “System ( TC-HELICON GoXLR”
under “Välj din utmatningsenhet”.
b. Under "Välj din inmatningsenhet" väljer du
"Chattmikrofon (TC-HELICON Go XLR )".
c. Des sa åtgärder ställ er in din huvudsak liga Windows-
ljudutgån g till "System" -fader n (skjutreglage t) på
GoXLR och an ger din XLR MIC INPUT eller 3. 5 mm
MIC-ingång som din huvudsakliga mikrofoningång.
9. För alla cha ttapplikati oner som Discord, Sk ype,
TeamSpeak, cha tt i spelet, etc.:
a. Välj "Chat Mic (TC-HELICON GoXLR)"
som din INPUT-enhet.
b. Välj "C hat (TC-HELICON Go XLR)"
som din OUTPUT-enhet.
c. Des sa åtgärder ställ er in ditt chatt programs
volymkontroll till "Chat" -fader (skjutreglage)
på GoXLR.
10. För musik, spel eller andra applikationer:
a. I inställningsfönstret "Ljud" i Windows klickar du
på "Inställningar för appvolym och enhet" under
"Avancerade ljudalternativ" längst ned.
b. Se t ill att ditt spe l, din musikspelar e etc. spelar ljud.
Du ser inte di tt program lis tat om det för när varande
inte gör någ ot ljud.
c. Hit ta det program du v ill tilldela en fade r
(skjutre glage) i listan.
d. Kli cka på listrut an till höger om prog ramnamnet och
välj skjut reglaget du vill at t programmet sk a visas på.
Du kan till e xempel välja “Musik ( TC-HELICON
GoXLR)” för Sp otify.
11. I ditt sändningsprogram väljer du GoXLR:s strömningsmix –
antingen " Broadcast Stre am Mix (TC-HELICON GoXL R)" eller
"Stream Mi x (TC-HEL ICON GoXLR)" – som din enda enhe t för
inkommande ljud:
a. I OBS går du till Fil e → Settings → Audio:
i. Välj GoXL R's Stream Mix som din
mikrofon / extra ljudenhet.
ii. Välj INAKTIVERAD för ALLA and ra enheter.
b. I St reamlabs klick ar du på kugghjulet i d et övre
högra hörnet:
i. Klicka på Ljud.
ii. Välj GoXLR's Stre am Mix som din
mikrofo n / extra enhet 1.
iii. Välj INAKTIVERAD för ALL A andra ljudenheter.
c. I XSp lit går du till Tools → Settings → Audi o:
i. Välj GoXL R's Stream Mix under mikrofon.
ii. Välj INGEN för ljudförhandsgranskning
och systemljud.
iii. Du kan få en va rnings popup. Kli cka ok!
12. Dessa s teg ska få dig igång. F ör alla andra funk tioner
har vi en fan tastisk serie YouTube-vid eor, en aktiv
Discord-community, fullständig användarmanual oc h
underbart suppor tteam. Använd länka
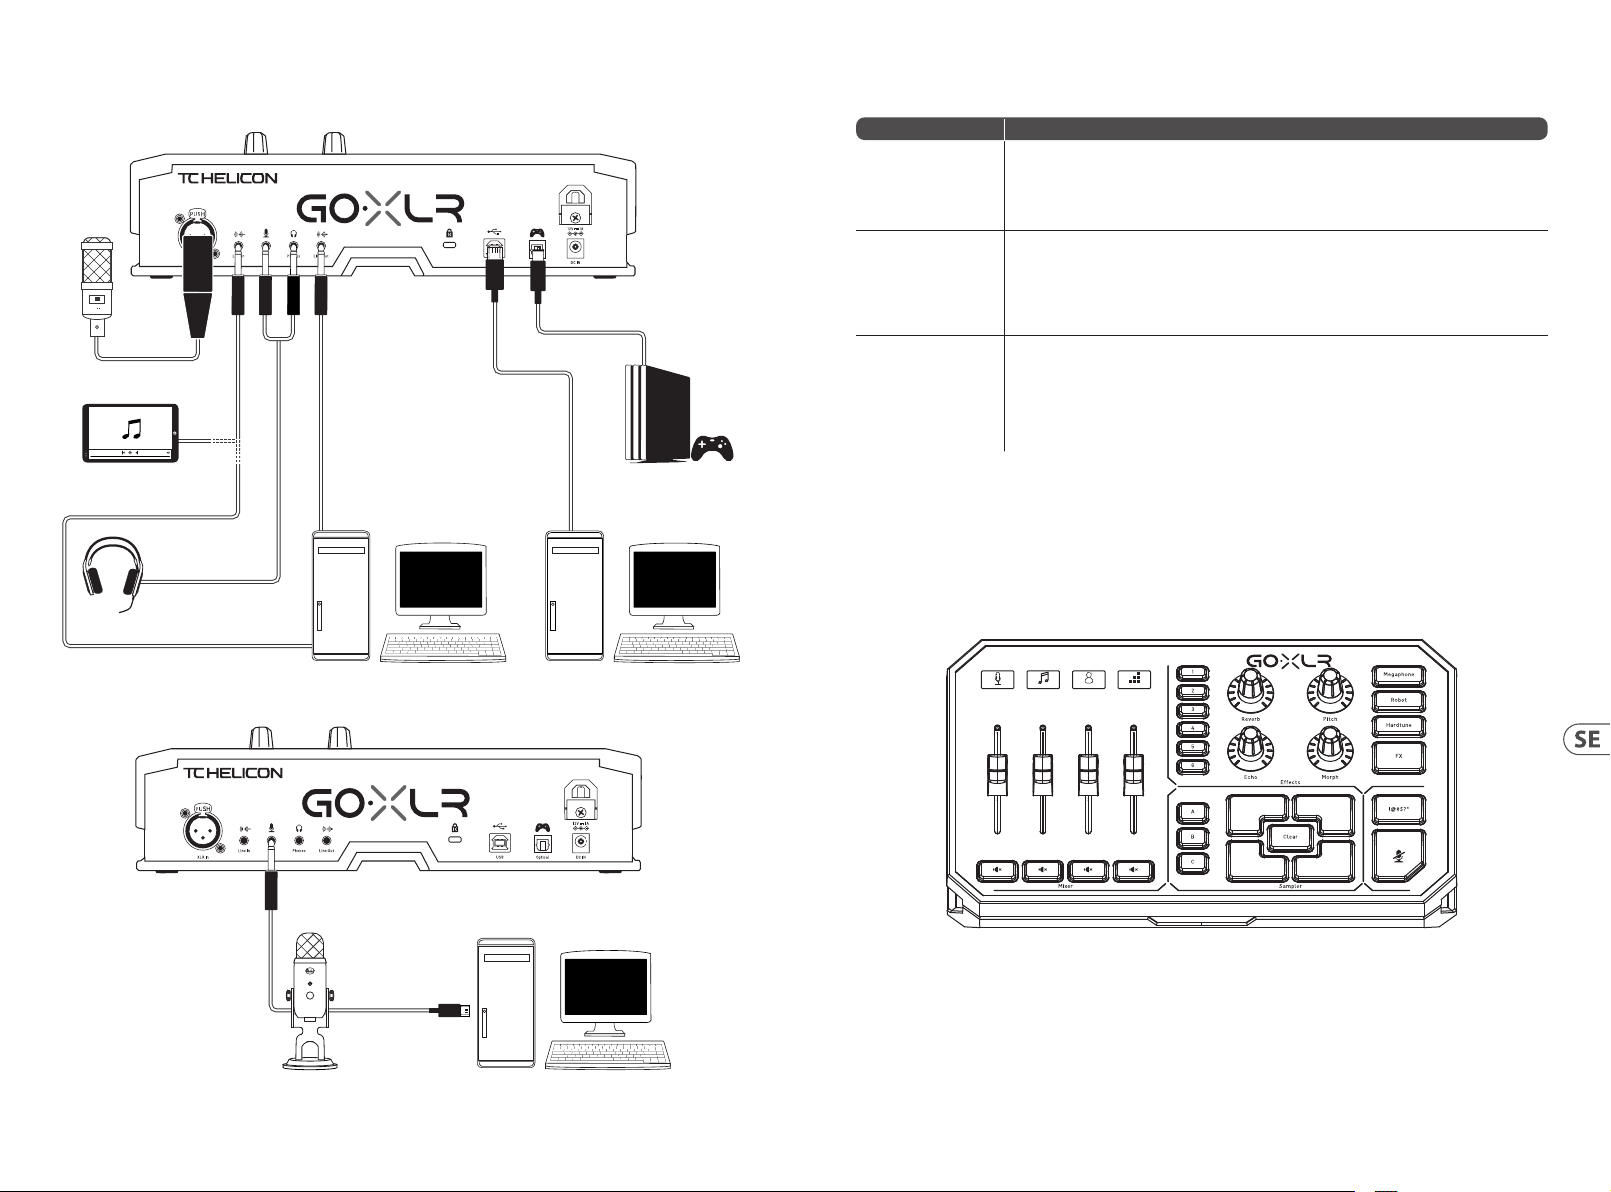
60 61Quick Start GuideGoXLR
Kopplingsschema
Studio Vocal Mic
External Audio Device
(if applicable)
Stream alerts
Gaming Headset with Mic
Stream
broadcast
Gaming Console
Felsökning
Problem Möjlig lösning
För mycket br um
och buller
Jag hör inte min mikrofon • • S e till att du har gåt t igenom stegen f ör mikrofon inställningar, ink lusive att välja "Ko ndensor (48 V)"
Appen ansl uter inte till
min enhet
• • Kontro llera att alla ut tag är ordentligt j ordade.
• • Se till at t ljudkablar är bo rta från näta daptrar och nätag gregat.
• • Om det b ehövs, köp en "Ground Lo op Isolator"-enhe t (nns på Amazon och ho s andra
återförsäljare) för analoga ljudanslutningar till/f rån andra strömförsörjda enheter.
om din mikrofon kräver "fantommatning".
• • Kontrollera att din mikrofonavstängningsknapp inte har aktiverats.
• • Ans lut antingen en XLR EL LER en 3.5 mm mikrofo n. XLR-uttag et inaktivera s automatiskt n är
du ansluter e n 3.5 mm mikrofon.
• • Stäng GoX LR-appen genom at t klicka på “X” i de t övre högra hörne t.
• • Välj "Avsluta" i po pup-fönstr et "Stäng app".
• • Koppla u r GoXLR.
• • Anslut GoXLR igen.
• • Starta om GoXLR-appen.
Audio out to GoXLR
via headphone output
Blue Yeti Mic r ekommend erad anslut ning
Dedicated Streaming
Computer (if applicable)
Power via
USB (no audio)
Gaming/Streaming
Computer
ComputerBlue Yeti Microphone
21 3 4
Mic
Music Chat System

62 63Quick Start GuideGoXLR
Witamy
O tym Dokumencie
Ta skrócona instrukcja obsługi pomoże skongurować, podłączyć i
rozpoc ząć obsługę ur ządzenia GoXLR.
GoXLR App
Aplikacj a GoXLR jest WYMAGAN A do obsługi urz ądzenia GoXLR.
Najważniejsze funkcje aplikacji GoXLR obejmują:
• • Ko rektor (EQ), kompres or, bramka oraz de- esser dla
Twojego mikrofonu
• • Skonguruj i dostosuj ustawienia miksera
• • Zmień kolor y przycisków / ekranu
• • Twór z próbki i zarz ądzaj nimi
• • Z apisz ustawien ia efektów gło sowych
• • Be zpośredni dostęp do ins trukcji produktów
• • D ostęp do wsparci a TC Helicon
Minimalne wymagania sprzętowe:
Sprzęt o party na PC
Zalecane systemy operacyjne:
Windows*
* Window s jest zas trzeżony m znakiem to warowym lu b znakiem to warowym f irmy Micro soft
Corpor ation w Stan ach Zjedno czonych i / lu b innych kraja ch.
* Starsz e wersje Win dows – Window s 7 oraz Wind ows 8, 32 lub 64 -bitowe – wy magają
sterow nika v4.67.0. Wsparc ie aplikacj i może zakońc zyć się na ko nkretnej w ersji; będ zie ona
wtedy d ostępna d o pobrania o raz odpow iednio ozna czona, je śli tak się st anie.
Prosimy Zarejestrować Swój GoXLR
Aby zareje strować swój GoXL R za pomocą aplik acji GoXLR,
przejdź d o karty SYSTE M, kliknij „Pomoc i w sparcie” (Help &
Suppor t), a następnie „Zar ejestruj GoXLR ” (Register), aby przejś ć
do strony r ejestracji. Z arejestruj swo je urządzenie i za poznaj
się z warunk ami gwarancji (War ranty Terms & Condit ions)
zawierających dodat kowe szczegół y.
Rejestr acja produkt u jest WYMAGANA, aby m óc uzyskać
ROZSZERZO NĄ GWARANCJĘ w objęt ych krajach.
Rejestr acja produkt u NIE JEST wymagan a, aby korzystać z
GoXLR, aktualizować oprogramowanie rmowe lub skontaktować
się ze wsparciem.
-Core 2 DU O CPU
-Internet connection
-1 GB pamięci R AM
- Wind ows 10, 32-bitowy lu b
64-bitowy
-Window s 11, 64-bi t
Pobierz Pełną Instrukcję
Pełna in strukcja jest do stępna ze strony p roduktu GoXLR,
tc-helicon.com/gaming, pod zakładką „Dokument acja”
(Documen tation) lub w aplikacj i GoXLR pod zakład ką SYSTEM w
sekcji „Po moc i wsparcie” (Hel p & Support).
Uzyskanie Wsparcia
Jeśli mas z dodatkowe pytani a dotyczące GoXL R po przeczy taniu
tego pora dnika szybki ego startu or az pełnej inst rukcji, dołąc z do
naszego k anału Discord dl a najnowszych od powiedzi na pyt ania
oraz wsparcia społeczności:
HeliconGaming
https://discord.gg/helicongaming
https://discord.gg/tchelicongaming
Możesz rów nież znaleźć pora dniki na naszym k anale YouTu be,
HeliconGamingYT:
https://www.youtube.com/helicongamingyt
Dołącz do nas!
@helicongaming
@tchelicongaming
@tcheliconoicial
@tchelicon
Sterowanica
21 3 4
Mic
(1)
(2)
(3)
(1) SCRIBBLE STRIPS - do nadawania nazw kanałom.
(2 ) CHANNEL FADERS - Suwaki z moż liwością
alternatywnego przypisania do kontroli poziomów
indyw idualnych kanałów w m iksie.
(3 ) CHANNEL MUTE - przełąc za pasującego kanału
w mikser ze.
(4 ) VOICE FX PRESETS - umożliwi a przechowy wanie do
sześciu presetów efektów.
(5 ) VOICE FX CON TROLS - pozwalają na ko ntrolę w czasie
rzeczywistym przypisanego parametru efektów.
(6 ) MEGAPHONE - przyc isk dodaje zniek ształcenia do
twojego głosu jak megafon.
(7 ) ROBOT - prz ycisk przeks ztałca Twój głos w r obota
podobnego do maszyny.
Music Chat System
(4) (5) (6)
(7)
(8)
(9)
(10)
(11)
(12)(13)
(8 ) HARDTUNE - dost raja Twój głos do dźwi ęku Twojej
muzyk i lub gry.
(9 ) FX - włąc za lub wyłąc za wszystk ie efekty gł osowe.
(10) !@#$* - Prz ycisk umożliwia na tychmiastowe
cenzurowanie i wyciszanie mikrofonu.
(11) “COUGH” - wyci sza Twój mikrofon, gdy p rzycisk jes t
wciśnięt y, lub może być skongurowa ny do włączenia
ciągłego wyciszenia.
(12 ) SAMPL E PADS - PODKŁADKItrzymaj wybrane próbki i
zderzaki do natychmiastowego przy wołania. Przytrzymaj
przyc isk, aby nagrać nową p róbkę, a następnie nac iśnij,
aby odtw orzyć. Naciśni j CLEAR, a następni e jeden z
czter ech padów samplo wych, aby wycz yścić tę próbkę.
(13 ) SAMPLE BANK - organizu je próbki i zderz aki w grupy w
celu natychmiastowego prz ywołania.

64 65Quick Start GuideGoXLR
Sterowanica
(14) (15) (16) (17) (18) (19) (21)(20)
(14) XLR MIC INPUT - Dla prz ychodzącego s ygnału audio
z profesjonalnych mikrofonów. Dla mikrofonów
pojemnościowych wyma gających zasilania „phantom”,
przejdź d o karty MIC w apli kacji GoXLR, otwó rz
„Kongurację mikrofonu” (Mic setup) i włącz ustawienie
mikrofonu pojemnościowego (Condenser) jako typ
mikrofo nu (Mic Type), aby włączyć z asilanie phantom
w GoXLR.
(15) LINE IN - do wejścia au dio z urządzeń tak ich jak telefony,
tablet y, komputery itp.
(16) MIC - wejście do pod łączenia mikr ofonów zestawu
słuchaw kowego. Zazwy czaj to połąc zenie zestawu
słuchawkowego będzie różow ym złączem.
UWAGA: Jeśli zamier zasz używać popularnego mikrofonu
Blue Yeti *, który m a własne wbudowan e wyjście
słuchaw kowe, powinieneś po dłączyć to wbu dowane
wyjśc ie słuchawkowe do wej ścia MIC w GoXLR. W
przy padku mikrofon ów Blue Yeti zasilanych pr zez USB
podłąc z złącze USB bezp ośrednio do kompu tera w celu
zasilani a, ale nie wybieraj B lue Yeti jako źródła dź więku w
komputer ze. Zamiast tego w yjście słuch awkowe Blue Yeti
będzie źródłem dźwięku do miksowania wewnątrz GoXLR.
(17) PHONES - gniazdo wy jściowe do słuc hawek. Zazwyc zaj
złącze słuchawkowe będzie zielonym złączem.
(18) LINE OUT - Pozwal a na przesyłani e dźwięku do komp utera
w celu stre amingu lub gier w prz ypadku korz ystania z
dwóch komp uterów, lub do innych urz ądzeń jak głośnik i.
(19 ) USB - W celu podł ączenia do kompute ra, aktualizac ji
oprogramowania rmowego oraz zdalnej kontroli przez
aplikację GoXLR.
(20) OPTICAL - Połączenie wejściowe dla poprzedniej generacji
ekstr aktorów audio SO NY PlayStation lub Mi corosoft Xbo x
lub HDMI.
(21 ) DC IN - akceptuje po dłączenie za silania przez do łączony
adapter 12 V.
*Yeti jest zastrzeżonym znakiem towarowym rmy Blue Microphones.
†PlaySt ation jes t zastrz eżonym znak iem towar owym lub zn akiem towar owym rm y
Sony Inte ractiv e Enterta inment Inc . SONY jest z astrze żonym znak iem towarow ym
rmy Sony Corporation.
‡Xbox je st zastr zeżonym zn akiem towa rowym lub z nakiem tow arowym r my
Micros oft Corp oration w St anach Zje dnoczon ych i / lub innyc h krajach.
Kroki Konfiguracji
1. Pobier z i zainstaluj pa kiet sterowni ka / aplikacji. Może sz zostać
popros zony o ponowne uruc homienie podc zas tego proces u:
a. Przejdź do tc-heli con.com/gaming i znajdź s tronę
produktu GoXLR.
b. Wybierz zakładkę „Oprogramowanie” (Software) i
pobierz najnowszą wersję aplikacji GoXLR.
c. Uruc hom pakiet inst alacyjny i zast osuj się do
instru kcji na ekranie.
2. Po zakończeniu inst alacji sterownika i aplikacji
zamknij aplikację.
3. Podłącz G oXLR do sprzętu audi o. Upewnij się, że analog owe
kable audi o znajdują się z dala od ka bli i źródeł zasi lania.
Zapoznaj s ię z diagramem pod łączenia pokaz ującym
możliwe konguracje.
Prosimy pa miętać, że GLI (izolat or masy) służy do d źwięku
analogowe go do/z innych zasilanyc h urządzeń.
4. Po dłącz GoXLR pr zez USB do komputera.
5. Podłącz z asilacz GoXLR i poc zekaj na jego wł ączenie
(kilka se kund).
6. Ponownie otwór z aplikację GoXLR.
7. Dolny róg aplikacji GoXLR powinien wyświetlać komunikat
„GoXLR pod łączony przez USB ”.
8. O twórz panel „Ustawienia dźwięku” systemu Windows:
a. W sekcji „Wybierz urządzenie wyjściowe” wybierz
„Syst em (TC-HELICON G oX LR) ”.
b. W sekcji „Wybierz urządzenie wejściowe” wybierz
„Chat Mic (TC-HELICON Go XLR )”.
c. Te dział ania ustawiają gł ówne wyjście dź więku
system u Windows na suwak (suwa k) „System”
w urządz eniu GoXLR i wyzna czają wejście
XLR MIC INPUT lu b wejście MIC 3.5 mm jako gł ówne
wejście mikrofonowe.
9. W przy padku aplikacj i do czatu, takic h jak Discord, Sky pe,
TeamSpeak, c zat w grze itp .:
a. Wybierz „C hat Mic (TC-HELICON GoX LR)”
jako urządzenie WEJŚCIOWE.
b. Wy bierz „Czat (TC-HELICON GoXLR)”
jako urządzenie WYJŚCIOWE.
c. Te czynności powodują ustawienie poziomu
głośno ści programu do c zatu na suwak (suwak)
„Czat ” w urządzeniu G oXLR.
10. W pr zypadku muz yki, gier lub innych ap likacji:
a. W panelu ust awień dźwięku Wi ndows kliknij
„Prefe rencje głośnoś ci i urządzeń apli kacji” na dole,
pod „Zaawansowane opcje dźwięku”.
b. Upe wnij się, że Twoja gra, odt warzacz muz yki itp.
Odtwa rza dźwięk. N ie zobaczys z swojego program u na
liście, jeśli obecnie nie wydaje żadnego dźwięku.
c. Znajd ź program, któr y chcesz prz ypisać do suwaka
(suwaka) na liśc ie.
d. Kli knij listę rozwi janą po prawej stron ie nazwy
program u i wybierz suwa k, na którym ma si ę
wyśw ietlać ten program . Na przykład mo żesz wybrać
„Muzyka (TC-HELICON GoXLR)” dla Spotify.
11. W pro gramie do transmis ji wybierz GoXL R Stream Mix –
„Broad cast Stream Mix (TC-HELICON GoXL R)” lub „Stream
Mix (TC-HELICON GoXLR)” jako s woje JEDYNE urząd zenie
przyc hodzącego audi o:
a. W OBS przejdź d o Plik → Ustawienia → Audio:
i. Wybierz GoXLR 's Stream Mix jako
mikrofon / pomocnicze urządzenie audio.
ii. W przypa dku WSZYSTKICH in nych urządzeń
wybierz WYŁĄCZONE.
b. W Str eamlabs kliknij ko ło zębate w prawym
górnym r ogu:
i. Klik nij Audio.
ii. Wybierz GoXLR's Strea m Mix jako
mikrofon / urządzenie pomocnicze 1.
iii. W przy padku WSZYSTKIC H innych urządzeń a udio
wybierz WYŁĄCZONE.
c. W XSp lit wybierz Nar zędzia → Ustawienia → Audio
i. W obsz arze Mikrofon w ybierz GoXLR 's
Stream Mix
ii. Dla podglądu a udio i dźwięku s ystemowego
wybierz BRAK.
iii. Możesz ot rzymać ostr zeżenie. Kliknij OK !
12. Te kroki powin ny pomóc Ci zacz ąć działać. Jeśli c hodzi
o wszys tkie inne funkcj e, mamy świetną seri ę lmów na
YouTube, aktywn ą społeczno ść Discord, peł ną instrukcję
obsług i i wspaniały ze spół wsparcia. S korzystaj z łą czy
w sekcji Uz yskaj pomoc sekcja d o łączenia się z nami.

66 67Quick Start GuideGoXLR
Schemat Podłączenia
Studio Vocal Mic
Stream
broadcast
External Audio Device
(if applicable)
Stream alerts
Gaming Headset with Mic
Gaming Console
Rozwiązywanie Problemów
Problem Możliwe Rozwiązanie
Nadmierny przydźwięk
i szum
Nie sł yszę mikrofonu • • Upe wnij się, że wykona łeś wszys tkie kroki kon guracji mikro fonu, w tym wy branie opcji
Aplikacj a nie łączy się z
moim urządzeniem
• • Sprawdź, czy wszys tkie gniazda są odpowiednio uziemione.
• • Upewn ij się, że kable audio są z da la od zasilacz y i zasilaczy.
• • Jeśli to ko nieczne, zaku p urządzenie ty pu „izolator mas y” (dostępny w sklep ach jak np. Allegro) dla
analogow ych podłącz eń audio do/z innych zasi lanych urządzeń.
„Kondensator (48 V)”, jeśli Twój mikrofon w ymaga „zasi lania phantom”.
• • Spr awdź, czy pr zycisk wycis zania mikrof onu nie został ak tywowany.
• • Pod łącz ALBO XLR LUB mi krofon 3.5 mm. Gnia zdo XLR jest auto matycznie w yłączane
po podł ączeniu mikro fonu 3.5 mm.
• • Zamk nij aplikację GoXLR , klikając „X” w praw ym górnym rogu.
• • Wybie rz „Zakończ ” w wyskakując ym oknie „Zam knij aplikację”.
• • Odłącz GoXLR.
• • Podłącz ponownie GoXLR.
• • Uruchom ponownie aplikację GoXLR.
Audio out to GoXLR
via headphone output
Zalecan e połączen ie Blue Yeti Mic
Dedicated Streaming
Computer (if applicable)
Power via
USB (no audio)
Gaming/Streaming
Computer
ComputerBlue Yeti Microphone
21 3 4
Mic
Music Chat System

68 69Quick Start GuideGoXLR
Specications
Analog Connections
XLR In 1 x XLR, bala nced
Phantom power +48 V, switc hable via cont rol app
Line In 1 x /" TRS, stereo
Mic 1 x /" TRS, biased for c omputer micr ophone inpu t
Phones 1 x /" TRS, stereo
Line Out 1 x /" TRS, stereo
Digital Connections
USB 1 x USB 2.0, typ e B
Optical 1 x Toslink
Controls
Motorized faders 4
Backlit LCD scribble strips 4
Rotational encoders 4
Lighting RGB
Buttons 24
System / Processing
A/D – D/A conver sion 24-bit @ 4 8 kHz
Eects
Frequency response 10 Hz to 20 kHz , +0/-2 dB
Dynamic range > 110 dB
S/N ratio > 101 dB
Power Supply / Voltage
Power input
Adapter 12 V DC / 1 A
Power consumption 10 W
Dimensions / Weight
Dimensi ons (H x W x D) 82 x 285 x 174 mm (3.2 x 11.2 x 6.9")
Weight 1.55 kg (3.41 lbs)
Reverb, Ec ho, Pitch Shif ting, Morph (f ormant shif ting),
Megaphone, Robot, Hardtune, Sampler
Standar d 12 V DC, center negat ive
< 1 A (power su pply include d)
FEDERAL COMMUNICATIONS COMMISSION
COMPLIANCE INFORMATION
TC Helicon
GoXLR
Responsible Party Name: Music Tri be Commercia l NV Inc.
Address: 122 E. 42nd St.1,
8th Floor N Y, N Y 10168,
United States
Email Address: legal@musictribe.com
GoXLR
This equi pment has been te sted and found t o comply with the li mits for a Class B d igital device,
pursua nt to part 15 of the FCC Rul es. These limit s are designed t o provide reason able protec tion
against harmful interference in a residential installation. This equipment generates, uses and can
radiate radio frequency energy and, if not installed and used in accordance with the instructions,
may cause harmful interference to radio communications. However, there is no guarantee that
interference will not occur in a particular installation. If this equipment does cause harmful interference
to radio or t elevision rece ption, which ca n be determined b y turning the equ ipment o and on,
the user is e ncouraged to tr y to correc t the interfer ence by one or more of t he following me asures:
• • Reorient or relocate the receiving antenna.
• • Increase the separation between the equipment and receiver.
• • Connect t he equipment int o an outlet on a circ uit dierent f rom that to which t he receiver is con nected.
• • Consult the dealer or an e xperienced radio/TV technician for help.
This equi pment complie s with Part 15 of the FCC r ules. Operati on is subject to t he following t wo conditions:
(1) this device may no t cause harmf ul interfere nce, and
(2) this device must accept any interference received, including interference that may cause undesired operation.
Important information:
Changes o r modicatio ns to the equipme nt not expressl y approved by Musi c Tribe ca n void the
user’s authority to use the equipment.
Hereby, Musi c Tribe dec lares that this p roduct is in com pliance with Dir ective 2014/35/EU,
Direc tive 2014/30/EU, Direc tive 2011/65/EU and Amendment 2015/863/EU,
Direc tive 2012/19/EU, Regulation 519/2012 REACH SV HC and Direct ive 1907/2006/ EC.
Full text of EU DoC is available at https://community.musictr ibe.com/
EU Represe ntative: Music Tribe Br ands DK A/S
Address: G ammel Strand 44, DK-1202 Københav n K, Denmark
UK Repres entative: Music Tribe Br ands UK Ltd.
Address: 6 L loyds Avenue, Unit 4CL Lon don EC3N 3AX, United K ingdom

 Loading...