

User Manual
GO XLR
Revolutionary Online Broadcaster Platform with 4-Channel Mixer, Motorized Faders,
Sound Board and Vocal Eects

2 GO XLR User Manual
Table of Contents
Important Safety Instructions ...................................... 3
Legal Disclaimer ............................................................. 3
Limited warranty ............................................................ 3
1. PC Setup Guide .......................................................... 4
2. Connection Diagram ................................................. 7
3. Setting Up Your Mic ................................................... 8
4. Understanding Audio Channels ............................. 11
5. App Basics ................................................................ 14
6. Navigating the Mixer Tab .......................................16
7. Setting Up GO XLR for Voice Chat .......................... 17
8. Assigning Apps without an Output to a Fader ..... 19
9. Setting Up GO XLR with XSplit /OBS ...................... 21
10. Sampler Basics ....................................................... 22
11. Global, FX & Sampler Lighting ..............................25
12. Specication ..........................................................28
9. Do not defeat the safety purpose of the polarized
20. Please keep the environmental aspects of battery
Important Safety Instructions
Terminals marked with this symbol carry
electrical current of sucient magnitude
to constitute risk of electric shock.
Use only high-quality professional speaker cables with
¼" TS or twist-locking plugs pre-installed. Allother
installation or modication should be performed only
by qualiedpersonnel.
This symbol, wherever it appears,
alertsyou to the presence of uninsulated
dangerous voltage inside the
enclosure-voltage that may be sucient to constitute a
risk ofshock.
This symbol, wherever it appears,
alertsyou to important operating and
maintenance instructions in the
accompanying literature. Please read the manual.
Caution
To reduce the risk of electric shock, donot
remove the top cover (or the rear section).
No user serviceable parts inside. Refer servicing to
qualied personnel.
Caution
To reduce the risk of re or electric shock,
do not expose this appliance to rain and
moisture. The apparatus shall not be exposed to dripping
or splashing liquids and no objects lled with liquids,
suchas vases, shall be placed on the apparatus.
Caution
These service instructions are for use
by qualied service personnel only.
Toreduce the risk of electric shock do not perform any
servicing other than that contained in the operation
instructions. Repairs have to be performed by qualied
servicepersonnel.
1. Read these instructions.
2. Keep these instructions.
3. Heed all warnings.
4. Follow all instructions.
5. Do not use this apparatus near water.
6. Clean only with dry cloth.
7. Do not block any ventilation openings. Install in
accordance with the manufacturer’s instructions.
8. Do not install near any heat sources such as
radiators, heat registers, stoves, or other apparatus
(including ampliers) that produce heat.
or grounding-type plug. A polarized plug has two blades
with one wider than the other. A grounding-type plug
has two blades and a third grounding prong. The wide
blade or the third prong are provided for your safety. Ifthe
provided plug does not t into your outlet, consult an
electrician for replacement of the obsolete outlet.
10. Protect the power cord from being walked on or
pinched particularly at plugs, convenience receptacles,
and the point where they exit from the apparatus.
11. Use only attachments/accessories specied by
themanufacturer.
12. Use only with the
cart, stand, tripod, bracket,
or table specied by the
manufacturer, orsold with
the apparatus. When a cart
is used, use caution when
moving the cart/apparatus
combination to avoid
injury from tip-over.
13. Unplug this apparatus during lightning storms or
when unused for long periods of time.
14. Refer all servicing to qualied service personnel.
Servicing is required when the apparatus has been
damaged in any way, such as power supply cord or plug
is damaged, liquid has been spilled or objects have fallen
into the apparatus, the apparatus has been exposed
to rain or moisture, does not operate normally, or has
beendropped.
15. The apparatus shall be connected to a MAINS socket
outlet with a protective earthing connection.
16. Where the MAINS plug or an appliance coupler is
used as the disconnect device, the disconnect device shall
remain readily operable.
17. Correct disposal of this
product: This symbol indicates that
this product must not be disposed
of with household waste,
according to the WEEE Directive
(2012/19/EU) and your national
law. This product should be taken
to a collection center licensed for the recycling of waste
electrical and electronic equipment (EEE). The
mishandling of this type of waste could have a possible
negative impact on the environment and human health
due to potentially hazardous substances that are generally
associated with EEE. At the same time, your cooperation
in the correct disposal of this product will contribute to
the ecient use of natural resources. For more
information about where you can take your waste
equipment for recycling, please contact your local city
oce, or your household waste collection service.
18. Do not install in a conned space, such as a book
case or similar unit.
19. Do not place naked ame sources, such as lighted
candles, on the apparatus.
disposal in mind. Batteries must be disposed-of at a
battery collection point.
21. Use this apparatus in tropical and/or
moderate climates.
LEGAL DISCLAIMER
Music Tribe accepts no liability for any loss which
may be suered by any person who relies either
wholly or in part upon any description, photograph,
or statement contained herein. Technical specications,
appearances and other information are subject to
change without notice. All trademarks are the property
of their respective owners. Midas, Klark Teknik,
Lab Gruppen, Lake, Tannoy, Turbosound, TC Electronic,
TC Helicon, Behringer, Bugera and Coolaudio are
trademarks or registered trademarks of Music Tribe
Global Brands Ltd. © Music Tribe Global Brands Ltd.
2019 All rights reserved.
LIMITED WARRANTY
For the applicable warranty terms and conditions
and additional information regarding Music Tribe’s
Limited Warranty, please see complete details online at
musictribe.com/warranty.
Zhongshan Eurotec Electronics Limited
No. 10 Wanmei Road, South China Modern Chinese
Medicine Park, Nanlang Town, 528451, Zhongshan City,
Guangdong Province, China
GO XLR User Manual
1. PC Setup Guide
This section will describe how to set up a basic one-PC streaming setup.
To begin, you must rst download the GO XLR app and driver.
1.1 GO XLR App
The GO XLR app is REQUIRED to operate your GO XLR.
GO XLR app key features include:
• EQ, Compress and Gate your mic
• Set up and dene mixer controls
• Change button/screen colors
• Create and manage samples
• Save voice FX settings
• Direct access to product manuals
• Access to TC Helicon support
Minimum Hardware
-Core 2 DUO CPU
PC-based Hardware
Recommended Operating Systems
Windows*w
-Ethernet port
-1 GB RAM
-Windows 7, 32-bit or 64-bit
-Windows 8, 32-bit or 64 bit
-Windows 10, 32-bit or 64-bit
1.3 Power Up
To begin working with the GO XLR app, the GO XLR unit should be connected to
your computer and powered up with these basic connection steps:
1. Connect the include USB cable to the USB jack on the rear panel of XLR GO.
2. Connect the other end of the USB cable to your computer.
3. Plug the power supply connector into the DC IN power jack on the back panel
of GO XLR.
*Windows i s either a register ed trademark or tr ademark of Micros oft Corporat ion in the United State s and/or
other countries.
1.2 Download the app
1. Download the GO XLR app:
a) Go to the GO XLR product page at tc-helicon.com/products/goxlr.
b) Click on the Downloads tab.
c) Click on the download icon for the latest version of the GO XLR app.
d) Follow the onscreen installation instructions.
2. You may be asked to reboot your computer.
3. Connect the GO XLR USB cable to your computer when app installation
is complete.
4. Power up GO XLR.
5. Dominate the Interwebs!
1.4 Single PC Setup
The most basic livestreaming setup you can use with GO XLR is a one-PC setup
withy the following devices and connections:
• Your PC computer
• GO XLR
• Power
• Headphones
• USB
• XLR microphone
4
1.5 Dual PC Setup
A dual PC setup uses two computers:
• a gaming computer
• a streaming computer
We recommend you connect GO XLR to your gaming computer, and then use the
LINE IN and LINE OUT jacks on the GO XLR rear panel to communicate with your
streaming computer.
5 GO XLR User Manual
1.6 Why is a dual-PC setup special?
First, understand that all audio processing is done inside GO XLR, and you
end up with a USB audio stream called “Broadcast Mix.” This Broadcast Mix
would normally go through a one-PC setup directly to OBS, XSplit or whatever
livestreaming service you plan to use.
However, with a dual-PC setup, you need to get that Broadcast Mix audio out of
GO XLR and into your streaming computer.
To accomplish this re-channeling of the Broadcast Mix to your streaming PC,
you will need two 3.5 mm stereo cables:
1. Run the rst cable from the LINE OUT jack on GO XLR to the LINE IN jack on
your streaming computer.
2. Run the second cable from the LINE OUT on your streaming computer to the
LINE IN jack on the rear panel of GO XLR. This second connection will allow
you to route in all streaming alerts or other audio from your streaming
computer back into GO XLR so you can hear them over your headphones.
1.7 Basic Audio Connections
The following connections will work for a single-PC setup, and they can be
adapted for a dual-PC setup if you also use the LINE IN and LINE OUT jacks to
connect to your streaming computer.
To get started, follow these steps:
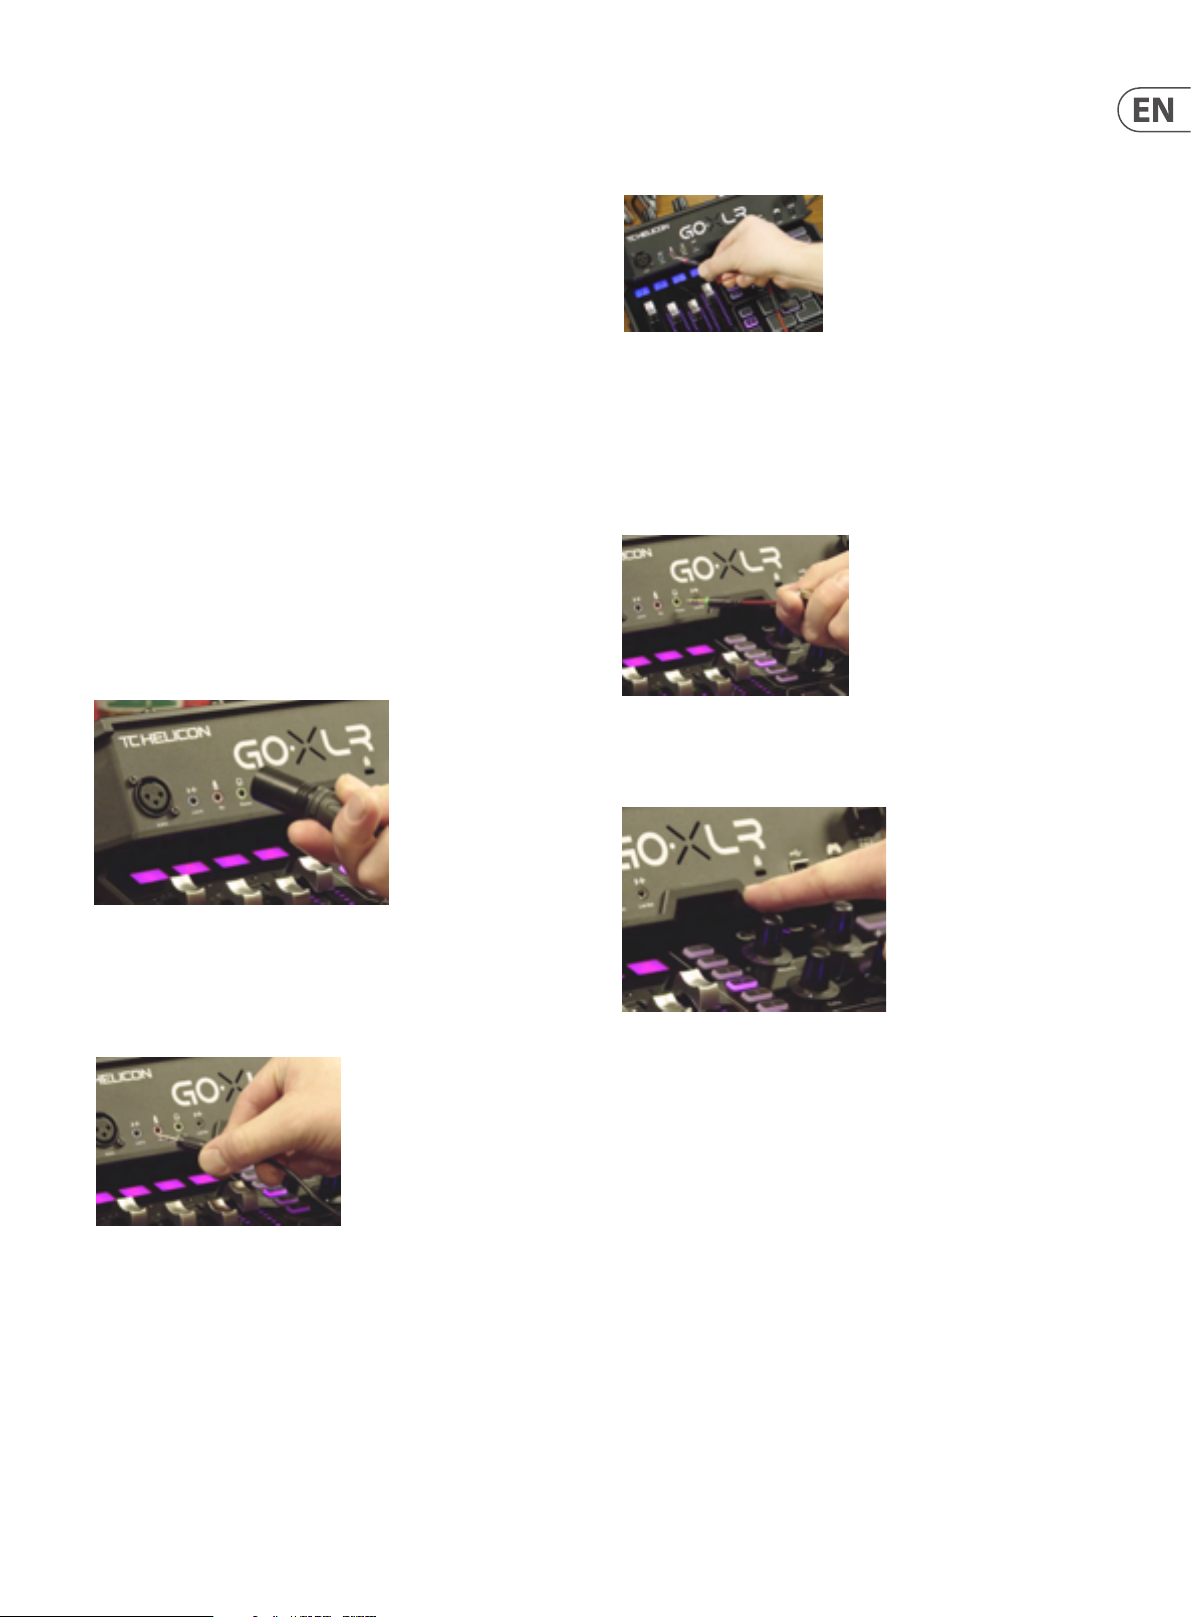
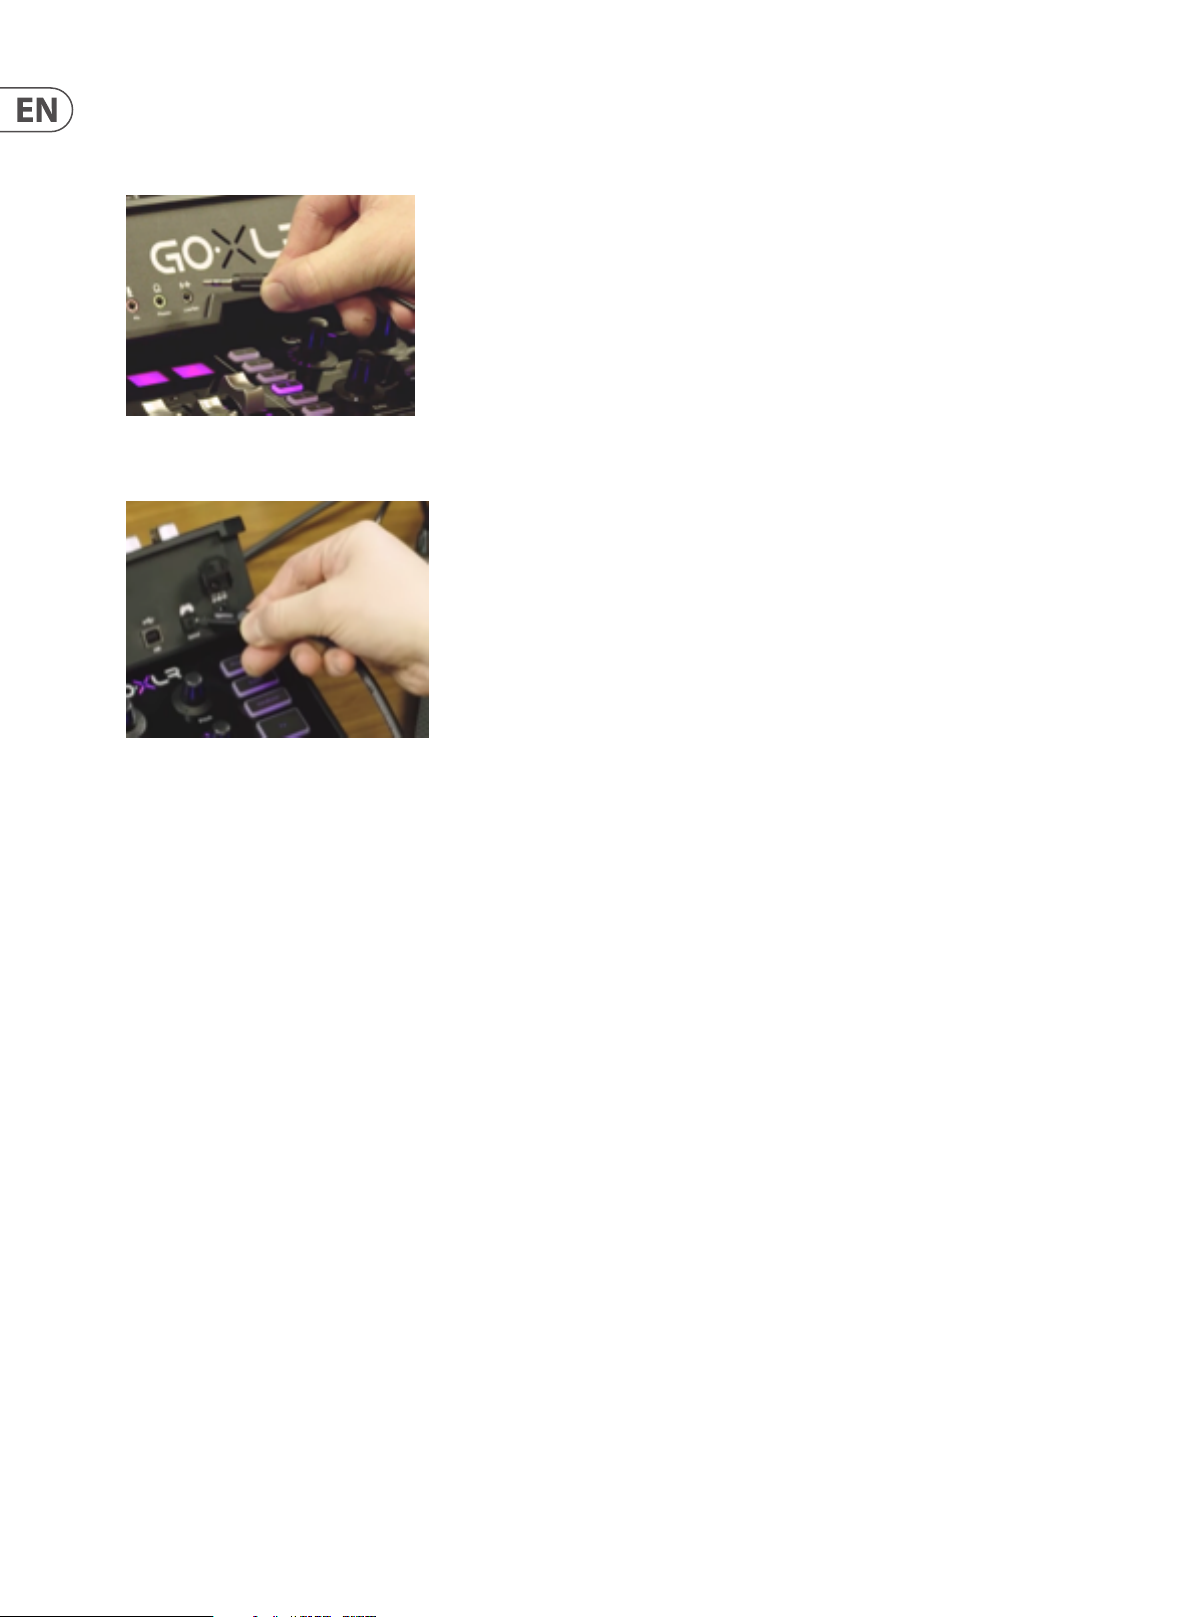
1. Plug one end of your XLR microphone cable into your microphone.
2. Connect the other end of your XLR cable into the XLR jack on the back panel
of GO XLR.
4. If your microphone does not have an XLR connection, you can connect the
microphone to the MIC input with the pink ring immediately to the right of
the LINE IN jack. This MIC connection can also work with the
Blue Yeti* microphone.
NOTE: If you intend to use the popular Blue Yeti* microphone, which has its
own built-in headphone output, you should run that built-in headphone output
into the GO XLR’s MIC input. For Blue Yeti mics powered via USB, plug the USB
connector directly into your computer for power, but do not select the Blue Yeti
as an audio source on the computer. Instead, the Blue Yeti’s headphone output
will be the audio source for mixing inside GO XLR.
5. Plug your headphones into the PHONES output.
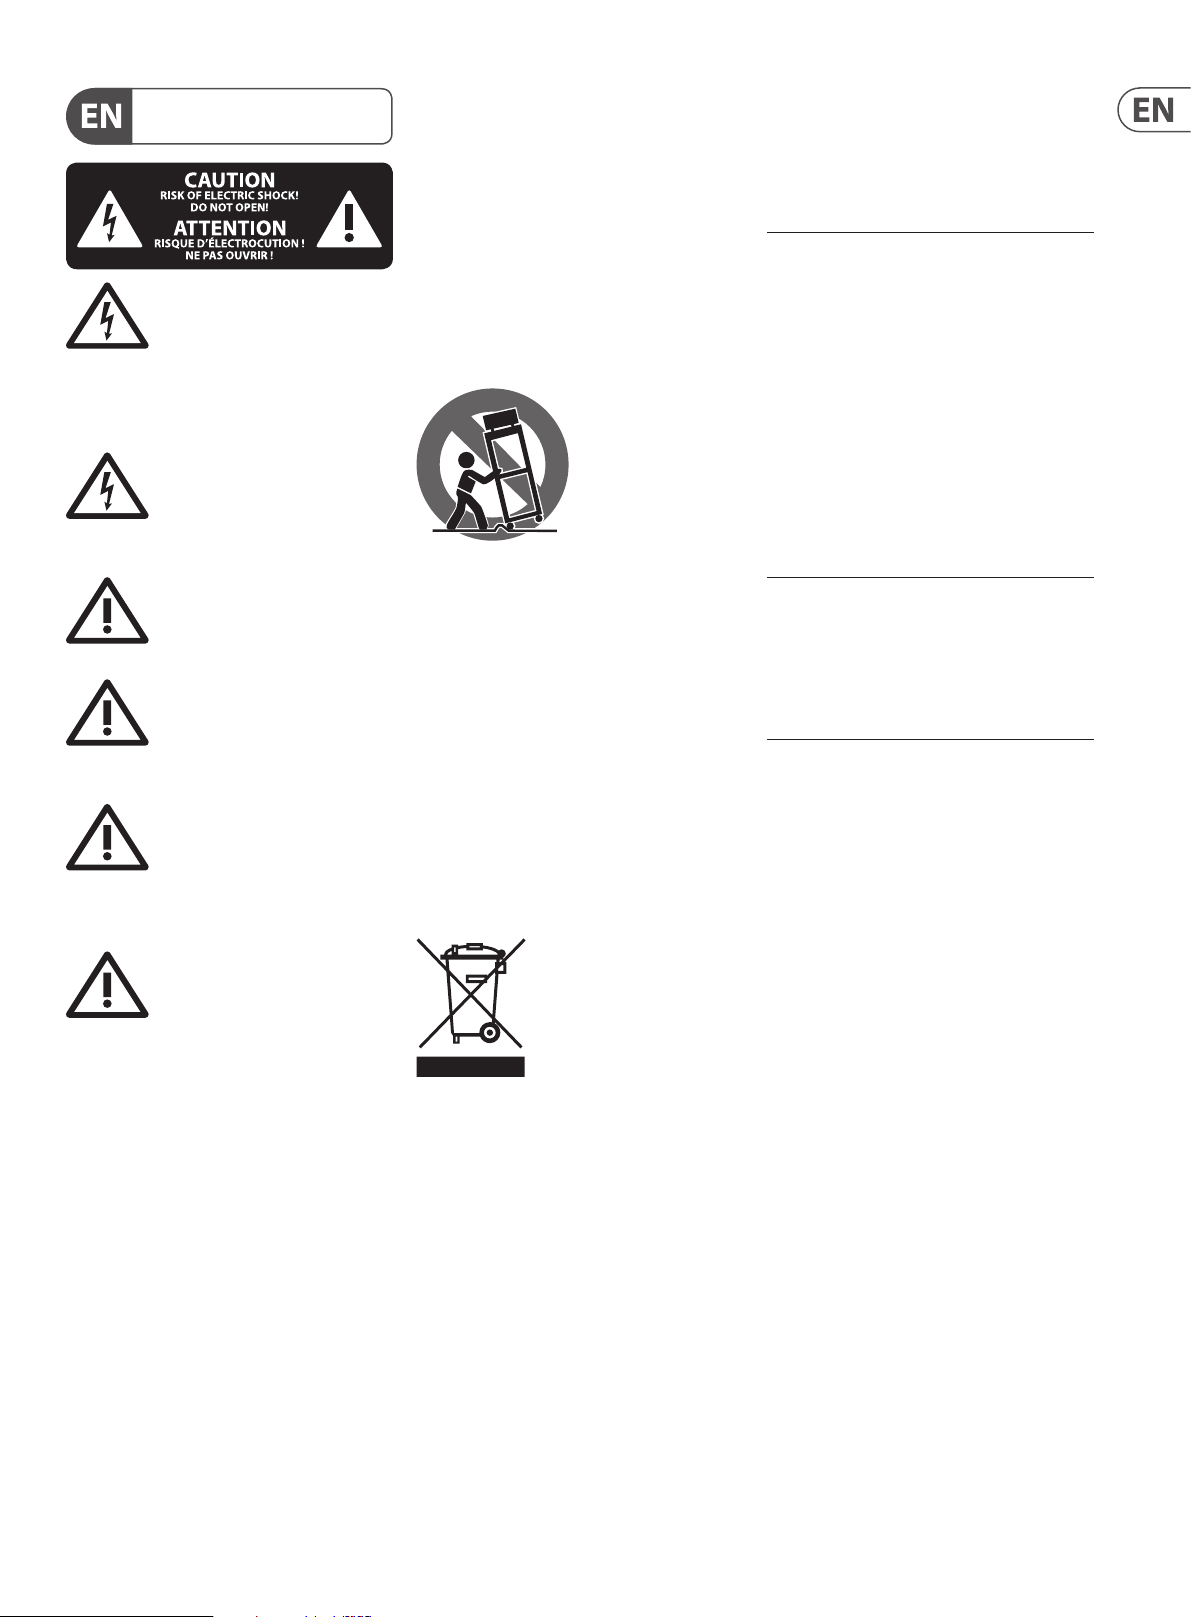
3. Connect any auxiliary audio devices to the LINE IN 3.5 mm jack on the back
panel. Auxiliary audio devices could include your phone, a tablet computer,
and so on. For a dual-PC setup, the LINE IN jack will be used to route
streaming alerts and other audio from your streaming computer back into
GO XLR.
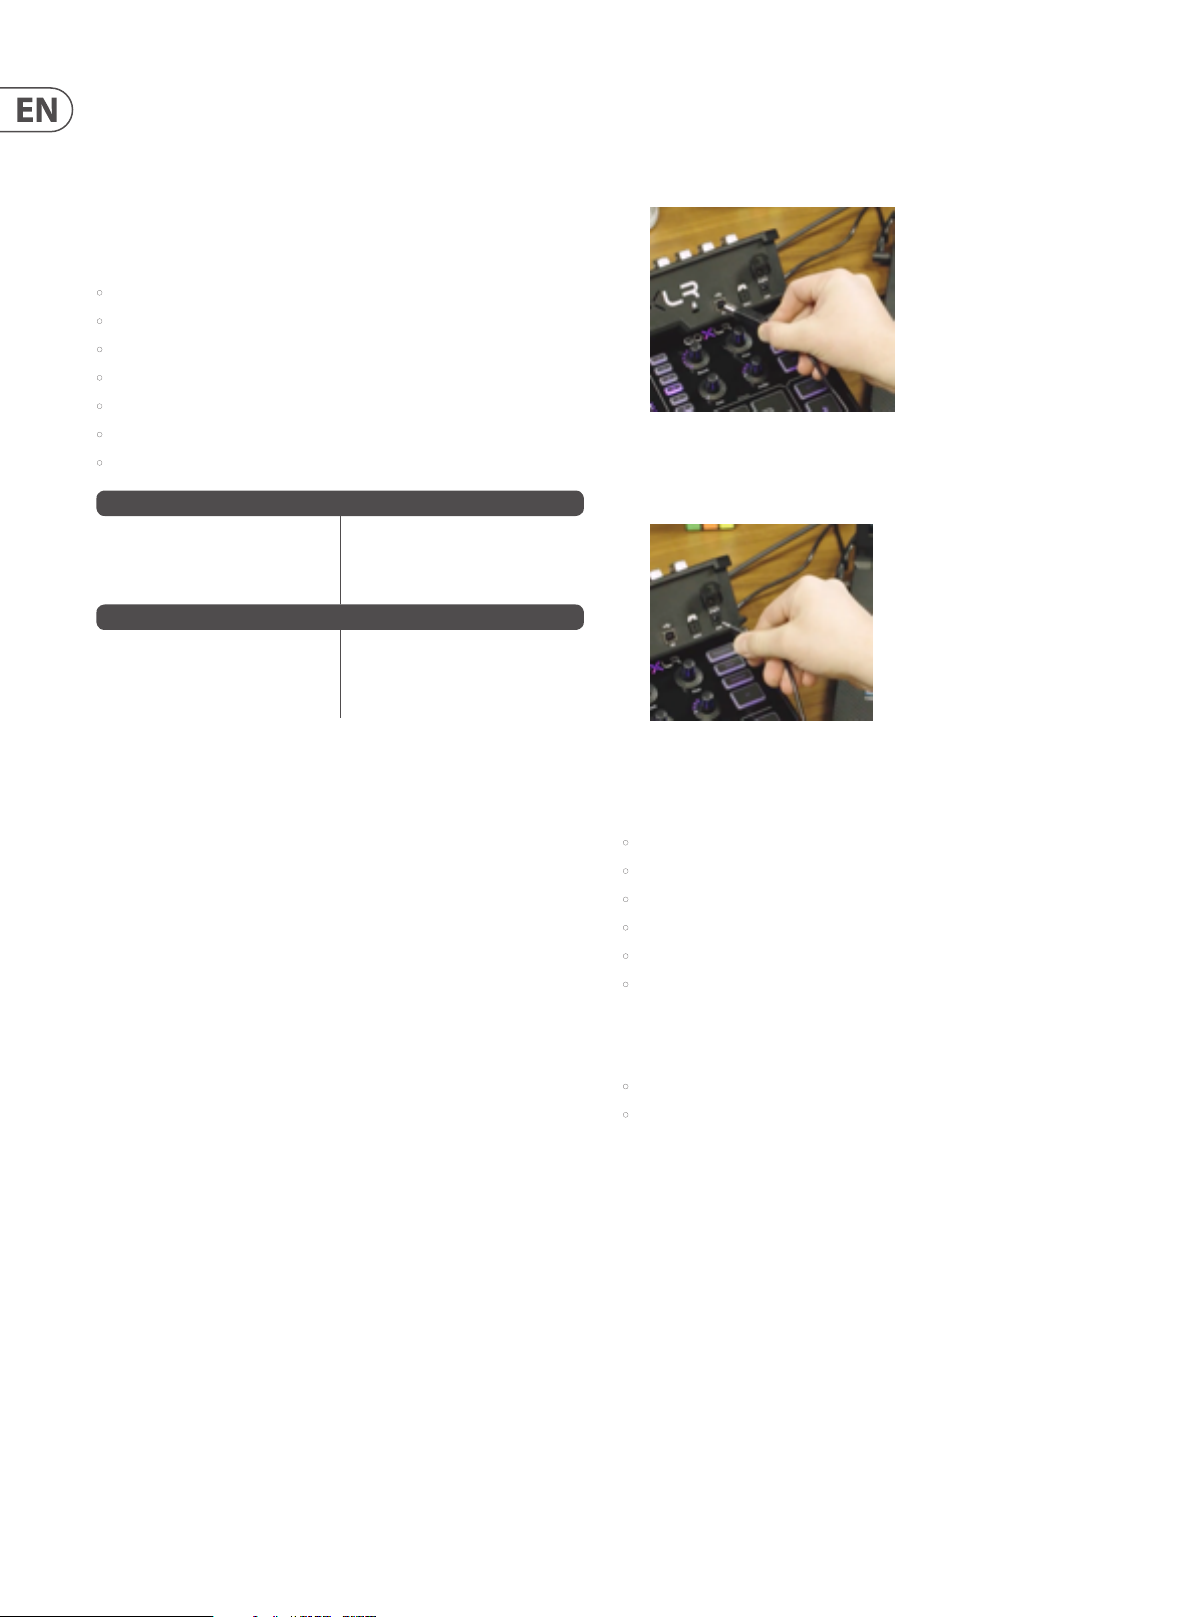
Pro Tip: You may also run your headphone cable underneath GO XLR by using
the cable channel designed into the underside of the unit, so that you do not
have to wrap your headphone cable around the GO XLR mixer.
Cable channel
6 GO XLR User Manual
6. Plug a 3.5 mm stereo cable into the LINE OUT jack if you wish to route a
stereo copy of your livestream out to other devices. In a dual-PC setup,
you will want to connect the LINE OUT jack on GO XLR to the LINE IN jack
on your streaming PC.
7. If you will be gaming on a Playstation† or Xbox‡, plug these gaming consoles
into the OPTICAL output on the rear panel.
* Yeti is a register ed trademark of Blu e Microphones.
† PlayStatio n is a registered tr ademark or tradem ark of Sony Interac tive Entertainm ent Inc. SONY is a regis tered
trademar k of Sony Corporati on.
‡ Xbox is eith er a registered tr ademark or tradem ark of Microsof t Corporation in t he United States
and/or other countries.
7 GO XLR User Manual
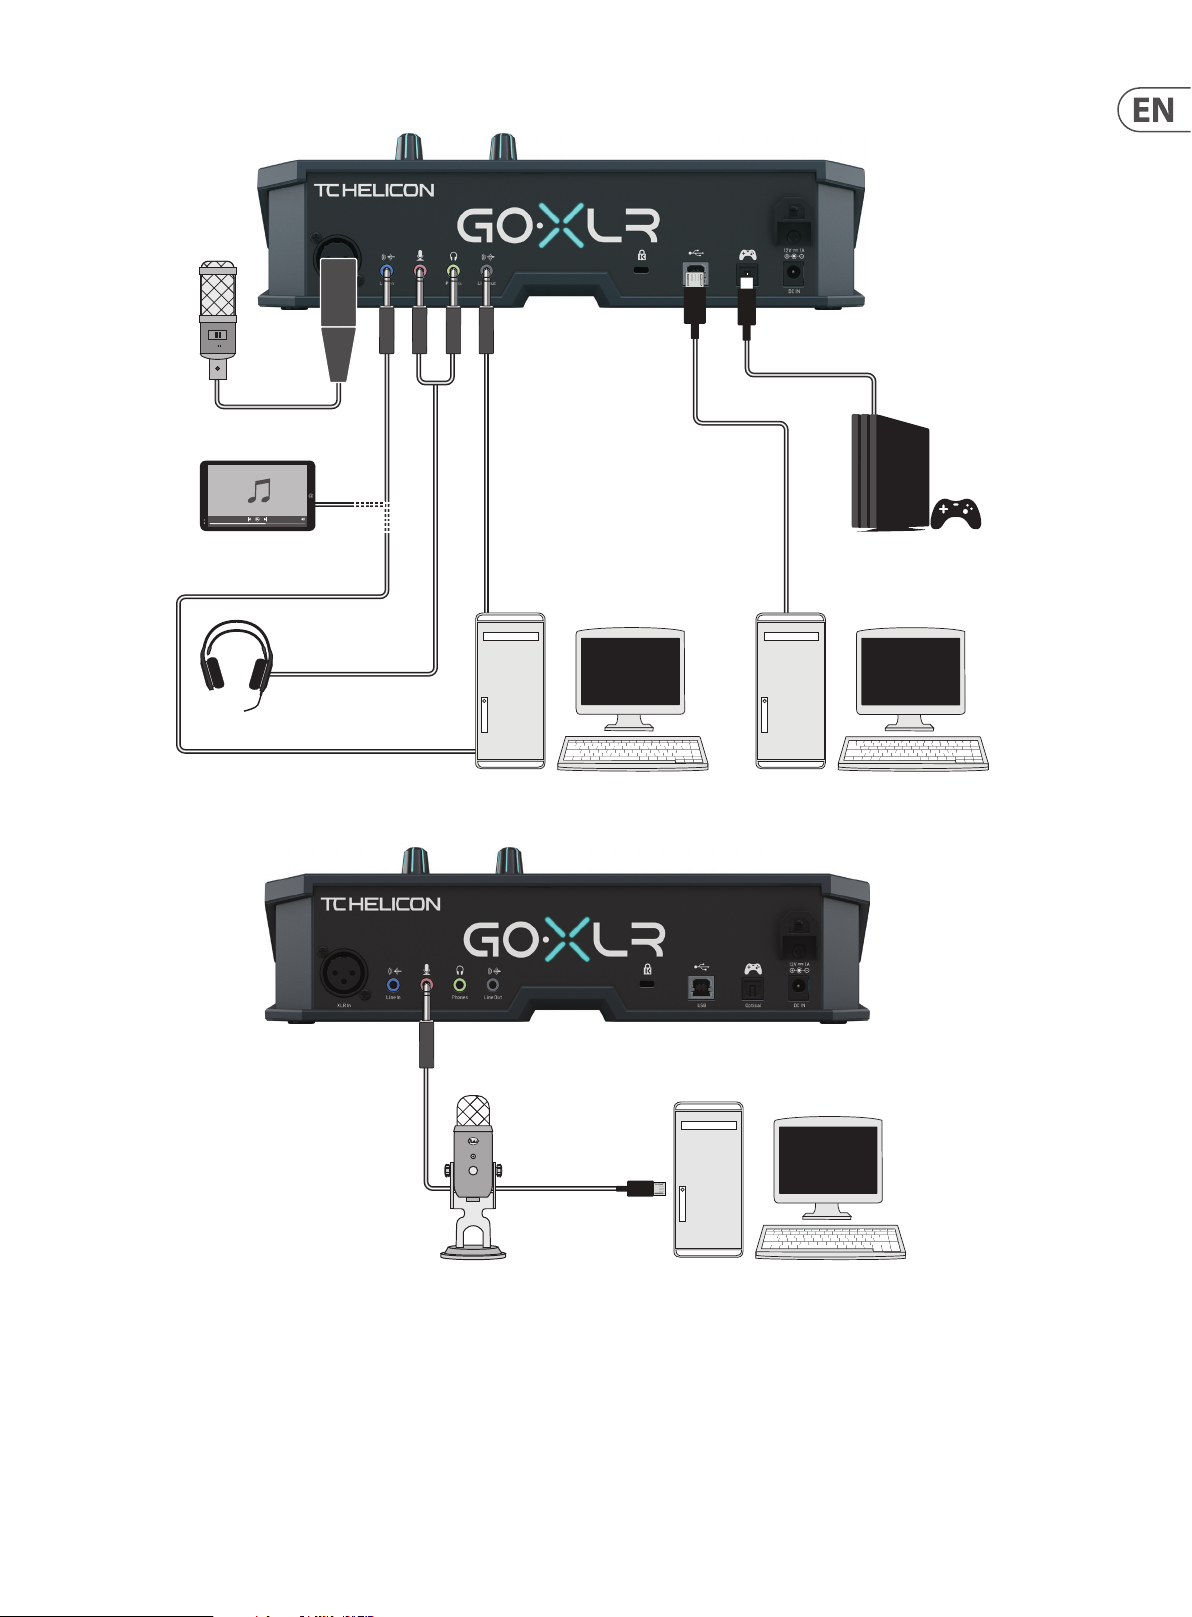
2. Connection Diagram
Studio Vocal Mic
Stream
broadcast
External Audio Device
(if applicable)
Stream alerts
Gaming Headset with Mic
Audio out to GO XLR
via headphone output
Dedicated Streaming
Computer (if applicable)
Power via
USB (no audio)
Gaming Console
Gaming/Streaming
Computer
Blue Yeti Mic Recommended Connection
ComputerBlue Yeti Microphone
8 GO XLR User Manual
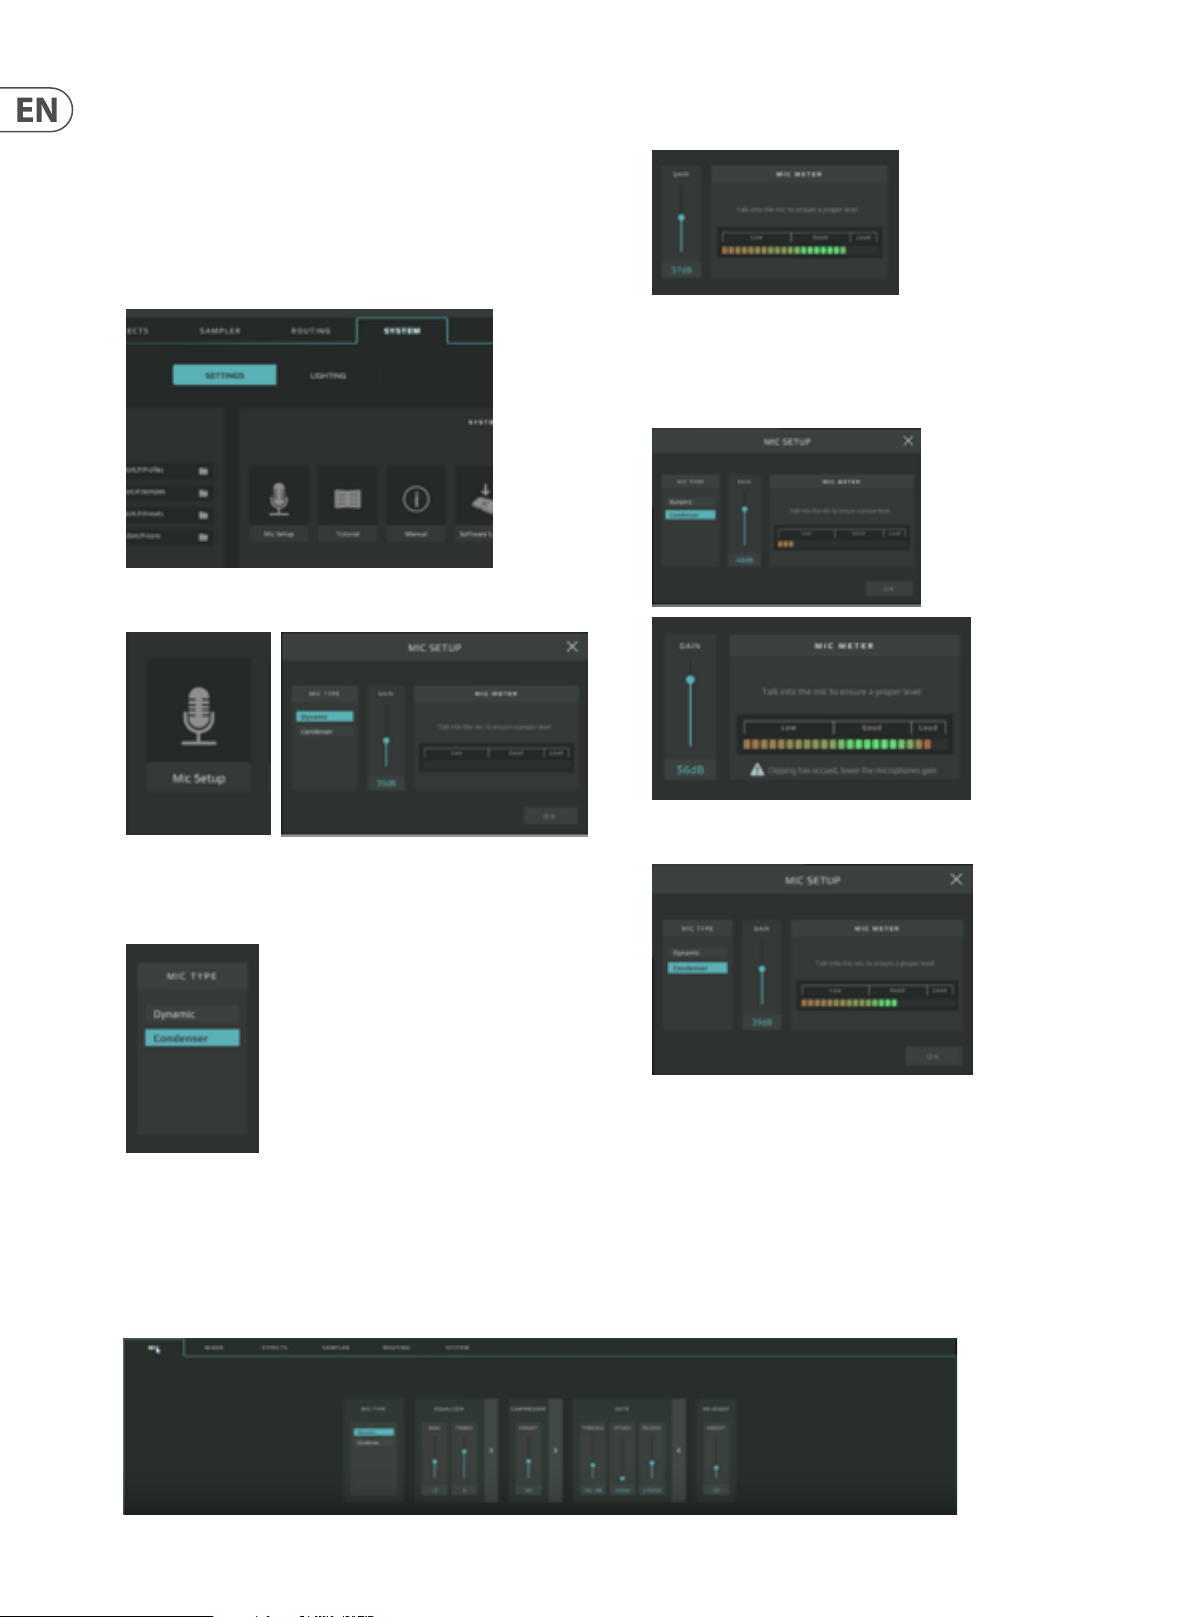
3. Setting Up Your Mic
Once you have your microphone connected to GO XLR, you will need to go into
the GO XLR app and set up the input levels and processing for your microphone.
3.1 Setting the Input Level
After plugging your microphone into GO XLR, you will rst need to set the input
level by following these instructions:
1. Go to the System tab in the lower half of the GO XLR app window.
2. Under Settings, click on Mic Setup. The system will launch a dialogue box.
4. While talking into the microphone at a regular level, watch the level in the
Mic Meter.
5. Adjust the Gain control until the signal peaks in the Good portion of the
meter, with occasional peaks in the Loud range. If the level peaks in the Low
range, increase the gain. If the meter peaks too consistently in the Loud
range, reduce the gain.
6. Once you have an acceptable signal level, click on OK to exit.
3. Choose between Dynamic and Condenser settings. If your microphone is a
condenser mic, you will need to use the Condenser setting so that GO XLR
transmits the “phantom power” required to run the microphone.
3.2 Setting Microphone Processing
Once you have set an acceptable level for your microphone, now it’s time add some equalization, compression, gating, and if necessary, de-essing. These processing
eects will help you nd that “pro” sound for your vocals.
To add basic processing to your mic signal, follow these instructions:
1. Go to the Mic tab in the lower half of the GO XLR app’s screen.
9 GO XLR User Manual
2. Raise or lower the Bass and Treble controls in the Equalizer section to adjust
the basic equalization of your vocal. Raise the Bass control to add thickness,
or reduce the control to thin out your vocal sound. Raise the Treble control to
add brightness, or reduce the control to remove a harsh or tinny sound.
3. Adjust the Compression setting until your vocal sound has the
desired evenness.
4. Adjust the Gate setting if you wish to screen out ambient background noise
in your room. The right Gate setting will open up quickly and smoothly to let
your voice through and then close down when you stop speaking, without
stuttering or abrupt cutos.
5. Adjust the De-Esser to control “S” sounds in your vocal. The right setting will
sound natural, without trebly harshness or sounding mued.
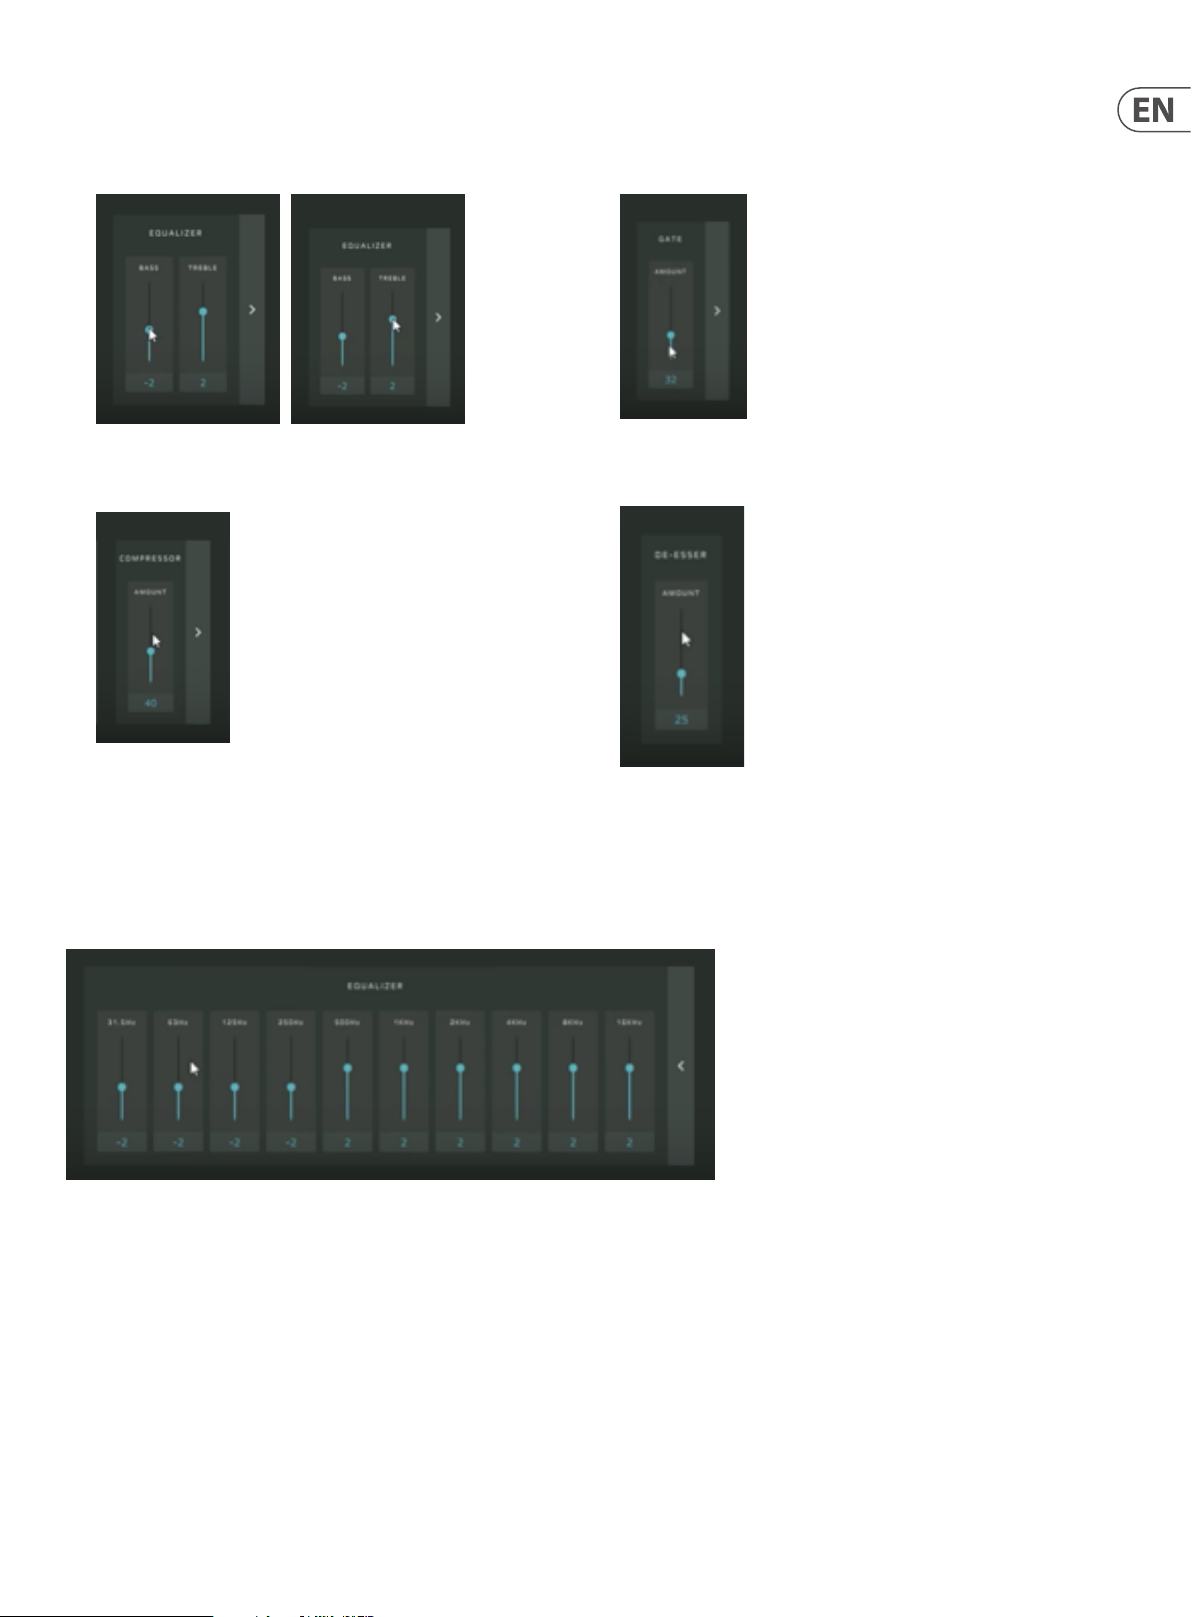
3.3 Descriptions and Advanced Processing Settings
The Equalizer, Compressor and Gate eects in the Mic tab can each be expanded to show additional settings and parameters for ner control of your sound.
Click on the arrow to the right of each window to expand the windows and expose the additional controls.
3.3.1 Equalizer
Equalizer w ith expanded con trols
In the Equalizer, the expanded controls go beyond the basic Bass and Treble adjustment with multiple controls laid out like a graphic equalizer. Each control focuses on
a specic band of frequencies, which can be handy, for example, if you need to nd and reduce the frequency band containing an unpleasant room resonance in your
microphone sound.

10 GO XLR User Manual
3.3.2 Compressor
Compressor with expanded controls
Compressors even out sounds by reducing the loud portions and increasing
the quiet parts, i.e., they “squish” or compress the sound into a more narrow
dynamic range. Compression is extremely important to voice professionals,
such as radio DJs and voiceover artists, so your livestream broadcast will sound
more professional.
The expanded Compressor controls include these functions:
• Threshold—This parameter controls the signal level at which the
compressor begins to work. If you want to manually control the Threshold,
speak into the mic while slowly lowering the Threshold slider from the top
0 dB setting, until you nd an acceptable level. A high Threshold setting
will only aect the highest signal peaks, while a lower ratio will apply
compression to a greater proportion of the signal.
• Ratio—The Ratio controls the intensity of the compression eect. Higher
ratios will produce a more intense eect, while lower ratios will be gentler.
• Attack—The Attack parameter controls how quickly the compressor reacts
to signals that go over the Threshold setting.
• Release—This parameter determines how quickly the compressor lets go
of the signal.
• Make-Up Gain—This control is important because by reducing the loudest
parts of the signal, compression makes the overall signal seem more quiet,
even though you haven’t changed the volume. By increasing the gain on the
way out of the compressor, you can restore the original perceived volume.
3.3.3 Gate
Gate with e xpanded contro ls
A noise gate lters out background noise by switching the signal o when the
level drops below a pre-determined threshold, usually at a point just above
the ambient “noise oor” in the space where you are running the microphone.
Similarly, the noise gate opens back up again when the signal increases and
exceeds the set threshold.
The expanded Gate controls have the following advance parameters available
for adjustment:
• Threshold—The Threshold setting controls the audio level at which the
Gate is triggered to close or open. A good Threshold level will be just above
the level of ambient noise in the space around your microphone, but low
enough that your voice will easily trigger the Gate to open again.
• Attack—The Attack setting controls how quickly the Gate opens after
the sound coming into the mic exceeds the Threshold level. A good Attack
setting will open the Gate quickly enough that it does not cut o the rst
sounds out of your mouth.
• Release—The Release parameter controls how quickly the Gate closes.
A fast release abruptly cuts o the sound, while a slower setting more
smoothly “fades” the closing of the gate.
3.3.4 De-Esser
Make-Up G ain control
NOTE: Be careful about how much Make-Up Gain you apply. Too much Make-Up
Gain can distort your microphone signal.
De-Esser
The De-Esser in GO XLR does not have expanded functions, but we should take
a moment to describe how a de-esser works and why de-essing is a common
process in the audio world.
The De-Esser, true to its name, removes excessive “S” sounds or “sibilance” from
vocals. A vocal with too much sibilance will sound harsh and have a trebly “edge”
that can be unpleasant or distracting, so a de-esser is programmed to look for
those trebly “S” sounds and reduce their prominence in the sound.
However, if the de-essing lter is applied too heavily, your voice can have an
unnatural, lisping sort of sound, so you will need to nd a setting that works for
you and your voice.

11 GO XLR User Manual
4. Understanding Audio Channels
Instead of showing up in your computer’s operating system as a single device
with multiple inputs and outputs, GO XLR shows up in your computer as
several dierent audio sub-devices dedicated to dierent elements of your
overall livestream.
4.1 Sound>Playback Tab
These dierent sub-devices will each appear separately in your PC’s
Sound>Playback tab:
4.2 Setup tips
To set up your audio devices in the Sound>Playback tab, use the right-click
option on your mouse to take the following assignments:
• set up the System channel as your overall Default Device
• set the Chat channel as your Default Communications Device
Once assigned, the system will add a green check mark and text label to mark
each of these devices:
Sound>Playback tab
These Playback sub-devices carry the following types of audio information:
• Chat—voice chat audio from services such as Discord or Skype
• Game—audio from your videogame, such as explosions, special eects
sounds, or alert noises that originate inside the game
• Music—audio from music applications running on your computer, such as
Spotify, Windows Media Player or iTunes
• Sample—audio that has been sampled in GO XLR plays back into your
stream over this channel
• System—this channel serves as a catch-all for when perhaps you
have a particular video game that won’t allow you to choose a specic
output device
Sound>Playba ck tab with assign ed devices
4.3 Sound>Recording Tab
Similar sub-devices also appear in the system Sound>Recording tab in order to
make your livestream audio available for recording.
These Recording sub-devices carry the following types of audio:
• Broadcast Stream Mix—the nal stereo mix that contains audio from all
sub-devices combined into a single stream
• Chat Mic—audio from your personal chat mic (chosen as the Default Device
via the right-click function)
• Sample—sampled audio from GO XLR plays back and can be recorded
using this sub-device
Sound>Recording tab with assigned devices

12 GO XLR User Manual
4.4 Audio devices and GO XLR
Once each of these sub-devices has been set up and assigned to a GO XLR slider,
each slider on GO XLR can independently control its assigned audio device.
Each slider may then be used to adjust that device’s volume within the nal
livestream stereo mix.
To further illustrate this separate-and-mix concept, if you feel that your Chat
audio is too loud, you simply reach out to the assigned slider on your GO XLR and
move the slider downward to decrease the Chat volume relative to the Game,
Music or Sample audio.
If the Chat audio is too quiet, you can reach out and move the Chat slider up to
increase the Chat volume (or you may also grab the Game, Music and Sample
sliders and move those sliders downward to decrease those sub-devices’ volume
relative to the Chat audio).
4.5 Enabling Surround Sound
A virtualized surround sound can be enabled on the Game and System channels
in the Windows Sound panel, and this surround sound algorithm should work
ne on most stereo headsets.
To enable surround sound for GO XLR, follow these steps:
1. Open the Windows Sound control panel.
2. Right-click on the audio device you want to use with surround sound.
5. Select “Windows Sonic for Headphones” from the pulldown menu to turn on
the 7.1 virtual surround sound function.
6. In your game, also make sure to turn on the game’s 7.1 surround sound
option, if available.
Once activated, audio from your game will be mixed down to a virtualized
version of surround sound on your headphones.
If you have purchased the “Dolby Atmos for Headphones” function for Windows,
you may also select the Dolby algorithm, and the audio will similarly be mixed
down to a virtualized surround sound for your headphones.
3. Choose the Properties option from the pop-up menu.
4. Go to the “Spatial sound” tab.
4.6 De-Select the PC’s Internal “Listen” Option
To avoid an unintentional doubling of your audio, you will need to go into
Windows under the Sound>Recording tab and make sure that the Windows
“Listen to this device” option is switched o for your designated Default Device.
The “Listen to this device” option is the internal method by which Windows
allows you to monitor audio, but the processing latency inside your PC is slower
than GO XLR’s internal audio processing, and so this slight delay inside the PC can
create an unintentional doubling of the audio.
To de-select “Listen to this device,” follow these steps:
1. Open the Windows Sound control panel.
2. Click on the Recording tab.

13 GO XLR User Manual
3. Right-click on your designated Default Device.
4. Choose the Properties option from the pop-up menu.
5. Choose the “Listen” tab in the Properties pop-up window.
6. Find the “Listen to this device” option.
7. Make sure “Listen to this device” is UN-CHECKED.

14 GO XLR User Manual
5. App Basics
Be aware that all audio processing happens in the GO XLR unit itself. The GO XLR
unit’s processing and settings may be coordinated and controlled from your
computer via the GO XLR app, but all audio is manipulated in GO XLR and
therefore does not take up processing headroom in your computer.
5.1 The GO XLR App Interface
The GO XLR App’s interface breaks down into three main areas: Prole/Sample/
Preset Management, Live View Area, and Processing Tabs.
GO XLR App interface
5.2 Prole/Sample/Preset Management
The Prole/Sample/Preset Management area in the upper left area of the app
interface contains these tabs:
• Prole Tab—Located in the top-left corner, this area is where you can
create proles that store all the settings you need for particular tasks. For
example, by clicking on a prole, you can instantly load all of the routing,
level and processing settings you need, as well as any customized color
schemes and samples.
• Samples Tab—This tab is where you manage samples. Any samples you
have recorded “in the box” will live in this tab, and all sample will appear
time-stamped and dated, so you know when you created a sample. These
dated samples can be re-named later. This tab also has a le management
option so you can look through other folders and locations to nd and pull in
samples created elsewhere.
• Presets Tab—This area handles presets for your vocal eects section.
You can create and save new presets here and then load them up into GO XLR
when desired. Presets can also be dragged and dropped inside the app.

15 GO XLR User Manual
5.3 Live View
The Live View is the GO XLR app’s onscreen representation of the GO XLR panel.
This digital version of the mixer panel changes to reect any control changes you
may make on the hardware, such as moving a slider, turning a knob or
pressing a button.
Live View in t he GO XLR app
By clicking on individual sliders or other controls in Live View, you can go in and
change settings and processing for that control in the Control Tabs section.
5.4 Control Tabs
The Control Tabs live in the lower half of the GO XLR app screen and contain
these sections:
• Mic—Select settings to suit your mic, such Dynamic or Condenser (which
activates Phantom Power to run the mic), as well as EQ, compression, gating
and a de-esser.
• Eects—Shows eects and set tings assigned to the knobs and buttons in
the Eects section, as well as color customization for these controls.
• Sampler—Shows settings and sample assignments for each button in the
Sampler section, as well as controls for color customization. The Samples tab
in the upper left will automatically open when you open this section.
You can use this section to record, manipulate and assign samples to your
desired controls.
• Routing—Display a grid showing your inputs and outputs, so you can
control where your audio goes in detail.
• System—This is where you go to set up folders, set up mic gain,
watch tutorials, look for software updates, and so on.
• Mixer—View settings for the Mixer section, including fader assignments,
muting options and mix levels for all active devices, not just devices assigned
to the hardware faders. In the Lighting sub-section, you can also customize
the various LED colors for related controls on the hardware panel.

16 GO XLR User Manual
6. Navigating the Mixer Tab
The Mixer Tab is where you assign devices to the four hardware faders, designate what will appear on the slider screens and work with the Mute buttons.
Mixer tab
The Mixer Tab has two main sub-sections, the Settings tab and the Lighting tab.
• Settings—This sub-section shows fader assignments and labels, options for how the Mute buttons function, as well as a mixer section showing levels for all
audio devices, including devices not assigned to a hardware fader.
• Lighting—The Lighting sub-section controls color, text and icon settings for the fader screens, as well as LED colors and arrangement for the fader LEDs.
You can also assign custom colors to the Mute buttons so you can know at a glance whether a channel is open or muted. (For more about the Lighting functions,
see XXX on pg.X.)
6.1 Assigning Audio Devices to Faders
To assign and set up each of the four faders in the Mixer section,
follow these steps:
1. Activate a fader by clicking on that fader in the Live View panel in the upper
right of the app window, or go to the Faders window in the Mixer tab and
click on Channel 1, Channel 2, and so on. If you choose to click on a fader in
Live View, that fader’s settings will automatically appear in the Mixer
tab below
2. Go to the Input box list to choose a device for this fader, such as Mic, Chat,
Music and so on. This device assignment will then appear as a text label on
the matching fader screen, and the selected fader will control the mix level
for that particular device.
3. Click on the next Channel and repeat Steps 1-3.
4. Continue until you have assigned audio devices to all four available channels.
Pro Tip: When you set up a mix, we recommend you set your primary Mic level
rst, and then balance levels for all other devices versus the Mic level. This way,
you can always hear yourself clearly in the broadcast stream.

17 GO XLR User Manual
6.2 Setting Mix Levels for Additional Devices
Even though you only have four hardware faders, you may have additional
devices that also need to be mixed into your livestream.
To control and mix these additional devices, go to the Mixer box next to the Mute
box. In the Mixer box, you will nd vir tual faders for every available device,
assigned and unassigned, including the devices already assigned to the
hardware faders.
Mixer sub-section of Mixer tab
Un-assigned devices will each have a virtual fader in this section, and this is
where you control the mix levels for these other devices. For example, if you have
not assigned the Sample device to a hardware fader, but you need to adjust how
loud your samples are in the mix, you can go to this section, click on the Sample
virtual fader, and make adjustments.
Pro Tip: Use the four hardware faders for important devices that will require
frequent, real-time level adjustments, so that those devices are always ready and
available for quick adjustment.
7. Setting Up GO XLR for Voice Chat
Now let’s set up GO XLR for your voice chat program.
The following examples use Discord, but this setup should work similarly in
Skype, Mumble, Vent and other chat services.
7.1 Setup Recommendations
For Discord, follow these setup instructions (and adapt for other chat services
as needed):
1. Go to the User Settings menu in Discord.
2. Click on Voice & Video to open the settings window.
3. Go to Input Device under Voice Settings and choose “Chat Mic (2- TC-Helicon
GoXLR)” from the pulldown menu.
4. Go to Output Device and choose “Chat Mic (2- TC-Helicon GoXLR)” from the
pulldown menu.
5. Set the Input Volume to 100%.

18 GO XLR User Manual
6. Set the Output Volume to 100%, which is located a little over halfway
toward the right end of the Output Volume slider. Avoid going beyond 100%
to avoid an unwanted volume boost.
7. Under Input Mode, you may select either “Voice Activity” or “Push to Talk,”
depending on your preferences.
8. “Automatically determine input sensitivity” may be left on.
9. In the Advanced options for Discord, you should switch OFF the
following items:
• Echo Cancellation
• Noise Suppression
• Automatic Gain Control
• Attenuation (the “When I speak” and “When others speak” options should
be switched o)
10. Switch on “Enable Quality of Service High Packet Priority.”
11. Switch on “Show a warning when Discord is not detecting audio from
your mic.”
When you set up Discord or other chat programs properly, when you go to GO XLR
your chat service will be assigned to a fader and labeled as “Chat.”
GO XLR Chat fa der
From this designated Chat fader, you may now raise or lower the volume of
people talking on Discord versus your own voice on the GO XLR Mic channel.
People on Discord will still hear your Mic audio at full level, no matter your own
monitoring level.
19 GO XLR User Manual
8. Assigning Apps without an Output to a Fader
In the “Understanding Audio Channels” chapter on pg.X, we described how to
assign audio devices in your PC’s operating system to channel faders on GO XLR.
This assignment method works well when your video game has the ability to
choose an existing GO XLR audio input.
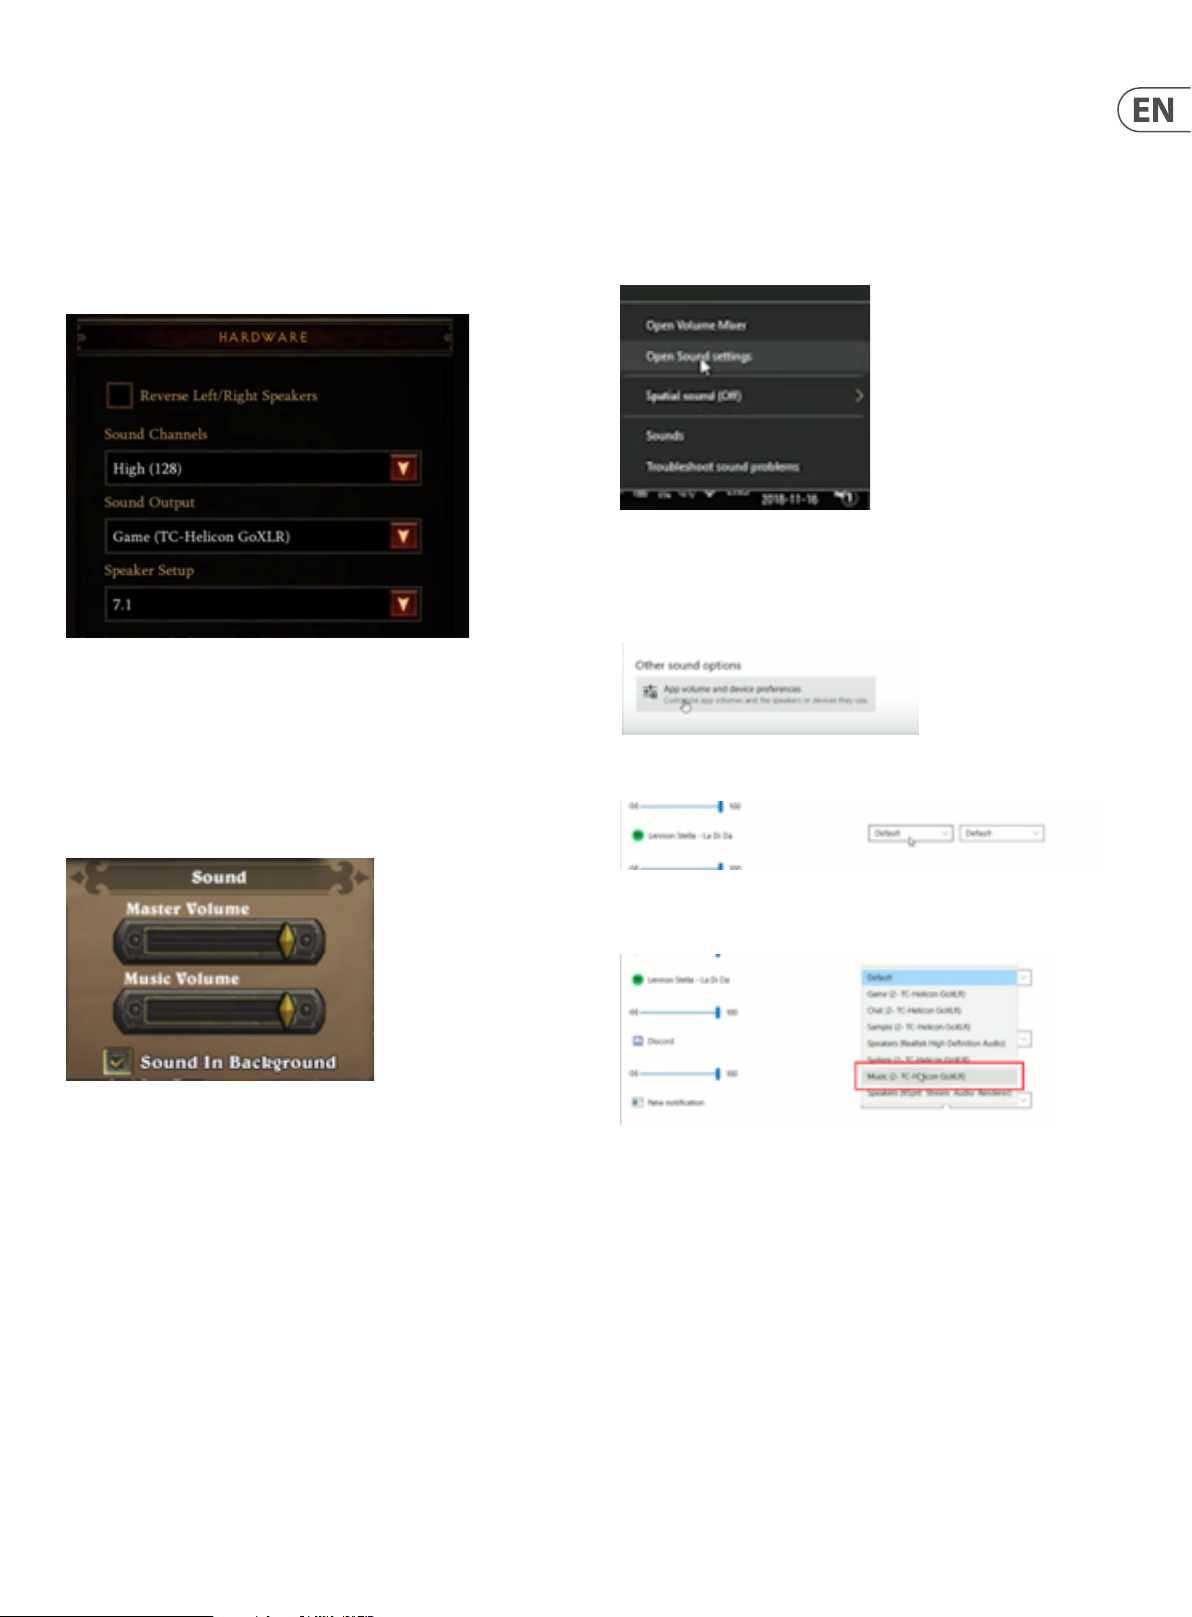
For example, the Hardware window for this game has a built-in option to choose
a “Sound Output ” device:
Game dialo g with Sound Outp ut option
8.1 Audio Device Workaround Inside Windows
As an example, let’s change Spotify from its default assignment to GO XLR’s
System fader, and then re-assign Spotif y to the Music fader.
Go to your PC and follow these steps:
1. Right-click on the speaker icon in the Windows Taskbar.
2. Select “Open Sound Settings” from the pop-up menu to open the Windows
Sound panel.
3. Scroll down and click on “Other sound options” to open a new “App volume
and device preferences” dialog. The new dialog will list ever y program and
app on your computer that is currently running and playing audio, along
with a series of pulldown menus for Input and Output selection.
In this example, you would select “Game (TC-Helicon GoXLR)” from the pulldown
menu, and then assign the Game device to a fader using the method in the
“Understanding Audio Channels” section on pg. X.
However, many games do not have the built-in option to select an audio device.
Similarly, some audio streaming applications such as Spotify, also do not have an
option to select a GO XLR audio input device.
Game dialo g without option f or choosing a soun d device
4. Scroll down to the section for Spotify.
5. Select “Music (2- TC-Helicon GoXLR)” from the Output pulldown
menu for Spotify.
Once you have selected the new Output device, when you go to GO XLR, you will
nd that Spotify audio has been re-assigned to the Music fader, where the
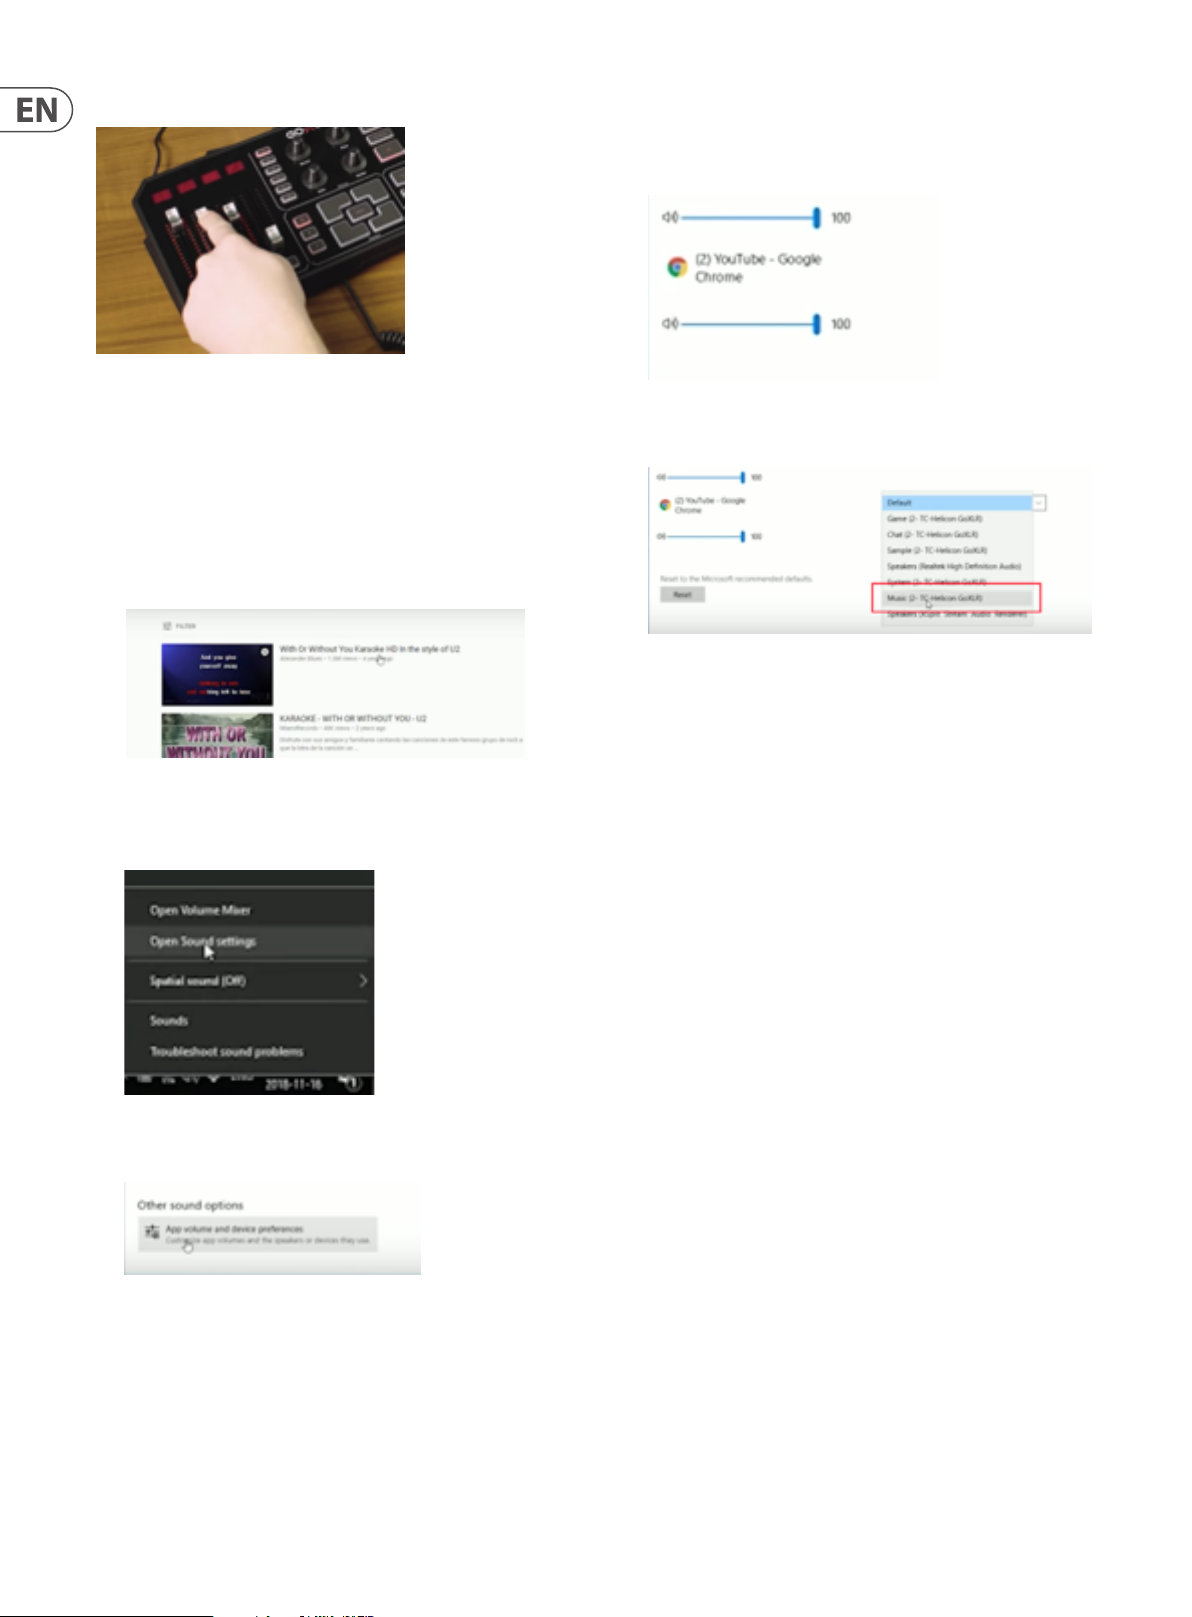
20 GO XLR User Manual
Spotify audio level can now be adjusted and mixed separately.
Checking the Music fader
You may repeat this process for any game or even for your web browsers.
8.2 Re-Assigning Youtube Audio in Chrome
As an additional example, let’s also assign audio from a YouTube video to the
Music fader (which YouTube will now share with Spotif y).
1. Open Chrome and go to youtube.com.
2. Select a video and begin playback.
3. Right-click on the speaker icon in the Windows Taskbar.
4. Select “Open Sound Settings” from the pop-up menu to open the Windows
Sound panel.
6. Your Chrome tab should now be visible in the list of programs running audio.
(If you do not see your Chrome tab listed, go back and momentarily play
some audio from the YouTube video in the Chrome tab. This quick playback
should cause Windows to detect your Chrome tab and place it in the list.)
7. Select “Music (2- TC-Helicon GoXLR)” from the Output pulldown menu for
your Chrome tab.
8. Re-start playback on the YouTube video and check the “Music” fader to
conrm that audio from your Chrome tab has been properly re-assigned.
Now, when you go back to GO XLR, you should nd that your YouTube video in
Chrome is now playing audio on the Music fader along with Spotif y.
Pro Tip: Windows will sometimes revert back to the default System assignment,
even though you have individual programs properly assigned to the Music fader.
To x this problem, go to the pulldown for your programs (Chrome, Spotify, etc.)
and temporarily re-assign to another Output. Then, move the Output assignment
back to “Music (2- TC-Helicon GoXLR)” and Windows should then re-detect the
program and x the audio assignment.
5. Scroll down and click on “Other sound options” to re-open the “App volume
and device preferences” dialog.
21 GO XLR User Manual
9. Setting Up GO XLR with XSplit /OBS
This section will show you how to set up audio for OBS (Open Broadcaster
Software) and XSplit.
Both programs are very similar, so these instructions for XSplit should also work
for OBS.
9.1 Setup Recommendations
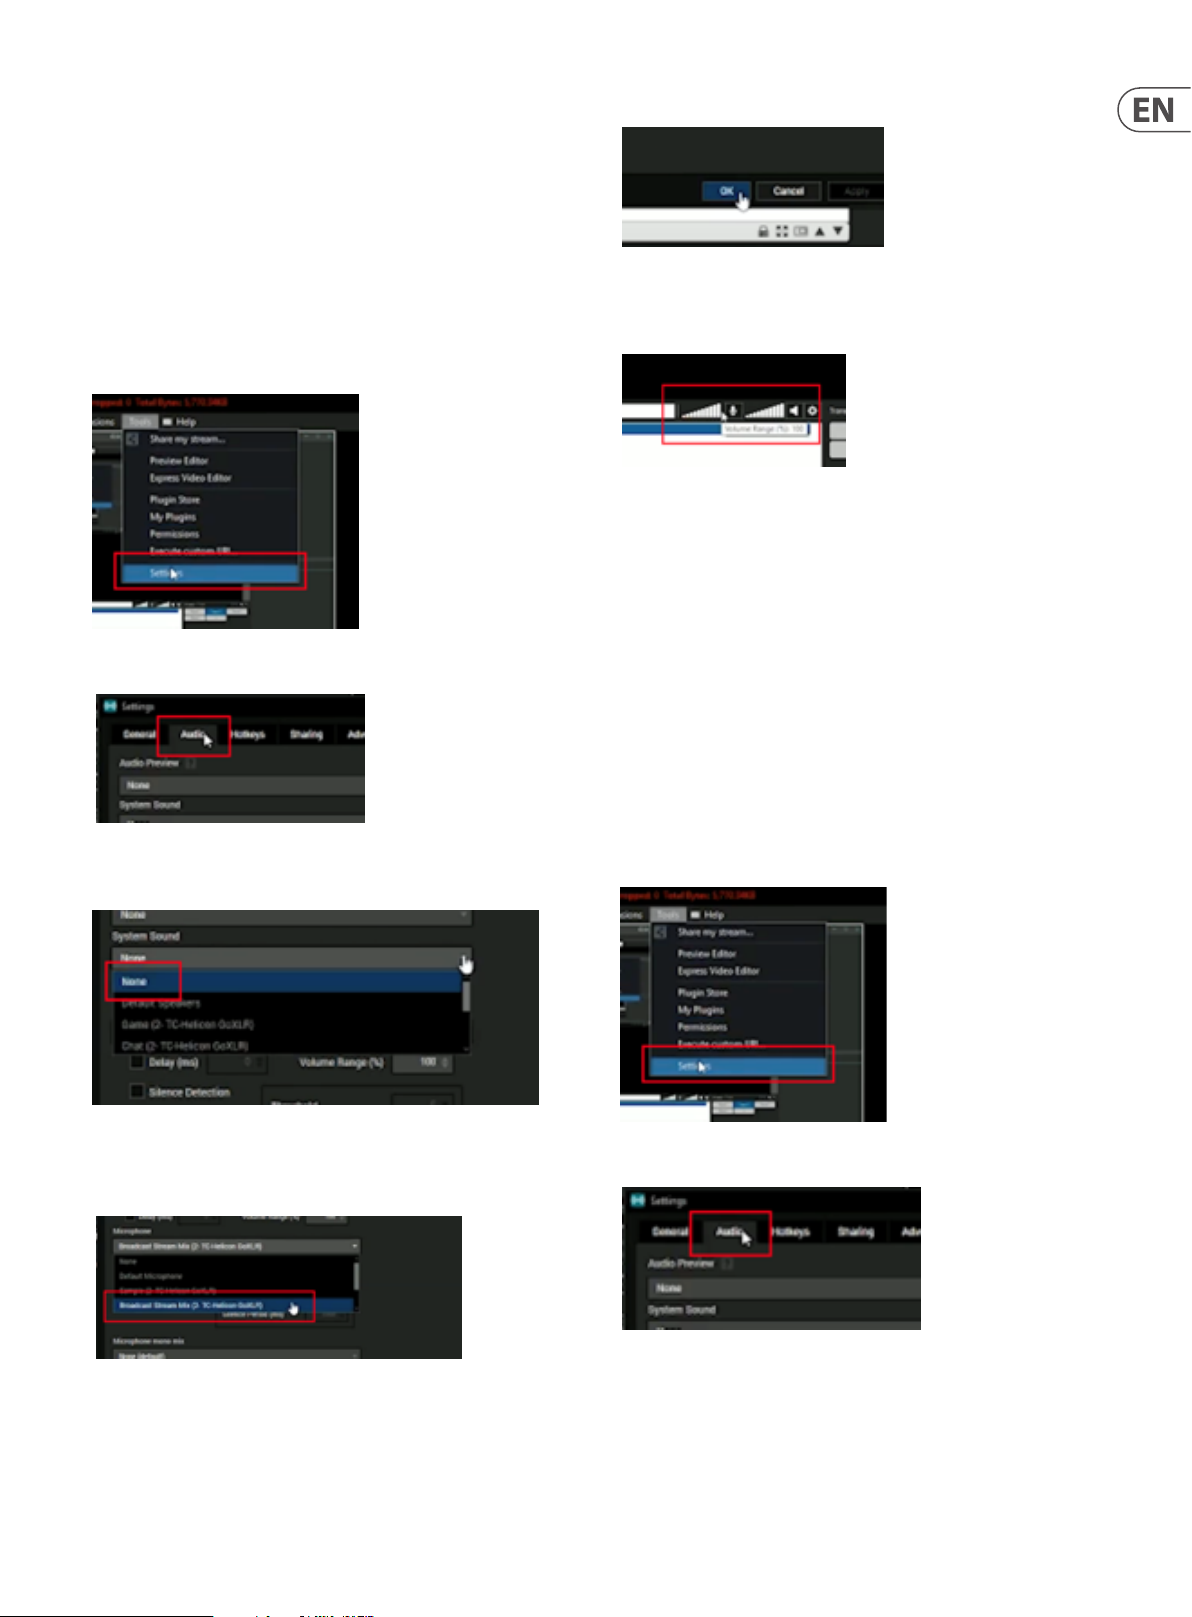
Open up XSplit and follow these setup instructions:
1. Click on the Tools pulldown menu and select “Settings” to open the
Settings window.
2. Go to the Audio tab in the Settings window.
3. Set “System Sound” to “None” by using the pulldown menu. You will not
want any other audio streams going in to XSplit.
5. Click “OK” to exit the Settings window.
6. Set your livestream audio to 100% by maximizing the level bars next to the
XSplit microphone icon. Your GO XLR audio should now play into XSplit
without any clipping or distortion
9.2 Advanced: Audio Delay for Video
Playback Sync
Sometimes, your livestream audio in XSplit and OBS will need to be delayed by
a few milliseconds to remain in sync with your video. Video in your XSplit/OBS
livestream will often need some time to encode, and this small delay can cause
your audio to fall out of sync with the video.
The XSplit “Delay (ms)” function (called “Oset” in OBS) can be used to x this
synchronization problem by delaying the audio ever so slightly so that the audio
can re-sync with the video.
To deploy the Delay function for audio sync, follow these instructions:
1. Record a short video of yourself clapping and then play the video back over
XSplit. The slight delay for video encoding should cause the sound of the clap
to fall out of sync and happen a split second before you see the clap on video.
2. Click on the Tools pulldown menu and select “Settings” to open the
Settings window.
4. Set “Microphone” to “Broadcast Stream Mix” by using the pulldown menu.
Choosing “Broadcast Stream Mix” will ensure that all audio going into XSplit
has been processed and mixed in GO XLR exactly how you want it.
3. Go to the Audio tab in the Settings window.

22 GO XLR User Manual
4. Select “Delay (ms)” by clicking on the selection box.
5. Use the selector box immediately to the right to add several milliseconds of
delay to the audio stream. Begin with about 10 ms of audio delay and
gradually add more delay as needed.
6. Check against the video playback to see if the audio of the clap is beginning
to come back into sync with the visual of the clap. You can also try adding
300-400 milliseconds of delay, to the point where the clap audio arrives after
the visual clap, and then back o to see if you can nd the sync “sweet spot.”
7. Keep adjusting the delay as needed until you are satised that the audio-
video sync feels just right.
8. Press OK to exit.
10. Sampler Basics
The GO XLR sampler has three banks of samples (A, B and C). Each bank can
contain up to four samples (one for each of the Sample Pads on the GO XLR unit).
The GO XLR sampler is both a live sampler and sound board, which means
that you can record a sample in real time and play it back whenever you want.
Or, you can go out and grab a pre-made sample and assign this external sample
to one of GO XLR’s sample pads for playback.
GO XLR also includes a sound-leveling algorithm that will take dierent samples
with dierent volume levels—some loud, some quiet—and process those
samples so that they have the same apparent loudness to your ear. This way,
you can avoid nasty surprises, such as a sample that is too loud bursting through
your mix.
NOTE: Multiple samples can be triggered for playback at the same time.
10.1 Capturing a Sample
To capture a sample with GO XLR’s sample pads using your microphone, follow
these steps:
1. Press a sample pad and hold.
2. Speak into the microphone.
3. Release the sample pad.
4. Press the sample pad again to conrm you have captured an audio sample.
The waveform for the captured sample will appear in the Waveform window in
the GO XLR app.
Once you dial in the right amount of audio delay, your livestreams on XSplit and
OBS should now be perfectly synced.
23 GO XLR User Manual
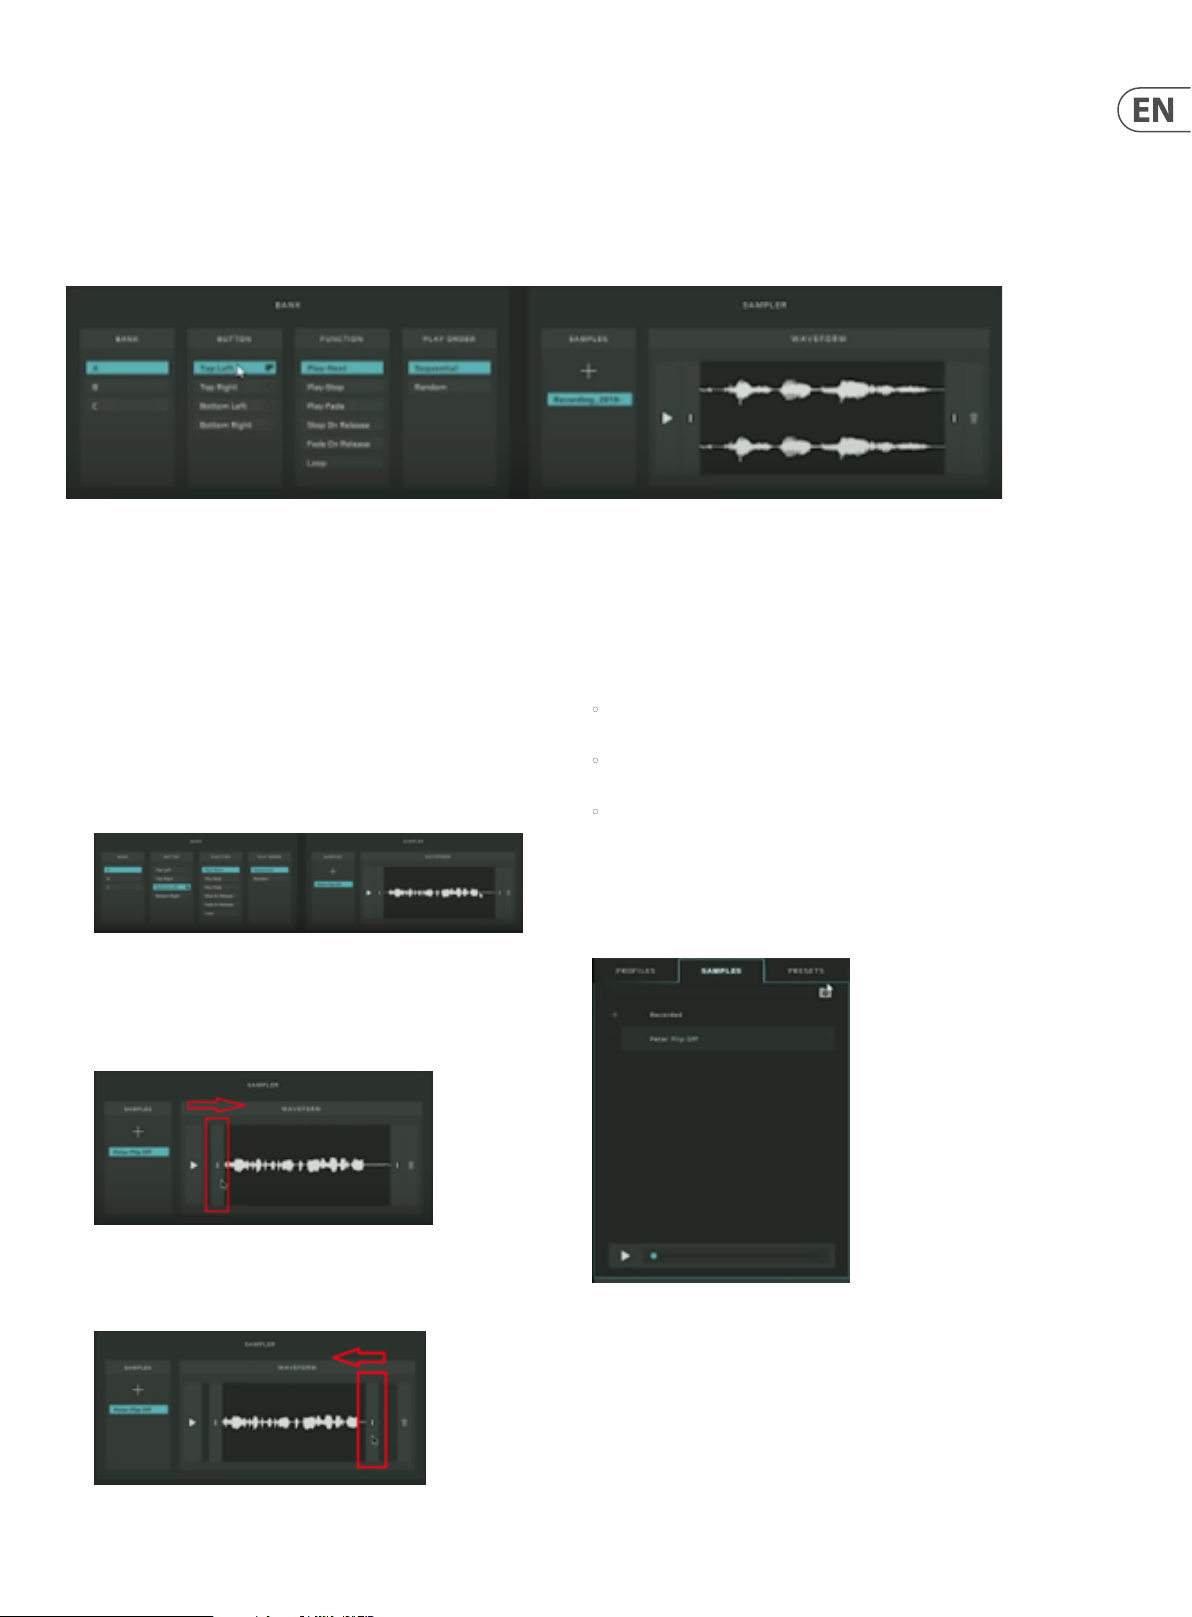
10.2 Working with the Sampler Tab
The Sampler tab can be found in the Control Tabs section located in the bottom half of the GO XLR app window on your computer.
Within the Sampler tab, the Settings window shows controls for the sample banks on the left, along with playback options.
The Sampler section to the right shows the lename and waveform for the currently-selected Sample Pad, along with some basic editing tools so you can trim the
length of the sample as needed.
When you go to the Bank>Button section and click on any of the Sample Pads listed, the Waveform window will change to display the audio waveform for that
Sample Pad.
Sampler t ab with sample wave form shown
NOTE: You can sample your voice through your vocal eects setup, so however your voice sounds in your headphones at that moment will be captured in the sample.
10.3 Editing a Sample
Once you have used a Sample Pad to capture a sample, you can then edit the
sample for length by using the editing bars on the left and right sides of the
waveform.
1. Sample some audio by pressing-and-holding one of the four Sample Pads.
2. Make sure this Sample Pad is selected under Bank>Button in the GO XLR app
so that the sample’s waveform appears in the Waveform window on
the right.
3. To edit the sample’s beginning, click on the left-hand editing bar
immediately to the left of the sample waveform.
4. Drag the editing bar rightward until you nd the right beginning point for
sample playback.
10.4 Color Indicators for Sample Pads
You can assign colors to the Sample Pads so that you can tell a Sample Pad’s
status at a glance, including the following conditions:
• active/loaded—the Sample Pad has a sample loaded and is playing back
(color is bright)
• inactive—the Sample Pad has a sample loaded, but is not playing back
(“active/loaded” color is dimmed)
• sample empty—no sample currently loaded to the Sample Pad (dimmed
color, which may be dierent from the “active/loaded” color)
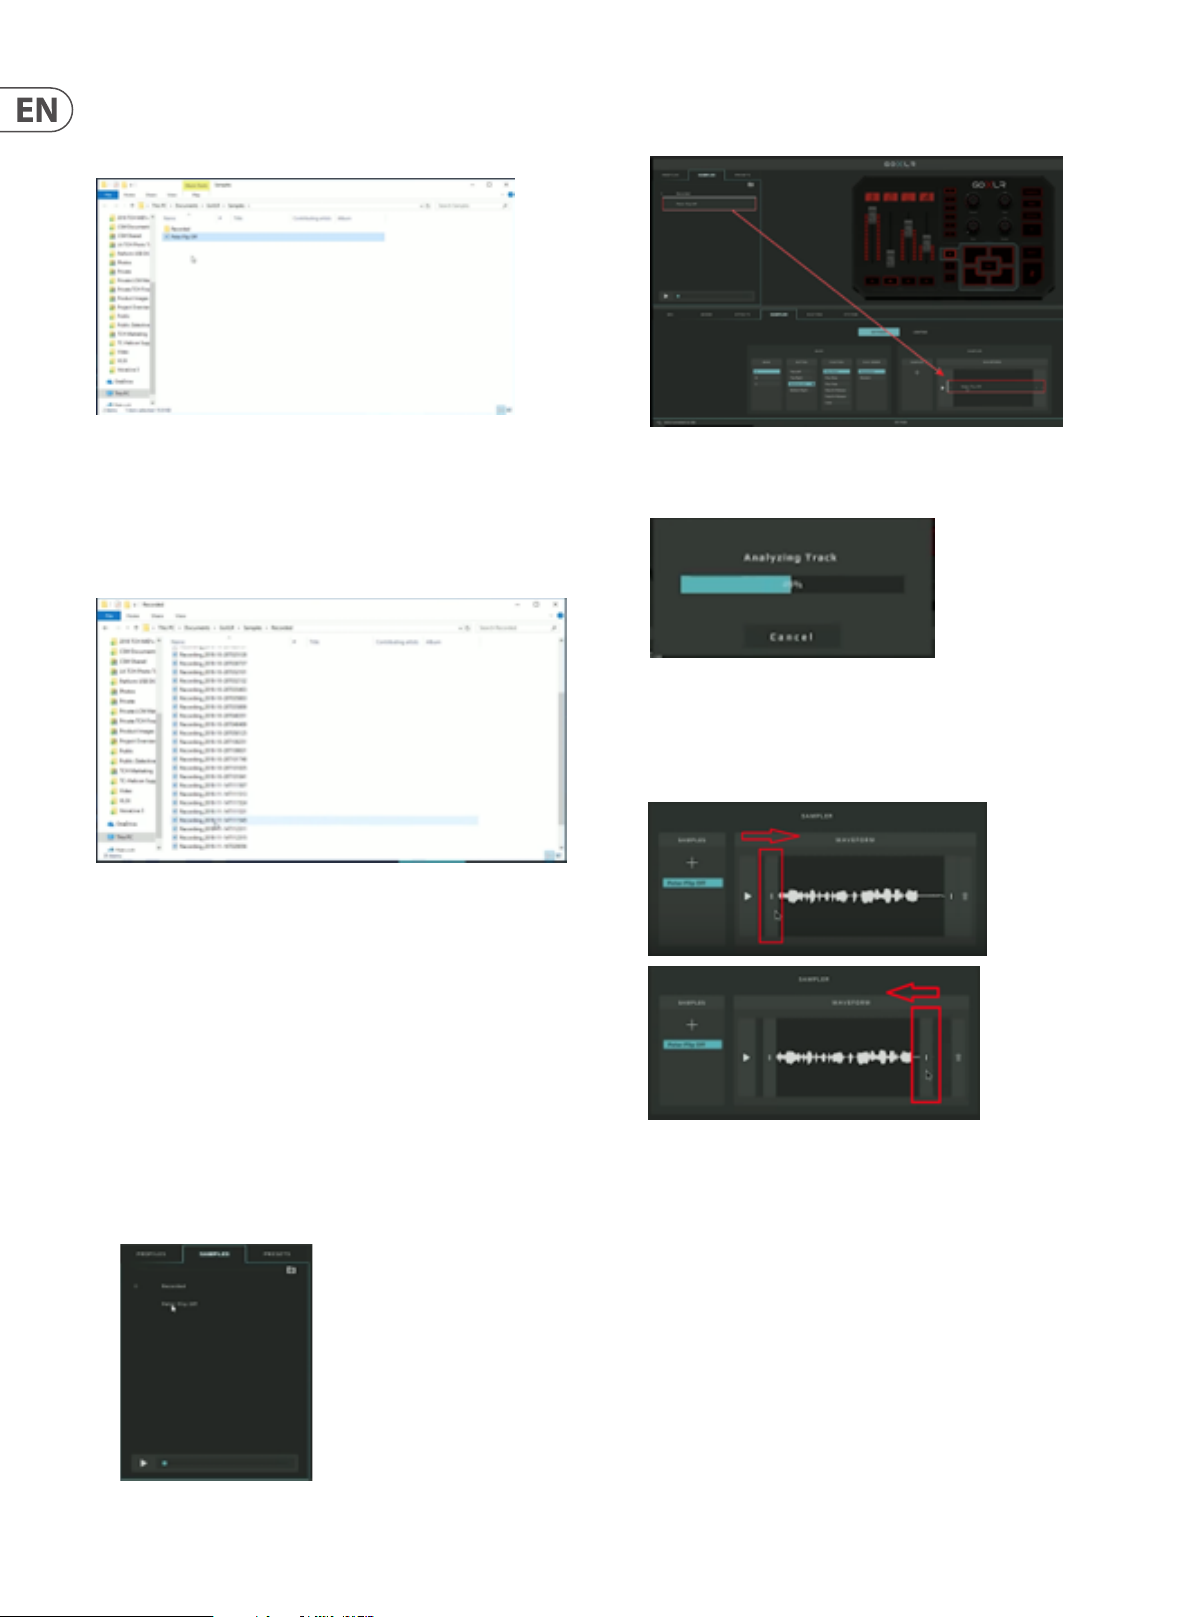
10.5 Building a Sample Library
Your sample library can be built by going to the Samples tab in the upper left
corner of the GO XLR app screen.
5. To edit the sample’s ending, click on the right-hand editing bar immediately
to the right of the sample waveform.
6. Drag the editing bar to the left until you like how the sample ends.
Samples tab
24 GO XLR User Manual
Click on the folder icon in the upper left of the Samples tab to open the le
browser. Then, within the le browser, you can create new folders to organize
your samples, e.g., “All Rick & Morty Samples” or “Samples I Made with Friends”.
Samples tab le browser
You will also nd a system-generated folder called “Recorded,” which contains
every sample you have ever recorded while you were broadcasting live. All of
these historical samples will be date-stamped so that you can go back to pick
your favorites and re-name the les to suit your purposes.
4. Drag the sample down from the Samples tab to the Sample section in the
lower right of the screen.
5. GO XLR will analyze the sample’s audio le and adjust the playback volume
to the same perceived loudness as your other samples.
“Record ed” folder with t ime-stampe d sample les
Pro Tip: The GO XLR sampler can accept long audio les, which can be useful
when you have some background music that you want to launch on the y, e.g.,
during crucial moments of a video game that you want to highlight musically.
10.6 Loading a Sample from the
Sample Library
To pull a sample into GO XLR from your sample library, follow these steps:
1. Select the Sample Pad you wish to load by going to the lower Sampler tab.
2. Select the Bank and Sample Pad from the list in the Button section.
3. Click-and-hold on a sample from the Samples tab in the upper left of the
GO XLR app.
6. When loaded, the waveform and sample name will appear in the lower
Sample section.
7. Edit the length of the sample, if desired, by clicking-and-dragging on the
editing bars to either side of the waveform.
25 GO XLR User Manual
11. Global, FX & Sampler Lighting
The GO XLR app gives you detailed custom control over the color and appearance of the GO XLR panel. You can assign colors for dierent functions and states, such as
whether a Sample Pad has a sample loaded, is actively playing back, is stopped, and so on.
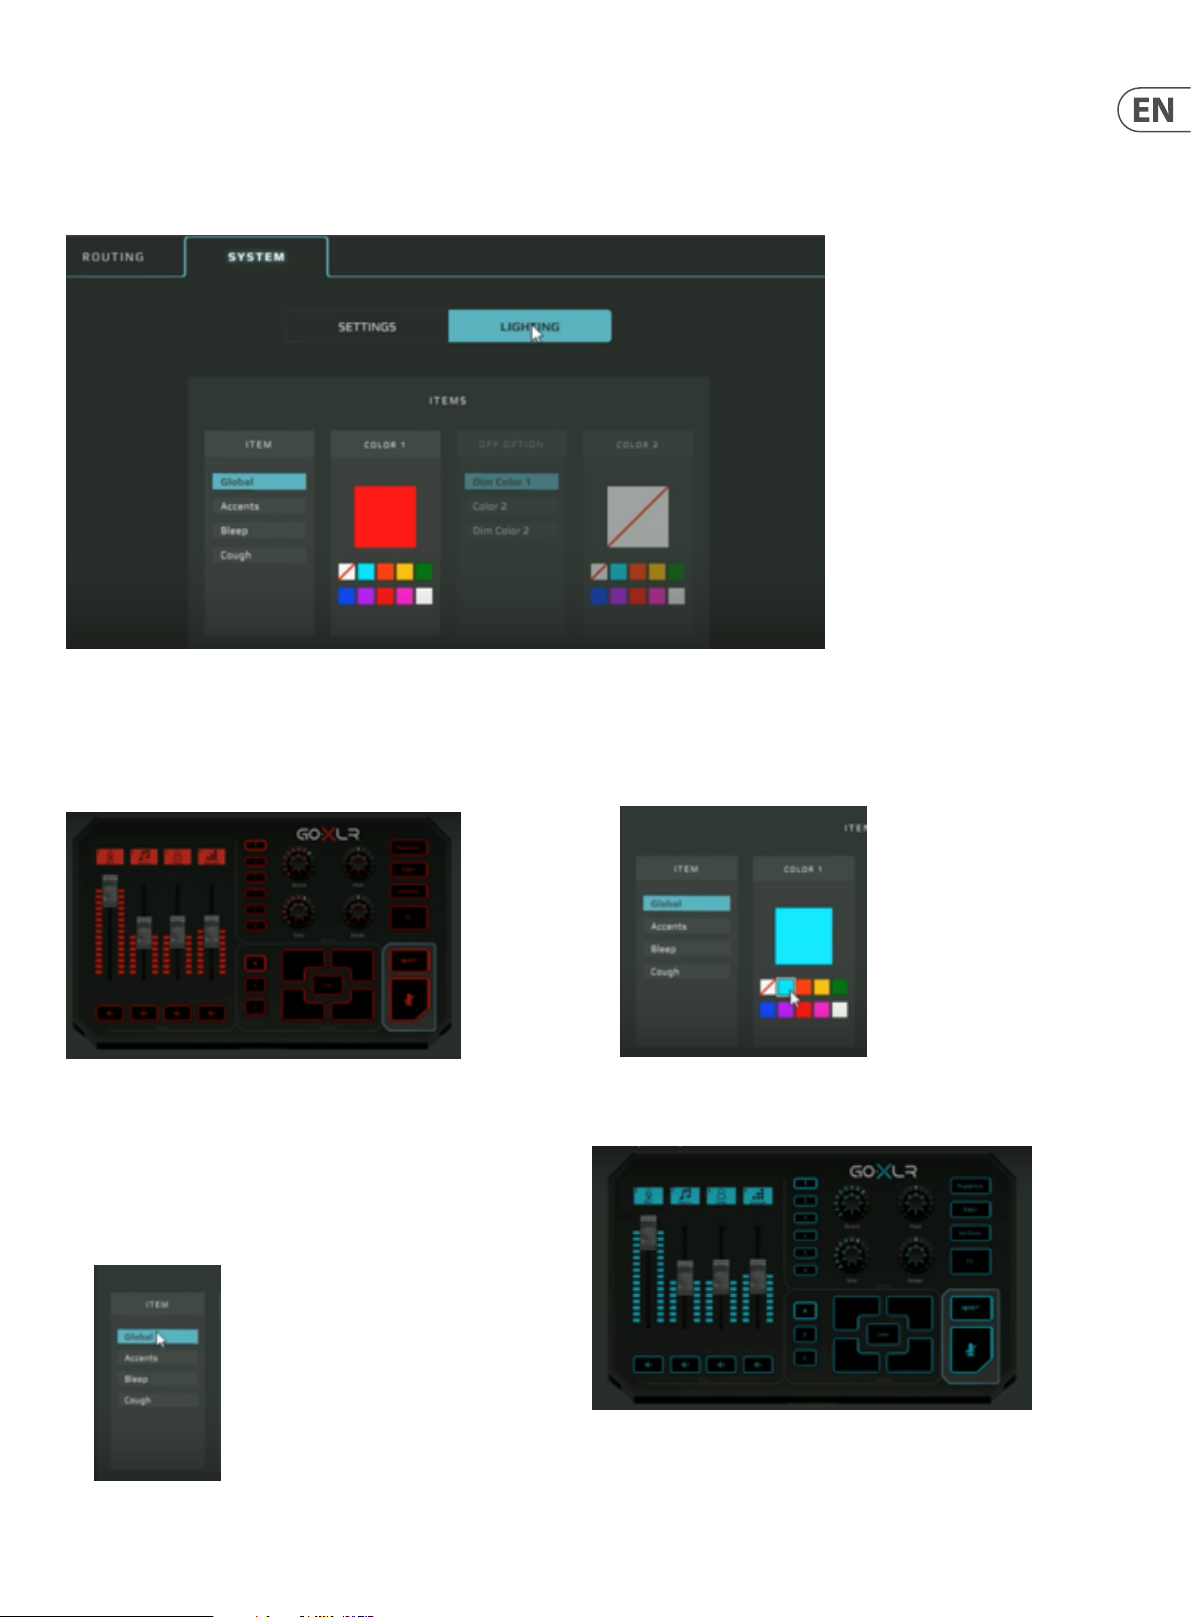
Within the Lighting section of the lower System tab, you can a assign a single overall color for the GO XLR panel, customize the accent light color (the “X” in the GO XLR
logo and the interior LEDs inside the ventilation grille), assign a color to the !@#$* or “bleep button,” and set up a custom color for the Cough button.
Global color settings under the System tab
11.1 Globally Assigning Colors
GO XLR can be set up with a single color as the overall, dominant “look” of
the unit.
GO XLR panel w ith red global col or scheme
To assign a global, overall color scheme for GO XLR, follow these steps:
1. Click on the System tab in the Control Tabs area at the bottom of the GO XLR
app screen.
2. Click on the Lighting option.
3. Under Item, click on the Global option.
4. Under Color 1, select a color from the options shown on the palette.
Whenever you select a new color, the GO XLR panel will immediately change
to show the new color.
NOTE: Only one Global and Accent color may be selected, so the Color 2 option
will be grayed out and non-functional for the Global lighting section.
GO XLR panel w ith blue global col or scheme

26 GO XLR User Manual
The Bleep and Cough sections will also allow you to customize a Color 2 to represent the “o” state for those buttons. By default, the O Option will be Dim Color 1, but
you can easily select the Color 2 or Dim Color 2 options.
Cough button color assignments
11. 2 Assigning Custom Sampler Colors
To begin assigning custom colors for Sampler buttons, go to the Sampler tab in
the lower set of Control Tabs. Inside the Sampler tab, select Lighting to open up
the Sample color-setting section.
Sampler color assignment section
In this section, you can choose a color to represent when a Sample Pad has a
sample loaded and is playing back.
For example, you might set up the following color arrangements for your
Sample Pads:
• Red = Active/Loaded—the Sample Pads for that Bank will light up red
whenever a sample is loaded.
• Dimmed red = Inactive Option—when a sample is loaded, but is not
playing back, the Sample Pad will shine with a dimmed version of the red
Active/Loaded color.
• Green = Inactive Option—when there is no sample assigned to a Sample
Pad, that pad will appear green.
11. 3 Apply To All
If you want all of your Banks to use the same color scheme, click the “Apply To
All” check box in the upper right of the Lighting>Bank section.
“Apply To All” optio n checked
Once “Apply To All” has been checked, any colors you set up in one Bank will
automatically apply your new settings to all other Banks.
New Sampler color assignment

27 GO XLR User Manual
11. 4 Assigning Custom Colors for Eects
Similarly, you may also assign custom colors to the buttons and knobs in the GO XLR Eects section, with separate sets of color options for Presets, Encoders and
buttons for Eects, including the Megaphone, Robot, Hardtune and FX buttons.
Eects lighting options
Each section also has the “Apply To All” option available if you want identical color schemes for all Presets buttons or for all encoder knobs.
11. 5 Encoder Colors
The Encoder knobs have special color assignment options that allow you to assign
separate colors on either of the white indicator that shows exactly where the
encoder knob is set. For example, you could assign all LEDs to the lef t of the white
indicator to shine red, while to the left the LEDs are blue.
Color opti ons for Encoder kno bs
These diering color assignments are handy if you wish to know at-a-glance
where the eects encoders are set.
You may also set the LEDs inside the encoder knobs to shine with a custom color
by selecting a color under the Knob Color section.
Knob Color w ith custom color a ssignment
Reverb enco der knob with blue t o the left of the wh ite indicator

28 GO XLR User Manual
12. Specication
Analog Connections
XLR In 1 x XLR, balanced
Phantom power +48 V, switchable via control app
Line In 1 x ⁄" TRS, stereo
Mic 1 x ⁄" TRS, biased for computer
microphone input
Phones 1 x ⁄" TRS, stereo
Line Out 1 x ⁄" TRS, stereo
Digital Connections
USB 1 x USB 2.0, type B
Optical 1 x Toslink
Controls
Motorized faders 4
Backlit LCD scribble strips 4
Rotational encoders 4
Lighting RGB
Buttons 24
System / Processing
A/D – D/A conversion 24-bit @ 48 kHz
Eects Reverb, echo, pitch shifting, gender
(formant shifting), megaphone, robot,
hardtune, sampler
Frequency response 10 Hz to 20 kHz, +0/-2 dB
Dynamic range > 110 dB
S/N ratio > 101 dB
Power Supply / Voltage
Power input Standard 12 V DC, center negative
< 1 A (power supply included)
Adapter 12 V DC / 1 A
Power consumption 10 W
Dimensions / Weight
Dimensions (H x W x D) 82 x 285 x 174 mm (3.2 x 11.2 x 6.9")
Weight 1.55 kg (3.41 lbs)

29 GO XLR User Manual
FEDERAL COMMUNICATIONS
COMMISSION COMPLIANCE
INFORMATION
GO XLR
Responsible Party Name: Music Tribe Brands UK Ltd.
Address: Klark Industrial Park,
Walter Nash Road,
Kidderminster, Worcestershire,
DY11 7HJ United Kingdom
Phone Number: +44 1562 732290
GO XLR
complies with the FCC rules as mentioned in the following paragraph:
This equipment has been tested and found to comply with the limits for a Class A
digital device, pur suant to Part 15 of the FCC Rules. These limits are designed to
provide reasonable protection against harmful interference when the equipment
is operated in a commercial environment. This equipment generates, uses, and can
radiate radio frequency energy and, if not installed and used in accordance with
the instruction manual, may cause harmful interference to radio communications.
Operation of this equipment in a residential area is likely to cause harmful
interference in which case the user will be required to correc t the interference at his
own expense.
Important information:
Changes or modications to the equipment not expressly approved by Music Tribe
can void the user’s authority to use the equipment.

 Loading...