

Page 1
Trinity Reverb
Page 2

Trinity Reverb English Manual Version 1.0 Table of contents
Important Safety Instructions 1
EMC / EMI 2
About this manual 3
Introduction 4
Unpacking and setting up 5
Setup examples 6
Choosing the right setup 8
Inputs, outputs, controls 10
1. Power input 10
2. Audio inputs 10
3. Audio outputs 10
4. Footswitch 10
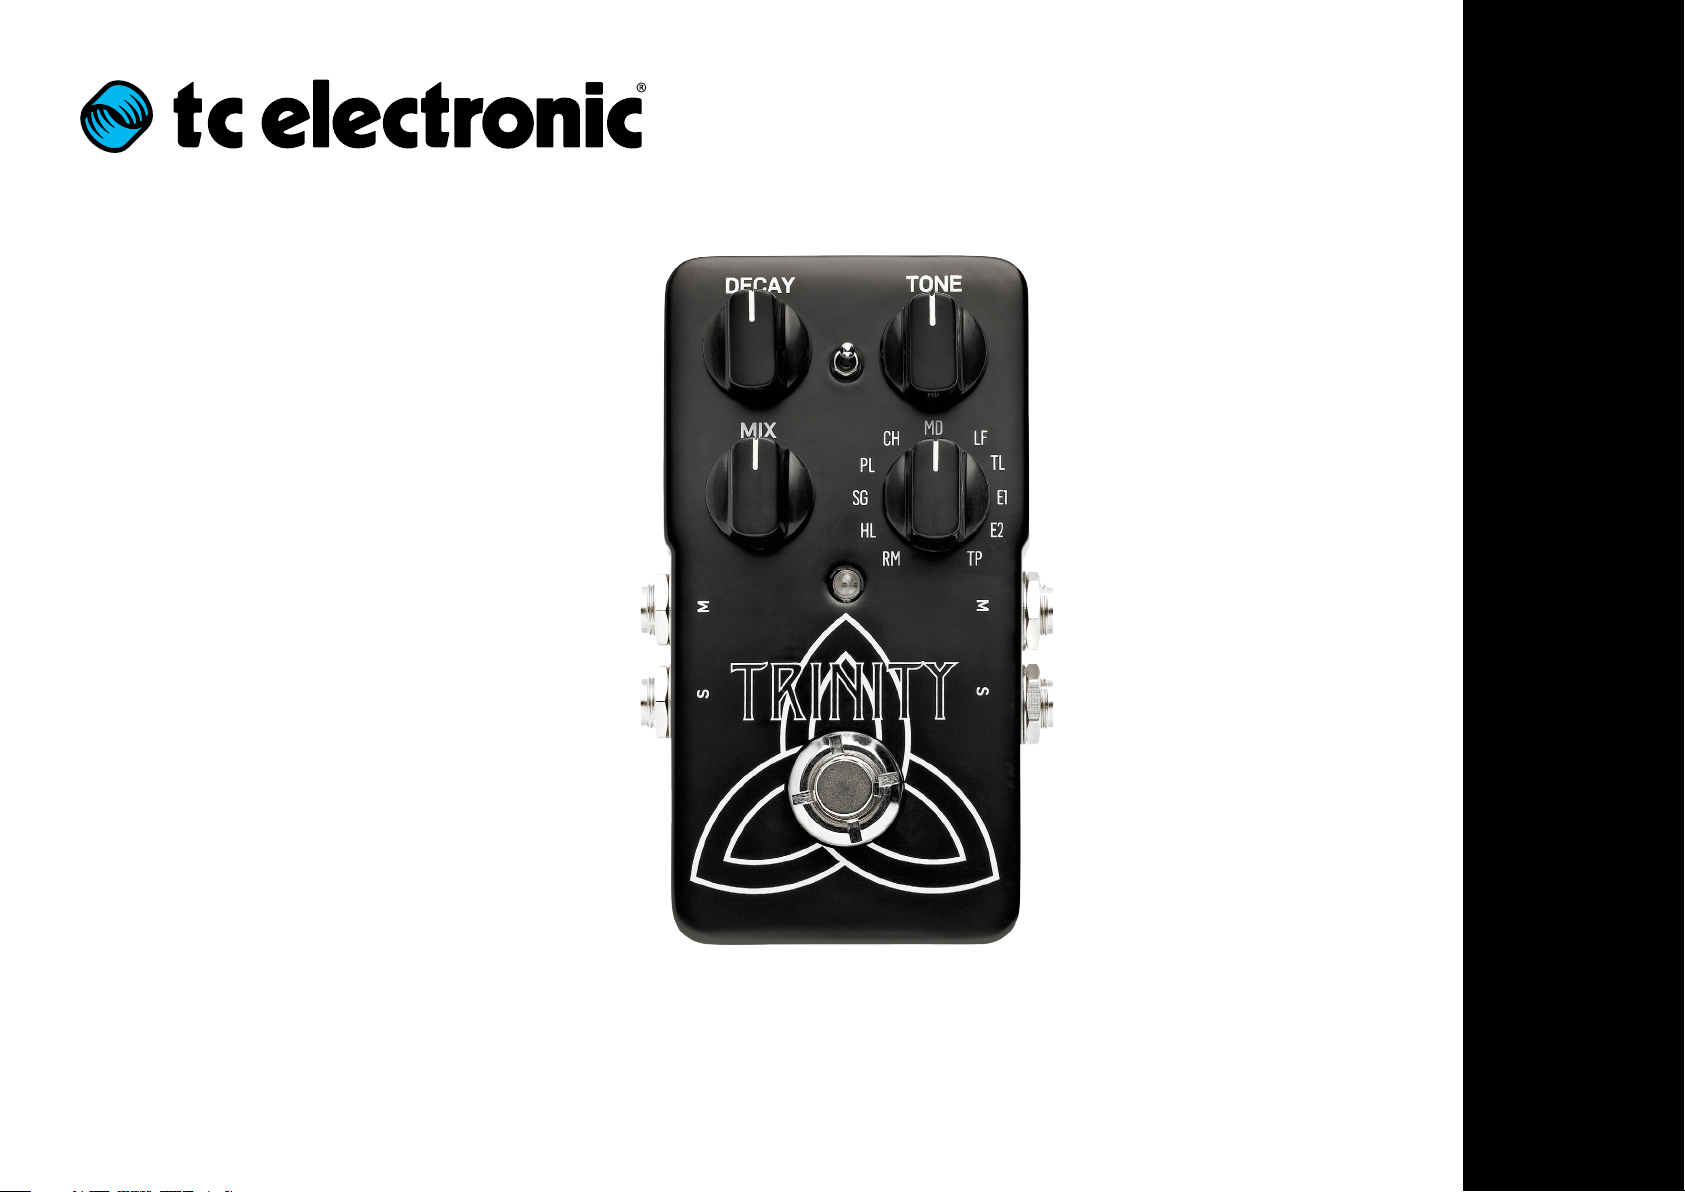
5. DECAY – Decay time control 10
6. TONE control 10
7. MIX – Effect level control 10
8. Reverb type selector 11
9. Pre-delay length selector 11
10. USB port 11
Reverb types 12
Using TonePrints 14
Bypass modes 16
Kill-dry on/off 16
Changing the battery 17
Technical Specifications 17
Getting support 17
a
Page 3

Important Safety Instructions
Important Safety Instructions
1) Read these instructions.
2) Keep these instructions.
3) Heed all warnings.
4) Follow all instructions.
5) Do not use this apparatus near water.
6) Clean only with dry cloth.
7) Do not block any ventilation openings. Install in accordance with the manufacturer’s
instructions.
8) Do not install near any heat sources such
as radiators, heat registers, stoves, or other
apparatus (including amplifiers) that produce heat.
9) Do not defeat the safety purpose of the polarized or grounding-type plug. A polarized
plug has two blades with one wider than
the other. A grounding type plug has two
blades and a third grounding prong. The
wide blade or the third prong are provided
for your safety. If the provided plug does
not fit into your outlet, consult an electrician
for replacement of the obsolete outlet.
10) Protect the power cord from being walked
on or pinched particularly at plugs, convenience receptacles, and the point where
they exit from the apparatus.
11) Only use attachments/accessories specified by the manufacturer.
12) Use only with the cart, stand, tripod, bracket, or table specified by the manufacturer,
or sold with the apparatus. When a cart is
used, use caution when moving the cart/
apparatus combination to avoid injury from
tip-over.
13) Unplug this apparatus during lightning
storms or when unused for long periods of
time.
14) Refer all servicing to qualified service personnel. Servicing is required when the apparatus has been damaged in any way,
such as power-supply cord or plug is damaged, liquid has been spilled or objects
have fallen into the apparatus, the apparatus has been exposed to rain or moisture,
does not operate normally, or has been
dropped.
Warning
Do not expose this equipment to dripping or
splashing and ensure that no objects filled with
liquids, such as vases, are placed on the equipment.
Do not install this device in a confined space.
Service
All service must be performed by qualified personnel.
Caution
You are cautioned that any change or modifications not expressly approved in this manual
could void your authority to operate this device.
Trinity Reverb English Manual Version 1.0 1
Page 4

EMC / EMI
EMC / EMI
Electromagnetic compatibility /
Electromagnetic interference
This equipment has been tested and found to
comply with the limits for a Class B Digital device, pursuant to part 15 of the FCC rules.
These limits are designed to provide reasonable
protection against harmful interference in residential installations. This equipment generates,
uses and can radiate radio frequency energy
and, if not installed and used in accordance with
the instructions, may cause harmful interference to radio communications. However, there
is no guarantee that interference will not occur
in a particular installation. If this equipment does
cause harmful interference to radio or television
reception, which can be determined by turning
the equipment off and on, the user is encouraged to try to correct the interference by one or
more of the following measures:
– Reorient or relocate the receiving antenna.
– Increase the separation between the equip-
ment and receiver.
– Connect the equipment into an outlet on a cir-
cuit different from that to which the receiver is
connected.
– Consult the dealer or an experienced ra-
dio / TV technician for help.
For customers in Canada
This Class B digital apparatus complies with Canadian ICES-003.
Cet appareil numérique de la classe B est
conforme à la norme NMB-003 du Canada.
Trinity Reverb English Manual Version 1.0 2
Page 5
About this manual
About this manual
This manual will help you learn understanding
and operating your TC product.
This manual is only available as a PDF download
from the TC Electronic website.
Of course, you can print this manual, but we encourage you to use the PDF version, which has
both internal and external hyperlinks. For example, clicking the TC Electronic logo in the upper
left corner of each page will take you to the table
of contents.
To get the most from this manual, please read it
from start to finish, or you may miss important
information.
To download the most current version of this
manual, visit tcelectronic.com/support/manuals/
Enjoy your TC product!
TonePrint-enabled
This TC Electronic product
supports TonePrints. Follow
the icon to learn more about
TonePrints, or go to
tcelectronic.com/toneprint/
Trinity Reverb English Manual Version 1.0 3
Page 6

Introduction
Introduction
Introduction by Aaron Miller, Founder of PGS
“ProGuitarShop and TC Electronic put their
heads together once again. The result is the TC
Electronic Trinity Reverb. The Trinity is a collaborative design based on the popular Hall of Fame
Reverb from TC Electronic’s TonePrint series.
The entire idea of the Trinity Reverb came about
when Tore at TC Electronic mentioned that they
had a cathedral reverb algorithm for the Hall of
Fame that was never used in the production
model. This sparked the creative side of Andy
and Aaron here at PGS – and the idea for the
Trinity Reverb was born.
We think these two new presets will present a
world of creative spark for anyone that loves to
test the limits in their playing and music. From
the ghostly, otherworldly to the spinning chopper: The all-new TC Electronic Trinity Reverb
pushes all the boundaries of conventional reverb
effects. Trinity still has a spot for your favorite
TonePrint, as well as 8 standard presets from the
popular Hall of Fame.”
Trinity Reverb English Manual Version 1.0 4
Page 7

Unpacking and setting up
Unpacking and setting up
Ready…
The Trinity Reverb box should contain the following items:
– 1 Trinity Reverb pedal
– 2 rubber feet for “non-velcro” pedalboard
mounting
– 1 TC Electronic sticker
– 1 leaflet about TC’s guitar FX product range.
– 1 USB cable for transferring TonePrints from
the computer to the pedal and updating the
pedal firmware
Inspect all items for signs of transit damage. In
the unlikely event of transit damage, inform the
carrier and supplier.
If damage has occurred, keep all packaging as it
can be used as evidence of excessive handling
force.
Set…
– Connect a 9V power supply with the following
symbol to the DC input socket of Trinity Reverb.
! Please note that Trinity Reverb does not
come with a power supply.
– Plug the power supply into a power outlet.
– Connect your instrument to the MONO IN jack
on the right side of the pedal using a ¼“ jack
cable. You can also feed the pedal with a stereo signal by using both IN jacks.
– Connect the MONO OUT jack on the left side
of the pedal to your amplifier using a ¼“ jack
cable.
Play!
Trinity Reverb English Manual Version 1.0 5
Page 8

Setup examples
Setup examples
Trinity Reverb in front of the amp
Input
Combo
Looper
Pedal
Modulation &
Delay Pedals
Drive
Pedals
Trinity Reverb English Manual Version 1.0 6
Page 9

Setup examples
Trinity Reverb in an FX Loop
Drive
Pedals
FX Loop Send ►
Input ▼
Combo
◄ FX Loop Return
Looper
Pedal
Modulation & Delay
Pedals
Trinity Reverb English Manual Version 1.0 7
Page 10

Reverb effects and volume pedals: choosing the right setup
Reverb effects and volume pedals: choosing the right setup
You have a reverb effect and a volume pedal. Great! Now – which setup is right for you? It really depends on how you intend to shape your sound.
“I want to be able to turn down the volume of everything!”
Cool. Then you will want to place your volume pedal after Trinity Reverb.
Looper
Pedal
Input
Combo
Your volume pedal goes somewhere over here.
▲
Modulation &
Delay Pedals
Drive
Pedals
Trinity Reverb English Manual Version 1.0 8
Page 11

Reverb effects and volume pedals: choosing the right setup
“I want my reverb to trail out when I use my volume pedal!”
Awesome! In that case, place your volume pedal before Trinity Reverb so the pedal can work its magic.
Looper
Pedal
Input
Combo
Your volume pedal goes somewhere over here if you want
your reverb to trail out when lowering the volume.
Modulation &
Delay Pedals
Drive
Pedals
▲
Trinity Reverb English Manual Version 1.0 9
Page 12

Inputs, outputs, controls
4
9101
7
8
5
6
3
2
Inputs, outputs, controls
1. Power input
The power input of this pedal is a standard
5.5 / 2.1mm DC plug (centre = negative). To power up your pedal, connect a power supply to its
power input socket. Trinity Reverb requires a 9V
power supply providing 100 mA or more (not
supplied). To minimize hum, use a power supply
with isolated outputs.
2. Audio inputs
The audio inputs of this pedal are standard ¼”
jacks (mono/TS).
– If your signal source is mono, connect it to the
M input jack on the right side of the pedal.
– If your signal source is stereo, connect the ca-
ble carrying the left signal component to the
M jack and the cable carrying the right signal
component to the S jack.
3. Audio outputs
The audio outputs of this pedal are standard ¼”
jacks (mono/TS).
– If the next device in the signal chain has a
mono input (e.g. your amp), connect the M
output jack of Trinity Reverb to the other device’s input.
– If the next device in the signal chain has ste-
reo inputs (e.g. another stereo effect pedal),
connect the M output jack of Trinity Reverb to
the left input and the S output jack to the right
input of the other device.
4. Footswitch
Tap the footswitch to turn the pedal on or off, just
like with any other pedal on your board.
5. DECAY – Decay time control
Use the Decay knob to set the decay time of the
reverb.
Please note that the maximum decay time for the
different reverb types varies due to the nature to
the reverbs.
6. TONE control
Use the TONE knob to change the emphasis
on high and low frequencies in the reverb from
“dark” to “crisp”. The “best” setting is really a
matter of how dominant you wish the reverb to
sound.
7. MIX – Effect level control
Use the Mix knob to control the level of the reverb.
! The direct, unprocessed signal is always
passed at the original level (unity gain). Only
the level of the reverb is changed when turning
the MIX knob.
Trinity Reverb English Manual Version 1.0 10
Page 13

Inputs, outputs, controls
4
9101
7
8
5
6
3
2
Inputs, outputs, controls
continued
8. Reverb type selector
Use the Reverb type selector to choose the type
of reverb you want to work with.
The reverb types are described in the section
“Reverb types”.
9. Pre-delay length selector
“Pre-delay” is the time between the direct sound
and the onset of the reverb tail. To keep the direct sound “in-your-face” – even with a long decay time and a high mix setting –, use the long
pre-delay setting.
– Top position: short pre-delay
– Bottom position: long pre-delay
10. USB port
Use this standard Mini-B USB port to load new
TonePrints into the pedal or create your own
using the TonePrint Editor – it’s 100 % free of
charge! If there should be firmware updates for
this device, they can also be installed using this
port.
Trinity Reverb English Manual Version 1.0 11
Page 14

Reverb types
Reverb types
This section of the manual describes the reverb
types you can access using the Reverb type selecto r.
RM – Room reverb
The Room algorithm simulates a relatively small,
well furnished room. In such a room, many reflections are absorbed by soft materials, and
the sound is reflected and sustained only by
the walls (covered with wallpaper), windows and
maybe some furniture.
HL – Hall reverb
The Hall Acoustic preset is a broad yet slightly
diffuse reverb. It simulates a large environment
but adds a distinctive acoustic flavor to the
source material. Great discreet reverb for large
epic sounds at longer decay settings but also
perfect for genuine ambient sounds at shorter
decay settings.
SG – Spring reverb
The Spring algorithm has been designed to reproduce the sound of the old spring reverbs,
such as the ones used in vintage guitar amps.
PL – Plate reverb
Prior to the digital era, reverb was created either using springs or large metallic plates. A
Plate reverb is recognized by its very diffuse and
bright sound and is excellent for guitar when you
search for a significant guitar reverb.
CH – Church reverb
A highly diffuse large reverb that is recognizable
for its emulation of the many hard surfaces of different shapes found in traditional church rooms.
If you are looking for a large reverb and think the
Hall is too clean and subtle – try Church.
MD – Modulated reverb
The MOD mode adds modulation to the reverb
only – not to the dry signal. This opts for a reverb
that is really noticeable and cuts through in live
situations.
LF – Lo-Fi reverb
Down and dirty reverb. Use LF and show your
awareness of aiming in the straight opposite direction of a smooth discrete studio reverb type.
Make a statement.
TL – Tile reverb
If you want the “bathroom” effect, without actually sounding like you’re playing in your bathroom. The Tiled Room reverb simulates the qualities of a small to medium size tiled room with its
many reflections and at the same time it behaves
respectfully towards the original source material.
This is not a soft smooth reverb – this one cuts
through the mix.
E1 – Ethereal 1
Tweaked by ProGuitarShop
“This setting came about when we decided to
push the limits of the EQ settings of the reverbs
decay. By doing so, we were able to create a
distinct presence of upper harmonic overtones
swirling behind the reverb. These overtones
hang in the air above the signal like an Aurora
Borealis of harmonics, glimmering and shifting
about as you play. We did not use any sort of
synthesis or octave effects to attain this setting;
E1 is pure reverb interacting with itself, bouncing around to create a perceived upper harmony.
Your guitar is suddenly transformed into a choir
of heavenly harmonies. “
Aaron Miller, Founder of PGS
E2 – Ethereal 2
Tweaked by ProGuitarShop
“The Ethereal 2 setting creates a pulsating helicopter effect. This effect provides a pulsing,
throbbing drone behind the note, generating an
eerie wall of sound. Like E1 this is also in the
background of the reverb but E2 is very dynamic
and responsive to pick attack and which strings
you’re playing. The low strings tend to have a low
end heavy throbbing that transitions to a bubbling brook type of effect when played lightly
while the high strings yield more of a swirling,
spinning aura behind the reverb effect.”
Aaron Miller, Founder of PGS
Trinity Reverb English Manual Version 1.0 12
Page 15

Reverb types
TP – TonePrint setting
Set the Reverb type selector to TP to use the
TonePrint setting.
Using and editing TonePrints is explained in the
Using TonePrints section.
Trinity Reverb English Manual Version 1.0 13
Page 16

Using TonePrints
Using TonePrints
When you look at your pedal,
you’ll only see a few knobs
and switches. However, they
actually control a large number of internal parameters.
TC has defined the relationship between the knob and all the parameters
“under the hood”. But wouldn’t it be cool to have
guys like Steve Stevens, Scott Ian or Paul Gilbert (i.e., some of the world’s leading guitar players) virtually rewire these controls, defining what
should happen behind the scenes or perhaps
even do it yourself?
This is exactly what TonePrint does.
We work with top guitar players who explore
a pedal’s hidden tonal potential, redefining the
controls and creating their personal TonePrints.
TC is making these custom TonePrints available to you. Uploading them to your pedal is really easy, and with the amazing TonePrint Editor
you can even create your own signature pedal
tweaked specifically to your liking.
Transferring TonePrints to the pedal
“So how do I load new TonePrints into my pedal?”
“Use USB, Luke – or beam it.”
Transferring TonePrints to
the pedal by beaming
For all you iPhone and Android users out there,
we created the TonePrint app. iPhone users can
download the app from Apple’s App Store, Android users will find it on Google Play.
– Launch the TonePrint app on your smart-
phone and find the TonePrint you want to use.
– Plug your guitar or bass into your Alter Ego
Delay.
– Turn your Alter Ego Delay on.
– Turn up the volume on your instrument and set
the pickup selector to one pickup.
– Hold the speaker of your smartphone next to
the chosen pickup and touch “Beam to ped-
al”.
(Or just follow the on-screen instructions on
your phone.)
Transferring TonePrints to
the pedal via USB
– Go to tcelectronic.com/toneprint.
– Select your TC product in the “TonePrint by
product” section.
– Download a TonePrint you’d like to try.
– Connect your TC pedal and your computer
using a Mini-B to Type A USB cable.
– Turn Alter Ego Delay on.
– Launch the TonePrint application you down-
loaded and follow the on-screen instructions.
It’s quick and easy.
You can change the TonePrint in your pedal as
often as you like, and the best part:
It’s totally free.
Trinity Reverb English Manual Version 1.0 14
Page 17

Using TonePrints
Editing TonePrints with
the TonePrint Editor
For years, we have given musician the opportunity to use TonePrints created by their favorite
guitar and bass players. But it’s time to step up
the game. Finally, you can create your very own
signature pedal sounds using TC’s TonePrint
Editor!
TonePrint Editor features
– Use TonePrint Editor to build your own custom
sounds.
– Enjoy complete control over all effect parame-
ters and effect behavior – it’s your vision, your
sound.
– Customize knob function and knob range to
suit your needs and sounds.
– Audition your sonic creations in real-time live
– make changes on the fly and listen to results
immediately.
– Works with both PC and Mac.
Last but not least…
TonePrint Editor is absolutely free!
Getting and using TonePrint Editor
– Download TonePrint Editor for your computer
from tcelectronic.com/toneprint-editor/.
– Find the manual in your language at
tcelectronic.com/toneprint-editor/support/.
If you open the manual for TonePrint Editor
in Adobe Reader, you can click on interface
sections to jump directly to the sections of
the manual you are interested in.
Trinity Reverb English Manual Version 1.0 15
Page 18

Kill-dry on/off
Bypass modes
Here at TC, we have a simply philosophy: When
you are using one of our products, you should
hear something great – and if you don’t, you
shouldn’t hear it at all. This is why this pedal
sports True Bypass. When it is bypassed, it is
really off and has zero influence on your tone, resulting in optimum clarity and zero loss of highend. Also please note that the pedal lets your
dry, unprocessed sound pass without ever converting it to digital – keeping your original tone
pure and without any latency.
To set the bypass mode, proceed as follows:
– Disconnect the pedal and turn it on its back.
– Unscrew the back plate of the pedal and look
for the two small dip-switches in the upper left
corner.
– The upper DIP switch (the one closer to the
power in jack), switches between Tr ue B y-
pass mode (default) and Buffered Bypass
mode.
True Bypass and Buffered
Bypass explained
True Bypass mode is a hard-wire bypass that
gives absolutely no coloration of tone when the
pedal is bypassed.
Using True Bypass on all pedals is a perfect
choice in setups with a few pedals and relatively
short cables before and after the pedals.
If…
– you use a long cable between your guitar and
the first pedal or
– if you use many pedals on your board or
– if you use a long cable from your board to the
amp,
…then the best solution will most likely be to set
the first and the last pedal in the signal chain to
Buffered Bypass mode.
Can you hear the difference between a pedal in
True Bypass or Buffered Bypass mode?
Maybe, maybe not – many factors apply: active/
passive pick-ups, single coil/humbucker, cable
quality, amp impedance and more. We cannot
give a single ultimate answer. Use your ears and
find the best solution for your setup!
Kill-dry on/off
When you activate Kill-dry, the direct signal is
removed from the pedal’s output. Use this mode
when you place the pedal in a parallel effects
loop.
Please refer to the Setup examples section of
this manual to decide wether you want the dry
signal at the pedal’s outputs or not.
To set Kill-dry mode, proceed as follows:
– Disconnect the pedal and turn it on its back.
– Unscrew the back plate of the pedal and look
for the two small dip-switches in the upper left
corner.
– The lower DIP switch (the one further away
from the power in jack), switches between Killdry on and Kill-dry off mode.
! You can only remove the dry signal from the
signal path if you have selected Buffered Bypass mode using the upper DIP switch – see
previous section of this manual. Kill-dry is not
available in True Bypass mode.
True Buffered Kill-dry Kill-dry
Bypass Bypass off on
Trinity Reverb English Manual Version 1.0 16
Page 19

Getting support
Changing the battery
If you need to change the battery of your pedal,
proceed as follows:
– Unscrew the thumb-screw on the back of the
pedal and detach the back-plate.
– Unmount the old battery and attach the new
battery to the battery clip making sure the polarity is correct.
– Remount the back-plate.
Notes regarding batteries
– Batteries must never be heated, taken apart or
thrown into fire or water.
– Only rechargeable batteries can be recharged.
– Remove the battery when the pedal is not
being used for a longer period of time to save
battery life.
– Dispose batteries according to local laws and
regulations.
Technical Specifications
– Reverb Types:
8 TC settings
+ 2 settings tweaked by ProGuitarShop
+ TonePrint
– Mono/Stereo: Auto-sensing – automatic
Mono or True Stereo mode depending on the
connections used
– Bypass mode:
True Bypass (Buffered Bypass optional)
– Signal Circuitry: Analog Dry-Through
– Dimensions (W x D x H):
72 x 122 x 50mm / 2.8 x 4.8 x 2.0”
– Input Connector Types:
2 Standard ¼” jack – mono/TS
– Output Connector Types:
2 Standard ¼” jack – mono/TS
– Power Input: Standard 9V DC, centre nega-
tive >100mA (not supplied)
– Battery option: Standard 9V (not supplied)
– Input Impedance: 1 MΩ
– Output Impedance: 100 Ω
Getting support
If you still have questions about the product after reading this manual, please get in touch with
TC Support:
http://tcelectronic.com/support/
Trinity Reverb English Manual Version 1.0 17
Page 20

 Loading...