

Page 1
English Manual
PolyTune Clip
Page 2

Important Safety Instructions 1
About this manual 3
Introduction 4
Setup 5
Display and controls 6
How to use PolyTune Clip 7
Chromatic versus polyphonic tuning 7
Setting instrument type (guitar or bass) 7
Battery life 7
Switching Display Modes 8
Polyphonic tuning 9
Alternate tunings and capos 9
Changing the reference pitch 10
Inserting/replacing the battery 11
Technical specifications 11
Getting support 11
Product PolyTune Clip
Document Reference manual
Document version / date 2015 - 0 6 -16
PolyTune Clip English Manual a
Page 3
Important Safety Instructions
Important Safety Instructions
– Read these instructions.
– Keep these instructions.
– Heed all warnings.
– Follow all instructions.
– Do not use this apparatus near water.
– Clean only with dry cloth.
– Do not block any ventilation openings.
– Install in accordance with the manufacturer’s
instructions.
– Do not install near heat sources such as radi-
ators, heat registers, stoves, or other apparatus (including amplifiers) that produce heat.
– Only use attachments/accessories specified
by the manufacturer.
– Refer all servicing to qualified service per-
sonnel. Servicing is required when the apparatus has been damaged in any way, such as
power supply cord or plug is damaged, liquid
has been spilled or objects have fallen into
the apparatus, the apparatus has been exposed to rain or moisture, does not operate
normally, or has been dropped.
– Warning: Batteries installed shall not be ex-
posed to excessive heat such as direct sunlight, fire or the like.
– To reduce the risk of fire or electrical shock,
do not expose this equipment to dripping or
splashing and ensure that no objects filled
with liquids, such as vases, are placed on or
near the equipment. Do not install this product in a confined space.
Warning –
Coin/Button cell battery
Applicable to products with the symbol
DO NOT INGEST BATTERY.
CHEMICAL BURN HAZARD!
This product contains a coin/button cell
battery. If the coin/button cell battery is
swallowed, it can cause severe internal
burns in just 2 hours and can lead to death.
Keep new and used batteries away from
children. If the battery compartment does
not close securely, stop using the product
and keep it away from children.
If you think batteries might have been swal-
lowed or placed inside any part of the body,
seek immediate medical attention.
Caution
– You are cautioned that any change or modi-
fications not expressly approved in this manual could void your authority to operate this
equipment.
– Danger of explosion if battery is incorrect-
ly replaced. Replace only with the same or
equivalent type.
EMC/EMI
This equipment has been tested and found to
comply with the limits for a Class B Digital device, pursuant to part 15 of the FCC rules. These
limits are designed to provide reasonable protection against harmful interference in residential installations. This equipment generates, uses
and can radiate radio frequency energy and, if
not installed and used in accordance with the
instructions, may cause harmful interference
to radio communications. However, there is no
guarantee that interference will not occur in a
particular installation. If this equipment does
cause harmful interference to radio or television
reception, which can be determined by turning
the equipment off and on, the user is encouraged to try to correct the interference by one or
more of the following measures:
– Reorient or relocate the receiving antenna.
– Increase the separation between the equip-
ment and receiver.
– Connect the equipment into an outlet on a
circuit different from that to which the receiver is connected.
– Consult the dealer or an experienced radio/
TV technician for help.
– For customers in Canada: This Class B digi-
tal apparatus complies with Canadian CAN
ICES-3(B).
PolyTune Clip English Manual 1
Page 4

Important Safety Instructions
Service
– All service must be performed by qualified
personnel.
– Used batteries must be disposed of or recy-
cled properly.
PolyTune Clip English Manual 2
Page 5

About this manual
About this manual
This manual will help you learn understanding
and operating your TC product.
This manual is only available as a PDF download
from the TC Electronic website. A printed multilingual quick guide is provided with the product.
Of course, you can print this manual, but we encourage you to use the PDF version, which has
both internal and external hyperlinks. For example, clicking the TC Electronic logo in the upper
left corner of each page will take you to the table
of contents.
To get the most from this manual, please read it
from start to finish, or you may miss important
information.
To download the most current version of this
manual, visit tcelectronic.com/support/manuals/
Enjoy your TC product!
PolyTune Clip English Manual 3
Page 6

Introduction
Introduction
PolyTune Clip is much more than just a clip-on
tuner, it’s a revolution! Perfectly combining state
of the art tuning technology with an unprecedented attention to aesthetics and functionality,
PolyTune Clip gives a tune-up that’s unmatched
in speed, precision and grace.
PolyTune Clip is designed to be your trusty tuning companion, whether you’re going for a
quick on-stage tune-up or an ultra-precise setup
of your instrument.
PolyTune Clip sports three distinct tuning modes
– ranging from the game-changing polyphonic
tuning mode that lets you tune all strings of your
instruments at once, to your trusty chromatic
tuner and all the way to an ultra-precise strobe
tuner mode, which offers ±0.02 cents of tuning
precision.
PolyTune Clip English Manual 4
Page 7

Setup
Setup
Ready…
The PolyTune Clip box should contain the following items:
– 1 PolyTune Clip tuner
– 1 CR2032 button cell battery
– 1 multilingual quick guide
– 1 voucher for the free PolyTune Plug-in.
Inspect all items for signs of transit damage. In
the unlikely event of transit damage, inform the
carrier and supplier.
If damage has occurred, keep all packaging as it
can be used as evidence of excessive handling
force.
Set…
– Insert the battery into the PolyTune Clip as
described under “Inserting/replacing the battery”.
– Remove the protective film from the PolyTune
Clip display.
– Attach PolyTune Clip to the neck of your gui-
tar, and adjust the hinge. Chose whatever position you like – the display will automatically
adapt to PolyTune Clip’s position.
That’s it. There are no audio connections to
make. Both for acoustic and electric instruments, PolyTune Clip will pick up the signal
with its built-in piezo sensor.
Important note regarding
your instrument’s coating
Depending on various factors such as age-related changes or the surface finish, there is a
possibility that your instrument’s coating may be
damaged by attaching this product.
In general, do not leave accessories such as
PolyTune Clip attached to your guitar longer than
necessary, as the rubber pad may adversely
affect the finish of your instrument, especially
when it is exposed to sunlight for extended periods of time.
Get ready for a new
tuning experience!
Tuning your instrument with PolyTune Clip is fast
and intuitive. If you don’t feel like reading the
manual, just strum your instrument and watch
the display. We think you’ll like what you see.
E A D G B E
E A D G B E
If you want to learn more – read on!
PolyTune Clip English Manual 5
Page 8

Display and controls
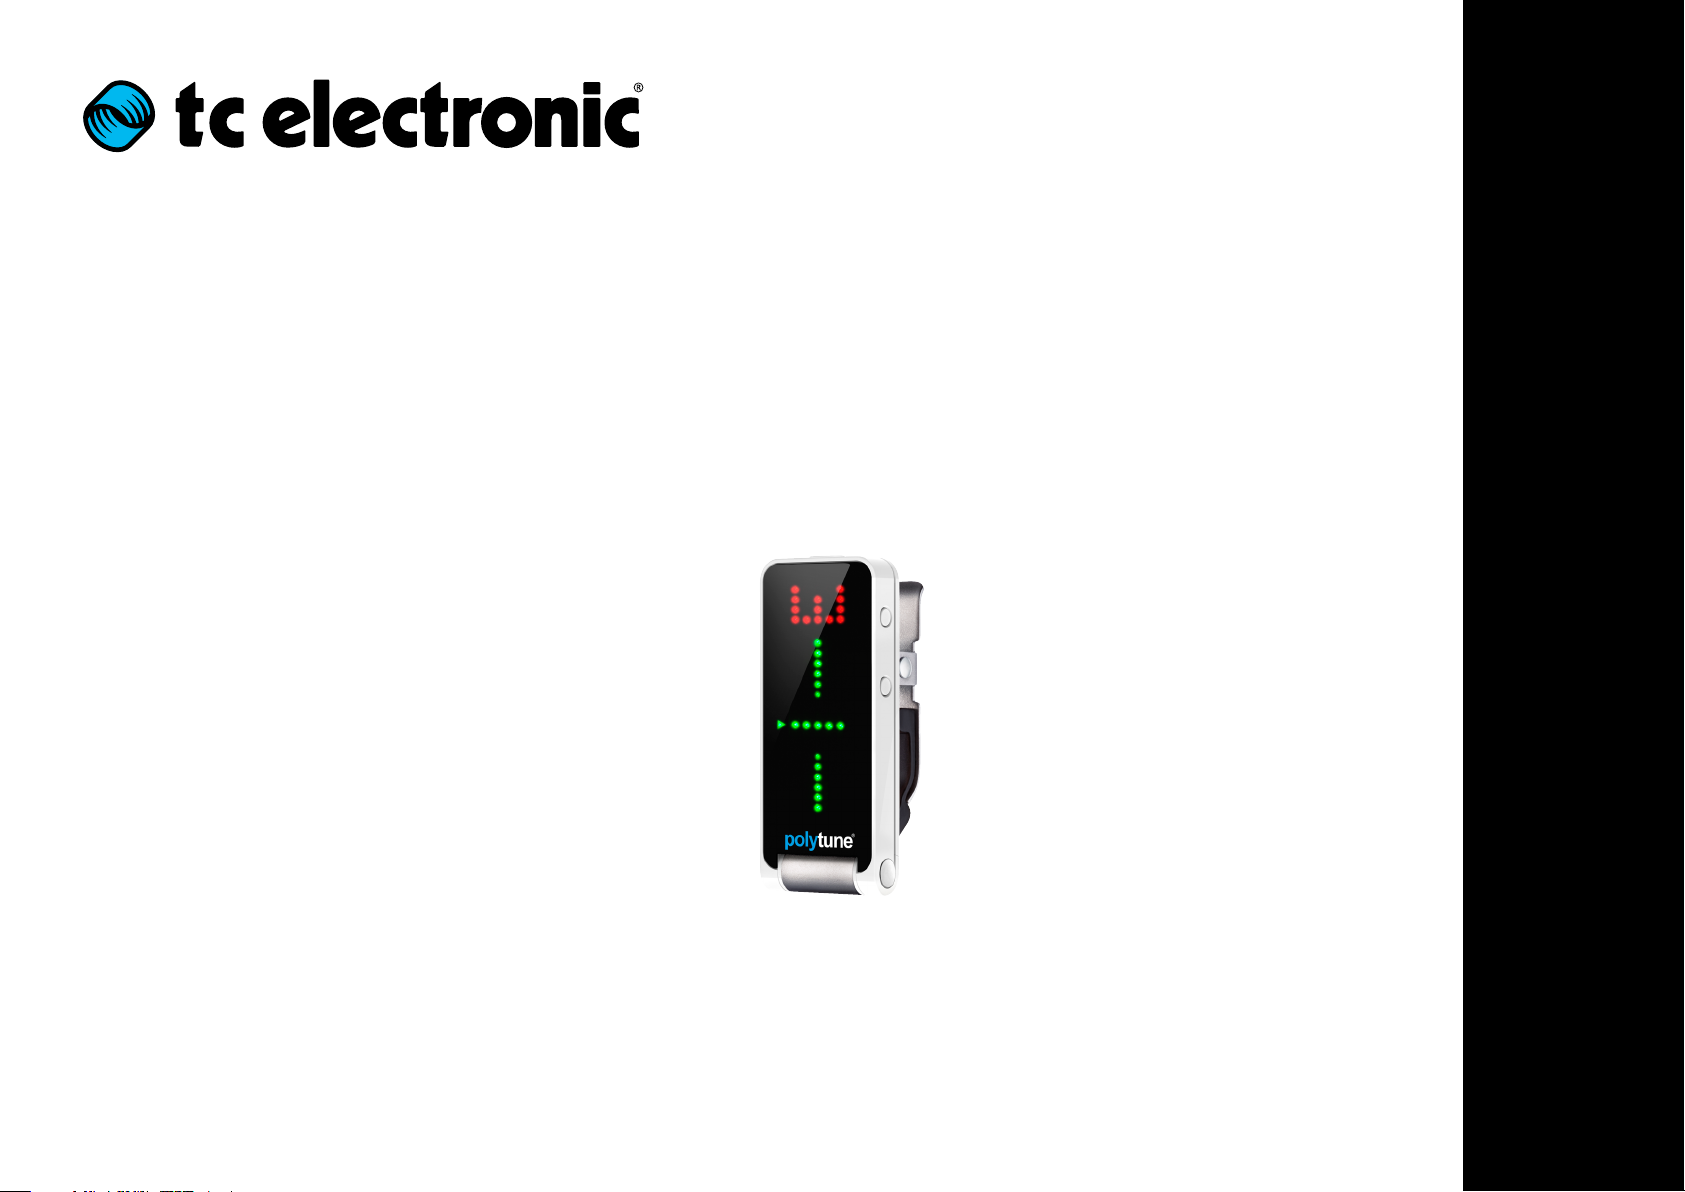
Display and controls
4
5 6
4
23
1
Please note that all settings will be stored and
preserved even when you change the battery.
1
Power On/Off Button
Press the Power On/Off Button to turn PolyTune
Clip on.
PolyTune Clip turns off automatically after 3 minutes.
2
Tuning Mode Button
Press the Tuning Mode Button to cycle through
the available tuning modes:
E - Eb - D - Db - C - B - F - Gb -
G - Ab - A - Bb - B - E
For more information, see “Alternate tunings and
capos”.
3
Display Mode Button
Press the Display Mode Button to toggle between Needle and Strobe Tuning Modes.
For more information, see “Switching Display
Modes”.
Press and hold the Display Mode Button for 5
seconds to toggle between Guitar (G) and Bass
Mode (B).
Please note that polyphonic tuning is only available in the Guitar Modes. If you select Bass
Needle Mode or Bass Strobe Mode, polyphonic
tuning is disabled.
For more information, see “Setting instrument
type (guitar or bass)”.
2
+ 3 Reference pitch
Press the Tuning Mode Button and the Display
Mode Button simultaneously to set the reference
pitch.
– To increase the reference pitch in 1Hz steps,
press the Tuning Mode Button.
2
– To decrease the reference pitch in 1Hz
steps, press the Display Mode Button.
3
For more information, see “Changing the reference pitch”.
4
Adaptive Display
Orientation Indicators
PolyTune Clip’s display automatically flips. If you
use the tuner either at the front or back of the
headstock, or even if you are left-handed, the
display will always be correctly aligned. The lit
arrow shows the current direction.
5
Display – Main Display
The larger part of the PolyTune Clip display (the
Main Display) is used to indicate the pitch of all
strings in polyphonic tuning mode and the pitch
of the currently tuned string in chromatic tuning
mode.
6
Display – Secondary Display
The smaller part of the display (the Secondary
Display) displays the detected note name for the
currently tuned string in chromatic tuning mode.
When switching Display Mode, it will display a
“G” for guitar tuning or a “B” for bass tuning. For
more information, see “Setting instrument type
(guitar or bass)” (page 7).
PolyTune Clip English Manual 6
Page 9

How to use PolyTune Clip
How to use PolyTune Clip
Chromatic versus polyphonic tuning
A very simple guitar tuner will only allow you to
tune open strings, one string at a time – e.g. E, A,
d, g, b, and e’ for the standard tuning of a guitar.
PolyTune Clip is a chromatic tuner – meaning it
will detect and allow you to tune all twelve notes
of the scale.
But that’s not all. Other than a traditional tuner,
PolyTune Clip allows you to strum all your instrument’s string simultaneously when tuning.
PolyTune Clip will detect which strings need to
be tuned and indicate those strings in its display.
This allows you to tune your instrument much
fa ste r.
Finally, you may have tuned one or all strings on
your instrument differently from standard tuning,
or you may be using a capo to change the playable length of the strings.
Setting instrument type (guitar or bass)
By default, PolyTune Clip is set up for tuning guitars. To tune a bass, press and hold the Display
Mode Button for more than 5 seconds. The secondary display will display “B”.
To return to Guitar Tuning Mode, press and hold
the Display Mode Button for more than five seconds again. The Secondary Display will display
“G ”.
The selected instrument type will be stored and
preserved even when you change the battery.
Battery life
Depending on the quality of the button cell lithium battery you are using, you can expect a battery life of approximately 18 hours. This means
that after inserting a fresh battery, you should
be able to tune your instrument for three minutes
every day for a full year.
PolyTune Clip turns off automatically after 3 minutes, but to increase battery life, you might want
to turn it off manually after tuning.
In all these situation, PolyTune Clip has you covered.
PolyTune Clip English Manual 7
Page 10

How to use PolyTune Clip
Switching Display Modes
If you press the Display Mode Button once, the
currently selected Display Mode will be shown.
Pressing the Display Mode Button repeatedly will
cycle between the two display modes described
in this section.
– Needle Mode is indicated by the center LED
column and row lighting up.
– Strobe Mode is indicated by the middle row
of LEDs lighting up.
The selected Display Mode will be stored and
preserved even when you change the battery.
Needle Mode
In Needle Mode, when you tune a single string,
pitch is indicated by a column of five LEDs in the
main display, and the name of the target note is
displayed in the secondary display.
If the string you are tuning is too low, LEDs to
the left of the center column will light up. If the
string is too high, LEDs to the right of the center
column will light up.
Tune the string until the middle column and the
middle row of green LEDs lights up. This means
you are “on target”.
Strobe Mode
In Strobe Mode, the difference between the
correct (target) frequency and the actual detected frequency is displayed by two indicators
simultaneously:
1. Red LEDs to the left (pitch too low) or to the
right (pitch to high) of the center LED column
2. “Rotating” segments in the display. The closer
the detected frequency is to the target frequency, the slower the rotation.
– Tune the string until the rotating pattern has
come to a stop and only the middle column
of green LED lights up.
PolyTune Clip English Manual 8
Page 11

How to use PolyTune Clip
Polyphonic tuning
As you know by now, PolyTune Clip is a poly-
phonic tuner. You can strum your instrument,
and PolyTune Clip will analyze and display the
tuning of all strings. So how do you activate polyphonic tuning mode?
You don’t – it just works. Strum, tune, rock on!
E A D G B E
Strum your guitar. Strings that are in tune will
be represented by two green LEDs. Strings that
need tuning are represented by two red LEDs
below (flat) or above (sharp) the middle row.
E A D G B E
Polyphonic tuning and Bass Mode
Please note that polyphonic tuning is only available for guitar. If you select Bass Needle Mode
or Bass Strobe Mode, polyphonic tuning is disabled.
If you play guitar and you don’t want to use polyphonic tuning at all, you can also change the
instrument type to Bass by pressing and holding the Display Mode Button for more than 5
seconds – see “Setting instrument type (guitar
or bass)” (page 7). You will still be able to
tune your guitar chromatically, but strumming
multiple strings will not trigger polyphonic tuning anymore.
Alternate tunings and capos
There’s more to life than E A D G B E’! You may
have tuned all strings of your instruments down,
or you may be using a capo. In that case, tell
PolyTune Clip about your instrument’s tuning by
pressing the Tuning Mode Button.
If you press the Tuning Mode Button once, the
current tuning will be displayed (“--E--” for standard tuning). Pressing the Tuning Mode Button
repeatedly will cycle through the following tunings:
Display Mode
--- E --- Standard tuning
Eb All strings tuned down 1 semitone
D All strings tuned down 2 semitones
Db All strings tuned down 3 semitones
C All strings tuned down 4 semitones
B All strings tuned down 5 semitones
F 1 Capo at first fret
Gb 2 Capo at second fret
G 3 Capo at third fret
Ab 4 Capo at fourth fret
A 5 Capo at fifth fret
Bb 6 Capo at sixth fret
B 7 Capo at seventh fret
Tune your guitar and strum again. Your instrument is in tune when each string is represented
by two green LEDs in the middle row.
PolyTune Clip English Manual 9
If you do not touch the Tuning Mode Button for
two seconds, the display will blink twice, and the
selected tuning will be used.
The selected tuning will be stored and preserved
even when you change the battery.
Page 12

How to use PolyTune Clip
Changing the reference pitch
In most cases, you may want to tune your what
is considered standard pitch, where the A above
the middle C has a frequency of 440 Hz.
However, you and your band may prefer a different pitch, or you may have to tune to an acoustic
instrument that cannot easily be retuned. In that
case, you need to change the reference pitch.
– To change the reference pitch, press the Dis-
play Mode Button and the Tuning Mode Button simultaneously.
The display will show the current reference
pitch (e.g. “440” for 440 Hz).
– To increase the reference pitch in 1 Hz steps,
press the Tuning Mode Button.
– To decrease reference pitch in 1 Hz steps,
press the Display Mode Button.
– To accept the currently displayed reference
pitch and return to normal operation, do not
press either button for two seconds. The set
reference pitch will blink three times.
The selected reference pitch will be stored and
preserved even when you change the battery.
PolyTune Clip English Manual 10
Page 13

Getting support
Inserting/replacing the battery
If you need to change the PolyTune Clip battery,
proceed as follows:
– Open the PolyTune Clip hinge so that the bat-
tery compartment on the back is accessible.
– Open the battery compartment.
– Remove the drained battery.
– Insert a full CR2032 lithium battery (20 mm
diameter, 3.2 mm height) into the battery
compartment, with the positive terminal (the
plus pole) facing towards you. I.e., when you
have inserted the battery, you should see the
“+” marker on its bottom.
– Close the battery compartment.
Technical specifications
– Tuning Range:
A0 (27.5Hz) to C8 (4186Hz)
– Tuning Accuracy – Chromatic tuning mode:
±0.5Cent
– Tuning Accuracy – Strobe tuning mode:
±0.02Cent
– Reference Pitch:
A4 = 435 to 445Hz
(adjustable in 1 Hz steps)
– Battery:
CR2032 Li-Mn battery
(battery included)
– Dimensions (W x D x H):
25 x 60 x 28mm / 0.98 x 2.36 x1.1”
– Weight:
32g / 1.13oz.
(including battery)
Due to continuous development, these
specifications are subject to change without
notice.
Getting support
If you still have questions about the product after reading this manual, please get in touch with
TC Support:
http://tcelectronic.com/support/
PolyTune Clip English Manual 11
Page 14

 Loading...