

Page 1
User Manual
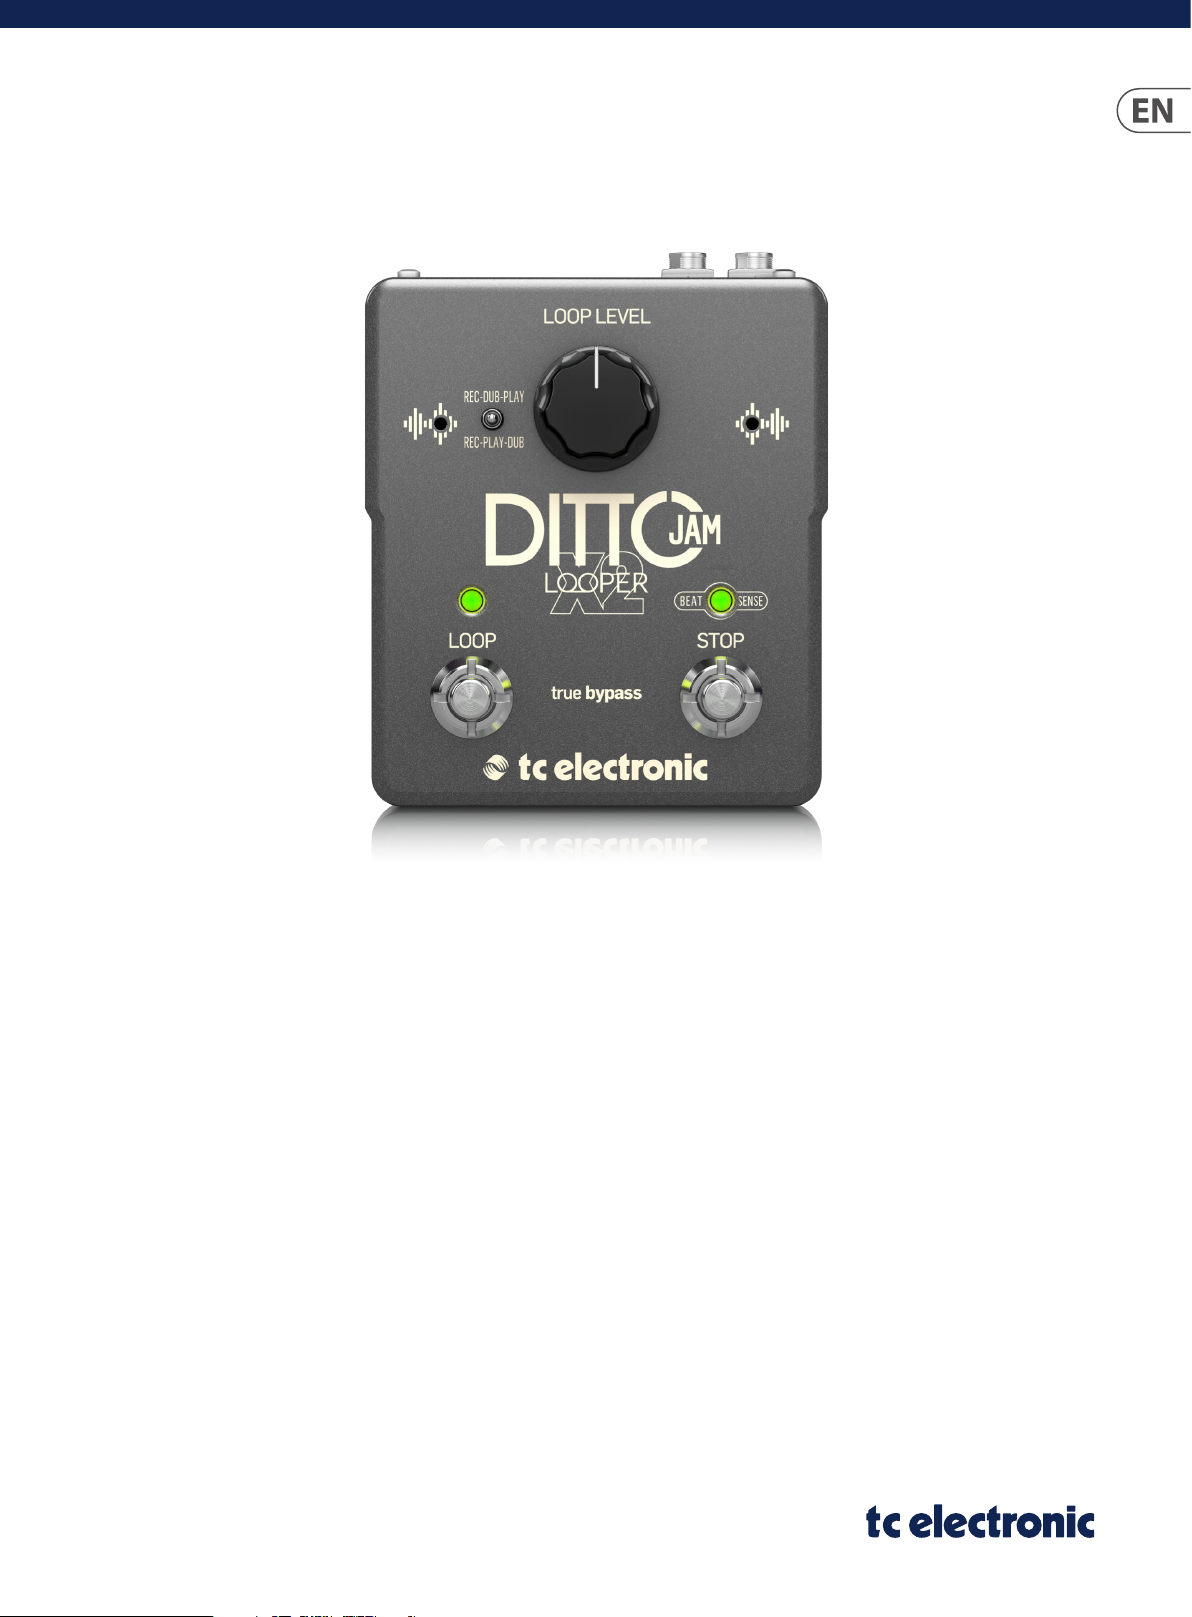
DITTO JAM X2 LOOPER
Intuitive Looper Pedal with Responsive BeatSense Technology,
Rec-Play/Rec-Dub Modes and Unlimited Overdubs
Page 2

2 DITTO JAM X2 LOOPER User Manual
Table of Contents
Important Safety Instructions ...................................... 3
Legal Disclaimer ............................................................. 3
Limited warranty ............................................................ 3
1. About this Manual ..................................................... 4
2. Introduction ............................................................... 4
2.1 Unpacking ............................................................................. 4
2.2 Setting Up ............................................................................. 4
2.3 Check for Updates .............................................................. 4
3. Controls and Connectors ..........................................5
4. Hookup Scenarios...................................................... 6
5. Operation ................................................................... 7
5.1 Mode Descriptions ............................................................. 7
5.2 Selecting Modes ................................................................. 7
5.3 Modes Operation ............................................................... 7
5.4 BeatSense Notes ................................................................. 8
5.5 Dip Switch Settings ............................................................ 9
6. Maintenance .............................................................. 9
6.1 Firmware Update ................................................................ 9
6.2 Changing the Batteries ..................................................... 9
7. Lin k s .......................................................................... 10
8. Specications ........................................................... 10
Page 3
3 DITTO JAM X2 LOOPER User Manual
9. Do not defeat the safety purpose of the polarized
20. Please keep the environmental aspects of battery
Important Safety Instructions
Terminals marked with this symbol carry
electrical current of sucient magnitude
to constitute risk of electric shock.
Use only high-quality professional speaker cables with
¼" TS or twist-locking plugs pre-installed. Allother
installation or modication should be performed only
by qualiedpersonnel.
This symbol, wherever it appears,
alertsyou to the presence of uninsulated
dangerous voltage inside the
enclosure-voltage that may be sucient to constitute a
risk ofshock.
This symbol, wherever it appears,
alertsyou to important operating and
maintenance instructions in the
accompanying literature. Please read the manual.
Caution
To reduce the risk of electric shock, donot
remove the top cover (or the rear section).
No user serviceable parts inside. Refer servicing to
qualied personnel.
Caution
To reduce the risk of re or electric shock,
do not expose this appliance to rain and
moisture. The apparatus shall not be exposed to dripping
or splashing liquids and no objects lled with liquids,
suchas vases, shall be placed on the apparatus.
Caution
These service instructions are for use
by qualied service personnel only.
Toreduce the risk of electric shock do not perform any
servicing other than that contained in the operation
instructions. Repairs have to be performed by qualied
servicepersonnel.
1. Read these instructions.
2. Keep these instructions.
3. Heed all warnings.
4. Follow all instructions.
5. Do not use this apparatus near water.
6. Clean only with dry cloth.
7. Do not block any ventilation openings. Install in
accordance with the manufacturer’s instructions.
8. Do not install near any heat sources such as
radiators, heat registers, stoves, or other apparatus
(including ampliers) that produce heat.
or grounding-type plug. A polarized plug has two blades
with one wider than the other. A grounding-type plug
has two blades and a third grounding prong. The wide
blade or the third prong are provided for your safety. Ifthe
provided plug does not t into your outlet, consult an
electrician for replacement of the obsolete outlet.
10. Protect the power cord from being walked on or
pinched particularly at plugs, convenience receptacles,
and the point where they exit from the apparatus.
11. Use only attachments/accessories specied by
themanufacturer.
12. Use only with the
cart, stand, tripod, bracket,
or table specied by the
manufacturer, orsold with
the apparatus. When a cart
is used, use caution when
moving the cart/apparatus
combination to avoid
injury from tip-over.
13. Unplug this apparatus during lightning storms or
when unused for long periods of time.
14. Refer all servicing to qualied service personnel.
Servicing is required when the apparatus has been
damaged in any way, such as power supply cord or plug
is damaged, liquid has been spilled or objects have fallen
into the apparatus, the apparatus has been exposed
to rain or moisture, does not operate normally, or has
beendropped.
15. The apparatus shall be connected to a MAINS socket
outlet with a protective earthing connection.
16. Where the MAINS plug or an appliance coupler is
used as the disconnect device, the disconnect device shall
remain readily operable.
17. Correct disposal of this
product: This symbol indicates
that this product must not be
disposed of with household
waste, according to the WEEE
Directive (2012/19/EU) and
your national law. This product
should be taken to a collection center licensed for the
recycling of waste electrical and electronic equipment
(EEE). The mishandling of this type of waste could have
a possible negative impact on the environment and
human health due to potentially hazardous substances
that are generally associated with EEE. At the same time,
your cooperation in the correct disposal of this product
will contribute to the ecient use of natural resources.
For more information about where you can take your
waste equipment for recycling, please contact your local
city oce, or your household waste collection service.
18. Do not install in a conned space, such as a book
case or similar unit.
19. Do not place naked ame sources, such as lighted
candles, on the apparatus.
disposal in mind. Batteries must be disposed-of at a
battery collection point.
21. Use this apparatus in tropical and/or
moderate climates.
LEGAL DISCLAIMER
Music Tribe accepts no liability for any loss which
may be suered by any person who relies either
wholly or in part upon any description, photograph,
or statement contained herein. Technical specications,
appearances and other information are subject to
change without notice. All trademarks are the property
of their respective owners. Midas, Klark Teknik, Lab
Gruppen, Lake, Tannoy, Turbosound, TC Electronic,
TC Helicon, Behringer, Bugera and Coolaudio are
trademarks or registered trademarks of Music Tribe
Global Brands Ltd. © Music Tribe Global Brands
Ltd. 2018 All rights reserved.
LIMITED WARRANTY
For the applicable warranty terms and conditions
and additional information regarding Music Tribe’s
Limited Warranty, please see complete details online at
musictribe.com/warranty.
Page 4

4 DITTO JAM X2 LOOPER User Manual
1. About this Manual
Thank you for spending your hard-earned money on this TC Electronic product!
We have done our best to ensure that it will ser ve you for many years to come,
and we hope that you will enjoy using it.
This manual is available as a PDF download from the TC Electronic website.
Please read this manual in full, or you may miss important information.
Please do not operate your TC device before you have made all connections
to external equipment as described in the “2.2 Setting Up” section. In the
subsequent sections of the manual, we assume that all connections are made
correctly and that you are familiar with the previous sections.
We reserve the right to change the contents of this manual at any time.
To download the most current version of this manual, view the product warranty,
and access the growing FAQ database for this product, visit the web page
tcelectronic.com/support/
2. Introduction
Thank you for purchasing Ditto X2 Jam, the world’s rst listening looper
stompbox. Its BeatSense feature constantly adjusts your loop’s playback tempo to
play in time with your drummer or percussionist instead of the other way around.
This makes it possible for bands to nally use a looper in live performance
without the need for nely-tuned monitoring systems and the possibility of
losing sync with the loop.
You can think of Ditto X2 Jam as an ex tra player who can ll out a band’s sound,
play chords under guitar solos, allow the building of audio layers in time with the
band, and many more uses yet to be determined as this technology has never
been seen or used before.
Of course it can also be set to “Classic” mode as a fully capable traditional nonBeatSensing looper, or to “Practice” mode that allows you to speed up or slow
down loop playback and prac tice those challenging runs at dierent speeds.
2.1 Unpacking
Your TC Electronic eect pedal box should contain the following items:
2.2 Setting Up
Connect a 9 V power supply with the following symbol to the DC input socket of
your TC Electronic eect pedal.
+
This product does not come with a power supply. We recommend using
TC Electronic’s PowerPlug 9 (sold separately).
• If no power supply is available, you can run this product using one or
two 9 V batteries.
• For more information on changing batteries, see
“6.2 Changing the Batteries”.
• Plug the power supply into a power outlet.
• Connect your instrument to the Input jack on the rear side of the pedal using
a ¼" jack cable.
• Connect the Output jack on the rear side of the pedal to your amplier using
a ¼" jack cable. See chapter 4 “Hookup Scenarios” for more information
on connections.
Then get the Ditto X2 Jam ready to listen to the tempo…
• Connect the external microphone to the Ext Mic input on the rear side
of the pedal. Clamp the mic onto the snare drum, cajón, djembe, etc. to
allow the BeatSense to “listen” to the rhythm clearly. If necessar y, use a
⁄" TRS headphone extension cable to allow the mic to reach the drummer.
These can be purchased cheaply and easily online or at any electronics or
music store.
• If you plan to use the onboard BeatSense mics, the Ditto X2 Jam will have
the best chance of detecting the rhythm accurately if it is placed closer to the
drums than any other instrument.
• Avoid aiming ampliers directly at the onboard or external BeatSense mics.
• When used without an external rhythm source, BeatSense will cause erratic
loop timing. See “Selec ting Modes” to change to Classic or Practice mode.
-
• Your TC Electronic eect pedal
• Rubber feet for “non-Velcro” use
• External microphone
• Quick Start Guide sheet
• TC Electronic sticker
Inspect all items for signs of transit damage. In the unlikely event of transit
damage, inform the carrier and supplier. If damage has occurred, keep all
packaging, as it can be used as evidence of excessive handling force.
2.3 Check for Updates
Visit the product page at tcelectronic.com and check for new rmware. We may
periodically release updates with additional features and bug xes, so make sure
you have the latest-and-greatest. Firmware update procedure is described in
chapter 6.1.
Page 5

5 DITTO JAM X2 LOOPER User Manual
3. Controls and Connectors
(5) (4) (3) (2) (1)
(7)
(8)
(9)
1. Input – Connect your guitar via ¼" TS cable.
2. Output – Send the loops and direct signal to your amp via ¼" TS cable.
3. Ext Mic input – Connec t the included external microphone to this input,
then attach the mic directly to a drum for optimal tempo detection.
If necessary, you can increase the reach of the mic with a ⁄" TRS headphone
extension cable.
4. Power input – Connect a 9 V / >150 mA center-negative power supply
(not included).
5. USB port – Use a USB cable to connect to a computer for rmware updates.
6. Loop Level – Adjust the volume of the loops with this knob.
7. Overdub mode switch – Use this switch to determine the overdub
behavior. With the switch down, you record your loop, and upon completing
the loop, the Ditto X2 Jam goes directly into playback. However, some
players prefer to record a loop of silence or ambient soundscape, or even a
rhythmic layer for their rst loop, and then immediately overdub another
layer of harmonic content on top before beginning normal playback. In this
case, set the switch to the up position.
(6)
(11)
(12)(10)
8. Onboard BeatSense mics – These mics will monitor the tempo of the
performance and keep your loops in time with the band. Make sure that
the Ditto X2 Jam is placed close to the drums so it can pick up the rhythmic
accents clearly. Note that the onboard mics are muted if the external mic
is connected.
9. Record LED – The status of the looping process and other functions are
indicated on this LED. See chapter 5 for details.
10. LOOP footswitch – Control several loop-related functions with this switch,
including record/overdub/play and undo/redo. See chapter 5 for details.
11. BeatSense LED – Indicates the detected tempo as well as other
looping functions.
12. STOP footswitch – Press the switch once to stop loop playback, and hold
the switch to clear the loop. This switch also allows manual tempo input
during Practice mode.
Press Once
Record
Press Once
Overdub
Press Once
Play
Press Once
Record
Press Once
Play
Press Once
Overdub
Page 6

6 DITTO JAM X2 LOOPER User Manual
4. Hookup Scenarios
Example 1: Ditto X2 Jam with other eects
Input
Drive
Pedals
Hand Drum / Snare
Combo
Modulation
Pedals
Note: amplier gain should be set to its cleanest set ting to avoid additional distortion as a result of the extra level that loopers produce
when overdubbing or playing live over loops.
Example 2: Ditto X2 Jam in an amp’s FX loop
Drive Pedal(s)
FX Loop Send
Input
FX Loop Return
Combo
This setup generally produces the best result when using a looper because of the clean FX return path.
Reverb, delay and
modulation pedals
Page 7

7 DITTO JAM X2 LOOPER User Manual
5. Operation
The Ditto X2 Jam was primarily designed around its unique ability to monitor the
tempo of the band’s performance and adjust the loop length to match. This is
called BeatSense mode.
However, knowing that you will probably want to use this looper when playing
by yourself, we’ve also included Practice and Classic modes.
5.1 Mode Descriptions
BeatSense Mode: Tempo is acquired from a rhythm part played on a percussion
instrument so that loops can be recorded and played back in time with varying
human tempo guidance. Record and loop footswitch taps are quantized to the
nearest beats for the best loop points and loop playback is time compressed and
expanded where necessary to stay in time.
NOTE - BeatSense mode will cause unwanted tempo changes if used without
a steady rhythmic source. When looping without ex ternal rhythm, Classic or
Practice mode will work better. See 5.2 Selecting Modes below.
Practice Mode: Practice Loop tempo is sensed only from the guitar input while
preparing and recording the loop. This tempo is used to quantize the record and
playback actions to assist in making better loops as well as to allow playback
tempo to be increased and decreased allowing practice at dierent tempos.
Classic Mode: This mode works the way the hugely successful line of multifootswitch Ditto pedals have worked. Loops are recorded and played back with
no assistance from or variation of tempo.
5.2 Selecting Modes
From the factory, Ditto X2 Jam is set to BeatSense mode. The Stop button is used
to cycle between the 3 modes.
To cycle through the Loop modes, quickly double tap and hold the STOP
footswitch for ~2 seconds. While your foot is on the STOP footswitch, the LOOP
footswitch LED will ash briey to conrm a successful mode change:
• 1 green LOOP ash = Classic loop mode
• 2 green LOOP ashes = BeatSense mode
• Red LOOP ashing continuously = Practice mode
You can conrm the current mode at any time by observing the
STOP LED behavior:
• STOP LED o = Classic mode
• STOP LED solid green or ashing at tempo = BeatSense mode
• STOP LED solid red or ashing at guitar input tempo = Practice mode
The current loop mode will be retained on next power-up.
5.3 Modes Operation
The following tables will detail all of the relevant looping actions and associated
LED behavior for each mode.
BeatSe nse mode (EXTERN AL mic) LED acti vity
Either clip the supplied external
mic on the sna re drum support s, in
Place it
Gimme a beat!
Record
Play your loo p
Overdub
Undo/Redo
Stop Tap Stop to halt loop p layback. Both LEDs a sh green.
Clear
BeatSe nse mode (ONBOARD mics) LED activ ity
Place it
Gimme a beat!
Record
Play your loo p
Jam
Overdub
Undo/Redo
Stop Tap Stop to halt loop p layback. Both LEDs a sh green.
Clear
the sound hole of a cajón, clipp ed
to the tension strings of a djembe,
or place it cl ose to a percussion
instrument.
Ask your percussionist/drummer to
play a stead y groove.
Tap the Loop but ton on a
downbeat a nd record someth ing
cool on your g uitar.
Tap Loop butt on on the downbeat
where you wa nt the loop to star t
playing. Pr ess Stop button if y ou
want to save th e loop for later
playback.
Tap Loop during p layback to enter
Overdub r ecording. Add as many
layers as you w ant. Tap Loop to end
Overdubbing.
Hold Loop f ootswitch to un do the
most rec ent overdub. Hold again
to redo.
Hold Stop to cl ear the current loo p
so you can re cord another. A good
place to clea r is right before th e
beginning of the next song.
Place the pro duct either be side
your foot i f you want to keep time
that way (“ta ppin”), or place Dit to
Jam nearer to a p ercussion sourc e
than your gu itar amp (“groovin”).
Tap a steady beat w ith your foot
beside th e left side of Dit to Jam
to estab lish tempo or ask your
percuss ionist to play a groove.
Tap Loop butt on on a downbeat
and recor d something cool on
your guit ar. As yo u record, keep
tapping yo ur foot beside Dit to Jam
or have your pe rcussionist cont inue
gr oo vi n’.
Tap Loop butt on on the downbeat
where you wa nt to start loop ing.
Keep tappi n’ or groovin’.
Play something complimentary on
your guit ar to go with the loop.
Tap Loop during p layback to enter
Overdub r ecording. Add as many
layers as you w ant. Tap Loop to
end Overdu bbing. Keep tappi n’ or
gr oo vi n’.
Hold Loop f ootswitch to un do the
most rec ent overdub. Hold again
to redo.
Hold Stop to cl ear out the curren t
loop so you c an record another. A
good place t o clear is right bef ore
the beginning of the next song.
Loop LED ash es red during power
up only, then Bea tSense LED light s
solid gre en until it hears a be at.
BeatSe nse LED will ash gree n in
time when it’s ready.
Loop and Be atSense LEDs ash in
time: Loop = r ed, BeatSense =
green.
Loop LED sol id green, then blink s
at loop poi nt. BeatSense as hes
green at tem po.
Loop LED ash es red in time.
BeatSense shows green tempo.
Loop LED ash es green until Undo/
Redo is complete*
Loop LED tur ns o.
Loop LED ash es red during power
up only, then Bea tSense LED light s
solid gre en until it hears a be at.
BeatSe nse LED will ash gree n in
time when it’s ready.
Loop and Be atSense LEDs ash in
time: Loop = r ed, BeatSense =
green.
Loop LED sol id green, then blink s
at loop poi nt. BeatSense as hes
green at tem po.
—
Loop LED ash es red in time.
BeatSense shows green tempo.
Loop LED ash es green until Undo/
Redo is complete*
Loop LED tur ns o.
Page 8

8 DITTO JAM X2 LOOPER User Manual
Classic mode LED acti vity
Ready No loop. Waiti ng for record. No LEDs
Record
Play your loo p
Jam
Overdub
Undo/Redo
Stop Tap Stop to halt loop p layback. Loop LED ash ing green.
Clear
Ready Waiting for g uitar rhythm. B eatSense LED sol id or ashing red.
Gimme a beat!
Record
Play your loo p
Adjust tempo
Overdub
Undo/Redo
Clear
Tap Loop butt on and record
something cool on your guitar.
Tap Loop butt on on the downbeat
where you wa nt to start loop ing.
Tap Stop to play the loo p later.
Play something complimentary on
your guit ar to go with the loop.
Tap Loop during p layback to enter
Overdub r ecording. Add as many
layers as you w ant. Tap Loop to end
Overdubbing.
Hold Loop f ootswitch to un do the
most rec ent overdub. Hold again
to redo.
Hold Stop to cl ear out the curren t
loop so you c an record another.
Pract ice mode LED acti vity
Play the chor ds or ri on your
guitar be fore recordin g to set
tempo. If you w ant to start
recordi ng immediately, you can
tap 4 beat s, and on the 5th, hit the
Loop swi tch to start reco rding at
the new tempo while it senses
the ongoin g beat of your loop
recording.
Tap Loop butt on and record
somethi ng cool on your guita r at
the tempo yo u set.
Tap Loop butt on on the downbeat
where you wa nt to start loop ing.
Once the loo p is playing,
BeatSensing stops and tempo will
remain at wh ere you played it.
Playback sp eed can be adjust ed
during Stop o r Play. Tap Stop to
halt loop pl ayback, then tap in
a new slower or f aster tempo so
you can pra ctice those sup er-fast
runs or hear t hem played at
superhuman speeds.
Tap Loop during p layback to enter
Overdub r ecording. Add as many
layers as you w ant. Tap Loop to end
Overdubbing.
Hold Loop f ootswitch to un do the
most rec ent overdub. Hold again
to redo.
Hold Stop to cl ear out the curren t
loop so you c an record another.
Loop LED sol id red during
recording.
Loop LED sol id green during
playback.
—
During O verdub, Loop LED solid r ed
with a blin k at loop point.
Loop LED ash es green until Undo/
Redo is complete*
No LEDs.
BeatSe nse LED will ash red in t ime
when it ’s acqui red your rhythm.
Both LEDs a sh red in time.
Loop LED sol id green, then blink s at
loop poin t. BeatSense ash es red
at tempo.
Both LEDs at t empo: Loop = green,
BeatSe nse = red.
Loop LED ash es red in time.
BeatSe nse shows red tempo.
Loop LED ash es green until Undo/
Redo is complete*
BeatSe nse LED solid or ashin g red.
* Only when Undo/Redo DIP switch set to Immediate. If the position of the DIP
switch is changed to Loop Point, the Loop LED will continue to ash until the loop
point, at which time it will play or mute the overdub.
5.4 BeatSense Notes
To get the most from Jam, check out the following points.
Percussion tips
Ditto Jam senses beats during the loop recording process as well as during
playback. During these times, it needs to hear a steady groove from the
percussionist. Basic drum lls are okay, but mega-syncopated rapid meter
changes are not. Think of Ditto Jam as a real band member; if the drummer,
without warning, starts playing 30 BPM faster, chances are somebody in the
band is going to get confused and might drop out for a while. Ditto Jam is no
dierent. The produc t was designed to follow subtle, natural tempo movements
- not ace a Frank Zappa audition!
Ditto Jam needs a lot of the percussion hits to land on the on-beats. If Jam
sees lots of syncopation such as a string of 8th or 16th note anticipations
(“pushed” notes) in a row, they’ll be interpreted as downbeats and this will aect
playback timing. As your percussionist gets used to you using the product in
certain song sections, simpler playing during those bits will yield better looping.
Beyond 4/4
If you like to stray away from the 4/4 time signature, Ditto Jam can do that! As
long as your time signature is based on quarter notes (3/4, 5/4, 7/4, etc.), you can
record and play loops.
Tempo hinting
If the BeatSense LED glows solid or “hunts” during an otherwise solid percussion
groove, it may be a large mismatch between tempo history of the previous song
and the current one. If you see this before recording a loop you can:
1. Hold Stop again to perform a Clear/Reset even if you cleared recently.
2. Tap Stop at the tempo to “hint” at the tempo so Ditto Jam can focus more
directly on it.
If your loop played successfully earlier but now the BeatSense LED is wandering
or solid, during playback you can also tap the Loop footswitch to hint at the
downbeats. Of course, the normal function of the Loop footswitch causes an
overdub to be triggered when pressed during playback, but if Jam receives more
than 2 taps, the overdub will be overridden and only tempo information will
be entered.
In other words, tap the Stop footswitch to hint the tempo before recording
a loop, or tap the Loop footswitch more than 2 times to hint the tempo
during playback.
Double time hint
Ensure that the BeatSense LED is showing the downbeats in your music,
not obeats. If you see (1) AND (2) AND… instead of ONE (and) TWO (and)…
then you can tap STOP a couple of times at twice the tempo (ONE AND TWO
AND) which will orient the beats properly before you record and then play back
your loop.
If the song tempo is very slow, double time hinting will eectively extend Ditto
Jam’s BeatSense range.
If Ditto Jam has automatically sensed a tempo that is doubletime (exactly twice
as fast) by itself, it’s ne to record and play loops with no hinting.
Do the Tighten Up…
Ditto Jam can help your playing sound more on-beat. If, during recording, some
guitar notes landed a little wide of the mark, Ditto Jam will try to move recorded
audio near beats closer to where it’s sensing that the beats are falling. Each time
around it’ll sound a little tighter.
Page 9

9 DITTO JAM X2 LOOPER User Manual
5.5 Dip Switch Settings
If you remove the battery compartment plate and look to the right of the
compartment, you will see 2 tiny DIP switches on the side. These allow a couple
customizations to the pedal’s operation. The default setting for both switches is
the “down” position, which is set away from the compartment plate.
Switch 1 - Undo/Redo
In the “down” position (default), the undo/redo command is accessed by pressing
and holding the Loop footswitch for 2 seconds, at which point the command
immediately takes eect.
In the “up” position, the undo/redo command will still be entered by holding the
Loop footswitch for 2 seconds, but the Loop LED will ash green until the end of
the loop, and only then will the command take eect.
6. Maintenance
6.1 Firmware Update
TC may provide updates for the built-in sof tware of your pedal, the rmware.
Updating your TC pedal’s rmware requires…
– a computer running Microsoft Windows or OS X with a standard
USB interface.
– the specied DC power supply for your pedal.
Preparing the rmware update
1. Download the newest rmware from the “Support” page for your TC pedal.
There are updaters
– for Microsoft Windows (these are ZIP archives containing the rmware
installer) and
– for OS X (these are disk image les containing the rmware installer).
2. Unplug all cables (including the power supply) from your TC pedal.
3. Connect the pedal to your computer using a USB cable.
4. Insert the DC power supply plug. The lef tmost LED on your pedal should
turn green.
Your TC pedal will now be recognized as an updatable device.
Applying the rmware update
5. Open the rmware update le. The pedal’s current rmware will be listed,
as well as the version contained in the updater.
Switch 2 - Bypass Mode
True Bypass mode is a hard-wire bypass that gives absolutely no coloration of
tone when the pedal is bypassed. This is the default mode for your eect pedal
(switch down).
Using True Bypass on all pedals is a perfect choice in setups with a few pedals and
relatively short cables before and after the pedals.
If…
– you use a long cable between your guitar and the rst pedal or
– if you use many pedals on your board or
– if you use a long cable from your board to the amp,
…then the best solution will most likely be to set the rst and the last pedal in
the signal chain to Buered Bypass mode. Can you hear the dierence between
a pedal in True Bypass or Buered Bypass mode? Maybe, maybe not – many
factors apply: active/ passive pick-ups, single coil/humbucker, cable quality, amp
impedance and more. We cannot give a single ultimate answer, so experiment
with switch 2 in the “up” position to hear what sounds best to you.
6. Click “Update” and let the program run. The BeatSense LED will ash red
during the update. At some point, the update window may indicate that the
pedal has disconnected, which is normal.
7. When nished, the unit will return to the loop mode display shown prior to
the update procedure.
6.2 Changing the Batteries
The Ditto X2 Jam can operate on one or two 9 V batteries. However, the unit
can operate signicantly longer with a pair of batteries installed. If you need to
change the batteries, proceed as follows:
– Unscrew the cross-head screw on the back of the pedal and detach
the backplate.
– Unmount the old batteries and attach the new batteries to the battery clips.
Make sure the polarity is correct!
– Remount the backplate.
Page 10

10 DITTO JAM X2 LOOPER User Manual
Notes regarding batteries
– Batteries must never be heated, taken apart or thrown into re or water.
– Only rechargeable batteries can be recharged.
– Remove the batteries when the pedal is not being used for a longer period of
time to save battery life.
– Dispose batteries according to local laws and regulations.
7. Links
Support resources
• TC Electronic Support: tcelectronic.com/support/
• TC Electronic – product sof tware: tcelectronic.com/support/software/
• TC Electronic – all product manuals: tcelectronic.com/support/manuals/
• TC Electronic user forum: forum.tcelectronic.com/
TC Electronic on...
• the Web: tcelectronic.com/
• Facebook: facebook.com/tcelectronic
• Google Plus: plus.google.com/+tcelectronic/
• Twitter: twitter.com/tcelectronic
• YouTube: youtube.com/user/tcelectronic
8. Specications
Maximum loop length 2 minutes
Maximum no. of overdubs Unlimited
Bypass mode True Bypass
(buered bypass selectable via DIP switch)
Latency None (analog dry-through)
Dimensions (W x D x H) 113 x 135 x 54 mm (4.4 x 5.3 x 2.1")
Weight 0.57 kg (1.3 lbs)
Input connector Standard TS ¼" jack
Output connector Standard TS ¼" jack
Ext Mic input ⁄" TRS only use included microphone
Power input
USB Mini-B USB for rmware updates
Standard 9 V DC / >150 mA,
centre negative (not supplied)
Memory Selected loop mode is recalled over power
cycles, loops are not.
Due to continu ous development, t hese specif ications are subjec t to change witho ut notice.
Page 11

11 DITTO JAM X2 LOOPER User Manual
FEDERAL COMMUNICATIONS
COMMISSION COMPLIANCE
INFORMATION
DITTO JAM X2 LOOPER
Responsible Party Name: Music Tribe Brands UK Ltd.
Address: Klark Industrial Park,
Walter Nash Road,
Kidderminster, Worcestershire,
DY11 7HJ United Kingdom
Phone Number: +44 1562 732290
DITTO JAM X2 LOOPER
complies with the FCC rules as mentioned in the following paragraph:
This equipment has been tested and found to comply with the limits for a ClassB
digital device, pur suant to part 15 of the FCC Rules. These limits are designed
to provide reasonable protection against harmful interference in a residential
installation. This equipment generates, uses and can radiate radio frequency
energy and, if not installed and used in accordance with the instructions, may cause
harmful interference to radio communications. However, there is no guarantee that
interference will not occur in a par ticular installation. If this equipment does cause
harmful interference to radio or television reception, which can be determined
by turning the equipment o and on, the user is encouraged to try to correct the
interference by one or more of the followingmeasures:
– Reorient or relocate the receiving antenna
– Increase the separation between the equipment and receiver
– Connect the equipment into an outlet on a circuit dierent from that to which the
receiver is connected
– Consult the dealer or an experienced radio/TV technician forhelp
This device complies with Part 15 of the FCC rules. Operation is subjec t to the
following two conditions:
(1) this device may not cause harmful interference, and
(2) this device must accept any inter ference received, including inter ference that may
cause undesired operation.
Important information:
Changes or modications to the equipment not expressly approved by Music Tribe
can void the user’s authority to use the equipment.
Page 12

 Loading...