

Page 1
BUILT FOR POWERCORE
USER MANUAL
DISTRIBUTED BY
Page 2

© BY TC WORKS SOFT & HARDWARE GMBH 2002. ALL PRODUCT AND COMPANY NAMES ARE TRADEMARKS OF THEIR RESPECTIVE OWNERS.
D-CODER IS A TRADEMARK OF WALDORF ELECTRONICS GMBH. ALL SPECIFICATIONS SUBJECT TO CHANGE WITHOUT NOTICE. ALL RIGHTS RESERVED.
Page 3

TABLE OF CONTENTS
CONTACT DETAILS . . . . . . . . . . . . . . . . . . . . . . . . . . . . . . . . . . . . . . . . . . . . . . . . . . . . . . . . . . . . 4
INTRODUCTION . . . . . . . . . . . . . . . . . . . . . . . . . . . . . . . . . . . . . . . . . . . . . . . . . . . . . . . . . . . . . . . . 5
GETTING STARTED
System Requirements
Important Note about D-CODER
Vocoding Basics . . . . . . . . . . . . . . . . . . . . . . . . . . . . . . . . . . . . . . . . . . . . . . . . . . . . . . . . . . 6
What to use it for
Glossary of Terms . . . . . . . . . . . . . . . . . . . . . . . . . . . . . . . . . . . . . . . . . . . . . . . . . . . . . . . . 7
. . . . . . . . . . . . . . . . . . . . . . . . . . . . . . . . . . . . . . . . . . . . . . . . . . . . . . . . . . . . 6
. . . . . . . . . . . . . . . . . . . . . . . . . . . . . . . . . . . . . . . . . . . . . . . . . . . . .
. . . . . . . . . . . . . . . . . . . . . . . . . . . . . . . . . . . . . . . . . . . .
. . . . . . . . . . . . . . . . . . . . . . . . . . . . . . . . . . . . . . . . . . . . . . . . . . . . . . . . . 7
ENGLISH
6
6
GENERAL
. . . . . . . . . . . . . . . . . . . . . . . . . . . . . . . . . . . . . . . . . . . . . . . . . . . . . . . . . . . . . . . . . . . . . 8
Information Panel . . . . . . . . . . . . . . . . . . . . . . . . . . . . . . . . . . . . . . . . . . . . . . . . . . . . . . . . 8
VOCODER SECTION
Routing
Analysis Filter Bank
. . . . . . . . . . . . . . . . . . . . . . . . . . . . . . . . . . . . . . . . . . . . . . . . . . . . . . . . . . . . 8
. . . . . . . . . . . . . . . . . . . . . . . . . . . . . . . . . . . . . . . . . . . . . . . . . . . . . . . . . . . . . . . . . . . 9
. . . . . . . . . . . . . . . . . . . . . . . . . . . . . . . . . . . . . . . . . . . . . . . . . . . . . . 9
Vocoder Filter Bank . . . . . . . . . . . . . . . . . . . . . . . . . . . . . . . . . . . . . . . . . . . . . . . . . . . . . 10
LFO . . . . . . . . . . . . . . . . . . . . . . . . . . . . . . . . . . . . . . . . . . . . . . . . . . . . . . . . . . . . . . . . . . . . . 11
Mixer . . . . . . . . . . . . . . . . . . . . . . . . . . . . . . . . . . . . . . . . . . . . . . . . . . . . . . . . . . . . . . . . . . . . 12
SYNTHESIZER SECTION
. . . . . . . . . . . . . . . . . . . . . . . . . . . . . . . . . . . . . . . . . . . . . . . . . . . . . . 13
LFO . . . . . . . . . . . . . . . . . . . . . . . . . . . . . . . . . . . . . . . . . . . . . . . . . . . . . . . . . . . . . . . . . . . . . . 13
. . . . . . . . . . . . . . . . . . . . . . . . . . . . . . . . . . . . . . . . . . . . . . . . . . . . . . . . . . . . . . . . . . . . 14
Glide
Oscillators . . . . . . . . . . . . . . . . . . . . . . . . . . . . . . . . . . . . . . . . . . . . . . . . . . . . . . . . . . . . . . 14
Mixer . . . . . . . . . . . . . . . . . . . . . . . . . . . . . . . . . . . . . . . . . . . . . . . . . . . . . . . . . . . . . . . . . . . 15
. . . . . . . . . . . . . . . . . . . . . . . . . . . . . . . . . . . . . . . . . . . . . . . . . . . . . . . . . . . . . . . . . . . . 15
Filter
Amplifier . . . . . . . . . . . . . . . . . . . . . . . . . . . . . . . . . . . . . . . . . . . . . . . . . . . . . . . . . . . . . . . . 16
Envelope . . . . . . . . . . . . . . . . . . . . . . . . . . . . . . . . . . . . . . . . . . . . . . . . . . . . . . . . . . . . . . . . 16
EFFECTS
. . . . . . . . . . . . . . . . . . . . . . . . . . . . . . . . . . . . . . . . . . . . . . . . . . . . . . . . . . . . . . . . . . . . . 17
EQ . . . . . . . . . . . . . . . . . . . . . . . . . . . . . . . . . . . . . . . . . . . . . . . . . . . . . . . . . . . . . . . . . . . . . . 17
UV Detector . . . . . . . . . . . . . . . . . . . . . . . . . . . . . . . . . . . . . . . . . . . . . . . . . . . . . . . . . . . . . 17
Chorus
. . . . . . . . . . . . . . . . . . . . . . . . . . . . . . . . . . . . . . . . . . . . . . . . . . . . . . . . . . . . . . . . . . 18
TUTORIAL . . . . . . . . . . . . . . . . . . . . . . . . . . . . . . . . . . . . . . . . . . . . . . . . . . . . . . . . . . . . . . . . . . . 19
Setup Examples
. . . . . . . . . . . . . . . . . . . . . . . . . . . . . . . . . . . . . . . . . . . . . . . . . . . . . . . . . 19
Not hearing anything? . . . . . . . . . . . . . . . . . . . . . . . . . . . . . . . . . . . . . . . . . . . . . . . . . . . 24
D-CODER /
3
Page 4

CONTACT DETAILS
If you would like to get in touch with us please e-mail to: info@tcworks.de, contact our
local distribution partner or write to:
TC WORKS Soft-& Hardware GmbH
Customer Support
ENGLISH
Flughafenstrasse 52B
22335 Hamburg
Germany
www.tcworks.de
e-mail: info@tcworks.de
USA:
TC Electronic Inc.
TC Works Customer Support
742-A Hampshire Rd.
Westlake Village, CA 91361
www.tcworks.de
e-mail: us@tcworks.de
4
/ D-CODER
Page 5

INTRODUCTION
Congratulations on your purchase order of D-CODER, the Synthesizer Vocoder
for POWERCORE.
Waldorf is a world-renowned Synthesizer maker, with classic hardware products like the
Microwave and innovative software products like the Attack. It’s natural that Waldorf
were amongst the first to come on board to develop a POWERCORE Plug-In.
D-CODER includes a polyphonic synthesizer in the Waldorf tradition and a powerful
Vocoder, that can modulate an external sound source or the synthesizer.
Thanks to a free-run mode, the Vocoder works even with no MIDI input – and the
number of bands can be adjusted to up to 100 bands for an extremely rich and
smooth resolution.
The sound creation possibilities and the quality turn this into a new virtual classic
courtesy of the Waldorf-engineering team!
Enjoy!
The TC WORKS Team
ATTENTION! THIS IS A POWERCORE PLUG-IN AND REQUIRES TC POWERCORE TO
BE INSTALLED IN THE COMPUTER! THIS PLUG-IN WILL NOT RUN WITHOUT
POWERCORE.
ENGLISH
D-CODER /
5
Page 6

GETTING STARTED
System Requirements
Windows
• POWERCORE PCI or FIREWIRE running system 1.7 or later
• Windows XP
ENGLISH
• PIII 1 GHz or faster
• 256 MB RAM
• VST compatible host application
• System must meet requirements of the host application
Mac OS
• POWERCORE PCI or FIREWIRE running system 1.7 or later
• Mac OS X [10.2.4 or higher]
• G4 / 800 MHz or faster
• 256 MB RAM
• VST or Audio Unit compatible host application.
• System must meet requirements of the host application
POWERCORE REQUIRED!
The
D-CODER Plug-In requires a POWERCORE PCI or POWERCORE FIREWIRE to be
available in your system.
Important Note about D-CODER:
The Waldorf D-CODER is a Hybrid POWERCORE and Native Plug-In. To maximize the
performance of this Plug-In on your system while maintaining the best sound quality,
the vocoder portion of the Plug-In will run on the TC POWERCORE, and the synthesizer
will run Native on your host CPU. Under normal operating circumstances, the CPU load
of the D-CODER synthesizer will be minimal. As a general rule, the more voices you
play on the synthesizer, the greater the CPU use of the host application.
D-CODER requires the DSP power of POWERCORE.
Vocoding Basics
A Vocoder processes the frequency content of one signal with the frequency content of
another signal. This is why a Vocoder always needs two signals to function – one for
analysis and one to be processed.
The key ingredients of a Vocoder are matching banks of Analysis and Processing Filters.
The analysis filter bank splits the analysis signal (also referred to as “Speech signal”)
into several frequency bands. Each band has an envelope follower to analyze the band’s
volume. The resulting envelope controls the volume of the corresponding bandpass
filter in the Processing Filter Bank – which then processes the synthesis signal (also
referred to as “Carrier signal”). Each analysis filter has its counterpart in the synthesis
filter bank.
6
/ D-CODER
Page 7

What to use it for
A Vocoder is typically applied to speech to generate “robot voices”, but can be used
just as well to process rhythmic material such as loops and drum sounds.
If your goal is to recreate the original signal as closely as possible, the synthesis signal
used should consist of continuous unfiltered noise. For spoken or sung voice, a
waveform with a lot of harmonics should be used, such as a sawtooth – the melody
and pitch are then controlled by the oscillator’s frequency. If the oscillator is being
modulated by a slow sine LFO, spoken voice will sound especially natural as the LFO
simulates emphasis.
Glossary of Terms
Analysis:
The “analysis” channel of the D-CODER is the signal that is being analyzed. Typically,
the signal being analyzed will be speech or a vocal performance.
Carrier:
The carrier signal is the sound source that carries the analysis sound. In the case of
the D-CODER, the carrier will either be the built in synthesizer, or an external channel
when the Carrier Plug-In is used.
Intelligibility:
This relates to how well the vocoded signal is understood. The ability to hear the
sibilant frequencies will have a tremendous impact on the overall clarity of the
vocoded signal.
Sibilance:
Sibilant sounds are characterized by a hissing sound. These include the english
pronunciation of such consonants as “f”, “s”, “z”, or “th”.
ENGLISH
Vocoder:
’Vocoder’ is an abbreviation of ’Voice Operated Recorder’. A Vocoder is an audio
processor that captures the characteristic elements of an audio signal and then uses
this characteristic signal to affect other audio signals.
Voiced:
Voiced signals have the tonal characteristic of a narrow frequency band, such as the
vowel sounds “a”, “e”, “i”, “o” and “u”.
Unvoiced:
Unvoiced signals have the tonal characteristic of the full frequency band, such as the
consonant sounds that cover almost the entire frequency spectrum, such as “f”, “s”,
“t” and so forth.
D-CODER /
7
Page 8
GENERAL
Information Panel
The blue information panel under the analysis and vocoder meters is an active window
that will always display the name and value of the parameter that your mouse is rolling
over.
ENGLISH
VOCODER SECTION
D-CODER consists of 2 Plug-Ins in one: a Vocoder and a Synthesizer. First, let’s have a
look at the Vocoder section.
Display
8
/ D-CODER
The upper half of the display shows the Analysis Band
range, the lower half indicates the settings for the Vocoder
Filter Band range. By clicking on the “L” or “H” handles,
you can move the parameters directly in the display.
The waveform at the center indicates if there is input
signal for processing. It should look similar to the
screenshot.
The blue information display is a multi-function display
that always indicates the currently selected parameter and
its value.
Page 9

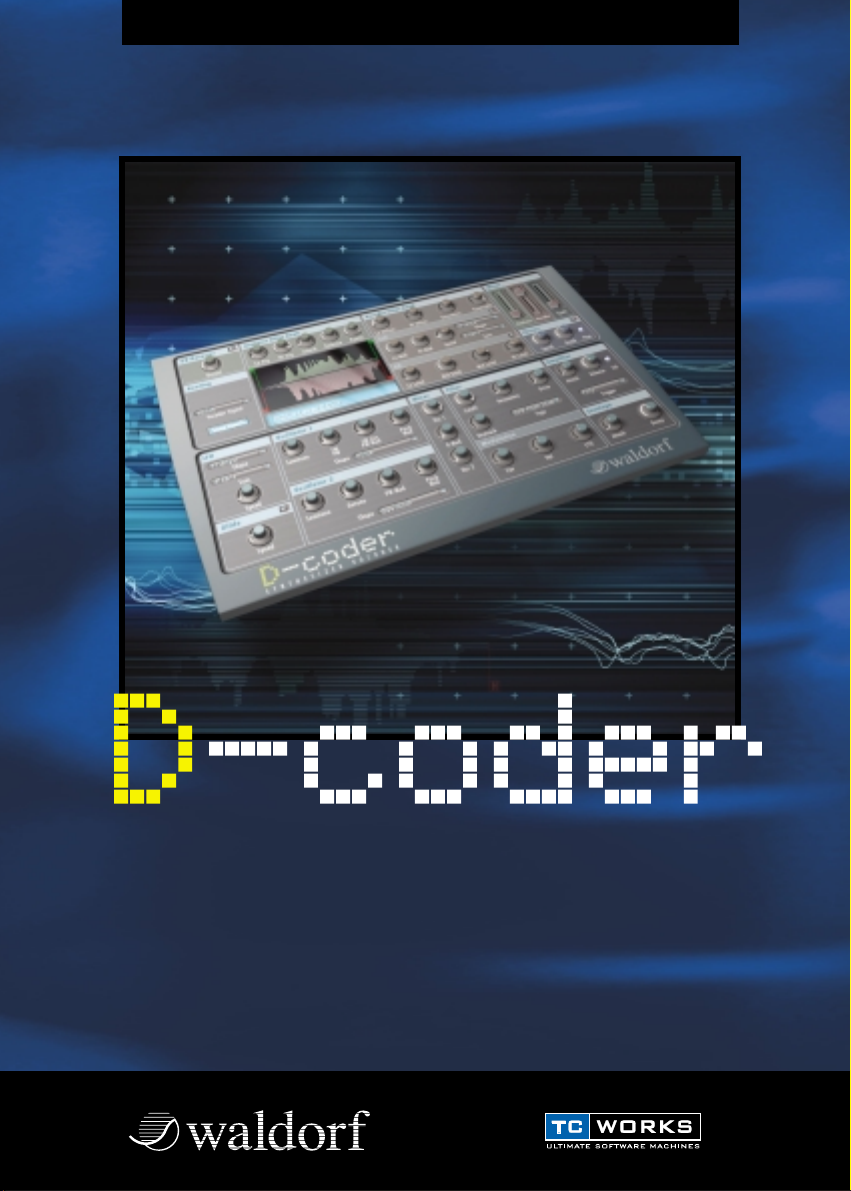
Routing
Vocoder Signal
Determines the source of the signal being vocoded. By default, this
is set to the internal synthesizer. Alternatively, this can be set to
either “Carrier 1” or “Carrier 2”. Please note that setting the Signal
to either “Carrier 1” or “Carrier 2” will only have an effect when the
corresponding Carrier Plug-In is loaded, and active!
Swap Signals
Swaps the Carrier and Analysis Sources.
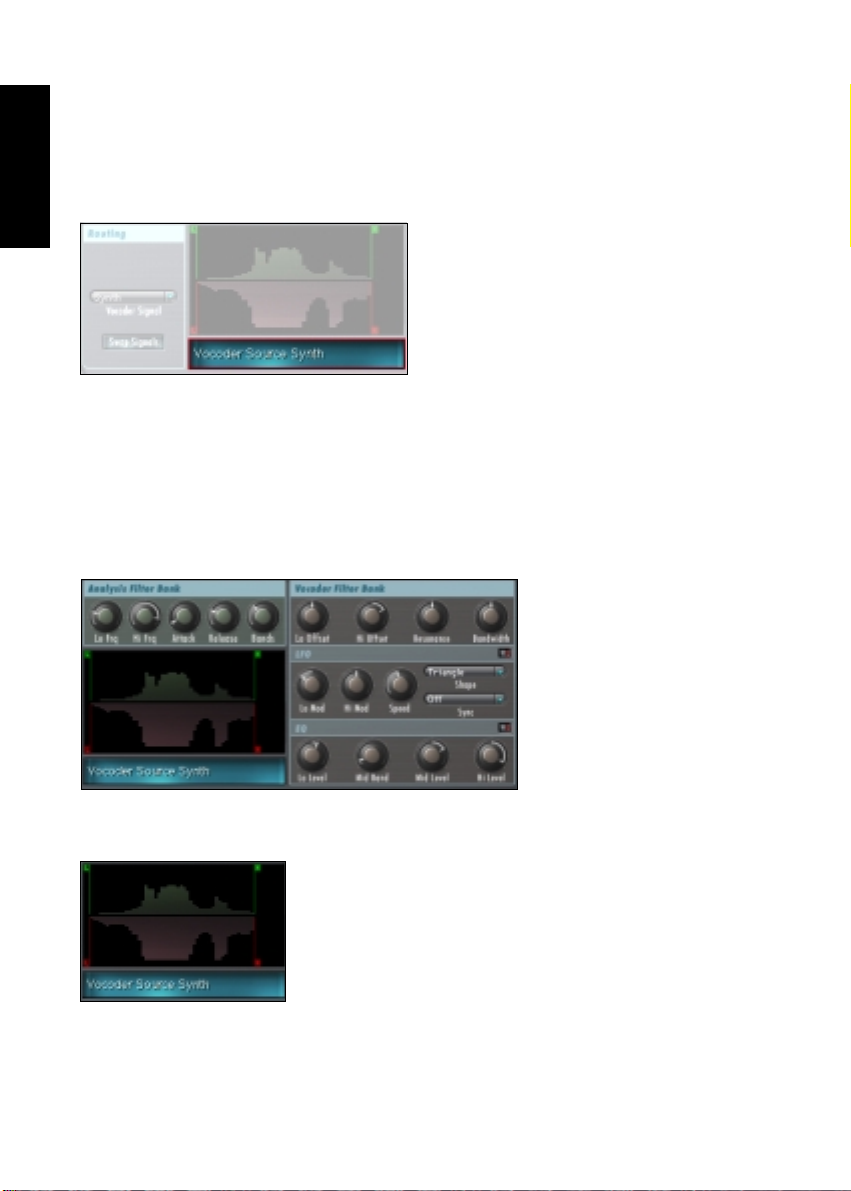
Analysis Filter Bank
The Analysis Filter Bank determines which part of the frequency spectrum is being
analysed by the Vocoder. Also, it includes the critical “Bands” parameter that sets the
“resolution” of the whole Vocoding section. This parameter effects both the Analysis
and Vocoder Banks.
Lo Frq and Hi Frq / 20Hz…20 kHz
These parameters set the frequency range of the analysis band. For voice analysis, Lo
should be set to around 220 Hz and Hi to 14 kHz. For loops and other signals, the
values should be 100 Hz and 16 kHz. The bands in between the set lowest and
highest bands are equally spread across the adjusted range, the resolution depending
on the selected number of bands.
ENGLISH
Attack
Sets the Attack speed for the Analysis Filter Bank. The lower the value, the faster the
Attack. The higher the value the slower – thus softer – the Attack.Typically, this should
be set to values between 0 - 15.
Release
Sets the Release Time for the Analysis Filter Bank. The higher the value, the longer
the release. Low values will create a more percussive effect, higher values will have
more “legato” results.Typically, this should be set to values between 10 - 25.
D-CODER /
9
Page 10

Bands
Sets the number of Filter Bands. Please note, that this parameter
affects both the Analysis and Vocoder Banks! Both sections always have
a matching amount of filters. The higher the number, the finer the
resulting resolution, i.e. the more “intelligible” the results when used on
speech signals. This Vocoder can have from 3 to 100 bands!
ENGLISH
TIP: For classic Vocoder effects, you should set the number of bands to
values between 13 and 22. If you take it further (beyond 40) it can
sound increasingly “harsh”.
Vocoder Filter Bank
Lo Offset and Hi Offset
Sets the relative offset of the lowest and highest synthesis band compared to the
lowest or highest analysis band. A setting of “0” indicates that analysis and synthesis
bands are exactly matching. Negative values indicate that the synthesis bands have
been moved below the analysis bands, while positive values indicate that the highest
synthesis band has been moved higher than the highest analysis band.
Resonance
Sets the steepness of the Vocoder filter: the higher the value, the more the Vocoder
bands will resonate.
TIP: Increasing the Vocoder resonance can increase the intelligibility of the Vocoder
signal.
Bandwidth
Controls the width of the synthesis bands. Negative values increase the width of the
bands while positive values decrease the width. The default value of “0” is
recommended for best vocoding results.
Attack
Sets the attack speed of the synthesis bands. The higher the value, the slower the
attack time. For classic Vocoder sounds, use values between 0 and 15.
Decay
Sets the decay rate of the synthesis bands. The higher the value, the longer the decay
time. For classic Vocoder sounds, use values between 10 and 25.
10
/ D-CODER
Page 11

LFO
The red LED next to the Label indicates the state of the switch (On/Off). When it is
red, the LFO is operating.
Lo and Hi Mod
These Parameters adjust the amount of LFO modulation for the Lo and Hi Vocoder
Band positions. The higher the value, the wider the modulation width.
TIP: By using the LFO on the band positions, you can get a more natural, dynamic
sound. For a more robotic sound, do not engage the LFO.
Speed
Adjusts the LFO’s speed. This parameter has no effect once Sync is active!
Shape
Adjusts the shape of LFO modulation.
Sync
The sync parameter allows you to synchronize the speed to incoming MIDI clock in
musically relevant values like “1 bar”, which would result in one full LFO cycle taking
exactly 1 bar. The functionality of this parameter requires that your host application
can provide the clock information to the Plug-In.
ENGLISH
D-CODER /
11
Page 12

Mixer
The Mixer section allows you to adjust the audio levels of the different sources in
D-CODER.
ENGLISH
Analysis
This fader will set the “dry” level of your analysis material. Typically, you will want to
set the level to zero for classic vocoding sounds.
Vocoder
This fader adjusts the level of your vocoding output. Typically, you will want to set this
parameter close to a maximum level for those pure, classic vocoding sounds.
Synth
This fader allows you to mix the “dry” synthesizer sound in with the other two sources.
Depending on the gain settings of the amplifier in the synth section, you will want to
set this fader to maximum comfortable level when using D-CODER as a synthesizer.
For classic Vocoder use, it should be set to zero.
12
/ D-CODER
Page 13

SYNTHESIZER SECTION
The D-CODER offers a fully-featured polyphonic synthesizer, that can also be used
independently of the Vocoding section and be played just like any other virtual VST
synth. And as this is a true WALDORF synthesizer – expect something nice!
LFO
The synthesizer’s LFO Section is independent of the LFO in the
Vocoder section – it is only for the synthesizer and has no effect
on the Vocoder itself!
ENGLISH
SHAPE
The Shape parameter offers different waveforms for the LFO:
Sync
The sync parameter allows you to synchronize the speed to
incoming MIDI clock in musically relevant values like “1
bar”, which would result in one full LFO cycle taking exactly
1 bar. The functionality of this parameter requires that your
host application can provide the clock information to
Plug-Ins.
Speed
Adjusts the LFO’s speed. Please note, that this has no effect
once Sync is active!
D-CODER /
13
Page 14

Glide
The red LED next to the Label indicates the state of the switch (On/Off) When this
parameter is engaged, a change in pitches played by the oscillator will “glide” into the
next pitch, creating interesting pitch “scoops.”
Speed
ENGLISH
Adjusts the speed of the glide effect. The behavior of this parameter is different in
Poly and Mono Trigger mode. In Free Run mode you will hear no difference, as the
pitch is usually fixed.
Oscillators
D-CODER provides tone generation via two oscillators.
Semitone
Allows you to offset the root key, indicated in musical
notes (e.g. “C2”).
TIP: Properly setting the oscillator tones becomes critical
when you are in “Free Run” mode, as this is the only tonal
control you have for the pitch of the Vocoder signal output
in this mode.
FM/PW (Osc 1)
Sets the amount of Frequency Modulation (FM). When “Square” is selected as the
Oscillator Shape, this parameter will control the Pulse Width (PW).
Detune (Osc 2)
This parameter will detune Oscillator 2 relative to Oscillator 1.
FM Env / PW Mod (Osc 2: only PW Mod)
Sets the amount of FM or PW modulation. In the case of FM, it sets the amount of
modulation by the “ENV” envelope below the Amplifier.
Pitch Mod
Adjusts the Pitch Modulation amount.
Shape
Sets the Oscillator’s waveform shape. For the best vocoding effects, you should have a
continuous waveform with many harmonics, such as Pulse, Sawtooth or Noise. Sine
has few harmonics, and will create a much more subtle effect.
14
/ D-CODER
Page 15

Mixer
Osc 1
Adjusts the level of Oscillator 1
Ring Mod
Adjusts the amount of Ring Modulation between Oscillator 1 and 2. (Both
Oscillators must have some amount of level setting for RingMod to function
properly.)
Osc 2
Adjusts the level of Oscillator 2
Filter
Cutoff
Adjusts the filter’s Cutoff. Depending on the selected filter type, the position has
different meaning. If Hi Pass is selected, the left most position is neutral – if Lo Pass
is selected, the right most position is neutral. We suggest you try the different filter
types and then adjust the cutoff parameter in order to find out how to best use this.
Resonance
The position of this parameter sets the steepness of the selected filter type – the
higher the value, the more audible the effect. If you select e.g. Lo Pass and move the
parameter up very far, the filter will start resonating – thus the name!
ENGLISH
Drive
D-CODER provides an integrated distortion circuit for the filter. This way you can
create really extreme synth sounds without requiring external effects.
Type
The synthesizer provides an extensive filter section with the following filter types:
• Low Pass 24 / 12 dB
• Band Pass 24 / 12 dB
• Lo Pass + Band Pass 24 dB
• Hi Pass 12 / 24 dB
• Notch 24 / 12 dB
Modulation
The Synthesizer’s Envelope, Keyboard Velocity or LFO can modulate the filter.
The higher the value set, the more extreme the modulation of the filter by the
corresponding source.
D-CODER /
15
Page 16

Key Track
If set to higher values such as +100% (far right), the overtone structure of the filter
will be identical across the entire keyboard range, and will generally result in a brighter
sound across the entire range of the keyboard. If set to lower values such as -100%
(far left), the higher the pitch of the note, the less overtones will be present in the
filtered signal. This results in a “softer” or “darker” sound the higher the note you play
on the keyboard.
ENGLISH
Amplifier
Attack
Adjusts the amplifier envelope’s Attack rate. The higher the value, the slower the
Attack phase! Short values will provide a percussive synth sound, while higher values
will be more legato or string like.
Release
Adjusts the amplifier envelope’s Release rate. The higher the value, the longer the
Release time!
Trigger
Poly/Mono/Free Run.
Poly and Mono will respond to incoming MIDI notes to control the synthesizer. Free
run will simply set the Oscillator’s amplifier to run continuously.
Vel
This switch activates or deactivates keyboard velocity for the amplifier stage.
Envelope
This envelope is assignable to Oscillator 1’s FM modulation and the Filter modulation.
Attack
Adjusts the Attack rate. The higher the value, the slower the Attack time!
Decay
Adjusts the amplifier envelope’s Decay rate. The higher the value, the longer the Decay
time!
16
/ D-CODER
Page 17

EFFECTS
EQ
EQ Low and Hi Band Level
Controls the overall balance of all synthesis bands by +/- 18 dB. Identical values will
result in equal filter volume across the range; different values will change the lo/hi
balance. All filters in-between are scaled proportionally.
EQ Mid
Selects the band to be controlled by Mid Level. The surrounding bands are scaled to
match the level of the mid EQ.
Mid Level
Cuts or boosts the selected mid band by +/- 18 dB.
TIP: Adjusting the EQ levels will change the intelligibility of the vocoded signal.
For more female tones, try higher values for the Hi Level, and lower values for the Lo
Level.
ENGLISH
UV Detector
UV is short for “Un-Voiced”. By default, this parameter is in the UnVoiced position.
By increasing the value of this parameter, you will add a small amount of noise to the
signal, improving the intelligibility of the sibilant frequencies.
The red LED next to the label indicates the state of the switch (On/Off).
D-CODER /
17
Page 18

Chorus
The red LED next to the Label indicates the state of the switch (On/Off). Red
indicates, that Chorus is active. The integrated Chorus effect is the last stage in the
signal chain and is applied to all of the three sources in the Mixer section.
TIP: Chorusing may reduce the Vocoder’s intelligibility. If your Vocoder sounds
“mushy”, try disabling the Chorus.
ENGLISH
Speed
Adjusts the speed of the chorusing effect.
Depth
Adjusts the amount of the chorusing effect.
Phat
“Boosts” the chorusing effect and creates extra-rich chorusing.
18
/ D-CODER
Page 19

TUTORIAL
Setup Examples
In this section, we would like to give you a couple setup examples. Essentially,
D-CODER can be used in three fundamentally different situations:
1. As “Free Run” Vocoder effect using the internal synthesizer and no MIDI input.
2. As classic Vocoder with MIDI controlling the pitch and using the internal
synthesizer.
3. As Vocoder effect for an external carrier (i.e. not using the internal synth).
1. Free Run Vocoder
This mode is great for quickly and effectively altering the sound of a voice (especially
“robot voices”) or percussion, as the pitch would not be tracked or controlled
externally
1. Select a track where you would like the audio to be processed.
2. Insert the D-CODER directly on the channel.
3. Check the settings in the Mixer section. Only “Vocoder” should be up, as
shown in the screenshot.
ENGLISH
4. Select “Free Run” in the Amplifier section.
D-CODER /
19
Page 20

5. Make sure you have selected “Synth” as your Vocoder signal in the Routing
section.
ENGLISH
6. Hit Play in your application, you’re ready to have some fun!
7. Depending on your source signal, enhance the siblent frequencies to improve
intelligibility by adjusting the UV Detector. Make sure it’s on (indicated by the
LED) and adjust the value to your requirements.
2. MIDI controlled Vocoder
This is the typical setup for using the Vocoder musically, i.e. creating a melodic
Vocoder effect, typically using the internal synthesizer. If you would like to process an
external sound source that is of course also possible, but then you need to use setup 3
with “Poly” or “Mono” mode.
20
/ D-CODER
1. Select a track where you would like the audio to be processed.
2. Insert the D-CODER directly on the channel.
3. Check the settings in the Mixer section. Only “Vocoder” should be up, as
shown in the screenshot.
Page 21

4. Select “Poly” or “Mono” in the Amplifier section, depending on if you’d like the
Vocoder to be monophonic or polyphonic.
5. Make sure you have selected “Synth”as your Vocoder signal in the Routing
section.
6. Hit Play in your application, you’re ready to have some fun… but you won’t be
hearing anything yet. First, you need to assign a MIDI track in your sequencer to
the D-CODER MIDI input! How this is handled depends on your sequencer’s
VST instrument handling. In the following, you will find a Cubase setup example.
ENGLISH
D-CODER /
21
Page 22

7. Depending on your source signal, enhance the siblent frequencies to improve
intelligibility by adjusting the UV Detector. Make sure it’s on (indicated by the
LED) and adjust the value to your requirements.
ENGLISH
3. Vocoding an external Carrier
This setup is great for processing the envelope of one track onto another. For best
results, you should be using pad-like continuous sounds as carrier and percussive
signals as analysis signal.
1. Select a track where you would like the audio to be processed.
2. Now load the second Plug-In that comes with D-CODER as an insert, the
D-CODER Carrier on the CARRIER channel (the channel where you’d like the audio
to be processed – not the main D-CODER Plug-In). The Carrier Plug-In doesn’t
have any user interface (UI) – and will look different in any application – or user
adjustable parameters. Make sure it’s active and close the UI.
22
/ D-CODER
3. Now bring up the D-CODER on the channel that is supposed to control the
D- CODER’s sound, the analysis or speech signal.
4. Check the settings in the Mixer section. Only “Vocoder” should be up, as
shown in the screenshot.
Page 23

5. Select “Poly”, “Mono” or “Free Run” in the Amplifier section, depending
on if you’d like to control the D-CODER externally or internally. To simplify
things for now, let’s set this to “Free Run”.
6. Make sure you have selected “Carrier 1” in the Routing section as your Vocoder
signal. Now D-CODER will not be using the internal synth, but the Carrier signal
as sound source.
ENGLISH
7. Hit Play in your application, you’re ready to have some fun.
8. Depending on your source signal, enhance the siblent frequencies to improve
intelligibility by adjusting the UV Detector. Make sure it’s on (indicated by the
LED) and adjust the value to your requirements..
D-CODER /
23
Page 24

Not hearing anything?
OK, so you picked one of the above setup examples and you aren’t hearing anything?
Let’s check the most likely pilot errors – the D-CODER is a very powerful tool, and
considering that there’s a Vocoder and a synthesizer integrated into this cute little
window, we’re talking high integration!
ENGLISH
1. Check Input Routing’s “Vocoder Signal” – if you want to use the internal
synth, this should not read “Carrier 1” or “Carrier 2”. When using Setup 3., it
should read “Carrier 1”.
2. Check the Trigger mode in the amplifier section – if using no external MIDI
control, it should be set to “Free Run”, so you’d instantly be hearing something
when you hit “Play”. If using an external MIDI track to control the Vocoder, it
should be set to “Poly” or “Mono”. Be aware that you’ll then only hear
something when MIDI events are coming in from the assigned MIDI track!
24
/ D-CODER
3. Check the Vocoder’s Mixer section. If you’d like to only hear the Vocoder
Output signal, it should look exactly as it is pictured here.
Page 25

4. Check the Synthesizer’s mixer section, if using the synth! Of course one of the
Oscillators should be up at least.
5. Check the Filter and Amplifier section if Cutoff or Attack and Release have
unusual settings.
6. Check the Analysis Filter Bank Settings. To be sure, make them look like this:
7. Check the Vocoder Filter Bank Settings. To be sure, make them look like this:
ENGLISH
8. STILL NOT HEARING ANYTHING? Please load factory presets in order to verify,
if the problem might result in your environment rather than D-CODER.If there is
nothing indicated in the Vocoder’s waveform display you have no input signal.
The display must look similar to the screenshot below:
D-CODER /
25
 Loading...