

TC electronic Assimilator Konnekt Owner's Manual
ASSIMILATOR KONNEKT
u s e r m a n u a l
ASSIMILATOR KONNEKT
99

E N G L I S H
INTRODUCTION
Did you ever ask yourself “Why doesn’t my mix sound like THAT?” If you have asked
yourself this question, then ASSIMILATOR is your Plug-In. With ASSIMILATOR, you
can learn the frequency curve of your favorite mix or solo instrument track and apply
that frequency curve to your mix or track; sort of like an “automatic equalizer”.
Simply put, ASSIMILATOR is an equalization tool that delivers excellent results while
removing the tedious work from equalizing and fine tuning your mix. What’s more,
ASSIMILATOR is a phase linear equalization tool, freeing you from needless worries
about artifacts related to phase distortion. Without such phase interference, you get
the most transparent and musical processing possible.
Enjoy!
The TC Electronic Team
ATTENTION!
THIS PLUG-IN REQUIRES A KONNEKT 24D INSTALLED
AND CONNECTED TO YOUR COMPUTER!
THE PLUG-IN WILL NOT RUN WITHOUT
KONNEKT 24D INSTALLED!
© by TC ElECTr oniC A/S 2006. All produ CT And CompAny nAmES A rE TrAdE mArkS of ThEir rESpECT ivE ownE rS.
ll Sp ECifiCATionS SubjEC T To Ch AngE wiT houT noT iCE. All righTS rESErvEd.
A
is a TC Group company.

GETTING STARTED
SYSTEM REQUIREMENTS
Windows
• TC Electronic KONNEKT 24D
• Windows XP
• Pentium 4, 2.0 GHz
• 512 MB RAM
• VST compatible host application
• System must meet requirements of the host application
MacOS X
• TC Electronic KONNEKT 24D
• OS X 10.4.x
• G4, 1 GHz
• 512 MB RAM
• VST or MAS compatible host application
• System must meet requirements of the host application
ASSIMILATOR KONNEKT
E N G L I S H
1
1

2
ASSIMILATOR KONNEKT
E N G L I S H
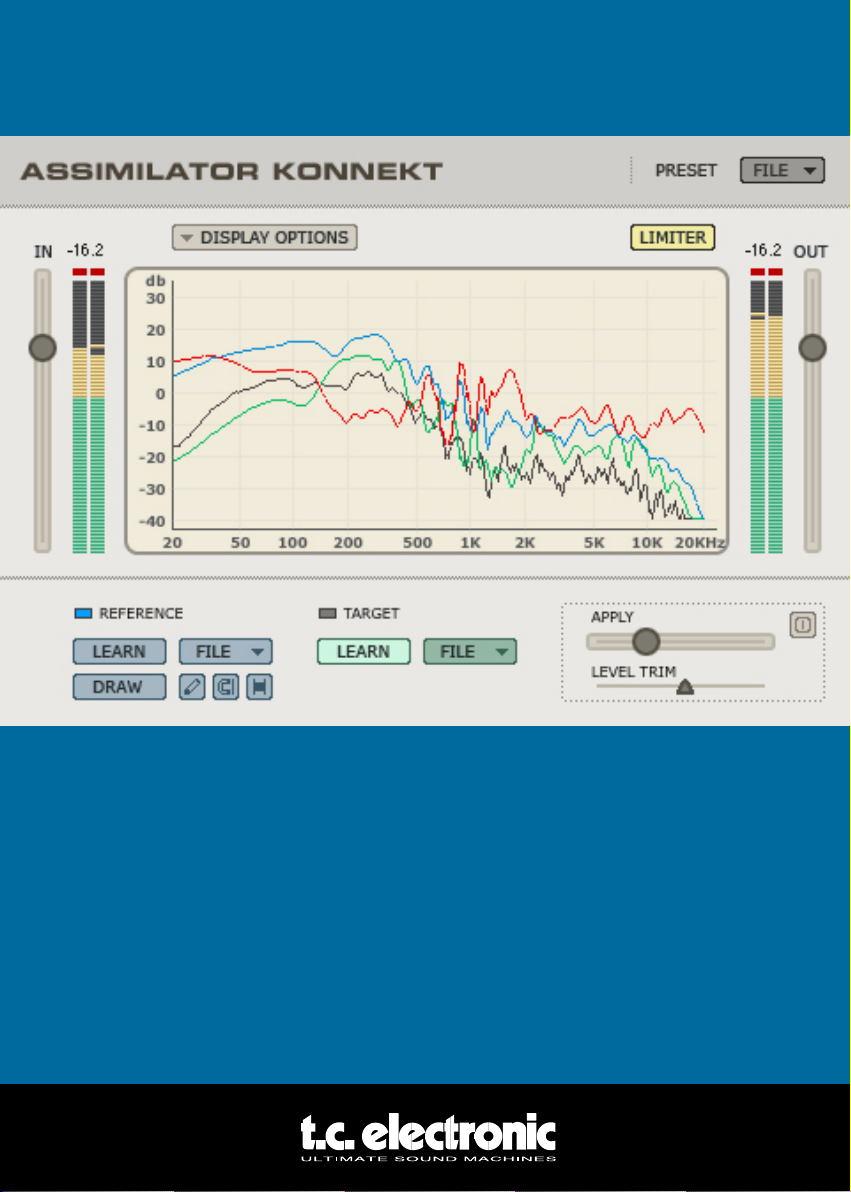
ASSIMILATOR BASICS
The ASSIMILATOR is an extremely powerful equalization tool and it is unlike anything
else. The idea is simple: you “learn” the frequency curve of one piece of audio and
apply it to another audio file. It is best to think of it in terms of sampling:
• You “sample” the frequency curve of the audio that you want your audio to sound
like. (Learn the “reference” audio.)
• You “sample” the frequency curve of the audio that you want to process.
(Learn the “target” audio.)
• You “apply” the “reference” curve to the “target” curve to meet your needs.
Simple, isn’t it? The ASSIMILATOR compares the frequency curves of the two audio
sources and interpolates between the two to generate the ideal EQ curve for the target
audio.
ASSIMILATOR APPLICATIONS
The ASSIMILATOR is perfectly suited for:
• Matching a live mix to a studio mix (…or vice versa.)
• Matching tracks on an album to “even out” the overall EQ across the entire
project.
• Applying the frequency curve of your favorite song to your song.
• Applying the frequency curve of your favorite track to your track, i.e. vocals, a
snare, etc.
• Matching the sound of multiple environments and morphing between them, as an
audio post effect for film or video.
2

GLOSSARY OF TERMS
Analysis Curve: The “analysis curve” is based on a frequency analysis – or spectral
snap-shot – of any audio source, such as a complete mix or an
individual audio track. The “analysis curve” can be stored for later
use.
Assimilation: The process of making the overall spectral information – or
equalization – of one piece of audio similar to another.
EQ Curve: The “EQ curve” is the calculated equalization applied to the target
curve. The EQ curve is an interpolation between the reference
analysis curve and the target analysis curve.
Learn: The “Learn” function is how you can sample (or grab) the spectral
curve of any audio file or source.
Reference: This is the desired analysis curve or the audio you want to sound
like.
Target: This analysis curve is based on your audio; or, the audio you want to
process with the “reference” analysis curve.
ASSIMILATOR KONNEKT
E N G L I S H
3
3

4
ASSIMILATOR KONNEKT
E N G L I S H
WHY LEARN TWO CURVES?
Learning just one curve would be insufficient for proper assimilation. Consider the
concept as a whole: how else does the ASSIMILATOR Plug-In know how to make your
“target” sound like the “reference”? Here are two examples that show the value of
learning two curves.
ONE CURVE IS INSUFFICIENT FOR PROPER ASSIMILATION
1. “Learn” the analysis curve of the audio that you want your audio to sound like
(“reference”).
2. “Apply” the analysis curve to the “target” audio.
What are the results? In this example, there is the risk that the results will not meet
your expectations. Consider what happens when we process our target audio using the
method from the example above. If the “reference curve” has a level of +12dB at 100
Hz and then you apply that to your target, which already has +6 db at 100 Hz, then
the total boost at 100 Hz would be +18dB. The conclusion is that if we apply the
reference curve to the target without also learning the target, then there will be a 6dB
difference at 100 Hz and the two pieces of audio will not share a common frequency
response!
PROPER ASSIMILATION REQUIRES TWO CURVES
With the additional step of learning the analysis curve of your “target” audio, or the
audio you want to process with the “reference” analysis curve, then there is the ability
to do a highly accurate comparison between the two curves and interpolate an ideal EQ
curve.
Let’s expand on our previous example adding only one step to correctly use the
ASSIMILATOR.
1. “Learn” the analysis curve of the audio that you want your audio to sound like
(“reference”).
2. “Learn” the analysis curve of the audio that you want to process (“target”).
3. “Apply” the interpolated “EQ curve” to the “target” audio.
Now what are the results? Quite good! If we process our “target” audio from the
example above, we have an interpolation process that compares the two curves prior
to processing. If the reference curve has a level of +12 dB at 100 Hz, and then you
apply that to your target, which already has +6db at 100 Hz, then the total boost
would be +6dB at 100 Hz. 6dB is the difference between the two curves, so the sum
will result in something extremely different – and much more useful – than in the first
example.
4
 Loading...