

Page 1
TAYAMA®
Electric Pressure Cooker
User Manual
Pictures in the text are for reference only, please refer to the actual product.
Thank you for purchasing a TAYAMA
Please read the User Manual carefully before use and keep it in a convenient place for
® Electric Pressure Cooker.
future reference.
Model No.: B8
1
Page 2

IMPORTANT SAFEGUARDS
When using electrical appliances, basic safety precautions should always be followed including the following:
Read all instructions.
1. This appliance cooks under pressure. Improper use may result in scalding injury. Make certain unit is
properly closed before operating. See “Operating Instructions.”
2. Never fill the unit over MAX level (2/3 full). When cooking foods that expand during cooking such as rice or
dried vegetables, do not fill the unit above the halfway point (1/2 full). Over filling may cause a risk of
clogging the vent pipe and developing excess pressure.
3. Be aware that certain foods, such as applesauce, cranberries, pearl barley, oatmeal or other cereals, split
peas, noodles, macaronis, rhubarb, or spaghetti can foam, froth, and sputter, and clog the pressure release
device (steam vent). These foods should only be cooked in a pressure cooker with caution with the inner
pot never more then1/2 full and using natural release.
4. Always check the pressure release devices for clogging before use. Do not cover the pressure valves.
5. Do not open the pressure cooker until the unit has cooled and all internal pressure has been released. If
the handles are difficult to push apart, this indicates the cooker is still pressurized— Do not force open it.
Any pressure in the cooker can be hazardous.
6. Caution: to reduce the risk of electric shock, cook only in the provided removable container (cooking pot).
7. Be sure that the handles are assembled and fastened properly before each use. Cracked, broken, or
charred handles should be replaced.
8. Do not touch hot surfaces. Use handles or knobs. Do not place hands or face over the exhaust valve or
float valve to avoid scald when the unit is in operation.
9. To protect against electrical shock, do not immerse cord, plugs, or appliance in water or other liquid.
10. Close supervision is necessary when the pressure cooker is used by or near children.
11. Always unplug from outlet when not in use and before cleaning. Allow to cool before putting on or taking off
parts, and before cleaning.
12. Do not operate any appliance with a damaged cord or plug or after the appliance malfunctions or has been
damaged in any manner. Return appliance to the service center for examination repair or adjustments. See
Warranty.
13. The use of accessory attachments not recommended by the appliance manufacturer may cause injuries.
14. Do not use outdoors. For household use only.
15. Do not let cord hang over edge of table or counter, or touch hot surfaces.
16. Do not place the unit on or near a hot gas or electric burner, or in a heated oven.
17. Extreme caution must be used when moving an appliance containing hot oil or other hot liquids.
18. Always attach plug to appliance first, then plug cord into the wall outlet. To disconnect, turn any control to
“OFF” then remove plug from wall outlet.
19. Do not make unauthorized replacement of any spare parts inside the pressure cooker, as this may cause
electric shock, fire, or injury.
20. DO NOT operate the unit on an unstable surface. Never operate the unit on or near flammable objects
such as newspaper or paper plates.
21. DO NOT operate the unit near water, oil, or fire. DO NOT expose the unit to direct sunlight. Keep out of
reach of children.
22. Before use each time, be sure to check the anti-block shield, float valve and exhaust valve for obstruction,
2
Page 3

wipe the surface of the inner pot and the heating plate to confirm they are free of any foreign object; make
sure the exhaust valve is in sealing location.
23. A short power supply cord should be provided to reduce risks resulting from becoming entangled in or
tripping over a longer cord. An extension cord may be used if care is exercised in its use. If an extension
cord is used, the electrical rating of the cord must be at least 20 amps and 120 volts. The extension cord
should be a grounding type 3-wire cord and must be arranged so not to drape over edge of table or counter
where it can be pulled by children or tripped over accidentally. This appliance has a fitted plug. Do not
attempt to modify the plug in any way.
24. Helpful Hint: Please soak the dry foods before cooking them in this product.
25. DO NOT move this product or force to remove the lid when the unit is in operation.
26. After cooking, use extreme caution when removing the lid. Always open the lid away from you to avoid skin
contact with any heat or steam. Serious burns can result from steam inside the unit.
27. When opening the lid after cooking, do not touch the inner pot and cover inside with hands directly to avoid
scalding.
28. WARNING: Never deep fry or pressure fry in the unit. It is dangerous and may cause fire or serious
damage.
29. Anyone who has not fully understood all operating and safety instructions in this manual is not qualified to
operate or clean the pressure cooker.
30. This appliance is not intended for use by persons (including children) with reduced physical sensory or
mental capabilities or lack of experience and knowledge. Unless supervised by a person responsible for
their safety.
31. Do not use pressure cooker for other than intended use.
SAVE THESE INSTRUCTIONS
Brief introduction
Technical data
Model No. B8
Voltage 120V~60Hz
Power 900W
Capacity 5L
Working Pressure 40~70kPa
Safety Pressure 85-115kPa
Keep Temperature 60~80 ℃
Accessories
Scoop Measuring Cup Power Cord
3
Page 4

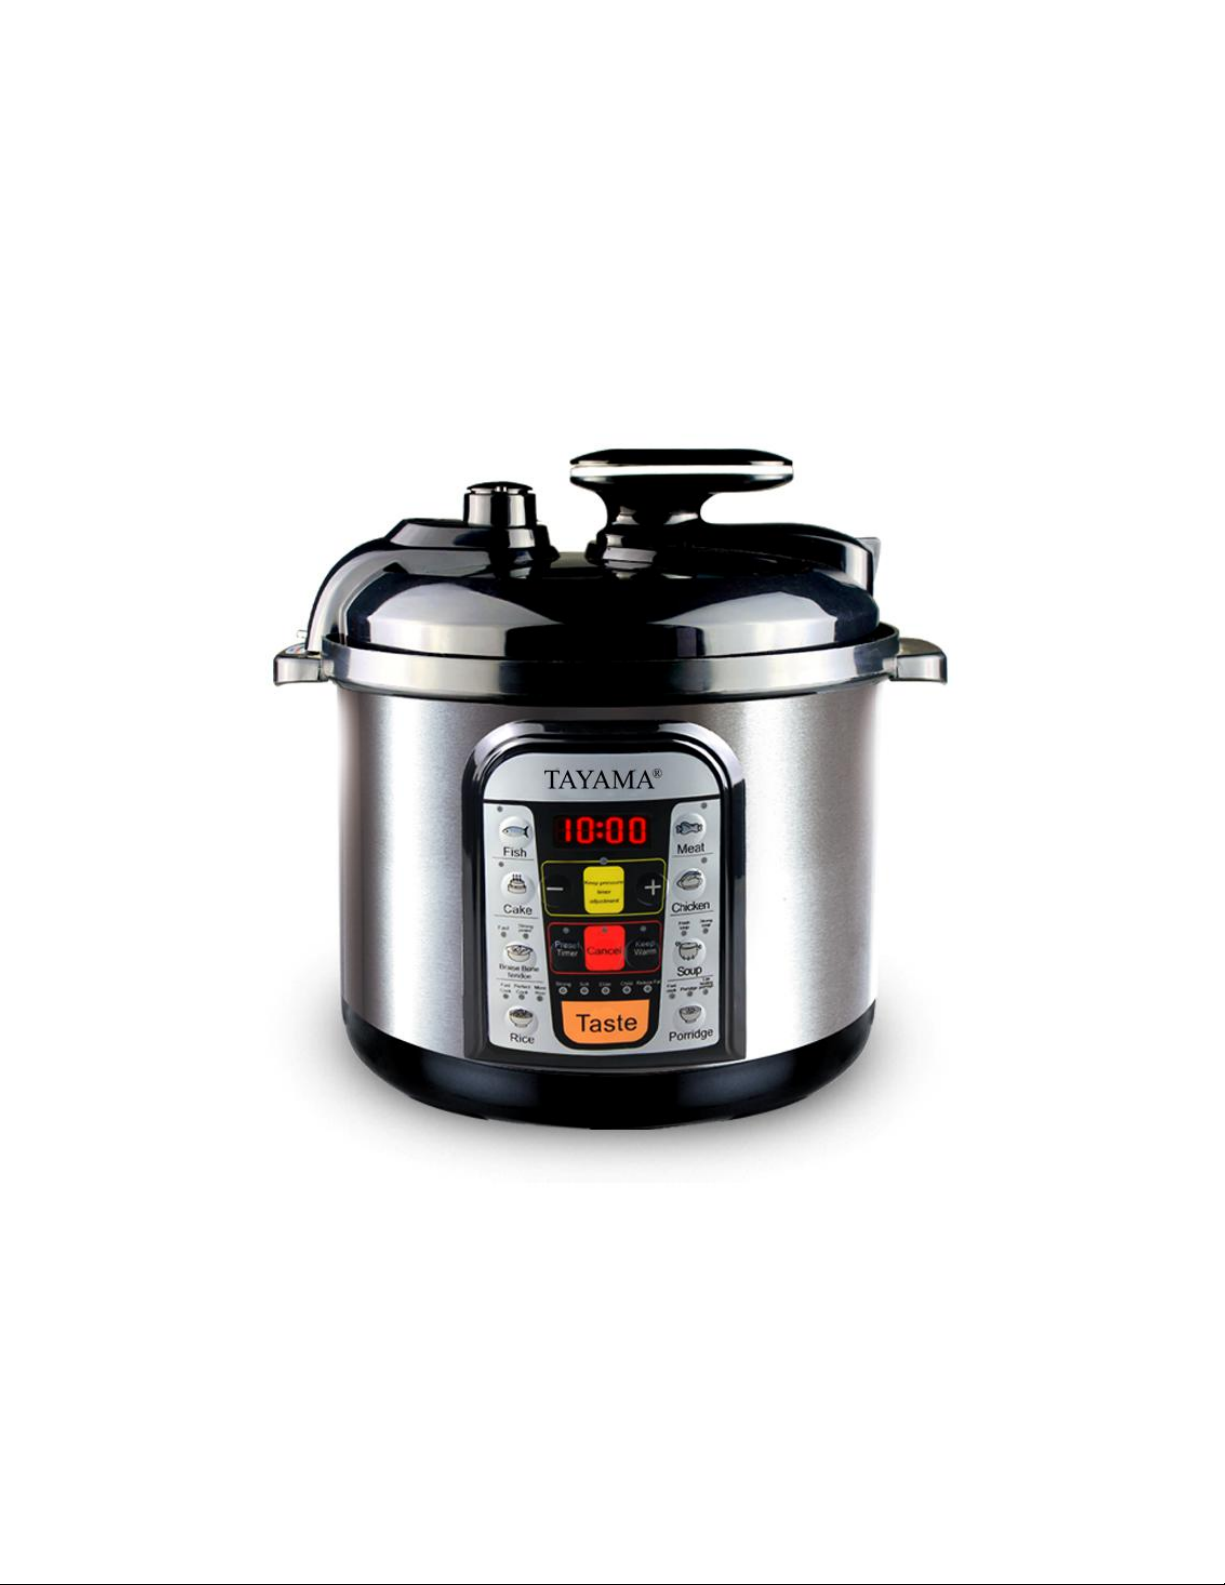
Control Panel Display
Cooking Program Functions
Fish Button: Default setting is 5 minutes, LED display shows “P05”. Press “SELECT TIMER”, “-“ or “+” to
reduce or add cooking time you want.
Cake Button: Default setting is 30 minutes, LED display shows “P30”. Time can not be adjusted..
Braise Bone Tendon Button: Default setting is 35 minutes, LED display shows “P35”. Press “SELECT
TIMER”, “-“ or “+” to reduce or add cooking time you want.
Rice Button: Default setting is 8 minutes, LED display shows “P08”. Press “SELECT TIMER”, “-“ or “+” to
reduce or add cooking time you want.
Meat Button: Default setting is 20 minutes, LED display shows “P20”. Press “SELECT TIMER”, “-“ or “+” to
reduce or add cooking time you want.
Chicken Button:
reduce or add cooking time you want.
Soup Button:
reduce or add cooking time you want.
Porridge Button:
reduce or add cooking time you want.
“-“ Button: Time reducing, press it one time, time reduces 1 minutes.
“+”Button: Time adding, press it one time, time adds 1 minutes.
Default setting is 12 minutes, LED display shows “P12”. Press “SELECT TIMER”, “-“ or “+” to
Default setting is 20 minutes, LED display shows “P20”. Press “SELECT TIMER”, “-“ or “+” to
Default setting is 15 minutes, LED display shows “P15”. Press “SELECT TIMER”, “-“ or “+” to
5
Page 5

Keep pressure timer adjustment Button: For keeping pressure time adjusting. First select a cooking function
button, for example, choose “FISH” function by pressing “FISH” button, then press “Keep pressure timer
adjustment " to adjust time. The LED display will show DEFAULT setting time, press “-“ or “+” to reduce or add
desired cooking time. Cooking time setting range is 1-180 minutes.
Preset timer/Keep warm/Cancel Button: After cooking is done, the appliance automatically starts Keeping
Warm. If you do not want to keep warm, press Preset timer/Keep warm/Cancel Button one more time to
cancel it.
Remark: The longest keep warm time is 24 hours; it is better to use within 6 hours to avoid any bad
cooking function.
TASTE Button:
function, press “TASTE” button to select the taste you want.
5 settings for taste option, “Strong, Soft, Elder, Children, Reduce Fat”. After selecting a cooking
Braise Bean Tendon Rice Function Fish Cake
Default
time(minute)
Adjustable
time(minute)
Taste Strong,
5 30 35 45 8 12 12
3-7 31-59 25-46 10-18 12-16 12-16
Soft,
Elder,
Children,
Reduce
Fat
Default
time(minute)
Adjustable
time(minute)
Taste Strong,
20 12 20 40 15 10 25
14-29 7-16 14-26 28-52 11-20 7-13 18-33
Soft,
Elder,
Children,
Reduce
Fat
Fast Strong
Strong, Soft,
Elder,
Children,
Reduce Fat
Soup Porridge Function Meat Chicken
Fresh soup Strong
Strong,
Soft, Elder,
Children,
Reduce
Strong, Soft,
Elder,
Children,
Reduce Fat
power
Strong,
Soft, Elder,
Children,
Reduce Fat
soup
Strong,
Soft, Elder,
Children,
Reduce Fat
Fast cook Perfect
cook
Soft,
Elder,
Children
Fast cook Porridge Low
Strong,
Soft,
Elder,
Children,
Reduce
Fat
Soft,
Elder,
Children
Strong,
Soft,
Elder,
Children,
Reduce
Fat
More rice
Soft,
Elder,
Children
heating
porridge
Strong,
Soft,
Elder,
Children,
Reduce
Fat
6
Page 6

Operating Instructions: How to use it
1. Open the lid correctly. Hold the lid with a hand. Rotate approximately 30 degrees clockwise follow
marking towards “Open” on the outer casing. Once you reach the end position, then pull lid up. See image
1 and 2 below:
Take out the inner pot, and put food and water in it. The total amount of food and water shall not
2.
exceed the maximum level of the inner pot. Take inner pot out, put food and water inside the inner pot. The
height of food and water must be below 2/3 (MAX) of inner pot; easily expanded food in the water must be
below 1/2 of inner pot: Water and food must be over 1/3 of inner pot (MIN). See image 3, 4 and 5.
*5L, the max rice capacity is 10 cup.
Check whether all parts on the cover are assembled properly. Check the floating valve for obstruction,
3.
and whether such parts as seal and anti-block shield are assembled properly. Take the inner pot out, use
dry cloth wipe heating element and pot inside. Check for obstructions. Then put inner pot into cooker turn
left and right to ensure that inner pot fits the heating element securely. See image 6
Close the lid completely.
4.
*Check the airproof rubber ring under the pot lid is correctly in place.
Place the lid over the pot in aligned position, turn counter clockwise until end position, you will hear locking
click sound indicating lid has been secured locked. See image 7 and image 8.
7
Page 7

5. Turn pressure limited valve, according to image, turn the valve to airproof position, and check the valve is
securely in down position. See image 9. (Without heating the pressure limited valve is down)
6. Open lid and take food out. When keep warm indicator light is on, wait till the float valve is down and all
pressure has been released before opening the lid to take food out.
Pressing KEEP WARM/CANCEL button once will exit keep warm state. Then turn pressure limited valve to
ESCAPE position till the valve is down. See image 10
*If the food is liquid, such as soup, porridge, when KEEP WARM/CANCEL light is flashing, and you can not
pull out pressure valve to escape pressure, you must wait till the float valve comes down automatically.
Otherwise the liquid food will sputter through the valve pipe. You can also place a wet and cool cloth
around the pot lid to help reduce the high temperature inside of the cooker.
*Unplug the power cord
*Hold lid handle securely, turn clockwise till you reach the end position, and pull up to remove lid. See
image 1 and image 2.
8
Page 8

Cleaning and maintenance
1
Unplug power cord before cleaning.
2 Use wet cloth clean the pot body, never immerse the pot in water.
3 Use a wet cloth to clean the outer casing
4 Clean inside of the pot lid, including all parts, then use dry cloth to dry.
5 Use soft cloth or soft brush to clean inner pot, then use dry cloth to dry.
*To clean pressure limiting valve, remove escape valve and run under water, see image as below:
6. Any other servicing should be performed by an authorized service representative.
Troubleshooting
Problem Possible Reason Solution
Display remains blank
after connecting the
power cord
Difficult to close the lid
Difficult to open the lid Pressure exist inside the cooker
Steam leaks from the
side of the lid
Bad power connection or no power
Cookers electrical fuse was blown
Airproof rubber sealing ring is not installed
properly
Float valve in the popped-up position Press the float valve lightly
Float valve stuck at the popped-up position
No sealing ring Install the sealing ring
Sealing ring is damaged Replace the sealing ring
Food debris attached to the sealing ring Clean the sealing ring
Lid not closed properly Open then close the lid again
Inspect the power cord to ensure a
good connection, check the power
outlet is active.
Contact support online.
Position the sealing ring well
downwards
Use the steam release handle to
reduce the internal pressure. Open
the lid after the pressure is
completely released.
Press the float valve lightly with a
pen or chopstick.
9
Page 9

Steam leaks from float
valve for over 2
minutes
Float valve unable to
rise
Food debris on the float valve silicone seal
Float valve silicone ring is worn out
Too little food or water in inner pot Add water according to the recipe
Float valve obstructed by the lid locking pin Close the lid completely
Airproof rubber sealing ring or float valve is
damaged
Too little water Adjust dry rice and water ratio
Rice half cooked or
too hard
Cover opened prematurely After cooking cycle completes,
Rice too soft
Too much water Adjust dry rice and water ratio
Clean the float valve silicone seal
Replace the float valve silicone
seal
Contact support online
according to recipe
leave the cover on for 5 more
minutes.
according to recipe
Display E1 Temperature tip link is damaged Send product to repair center
Temperature tip link is damaged Send product to repair center
Display E2
Main electric board link is loose Send product to repair center
Display E3 Temperature is too high Check inner pot for sufficient
water or weather there is
obstruction between inner pot and
heating element
Display E4 Pressure switch is damaged Send product to repair center
Remark: If control board display E1, E4, and pressure switch is damaged and need to adjust pressure,
please send to repair center. Please do not adjust by yourself, to avoid any harm or danger.
10
Page 10

TAYAMA APPLIANCE USA INC.
www.tayama-usa.com
Email: info@tayama-usa.com
11
 Loading...