

Page 1
Montage- und Bedienungsanleitung
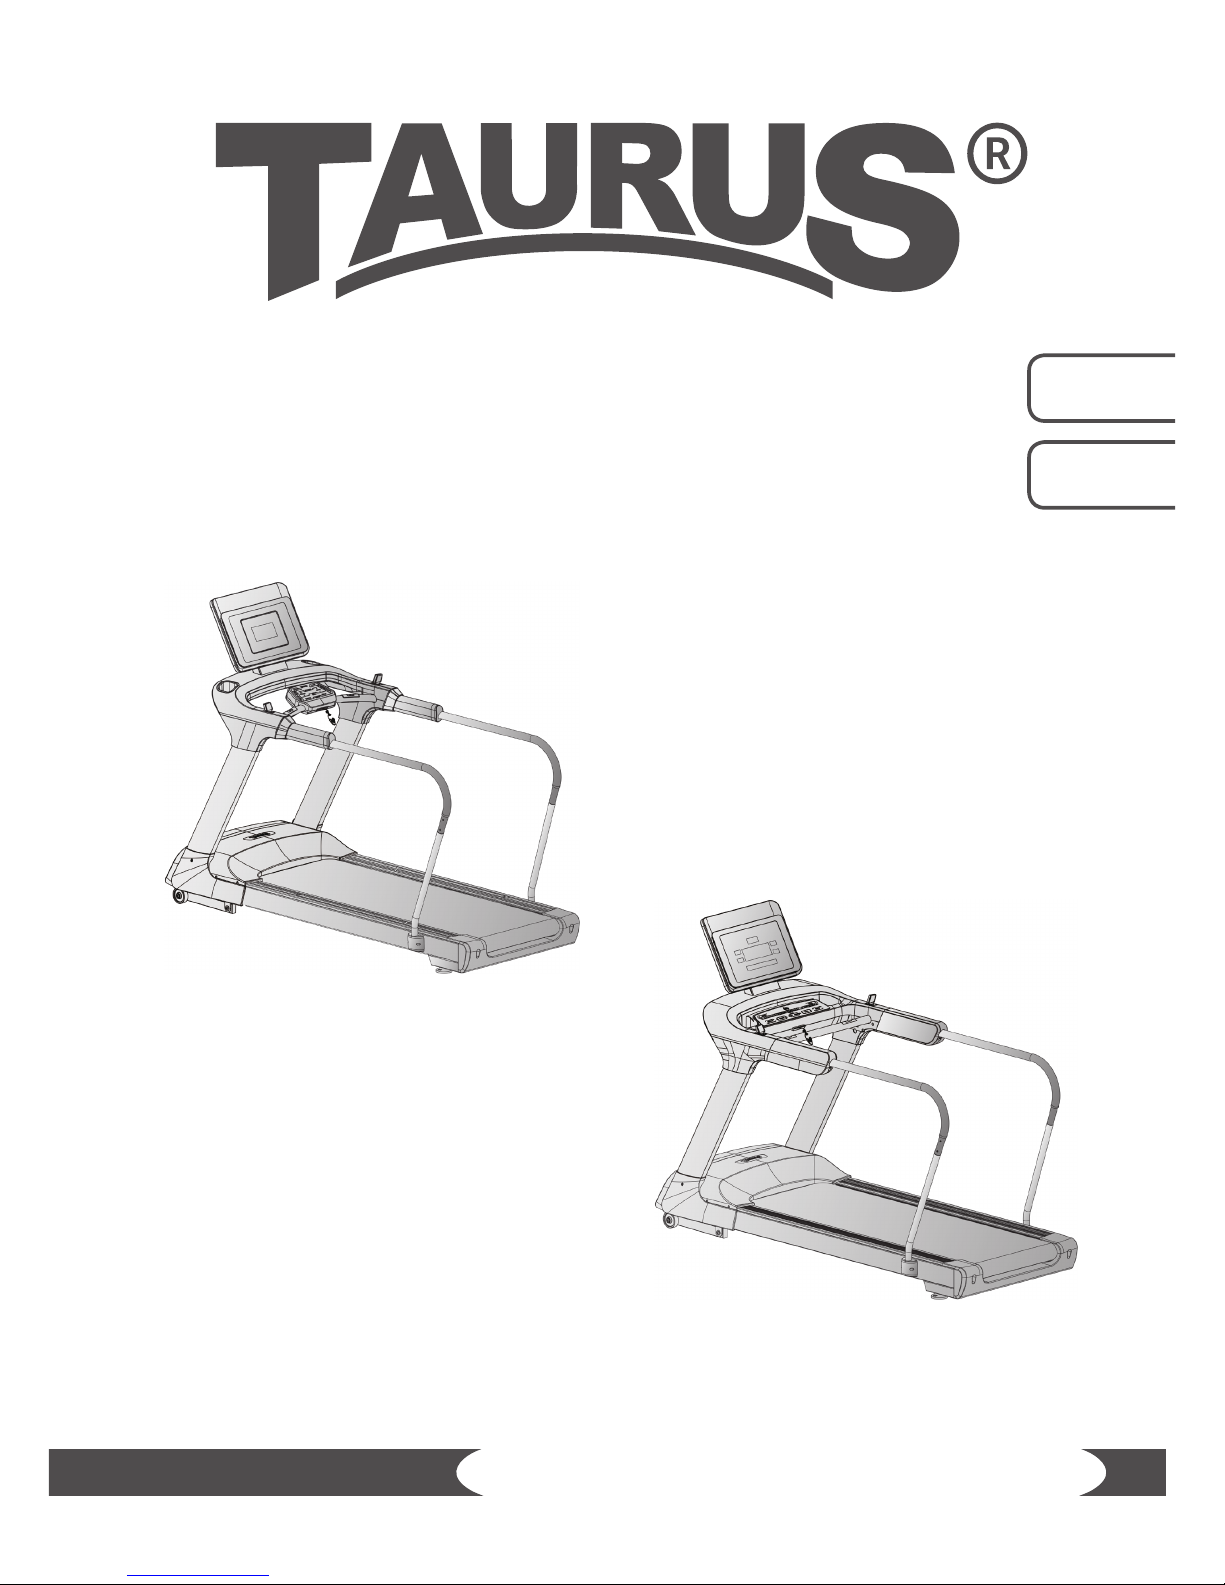
Hand Rails T9.5, T9.9 & T10.3 Handläufe
ArtNr./ArtNo. TF-EXT-HR
Assembly and operating instructions
D
GB
T9.5 Pro
T9.9 Pro & T10.3 Pro
Page 2

2
Page 3
3
D
These handrails are an optional accessory for the Taurus treadmills T9.5, T9.9 and T10.3.
All instructions regarding the proper use, safety instructions, technical data and service
instructions you will nd in the manuals of the treadmills.
Dear Customer,
Thank you for deciding for a high-quality training equipment of the brand Taurus®, the brand that
makes athlete‘s hearts beat faster. Taurus® oers a wide range of home tness equipment like elliptical
cross trainers, ergometers, treadmills and rowing machines. Taurus® equipment is the optimal
equipment for all those who want to train at home independent of goals and tness level. For further
information please visit www.sport-tiedje.com or www.taurus-tness.de.
Diese Handläufe dienen als optionales Zubehör für die Laufbänder T9.5, T9.9 und T10.3 der
Marke Taurus. Sämtliche Hinweise zur bestimmungsgemäßen Verwendung,
Sicherheitshinweise, technische Daten und Hinweise zur Pege und Wartung nden Sie in
der beiliegenden Bedienungsanleitung der entsprechenden Laufbänder.
Sehr geehrte Kundin, sehr geehrter Kunde,
vielen Dank, dass Sie sich für ein Qualitäts-Trainingsgerät der Marke Taurus® entschieden haben,
der Marke, die Sportlerherzen höher schlagen lässt. Darwin bietet eine breite Palette an (Heim-)
Fitnessgeräten wie beispielsweise Ellipsentrainer, Ergometer, Laufbänder und Kraftstationen an.
Taurus-Geräte sind die optimalen Geräte für alle, die zu Hause trainieren wollen, unabhängig von
ihren Zielen und ihrer Fitness. Weitere Informationen nden Sie unter www.sport-tiedje.com oder
www.taurus-tness.de.
GB
Page 4
4
D
GB
INHALTSVERZEICHNIS
1 ASSEMBLY 4
1.1 Handläufe für das T9.9 Pro und T10.3 Pro 4
1.1.1 Lieferumfang 5
1.1.2 Aufbauanleitung 6
1.2 Handläufe für das T9.5 Pro 9
1.2.1 Lieferumfang 10
1.2.2 Aufbauanleitung 11
2 GARANTIEINFORMATIONEN 15
3 ENTSORGUNG 19
4 ERSATZTEILBESTELLUNG 20
4.1 Service Hotline 20
4.2 Seriennummer und Modellbezeichnung 20
4.3 Teileliste 22
4.4 Explosionszeichnung 23
CONTENTS
1 ASSEMBLY 4
1.1 Handrails for the T9.9 Pro and T10.3 Pro 4
1.1.1 Package contents 5
1.1.2 Assembly instructions 6
1.2 Handrails for the T9.5 Pro 9
1.2.1 Package contents 10
1.2.2 Assembly instructions 11
2 WARRANTY INFORMATION 17
3 DISPOSAL 19
4 ORDERING SPARE PARTS 21
4.1 Service hotline 21
4.2 Serial number and model name 21
4.3 Parts list 22
4.4 Exploded drawings 23
Page 5
5
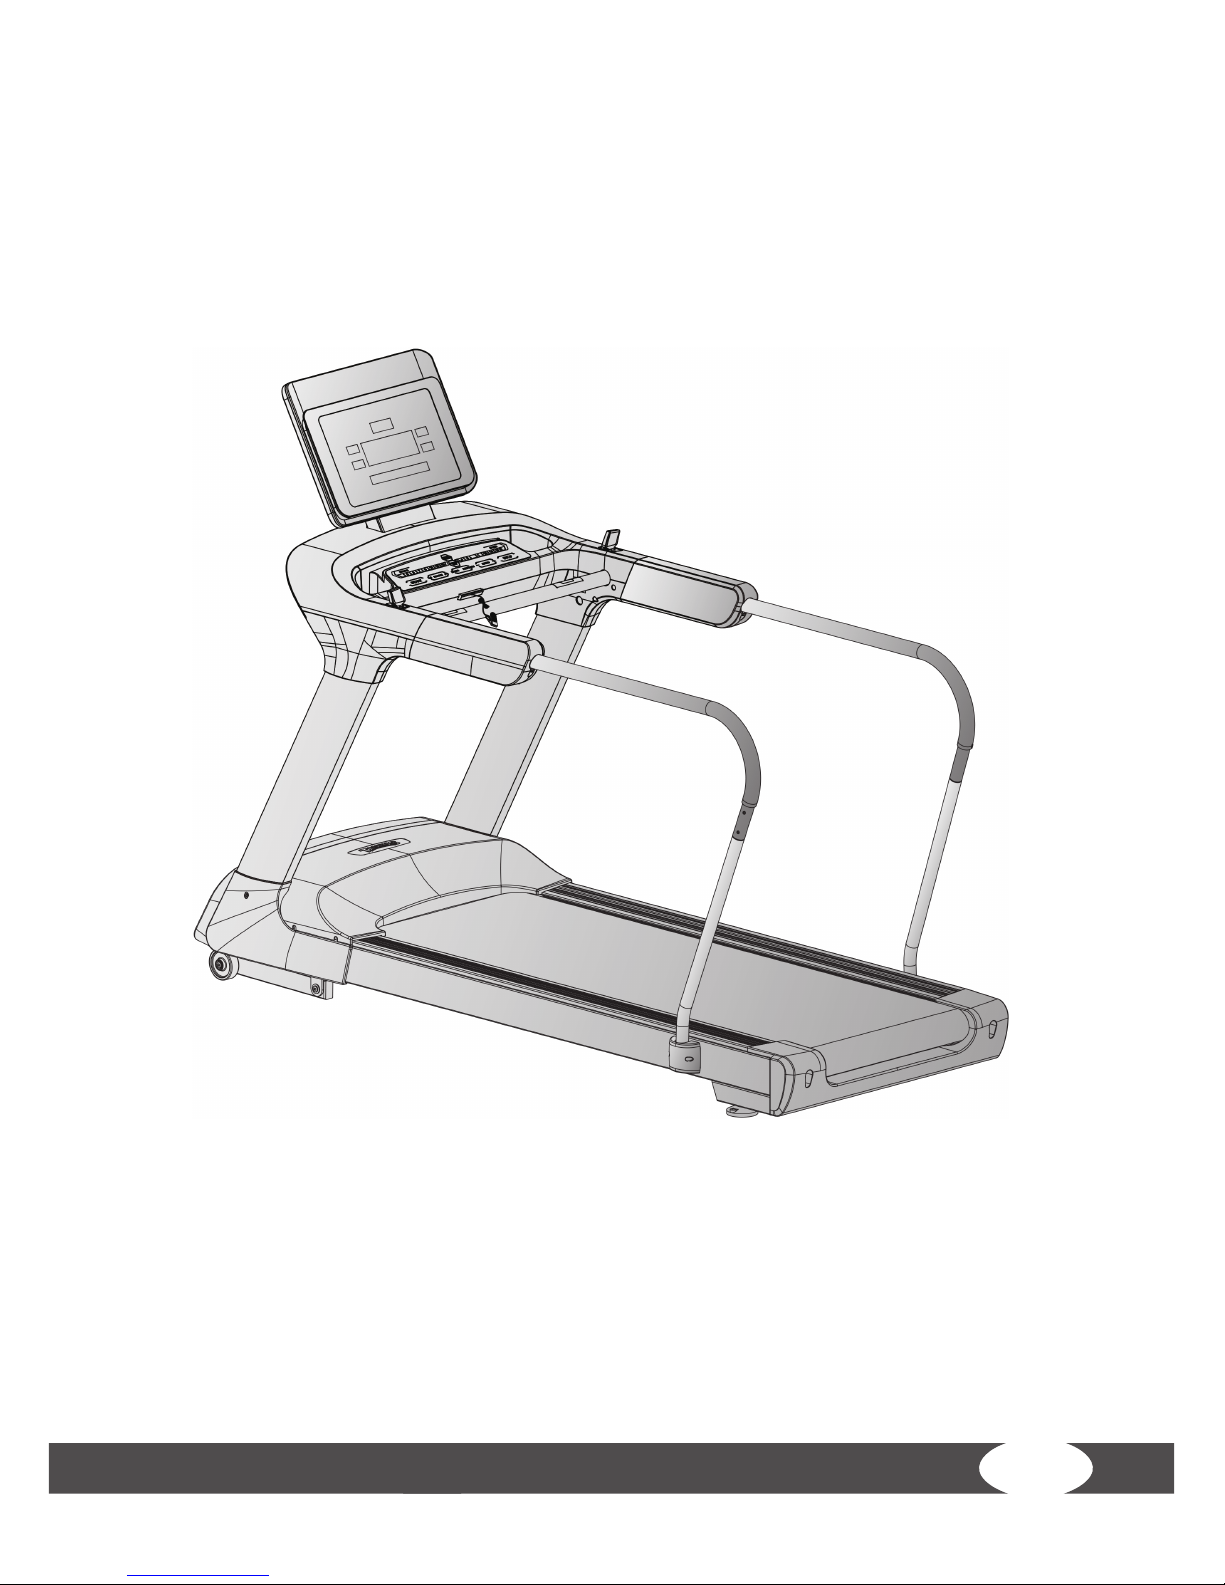
1.1 Handläufe für das T9.9 Pro und T10.3 Pro
/ Handrails for the T9.9 Pro and T10.3 Pro
Page 6
6
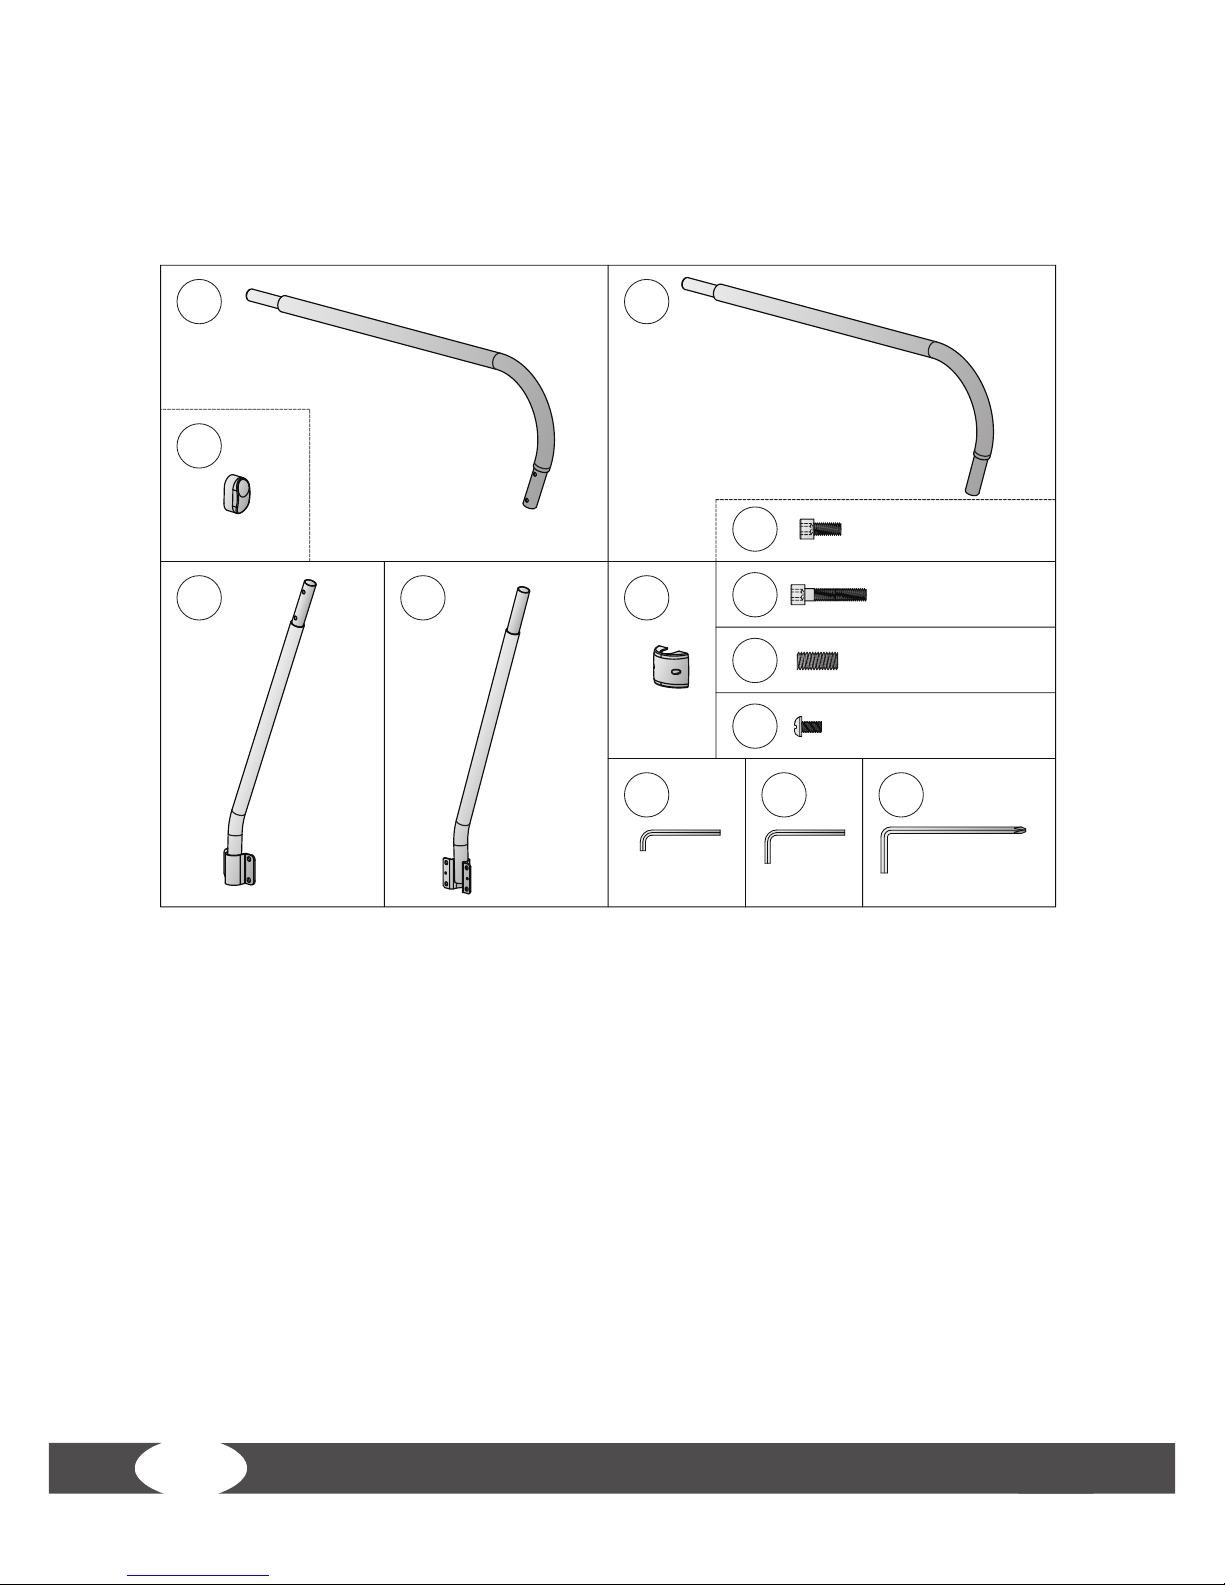
1.1.1 Lieferumfang
/ Package contents
M8x1.25x55L
x4
M8x1.25x25L
x4
M5x0.8x10L
x4
M5
M6
M4
M8x1.25x16L
x4
1L 1R
x1
x1
2L
2R
x1 x1
8
3
x2
7
9
10 11 12
x2 x2 x2
5
x2
4
Page 7
7
1.1.2. Aufbauanleitung
/ Assembly instructions
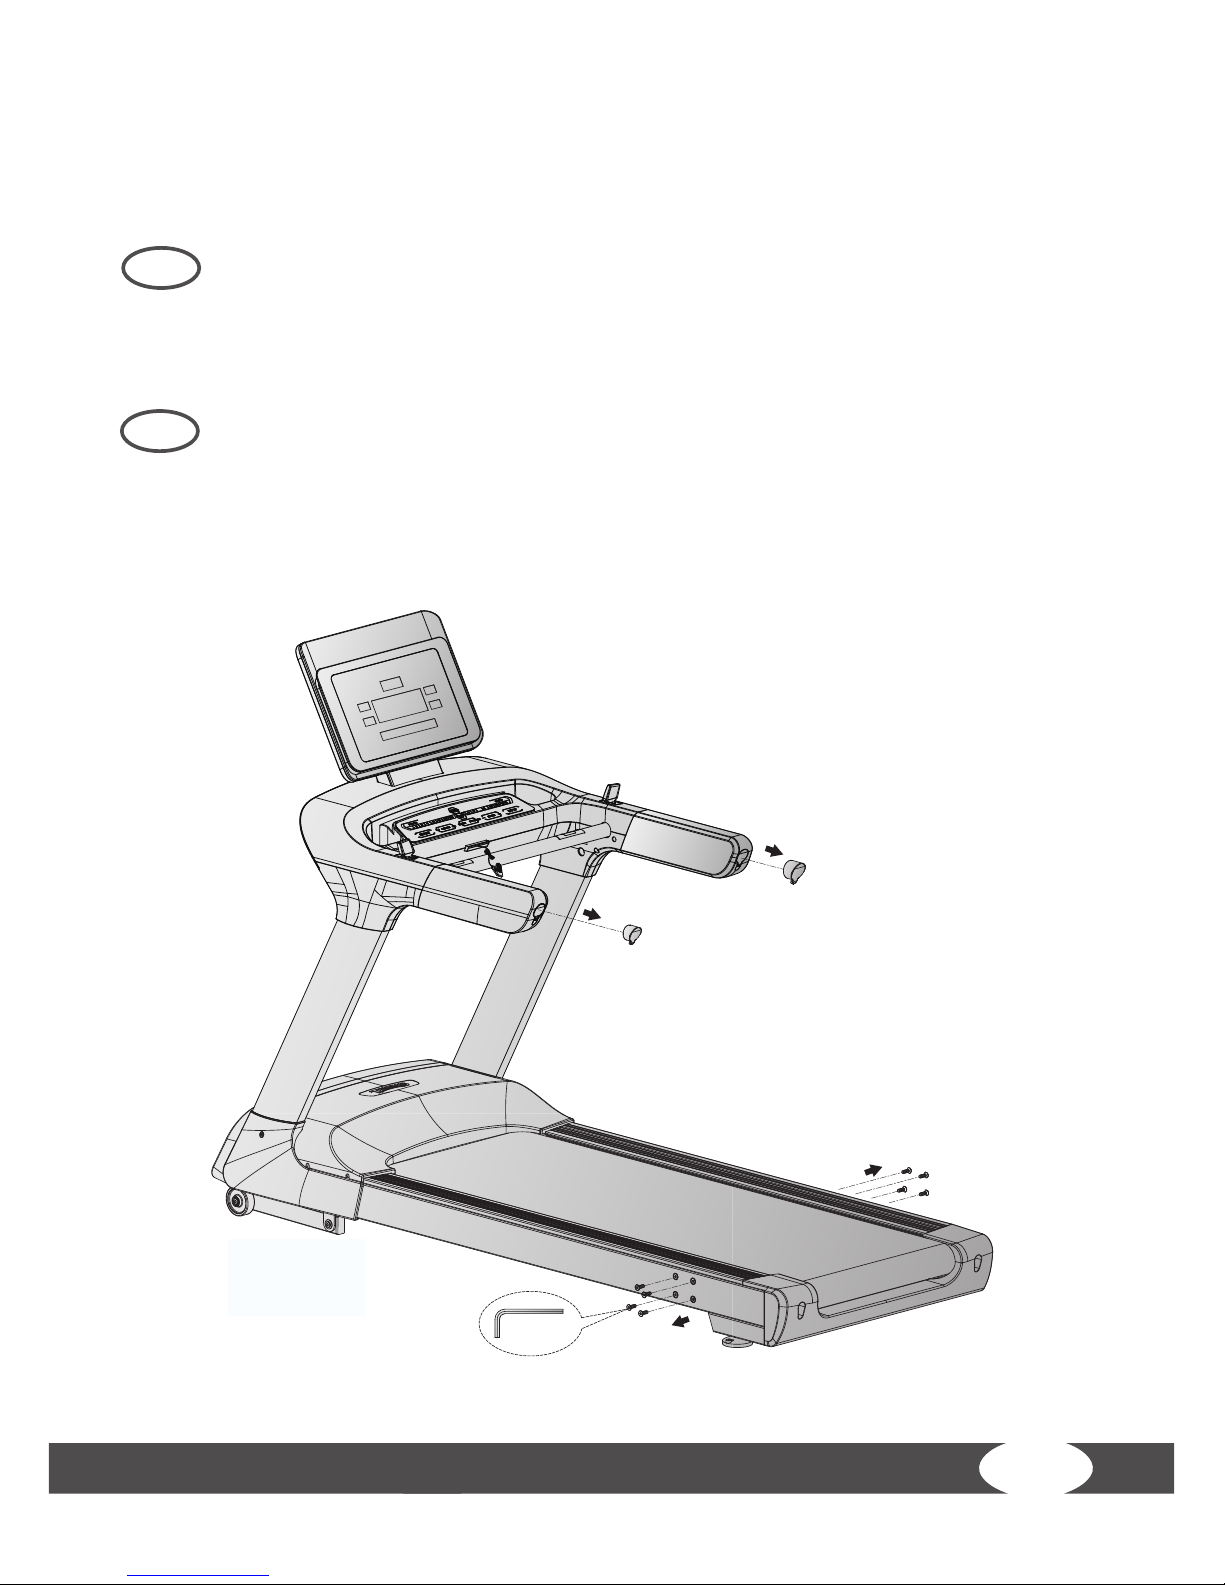
Schritt 1
Entfernen Sie die Endkappen der Handläufe des Laufbands und lösen Sie die acht Schrauben am
Hauptrahmen.
Step 1
Remove the end caps of the handrails and loosen the eight screws on the main frame.
D
GB
Step1
M5
Page 8
8
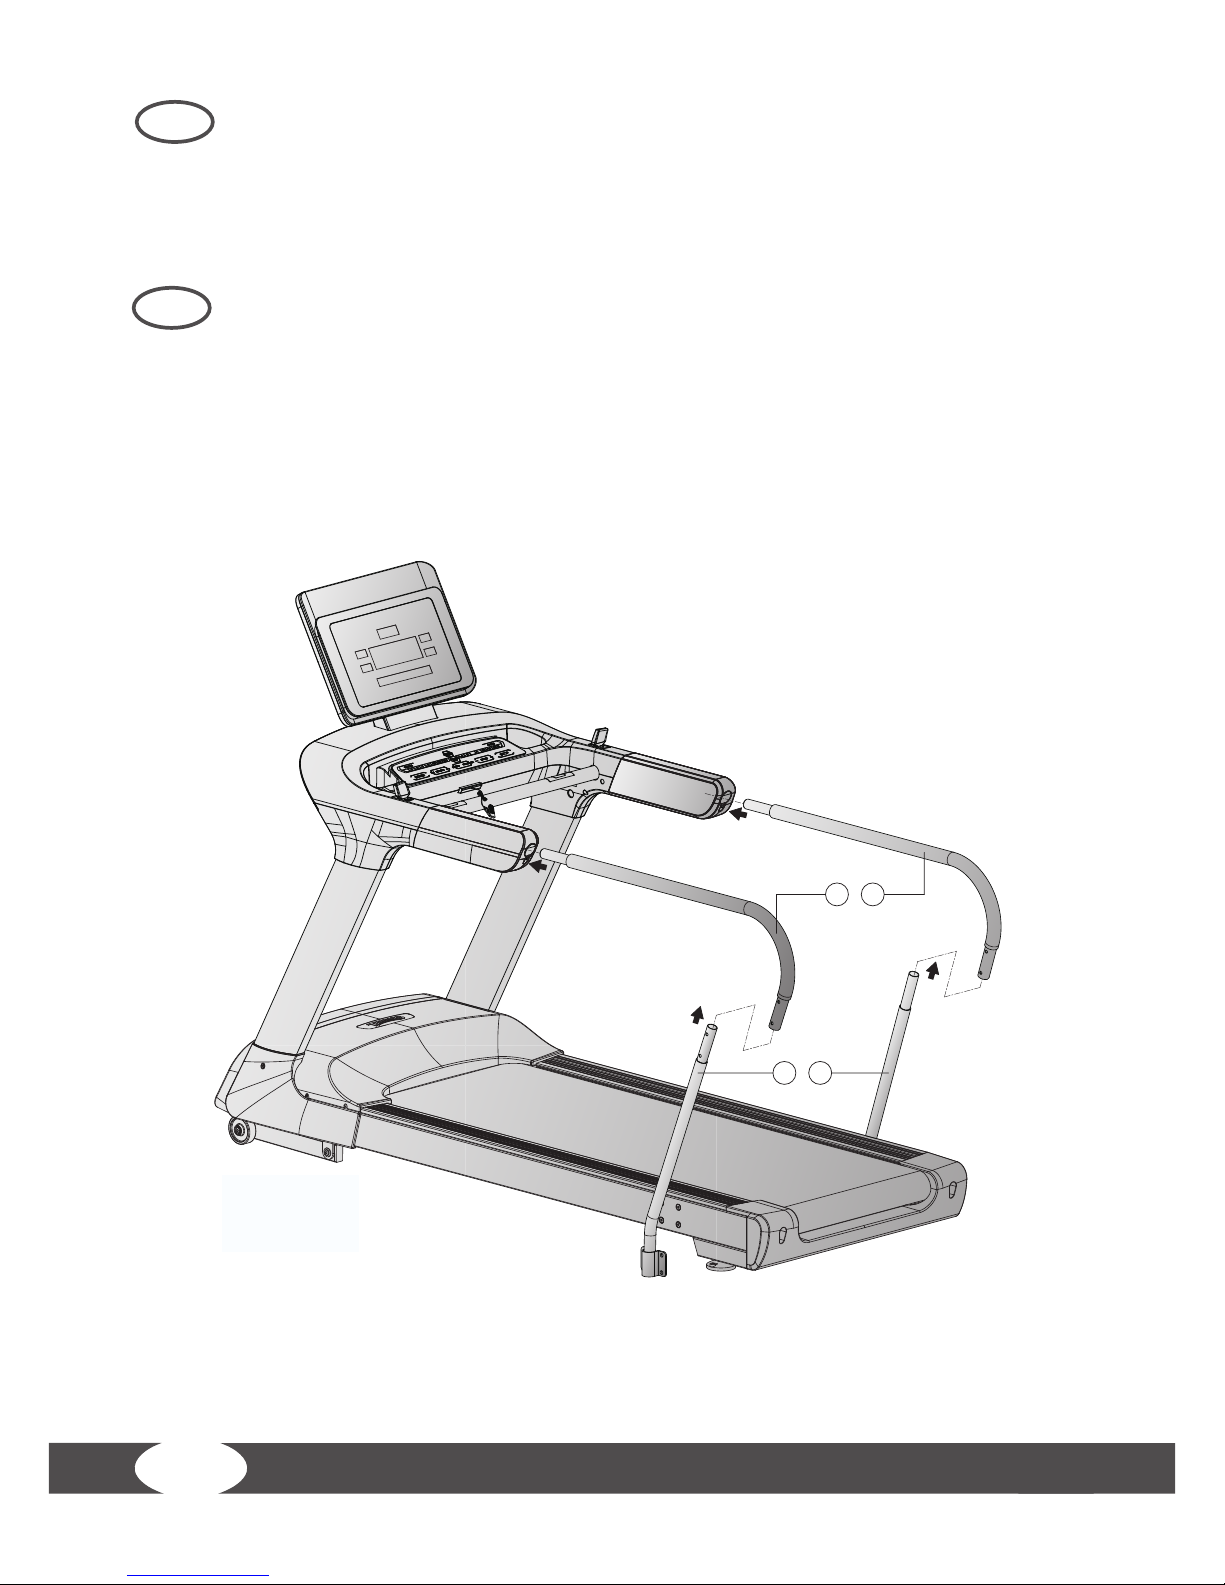
Schritt 2
Stecken Sie die verlängerten Handläufe (1L und 1R) in die entsprechenden Aufnahmen.
Verbinden Sie die verlängerten Handläufe (1L unf 1R) mit ihren entsprechenden Gegenstücken
(2L und 2R).
Step 2
Insert the extended handrails (1L and 1R) into the respective housings.
Connect the extended handrails (1L and 1R) with their resprective counterparts (2L and 2R).
D
GB
Step2
1L 1R
2L 2R
Page 9

9
Schritt 3
Befestigen Sie die verlängerten Handläufe (1L und 1R) an den Enden der Handläufe des
Laufbands mit insgesamt vier Schrauben (3).
Schrauben Sie die verlängerten Handläufe (1L und 1R) und ihre Gegenstücke (2L und 2R) mit
insgesamt vier Schrauben (7) zusammen.
Befestigen Sie die Handläufe (2L und 2R) am Hauptrahmen mit den vier, in Schritt 1 entfernten,
Schrauben.
Befestigen Sie abschließend die beiden Abdeckungen (8) mit insgesamt vier Schrauben (9).
Step 3
Fix the extended handrails (1L and 1R) to the ends of the treadmill‘s handrails with four screws
(3).
Screw the extended handrails (1L and 1 R) and their respective counterparts (2L and 2R)
together with four screws (7).
Fix the external handrails (2L and 2R) to the main frame with the four screws that you have
removed previously in step 1.
Finally attach the two covers (8) with four screws (9).
D
GB
Step3
M5x0.8x10L
x4
M8x1.25x25L
x4
M5
M6
M4
M8x1.25x55L
x4
3
7
9
3
7
8 9
Page 10

10
1.2 Handläufe für das T9.5 Pro
/ Handrails for the T9.5 Pro
Page 11

11
1.2.1 Lieferumfang
/ Package contents
M8x1.25x55L
x4
M8x1.25x25L
x4
M5x0.8x10L
x4
M5
M6
M4
M8x1.25x16L
x4
1L 1R
x1
x1
2L
2R
x1 x1
8
3
x2
7
9
10 11 12
x2 x2 x2
5
x2
4
Page 12

12
1.2.2. Aufbauanleitung
/Assembly instructions
Schritt 1
Entfernen Sie die Endkappen der Handläufe des Laufbands und lösen Sie die acht Schrauben am
Hauptrahmen.
Hinweis: Die hier erwähnten Endkappen weisen im Gegensatz zu den in Schritt 2 zu
verwendenden Endkappen (5) keine Aufnahmen für die verlängerten Handläufe auf.
Step 1
Remove the end caps of the handrails and loosen the eight screws on the main frame.
Note: In contrast to the here mentioned end caps, the end caps (5), which are used in step 2 do
not have a housing.
D
GB
Step1
M5
Page 13

13
Schritt 2
Platzieren Sie die Endkappen (5) an den Enden der Handläufe.
Stecken Sie die verlängerten Handläufe (1L und 1R) in die entsprechenden Aufnahmen.
Verbinden Sie die verlängerten Handläufe (1L unf 1R) mit ihren entsprechenden Gegenstücken
(2L und 2R).
Step 2
Place the end caps (5) at the ends of the treadmill‘s handrails.
Insert the extended handrails (1L and 1R) into the respective housings.
Connect the extended handrails (1L and 1R) with their resprective counterparts (2L and 2R).
D
GB
Step2
5
1L 1R
2L 2R
Page 14

14
Schritt 3
Befestigen Sie die verlängerten Handläufe (1L und 1R) an den Enden der Handläufe des
Laufbands mit insgesamt vier Schrauben (4).
Schrauben Sie die verlängerten Handläufe (1L und 1R) und ihre Gegenstücke (2L und 2R) mit
insgesamt vier Schrauben (7) zusammen.
Befestigen Sie die Handläufe (2L und 2R) am Hauptrahmen mit den vier, in Schritt 1 entfernten,
Schrauben.
Befestigen Sie abschließend die beiden Abdeckungen (8) mit insgesamt vier Schrauben (9).
Step 3
Fix the extended handrails (1L and 1R) to the ends of the treadmill‘s handrails with four screws
(4).
Screw the extended handrails (1L and 1 R) and their respective counterparts (2L and 2R) together
with four screws (7).
Fix the external handrails (2L and 2R) to the main frame with the four screws that you have
removed previously in step 1.
Finally attach the two covers (8) with four screws (9).
D
GB
Step3
7
4
8 9
M5x0.8x10L
x4
M8x1.25x25L
x4
M5
M6
M4
M8x1.25x16L
x4
4
7
9
Page 15

15
2 GARANTIEINFORMATIONEN
Trainingsgeräte von Taurus unterliegen einer strengen Qualitätskontrolle. Sollte ein bei uns gekauftes
Fitnessgerät dennoch nicht einwandfrei funktionieren, bedauern wir dies sehr und bitten Sie, sich
an unseren aufgeführten Kundendienst zu wenden. Gerne stehen wir Ihnen telefonisch über die
Technik-Hotline zur Verfügung.
Fehlerbeschreibungen
Ihr Trainingsgerät wurde so entwickelt, dass es dauerhaft ein hochwertiges Training ermöglicht.
Sollte dennoch ein Problem auftreten, lesen Sie bitte zuerst die Bedienungsanleitung. Zur weiteren
Problemlösung, wenden Sie sich bitte an Sport-Tiedje oder rufen Sie unsere kostenlose ServiceHotline an. Zur schnellstmöglichen Problemlösung beschreiben Sie den Fehler bitte so genau wie
möglich.
Zusätzlich zur gesetzlichen Gewährleistung gewähren wir Ihnen eine Garantie auf alle bei uns
gekauften Fitnessgeräte nach Maßgabe der nachfolgenden Bestimmungen.
Ihre gesetzlichen Rechte werden hierdurch nicht eingeschränkt.
Garantieinhaber
Garantieinhaber ist der Erstkäufer bzw. jede Person, die ein neu gekauftes Produkt von einem
Erstkäufer als Geschenk erhalten hat.
Garantiezeiten
Ab Übergabe des Trainingsgerätes übernehmen wir folgende Garantiezeiten.
Modell Nutzung Vollgarantie
TF-EXT-HR
Heimgebrauch 24 Monate
Semiprof. Nutzung 12 Monate
Professionelle Nutzung 6 Monate
Instandsetzungskosten
Nach unserer Wahl erfolgt entweder eine Reparatur, ein Austausch von beschädigten Einzelteilen
oder ein Komplett-Austausch. Ersatzteile, welche beim Geräteaufbau selbst anzubringen sind, sind
vom Garantienehmer selbst zu tauschen und sind nicht Bestandteil der Instandsetzung. Nach Ablauf
der Garantiezeit für Instandsetzungskosten gilt eine reine Teilegarantie, welche die Reparatur-,
Einbau- und Versandkosten nicht beinhaltet.
Die Benutzungszeiten werden wie folgt deklariert:
• Heimgebrauch: ausschließlich private Nutzung nur im Privathaushalt bis zu
3 Std. täglich
• Semiprofessionelle Nutzung: bis zu 6 Std. täglich
(z.B. Reha, Hotels, Vereine, Firmentness)
• Professionelle Nutzung: mehr als 6 Std. täglich (z.B. Fitnessstudio)
Page 16

16
Garantie-Service
Während der Garantiezeit werden Geräte, die aufgrund von Material- oder Fabrikationsfehlern
Defekte aufweisen, nach unserer Wahl repariert oder ersetzt. Ausgetauschte Geräte oder Teile von
Geräten gehen in unser Eigentum über. Die Garantieleistungen bewirken weder eine Verlängerung
der Garantiezeit, noch setzen sie eine neue Garantie in Gang.
Garantiebedingungen
Zur Geltendmachung der Garantie sind folgende Schritte erforderlich:
Setzen Sie sich bitte per E-Mail oder Telefon mit dem Kundendienst in Verbindung. Falls das Produkt
in der Garantie zwecks Reparatur eingeschickt werden muß, übernimmt der Verkäufer die Kosten.
Nach Ablauf der Garantie trägt der Käufer die Transport- und Versicherungskosten. Wenn der Defekt
im Rahmen unserer Garantieleistung liegt, erhalten Sie ein repariertes oder neues Gerät zurück.
Garantieansprüche sind ausgeschlossen bei Schäden durch:
• missbräuchliche oder unsachgemäße Behandlung
• Umwelteinüsse (Feuchtigkeit, Hitze, Überspannung, Staub etc.)
• Nichtbeachtung der für das Gerät geltenden Sicherheitsvorkehrungen
• Nichtbeachtung der Bedienungsanleitung
• Gewaltanwendung (z. B. Schlag, Stoß, Fall)
• Eingrie, die nicht von der von uns autorisierten Serviceadresse
vorgenommen wurden
• eigenmächtige Reparaturversuche
Kaufbeleg und Seriennummer
Bitte achten Sie darauf, die entsprechende Rechnung im Garantiefall vorlegen zu können. Damit wir
Ihre Modellversion eindeutig identizieren können sowie für unsere Qualitätskontrolle benötigen
wir in jedem Service-Fall die Angabe der Geräte-Seriennummer. Bitte halten Sie die Seriennummer
sowie Kundennummer möglichst schon bei Anruf unserer Service-Hotline bereit. Dies erleichtert
eine zügige Bearbeitung. Falls Sie Probleme haben, die Seriennummer an Ihrem Trainingsgerät zu
nden, stehen Ihnen unsere Service-Mitarbeiter mit weiteren Auskünften bereit.
Service außerhalb der Garantie
Auch in Fällen eines Mangels an Ihrem Trainingsgerät nach Ablauf der Garantie oder in Fällen, welche
nicht in der Gewährleistung eingeschlossen sind, wie z.B. normale Abnutzung stehen wir Ihnen gerne
für ein individuelles Angebot zur Verfügung. Wenden Sie sich bitte an unseren Kundendienst, um
eine schnelle und kostengünstige Problemlösung zu nden. In diesem Fall gehen die Versandkosten
zu Ihren Lasten.
Kommunikation
Viele Probleme können bereits durch ein Gespräch mit uns als Ihrem Fachhändler gelöst werden.
Wir wissen, wie wichtig Ihnen als Nutzer des Trainingsgerätes die schnelle und unkomplizierte
Problembehebung ist, damit Sie ohne große Unterbrechungen mit Freude trainieren können. Darum
sind auch wir an einer schnellen und unbürokratischen Lösung Ihrer Anfrage interessiert. Halten Sie
daher bitte Ihre Kundennummer sowie die Seriennummer des defekten Gerätes bereit.
Page 17
17
2 WARRANTY INFORMATION
Taurus training tness equipment is subject to strict quality controls. However, if a tness equipment
purchased from us does not work perfectly, we take it very seriously and ask you to contact our
customer service as indicated. We are happy to help you by phone via our service hotline.
Error descriptions
Your tness equipment is developed for long-term, high-quality training. However, should a problem
arise, please rst read the operating instructions. For further assistance, please contact your contract
partner or call our service hotline. To ensure your problem is solved as quickly as possible, please
describe the defect as exactly as possible.
In addition to the statutory warranty, we provide a warranty for every tness equipment purchased
from us according to the following provisions.
Your statutory rights are not aected.
Warrantee
The warrantee is the rst/original buyer and/or any person who received a newly purchased product
as a gift from the original buyer.
Warranty periods
The following warranty periods begin on delivery of the tness equipment.
Model Use Full warranty
TF-EXT-HR
Home use 24 months
Semi-professional use 12 months
Professional use 6 months
Repair costs
According to our choice, there will either be a repair, a replacement of individual damaged parts or
a complete replacement. Spare parts, that have to be mounted while assembling the equipment,
have to be replaced by the warrantee personally and are not a part of repair. After the expiration of
the warranty period for repair costs, a pure parts warranty applies, which does not include the repair,
installation and delivery costs.
The terms of use are dened as follows:
• Home use: solely for private use in private households up to 3 hours per day
• Semi-professional use: up to 6 hours per day (e. g. rehabilitation centers, hotels,
clubs, company gyms)
• Professional use: more than 6 hours per day (e. g. commercial gyms)
Page 18

18
Warranty service
Within the warranty period, equipment which develops faults as a result of material or manufacturing
defects, will be repaired or replaced at our discretion. Ownership of equipment or parts of equipment
which have been replaced is transferred to us. The warranty period is not extended nor does a new
warranty period begin following repair or replacement under the warranty.
Warranty conditions
For the warranty to be valid, the following steps must be taken:
Please contact our customer service by email or phone. If the product under warranty has to be sent
in for repair, the seller bears costs. After expiry of the warranty, the buyer bears the costs of transport
and insurance. If the fault is covered by our warranty, you will receive a new or repaired equipment
in return.
Warranty claims are invalid in case of damage resulting from:
• misuse or improper handling
• environmental inuences (moisture, heat, electrical surge, dust, etc.)
• failure to follow the current safety measures for the equipment
• failure to follow the operating instructions
• use of force (e. g. hitting, kicking, falling)
• interventions which were not carried out by one of our authorized service centers
• unauthorized repair attempts
Proof of purchase and serial number
Please make sure that you are able to provide the appropriate receipt when claiming on your
warranty. So that we can clearly identify the model of your equipment, and for the purposes of our
quality control, you will need to give the serial number of your equipment, when contacting the
service team. Where possible please have your serial number and your customer number ready
when you call our service hotline. It will help us to deal with your request swiftly. If you have trouble
nding the serial number on your tness equipment, our service team is at your disposal to oer
further information.
Service outside the warranty period
We are also happy to issue an individual cost estimate if there is a problem with your tness equipment after the warranty has expired, or in cases which do not fall under the terms of the warranty, e.
g. normal wear and tear. Please contact our customer service team to nd a quick and cost-eective
solution to your problem. In such a case you will be responsible for the delivery costs.
Communication
Many problems can be solved just by speaking to us as your contract partner. We know how important it is to you as a user of the tness equipment to have problems solved quickly and simply, so
you can enjoy working out with minimal interruption. For that reason, we also want to resolve your
queries quickly and in a straightforward manner. Thus, please always keep your customer number
and the serial number of the faulty equipment handy.
Page 19

19
3 DISPOSAL
At the end of its operational life, this equipment cannot be disposed of in normal
household waste. Instead, it must be disposed of via an electricals recycling centre.
Further information can be obtained from your local authority‘s recycling service.
The materials can be recycled as per their symbols. Through the reuse, recycling
of materials or other forms of recovery of old equipment, you make an important
contribution to the protection of the environment.
3 ENTSORGUNG
Dieses Gerät darf am Ende seiner Lebensdauer nicht über den normalen
Haushaltsmüll entsorgt werden, sondern muss an einem Sammelpunkt für das
Recycling von elektrischen und elektronischen Geräten abgegeben werden.
Nähere Informationen erhalten Sie bei der zuständigen Entsorgungsstelle Ihrer
Gemeindeverwaltung.
Die Werkstoe sind gemäß ihrer Kennzeichnung wiederverwertbar. Mit der Wiederverwendung,
der stoichen Verwertung oder anderen Formen der Verwertung von Altgeräten leisten Sie einen
wichtigen Beitrag zum Schutze der Umwelt.
D
GB
Page 20

20
4 ERSATZTEILBESTELLUNG
4.1 Service-Hotline
Um Ihnen den bestmöglichen Service gewährleisten zu könnnen, halten Sie bitte Modellbezeichnung,
Artikel-Nummer, Explosionsbezeichnung und Teileliste bereit.
SERVICE-HOTLINE
4.2 Seriennummer und Modellbezeichnung
Machen Sie die Seriennummer Ihres Gerätes auf dem weißen Aufkleber ausndig und tragen Sie sie in
das entsprechende Feld ein.
Seriennummer:
Marke / Kategorie: Modellbezeichnung:
Taurus / Handläufe TF-EXT-HR
+31 172 619961
info@tshop.nl
Ma. - Do. 9:00 - 17:00
Vr. 9:00 - 21:00
Za. 10:00 - 17:00
+33 (0) 172 770033
+49 4621 4210-933
service-france@sport-tiedje.fr
Lun. - Ven. 8:00 - 18:00
Sam. 9:00 - 18:00
80 90 16 50
+49 4621 4210-945
info@t-tness.dk
Ma. - Fr. 8:00 - 18:00
Lø. 9:00 - 18:00
+44 141 876 3972
orders@powerhousetness.co.uk
Mon. - Fri. 9:00 - 17:00
+49 4621 4210-0
service-int@sport-tiedje.de
Mon - Fri 8:00 - 18:00
Sat 9:00 - 18:00
+49 4621 4210-0
+49 4621 4210-699
service@sport-tiedje.de
Mo. - Fr. 8:00 - 18:00
Sa. 9:00 - 18:00
DE
NL
DK
UK
FR
INT
D
Page 21

21
4 ORDERING SPARE PARTS
2.1 Service hotline
So that we can give you the best possible service, please have your model name, part number, exploded
drawing and parts list ready.
Service hotline
4.2 Serial number and model name
Find the serial number on the white sticker and enter it in the appropriate space.
Serial number:
Brand / category: Model name:
Taurus / Hand rails TF-EXT-HR
+31 172 619961
info@tshop.nl
Ma. - Do. 9:00 - 17:00
Vr. 9:00 - 21:00
Za. 10:00 - 17:00
+33 (0) 172 770033
+49 4621 4210-933
service-france@sport-tiedje.fr
Lun. - Ven. 8:00 - 18:00
Sam. 9:00 - 18:00
80 90 16 50
+49 4621 4210-945
info@t-tness.dk
Ma. - Fr. 8:00 - 18:00
Lø. 9:00 - 18:00
+44 141 876 3972
orders@powerhousetness.co.uk
Mon. - Fri. 9:00 - 17:00
+49 4621 4210-0
service-int@sport-tiedje.de
Mon - Fri 8:00 - 18:00
Sat 9:00 - 18:00
+49 4621 4210-0
+49 4621 4210-699
service@sport-tiedje.de
Mo. - Fr. 8:00 - 18:00
Sa. 9:00 - 18:00
DE
NL
DK
UK
FR
INT
GB
Page 22

22
4.3 Teileliste
/ Parts list
Nr. Bezeichnung (ENG) Hrst. Teilenummer Spezikation Anz.
No. Description Parts number (Supplier) Specication Qty.
1L Left extended handrail 26401-6-1511-J0 D31.8*1.8T*943L 1
1R Right extended handrail 26401-6-1521-J0 D31.8*1.8T*943L 1
2L Left handrail support tube 26401-3-1550-J0 1
2R Right handrail support tube 26401-3-1560-J0 1
3 Inner hex screw 54008-5-0055-F4 M8*1.25*55L 4
4 Inner hex screw 54008-5-0016-F0 M8*1.25*16L 4
5 Oval end cap of handlebar (with
hole)
26401-6-1588-B0 86*46*40 2
6 Foam 58015-6-1383-B0 D30*3T*1050L,w/o hole 2
7 Flat end fastening hex screw 54108-2-0025-F0 M8*1.25*25L 4
8 Lower protective cover 81000-6-2481-B0 100*81*40.8 2
9 Roundhead cross screw 50805-2-0010-F0 M5x0.8x10L 4
10 Inner hex spanner (M4) 58030-6-1047-D0 M4*68L*13 1
11 Inner hex spanner (M5) 58030-6-1001-N1 M5 1
12 Inner hex cross spanner (M6) 58030-6-1051-N0 M6*130L 1
Page 23

23
7
1L
2L
6
3
8
9
2R
1R
4.4 Explosionszeichnung /
Exploded drawing
T9.9 Pro & T10.3 Pro
Page 24

24
7
1L
2L
6
4
5
8
9
2R
1R
T9.5 Pro
Page 25

25
KONTAKT
Firmenhauptsitz
Sport-Tiedje GmbH
Flensburger Str. 55
24837 Schleswig
Technik-Hotline
HAFTUNGSAUSSCHLUSS
©2011 TAURUS ist eine eingetragene Marke der Firma Sport-Tiedje GmbH. Alle Rechte
vorbehalten. Jegliche Verwendung dieser Marke ohne die ausdrückliche schriftliche
Genehmigung von Sport-Tiedje ist untersagt.
Produkt und Handbuch können geändert werden. Die technischen Daten können ohne
Vorankündigung geändert werden.
Auf dieser Webseite nden Sie eine detaillierte Übersicht inkl. Anschrift und Önungszeiten für alle Fitness
Fachmärkte der Sport-Tiedje Group im In- sowie im Ausland.
www.sport-tiedje.com/filialen
+31 172 619961
info@tshop.nl
+33 (0) 172 770033
+49 4621 4210-933
service-france@sport-tiedje.fr
80 90 16 50
+49 4621 4210-945
info@t-tness.dk
+44 141 876 3986
support@powerhousetness.co.uk
+49 4621 4210-0
service-int@sport-tiedje.de
www.sport-tiedje.com
www.taurus-tness.de
+49 4621 4210-0
+49 4621 4210-698
technik@sport-tiedje.de
DE
NL
DK
UK
FR
INT
Page 26

26
CONTACT
Company head oce
Sport-Tiedje GmbH
Flensburger Str. 55
24837 Schleswig
Germany
Hotline for Technical Information
DISCLAIMER
©2011 TAURUS is a registered brand of the company Sport-Tiedje GmbH. All rights
reserved. Any use of this trademark without the explicit written permission of SportTiedje is prohibited.
Product and instructions are subject to change. Technical data can be changed without
advance notice.
Please nd a detailed overview including address and opening hours for all specialist tness stores of the
Sport-Tiedje Group in Germany and abroad on the following website.
www.sport-tiedje.com/en/stores
+31 172 619961
info@tshop.nl
+33 (0) 172 770033
+49 4621 4210-933
service-france@sport-tiedje.fr
80 90 16 50
+49 4621 4210-945
info@t-tness.dk
+44 141 876 3986
support@powerhousetness.co.uk
+49 4621 4210-0
service-int@sport-tiedje.de
www.sport-tiedje.com
www.taurus-tness.de
+49 4621 4210-0
+49 4621 4210-698
technik@sport-tiedje.de
DE
NL
DK
UK
FR
INT
Page 27

27
Page 28

Hand Rails T9.5, T9.9 & T10.3 Handläufe
 Loading...