

Page 1

PROCESSADOR MAXIM
10 in
complies with
INTERNATIONAL
IEC60335
SAFETY SPECIFICATIONS
PLEASE READ ALL INSTRUCTIONS BEFORE USE
1100W
Model:
913110
ENGLISH / AFRIKAANS
STAINLESS
STEEL
1
Page 2

ENGLISH MANUAL
Dear customer,
Many thanks for choosing to purchase a
TAURUS brand product.
Thanks to its technology, design and operation
and the fact that it exceeds the strictest quality
standards, a fully satisfactory use and long
product life can be assured.
11
6
5
10
19
21
18
209
8
3
7
15
2
4
1
1. Motor unit
2. Power shaft
3. Food processing bowl
4. Shredding and slicing blades
5. Food processing lid
6. Pusher assembly
7. Juicing attachment
Read this user manual carefully before you use the
appliance and save it for future reference.
Important Safety Instructions:
When using electrical appliances, basic safety precautions should always be followed. Please read the
following safety instructions and keep this instruction
manual for future reference.
• Read all these instructions before use.
• Do not immerse the appliance its power cord or
8. Transparent pulp collector
9. Filter
10. Juice extractor lid
11. Fruit pusher
12. Citrus press
13. Cone
14. Mixing accessory
17
13
16
12
14
15. Blade assembly
16. Blender/chopper blade assembly
17. Blender jug
18. Blender lid
19. Measuring cup/ quick access lid
20. Chopping cup
21. Chopper lid
plug in water or any other liquid. Do not place the
appliance or its power cord under running water.
• This appliance is intended for use by adults only.
• Children should be supervised at all times to ensure they do not play with this appliance.
• Always remove the plug from the wall socket when
the appliance is not in use. Allow the appliance
to cool down completely before undertaking any
cleaning task. Before attaching or detaching accessories ensure that the appliance is switched off.
Page 3

• Do not operate this appliance with a damaged
power cord or plug. If the appliance is damaged in
any manner discontinue use immediately and return the appliance to the nearest authorised service
centre for repair.
• The use of accessories or attachments not recommended by the manufacturer may cause injuries
and damage to the appliance.
• Do not use this appliance outdoors.
• Do not let the power cord hang over the edge of a
table or let it touch any hot surfaces.
• Do not place this appliance on or near any heat
source, eg. an electric burner or in a heated oven.
• To disconnect, turn the speed selection dial to the
“OFF” position, switch it off at the wall socket and
then remove the plug.
• Oversized foods and metal utensils must not be in-
serted into the appliance as they may cause a re
or injury.
• A re may occur if the appliance is covered or if it
is touching any ammable material, eg. curtains or
drapes while it is in operation.
• Do not clean this appliance with any abrasive materials.
• Do not store any items in this appliance even when
it is not in use.
• Do not put your hands inside the blender jug when
the appliance is connected to the wall socket and
when the blender jug is seated on the base.
• Always be careful when cleaning the blades as
they are sharp, always exercise extreme caution.
• Do not operate the appliance for longer than 2 minutes at a time.
• If the appliance becomes hot during use, switch the
appliance off and then disconnect it from the wall
socket and allow it to cool down, before using it
again.
• This appliance is not intended for use by persons
(including children) with reduced physical, sensory
or mental capabilities, or lack of experience and
knowledge, unless they have been given supervision or instruction concerning use of the appliance
by a person responsible for their safety.
• Check if the voltage indicated on the rating label
corresponds to the mains voltage before you connect the appliance to a wall socket.
• The use of timers, plug adaptors and extension
leads is not advised.
• Never leave the appliance unattended while it is
switched on.
• Never use your ngers or an object (e.g. a spatula)
to push ingredients down the feeding tube while
the appliance is running. Only use the pusher for
this purpose.
• Be very careful when you handle the slicing discs,
blender blade unit or food processor blade unit. Be
especially careful when you remove them from the
food processor bowl or blender jar and when you
clean them as they are very sharp.
• This appliance is intended for household use only.
Before rst use:
• Clean all the parts of the food processor that will
come into contact with food.
• Fully unwrap the power cord from the power cord
storage before use.
Caution
• Never switch off the appliance by turning the blender jar, the food processor bowl or the juicer bowl
(the product would be switched off as the safety
switch will be disengaged). Always switch off the
appliance by turning the speed selection dial to the
“OFF” position.
• Switch off the appliance before you attach or detach any of the accessories.
• Unplug the appliance immediately after use.
• Always unplug the appliance before you reach into
the blender jar or food processor bowl with your
ngers or an object (e.g. a spatula).
• Wait until all the moving parts have stopped before
you remove the lid of the bowl, juicer, chopper or
blender.
• Do not exceed the maximum level indicated on the
food processor bowl or the blender jar.
• Do not use the processor if the motor body or any
of the attachments are damaged. Take the appliance or attachment to your nearest authorized service centre for repair.
• Consult this user manual for the correct quantities
and processing times.
• Thoroughly clean the parts that come into contact
with food before you use the appliance for the rst
time.
• Let hot ingredients cool down before you process
them (max. temperature 80°C/175°F).
Built-in safety lock
This feature ensures that you can only switch on the
appliance if you have assembled the blender jar with
blade unit, the food processor bowl, the juicer bowl
with coupling unit or the citrus press correctly on the
motor unit. If the blender jar with blade unit, the food
processor bowl, the juicer bowl with coupling unit or
the citrus press is assembled correctly, i.e. when it
has been turned in the direction of the ‘locked’ symbol as far as possible and a ‘click’ is heard, the built-in
safety lock will be unlocked.
Please ensure that the unit is assembled properly
for whichever attachment you are using. If the unit is
not assembled properly it will not switch on.
Please follow the below assembly instructions explicitly in order for the appliances’ safety lock to be disabled and for the machine to work properly.
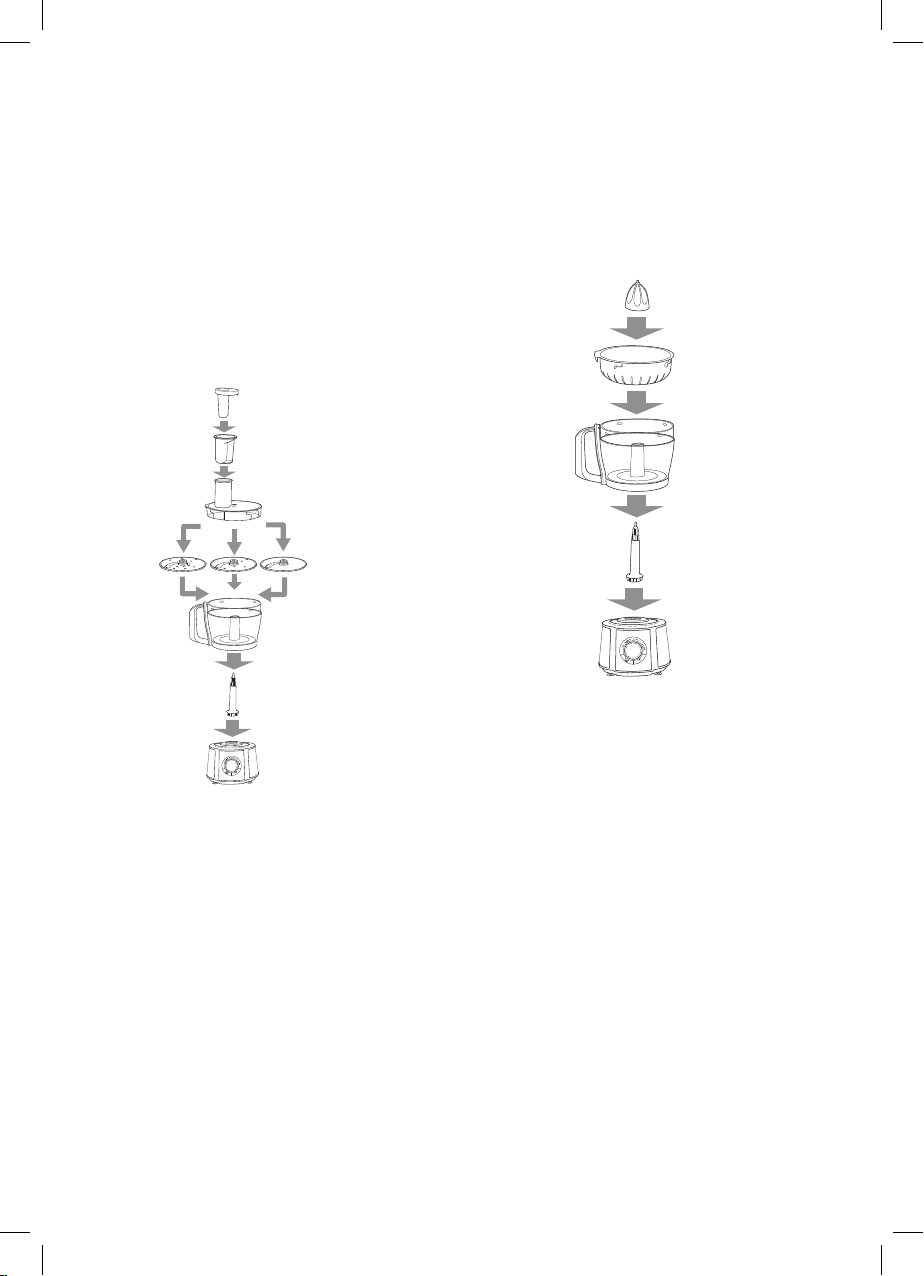
Food Processor Attachment:
• Attach the power shaft by inserting its base into
the motor unit.
• Place the food processing bowl onto the unit,
over the power shaft. Position the bowl with the
handle at the “2 o’clock” position and then turn
it clockwise until it rmly clicks into place. The
Page 4

safety switch is now engaged. The bowl handle
should be in the “3 o’clock” position.
• Then place the blade assembly on the centre shaft
ensuring the blade unit engages and that it is tted
securely. Place the lid over the bowl with the feeding tube in the “2 o’clock” position and turn clock-
wise until the lid clicks rmly into place. The feeder
tube should now also be at the “3 o’clock” position
which means the safety switch is engaged.
NOTE: ONLY USE THE PUSHER PROVIDED TO
PUSH FOOD INTO THE PROCESSING BOWL. NEVER USE ANY OTHER UTENSILS OR OBJECTS.
Blade - Tips and Warnings
• Do not let the appliance run for too long when you
are chopping hard foodstuffs such as hard cheese
or chocolate as these ingredients might become
too hot and start to melt.
• Always put the food processor blade unit in the
food processor bowl before you add the ingredients.
• Do not use the food processor blade to chop very
hard ingredients such as coffee beans, nutmeg,
turmeric and ice cubes, as this may cause the
blade unit to become blunt or may damage it.
• Do not ll the bowl beyond the “MAX” indication.
• The standard processing time for chopping is 3060 seconds.
• If you chop onions, press the pulse button a few
times to prevent the onions from becoming too
nely chopped.
• If food sticks to the blade unit or to the inside of the
food processor bowl:
• Switch off the appliance both on the appliance and
at the wall socket.
• Remove the lid from the food processor bowl.
• Remove the ingredients from the blade unit or from
the wall of the bowl with a spatula.
• Exercise extreme caution when dealing with the
blade as it is very sharp, take care not to run your
nger along the sharp blade.
4Mixing Attachment:
• Attach the power shaft by inserting its base
into the motor unit.
• Place the food processing bowl onto the unit,
over the power shaft. Position the bowl with the
handle at the “2 o’clock” position and then turn
it clockwise until it rmly clicks into place. The
safety switch is now engaged. The bowl handle
should be in the “3 o’clock” position.
• Then place the mixing accessory on the centre
shaft ensuring the blade unit engages and that it
is tted securely. Place the lid over the bowl with
the feeding tube in the “2 o’clock” position and
turn clockwise until the lid clicks rmly into place.
The feeder tube should now also be at the “3
o’clock” position which means the safety switch
is engaged.
Mixing Tips and Warnings
• Always put the mixing accessory in the food processor bowl before you add the ingredients.
• The standard processing time for all mixing jobs is
30-120 seconds.
Slicing/Shredding Discs
• Attach the power shaft by inserting its base into the
motor unit.
• Place the food processing bowl onto the unit,
over the power shaft. Position the bowl with the
handle at the “2 o’clock” position and then turn it
clockwise until it rmly clicks into place. The safety
switch is now engaged. The bowl handle should
be in the “3 o’clock” position.
• Then place the desired blade on the centre shaft
ensuring it is blade engages with the Power shaft,
and that is it tted securely. Remember that each
disc can be used on both sides, one side for slicing
and the other for shredding.
• Place the lid over the bowl with the feeding tube in
the “2 o’clock” position and turn clockwise until the
lid clicks rmly into place. The feeder tube should
now also be at the “3 o’clock” position which
means the safety switch is engaged.
• Do not exert too much pressure on the pusher
when you press ingredients down the feeding tube.
• Do not let the appliance run for too long when
you are shredding (hard) cheese. Otherwise the
cheese becomes too hot and starts to melt and
turns lumpy.
• Do not use the shredding disc to shred chocolate.
Only use the food processor blade unit for this purpose.
• Do not ll the bowl beyond the “MAX” indication.
• Precut large ingredients to make them t into the
Page 5
feeding tube easier.
• Fill the feeding tube evenly for the best results.
• When you shred or grate soft ingredients, use a low
speed to prevent the ingredients from turning into
a puree.
• If the ingredients you are going to shred or slice
have a small diameter, put the outer pusher in the
feeding tube to make the feeding tube smaller.
Then use the inner pusher to push the ingredients
down the feeding tube.
• When you have to process a large amount of ingredients, process small batches and empty the
bowl between batches.
Slicing/Shredding Disc - Tips and Warnings
• Do not touch the cutting edge.
• Do not ll the bowl beyond the “MAX” indication.
• Press the citrus fruit onto the cone.
• Take care not to press your hand directly onto the
cone as the motor is powerful and it may cause
injury.
Note: stop pressing from time to time to remove the
pulp from the sieve. When you have nished pressing or when you want to remove the pulp, switch off
the appliance (both on the appliance and at the wall
socket) and remove the bowl from the appliance.
Citrus Press
• Attach the power shaft by inserting its base into the
motor unit.
• Place the food processing bowl onto the unit, over
the power shaft. Position the bowl with the handle
at the “2 o’clock” position and then turn it clockwise
until it rmly clicks into place. The safety switch is
now engaged. The bowl handle should be in the “3
o’clock” position.
• Then place the citrus press on the centre shaft ensuring the blade engages with the power shaft, and
that it is tted securely. There is a plastic lip on the
one side of the citrus press, this should be placed
to the left of the bowl handle. The press should
then be rotated clockwise until it engages with the
safety lock of the handle.
• Place the cone over the centre of the sieve ensur-
ing the gears engage and the cone ts securely.
• Do not ll the bowl beyond the “MAX” indication.
• Set the speed selection dial to the “MIN” speed setting.
Juice Extractor
• Attach the base of the juicing attachment on top
of the motor housing with the juice spout at the
“12 o’clock” position. Rotate clockwise until the 3
o’clock position when you will hear a “click” as the
safety lock engages. The locking arms will now be
at the “12 o’clock” and “6 o’clock” positions
• Place the transparent pulp collector on the base of
the juicing unit ensuring that it ts securely.
• Then place the lter in the centre of the pulp collector ensuring it ts securely and the gears engage
properly. There will be a small gap between the l-
ter and the centre plastic of the pulp collector.
• Then place the lid of the juice extractor attachment
on top of the pulp collector. Ensure that the “handles” for the locking mechanism are placed in the
appropriate grooves on the pulp container so that
the safety lock can engage once the lid is locked
onto the pulp collector.
• Lift the locking arms of the juice extractor base and
place them over the “handles” of the lid. Then push
the base of the locking arm inwards towards the
juice extractor, there will be a“click” as they lock
into place, do this on both sides locking both arms.
Plug the appliance into a wall socket and place
the prepared ingredients for juicing into the feeder
tube. Switch the speed selection dial to “MIN” and
Page 6
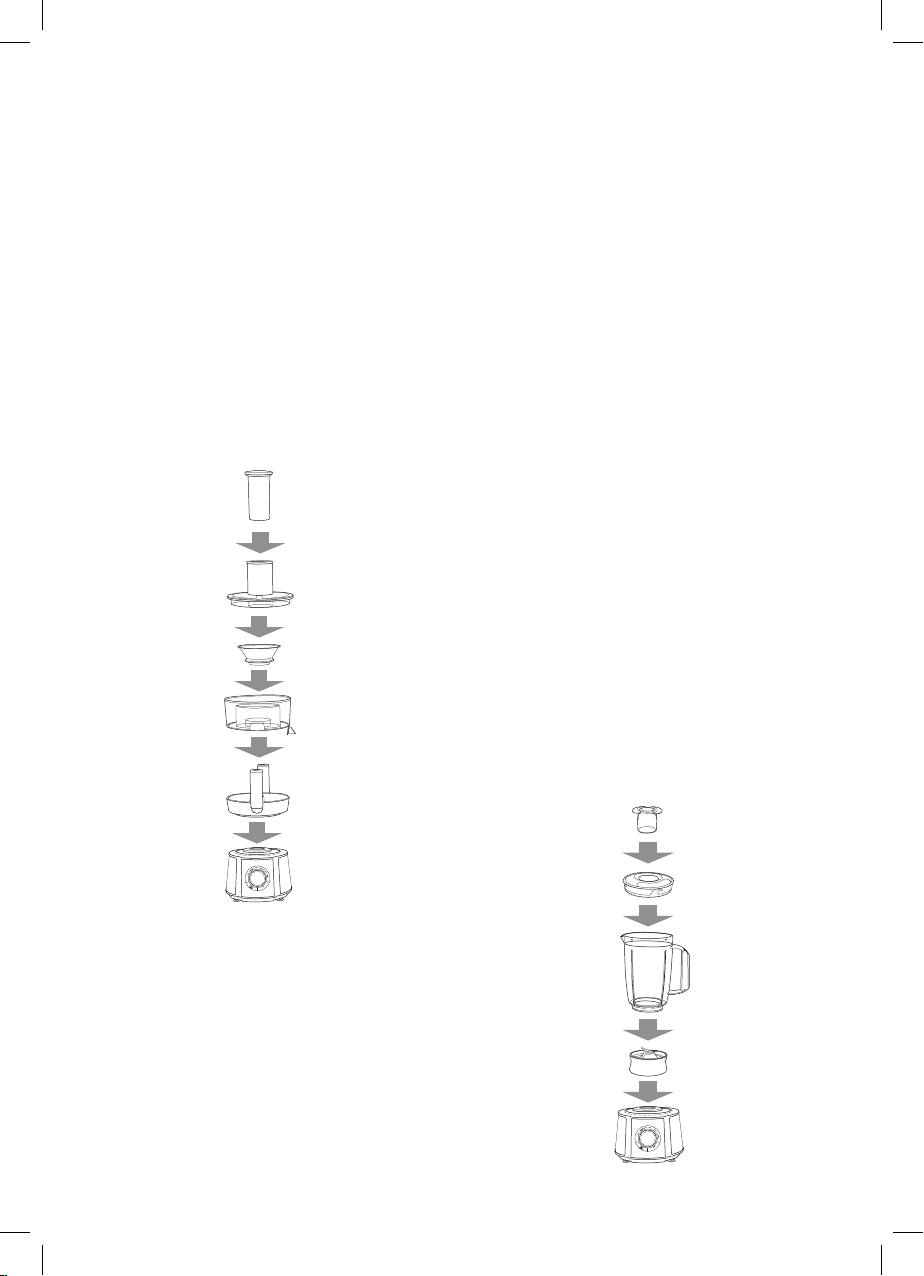
use the food pusher provided to push the ingredi-
ents down towards the lter.
• Never insert your hand or another object (e.g. a
fork, knife, spoon or spatula) into the feeding tube.
Only use the pusher supplied with the appliance
for this purpose. Wait until the lter has completely
stopped rotating before you remove the lid.
• If for some reason the appliance is on but the motor does not rotate it means that the safety lock is
not engaged. Please ensure that all the parts are
tted securely and properly. Ensure the safety lock
is engaged with the motor housing.
Tips for Juicing
• The standard processing time for juicing is 30-90
seconds.
• Peel citrus fruits, pineapples, melons, etc. before
you juice them.
• Remove the pips of cherries, plums, apricots,
peaches, etc. before you juice them.
blend. Place the lid on top of the jar ensuring that
the spaces on the rim of the lid are aligned with the
ridges inside the blender jug. Twist the lid clockwise until the lid is locked in place.
• To add liquid ingredients during processing, remove the measuring cup and pour ingredients into
the blender jar through the hole in the lid.
Tips for blending
• Precut solid ingredients into smaller pieces before
you process them.
• If you want to prepare a large quantity, process
small batches of ingredients instead of a large
quantity at once.
• When you process a liquid that is hot or tends to
foam (e.g. milk), do not put more than 1 litre in the
blender jar to avoid spillage.
• If you are not satised with the result, switch off the
appliance and stir the ingredients with a spatula.
Remove some of the contents to process a smaller
quantity or add some liquid.
• If the blender is not blending hard fruit or other
ingredients to the desired consistency then chop
the contents into smaller pieces or add additional
liquid.
• If the ingredients stick to the wall of the blender jar:
•Switch off the appliance and unplug it.
•Remove the lid and use a spatula to remove the
ingredients from the wall of the jar.
•Keep the spatula at a safe distance of approx. 2cm
from the blades.
•Never open the lid when the blade is still rotating.
• Never put any utensils (ie. a spatula) or other instruments into the blender to loosen foodstuffs
while the blades are rotating or while the unit
is switched on.
• Always let the appliance cool down to room temperature after you have processed two batches.
Blender
• The blender and chopper share the same blade
assembly attachment. Ensure that the sealing ring
(a small rubber seal at the base of the blade unit)
is already tted to the blade assembly before the
jug is tted to it.
• Attach the blade assembly to the blender attachment by screwing the jug in a clockwise direction
onto the blade assembly.
• Place the blender on the motor housing with the
handle at the “12 o’clock” position and rotate it
clockwise until the handle is at the “3 o’clock” position and the safety lock is engaged.
• Remove the lid and add the ingredients you wish to
Page 7
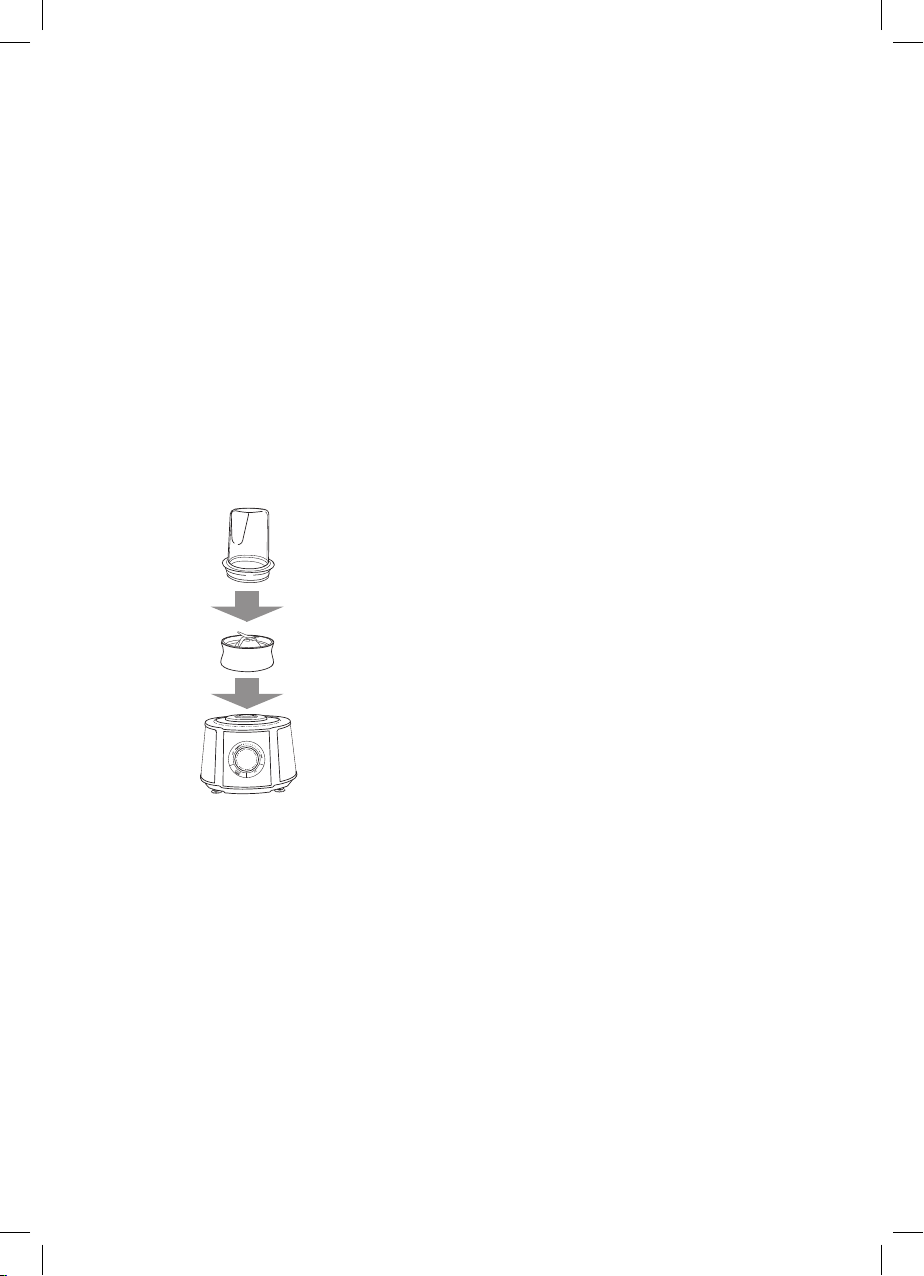
Chopper Attachment
• Place the ingredients to be chopped into the chopping cup while it is upside down.
• Place the blade unit over the top of the chopping
cup with the blades facing downwards and rotate
the blade assembly clockwise.
• Turn the chopper right side up with the blade unit
at the bottom.
• Place the chopper on the motor housing with the
indentation in the plastic of the chopping cup at the
“11 o’clock” position and rotate in clockwise until it
is in the “2 o’clock” position.
• Use the speed selection dial to select the appropriate speed for chopping.
• When removing the chopper from the motor housing take care not to twist the chopper off the blade
unit. Rather twist the chopper at the blade unit in
order to avoid the contents from spilling.
• Turn the chopper upside down and remove the
blade unit.
• If you would like to keep the contents in the chopper use the lid provided. Screw this onto the chopper as you did the blade unit.
Other Functions:
Pulse Function
• This unit has a Pulse function. This can be used
when you want complete control of chopping/
blending.
• The blades will rotate at maximum power only while
you are holding the “Pulse” button.
• Ensure the speed selection dial is in the “ON” position when using the pulse function.
• Avoid holding the button continuously for more
than 15 seconds at a time.
• This function is specically for the blender,
chopper and food processor attachments and
should not be used for the juice extractor or
citrus juicer attachment.
Ice Crush Function
• The “ICE” function can be used only when using
the blender attachment.
• This will rotate the blades for a preset time with brief
intervals when the button is pressed.
• This will happen continuously until the button is
pressed again to switch off this function.
• The speed selection dial must be in the “ON” position.
• Always remember to press the “ICE” button again
when the ice has reached the desired consistency
in order to disable this function and avoid injury.
• Switch the appliance off both on the appliance
body and at the wall socket before attempting to
remove the jug from the motor body.
• Never use utensils or your hands to loosen the ice
while the jug is still attached to the motor housing.
• Never touch the blades with your hands as they are
very sharp.
Cleaning
• Always unplug the appliance from the power wall
socket before you remove accessories or clean the
motor unit.
• You are able to quickly and easily preclean the food
processor bowl and blender jar with the pulse button. Simply add some water and washing-up liquid
to the dirty bowl or jar and secure the lid. Then use
the pulse button until the bowl or jar is clean. When
you preclean the food processor bowl in this way,
make sure the food processor blade is assembled
in the bowl.
• Once you have pre-cleaned you may use warm
soapy water to clean all the attachments.
• Always exercise extreme caution when washing
the blades/blade assembly. Never run your hand
or ngers along the blades.
• To clean the appliance body, use a damp cloth to
wipe it and dry thoroughly.
• Never submerge the motor unit and cord in water
or any other liquid, and never place them under
running water.
Recycling
Do not throw the appliance away with normal
household waste at the end of its life. Rather hand it in
at an ofcial collection point for recycling. By
doing this, you help to preserve the environment.
Page 8

Page 9

Thank you for purchasing a Taurus product. Taurus guarantees that your
product has been thoroughly inspected and tested before being dispatched
and is free from mechanical and electrical defects and complies with the applicable safety standards. With every Taurus product purchased you get a 2 year
warranty as detailed in the terms and conditions below.
First Year – 1 Year Retail Warranty:
Should defects due to faulty parts or workmanship
develop, under normal domestic use, within 12
months from the original date of purchase please
return the product to the store from where it was
purchased for a refund or replacement.
Second Year – 1 Year Extended Warranty
Taurus takes pride in their product quality and
therefore offer an extended 12 month warranty
over and above the 1 Year Retail Warranty. Should
defects due to faulty material or workmanship
develop, under normal domestic use, after the 12
month period and within 24 months from the original date of purchase, please return the product
postage pre-paid to Taurus for repair. Taurus will repair the product free of charge and return it to you
directly. Taurus will replace a product with a similar
product in the same or better condition, if the
repair cannot be conducted for whatever reason.
NB: The 1 Year Extended Warranty is only valid
for customers who have registered their warranty
online at www.taurusappliances.co.za within the
rst year after making their purchase. See overleaf
for details and instructions.
Before returning your product, check the
following:
• Your household mains supply socket is in good
condition, working and switched on.
• The mains supply circuit is not overloaded (White
trip switch on your DB board is off).
• You have read the trouble shooting guide in your
Instructions for Use.
• All accessories and parts are present.
The following conditions apply:
1. Please ensure you retain your receipt as this must be
presented when making a claim under the terms of the
guarantee. It is impossible to determine the guarantee
period without proof of purchase, so please keep this in
a safe place. (NB. Your guarantee can be scanned onto
the Taurus web site for safe storage – see reverse side
for details.)
2. If a refund or exchange is required the product must
be complete with all accessories, parts and packaging.
Missing parts will render the guarantee void.
3. Upon receipt of your appliance, check it for any trans-
port damage to ensure it is safe for use. Return it to the
store as soon as possible for exchange if damaged.
The guarantee is void if products are damaged after
use, so please do not use the damaged product.
4. Your product is designed for normal domestic household use. Failure to read and comply with the instructions for use, cleaning and maintenance will render
your guarantee void, so please read these instructions
carefully to ensure your safety, and to get the most
effective use from the product. (e.g. not removing lime
scale; water deposits; insect infestation, and/or burnt
products)
5. Any abuse, negligent, improper or accidental use
or care will render the guarantee void and Creative
Housewares (Pty) Ltd will not be liable for any loss or
damage.
6. Any attempted repair, or replacement of unauthorised
parts will render the guarantee void, so please contact
an authorised service centre or service agent for any
service or repair requirements.
7. NB: The guarantee on replaced products will be from
the original date of purchase and not from when the
date replacement was made.
8. All repairs carry a 3 month guarantee even if this falls
outside of the 2 year guarantee period.
9. Taurus will attempt to conduct repairs within reasonable
time in line with industry standards but cannot be held
responsible or liable for any circumstances not under
our control.
Repairs Out of the Warranty Period
If service or repair becomes necessary outside the
warranty period, this service is still available however all
transport/postage, spares and labour costs will be for the
customers’ account. All chargeable repairs will require
the customers’ written acceptance of the quote. Once
the go-ahead has been received Taurus will undertake to
conduct the repair within a reasonable time and maintain
the condition of the product as received. All repairs are
guaranteed for 3 months from the date of the repair.
For any service, enquiries and complaints please contact
our Customer Care on 086 111 5006 or e-mail help@
creativehousewares.co.za from 08h00 to 15h00 Monday
to Friday excluding public holidays. Please also note
that the company is normally closed for 2 weeks around
Christmas and New Year.
Please send all products for repair postage pre-paid to
one of the service centres listed on the back of this page.
Page 10

ONLINE WARRANTY REGISTRATION
Why register your warranty?
We at Taurus pride ourselves on bringing premium quality appliances to market, and as a commitment to this
level of quality we offer a 2 year warranty (1 Year Retail + 1 Year Extended) on all of our products. We often hear
that our customers lose their receipts and can therefore no longer claim if they have a problem. To take advantage
of the 1 Year Extended Warranty you will need to register your warranty online within the rst year of purchase in
order to make a valid claim. Now you can register your product, upload your warranty online, never have to worry
about losing your receipt again and enjoy the benet of your 2 year warranty.
Added Benets
In addition to providing you with an online prole of your registered
products we will also provide a host of value added benets:
• Incentives and Competitions for registered users
• New recipes or ideas for your products
• New product developments – be the rst to get the latest appliances
• Special offers on promotional items
How to Register your Online Warranty?
STEP1 Create your user prole:
If you haven’t done so already, simply visit www.taurusappliances.co.za, click on
the “Product Registration” link and follow the easy instructions. You will receive a
username and password once registered. This will give you access to your user
prole.
STEP2 Pick a registration method:
DESKTOP/
LAPTOP
• Open your internet browser and visit
www.taurusappliances.co.za
• Click on the “Registration” link and
login using your user name
and password.
• Click on “Register your products
and upload receipts” and follow the
easy instructions.
• Scan and upload your receipt
Notes:
1. The online warranty system is a safe storage facility for your
receipt.
2. You will be required to register on the Taurus website. You
will receive a username and password once registered. This will
give you access to your prole.
3. From your prole you will be able to load products that you
have purchased. In order to successfully register your warranty
you will need to either scan and upload, or fax through your
receipt to us.
4. All instructions on how to load your products are available
• Scan the QR code above or visit
www.taurusappliances.co.za
• Click on the “Registration” link
and login using your user
name and password.
• Click on “Register your products
and upload receipts” and follow
the easy instructions.
• Scan or take a photo and
upload your receipt.
National Service Centre: 086 111 5006
e-mail: [email protected]
www.creativehousewares.co.za
SMART
PHONE/
FAX
TABLET
• Fax the following to 021 931 4058
• First Name and Surname
• Contact telephone and fax number.
• Product Model number and Type.
• Traceability Code (found on the
Warranty Card or on a label
on the product)
• A clear and legible copy
of your receipt.
inside your prole.
5. Please note that you must check that your receipt has been
uploaded correctly. Creative Housewares cannot be held
responsible for faxes or les not received.
6. For assistance with registration please email: marketing@
creativehousewares.co.za.
NB: Your 1 year extended warranty is only valid if your prod-
uct is registered online within the rst year after purchasing your
Taurus product. Failure to register your product on-line within
the rst year will render the extended warranty as void.
Page 11

Dankie vir die aankoop van ‘n Taurus produk. Taurus waarborg dat u
produk deeglik geïnspekteer en getoets word voordat dit versend word en
is vry van meganiese en elektriese gebreke en voldoen aan die toepaslike
veiligheidstandaarde. Met elke Taurus produk wat gekoop word kry u 'n 2 jaar
waarborg soos uiteengesit in die terme en voorwaardes hieronder.
Eerste Jaar - 1 Jaar Kleinhandelswaarborg:
Indien defekte as gevolg van foutiewe onderdele of
vakmanskap binne 12 maande onder normale huishoudelike gebruik ontwikkel, binne die 12
maande vanaf die oorspronklike datum van aankoop,
neem asseblief die produk na die winkel van waar dit
gekoop is vir 'n terugbetaling of vervanging.
Tweede Jaar - 1 Jaar Uitgebreide Waarborg
Taurus is trots op die kwaliteit van die produk en
bied dus 'n uitgebreide 12 maande waarborg bo en
behalwe die 1 Jaar kleinhandelswaarborg. Indien
defekte as gevolg van foutiewe materiaal of vakmanskap ontwikkel, onder normale huishoudelike gebruik,
na die 12 maande tydperk en binne 24 maande vanaf
die oorspronklike datum van aankoop, stuur die
produk terug met posgeld betaal na Taurus vir herstel.
Taurus sal die produk gratis herstel en dit direk aan
u terugstuur. Taurus sal die produk vervang met 'n
soortgelyke produk in dieselfde of beter toestand,
as die herstel nie uitgevoer kan word vir watter rede
ookal nie.
NB: Die 1 Jaar Uitgebreide waarborg is slegs geldig
vir kliënte wat hul waarborg geregistreer het op ons
webtuiste by www.taurusappliances.co.za binne die
eerste jaar nadat hulle dit aangekoop het
Sien keersy vir besonderhede en instruksies.
Voordat u die produk terug stuur, maak seker
van die volgende:
• U huishoudelike geleidingsok is in 'n goeie toestand,
werk en aangeskakel is,
• Die geleidingsok is nie oorlaai nie (Wit uitskop
skakelaar op u DB bord af is),
• U het die moeilikheid steuringsgids gelees in u
instruksies vir gebruik,
• Alle bykomstighede en dele teenwoordig is.
Die volgende voorwaardes geld:
1. Maak seker dat u kwitansie behoue is, dit moet aangebied
word wanneer 'n eis gemaak word onder die voorwaardes
van die waarborg. Dit is onmoontlik om die waarborg
tydperk te bepaal sonder die bewys van aankoop, so hou
dit asseblief in 'n veilige plek. (NB. U waarborg kan opgeskandeer word na die Taurus webtuiste vir veilige bewaring
- sien keersy vir meer inligting.)
2. Indien 'n terugbetaling of omruiling van die produk nodig is
moet die produk volledig wees met al die bykomstighede,
onderdele en verpakking. Toebehore wat weg is sal die
waarborg nietig maak.
3. Met ontvangs van u toestel, gaan dit na vir enige vervoer
skade om te verseker dat dit veilig is vir gebruik. Stuur dit
so gou as moontlik terug na die winkel om die beska-
digde toestel te vervang. Die waarborg is nietig indien
die beskadigde produk gebruik word na die tyd, so
moet asseblief nie die beskadigde produk gebruik nie.
4. U produk is ontwerp vir normale huishoudelike
gebruik. Deur te versuim om die instruksies te lees en
te voldoen aan die terme van gebruik, die skoonmaak
en instandhouding van die produk maak u waarborg
ongeldig, so lees asseblief hierdie instruksies versigtig
om u veiligheid te verseker, en om die beste uit die
gebruik van die produk te kry. (bv nie die verwydering
van kalk skaal; water neerslag; insek besmetting, en /
of verbrande produkte)
5. Enige misbruik, nalatige, onbehoorlike of toevallige
beskadiging of sorg van die produk word die waarborg
nietig en Creative Housewears (Pty) Ltd, sal nie
aanspreeklik wees vir enige verlies of skade nie.
6. Enige poging tot herstel, of vervanging met
ongemagtigde onderdele sal die waarborg nietig maak,
so kontak 'n gemagtigde dienssentrum of diensagent
vir enige diens of herstelwerk.
7. NB: Die waarborg op die vervangingsproduk sal by die
oorspronklike datum van aankoop bly en nie van die
datum wanneer dit vervang is nie.
8. Alle herstelwerk dra 'n 3 maande waarborg selfs al val
dit buite die 2-jaar waarborg tydperk.
9. Taurus sal probeer om die herstelwerk te doen binne 'n
redelike tyd in lyn met die industrie standaarde, maar
kan nie verantwoordelik gehou word of aanspreeklik
wees vir enige omstandighede nie onder ons beheer
nie.
Herstelwerk buite die waarborg tydperk
As diens of herstelwerk benodig word buite die waarborg
tydperk, is hierdie diens steeds beskikbaar, maar is alle
vervoer / posgeld, onderdele en arbeidskoste op die
kliënte se onkoste. Alle betaalbare herstelwerk sal skriftelike aanvaarding van die kwotasie vereis van die kliënt. Sodra Taurus die groen lig ontvang sal ons onderneem om
die herstel binne 'n redelike tyd en in dieselfde toestand
te hou as wat die produk ontvang is. Alle herstelwerk is
gewaarborg vir 3 maande vanaf die datum van die herstel.
Vir enige diens, navrae en klagtes kontak ons kliënte diens
op 086 111 5006 of e-pos help@creativehousewares.
co.za vanaf 08h00 tot 15h00, Maandag tot Vrydag, openbare vakansiedae uitgesluit. Let asseblief ook daarop
dat die maatskappy gewoonlik gesluit is vir 2 weke gedurende Kersfees en Nuwejaar.
Stuur asseblief alle produkte vir herstel met posgeld
vooruit betaal aan een van die dienssentrums wat op die
agterkant van hierdie bladsy verskyn.
Page 12

AANLYN WAARBORG REGISTRASIE
Hoekom moet u die waarborg moet registreer?
Ons by Taurus is trots om premium gehalte toestelle op die mark te bring, en as 'n verbintenis tot die vlak van
gehalte bied ons 'n 2 jaar waarborg (1 Jaar Kleinhandel + 1 Jaar Uitgebreide) op al ons produkte. Ons hoor
dikwels dat ons kliënte hul kwitansies verloor en kan dus nie meer eis as hulle 'n probleem het nie. Om voordeel te
trek van die 1 Jaar Uitgebreide waarborg sal u nodig hê om u waarborg aanlyn te registreer binne die eerste jaar
van aankoop om 'n geldige eis te maak. Nou kan u die produk aanlyn registreer, laai u waarborg en hoef u nooit te
bekommer dat u die kwitansie sal verloor nie en die voordeel van u 2-jaar waarborg geniet.
Bygevoegde Voordele
Bykomend tot die verskafng van ‘n aanlyn proel van u geregistreerde produkte bied ons ook vele ander toegevoegde waarde voordele:
• aansporings en kompetisies vir geregistreerde gebruikers
• nuwe resepte of idees vir u produkte
• nuwe produk ontwikkelings - die eerste wees om die nuutste toestelle te kry
• spesiale aanbiedings op promosie-items
Hoe om u Aanlyn Waarborg te Registreer?
STAP 1 Skep u gebruikersproel:
As u dit nie reeds gedoen het nie, besoek www.taurusappliances.co.za, kliek op
die "Product Registration" skakel en volg die maklike instruksies. U sal 'n gebruikersnaam en wagwoord ontvang sodra u geregistreer het. Dit sal u toegang tot u
proel gee.
STAP 2 Kies 'n registrasie metode:
REKENAAR/
SKOOTREKENAAR
• Maak u internet snuffelgids oop en
besoek
www.taurusappliances.co.za
• Klik op die "Registrasie" skakel en
teken in met u gebruikersnaam en
wagwoord.
• Klik op "Register your products” en
laai kwitansies en volg die maklike
instruksies.
• Skandeer en laai u strokie
Notas:
1. Die aanlyn waarborg stelsel is 'n veilige stoor fasiliteit vir u
strokies.
2. U sal gevra word om op die Taurus webtuiste te registreer. U
sal 'n gebruikersnaam en wagwoord ontvang. Dit sal u toegang
gee tot u proel.
3. Van u proel u sal in staat wees om produkte te laai wat u
gekoop het. Om u waarborg suksesvol te registreer sal u nodig
hê om of te skandeer en oplaai, of faks u strokie deur na ons.
4. Alle instruksies oor hoe om u produkte te laai is beskikbaar
binne in u proel.
5. Let daarop dat u moet seker maak dat u kwitansie korrek op-
• Skandeer die QR-kode bo of besoek
www.taurusappliances.co.za
• Klik op die "Registration" skakel en
teken aan met u verbruikersnaam en
wagwoord.
• Klik op "Register your products” en
laai u kwitansie en volg die maklike
instruksies.
• Skandeer of neem 'n foto en laai u
strokie.
National Service Centre: 086 111 5006
e-mail: [email protected]
www.creativehousewares.co.za
SMARTFOON /
FAKS
TABLET
• Faks die volgende na 021 931 4058
• Naam en Van
• Kontak telefoon en faksnommer.
• Produk model nommer en tipe.
• Traceability Code (wat op die
• Waarborgkaart of op 'n etiket op die
produk gevind kan word)
• 'n Duidelike en leesbare afskrif van
u ontvangs.
gelaai is. Creative Housewares kan nie verantwoordelik gehou
word vir fakse of lêers nie ontvang nie.
6. Vir hulp met registrasie e-pos asseblief: marketing@creativehousewares.co.za.
NB: U 1 jaar verlengde waarborg is slegs geldig indien u
produk aanlyn geregistreer is binne die eerste jaar na die
aankoop van u Taurus produk. Indien u produk nie aanlyn
geregistreer word binne die eerste jaar nie sal dit die verlengde
waarborg nietig maak.
Page 13

 Loading...