

Page 1
HIBRIDO
complies with
INTERNATIONAL
IEC60335
SAFETY SPECIFICATIONS
1200W
1.5-4.2KW
Model:
947183
PLEASE READ ALL INSTRUCTIONS BEFORE USE
ENGLISH / AFRIKAANS
Page 2
ENGLISH MANUAL
TOP PANEL
LEFT SIDE PANEL
RIGHT SIDE PANEL
BOTTOM PANEL
2. Safety advice and warnings!
Dear customer,
Thank you for choosing to purchase a Taurus brand
product. Thanks to its technology, design and operation and the fact that it exceeds the strictest quality
standards, a fully satisfactory use and long product
life can be assured.
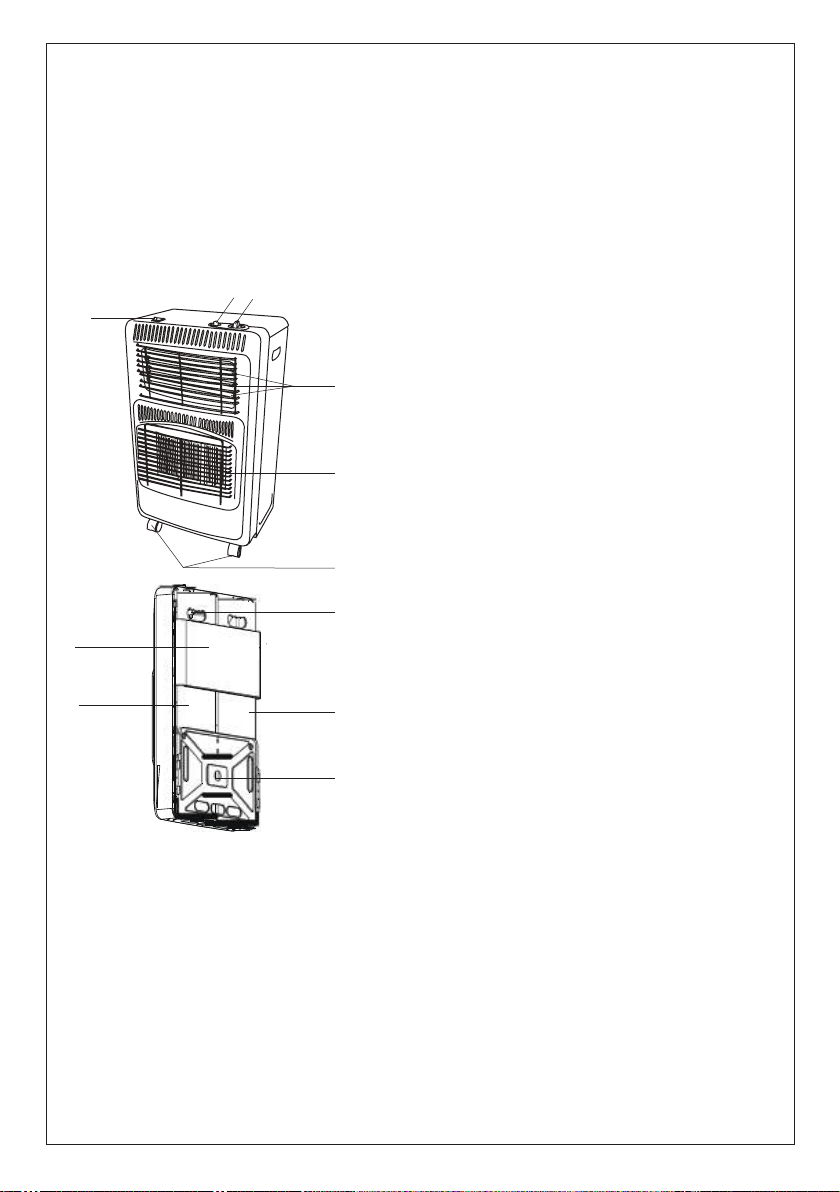
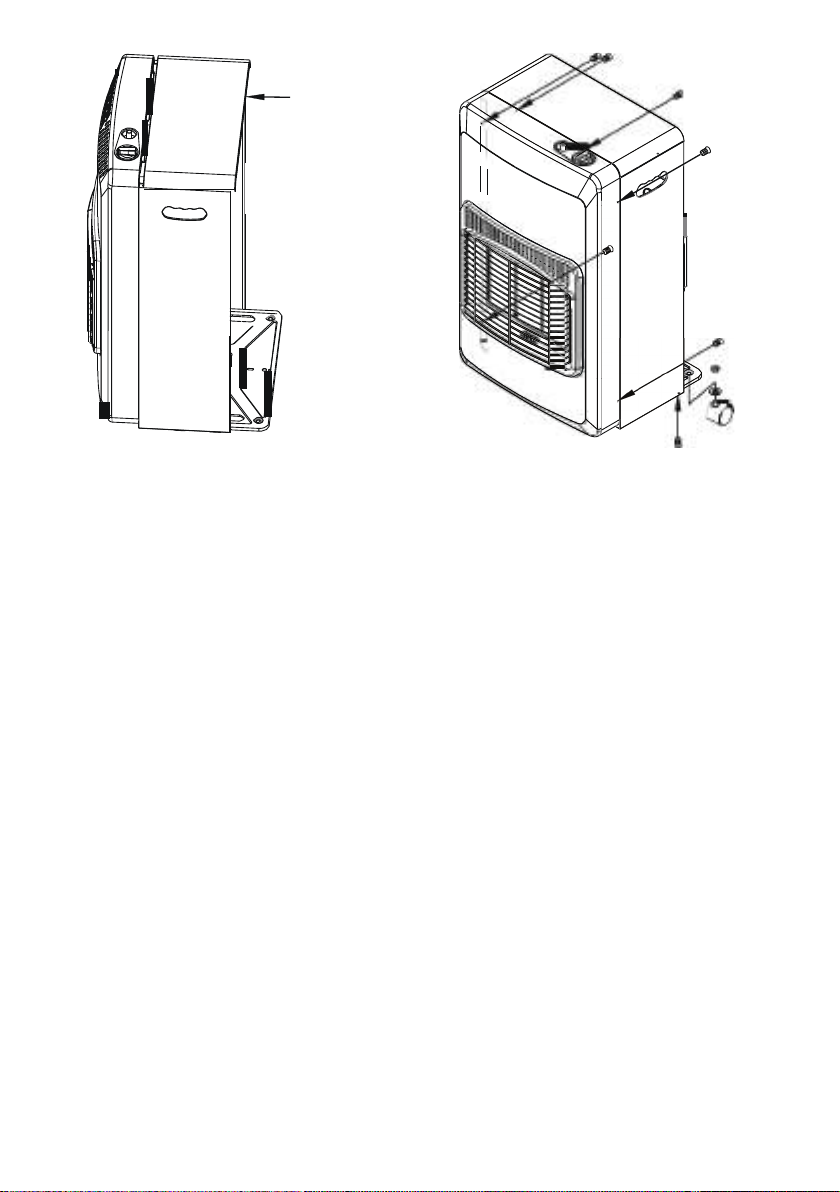
1. Parts description
2
3
1
4
5
6
7
8
9
10
11
1. Quarts tubes ON/OFF switch
2. Igniter button
3. Gas regulator control
4. Quartz tubes
5. Ceramic heating panels
6. Castor wheels
7. Gas valve
8. Top panel
9. Right panel
10. left panel
11. Bottom pannel
Read these instructions carefully before switching
on the appliance and keep them for future reference.
Failure to follow and observe these instructions
could lead to an accident. Clean all the parts of the
product as indicated in the cleaning section, before
use.
2.1. Use or working environment:
2.1.1. This appliance is designed solely for domestic
use and for the designated purpose.
2.1.2. Do not use the appliance outdoors (unless it
has been specifically designed for outdoor use)
2.1.3. Use the appliance in a well ventilated area.
2.1.4. Do not subject the appliance to heat, direct
sunshine or very high moisture (e.g. Rain)
2.1.5. Never immerse the appliance in liquids and be
aware of sharp edges that may damage it.
2.1.6. Never use the appliance with wet or damp
hands. Unplug it immediately if the becomes wet or
damp when it is running.
2.1.7. Keep children and bystanders away when
using this appliance.
2.1.8. Do not place flammable material near the
appliance.
2.1.9. Do not use the appliance in association with a
programmer, timer or other device that automatically
switches it on.
2.1.10. Do not use the appliance if the cable or plug
is damaged.
2.1.11. Ensure that the voltage indicated on the
rating label matches the mains power supply voltage
before plugging in the appliance.
2.1.12. Connect the appliance to the mains power
supply with an earth socket withstanding a minimum
of 10 amperes.
2.1.13. The appliance’s plug must fit into the mains
power supply socket properly. Do not alter the plug.
2.1.14. If using a multi plug check ratings carefully
as the current used by several appliances could easily exceed the rating of the multi plug.
2.1.15. If any of the appliance casings breaks, immediately disconnect the appliance from the mains
power supply to prevent the possibility of an electric
shock.
2.1.16. Do not use the appliance if it has fallen on
the floor or if there are visible signs of damage.
2.1.17. Do not force the power cord. Never use the
power cord to lift up, carry or unplug the appliance.
Page 3

2.1.18. Do not wrap the power cord around the
appliance.
2.1.19. Do not clip or crease the power cord.
2.1.20. Do not allow the power cord to hang or
to come into contact with the hot surfaces of the
appliance.
2.1.21. Check the state of the power cord. Damaged
or tangled cables increase the risk of electric shock.
2.1.22. The appliance is not suitable for outdoor use.
2.1.23. Power cord should be regularly examined
for signs of damage, and if the cord is damaged, the
appliance must not be used.
2.1.24. Do not touch the plug with wet hands.
2.1.25. Ensure the room is ventilated while the
heater is in operation. Do not operate in a bedroom,
caravan, boat or any confined spaces.
2.1.26. Do not place the heater near walls, curtains
or furniture while in operation. Always face the
heater towards the center of the room during operation.
2.1.27. Do not place objects on or against the heater.
2.2. Personal safety:
2.2.1. CAUTION: Do not leave the appliance unattended during use as there is a risk of an accident.
2.2.2. Do not touch the heated parts of the appliance, as it may cause serious burns.
2.2.3. This appliance is only for domestic use, not
for industrial or professional use. It is not intended to
be used by guests in hospitality environments such
as bed and breakfast, hotels, motels, and other types
of residential environments, even in farm houses,
areas of the kitchen staff in shops, offices and other
work environments.
2.2.4. This appliance is not intended for use by
persons (including children) with reduced physical,
sensory or mental capabilities, or lack of experience
and knowledge, unless they have been given supervision or instruction concerning use of the appliance
by a person responsible for their safety.
2.2.5. This appliance is not a toy. Children should be
supervised to ensure that they do not play with the
appliance.
2.3. Use and care:
2.3. Use and care:
2.3.1. Fully unroll the appliance’s power cable before
each use.
2.3.2. Do not use the appliance if the parts or acces-
sories are not properly fitted.
2.3.4. Do not turn the appliance over while it is in
use or connected to the mains power supply.
2.3.5. Unplug the appliance from the mains power
supply when not in use and before undertaking any
cleaning task.
2.3.6. This appliance should be stored out of reach
of children.
2.3.7. Do not store the appliance if it is still hot.
2.3.8. Never leave the appliance unattended when in
use and keep out of the reach of children.
2.3.9. Unplug the appliance from the mains supply
socket after use and before every cleaning. Pull the
plug, not the mains cable, in order to disconnect the
appliance from the mains.
2.3.10. If, for some reason, the appliance were to
catch fire, disconnect the appliance from the mains
power supply and DO NOT USE WATER TO PUT THE
FIRE OUT.
2.3.11. This appliance needs to be tested for leaks
before initial use and whenever the cylinder has been
reconnected after being filled. NEVER USE A NAKED
FLAME TO TEST FOR LEAKS.
NOTE: The heater incoporates several safety devices
that will shut down the heater in unsafe conditions.
•ODS (Oxygen depletion system) In case of accidental flame failure, the gas heater will shut down
automatically.
The Tip Over Switch will turn off the heater if it is not
standing upright on a level surface. If this activates,
set the heater upright, check for obvious damaage
and again wait 10-15 minutes before attempting to
re-ignite the heater. This device may also operate if
the heater is knocked against or bumped.
2.4. Service:
2.4.1. Make sure that the appliance is serviced only
by suitably qualified technician, and that only original
spare parts or accessories are used to replace existing parts/accessories.
2.4.2. If the power cord is damaged, the manufacturer or its service agent or a similarly qualified
person must
replace it in order to avoid a hazard.
2.4.3. Any misuse or failure to follow the instructions for use renders the guarantee and the manufacturer’s liability null and void.
Page 4
3. Instructions for use
ANEL
3.1. Before use:
3.1.1. Remove the appliance’s protective film(if
applicable).
3.1.2. Unwind the power cord.
3.2. Use and care:
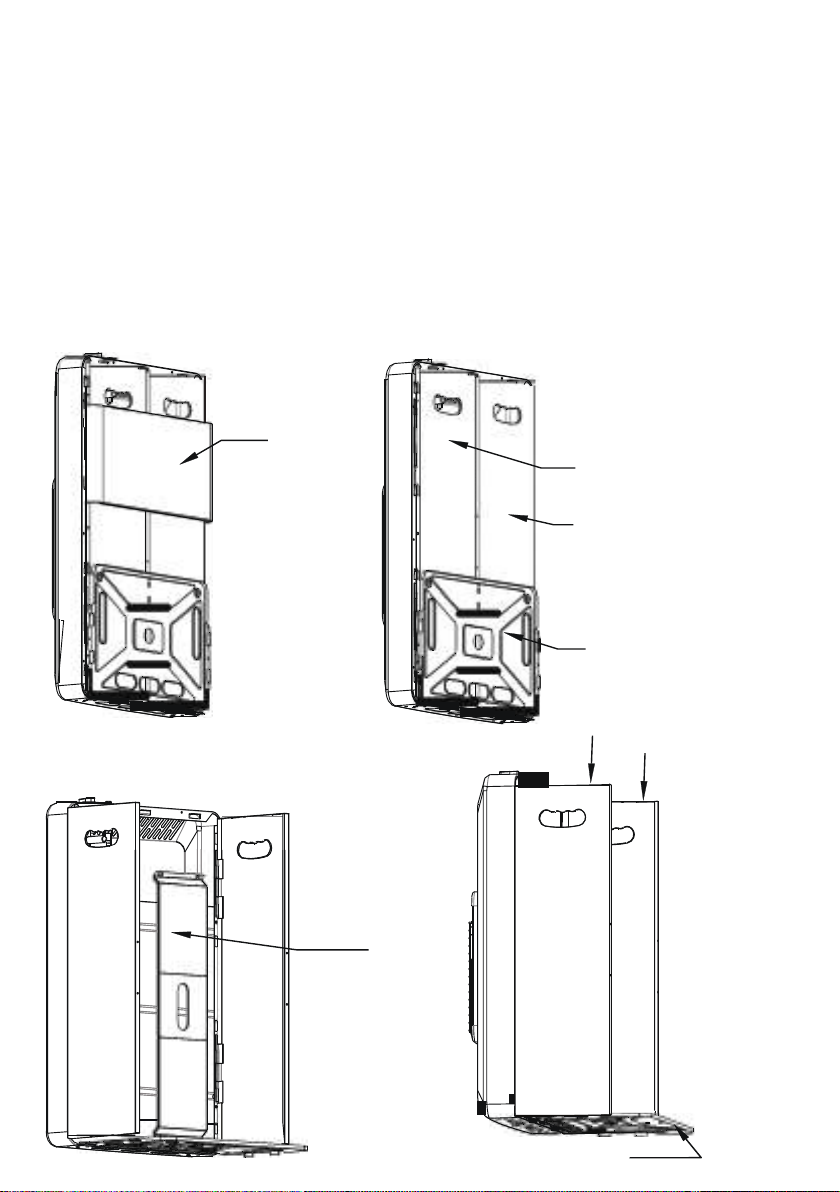
3.2.1. Assembly
1. For your safety, please follow the assembly
instructions step by step as provided below.
TOP PANEL
LEFT SIDE PANEL
RIGHT SIDE P
BACK PANEL
BOTTOM PANEL
BOTTOM PANEL
Page 5
Page 6
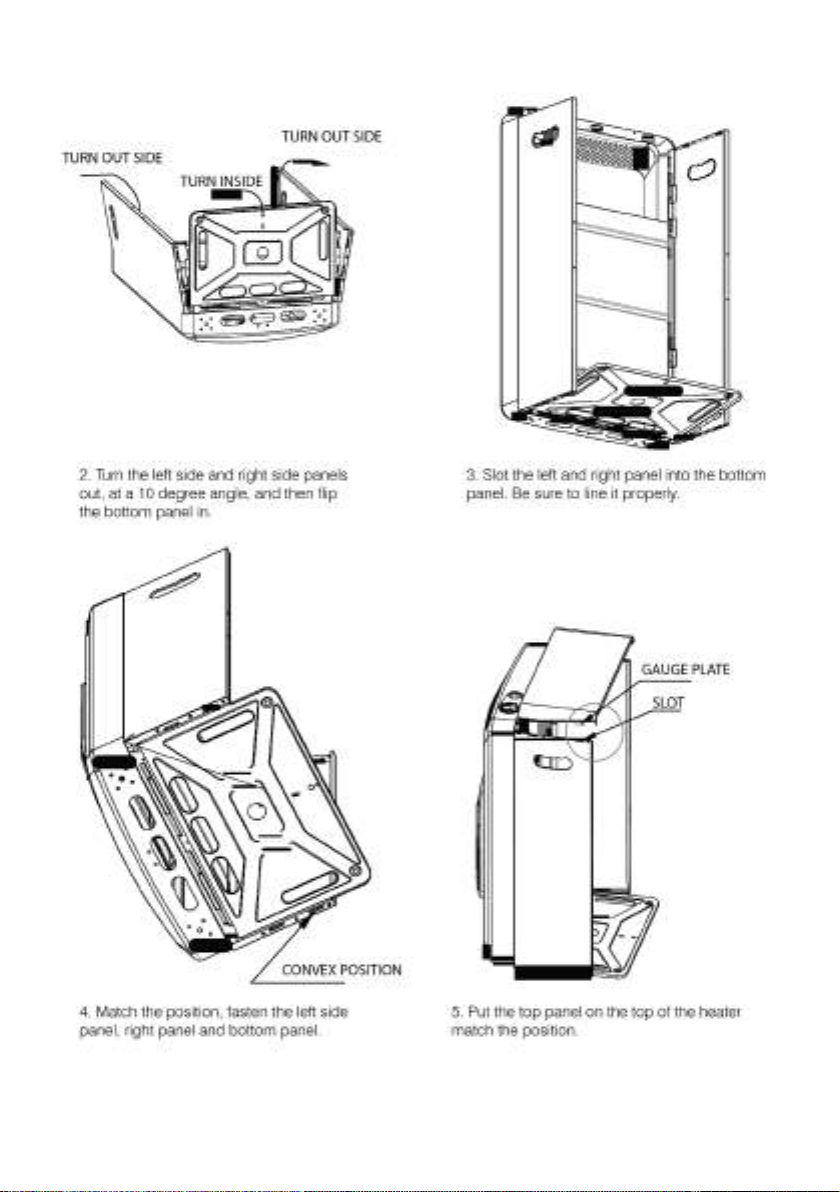
castors. Following the arrows, insert screws
castor wheels to the bottom panel.
6. Push the top panel into the front
panel; fasten the left and right side
panel and front panel with screws
supplied.
3.2.2. Installing the heater
3.2.2.1. After the heater has been removed from its
packaging, remove the back panel from inside the
back cavity.
3.2.2.2. Place the filled gas cylinder into the back of
the heater with the valve outlet facing outwards.
3.2.2.3. Screw the correct regulator onto the outlet
of the gas cylinder valve clockwise. Turn by hand
only. Do not use a spanner. Screw on until the nut is
fully secured.
3.2.2.4. IMPORTANT TEST for leaks: This must be
carried out in a well-ventilated area, free from any
open flames or other sources of ignition. With the
regulator connected to the cylinder, turn on the gas
cylinder valve 1 and 1/2 turns anti-clockwise. Brush
all hose connections, pipe connections to the gas
valve, regulator connection to the cylinder and gas
cylinder valve with a 50:50 solution of detergent and
water. A stream of bubbles forming is an indication of a leak. If a leak is found, turn off the cylinder
valve (clockwise), disconnect the regulator from the
gas cylinder and remove the gas cylinder to a cool,
outdoor well-ventilated area. Contact your dealer or
gas supplier for assistance.
7. According to arrow keys fasten with
screws; install the back panel and
and tighten, use the nuts to secure the 5
DO NOT USE THE HEATER IF A LEAK IS FOUND.
DO NOT USE A NAKED FLAME FOR LEAK TESTING.
DO NOT OPERATE ANY ELECTRICAL EQUIPMENT
IN THE PRESENCE OF A GAS LEAK.
3.2.2.5. After leak-testing has passed, fit the rear
panel onto the heater. It may be necessary to twist
the cylinder slightly to allow the regulator and hose
to fit inside the back panel without kinking the hose.
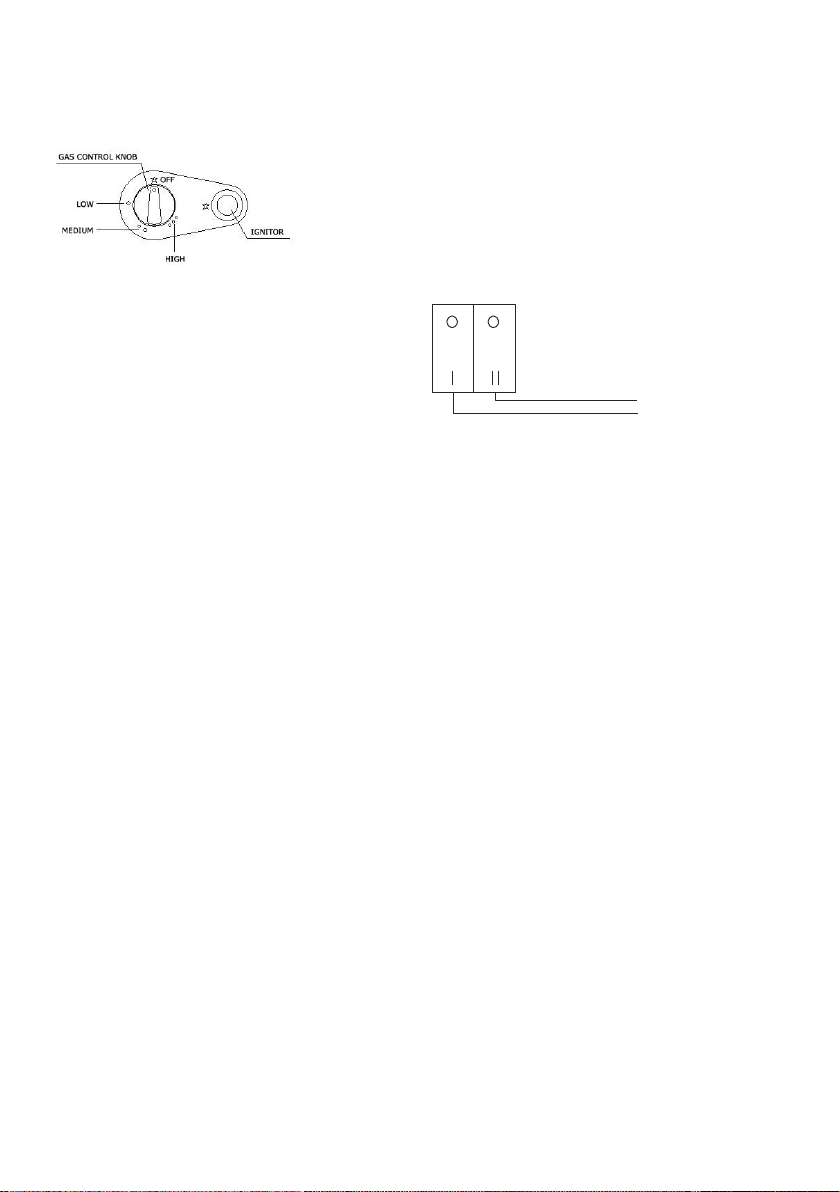
3.2.2. Using the gas heater
•IMPORTANT: The electric and gas heater cannot
be used together.
The heater can be regulated to three different heater
intensities: 1-LOW, 2-MEDIUM and 3-HIGH. Ignition
mode: piezo ignition.
3.2.2.1. Open the valve on the gas cylinder 1 to 1/2
turns.
3.2.2.2. Press down and turn the control knob to
1-low position and hold for 10 seconds.
3.2.2.3. While still holding the control knob in position 1, press the ignition button once or twice until
the burner ignites. Continue to hold the knob for
Page 7
10-15 seconds more after the burner has ignited. If
the pilot flame goes out when you release the knob,
repeat the above process.
Note:
•UPON first lighting a new heater, it may be necessary to hold the control knob down for a longer time
in order to allow gas to flow to the pilot.
•Once the heater is alight at the 1-LOW setting, turn
the control knob to 2-MEDIUM or 3-HIGH position to
light the second and third panel respectively.
•UPON first lighting, panel 2 and 3 will take a little
longer to ignite. Be patient as this is normal.
• To turn off the heater, return the control knob to the
OFF position and close the GAS cylinder valve fully
(clockwise).The heater can only be turned off by
closing the cylinder valve. It cannot be turned off by
the control knob.
•Changing the cylinder:
Turn off the cylinder valve fully (clockwise) and
allow the heater to cool fully before removing and
replacing the cylinder. Do not attempt to remove the
regulator while the heater is still running.
• The heater incorporates several safety devices
that will shut down the heater in unsafe conditions.
The first is that in case of accidental flame failure,
the gas heater will shut down automatically. The
second device will turn off the heater if it is tipped
over, if this activates, set the heater upright, check
for obvious damage and again wait 5-10 minutes
before attempting to re-light the heater. This device
may also operate if the heater is knocked against or
bumped.
IMPORTANT: You should have purchased suitable
9kg gas cylinder for this heater. The cylinder will
require purging of air the first time it is filled, to
ensure correct operation of the heater. This should
be carried out by the gas filling station. Your cylinder
should be checked for safe operation each time
when it is filled by an authorized filling station.
3.2.3. Using the electric heater
•IMPORTANT: The electric and gas heater cannot
be used together.
3.2.3.1. Plug the appliance into the mains power
socket.
3.2.3.2. Turn the heater on by selecting your desired
heat setting. Pressing the 1st switch will turn on the
first quartz tube on and pressing the 2nd switch will
turn on the remaining two quartz tubes.
For the other two quartz tubes
For top quartz tube
4. Cleaning and maintenance
4.1. Disconnect the appliance from the mains power
supply before undertaking any cleaning task.
4.2. Before any cleaning task is performed, ensure
that the gas supply is completely turned off.
4.3. Ensure the heater has cooled down completely
before undertaking any cleaning task.
4.4. The heater should be checked for gas leaks
regularly.
4.5. Clean the outer parts of the appliance with a
damp cloth with a few drops of washing-up liquid
and then dry. CAUTION! Do not immerse electrical
parts of the appliance in any liquid.
4.6. Do not use solvents, or products with an acid
or base pH such as bleach, or abrasive products, for
cleaning the appliance.
4.7. Never submerge the appliance in water or any
other liquid or place it under running water.
5. Anomalies and repair
5.1. Take the appliance to an authorised support
centre if product is damaged or other problems
arise.
5.2. If the connection to the mains has been damaged, it must be replaced and you should proceed as
you would in the case of damage.
Page 8
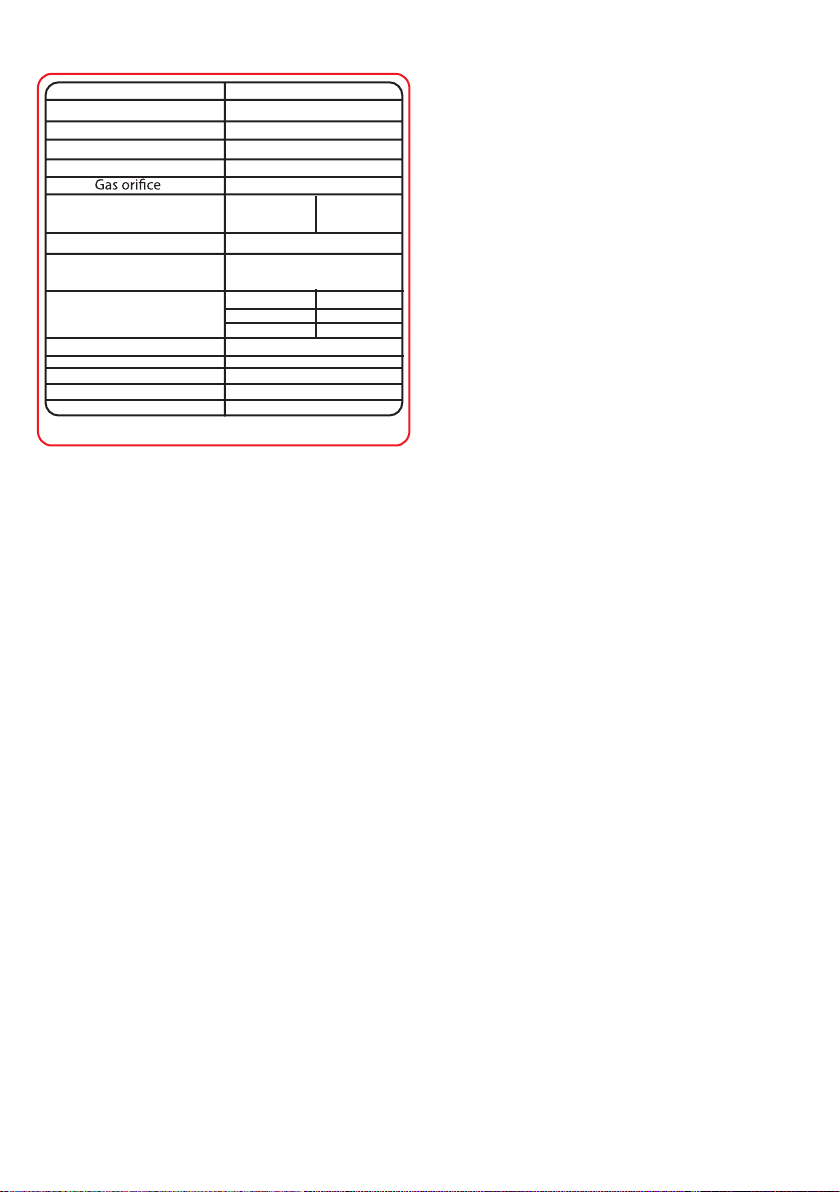
PRODUCT SPECIFICATIONS:
Brand name
Model number
Gas type
Cylinder size
Ignition
Regulator
(kpa)
Operating pressure
Max gas
consumption
Heat capacity
Electric Output 1200W
Weight(kg)
Boxed Size(lxbxh)
For indoor use only
Regulator and hose supplied. Replace only with a SANS 1237
approved regulator and SANS1156 or 853212 approved hose.
Taurus
947183
LPG only
9kg cylinder only
Piezo ignition
0.59mm
Outlet
Inlet
2.8kPa
0.375kg/h
Max
Med
Min
11kg
420x150x695mm
+
-
2.8 0.5
80~700
4.2 kW
2.8kW
1.4kW
IF YOU SMELL GAS:
• Turn off gas supply at bottle
• Extinguish all naked flames;
• Do not operate any electrical appliances
• Ventilate the area
• Check for leaks as detailed in this manual
If odour persists, contact your dealer or gas supplier
immediately
number. Ask to be shown the card before allowing
the
installation work to commence and make a note of
the Installer registration number. Upon completion
of the installation, the installer is required to explain
the operational details of the appliance together
with the safety instructions. You will be asked to sign
acceptance of the installation and be provided
with a completion certificate. You should only sign
for acceptance of the installation when the
installation is completed to your satisfaction.
Note that your invoice is required in the event that
you wish make a guarantee claim.
IMPORTANT INFORMATION FOR THE INSTALLER.
This appliance may only be installed by a gas installer registered with the South African qualification
and certification committee (SAQCC). The appliance
must be installed in accordance with the
requirements of SANS 10087-1for use with LPG,
SANS 827 for use with NG and any fire department
regulations and/or local bylaws applicable to the
area. If in doubt, check with the relevant authority
before undertaking the installation. Upon completion
of the installation you are required to fully
explain and demonstrate to the user the operational
details and safety practices applicable to the
appliance and the installation.
BURN-BACK (FIRE IN BURNER TUBE OR CHAMBER)
In the event of a burn-back, where the flame burns
back to the jet, immediately turn the gas supply off
at the control valve on the panel. After ensuring the
flame is extinguished, wait for I minute and relight
the appliance in the normal manner. Should the appliance again burn back, close the control valve
and call a service technician. Do not use the appliance again until the service technician has declared
that it is safe to do so.
GAS-PRESSURE REGULATOR
This appliance requires an operating pressure of 2,8
kPa at the appliance. A suitable LPG regulator that
complies with the requirements of SANS 1237 must
be installed.
IMPORTANT INFORMATION FOR THE USER
This appliance may only be installed by a registered
SAQCC Gas installer. All registered installers
are issued with a card carrying their registration
Page 9

Warning labels on heater:
Roll about Heater - Safety Tips
Fig.1:
Keep room well ventelated. Switch off gas supply when
heater is not in use. Do not cover the heater.(Fig.1)
Fig.2:
CHECK LIST(before connecting cylinder and igniting heater)
CHECK, that the hose clamps are in the right place and
properly tightened
CHECK that the nose washer in the regulator is in place
CHECK for leaks as per the guidelines in this manual
before lighting
A slight gas smell may be detected-this is normal
please refer to Manual
NB. NEVER leave the heater unattended or burning
through the night while you sleep
NB. THE HEATER MUST BE TURNED OFF USING THE
CONTROL KNOB ON THE HEATER FIRST AND ONLY THEN
CLOSING THE CYLINDER VALVE.
IGNITION
Checklist and ignition instructions.(fig.2)
Fig.3:
Fig.5:
Important safety warning.(fig.3)
Fig.4:
THIS HEATER CAN ONLY BE OPERATED
WITH THIS REGULATOR, AND WITH 9KG
L.P.G GAS CYLINDER
15 15 15 15 15 15 15 15 15 15 15 15
Caution! 9kg LPG gas cylinder only.(fig.4)
Safety tips.(fig.5).
Fig.6:
SAFE CONNECTING INSTRUCTIONS
Safety connection instructions.(fig.6)
This information is only for cylinders
with gas capacity of less than 9kg
To engage and
tighten the
regulator, turn
the handwheel in
the direction of
the arrow
To close the cylinder
valve turn the valve
knob fully in the
direction of the arrow
Page 10

Troubleshoot Guide:
Page 11

Afrikaans handleiding
TOP PANEL
LEFT SIDE PANEL
RIGHT SIDE PANEL
BOTTOM PANEL
2. Belangrike veiligheidsvoorsorg!
Dear customer,
Baie dankie vir u keuse om `n Taurus handelsmerk
produk te koop. Danksy die tegnologie,ontwerp en
werking en die feit dat dit voldoen aan die strengste
gehalte standaarde, is u verseker van `n volle bevredigende gebruik en lang produklewe.
1. Parte Beskrywing
2
3
1
4
5
6
7
8
9
10
11
1. Kwarts buis aan/af skakelaar
2. Ignitor knoppie
3. Gas reguleerder beheer
4. Kwarts buise
5. Keramiek verwarming panele
6. Castor wiele
7. Gas klep
8. Boonste paneel
9. Regter paneel
10. Linker paneel
11. Onderste paneel
Lees asseblief en stoor die handleiding
Wanneer elektriese toestelle gebruik word, moet die
basiese veiligheidsmaatreels gevolg word.
2.1. Gebruik en werksomgewing:
2.1.1. Die toestel is vir huishoudelike gebruik alleen
en nie vir kommersiele gebruik
2.1.2. Die toestel moet nie buite gebruik word nie
(tensy dit vir die doel vervaardig is)
2.1.3. Gebruik die produk in n goed geventileerde
area.
2.1.4. Die teostel mag nie aan hitte, direkte sonlig of
nattigheid blootgestel word nie (i.e. Reen)
2.1.5. Maak die buitekant van die toestel met n klam
lap skoon en moet glad nie in water gedruk word nie.
2.1.6. Moenie die prop met nat hande hanteer nie.
2.1.7. Die toestel is ontwerp om material wat nie
gevaarlik is en vlambaar is op te suig.
2.1.8. Die verbindings mag nie naby die gesig kom
nie. Die mondstuk mag nie na persone of diere gerig
word nie..
2.1.9. Hou kinders en omstanders weg wanneer
toestel gebruik word..
2.1.10. Moenie warm as, warm kole, groot stukke
glas en skerp.
2.1.11. Moenie toner stof wat in `n drukker gebruik
word opsuig nie, want dit is Elektries geleidend. Dit
sal nie deur die filter sisteem gaan nie en sal in die
lug vrygelaat word.
2.1.12. Die toestel mag nie naby vlambare material
geplaas word nie.
2.1.13. Do not use the appliance in association with
a programmer, timer or other device that automatically switches it on.
2.1.14. Moenie die toestel gebruik as die koord of
prop beskadig is.
2.1.15. Maak seker die spanning soos aangedui op
die gradering etiket kom ooreen met die hoofspanning.
2.1.16. prop in elektriese uitlaat wat 16 amperes
hanteer
2.1.17. die toestel prop moet in die hoof prop pas
en Moenie die prop verander.
2.1.18. Indien `n multi prop gebruik word maak
seker die toestel se strome oorskry nie die gradering
van die multi prop
2.1.19. Moenie die toestel gebruik as die prop of
koord beskadig isnie of enige sigbare skade aan die
Page 12

omhulsel is nie
2.1.20. Moenie die toestel gebruik as dit op die vloer
geval het en daar is sigbare skade
2.1.21. Moenie die koord gebruik om toestel op te
tel of te sleep.
2.1.22. Die koord mag nooit om die toestel gedraai
word nie.
2.1.23. Moenie die koord plooi nie
2.1.24 Moenie die prop met nat hande hanteer nie.
2.1.25. Maak seker die kamer is goed geventileer
wanneer verwarmer gebruik word. Moenie in slaapkamer, karavane, bote en beperkte spasies gebruik
word nie.
2.1.26. Moenie die verwarmer naby die muur
,gordyne of meubels plaas nie. Die verwarmer moet
altyd na die binnekant van die kamer wys.
2.1.27 Moenie voorwerp op en teen die verwarmer
sit nie.
2.2. Persoonlike veiligheid:
2.2.1. LET WEL: Moenie die toestel sonder toesig
laat nie.
2.2.2. Moenie warm oppervlaktes aanraak nie
gebruik handvatsels of knoppe want dit kan lei tot
ernstige brandwonde.
2.2.3. Die toestel is nie geskik vir industriele gebruik
soos kantore,hotelle motelle en gastehuise.
2.2.4. Die toestel is nie geskik vir gebruik deur vermindered fisiese verstandelike vermoens of gebrek
aan ervaring of kennis tensy hulle opleiding gehad
het.
2.2.5. Die toestel is nie `n speelding and kinders
moet altyd toesig he om te verhoed dat hulle met die
toestel speel.
2.3.6. Die toestel moet altyd onder toesig wees
wanneer in gebruik en moet buite bereik van kinders
gehou word.
2.3.7. As die toestel aan die brand slaan, ontkoppel
van die muursok end gooi n kombuis vadoek oor.
MOET NOOT WATER GEBRUIK NIE!
2.3.11. Die toestel moet getoets word om sker te
maak die gas letk nie en wanneer die slider hervul
word. MOET NOOIT 'N VLAM GEBRUIK OM TE
TOETS VIR LEKASIES NIE!
NEEM KENNIS: Die verwarmer het verskeie
veiligheids toestelle wat die verwarmer sal afsit as
die kondisies onveilig is.
• (Suurstof uitputting stelsel) In geval van vlam mislukking sal die gas verwarmer automaties afskakel
Die omslaan skakelaar sal afsit as die verwarmer
omval of nie op `n stewige oppervlakte staan nie.
As dit gebeur sit die verwarmer regop , maak seker
niks is beskadig nie en wag 10 – 15 min voor jy
die verwarmer aansit. Dit sal ook gebeur as die
verwarmer gestamp word.
2.4. Diens:
2.4.1Die toestel mag net deur `n gemagtigde
tegnikus gediens word. Alle parte wat vervang word
moet die oorspronklike parte wees.
2.4.2. As die koord beskadig is an dit net deur
gemagtigde tegnikus vervang word.
2.4.3. Enige misbruik maak die waarborg nul en van
gener waarde.
2.3. Gebruik en sorg:
2.3.1. Die kabel moet ten volle afgewikkel word voor
gebruik.
2.3.2. Die toestel moet nie gebruik word as die par te
of bykomstighede nie behoorlik pas.
2.3.3. Die Toestel moet nooit gedraai word terwyl dit
in werking is of in die muurprop gekoppel is.
2.3.4. Ontkoppel die toestel van die hooftoevoer as
dit nie in gebruik is nie en laat dit heeltemal afkoel
voordat dit skoongemaak word. As dele afgehaal
word of toegevoeg word,moet die toestel nie in
werking wees nie.
2.3.5. Die toestel moet buite bereik van kinders
gestoor word.
Page 13

3. Instruksies vir gebruik
ANEL
3.1. Voor gebruik:
3.1.1. Verwyder verpakkings material waar nodig
3.1.2. Ontwikkel die koord heeltemal
3.2. Gebruik en sorg:
3.2.1. Aan mekaar te heg:
1. Vir jou veiligheid volg die instruksies stap vir stap
soos onder aangedui.
Boonste Paneel
TOP PANEL
Linker Kant
LEFT SIDE PANEL
Paneel
Regter Kant
RIGHT SIDE P
Paneel
Agter Paneel
BACK PANEL
Onderste Paneel
BOTTOM PANEL
BOTTOM PANEL
Onderste Paneel
Page 14

Draai na buite
2. Draai die linker en regter kant panele uit teen `n 10
grade wydte en sit die onderste panel in.
Draai na binnekant
Draai na binne
3. Sit die linkr en regter kant panele in die onderste
gleuwe en lyn behoorlik.
Meet plaat
Slot
Konvekse
posisie
4. Lyn posisie op en maak die linker, regter en
onderste panel vas.
Page 15

castors. Following the arrows, insert screws
castor wheels to the bottom panel.
6 Druk die boonste panel in die voorste panel.
6. Push the top panel into the front
Heg linker, regter en voorste panele met die
panel; fasten the left and right side
skroefies wat by gekom het.
panel and front panel with screws
supplied.
3.2.2. Installasie van verwarmer
3.2.2.1. Na alle verpakkings material verwyder is
haal die agterste panel af.
3.2.2.2. Plaas die gas bottle in die agterkant vasn
die verwarmer met die klep wat uit wys
3.2.2.3. Skroef die korrekte regulator aan die uitlaat
klep van die gas bottle kloksgewys. Draai met die
hand vas allenlik. Draai tot dit stewig vas is.
3.2.2.4. BELANGRIKE TOETS VIR LEKPLEKKE: Die
toets moet in `n goed geventileerde area plaasvind.
Met die reguleerder gekoppel aan die gas bottle
draai 1 en `n ½ draaie anti kloksgewys. Borsel die
pyp konneksies na die klep en regulator met 50/50
mengsel van seep en water. As borrels vorm is dit `n
indikasie van `n lekplek. Diskonnekteer die regulator
van die gas bottle en kontak jou gas verskaffer vir
hulp.
MOENIE GEBRUIK AS DAAR `N LEKPLEK IS NIE
MOENIE `N OOP VLAM GEBRUIK OM TE TOETS
VIR LEKPLEKKE NIE. MOENIE ELEKTRIESE TOESTELLE GEBRUIK AS DAAR `N LEK PLEK IS NIE.
3.2.2.5. Na die lek toets voltooi is en daar is nie lek
plekke nie,sit die agterste panel terug op die verwarmer. Jy mag dalk die gas bottle effens moet draai
7. Volg die pyltjies om die skroewe in te sit en maak
7. According to arrow keys fasten with
stewig vas Gebruik die boude om die wiele aan die
screws; install the back panel and
onderste panel aan te heg.
and tighten, use the nuts to secure the 5
om dit te laat pas. Maak seker die pyp buig nie.
3.2.2. Gebruik van gas verwarmer
•BELANGRIK: Die elektriese en gas verwarmer
kan nie saam gebruik word nie.
Die Verwarmer kan gereguleer word op drie verskillende intensiteite: 1-LAAG, 2-MEDIUM and 3-HOOG
Onsteking wyse: piezo aansteker
3.2.2.1. Draai die klep op die gas silider 1 tot 11/2
draaie oop
3.2.2.2. Druk af en draai die kontrole knop na 1- lae
posisie en hou vir 10 sekondes
3.2.2.3. Hou die kontroleer knop in posisie 1
en druk die aansteek knoppie tot die verwarmer
aangaan. Hou die knop in vir 10-15 sekondes na die
verwarmer aangegaan het.. Los die knop en herhaal
die proses.
Page 16

Gas beheer knop
Laag
Medium
Hoog
Ontsteker
NEEM KENNIS
•Dit sal dalk nodig wees om die kontrolle knop
langer in te hou as die verwarmer vir die eerste keer
gebruik word om toe te laat vir die gas om te vloei
•Wanneer die verwarmer aan is op 1 – laag, draai
na 2-medium of 3- hoog om die ander panele aan
te sit..
•Panele 2 and 3 sal langer vat om aan te steek wanneer eerste maal gebruik. Dit is normal.
• Om verwarmer af te skakel draai kntrole knop na
as posisie en maak die gas silinder klep te volle toe
(kloksgewys). Die verwarmer sal net af gaan as die
gas silinder toegemaak word.
•VERANDER DIE SILINDER:
Maak die silinder klep heeltemal toe (kloksgewys) en
laat die verwarmer toe om af te koel voor die silinder
vervang word. Die silinder mag glad nie vervang
word as die verwarmer aan is nie.
• Die verwarmer het verskeie ingeboude veiligheids
toestelle wat sal afskakel as die verwarmer in
onveilige toestande gebruik word.
1. As die vlam nie aankom na `n tyd sal die verwarmer afskakel.
2. Die tweede toestel sal afgaan as die verwarmer
omval, in die geval sit die verwarmer regop en gaan
na vir enige skade en wag dan 5 – 10 min voor die
verwarmer weer aangeskekel word. Die veiligheids
toestel aktiveer ook as daar teen die verwarmer
gestamp word.
BELANGRIK: `N GESKIKTE 9KG SILINDER MOET
VIR DIE VERWARMER GEKOOP WORD. Die silinder
sal suiwering van lug verwag wanneer dit die
eerste keer gebruik word om korrekte gebruik van
verwarmer te verseker. Jou silinder moet na gegaan
word elke keer as die silider hervul word
3.2.3.1. Koppel die toestel aan die hoof krag prop.
3.2.3.2. Skakel die verwarmer aan deur dei gewenste hitte stelling te gebruik. Deur die eerste skakelaar
te druk sal die eerste kwarts buis aanskakel en deur
die tweede skakelaar te druk sal die oorblywends
twee kwarts buise aanskakel
Vir die ander twee kwarts buise
For the other two quartz tubes
For top quartz tube
Vir die boonste kwarts buis
4. Skoonmaak en sorg
4.1. Ontkoppel van krag prop voor enige skoonmaak
begin
4.2. Voor skoonmaak begin maak sekr die gas
toevoer is heeltemal af.
4.3. Laat die verwarmer heeltemal afkoel voor
skoonmaak begin
4.4. Die verwarmer moet gereeld ondersoek word vir
gas lekke
4.5. Maak die buitekan van die toestel skoon met a
klm doek en `n paar druppels skoonmaakmiddel en
maak deeglik droog
VERSIGTIG! Die toestel mag glad nie in water of
enige vloeistof gedompel word nie.
4.6. Moenie skuur produkte of suur gebruik op die
toestel of bleikmiddels om skoon te maak nie
5. Anomolies en herstel
5.1. Neem die toestel na `n gemagtigde tegmniese
sentrum as toestel beskadig is of probleme ontstaan
5.2. As koneksie na die muurprop beskadig is moet
die toestel vervang word volgens waarborg
3.2.3. Gebruik van eletriese verwarmer
•BELANGRIK: Die gas en elektriese verwarmer
kan nie saam gebruik
Page 17

PRODUK SPESIFIKASIES:
Brand name
Handels naam
Model number
Model nommer
Gas type
Gas tipe
Cylinder size
Silinder groote
Ignition
Aansteker
Gas orifice
Regulator
Regulator
(KPA)
(kpa)
Operating pressure
Werkdruk
Max gas
Max gas
consumption
consumption
Heat capacity
Hitte Kapasiteit
Elektriese uitset
Electric Output 1200W
Taurus
947183
LPG only
9kg cylinder only
silinder alleen
Piezo ignition
0.59mm
Outlet
Inlet
2.8kPa
0.375kg/h
Max
Med
Min
+
-
2.8 0.5
80~700
4.2 kW
2.8kW
1.4kW
Jy sal gevra word om te teken vir installasie maar
doen dit net as jy ten volle tevrede is met al die
instruksies en veiligheids instruksies.
Bewaar jou faktuur as daar `n waarborg eis is
BELANGRIKE INLIGTING VIR INSTALLEERDER.
Die toestel mag net deur `n geregistrerde gas
installeerder wat SA kwalifikasies het (SAQCC). Die
toestel moet volgens SANS 10087-1 gebruik met
LPG, SANS 827
Vir gebruik met Ng en enige brandweer regulasies
en plaaslike verordeninge in die area.
Na installasie moet die installeerder demonstreer en
verduidelik die werk en veiligheids operasies
Weight(kg)
Gewig
Boks grootte(lxbxh)
Boxed Size(lxbxh)
For indoor use only
Vir binne gebruik alleenlik. Regulator en pyp word voorgesien. Vervang alleenlik met 'n SANS 1237 goegekeurde
Regulator and hose supplied. Replace only with a SANS 1237
regulator en SAN 1156 of 853212 pyp.
approved regulator and SANS1156 or 853212 approved hose.
11kg
420x150x695mm
As jy gas ruik:
• Draai die gas silinder toe
• Maak alle vlamme dood
• Moenie elektriese toestelle gebruik nie
• Ventileer die area
• Gaan na vir gas lekke soos in handleiding
As die gas reuk bly gaan na die handelaar
Brand terug (Vuur in brander buis)
As die vlam terug brand in die gas straler draai die
gas onmiddelik toe. As die vlam heeltemal uit is wag
1 minuut and sit die verwarmer aan soos in instruksies. As die probleem weer voorkom maak die gas toe
en neem na `n diens sentrum. Moenie weer gebruik
tot die tegnikus die verwarmer hersien het en veilig
verklaar.
GAS-DRUK REGULATOR
Die toestel benodig `n druk van 2,8 kPa. `n
geskikte LPG regulator wat voldoen aan vereistes
van SANS 1237 moet ge installer word.
BELANGRIKE INLIGTING VIR VERBRUIKER
Die toestel mag net deur a geregistreerde SAQCC
gas installeerder gedoen word.
Alle gas installeerders het `n registrasie kaart met
`n nommer
Vra vir die kaart voor installasie begin.
Na installasie moet die person die werking en
veiligheids insttuksies verduidelik.
Page 18

Waarskuwings etikette op verwarmer:
Roll about Heater - Safety Tips
Fig.1:
Hou kamer geventileerd. Skakel die verwarmer af na
gebruik. Moenie verwarmer toemaak .(Fig.1)
Fig.2:
CHECK LIST(before connecting cylinder and igniting heater)
CHECK, that the hose clamps are in the right place and
properly tightened
CHECK that the nose washer in the regulator is in place
CHECK for leaks as per the guidelines in this manual
before lighting
A slight gas smell may be detected-this is normal
please refer to Manual
NB. NEVER leave the heater unattended or burning
through the night while you sleep
NB. THE HEATER MUST BE TURNED OFF USING THE
CONTROL KNOB ON THE HEATER FIRST AND ONLY THEN
CLOSING THE CYLINDER VALVE.
IGNITION
Kontrolelys en ontsteking instruksies.(fig.2)
Fig.3:
Fig.5:
Belangrike veiligheid.(fig.3)
Fig.4:
THIS HEATER CAN ONLY BE OPERATED
WITH THIS REGULATOR, AND WITH 9KG
L.P.G GAS CYLINDER
15 15 15 15 15 15 15 15 15 15 15 15
Waarskuwing! 9kg LPG gas silinder alleenlik.(fig.4)
Veiligheid.(fig.5).
Fig.6:
SAFE CONNECTING INSTRUCTIONS
Konneksie instruksies.(fig.6)
This information is only for cylinders
with gas capacity of less than 9kg
To engage and
tighten the
regulator, turn
the handwheel in
the direction of
the arrow
To close the cylinder
valve turn the valve
knob fully in the
direction of the arrow
Page 19

Probleem Gids:
Probleem
Verwarmer wil nie
aansteek
Verwarmer wil nie aanbly nie
Verwarmer wil nie aansit na
silinder verander is
Rede
Gas
•
•
behoorlik vas nie
•
nie
•
`n gelyke oppervlakte nie
•
die verwarmer gebruik word
•
•
•
•
daar mag dalk kinkels in die
pyp wees
silinder leeg
Gas
regulator nie
Gas
silinder klep nie oop
Die verwarmer is nie op
Die lug in die area waar
is nie genoeg nie
Die gas in silinder is
.
klaar
Pyp en klampe is nie
goed vasgemaak nie
Nie genoeg gas om
aan te skakel
Gas silinder is nie gelyk en
.
.
.
.
.
.
Aksie
Maak seker die
silinder het
genoeg gas.
Maak seker die
klep is op die
regte posisie
.
oop
Maak seker die
verwarmer is op `n
gelyke vlak want die
oorval skakelaar sal die
verwarmer afskakel
Maak seker die
verwarmer is in `n goed
geventileerde area
Gaan die kondisie van
die silinder na en kyk of
daar genoeg gas in is
Maak seker alle klampe
van die regulator na die
silinder is vas
genoeg tyd om die
kontrole knop af te hou
vir die gas. Staan agter
die verwarmer wanneer
jy aansteek
Maak seker die gas
silinder is behoorlik
agter in die verwarmer
en daar is geen kinkels
in die pype nie
.
Laat
Page 20

Thank you for purchasing a Taurus product. Taurus guarantees that your
product has been thoroughly inspected and tested before being dispatched
and is free from mechanical and electrical defects and complies with the applicable safety standards. With every Taurus product purchased you get a 2 year
warranty as detailed in the terms and conditions below.
First Year – 1 Year Retail Warranty:
Should defects due to faulty parts or workmanship
develop, under normal domestic use, within 12
months from the original date of purchase please
return the product to the store from where it was
purchased for a refund or replacement.
Second Year – 1 Year Extended Warranty
Taurus takes pride in their product quality and
therefore offer an extended 12 month warranty
over and above the 1 Year Retail Warranty. Should
defects due to faulty material or workmanship
develop, under normal domestic use, after the 12
month period and within 24 months from the original date of purchase, please return the product
postage pre-paid to Taurus for repair. Taurus will repair the product free of charge and return it to you
directly. Taurus will replace a product with a similar
product in the same or better condition, if the
repair cannot be conducted for whatever reason.
NB: The 1 Year Extended Warranty is only valid
for customers who have registered their warranty
online at www.taurusappliances.co.za within the
rst year after making their purchase. See overleaf
for details and instructions.
Before returning your product, check the
following:
• Your household mains supply socket is in good
condition, working and switched on.
• The mains supply circuit is not overloaded (White
trip switch on your DB board is off).
• You have read the trouble shooting guide in your
Instructions for Use.
• All accessories and parts are present.
The following conditions apply:
1. Please ensure you retain your receipt as this must be
presented when making a claim under the terms of the
guarantee. It is impossible to determine the guarantee
period without proof of purchase, so please keep this in
a safe place. (NB. Your guarantee can be scanned onto
the Taurus web site for safe storage – see reverse side
for details.)
2. If a refund or exchange is required the product must
be complete with all accessories, parts and packaging.
Missing parts will render the guarantee void.
3. Upon receipt of your appliance, check it for any trans-
port damage to ensure it is safe for use. Return it to the
store as soon as possible for exchange if damaged.
The guarantee is void if products are damaged after
use, so please do not use the damaged product.
4. Your product is designed for normal domestic household use. Failure to read and comply with the instructions for use, cleaning and maintenance will render
your guarantee void, so please read these instructions
carefully to ensure your safety, and to get the most
effective use from the product. (e.g. not removing lime
scale; water deposits; insect infestation, and/or burnt
products)
5. Any abuse, negligent, improper or accidental use
or care will render the guarantee void and Creative
Housewares (Pty) Ltd will not be liable for any loss or
damage.
6. Any attempted repair, or replacement of unauthorised
parts will render the guarantee void, so please contact
an authorised service centre or service agent for any
service or repair requirements.
7. NB: The guarantee on replaced products will be from
the original date of purchase and not from when the
date replacement was made.
8. All repairs carry a 3 month guarantee even if this falls
outside of the 2 year guarantee period.
9. Taurus will attempt to conduct repairs within reasonable
time in line with industry standards but cannot be held
responsible or liable for any circumstances not under
our control.
Repairs Out of the Warranty Period
If service or repair becomes necessary outside the
warranty period, this service is still available however all
transport/postage, spares and labour costs will be for the
customers’ account. All chargeable repairs will require
the customers’ written acceptance of the quote. Once
the go-ahead has been received Taurus will undertake to
conduct the repair within a reasonable time and maintain
the condition of the product as received. All repairs are
guaranteed for 3 months from the date of the repair.
For any service, enquiries and complaints please contact
our Customer Care on 086 111 5006 or e-mail help@
creativehousewares.co.za from 08h00 to 15h00 Monday
to Friday excluding public holidays. Please also note
that the company is normally closed for 2 weeks around
Christmas and New Year.
Please send all products for repair postage pre-paid to
one of the service centres listed on the back of this page.
Page 21

ONLINE WARRANTY REGISTRATION
Why register your warranty?
We at Taurus pride ourselves on bringing premium quality appliances to market, and as a commitment to this
level of quality we offer a 2 year warranty (1 Year Retail + 1 Year Extended) on all of our products. We often hear
that our customers lose their receipts and can therefore no longer claim if they have a problem. To take advantage
of the 1 Year Extended Warranty you will need to register your warranty online within the rst year of purchase in
order to make a valid claim. Now you can register your product, upload your warranty online, never have to worry
about losing your receipt again and enjoy the benet of your 2 year warranty.
Added Benets
In addition to providing you with an online prole of your registered
products we will also provide a host of value added benets:
• Incentives and Competitions for registered users
• New recipes or ideas for your products
• New product developments – be the rst to get the latest appliances
• Special offers on promotional items
How to Register your Online Warranty?
STEP1 Create your user prole:
If you haven’t done so already, simply visit www.taurusappliances.co.za, click on
the “Product Registration” link and follow the easy instructions. You will receive a
username and password once registered. This will give you access to your user
prole.
STEP2 Pick a registration method:
DESKTOP/
LAPTOP
• Open your internet browser and visit
www.taurusappliances.co.za
• Click on the “Registration” link and
login using your user name
and password.
• Click on “Register your products
and upload receipts” and follow the
easy instructions.
• Scan and upload your receipt
Notes:
1. The online warranty system is a safe storage facility for your
receipt.
2. You will be required to register on the Taurus website. You
will receive a username and password once registered. This will
give you access to your prole.
3. From your prole you will be able to load products that you
have purchased. In order to successfully register your warranty
you will need to either scan and upload, or fax through your
receipt to us.
4. All instructions on how to load your products are available
Cape Town
20 Tekstiel Street, Parow, Cape Town, 7493,
South Africa • P.O. Box 6156 Parow East, 7501,
South Africa Tel: +27 21 931 8117
Fax: +27 21 931 4058
• Scan the QR code above or visit
www.taurusappliances.co.za
• Click on the “Registration” link
and login using your user
name and password.
• Click on “Register your products
and upload receipts” and follow
the easy instructions.
• Scan or take a photo and
upload your receipt.
National Service Centre: 086 111 5006
e-mail: help@creativehousewares.co.za
www.creativehousewares.co.za
Durban
35 Adrian Road, Windermere,
Durban, South Africa, 4001
Tel: +27 31 303 3465
Fax: +27 31 303 8259
SMART
PHONE/
FAX
TABLET
• Fax the following to 021 931 4058
• First Name and Surname
• Contact telephone and fax number.
• Product Model number and Type.
• Traceability Code (found on the
Warranty Card or on a label
on the product)
• A clear and legible copy
of your receipt.
inside your prole.
5. Please note that you must check that your receipt has been
uploaded correctly. Creative Housewares cannot be held
responsible for faxes or les not received.
6. For assistance with registration please email: marketing@
creativehousewares.co.za.
NB: Your 1 year extended warranty is only valid if your prod-
uct is registered online within the rst year after purchasing your
Taurus product. Failure to register your product on-line within
the rst year will render the extended warranty as void.
9 Hamburg Road, Aeroport, Spartan,
Johannesburg, South Africa
Johannesburg
Tel: +27 11 392 5652
Fax: 086 567 9222
Page 22

Dankie vir die aankoop van ‘n Taurus produk. Taurus waarborg dat u
produk deeglik geïnspekteer en getoets word voordat dit versend word en
is vry van meganiese en elektriese gebreke en voldoen aan die toepaslike
veiligheidstandaarde. Met elke Taurus produk wat gekoop word kry u 'n 2 jaar
waarborg soos uiteengesit in die terme en voorwaardes hieronder.
Eerste Jaar - 1 Jaar Kleinhandelswaarborg:
Indien defekte as gevolg van foutiewe onderdele of
vakmanskap binne 12 maande onder normale huishoudelike gebruik ontwikkel, binne die 12
maande vanaf die oorspronklike datum van aankoop,
neem asseblief die produk na die winkel van waar dit
gekoop is vir 'n terugbetaling of vervanging.
Tweede Jaar - 1 Jaar Uitgebreide Waarborg
Taurus is trots op die kwaliteit van die produk en
bied dus 'n uitgebreide 12 maande waarborg bo en
behalwe die 1 Jaar kleinhandelswaarborg. Indien
defekte as gevolg van foutiewe materiaal of vakmanskap ontwikkel, onder normale huishoudelike gebruik,
na die 12 maande tydperk en binne 24 maande vanaf
die oorspronklike datum van aankoop, stuur die
produk terug met posgeld betaal na Taurus vir herstel.
Taurus sal die produk gratis herstel en dit direk aan
u terugstuur. Taurus sal die produk vervang met 'n
soortgelyke produk in dieselfde of beter toestand,
as die herstel nie uitgevoer kan word vir watter rede
ookal nie.
NB: Die 1 Jaar Uitgebreide waarborg is slegs geldig
vir kliënte wat hul waarborg geregistreer het op ons
webtuiste by www.taurusappliances.co.za binne die
eerste jaar nadat hulle dit aangekoop het
Sien keersy vir besonderhede en instruksies.
Voordat u die produk terug stuur, maak seker
van die volgende:
• U huishoudelike geleidingsok is in 'n goeie toestand,
werk en aangeskakel is,
• Die geleidingsok is nie oorlaai nie (Wit uitskop
skakelaar op u DB bord af is),
• U het die moeilikheid steuringsgids gelees in u
instruksies vir gebruik,
• Alle bykomstighede en dele teenwoordig is.
Die volgende voorwaardes geld:
1. Maak seker dat u kwitansie behoue is, dit moet aangebied
word wanneer 'n eis gemaak word onder die voorwaardes
van die waarborg. Dit is onmoontlik om die waarborg
tydperk te bepaal sonder die bewys van aankoop, so hou
dit asseblief in 'n veilige plek. (NB. U waarborg kan opgeskandeer word na die Taurus webtuiste vir veilige bewaring
- sien keersy vir meer inligting.)
2. Indien 'n terugbetaling of omruiling van die produk nodig is
moet die produk volledig wees met al die bykomstighede,
onderdele en verpakking. Toebehore wat weg is sal die
waarborg nietig maak.
3. Met ontvangs van u toestel, gaan dit na vir enige vervoer
skade om te verseker dat dit veilig is vir gebruik. Stuur dit
so gou as moontlik terug na die winkel om die beska-
digde toestel te vervang. Die waarborg is nietig indien
die beskadigde produk gebruik word na die tyd, so
moet asseblief nie die beskadigde produk gebruik nie.
4. U produk is ontwerp vir normale huishoudelike
gebruik. Deur te versuim om die instruksies te lees en
te voldoen aan die terme van gebruik, die skoonmaak
en instandhouding van die produk maak u waarborg
ongeldig, so lees asseblief hierdie instruksies versigtig
om u veiligheid te verseker, en om die beste uit die
gebruik van die produk te kry. (bv nie die verwydering
van kalk skaal; water neerslag; insek besmetting, en /
of verbrande produkte)
5. Enige misbruik, nalatige, onbehoorlike of toevallige
beskadiging of sorg van die produk word die waarborg
nietig en Creative Housewears (Pty) Ltd, sal nie
aanspreeklik wees vir enige verlies of skade nie.
6. Enige poging tot herstel, of vervanging met
ongemagtigde onderdele sal die waarborg nietig maak,
so kontak 'n gemagtigde dienssentrum of diensagent
vir enige diens of herstelwerk.
7. NB: Die waarborg op die vervangingsproduk sal by die
oorspronklike datum van aankoop bly en nie van die
datum wanneer dit vervang is nie.
8. Alle herstelwerk dra 'n 3 maande waarborg selfs al val
dit buite die 2-jaar waarborg tydperk.
9. Taurus sal probeer om die herstelwerk te doen binne 'n
redelike tyd in lyn met die industrie standaarde, maar
kan nie verantwoordelik gehou word of aanspreeklik
wees vir enige omstandighede nie onder ons beheer
nie.
Herstelwerk buite die waarborg tydperk
As diens of herstelwerk benodig word buite die waarborg
tydperk, is hierdie diens steeds beskikbaar, maar is alle
vervoer / posgeld, onderdele en arbeidskoste op die
kliënte se onkoste. Alle betaalbare herstelwerk sal skriftelike aanvaarding van die kwotasie vereis van die kliënt. Sodra Taurus die groen lig ontvang sal ons onderneem om
die herstel binne 'n redelike tyd en in dieselfde toestand
te hou as wat die produk ontvang is. Alle herstelwerk is
gewaarborg vir 3 maande vanaf die datum van die herstel.
Vir enige diens, navrae en klagtes kontak ons kliënte diens
op 086 111 5006 of e-pos help@creativehousewares.
co.za vanaf 08h00 tot 15h00, Maandag tot Vrydag, openbare vakansiedae uitgesluit. Let asseblief ook daarop
dat die maatskappy gewoonlik gesluit is vir 2 weke gedurende Kersfees en Nuwejaar.
Stuur asseblief alle produkte vir herstel met posgeld
vooruit betaal aan een van die dienssentrums wat op die
agterkant van hierdie bladsy verskyn.
Page 23

AANLYN WAARBORG REGISTRASIE
Hoekom moet u die waarborg moet registreer?
Ons by Taurus is trots om premium gehalte toestelle op die mark te bring, en as 'n verbintenis tot die vlak van
gehalte bied ons 'n 2 jaar waarborg (1 Jaar Kleinhandel + 1 Jaar Uitgebreide) op al ons produkte. Ons hoor
dikwels dat ons kliënte hul kwitansies verloor en kan dus nie meer eis as hulle 'n probleem het nie. Om voordeel te
trek van die 1 Jaar Uitgebreide waarborg sal u nodig hê om u waarborg aanlyn te registreer binne die eerste jaar
van aankoop om 'n geldige eis te maak. Nou kan u die produk aanlyn registreer, laai u waarborg en hoef u nooit te
bekommer dat u die kwitansie sal verloor nie en die voordeel van u 2-jaar waarborg geniet.
Bygevoegde Voordele
Bykomend tot die verskafng van ‘n aanlyn proel van u geregistreerde produkte bied ons ook vele ander toegevoegde waarde voordele:
• aansporings en kompetisies vir geregistreerde gebruikers
• nuwe resepte of idees vir u produkte
• nuwe produk ontwikkelings - die eerste wees om die nuutste toestelle te kry
• spesiale aanbiedings op promosie-items
Hoe om u Aanlyn Waarborg te Registreer?
STAP 1 Skep u gebruikersproel:
As u dit nie reeds gedoen het nie, besoek www.taurusappliances.co.za, kliek op
die "Product Registration" skakel en volg die maklike instruksies. U sal 'n gebruikersnaam en wagwoord ontvang sodra u geregistreer het. Dit sal u toegang tot u
proel gee.
STAP 2 Kies 'n registrasie metode:
REKENAAR/
SKOOTREKENAAR
• Maak u internet snuffelgids oop en
besoek
www.taurusappliances.co.za
• Klik op die "Registrasie" skakel en
teken in met u gebruikersnaam en
wagwoord.
• Klik op "Register your products” en
laai kwitansies en volg die maklike
instruksies.
• Skandeer en laai u strokie
Notas:
1. Die aanlyn waarborg stelsel is 'n veilige stoor fasiliteit vir u
strokies.
2. U sal gevra word om op die Taurus webtuiste te registreer. U
sal 'n gebruikersnaam en wagwoord ontvang. Dit sal u toegang
gee tot u proel.
3. Van u proel u sal in staat wees om produkte te laai wat u
gekoop het. Om u waarborg suksesvol te registreer sal u nodig
hê om of te skandeer en oplaai, of faks u strokie deur na ons.
4. Alle instruksies oor hoe om u produkte te laai is beskikbaar
binne in u proel.
5. Let daarop dat u moet seker maak dat u kwitansie korrek op-
Kaapstad
20 Tekstielstraat, Parow, Kaapstad, 7493, Suid
Afrika • P.O. Box 6156 Parow Oos, 7501, Suid
Afrika Tel: +27 21 931 8117
Faks: +27 21 931 4058
• Skandeer die QR-kode bo of besoek
www.taurusappliances.co.za
• Klik op die "Registration" skakel en
teken aan met u verbruikersnaam en
wagwoord.
• Klik op "Register your products” en
laai u kwitansie en volg die maklike
instruksies.
• Skandeer of neem 'n foto en laai u
strokie.
Nationale Dienssentrum: 086 111 5006
e-pos: help@creativehousewares.co.za
www.creativehousewares.co.za
35 Adrianweg, Windermere,
Durban, Suid Afrika, 4001
Tel: +27 31 303 3465
Faks: +27 31 303 8259
SMARTFOON /
FAKS
TABLET
• Faks die volgende na 021 931 4058
• Naam en Van
• Kontak telefoon en faksnommer.
• Produk model nommer en tipe.
• Traceability Code (wat op die
• Waarborgkaart of op 'n etiket op die
produk gevind kan word)
• 'n Duidelike en leesbare afskrif van
u ontvangs.
gelaai is. Creative Housewares kan nie verantwoordelik gehou
word vir fakse of lêers nie ontvang nie.
6. Vir hulp met registrasie e-pos asseblief: marketing@creativehousewares.co.za.
NB: U 1 jaar verlengde waarborg is slegs geldig indien u
produk aanlyn geregistreer is binne die eerste jaar na die
aankoop van u Taurus produk. Indien u produk nie aanlyn
geregistreer word binne die eerste jaar nie sal dit die verlengde
waarborg nietig maak.
Durban
9 Hamburgweg, Aeroport, Spartan,
Johannesburg
Johannesburg, Suid Afrika
Tel: +27 11 392 5652
Faks: 086 567 9222
Page 24

Durban
35 Adrain Road, Windermere,
Durban, South Africa, 4001
Tell: +27 31 303 3465
Fax: +27 31 303 8259
Unit 25 & 26 San Croy Office Park
Johannesburg
Die Agora Road, Croydon, 1619
Tell: +27 11 392 5652
Fax: +27 11 392 1694
 Loading...