

Page 1
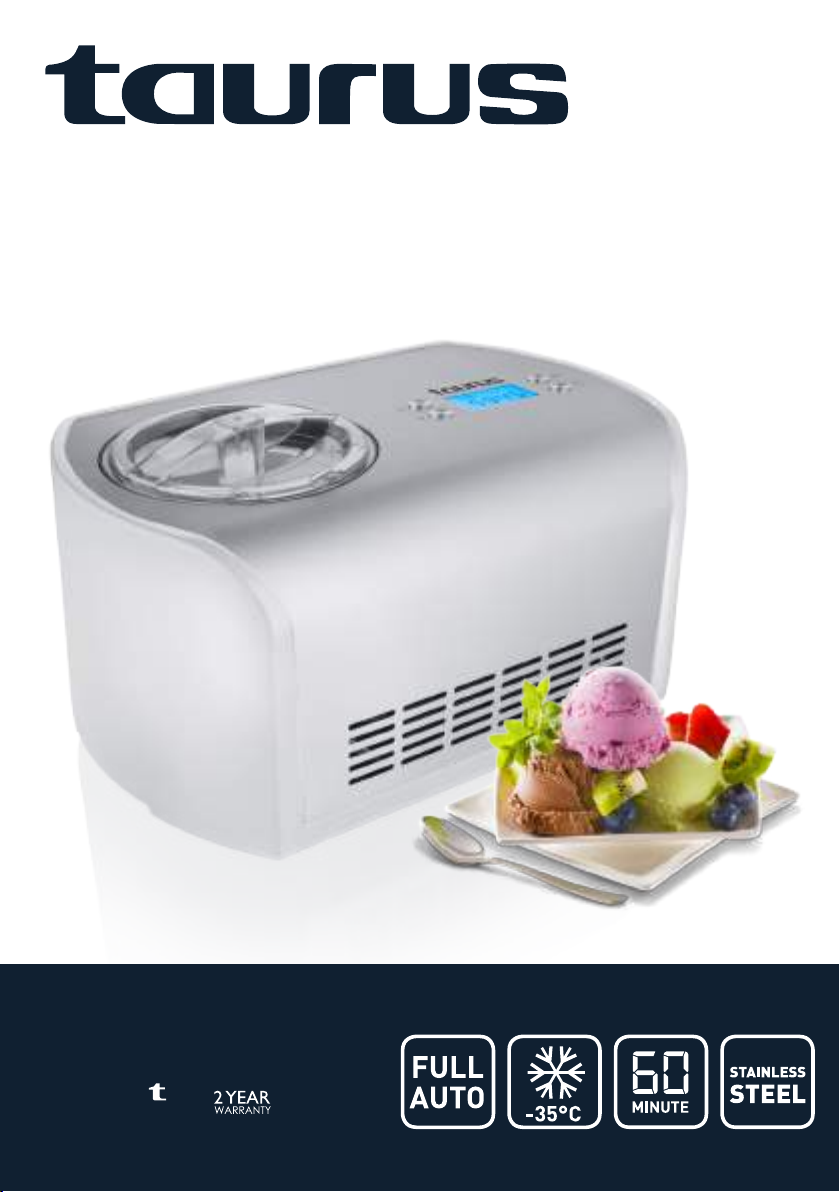
CASA GELAT
complies with
INTERNATIONAL
IEC60335
SAFETY SPECIFICATIONS
135W
Model:
969135
PLEASE READ ALL INSTRUCTIONS BEFORE USE
ENGLISH / AFRIKAANS
Page 2
ENGLISH MANUAL
2.1. Use or working environment:
Dear customer,
Thank you for choosing to purchase a Taurus brand
product. Thanks to its technology, design and operation and the fact that it exceeds the strictest quality
standards, a fully satisfactory use and long product life
can be assured.
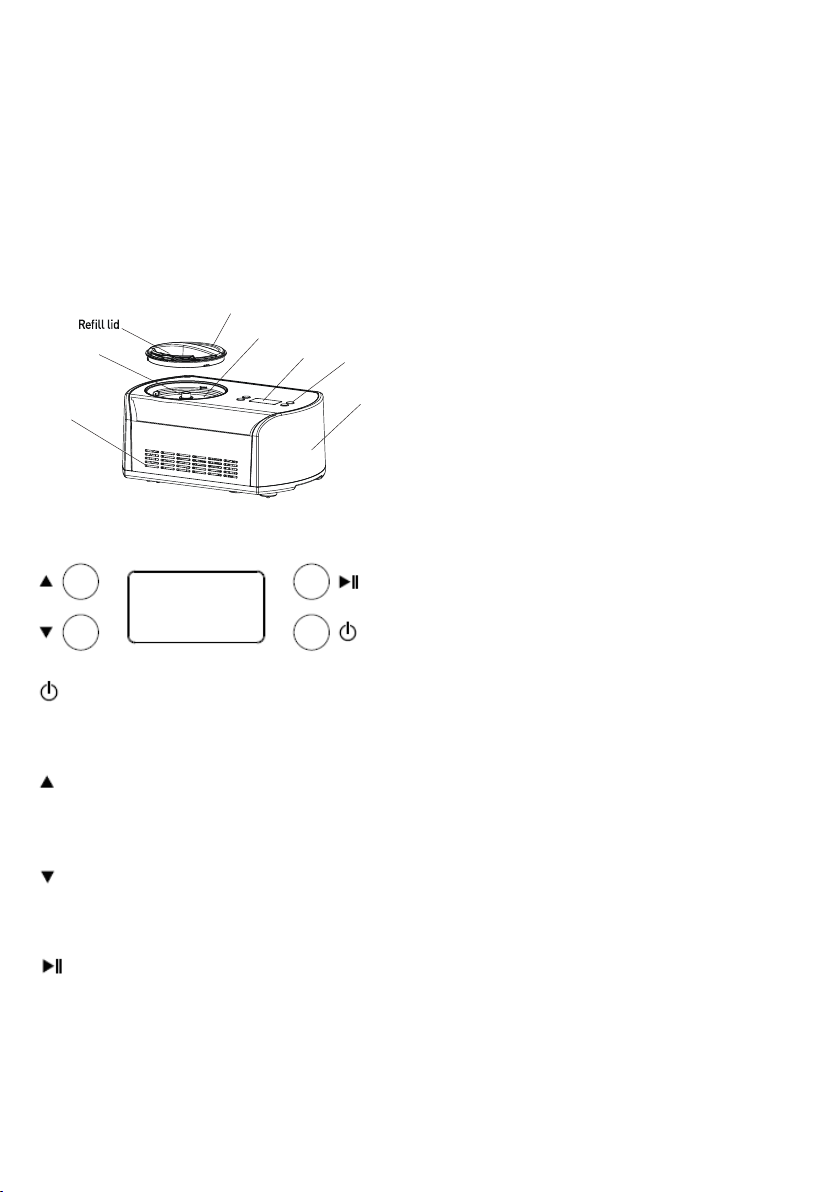
1. PARTS Description
1.1 Structure
Mixing blade
Air vent
1.2 Function buttons
" " button: After plugging in the power cord, the machine will
enter into standby mode. Then touch this power button to enter
into the setting mode. Touch this button during operation and the
machine will be powered off.
“ ”button: This button is for increasing the working time.
Touch this button once and the time will increase by 1 minute. If
the button is held for over 2 seconds, the time will increase more
rapidly. The maximum time is 60 minutes.
“ ” button: This button is for decreasing the working time.
Touch this button once, the time will decrease by 1 minute. If the
button is held for over 2 seconds, the time will decrease more
rapidly. The minimum time is 5 minutes.
“ ”button: After setting the menu and time, touch this button
to start the working mode. During operation, by touching this
button, the mixing will pause and the time countdown will also
pause.
Transparent lid
Removable bowl
Display
Buttons
Housing
2.1.1. Keep the working area clean and well lit. Cluttered and dark areas invite accidents.
2.1.2. Use the appliance in a well ventilated area.
2.1.3. Do not place the appliance on hot surfaces,
such as cooking plates, gas burners, ovens or similar
items.
2.1.4. Keep children and bystanders away when using
this appliance.
2.1.5. Place the appliance on a horizontal, flat, stable
surface suitable for withstanding high temperatures
and away from other heat sources and contact with
water.
2.1.6. Keep the appliance away from flammable material such as textiles, curtains, cardboard or paper, etc.
2.1.7. Do not place flammable material near the appliance.
2.1.8. Do not use the appliance in association with a
programmer, timer or other device that automatically
switches it on.
2.1.9. Do not use the appliance if the cable or plug is
damaged.
2.1.10. Ensure that the voltage indicated on the rating
label matches the mains power supply voltage before
plugging in the
appliance.
2.1.11. Connect the appliance to the mains power
supply with an earth socket withstanding a minimum
of 10 amperes.
2.1.12. The appliance’s plug must fit into the mains
power supply socket properly. Do not alter the plug.
2.1.13. If using a multi plug check ratings carefully as
the current used by several appliances could easily
exceed the rating of the multi plug.
2.1.14. If any of the appliance casings breaks, immediately disconnect the appliance from the mains power
supply to prevent the possibility of an electric shock.
2.1.15. Do not use the appliance if it has fallen on the
floor or if there are visible signs of damage.
2.1.16. Do not force the power cord. Never use the
power cord to lift up, carry or unplug the appliance.
2.1.17. Do not wrap the power cord around the appliance.
2.1.18. Do not clip or crease the power cord.
2.1.19. Do not allow the power cord to hang or to
come into contact with the hot surfaces of the appliance.
2.1.20. Check the state of the power cord. Damaged or
tangled cables increase the risk of electric shock.
2.1.21. The appliance is not suitable for outdoor use.
2.1.22. Power cord should be regularly examined for
signs of damage, and if the cord is damaged, the appliance must not be used.
2.1.23. Do not touch the plug with wet hands.
Page 3
2.2. Personal safety:
2.2.1. CAUTION: Do not leave the appliance unattended during use as there is a risk of an accident.
2.2.2. Do not touch the heated parts of the appliance,
as it may cause serious burns.
2.2.3. This appliance is only for domestic use, not for
industrial or professional use. It is not intended to be
used by guests in hospitality environments such as
bed and breakfast, hotels, motels, and other types of
residential environments, even in farm houses, areas
of the kitchen staff in shops, offices and other work
environments.
2.2.4. This appliance is not intended for use by
persons (including children) with reduced physical,
sensory or mental capabilities, or lack of experience
and knowledge, unless they have been given supervision or instruction concerning use of the appliance by
a person responsible for their safety.
2.2.5. This appliance is not a toy. Children should be
supervised to ensure that they do not play with the
appliance.
2.3. Use and care:
2.3.1. Fully unroll the appliance’s power cable before
each use.
2.3.2. Do not use the appliance if the parts or accessories are not properly fitted.
2.3.3. Do not use the appliance when empty.
2.3.4. Do not turn the appliance over while it is in use
or connected to the mains power supply.
2.3.5. Do not cover the cooking surface or food with
aluminium foil and other similar materials.
2.3.6. Unplug the appliance from the mains power
supply when not
in use and before undertaking any cleaning task.
2.3.7. This appliance should be stored out of reach
of children.
2.3.8. Do not store the appliance if it is still hot.
2.3.9. Never leave the appliance unattended when in
use and keep out of the reach of children.
2.3.10. If, for some reason, the appliance were to
catch fire, disconnect the appliance from the mains
power supply and DO NOT USE WATER TO PUT THE
FIRE OUT.
2.4. Service:
2.4.1. Make sure that the appliance is serviced only
by suitably qualified technician, and that only original
spare parts or accessories are used to replace existing
parts/accessories.
2.4.2. If the power cord is damaged, the manufacturer
or its service agent or a similarly qualified person must
replace it in order to avoid a hazard.
2.4.3. Any misuse or failure to follow the instructions
for use renders the guarantee and the manufacturer’s
liability null and void.
3. Instructions for use:
Making Ice Cream
Cleaning before use: Before use, thoroughly wash all the parts
that will come into contact with the ice cream (including the fixed
bowl, removable bowl, mixing blade, transparent lid, refill lid).
Important: Always place the Ice Cream Maker upright on a flat
surface in order for the build-in COMPRESSOR to provide the
best performance.
Step 1. Prepare recipe ingredients:
Prepare the recipe ingredients from your own recipe or from the
recipes provided in this manual.
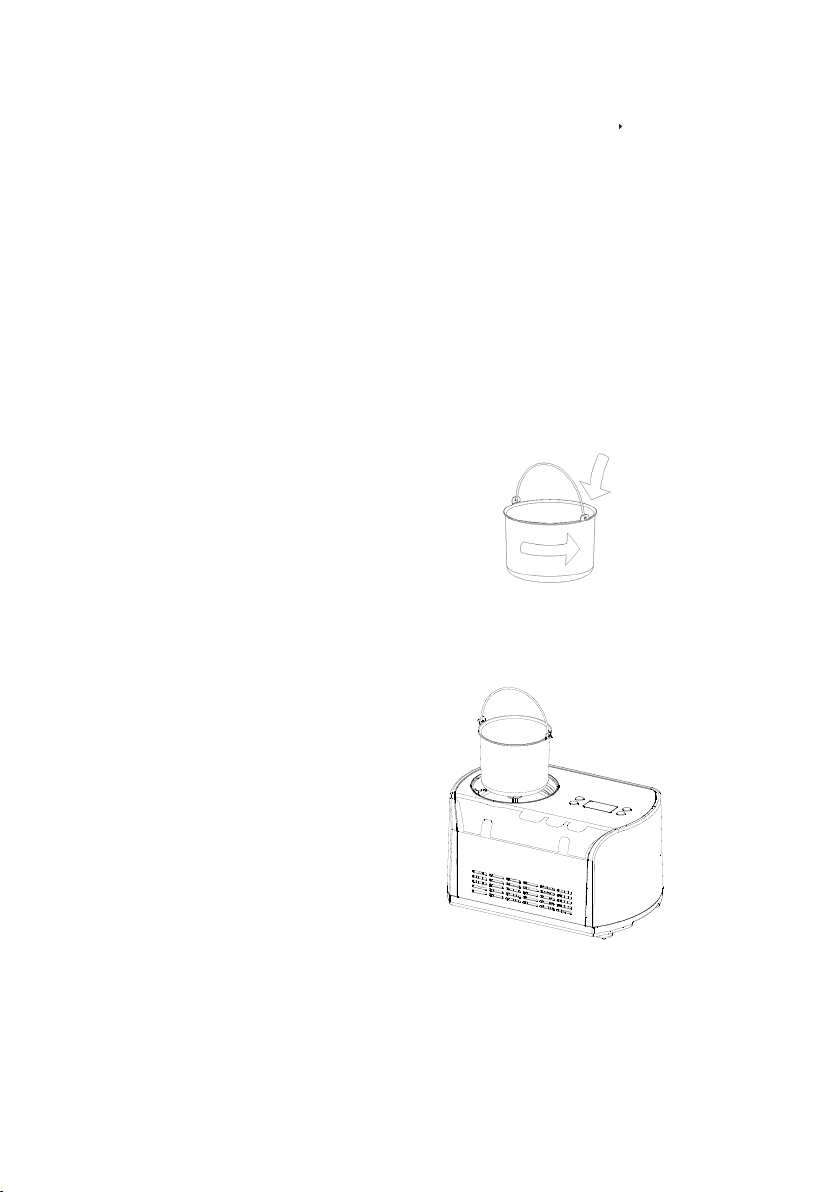
Step 2.Pour the prepared recipe ingredients into the
removable bowl
Pour in recipe ingredients
Step 3. Put the removable bowl into the machine and slightly
turn the bowl to make sure it is fitted properly
(See below picture).
Step 4. Place the mixing blade into the removable bowl. Then
put the transparent lid onto the machine and lock it anticlockwise
(See below picture).
Page 4
To avoid over flow and waste, please make sure that the ingredients do not exceed 60% of the capacity of the removable bowl
(Ice cream expands when being formed)
STORAGE OF ICE CREAM
Remove the finished ice cream and place into another container
using a plastic scoop or a wooden spoon, do not use a metal
scoop avoiding scratches on the inside of the removable bowl.
4. Cleaning
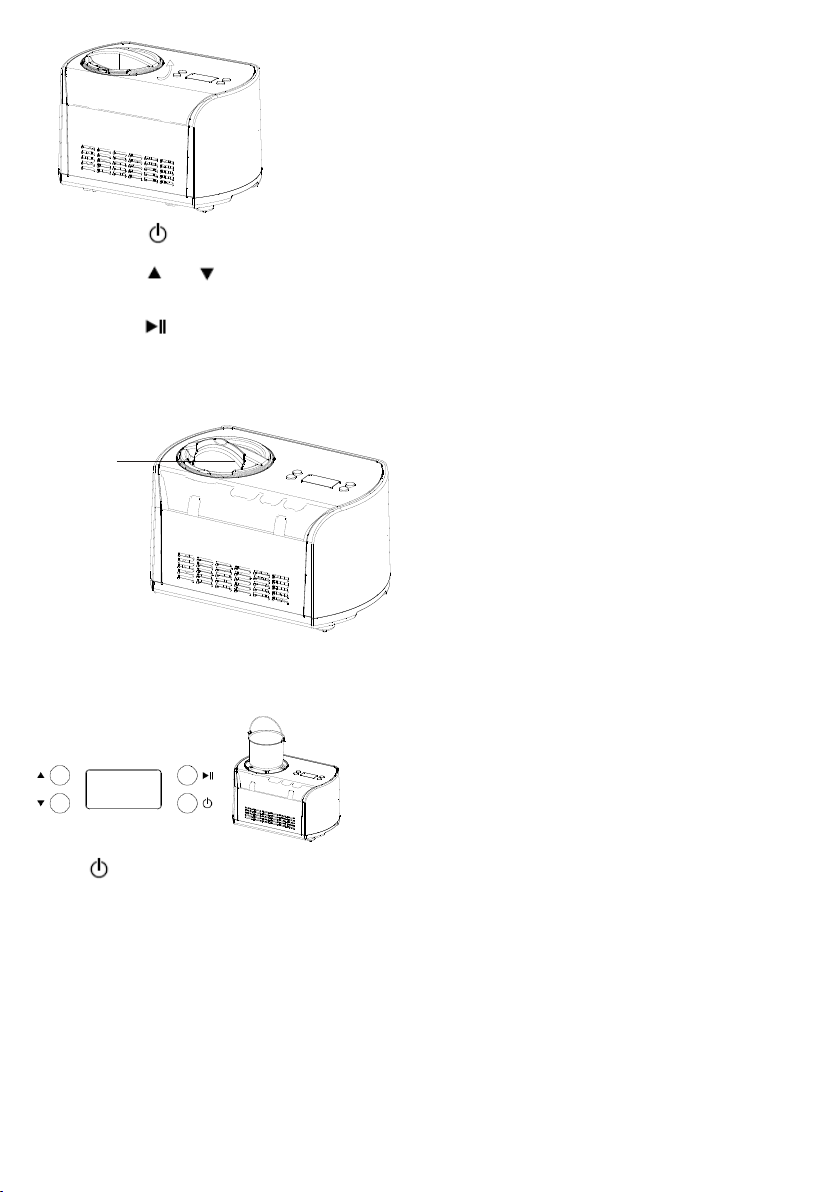
Step 5. Touch the [ ] button to turn the machine on
Step 6. Touch the [ ] or [ ] button to choose the working
time
Step 7. Touch the [ ] button to start working
Step 8. You can add the favorite ingredients by opening the refill
cover (See below picture).
Open the
refilling lid,
and add the
ingredients
Step 9. After the operation is over, turn off the machine, then pull
the removable bowl out.
- Touch [ ] to turn off the ice cream maker.
- Pull out the removal bowl.
Operation
Keep cool process
After 10 minutes the machine will enter the keep cool process.
This keep cool function lasts up to 1 hour.
After this time the machine will return to the standby state.
Motor self-protection function
When the ice cream becomes harder, the mixing motor might
get blocked. Then the motor protection device makes the mixing
motor stop working by detecting its temperature to ensure the
life of the motor.
Controlling the Volume of the Ingredients
4.1. Disconnect the appliance from the mains power
supply and allow it to cool completely before undertaking any cleaning task.
4.2. Clean the removable frothing paddle with a
damp cloth and dry.
4.3. Clean the outer parts of the appliance with a damp
cloth with a few drops of washing-up liquid and then
dry. CAUTION! Do not immerse electrical parts of the
appliance in any liquid.
4.4. Do not use solvents, or products with an acid
or base pH such as bleach, or abrasive products, for
cleaning the appliance.
4.5. Never submerge the appliance in water or any
other liquid or place it under running water.
5. Anomalies and repair
5.1. Take the appliance to an authorised suppor t centre
if product is damaged or other problems arise.
5.2. If the connection to the mains has been damaged,
it must be replaced and you should proceed as you
would in the case of damage.
ICE CREAM RECIPES
VANILLA ICE CREAM
Makes eight 1/2-cup servings.
1 cup full cream milk
1/2 cup granulated sugar
2/3 cups heavy cream, well chilled
1 – 2 teaspoons pure vanilla extract, to taste
In a medium bowl, use a hand mixer or a whisk to combine the
milk and granulated sugar until the sugar is dissolved, about 1
– 2 minutes on low speed. Stir in the heavy cream and vanilla to
taste. Turn machine on, pour mixture into freezer bowl through
ingredient spout and let it mix until it has thickened, about 30 –
40 minutes.
VARIATIONS:
Mint Chip: Omit the vanilla and replace with 1 to 1-1/2 tea-
spoons pure peppermint extract (to taste). Chop your favorite
4-ounce bittersweet or semi-sweet chocolate bar into tiny
uneven pieces. Add the chopped chocolate during the last 5
minutes of mixing.
Butter Pecan: Melt 1 stick unsalted butter in a 10-inch skillet.
Add 1 cup roughly chopped pecans and 1 teaspoon kosher
Page 5

salt. Cook over medium-low heat, stirring frequently until the
pecans are lightly browned. Remove from the heat, strain
(the butter will have a pecan flavor and may be reserved for
another use). Allow the pecans to cool completely. Add the
toasted buttered pecans during the last 5 minutes of mixing.
Cookies & Cream: Add 3/4 cup coarsely chopped cookies or
your favorite candy (chocolate chip, Oreos., Mint Oreos., etc.)
during the last 5 minutes of mixing.
BASIC CHOCOLATE ICE CREAM
Makes eight 1/2-cup servings.
In a medium bowl, use a hand mixer or a whisk to combine
the milk, and granulated sugar until the sugar is dissolved,
about 1 – 2 minutes on low speed. Stir in the heavy cream
plus any accumulated juices from the strawberries and
vanilla. Turn the machine on, pour mixture into freezer bowl
through ingredient spout and let mix until thickened, about
30 – 40 minutes. Add the sliced strawberries during the last 5
minutes of freezing.
Note: this ice cream will have a “natural” appearance of very
pale pink; if a deeper pink is desired, sparingly add drops of
red food coloring until desired color is achieved.
1 cup full cream milk
1/2 cup granulated sugar
240g or 8 ounces bittersweet or semi-sweet chocolate (your
favorite), broken into 1/2-inch pieces
1 cup heavy cream, well chilled
1 teaspoon pure vanilla extract
Heat the milk until it is just bubbling around the edges (this
may be done on the stovetop or in a microwave). In a blender
or food processor fitted with the metal blade, pulse to process
the sugar with the chocolate until the chocolate is very finely
chopped. Add the hot milk, process until well blended and
smooth. Transfer to a medium bowl and let the chocolate
mixture cool completely. Stir in the heavy cream and vanilla
to taste.
Turn the machine on, pour mixture into freezer bowl through
ingredient spout and let mix until thickened, about 30 – 40
minutes.
VARIATIONS:
Chocolate Almond: Add 1/2 teaspoon pure almond extract
along with the vanilla. Add 1/2 - 3/4 cup chopped toasted
almonds or chopped chocolate-coated almonds during the
last 5 – 10 minutes of freezing.
Chocolate Cookie: Add 1/2 - 1 cup chopped cookies during
the last 5 minutes of freezing.
Chocolate Fudge Brownie: Add 1/2 - 1 cup chopped day old
brownies during the last 5 minutes of freezing.
Chocolate Marshmallow Swirl: When removing the ice
cream to a container for freezing, layer it with dollops of your
favorite chocolate sauce and scoops of marshmallows.
FRESH STRAWBERRY ICE CREAM
Makes eight 1/2-cup servings.
250g or 1 pint fresh ripe strawberries, stemmed and sliced
2/3tablespoons freshly squeezed lemon juice
1/2 cup sugar, divided
1 cup full cream milk
1 cups heavy cream
1 teaspoon pure vanilla extract
FRESH LEMON SORBET
Makes eight 1/2-cup servings.
2/3 cups sugar
2/3 cups water
1 cup freshly squeezed lemon juice
1 tablespoon finely chopped lemon zest *
Combine the sugar and water in a medium saucepan and
bring to a boil over medium-high heat. Reduce heat to low
and simmer without stirring until the sugar dissolves, about
3 – 5 minutes. Cool completely. This is called a simple syrup,
and may be made ahead in larger quantities to have on hand
for making fresh lemon sorbet. Keep refrigerated until ready
to use.
When cool, add the lemon juice and zest; stir to combine.
Turn the machine on, pour the lemon mixture into freezer
bowl through ingredient spout and mix until thickened, about
30 – 40 minutes.
*When zesting a lemon or lime use a vegetable peeler to
remove the colored part of the citrus rind.
CHOCOLATE FROZEN YOGURT
Makes eight 1/2-cup servings
1 cup full cream milk
180g or 6 ounces bittersweet or semisweet chocolate,
chopped
2 cups low-fat vanilla yogurt
1/4 cup sugar
Combine the milk and chocolate in a blender or food processor fitted with the metal blade and process until well blended
and smooth, 20 – 30 seconds. Add the yogurt and sugar;
process until smooth, about 15 seconds. Turn the machine
ON, pour mixture into freezer bowl through ingredient spout
and let mix until thickened, about 50 – 60 minutes.
In a small bowl, combine the strawberries with the lemon
juice and 1/2 cup of the sugar; stir gently and allow to the
strawberries to macerate in the juices for 2 hours.
Page 6

AFRIKAANS HANDLEIDING
Geagte kliënt,
Baie dankie vir u keuse om 'n Taurus handelsmerk
produk te koop.
Danksy die tegnologie, ontwerp en werking
en die feit dat dit voldoen aan die strengste
gehalte standaarde, is u verseker van ‘n volle
bevredigende gebruik en lang produklewe.
1. Dele en Kenmerke
1.1. Struktuur
Hervuldeksel
Menglem
Lugskag
1.2. Funksieknoppies:
“ ”: Nadat die kragkoord ingeprop is, sal die toestel in die
bystandsmodum wees. Raak dan aan die kragknoppie om in
die instellingsmodus te kom. Sou hierdie knoppie gedurende
werking van die toestel gedruk word, sal die masjien se krag
afskakel.
“ ”: Hierdie knoppie is vir vermeerdering van die werktyd.
Raak die knoppie een keer aan en die werktyd sal vermeerder
met een minuut. As die knoppie gehou word vir meer as 2
sekondes, sal die werktyd baie vinniger vermeerder. Die
maksimum tyd is 60 minute.
“ ”: Hierdie knoppie is vir die vermindering van werktyd.
Raak eenmaal aan die knoppie, en die tyd sal met 1 minuut
verminder. As die knoppie vir meer as 2 sekondes gehou
word, sal die werktyd baie vinniger verminder. Die minimum
tyd is 5 minute.
“ ”: Na die instel van die spyskaart en tyd, raak hierdie
knoppie aan om die werk te begin. Deur aan hierdie knoppie
te raak tydens die werking van die toestel, sal die mengery ‘n
bietjie ophou asook die aftelling.
Deursigtige Deksel
Verwyderbare Bak
Vertoonskerm
Knoppies
Behuising
2. Belangrike veiligheidsvoorsorg
Wanneer elektriese toestelle gebruik word, moet die
basiese veiligheidsmaatreels altyd gevolg word.
Maak al die parte wat met kos in aanraking kom
deeglik skoon voor gebruik.
2.1. Gebruik en werksomgewing:
2.1.1. Hou die werk oppervlak skoon en helder
verlig. Ongelukke gebeur in donker areas.
2.1.2. Gebruik die produk in n goed geventileerde
area.
2.1.3. Moenie die toestel naby `n warm gas of
elektriese brander of qn warm oond plaas nie.
2.1.4. Streng toesig is nodig as die toestel naby of
deur kinders gebruik word.
2.1.5. Plaas toestel op `n stabiele area en weg van
water.
2.1.6. `n Brand mag ontstaan as die rooster bedek
is of aan vlambare material raak, insluitende gordyne
as dit in werking is.
2.1.7. Die toestel is nie geskik om op aan `n tydsbeheer toestel te Koppel nie.
2.1.8. Moenie die toestel gebruik as die koord of
prop beskadig is.
2.1.9. Maak seker die spanning soos aangedui op
die gradering etiket kom ooreen met die hoofspanning.
2.2.10. Prop in elektriese uitlaat.
2.1.11. Die toestel prop moet in die hoof prop pas
en moenie die prop verander.
2.1.12. Indien `n multi prop gebruik word maak
seker die toestel se strome oorskry nie die gradering
van die multi prop.
2.1.13. Moenie die toestel gebruik as die prop of
koord beskadig isnie of enige sigbare skade aan die
omhulsel is nie.
2.1.14. Moenie die toestel gebruik as dit op die vloer
geval het en daar is sigbare skade.
2.1.15. Moenie die koord gebruik om die toestel te
dra, op te tel of van diemuurprop te ontkoppel nie.
2.1.16. Die koord mag nooit om die toestel gedraai
word nie.
2.1.17. Moenie die koord plooi nie.
2.1.18. Die koord Moenie oor die kant van die tafel of
toonbank hang of aan warm oppervlaktes raak nie.
2.1.19. Maak seker die koord is nie beskadig of
verstrengel nie.
2.1.20. Die toestel moet nie buite gebruik word nie
2.1.21. Moenie die prop met nat hande hanteer nie.
Page 7

2.2. Persoonlike veiligheid:
3. Instruksies vir gebruik
2.2.1. LET WEL: Moenie die toestel sonder toesig
laat nie.
2.2.2. Moenie warm oppervlaktes aanraak nie
gebruik handvatsels of knoppe want dit kan lei tot
ernstige brandwonde.
2.2.3. Die toestel is nie geskik vir industriele gebruik
soos kantore,hotelle motelle en gastehuise.
2.2.4. Die toestel is nie geskik vir gebruik deur vermindered fisiese verstandelike vermoens of gebrek
aan ervaring of kennis tensy hulle opleiding gehad
het.
2.2.5. Die toestel is nie `n speelding and kinders
moet altyd toesig he om te verhoed dat hulle met die
toestel speel.
2.3. Gebruik en sorg:
2.3.1. Die kabel moet ten volle afgewikkel word voor
gebruik.
2.3.2. Die toestel moet nie gebruik word as die parte
of bykomstighede nie behoorlik pas.
2.3.3. Die toestel moet nooit leeg gebruik word nie.
2.3.4. Die Toestel moet nooit gedraai word terwyl dit
in werking is of in die muurprop gekoppel is.
2.3.5. Die kook oppervlakte moet nooit toegemaak
word me foelie of soortgelyke materiaal.
2.3.6. Ontkoppel die toestel van die hooftoevoer as
dit nie in gebruik is nie en laat dit heeltemal afkoel
voordat dit skoongemaak word. As dele afgehaal
word of toegevoeg word,moet die toestel nie in
werking wees nie.
2.3.7. Die toestel moet buite bereik van kinders
gestoor word.
2.3.8. Die toestel moet heeltemal afkoel voor dit
gestoor word.
2.3.9. Die toestel moet altyd onder toesig wees
wanneer in gebruik en moet buite bereik van kinders
gehou word.
2.3.10. As die toestel aan die brand slaan ontkoppel van die muursok en gooi n kombuis vadoek oor
MOET NOOIT WATER GEBRUIK!!!
2.4. Diens:
2.4.1.Die toestel moet deur `n gekwalifiseerde
tegnikus gediens word
2.4.2 As die koord beskadig word moet dit deur die
diensagent of `n gekwalifiseerde person vervang
word om brandgevaar te verhoed
2.4.3.Enige misbruik en mislukking om instruksies te
volg lewer die waarborg nul en leemte.
Hoe om roomys te maak:
Skoonmaak voor die maak van roomys:
Voor gebruik, was al die dele deeglik wat in kontak met die
roomys sal kom(insluitende die vaste bak,verwyderbare bak,
menglem, deursigtige deksel, hervullingsdeksel, koppie en
lepel).
Belangrik:
Plaas altyd die Roomysmaker regop op ‘n plat oppervlak ten
einde die ingeboude kompressor toe te laat om die beste
prestasie te lewer.
Stap 1: Berei die resep se bestanddele: Berei jou eie resep se
bestanddele of van die resepte in hierdie handleiding.
Stap 2: Gooi die voorbereide resep bestanddele in die
verwyderbare bak.
Stap 3: Sit die verwyderbare bak in die masjien en draai
die bak effens om te verseker dat dit behoorlik pas(sien die
prentjie hieronder).
Stap 4: Plaas die menglem in die verwyderbare bak. Plaas die
deurskynende deksel op die masjien en sluit dit teenkloksgewys vas(sien prentjie onder).
Page 8

Stap 5: Raak aan die ( ) knoppie om die masjien aan te
skakel.
Stap 6: Raak aan die ( ) of ( ) knoppie om die werktyd
te kies.
Stap 7: Raak aan die ( ) knoppie om die werking te laat
begin.
Stap 8: Jy kan jou geliefkoosde bestanddele byvoeg deur die
hervullingdeksel oop te maak(sien prentjie onder).
Maak deksel
oop en voeg
bestanddele by
2. Haal die verwyderbare bak uit, maak dit skoon met ‘n
sagte klam lap.
3. Vee beide die deursigtige en hervuldeksel met ‘n klam lap
af. Maak die hervuldeksel oop, voeg die bestanddele by.
4. Verwyder die vuilheid van die masjien of ander plekke met
‘n klam lap. Moenie water op die koord , prop , ventilasie
areas laat kom of die toestel onder water of enige ander
vloeistof dompel nie.
5. Droog deeglik af met ‘n droë doek en sit dan die komponent terug in sy plek.
4.Sorg en skoonmaak
4.1. Ontkoppel van muurprop en laat toe om heelte-
mal aftekoel.
4.2. Maak die buitekant van die toestel met n klam
lap skoon en moet glad nie in water gedruk word nie.
4.3. Moenie oplosmiddels,suur,bleikmiddels of skuur
produkte gebruik om toestel skoon te maak nie.
4.4. Moet nooit toestel onder lopende water was nie.
5. Anomalies and herstel
Stap 9: Nadat die werking oor is, skakel die masjien af, en
haal dan die verwyderbare bak uit.
- Raak aan [ ] om die roomysmaker af te skakel.
- Haal die verwyderbare bak uit.
Operasie verkoelingsproses:
Na 10 minute sal die masjien die diep koel hou proses binnegaan. Hierdie koel hou proses hou vir ongeveer een uur.
Hierna sal die masjien na die bystand staat terugkeer.
Motor selfbeskerming funksie:
Wanneer die roomys harder word, kan die mengmotor geblok
raak. Dan sal die motor se selfbeskerming die motor laat stop
deur die temperatuur daarvan vas te stel om die lewe van die
motor te verseker.
Beheer oor die volume van bestanddele om oorloop en vermorsing te vermy, maak seker dat die besanddele nie meer
as 60% van die kapasiteit van verwyderbare bak oorskrei
nie(roomys sit uit wanneer dit gevorm word).
STORING VAN ROOMYS:
Verwyder die voltooide roomys en sit dit in ‘n ander houer met
‘n plastiese skoppie of houtlepel, dit verhoed skrape aan die
binnekant van die verwyderbare bak.
Onderhoud:
Let op: Verwyder die prop voor die skoonmaak proses om ‘n
elektriese skok te vermy.
1. Neem die menglem uit en vee dit met ‘n klam lap af.
5.1. Neem die toestel na gemagtigde tegniese sen-
trum as toestel beskadig is of probleme ontstaan.
5.2. As koneksie na die muurprop beskadig is moet
die toestel vervang word volgens waarborg
ROOMYS RESEPTE:
VANIELJE ROOMYS:
Maak agt ½ koppie porsies.
1 koppie volroom melk
½ koppie gegranuleerde suiker
2/3 koppie dik room, goed verkoel
1 – 2 teelepels suiwer vanielje ekstrak na smaak
Gebruik ‘n handklitser om die melk en suiker te meng tot die
suiker opgelos is, ongeveer 1-2 minute op lae spoed. Roer die
dik room en die geursel na smaak in. Sluit die masjien aan,
gooi die mengsel in die vriesbak deur die bestanddele tuit en
laat dit meng tot dit verdik, ongeveer 30 – 40 minute.
VARIASIES:
Ment snippers: Los die vanielje uit en vervang met1 tot 11/2
teelepels suiwer peperment ekstrak(na smaak). Kap jou
geliefkoosde 4 ons bittersoet of semisoet sjokolade stafie in
klein oneweredige stukkies. Voeg die sjokolade by gedurende
die laaste 5 minute van die mengproses.
Botter pekan: Smelt 1 stokkie ongesoute botter in ‘n 10 duim
pan. Voeg 1 koppie grof gekapte neute met 1 teelepel kosher
sout.Maak gaar oor medium hitte, roer gereëld tot neute lig
bruin is. Verwyder van die hitte, dreineer(die botter sal ‘n
pekangeur hê – kan later weer gebruik word). Laat die pekans
goed afkoel. Voeg die geroosterde pekans in die mengsel
gedurende die laaste vyf minute van die mengproses.
Koekies en Room: Voeg ¾ koppie grof gekapte koekies
of jou geliefkoosde lekkers(sjokolade snippers,Oreos,Ment
Page 9

Oreos ens) by die mengsel in die laaste 5 minute van die
mengproses.
BASIESE SJOKOLADE ROOMYS:
Maak ongeveer agt ½ koppie porsies.
½ koppie gegranuleerde suiker,
240g bittersoet of semisoet sjokolade(jou geliefkoosde
sjokolade) gebreek in ½ duim stukkies,
1 koppie dik room , goed koud.
1 teelepel vanielje ekstrak.
Verhit die melk tot dit om die kante begin borrel. Dit kan in die
mikrogolf of op die stoof gedoen word). In ‘n menger of klitser
met ‘n staal lem, pols die suiker met die sjokolade tot die
sjokolade baie fyn gemeng is. Voeg die warm melk by, hou
aan met meng tot die mengsel goed gemeng en glad is. Gooi
dit in ‘n medium grootte bak en laat die sjokolade mengsel
heeltemal afkoel. Roer die vanielje en dik room in na smaak.
Skakel die masjien aan, gooi dit in die vriesbak deur die
bestanddele tuit en meng tot dik, ongeveer 30-40 minute.
VARIASIES:
Sjokolade amandel: Voeg by ½ teelepel suiwer amandel
ekstrak saam met die vanielje. Voeg by1/2 -3/4 koppie gekapte geroosterde amandels of sjokolade bedekte amandels
gedurende die laaste 5-10 minute van die vriesing.
Sjokolade koekies: Voeg ½ -1 koppie gekapte koekies
gedurende die laaste 5 minute van die bevriesing.
Sjokolade Fudge Bruintjies: Voeg by ½ - 1 koppie dag-oud
gekapte bruintjies gedurende die laaste 5 mniute van bevriesing.
Sjokolade Malva Draaikolk: As jy die roomys na ‘n houer
verplaas vir bevriesing, maak lae met jou geliefkoosde
sjokolade sous en skoppies malvalekkers.
2/3 koppie suiker.
2/3 koppie water.
1 koppie vars uitgedrukte suurlemoensap
en een eetlepel gekapte suurlemoenskil.
Kombineer die suiker en water in’n medium pan en laat kook
oor medium-hoog hitte. Verlaag hitte, en sonder om te roer,
laat die mengsel prut vir 4-5 minute tot die suiker opgelos
is. Laat dit heeltemal afkoel. Dit word ‘n eenvoudige stroop
genoem, en kan voor die tyd in groot hoeveelhede gemaak
word sodat die stroop altyd byderhand is vir die maak van
sorbet. Hou dit in die yskas tot benodig vir gebruik. Wanneer
afgekoel, voeg die suurlemoen en skil by die stroop en roer
om te meng. Skakel die masjien aan, gooi die suurlemoen
mengsel in die vriesbak deur die bestanddele tuit en meng
totdat dit verdik ongeveer 30-40 minute. Wanneer jy ‘n
suurlemoen of lemmetjie se skil gebruik, neem groente skiller
om die gekleurde deel van die skil te verwyder.
SJOKOLADE BEVRORE JOGURT:
Maak ongeveer agt ½ koppie porsies.
1 koppie volroom melk
180g of 6onse bittersoet of semisoet sjokolade
2 koppies gekapte laevet vanielje jogurt
¼ koppie suiker.
Meng die melk en sjokolade in ’n voedselmenger met staallemme en meng tot mengsel glad is, 20-30 sekondes. Voeg
die jogurt en suiker by; meng tot glad, +_ 15 sekondes.
Skakel die masjien aan, gooi die mengsel in die vrieserbak
deur die bestanddele tuit en laat meng tot verdik - ongeveer
50-60 minute.
VARS AARBEI ROOMYS:
Maak agt ½ koppie bedienings.
250g of 1 pint vars ryp aarbeie, stingel verwyder en gesny.
2/3 eetlepels vars uitgedrukte suurlemoen.
½ koppie suiker, gedeel
1 koppie volroom melk en 1 koppie dik room.
1 teelepel met suiwer vanielje ekstrak in ‘n klein bakkie.
Meng die aarbeie met ½ koppie suiker en suurlemoensap,
roer baie liggies en laat die aarbeie vir 2 uur in die sappe
week. In ‘n medium grootte bak, gebruik ‘n handklitser om
die melk, suiker te kombineer tot die suiker gesmelt het,
1 – 2 minute op lae spoed. Roer die dik room in plus al die
sappe van die vanielje en aarbeie. Sit die masjien aan, gooi
die mengsel in die vriesbak deur die bestanddele tuit en meng
tot die mengsel verdik , 30-40 minute lank. Voeg die gesnyde
aarbeie by gedurende die laaste 5 minute van bevriesing. NB:
die mengsel sal ‘n “natuurlike” ligte pienk kleur hê; sou ’n
donkerder pienk kleur vereis word, drup baie spaarsaam rooi
voedselkleur by tot die gewenste kleur verkry is.
VARS SUURLEMOEN SORBET:
Maak agt ½ koppie porsies.
Page 10

Thank you for purchasing a Taurus product. Taurus guarantees that your
product has been thoroughly inspected and tested before being dispatched
and is free from mechanical and electrical defects and complies with the applicable safety standards. With every Taurus product purchased you get a 2 year
warranty as detailed in the terms and conditions below.
First Year – 1 Year Retail Warranty:
Should defects due to faulty parts or workmanship
develop, under normal domestic use, within 12
months from the original date of purchase please
return the product to the store from where it was
purchased for a refund or replacement.
Second Year – 1 Year Extended Warranty
Taurus takes pride in their product quality and
therefore offer an extended 12 month warranty
over and above the 1 Year Retail Warranty. Should
defects due to faulty material or workmanship
develop, under normal domestic use, after the 12
month period and within 24 months from the original date of purchase, please return the product
postage pre-paid to Taurus for repair. Taurus will repair the product free of charge and return it to you
directly. Taurus will replace a product with a similar
product in the same or better condition, if the
repair cannot be conducted for whatever reason.
NB: The 1 Year Extended Warranty is only valid
for customers who have registered their warranty
online at www.taurusappliances.co.za within the
rst year after making their purchase. See overleaf
for details and instructions.
Before returning your product, check the
following:
• Your household mains supply socket is in good
condition, working and switched on.
• The mains supply circuit is not overloaded (White
trip switch on your DB board is off).
• You have read the trouble shooting guide in your
Instructions for Use.
• All accessories and parts are present.
The following conditions apply:
1. Please ensure you retain your receipt as this must be
presented when making a claim under the terms of the
guarantee. It is impossible to determine the guarantee
period without proof of purchase, so please keep this in
a safe place. (NB. Your guarantee can be scanned onto
the Taurus web site for safe storage – see reverse side
for details.)
2. If a refund or exchange is required the product must
be complete with all accessories, parts and packaging.
Missing parts will render the guarantee void.
3. Upon receipt of your appliance, check it for any trans-
port damage to ensure it is safe for use. Return it to the
store as soon as possible for exchange if damaged.
The guarantee is void if products are damaged after
use, so please do not use the damaged product.
4. Your product is designed for normal domestic household use. Failure to read and comply with the instructions for use, cleaning and maintenance will render
your guarantee void, so please read these instructions
carefully to ensure your safety, and to get the most
effective use from the product. (e.g. not removing lime
scale; water deposits; insect infestation, and/or burnt
products)
5. Any abuse, negligent, improper or accidental use
or care will render the guarantee void and Creative
Housewares (Pty) Ltd will not be liable for any loss or
damage.
6. Any attempted repair, or replacement of unauthorised
parts will render the guarantee void, so please contact
an authorised service centre or service agent for any
service or repair requirements.
7. NB: The guarantee on replaced products will be from
the original date of purchase and not from when the
date replacement was made.
8. All repairs carry a 3 month guarantee even if this falls
outside of the 2 year guarantee period.
9. Taurus will attempt to conduct repairs within reasonable
time in line with industry standards but cannot be held
responsible or liable for any circumstances not under
our control.
Repairs Out of the Warranty Period
If service or repair becomes necessary outside the
warranty period, this service is still available however all
transport/postage, spares and labour costs will be for the
customers’ account. All chargeable repairs will require
the customers’ written acceptance of the quote. Once
the go-ahead has been received Taurus will undertake to
conduct the repair within a reasonable time and maintain
the condition of the product as received. All repairs are
guaranteed for 3 months from the date of the repair.
For any service, enquiries and complaints please contact
our Customer Care on 086 111 5006 or e-mail help@
creativehousewares.co.za from 08h00 to 15h00 Monday
to Friday excluding public holidays. Please also note
that the company is normally closed for 2 weeks around
Christmas and New Year.
Please send all products for repair postage pre-paid to
one of the service centres listed on the back of this page.
Page 11

ONLINE WARRANTY REGISTRATION
Why register your warranty?
We at Taurus pride ourselves on bringing premium quality appliances to market, and as a commitment to this
level of quality we offer a 2 year warranty (1 Year Retail + 1 Year Extended) on all of our products. We often hear
that our customers lose their receipts and can therefore no longer claim if they have a problem. To take advantage
of the 1 Year Extended Warranty you will need to register your warranty online within the rst year of purchase in
order to make a valid claim. Now you can register your product, upload your warranty online, never have to worry
about losing your receipt again and enjoy the benet of your 2 year warranty.
Added Benets
In addition to providing you with an online prole of your registered
products we will also provide a host of value added benets:
• Incentives and Competitions for registered users
• New recipes or ideas for your products
• New product developments – be the rst to get the latest appliances
• Special offers on promotional items
How to Register your Online Warranty?
STEP1 Create your user prole:
If you haven’t done so already, simply visit www.taurusappliances.co.za, click on
the “Product Registration” link and follow the easy instructions. You will receive a
username and password once registered. This will give you access to your user
prole.
STEP2 Pick a registration method:
DESKTOP/
LAPTOP
• Open your internet browser and visit
www.taurusappliances.co.za
• Click on the “Registration” link and
login using your user name
and password.
• Click on “Register your products
and upload receipts” and follow the
easy instructions.
• Scan and upload your receipt
Notes:
1. The online warranty system is a safe storage facility for your
receipt.
2. You will be required to register on the Taurus website. You
will receive a username and password once registered. This will
give you access to your prole.
3. From your prole you will be able to load products that you
have purchased. In order to successfully register your warranty
you will need to either scan and upload, or fax through your
receipt to us.
4. All instructions on how to load your products are available
• Scan the QR code above or visit
www.taurusappliances.co.za
• Click on the “Registration” link
and login using your user
name and password.
• Click on “Register your products
and upload receipts” and follow
the easy instructions.
• Scan or take a photo and
upload your receipt.
National Service Centre: 086 111 5006
e-mail: help@creativehousewares.co.za
www.creativehousewares.co.za
SMART
PHONE/
FAX
TABLET
• Fax the following to 021 931 4058
• First Name and Surname
• Contact telephone and fax number.
• Product Model number and Type.
• Traceability Code (found on the
Warranty Card or on a label
on the product)
• A clear and legible copy
of your receipt.
inside your prole.
5. Please note that you must check that your receipt has been
uploaded correctly. Creative Housewares cannot be held
responsible for faxes or les not received.
6. For assistance with registration please email: marketing@
creativehousewares.co.za.
NB: Your 1 year extended warranty is only valid if your prod-
uct is registered online within the rst year after purchasing your
Taurus product. Failure to register your product on-line within
the rst year will render the extended warranty as void.
Page 12

Dankie vir die aankoop van ‘n Taurus produk. Taurus waarborg dat u
produk deeglik geïnspekteer en getoets word voordat dit versend word en
is vry van meganiese en elektriese gebreke en voldoen aan die toepaslike
veiligheidstandaarde. Met elke Taurus produk wat gekoop word kry u 'n 2 jaar
waarborg soos uiteengesit in die terme en voorwaardes hieronder.
Eerste Jaar - 1 Jaar Kleinhandelswaarborg:
Indien defekte as gevolg van foutiewe onderdele of
vakmanskap binne 12 maande onder normale huishoudelike gebruik ontwikkel, binne die 12
maande vanaf die oorspronklike datum van aankoop,
neem asseblief die produk na die winkel van waar dit
gekoop is vir 'n terugbetaling of vervanging.
Tweede Jaar - 1 Jaar Uitgebreide Waarborg
Taurus is trots op die kwaliteit van die produk en
bied dus 'n uitgebreide 12 maande waarborg bo en
behalwe die 1 Jaar kleinhandelswaarborg. Indien
defekte as gevolg van foutiewe materiaal of vakmanskap ontwikkel, onder normale huishoudelike gebruik,
na die 12 maande tydperk en binne 24 maande vanaf
die oorspronklike datum van aankoop, stuur die
produk terug met posgeld betaal na Taurus vir herstel.
Taurus sal die produk gratis herstel en dit direk aan
u terugstuur. Taurus sal die produk vervang met 'n
soortgelyke produk in dieselfde of beter toestand,
as die herstel nie uitgevoer kan word vir watter rede
ookal nie.
NB: Die 1 Jaar Uitgebreide waarborg is slegs geldig
vir kliënte wat hul waarborg geregistreer het op ons
webtuiste by www.taurusappliances.co.za binne die
eerste jaar nadat hulle dit aangekoop het
Sien keersy vir besonderhede en instruksies.
Voordat u die produk terug stuur, maak seker
van die volgende:
• U huishoudelike geleidingsok is in 'n goeie toestand,
werk en aangeskakel is,
• Die geleidingsok is nie oorlaai nie (Wit uitskop
skakelaar op u DB bord af is),
• U het die moeilikheid steuringsgids gelees in u
instruksies vir gebruik,
• Alle bykomstighede en dele teenwoordig is.
Die volgende voorwaardes geld:
1. Maak seker dat u kwitansie behoue is, dit moet aangebied
word wanneer 'n eis gemaak word onder die voorwaardes
van die waarborg. Dit is onmoontlik om die waarborg
tydperk te bepaal sonder die bewys van aankoop, so hou
dit asseblief in 'n veilige plek. (NB. U waarborg kan opgeskandeer word na die Taurus webtuiste vir veilige bewaring
- sien keersy vir meer inligting.)
2. Indien 'n terugbetaling of omruiling van die produk nodig is
moet die produk volledig wees met al die bykomstighede,
onderdele en verpakking. Toebehore wat weg is sal die
waarborg nietig maak.
3. Met ontvangs van u toestel, gaan dit na vir enige vervoer
skade om te verseker dat dit veilig is vir gebruik. Stuur dit
so gou as moontlik terug na die winkel om die beska-
digde toestel te vervang. Die waarborg is nietig indien
die beskadigde produk gebruik word na die tyd, so
moet asseblief nie die beskadigde produk gebruik nie.
4. U produk is ontwerp vir normale huishoudelike
gebruik. Deur te versuim om die instruksies te lees en
te voldoen aan die terme van gebruik, die skoonmaak
en instandhouding van die produk maak u waarborg
ongeldig, so lees asseblief hierdie instruksies versigtig
om u veiligheid te verseker, en om die beste uit die
gebruik van die produk te kry. (bv nie die verwydering
van kalk skaal; water neerslag; insek besmetting, en /
of verbrande produkte)
5. Enige misbruik, nalatige, onbehoorlike of toevallige
beskadiging of sorg van die produk word die waarborg
nietig en Creative Housewears (Pty) Ltd, sal nie
aanspreeklik wees vir enige verlies of skade nie.
6. Enige poging tot herstel, of vervanging met
ongemagtigde onderdele sal die waarborg nietig maak,
so kontak 'n gemagtigde dienssentrum of diensagent
vir enige diens of herstelwerk.
7. NB: Die waarborg op die vervangingsproduk sal by die
oorspronklike datum van aankoop bly en nie van die
datum wanneer dit vervang is nie.
8. Alle herstelwerk dra 'n 3 maande waarborg selfs al val
dit buite die 2-jaar waarborg tydperk.
9. Taurus sal probeer om die herstelwerk te doen binne 'n
redelike tyd in lyn met die industrie standaarde, maar
kan nie verantwoordelik gehou word of aanspreeklik
wees vir enige omstandighede nie onder ons beheer
nie.
Herstelwerk buite die waarborg tydperk
As diens of herstelwerk benodig word buite die waarborg
tydperk, is hierdie diens steeds beskikbaar, maar is alle
vervoer / posgeld, onderdele en arbeidskoste op die
kliënte se onkoste. Alle betaalbare herstelwerk sal skriftelike aanvaarding van die kwotasie vereis van die kliënt. Sodra Taurus die groen lig ontvang sal ons onderneem om
die herstel binne 'n redelike tyd en in dieselfde toestand
te hou as wat die produk ontvang is. Alle herstelwerk is
gewaarborg vir 3 maande vanaf die datum van die herstel.
Vir enige diens, navrae en klagtes kontak ons kliënte diens
op 086 111 5006 of e-pos help@creativehousewares.
co.za vanaf 08h00 tot 15h00, Maandag tot Vrydag, openbare vakansiedae uitgesluit. Let asseblief ook daarop
dat die maatskappy gewoonlik gesluit is vir 2 weke gedurende Kersfees en Nuwejaar.
Stuur asseblief alle produkte vir herstel met posgeld
vooruit betaal aan een van die dienssentrums wat op die
agterkant van hierdie bladsy verskyn.
Page 13

AANLYN WAARBORG REGISTRASIE
Hoekom moet u die waarborg moet registreer?
Ons by Taurus is trots om premium gehalte toestelle op die mark te bring, en as 'n verbintenis tot die vlak van
gehalte bied ons 'n 2 jaar waarborg (1 Jaar Kleinhandel + 1 Jaar Uitgebreide) op al ons produkte. Ons hoor
dikwels dat ons kliënte hul kwitansies verloor en kan dus nie meer eis as hulle 'n probleem het nie. Om voordeel te
trek van die 1 Jaar Uitgebreide waarborg sal u nodig hê om u waarborg aanlyn te registreer binne die eerste jaar
van aankoop om 'n geldige eis te maak. Nou kan u die produk aanlyn registreer, laai u waarborg en hoef u nooit te
bekommer dat u die kwitansie sal verloor nie en die voordeel van u 2-jaar waarborg geniet.
Bygevoegde Voordele
Bykomend tot die verskafng van ‘n aanlyn proel van u geregistreerde produkte bied ons ook vele ander toegevoegde waarde voordele:
• aansporings en kompetisies vir geregistreerde gebruikers
• nuwe resepte of idees vir u produkte
• nuwe produk ontwikkelings - die eerste wees om die nuutste toestelle te kry
• spesiale aanbiedings op promosie-items
Hoe om u Aanlyn Waarborg te Registreer?
STAP 1 Skep u gebruikersproel:
As u dit nie reeds gedoen het nie, besoek www.taurusappliances.co.za, kliek op
die "Product Registration" skakel en volg die maklike instruksies. U sal 'n gebruikersnaam en wagwoord ontvang sodra u geregistreer het. Dit sal u toegang tot u
proel gee.
STAP 2 Kies 'n registrasie metode:
REKENAAR/
SKOOTREKENAAR
• Maak u internet snuffelgids oop en
besoek
www.taurusappliances.co.za
• Klik op die "Registrasie" skakel en
teken in met u gebruikersnaam en
wagwoord.
• Klik op "Register your products” en
laai kwitansies en volg die maklike
instruksies.
• Skandeer en laai u strokie
Notas:
1. Die aanlyn waarborg stelsel is 'n veilige stoor fasiliteit vir u
strokies.
2. U sal gevra word om op die Taurus webtuiste te registreer. U
sal 'n gebruikersnaam en wagwoord ontvang. Dit sal u toegang
gee tot u proel.
3. Van u proel u sal in staat wees om produkte te laai wat u
gekoop het. Om u waarborg suksesvol te registreer sal u nodig
hê om of te skandeer en oplaai, of faks u strokie deur na ons.
4. Alle instruksies oor hoe om u produkte te laai is beskikbaar
binne in u proel.
5. Let daarop dat u moet seker maak dat u kwitansie korrek op-
• Skandeer die QR-kode bo of besoek
www.taurusappliances.co.za
• Klik op die "Registration" skakel en
teken aan met u verbruikersnaam en
wagwoord.
• Klik op "Register your products” en
laai u kwitansie en volg die maklike
instruksies.
• Skandeer of neem 'n foto en laai u
strokie.
Nationale Dienssentrum: 086 111 5006
e-pos: help@creativehousewares.co.za
www.creativehousewares.co.za
SMARTFOON /
FAKS
TABLET
• Faks die volgende na 021 931 4058
• Naam en Van
• Kontak telefoon en faksnommer.
• Produk model nommer en tipe.
• Traceability Code (wat op die
• Waarborgkaart of op 'n etiket op die
produk gevind kan word)
• 'n Duidelike en leesbare afskrif van
u ontvangs.
gelaai is. Creative Housewares kan nie verantwoordelik gehou
word vir fakse of lêers nie ontvang nie.
6. Vir hulp met registrasie e-pos asseblief: marketing@creativehousewares.co.za.
NB: U 1 jaar verlengde waarborg is slegs geldig indien u
produk aanlyn geregistreer is binne die eerste jaar na die
aankoop van u Taurus produk. Indien u produk nie aanlyn
geregistreer word binne die eerste jaar nie sal dit die verlengde
waarborg nietig maak.
Page 14

Durban
35 Adrain Road, Windermere,
Durban, South Africa, 4001
Tell: +27 31 303 3465
Fax: +27 31 303 8259
Unit 25 & 26 San Croy Office Park
Johannesburg
Die Agora Road, Croydon, 1619
Tell: +27 11 392 5652
Fax: +27 11 392 1694
 Loading...