

Page 1
P
POORRTTAABBLLEE AAIIRR CCOONNDDIITTIIOONNEERR
大同移動 機冷氣
使用手冊
Please read the instructions completely before using this product
This product is designed for household use only.
使用前請詳閱使用手冊 本產品只限家庭使用
TPAC-09K
TPAC-12K
INSTRUCTION MANUAL
.
Page 2

- 2 -
1. Introduction
--------------------------------------
3
2. Important safeguards
--------------------------------------
4
3. LCDI power cord and plug
--------------------------------------
5
4. Parts names
--------------------------------------
6
5. Installation
--------------------------------------
7
6. Operating instruction
--------------------------------------
9
7. Water drainage
--------------------------------------
13
8. Maintenance and cleaning
--------------------------------------
14
9. Troubleshooting
--------------------------------------
15
10. Specification
--------------------------------------
16
11. 產品介紹
--------------------------------------
17
12. 使用安全須知
--------------------------------------
18
13. LCDI
電源線與插座
--------------------------------------
19
14. 產品部位名稱
--------------------------------------
20
15. 安裝注意事項
--------------------------------------
21
16. 操作使用說明
--------------------------------------
23
17. 排水方式
--------------------------------------
27
18. 產品清潔與維護
--------------------------------------
28
19. 異常故障排除
--------------------------------------
29
20. 產品規格
--------------------------------------
30
21. Tatung Limited Warranty
--------------------------------------
31
TABLE OF CONTENTS
Page 3

- 3 -
Thank you for choosing Tatungs Portable Air Conditioner . We hope you enjoy this instant cooling portable air
Please read this manual carefully before
using this product.
The following tips may help to maximize the efficiency of your air conditioner:
• When the air conditioner is on, keep doors and windows closed.
• Turn off kitchen or bathroom exhaust fans when your air conditioner is on.
• Turn off the air conditioner when you leave home.
• Check the filters monthly.
• Do not place anything that may generate heat near t he thermostat since it may sense the heat and will
make the air conditioner run longer than necessary.
• Keep blinds and curtains closed during hot weather.
• Do not block the air vents. A free flowing air conditioner operates most efficiently
SAVE THESE INSTRUCTIONS FOR FUTURE REFERENCE
INTRODUCTION
conditioner.
Page 4

- 4 -
When using electrical appliances,basic sa fety precautions should always be followed:
1. Read all instructions
2. To protect against fire,electric shock and personal injury, do not immerse cord, plugs, or the unit in
water or other liquid.
3. Close supervision is necessary when the product is used around children. This product is not
intended for use by chirdren.
4. Do not operate the product with a damaged cord/plug.If the plug is damaged, please return the
product for repair.
5. Always keep the product in an upright position.
6. During the transit, the product could be placed up side down, which may cause the oil in the
compressor drain into the refrigerant tubes reducing the cooling efficiency. Thus, before using the
product,keep the product in a upright position for hours. 1 2
7. Connect the product to a properly grounded power supply. Do not use an adapter plug or extension
cord.
8. Do not cover or insert any object into the air inlet and/or outlet.
9. Turn off the power when no one is in the room.
10. Do not place anything in the direct path of the airflow.
11. Do not place the product near any heat source or where gas leakage may occur.
12. Do not use the product near a bath,shower, swimming pool,or in any other steamy, or wet areas.
13. Do not turn off/on the product by plugging or unplugging the power cord directly.
14. Do not modify the power cord or share the outlet with other appliances.
15. Unplug the product from the outlet when not in use and before cleaning.
16. Attachments not recommended by the manufacturer may cause injuries.
17. Do not expose skin, face and eyes directly to cool air for a long period of time.
18. If an abnormal odor or smoke comes from the product, disconnect the unit immediately and contact Tatung
Service Department.
19. Unplug the power from wall outlet before cleaning the filter and do not touch the metal parts inside.
20. Do not apply any kind of insecticide or flammable spray onto or into the unit.
21. Do not step on the product or place objects on the unit.
22. Always place the product on a steady and flat surface.
23. Before storing the product, always drain the water from the unit and clean the filter.
24. Do not use the product for other than its intended use.
The manufacturer disclaims any responsibility if the above instructions are not followed.
The manufacturer reserves the right to make technical changes without notice.
SAVE THESE INSTRUCTIONS
This product is designed for household use only
IMPORTANT SAFEGUARDS
~
Page 5
- 5 -
This air conditioner is equipped with an LCDI (Leakage Current Detection and Interruption) power cord and
plug. The LCDI power cord and plug will shut off the supply source via electrical disconnect (circuit trip) if the
nominal current leakage between the cord shield and either load conductor exceeds a predetermined value.
The cord will not be able to conduct power until the devise has been manually reset. This device provides
protection to reduce the risk of fire due to arcing faults in the power cord. The cord shields are not grounded
and they must be considered as shock hazards if exposed. The cord shield must not be connected to ground
or to any exposed metal.
To ensure if the plug is working properly, please follow the following instructions to test it:
1. Plug power cord into wall outlet.
2. Press TEST button. The circuit should tr ip, cutting power to the air conditioner.
3. Press RESET button for use.
DO NOT USE IF ABOVE TEST FAILS.
In the event the LCDI Plug of the power cord trips by itself, then first examine the cord for any damage. If there
is no damage to the cord, then press the RESET Button. If the
LCDI Plug trips again, then immediately unplug the power supply
cord and Tatung Service Department.
LCDI POWER CORD AND PLUG
WAR NING:
1. Do not u se the TEST an d RESET butt ons as “ON” and
“OFF” swi tches.
2. Do not p ress the TES T button whi le the air conditio ner is
opera ting
3. The co rd and plug ar e designed for indo or use only.
4. Peri odically e xamine the cord for any damage. I f the
shiel d gets expos ed, immediately unplug the po wer cord and d o not use the un it.
Test bu tton
Res et butt on
Page 6
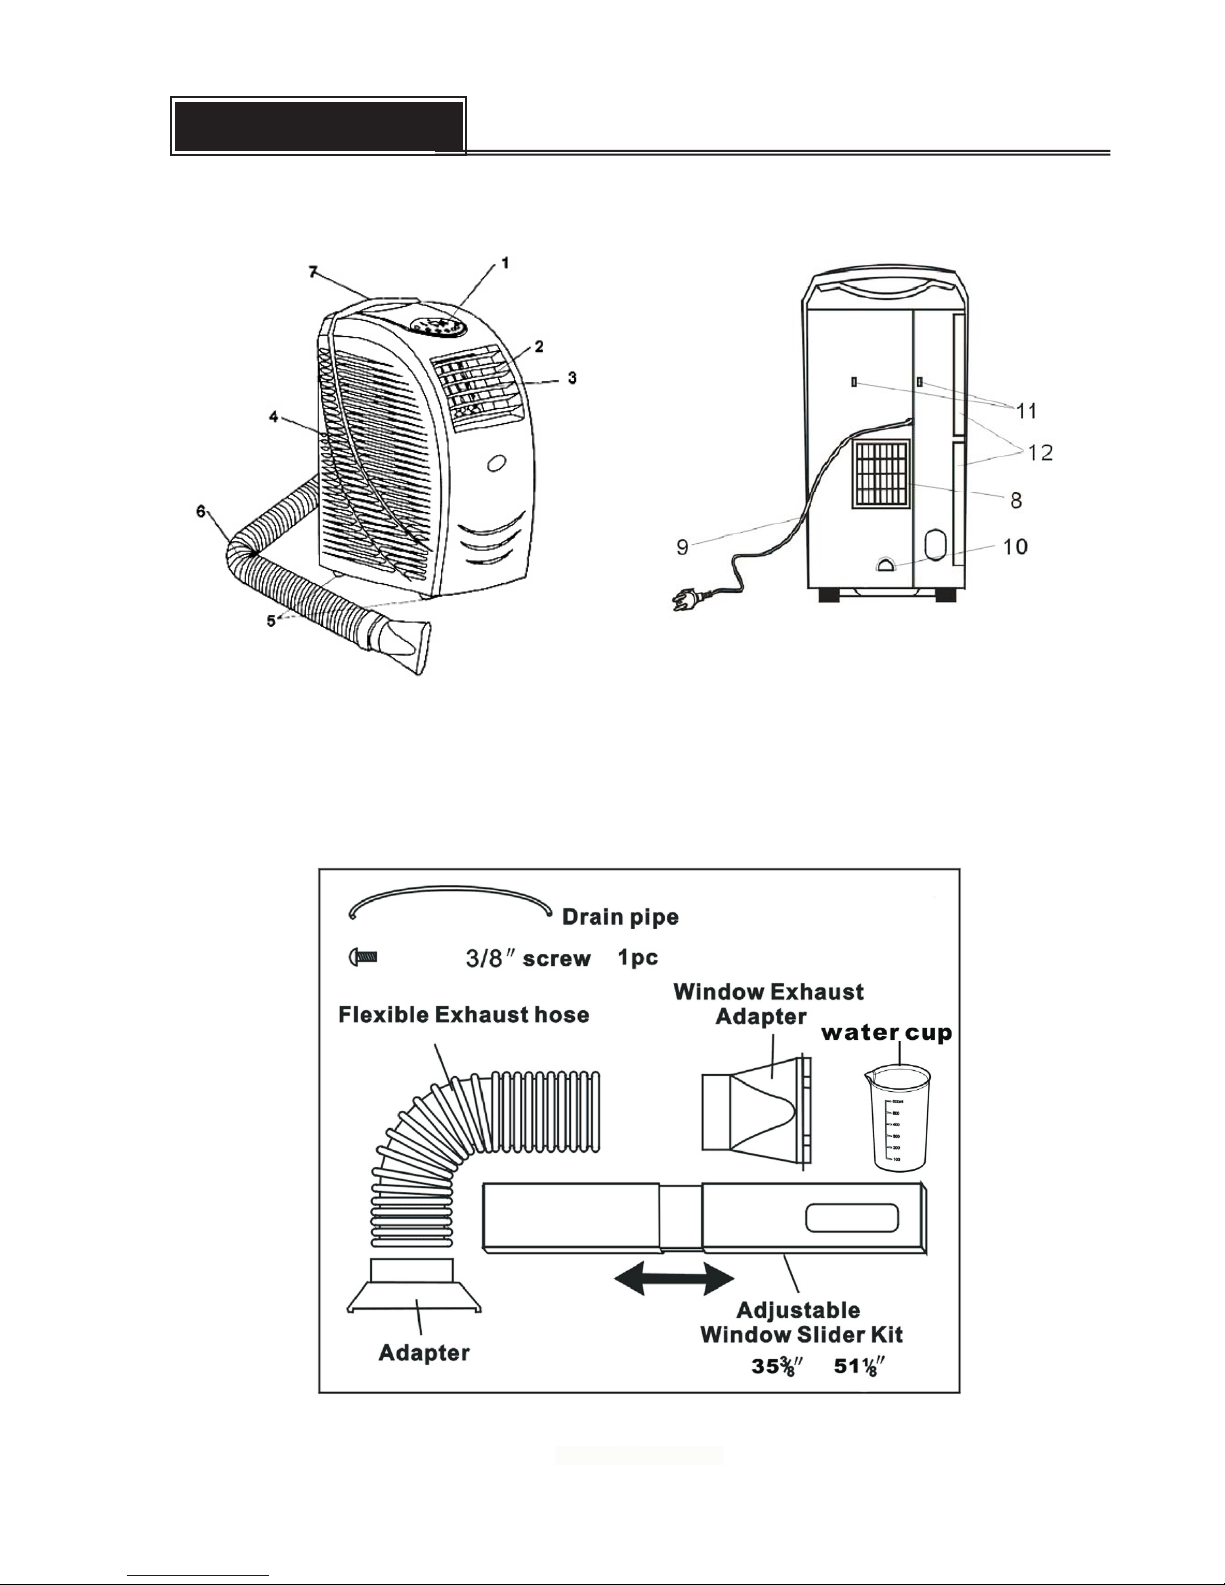
- 6 -
Front view Back view
1. Control panel
2. Horizontal louver
3. Vertical louver
4. Air inlet grille
5. Castor
6. Air Exhaust hose
7. Moving handle
8. Air outlet grille
9. Power cord
10. Water filling
drawer
11. Power cord hook
12. Air filter
Accessories
PARTS NAMES
Page 7

- 7 -
2. Assemble the air exhaust hose
Connect the end of the hose and adapter
and twist them.
3. Mount the air exhaust duct on the product
(1) Slide the square Adapter A of the exhaust dust to the exhaust
terminal of the unit.
(2) Put the other end to the nearest window. Leave at least 20 inch(50 cm)
space around it.
4. Install the window kit
Your window kit has been designed to fit most standard "vertical"
and "horizontal" window applications. However, it may be necessary for you to modify some
aspects of the installation procedur es for certain types of windows. Please refer to the illustration for
minimum and maximum window openings
Installation in the horizontal window Installation in the Vertical window
INSTALLATION
Adapter A
Adapter B
1 . Select a proper installation location
Place t he portabl e air condit ioner on a flat and dry l ocation wh ere the air
outle ts cannot be o bstructe d. Leave a 20 inch ( 50 cm) mi nimum spac e
betwe en the produ ct and the wal l.
NOTE:
The length o f the air exha ust duct can be exten ded from 17. 5 to
62 inch . Using the mi nimum length of the air exhaust d uct could sa ve
energ y for you.
This lengt h has been des igned especiall y accordin g to the
speci fication s of the air con ditioner. Do not rep lace or exte nd it with
your ow n hose as this c ould cause the unit to malfunct ion.
inch
(20 i nch )
Page 8
- 8 -
5. The correct way of bending the hose
Correct bending
Wrong bending
CAUTION:
This length has been designed especially according to the specifications of the air conditioner. Do not
replace or extend it with your own hose as this could cause the unit to malfunction
INSTALLATION
(5 1" )
(1 7" )
Page 9
- 9 -
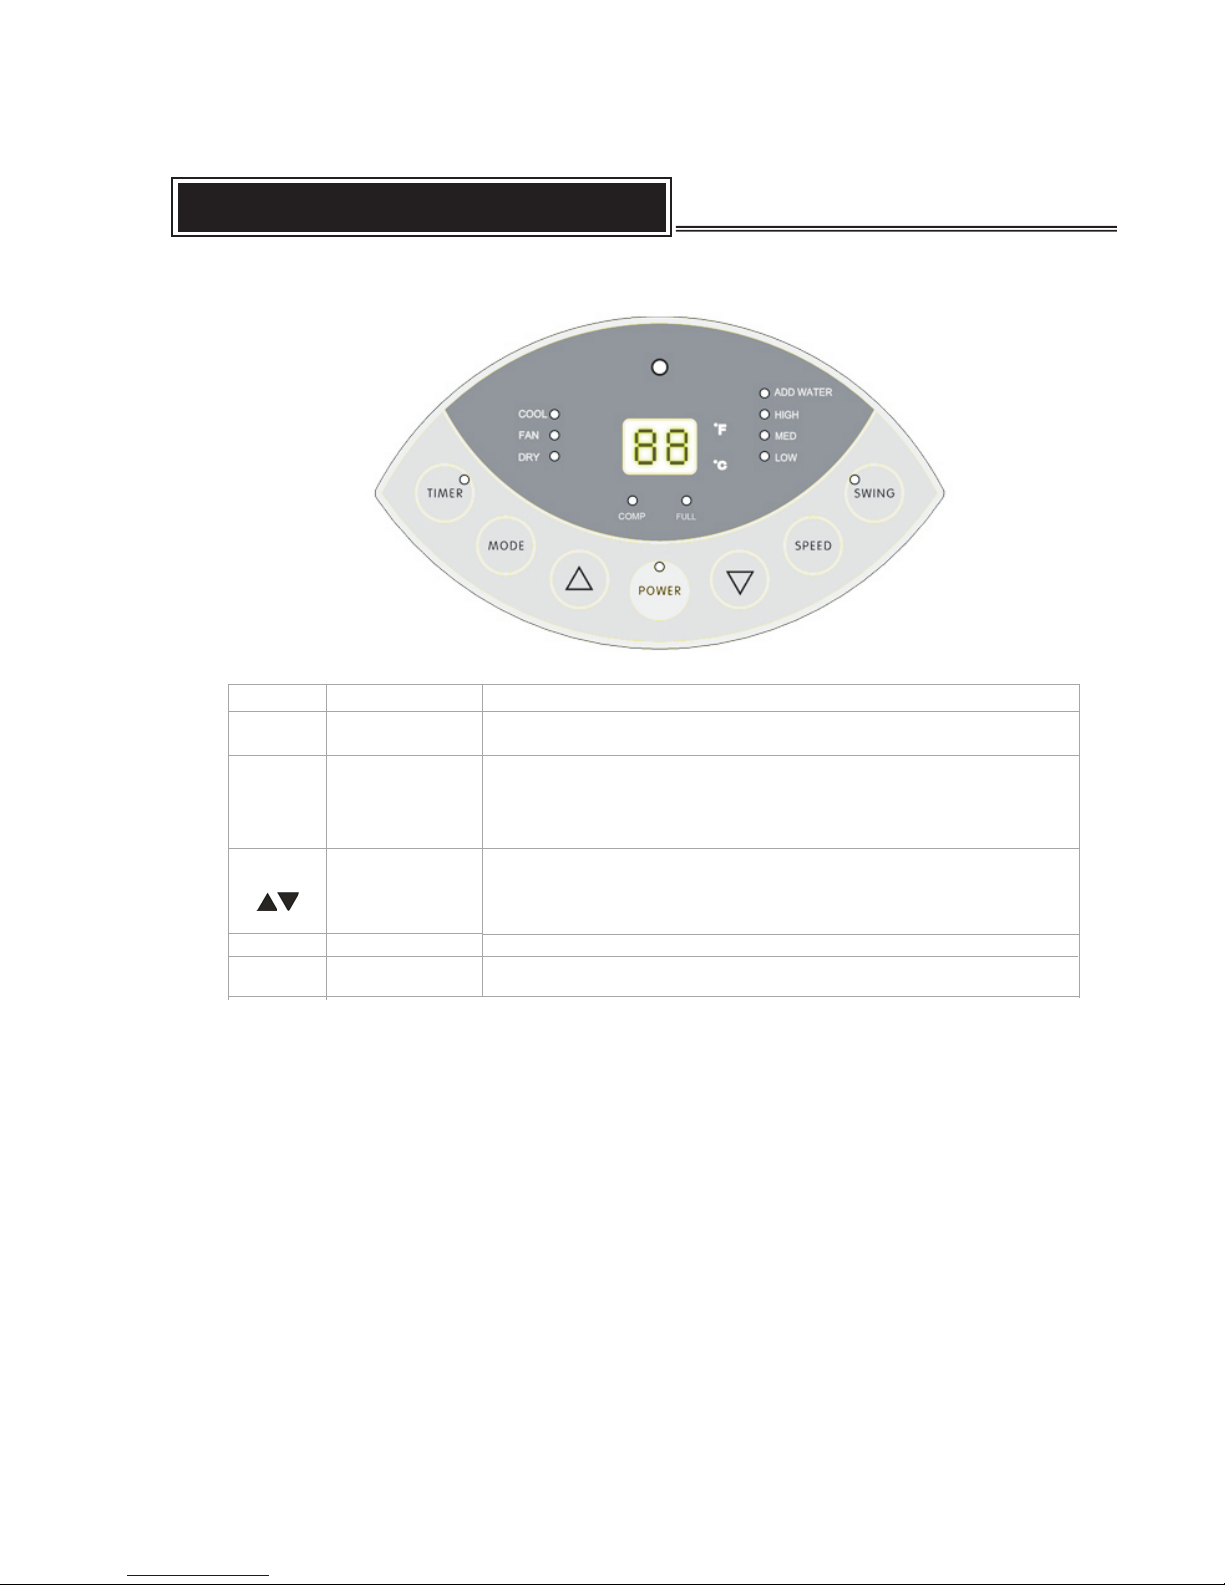
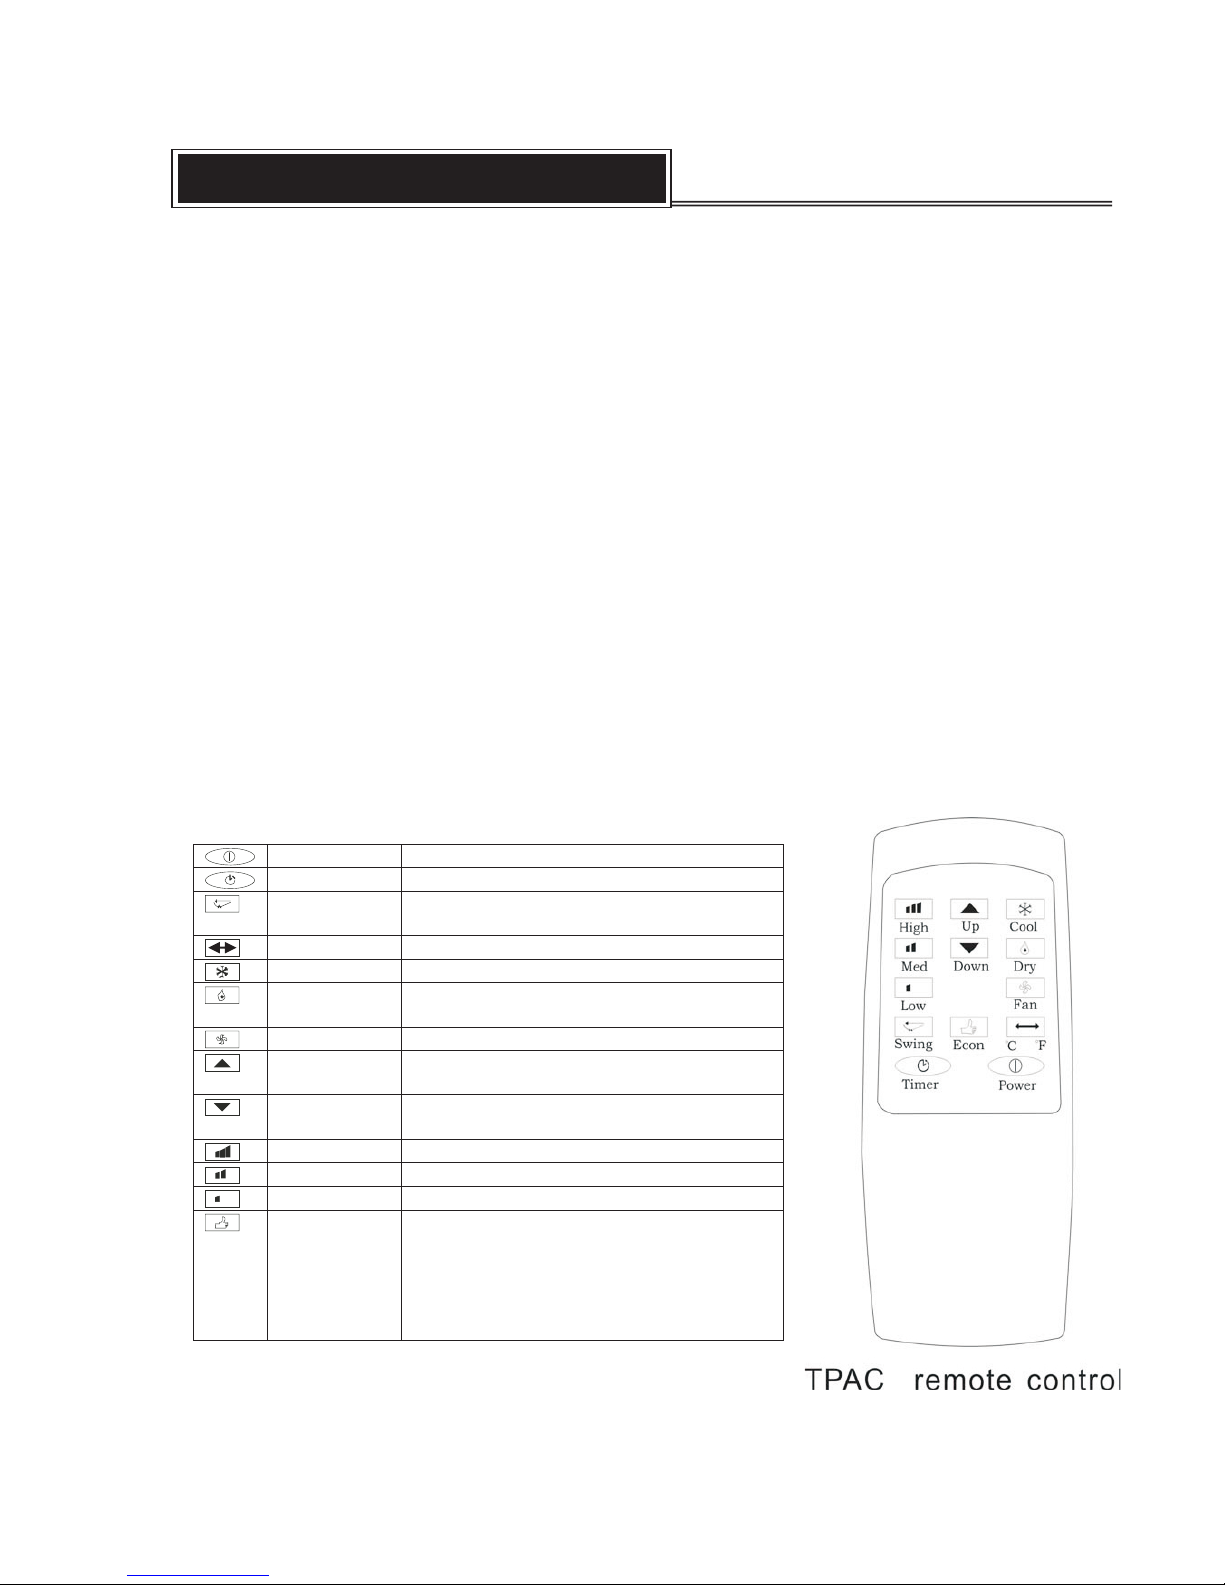
1.
Control panel
Timer
Press t his button t o enter time -setting s tatus.
Swing
Press this button to make the vertical louver swing automatically. To
stop swing, press the swing button again.
Speed
Up/Down
Mode
Power
Press this button to turn on/off the unit.
OPERATING INSTRUCTION
Timer
Swing
Speed
Mode
Power
Press this butt on fo r 5 seconds to se lect high, m iddle or low fan
Speed . When the machine is on FAN m ode, p ress t his bu tton f or
five se conds, the s ystem will d ry itself; if you wan t to stop dryi ng,
press f or another f ive second s.
Press up or dow n but ton to set tempera ture or adjus t the time inTim er
mode. When se tting timer-on and timer-off, press th ese two but tons to
adjus t the time of st arting or sh utting off. Press both buttons to co nvert
from Ce lsius to Fah renheit.
Press t his button t o select coo l, heat, dry o r fan mode
Page 10
- 10 -
2. LED Indicator
3. Remote control
Power Press this button to turn on/off the unit
Timer Press this button to set the timer
Swing Press this button to make the vertical louver
swing automatically.
Cool Press this button to choose Cooling mode
Dry Press this button to choose Dehumidifying
mode
Fan Press this button to choose fan mode
Up Press this button to adjust temperature or
timer setting.
Down Press this button to adjust temperature or
timer setting.
High Press this button to select high fan speed
Medium Press this button to select high fan speed
Low Press this button to select high fan speed
Auto mode This function presets the fan speed, mode
and temperature, and the setting cannot be
changed. Under this mode, the default
setting for the temperature is 80.6F(27C),
operating mode is cooling, and fan speed is
low.
OPERATING INSTRUCTION
COOL: On cooling mo de, the led will illuminate.
FAN: On fan mode, th e led will illuminate.
DRY: On dehumidifying mode , the led will il luminate.
COMP: When compre ssor is working, the led will illumin ate.
FULL: When water is f ull in the machine, the led will illumi nate.
ADD WATER: When the led is illumin ating, the user can put some
water in the machine.
HIGH: When the fan sp eed is on high, the led will illuminate .
MED: W hen the fan speed is on the middle setting, the led will illumina te.
LOW: When the fan speed is on lo w, the led will illumina te.
C F
。 。
Celsius degree and Fahrenheit degree indicator
Page 11

In COOLING and FAN mode, press “SPEED” to adjust the fan speed. There are high, medium and low
- 11 -
5. Simple steps to use cooling mode
6. Setting the timer
(1) Turn off the unit automatically:
When the unit is running, press TIME
R to set operating duration, and then the LED will flash five times.
During this period of time, press Up or Down button to adjust setting time from 0.5 hr. to 24 hr. After
setting, the LED will flash five times and then display the room temperature again. When the
operating duration reaches the pre-set time , the power will turn off automatically.
(2) Turn on the unit automatically:
When the unit is off, press TIMER to set start time, and then the LED will flash five times. During this
period of time, press Up or Down button to adjust se tting time from 0.5 hr. to 24 hr. After setting, the
LED will flash five times and then display the temperature again. Once the set time is reached, the
power will turn on automatically.
(3) Change the setting:
When TIMER is on, you can check the remain time by pressing the TIMER button. It will flash five
times. Press Up or Down button to adjust the timer. The timer can be canceled if you press the TIMER
button once again when LED is flashing.
Attention:
If the unit is suddenly turned off during operation, the compressor will start to run five minutes after the
power is turned back on.
7. Setting operating mode
COOLING: When this mode is selected, the fan will run first and then the compressor will start to run
five minutes after the power is back on. To set y our desired temperature, pr ess UP or DOWN button.
The temperature ranges from 64F 84F (18C 31C). When the room temperature lower than the
setting temperature, the compressor will stop running until the room te mperature is higher than set
temperature.In this case, onl y the fan will keep running.
FAN: When this mode is selected, the temperatur
e setting cannot be changed, but you can set your
desired speed. There is no need to use air exhaust duct in this mode.
DEHUMIDIFING: When this mode is selected, it presets the fan speed and other mode,and these settings
cannot be changed. Under this mode, the compressor will not run, and LCD will display room
temperature. There is no need to use air exhaust duct. You may need to drain water with the drainpipe
if the humidity is very high.
8. Setting temperature
In COOLING mode, press the "UP” button to increase the temperature se tting or press the "DOWN "
button to lower the temperature setting. When the number is flashing, it indicates the temperature you
are setting up. When the number is lit but not flashing,it indicates the current room temperature.
9. Setting fan speed
OPERATING INSTRUCTION
*Plu g in the power c ord and pres s the “POWER” bu tton
*Pre ss “MODE” to cho se COOLING m ode.
*Pre ss “UP” or “DOWN“ to s et the desir ed tempera ture. The te mperatur e ranges fro m 64F to
84F(1 8C~31C)
*Pre ss, “SPEED” to s et a desired f an speed.
*The f an will run fi rst. After f ew minutes , the compre ssor will st art to run if th e room tempe rature is
highe r then the set ting tempe rature. The compr essor will s top runnin g when the roo m temperat ure is
below t he setting t emperatu re.
~ ~
Page 12

- 12 -
modes. Each fan speed corresponds to one indicator on LED control panel.Please note: when unit is in
dehumidifier mode, the fan speed cannot be adjusted.
10. About water adding function
Some portable air conditioners in the market can self-evaporate the condenser water, by using water
pump to extract the condenser water collected from the air to cool the condenser in order to increase the
cooling efficiency.
This unit not only self-evaporates the condenser wate
r, but also comes with patented water injection
function, allowing the user to add some water to increase the cooling efficiency,rather than rely on the
condenser water collected from the air.This function is especially useful to the
areas where the humidity is
very low and condenser water is not enough to cool the condenser.
When the water is not enough for the water pump,the pump will stop working.At the same time, the
Water filling light on the control panel will illuminate
,you can fill
some water into the water-filling drawer carefully.To avoid overfilling the
water, use the included measuring cup to fill the water no more than
1800ml (three cups).This operation may help save 20%-30% energy for
you.
Please note, all the functions will work normally even when the water tank is empty and water pump stop
running. You can choose not to add water.However,do not add water if the product is
used in the place where humidity. has moderate or high
Page 13

- 13 -
During the cooling or dehumidifying mode, the condenser water will be drained into the internal water tank.
Since this unit is equipped with a self-evaporative system,the condenser water will be used to cool the
condenser making the unit run more efficiently. However, if the unit is used in high humidity areas, the water
may need to be drained out. When the water tank is full,the water full indicator at LED control panel will light
up and the compressor will stop running.The buzzer will s ound for 10 times every 5 minutes unit the water is
drained out.
After draining out the water, the alarm will stop and the unit will work normally. The compressor will start to run
five minutes after the power is back on.
You can drain the water out with a drainpipe (included).
Please follow the steps to drain the water:
1. Turn off the power;
2. Place a plate, pan or container under the drain
mouth;
3. Remove the water stopper from the drain mouth,
thus the condenser water will flow out of the water
tank.
4. If you want to continuously drain the water, please
use the drainpipe and follow the steps:
(1) Turn off the power;
(2) Place a plate, pan or container under the
drain mouth;
(3) Take off the water stopper
(4) Connect the supplied drainpipe to the water
mouth, and place a container at the end of
the pipe to collect the water. The condenser water will drai n out automatically into the
container.
(5) If you want to extend the drainpipe,you can use 9mm I.D. plastic pipe to connect with the
supplied drainpipe.
Attention: Do not move the unit while the water is full. It may cause the water to overflow on the floor
and damage the product.
WATER DRAINAGE
Page 14

- 14 -
Attention: unplug the power from the wall outlet before cleaning.
1. Clean the air filters
Clean the filters regularly to optimize the airflow.
(1) Unplug the power
(2) Pull out the air filters as shown at right figure
(3) Wash the filters by immersing them gently into warm water (no hotter than 104F). Apply some neutral
detergent if necessary and ri
nse the filter thoroughly.
(4) Put them back to the unit after the filters are dry.
Attention: Never operate the unit without the filter.
2. Clean the housing
(1) Unplug the power
(2) Wipe the surface of the appliance with a wet and soft cloth.
(3) Never use strong chemicals,oil-based products,
detergents,chemically treat ed cloths or other cleaning
solutions.These could damage the plastic surface.
(4) Do not immerse the unit in water
(5) Do not allow water on the control panel as it may cause
malfunction.
3. End of season storage
(1) Unplug the power from wall outlet.
(2) Clean the filter
(3) Drain out the condenser water COMPLETELY.
(Please refer to “water drainage” section.)
(4) Plug the power back in and operate the unit with FAN mode for half day to dry the water inside the
water tank.
(5) Unplug the power and tie the power cord in power cord hook.
(6) Uninstall the air exhaust hose.
(7) Pack the appliance and accessories with its original box.
(8) Store the product in a dry place.
MAINTENANCE AND CLEANING
Page 15

- 15 -
If you cannot solve the problem or the problem is not listed on above,unplug the power and contact Tatung
Service Department at 1-800-827-2850.
When one the following situations happen,stop running the unit and contact Tatung Service Center:
1. The fuse and switch often break
2. The power cord superheat or sleeve of the cord is broken
3. There is abnormal odor or smoke comes out the units.
!
TROUBLESHOOTING
Symptom
The unit does not
operate
Check
Is the unit plugged in?
Cannot power on?
Does the power tur n on ?
Is the timer on?
Is the water tank full?
Is the room tem per ature below the set
temperature?
Is the room too big?
Are there too many people in the room?
Is the filter dirty?
Are there too many windows or doors
open?
Is the room in direct sunshine?
Is the air exhaust hose installed
correctly?
Is the temperature setting too high?
Is there additional heat source nearby?
The unit is too noisy
and vibrates
Is the unit placed on an uneven surface?
Hear the inner liquid flow inside
Action
Plug in the power cord
Check the power switch
Turn on the power
Turn the timer off
Empty the water. Please r ead the
“Water Drainage” section
Change the temperature setting
Use this unit at the recommended
room size.
The more people in the room, the
longer time it needs to cool the room
Clean the filters
Close the windows and door s
Close the blinds or curtains
Check the air exhaust hose
Change the temperature setting
Remove the heat sources from the
room.
Place the unit on an even surface.
It is normal. That is the sound of
refrigerant fl owing inside the
condenser .
Check the voltage 115V/60Hz
Check the exhaust hose
Do not modify or add air exhaust by
yourself .
Place the unit on an even surface.
Make sure the knob is secured tightly
in the drainage spout.
Empty the water. Please r ead the
“Water Drainage” section.
Contact Tatung Service Center
Contact Tatung Service Center
That is the normal status. The
message will disappear after few
minutes.
Contact Tatung Service Center.
The unit only runs in
fan mode (the
compressor doesn’ t
run)
The room is not cool
enough
The unit starts and
stops frequently
Is the proper voltage connected
Is the air exhaust hose installed
incorrectly?
Is the air exhaust hose modified?
Surface is uneven
Drain knob is loose
Is the water tank full?
Water is leaking from
the unit
LED control panel
show some error
codes
E2- Room tem perature faults
E3- Faulty coil temperature
E4- the coil is defrosted
E5- Unit faults
Page 16

- 16 -
Remarks:
(1) The data may vary, please refer to the rating label placed on the product.
(2) The manufacture reserves the rights to change without notice.
SPECIFICATION
Model number
Cooling capacity
Power supply
Power consumption
Control
Working temperature
Noise level (dBA)
Max room size
Refrigerant
Dimension (WxDxH)
Net wei ght (lbs)
Safety compliance
TPAC-09K
9000 BTU
115V/60 Hz
Cooling: 1050W
Dehumidifying: 750 W
Digital LCD control panel / remote
controller
64°F~8 6°F
=< 52 (dBA)
150 sq.ft.
R22/12.35oz/0.77lb
20.8” x 12.5” x 28”
66 lbs
ETL
TPAC-12K
12000BTU
115V/60 Hz
Cooling: 1380 W
Dehumidifying: 750 W
Digital LCD control panel / remo te
controller
64°F~86°F
=< 54 (dBA)
200 sq.ft.
R22/12.35oz/0.77lb
20.8” x 12.5” x 28”
68 lbs
ETL
Page 17

- 17 -
謝謝您選購本產品
! 我們希望這款移動式即時冷卻冷氣機,可以為您提升居家環境的舒適度.
建議您, 使用前, 請詳閱本使用說明書, 以確保產品可以為您創造出的最佳的工作效能.
以下的小提示, 可以幫助提升冷卻效果. 在您使用時, 請參考 實際情況並加以調整.
• 使用移動空調時, 請將廚房或浴室的熱源關閉
• 在建議使用的空間大小內使用本產品. 若使用的空間比我們所建議的還大, 您還是可以使用本產品, 只
• 當您離開房間時, 關掉電源,或是將溫度的設定設高一點, 這樣可以為您節省能源
• 定期檢查空氣瀘網是否太髒. 空氣瀘網太髒會堵塞空氣的流通, 降低冷 效能 卻
• 不要將燈, 或任何會產生熱的物品放在空調機旁, 以免空調機感應到熱源, 持續運轉而損耗能源.
• 在使用空調機時, 將窗簾拉上, 減少太陽的照射.
• 空調機與四周牆壁至少保留20 英吋(50公分)的距離.
空氣流通較好的地方, 冷卻效果會相對增加.
產 品 介 紹
Page 18

- 18 -
為避免危險
,
使用任何電器用品前, 請留意以下的使用說明:
1. 使用本產品前, 請詳閱本使用說明書
2. 為避免觸電與受傷, 請勿將電源線, 插座, 以及本產品浸泡在水裏或任何液體中, 也勿讓水或任何液體
流入本產品之電子零件, 以免受傷或損傷產品的功能.
3. 當本產品由孩童使用, 或者是使用時有孩童在旁邊, 請特別留意孩童的安全,小心使用. 由於本產品並未
為針對孩童特別設計防護措施, 因此建議您,勿讓孩童使用本產品.
4. 若電源線, 插座或產品本身有嚴重損傷, 請停止使用, 並連絡大同服務維修部門.
5. 請將產品直立放置. 不要倒置, 也不要水平放置, 以免損傷產品的功能
6. 在運送過程中, 產品可能會被水平放置, 使壓縮機內的油流入製冷銅管而影響製冷效能. 因此, 在第一
次使用時, 請將產品直立放置1 2 小時之後, 再插電運轉.
7. 請勿使用延長線, 或修改電源線. 也不要與其他電器用品共用一個插座.
8. 請勿用任何物品堵塞進風口與出風口. 出風口或入風口一定要保持空氣流通.
9. 離開房間, 或長時間外出, 請將關閉電源.
10. 不要讓寵物在空調機附近玩耍, 以免受傷
. 也請勿將植物放置在空調機附近, 以免堵塞出風口或入風口.
11. 請勿將本產品放置於任何熱源旁邊, 比如: 瓦斯爐, 電爐或烤箱.
12. 請勿在浴室, 游泳池, 或是濕的地板上使用本產品.
13. 請勿直接拔插頭來啟動或是關閉電源.
14. 在進行清潔或搬運前, 請先拔掉電源插頭.
15. 請使用本產品製造商所建議的零件, 若使用其他零件, 可能會造成火災與傷害.
16. 請勿將眼睛, 臉, 皮膚, 或其他身體部位靠出風口太近, 或貼近出風口吹風太久.
17. 如果有任何異味或煙產生, 應立即斷電並停止使用, 並連絡維修中心.
18. 請勿在產品上噴灑任何易燃的液體或氣體.
19. 請勿站立或放置任何在產品上.
20. 請將產品直立放置, 並放置在平坦的地板上, 以免水箱的水溢出.
21. 若長時間不使用, 請將水箱中的水導引出來, 以免產生異味或發黴.
22. 不要將本產用於其他用途.
如果沒有遵守以上使用注意事項
,
製造商不負任何相關責任.
製造商保留修改上述事項的權利, 不另行通知.
請妥善保存本手冊
本產品只限家庭使用
使 用 安 全 須 知
~
Page 19

- 19 -
本產品附有
LCDI (Leakage Current Detection and Interruption) 電源線與插座. 當偵測到任何不正常的電流, 或是有
漏電的情形發生時
LCDI
插座會自動將電源切斷. 電源在切斷後並不會自動恢復, 除非手動將RESET的按鍵按
下.這樣的設計是為了防止漏電而造成的觸電, 火災或受傷. 因此, 為確保LCDI的插座工作正常, 請按照以下步
聚進行測試:
1. 將LCDI插頭插到牆上的插座, 此時, 插頭上的POWER燈會亮起
2. 按下在LCDI上的TEST按鍵. 此時, 電源應該會被切斷, 而插頭上的POWER燈會熄滅.
3. 按下在LCDI上的RESET按鍵. 電源即可恢復.
在測試的過程中
, 若發現LCDI插座不能正常工作, 請勿使用, 立即拔掉插頭並連絡專業的技術人員或維修中心.
若在使用產品的過程中, LCDI啟動並切斷電源, 此時請先檢查電源線是否有任何的損壞. 如果沒有, 則按下插頭
上的RESET按鍵, 以接通電源. 但如果電源仍舊被切斷, 請立即拔掉
插頭, 並連絡大同服務維修部門.
請特別留意:
1. 請勿將TEST和RESET按鍵當作電源開關來開啟或關閉電源.
2. 當空調機在運轉時, 請勿按TEST
按鍵
.
3. LCDI電源線與插座只限室內使用.
4. 定期檢查電源線. 如果有任何損傷, 請立即拔掉插頭, 停止
使用
LCDI 電 源 線 與 插 座
Test bu tton
Res et butt on
Page 20

Page 21

- 21 -
1. 選擇合適的安裝地點
將空調機放置在平坦
, 穏定, 乾燥且空氣流動不會被堵住的地方. 冷氣機
距離四周的牆壁至少要有20英吋(50公分)的距離.
2. 安裝熱風排放管
將轉接頭
A 和B,
以旋轉的方式與伸縮軟
管接連在一起.
3. 將熱風排放管固定在空調機上
(1) 將轉接頭A滑入空調機上的排風管介面
(2)
將另一端放在窗戶上或窗戶伸縮板上. 如何安裝窗戶安
裝附板, 請看以下說明.
請注意
:
伸縮軟管的長度為17.5英吋, 最長可拉至62 英吋. 伸縮軟管拉的
愈短, 愈節省能源.
這個伸縮軟管的長度是根據產品性能而設計的. 請勿任意修改,
或使用其他非本製造商設計的軟管, 以免損傷產品
4. 安裝窗戶伸縮板
本空調機所附的窗戶伸縮板是適用於大部份的上下或左右開啟的
窗戶. 然而, 可能仍有些窗戶無法適用, 因此, 您也許需要視實際情況, 修改或調整伸縮板. 安裝伸縮板,
請參看以下說明.
上下拉開式窗戶安裝法 左右拉開式窗戶安裝法
安 裝 注 意 事 項
轉接頭 A
轉接頭B
20
”
2
0”
20”
Page 22

- 22 -
5. 彎曲伸縮軟管的正確方法
正確的伸縮軟管方法
錯誤的伸縮軟管方法
注 意:
這個伸縮軟管的長度是根據產品的性能而設計的. 請勿任意修改, 或使用其他非本製造商設計的軟管, 以免
損傷產品
安 裝 注 意 事 項
51”
16”
Page 23

- 23 -
1. 控制面板說明
Timer
(定時設定)
按這個按鍵設定空調機開啟或關閉的時間.
Swing
(扇葉轉動)
按這個按鍵啟動垂直出風扇葉, 使其自動左右擺動. 再按一次則停止轉
動.
Speed
(風速設定)
按這個按鍵設定風速. 風速共有三段:高, 中, 低.LED
面板上會
示顯示所設定的風速
Up/Down
( /上 下
)
• 按這個鍵去調整溫度或定時設定.
• 若同時按二個按鍵, 可以改變溫度單位華氏或攝氏
Mode
(運轉模式)
按這個鍵設定運轉模式. 共有三種運轉模式: 冷氣, 送風, 除溼
LED
面
板上會示顯示所設定之模式 .
Power
(電源開關)
按這個按鍵去啟動或關閉電源.
操 作 使 用 說 明
Timer
Swing
Speed
Mode
Power
Page 24

- 24 -
2. LED 圖示說明
3. Remote control
Power
(電源開關)
按這個按鍵啟動或關閉電源.
Timer
(定時設定)
按這個按鍵設定空調機開啟或關閉的
時間.
(如何設定定時, 請參閱第11 頁)
Swing
(扇葉轉動)
按這個按鍵啟動垂直出風扇葉, 使其
自動左右擺動. 再按一次則停止轉動
華氏與攝氏切換
Cool
(冷氣模式)
按這個按鍵設定冷氣運轉模式
Dehumidifying
(除溼模式)
按這個按鍵設定除溼運轉模式
Fan
(送風模式)
按這個按鍵設定送風運轉模式
Up (上) 按這個按鍵往上調整溫度與定時設
定.
Down (下) 按這個按鍵往下調整溫度與定時設
定.
High
(高檔風速)
按這個按鍵設定高檔風速
Medium
(中檔風速)
按這個按鍵設定中檔風速
Low
(低檔風速)
按這個按鍵設定低檔風速
Auto mode
(自動模式)
在這個模式下, 風速, 運轉模式以及
溫度都是預設好的. 這些預設值是不
能改變的. 預設值為: 風速
=低速; 溫
度=27C(80.6F); 運轉模式=冷氣. 若
要取消自動模式, 再一次本鍵即可.
操 作 使 用 說 明
COOL:製冷模式顯示燈。
FAN :送風模式顯示燈。
DRY:除濕模式顯示燈。
COMP:壓縮機運行顯示燈。
FULL:水滿報警顯示燈。
ADD WATER:加水顯示燈。
HIGH:高風顯示燈。
MED:中風顯示燈
C F
. .
Page 25

- 25 -
操 作 使 用 說 明
4.時間設置
1.關定時設置
當電源打開時, 按定時按鈕。LE D會閃5次,在這時,按Up/ Down調節時間從0. 5小時到24小時。此後,
在3小時和1小時,每次會改變0. 5小時。
2.改變設置時間
當時間打開時, 您可以按時間按鈕來檢查剩餘的時間。 它將會閃5次。按Up/ Down調節時間。如果您在
閃動時再按一次,設置的時間將會取消。
3.開啟定時
當機器關閉時按定時按鈕。 同關閉時間顯示一樣。只要設置時間結束, 機器會自動啟動。
冷氣和除濕模式
1.冷 氣/制 热 操作
按模式 按 钮或者
/ 来 选 择冷氣 模式。
按向上 和 向下键 或 和設置合 的 室温。
是 6 4-84°F (18 -30°C).1°C or 1°F。
按速度 按 钮或 來 選擇合適的風 速。
按風擺按 钮 或 來設置風窗 的 垂直方 向。
用手來調 節水 平風窗。
2. 除濕設置
按模式 按鈕或 選 擇乾燥模 式 。 風 速低時
LED 顯 示 室温,其他 功 能不可以調節。
注意:
1. 冷氣模式時,當加水指示顯示時,您可以從注射端口注入水,在
冷氣開始前(但不要超過最高水位)
2. 在除濕模式時,您應該用排水管排水。當水位超過最高水
位時,機器會停止工作。
在乾燥和通風模式時,不要使用排氣管
3. 如果您的房間有陽光直曬,請拉上窗簾。
Page 26

- 26 -
11. 關於特殊的加水功能
一般的空調機, 會將空氣中水氣轉成冷凝水而收集在水箱中, 再用水 抽出用以冷 冷凝管以提升冷唧筒 卻
氣效果. 然而. 若在溼度很低的地區使用, 是不會產生足夠的冷凝水來冷 冷凝管卻 . 因此, 為增加冷 效果氣 ,
本空調機特別設計了加水口, 讓使用者自行加水進入水箱, 來提升冷 效果氣 , 而不用等待冷凝水的累積. 這
個設計特別適合空氣溼度很低的地區.
當水箱中沒有水時, 本空調機也可以正常運作, 因此, 加水這個動作並不是一定要執行的 . 若您想加水, 在
控制面版的加水指示燈亮起時, 用所附的量杯, 在加水口倒入1800ml
以下的水(約三杯)量. 如果你所居住的地區溼度不是太低, 或加水指
示燈未亮起, 建議您不要加水, 因為空氣中的水會變成冷凝水而匯集
到水箱中.
請特別留意: 不論水箱中有沒有水, 本空調機的所有功能都可以正常
運作.
操 作 使 用 說 明
Page 27

- 27 -
在使用冷氣與除溼的運轉模式下, 冷凝水會流入空調機內部的水箱中. 本產品設計有冷凝水蒸發系統, 即水箱
內的 會將冷凝水抽出用以冷缷冷凝管以提升冷 效果唧筒抽 卻
,
同時蒸發冷凝水以減少冷凝水的累積量
, 與排水的
次數. 然而, 如果本產品在溼度很高的地方使用, 水箱中的水累積的速度會比較快, 需要排水的次數也會比較
多.
當水箱的水滿時
LED
控制面板會閃爍, 並發出警告聲, 每5分鐘10聲, 壓縮機會停止運轉, 而保留送風功能. 此
時, 應關閉電源並將水箱中的水排出. 水排出之後, 重新開啟電源, 空調機會先以送風模式運行幾分鐘後, 壓縮
機才會啟動, 並開始送出冷風
排水方式: 您可以用排水管來持續排水, 也可以用以下步驟將
水排出:
1. 關掉電源;
2. 將裝水容器放在排水口的下方用以接水;
3. 將排水口的栓塞拿出, 水即會入裝水容器中.
4. 如果您想要用排水管來持續排水, 請參照以下步驟:
(1) 關掉電源;
(2) 放在一個裝水容器在排水口的下方用以接水;
(3) 將排水口的的栓塞拿出
(4) 將所附的排水管的一端套入排水口, 並將排
水管的另一端放入另一個裝水容器中, 則水
會流入裝水容器
(5) 如果排水管的長度不夠, 您可以使用9mm I.D.
的塑膠管接在隨產品附贈的排水管上.
注意: 當水箱水滿時, 請勿移動空調機, 以免水箱內的水溢出而弄溼地板或損傷產品
排 水 方 式
Page 28

- 28 -
特別留意: 在清洗與檢修時, 必須先切斷電源電, 並拔掉插頭.
1. 清洗空氣瀘網:
定期清洗空氣瀘網可以提升冷卸效果
(1) 拔掉電源插頭.
(2) 將二個空氣瀘網拉出, 如右圖
(3) 將瀘網浸泡在溫和的水中(不能超過104F). 如果必要, 倒入一些中性的清潔劑清洗, 然後用清水將其完
全清潔乾淨.
(4) 在瀘網完全乾燥後, 將其放回原處.
注意: 在沒有裝上濾網前, 請勿使用.
2. 清潔外殼
(1) 拔掉電源插頭.
(2) 用溼的柔質抺布擦拭外殼.
(3) 不要使用粗糙的刷子或抺布擦洗, 也不要使用亮光劑, 含苯的
清潔劑或是稀釋劑清潔產品, 以免造成產品的損傷
(4) 不可將本機浸泡在水裏清洗, 也不可用水直接沖洗.
(5)
控制面版上的任何部份不可沾水, 以免損傷產品機能
3. 季節末的收納
(1) 拔掉插頭
(2) 清洗瀘網
(3) 將水箱中的水完全排出(請參考排水說明單元)
(4) 插上電源, 並使產品在 送風模式下運轉約 3-4小時, 以使水箱完全乾燥.
(5) 拔掉電源, 並將電源線纏繞在電線掛勾上.
(6) 將熱風排管拆卸下來.
(7) 將產品與配件用原始的包裝盒包起來.
(8) 將產品放置在乾燥的地方.
產 品 清 潔 與 維 護
Page 29

- 29 -
問 題 檢 查 解 決 方 法
電源線是否插上? 插上電源
POWER鍵是否有損壞? 檢查POWER按鍵是否正常. 如果損
壞, 請連絡大同維修中心.
POWER鍵是否己按下? 按下電源開關
沒有電源
是否定時功能啟動? 關閉定時功能
水箱的水是否己滿? 將水箱的水排出. (請參看排水單元說
明)
只有送風, 壓縮機沒有
運轉
室內溫度是否低於設定溫度? 改變溫度設定
房間是否太大? 請在建議的空間大小內使用本產品,
否則需要較長的時間才會感覺到冷
房間內是否有太多人? 房間的人愈多, 需要較長的時間才會
感覺到冷
空氣瀘網是否太髒? 清潔空氣瀘網
房間內的窗戶是否打開? 將窗戶關起來
房間是否有陽光直接照射? 把窗簾拉上減少陽光直射
熱風排放管是否有正確安裝? 熱風排放管的一端要緊密的接扣在產
品的出風口上, 另一端要正確的安裝
在窗戶或門上, 使熱風完全排放到室
外.
是否溫度設定太高 改變溫度設定
感覺房間不夠冷
是否有熱源在房間裏? 將熱源移開
產品是否被放置在平坦穏固的地方? 將產品放置在平坦穏固的地方 有噪音產生或掁動
聽到內部液體流動的聲音? 這是正常的. 這個聲音是由於冷媒在
冷凝管內流動所產生.
是否供應正確的電流? 電壓應為115V/60Hz
熱風排放管是否安裝正確? 檢查熱風管
使用中, 電源時常被切
斷.
熱風排放管是否有被修改? 請勿修改熱風管, 也不要使用非本製
造商建議的熱風管
產品是否被放置在平坦穏固的地方? 將產品放置在平坦穏固的地方
排水口的栓塞是否鬆開? 檢查栓塞. 要將栓塞緊密的套進排水
口.
水從水箱流出
水箱的水是否己滿? 將水箱中的水排出. (請參看排水單元
說明)
E2-室內溫度感測器故障 請連絡大同維修中心.
E3- 盤管溫度感測器故障 請連絡大同維修中心.
E4- 盤管正在除霜 這是正常現象. 這幾分鐘後
,E4
指示會
消失
LED控制面板上出現
訊息
E5-製冷系統故障 請連絡大同維修中心
如果上述解決方法無法解決問題, 請勿自行修理, 並連絡專業的技術人員, 或大同維修中心 1-800-827-2850.
當有以下的情形發生時, 請立即停止使用產品, 拔掉電源並連絡大同維修中心.
a. 保險絲與開關時常跳開.
b. 電源線過熱, 或電源線有損傷
c. 有異味或煙產生.
!
異 常 故 障 排 除
Page 30

- 30 -
型號
TPAC-09K TPAC-12K
製冷效果
9000 BTU 12000BTU
額定電壓
115V/60 Hz 115V/60 Hz
製冷: 1050W 製冷: 1380 W 耗電量
除溼: 750 W 除溼: 750 W
控制面板 數位
LED
面板 / 內附搖控器 數位
LED
面板 / 內附搖控器
溫度
64度~86度
噪音 dBA)
=< 52 (dBA) =< 54 (dBA)
建議房間大小
150 sq.ft. 200 sq.ft.
冷媒
尺寸(WxDxH)
淨重(lbs)
66 lbs 68 lbs
安全認證
ETL
產 品 規 格
64度~86度
ETL
R22/12.35oz/0 .7 7lb
R22/12.35oz/0 .7 7lb
請留意:
(1)以上 的資料 若與 產品上 的銘牌 標籤不 同, 以產 品 上的 銘 牌標籤 為準.
(2)產品 製 造商保 留修 改的權 利, 通 知.
不另行
64度~86度 64度~86度
20.8” x 12 .5” x 28”
20.8” x 12 .5” x 28”
Page 31

- 31 -
SERVICE INFORMATION
TATUNG LIMITED WARRANTY
Carry-In or Mail-in Service
TATUNG LIMITED WARRANTY
If the product is defective or not working properly, please contact us directly with our service or technical assistances at
1-800-827-2850
Tatung Company of America, Inc. (“Tatung”) , 285 0 El Pr esi dio S tre et, L ong B eac h, Ca lif orn ia 9 08 10, wa rra nts t o you ,
the original owner of this new Tatung product that all parts of this product are free from defects in material and
workmanship,for one year from the date of purchas e und er no rma l use a nd se rvi ce.
Tatung will, at our option, repair or repl ace t he pr odu ct or a ny pa rt th at be com es de fec tiv e, ma lfu nct ion s, or o the rwi se
fails to conform to this warranty under normal use an d ser vic e dur ing t he te rm of t his w arr ant y, at no charge to you for parts and
labor.
This warranty does not cover:
1. Defects, malfunctions or failures resulting fro m cau ses b eyo nd th e con tro l of Tatung or the manufacture of the
product, including, but not limited to, shippin g or tr ans it ac cid ent s, ab use , mis use o per ati on co ntr ary t o fur nis hed
instructions, improper or insufficient ventilation, operation with incorrect power supplies, operation with faulty
associated equipment, modification, al ter nat ion , imp rop er se rvi cin g, ac ts of G od, t amp eri ng or n orm al we ar an d
tear;
2. Products on which the serial number has been al ter ed, d efa ced o r rem ove d;
3. Products purchased outside of the United States.
Should any product submitted for warranty servi ce be f oun d ine lig ibl e for w arr ant y ser vic e, we w ill p rov ide y ou wi th an
estimate of the cost of repair and will repair the prod uct u pon y our r equ est a nd up on re cei pt of p aym ent o r acc ept abl e
arrangements for payment.
You mu st ca rry -in o r mai l-i n you r pro duc t at yo u cos t dur ing t he li mit ed wa rra nty p eri od (o ne ye ar fr om th e dat e of
purchase). This limited warranty only applies to products purchased and serviced in the United States. This Limited
War ran ty is e xte nde d onl y to th e ori gin al pu rch ase r and o nly c ove rs pr odu ct pu rch ase d as ne w. Ple ase p ack your portable
air conditioner carefully to avoid damages i n tra nsi t. Tatung dose not be responsible for improper handling in transit, or for
transportation expenses. To expedite processing, please indicate nature of the defect, along with a copy of one of the
following: a dated sales receipt, invoice, b ill o f sal e, de tai led c har ge sl ip, o r dat ed pr oof o f pur cha se, a nd co nta ct Tatung
Service Department at 1-800-827-2850
Some states do not allow the exclusion or limita tio n of in cid ent al or c ons equ ent ial d ama ges , or li mit ati ons o n how l ong a n
implied Limited War ran ty la sts , so th e exc lus ion s may n ot ap ply t o you .
This warranty gives you specific legal rights and y ou ma y als o hav e oth er ri ght s, wh ich v ary f rom s tat e to st ate . This is the
only express warranty applicable to the prod uct . Ta tun g nei the r ass ume s nor a uth orized anyone to assume for it any other
express warranty.
THIS LIMITED WAR RAN TY IS CONDITIONED ON AND BECOMES EFFECTIVE UPON DATE OF PURCHASE.
© 200 7, Tat ung C omp any o f Am eri ca, I nc.
Tatung reserves the right to change implied w arr ant y wit hou t not ice .
 Loading...