

Page 1
Digital Thermometer
TA410AX/BX
Instruction Manual
...
•••••
••••••
•
tJ1t{1]
•••••
•••••
f.]
ICHINEN
1-2-16 Kawaguchi, Nishi-ku, Osaka 550-0021 JAr AN
Phone: 81-6-6584-0809 Fax: 8H l-6584-10"
Web Site: hltp:/Iwww tascojapan co jpl
TA
SCa CO
.,LT
....
JY20 1:!OJ I
- : .
.
Ll
I A~
WAX I
Thank
this
instruction
properly.
you
for
purchasing
manual
f.]
the TA410AX/BX Digital Thermometer. Please read
carefull
y before use 5 0
ICHINEN TASCO
~.40.l'
that
CO.
you
/LT
D.
can use the
product
Page 2
afety
Precautions
Before operation, read this "Safety Precautions" section carefully to use the product properly,
The precautions shown herein are divided into the two categories, Since both of
important safety precautions, make sure that you observe them,
them conl..in
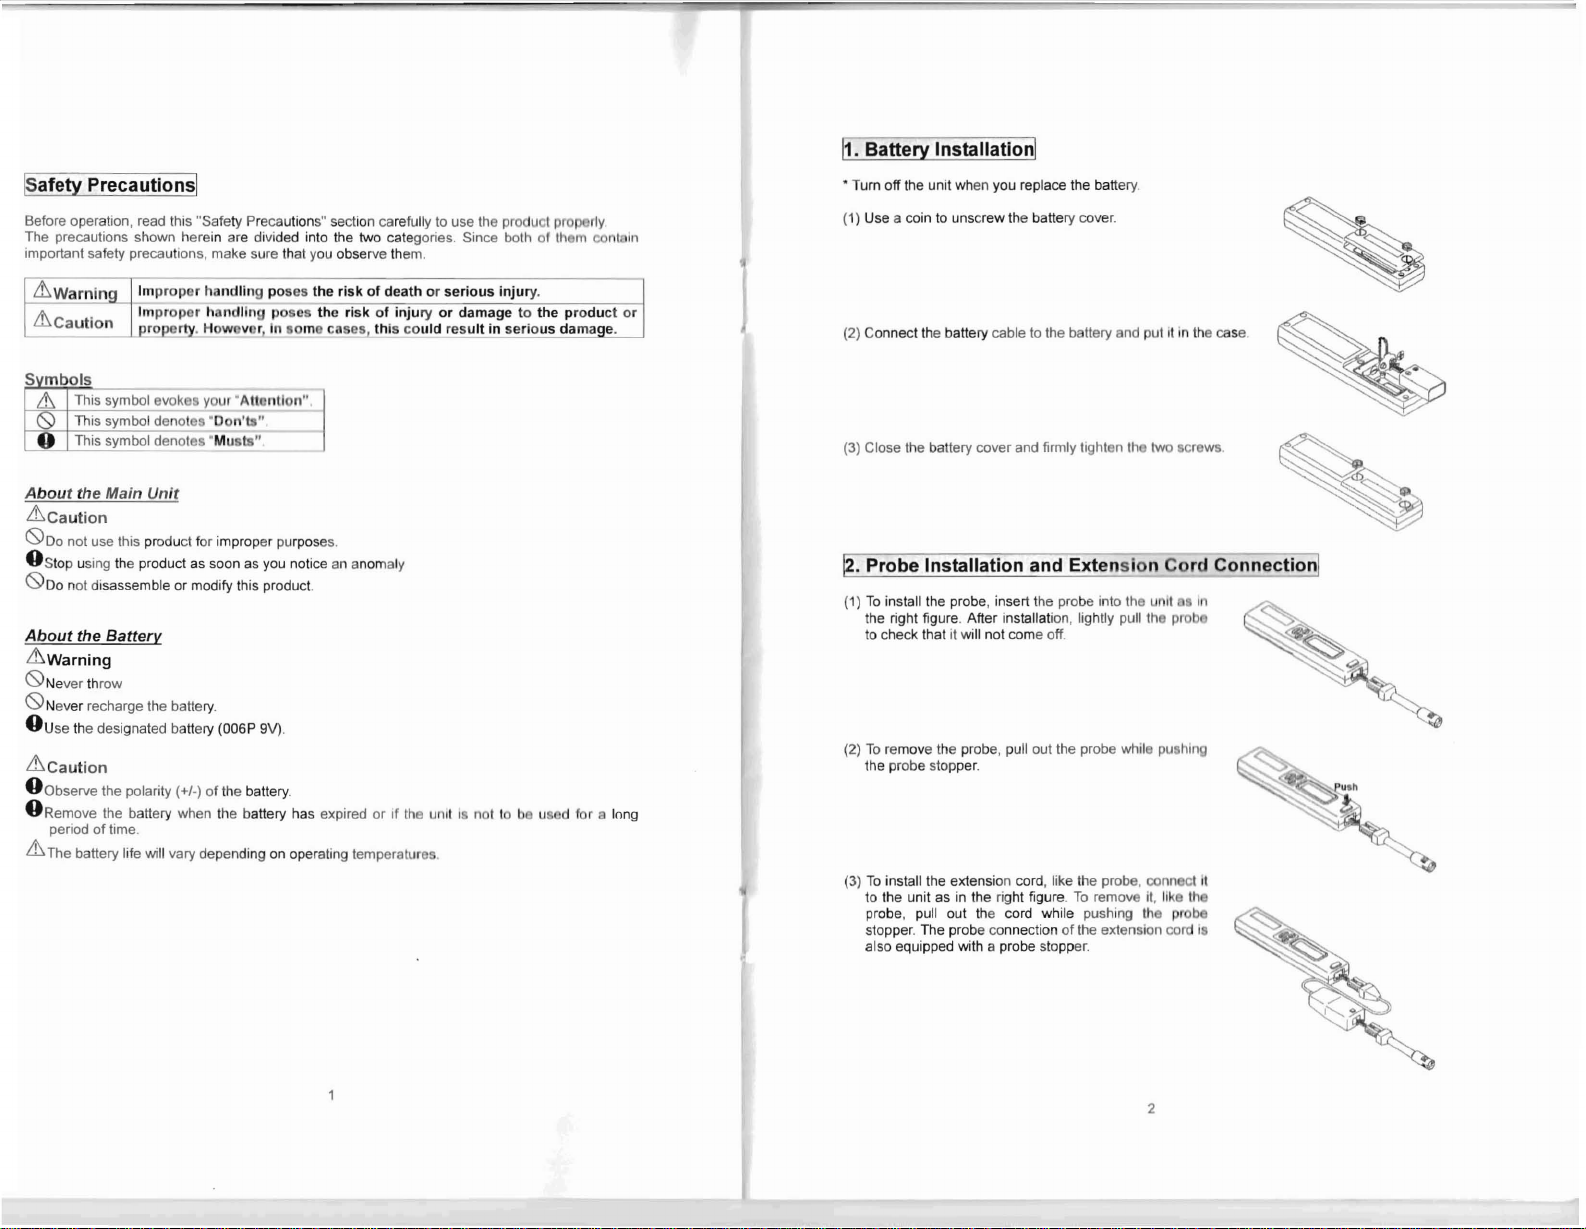
• Turn off the unit when you replace the battery.
(1) Use a coin to unscrew the battery cover.
&"
Warning_
&,.
Caution EroEerty. Howov,!",
Svmb
ols
&,.
This symbol evokes
This symbol denotes "Don'ts" ,
"0
This symbol denotes "M u!-t5" ,
About the Main Unit
it>
Caution
0 Do not use this product for improper purposes,
O Stop using the product as soon as you notice an anomaly
0 Do not disassemble or modify this product.
About
the Ba
it> Warning
0 Never throw
0 Never recharge the battery.
O Use the designated battery (006P 9V).
it>
Cauti on
O Observe the polarity (+/-) of the battery.
O Remove the battery when the battery has expired or If the unu IS not to be used for
period of time.
it>
The battery life will vary depending on operating temperature
I
mp r~p
e
r
handling poses the risk of death or seriou s
inju
ry.
. Improper handllnu poses the risk of inj ury or damage to the produ ct or
hl --"~O_ca !!.
YOl~·A lIcnllo
tterv
n"
~
this could result in
,
serio
us damag_e_. _
1I long
(2) Connect the battery cable to the battery and put It in the case.
(3) Close the battery cover and firmly tighten the two screws.
@"Probe Installation and Extension Cord
(1) To install the probe, insert the probe into the unit
the right figure. After installation, lightly pull the prob
to check that it will not come off.
(2) To remove the probe, pull out the probe while pushin
the probe stopper.
(3) To install the extension cord, like the probe, connect it
to the unit as in the right figure. To remove it, like th
probe, pull out the cord while pushing the prob
stopper. The probe connection of the extension cord is
also equipped with a probe stopper.
Connection
liS in
~
c-,
~
~
l
2
Page 3

Procedures
and Features:
(1) Power ON/OFF
Press the !POWERIkey. After all thle digitsRiave flashed on the display lor on and, the unit is
ready for measurement. Press the POWE key again to turn the unit ott.
Display All digits flashing Normal measurement mode
S
Press the !POWE
unit is set in the normal measurement mode.
• This instruction manual describes the situation where the unit has just been turned on (the
situation where there is no feature indications on the left side of lhe display) as the normal
measure ment mode.
(2) HOLD Fea
1. HOL D Fea
This feature holds the indication of tho current mensurod IlIlmpor
"HOLD" flashes on the display .
2.
Maximu
"MAX" and "HOLD" flashing on the display means that tho Unit holds Iho ImJicl'ltlon of the
constantly updated highest temperature.
If an error occurs, the unit will hold the indication of the orror.
3. M
"MIN" and "HOLD" flashing on the display means Ihat Iho urut holdl
updated lowest temperature,
If an error occurs, lhe unit will HOLD the indication of tho error
4. Average Val ue HOLD
This feature indicates the average values between any two pollit.. 01
While "AVG" is flashing on the display, the unit retains Ihe hlmr "Hl,tllI . dill"
doing, the unit indicates the actual temperalure data
Press the !HOLD! key to have "AVG" and "HOLD" flash all Iho
average value calculated based on the temperature data rot
The unit can average the data for up to 5 hours. If the umt II us,," ,,"
feature will be canceled.
If an error occurs during equation, the unit will hold the incicotlon of Ih" 01101
tur
m Value HOLD F
inimum
Value HOLD Feature (MIN HOLD)
--1~dA~
RJ
key to turn off the unit at any point of time during operation Also, turned on, the
tur
es (See the chart on Page 4.)
e
Feature
B B B ~
AVO 1. . . :CI
eatur
e (MAX HOLD)
(AVG HOLD)
· C-
'---
_=_-==_
llllll
d
llill
od III II
1
1111
l
lilI1
~
p
3.B
In(li
(1/'111011
l .,y
I1l'JIII
'C
-=
01III
h"'IIU 1I1t"
II ItI 11lIiI w,
11 10 11
1 !,
"I
II,,,1 1
1I II"l
""111
nl tlllltly
11
"0
d III
',th
p
1ii
Gl
c:n
=r Gl •
IU
Cl
~
:<: a s
s:
.2l
s:
Gl
.c ...
-J
~~
co
-a.
g-E
p
1ii
Gl
01
eli
L..l:J
r-r-,
Gl - Gl
l><
:I
~
s
~
..Q
s: e
- J
~
co
a. a.
.!!!.
o.!
1
@ @
;
~
·co
:Gl
,-
,Gl
rr
w
,
:0
: -1
: 0
:
:::c
-1
: Gl
'
VI
o
:::c
:~
: "i)
:0:::
...
p
en
::r
ru
0'
-1
><
c!_
~®
::i:
~
t)
Gl
c;
III
",0:::
~J
c2
~
c II>
II> _
:;: >
U .,C
,-
-g
E
0-.
-
.,
.,
..
.. :::l
lJl
:::l
=r-:
-
II>o
..
.,
~
E
'W
E iii
., E
0i\'I J I
I-
C
><
«I.
""
en
:E :z:
xl
~
"
'Ti
a.
lJl
i5
l.LJ
0
a
:::E
9
c
T
p
~
.......
0'
-1
o
:::c
z
-~-
t)
.!!
CI>
I/)
p
CO
t=:i
--
1ii
...
,
E
(
:Gl
, VI
:~
:"ii
~
r
...
0:::
,;
c 2 r'·- - - -
C
..
>
-
c
0"1
~
..
~
::r-
r-u
E
gI" I 1/
.::: =:9
~
::E~ ;::-
-5.
-"77 "
CIl
i5
p
.~
..
u
i5 G
.E
.,
:i
e:
., E
E iii
~
10
; :
.3 >.
oj
:::l
iii
>
.,
..
"co
~ E ~
10
~
-
c
.
~
--
:::l 0..
~
u O
.!!
~
.
'"
- J
0
C
co
VI
fU'
.!!!.
o
eli
-
r-
_
......
:;
"'-J...J
E
Gl
rn
:;
VI
'"
Gl
E
~
p
-
1
:~
~
"I
~
C1
- ::-
~
o<
-
0
::c:
Gl
J
'iiidl
> c:
Gl
:C
Cl
IIl
c:o
~~
o::i
i;.!!!.
Gl:
s: t.'
rw
- >
VIc!
>..
-[
~
H
@
•.............
fi\
\Y
p
9",
0>
:Z:C
3
4
Page 4

. Error Messages
(1) B
rok
If the detection terminal of the probe gets broken or the probe is not
connected, "Err"is indicated on the display as in the right figure.
If so indicated, replace or connect the probe.
(2) Ove r R
If the temperature being measured goes beyond the measurable range,
"or" or "-or" is indicated on the display.
• This indication may appear when the detection terminal of the probe is
(3) Low Battery Indication I • :J U 9 I
If the battery voltage gets low, the low battery voltage indication Ii! Will C
flash with 5 hours of life left.
In addition, the whole display is programmed to blink with 30 minutes of lifo lelt.
• The duration of the low battery voltage indication varies depending on Ihe battery type and
(4)
If you have found a problem with the display or features, usc II thin stick to press tho reset button
located on the battery compartment.
Pressing the reset button will reset the unit to the same selling as it has just beon turnod ON.
en Detection Terminal Indi
ang
e I
ndi
cation
almost broken. If it is clear that the temperature being measured is
within the measurable range, check the probe. In addition, if the
instrument reading abnormally fluctuates, check the probe .
environment.
Troubleshootinq
,.- __,. -- -
~
[:
"""
' ~"!Bi
,a.= - ;:':::::'
@ •
catio
n
" 1
I:: I ' ~:"
"::
~
_. ~
-
Reset button
[-
C
Err
~
I
I - or I
-'0
°C
@
10
~
ill>
ill>
[5. How to Place the
Place the probe perpendicular to the contact surface or
facing to the direction wind is coming from. In addition,
note that the unit will not operate properly if the surface is
rough or uneven.
• Before measurement, check the measurable range of
the probe. If you measure a temperature beyond the
range, there is a risk of failure and/unexpected injury.
Prob
~
o
~
~
o
"'"
16.
Maintenanc
(1)
Storage
When you store the unit, avoid such places as follows:
• Place exposed to direct sunlight
• Place that oscillates violently
• Place where the humidity is high (above 80%R.H )
• Hot atmos phere (above 50' C)
• High electromag netic field
(2) If the Housi ng Gets Dirty
Ii the housing gets dirty, immerse a shop towel in water or oil to wipe the housing. The housing is
made of ABS resin. Do not use organic solvents such as thinner, benzine and alcohol. These
solvents may deform and/or discolor the housing and keyboard
~
• If the unit will not operate properly even after pressing the reset button, tho urlll may have been
damaged. In such a case, contact your authorized dealer.
5 6
Page 5

o
:!:
w
~
,
o
:!E
w
:!:
,
Page 6

-MEMO-
WarrantYI
Thank you very much for purchasing one of our products, This product has been manufactured
through a perfect quality control and strict inspection process, However, should a failure occur
despite proper use, we warrant the product for one year after the date of purchase,
In addition, note that failures due to the following causes will not be warranted in any case,
• Failures due to accidental force such as fires and earthquakes,
• Failures due to improper use, inappropriate handling or modification.
• Failures and damages not deemed to be our responsibilities.
Product Name: TA410AX/BX
Serial Num ber:
Date of Purchase:
Authorized Dealer:
• This warranty is void without the serial number, date of purchase, and authorized dealer.
Make sure to return this war ranty together with the actual product.
ICHINEN TASCO CO., LTD.
1-2-16 Kawaguchi, Nishi-ku, Osaka 550-0021 JAPAN
Phone: 81-6-6584-0809 Fox: 81·6-6584-1056
warranty is exclusively for TA41OAB,
his
1Ill! accessories are not to be covered by this warranty.
Autho rized Dealer
9
10
 Loading...