


REDDOT Scope
Instruction Manual
Manuel D'instructions
Manual de Instrucciones
Bedienungsanleitung
Manuale di Istruzioni
Manual de Instruções
Lit. #: 9302761005b
RED DOT 6LIM-swapped adjustment 1 1 8/22/07 10:58:28 PM

RED DOT 6LIM-swapped adjustment 2 2 8/22/07 10:58:28 PM

INSTRUCTIONS (English) ............................................................................. 2
INSTRUCTIONS (Français) ........................................................................... 6
INSTRUCCIONES (Español) ............................................................................ 10
ISTRUZIONI (Italiano) ................................................................................. 14
ANWEISUNGEN (Deutsch) .......................................................................... 18
INSTRUÇÕES (Português) ........................................................................... 22
1
RED DOT 6LIM-swapped adjustment 3 3 8/22/07 10:58:28 PM
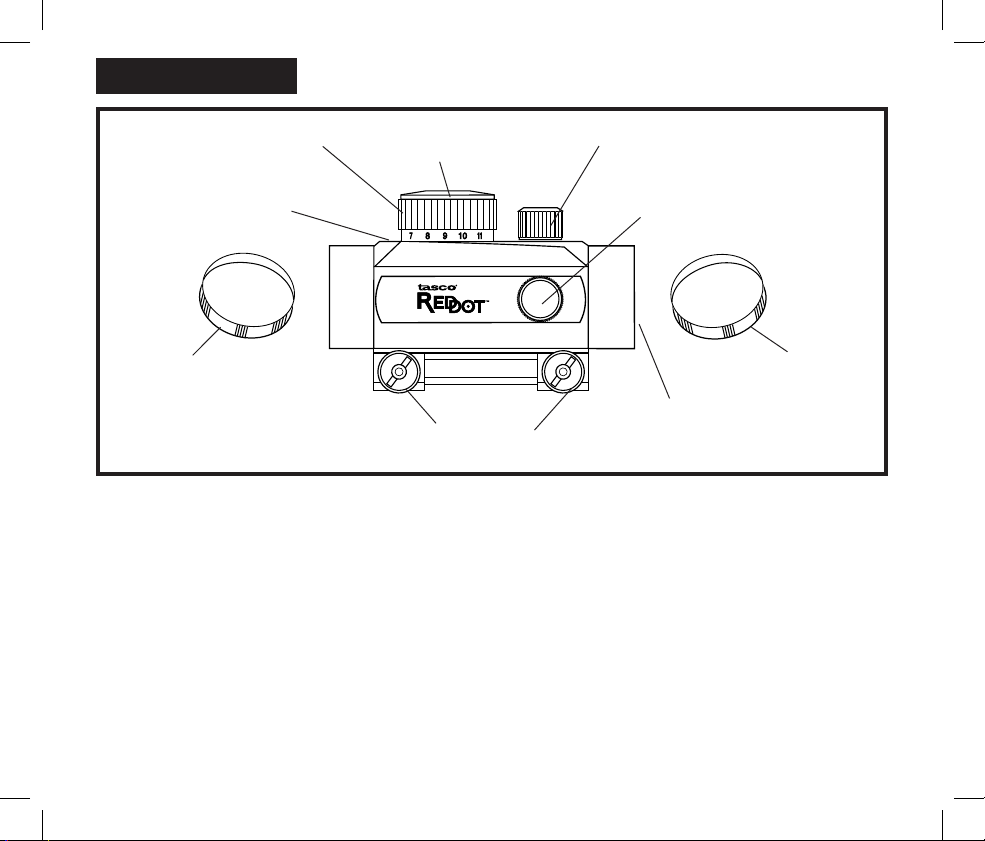
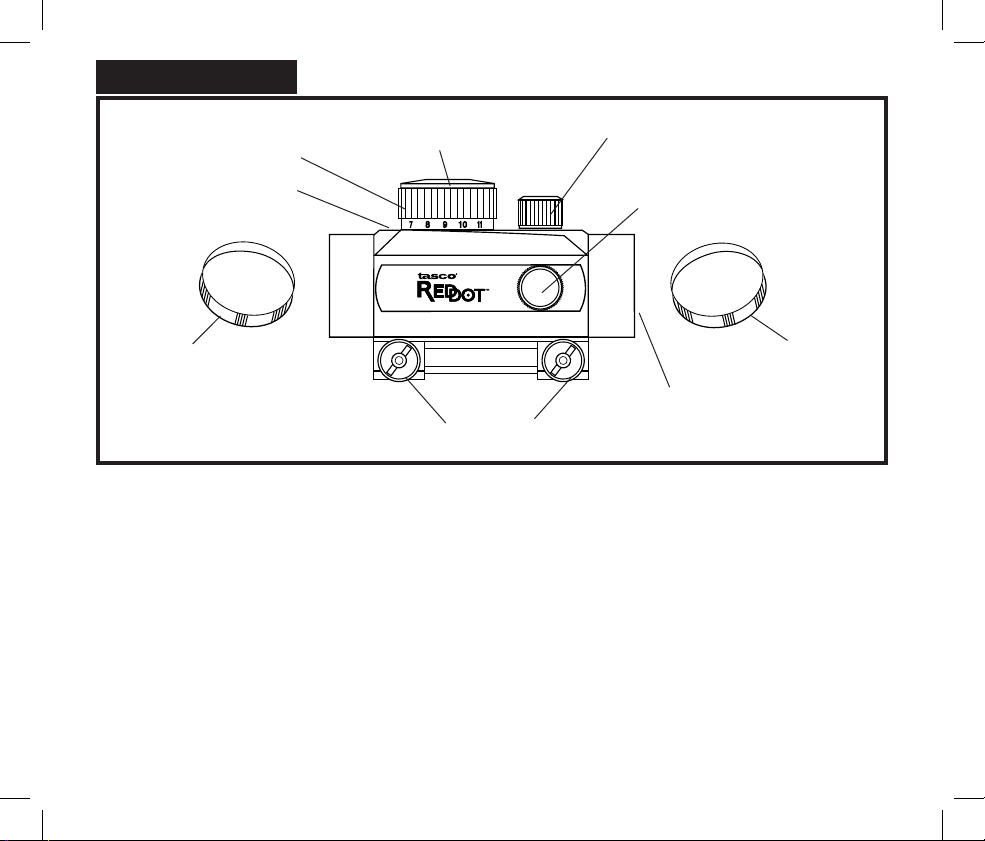
Rheostat with 11-Position
Detents for Varying
Light Intensity/
Solar panel power source
(select models only)
Windage Adjustment Turret
Elevation Adjustment Turret
Locking Nut
Dust
Cap
Dust
Cap
Eyebell
Battery
Compartment
Congratulations on purchasing your Tasco Red Dot illuminated optical sight. Designed with a unique rheostat that
features 11 positive detents for a full range of light intensities, this is a state-of-the-art scope designed for hunting,
plinking and target shooting with pistols, rifles, shotguns and bows.
Engineered for greater speed and accuracy, this scope allows you to unconsciously concentrate on the reticle, thus
increasing accuracy. Tasco’s Red Dot illuminated reticle has been pre-focused so the aiming point always appears
against the target. By comparison, open sights force you to focus on the rear sight, front sight and target at the same
time. Also standard rifle or pistol scopes bring the target into focus only on the internal reticle.
Its aiming system is engineered to be the brightest of its kind. All in all, this scope is proof positive that Tasco is
positioned squarely on the leading edge of advanced technology.
ENGLISH
2
RED DOT 6LIM-swapped adjustment 4 4 8/22/07 10:58:28 PM
MOUNTING YOUR RED DOT SCOPE
1. The base or bases should be manufactured specifically for your pistol, rifle or shotgun and should create a uniform
horizontal and vertical mounting platform. Be sure they are properly installed and securely fastened according to the
manufacturer’s instructions for your safety. There is no set eye relief for this sight, therefore, you should provide at
least three inches of clearance between the eyebell and your eye when in the shooting position.
2. Set the clamps onto the base or bases so that they align with the crosscut grooves. Work each clampscrew into the base
until the crossbolt seats into the groove. Securely tighten each locking nut with a coin or screwdriver. For additional
holding power, add a drop of thread-locking compound to the center of each locking nut.
INSTALLING BATTERIES
Your new Tasco Red Dot is powered by one 3V “coin-style” lithium battery, Type 2032. Should your reticle
grow dim or not light at all, you will need to replace the batteries. To install new batteries, unscrew the battery
compartment and insert “+” side up. Replace battery cover.
ZEROING YOUR RED DOT SIGHT
NOTE: THE FOLLOWING SHOULD BE DONE AT AN APPROVED RANGE OR OTHER SAFE AREA. EYE AND
EAR PROTECTION IS RECOMMENDED.
1. Activate the illuminated reticle by turning the rheostat knob clockwise to brighten and counterclockwise to dim. The
“1” represents the dimmest and the “11” the brightest illuminations.
2. Remove the windage and elevation adjustment caps.
3. With the scope mounted, rest the gun on a solid support. Sight along the barrel and aim at a target 50 to 100 yards
away. Sight through your Red Dot and use the windage and elevation adjustments to align the lighted reticle with the
target as seen along the barrel. Each click of adjustment moves the point of impact by 1/2” at 100 yards, 1/4” at 50
yards, and 1/8” at 25 yards.
CAUTION! BE SURE GUN IS NOT LOADED.
USE SAFE GUN HANDLING PROCEDURES AT ALL TIMES.
3
RED DOT 6LIM-swapped adjustment 5 5 8/22/07 10:58:28 PM
SOLAR POWERED TASCO RED DOT (not available on all models)
If your Tasco sight has a solar panel, no batteries are required during regular daylight hours. However you may
wish to install them as a backup for times when the sun is not bright enough to power the red dot to the intensity you
might like. For example, at dusk and dawn, you probably will want to use the battery backup to power the red dot.
To switch from solar power to auxiliary power, just switch the power source button from the solar position ( ) to
the battery ( ) position. When you want to turn the unit off, just switch the power source button to solar and set
the rheostat at “0”.
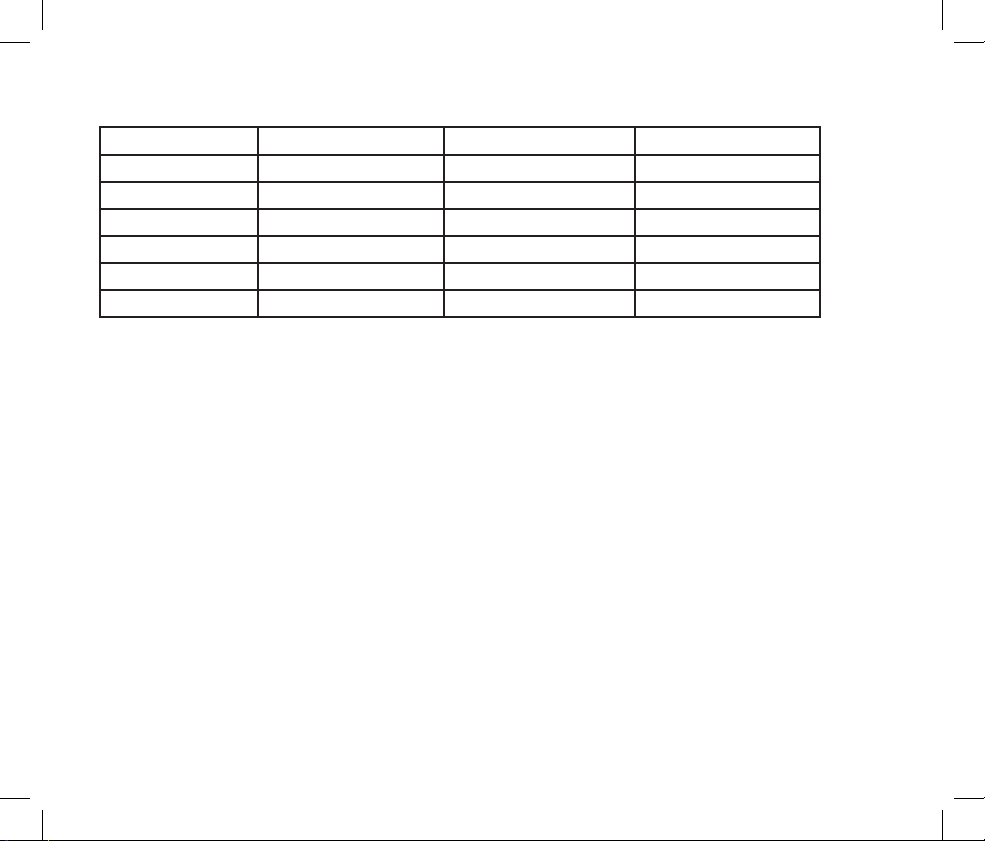
LITHIUM BATTERY REFERENCE CHART
Duracell Sunrise/Radio Shack NEDA Type (size)
DL2032 CR2032 5004L
Other brands of batteries not listed in the chart are available and suitable for use with your Red Dot. Refer to “coin
cell” NEDA type when purchasing batteries or consult with your dealer.
CAUTION: BE SURE GUN IS NOT LOADED WHEN INSTALLING BATTERIES.
4
RED DOT 6LIM-swapped adjustment 6 6 8/22/07 10:58:28 PM
INCLUDED ACCESSORIES:
Plastic Dust Caps (2), Polishing cloth, Lithium Battery
TECHNICAL SPECIFICATIONS:
Model Number:
BKRD30 BKRD30/22 BKRD42
Power: 1X 1X 1X
Reticle Type: Illuminated, 5 MOA Illuminated, 5 MOA Illuminated, 5 MOA
Finish: Matte Black Matte Black Matte Black
Weight: 171g 167g 187g
Length: 3 7/8” 3 7/8” 3 7/8”
Diameter: 30mm 30mm 42mm
5
RED DOT 6LIM-swapped adjustment 7 7 8/22/07 10:58:28 PM
INSTRUCTIONS POUR LA LUNETTE TASCO RED DOT
Nous vous félicitons pour l'achat du Tasco Red Dot à lunette optique illuminée. Conçu avec un rhéostat unique
permettant 11 détentes différentes pour une large portée lumineuse, il s'agit d'un appareil ultramoderne destiné à la
chasse, la chasse aux canards et le tir à la cible au pistolet, à la carabine, au fusil de chasse et à l'arc.
Désignée pour une vitesse et une précision plus élevées, cette lunette vous permet de vous concentrer
inconsciemment sur le réticule, ce qui augmente la précision. Le réticule illuminé du Red Dot de Tasco a été
préalablement mis au point de sorte que la mire apparaît toujours en face de la cible. Le réticule illuminé ProPoint a
été pré-focalisé, ainsi le point de mire apparaît toujours contre la cible. A titre de comparaison: une lunette ouverte
vous oblige de procéder au réglage par rapport à l'arrière, à l'avant et à la cible en même temps. De plus, les mires
pour fusils ou pistolets standard ne laissent entrer la cible qu'à l'intérieur du champ du réticule interne.
Son système de mire a été conçu pour être le plus clair qui soit. Toutes ces qualités font que Tasco se situe sans
conteste au sommet de la technologie de pointe.
Rhéostat avec détente
11 positions pour intensité
lumineuse variable/
Source d’énergie par panneau
solaire
(certains modèles seulement)
Capuchon de réglage latéral
Capuchon de réglage vertical
Veroux de securité
Coiffe
anti-poussières
Coiffe
anti-poussières
Oculaire
FRANÇAIS
Compartiment à
piles
6
RED DOT 6LIM-swapped adjustment 8 8 8/22/07 10:58:29 PM
ATTENTION: VEILLEZ A CE QUE VOTRE ARME NE SOIT PAS CHARGEE.
RESPECTEZ A TOUT MOMENT LES PROCEDURES DE SECURITE.
MONTAGE DE VOTRE LUNETTE RED DOT
1. La(les) base(s) doit (doivent) être fabriquée(s) tout spécialement pour votre pistolet ou fusil, formant une plate-forme
de montage horizontale et verticale uniforme. Assurez-vous qu'elles sont bien serrées conformément aux instructions
de sécurité du fabricant. Il n'y a pas de compensateur de profondeur, prévoyez dès lors trois pouces entre la mire
conique et votre œil lorsque vous êtes en position de tir.
2. Montez les anneaux sur la (les) base(s) de sorte à ce qu'ils soient bien alignés par rapport aux entailles. Insérez chaque
anneau dans la base jusqu'à ce que le boulon se cale bien dans la rainure. Serrez bien chaque écrou à l'aide d'une pièce
de monnaie ou d'un tournevis.
INSTALLATION DES PILES
Votre nouveau Tasco Red Dot est alimenté par une pile lithium ronde de 3V, de type 2032. Lorsque la vue à travers
votre appareil devient floue ou qu'il n'y a plus d'éclairage, il vous suffit de remplacer la pile. Pour installer une
nouvelle pile, dévissez le compartiment pour pile et insérez une nouvelle pile, le pôle "+" tourné vers le haut.
Remettez le couvercle en place.
MISE A ZERO DE VOTRE LUNETTE RED DOT
NOTE: CE QUI SUIT DOIT ETRE FAIT DANS UNE ZONE AUTORISEE OU SURE. IL EST RECOMMANDE DE SE
PROTEGER LES YEUX ET LES OREILLES.
1. Activez le réticule illuminé en faisant tourner le bouton du rhéostat dans le sens des aiguilles d'une montre pour
augmenter l'éclairage et dans le sens contraire pour le réduire. Le "1" représente l'éclairage le plus faible et le "11" le
plus élevé.
2. Enlevez les coiffes de réglage latéral et vertical.
3. La lunette montée, faites reposer l'arme sur une assise solide. Regardez le long du barillet et visez une cible éloignée
de 50 à 100 mètres. Regardez à travers votre Red Dot et réglez les capuchons latéraux et verticaux afin d'aligner le
réticule éclairé par rapport à la cible telle que vous l'avez observée le long du barillet. Chaque clic déplace le point
d'impact de 1/2" à 100 mètres, de 1/4" à 50 mètres et de 1/8" à 25 mètres.
7
RED DOT 6LIM-swapped adjustment 9 9 8/22/07 10:58:29 PM
 Loading...