

Page 1
OPTEX
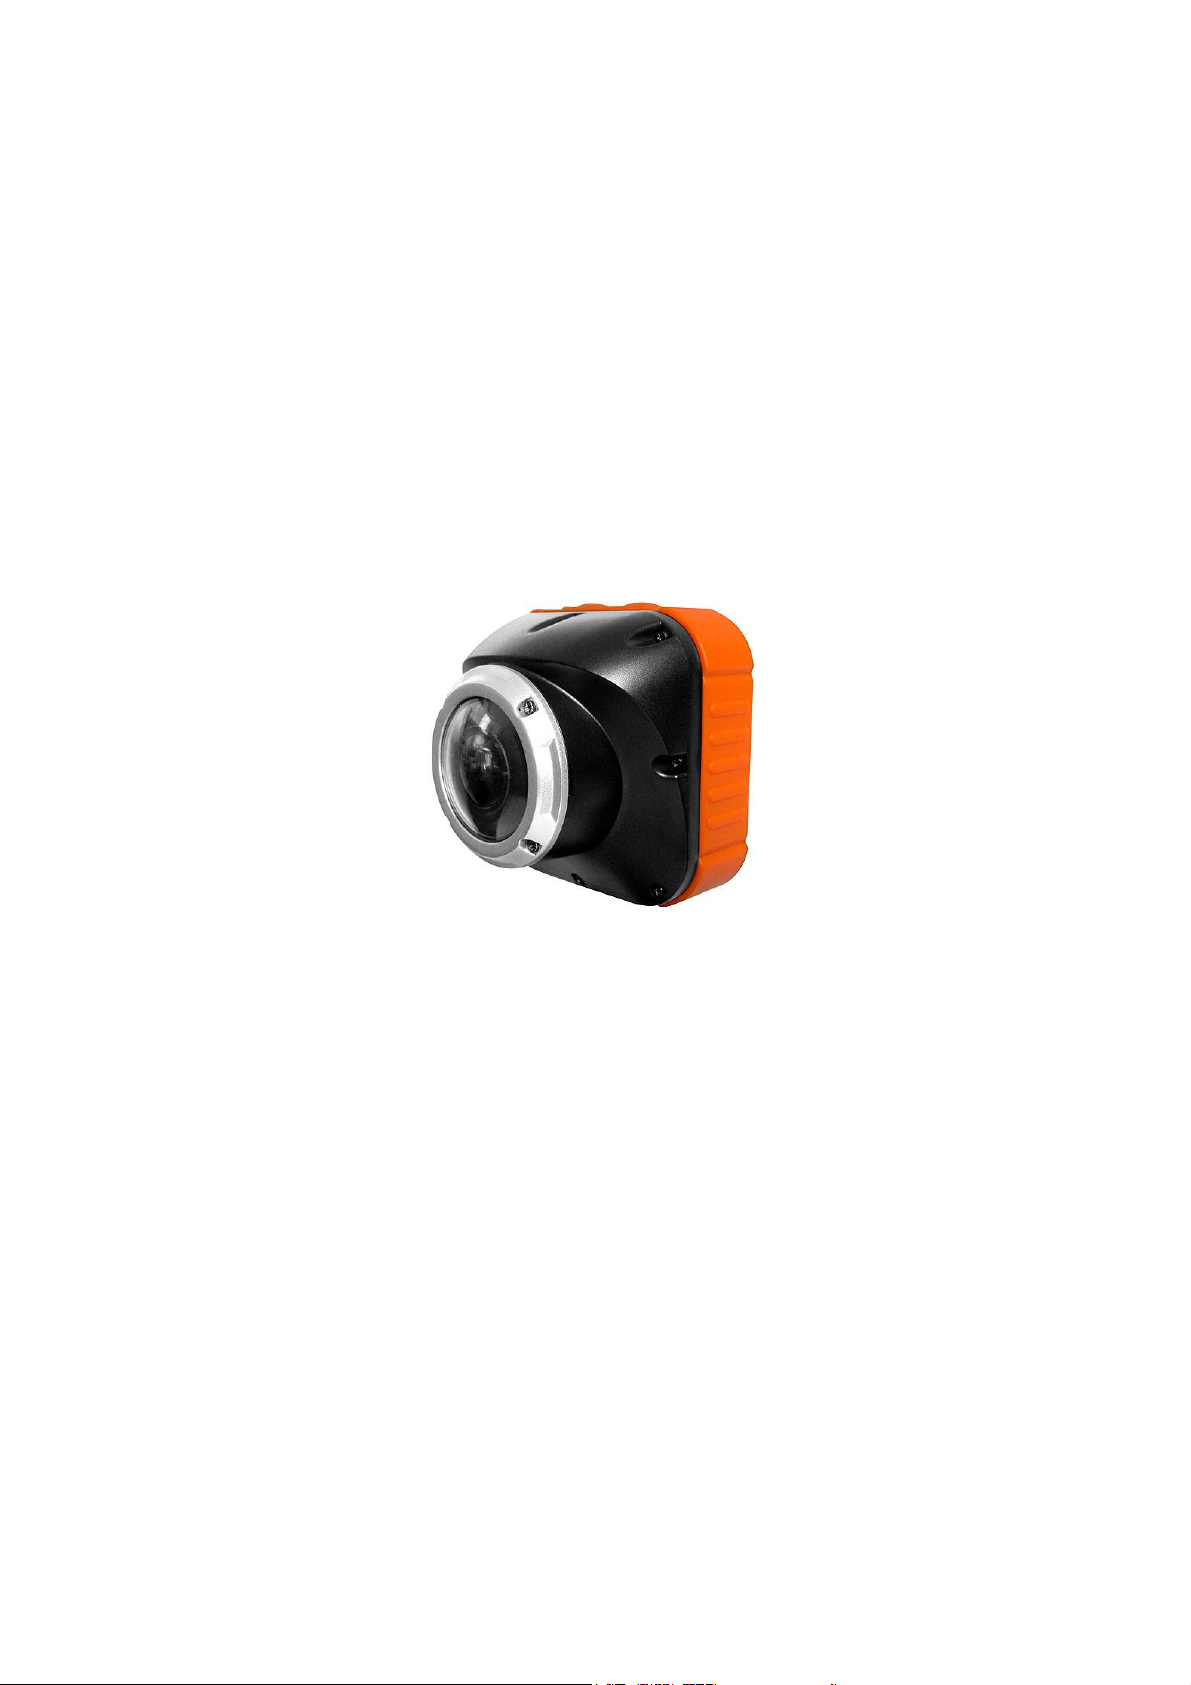
GO-CAM
Full HD 1080P
Waterproof camcorder
Dear Customer:
Thanks for choosing the Optex GO-CAM, Full HD waterproof video recorder.
We hope you will read this manual before use, this is some general
advice you may find helpful.
Features
1.5 Mega Pixels, CMOS Sensor.
2.170 degree angle lens.
3. H.264 Video format.
4. Waterproof 5 meters
5.320*240 TFT 1.5 “ display.
6.Support max 3200*2400 photo resolution.
7. Video resolution:1080P@30FPS, 720P@60FPS,
720P@30FPS, WVGA@60FPS, WVGA@30FPS.
8.Battery status display and balance memory display.
Page 2
9. Self-capture, continuous capture function.
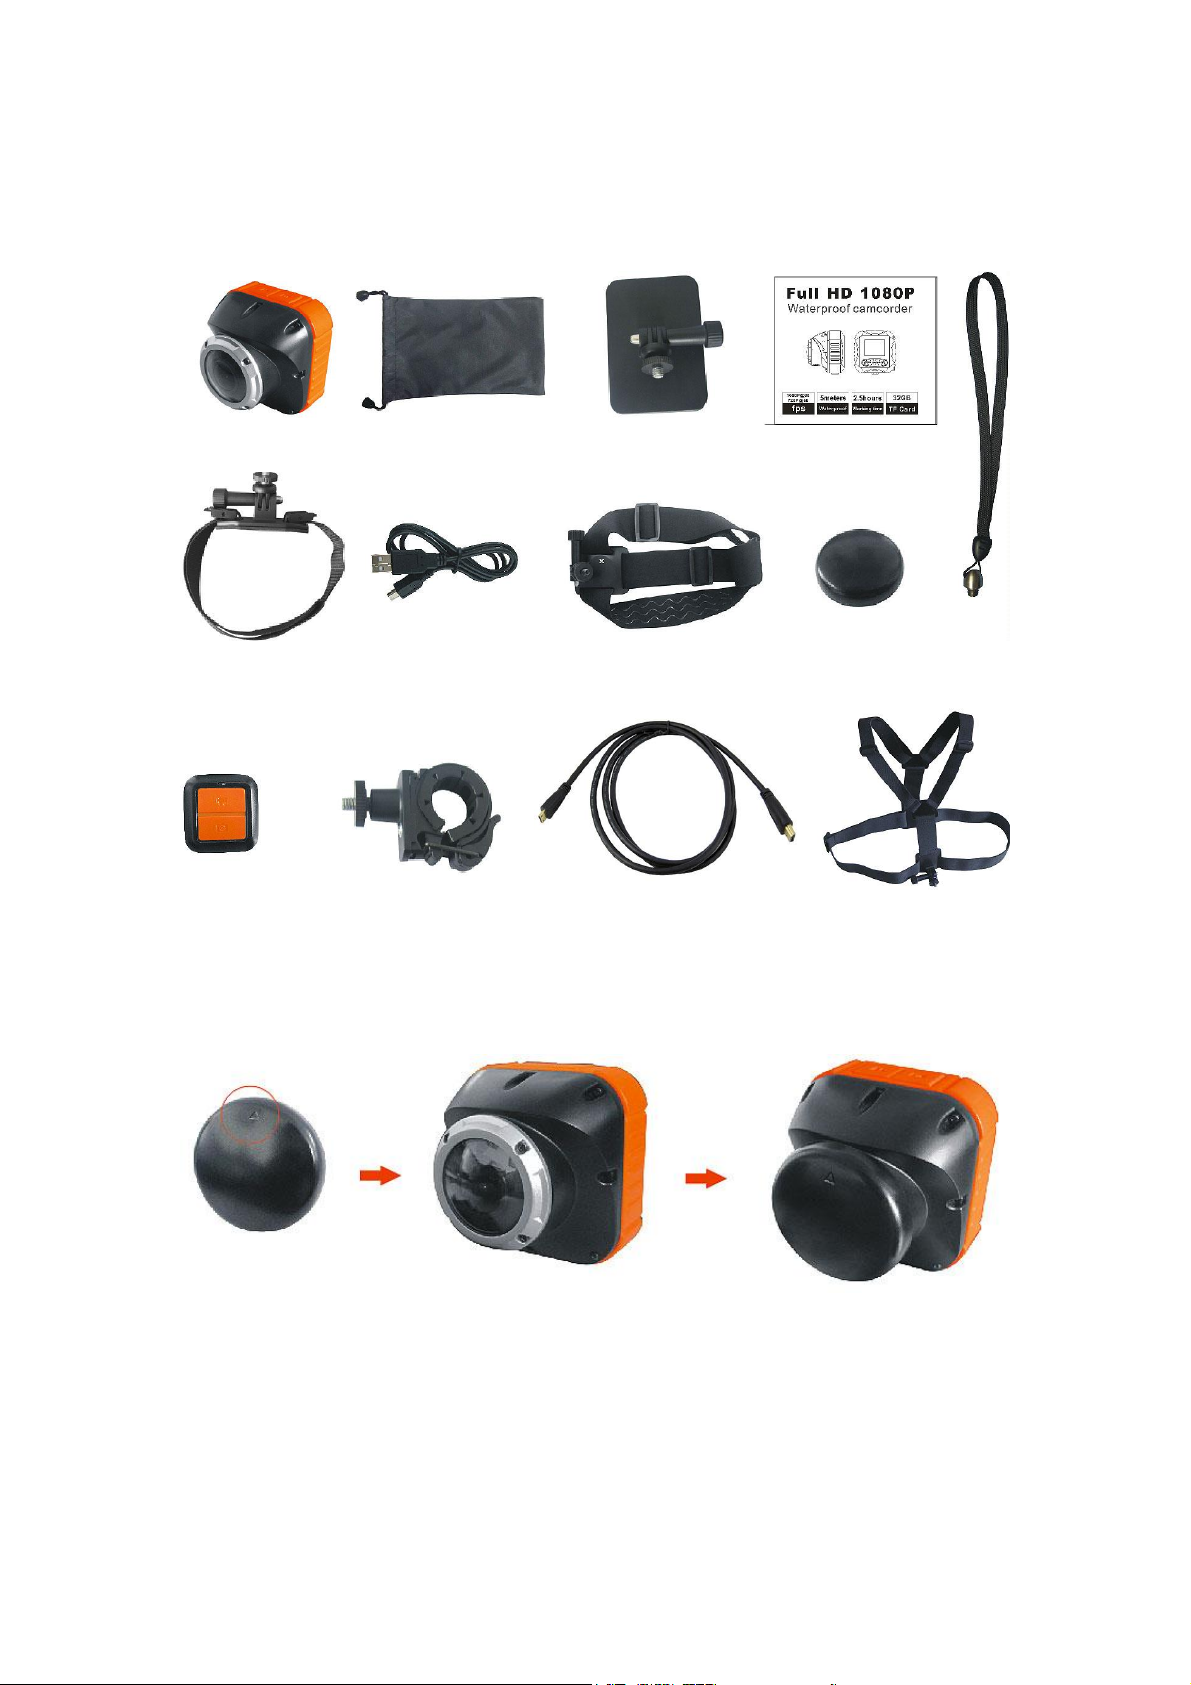
Camera carrying bag surfing holder manual
Helmet USB cable head strap cover string
Remote bicycle holder HD TV cable chest harness
Keep arrow upside
10. HD TV port, Support max 32GB Micro SD card.
11.2.4GHZ, globally compatible remote control.
Package contents (included)
Optional
Mounting the camera
1.Lens cover
2.Mounting the camera on a chest harness
Page 3
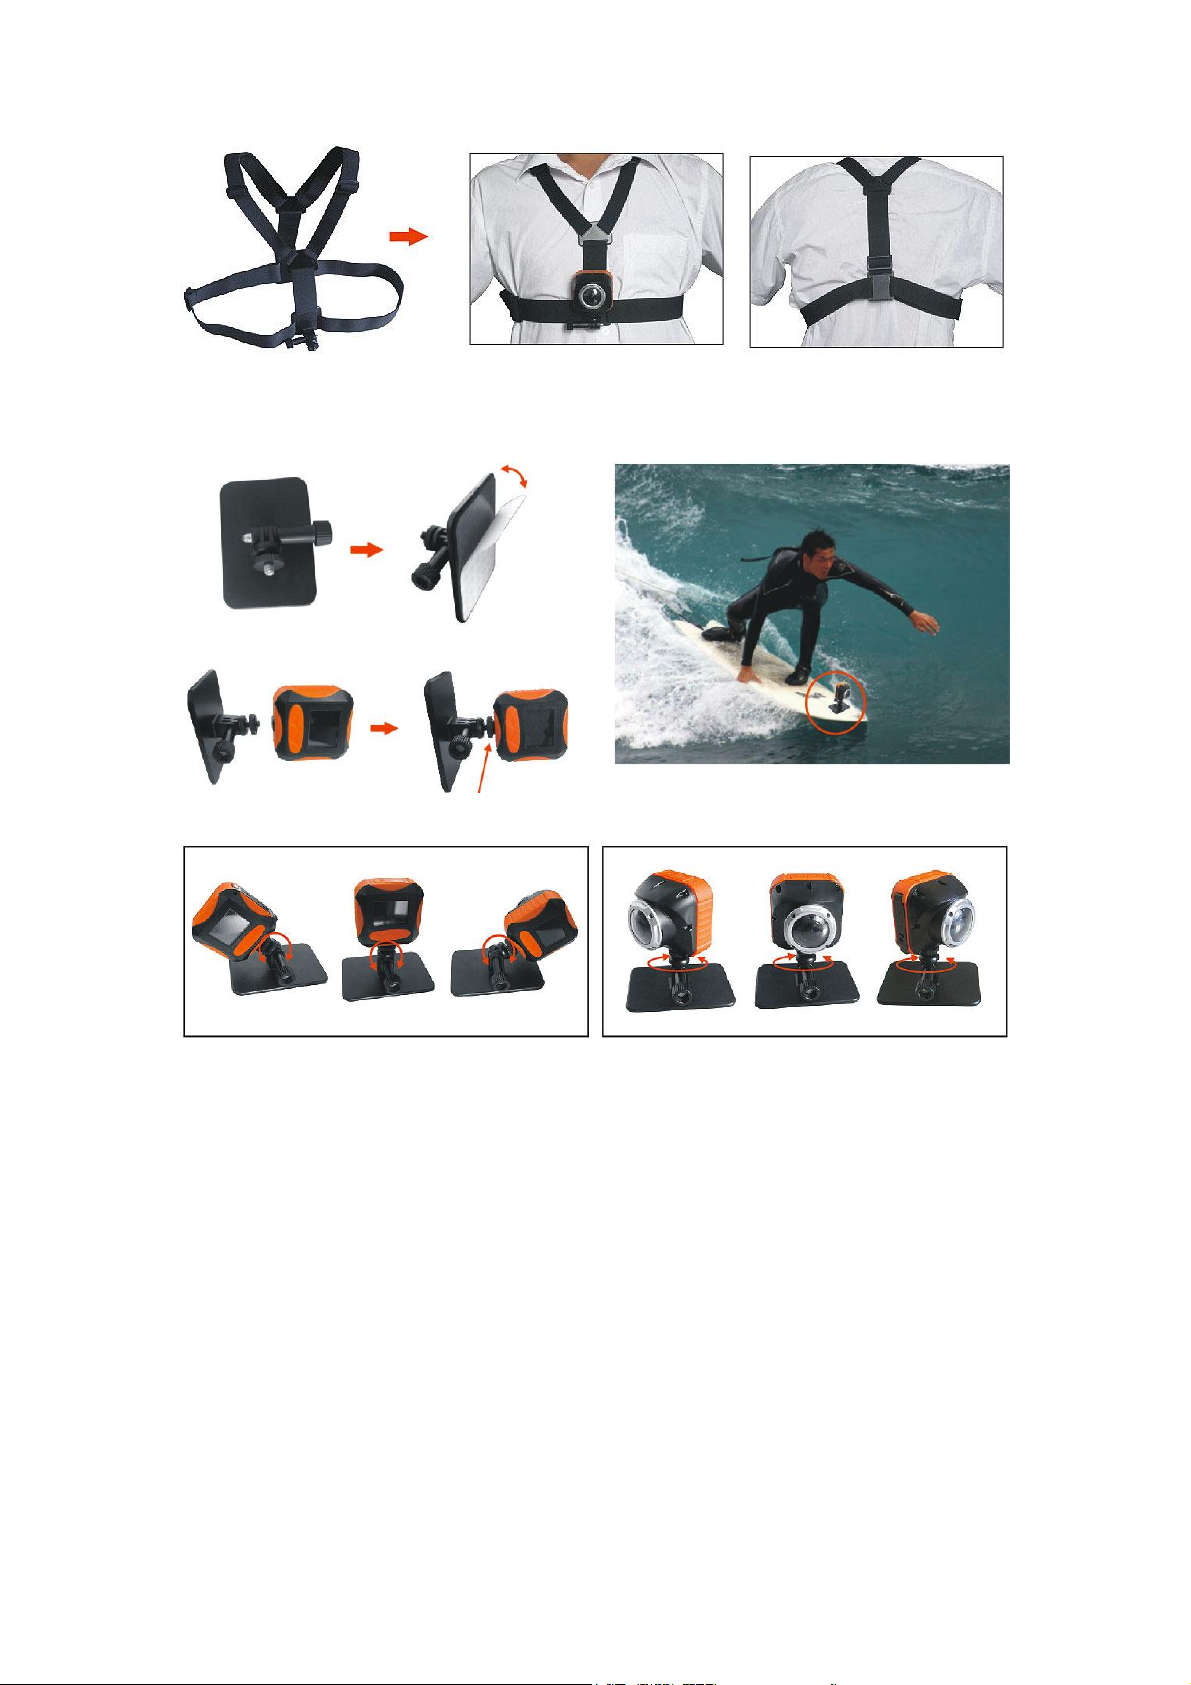
Front Back
3.Mounting the camera on a surfing board holder
Tighten the screw
Rotatable 180 º Rotatable 360 º
4.Mounting the camera on a handlebar
Page 4
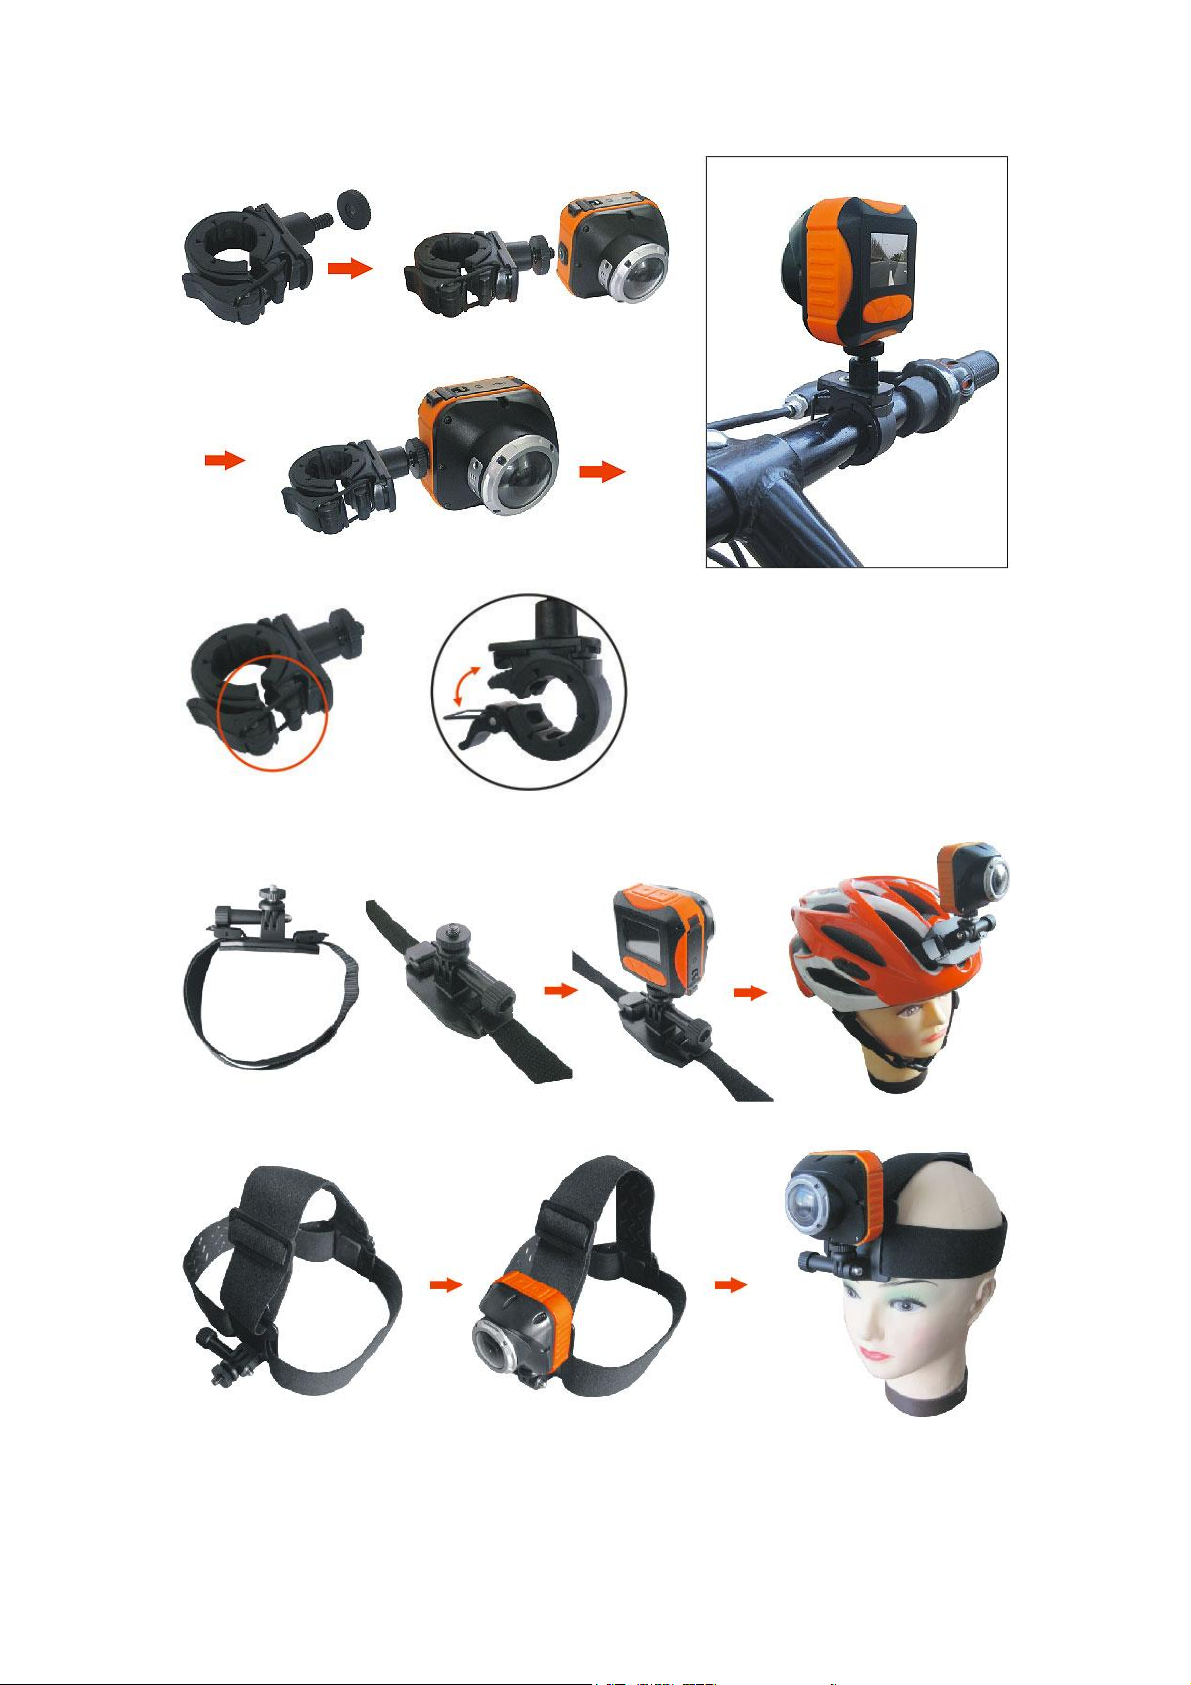
5.Mounting the camera on a helmet
lock tightly
6.Mounting the camera using the head strap
Quick Start
Turning on the camera
Page 5

Press“Power on/off ”,a startup screen will be shown on the LCD.
Video recording
1. Focus on what you would like to record.
2. Press the “Movie shutter button ”to start recording.
3. Press the“Movie shutter button”again to stop recording,there will be an
indication for saving the file.
Shooting photos
1. Focus on what you would like to take picture.
2. Press the “Picture ” button on the top of the camera.
3. The taken picture will freeze on the screen for a while to indicate the picture
captured.
Camera Precautions
Please notice the following guidelines when using this camera:
~For your safety, please do not operate the camera during sports activities.
~Do not put the camera in damp or dusty places for extended periods of time,
this may cause fire or electrical shock .
Camera Precautions
~Do not leave the camera in places exposed directly to sunlight or high
temperatures for extended period of time, this may affect the camera
housing and internal components.
~Please clean the lens with soft cloth to remove the fingerprints or dust.
~Do not disassemble the camera, this may cause non- waterproof.
~Please use the recommended charger or the camera for charging the battery.
~Please turn off the camera before remove the micro SD card, or else, it may
cause damage to the TF card and destroy the files.
~Store the camera without TF card inside in a well-ventilated place for a long
period of time.
Under the following circumstances, Please contact qualified personnel:
a) Plug damaged or cannot use.
b) Camera broken or the housing cracked.
c) Liquid gets inside the camera.
Disclaimer:
Our warranty only covers manufacturing defects: we are not responsible for
those injuries or property damage incurred during participation of any high
risk sports or activities not endorsed by our company.
Copyright:
Users are asked to note that the transfer of memory containing photos or
Page 6

data protected under copyright laws is only permissible within the
restrictions imposed. Users assume all responsibility in the event that
copyrights are violated by the use of this camera.
Waterproof Feature:
This camera can waterproof for 5 meters. We will not be responsible for
camera malfunction caused by liquid entering the camera as a result of
misuse by the user.
Liquid may get inside the camera if the port cover is not firmly locked.
Press here
Press firmly until it locks tightly for waterproof
- If the camera gets wet, wipe the liquid off as soon as possible with a dry cloth.
- Other camera accessories may not be waterproof.
- (Don't use the camera in extreme temperatures as this may cause the camera
to malfunction).
Technical Specifications
~Sensor resolution 5 Mega pixels CMOS.
~Support Micro SD/SDHC Class 4 card or above and compatible up to 32GB (not included).
~Movie storage:
1080P=1920×1080p (16:9).30fps,~12 Mbit/s data rate,
1G Byte memory can record for 9 minutes.
720p=1280x720 pixels (16:9), 60fps, ~12 Mbit/s data rate, approximately 10
minutes of video per 1G Byte.
720p=1280x720 pixels (16:9), 30fps, ~8 Mbit/s data rate, approximately 15
minutes of video per 1G Byte.
WVGA=848x480 pixels (16:9), 60fps, ~8 Mbit/s data rate, approximately 15
minutes of video per 1G Byte.
WVGA=848x480 pixels (16:9), 30fps, ~8 Mbit/s data rate, approximately 20
minutes of video per 1G Byte.
The recording duration will be varied which depends on the recording objects
and environment.
~320x240 Color LCD screen.
~Focusing range 3m~infinity.
Technical Specifications
~USB Interface (2.0).
~Monitor Interface HD TV cable.
~Rechargeable battery (included).
Page 7

~Dimensions 64*62*56.7MM(length*width*height).
1
2
3
4
5
6
7
8
9
10
111213
14
1
2
1.Power On-Off
2.Right button
3.Play/Pause button
4.Menu button
5.Left button
6.LCD screen
7.Photo capture button
8.Movie shutter button
9.Camera
10.HD TV Port Connection
11.Reset button
12.Indicator light
13.MicroSD card slot
14.USB Connection
1.Movie shutter button
2.Photo capture button
Computer System Requirements
Minimum System Requirements
-Windows Environment: 3.0 Ghz Intel Pentium D(dual-core) or faster.
-Mac Environment: Dual 2.0 Ghz PowerMac G5 or faster; 2.0 GHz Intel Core Duo or faster.
-Windows XP (Service Pack 2 or later),Windows Vista, Windows7 or Apple Mac X 10.6 or above.
-2GB RAM.
-1G Free hard disk space.
-1GB or greater video card.
-Quicktime 7.
-1024x768 resolution video support(32 bit).
-16 bit Windows compatible sound device.
(In some cases, the frame rate may be automatically reduced to maximize the memory usage).
Camera Appearance
Main unit
Remote control Unit
Page 8

10 8 0 P 30
3M
0 0 : 4 4 : 17
Camera operation
Turning on the Camera
Press the “On/Off button ”
Recording videos
1.Aim at what you want to record. To start recording press the “Movie shutter button ”at the
top of the camera.
2.The Laser pointer at the front of the camera will be turned on for a more accurate adjustment of
the target. Users can set the turn on time of the Laser pointer in User Settings.
(Do Not look directly to the Laser Pointer or aim at other’s eyes.)
3.The Laser pointer will be turned off according to the user selected time. Then the camera will
start recording (one sound effect with red LED light flashing). The Movie shutter icon will blink
on the top left corner of the screen while the time elapsed will be shown at the bottom of the
screen.
4.To stop recording press the “Movie shutter button” at the top of the camera
again.(with one sound effect)
5.Digital zoom in/out 4X only available at 720p mode.
Taking Photos
1. Aim at what you want to capture, press the “Photo capture button ”at the top of the camera.
2.A shutter sound and the red LED will blink once to indicate that a photo was taken. A preview
will be shown on the LCD screen briefly.
Using the Remote Control
1.Make sure you're pointing the remote control sensor towards the front of the camera.Press either
“Movie shutter button ”or “Photo Capture button ” on the remote control.
2.The red LED will flash once to show recording or photo capturing has started.
3. One press for one picture when taking photos. In recording videos, the first press is recording;
the second press is saving footage.
4. Pair the remote control: the remote and the camera were paired in default, so you no need to
pair it again, one remote control can only connect with only one camera.
If in the first use of the remote control and find the red LED is on but cannot control the camera,
please match at first according to below instructions: Turn on the camera at preview mode, press
the two buttons on the remote control at the same time for 3 seconds, the red LED will flash
continuously, the LCD screen of the camera will indicate continuous shutter sound, it shows
paired successfully.
If the red LED doesn’t respond when press the button, maybe it’s out of battery, you need to
change a new battery, the model is CR2032. Here are the instructions for how to change a battery:
1.Disassemble the four screws of the back cover.
2.Disassemble the battery at the right direction.
3.Assemble the new battery at the right direction.
Page 9

4.Lock the four screws.
10 8 0 P3 0
5M
0 0 :4 4 :17
Display the video resolution setting.
Display the photo resolution setting.
Display the EV value.
Display the quality setting of the videos & photos.
Micro SD card inserted.
Searching GPS signal.
GPS signal found.
5.Pair the remote with camera again.
1 2 3 4
Note:When pairing the remote to your camera; please do not turn on another
GO-CAM camera, so as to make sure you are paired one remote with one camera.
Our remote will only pair with this camera, it cannot support other cameras.
The wireless remote is 2.4G, mainly for outdoor use, if for indoor use, there
may be interference with a similar 2.4G product, and you will need to move away from that device
to an appropriate distance for use with the remote.
LCD Screen Display
Page 10

Night mode is on. It will disappear when it is disabled in the user settings.
Continuous shots function is on. It will disappear when it is disabled in the user settings.
Self-timer function is on. It will disappear when it is disabled in the user settings.
Display the white balance settings.
Photometry mode
Timestamp function is on. It will disappear when it is disabled in the user settings.
Motion Detection function is on. It will disappear when it is disabled in the user settings.
Display the battery status.
Indicate the charger is inserted. It will disappear when it is disabled in the user settings.
FIRMWARE VERSION
F W V ER : 201 11 025
Camera Settings
There are 5 main camera settings which are Video, Photo, Playback, AAA,
System settings, GPS. The GPS setting is activated only when the GPS
Module (sold separately) is built in the camera. GPS module due later in 2013.
1. To enter into settings, press “Menu”
button in the live view mode.
2. You can scroll through these categories by pressing “Left” and “Right” buttons.
3. To enter the Category, press “Play/Pause” button
4. To select a setting. Press “left” button
5. To select options under a setting, press “Right” buttons.
6. To confirm an option, press "Play/Pause" button To exit settings, press “Menu” button ,to
enter into preview mode, press “menu” button again.
Page 11

Full HD/30
1920×1080,30fps
HD/60
1280×720,60fps
HD/30
1280×720,30fps
WVGA
848×480,60fps
WVGA
848×480,60fps
ⅠVideo system
1. Quality
You can select Super Fine, Fine or Normal.
2.Resolution
3. Motion Detect
Motion Detection function is on, in the live view mode, the video function will
open when there is any movement, otherwise it will return back to live view mode.
4. Video Duration
(Any Duration, 30Sec, 180Sec, 300Sec.) To record a video with a time
limit, select a duration here.(30s,180s,300s,unlimited)
5. Loop Video
The Loop video function is only available when the setting is on. (unlimited
without this function).When the loop function is on, the video will override
automatically according to the settings once the SD card is full.
Note: When setting this function on, please make sure a minimum of 2GB of memory is left.
6.Upside down
The video will reverse automatically each time you choose this setting on.
Note: When capture pictures, this function is not available.
Ⅱ.PHOTO System
1.Quality
you can select Super Fine, Fine, Normal
2.Size
you can set your photo resolution here with 3MP,5MP or 8MP
3. Self Capture
With this setting on, the countdown time is 10 seconds before the shutter captures automatically
4.Capture
With this setting on, 1 press will get 3 continuous shots
Ⅲ .Playback
Choose “Playback” menu or press“ ”, then the screen will switch to playback
mode, press “play/pause” to confirm it.
Press “photo capture button” to switch the photo and video playback mode.
Press “Left” and “right” button to select the video or photo that you want to see.
During video playback, press “play/pause ”, to pause or resume playback,
press “left” and “right” button to activate fast forward and fast backward.
To exit the playback mode, press “movie shutter” button.
Page 12

Delete a Video or Photo
1.Select the file, press “Menu” button.
2.The screen will show “Delete file?”.
3.Select “Yes”.
4.Press “Play/pause” to confirm deletion.
Ⅳ.AAA Setting
Image effect setting
1.Flicker, you can choose 50HZ or 60HZ by this setting to avoid flickering in the video while
shooting indoors, you need to adjust this setting to match the frequency of light source.
2. Contrast
According to your preference, you can adjust contrast level with Standard, Hard, or Soft.
3.Sharpness
According to your preference, you can adjust sharpness with Standard, Hard, or Soft
4. AE ISO
You can choose: Auto, 100,200,400,800
5.White balance
According to your preference, you can select Auto, Sunny, Cloudy, Fluorescent, Incandescent.
6.AE BIAS, you can choose The exposure values range from 0,0.3,0.7,1.0,1.3,
1.7,2.0,-2,-1.7,-1.3,-1.0,-0.7,-0.3, totally 13 options
7.AE Meter mode
Center, average, spot, 3 options, The default setting is centre metering
8.Night Shot
You can choose by On or Off
Ⅴ.SYSTEM
1.Firmware Version
Display the current system version
2. LCD sleep
This setting controls the sleep time of the LCD screen, while the LCD is sleeping, power
consumption is reduced, According to your preference, you can choose: Off,1Min,3Min 5Min
3.Time Setup
Press the "left button" to choose Year, Month, Day, Hour, Min, Second, press the
"right button" to adjust. by pressing the "play/pause" button to confirm the setting.
4. Volume
You can adjust the sound volume here from 0-13
5. Reset System Settings
You can restore back to factory default setting by choosing “yes”. The screen will show “press ok
button to reboot the system”, so you can press “play/pause” button to restart the camera to confirm
this setting.
6. Format
You can format the Micro SD card which inserted in the camera by choosing
Yes or No.
Note: please format the Micro SD card in the camera when it’s in the first use in this camera.
Page 13

7. Language
YES
Set the system language for three choices: simplified Chinese, traditional Chinese and English.
8.Stamp
Date and time will be stamped on the video and photos with this setting being turned on.
9.Beep sound
Set the beep sound by choosing On or Off
10.Laser
This setting allows you to have either 5 or 10seconds to adjust the direction of the camera using
the laser pointer before capturing of video after you press the "Movie shutter button"
Ⅵ.GPS Setting
GPS module is sold separately; please refer to the corresponding manual for these setting
Firmware update
1. Please connect the USB to PC.
2. Unzip the package and copy unzipped file to root folder of the micro SD card.
3. Disconnect the USB to restart the camera, it will show firmware update, please choose “Yes”.
4.Press to confirm the update, after the update the screen will show:
PRESS OK BUTTON AND REBOOT SYSTEM
5.Press play/pause button, the camera turn off.
6.Remove the firmware from the Micro SD Card via USB connection to PC.
Recharge the battery
When the battery is low, the low battery icon will appear on the LCD screen, Recharge the battery
by
External Charger (sold separately).
1.Plug the charger to the power supply and slot the battery into charger as indicated on the charger.
2.The red LED on the charger will light up when the battery starts to recharge The Green LED
will light up when the battery is fully charged.
Recharge the battery via USB
1.Turn the camera off, then plug the camera with the rechargeable battery to a computer with the
USB cable provided
2.The red LED will light up to show the battery is charging.
Page 14

3.The red LED will be turned off, and the green LED will light up when the battery is fully
charged.
NOTE:The rechargeable battery will be fully charged in 4-5 hours.
MicroSD Card Insertion/ Removal
Insert MicroSD Card
1.Turn the camera off
2.Unlock the port cover to open the camera
3.Eusure the microSD card terminals are facing down, then insert it carefully and completely until
it clicks in place
4.Close the camera and lock the cover
Remove SD Card
1.Turn the camera off
2.Unlock the port cover to open the camera
3.Push the card until it clicks, then pull the card out
4.Close the camera and lock the cover
NOTE:
- Ensure the card is inserted correctly
- Do not touch the connect terminals on the back of the microSD card
- The card may be damaged if it is not fully inserted
- The card and the data may be damaged if the microSD card is inserted or removed while the
camera is on
- Do not touch the flat cable as this may seriously affect the camera performance and functions
- The camera supports microSD/SDHC Class 4 cards or above and compatible up to 32GB。
MicroSD cards with lower classes may cause performance drop during recording.
Connecting to a Computer
You can upload your recorded video footage and photos on a computer when enabled the
computer and camera.
1.Turn the camera on.
2.Connect your camera to a computer using the USB cable.
3.It will show the removable disk when connected successfully.
4.Using the computer software to process the video and photo.
Page 15

Connecting to a HD TV
Use HD TV cable to connect, you can playback the video and photo from HD Television
1.Turn off the camera and television.
2.Use HD TV cable to connect camera and television.
3.Turn on the camera and the television.
Note: If the HDTV cable is used to send live HD video out from the camera,
and you begin simultaneously recording HD video to the SD card, the
live video will be reduced to standard definition as the camera cannot
record and transmit HD video at the same time.
Switching a Video and Photo
1. Press “Play/Pause” to the playback mode
2.Press“Camera”to select “Preview Video” or “Preview Photos”.
3.Press“Play/Pause”to confirm.
Troubleshooting
There’s no display
•Does the rechargeable battery properly installed?
After the camera is connected to my PC, it cannot find the new drive in the “My Computer” folder
•Ensure each end of the camera USB cable is properly and firmly connected Ensure your USB
port is working properly. Try connecting another USB device into the port. If the other device does
not work, the USB port may have a malfunction. In this case, contact your system manufacturer or
the manufacturer of your USB card. I can’t capture video footage
•Eunsure there is enough space in the micro SD card; the display will tell you how much time left
is available for video recording. The remaining time is not accurate
•The remaining time is an estimate
•The remaining time depends not only on the time recorded, but on the color density of the video
footage. Under conditions with high contrast, such as outdoors, the actual time available will be
less than under low-contrast conditions, such as indoors I cannot play the video footage on my
television
•Eusure each end of the HD TV cable is properly and firmly connected to the camera and to your
television
•Eusure the camera and television are both turned on The sound is very low or there is no sound
•Ensure to increase the volume of the speaker in the volume setting
•The camera is specifically designed for extreme sports and is waterproof, it is for this reason that
we have made the microphone less sensitive.
The Optex GO-CAM is distributed by Tasco Sales (Aust) Pty Ltd, Unit 6, 9-13
Winbourne Road, Brookvale, NSW, 2100. Ph: +61 2 9938 3244, www.tasco.com.au
 Loading...