

Page 1
OWNER’S MANUAL
MANUEL DU PROPRIÉTAIRE
MANUAL DEL USUARIO
MANUALE DELL’UTENTE
BENUTZERHANDBUCH
HANDLEIDING
MANUAL DO UTILIZADOR
#5TN / 49TN / 49TNW / 45T / 54TN
54TN
5TN
45T
49TN/49TNW
04-14
Page 2
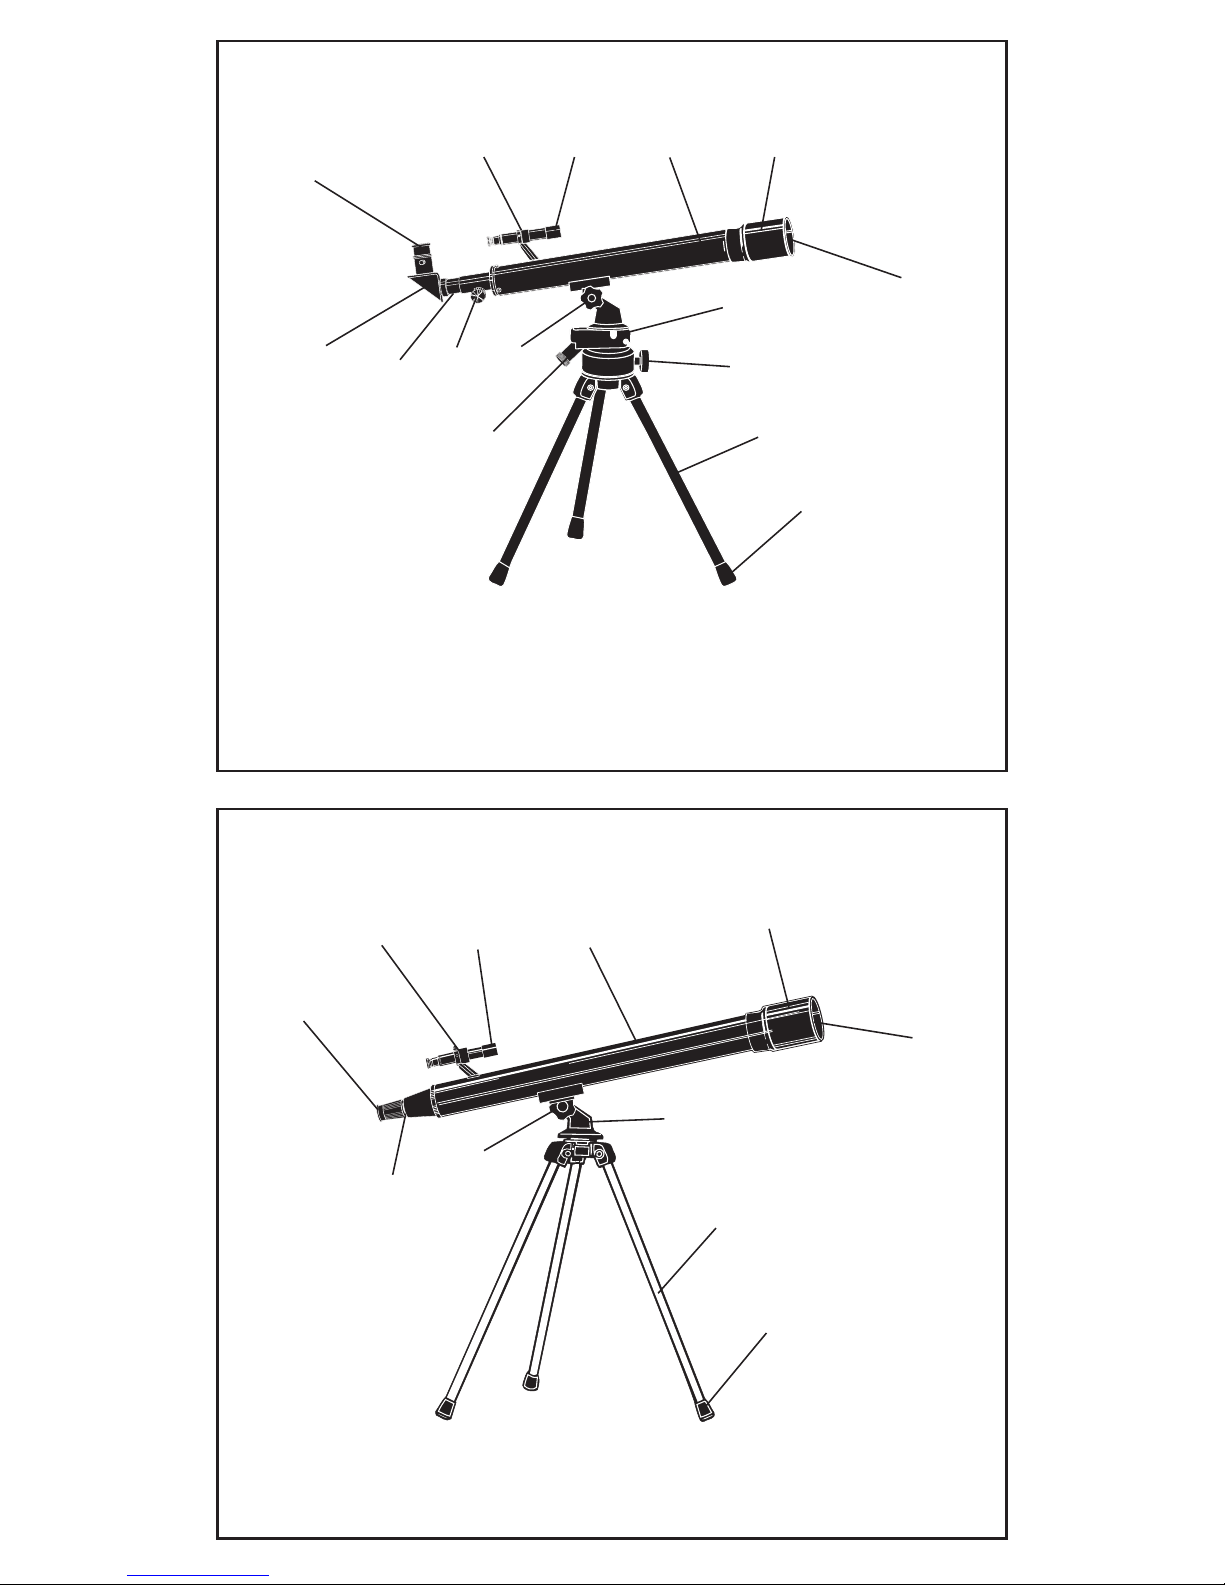
2
G
H I
J
K
P
N
L
B
D
F
54TN
5TN
49TN
45T
K
IHG
F
E
P
N
A
B
C
D
M
L
J
Page 3

3
A. Micro Altitude
Adjustment Knob
B. Altitude Knob
C. Focus Knob
D. Focus Tube
E. Diagonal Mirror
F. Eyepiece
G. Finderscope Bracket
H. Finderscope
I. Telescope Tube
J. Sunshade
K. Objective Lens
L. Scope Mount
M. Azimuth Adjustment
Knob
N. Tripod Legs
O. Leg Clamp
P. Rubber-Tipped Feet
Q. Accessory Tray
A. Mikroknopf zur
Höheneinstellung
B. Höhenknopf
C. Fokussierknopf
D. Fokussiertubus
E. Diagonalspiegel
F. Okular
G. Sucherfernrohrklammer
H. Sucherfernrohr
I. Teleskoptubus
J. Sonnenblende
K. Objektivlinse
L. Fernrohrhalterung
M. Azimuteinstellknopf
N. Stativbeine
O. Beinklammer
P. Mit Gummi überzogene
Füße
Q. Zubehörtablett
A. Micro botão rotativo
de ajuste da altitude
B. Botão rotativo
da altitude
C. Botão rotativo
de focagem
D. Tubo de focagem
E. Espelho diagonal
F. Ocular
G. Suporte do dispositivo
Finderscope
H. Dispositivo Finderscope
I. Tubo do telescópio
J. Pára-sol
K. Lente da objectiva
L. Suporte da mira
M. Botão rotativo de ajuste
do Azimute
N. Pernas do tripé
O. Abraçadeira da perna
P. Pés com extremidades
em borracha
Q. Tabuleiro de acessórios
A. Micro-bouton de réglage
de l’altitude
B. Bouton pour l’altitude
C. Bouton de focalisation
D. Tube de focalisation
E. Miroir diagonal
F. Oculaire
G. Support viseur
H. Viseur
I. Tube du télescope
J. Pare-soleil
K. Lentille téléobjectif
L. Monture du télescope
M. Bouton de réglage pour
l’azimut
N. Pieds du trépied
O. Serrage du pied
P. Pied avec base
en caoutchouc
Q. Plateau pour
accessoires
A. Manopola di regolazione
micro altitudine
B. Manopola Altitudine
C. Manopola Fuoco
D. Tubo di messa a fuoco
E. Diagonale a specchio
F. Oculare
G. Sostegno cercatore
H. Cercatore
I. Tubo telescopio
J. Schermo sole
K. Lenti obiettivo
L. Montatura scopio
M. Manopola regolazione
azimutale
N. Gambe treppiedi
O. Reggi gambe treppiedi
P. Piedini gommati
Q. Scatola porta accessori
A. Botón de Ajuste
micro-altura
B. Botón de altura
C. Botón de enfoque
D. Tubo de enfoque
E. Espejo diagonal
F. Mirilla
G. Abrazadera del
telescopio buscador
H. Telescopio buscador
I. Tubo telescópico
J. Protección contra el sol
K. Lentilla de objetivo
L. Base del telescopio
M. Botón de ajuste acimut
N. Patas trípode
O. Abrazadera de la pata
P. Pies recubiertos
de goma
Q. Bandeja de accesorios
A. Micro-hoogteregelaar
B. Hoogteregelaar
C. Scherpteregelaar
D. Scherpstellingbuis
E. Diagonaalspiegel
F. Oogstuk
G. Klem van de zoeklens
H. Zoeklens
I. Telescoopbuis
J. Zonneklep
K. Objectieve lens
L. Vizierhouder
M. Azimuth-regelaar
N. Driepoot
O. Pootklem
P. Voetstukjes met
rubberen dopjes
Q. Bakje voor accessoires
Page 4
4
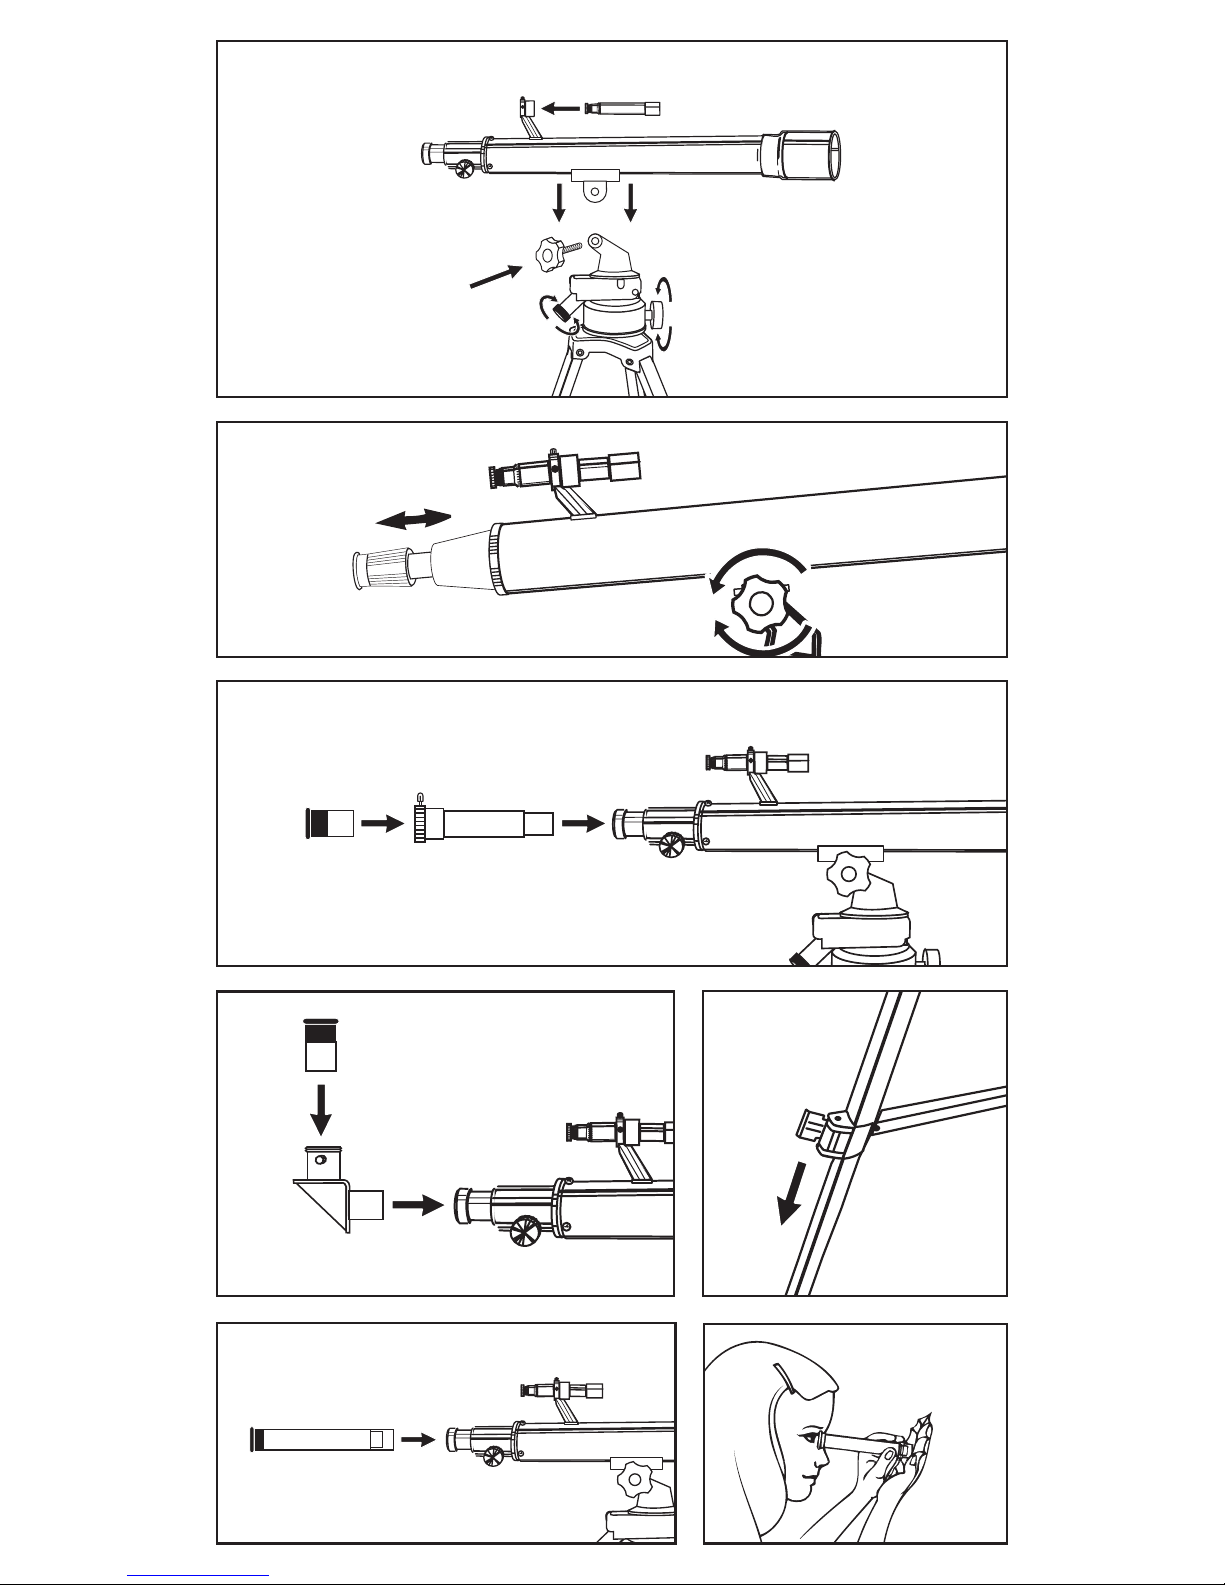
Fig. 1
Fig. 2
Fig. 3
Fig. 4
Fig. 6
Fig. 7
Fig. 5
b
a
d
e
c
k
m
n
lF
Page 5

5
INSTRUCTIONS FOR TELESCOPE MODELS 5TN / 49TN / 45T / 54TN
1. Remove tripod (N) from box.
2. Stand tripod and spread legs.
3. Remove telescope main body (I) from the box. Unscrew mounting bolt (B) from telescope base
(5TN/49TN/45T) or remove from the box (54TN). Place telescope onto tripod mount (Fig. 1).
Insert bolt through tripod mount (Fig. 1c) and tighten securely.
4. Remove the finderscope (Fig. 1a) from the box. Place the finderscope (H) in the finderscope
bracket (G) and secure with three finderscope bracket set screws.
5. Model 5TN/49TN/45T: Insert diagonal into the focus tube (Fig. 4m). Secure by tightening small
retaining screws.
6. Model 5TN/49TN/45T: Use the micro-altitude adjusting knob (Fig. 1d) and the azimuth adjusting
knob (Fig. 1e) in the tripod mount to move the telescope as desired.
NOTE: Diagonal is only to be used in combination with the eyepieces (oculars).
7. Model 5TN/49TN/45T: Insert eyepiece (Fig. 4k) into diagonal (Fig. 4m). Secure by tightening
small retaining screw.
NOTE (5TN/49TN/45T): In all astronomical telescopes, the image appears upside down. With
the use of the diagonal the image appears erect but with a left to right inversion (mirror like).
To use the telescope for terrestrial viewing and to correct the mirrored image, remove the
diagonal and replace with the erecting eyepiece (Fig 6).
8. To obtain focus on model 54TN, push or pull the focusing tube (D) until the image is sharp
(Fig. 2).
The telescope is now fully assembled and ready for use.
TECHNICAL SPECIFICATIONS
5TN 49TN/45T 54TN
Objective Diameter 50mm (1.96”) 50mm (1.96”) 40mm (1.57”)
Focal Length 600mm 600mm n/a
Eye Lenses H 12.5mm
18mm (35x Land)
H 12.5mm
18mm (35x Land)
Fixed
Erecting Eyepiece 35X 35X n/a
Maximum
Magnification
50X 50X 40X
Accessories
Diagonal Mirror,
2X Finderscope
Diagonal Mirror,
2X Finderscope,
2X Barlow
2X Finderscope
EYE LENS CHART & THEORETICAL POWER LIMITS
5TN 49TN/45T 54TN
12.5mm Eye Lens
Power
50X 50X 40X
18mm Eye Lens
Power
35X 35X n/a
CAUTION: Viewing the sun can cause permanent eye damage. Do not view the sun with
this product or even with the naked eye.
Page 6

INSTRUCTIONS POUR LES TELESCOPES MODELES 5TN / 49TN / 45T / 54TN
1. Sortez le trépied (O) de la boîte.
2. Posez le trépied par terre et étendez les pieds.
3. Sortez le corps du télescope (I) de la boîte. Desserrez le boulon de montage (B) de la base du
télescope (5TN/49TN/45T) ou sortez-le de la boîte (54TN). Placez le corps du télescope sur la
monture du trépied (Fig. 1). Insérez le boulon (Fig. 1c) à travers la monture du trépied (Fig. 2c) et
serrez bien.
4. Sortez le viseur (Fig. 1a) de la boîte. Placez le viseur (H) dans le support pour viseur (G) et serrez
les trois vis pour le support du viseur (Fig. 2a).
5. Modèle 5TN/49TN/45T: Introduisez le miroir diagonal dans le tube de focalisation (Fig. 4m). Serrez
bien les petites vis.
6. Modèle 5TN/49TN/45T: Utilisez le bouton de réglage pour l’altitude (Fig. 1d) et le bouton de réglage
pour l’azimut (Fig. 1e) dans la monture du trépied pour déplacer le télescope selon vos souhaits.
NOTE: Le miroir diagonal n’est utilisé qu’en combinaison avec les oculaires.
7. Modèle 5TN/49TN/45T: Introduisez l’oculaire (Fig. 4k) dans le miroir diagonal (Fig. 4m). Serrez à
l’aide des petites vis.
NOTE (5TN/49TN/45T): Tous les télescopes astronomiques rendent une image inversée. Le
miroir diagonal rétablit cette inversion verticale mais inverse le champ horizontal (comme
un miroir). Pour observer la terre et obtenir une image correcte, enlevez le miroir diagonal et
remplacez-le par l’oculaire de redressement (Fig. 6).
8. (54TN) Jusqu’à l’obtention d’une image nette (Fig. 2).
Le télescope est à présent complètement assemblé et prêt pour l’usage.
ATTENTION: L’observation du soleil peut causer des lésions permanentes à l’œil. N’observez
jamais le soleil, ni à l’œil nu, ni à travers ce télescope.
6
SPECIFICATIONS TECHNIQUES
5TN 49TN/45T 54TN
Diamètre objectif 50mm (1.96”) 50mm (1.96”) 40mm (1.57”)
Longueur de
focalisation
600mm 600mm n/a
Lentilles H 12.5mm
18mm (35x terre)
H 12.5mm
18mm (35x terre)
Fixes
Oculaire de
redressement
35X 35X n/a
Grossissement
maximal
50X 50X 40X
Accessoires
Miroir diagonal,
2X Viseur
Miroir diagonal,
2X Viseur,
2X Barlow
2X Viseur
TABLEAU LENTILLE OCULAIRE & LIMITES DE PUISSANCE THEORIQUES
5TN 49TN/45T 54TN
12.5mm Puissance
Lentille Oculaire
50X 50X 40X
18mm Puissance
Lentille Oculaire
35X 35X n/a
Page 7

INSTRUCTIOCIONES PARA LOS MODELOS TELESCOPICOS 5TN / 49TN / 45T / 54TN
1. Quitar el trípode (N) de la caja.
2. Posicionar el trípode y extender las patas.
3. Quitar el cuerpo principal del telescopio (I) de la caja. Destornillar el perno de montaje (B) de la
base del telescopio (5TN/49TN/45T) o quitar de la caja (54TN). Poner el telescopio en la base del
trípode (Dib. 1). Insertar el perno por la base del trípode (Dib. 1c) y fijar fuertemente.
4. Quitar el telescopio buscador (Fig. 1a) de la caja. Poner el telescopio buscador (H) en su
correspondiente abrazadera (G) y fijar con tres tornillos previstos para este fin.
5. Modelo 5TN/49TN/45T: Insertar la diagonal en el tubo de enfoque (Dib. 4m). Fijar atornillando
pequeños tornillos de sujeción.
6. Modelo 5TN/49TN/45T: Utilizar el botón de ajuste micro-altura (Dib. 1d) y el botón de ajuste acimut
(Dib. 1e) en la base del trípode para mover el telescopio como usted desea.
OBSERVACION: La diagonal solamente se puede utilizar en combinación con la mirilla
(oculares).
7. Modelo 5TN/49TN/45T: Insertar la mirilla (Fig. 4k) en la diagonal (Dib. 4m). Fijar atornillando los
pequeños tornillos de sujeción.
OBSERVACION (5TN/49TN/45T): En todos los telescopios astronómicos, la imagen aparece
al revés. Con al utilización de la diagonal la imagen aparece recta, pero con una inversión de
izquierda a derecha (como un espejo). Para utilizar el telescopio para vistas terrestres y para
corregir la imagen reflejada, hay que quitar la diagonal y sustituirla por la mirilla recta (Fig. 6).
8. Para obtener el enfoque en modelo 54TN se debe empujar o tirar del tubo de enfoque (D) hasta
conseguir una imagen clara (Dib. 2).
Ahora el telescopio está completamente montado y listo para ser utilizado.
CUIDADO: Mirar al sol puede causar daños permanentes a la vista. No mirar al sol con este
producto o incluso con el ojo desnudo.
7
ESPECIFICACIONES TECNICOS
5TN 49TN/45T 54TN
Diámetro objetivo 50mm (1.96”) 50mm (1.96”) 40mm (1.57”)
Longitud de enfoque 600mm 600mm n/a
Lentillas oculares H 12.5mm
18mm (35x Tierra)
H 12.5mm
18mm (35x Tierra)
Fijas
Mirilla recta 35X 35X n/a
Magnificació
máxima
50X 50X 40X
Accesorios
Espejo Diagonal,
2X Telescopio
buscado
Espejo Diagonal,
2X Telescopio
buscado,
2X Barlow
2X Telescopio
buscado
TABLA DE LAS LENTILLAS OCULARES & LIMITES DE POTENCIA TEORETICAS
5TN 49TN/45T 54TN
12.5mm Potencia
Lentilla Ocular
50X 50X 40X
18mm Potencia
Lentilla Ocular
35X 35X n/a
Page 8

ISTRUZIONI PER TELESCOPI MODELLI 5TN / 49TN / 45T / 54TN
1. Estraete il treppiedi (N) dal contenitore.
2. Posizionate il treppiedi e allargate le gambe dello stesso.
3. Estraete il corpo principale del telescopio (I) dal contenitore. Svitate il bullone di montaggio (B) dalla
base del telescopio (5TN/49TN/45T) o rimuovetelo dal contenitore (54TN). Posizionate il telescopio
nella montatura del treppiedi. (Fig. 1). Inserite il bullone attraverso la montatura del treppiedi (Fig.
1c) e stringete fortemente.
4. Estraete dal contenitore il cercatore (Fig. 1a) Posizionate il cercatore (H) nell’apposito sostegno (G)
e assicuratelo con tre viti del suo set.
5. Modello 5TN/49TN/45T: Inserite la diagonale nel tubo di messa a fuoco (Fig. 4m). Assicuratela
stringendo la piccola vite di sostegno.
6. Modello 5TN/49TN/45T: Usate la manopola di regolazione della micro altitudine (Fig. 1d) e la
manopola di regolazione azimutale(Fig. 1e) nella montatura del treppiedi per muovere il telescopio
come desiderato.
NOTA: La diagonale può essere usata solo in combinazione con gli oculari.
7. Modello 5TN/49TN/45T: Inserite l’oculare (Fig. 4k) nella diagonale (Fig. 4m). Assicuratela stringendo
la piccola vite di sostegno.
NOTA (5TN/49TN/45T): In tutti i telescopi astronomici, l’immagine appare sotto sopra. Con
l’uso della diagonale l’immagine apparirà diritta ma con un’inversione sinistra/destra (come
in uno specchio). Per adoperare il telescopio per observazioni terrestri e per correggere
l’immagine riflessa, rimuovere la diagonale e sostituirla con l’oculare raddrizzatore (Fig. 6).
8. Per mettere a fuoco modello 54TN spingete o tirate il tubo di messa a fuoco (D) fin quando
l’immagine appaia nitida (Fig. 2).
Il telescopio è adesso completamente assemblato e pronto per l’uso.
ATTENZIONE! Guardare il sole può causare danni gravi e permanenti alla vista. Non guardate
al sole con questo apparecchio e neppure ad occhio nudo.
8
SPECIFICHE TECNICHE
5TN 49TN/45T 54TN
Diametro obiettivor 50mm (1.96”) 50mm (1.96”) 40mm (1.57”)
Lunghezza focale 600mm 600mm n/a
Lenti occhio H 12.5mm
18mm (35x terra)
H 12.5mm
18mm (35x terra)
Fisso
Oculare
raddrizzatore
35X 35X n/a
Magnificazione
massima
50X 50X 40X
Accessori
Diagonale a
specchio,
2X cercatore
Diagonale a
specchio,
2X cercatore,
2X Barlow
2X cercatore
TABELLA LENTE OCCHIO & LIMITI TEORICI POTENZA
5TN 49TN/45T 54TN
12.5mm Potenza
lente occhio
50X 50X 40X
18mm Potenza
lente occhio
35X 35X n/a
Page 9

ANWEISUNGEN FÜR DIE TELESKOPMODELLE 5TN / 49TN / 45T / 54TN
1. Nehmen Sie das Stativ (N) aus der Schachtel.
2. Stellen Sie das Stativ auf und breiten Sie die Beine aus.
3. Nehmen Sie den Körper des Teleskops (I) aus der Schachtel. Schrauben Sie den
Befestigungsbolzen (B) aus der Teleskopbasis (5TN/49TN/45T) oder nehmen Sie ihn aus der
Schachtel (54TN). Stellen Sie das Teleskop auf die Stativhalterung (Abb. 1). Setzen Sie den Bolzen
durch die Stativhalterung (Abb. 1c) ein und ziehen Sie gut fest.
4. Nehmen Sie das Sucherfernrohr (Abb. 1a) aus der Schachtel. Legen Sie das Sucherfernrohr
(H) in die Sucherfernrohrklammer (G) und sichern Sie es mit drei Anschlagschrauben für die
Sucherfernrohrklammer.
5. Durch Anziehen der kleinen Anschlagschrauben.
6. Modell 5TN/49TN/45T: Verwenden Sie den Mikroknopf für die Höheneinstellung (Abb. 1d) und
den Azimut-Einstellknopf (Abb. 1e) in der Stativhalterung zum Bewegen des Teleskops nach Ihren
Wünschen.
ANMERKUNG: Der Diagonalspiegel ist nur in Verbindung mit den Okularen zu verwenden.
7. Modell 5TN/49TN/45T: Setzen Sie das Okular (Abb. 4k) in den Diagonalspiegel ein (Abb. 4m).
Sichern Sie es durch Anziehen der kleinen Anschlagschraube.
ANMERKUNG (5TN/49TN/45T): In allen astronomischen Teleskopen erscheint das Bild auf
dem Kopf stehend. Bei Verwendung des Diagonalspiegels erscheint das Bild aufrecht, aber
seitenverkehrt (spiegelbildlich). Zur Verwendung des Teleskops für Erdbeobachtungen und
zur Korrektur des Sptegelbildes entfernen Sie bitte den Diagonalspiegel und ersetzen Sie ihn
durch die aufrichtende Okular (Abb. 6).
8. Zum Erhalten des Brennpunktes bei Modell 54TN ziehen oder schieben Sie am Fokussiertubus (D),
bis das Bild scharf ist (Abb. 2).
Das Teleskop ist nun vollständig zusammengesetzt und gebrauchsfertig.
VORSICHT: Die Betrachtung der Sonne kann bleibende Augenschäden verursachen.
Schauen Sie daher mit diesem Produkt oder sogar mit dem bloßen Auge nie in die Sonne!
9
TECHNISCHE ANGABEN
5TN 49TN/45T 54TN
Objektivdurchmesser
50mm (1.96”) 50mm (1.96”) 40mm (1.57”)
Brennweite 600mm 600mm n/a
Okulare H 12.5mm
18mm (35x Erde)
H 12.5mm
18mm (35x Erde)
Fest
Aufricht-Okular 35X 35X n/a
Maximale
Vergrößerung
50X 50X 40X
Zubehör
Diagonalspiegel,
2X Sucherfernrohr
Diagonalspiegel,
2X Sucherfernrohr,
2X Barlow
2X
Sucherfernrohr
OKULARTABELLE UND THEORETISCHE LEISTUNGSGRENZEN
5TN 49TN/45T 54TN
Vergrößerung des
12,5mm-Okulars
50X 50X 40X
Vergrößerung des
18mm-Okulars
35X 35X n/a
Page 10

INSTRUCTIES VOOR TELESCOOPMODELLEN 5TN / 49TN / 45T / 54TN
1. Neem de driepoot (N) uit de doos.
2. Zet de driepoot recht en spreid de poten.
3. Neem het hoofdonderdeel van de telescoop (I) uit de doos. Draai de montagebout (B) los uit het
voetstuk van de telescoop (5TN/49TN/45T) of neem uit de doos (54TN). Plaats de telescoop op de
driepoot (Fig. 1). Breng de bout aan door de montageplaat van de driepoot (Fig. 1c) en maak stevig
vast.
4. Neem de zoeklens (Fig. 1a) uit de doos. Plaats de zoeklens (H) in de klem voor de zoeklens (G)
en maak vast met drie bevestigingsschroeven.
5. Model 5TN/49TN/45T: Breng de diagonaal in de scherpstellingbuis (Fig. 4m). Vastzetten door de
borgschroefjes vast te draaien.
6. Model 5TN/49TN/45T: Gebruik de micro-hoogteregelaar (Fig. 1d) en de azimuth-regelaar (Fig. 1e)
aan de driepoot om de telescoop naar wens te bewegen.
N.B.: De diagonaal mag enkel gebruikt worden in combinatie met de oogstukken (occulairen).
7. Model 5TN/49TN/45T: Breng het oogstuk (Fig. 4k) in de diagonaal (Fig. 4m). Vastzetten door de
borgschroefjes vast te draaien.
N.B. (5TN/49TN/45T): Bij alle astronomische telescopen verschijnt het beeld ondersteboven.
Door gebruik te maken van de diagonaal verschijnt het beeld in de juiste richting, maar in
spiegelbeeld. Om de telescoop te gebruiken voor observsties op aarde en om het gespiegel
de beeld te corrigieren, verwijdert u de diagonal en vervangt die door het rechtzettingsoogstuk (Fig. 6).
8. Voor scherpstelling op model 54TN moet u aan de scherpstellingbuis duwen of trekken (D) totdat
het beeld scherp is (Fig. 2).
De telescoop is nu helemaal gemonteerd en klaar voor gebruik.
OPGEPAST: Naar de zon kijken kan onherstelbare schade aanrichten aan uw ogen. Gebruik
dit product niet om naar de zon te kijken en doe het ook niet met het blote oog.
10
TECHNISCHE SPECIFICATIES
5TN 49TN/45T 54TN
Objectieve
diameter
50mm (1.96”) 50mm (1.96”) 40mm (1.57”)
Focuslengte 600mm 600mm nvt
Ooglenzen H 12.5mm
18mm (35x Land)
H 12.5mm
18mm (35x Land)
Vast
Rechtzettingsoogstuk
35X 35X nvt
Maximale
vergroting
50X 50X 40X
Accessoires
Diagonaalspiege,
2X Zoeklens
Diagonaalspiege,
2X Zoeklens,
2X Barlow
2X Zoeklens
OOGLENSTABEL & THEORETISCHE KRACHTLIMIETEN
5TN 49TN/45T 54TN
12,5mm Ooglens 50X 50X 40X
18mm Ooglens 35X 35X nvt
Page 11

INSTRUÇÕES DE UTILIZAÇÃO DOS TELESCÓPIOS MODELOS 5TN / 49TN / 45T / 54TN
1. Retire o tripé (N) da caixa.
2. Coloque o tripé na vertical e estique as pernas.
3. Retire o corpo principal do telescópio (I) da caixa. Desaperte o perno de montagem (B) da base do
telescópio (5TN/49TN/45T) ou retire a base da caixa (54TN). Coloque o telescópio no suporte do
tripé (Fig. 1) e introduza o perno através do suporte do tripé (Fig. 1c) apertando-o firmemente.
4. Retire o dispositivo finderscope (Fig. 1a) da caixa. Coloque o dispositivo finderscope (H) no seu
suporte (G) e fixe-o com os três parafusos de fixação do suporte do dispositivo finderscope.
5. Modelo 5TN/49TN/45T: Introduza o espelho diagonal no tubo de focagem (Fig. 4m) e fixe-o
apertando os pequenos parafusos de retenção.
6. Modelo 5TN/49TN/45T: Utilize o micro botão rotativo de ajuste da altitude (Fig. 1d) e o botão
rotativo de ajuste do azimute (Fig. 1e) existentes no suporte do tripé para movimentar o telescópio
como pretendido.
NOTA: O espelho diagonal apenas deverá ser utilizado em conjunto com as oculares.
7. Modelo 5TN/49TN/45T: Introduza a ocular (Fig. 4k) no espelho diagonal (Fig. 4m) e fixe-a
apertando o pequeno parafuso de retenção.
NOTA (5TN/49TN/45T): Em todos os telescópios astronómicos a imagem aparece invertida.
Com a utilização do espelho diagonal a imagem aparece direita mas com uma inversão da
esquerda para a direita (como num espelho). Para utlizar o telescopio para observações
terrestres e para corrigir a imagen espelhada, é necessário retirar o espelho diagonal e
substitui-lo pela ocular erectora de imagen (Fig. 6).
8. Para focar os objectos com os modelo 54TN é necessário empurrar ou puxar o tubo de focagem
(D) até que a imagem esteja nítida (Fig. 2).
O telescópio encontra-se agora totalmente montado e pronto para ser utilizado.
CUIDADO: A observação do sol pode provocar lesões oculares permanentes. Não observe
o sol com este produto nem a olho nu.
11
ESPECIFICAÇÕES TÉCNICAS
5TN 49TN/45T 54TN
Diâmetro da
Objectiva
50mm (1.96”) 50mm (1.96”) 40mm (1.57”)
Distância focal 600mm 600mm Indisponível
Lentes da ocular H 12.5mm
18mm (35x terra)
H 12.5mm
18mm (35x terra)
Fixas
Ocular erectora
de imagem
35X 35X Indisponível
Aumento
máximo
50X 50X 40X
Acessórios
Espelho diagonal,
Dispositivo
Finderscope c/
aumento de 2X
Espelho diagonal,
Dispositivo
Finderscope c/
aumento de 2X,
2X Barlow
Dispositivo
Finderscope c/
aumento de 2X
TABELA DAS LENTES DA OCULAR E LIMITES TEÓRICOS DOS AUMENTOS
5TN 49TN/45T 54TN
Lente de ocular com
aumento de 12,5 mm
50X 50X 40X
Lente de ocular com
aumento de 18 mm
35X 35X Indisponível
Page 12

12
MICROSCOPE COMPONENTS:
1. Ocular Barrel—a protective cover is provided for the ocular barrel. This should be removed
before use.
2. Focusing knob—This knob is twisted to adjust the distance between the slide and the lens
in order to bring the object being viewed into focus.
3. Connection barrel—This connects the ocular barrel to the multiple objective lens holder.
4. Objective lens holder—This holder contains 3 objective lenses of varying magnifying power.
The objective lenses can be changed by rotating the disc until a click is heard indicating that
the lens is locked in place.
5. Objective lenses—There are 3 objective lenses to choose from. 75x, 300x, 900x
6. Vertical arm
7. Slide support—to support the specimen being studied.
8. Slide clip—used to support the specimen being studied.
9. Spotlight—Used to light specimen when there is not enough natural light available. The
light is switched on when the unit is turned over so that the bulb points upward (A). If the
bulb needs replacing, push the white collar downwards and twist it through 90 degrees
counterclockwise (B). The bulb and its holder can then be removed. To install a new bulb,
align two notches on the bulb seat, push downward, and twist is slightly clockwise (C). Then
it is positioned.
10. Reector—Used to reect natural light onto specimen (D).
11. Base
12. Anti-slip base—The spotlight is powered by 2xAA type batteries. The bottom base can be
pulled o to allow access to the battery box inside the base of the microscope (E).
Page 13

13
USING THE MICROSCOPE
1. Select one of the pre-prepared slides and place it under the clips on the slide support table.
The specimen should be in the center of the hole in the table. Adjust the observation angle
(F) and the reector so the light is focused on the specimen (G). If there is not enough
natural light, the reector can be turned over so that the specimen is lit by the spotlight.
Caution! Do not use under direct sunlight to avoid injury to eyes.
2. Select the objective lens according to the magnication required by turning the lens holder.
The microscope can then be focused by turning the focusing knob until the specimen can
be seen clearly. Caution! Take care not to let the objective lens come into contact with the
specimen when focusing the microscope. If more detail is required, the objective lens can
be changed to one giving more magnication by turning the objective lens holder and
focusing again.
3. What you see is the inverted image of a specimen. If you want to see more of a specimen’s
left part, you should move the slide to the right.
4. Besides viewing the ready made specimens, specimens can be prepared from other
materials. For example, if a piece of newspaper printing is viewed, the individual dots
making up the print can be seen.
5. A piece of peeled potatoes can be rubbed over a glass slide. Place a drop of clear water on
the slide and place a cover glass over the drop of water. The particles of starch from the
potato can then be viewed through the microscope.
6. Some specimens such as onion skins need to be colored before they can be viewed. To
prepare a specimen of onion skin, drip two drops of methylene blue or methyl orange which
has been added with water in a cup. Use the scalpel to scrape a layer of skin from a peeled
onion and dip a small piece of it into a coloring agent. Leave the specimen for a few minutes
to absorb the color. Then take out the specimen and wash away unnecessary coloring agent
with clear water, using the dropper. Place the colored specimen on a blank slide, the skin
should be stretched out and not folded so that a single layer is being viewed. Place a cover
glass over the specimen and view the specimen as before.
7. If you want to keep a specimen for a long time, it can be prepared in the same way but using
gum (supplied) instead of water.
It is recommended that the microscope set is not used by
children under 8 years of age without parental guidance
because some of the accessories included in the set are sharp.
Maintenance Tips
• Remove slides from the microscope when not in use.
• Replace the lens cover when not in use.
• If the microscope is not going to be used for some time, remove the batteries.
Accessories
• 1 vial methylene blue
• 1 vial methyl orange
• 1 vial gum
• 5 blank labels
• 5 cover glasses
• 3 blank slides
• 3 prepared slides
• 2 spare bulbs
• 1 scalpel
• 1 pair tweezers
• 1 dissecting probe
• 1 spatula
• 1 dropper
• Instructions for use
Page 14

14
PIÈCES DU MICROSCOPE:
1. Barillet de l’oculaire—un cache de protection est fourni pour le barillet de l’oculaire. Il doit être
ôté avant l’utilisation.
2. Molette de mise au point—Cette molette se tourne pour régler la distance entre la lame et la
lentille et ainsi mieux observer l’objet d’étude.
3. Barillet de liaison—Il relie le barillet de l’oculaire au porte-lentille d’objectif multiple.
4. Porte-lentille d’objectif—Ce support comporte 3 lentilles d’objectif orant diverses puissances
de grossissement. Les lentilles d’objectif peuvent être permutées en faisant tourner le disque
jusqu’à ce qu’un clic soit émis, signe que la lentille est verrouillée en place.
5. Lentilles d’objectif—Il existe 3 lentilles d’objectif au choix : 75x, 300x, 900x.
6. Bras vertical
7. Porte-lame—Pour soutenir l’échantillon à étudier.
8. Barrette pince-lame—Sert à tenir l’échantillon étudié.
9. Projecteur—Sert à éclairer un échantillon lorsque la lumière naturelle est insusante. La lumière
est allumée lorsque l’unité est retournée de sorte que l’ampoule pointe vers le haut. (Fig. A)
Lorsque l’ampoule doit être remplacée, enfoncer la collerette blanche et la tourner de 90 degrés
dans le sens inverse des aiguilles d’une montre. (Fig. B) L’ampoule et son support peuvent alors
être retirés. Pour installer une nouvelle ampoule, aligner deux encoches sur le culot de l’ampoule,
pousser vers le bas et la tourner légèrement en position dans le sens des aiguilles d’une montre
(Fig. C).
10. Réecteur—Sert à rééchir la lumière naturelle sur l’échantillon. (Fig. D)
11. Base
12. Base anti-dérapante—Le projecteur est alimenté par 2 piles de type AA. Le fond peut être extrait
pour avoir accès au compartiment à piles à l’intérieur de la base du microscope. (Fig. E)
Page 15

15
Il est recommandé de ne pas laisser les enfants de moins de
8 ans utiliser le microscope sans surveillance parentale, car
certains accessoires inclus dans l’ensemble peuvent couper.
Conseils d’entretien
• Retirer les lames du microscope quand il n’est pas utilisé.
• Replacer le cache de lentille d’oculaire lorsqu’il n’est pas utilisé.
• Si vous prévoyez de ne pas utiliser le microscope sur une longue période, ôtez les piles.
Accessoires
• 1- ole méthylène bleue
• 1- ole méthylène orange
• 1- ole gomme
• 5- étiquettes vierges
• 5- verres de protection
• 3- lames vierges
• 3- préparations microscopiques
• 2- ampoules de rechange
• 1- scalpel
• 1- paire de pinces
• 1- sonde de dissection
• 1- spatule
• 1- compte-gouttes
• Instructions d’utilisation
INSTRUCTIONS RELATIVES AU MICROSCOPE
1. Prendre l’une des préparations microscopiques et la placer sous les barrettes sur le plateau portelame. L’échantillon doit se trouver au centre de l’orice sur le plateau. Régler l’angle d’observation
(Fig. F) et le réecteur de sorte que la lumière soit dirigée vers l’échantillon. (Fig. G) Si la lumière
naturelle est insusante, le réecteur peut être retourné de sorte que l’échantillon soit éclairé par
le projecteur. Attention ! Ne pas utiliser le microscope sous les rayons du soleil au risque de subir
des lésions oculaires.
2. Choisir la lentille d’objectif en fonction du grossissement requis en tournant le porte-lentille. Le
microscope peut ensuite être mis au point en tournant la molette de mise au point jusqu’à ce que
l’échantillon soit clairement visible. Attention ! Veiller à ne pas laisser la lentille d’objectif entrer
en contact avec l’échantillon lors de la mise au point du microscope. Pour plus de détails, il est
possible de dénir une seule lentille d’objectif, ce qui confèrera un meilleur grossissement, en
tournant le porte-lentille d’objectif et en eectuant à nouveau la mise au point.
3. Vous verrez une image inversée de l’échantillon. Pour examiner de plus près la partie gauche d’un
échantillon, déplacer la lame vers la droite.
4. En plus d’examiner les échantillons prêts à l’emploi, certains échantillons peuvent être préparés
à partir d’autres matériaux. Par exemple, en examinant un fragment de journal imprimé, il est
possible de distinguer les points composant l’imprimé.
5. Il est possible de frotter un morceau de pomme de terre épluchée au-dessus d’une lame de verre.
Déposer une goutte d’eau claire sur la lame et placer un verre de protection par-dessus la goutte.
Les particules d’amidon de la pomme de terre peuvent alors être étudiées à travers le microscope.
6. Certains échantillons, comme la peau d’oignon, doivent être colorés avant de pouvoir être
examinés. Pour préparer un échantillon de peau d’oignon, mélanger deux gouttes de méthylène
bleu ou de méthylène orange avec de l’eau dans un gobelet pour créer un colorant. Utiliser le
scalpel pour détacher une couche de peau d’un oignon épluché et en immerger une petite partie
dans le colorant. Laisser tremper l’échantillon quelques minutes pour qu’il absorbe la couleur.
Ensuite, retirer l’échantillon et clarier l’excès de colorant à l’eau claire à l’aide du compte-gouttes.
Placer l’échantillon coloré sur une lame vierge (la peau doit être étirée et non pliée de sorte à
pouvoir examiner une seule couche). Placer un verre de protection par-dessus l’échantillon et
examiner l’échantillon comme précédemment.
7. Pour conserver un échantillon à long terme, il peut être préparé de la même manière, mais avec de
la gomme (fournie) à la place de l’eau.
Page 16

16
PARTES DEL MICROSCOPIO:
1. Ocular: se proporciona una tapa protectora para el ocular. Esta tapa debe quitarse antes de utilizar
el microscopio.
2. Tornillo de enfoque: este tornillo se gira para ajustar la distancia entre la platina y la lente y poder
enfocar la vista del objeto en el foco.
3. Revolver: esta pieza conecta el ocular con el soporte de varias lentes del objetivo.
4. Sopor te de lentes del objetivo: este soporte contiene tres lentes de objetivo con distinta capacidad
de ampliación. Las lentes del objetivo se pueden cambiar girando el disco hasta que se oiga un
chasquido, lo que indica que la lente se ha jado en su posición.
5. Lentes del objetivo: hay tres lentes de objetivo entre las que elegir: 75x, 300x, 900x.
6. Brazo vertical
7. Soporte de la platina: para sujetar la muestra objeto de estudio.
8. Pinzas de la platina: se utilizan para sujetar la muestra objeto de estudio.
9. Iluminador: se utiliza para iluminar una muestra cuando no hay suciente luz natural. La luz se
enciende cuando la unidad está colocada de forma que la bombilla esté orientada hacia arriba.
(Fig. A) Si se tiene que cambiar la bombilla, empuje el anillo blanco hacia abajo y gírelo 90 grados
en sentido contrario a las agujas del reloj. (Fig. B) La bombilla y el casquillo se pueden extraer.
Para instalar una bombilla nueva, alinee las dos marcas en el receptáculo de la bombilla, empuje
hacia abajo y gírelo ligeramente en el sentido de las agujas del reloj hasta que encaje en su
posición (Fig. C).
10. Reector: se utiliza para reejar la luz natural en la muestra. (Fig. D)
11. Base
12. Base antideslizante: el iluminador funciona con dos pilas de tipo AA. La base inferior se puede
extraer para permitir el acceso al compartimento de las pilas dentro de la base del microscopio.
(Fig. E)
Page 17

17
Se recomienda que el equipo del microscopio no sea utilizado por
niños menores de 8 años sin la orientación de los padres porque
algunos de los accesorios incluidos en el equipo son cortantes.
Consejos de mantenimiento
• Extraiga las platinas del microscopio cuando no lo utilice.
• Coloque la tapa del ocular cuando no lo utilice.
• Si el microscopio no se va a utilizar durante un tiempo prolongado, extraiga las pilas.
Accesorios
• Un vial de azul de metileno
• Un vial de naranja de metilo
• Un vial de jador
• Cinco etiquetas en blanco
• Cinco cubreobjetos de
cristal
• Tres platinas vacías
• Tres platinas preparadas
• Dos bombillas de
recambio
• Un escalpelo
• Un par de pinzas
• Una sonda de disección
• Una espátula
• Un gotero
• Instrucciones de uso
INSTRUCCIONES DEL MICROSCOPIO
1. Seleccione una de las platinas preparadas y colóquela bajo las pinzas en el portaobjetos de la
platina. La muestra debe estar en el centro del agujero del portaobjetos. Ajuste el ángulo de
observación (Fig. F) y el reector de forma que la luz enfoque la muestra. (Fig. G) Si no hay
suciente luz natural, el reector se puede girar de forma que la muestra quede iluminada por el
iluminador. ¡Precaución! No utilice el microscopio bajo la luz directa del sol para evitar lesiones
oculares.
2. Seleccione las lentes del objetivo de acuerdo con la ampliación que necesita girando el soporte
de las lentes. El microscopio se puede enfocar girando el tornillo de enfoque hasta que la muestra
se pueda ver claramente. ¡Precaución! Tenga cuidado en no dejar que la lente del objetivo entre
en contacto con la muestra al enfocar el microscopio. Si se necesita más detalle, la lente del
objetivo se puede cambiar por una que amplíe más girando el soporte de las lentes del objetivo
y volviendo a enfocar.
3. Lo que se observa es la imagen invertida de una muestra. Si desea observar más detalles de la
parte izquierda de una muestra, deberá mover la platina hacia la derecha.
4. Además de observar las muestras ya preparadas, se pueden preparar muestras a partir de otros
materiales. Por ejemplo, al observar un trozo de periódico impreso, se podrán ver los puntos
individuales que forman la impresión.
5. Frote un trozo de patata pelada por el cristal de la platina. Deposite una gota de agua limpia
en la platina y coloque el cubreobjetos de cristal sobre la gota de agua. Se podrán observar las
partículas de almidón de la patata a través del microscopio.
6. Algunas muestras como las pieles de cebolla deben colorearse antes de poder observarlas. Para
preparar una muestra de piel de cebolla, vierta dos gotas de azul metileno o de naranja de metilo
en un vaso con agua para crear un agente colorante. Utilice el escalpelo para cortar una capa de
piel de una cebolla pelada y sumerja un trozo pequeño en el agente colorante. Deje pasar unos
minutos hasta que la muestra absorba el color. A continuación, saque la muestra y elimine el
agente colorante innecesario con agua limpia, utilice el gotero. Coloque la muestra coloreada en
una platina vacía, la piel debe estar estirada y no doblada para que se pueda observar una sola
capa. Ponga un cubreobjetos de cristal encima de la muestra y obsérvela tal y como ha hecho
antes.
7. Si desea conservar una muestra durante mucho tiempo, se puede preparar de la misma forma
pero utilizando jador (proporcionado) en lugar de agua.
Page 18

18
KOMPONENTEN DES MIKROSKOPS:
1. Okulartubus – Der Okulartubus ist mit einer Schutzkappe versehen. Die Kappe muss vor der
Verwendung des Mikroskops abgenommen werden.
2. Triebknopf – durch Drehen des Knopfes wird der Abstand zwischen Objekttisch und Objektiv
verändert und dadurch das Objekt fokussiert.
3. Tubus – der Tubus ist das Verbindungsstück zwischen Okulartubus und Objektivwechsler
(Revolver).
4. Objektivwechsler (Revolver) – dient zur Aufnahme von 3 Objektiven unterschiedlicher
Vergrößerungsstufen. Beim Objektivwechsel wird die Scheibe gedreht, bis ein Klickgeräusch das
Einrasten des gewählten Objektivs anzeigt.
5. Objektive – das Mikroskop ist mit drei Objektiven folgender Vergrößerungen ausgestattet: 75x,
300x, 900x.
6. Stativarm
7. Objektklemme – zur Aufnahme des zu beobachtenden Objekts.
8. Objekttisch – zur Aufnahme des zu beobachtenden Objekts.
9. Kondensor zur Beleuchtung des Objekts, falls nicht genügend natürliches Licht vorhanden ist. Das
Licht wird eingeschaltet, wenn der Kondensator gedreht ist und die Glühlampe nach oben zeigt.
(Abb. A) Zum Auswechseln der Glühlampe den weißen Ring niederdrücken und um 90 Grad im
Gegenuhrzeigersinn drehen. (Abb. B) Glühlampe und Fassung können jetzt entfernt werden. Zum
Einsetzen einer neuen Glühlampe die Glühlampe in die beiden Nuten der Glühlampenhalterung
einsetzen, niederdrücken und durch Drehen im Uhrzeigersinn in Position bringen (Abb. C).
10. Reektor – lenkt natürliches Licht auf das zu beobachtende Objekt. (Abb. D)
11. Stativfuß
12. Rutschfeste Auage – die Stromversorgung des Kondensors erfolgt durch 2 AA-Batterien. Für den
Zugang zum Batteriefach im Stativfuß kann die rutschfeste Auage abgenommen werden. (Abb.
E)
Page 19

19
Das Mikroskopset sollte von Kindern unter 8 Jahren
nicht ohne Beaufsichtigung der Eltern verwendet
werden, da es scharfe Zubehörteile enthält.
Pegetipps
• Nehmen Sie die Objektträger vom Mikroskop ab, wenn es längere Zeit nicht benutzt wird.
• Setzen Sie die Schutzkappe auf das Okular auf, wenn das Mikroskop nicht benutzt wird.
• Entnehmen Sie die Batterien, wenn das Mikroskop längere Zeit nicht benutzt wird.
Accessories
• 1 Gefäß Methylenblau
• 1 Gefäß Methylorange
• 1 Gefäß Gum Media
• 5 Etiketten unbeschriftet
• 5 Deckgläser
• 3 Objektträger leer
• 3 Objektträger mit
Präparat
• 2 Ersatz-Glühlampen
• 1 Skalpell
• 1 Pinzette
• 1 Präpariersonde
• 1 Spatel
• 1 Pipette
• Anwendungshinweise
BEDIENUNGSANLEITUNG MIKROSKOP
1. Legen Sie einen Objektträger mit Präparat unter die Objektklemme auf dem Objekttisch. Das
Präparat sollte mittig über dem Ausschnitt des Objekttischs liegen. Den Beobachtungswinkel
und den Reektor so einstellen, dass das Licht auf dem Präparat gebündelt wird (Abb. F). (Abb.
G) Ist nicht genügend natürliches Licht vorhanden, kann der Reektor gedreht werden, sodass
das Präparat vom Kondensor beleuchtet wird. Achtung! Das Mikroskop nicht bei direkter
Sonneneinstrahlung verwenden, um Verletzungen der Augen zu vermeiden.
2. Durch Drehen des Revolvers das Objektiv mit der benötigten Vergrößerung auswählen.
Anschließend erfolgt durch Drehen des Triebknopfs die Scharfstellung. Achtung! Bei der
Scharfstellung darf das Objektiv nicht mit dem Präparat in Berührung kommen. Wird eine
detailliertere Darstellung des beobachteten Objekts gewünscht, kann durch Drehen des Revolvers
ein Objektiv mit stärkerer Vergrößerung ausgewählt werden. Anschließend erneut scharfstellen.
3. Das vom Mikroskop gezeigte Bild ist seitenverkehrt. Möchten Sie die das Bild nach links
verschieben, müssen Sie den Objekttisch nach rechts bewegen.
4. Neben der Betrachtung der vorbereiteten Präparate besteht auch die Möglichkeit, verschiedenste
Objekte eigener Wahl zu beobachten und selbst Präparate herzustellen. Bei einem
Zeitungsausschnitt beispielsweise werden unter dem Mikroskop die einzelnen Punkte sichtbar,
aus denen das Druckbild besteht.
5. Oder reiben Sie ein Stück geschälte Kartoel auf einem Objektträger. Fügen Sie anschließend
einen Tropfen Wasser hinzu und legen Sie ein Deckglas auf. Anschließend können Sie im
Mikroskop einzelne Stärkepartikel der Kartoel betrachten.
6. Bestimmte Objekte wie etwa Zwiebelhäute müssen vor der Beobachtung eingefärbt werden.
Füllen Sie hierzu Wasser in eine Tasse und fügen Sie zwei Tropfen Methylenblau oder Methylorange
hinzu. Lösen Sie mit dem Skalpell ein Stück Haut von der Zwiebel und tauchen Sie es in die
Farbstoösung ein. Warten Sie einige Minuten, damit die Zwiebelhaut die Farbe aufnehmen
kann. Nehmen Sie die Zwiebelhaut aus der Farbstoösung, füllen Sie die Pipette mit Wasser und
waschen Sie überschüssigen Farbsto ab. Legen Sie die eingefärbte Haut auf einen Objektträger.
Sie sollte einlagig und sorgfältig ausgebreitet auf dem Träger positioniert werden. Legen Sie ein
Deckglas auf. Nun können Sie das Objekt wie oben beschrieben beobachten.
7. Wenn Sie auf diese Weise Objekte herstellen und länger aufbewahren möchten, verwenden Sie
zur Präparation Gum (im Lieferumfang enthalten) anstelle von Wasser.
Page 20

20
PARTI DEL MICROSCOPIO:
1. Oculare: viene venduto con un coperchio protettivo che deve essere rimosso prima dell’uso.
2. Manopola di messa a fuoco: questa manopola viene ruotata per regolare la distanza tra il vetrino
e la lente al ne di mettere a fuoco l’oggetto visualizzato.
3. Cilindro di collegamento: collega l’oculare al supporto lenti multiple dell’obiettivo.
4. Supporto lenti dell’obiettivo: questo supporto contiene 3 lenti dell’obiettivo di potenza di
ingrandimento variabile. Le lenti dell’obiettivo possono essere cambiate ruotando il disco nché
non viene emesso un clic a indicare che la lente è bloccata in posizione.
5. Lenti dell’obiettivo: è possibile scegliere tra 3 lenti dell’obiettivo: 75x, 300x, 900x.
6. Braccio verticale
7. Supporto del vetrino: per contenere il campione da esaminare.
8. Graetta del vetrino: utilizzata per contenere il campione da esaminare.
9. Faretto: utilizzato per illuminare il campione quando la luce naturale non è suciente. La luce si
accende quando l’unità è capovolta in modo che la lampadina sia rivolta verso l’alto. (Fig. A) Se è
necessario sostituire la lampadina, spingere verso il basso la ghiera bianca e ruotarla di 90 grandi
in senso antiorario. (Fig. B) È possibile rimuovere la lampadina e il suo supporto. Per installare
una nuova lampadina, allineare due tacche sull’alloggiamento della lampadina, spingere in
basso e ruotare leggermente in senso orario no a raggiungere la posizione (Fig. C).
10. Riettore: utilizzato per riettere la luce naturale sul campione. (Fig. D)
11. Base
12. Base antiscivolo: il faretto è alimentato da due batterie di tipo AA. La base inferiore può essere
rimossa per accedere al vano batteria all’interno della base del microscopio. (Fig. E).
Page 21

21
Si sconsiglia l’uso del microscopio da parte di bambini
minori di 8 anni in assenza dei genitori in quanto
alcuni accessori contenuti nel set sono alati.
Suggerimenti per il mantenimento
• Rimuovere i vetrini dal microscopio quando non è in uso.
• Applicare il coperchio dell’oculare quando non è in uso.
• Se il microscopio non verrà usato per un po’ di tempo, rimuovere le batterie.
Accessori
• 1 ala di blu di metilene
• 1 ala di metilarancio
• 1 ala di gomma
• 5 etichette vuote
• 5 vetri di copertura
• 3 vetrini vuoti
• 3 vetrini preparati
• 2 lampadine di
ricambio
• 1 bisturi
• 1 paio di pinzette
• 1 sonda di dissezione
• 1 spatola
• 1 contagocce
• Istruzioni per l’uso
ISTRUZIONI DEL MICROSCOPIO
1. Selezionare uno dei vetrini preparati e collocarlo sotto le graette sul tavolino di supporto dei
vetrini. Il campione deve trovarsi al centro del foro nel tavolino. Regolare l’angolo di osservazione
(Fig. F) e il riettore in modo che la luce sia puntata sul campione. (Fig. G) Se la luce naturale non
è suciente, è possibile capovolgere il riettore in modo che il campione sia illuminato dal faretto.
Attenzione: per evitare lesioni agli occhi, non utilizzare il microscopio alla luce diretta del sole.
2. Selezionare la lente dell’obiettivo in base all’ingrandimento richiesto ruotando il supporto lenti.
A questo punto è possibile mettere a fuoco il microscopio ruotando la manopola della messa
a fuoco nché non è possibile vedere chiaramente il campione. Attenzione: evitare che la
lente dell’obiettivo entri a contatto con il campione durante la messa a fuoco del microscopio.
Se è necessario vedere più nel dettaglio, è possibile sostituire la lente dell’obiettivo con una
dall’ingrandimento maggiore ruotando il supporto lenti dell’obiettivo e mettendo nuovamente
a fuoco.
3. Si vedrà l’immagine invertita del campione. Se si desidera vedere meglio la parte sinistra del
campione, spostare il vetrino a destra.
4. Oltre a osser vare i campioni già pronti, è possibile prepararli utilizzando altri materiali. Ad esempio,
se si visualizza un foglio di giornale, è possibile vedere i singoli punti che compongono la stampa.
5. Si può stronare una buccia di patata su un vetrino. Mettere una goccia d’acqua sul vetrino e
coprirla con il vetro di copertura. Le particelle di amido della patata possono essere osservate
attraverso il microscopio.
6. Alcuni campioni come le bucce di cipolla devono essere colorati prima di poterli osservare. Per
preparare un campione di buccia di cipolla, mettere due gocce di blu di metilene o di metilarancio
in una tazza d’acqua per realizzare l’agente colorante. Utilizzare il bisturi per staccare uno strato
di buccia da una cipolla sbucciata e immergerne un pezzetto nell’agente colorante. Lasciare il
campione per alcuni minuti in modo che assorba il colore. Rimuovere il campione e lavare via
l’agente colorante superuo con acqua pulita utilizzando il contagocce. Posizionare il campione
colorato su un vetrino vuoto, la buccia deve essere aperta e non piegata in modo da poter vedere
un unico strato. Posizionare un vetro di copertura sul campione e osservare il campione come
prima.
7. Se si desidera conservare un campione a lungo, può essere preparato allo stesso modo utilizzando
la gomma (fornita) invece dell’acqua.
Page 22

© 2014 B.O.P.
9200 Cody, Overland Park, Kansas 66214
(800) 423-3537 • www.tasco.com
 Loading...