

Page 1
TASCAM MA-AD8 Set-up Guide
The "pro-hip" way to record from the mic preamp direct to tape.
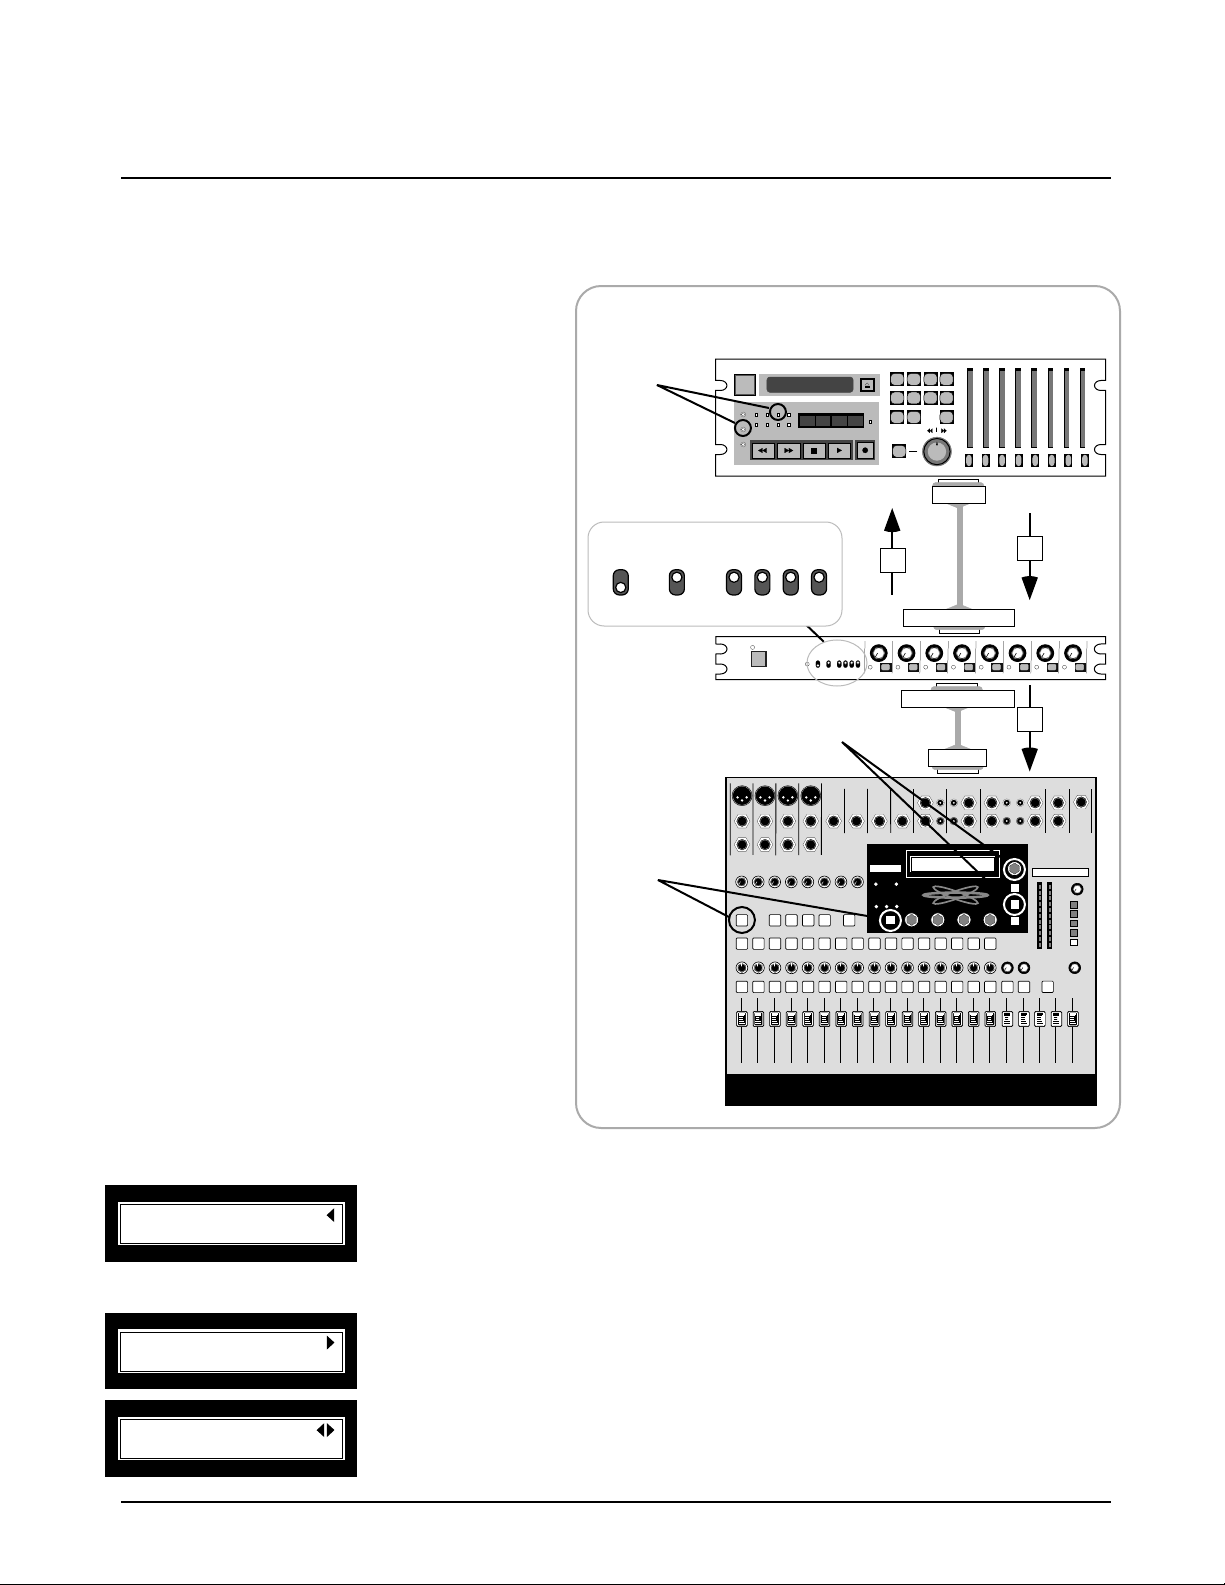
This set-up is for direct recording. In this example, the signal from the mic preamp is converted to digital and sent
directly to the DA-38 through the TDIF cable. The signal returns through the TDIF cable back to the MA-AD8 and
continues on to the TM-D1000 for monitoring. This is our recommended set up for recording, as it allows for
punch-ins easily.
Connections:
There are only two connections that need to be
made:
• TDIF cable from the DIGITAL I/O 1 of the
MA-AD8 to the TDIF I/O of the DA-38
(or DA-88, DA-98).
• TDIF cable from the DIGITAL I/O 2 of the
MA-AD8 to the TDIF-1 A port of the TM-D1000.
Setting the Digital Input on the DA-38:
Just up and to the left of the transport controls on
the DA-38, you will find a button labeled DIGITAL
IN. Press that button to engage the digital inputs.
An LED also labelled DIGITAL IN will illuminate
indicating the digital input is selected.
MA-AD8 Front Panel Settings:
On the front panel of the MA-AD8, there are
several switches which route signal and select
the word clock master. Set the first switch down
and the rest of them up.
The CLOCK switch determines whether the word
clock will come from a TDIF port or the BNC
input. If you have selected a TDIF port as the
master word clock source, the STATUS switch
will determine which of the two TDIF ports is the
master. The INPUT switches determine what is
fed out DIGITAL I/O 1. If the switch is set up to
mic, then the mic input will go into DIGITAL I/O 1.
If the switch is down, then the signal from
DIGITAL I/O 2 cascades into DIGITAL I/O 1.
Each switch controls a stereo pair of channels.
"DIGITAL IN"
selection
button and
LED indicator
CLOCK
STATUS
WORD
TDIF-1
SHIFT and
PARAM SEL
buttons
Hook-up and signal flow diagram.
TASCAM DA-38
D I/O 1
(TDIF-1)
D I/O 2
(TDIF-1)
INPUT
1/2 3/4 5/6 7/8
MIC
D I/O 2
(TDIF-1)
TASCAM
M A-AD8
DATA ENTRY
dial and
ENTER key
1
TDIF DIGITAL I/O 1
TDIF DIGITAL I/O 2
TDIF I/O
TDIF 1-A
2
3
TASCAM
TM-D1000
Setting the Word Clock Status on the TM-D1000: Side note for live recording:
Option
System ?
simultaneously. If the top line of
the display does not read Option,
press ESCAPE until it does.
Rotate the DATA ENTRY dial to SYSTEM, and press ENTER.
Press SHIFT and PARAM SEL
System
Master Clock Select ?
Rotate the DATA ENTRY dial to
Master Clock Select. Press
ENTER.
Rotate the DATA ENTRY dial to
Master Clock Select
TDIF-1 A?
TDIF-1 A. Press ENTER.
If you want to use the MA-AD8 and a DTRS
machine without the mixer, the above set-up
still applies. Simply disconnect the TMD1000 from DIGITAL I/O 2, and the MA-AD8
and DTRS machine will work great without
the mixer. The front panel setting shown in
the above diagram also remains the same.
See the MA-AD8 manual for more
information about the function of this unit.
 Loading...