

Page 1
™
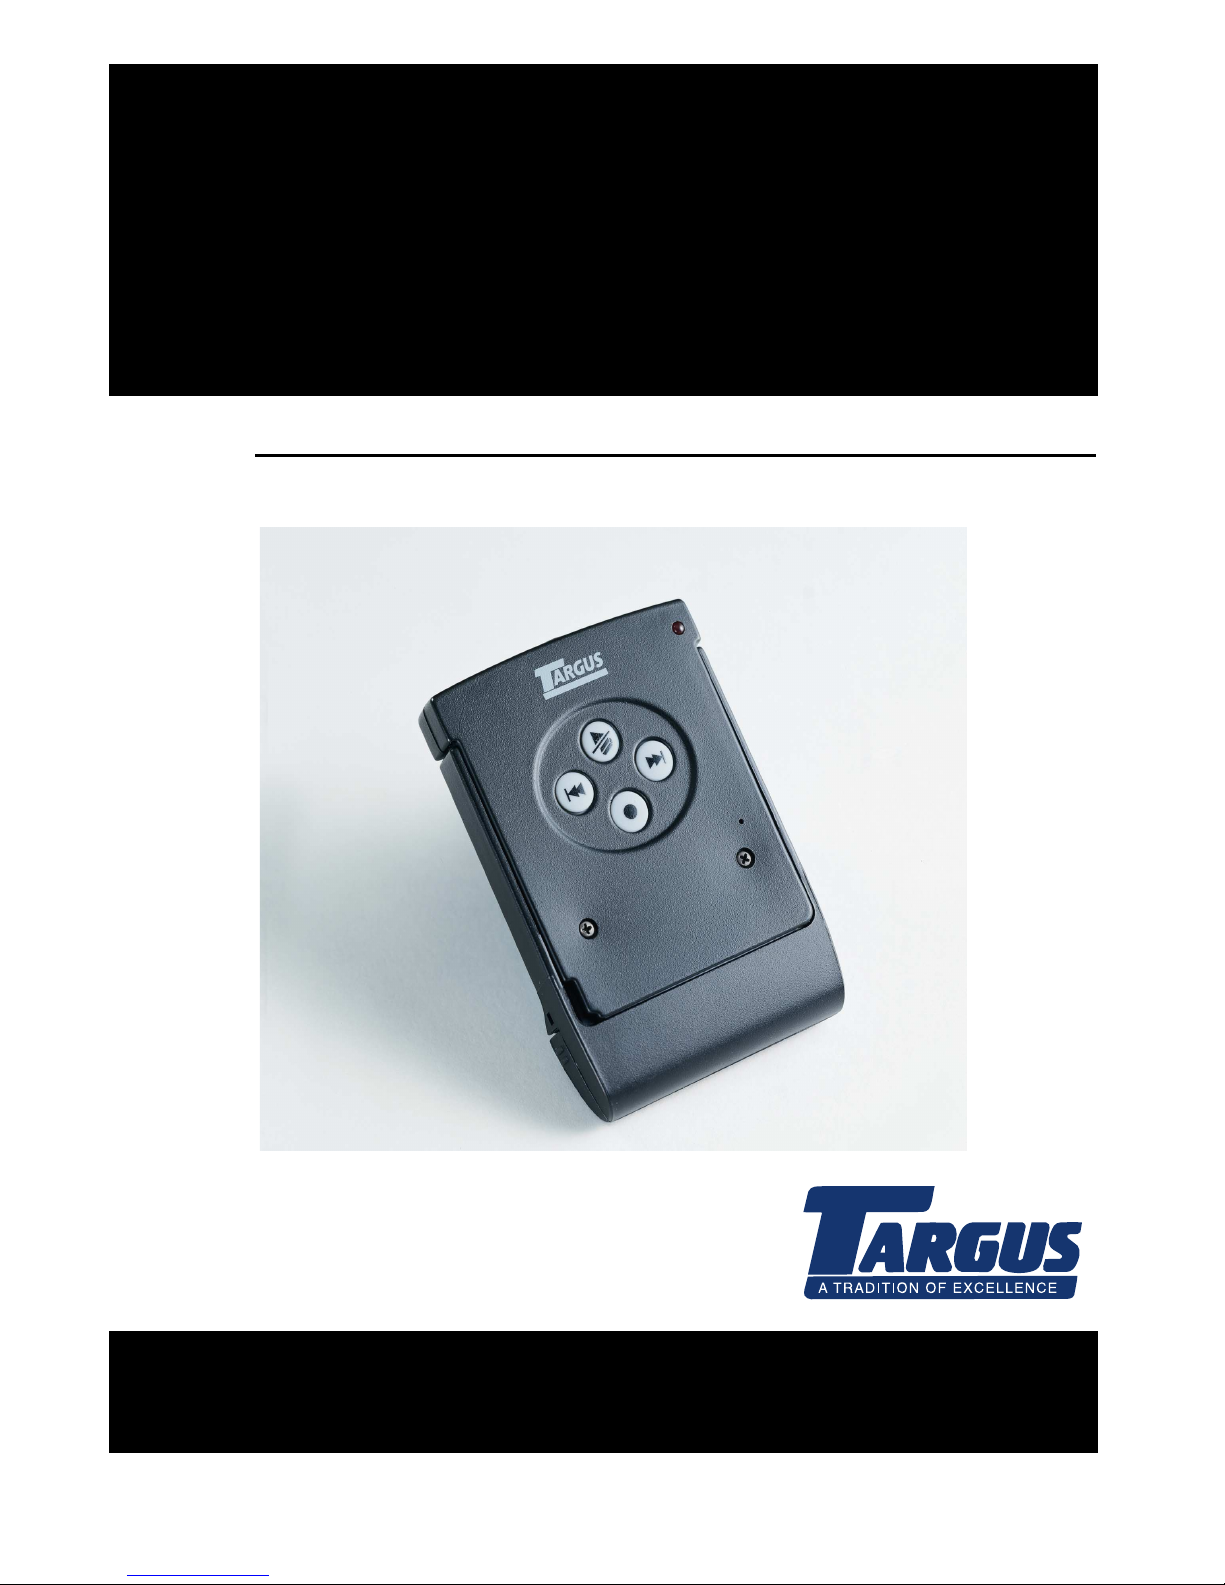
Total Recall
Digital V oice Recorder
Voice Recorder for
the Handspring
™
Visor
™
I’m
I’mdf
User’s Guide
Page 2

INTRODUCTION
Welcome to the world of portable Digital Voice
Recording!
1
Your Total Recall
™
Digital Voice Recorder gives
you a convenient way to record your thoughts
and ideas while on the go, either whil e installed
in your Visor handheld or as a stand-alone
recorder with its external stand-alone shutt le.
With your Voice Recorder and Visor
™
handheld,
you can upload stored voice messages to your
PC using standard Palm O/S
®
HotSync
™
Manager software.
Once on your PC, you can save your voice
messages as .wav files using the intuitive Total
Recall Voice Deskt op software. These .wav files
can even be attached to email messages for
distribution to your friends and colleagues.
Page 3
USING THE VOICE RECORDER IN
STAND-ALONE MODE
Your Total Recall Digital Voice Recorder can be
used in stand-alone mode with the external
stand-al one shuttle.
You can control all Voice Recorder operations
using the buttons on the front of the recorder.
2
Page 4
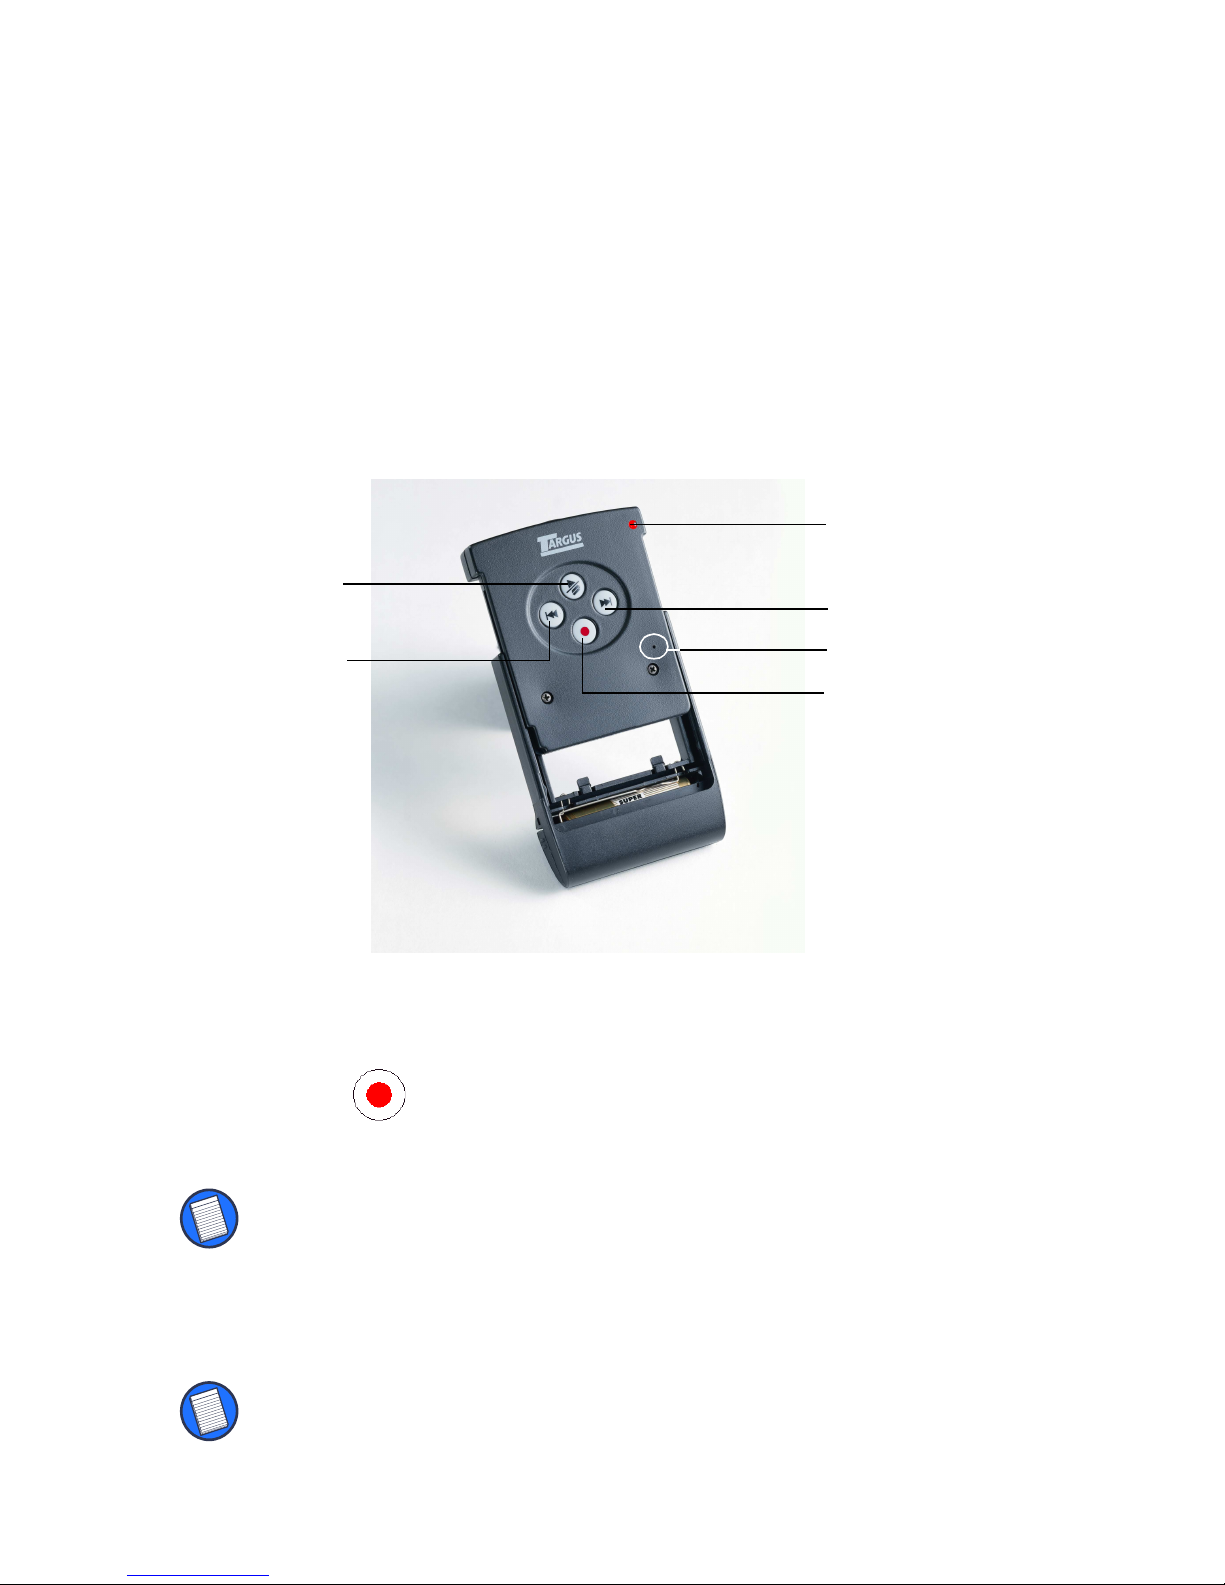
INSERTING THE VOICE RECORDER INTO THE
STAND-ALONE SHUTTLE
To insert the Voice Recorder into the stand-alone
shuttle, align the rails of the stand-alone shuttle
with the grooves in the Voice Recorder and slide
the parts together.
LED
Play/Stop
Forward
3
Rewind
Reset Button
Record
RECORDING MESSAGES
To record a new message, press th e red Record
button . The status LED glows red , indi cating
that recording is in process.
NOTE: In stand-alone mode, all messages are recorded in Best
quality with Voice Activation ON.
To stop recording, press the Record button
again.
NOTE: If the Voice Recorder is not recording in stand-alo ne
mode, use a small paper clip to press the reset button.
Page 5

PLAYING BACK MESSAGES
To play back the current recording, press the
Play/Stop button .
When a message is playing, you can fastforward through the re cording by pressing the
Forward button , or rewind by pressing the
Rewind button .
To stop message playback, press the Play/Stop
button.
To skip to the next message, press and release
4
the Forward button.
NOTE: It is not n ecessary to stop playback or ho ld down the
Forward o r Rewind button to skip messages.
To play the previous messag e, press and release
the Rewind button.
If you attempt to skip past the last or first
message, the status LED will flash once to let
you know that you’ve reached the end.
EDITING AND ERASING MESSAGES
The message editing and erase features are not
available when using the Voice Recorder in
stand-al one mo de.
For additional information, refer to “EDITING
VOICE MESSAGES” on page 14 or “DELETING
MESSAGES” on page 17.
Page 6

5
REPLACING THE BATTERIES IN THE STAND-ALONE
SHUTTLE
Your Voice Recorder stores all messages in nonvolatile memory, eliminating the need to
synchronize your messages to your PC prior to
changing the batteries.
WARNING: To avoid damagi ng the stand-alon e shuttle, do not
remove the Voice Recorder from the shuttle when re placing the
batteries.
To replace the batteries:
1. Hold the Voice Recorder and stand-alone
shuttle in one hand with the three grooves
on the battery cover facing you.
2. Press in the shuttle door latch with your
other thumb, gently open the hinged cover,
and remove the used batteries.
NOTE: Using a small pen or coin may help release the shutt le
door latch.
3. Install the f resh bat ter ies as indi cat ed on th e
inside of the pack, and close the hinged
cover until the l atch clicks into place.
Page 7

USING EXTERNAL EQUIPMENT
With your Voice Recorder, you can record
messages using an external mic rophone or listen
to messages using standard headphones.
Both microphone (mic) and headphone (ear)
jacks are on the top side of the Voice Recorder.
6
Headphone jack
Microphone jac k
Page 8

7
USING THE VOICE RECORDER WITH
THE VISOR HANDHELD
INSERTING THE VOICE RECORDER INTO THE VISOR
HANDHELD
To install the Total Recall Digital Voice Recorder
into your Visor handheld:
1. Press the release button on the stand-alone
shuttle and slide out the Voice Recorder.
2. Remove the expansion sl ot cover from the
back of the Visor handheld.
3. With the Voice Recorder speaker and the
back of the Visor handheld facing you, slide
the Voice Recorder into the Springboard
™
expansion sl ot.
Expansion slot
Page 9
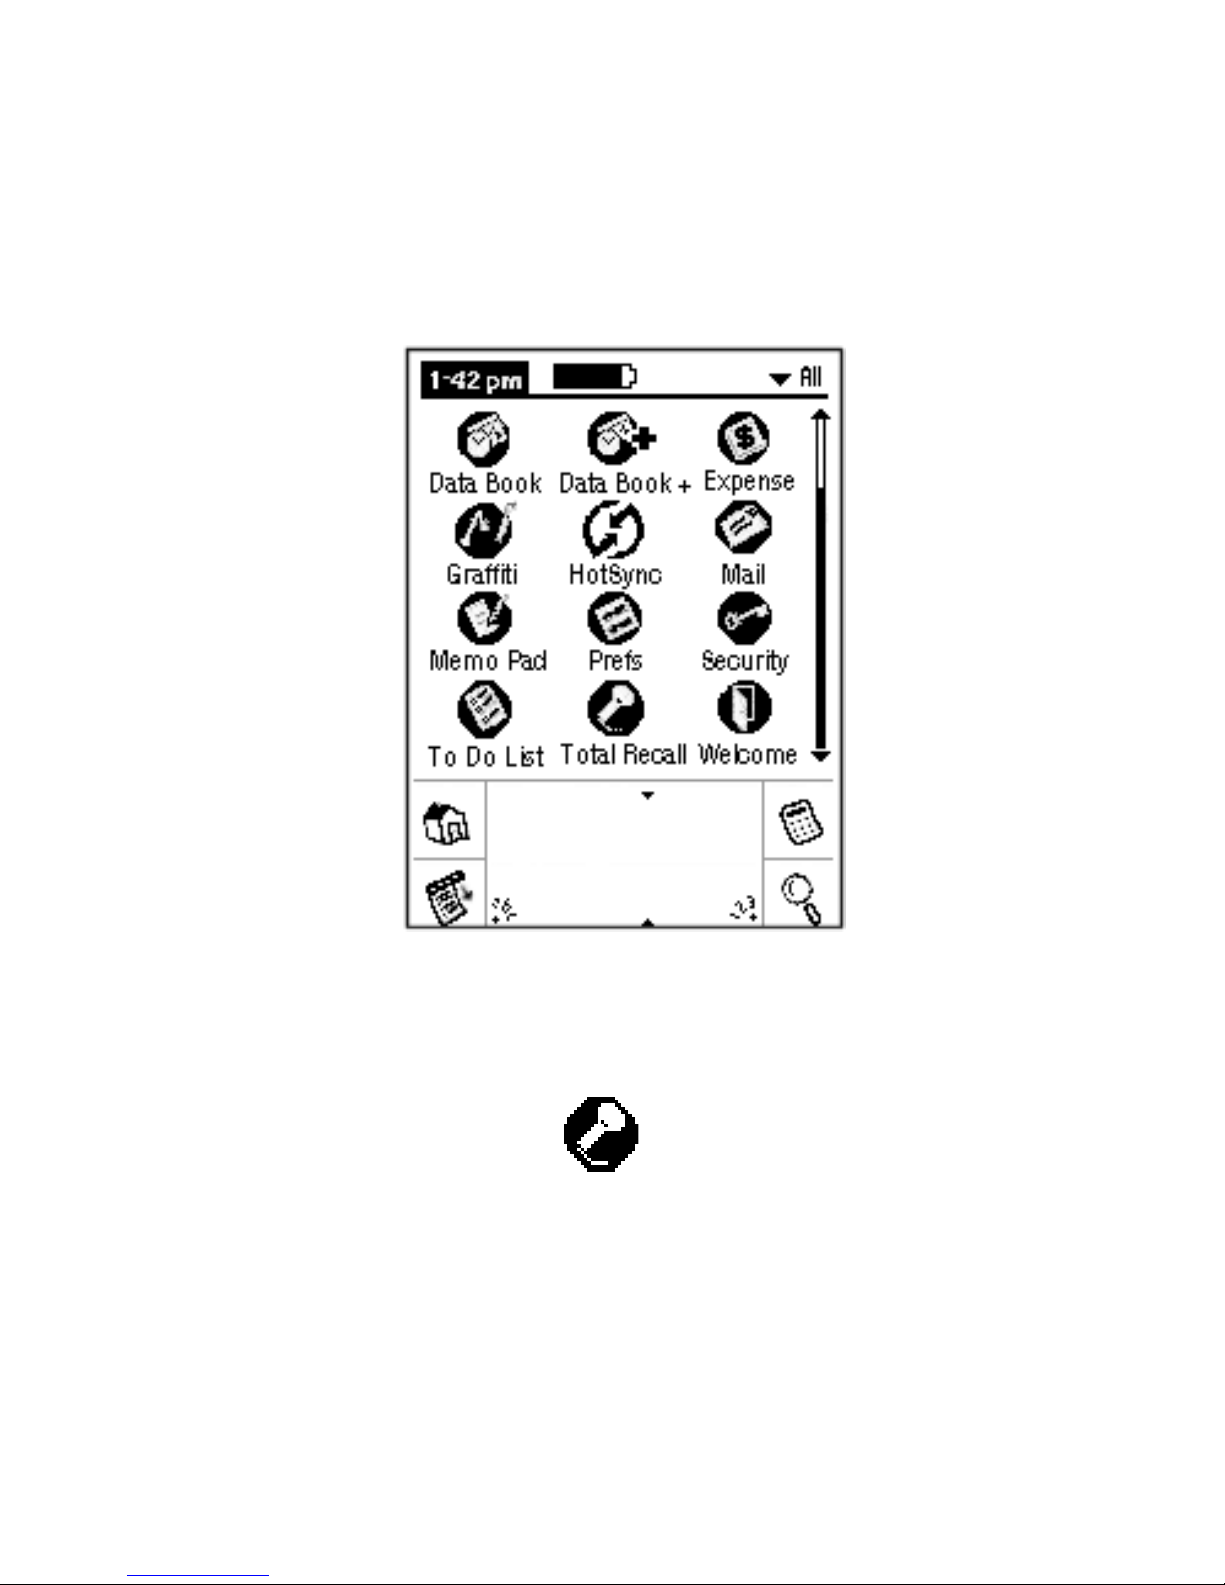
8
The Total Recall application automatically loads
onto the Visor handheld. When complete, the
application screen appears.
To start the applicati on, tap on the Total Recall
icon.
You are now ready to use your V oice Recorder
with your Visor handheld.
Total Recall
Page 10
RECORDING AND PLAYBACK
Recording Voice Messages
CAUTION: Do not remove your Voice Recorder from your V isor
handheld while it is recording. To do so may result in a loss or
corruption of voice data on your Voice Recorder.
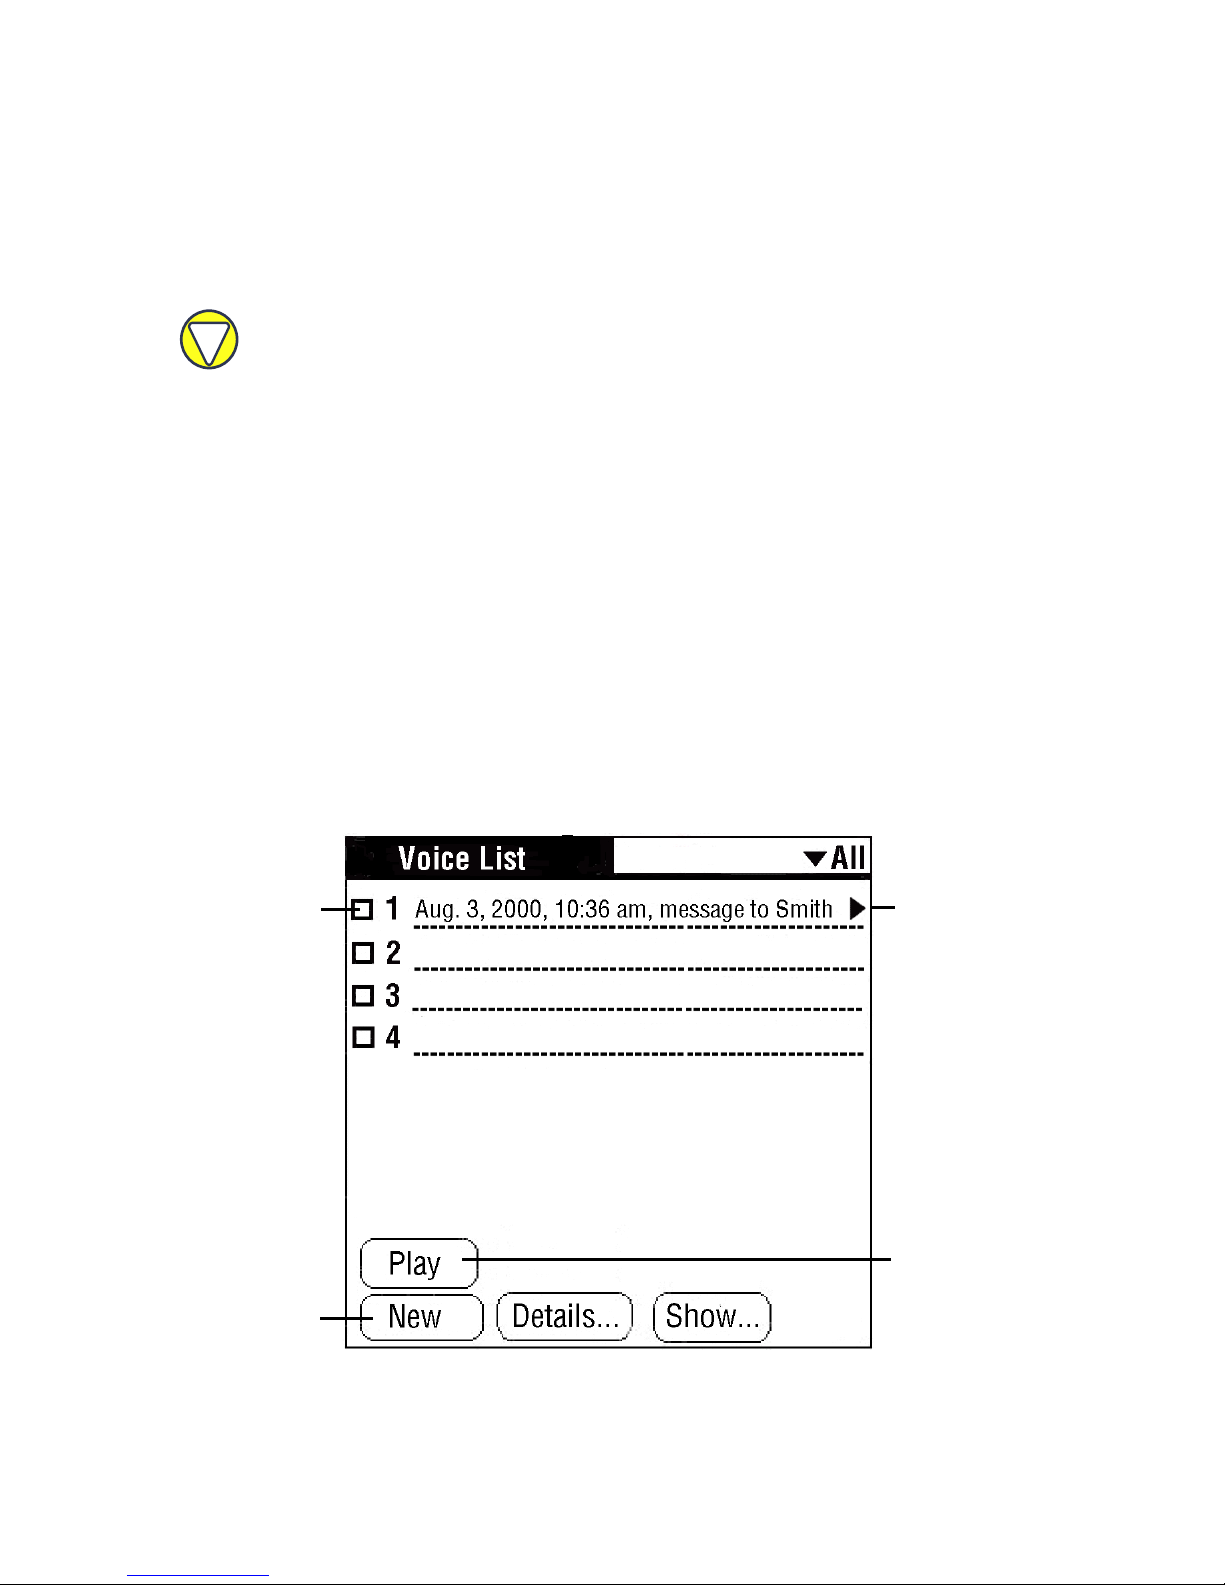
1. From the application screen, tap the Total
Recall icon.
The V oice List menu appears.
2. Tap New to begin recording.
9
The Control Panel appears. Refer to “VOICE
RECORD ER CONT ROL PANEL” on page11.
3. Tap Done to end recording.
Check box
Quick Pl ay
icon
Begin new
recording
Play button
Page 11

10
NOTE: The Visor handheld auto-off feature temporarily disables
when recording a vo ice message. When re cording is complete,
the auto-off feature automatically reactivates.
Playing Back Voice Messages
To initiat e playback from the V oi ce List, select the
message you want to hear by highl ighting it, then
tap the Play button.
To immediately start message playback, tap the
Quick Play icon next to the message of
interest.
The Control Panel appears and the message
begins to play.
Setting Playback Volume
The playback volume level range is 0 (mute ) to
30 (maximum). The volume is automatically set
to level 25. To change t he volume setting, t ap the
Up/Down buttons on the volume control.
Up
Down
Page 12

VOICE RECORDER CONTROL PANEL
The Control Panel appears on the Vi sor
handheld LCD and allows you to perform many
of the Voice Recorder options, including
message play back, stop, pause, fast forward,
rewind, skip track, bookmark, edit, time count,
and volume control.
Status bar
11
Counter
Rewind
Fast forward
Skip back
Skip next
Edit
Record Preferences
Play
Stop
Scissor/Edit
Bookmark
Volume
control
Done/Exit
The Voice Recorder options enable you to set
record and playback preferences to best suit
your needs. To change these preferences:
1. Tap the Menu icon.
Page 13

2. Under the Options menu, select
Preferences.
The Set Preferences window appears.
12
3. Tap the preference to alternate among the
available settings. Then tap OK when
complete.
The following tabl e summarizes the available
preferences.
Preferences Description
V oice Activation Controls the Voice Activation feature for recording. Turning on Voice
Activation sets the V oice Recorder to only record when an audible threshold
is detected and helps extend your effective recording time in situations
during which long pauses in dialog occur.
Recording
Quality
Determines the quality of your recording. The higher the setting, the shorter
the recording time. See below .
Page 14

13
Recording Quality
The following table summarizes the recording
qualities you can select from to suit your needs.
Available settings are:
Qualit y
Setting Algorithm
Best 32 Kbps ADPCM Conference room
Medium 6.8 Kbps CELP Personal note-taking >1 hour 15 minutes
Low 5.4 Kbps CELP Personal note-taking >1 hour 30 minutes
Recommended
Usa ge T o tal Reco r d Ti me
> 15 minutes
discussions or lecture
notes
Best quality is recommended for si tuati ons when
the speaker is mor e than 10 feet away, especially
if there is a significant amount of background
noise.
Page 15

EDITING VOICE MESSAGES
Your recorder allows you to edit previously
recorded messages from the Control Panel.
14
Scissor/Edit
Edit
There are four ways to edit a message:
• Cut - erases portions of your voice message
• Insert - inserts new recording at any point in
your voice message
• Append - adds new recording at the end of
your voice message
• Overwrite - rerecords you r vo ic e m es s a g e
Page 16

Erasing a portion of a message
1.
Select the appropriate message from the
Voice List and tap the Play button or the
Quick Play icon .
The Control Panel appears and the message
automatically begins to play.
2. Advance the message to where you want to
start erasing.
3. Tap the Scissors icon to begin erasing.
15
The message playback remains audible so you
can determine when to stop erasing.
NOTE: The Sci ssors icon changes from “closed” to “open,”
indicating that the message is erasing.
4. To stop erasing, tap the Scissors icon.
Inserting, Appending, and Overwriting
Inserting a comment, appending to the end of
your message, and overwriting a message are
very similar in operation.
NOTE: You must begin message playback to use Insert, A ppend,
or Overwrite f unctions.
1. Select the appropriate message from the
Voice List and tap the Play button or the
Quick Play icon .
The Control Panel appears and the message
automatically begins to play.
Page 17

2. Do one of the following:
• Tap the Insert button, where you want to
add new voice text
• Tap the Append button at any time
• Tap the Overwrite button, where you
want to change the existing voice text
The Control Panel status bar displays the mode
of recording (Inserting, Appending, or
Overwriting) during the editing session.
16
3. To halt th e recordi ng, tap the Stop button .
SETTING BOOKMARKS ON YOUR VISOR HANDHELD
Bookmarks provide a simple way to return to
specific locations in a message. You can set up
to 10 bookmarks per message when the Voice
Recorder is installed in the Visor handheld.
CAUTION: Once bookmarks are set, you cannot reuse them until
you cut or overwrite the part of t he message that cont ains the
bookmark, or delet e the entire message.
NOTE: If you atte m pt to set a bookmark an d no ne are avai la b le ,
the Control Panel status bar temporarily displays the message
“not bookm a r ked .”
To create a bookmark, tap the Bookmark button
on the Control Panel while the message is
playing. The Cont rol Panel s tatus bar temporarily
displays the message “Bookmarked.”
Page 18

Once a bookmark is set within a message, you
can use the skip backward and the skip
forward buttons on the Control Panel to skip
to the previous or the next bookmark.
If there are no bookmarks pr esent in the selected
direction of skippi ng, playback ski p s to eit her the
next or previous message.
DELETING MESSAGES
WARNING: Do not remove the Voice Recorder from the Visor
handheld whil e deleting messages. Unexpected po wer loss
17
during the process may result in a loss or corruption of voice
data.
There are three ways to completely delete voice
messages:
Deleting using Details...
From the Voice List, select the mes sage you
1.
want to delete and tap the Details... button.
The V oice It em Details box appears.
2. Tap the Delete... button and tap OK.
The message deletes.
Deleting using the Menu
From the Voice List, select the mes sage you
1.
wish to delete and tap the Menu icon .
Page 19

2. Under the Voice menu category, select
Delete Item... and tap OK.
Purging multiple messages
Using the Purge command, you can delete
multiple voice messages at the same time.
To purge several messages simultaneously:
1. Select the check box next to each message
on the Voice List you wish to delete.
This marks the voice message complete.
18
Check bo x
2. Tap the Menu icon , and select Purge...
from the Voice menu category.
A status message flashes on your Vi sor handheld
during the message deletion process. Long messages may take over 15 seconds to delete.
NOTE: Voice messages deleted from your Voice Recorder should
also be deleted manually from your PC. Synchronizing your Visor
handheld with your PC will not delete saved messages from your
PC.
Page 20

19
USING THE VOICE RECORDER WITH
THE PC
INSTALLING SOFTWARE
To automat ic a lly in s tall the Total Rec a ll Voice
Desktop software on your PC, ins ert the CDROM into your CD-ROM drive and follow the
instal lation wizard directions.
If your PC does not automatically begin
installation, click Start, then Run, and type in
D:\totalrecallinstall (Use the drive letter of your
CD-ROM drive in the place of
NOTE: During installation one or more messages may appear and
cause your PC to restart. This indicates the installation of
additional fi les. After your PC restart s, setup continues normally.
Follow any directions that appear on your screen.
D:).
After installing the Voice Desktop software, a
message prompts to restart your PC. To
immediately restart your PC, click OK. To re tu r n
to Windows, click Cancel.
NOTE: To use the Voice Desktop appl ication, you mu st restart
your PC to compl ete the software inst allation.
MANAGING MESSAGES
Uploading Messages to Your PC
Your Voice Recorder allows you to upload
messages to your PC for editing, review, and
Page 21

distribution using standard Palm O/S HotSync
Manager software.
NOTE: The Total Recall Voice Desktop softw are must be installed
on your PC prior to initial uploading of messages from your Voice
Recorder. The Desktop so ftware does not need to be running to
complete mes sage upload.
To upload messages to your PC:
1. Connect the V isor handheld cradle to your
PC.
2. Insert your Voice Recorder into the Visor
20
handheld.
3. Place the V isor handhel d into the cr adle and
press the HotSync button on the cradle.
Your voice messages, including bookmarks,
automatically transfer to your PC.
Playing Back Voice Messages
The Total Recall Voice Desktop application
functions similarly to the To Do List manager of
your Palm Desktop
™
softw ar e .
To access the V oice Desktop, click Start,
Program Files, Total Recall Voice Desktop,
and select Total Recall Voice Desktop.
The Voice List appear s in the left panel of the
Voice Desktop and the message attri butes
appear in the right panel.
Page 22

21
To play back a message, double-click the
Speaker icon .
The Message Playback window appears and
automatically begins playing the message.
Page 23

22
Editing V oice Message Attributes on a PC
By highlighting the message you want to edit in
the Voice List , you can change the following
attributes on th e right side of the screen:
• Voice File - type directly into the text box to
name or change the name of your message.
• Priority - click on the priority number you want
to assign to your message.
• Due date - select a date from the pull down
menu by clicking the down arr ow or t ype a date
directly into the field.
• Category - select a category f rom the pull down
menu by clicking on the down arrow.
NOTE: The Voice Desktop and the Visor ha ndheld have the sa me
list of categories.
• Note - create or edit a note by click ing on the
Note icon in the file li st or at the end of the
Note field on the right side of the screen.
• Complete - marking the check box i ndicates the
message is accomplished.
To save changes, click Apply.
CAUTION: Your Voice Recorder can not upload messages from
the PC. Any chang es made to the voice f iles on your PC will not
appear in the Voice Recorder.
Page 24

23
Setting Bookmarks on a PC
You can add an unlimited number of bookmarks
to your voice messages on the PC by using the
Voice Desktop application bookmark feature.
To set a bookmark:
1. Double-click the Speaker icon to begin
playing the message.
The Message Playback window appears and
automatically begins playing the message.
2. Listen for the section of the voice message
you desire to mark, then click the New
Bookmark button .
A small tick mark appears below the Play bar to
denote the bookmark position.
Moving Between Bookmarks
To skip between bookmarks, use the Prev Cue
Index and Next Cue Index buttons.
Deleting Bookmarks
Click the Delete Bookmark button .
1.
The Delete Bookmarks window opens.
2. From the list of time-stamps for each
bookmark, selec t the bookmark s you wish to
delete, and tap OK.
Page 25

24
Sorting Voice Messages
To organize your Voice List, click the Show...
button at the bottom of the Voice List to view the
Show Options window.
Select an option fr om the Sort by pull down menu
by clicking on the down arrow. Then select View
Options by marki ng the check boxes next t o your
preferences.
To begin sorting your voice messages, click OK.
Deleting Voice Messages
To delete voice messages from your PC, rightclick the message in the Voice List and click
Delete.
Page 26

25
Saving Voice Messages as .wav Files
To send voice messages as email attachments,
save your messages on the PC as .wav files.
To save your voice messages:
1. Highlight the message you want to save in
the Voice List.
2. Click File, then Save As... or right-click on
the message and select Save.
3. Select the folder you want to save the
message in and enter the file name.
You are now able to attac h the voice messag e as
a .wav file to an outgoing email.
Page 27

SPECIFICATIONS
Current Maximum Drain 100mA
V oltage 3.3V Maximum
26
Audio
Bandwidth
Recording
Types
Recording
Media
Pow er Source Handspring Visor or 2 AAA batteries for stand-alone
Battery Life Handspring Visor—operation please consult Visor
Dimensions
3.4 KHz
32Kbits/sec ADPCM, 5.4 and 6.8 Kbits/sec CELP
Digital non-volatile f lash memory (4 MB)
operation
handheld manual
Stand-alone operation—2-3 months (approx) with
alkaline batteries
Without stand-alone shuttle: 2 11/16 x 2 4/16 x 1/2
h x w x d
Weight Without stand-alone shuttle: 1.2 oz (34g)
PD A
Compatibility
Operating
Systems
inches
With stand-alone shuttle: 3 1/4 x 2 5/16 x 5/ 8 inches
With stand-alone shuttle: 2.4 oz (68g)
Visor Handhelds with Springboard Module slot
PD A—P alm OS v3.1 and v3.5
V oice Desktop Application—Windows 98 and
Windows 2000
Page 28

NOTICES
FCC Notice
This equipment has been tested and found to comply with
the limits for a Class B digital device, pursuant of Part 15 of
the FCC Rules. These limits are designed to provide
reasonable protection against harmful interference in a
residentia l i ns t al lati on. This equi pm ent ge nerates, uses and
can radiate radio frequency energy and, if not installed and
used in accordance with the instructions, may cause
harmful interference to radio communications. However,
there is no guar antee that the interference will not occu r in a
particular installation. If this equipment does cause harmful
27
interference to radio or television reception, which can be
determined by turning the equipment off and on, the user is
encouraged to try to correct the interferenc e by one or more
of the following:
• Reorient or relocate the receiving antenna.
• Increase the separation between equipment and receiver.
• Connect the equipment into an outlet on a circuit different
from the to which the receiver is connected.
• Consult the dealer or an experience radio/TV technician
for help.
Changes or modifications not expressly approved by the
party responsible for compliance could void the user's
authority to operate the equipment.
Proper connectors must be used for connection to the host
computer and/or peripherals in order to meet the FCC
emissi on limits.
Page 29

Technical Support
If you encounter a problem with your Targus accessory,
contact our technical support team at:
Email: techsupport@targus.com
Internet: http://www.targus.com/tech_support.asp
Our knowledgeable st aff is also available to
answer your questions through one of the
following numbers:
North America
Monday through Friday, 8:00 a.m. (08:00) to 6:00 p.m.
(18:00) Eastern time:
28
US & Canada: 800-283-6325
Europe
Belgium +32 (0) 02-717-2451
Denmark +45 (0) 35-25-8751
Fr ance +33 (0) 1-64-53-9151
Germany +49 (0) 21-16-579-1151
Italy +39 (0) 24-827-1151
Netherlands +31 (0) 53-484-9470
Spain +34 (0) 91-745-6221
Sweden +46 (0) 8-751-4058
Switzerland +41 (0) 1-212-0007
UK +44 (0) 20-7744-0330
Eastern Europe
and Others +31 (0) 53-484-9479
Page 30

Warranty
Targus warrants this product to be free from defects in
materials and workmanship for one year. If your Targus
accessory is found to be defective within that time, Targus
will repair or replace it. This warranty does not cover
damage from everyday wear and tear, or from
transport ati on by a com mon carri er.
Under no conditions is Targus liable for loss of, or damage
to, a computer; nor loss of, or damage to, programs,
records, or data; nor any consequential or incidental
damages, even if Tar gus has b een informed of the
possibility. This warranty does not affect your statutory
rights.
29
Warranty registration at:
http://www.targus.com/product_registration.asp
Total Recall is a registered trademark of Digital 5.
Handspring, Visor, and Springboard are registered
trademarks of Handspring Inc. Palm OS, HotSync, and
Palm Desktop are trademarks of Palm Computing Inc.,
3Com Corporation, or it’s subsidiaries. All other trademarks
and registered trademarks are the property of their
respective owners.
Page 31

The Leading Global Supplier of P ortable Solutions
V isit o ur Web site at www.tar g us.com
NEW YORK • LOS ANGELES • TOR ON TO • T OKY O • HONG K ONG
SINGAPORE • SYDNEY • LONDON • PARIS • BRU SSELS • HANNO VER
MILANO • BARCELONA • AMSTERDA M
Featur es a nd s pec i f ica ti ons ar e su bj ect to c ha nge wi thou t n ot ice ©200 0 Targus Corp.
400-0027-001A
 Loading...