

Page 1
USER GUIDE
Stow-N-Go
TM
Media Remote
Control Card
Page 2

Table of Contents
English
Targus Stow-N-GoTM media remote control card.................................2
Deutsch
Stow-N-GoTM Medien-Fernbedienungskarte von Targus...................12
Español
Tarjeta control remoto multimedia Stow-N-GoTM de Targus.................22
Français
Carte de télécommande multimédia Stow-N-GoTM de Targus.............32
Italiano
Telecomando formato scheda Targus Stow-N-GoTM.........................42
Nederlands
Targus Stow-N-GoTM Media-afstandsbedieningskaart.......................52
Português
Cartão de controlo remoto multimédia Stow-N-GoTM da Targus........62
1
Page 3

Introduction
System Requirements
• Operating System - Windows® 2000 / XP / Windows Vista™
• USB 1.1 Interface
TARGUS STOW-N-GO
TM
MEDIA REMOTE
CONTROL CARD
Congratulations on your purchase of the Targus Stow-N-GoTM media
remote control card. This media remote control card is built with 2.4
GHz RF technology and can operate up to 50 feet (15 meters) without
line of sight. It is designed to work with the most popular media
players most likely already available in one’s notebook computer
today. This is a plug and play device so no additional software is
required. The remote is the handiest and most compact PC remote
control, its USB receiver is designed slim enough to snap into the main
body and fit the whole remote control into your PC card slot of your
Notebook PC.
Contents
• Targus media remote control card
• Slim receiver (attached to the remote control card)
• 1 x CR2032 coin battery
• User Guide
2
Page 4
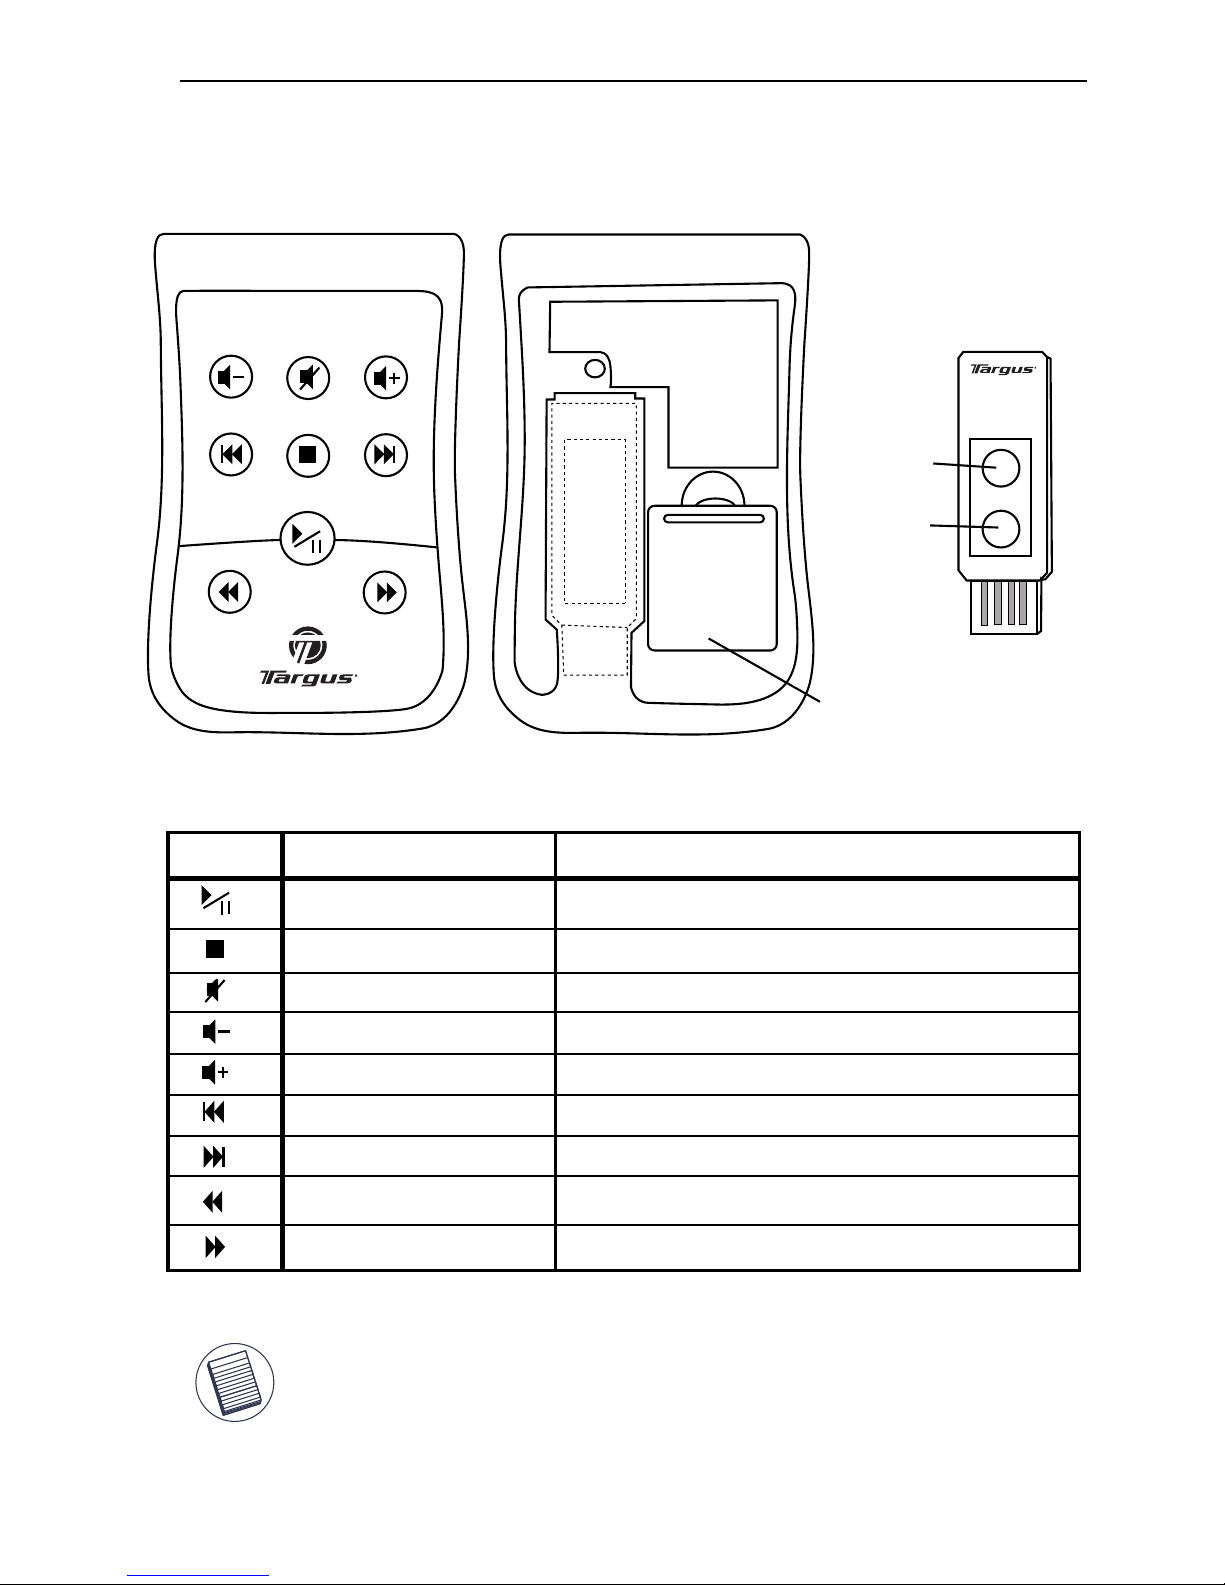
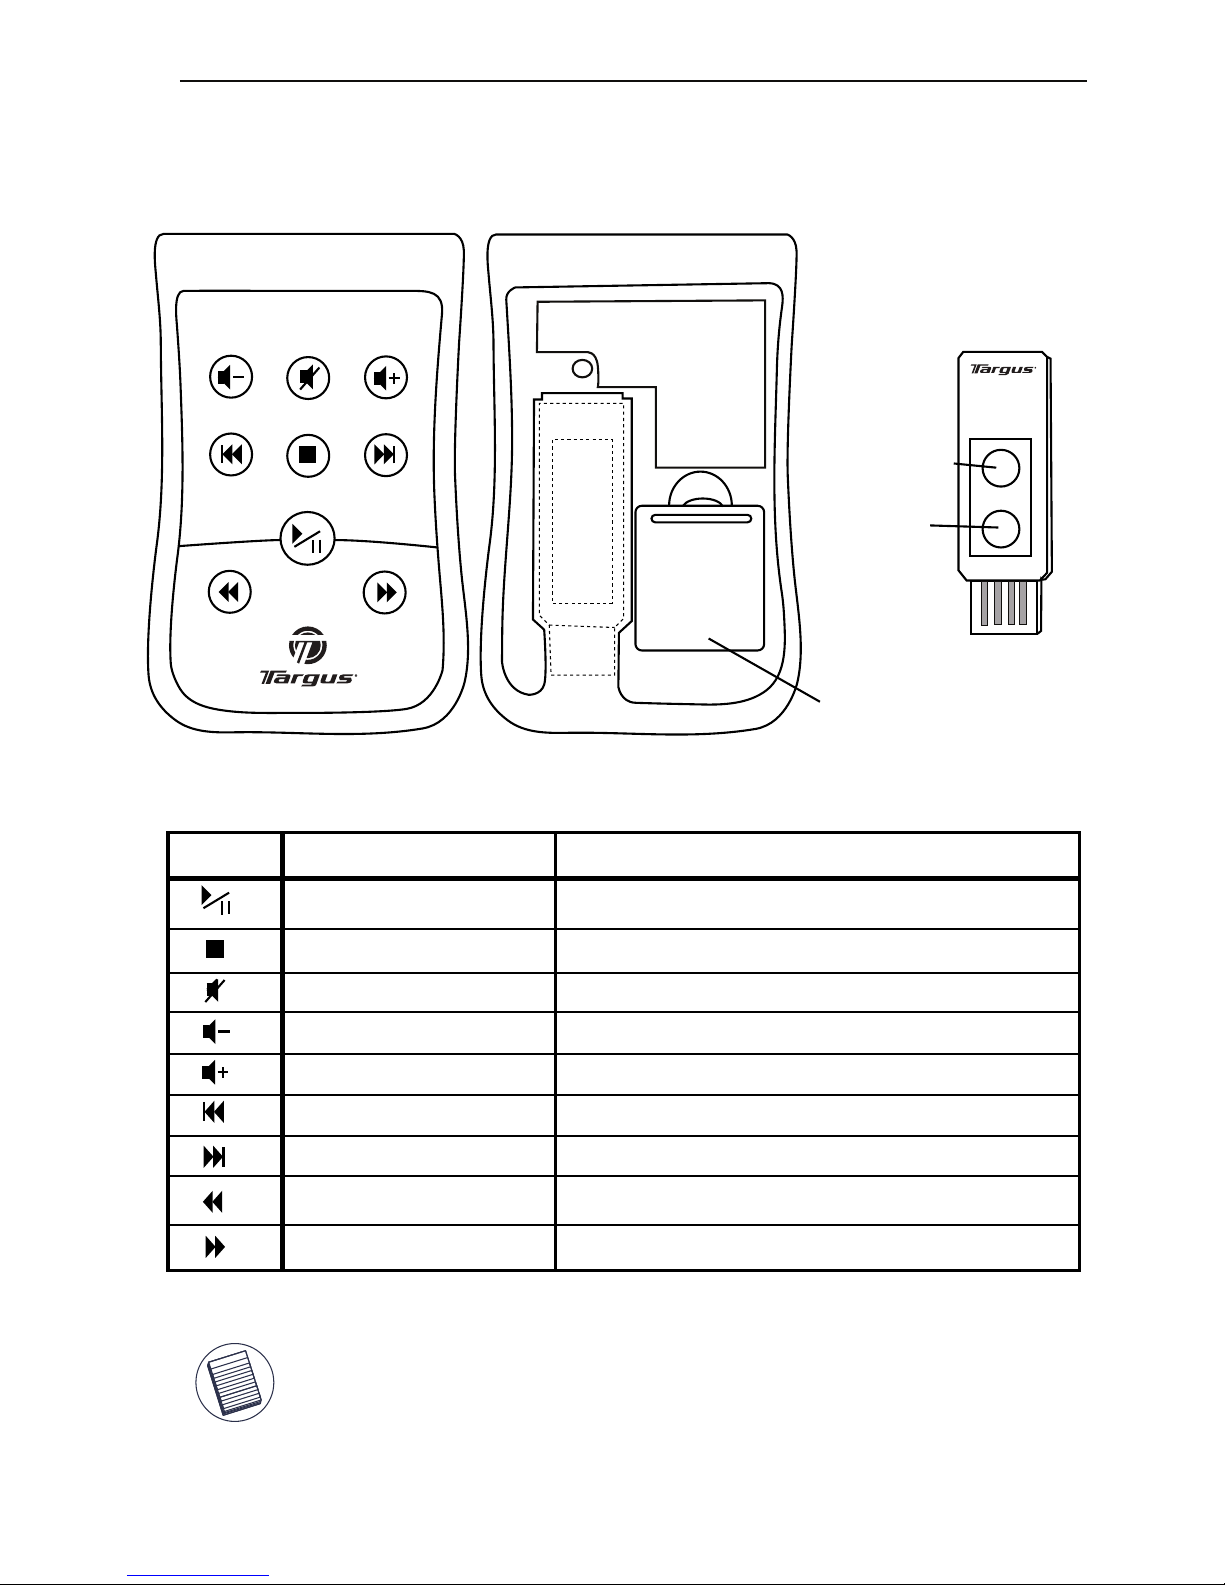
Front View
Back View
Battery Cover
Note: At the bottom of the controller, there’s a Power Low indicator which will
light up when the batter life lower than 5 hours of use. When the red light starts
blinking, please be sure to replace a fresh battery to keep the unit in normal
operation.
Function
How to operate
Keys
Play, Pause
STOP
MUTE
Decrease Volume
Increase Volume
Skip to next track
Return to previous track
Fast forward (for WinDVD)
Reverse (for WinDVD)
Press to start or pause playing.
Press to stop playing.
Press this key to mute volume.
Click this key to turn down volume
Click this key to turn up volume
Click this key to return to previous track
Click this key to skip to next track
Click this key to speed forward play.
Click this key to speed backward play.
USB receiver
Link
Indicator
connection
button
Keys and Functions
Targus Stow-N-GoTM Media Remote Control Card
3
Page 5
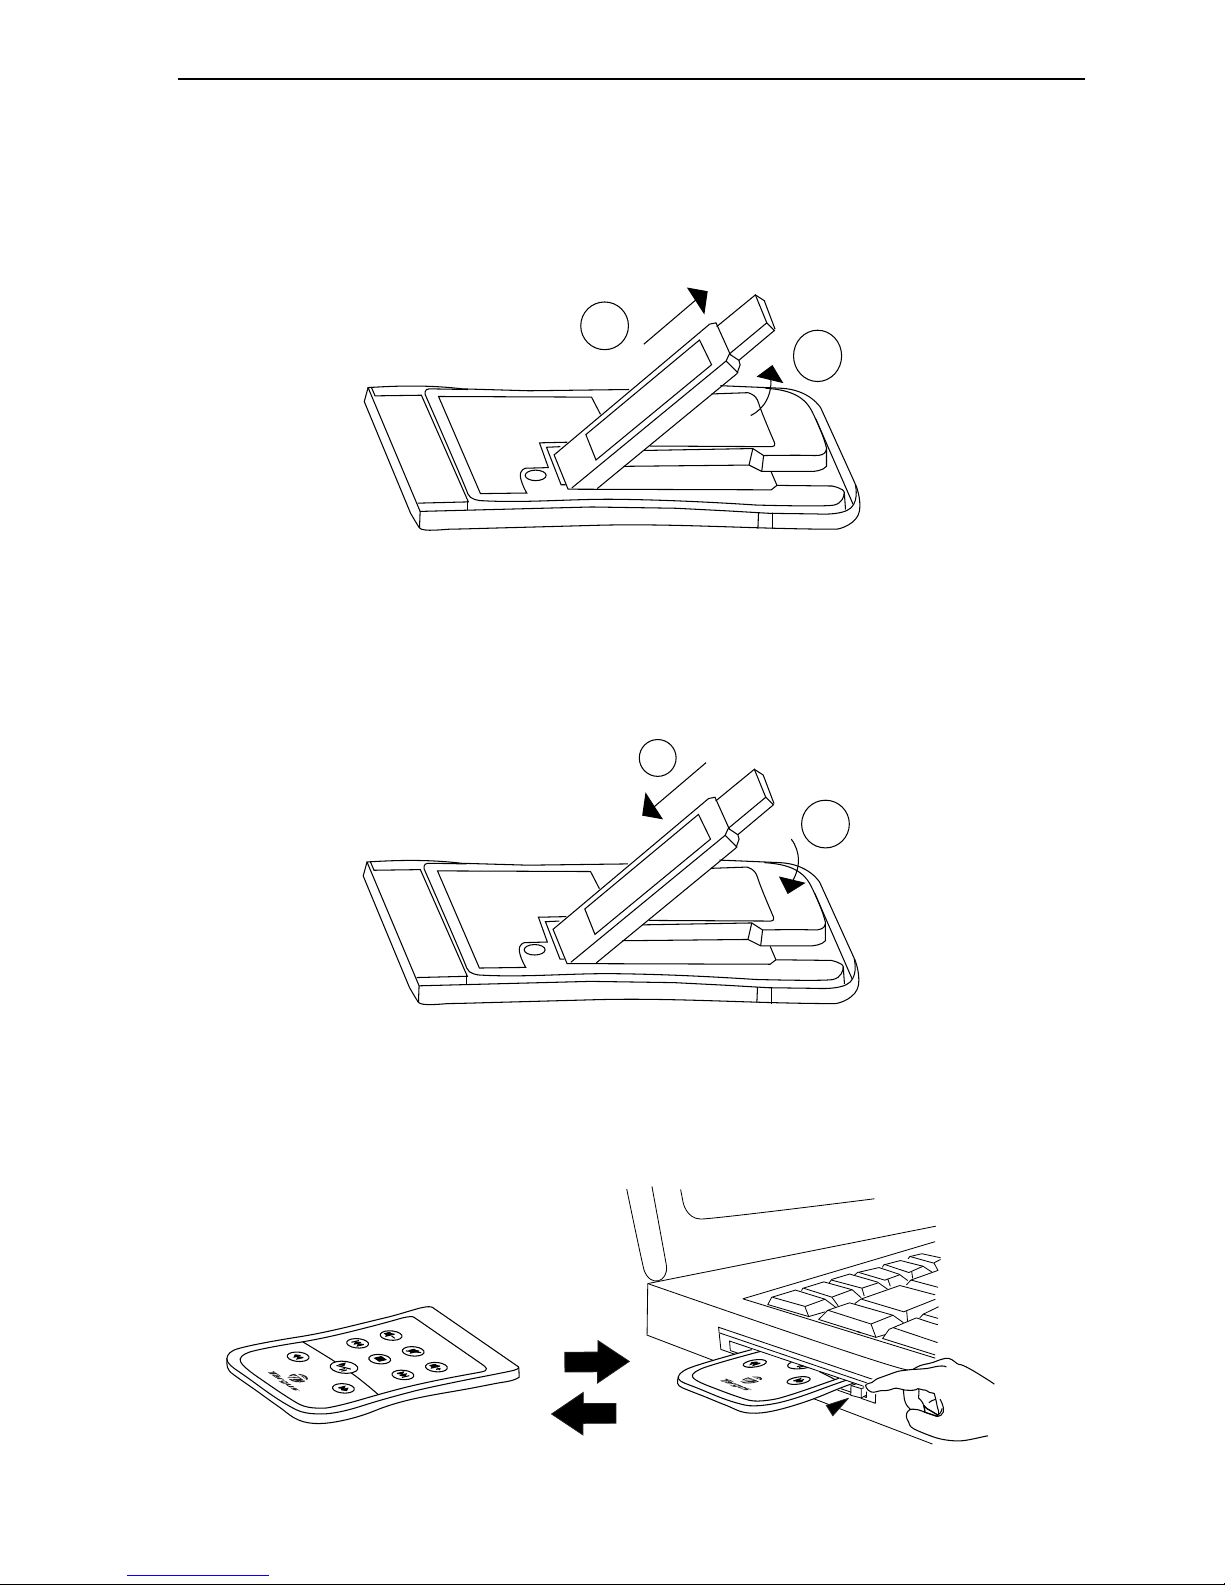
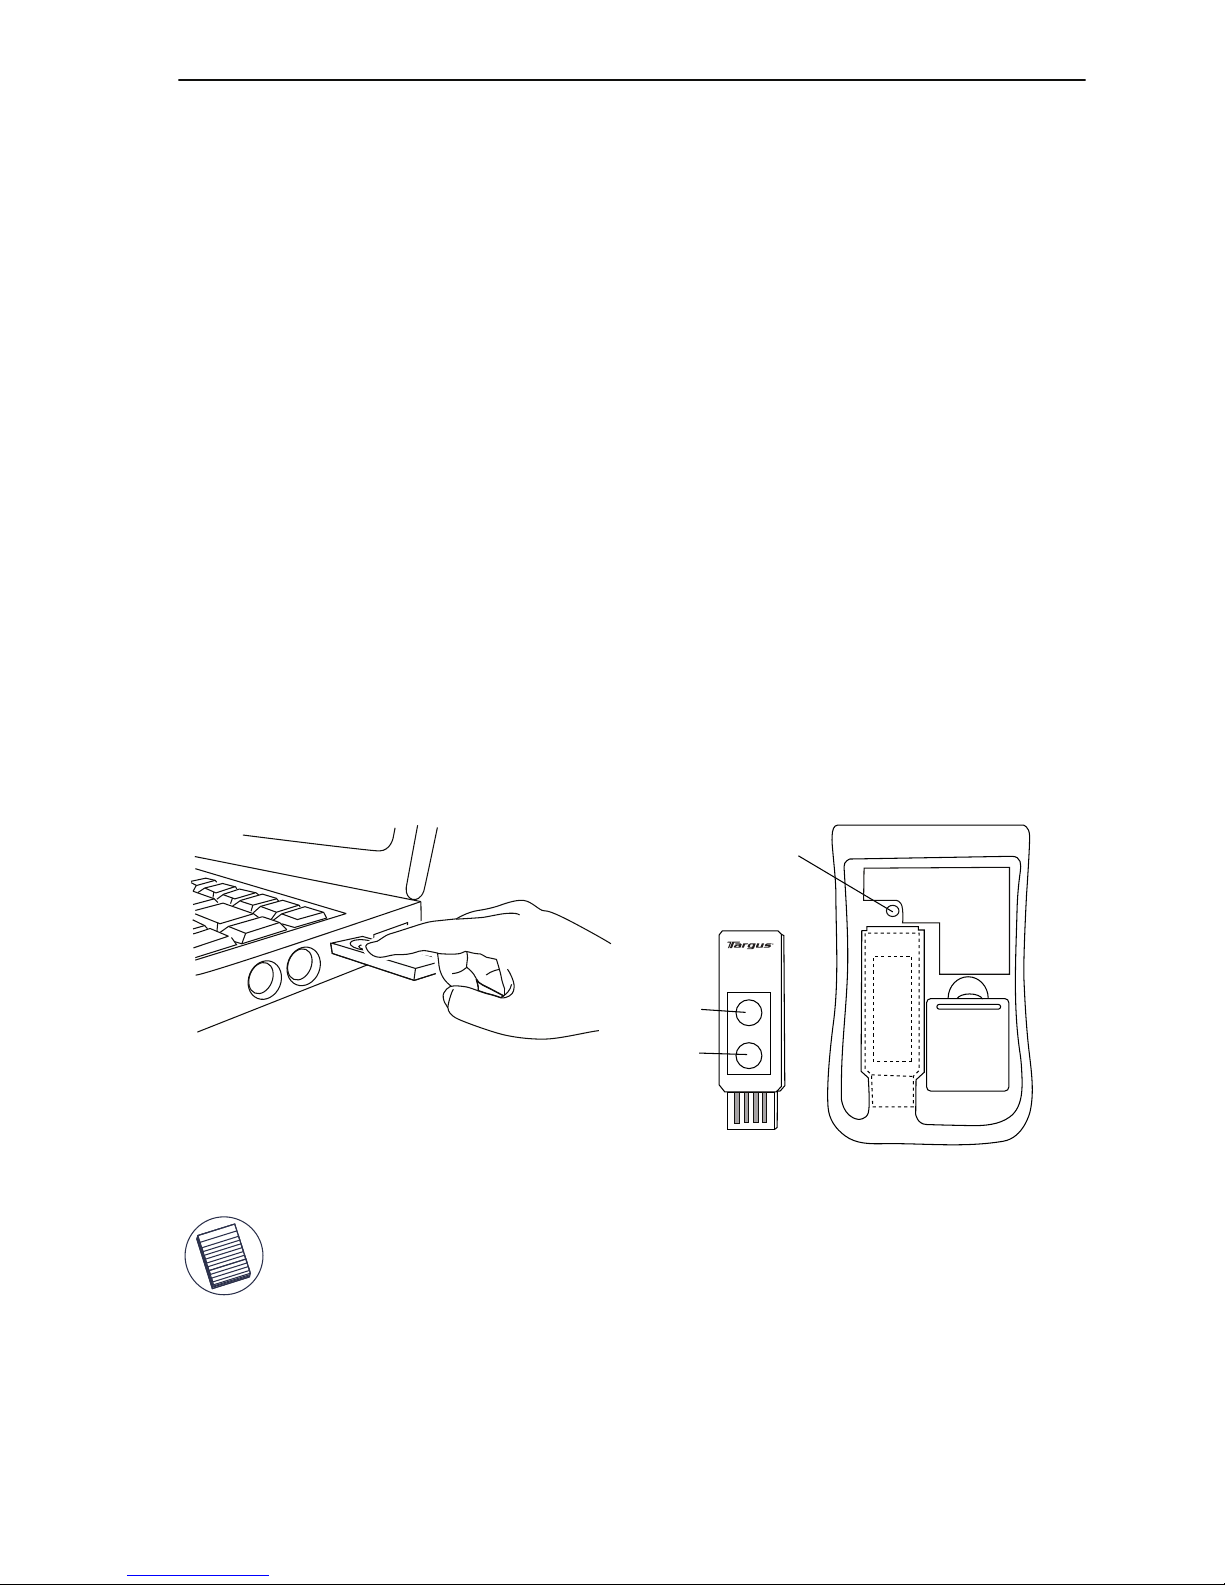
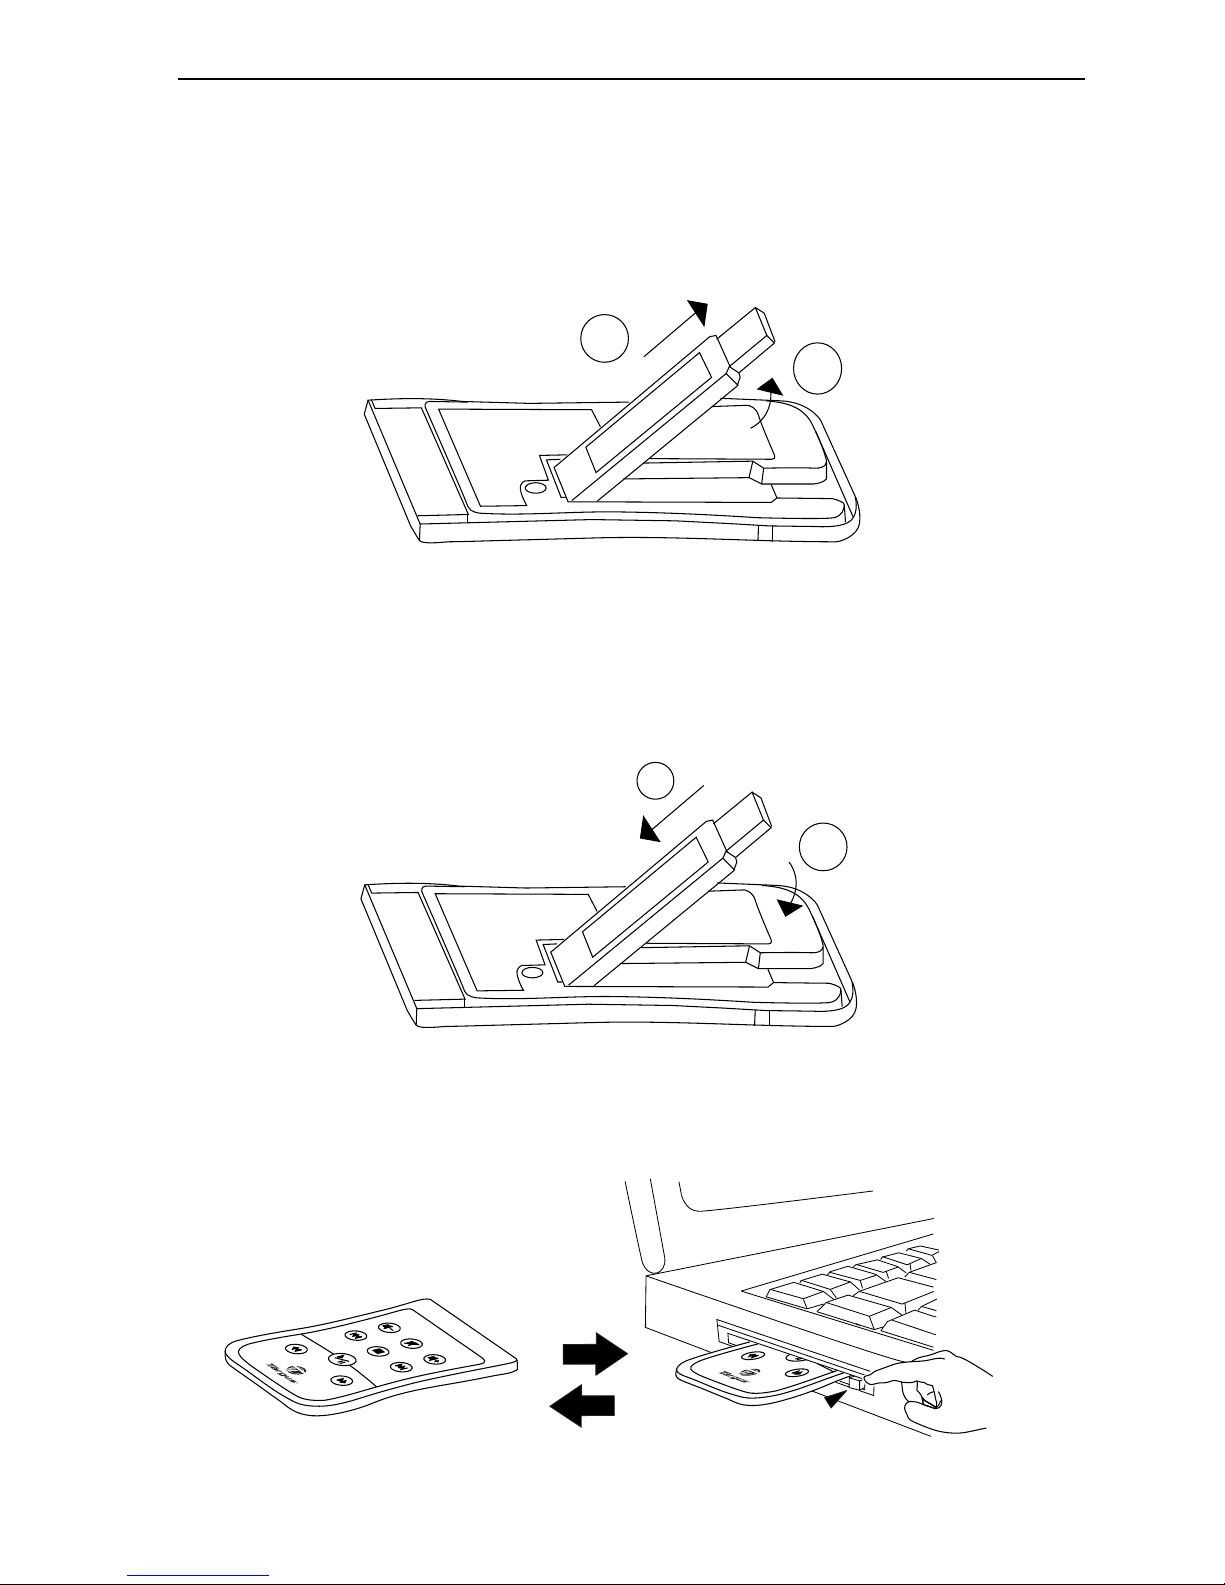
Pull up the USB receiver and take out the receiver.
Take out the USB Receiver
Put Back the USB Receiver
Insert the bottom of the USB receiver, label upwards, into the compartment first and press the USB receiver to the compartment.
Storing and Removing the Receiver
Targus Stow-N-GoTM Media Remote Control Card
The media control card is designed to fit into most notebook’s
standard PC card slot for storage.
1
2
1
2
4
Page 6
Installing the Batteries
• Use the CR2032 battery. (supplied)
• Remove the battery cover from the back of the device.
• Insert the battery, making sure that the positive (+) side
of the battery is facing up to the battery cover.
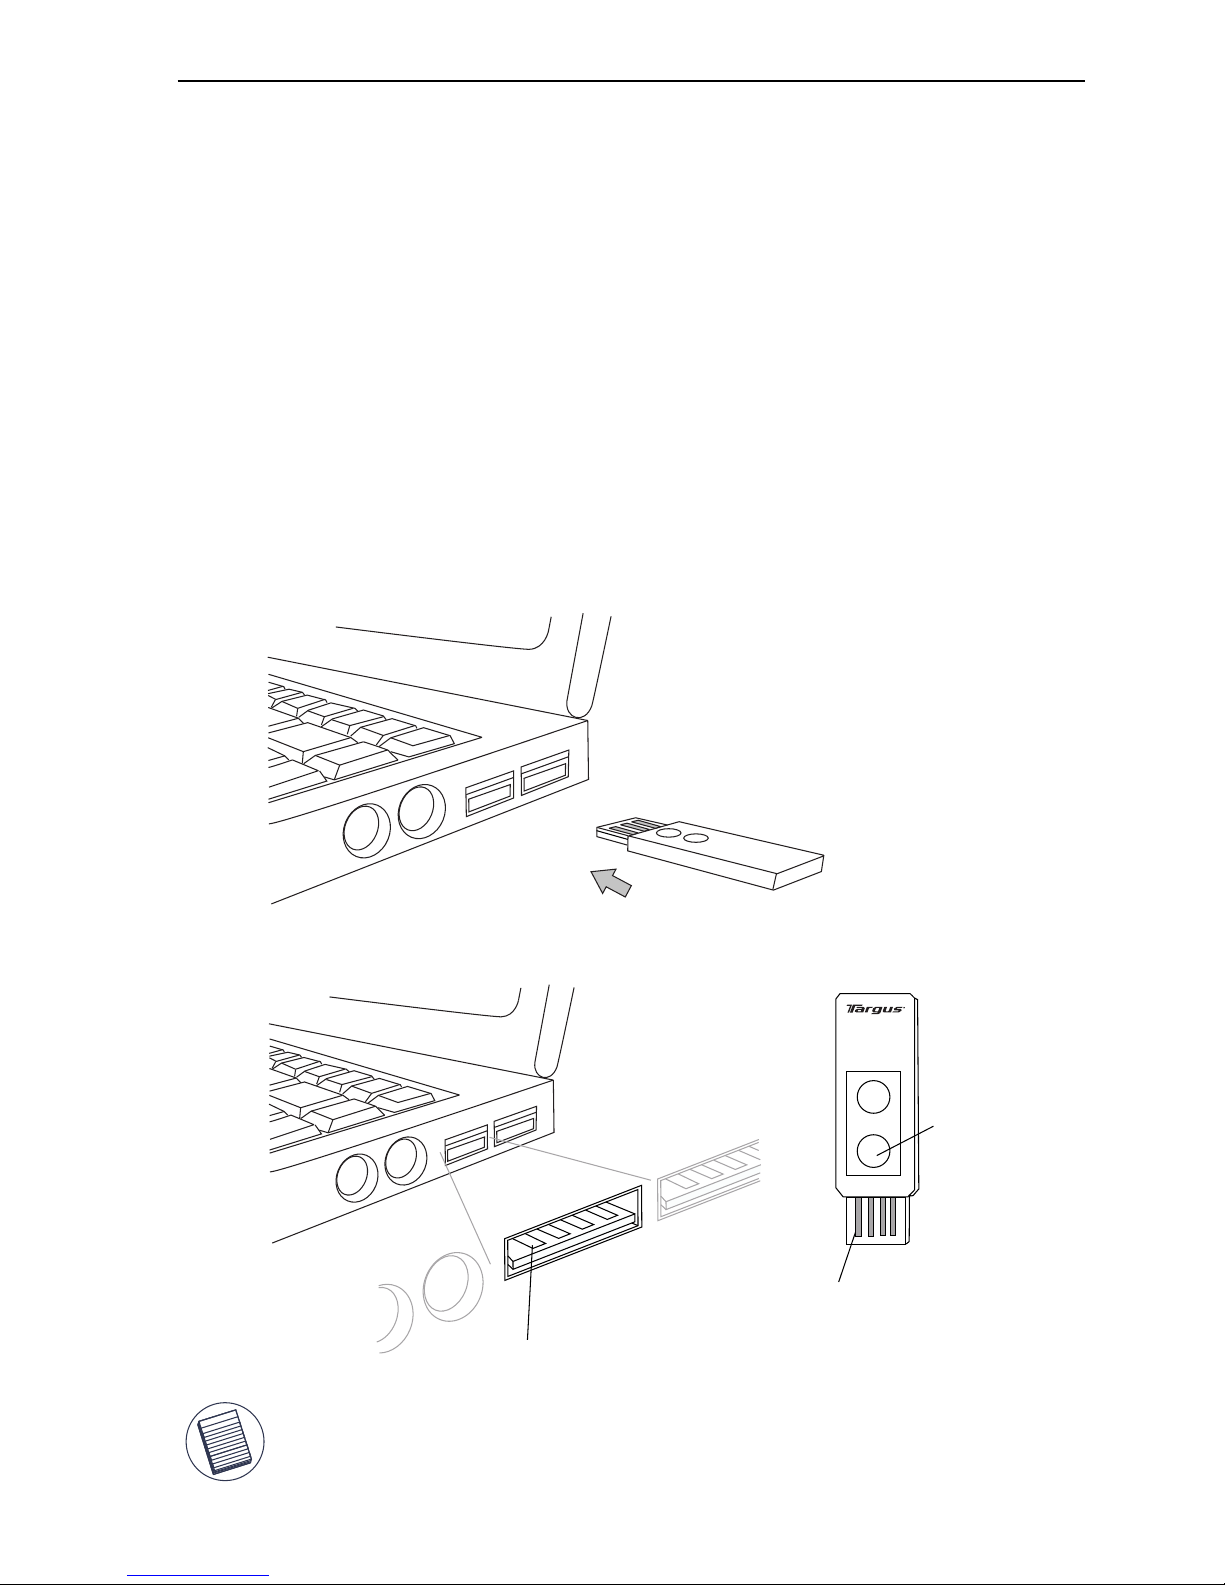
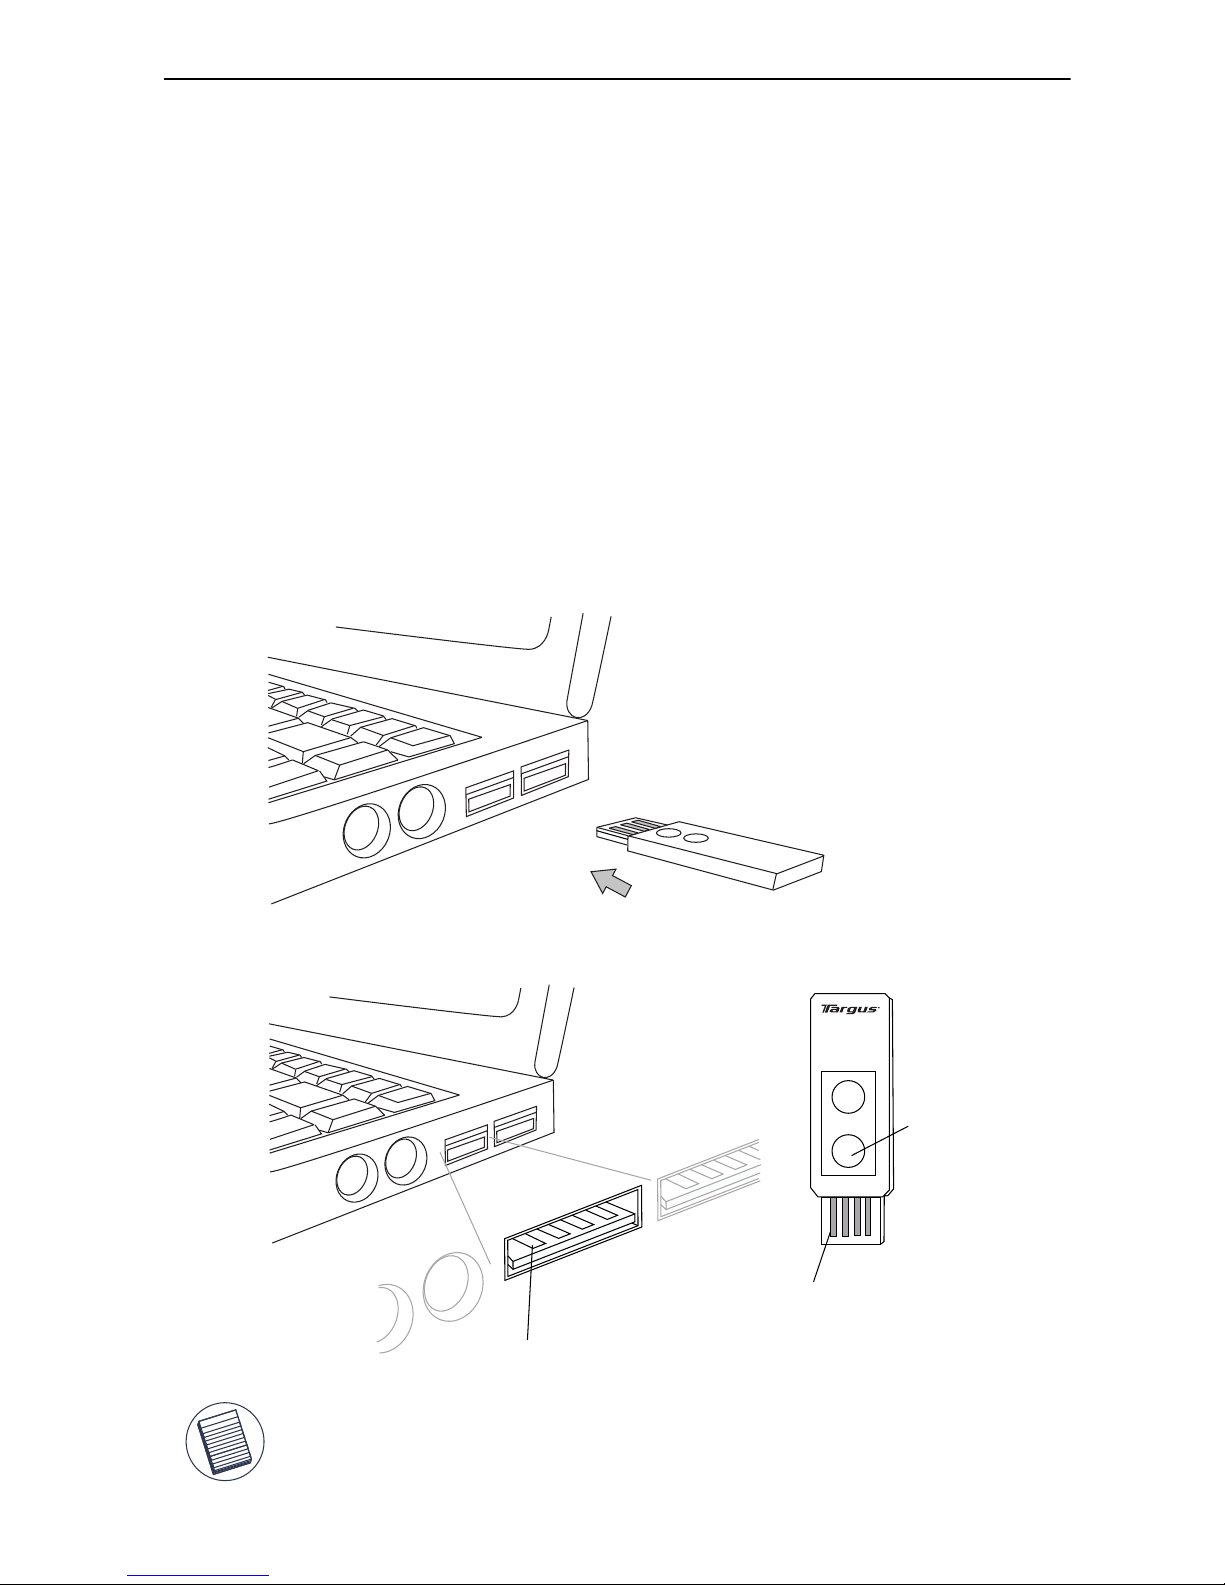
Connecting the USB Receiver to Your PC
• Take out the USB receiver attached on the back and plug it into
an available USB port with connecting pins on the receiver facing
the connecting pins in the USB port.
Targus Stow-N-GoTM Media Remote Control Card
When inserting the USB reciever into the computer’s USB port. Please make
sure that the connector pins on the reciever and the pins in the computer’s USB
port are facing each other. The link indicator LED will light when connected
correctly.
connection pins in USB port
connection pins on reciever
link
indicator
5
Page 7
NOTE: Make sure that your computer is turned on and has detected he
USB receiver before you set the ID code.
Now, you can launch your media player to confirm that the remote is
functioning properly.
Targus Stow-N-GoTM Media Remote Control Card
Link
Indicator
connection
button
• The operation system identifies the receiver, prompts ”USB
Human Interface Device” and begins installation automatically.
Please follow the instruction on the screen to complete the
installation procedure.
Establishing a Communication Link
• If the remote is not working or you have recently replaced the
battery, you can try to reset the ID code between the receiver and
the remote. To do this, do the following:
This remote is a plug-n-play device. It should be operating once the
USB receiver is connected and recognized by the computer.
Press and release the connection button on the receiver. The LED
should glow red. Next, locate and keep pressing the connection button
on the back of the remote until the Link Indicator starts blinking. Now
the remote controller has re-linked with the USB receiver.
connection
button
6
Page 8
Targus Stow-N-GoTM Media Remote Control Card
NOTE: DEPENDING ON THE MEDIA PLAYERS’ SOFTWARE CAPABILITIES, THE REMOTE
FUNCTIONS CAN VARY.
INSTRUCTIONS TO SET / CHANGE YOUR DEFAULT MEDIA PLAYER
• GO AND CLICK ON START BUTTON
• GO TO CONTROL PANEL, AND CHOOSE ADD/ REMOVE PROGRAM
• CLICK SET PROGRAM ACCESS AND DEFAULTS ON THE LEFT SIDE MENU. TO
PERSONALIZE, CHOOSE CUSTOM IN THE MAIN SCREEN
• CHOOSE YOUR DEFAULT PROGRAM FOR MEDIA PLAYER
• IF YOUR PREFERRED MEDIA PLAYER PROGRAM IS NOT ON THE LIST, CLICK HELP
FOR ASSISTANCE
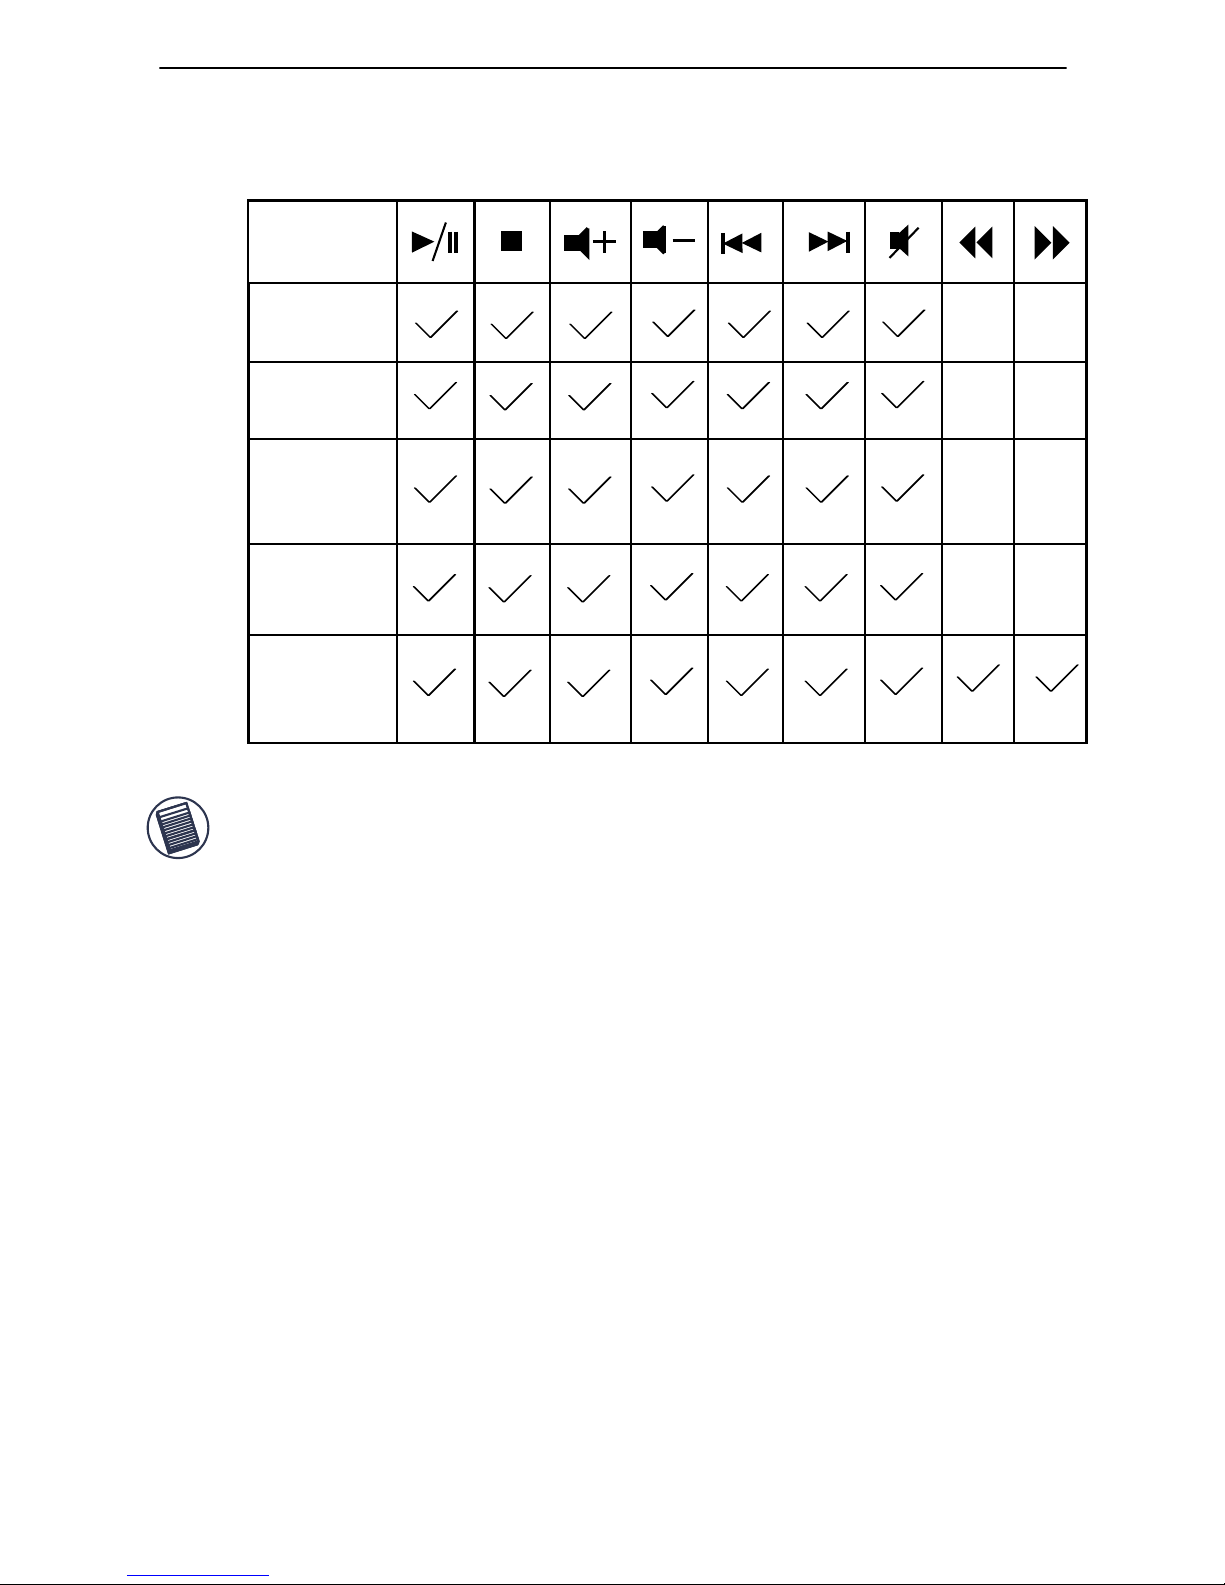
The remote is compatible to the following Media Players:
Media Players Compatibility
iTunes
V.6.0.1.3
Musicmatch
V.10
Windows
Media Player
V.10
Real Player
V.10.5
WinDVD
Player
V.7.0
7
Page 9
Targus Stow-N-GoTM Media Remote Control Card
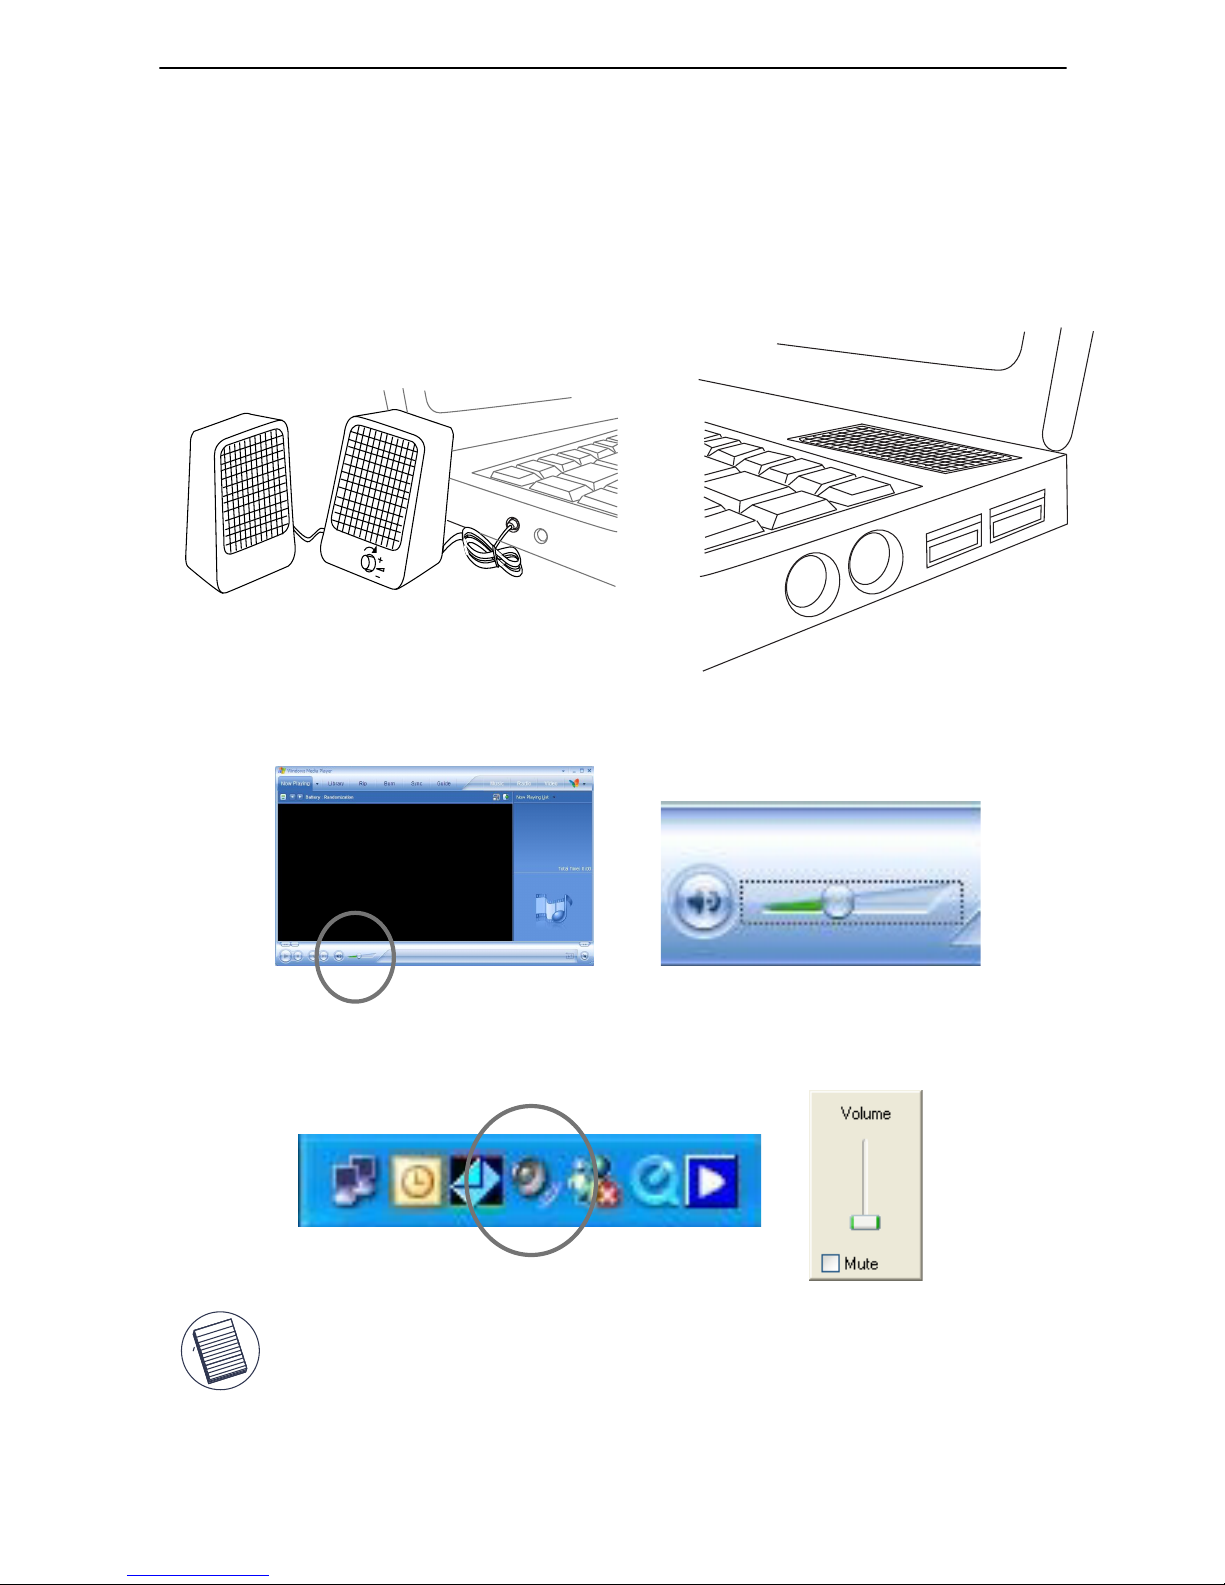
Adjusting the Volume Control
The volume can be adjust by different method. The most common are the
following:
3. The Windows OS volume control located in the task bar or control panel
- the remote control card adjusts this setting.
2. The volume control on the media player application software - preferably
set to high to allow wider range of volume control.
1. The volume control switch on the physical speakers or built-in on the
notebook PC - preferably set to high to allow wider range of volume control.
Please note that the remote operates with the Windows OS volume
control. You may want to adjust the other options mentioned to set the
desire volume level. Increasing the volume level on the physical speaker
can maximize the effective volume range.
8
Page 10

Technical Support
For technical questions, please visit:
Internet http://www.targus.com/support.asp
English http://www.targus.com/uk/support.asp
French http://www.targus.com/fr/support.asp
German http://www.targus.com/de/support.asp
Spanish http://www.targus.com/sp/support.asp
Italian http://www.targus.com/it/support.asp
Our knowledgeable staff is also available to answer your
questions through one of the following telephone
numbers.
Austria 01 795 676 42
Belgium 02-717-2451
Denmark 45 35-25-87 51
Finland 922948016
France 01-6453-9151
Germany 0211-6579-1151
Italy 02-4827-1151
Netherlands 02 0504 0671
Norway 022577729
Portugal +351 21 415 4123
Spain 91 745 6221
Sweden 08-751-4058
Switzerland 01-212-0007
United Kingdom 020-7744-0330
Eastern Europe & others +31 0 20 5040671
Targus Stow-N-GoTM Media Remote Control Card
9
Page 11

Product Registration
Targus recommends that you register your Targus accessory
shortly after purchasing it. To register your Targus accessory, go
to: http://www.targus.com/registration.asp
You will need to provide your full name, email address, phone
number, and company information (if applicable).
Warranty
Targus warrants this product to be free from defects in materials
and workmanship for two years. If your Targus accessory is found
to be defective within that time, we will promptly repair or replace
it. This warranty does not cover accidental damage, wear and
tear, or consequential or incidental loss. Under no conditions is
Targus liable for loss of, or damage to a computer; nor loss of, or
damage to, programs, records, or data; nor any consequential or
incidental damages, even if Targus has been informed of their
possibility. This warranty does not affect your statutory rights.
Regulatory Compliance
This device complies with Part 15 of the FCC Rules. Operation is
subject to the following two conditions: (1) This device may not
cause harmful interference, and (2) This device must accept any
interference received, including interference that may cause
undesired operation.
FCC Statement
Tested to Comply
This equipment has been tested and found to comply with the
limits of a Class B digital device, pursuant to Part 15 of the FCC
Rules. These limits are designed to provide reasonable protection
against harmful interference in a residential installation. This
equipment generates, uses, and can radiate radio frequency
energy and if not installed and used in accordance with the
instructions, may cause harmful interference to radio
communications. However, there is no guarantee that
interference will not occur in a particular installation.
If this equipment does cause harmful interference to radio or
television reception, which can be determined by turning the
Targus Stow-N-GoTM Media Remote Control Card
10
Page 12

equipment off and on, the user is encouraged to try to correct the
interference by one or more of the following measures:
• Reorient or relocate the receiving antenna;
• Increase the separation between the equipment and receiver;
• Connect the equipment into an outlet on a circuit different from
that to which the receiver is connected;
• Consult the dealer or an experienced radio/TV technician for
help.
Declaration of Conformity
Hereby, Targus, declares that this device is in compliance with the
essential requirements and other relevant provisions of Directive
1999/5/EC.
Targus Recycling Directive
At the end of this product’s useful life please dispose at an
appropriate recycling collection point provided in your country.
Targus recycling policy is available for viewing at:
www.targus.com/recycling
Changes or modifications not authorized by the party responsible
for compliance could void the user’s authority to operate this
product
Targus Stow-N-GoTM Media Remote Control Card
Microsoft, Windows, and Windows Vista are either registered trademarks or
trademarks of Microsoft Corporation in the United States and/or other countries. All
trademarks and registered trademarks are the properties of their respective owners.
All rights reserved.
11
Page 13

Einführung
Systemanforderungen
• Betriebssystem – Windows® 2000 / XP / Windows Vista™
• USB 1.1
STOW-N-GO
TM
MEDIEN-FERNBEDIEN-
UNGSKARTE
VON TARGUS
Herzlichen Glückwunsch zum Kauf der Stow-N-GoTM MedienFernbedienungskarte von Targus. Diese MedienFernbedienungskarte arbeitet mit 2,4-GHz-RF-Technologie und
funktioniert in einem Umkreis von bis zu 15 m. Sie wurde für alle
gängigen Media-Player entwickelt, die auf heutigen Notebooks
vorzufinden sind. Dies ist ein Plug-and-Play-Gerät, so dass keine
zusätzliche Software erforderlich ist. Die Fernbedienung gehört zu
den handlichsten und kompaktesten PC-Fernbedienungen. Der
extrem flache USB-Empfänger lässt sich im Gehäuse unterbringen
und passt als komplette Fernsteuerungseinheit in den Kartensteckplatz Ihres Notebooks.
Inhalt
• Targus Medien-Fernbedienungskarte
• flacher Empfänger (in die Karte integriert)
• 1 x CR2032 Knopfzelle
• Benutzerhandbuch
12
Page 14
Batteriefachdeckel
Hinweis: Unten an der Fernbedienung befindet sich eine Ladezustands-LED, die
aufleuchtet, wenn der Ladezustand der Batterie nur noch für weniger als 5
Stunden Betrieb reicht. Wenn die rote LED blinkt, sollten Sie die Batterie
unverzüglich auswechseln.
Funktion
Taste
Wiedergabe/Pause
Stopp
Stumm
Leiser
Lauter
Nächster Titel
Voriger Titel
Schnell vor (für WinDVD)
Schnell zurück (für WinDVD)
Startet oder unterbricht die Wiedergabe
Betätigen Sie sich, um zu spielen zu stoppen
Schaltet den Ton aus
Senkt die Lautstärke
Hebt die Lautstärke an
Kehrt zum letzten Titel zurück
Geht zum nächsten Titel weiter
Lässt die Wiedergabe schnell vorlaufen
Lässt die Wiedergabe schnell zurücklaufen
flacher
Empfänger
Verbindungs-LED
Verbindungstaste
Tasten und Funktionen
Stow-N-GoTM Medien-Fernbedienungskarte
13
Page 15
Ziehen Sie den USB-Empfänger nach oben und nehmen Sie ihn
heraus.
Entnehmen des USB-Empfängers
Einsetzen des USB-Empfängers
Setzen Sie den USB-Empfänger zunächst mit der unteren Kante
(Etikett nach oben) in die Aufnahme ein und drücken Sie ihn dann
vollständig hinein.
Lagern und Entnehmen des Empfängers
Stow-N-GoTM Medien-Fernbedienungskarte
Die Medien-Fernbedienungskarte lässt sich in den standardmäßigen
Kartensteckplatz der meisten Notebooks einsetzen.
1
2
1
2
14
Page 16
Einsetzen der Batterien
• Nehmen Sie die CR2032-Batterie (im Lieferumfang).
• Entfernen Sie den Batteriefachdeckel auf der Geräterück
seite.
• Setzen Sie die Batterie ein; achten Sie dabei besonders darauf,
dass der positive (+) Pol der Batterie nach oben zum Deckel
weist.
Anschließen des USB-Empfängers am PC
• Nehmen Sie den USB-Empfänger aus seinem Fach auf der
Rückseite heraus und schließen Sie ihn an einem freien
USB-Port an, wobei die Anschlussstifte am Empfänger mit denen
im USB-Port ausgerichtet sein müssen.
Achten Sie beim Anschließen des USB-Empfängers am USB-Port des
Computers darauf, dass die Anschlussstifte am Empfänger mit denen im
USB-Port ausgerichtet sind. Wenn der Anschluss korrekt ist, leuchtet die
Verbindungs-LED auf.
Anschlussstifte am USB-Port
Anschlussstifte am Empfänger
Verbindungs-LED
Stow-N-GoTM Medien-Fernbedienungskarte
15
Page 17

HINWEIS: Achten Sie darauf, dass Ihr Computer eingeschaltet ist und
den USB-Empfänger erkannt hat, bevor Sie den ID-Code einstellen.
Nun können Sie Ihren Media-Player starten und überprüfen, ob die
Fernbedienung korrekt funktioniert.
Verbindungs-LED
Verbindungstaste
• Das Betriebssystem erkennt den Empfänger und beginnt
automatisch mit der Installation. Befolgen Sie bitte die
Anweisungen auf dem Bildschirm, um die Installation
abzuschließen.
Verbindungsaufbau
• Falls die Fernbedienung nicht funktioniert oder Sie kürzlich die
Batterie ausgetauscht haben, können Sie versuchen, den ID-Code
zwischen Empfänger und Fernbedienung zurückzusetzen. Dazu
tun Sie Folgendes:
Diese Fernbedienung ist ein Plug-and-Play-Gerät. Sie sollten
funktionieren, sowie der USB-Empfänger am Computer angeschlossen ist und von diesem erkannt wurde.
Drücken Sie kurz die Verbindungstaste am Empfänger. Die LED sollte
nun rot leuchten. Drücken Sie nun die Verbindungstaste auf der
Rückseite der Fernbedienung, bis die Verbindungs-LED blinkt. Damit
ist die Verbindung zwischen Fernbedienung und USB-Empfänger
wiederhergestellt.
Verbindungstaste
Stow-N-GoTM Medien-Fernbedienungskarte
16
Page 18

Stow-N-GoTM Medien-Fernbedienungskarte
HINWEIS: JE NACH MEDIA-PLAYER-SOFTWARE KÖNNEN DIE FERNBEDIENUNGSFUNKTIONEN VARIIEREN.
HINWEISE ZUM EINRICHTEN/ÄNDERN DES STANDARDMÄSSIGEN MEDIA-PLAYERS:
• KLICKEN SIE AUF DIE START-SCHALTFLÄCHE.
• KLICKEN SIE AUF „SYSTEMSTEUERUNG“ UND WÄHLEN SIE „SOFTWARE“
• KLICKEN SIE AUF LINKS IM MENÜ AUF „PROGRAMMZUGRIFF UND -STANDARDS
FESTLEGEN“. WÄHLEN SIE IM HAUPTBILDSCHIRM „BENUTZERDEFINIERT“.
• WÄHLEN SIE DAS STANDARDMÄSSIGE PROGRAMM FÜR DEN MEDIA-PLAYER.
• SOLLTE DAS BEVORZUGTE MEDIA-PLAYER-PROGRAMN NICHT AUFGEFÜHRT SEIN,
KLICKEN SIE AUF HILFE.
Die Fernbedienung ist mit folgenden Media-Playern kompatibel:
Media-Player-Kompatibilität
iTunes
V.6.0.1.3
Musicmatch
V.10
Windows
Media Player
V.10
Real Player
V.10.5
WinDVD
Player
V.7.0
17
Page 19

Stow-N-GoTM Medien-Fernbedienungskarte
Einstellen der Lautstärke
Die Lautstärke lässt sich auf verschiedene Weise regeln; hier die gängigsten
Methoden:
3. Über die Windows-Lautstärkeregelung in der Taskleiste oder der
Systemsteuerung – die Fernbedienungskarte regelt diese Einstellung.
2. Über die Lautstärkeregelung der Media-Player-Software – vorzugsweise
einen hohen Wert einstellen, um einen breiten Regelbereich zu haben.
1. Über den Lautstärkeregler an den externen Lautsprechern oder über die im
Notebook integrierten Lautsprechern – vorzugsweise einen hohen Wert
einstellen, um einen breiten Regelbereich zu haben.
Beachten Sie bitte, dass die Fernbedienung mit der Lautstärkeregelung
des Windows-Betriebssystems arbeitet. Zum Einstellen der
gewünschten Lautstärke können Sie aber auch die anderen erwähnten
Optionen wählen. Durch Anheben des Lautstärkepegels am Lautsprecher lässt sich der effektive Einstellbereich maximieren.
18
Page 20

Technische Unterstützung
Wenn Sie technische Fragen haben, besuchen Sie bitte:
Internet http://www.targus.com/support.asp
Englisch http://www.targus.com/uk/support.asp
Französisch http://www.targus.com/fr/support.asp
Deutsch http://www.targus.com/de/support.asp
Spanisch http://www.targus.com/sp/support.asp
Italienisch http://www.targus.com/it/support.asp
Unser Expertenteam steht Ihnen auch telefonisch zur
Beantwortung Ihrer Fragen zur Verfügung.
Belgien 02-717-2451
Dänemark 45 35-25-87 51
Finnland 922948016
Frankreich 1-6453-9151
Deutschland 0211-6579-1151
Italien 02 4827-1151
Niederlande 02 0504 0671
Norwegen 022577729
Österreich 01 795 676 42
Portugal +351 21 415 4123
Spanien 91-745-6221
Schweden 08-751-4058
Schweiz 1-212-0007
Großbritannien 020-7744-0330
Osteuropa & sonstige Länder +31 (0) 20-5040671
Stow-N-GoTM Medien-Fernbedienungskarte
19
Page 21

Produktregistrierung
Targus empfiehlt die Registrierung des Targus-Zubehörs sofort
nach dem Kauf. Die Registrierung von Targus-Zubehör erfolgt
unter: http://www.targus.com/registration.asp
Geben Sie bitte Ihren vollständigen Namen, Ihre E-Mail-Adresse,
Telefonnummer und Firmeninformationen an (falls zutreffend).
Garantie
Targus garantiert zwei (2) Jahre lang, dass Zubehör von Targus
frei von Fehlern im Material und in der Verarbeitung ist. Erweist
sich Ihr Targus-Zubehör während dieser Zeit als fehlerhaft, wird
es umgehend repariert oder ersetzt. Diese Garantie deckt weder
zufällige oder mittelbare Schäden, noch Abnutzung oder
Verschleiß ab. Unter keinen Umständen haftet Targus für Verlust
oder Schäden an Computern bzw. für Verlust oder Schäden an
Programmen, Aufzeichnungen oder Daten. Targus haftet auch
nicht für mittelbare oder zufällige Schäden, selbst wenn Targus
über deren Möglichkeit informiert wurde. Diese Garantie hat
keinen Einfluss auf Ihre gesetzlichen Rechte.
Behördliche Genehmigungen/
Zulassungen
Dieses Gerät erfüllt die Voraussetzungen von Teil 15 der FCCRegeln. Der Betrieb unterliegt den folgenden beiden
Bedingungen: (1) Dieses Gerät darf keine störenden
Interferenzen verursachen, und (2) dieses Gerät muss alle
empfangenen Interferenzen aufnehmen, einschließlich
Interferenzen, die ein unerwünschtes Betriebsverhalten
verursachen können.
FCC-Bescheinigung
Auf Konformität getestet
Dieses Gerät wurde getestet und ist mit den Grenzwerten eines
digitalen Geräts der Klasse B (gemäß Teil 15 der FCC-Regeln)
konform. Diese Grenzwerte wurden zur Gewährleistung eines
angemessenen Schutzes gegen störende Interferenzen bei einer
Installation in Wohngebieten erstellt. Dieses Gerät erzeugt und
nutzt RF-Energie und kann diese abstrahlen. Bei
Stow-N-GoTM Medien-Fernbedienungskarte
20
Page 22

unsachgemäßer Installation und einer Verwendung, die nicht
gemäß den Anweisungen erfolgt, können störende Interferenzen
in der Radiokommunikation auftreten. Es liegt jedoch keine
Garantie vor, dass bei bestimmten Installationen keine
Interferenzen auftreten.
Falls dieses Gerät beim Radio- oder Fernsehempfang störende
Interferenzen verursacht, was durch ein Aus- und Einschalten
des Geräts festgestellt werden kann, sollte der Benutzer
versuchen, die Interferenzen anhand einer oder mehrerer der
folgenden Maßnahmen zu beseitigen:
• Die Distanz zwischen Ausrüstung und Empfänger vergrößern.
• Die Ausrüstung an eine Steckdose mit einem anderen
Stromkreis als dem des Empfängers anschließen.
• Für persönliche Unterstützung wenden Sie sich bitte an Ihren
Händler oder einen erfahrenen Radio/TV-Techniker.
Konformitätserklärung
Hiermit erklärt Targus, dass sich das Gerät in Übereinstimmung
mit den grundlegenden Anforderungen und den übrigen
einschlägigen Bestimmungen der Richtlinie 1999/5/EG befindet.
Dieses Gerät hat einen niedrigen Energiebedarf. Gerät ist nur für
Büro und häuslichen Bereich bestimmt. Dieses Produkt kann in
allen CE Ländern verwendet werden.
Targus Recycling Richtlinie
Bitte werfen Sie das Gerät nicht in den normalen Hausmüll!
Entsorgen Sie es bei denIhnen bekannten Recyclingstellen in
Ihrer Nähe. In jedem Ort werden Ihnen diese Sammelstellen zu
Verfügung gestellt. Die Targus Recycling-Richtlinien können Sie
einsehen unter: www.targus.com/recycling
• Die Empfangsantenne neu ausrichten oder an einem ande ren Ort.
Stow-N-GoTM Medien-Fernbedienungskarte
Änderungen oder Modifikationen, die nicht von der für die
Konformität verantwortlichen Partei genehmigt wurden, können
zum Verlust des Benutzerbetriebsrechts führen
Microsoft, Windows und Windows Vista sind eingetragene Marken der Microsoft
Corporation in den USA und/oder in anderen Ländern. Alle eingetragenen Marken
sind das Eigentum des jeweiligen Eigentümers. Alle Rechte vorbehalten.
21
Page 23

Introducción
Requisitos del sistema
• Sistema operativo - Windows® 2000 / XP / Windows Vista™
• USB 1.1
TARJETA CONTROL
REMOTO MULTIMEDIA
STOW-N-GO
TM
DE TARGUS
Enhorabuena por adquirir la tarjeta control remoto multimedia StowN-GoTM de Targus. Esta tarjeta control remoto multimedia está
diseñada con tecnología de radiofrecuencia de 2,4 Ghz y puede
funcionar hasta a 15 metros sin línea de visión. Esta diseñada para
trabajar con los reproductores multimedia más conocidos; la mayoría
probablemente ya estén disponibles hoy en los portátiles de cualquier
persona. Es un dispositivo plug and play por eso no necesita software
adicional. Éste es el control remoto de PC más útil y compacto, su
receptor USB es lo suficientemente fino como para acoplarlo al
cuerpo principal e introducir el control remoto por completo en la
ranura de tarjeta del PC del portátil.
Contenido
• Tarjeta de control remoto multimedia de Targus
• Receptor fino (conectado a la tarjeta de control remoto)
• 1 pila de botón CR2032
• Guía del usuario
22
Page 24

Tapa de las pilas
Nota: En la base del controlador, hay un indicador de energía baja que se
iluminará cuando a la pila le queden menos de 5 horas de vida útil. Cuando
parpadee la luz roja, asegúrese de sustituir la pila para mantener la unidad en
funcionamiento.
Función
Teclas
Reproducir, pausa
DETENER
SILENCIO
Disminuir el volumen
Aumentar el volumen
Saltar a la pista siguiente
Volver a la pista anterior
Avance rápido (para WinDVD)
Retroceso (para WinDVD)
Pulse para iniciar o pausar la reproducción.
Puse para detener la reproducción.
Pulse esta tecla para silenciar el volumen.
Haga clic en esta tecla para disminuir el volumen
Haga clic en esta tecla para aumentar el volumen
Haga clic en esta tecla para volver a la pista anterior
Haga clic en esta tecla para saltar a la pista siguiente
Haga clic en esta tecla para aumentar la velocidad de avance.
Haga clic en esta tecla para acelerar la velocidad de retroceso.
USB Receptor
Indicador
de enlace
botón de
conexión
Teclas y funciones
Tarjeta control remoto multimedia Stow-N-Go
TM
23
Page 25

Levante el receptor USB y saque el receptor.
Saque el receptor USB
Vuelva a colocar el receptor USB
Inserte primero la base del receptor USB, etiquetas hacia arriba, en el
compartimento y presione el receptor USB contra el compartimento.
Almacenamiento y eliminación del receptor
Tarjeta control remoto multimedia Stow-N-Go
TM
La tarjeta de control remoto multimedia está diseñada para acoplarse
a la mayoría de ranuras de tarjeta de PC estándar de portátiles.
1
2
1
2
24
Page 26

Instalación de las pilas
• Uso de la pila CR2032. (incorporada)
• Quite la tapa de las pilas de la parte trasera del dispositivo.
• Introduzca la pila, compruebe que la polaridad positiva
(+) de la pila está de frente a la tapa de la pila.
Conexión del receptor USB al PC
• Saque el receptor USB conectado en la parte trasera y conéctelo
a un puerto USB que esté disponible con las clavijas de conexión
del receptor frente a las clavijas de conexión del puerto USB.
Tarjeta control remoto multimedia Stow-N-Go
TM
Al insertar el receptor USB en el puerto USB del ordenador, compruebe que las
clavijas de conexión del receptor y las clavijas de conexión del puerto USB del
ordenador están unas frente a otras. El LED indicador de enlace se iluminará
cuando la conexión sea correcta.
clavijas de conexión del puerto USB
clavijas de conexión
del receptor
Indicador
de enlace
25
Page 27

NOTA: Compruebe que el ordenador está encendido y que ha
detectado el receptor USB antes de establecer el código ID.
Ahora puede arrancar el reproductor multimedia para confirmar que el
control remoto funciona correctamente.
Tarjeta control remoto multimedia Stow-N-Go
TM
Indicador
de enlace
botón de
conexión
• El sistema operativo identifica al receptor, aparece ”Dispositivo
de interfaz humana USB” y la instalación se inicia automática
mente. Siga las instrucciones de la pantalla para finalizar el
proceso de instalación.
Establecimiento de un enlace de comunicación
• Si el control remoto no funciona o ha sustituido la pila reciente
mente, puede intentar volver a establecer el código ID entre el
receptor y el control remoto. Para ello, haga lo siguiente:
Este control remoto es un dispositivo plug and play. Una vez que el
receptor esté conectado y el ordenador lo haya reconocido, debe
funcionar.
Pulse y suelte el botón de conexión del receptor. El LED debe
iluminarse en color rojo. A continuación, localice y mantenga
presionado el botón de conexión en la parte trasera del control remoto
hasta que el indicador de enlace empiece a parpadear. Ahora el
control remoto se ha vuelto a enlazar con el receptor USB.
botón de
conexión
26
Page 28

Tarjeta control remoto multimedia Stow-N-Go
TM
NOTA: LAS FUNCIONES DEL CONTROL REMOTO DEPENDEN DE LAS CARACTERÍSTICAS DEL SOFTWARE REPRODUCTOR MULTIMEDIA.
INSTRUCCIONES PARA CONFIGURAR O CAMBIAR EL REPRODUCTOR MULTIMEDIA
PREDETERMINADO.
• HAGA CLIC EN EL BOTÓN INICIO
• VAYA AL PANEL DE CONTROL Y SELECCIONE AGREGAR O QUITAR PROGRAMAS
• HAGA CLIC EN CONFIGURAR ACCESO Y PROGRAMAS PREDETERMINADOS EN EL
MENÚ DE LA IZQUIERDA. PARA PERSONALIZAR, SELECCIONE PERSONALIZADO
• ELIJA SU PROGRAMA EN REPRODUCTOR MULTIMEDIA
• SI NO APARECE SU PROGRAMA FAVORITO EN LA LISTA, HAGA CLIC EN AYUDA
PARA RECIBIR ASISTENCIA
El control remoto admite los siguientes reproductores multimedia:
Compatibilidad con reproductores multimedia
iTunes
V.6.0.1.3
Musicmatch
V.10
Windows
Media Player
V.10
Real Player
V.10.5
WinDVD
Player
V.7.0
27
Page 29

Tarjeta control remoto multimedia Stow-N-Go
TM
Ajuste del control de volumen
El volumen se puede ajustar utilizando varios métodos; los más comunes
son los siguientes:
3. El control de volumen del SO Windows ubicado en la barra de tareas o en
el panel de control - la tarjeta de control remoto ajusta esta configuración.
2. El control de volumen en el software de aplicación para el reproductor
multimedia - ajústelo preferiblemente en alto para una rango de control de
volumen mayor.
1. El interruptor de control de volumen en los altavoces externos o los que
vayan incorporados al PC portátil - ajústelo preferiblemente en alto para un
rango de control de volumen mayor.
Tenga en cuenta que el control remoto funciona con el control de
volumen del SO Windows. Puede que desee ajustar las otras opciones
mencionadas para obtener el nivel de volumen deseado. Aumentar el
nivel del volumen en el altavoz físico puede maximizar la efectividad del
rango de volumen.
28
Page 30

Soporte técnico
Si tiene preguntas técnicas, por favor visite:
Internet http://www.targus.com/support
Inglés http://www.targus.com/uk/support.asp
Francés http://www.targus.com/fr/support.asp
Alemán http://www.targus.com/de/support.asp
Español http://www.targus.com/sp/support.asp
Italiano http://www.targus.com/it/support.asp
Nuestro personal experto también puede contestarle sus
preguntas a través de uno de los siguientes números
telefónicos.
Alemania 0211-6579-1151
Austria 01 795 676 42
Bélgica 02-717-2451
Dinamarca 45 0 35-25-87 51
España 91 745 6221
Finlandia 922948016
Francia 0 1-6453-9151
Italia 02-4827-1151
Noruega 022577729
Países Bajos 02 0504 0671
Portugal +351 21 415 4123
Suecia 08-751-4058
Suiza 01-212-0007
El Reino Unido 20-7744-0330
Europa Oriental y otros +31 0 20-5040671
Tarjeta control remoto multimedia Stow-N-Go
TM
29
Page 31

Registro del producto
Targus le recomienda registrar su accesorio Targus
inmediatamente después de adquirirlo. Para registrar su
accesorio Targus, visite: http://www.targus.com/registration.asp
Quizás deba indicar su nombre completo, su dirección de correo
electrónico, su número de teléfono e información de su empresa
(si corresponde).
Garantía
Targus garantiza que este producto no tendrá defectos en los
materiales ni la mano de obra durante dos años. Si dentro de ese
lapso se determina que el accesorio Targus está defectuoso, lo
repararemos o reemplazaremos sin demora. Esta garantía no
cubre daños accidentales, el uso y desgaste natural ni las
pérdidas resultantes o incidentales. Targus no es responsable,
bajo circunstancia alguna, por pérdidas o daños al ordenador ni
por pérdida de programas, registros o datos ni daños a los
mismos, así como tampoco por daños resultantes o incidentales
algunos, incluso si a Targus se le informó de la posibilidad que
existieran. La presente garantía no afecta los derechos que la ley
le otorga.
Conformidad con las normas
Este dispositivo cumple con la Parte 15 de las Normas de FCC.
Su uso está sometido a las dos condiciones siguientes: (1) Este
dispositivo no debe causar interferencia nociva, y (2) este
dispositivo debe aceptar toda interferencia que reciba,
incluyendo aquella que ocasione un funcionamiento indeseado.
Declaración de FCC
Prueba de cumplimiento
Este equipo fue sometido a prueba y se ha determinado que
cumple los límites indicados para un dispositivo digital de Clase
B, en virtud de la Parte 15 de las Normas de FCC. Estos límites
se han impuesto para ofrecer una protección razonable contra la
interferencia nociva en una instalación en el hogar. Este equipo
genera, usa y puede irradiar energía de radiofrecuencia y, si no
se instala y usa de acuerdo a las instrucciones, puede causar
una interferencia nociva a las comunicaciones radiales. Sin
Tarjeta control remoto multimedia Stow-N-Go
TM
30
Page 32

embargo, no se garantiza que en una instalación específica no se
produzca interferencia.
Si este equipo causa interferencia nociva a la recepción de radio
o de televisión, lo que se puede determinar encendiendo y
apagando el equipo, se anima al usuario a que trate de corregir la
interferencia aplicando una o más de las siguientes medidas:
• Reorientar o reubicar la antena receptora
• Aumentar la distancia que separa al equipo del receptor
• Conecte el equipo a un enchufe de circuito diferente a aquel al
que esté conectado el receptor
• Consulte al distribuidor o a un técnico de radio/televisión para
más ayuda.
Declaración de Conformidad
Por medio de la presente Targus declara que al equipo cumple
con los requisitos esenciales y cualesquiera otras disposiciones
aplicables o exigibles de la Directiva 1999/5/CE. Este dispositivo
es de baja potencia. Dispositivo diseñado para uso profesional y
domestico únicamente. Este producto puede utilizarse en
cualquier país de la CE.
Directiva de reciclaje de Targus
Al final de la vida útil de este producto le rogamos lo disponga en
un punto de recogida para reciclaje situado en su país. La política
de reciclaje de Targus está disponible para su consulta en:
www.targus.com/recycling
Tarjeta control remoto multimedia Stow-N-Go
TM
Los cambios o modificaciones no autorizados por la parte responsable del cumplimiento podrían anular la autoridad del usuario para
utilizar este producto.
Microsoft, Windows y Windows Vista son marcas registradas o marcas comerciales
de Microsoft Corporation en los Estados Unidos y/o en otros países. Todas las
marcas comerciales y marcas registradas son propiedad de sus titulares
respectivos. Todos los derechos reservados.
31
Page 33

Introduction
Configuration requise
• Système d'exploitation - Windows® 2000 / XP /
Windows Vista™
• USB 1.1
CARTE DE
TÉLÉCOMMANDE
MULTIMÉDIA
STOW-N-GO
TM
DE TARGUS
Toutes nos félicitations ! Vous venez d'acheter la carte de télécommande multimédia Stow-N-GoTM de Targus. Cette carte de télécommande multimédia intègre la technologie RF 2,4 GHz et peut fonctionner sur une distance pouvant atteindre 15 m sans vue directe. Elle est
conçue pour être utilisée avec les lecteurs multimédia les plus populaires dont sont actuellement équipés les notebooks. Cette carte étant
de type Plug and Play, aucun logiciel supplémentaire n'est requis. Il
s'agit de la télécommande pour PC la plus pratique et la plus
compacte qui soit. Son récepteur USB est suffisamment compact pour
s'encliqueter dans le corps principal du périphérique et la carte de
télécommande peut être insérée dans son intégralité dans n'importe
quel emplacement pour cartes PC de votre notebook.
Contenu de l'emballage
• Carte de télécommande multimédia Targus
• Récepteur compact (fixé sur la carte télécommande)
• 1 pile CR2032
• Guide de l'utilisateur
32
Page 34

Cache du
compartiment des piles
Remarque : Un témoin de pile faible situé en bas du contrôleur s'allume lorsque
la batterie a moins de 5 heures d'autonomie. Lorsque le témoin rouge clignote,
remplacez la pile pour que l'unité puisse continuer de fonctionner.
Fonction
Touches
Lecture, pause
ARRÊT
SOURDINE
Volume -
Volume +
Piste suivante
Piste précédente
Avance rapide (pour WinDVD)
Retour (pour WinDVD)
Appuyez sur ce bouton pour lancer une lecture ou la mettre en pause.
Appuyez sur ce bouton pour arrêter la lecture en cours.
Appuyez sur ce bouton pour couper le son.
Appuyez sur ce bouton pour baisser le volume.
Appuyez sur ce bouton pour augmenter le volume.
Appuyez sur ce bouton pour sélectionner sur la piste précédente.
Appuyez sur ce bouton pour sélectionner la piste suivante.
Appuyez sur ce bouton pour effectuer une avance rapide.
Appuyez sur ce bouton pour effectuer un retour rapide.
USB Récepteur
Indicateur
de connexion
Bouton de
connexion
Touches et fonctions
Carte de télécommande multimédia Stow-N-Go
TM
33
Page 35

Relevez le récepteur USB et retirez-le de son emplacement.
Retrait du récepteur USB
Remise en place du récepteur USB
Insérez la partie inférieure du récepteur USB, étiquette vers le haut,
dans le compartiment puis appuyez sur le récepteur USB pour
l'insérer dans son emplacement.
Stockage et retrait du récepteur
Carte de télécommande multimédia Stow-N-Go
TM
La carte de télécommande multimédia peut être rangée dans les
emplacements pour cartes PC standard de la plupart des notebooks.
1
2
1
2
34
Page 36

Installation de la pile
• Utilisez la pile CR2032 (fournie).
• Retirez le cache du compartiment de la pile de la face
arrière du périphérique.
• Insérez la pile en vous assurant que la borne positive (+) de la
pile fait face au cache du compartiment de la pile.
Branchement du récepteur USB sur votre PC
• Retirez le récepteur USB fixé au dos du périphérique et
branchez-le dans l'un des ports USB disponibles de votre
ordinateur, les broches de raccordement du récepteur faisant
fasse aux broches de raccordement du port USB.
Carte de télécommande multimédia Stow-N-Go
TM
Lors de l'insertion du récepteur USB dans le port USB de votre ordinateur,
veuillez vous assurer que les broches du connecteur du récepteur et celles du
port USB de votre ordinateur se font fasse. Le témoin de connexion s'allume
lorsque le branchement est correctement effectué.
Broches de raccordement du port USB
Broches de raccordement
du récepteur
Indicateur
de connexion
35
Page 37

REMARQUE : Assurez-vous que votre ordinateur est allumé et qu'il a
détecté le récepteur USB avant de configurer le code d'identification.
Vous pouvez maintenant lancer votre lecteur multimédia afin de vous
assurer que la télécommande fonctionne correctement.
Carte de télécommande multimédia Stow-N-Go
TM
Indicateur
de connexion
Bouton de
connexion
• Le système d'exploitation identifie le récepteur, affiche le
message 'USB Human Interface Device' et lance automatique
ment l'installation. Veuillez vous conformer aux instructions qui
s'affichent pour finaliser la procédure d'installation.
Mise en œuvre d'une communication
• Si la carte de télécommande ne fonctionne pas ou que vous avez
récemment remplacé la pile, vous pouvez essayer de réinitialiser le
code d'identification entre le récepteur et la carte de télécom
mande. Pour ce faire, procédez comme suit :
Cette carte de télécommande est un périphérique Plug and Play. Elle
doit fonctionner une fois le récepteur USB branché et reconnu par
l'ordinateur.
Appuyez sur le bouton de connexion du récepteur puis relâchez-le. Le
témoin doit devenir rouge. Localisez le bouton de connexion au dos de
la carte de télécommande, appuyez dessus et maintenez-le enfoncé
jusqu'à ce que le témoin de connexion clignote. La télécommande est
désormais reliée au récepteur USB.
Bouton de
connexion
36
Page 38

Carte de télécommande multimédia Stow-N-Go
TM
REMARQUE : SELON LES FONCTIONS LOGICIELLES DES LECTEURS MULTIMÉDIA,
LES FONCTIONNALITÉS DE LA TÉLÉCOMMANDE PEUVENT VARIER.
INSTRUCTIONS POUR CONFIGURER/MODIFIER VOTRE LECTEUR MULTIMÉDIA PAR
DÉFAUT.
• CLIQUEZ SUR LE BOUTON DÉMARRER.
• RENDEZ-VOUS DANS LE PANNEAU DE CONFIGURATION ET CLIQUEZ SUR
AJOUT/SUPPRESSION DE PROGRAMMES.
• CLIQUEZ SUR SET PROGRAM ACCESS AND DEFAULTS (CONFIGURER L'ACCÈS AUX
PROGRAMMES ET LES PARAMÈTRES PAR DÉFAUT) DANS LE MENU DE GAUCHE.
POUR PERSONNALISER, SÉLECTIONNEZ CUSTOM (PERSONNALISER) DANS
L'ÉCRAN PRINCIPAL.
• SÉLECTIONNEZ VOTRE PROGRAMME PAR DÉFAUT SOUS MEDIA PLAYER (LECTEUR
MULTIMÉDIA).
• SI LE LECTEUR MULTIMÉDIA DE VOTRE CHOIX N'EST PAS RÉPERTORIÉ, CLIQUEZ
SUR HELP (AIDE) POUR OBTENIR DE L'AIDE.
La télécommande est compatible avec les lecteurs multimédia suivants :
Lecteurs multimédia compatibles
iTunes
V.6.0.1.3
Musicmatch
V.10
Windows
Media Player
V.10
Real Player
V.10.5
WinDVD
Player
V.7.0
37
Page 39

Carte de télécommande multimédia Stow-N-Go
TM
Réglage du volume
Le volume peut être réglé de différentes façons, les méthodes les plus
courantes étant les suivantes :
3. La fonction de contrôle du volume de Windows située dans la barre des
tâches ou le panneau de configuration - la carte de télécommande ajuste ce
paramètre.
2. Le bouton de contrôle du volume dans l'application du lecteur multimédia réglez-le de préférence sur un niveau élevé pour bénéficier d'une plage de
contrôle du volume plus large.
1. La molette de contrôle du volume sur les haut-parleurs externes ou sur
ceux intégrés au notebook - réglez-la de préférence sur un niveau élevé pour
bénéficier d'une plage de contrôle du volume plus large.
Veuillez noter que la télécommande est compatible avec la fonction de
contrôle du volume de Windows. Si vous le souhaitez, vous pouvez
également ajuster les autres options mentionnées pour régler le volume
sur le niveau de votre choix. L'augmentation du volume sur les hautparleurs physiques peut maximiser la portée effective du son.
38
Page 40

Support technique
Pour les questions techniques, merci de visiter :
Internet http://www.targus.com/support
Anglais http://www.targus.com/uk/support.asp
Français http://www.targus.com/fr/support.asp
Allemand http://www.targus.com/de/support.asp
Espagnol http://www.targus.com/sp/support.asp
Italien http://www.targus.com/it/support.asp
Nos employés qualifiés sont également disponibles aux
numéros de téléphone ci-dessous pour répondre à vos
questions.
l'Autriche 01 795 676 42
Allemagne 0211-6579-1151
Belgique 02-717-2451
Danemark 45 0 35-25-87 51
Espagne 91-745-6221
Finlande 922948016
France 01-6453-9151
Italie 02-4827-1151
Hollandes 02 0504 0671
Norvège 022577729
Le Portugal +351 21 415 4123
Royaume-Uni 020-7744-0330
Suède 08-751-4058
Suisse 01-212-0007
Europe de l'Est et autres pays +31 0 20-05040671
Carte de télécommande multimédia Stow-N-Go
TM
39
Page 41

Enregistrement du produit
Targus vous conseille vivement d'enregistrer votre accessoire
Targus dans les plus brefs délais après son achat. Pour
l'enregistrer connectez-vous à :
http://www.targus.com/registration.asp
Vous serez invité à fournir votre nom complet, votre adresse de
courriel et des renseignements sur votre entreprise (le cas
échéant).
Garantie
Targus garantit ce produit contre tout défaut de matériel ou de
fabrication pour une durée de deux ans. Si votre accessoire
Targus s'avère défectueux sous cette garantie, nous veillerons à
le remplacer ou à le réparer au plus vite. Cette garantie ne couvre
pas les dommages résultant d'accidents, l'usure normale ou les
pertes consécutives ou accessoires. En aucun cas, Targus ne
pourra être tenu responsable de la perte matérielle ou de
l'endommagement d'un ordinateur, ni de la perte de programmes,
d'enregistrements ou de données ou de leur endommagement, ni
de tout autre dommage indirect ou accidentel, même si Targus a
été préalablement informé de cette possibilité. Cette garantie n'a
aucun effet sur vos droits statutaires.
Respect de la réglementation
Cet appareil est conforme à la section 15 des règlements de la
FCC (Federal Communication Commission). Son utilisation est
soumise aux deux conditions suivantes : 1) Cet appareil ne peut
provoquer de brouillage préjudiciable. 2) Cet appareil doit
absorber toute interférence réceptionnée, même si cela provoque
des effets indésirables sur son fonctionnement.
Déclaration de la FCC
Testé et conforme
Cet appareil a été testé et déclaré conforme aux limites des
appareils numériques de Classe B, selon la section 15 des
règlements de la FCC (Federal Communication Commission).
Ces limites sont conçues pour assurer une protection raisonnable
contre un brouillage préjudiciable lorsque l'appareil est utilisé
Carte de télécommande multimédia Stow-N-Go
TM
40
Page 42

dans un milieu résidentiel. L'appareil génère, utilise et peut
diffuser de l'énergie sur les fréquences radio et, s'il n'est pas
installé et utilisé conformément au mode d'emploi, il peut brouiller
les communications radio. Il n'y a aucune garantie qu'un
brouillage ne se produira pas dans un milieu particulier.
Si cet appareil brouille les communications radio ou télévision,
comme cela peut être confirmé en éteignant puis en allumant
l'appareil, l'utilisateur peut tenter de corriger toute interférence en
essayant une ou plusieurs des méthodes suivantes :
• Réorienter l'antenne réceptrice ou la placer à un autre endroit;
• Éloigner davantage l'appareil du récepteur;
• Brancher l'appareil sur une autre prise de courant ou un circuit
électrique différent de celui auquel le récepteur est connecté;
• Pour toute aide, consulter le distributeur ou un technicien
expérimenté radio/TV.
Conformément à la directive
Cet appareil se situe au-dessous de la classification Class 1
conformément à la R&TTE Directive (99/5/EC). Cet appareil
fonctionne en faible puissance. L'appareil est prévu pour un
usage au bureau ou à la maison. Cet accessoire peut être utilisé
dans tous les pays européens.
Politique de recyclage TARGUS
Lorsque ces produits ne sont plus utilisables, merci de les
apporter à un centre de recyclage approprié dans votre pays. La
politique de recyclage TARGUS est consultable à l'adresse
www.targus.com/recycling
Carte de télécommande multimédia Stow-N-Go
TM
Toute modification non autorisée par les autorités responsables de
la conformité peut entraîner la révocation du droit d'utilisation de ce
produit.
Microsoft, Windows et Windows Vista sont des marques déposées ou commerciales
de Microsoft Corporation aux États-Unis et/ou dans d'autres pays. Toutes les
marques commerciales et déposées sont les propriétés de leurs détenteurs
respectifs. Tous droits réservés.
41
Page 43

Introduzione
Requisiti di sistema
• Sistema operativo - Windows® 2000 / XP / Windows Vista™
• USB 1.1
STOW-N-GO
TM
TELECOMANDO
MULTIMEDIALE
FORMATO SCHEDA
Congratulazioni per avere acquistato il telecomando formato scheda
Targus Stow-N-GoTM. Questa scheda/telecomando multimediale
implementa la tecnologia RF 2,4 GHz che ne consente l'impiego entro
un raggio di 15 metri anche senza visuale libera, in presenza di
ostacoli. E' progettata per controllare i lettori multimediali più diffusi,
solitamente già presenti nei notebook moderni. Si tratta di un dispositivo plug and play, che non richiede software aggiuntivo. Il
telecomando è ergonomico ed è il più compatto attualmente disponibile per i PC; il design del suo ricevitore USB è stato studiato per
integrarsi perfettamente nel telecomando, che a sua volta può essere
inserito all'interno dello slot PC card del notebook.
Contenuto
• Scheda telecomando multimediale Targus
• ricevitore a profilo ribassato
(collegato alla scheda telecomando)
• 1 batteria a bottone CR2032
• Guida utente
42
Page 44

Coperchio vano batterie
Nota: Nella parte inferiore del telecomando, è presente una spia di batteria
scarica, che si illumina quando la durata della batteria è inferiore alle 5 ore di
utilizzo. Quando la spia rossa lampeggia, dovete sostituire la batteria per poter
continuare ad utilizzare l'unità.
Funzione
Keys
Play, Pausa
STOP
MUTO
Volume -
Volume +
Traccia successiva
Traccia precedente
Avanti rapido (per WinDVD)
Indietro rapido (per WinDVD)
Premete per avviare o mettere in pausa la riproduzione.
Premete per interrompere la riproduzione.
Premete per disabilitare il sonoro.
Premete per abbassare il volume
Premete per alzare il volume
Premete per tornare alla traccia precedente
Premete per saltare alla traccia successiva
Premete per aumentare la velocità della riproduzione in avanti.
Premete per aumentare la velocità della riproduzione indietro.
Ricevitore
indicatore
connessione
pulsante
di connessione
Tasti e funzioni
Stow-N-GoTM Telecomando multimediale formato scheda
43
Page 45

Sollevate il ricevitore USB e estraetelo.
Estrarre il ricevitore USB
Reinserire il ricevitore USB
Inserite il lato posteriore del ricevitore USB, con l'etichetta in alto, nel
vano, poi premetelo all'interno del comparto.
Inserimento ed estrazione del ricevitore
Stow-N-GoTM Telecomando multimediale formato scheda
La scheda telecomando multimediale è progettata per essere inserita
nella maggioranza degli slot PC Card standard.
1
2
1
2
44
Page 46

Installare le batterie
• Utilizzate la batteria CR2032. (fornita)
• Rimuovete il coperchio del vano batteria dal retro del
dispositivo.
• Inserite la batteria, verificando che il lato positivo (+)
della batteria sia rivolto verso il coperchio del vano.
Collegare il ricevitore USB al PC
• Estraete il ricevitore USB dal retro del dispositivo e
collegatelo ad una porta USB disponibile, con i contatti
del connettore del ricevitore rivolti verso quelli del
connettore della porta USB.
Stow-N-GoTM Telecomando multimediale formato scheda
Durante l'inserimento del ricevitore nella porta USB del computer, controllate
che i pin del connettore del ricevitore siano rivolti verso i pin della porta USB del
computer. Il LED si illumina quando la connessione è corretta.
pin del connettore della porta USB
pin del connettore del ricevitore
indicatore
connessione
45
Page 47

NOTA: Assicuratevi che il vostro computer sia acceso e abbia rilevato
il ricevitore USB prima di impostare il codice ID.
Ora, provate ad aprire il vostro lettore multimediale per verificare che il
telecomando sta funzionando correttamente.
Stow-N-GoTM Telecomando multimediale formato scheda
Indicatore
connessione
pulsante di
connessione
• Il sistema operativo identifica il ricevitore, richiede il ”USB
Human Interface Device” e procede automaticamente con
l'installazione. Seguite le istruzioni visualizzate sullo schermo
per completare la procedura d'installazione.
Stabilire la comunicazione
• Se il telecomando non funziona o se avete sostituito la batteria di
recente, provate a ripristinare il codice ID tra ricevitore e dispositivo
remoto. Svolgete questa procedura:
Questo telecomando è un dispositivo plug and play. Dovrebbe quindi
essere pronto all'uso e funzionante non appena il ricevitore USB è
stato collegato e riconosciuto dal computer.
Premete e rilasciate il pulsante di connessione sul ricevitore. Il LED
dovrebbe diventare verde. Poi, individuate e mantenete premuto il
pulsante di connessione sul retro del telecomando, finché l'indicatore
di connessione inizia a lampeggiare. Ora il telecomando è
nuovamente collegato al ricevitore USB.
pulsante
di connessione
46
Page 48

Stow-N-GoTM Telecomando multimediale formato scheda
NOTA: LE FUNZIONI DEL TELECOMANDO VARIANO IN BASE ALLE PRESTAZIONI
SOFTWARE DEI VARI LETTORI MULTIMEDIALI.
ISTRUZIONI PER IMPOSTARE / MODIFICARE IL LETTORE MULTIMEDIALE
PREDEFINITO.
• FATE CLIC SUL PULSANTE START.
• APRITE IL PANNELLO DI CONTROLLO E SELEZIONATE INSTALLAZIONE
APPLICAZIONI.
• FATE CLIC SU IMPOSTAZIONI ACCESSO AI PROGRAMMI NEL MENU DI SINISTRA.
PER PERSONALIZZARE, SELEZIONATE L'OPZIONE "PERSONALIZZATA".
• SCEGLIETE IL LETTORE MULTIMEDIALE PREDEFINITO.
• SE IL LETTORE MULTIMEDIALE PREFERITO NON E' INCLUSO NELLA LISTA,
SCALLO AUITO PER L'ASSISTEN.
Il telecomando è compatibile con i seguenti lettori multimediali:
Compatibilità con i lettori multimediali
iTunes
V.6.0.1.3
Musicmatch
V.10
Windows
Media Player
V.10
Real Player
V.10.5
WinDVD
Player
V.7.0
47
Page 49

Stow-N-GoTM Telecomando multimediale formato scheda
Registrazione del contollo di volume
Il volume può essere regolato in vari modi, tra cui i più comuni sono:
3. Controllo del volume di Windows, nella barra delle applicazioni o nel
Pannello di controllo - il telecomando regola questa impostazione.
2. Controllo del volume del lettore multimediale (software) - è preferibile
impostarlo su un valore elevato per consentire il controllo completo del
volume.
1. Controllo del volume sulle casse esterne o integrate nel notebook - è
preferibile impostarlo su un valore elevato per consentire il controllo
completo del volume.
Tenete presente che il telecomando interagisce con il controllo di volume
del sistema operativo Windows. Per impostare il livello di volume
desiderato potete regolare anche altre opzioni. Alzando il livello di
volume sulle casse fisiche, si massimizza la gamma di volume effettiva.
48
Page 50

Supporto tecnico
In caso di quesiti tecnici, visitare:
Internet http://www.targus.com/support.asp
Inglese http://www.targus.com/uk/support.asp
Francese http://www.targus.com/fr/support.asp
Tedesco http://www.targus.com/de/support.asp
Spagnolo http://www.targus.com/sp/support.asp
Italiano http://www.targus.com/it/support.asp
Il nostro staff di tecnici esperti è anche disponibile per
rispondere telefonicamente alle vostre domande. Potete
quindi chiamare uno dei numeri seguenti.
Austria 01 795 676 42
Belgio 02-717-2451
Danimarca 45 35-25-87 51
Finlandia 922948016
Francia 01-64-53-9151
Germania 0211-657-911-51
Italia 02 4827-1151
Norvegia 022577729
Paesi Bassi 02 0504 0671
Portogallo +351 21 415 4123
Spagna 91 745 6221
Svezia 8-751-4058
Svizzera 1-212-0007
Regno Unito 20-7744-0330
Europa dell'est e altri Paesi +31 0 20 05040671
Stow-N-GoTM Telecomando multimediale formato scheda
49
Page 51

Registrazione del prodotto
Dovrete fornire il vostro nome e cognome, l'indirizzo e-mail, il
numero di telefono, e le informazioni dell'azienda (se applicabili).
Garanzia
Targus garantisce per la durata di due anni che questo prodotto è
privo di difetti di materiale e di manodopera. Se l'accessorio
Targus dovesse rivelarsi difettoso durante questo periodo, verrà
riparato o sostituito. Questa garanzia non copre i danni
accidentali, la normale usura e perdita consequenziale o
accidentale. In nessuna circostanza Targus sarà responsabile per
perdita di dati o danni a computer e/o programmi, dati
memorizzati o qualsiasi altro danno consequenziale o
accidentale, anche nel caso Targus sia stata informata di questa
possibilità. Questa garanzia non influisce sui diritti statutari
dell'utente.
Conformità alla normativa
Questo apparato è conforme alla Parte 15 delle Norme FCC
(Federal Communications Commission). La sua operatività è
soggetta alle due condizioni sottostanti: (1) Questo apparato può
non creare interferenze, e (2) Questo apparato deve accettare
eventuali interferenze ricevute, comprese quelle interferenze che
possono causare operazioni non desiderate.
Dichiarazione della FCC
Testato per la conformità
Questo apparato è stato testato e si è riscontrato essere
conforme ai limiti stabiliti per gli apparati di Classe B digitale, ai
sensi della Parte 15 del regolamento della FCC. Questi limiti sono
stabiliti per fornire una protezione ragionevole dalle interferenze
in installazioni residenziali. Questo apparecchio genera, utilizza,
e può emettere energia da radiofrequenze, e qualora non venisse
installato ed utilizzato secondo le istruzioni, può creare
interferenze alle comunicazioni radio. Comunque, non vi sono
Targus vi raccomanda di registrare il vostro prodotto subito dopo
averlo acquistato. Per registrarlo, visitate:
http://www.targus.com/registration.asp
Stow-N-GoTM Telecomando multimediale formato scheda
50
Page 52

garanzie che non avvengano interferenze in particolari
installazioni.
Qualora questo apparecchio dovesse creare interferenze per la
ricezione di radio o televisioni, che possono essere determinate
dall'accensione e dallo spegnimento dell'apparato, al cliente
viene consigliato di provare a correggere l'interferenza tramite
l'utilizzo di una o piu' di una delle seguenti soluzioni:
• Riorientare o riposizionare l'antenna ricevente
• Aumentare la distanza tra l'apparecchio ed il ricevitore
• Collegare l'apparato in una presa di un circuito diverso da
quello al quale è collegato il ricevitore
• Consulta il rivenditore o un tecnico radio/TV specializzato per
ricevere supporto.
Conformemente alle Direttive
Questa periferica rientra nella categoria Classe 1
conformemente alle Direttive R&TTE (99/5/EC). Questa periferica
è a basso consumo ed è eslcusivamente utilizzabile in casa e in
ufficio. Questo prodotto può essere utilizzato in tutti i Paesi della
Comunità Europea.
Direttive di Riciclaggio Targus
Disporre il prodotto alla fine del suo ciclo di vita utile, in un punto
appropriato di raccolta per il riciclaggio collocato nel tuo territorio.
www.targus.com/recycling
Qualsiasi modifica o alterazione non autorizzata dalla parte responsabile per gli aspetti di conformità potrebbe annullare il diritto
dell'utente all'utilizzo di questo prodotto
Stow-N-GoTM Telecomando multimediale formato scheda
Microsoft, Windows, e Windows Vista sono marchi registrati o marchi di fabbrica di
Microsoft Corporation negli Stati Uniti e/o in altri Paesi. Tutti i marchi di fabbrica e i
marchi registrati sono di proprietà dei rispettivi depositari. Tutti i diritti riservati.
51
Page 53

Inleiding
Systeemeisen
• Besturingssysteem - Windows® 2000 / XP/ Windows Vista™
• USB 1.1-aansluiting
TARGUS STOW-N-GO
TM
MEDIA-AFSTANDSBEDI-
ENINGSKAART
Gefeliciteerd met de aanschaf van een Targus Stow-N-GoTM Mediaafstandsbedieningskaart. Deze afstandsbedieningskaart is voorzien
van 2,4 GHz RF-technologie en werkt tot op een afstand van 15 meter
(obstakelvrij). De kaart is geschikt voor de meeste populaire
mediaspelers die veelal al beschikbaar zijn in uw notebook. Dit is een
"plug & play"-apparaat; er is dus geen extra software nodig. De
afstandsbediening is de meest praktische en compactste PCafstandsbediening. De USB-ontvanger is klein genoeg om in de
afstandsbediening zelf te klikken en de complete afstandsbediening
past in de PC Card-sleuf van uw notebook.
Inhoud
• Targus Media-afstandsbedieningskaart
• Kleine ontvanger (bevestigd in afstandsbedieningskaart)
• 1 x CR2032-knoopcelbatterij
• Gebruikershandleiding
52
Page 54

Batterijdekseltje
Opmerking: Aan de onderzijde van de afstandsbediening bevindt zich een Power
Low (batterij zwak)-LED die gaat branden als de levensduur van de batterij
minder 5 uur bedraagt. Als het rode lampje brandt, dient u de batterij te
vervangen om de eenheid te kunnen blijven gebruiken.
Function
Keys
Afspelen / Pauze
STOPPEN
GELUID DEMPEN
Volume verlagen
Volume verhogen
Naar volgende nummer
Terugkeren naar vorig nummer
Snel vooruitspoelen (voor WinDVD)
Omdraaien (voor WinDVD)
Indrukken om het afspelen te starten of te pauzeren.
Indrukken om afspelen te stoppen.
Indrukken om het geluid te dempen.
Druk op deze knop om het volume te verlagen.
Druk op deze knop om het volume te verhogen.
Druk op deze knop om terug te keren naar het vorige nummer
Druk op deze knop om naar het volgende nummer te gaan
Druk op deze knop om snel vooruit te spoelen
Druk op deze knop om snel achteruit te spoelen
Kleine ontvanger
Verbindings-LED
verbindingsknop
Knoppen en functies
Targus Stow-N-GoTM Media-afstandsbedieningskaart
53
Page 55

Trek de USB-ontvanger omhoog en haal deze uit de afstandsbediening
USB-ontvanger verwijderen
USB-ontvanger terugplaatsen
Steek eerst de onderzijde van de USB-ontvanger, met het etiket naar
boven gericht, in het compartiment en schuif de ontvanger dan naar
binnen.
Ontvanger plaatsen en verwijderen
Targus Stow-N-GoTM Media-afstandsbedieningskaart
De media-afstandsbedieningskaart past in de meeste standaard PC
Card-sleuven van een laptop.
1
2
1
2
54
Page 56

Batterijen installeren
• Gebruik de CR2032-batterij. (meegeleverd)
• Verwijder het batterijdeksel aan de achterzijde.
• Plaats de batterij, zorg er daarbij voor dat de positieve
(+) pool van de batterij naar het deksel wijst.
USB-ontvanger op de PC aansluiten
• Haal de USB-ontvanger uit de achterzijde van de kaart en
steek deze in een beschikbare USB-poort.
Targus Stow-N-GoTM Media-afstandsbedieningskaart
Zorg er bij het insteken van de USB-ontvanger in de USB-poort van de computer
voor dat de connectorpennen op de ontvanger en de pennen in de USB-poort
goed tegenover elkaar liggen. De verbindings-LED gaat branden als er een
verbinding tot stand is gebracht.
verbindingspennen in USB-poort
verbindingspennen op ontvanger
Verbindings-LED
55
Page 57

OPMERKING: Zorg ervoor dat de computer is ingeschakeld en de
USB-ontvanger heeft herkend voordat u de ID-code gaat instellen.
Nu kunt u uw mediaspeler starten om te controleren of de afstandsbediening goed functioneert.
Targus Stow-N-GoTM Media-afstandsbedieningskaart
verbindings-LED
verbindingsknop
• Het besturingssysteem herkent de ontvanger, toont de melding
”USB Human Interface Device” en begint automatisch met de
installatie. Volg de aanwijzingen op het scherm om de
installatieprocedure te voltooien.
Communicatie tot stand brengen
• Als de afstandsbediening het niet doet of wanneer u onlangs een
batterij hebt vervangen, kunt u proberen de ID-code tussen de
ontvanger en de afstandsbediening te resetten. Ga hiervoor als
volgt te werk:
Deze afstandsbediening is plug & play. Zodra de USB-ontvanger is
aangesloten en door de computer is herkend dient deze te werken.
Druk de verbindingsknop op de ontvanger in en laat deze los. De LED
moet nu rood branden. Hierna houdt u de verbindingsknop op de
achterzijde van de afstandsbediening ingedrukt tot de verbindingsLED begint te knipperen. Nu heeft de afstandsbediening opnieuw
verbinding gemaakt met de USB-ontvanger.
verbindingsknop
56
Page 58

Targus Stow-N-GoTM Media-afstandsbedieningskaart
OPMERKING: AFHANKELIJK VAN DE SOFTWAREFUNCTIES VAN UW MEDIASPELER
KUNNEN DE AFSTANDSBEDIENINGSFUNCTIES VARIËREN.
INSTRUCTIES VOOR INSTELLING/WIJZIGING VAN UW STANDAARDMEDIASPELER:
• KLIK OP “START”.
• GA NAAR “CONFIGURATIESCHERM” EN KIES “SOFTWARE”.
• KLIK IN HET LINKERMENU OP PROGRAMMATOEGANG –EN INSTELLINGEN. KIES
"AANGEPAST" IN HET HOOFDSCHERM OM DE MEDIASPELER TE PERSONALISEREN.
• KIES UW STANDAARDPROGRAMMA VOOR DE MEDIASPELER.
• ALS UW GEWENSTE MEDIASPELERPROGRAMMA NIET IN DE LIJST STAAT, KLIKT U
OP HELP VOOR ASSISTENTIE.
De afstandsbediening is compatibel met de volgende mediaspelers:
Compatibiliteit van mediaspelers
iTunes
V.6.0.1.3
Musicmatch
V.10
Windows
Media Player
V.10
Real Player
V.10.5
WinDVD
Player
V.7.0
57
Page 59

Targus Stow-N-GoTM Media-afstandsbedieningskaart
Volume instellen
Het volume kan op diverse manieren worden ingesteld. De meest
voorkomende methodes zijn:
3. De volumeregeling van het Windows-besturingssysteem, te vinden in de
taakbalk of het configuratiescherm – de afstandsbedieningskaart past
deze instelling aan.
2. De volumeregeling in de software van de mediaspeler - het liefst ingesteld
op hoog volume voor betere volumeinstelling.
1. De volumeregeling op de externe luidsprekers of de in de notebook
ingebouwde luidsprekers – het liefst ingesteld op hoog volume voor betere
volumeinstelling.
De afstandsbediening maakt gebruik van de volumeregeling van het
Windows-besturingssysteem. Eventueel kunt u de andere genoemde
opties instellen om het gewenste geluidsniveau te bereiken. Het
verhogen van het volumeniveau van de luidsprekers kan het effectieve
volumebereik maximaliseren.
58
Page 60

Technische ondersteuning
Met technische vragen kunt u terecht op:
Internet http://www.targus.com/support
Engels http://www.targus.com/uk/support.asp
Duits http://www.targus.com/de/support.asp
Spaans http://www.targus.com/sp/support.asp
Italiaans http://www.targus.com/it/support.asp
Ook kunnen wij uw vragen tevens telefonisch
beantwoorden.
België 02-717-2451
Denemarken 45 0 35-25-87 51
Frankrijk 01-64-53-9151
Duitsland 0211-6579-1151
Finland 922948016
Italië 02-4827-1151
Nederland 02 0504 0671
Noorwegen 022577729
Oostenrijk 01 795 676 42
Portugal +351 21 415 4123
Spanje 91-745-6221
Zweden 08-751-4058
Zwitserland 01-212-0007
Groot-Brittannië 020-7744-0330
Oost-Europa en overige landen +31 0 20-5040671
Frans http://www.targus.com/fr/support.asp
Targus Stow-N-GoTM Media-afstandsbedieningskaart
59
Page 61

Productregistratie
Targus raadt aan dat u uw Targus-product zo snel mogelijk na de
aankoop registreert. U kunt uw Targus-product registreren op:
http://www.targus.com/registration.asp
U zult uw volledige naam, e-mailadres, telefoonnummer en
bedrijfsinformatie (indien van toepassing) moeten opgeven.
Garantie
Targus biedt de garantie dat dit product gedurende twee jaar vrij
is van tekortkomingen in materiaal en vakmanschap. Als uw
Targus-product binnen die periode defect raakt, zullen wij het
onmiddellijk herstellen of vervangen. Deze garantie is niet van
toepassing op schade door ongelukken, slijtage of bijkomende of
incidentele schade. Targus is onder geen beding aansprakelijk
voor verlies of beschadiging van een computer, verlies of
beschadiging van programma's, records of gegevens, of
bijkomende of gevolgschade, zelfs als Targus is gewezen op die
mogelijkheid. Deze garantie is niet van invloed op uw wettelijke
rechten.
Naleving van de bepalingen
Dit toestel voldoet aan hoofdstuk 15 van de Amerikaanse FCCbepalingen (Federal Communications Commission). Bij de
werking dienen de twee volgende zaken in acht te worden
genomen: 1) dit toestel mag geen schadelijke interferentie
veroorzaken en 2) moet interferentie accepteren die een
ongewenste werking kan hebben.
FCC-verklaring
Getest om aan de bepalingen te voldoen
Dit apparaat heeft in tests bewezen te voldoen aan de limieten
gesteld in de ‘FCC’-bepalingen, deel 15 voor een digitaal toestel
van categorie B. Deze limieten zijn bepaald om een redelijke
bescherming te bieden tegen schadelijke interferentie in een
woongebied. Deze apparatuur produceert, gebruikt en straalt
radiofrequentie-energie uit en kan schadelijke interferentie met
radiocommunicatie veroorzaken, indien niet gebruikt
overeenkomstig de instructies. Er wordt echter geen garantie
Targus Stow-N-GoTM Media-afstandsbedieningskaart
60
Page 62

gegeven dat voor een bepaalde installatie geen interferentie zal
optreden.
Indien deze apparatuur schadelijke interferentie met radio- of
televisieontvangst veroorzaakt (dit kan worden bepaald door de
apparatuur aan en uit te schakelen), moet de gebruiker de
interferentie proberen te verhelpen via een van de onderstaande
maatregelen:
• de ontvangstantenne herrichten of verplaatsen;
• de afstand verhogen tussen de apparatuur en de ontvanger;
• de apparatuur aansluiten op een contact van een andere
stroomkring dan deze waarmee de ontvanger is verbonden;
• Raadpleeg de dealer of een ervaren Radio-/ Televisietechnicus
voor hulp.
Bewijs van overeenkomst
Dit apparaat valt onder Class 1 Classificatie volgens de richtlijenn
van R&TTE (99/5/EC). Laagspanning. Dit apparaat is uitsluitend
geschikt voor kantoor en thuisgebruik. Dit product kan in alle CE
landen worden gebruikt.
Targus Recycle Policy
Wanneer het apparaat niet meer wordt gebruikt, voert u het dan
af via een officieel recylcle punt. De Targus Recycle Policy is te
vinden op www.targus.com/recycling
Targus Stow-N-GoTM Media-afstandsbedieningskaart
Wijzigingen of aanpassingen die niet zijn goedgekeurd door de
verantwoordelijke partij kunnen ertoe leiden dat het product niet
meer mag worden gebruikt
Microsoft, Windows en Windows Vista zijn gedeponeerde handelsmerken of
handelsmerken van Microsoft Corporation in de Verenigde Staten en/of andere
landen. Alle handelsmerken en gedeponeerde handelsmerken zijn eigendom van
de respectievelijke eigenaars. Alle rechten voorbehouden.
61
Page 63

Introdução
Requisitos de sistema
• Sistema operativo - Windows® 2000 / XP / Windows Vista™
• USB 1.1
CARTÃO DE CONTROLO
REMOTO MULTIMÉDIA
STOW-N-GO
TM
DA TARGUS
Parabéns pela compra do cartão do controlo remoto multimédia
Stow-N-GoTM da Targus. Este cartão multimédia de controlo remoto
dispõe de uma tecnologia RF integrada de 2.4 GHz e pode funcionar
até 15 metros sem linha de visão. Foi concebido para funcionar com
os reprodutores de média mais populares e provavelmente mais
frequentemente fornecidos num computador portátil de hoje em dia. É
dispositivo plug and play, não é portanto necessário software
adicional. O comando é o controlo remoto de PC mais prático e
compacto, o receptor USB é suficientemente fino para se colocar na
unidade principal e encaixar todo o controlo remoto na ranhura para
cartões do PC portátil.
Conteúdo
• Cartão de controlo remoto multimédia da Targus
• Receptor fino (anexado ao cartão de controlo remoto)
• 1 x pilha botão CR2032
• Manual do utilizador
62
Page 64

Tampa das pilhas
Nota: Na parte inferior do controlador, existe um indicador de bateria fraca que
acende quando a vida útil da pilha for inferior a 5 horas de utilização. Quando a
luz vermelha pisca, certifique-se de que substitui a pilha para manter a unidade
em funcionamento.
Função
Teclas
Reproduzir, Pausa
PARAR
SEM SOM
Diminuir o volume
Aumentar volume
Saltar para a faixa seguinte
Voltar à faixa anterior
Avanço rápido (para WinDVD)
Retroceder (para WinDVD)
Prima para iniciar ou efectuar uma pausa na reprodução.
Prima para parar a reprodução
Prima esta tecla para cortar o som.
Clique nesta tecla para diminuir o volume
Clique nesta tecla para aumentar o volume
Clique nesta tecla para voltar à faixa anterior
Clique nesta tecla para saltar para a faixa seguinte
Clique nesta tecla para avançar a reprodução rapidamente.
Clique nesta tecla para retroceder a reprodução rapidamente.
Receptor
indicador
de ligação
botão de
ligação
Teclas e funções
Cartão de controlo remoto multimédia Stow-N-Go
TM
63
Page 65

Levante o receptor USB e retire-o.
Retire o receptor USB
Volte a colocar o receptor USB
Introduza a parte inferior do receptor USB, com a etiqueta para cima,
no compartimento e prima o receptor USB para o compartimento.
Armazenar e retirar o receptor
Cartão de controlo remoto multimédia Stow-N-Go
TM
O cartão de controlo de multimédia foi concebido para encaixar na
maioria das ranhuras para cartões do PC portátil padrão para
armazenamento.
1
2
1
2
64
Page 66

Colocação das pilhas
• Utilize a pilha CR2032. (fornecida)
• Retire a tampa da pilha da parte posterior do dispositivo.
• Introduza a pilha, certificando-se que o lado positivo (+)
da pilha está virado para cima, para a tampa da pilha.
Ligar o receptor USB ao PC
• Retire o receptor USB anexado à parte posterior e ligue-o
a uma porta USB disponível com os pinos de ligação do
receptor virados para os pinos de ligação da porta USB.
Cartão de controlo remoto multimédia Stow-N-Go
TM
Quando introduzir o receptor USB na porta USB do computador. Certifique-se de
que os pinos de ligação do receptor e os pinos da porta USB do computador
estão virados uns para os outros. O LED indicador de ligação acende quando
estiver devidamente ligado.
pinos de ligação na porta USB
pinos de ligação do receptor
indicador
de ligação
65
Page 67

NOTA: Certifique-se de que o computador está ligado e detectou o
receptor USB antes de definir o código de identificação.
Pode iniciar o reprodutor de multimédia para confirmar que o comando
está a funcionar correctamente.
Cartão de controlo remoto multimédia Stow-N-Go
TM
Indicador
de ligação
botão
de ligação
• O sistema operativo identifica o receptor, aparece ”USB Human
Interface Device” e começa automaticamente a instalação. Siga
as instruções no ecrã para concluir o procedimento de
instalação.
Estabelecer um elo de comunicação
• Se o comando não funcionar ou não tiver substituído as pilhas
recentemente, pode tentar repor o código de identificação entre o
receptor e o comando. Para isso, efectue o seguinte:
Este comando é um dispositivo plug and play. Deverá funcionar
assim que o receptor USB estiver ligado e for reconhecido pelo
computador.
Prima e solte o botão de ligação no receptor. O LED deve acender a
vermelho. Em seguida, localize e continue a premir o botão de ligação
na parte posterior do comando até o indicador de ligação começar a
piscar. O controlo remoto estabeleceu novamente ligação com o
receptor USB.
botão de
ligação
66
Page 68

Cartão de controlo remoto multimédia Stow-N-Go
TM
NOTA: CONSOANTE AS CAPACIDADES DO SOFTWARE DOS REPRODUTORES DE
MÉDIA, AS FUNÇÕES DO RATO PODEM VARIAR.
INSTRUÇÕES PARA DEFINIR/ALTERAR O REPRODUTOR DE MÉDIA PREDEFINIDO:
• VÁ E CLIQUE NO BOTÃO INICIAR
• VÁ AO PAINEL DE CONTROLO E ESCOLHA ADICIONAR OU REMOVER PROGRAMAS
• CLIQUE EM CONFIGURAR ACESSO A PROGRAMA E PREDEFINIÇÕES NO MENU DO
LADO ESQUERDO. PARA PERSONALIZAR, ESCOLHA PERSONALIZAR NO ECRÃ
PRINCIPAL
• ESCOLHA O PROGRAMA PREDEFINIDO PARA REPRODUTOR DE MÉDIA
• SE O SEU REPRODUTOR DE MÉDIA PREFERIDO NÃO CONSTAR DA LISTA, CLIQUE
EM AJUDA
O comando é compatível com os seguintes reprodutores de média:
Compatibilidade com reprodutor de média
iTunes
V.6.0.1.3
Musicmatch
V.10
Windows
Media Player
V.10
Real Player
V.10.5
WinDVD
Player
V.7.0
67
Page 69

Cartão de controlo remoto multimédia Stow-N-Go
TM
Ajustar o controlo de volume
O volume pode ser ajustado de diversas formas; as mais comuns são as
seguintes:
3. O controlo de volume do sistema operativo Windows situado na barra de
ferramentas ou no painel de controlo - o cartão de controlo remoto ajusta
esta definição.
2. O controlo de volume no software da aplicação do reprodutor de média de preferência definido para alto para permitir uma maior amplitude de
controlo de volume.
1. O interruptor de controlo do volume nos altifalantes externos ou nos
integrados no PC portátil – de preferência definidos para alto para permitir
uma maior amplitude de controlo de volume.
Note que o comando funciona com o controlo de volume do sistema
operativo Windows. Pode querer ajustar as outras opções mencionas
para definir o nível de volume pretendido. Aumentar o nível de volume no
altifalante físico pode maximizar a amplitude efectiva de volume.
68
Page 70

Assistência Técnica
Para questões de ordem técnica, é favor visitar:
Internet: http://www.targus.com/support.asp
Inglês http://www.targus.com/uk/support.asp
Francês http://www.targus.com/fr/support.asp
Alemão http://www.targus.com/de/support.asp
Espanhol http://www.targus.com/sp/support.asp
Italiano http://www.targus.com/it/support.asp
O nosso pessoal especializado está também disponível
para responder às suas questões através de um dos
seguintes números de telefone.
Áustria +43 01 795 676 42
Bélgica +32 0 02-717-2451
Dinamarca +45 0 35-25-8751
França +33 0 1-64-53-9151
Finland +35 8 922948016
Alemanha +49 (0) 211-657-911-51
Itália +39 (02) 4827-1151
Holanda +31 0 2-0504-0671
Espanha +34 0 91-745-6221
Noruega +47 2 2577729
Portugal +351 21 415 4123
Suécia +46 0 8-751-4058
Suíça +41 0 1-212-0007
Reino Unido +44 0 20-7744-0330
Europa do Leste e outros +31 0 20-5040671
Cartão de controlo remoto multimédia Stow-N-Go
TM
69
Page 71

Registo de Produto
A Targus recomenda que registe o seu acessório Targus logo
após o ter comprado. Para registar o seu acessório Targus, vá a:
http://www.targus.com/registration.asp
Necessitará de fornecer o seu nome completo, endereço de
email, número de telefone e informação sobre a companhia (se
aplicável).
Garantia
A Targus garante que este produto está isento de defeitos de
material e fabrico pelo período de dois anos. Se o seu acessório
Targus for considerado com defeito durante esse período de
tempo, procederemos de imediato à sua reparação ou
substituição. Esta garantia não cobre danos acidentais, desgaste
ou perdas consequênciais ou acidentais. Em nenhuma
circunstância será a Targus responsável por perda de, ou danos
para, um computador, nem perda de, ou danos para, programas,
registos ou dados, nem por quaisquer danos consequênciais ou
acidentais, mesmo que a Targus tenha sido informada sobre tal
possibilidade. Esta garantia não afecta os seus direitos
estatutários.
Conformidade Normativa
Este dispositivo está em conformidade com a Parte 15 das
Normas FCC. O seu funcionamento está sujeito às duas
seguintes condições: (1) Este dispositivo não pode causar
interferência prejudicial, e (2) Este dispositivo tem de aceitar
qualquer interferência recebida, incluindo interferência que possa
causar funcionamento indesejado.
Declaração FCC
Testado em conformidade
Este equipamento foi testado e considerado em conformidade
com os limites de um dispositivo digital de Classe B, de acordo
com a Parte 15 das Normas FCC. Estes limites destinam-se a
fornecer uma protecção razoável contra interferência prejudicial
numa instalação residencial. Este equipamento gera, utiliza e
pode irradiar energia de rádio-frequência e, se não for instalado e
Cartão de controlo remoto multimédia Stow-N-Go
TM
70
Page 72

utilizado de acordo com as instruções, poderá causar
interferência prejudicial em comunicações de rádio. No entanto,
não existe qualquer garantia de que não ocorrerá interferência
numa instalação em particular.
Se este equipamento não causar interferência prejudicial para a
recepção de rádio ou televisão, o que pode ser determinado
desligando e voltando a ligar o equipamento, aconselhamos o
utilizador a tentar corrigir a interferência através de uma ou mais
das seguintes medidas:
• Volte a orientar ou posicionar a antena receptora.
• Aumente a distância entre o equipamento e o receptor.
• Ligue o equipamento a uma tomada de parede que esteja num
circuito diferente daquele a que o receptor está ligado.
• Consulte o seu revendedor ou um técnico credenciado de
radio/TV para assistência.
Declaração de Conformidade
Este dispositivo está debaixo da classificação de Classe 1, de
acordo com R&TTE Directive (99/5/EC). Este dispositivo é de
baixa potência. Dispositivo só para uso no escritório e em casa.
Este produto pode ser usado em todos os países da CE.
Diretiva de Reciclagem Targus
Ao término de vida útil dos produtos, por favor coloque num
ponto apropriado de reciclagem disponível no seu país. A Política
de reciclagem da Targus encontra-se disponível para
visualização em: www.targus.com/recycling
Cartão de controlo remoto multimédia Stow-N-Go
TM
Alterações ou modificações não autorizadas pela entidade responsável pela conformidade pode resultar na perda de autorização de
utilização deste produto por parte do utilizador
Microsoft, Windows e Windows Vista sã marcas comerciais registadas da Microsoft
Corporation nos Estados Unidos de América e/ou outros países. Todas as marcas
comerciais e marcas comerciais registadas são propriedade dos respectivos
proprietários. Todos os direitos reservados.
71
Page 73

Visit our Website at www.targus.com/emea
Features and specifications subject to change without notice.
© 2006 Targus Group International, Inc. and Targus Group (UK) Ltd.
AMR01EU / 410-0606-003B
 Loading...