


Visit our Website at www.targus.com Features and specifications subject to change without notice.
© 2006 Targus Group International, Inc. and Targus, Inc.
PAKP003U / 410-0015-001A
wireless keypad and opitcal mouse combo
USER GUIDE
 30
30 
TARGUS WIRELESS
KEYPAD AND
OPTICAL MOUSE
COMBO
Introduction
Congratulations on your purchase of the Targus wireless keypad and opitcal mouse combo. This combo set offers the latest technology for interference free operation with 27 MHz wireless connection and 4,096 IDs per channel. Both keypad and mouse feature on/off switch and auto power saving management for effective power conservation.
Contents
In addition to this user’s guide, this package contains:
›Targus Wireless Keypad
›Targus Wireless Optical Mouse
›USB Receiver
›USB extension cable
›4 AAA batteries (2 for mouse, 2 for keypad)
›Carrying pouch
System Requirements
Hardware
•PC with an Intel® Pentium®processor or equivalent
•USB 1.1 interface
Operating System
• Windows ® 98SE/Me/2000/XP
2

Targus wireless keypad and opitcal mouse combo
NOTE: The third button and the scrolling wheel of
the mouse only work with the operating systems listed above. If you use the mouse with a different operating system, it will lose its enhanced features and function as a standard, two-button mouse.
Installing the Batteries
Optical Mouse
1Remove the battery cover from the top of the mouse by pressing the top center (over the Targus logo) and sliding it back.
Removing the battery cover
2 Insert the supplied batteries , making sure that the positive (+) and negative (-) ends of each battery match the polarity indicators inside the battery housing.
WARNINGS: When replacing the batteries, you may use alkaline or other heavy-duty NiMH batteries. Never combine an alkaline with a NiMH battery in a device.
Avoid mixing new and used batteries in a device.
3Slide the battery cover back in to position until it “clicks” firmly into place.
4Turn on the mouse by sliding the on/off switch on the bottom of the mouse to the “on” position.
The optical sensor, located on the bottom of the mouse, glows red.
3
Targus wireless keypad and opitcal mouse combo
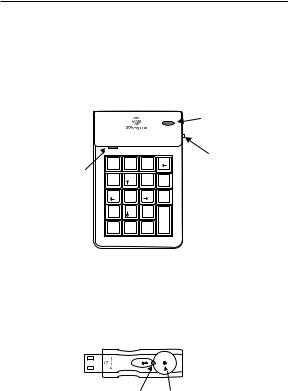
Wireless Keypad
1Remove the battery cover located on the bottom of the keypad.
2Insert the supplied batteries , making sure that the positive (+) and negative (-) ends of each battery match the polarity indicators inside the battery housing.
Num Lock
LED
|
|
|
|
Setup Key |
|
|
|
setup |
|
|
|
|
|
Power |
Num |
/ |
* |
BkSp |
Switch |
Lock |
|
|
|
|
7 |
8 |
9 |
- |
|
Home |
|
PgUp |
|
|
4 |
5 |
6 |
+ |
|
1 |
2 |
3 |
|
|
End |
|
PgDn |
|
|
|
00 . |
Enter |
|
|
0 |
|
|
||
Ins |
, |
Del |
|
|
3Turn on the keypad by sliding the Power switch on the right side of the keypad to the “on” position.
Connecting the Receiver
Plug the USB receiver into an available USB port on your computer.
Lock LED Setup Key
The “Lock LED” light turns on.
You are now ready to set the identification code to establish a communication link with the receiver.
4
 Loading...