

Targus PAWM004E User Manual

wireless
optical
notebook
mouse
USER GUIDE

IN TR OD UC TI ON .. .. .. .. .. .. .. .. .. .. .. .. .. .. .. .. 6
Installing the Batteries . . . . . . . . . . . . . . . . . . 7
Connecting the Receiver . . . . . . . . . . . . . . . . 8
Setting the Identification Code . . . . . . . . . . . 9
Power Management . . . . . . . . . . . . . . . . . . . . 9
Operating Hints . . . . . . . . . . . . . . . . . . . . . . 10
Things to Remember . . . . . . . . . . . . . . . . . . 12
Troubleshooting . . . . . . . . . . . . . . . . . . . . . . 13
Technical Support . . . . . . . . . . . . . . . . . . . . 14
Warranty . . . . . . . . . . . . . . . . . . . . . . . . . . . . 15
EI N FÜ HR UN G. . .. .. .. .. . .. .. .. .. .. . .. .. .. .. .. . 1 7
Einlegen der Batterien . . . . . . . . . . . . . . . . . 18
Der Anschluss des Empfängers . . . . . . . . . 19
Einstellen des Identifikationscodes . . . . . . 20
Energie Einsparung . . . . . . . . . . . . . . . . . . . 20
Hinweise zum Betrieb . . . . . . . . . . . . . . . . . 21
Wichtige Hinweise . . . . . . . . . . . . . . . . . . . . 23
Fehlersuche und -behebung . . . . . . . . . . . . 24
Technische Unterstützung . . . . . . . . . . . . . . 25
Garantie . . . . . . . . . . . . . . . . . . . . . . . . . . . . 27
2

IN TR OD UC CI ÓN .. .. .. .. .. .. .. .. .. .. .. .. .. .. .. 29
Instalación del Baterías . . . . . . . . . . . . . . . . 30
Cómo conectar el receptor . . . . . . . . . . . . . 32
Programación del código de identificación 33
Administración de la energía . . . . . . . . . . . . 34
Consejos de funcionamiento . . . . . . . . . . . 34
Cosas para recordar . . . . . . . . . . . . . . . . . . 36
Solución de problemas . . . . . . . . . . . . . . . . 37
Soporte técnico . . . . . . . . . . . . . . . . . . . . . . 38
Garantía . . . . . . . . . . . . . . . . . . . . . . . . . . . . 39
IN TR ODU CT IO N. .. .. .. .. .. ... .. .. .. .. .. .. .. .. 41
Installation des piles . . . . . . . . . . . . . . . . . . . 42
Branchement du récepteur . . . . . . . . . . . . . 43
Réglage du code d’identification . . . . . . . . 44
Gestion du courant . . . . . . . . . . . . . . . . . . . 45
Conseils d'utilisation . . . . . . . . . . . . . . . . . . 45
Remarques importantes . . . . . . . . . . . . . . . 47
Dépannage . . . . . . . . . . . . . . . . . . . . . . . . . . 48
Support technique . . . . . . . . . . . . . . . . . . . . 50
Garantie . . . . . . . . . . . . . . . . . . . . . . . . . . . . 51
3

IN TR O DU ZI ON E. .. ... .. .. .. .. .. .. .. . .. .. .. .. . 53
Installazione delle Batterie . . . . . . . . . . . . . . 54
Collegare il ricevitore . . . . . . . . . . . . . . . . . . 55
Impostazione del codice di riconoscimento 56
Controllo consumo . . . . . . . . . . . . . . . . . . . 57
Suggerimenti per l'uso . . . . . . . . . . . . . . . . . 57
Cose da non dimenticare . . . . . . . . . . . . . . 58
Localizzazione e soluzione dei problemi . . . 60
Assistenza tecnica . . . . . . . . . . . . . . . . . . . . 61
Garanzia . . . . . . . . . . . . . . . . . . . . . . . . . . . . 62
IN LE ID IN G. .. .. .. .. .. .. .. .. .. ... .. .. .. .. .. .. .. .. 64
De Batterijen Installeren . . . . . . . . . . . . . . . 65
Aansluiting van de ontvanger . . . . . . . . . . . 66
De identificatiecode instellen . . . . . . . . . . . 67
Energiebesparing . . . . . . . . . . . . . . . . . . . . . 68
Tips . . . . . . . . . . . . . . . . . . . . . . . . . . . . . . . . 70
Zuinig Energieverbruik . . . . . . . . . . . . . . . . . 70
Probleemoplossing . . . . . . . . . . . . . . . . . . . . 70
Technische ondersteuning . . . . . . . . . . . . . 72
Garantie . . . . . . . . . . . . . . . . . . . . . . . . . . . . 73
4

IN TR OD UÇ Ã O. .. .. .. .. .. .. .. .. .. .. .. .. .. .. .. .. 7 5
Instalar os Pilhas . . . . . . . . . . . . . . . . . . . . . 76
Conexão do Receptor . . . . . . . . . . . . . . . . . 77
Definir o Código de Identificação . . . . . . . . 77
Gestão da energia . . . . . . . . . . . . . . . . . . . . 78
Sugestões de funcionamento . . . . . . . . . . . 79
Pontos importantes . . . . . . . . . . . . . . . . . . . 80
Resolução de Problemas . . . . . . . . . . . . . . 81
Assistência Técnica . . . . . . . . . . . . . . . . . . . 83
Garantia . . . . . . . . . . . . . . . . . . . . . . . . . . . . 84
5

TARGUS WIRELESS
OPTICAL
NOTEBOOK MOUSE
Introduction
Congratulations on your purchase of the Targus wireless
optical notebook mouse. This mouse offers the latest
technology for interference free operation with 27 MHz
wireless connection and 4,096 IDs per channel. The mouse
features an on/off switch and auto power saving management for effective power conservation.This user’s guide
describes how to connect the receiver to your
computer,install default software drivers and setup the radio
link.
Contents
› Targus wireless optical notebook mouse
› USB receiver
› USB extension cable
› 2 x AAA batteries
› Carrying pouch
6

Targus wireless optical notebook mouse
System Requirements
To use the mouse your computer must meet the following
hardware requirements and run one of the operating
systems listed below.
Hardware
• PC with an Intel® Pentium® processor or equivalent
• USB 1.1 interface
Operating System
• Windows®98SE/Me/2000/XP
• Windows Vista™
NOTE: The thi rd button and the scrolling wheel of
the mouse only work with the operating systems listed
above. If you use the mouse with a different operating
system, it will lose its enhanced featuresand function
as a standard, two-button mouse.
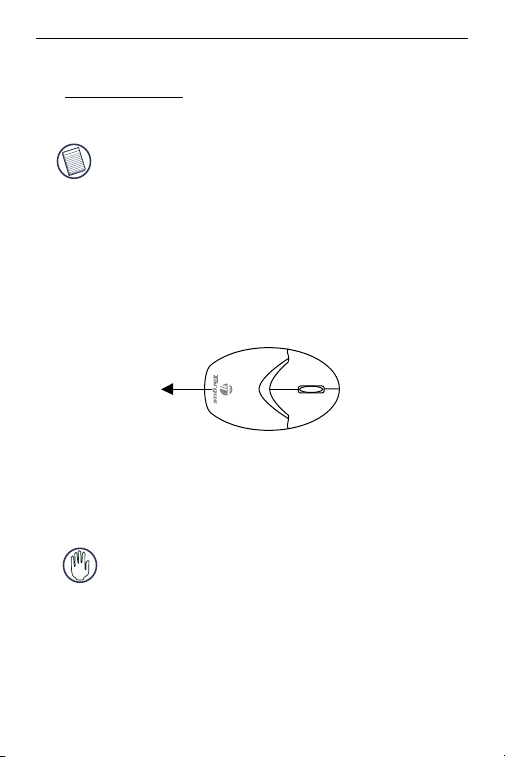
Installing the Batteries
1 Remove the battery cover from the top of the mouse by
pressing the top center (over the Targus logo) and
sliding it back.
Removing the battery cover
2 Insert the supplied batteries, making sure that the
positive (+) and negative (-) ends of each battery match
the polarity indicators inside the battery housing.
7
Targus wireless optical notebook mouse
WARNINGS: When replacing the batteries, you may use
alkaline or other heavy-duty NiMH batteries. Never
combine an alkaline with a NiMH battery in a device.
Avoid mixing new and used batteries in a device.
3 Slide the battery cover back in to position until it “clicks”
firmly into place.
4 Turn on the mouse by sliding the on/off switch on the
bottom of the mouse to the “on” position.
The optical sensor, located on the bottom of the mouse,
glows red.
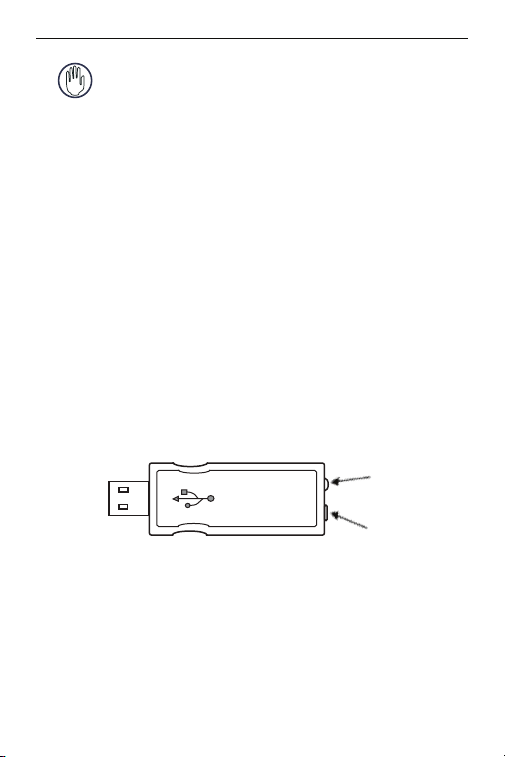
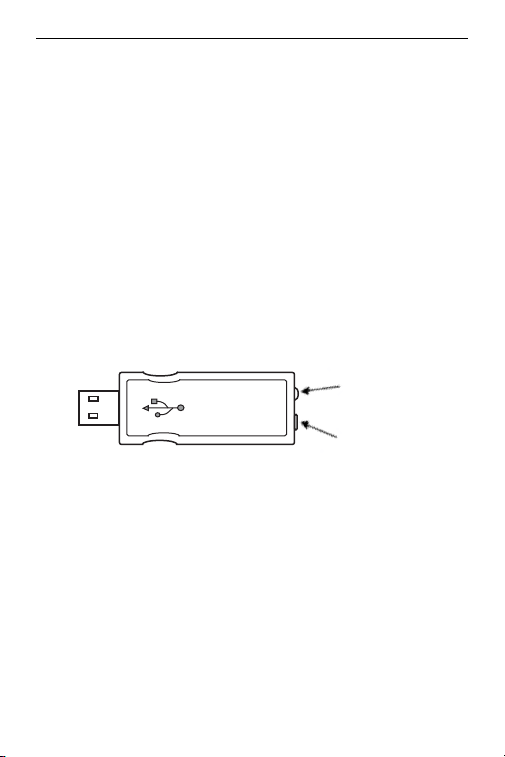
Connecting the Receiver
To connect the receiver:
1 Plug the USB receiver into an available USB port on
your computer.
2 Follow any on-screen instructions to complete the
default driver installation.
SETUP KEY
LOCK LED
The “Lock LED” light turns on.
You are now ready to set the identification code to establish
a communication link with the receiver.
8
Targus wireless optical notebook mouse
Setting the Identification Code
After your computer detects the USB receiver and the
driver software is installed, you must set the ID code
between the receiver and the mouse BEFORE you can use
it. To do this:
NOTE: Make sure that yourcomputer is turned onand
has detected the USB receiver before you set the ID
code.
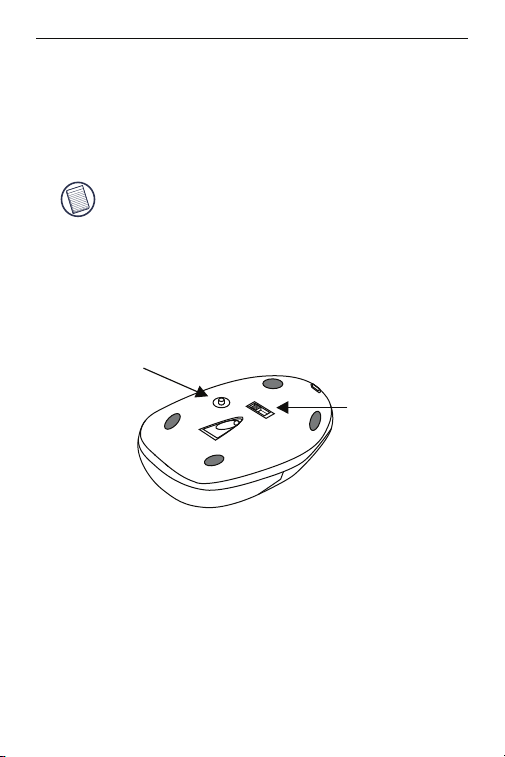
1 Press and release the setup key on the receiver. The
Lock LED light turns off.
2 Press the setup key on the bottom of the mouse.
Setup Key
Power switch
When the LED on the receiver is lit, the mouse is set up
with an ID and the receiver is locked.
You are now ready to use the mouse.
Power Management
• To power the mouse on and off, slide the on/off switch to
the desired position.
9

Targus wireless optical notebook mouse
• When power is on, the mouse goes into “power saving
mode” after 4 minutes of inactivity. To activate the mouse,
move the mouse or press any button.
• To save battery power, turn off the mouse while travelling
or when you’re not using it.
CAUTION: Removing the batteries will require you to
reset the ID code.
Operating Hints
For optimal performance and RF reception:
• Place the receiver at least 20 cm away from all electrical
devices, such as your monitor, speakers or external
storage devices.
• If necessary, use the supplied extension cable to keep the
receiver away from the computer. Plug the receiver into
the extension cable, and the extension cable to the
computer.
• Avoid using the optical mouse on a metal surface. Metals,
such as iron, aluminum or copper, shield the radio
frequency transmission and may slow down the mouse’s
response time or cause the mouse to fail temporarily.
• The mouse will enter a suspend mode at the same time
your computer does. To activate the mouse, press any of
the buttons.
• If your computer has a metal case that contains aluminum
or magnesium, use the optical mouse to the side. The
display panel may interfere with the radio frequency signal
if you use the mouse directly in front of the computer.
• Never use the optical mouse on a glass or mirrored
surface as these surfaces will cause the mouse to fail
temporarily.
10

Targus wireless optical notebook mouse
• To maximize battery life, use the optical mouse on a white,
or light colored surface. Dark surfaces cause the mouse’s
LED to glow brighter, which causes the battery to
discharge more rapidly.
Comfortable Usage
Research suggests that physical discomfort and injury to
nerves, tendons, and muscles may be related to repetitive
motion, an improperly set up work area, incorrect body
posture, and poor work habits.
To reduce the risk of injury, follow these precautions:
• Stand, stretch, and move around several times every hour.
• Switch hands while performing tasks. Use shortcut keys
to avoid repetitive or awkward mouse movements.
• Relax your shoulders and keepyour elbows at your sides.
Adjust the keyboard’s position so that you don’t have to
stretch to reach it.
• Adjust your position so that you don’t have to bend your
wrists to type; avoid placing your wrists on a sharp edge.
If you feel discomfort or numbness in your hands, wrists,
arms, shoulders, neck, or back while typing, consult a
qualified medical professional.
11

Targus wireless optical notebook mouse
Things to Remember
Batteries
General
• You must reset the ID code every time you change the
batteries.
• To extend the life of your batteries, turn off the mouse
while not in use and during travel.
Power Saving Mode
• The mouse’s power saving mode feature activates after 4
minutes of non-operation. To activate the mouse, move
the mouse or press any button.
12

Targus wireless optical notebook mouse
Troubleshooting
What do I do if the mouse does not work?
• Make sure that the polarity of the batteries is correct. The
positive (+) and negative (-) ends of each battery must
match the positive (+) and negative (-) connections in the
battery housing.
• Check that the receiver’s USB connector is firmly
attached to the USB port on your computer.
• Verify that the device drivers are installed.
• Make sure you have established a communication link
between the mouse and its receiver. See “Setting the
Identification Code” on page 9
When I use the mouse, other wireless devices work
more slowly or fail tempor arily – what should I do?
• The mouse may cause interference with any cordless,
radio-based device that operates at 27 MHz, such as a
telephone, baby monitor, or toy. To reduce interference,
move the mouse’s receiver and the base unit of the
affected device as far away from each other as possible.
• You can also reset the mouse’s identification code. The
mouse has 4096 identification codes that allow the
mouse and its receiver to operate without interference
from other radio frequency devices. To do this, see
“Setting the Identification Code” on page 9.
What do I do if the response time of the mouse is
slow or the mouse intermittently stops working?
Try one or more of the following:
• Increase the distance between the mouse’s receiver and
the rest of your computer equipment.
13

Targus wireless optical notebook mouse
• Increase the distance between the mouse’s receiver and
the base units of other wireless devices.
• Turn off any wireless devices and their base units that are
near the mouse’s receiver.
• If you are using the mouse on a metal surface, move it and
the receiver to a non-metal surface. Metals, such as iron,
aluminum or copper, shield the radio frequency
transmission and may slow down the mouse’s response
time or cause the mouse to fail temporarily.
• Replace the batteries.
I can’t use the mouse while another RF mouse is in
use – what should I do?
• Reset the identification code. See “Setting the
Identification Code” on page 9
Technical Support
For technical questions, please visit:
Internet: http://www.targus.com/support.asp
English:
French:
German:
Spanish:
Italian:
Our knowledgeable staff is also available to answer your
questions through one of the following telephone numbers.
http://www.targus.com/uk/support.asp
http://www.targus.com/fr/support.asp
http://www.targus.com/de/support.asp
http://www.targus.com/sp/support.asp
http://www.targus.com/it/support.asp
14

Targus wireless optical notebook mouse
Austria
Belgium
Denmark
Finland
France
Germany
Netherlands
Norway
Portugal
Spain
Sweden
Switzerland
United Kingdom
Eastern Europe & others
01 795 676 42
02-717-2451
+45 35 25 87 51
+358 922948016
01-6453-9151
0211-6579-1151
Italy
02-4827-1151
02 0504 0671
+472 22577729
+351 21 415 4123
91 745 6221
08-751-4058
01-212-0007
020-7744-0330
+31 0 20 5040671
Product Registration
Targus recommends that you register your Targus accessory
shortly after purchasing it. To register your Targus accessory,
go to: http://www.targus.com/registration.asp
You will need to provide your full name, E-mail address,
phone number, and company information (if applicable).
Warranty
Targus warrants this product to be free from defects in
materials and workmanship for two years. If your Targus
accessory is found to be defective within that time, we will
promptly repair or replace it. This warranty does not cover
accidental damage, wear and tear, or consequential or
incidental loss. Under no conditions is Targus liable for loss
of, or damage to a computer; nor loss of, or damage to,
programs, records, or data; nor any consequential or
incidental damages, even if Targus has been informed of
their possibility. This warranty does not affect your statutory
rights.
15

Targus wireless optical notebook mouse
Regulatory Compliance
This device complies with Part 15 of the FCC Rules. Operation is subject to
the following two conditions: (1) This device may not cause harmful
interference, and (2) This device must accept any interference received,
including interference that may cause undesired operation.
FCC Statement
Tested to Comply
This equipment has been tested and found to comply with the limits of a
Class B digital device, pursuant to Part 15 of the FCC Rules. These limits
are designed to provide reasonable protection against harmful
interference in a residential installation. This equipment generates, uses,
and can radiate radio frequency energy and if not installed and used in
accordance with the instructions, may cause harmful interference to radio
communications. However, there is no guarantee that interference will not
occur in a particular installation. If this equipment does cause harmful
interference to radio or television reception, which can be determined by
turning the equipment off and on, the user is encouraged to try to correct
the interference by one or more of the following measures:
• Reorient or relocate the receiving antenna
• Increase the separation between the equipment and receiver
• Connect the equipment into an outlet on a circuit different from that to
which the receiver is connected
• Consult the dealer or an experienced radio/TV technician for help
Changes or modifications not authorized by the party responsible for
compliance could void the user’s authority to operate this product
Declaration of Comformity
Hereby, Targus Group International, declares that this mouse is in
compliance with the essential requirements and other relevant provisions
of Directive 1999/5/EC.
Targus Recycling Directive:
At the end of this product’s useful life please dispose at an appropriate
recycling collection point provided in your country. Targus recycling policy
is available for viewing at: www.targus.com/recycling
Microsoft, Windows, and Windows Vista are either registered trademarks or trademarks
of Microsoft Corporation in the United States and/or other countries. All trademarks
and registered trademarks are the properties of their respective owners. All rights
reserved.
16

TARGUS OPTISHE
WIRELESS
NOTEBOOK-MAUS
Einführung
Herzlichen Glückwunsch zum Erwerb der Targus Optische
Wireless Notebook-Maus . Die Technologie dieses
ermöglicht einen störungsfreien Betrieb mit einer 27 MHz
Funkverbindung und 4,096 IDs pro Kanal. Der maus hat
einen Ein/Aus-Schalter und einer automatischen Stromeinsparung zur effektiven Stromerhaltung.
In dieser Bedienungsanleitung wird der Anschluss des
Empfängers an den Computer, die Installation der
Standardsoftwaretreiber und die Einrichtung der
Funkverbindung beschrieben.
Packungsinhalt
Neben dem Benutzerhandbuch enthält dieses Paket:
› Optische Wireless Notebook-Maus
› USB-Empfänger
› USB-Verlängerungskabel
› 2 AAA Batterien
› Kleine Tasche für diese Produkte
Systemanforderungen
Die Hardware Ihres Computers muss folgende
Bedingungen erfüllen und mit einem der nachfolgend
aufgeführten Betriebssysteme laufen:
Hardware
• PC mit Intel® Pentium® Prozessor o. ä.
17
Targus Optische Wireless Notebook-Maus
• USB-Schnittstelle
Betriebssystem
• Windows® 98/Me/2000/XP
• Windows Vista™
HINWEIS: Die dritte Taste und das Rollrädchen der
Maus funktionieren nur mit den o.a. Betriebssystemen.
Wird die Maus mit einem anderen Betriebssystem
verwendet, gehen die Sondermerkmale verloren und
sie funktioniert wie eine normale Maus mit zwei Tasten.
Einlegen der Batterien
1 Den Deckel zum Batteriefach oben in der Mitte
(oberhalb des Targus-Logos) herunterdrücken und
wegschieben.
Deckel zum Batteriefach entfernen
2 Legen Sie die im Lieferumfang enthaltene Batterie ein.
Achten Sie darauf, dass die Pole der Batterie der
angegebenen Polarität im Batteriegehäuse entsprechen.
ACHTUNG: Zum batterieaustausch können Alkalioder andere leistungsstarke NiMH-Batterien
verwendet werden. Alkali- und NiMH-Batterien dürfen
nicht zusammen verwendet werden.
Neue und gebrauchte Batterien dürfen nicht
zusammen verwendet werden.
18
Targus Optische Wireless Notebook-Maus
3 Den Deckel zum Batteriefach wieder zuschieben bis es
"klickt".
4 Die Maus einschalten, indem der Ein/Aus-Schalter an
der Unterseite der Maus auf "Ein" gestellt wird.
Der am Unterteil der Maus sitzende optische Sensor
leuchtet rot.
Der Anschluss des Empfängers
Den Empfänger anschließen:
1 Schließen Sie das USB-Empfangsgerät an einen
verfügbaren USB-Port am Computer an.
2 Befolgen Sie alle möglichen Bildschirmanweisungen,
um die Rückstellung Treiberinstallation durchzuführen.
SETUP KEY
LOCK LED
Die "Lock LED" Leuchte geht an.
Sie können nun den Identifikations-Code (ID-Code)
eingeben, um eine Kommunikationsverbindung zum
Empfänger herzustellen.
Einstellen des Identifikationscodes
Wenn der Computer den USB-Empfänger gefunden hat
und die Treibersoftware installiert wurde, muss, bevor diese
Vorrichtung benutzt werden kann, die ID-Code zwischen
Empfänger und Maus eingegeben werden. Hierzu wie folgt
vorgehen:
19

Targus Optische Wireless Notebook-Maus
HINWEIS: Der Computer muss eingeschaltet sein und
den USB-Empfänger gefunden haben, bevor der IDCode eingegeben werden kann.
1 Die Setup-Taste am Empfänger drücken und loslassen.
Die Lock-LED-Leuchte geht an.
2 Die Setup-Taste auf der Unterseite der Maus drücken.
Setup Key
Power switch
Wenn die LED am Empfänger leuchtet, wird die Maus
mit einer ID versehen und der Empfänger wird blockiert.
Sie können nun die Maus benutzen.
Energie Einsparung
• Um Maus ein- und auszuschalten, muss der Ein/AusSchalter in die gewünschte Position geschoben werden.
• Nach 4 Minuten Leerlauf stellt sich die angestellte Maus
in den "Stromsparmodus" um. Sie müssen nur die Maus
bewegen oder eine Taste drücken, um sie wieder zu
aktivieren.
• Beim Transport oder bei Nichtgebrauch das Tastenfeld
und die Maus abschalten, um Batterie zu sparen.
20

Targus Optische Wireless Notebook-Maus
VORSICHT: Werden die Batterien entfernt, muss der
ID-Code neu eingestellt werden.
Hinweise zum Betrieb
Wenn Sie die optimale Leistung und RF-Empfangsqualität
gewährleisten möchten:
• Stellen Sie das Empfangsgerät mindestens 20 cm von
allen elektrischen Geräten (Monitor, Lautsprecher oder
externe Speichergeräte) entfernt auf.
• Bei Bedarf können Sie ein 7,5 cm langes
Verlängerungskabel zwischen dem Empfangsgerät und
dem Computer verwenden, um den Abstand zwischen
den beiden Geräten zu vergrößern. Schließen Sie das
Empfangsgerät am Verlängerungskabel und das
Verlängerungskabel am Computer an.
• Vermeiden Sie die Verwendung der Optische Maus auf
Flächen aus Metall. Metall (z.B. Eisen, Aluminium, Kupfer)
beeinträchtigen die RF-Übertragung und können die
Reaktionszeit der Maus reduzieren oder auch zu
vorübergehendem Geräteausfall führen.
• Die optische Maus aktiviert den Bereitschaftsmodus zur
gleichen Zeit wie der Computer. Wenn Sie die Maus
aktivieren möchten, drücken Sie auf eine beliebige Taste.
• Wenn Ihr Computer über ein Metallgehäuse mit
Aluminium oder Magnesium verfügt, platzieren Sie die
Maus an der Seite. Die Anzeige kann mit dem RF-Signal
interferieren, wenn Sie die Maus direkt vor dem Computer
verwenden.
• Verwenden Sie die optische Maus nie auf einer Glasoder Spiegelfläche, da diese Flächen vorübergehend zu
Geräteausfall führen können.
21

Targus Optische Wireless Notebook-Maus
• Verwenden Sie die optische Maus auf einer weißen oder
hellen Fläche, um die Einsatzzeit der Batterie zu
verlängern. Auf dunklen Flächen muss die LED der Maus
mehr Leistung aufbringen. Dadurch entlädt sich die
Batterie schneller.
Ergonomie
Medizinische Erkenntnisse besagen, dass körperliche
Anstrengung und Verletzung der Nerven, Bänder und
Muskeln durch wiederholte Bewegungsabläufe, einen
falsch eingerichteten Arbeitsplatz, schlechte Körperhaltung
oder ungesunde Arbeitsgewohnheiten verursacht werden
können.
Beachten Sie folgende Vorsichtsmaßnahmen, um die
Verletzungsgefahr gering zu halten:
• Stehen Sie mehrmals pro Stunde auf, machen Sie
Dehnungsübungen und bewegen Sie sich.
• Führen Sie bestimmte Aufgaben nicht immer mit der
gleichen Hand durch. Verwenden Sie
Tastenkombinationen, um wiederholte oder schwierige
Mausbewegungen zu vermeiden.
• Entspannen Sie Ihre Schultern und halten Sie Ihre
Ellbogen an der Seite. Positionieren Sie die Tastatur so,
dass Sie sie einfach erreichen können.
• Passen Sie Ihre Haltung so an, dass Sie Ihre
Handgelenke beim Tippen nicht drehen müssen. Lassen
Sie Ihre Handgelenke nicht auf scharfen Kanten ruhen.
Wenn Sie beim Tippen Schmerzen oder ein
Taubheitsgefühl in den Händen, Handgelenken, Armen,
Schultern, im Hals oder Rücken spüren, fragen Sie einen
Arzt um Rat.
22

Targus Optische Wireless Notebook-Maus
Wichtige Hinweise
Batterien
Allgemein
• Sie müssen nach jedem Auswechseln der Batterien eine
Kommunikationsverbindung herstellen.
• Die Lebensdauer der Batterien wird verlängert, wenn Sie
die Maus bei Nichtgebrauch ausschalten. Halten Sie
dazu die Rücksetztaste auf der Mausunterseite zwei
Sekunden lang gedrückt. Siehe "See “Einstellen des
Identifikationscodes” auf Seite 19.
• Nach dem Auswechseln der Batterien sollten die Maus
und das Empfangsgerät stets synchronisiert werden.
Stromsparmodus
Der Stromsparmodus der Maus wird nach 4 Minuten
Leerlauf aktiviert. Sie müssen nur die Maus bewegen oder
eine Taste drücken, um sie wieder zu aktivieren.
23

Targus Optische Wireless Notebook-Maus
Fehlersuche und -behebung
Was mache ich, wenn die RF-Maus nicht funktioniert?
• Vergewissern Sie sich, dass die Polarität der Batterien
richtig ist. Der positive (+) und der negative (-) Pol jeder
Batterie muss den Markierungen im Batteriegehäuse
entsprechen.
• Vergewissern Sie sich, dass der USB-Anschluss des
Empfangsgeräts fest am USB-Port des Computers
angeschlossen ist.
• Vergewissern Sie sich, dass die Gerätetreiber installiert
sind.
• Vergewissern Sie sich, dassdass Sie eine
Funkverbindung zwischen der Maus und dem
Empfangsgerät hergestellt haben. Siehe “Einstellen des
Identifikationscodes” auf Seite 19.
Bei Verwendung der RF-Maus funktionieren alle
anderen drahtlosen Geräte nur langsam oder fallen
vorübergehend aus - was muss ich tun?
• Die Maus kann zu Interferenzen mit anderen drahtlosen
funkgestützten Geräten führen, die mit 27 MHz betrieben
werden (z.B. Telefon, Babymonitor oder Spielzeug).
Wenn Sie diese Interferenzen reduzieren möchten, stellen
Sie das Empfangsgerät der Maus und die Grundeinheit
des interferierenden Geräts so weit wie möglich von
einander entfernt auf.
24

Targus Optische Wireless Notebook-Maus
Was muss ich tun, wenn die Reaktionszeit der RFMaus sehr langsam ist bzw. die Maus vorübergehend ganz ausfällt?
• Erhöhen Sie den Abstand zwischen dem Empfangsgerät
der Maus und den anderen Computergeräten.
• Erhöhen Sie den Abstand zwischen dem Empfangsgerät
der Maus und den Grundeinheiten der anderen
drahtlosen Geräte.
• Schalten Sie die drahtlosen Geräte und Grundeinheiten,
die sich in der Nähe des Empfangsgerät der Maus
befinden, aus.
• Stellen Sie weder die RF-Maus noch das Empfangsgerät
auf eine Fläche aus Metall. Metall (z.B. Eisen, Aluminium,
Kupfer) beeinträchtigen die RF-Übertragung und können
die Reaktionszeit der Maus reduzieren oder auch zu
vorübergehendem Geräteausfall führen.
Ich kann die RF-Maus nicht verwenden, solange
eine andere RF-Maus in Ge brauch ist. Was muss ich
tun?
• Wählen Sie einen neuen Identifikationscode. Siehe
“Einstellen des Identifikationscodes” auf Seite 19.
25

Targus Optische Wireless Notebook-Maus
Technische Unterstützung
Wenn Sie technische Fragen haben, besuchen Sie bitte:
Internet http://www.targus.com/support.asp
Englisch http://www.targus.com/uk/support.asp
Französisch http://www.targus.com/fr/support.asp
Deutsch http://www.targus.com/de/support.asp
Spanisch http://www.targus.com/sp/support.asp
Italienisch http://www.targus.com/it/support.asp
Unser Expertenteam steht Ihnen auch telefonisch zur
Beantwortung Ihrer Fragen zur Verfügung.
Belgien 02-717-2451
Dänemark 45 35-25-87 51
Finnland 922948016
Frankreich 1-6453-9151
Deutschland 0211-6579-1151
Italien 02 4827-1151
Niederlande 02 0504 0671
Norwegen 022577729
Österreich 01 795 676 42
Portugal +351 21 415 4123
Spanien 91-745-6221
Schweden 08-751-4058
Schweiz 1-212-0007
Großbritannien 020-7744-0330
Osteuropa & sonstige Länder +31 (0) 20-5040671
26
 Loading...