

Page 1

BRUSSELS HANNOVER BARCELONA TOKYO MILANO AMSTERDAM SINGAPORE LONDON PARIS NEW YORK LOS ANGELES TORONTO HONG KONG SYDNEY
USB 2.0 High Speed
4-Port Hub
USER’S GUIDE
Making Your Mobile Life Easier.
Making Your Mobile Life Easier.
Visit our Web site at: www.targus.com
Features and specifications are subject to change without notice. © 2003 Targus Corp.
400-0109-001A
Page 2

Page 3

USB 2.0 High Speed 4-Port Hub
Introduction
Congratulations on your purchase of a Targus USB 2.0 High
Speed 4-Port Hub. This ultra portable hub is USB 2.0
compliant and connects to a Universal Serial Bus (USB) port
on your desktop or notebook computer.
The hub has four ports for connecting USB (high-speed 2.0 or
standard 1.1) devices to your computer. One or more of these
devices can be additional hubs. You can daisy-chain up to 127
USB (high-speed 2.0 or standard 1.1) devices to your computer
in this way.
The hub also provides a maximum bandwidth of 480 Mbps,
which enables you to connect devices that consume a large
amount of bandwidth, such as an external storage device,
printer, scanner, DVD or CD-RW drive or digital camera, to
your computer.
This user’s guide describes how to connect the hub to your
computer and install default software drivers for the following
hub models:
• PAUH200 – USB 2.0 High Speed 4-Port Switching Hub
• PAUH210 – USB 2.0 High Speed Mini Cable Powered Hub
In addition to this user’s guide, depending on the hub model
that you purchased, this package contains:
PAUH200 PAUH210
• USB 2.0 switching hub
• 2 USB 2.0 A to B cables
• AC power adapter
• USB 2.0 hub
• USB “Y” power cable
3
Page 4

Features
PAUH200
• Has two type B USB ports that allow a user to connect and
simultaneously use the hub with a second computer
• Supports hot swapping and Plug and Play operation
PAUH210
• Supplied “Y” power cable uses two type A USB connectors,
one for power and data flow (black) and the other for power
only (red), eliminating the need for an AC power adapter
System Requirements
To use the hub, your computer must meet the following
hardware requirements and run one of the operating systems
listed below.
Hardware Operating System
•PC with an Intel® Pentium®
processor or equivalent and a hard
disk drive
• 64 MB RAM or higher, depending
on the operating system
• USB interface
• Windows
• Windows
Edition
• Windows
• Windows
•Mac OS X
®
98SE
®
Millennium
®
2000
®
XP
NOTES: The USB 2.0 High Speed 4-Port Hub is backward
compatible, so you can connect it to a computer with either a
USB 1.1 or 2.0 interface.
When using the hub with a computer that has a version 1.1
USB interface, all of the devices attached to the hub will run at
USB 1.1 speed (up to 12Mbps).
4
Page 5
Connecting the Hub and Installing
the Drivers
To connect the hub to your computer and install the operating
system’s default drivers, follow the steps listed below for the
hub model that you purchased.
Model PAUH200
The model PAUH200 hub comes with two high-speed A/B
cables so that you can connect it to two host computers. If you
are connecting the hub to only one host computer, keep the
second cable in a safe, easy to remember place for future use.
1 Turn on your computer (if it’s off).
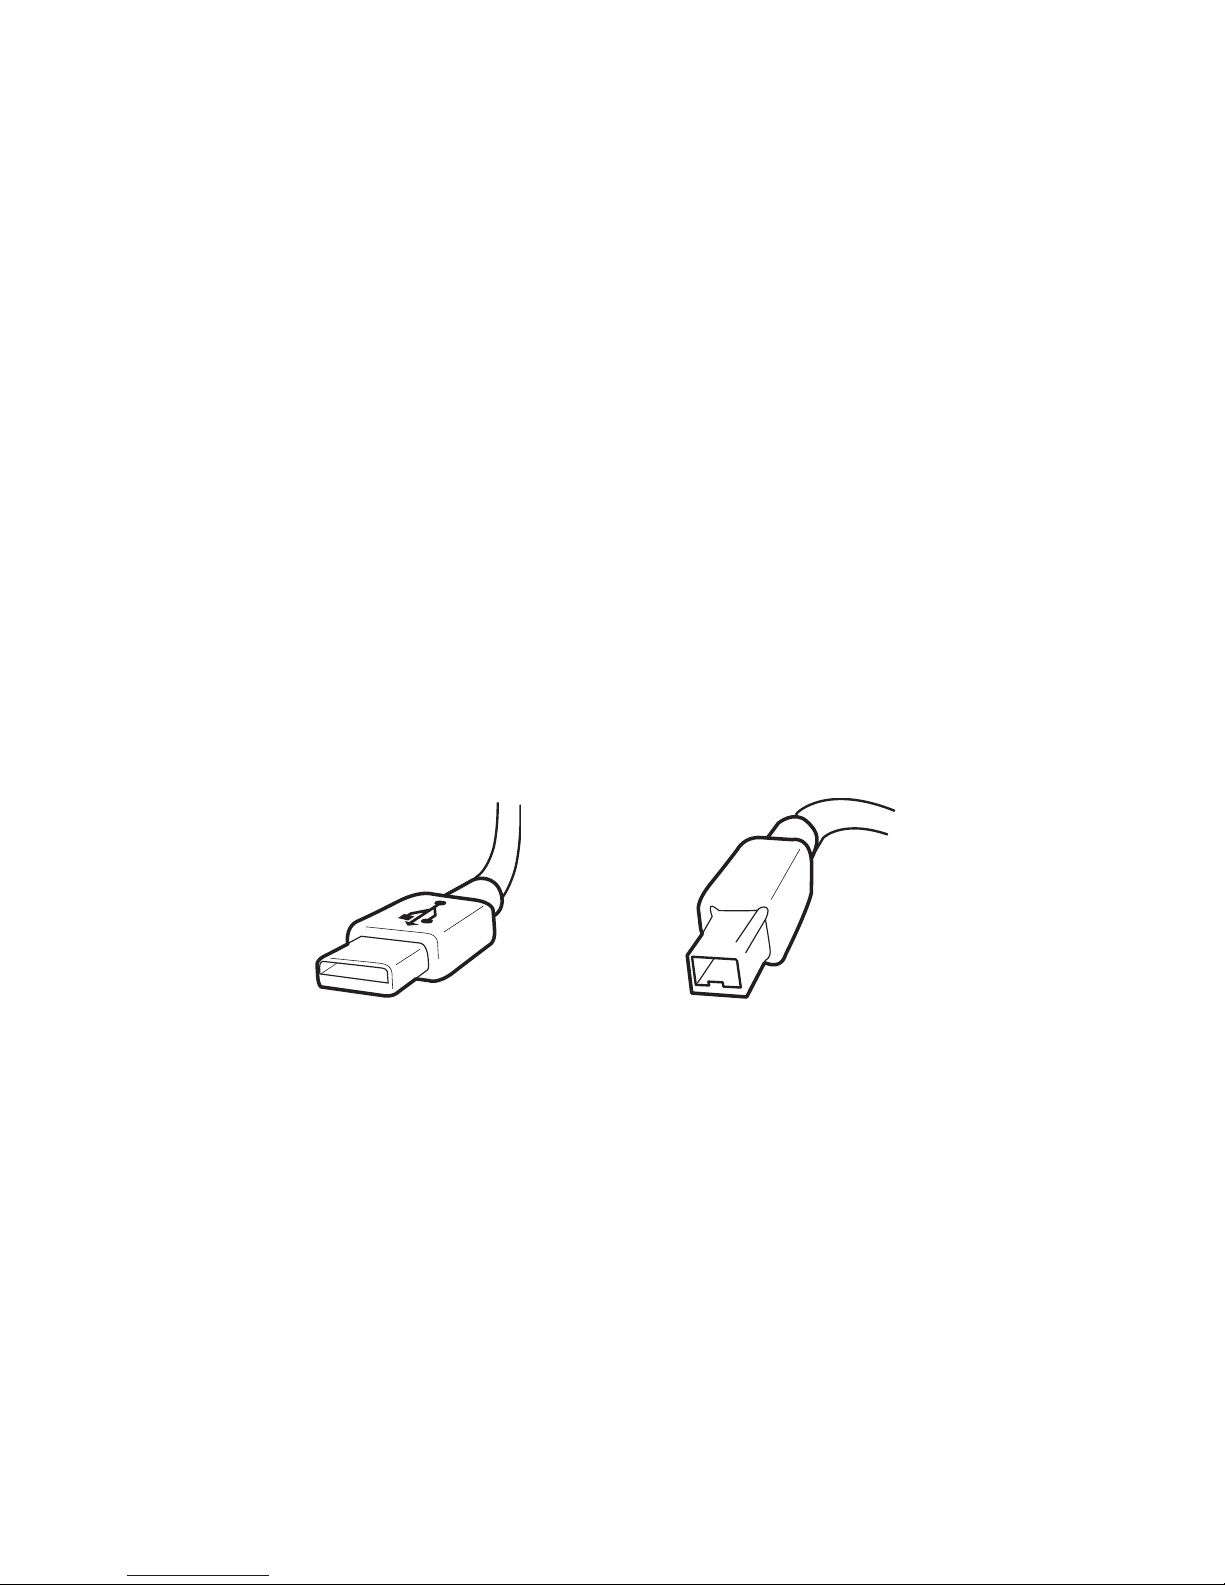
2 Plug the supplied cable’s USB type A connector end into a
USB port on your computer.
Type A
Type B
USB type A and B connector ends
3 Plug the cable’s USB type B connector end into the hub.
4 Repeat steps 2 and 3 using the second cable to connect the
hub to a second host computer.
5 Attach the supplied AC power adapter to the AC power
jack on the hub and plug the adapter into an available
electrical outlet.
Your computer’s operating system automatically detects
the new hardware and begins installing the appropriate
default drivers.
5
Page 6

6 Follow the on-screen instructions to complete the driver
installation.
You can now connect USB devices to the hub or
daisy-chain additional hubs.
Model PAUH210
The “Y” power cable that connects the model PAUH210 hub to
your computer has two USB type A connector ends, one black
and one red.
The black connector supports up- and downstream data flow
between the hub and your computer and provides power to the
hub and any device attached to the hub. The red connector only
provides power; data flow is not supported.
When the USB type A connectors are used together, the “Y”
power cable provides enough power to run any attached
device, even devices that consume large amounts of
bandwidth, eliminating the need for an AC power adapter (if
the device has one).
1 Turn on your computer (if it’s off).
2 Using the supplied “Y” power cable, plug the black USB
type A connector end into a USB port on your computer.
“Y” power cable with USB type A and B connector ends
3 Plug the red USB type A connector end into another USB
port on your computer for additional power to the hub.
6
Page 7

NOTE: If you are using the hub with just one USB connection,
any devices attached to the hub that require heavy power,
such as a printer or external storage device, may operate
slower due to reduced bandwidth. To increase speed, use the
device’s AC power adapter, or connect the red USB type A
connector to your computer.
4 Plug the cable’s USB type B connector end into the hub.
Your computer’s operating system automatically detects
the new hardware and begins installing the appropriate
default drivers.
5 Follow the on-screen instructions to complete the driver
installation.
You can now connect USB devices to the hub or
daisy-chain additional hubs.
Connecting Devices to the USB Hub
To connect a USB device, plug it into a USB port on the hub
and follow any additional instructions provided with the
device.
When connecting new devices to the hub, consider the
following guidelines:
®
• If your computer is running the Windows
system, a series of screens appear, beginning with the Add
New Hardware Wizard, to guide you through the driver
installation process.
98 operating
• If your computer is running the Windows
Edition, Windows
system, the device drivers may install automatically.
®
Millennium
®
2000 or Windows® XP operating
7
Page 8

• When connecting a new device to the hub, you must run the
Setup or Install program for that device.
• When connecting a device to the hub, to avoid possible
damage, never force the cable connector into the port on the
hub. If the cable connector does not attach smoothly, remove
the connector, turn it over and try attaching it again.
LED Status Indicator Lights
Once the default drivers are installed, the LED status indicator
lights glow and you can connect devices to the hub.
The LED lights display as follows:
Model PAUH200
• Power light glows green when the hub is receiving power
from your computer and glows orange when it’s receiving
power from the AC power adapter.
• Hub status light A glows green when a host computer is
connected.
• Hub status light B glows red if a second host computer is
connected.
NOTE: Use only the supplied AC power adapter with the hub
to avoid possible damage.
Model PAUH210
• Power light glows green when the hub is receiving power
from your computer via the “Y” cable.
8
Page 9

Specifications
NOTE: Specifications are for all models unless indicated
otherwise.
Models
PAUH200 and PAUH210
Dimensions
PAUH200: 0.93 x 2.8 x 1.8 inches (23.5 x 70 x 45 mm)
PAUH210: 0.93 x 2.4 x 1.5 inches (23.5 x 61 x 38 mm)
Weight
1.6 ounces (45 g)
Operating Temperature
32 to 158 degrees Fahrenheit (0 to 70 degree Celsius)
Standards
USB Specification Revision 2.0 and 1.1 compatibility
Data Speed
USB v1.1: 12 Mbps
USB v2.0: 480 Mbps
Connector Ports
PAUH200
Hub to computer: 2 (series B receptacle)
Hub to devices: 4 (series A receptacle)
PAUH210
Hub to computer: 1 (series B receptacle)
Hub to devices: 4 (series A receptacle)
9
Page 10

LED Indicators
PAUH200
Power: 1 (Orange - with AC power adapter,
Green - running off computer’s power
supply)
Hub to computers: 2 (A - Green, B - Red)
PAUH210
Power: 1 (Green)
Per-Port Current
500 mA (with the AC power adapter or “Y” power cable)
External Power - AC Power Adapter
DC 5 Volt
Cable length
3-foot (1 m)
Troubleshooting
General
Can I connect USB 1.1 compatible devices to the hub?
Yes, the hub is backward compatible with USB 1.1 devices.
Can I use the model PAUH210 hub if I have only one
available USB port?
Yes, the model PAUH210 hub works with one USB port if you
connect it to your computer with the black USB connector. For
more information, refer to “Model PAUH210” on page 6.
10
Page 11

Device Not Working
• Make sure that the device is firmly connected to the port on
the hub.
• Plug the device into a different port on the hub. If it still
doesn’t work, test the device by connecting it directly to your
computer.
• Check that you ran the Setup or Install program for the
device.
• Make sure that the device appears in Device Manager. See
“Verifying Device is Installed” below.
• Disconnect all devices from the hub and reconnect them, one
at a time. Check that each device works before plugging in
the next one.
Verifying Device is Installed
Windows® Operating System
To check that the hub is installed properly, use Device Manager
to locate the Generic USB Hub on USB 2.0 Bus device.
To access Device Manager for the Windows
system, right-click My Computer, Properties, and then click the
Device Manager tab.
For the Windows
Computer, Properties, click the Hardware tab, then click the
Device Manager button.
®
2000/XP operating system, right-click My
®
98/Me operating
To test that the hub is working properly, in the Device Manager
window:
1 Select the Generic USB Hub on USB 2.0 Bus device.
2Click the Properties button or icon, depending on your
operating system.
11
Page 12

3 Verify that the message “This device is working properly”
appears.
Macintosh Operating System
To verify that the hub is installed properly, locate the Generic
USB Hub on USB 2.0 Bus device by opening Apple System
Profiler and clicking Devices and Volumes.
USB Hub Current Limit Exceeded Warning
If a device exceeds the power available for its hub port, the
following screen appears with the offending device
highlighted.
USB Hub Current Limit Exceeded screen
To re-enable the hub port for the affected device, follow the
on-screen instructions.
12
Page 13

Technical Support
In the unlikely event that you encounter a problem with your
Targus accessory, please contact our technical support team at:
Email: techsupport@targus.com
Internet: http://www.targus.com/support.asp
Our knowledgeable staff is also available to answer your
questions through one of the following telephone numbers.
US
Monday through Friday, 8:00 a.m. (08:00) to 8:00 p.m. (20:00)
Eastern time: 800-283-6325
Canada
Monday through Friday, 9:00 a.m. (09:00) to 5:00 p.m. (17:00)
Eastern time: 888-827-4877
Europe
Belgium +32 0 02-717-2451
Denmark +45 0 35-25-8751
France +33 0 1-64-53-9151
Germany +49 0 21-16-579-1151
Italy +39 0 24-827-1151
Netherlands +31 0 53-484-9470
Spain +34 0 91-745-6221
Sweden +46 0 8-751-4058
Switzerland +41 0 1-212-0007
United Kingdom +44 0 20-7744-0330
Eastern Europe & others +31 0 53-484-9479
13
Page 14

Product Registration
For more efficient customer service and to activate the product’s
warranty, Targus recommends that you register your Targus accessory
shortly after purchasing it.
To register your Targus accessory, go to:
http://www.targus.com/registration.asp
You will need to provide your full name, email address, phone number,
and company information (if applicable).
Warranty
Targus warrants this product to be free from defects in materials and
workmanship for one year. If your Targus accessory is found to be
defective within that time, we will promptly repair or replace it. This
warranty does not cover accidental damage, wear and tear, or
consequential or incidental loss. Under no conditions is Targus liable for
loss of, or damage to a computer; nor loss of, or damage to, programs,
records, or data; nor any consequential or incidental damages, even if
Targus has been informed of their possibility. This warranty does not
affect your statutory rights.
Warranty Registration at:
http://www.targus.com/registration.asp
Regulatory Compliance
This device complies with Part 15 of the FCC Rules. Operation is
subject to the following two conditions: (1) This device may not cause
harmful interference, and (2) This device must accept any interference
received, including interference that may cause undesired operation.
FCC Statement
Tested to Comply
This equipment has been tested and found to comply with the limits of a
Class B digital device, pursuant to Part 15 of the FCC Rules. These
limits are designed to provide reasonable protection against harmful
interference in a residential installation. This equipment generates, uses,
and can radiate radio frequency energy and if not installed and used in
accordance with the instructions, may cause harmful interference to
14
Page 15

radio communications. However, there is no guarantee that interference
will not occur in a particular installation.
If this equipment does cause harmful interference to radio or television
reception, which can be determined by turning the equipment off and
on, the user is encouraged to try to correct the interference by one or
more of the following measures:
• Reorient or relocate the receiving antenna
• Increase the separation between the equipment and receiver
• Move the computer away from the receiver
• Connect the equipment into an outlet on a circuit different from that
to which the receiver is connected.
Intel and Pentium are registered trademarks of Intel Corporation. Windows is a registered
trademark of Microsoft Corporation. Macintosh is a registered trademark of Apple Computer,
Inc. All other trademarks are the property of their respective owners.
15
 Loading...