

Page 1

BRUSSELS HANNOVER BARCELONA TOKYO MILANO AMSTERDAM SINGAPORE LONDON PARIS NEW YORK LOS ANGELES TORONTO HONG KONG SYDNEY
USB Mini Business
Card Scanner
INSTALLATION GUIDE
Making Your Mobile Life Easier.
Making Your Mobile Life Easier.
Visit our Web site at: www.targus.com
Features and specifications are subject to change without notice. © 2007 Targus Corp.
PA570
400-0068-003C
Support Center
USA Germany
NewSoft America, Inc. SoftBay GmbH
4113 Clipper Court
Fremont, CA 94538, U.S.A.
Carlstrase 50
D - 52531 Ubach-Palenberg
Tel: 1-510-445-8616 Tel: + 49 - (0) 24 - 519 112 647
Email: contactus@newsoftinc.com Fax: + 49 - (0) 24 - 514 096 42
Internet: http://www.newsoftinc.com Email: newsoft@softbay.de
England
Taiwan
Guildsoft Inc. NewSoft Technology Corp.
The Software Centre 3F NO. 19-3, Sanchong RD.
East Way, Lee Mill Industrial Estate, Nankang, Taipei, Taiwan
Ivybridge, Devon, PL21 9PE, UK Tel: 886-2-26551201
Tel: (44) 01752-201148 Email: support@newsoft.com.tw
Fax: (44) 01752-894833 Internet: http://www.newsoft.com.tw
Email: Tech@guildsoft.co.uk
France
Japan
Graphics-France NewSoft Japan Corp .
12 rue des bles
93217 Saint Denis La Plaine cedex, France
6-21-3 Shinbashi
Minato-Ku, Tokyo 105-0004, Japan
Tel: + 33 (0) 1 49 46 23 40 Tel: 81-3-5472-7008
Fax: + 33 (0) 1 49 46 23 49 Email: support@newsoft.co.jp
Email: breader@graphics-france.com Internet: http://www.newsoft.co.jp
Page 2

Table of Contents
English: USB Mini Business Card Scanner ................................. 3
Français: Mini scanner USB de cartes de visite............................. 8
Deutsch: USB-MBC-Scanner (Mini-Visitenkarten-Scanner) ..... 14
Nederlands: USB Mini Business Card scanner................................ 19
Español: Mini escáner USB de tarjetas de visita......................... 24
Italiano: Miniscanner per biglietti da visita collegabile a USB.. 30
Português: Mini scanner de cartões de visita USB......................... 35
2
Page 3

USB Mini Business Card Scanner
Congratulations on your purchase of the Targus USB Mini Business Card
Scanner. With the MBC Scanner, you can electronically store the names,
addresses, phone numbers, and email addresses from your business card
collection to your personal digital assistant (PDA) or personal information
manager (PIM), such as Microsoft
In addition to this installation guide, this package contains the Targus USB
Mini Business Card Scanner and driver software CD.
System Requirements
To use the MBC Scanner, your computer must meet the following hardware
requirements and run one of the operating systems listed below.
®
Outlook® or Symantec® ACT!®.
Hardware
• PC with a Pentium® processor or
Operating System
®
• Windows
98
equivalent
• 32 MB of RAM and 40 MB of available
hard disk space
• USB version 1.1 interface
• CD-ROM drive
• Windows
Edition
• Windows
• Windows
®
Millennium
®
2000
®
XP
• Windows Vista
Installing the Device Driver
To use the MBC Scanner you must first install the device driver and the
application software. To do this:
1 Insert the device driver CD into your computer’s CD-ROM drive.
2 If setup does not begin automatically, click Start, then Run, and enter
D:\setup.exe (where D: is the path of the CD-ROM drive) and then
click OK.
3 Select the language that you want to use during installation and click
OK.
TM
4 When the Select Components screen appears, click Next to choose the
default settings and continue the installation process.
5 When the InstallShield Wizard Complete screen appears, click Finish.
The operating system prompts you to restart your computer when
installation is complete. Remove the device driver CD from your
computer’s CD-ROM drive before restarting your computer.
You are now ready to connect the MBC Scanner to your computer.
3
Page 4

Connecting the USB Mini Business Card Scanner to
Your Computer
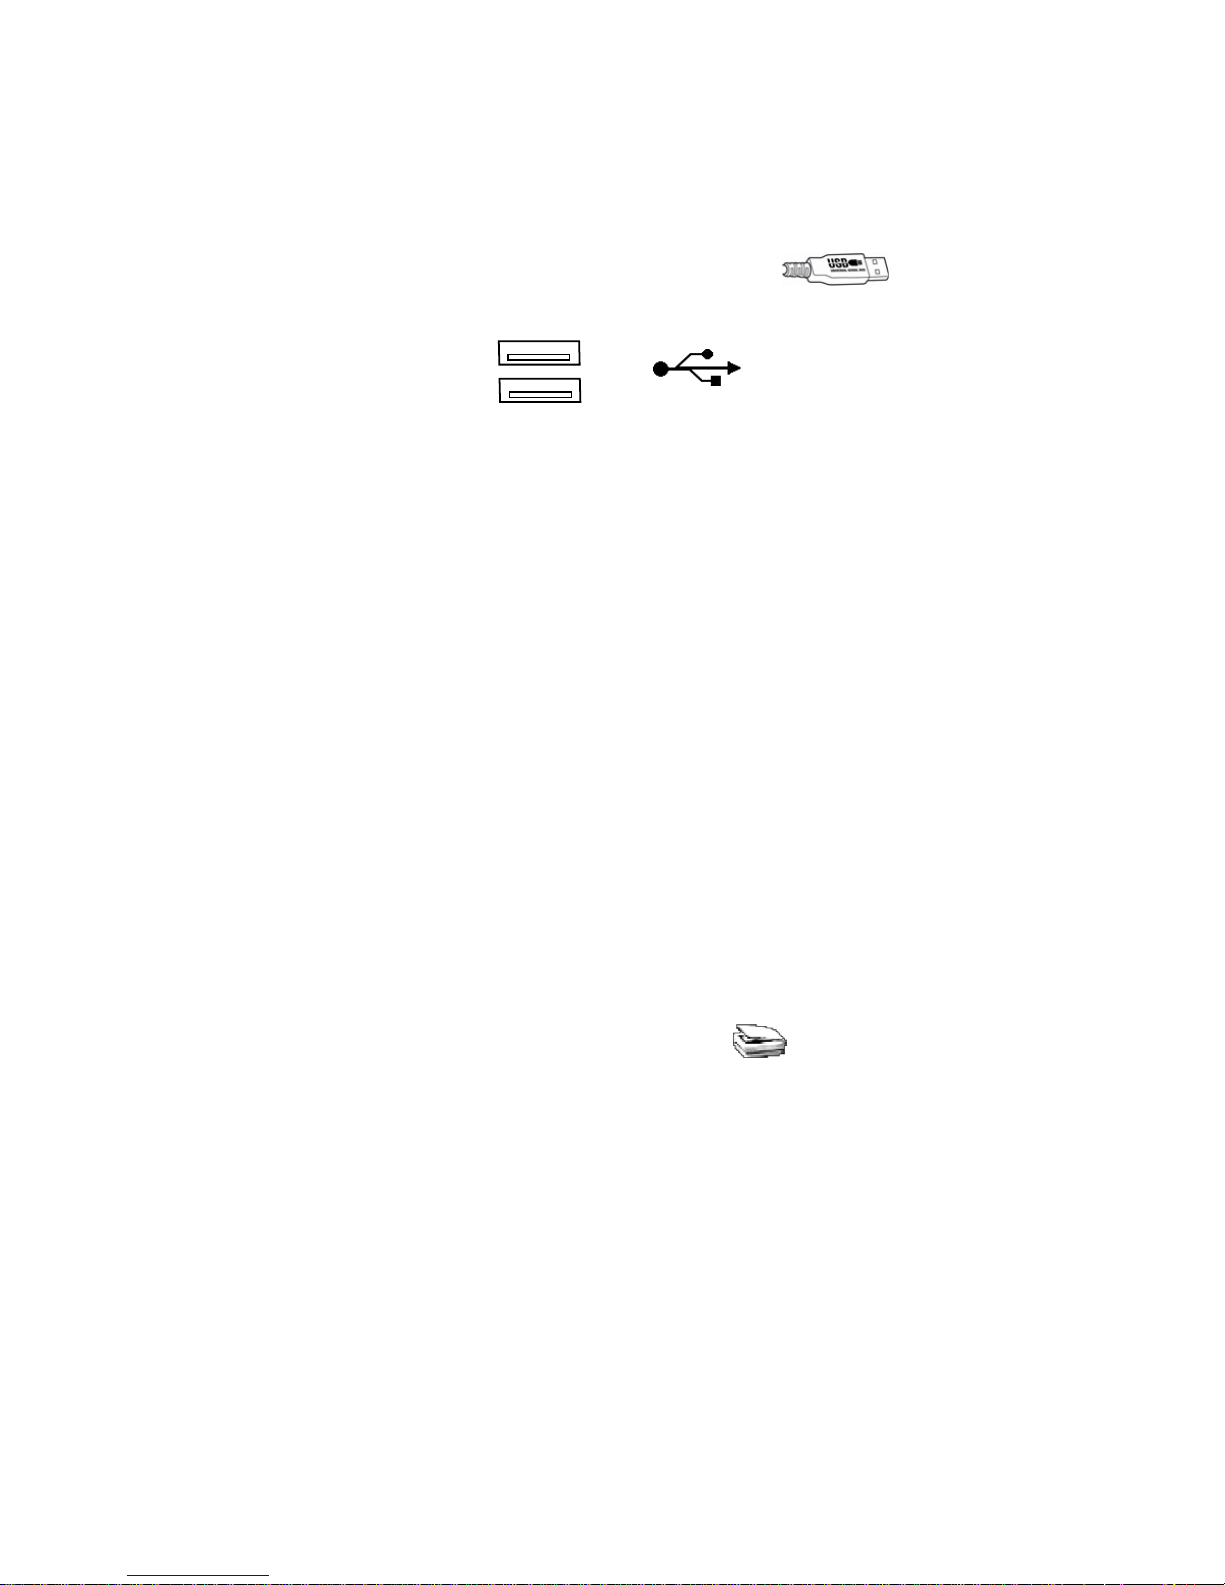
1 Plug the standard USB end of the cable ( ) into an available
USB port on your computer.
USB 1
USB 2
USB ports on your computer
2 Connect the other end of the cable to the MBC Scanner’s port.
The operating system automatically recognizes the MBC Scanner and
locates the appropriate driver.
You are now ready to begin using the MBC Scanner.
Using the USB Mini Business Card Scanner
Calibrating the MBC Scanner
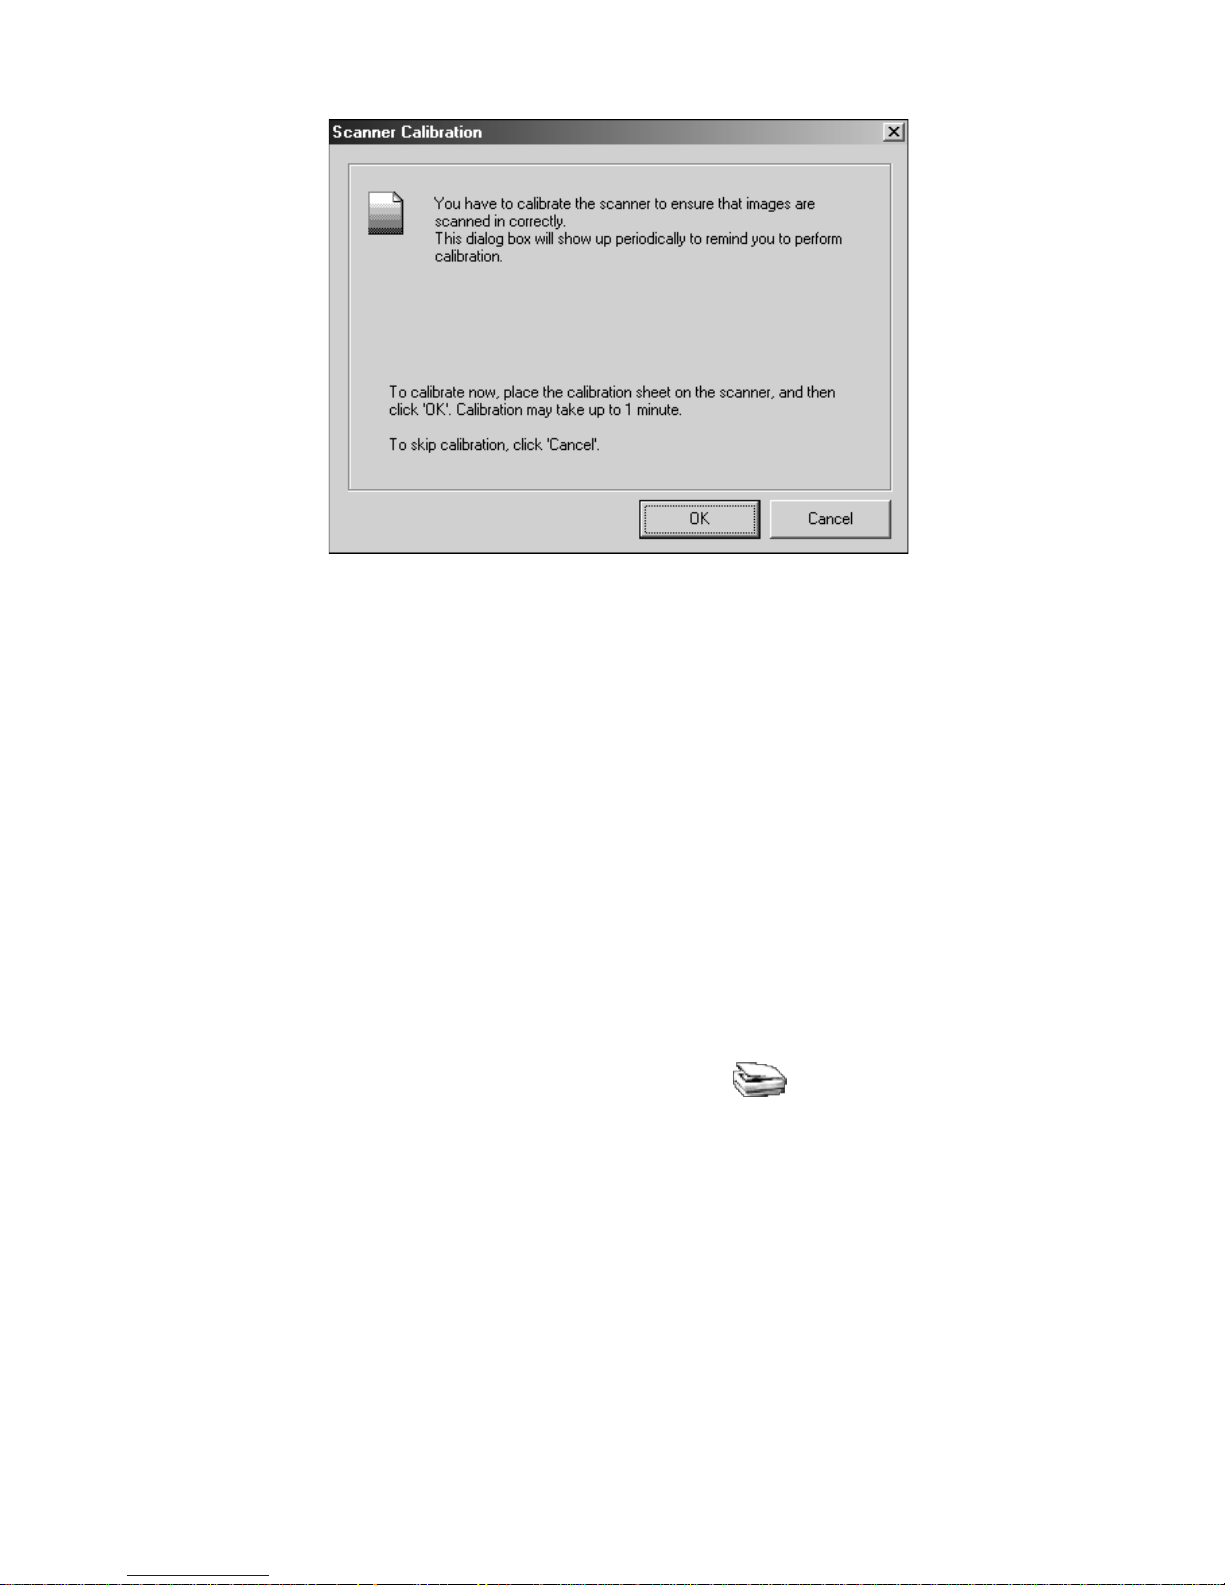
Before you use the MBC Scanner for the first time, you must calibrate it
using the supplied calibration card. Calibrating the MBC Scanner ensures
that you will receive high quality scanned images. To calibrate the MBC
Scanner:
1 Insert the supplied calibration card, with the white side facedown, into
the scanner.
2 Click the Scan icon ().
The Calibration Page screen appears.
3 Click OK.
Calibration Page screen
4
Page 5
Once the MBC Scanner is calibrated, a confirmation message appears
and you can begin scanning business cards.
It is recommended that you recalibrate the MBC Scanner once a month or
more, depending on how often you use the scanner, to continue receiving
high quality scanned images. To recalibrate the MBC Scanner:
1 Open the MBC Scanner application, click File and then select
Preferences.
2 Verify that the scan option is set to Scan with TWAIN User Interface.
3 Click the Scan icon ().
The Targus Bizcard Scanner screen appears.
4 Click Calibrate and then follow the calibration procedures above.
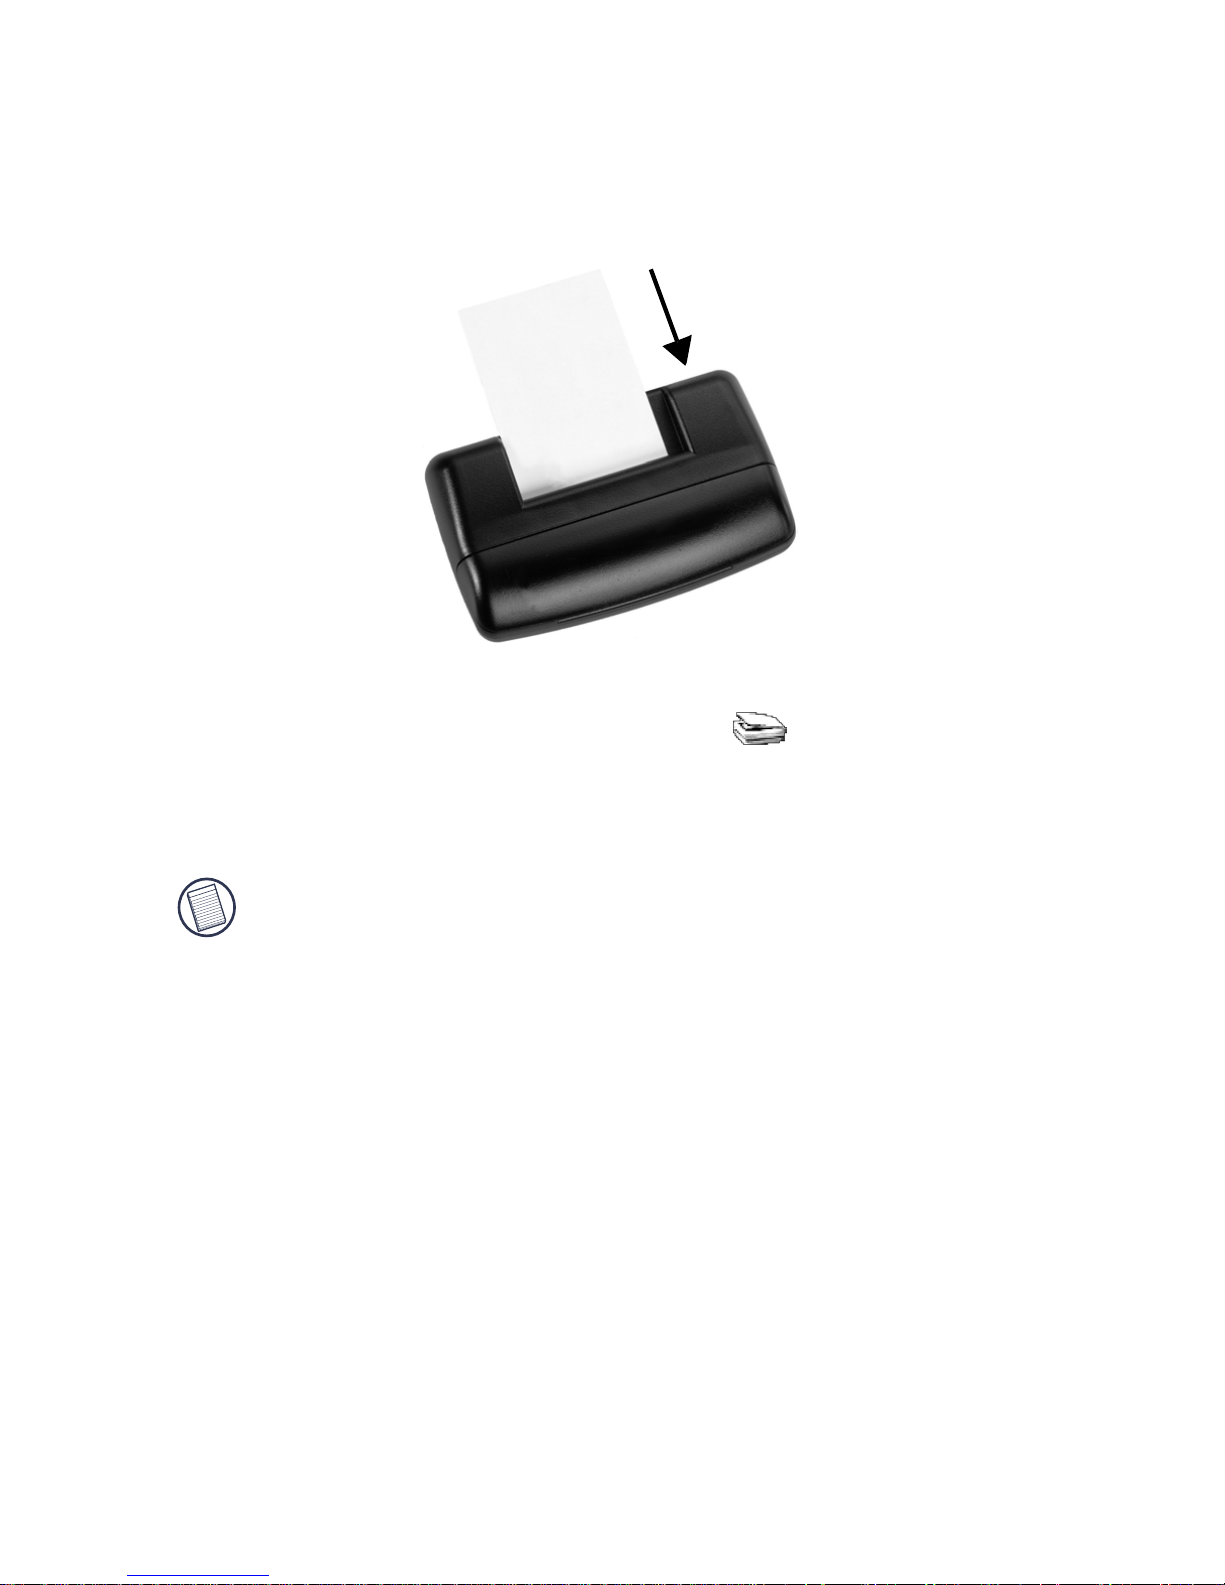
Scanning Business Cards
Once the MBC Scanner is calibrated, you can begin scanning business
cards. To do this:
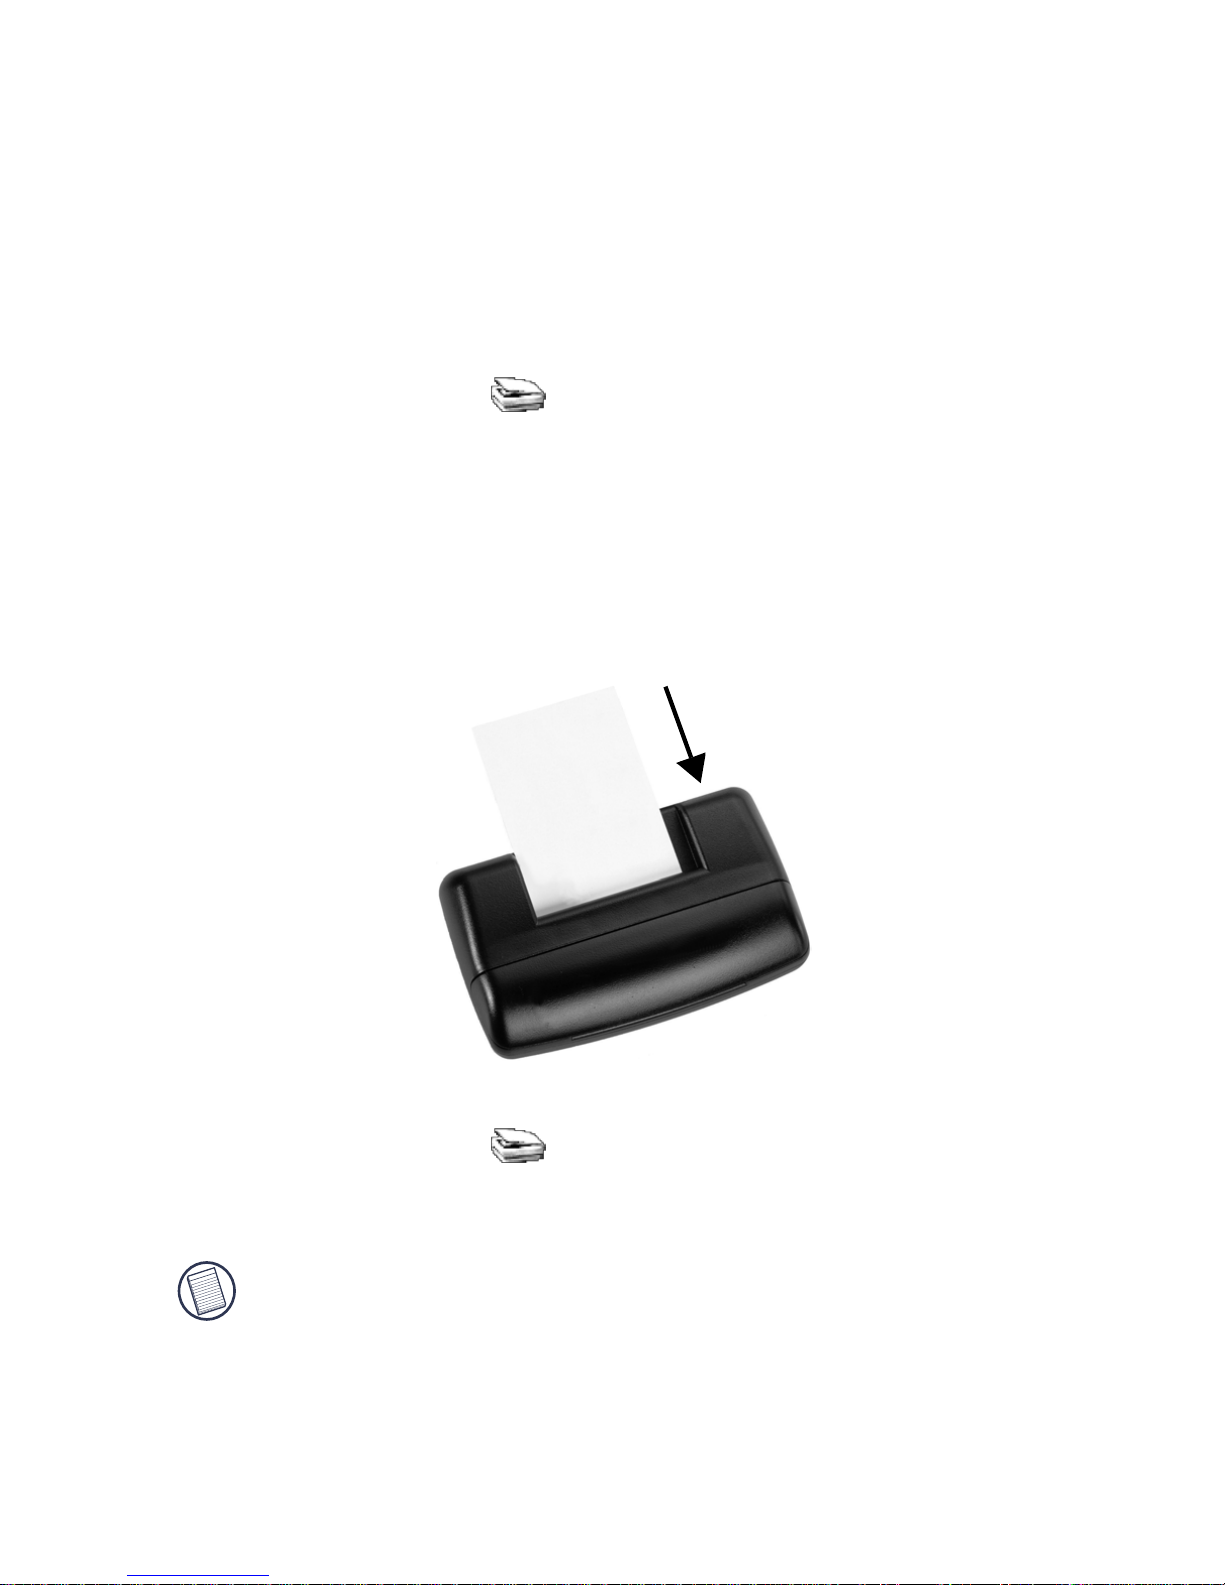
1 Place a business card facedown into the scanner.
2 Click the Scan icon ().
The Targus Bizcard Scanner screen appears.
3 Click the on-screen Scan button.
NOTES: The on-screen Scan button appears only when the scan option
is set to Scan with TWAIN user Interface. To check the scan option,
from the MBC Scanner application, click File and select Preferences.
The MBC Scanner begins reading the business card and the MBC
Scanner application displays the recognition progress.
Scanning a business card
5
Page 6
Once scanning is complete, an image of the card and its categorized
information appears on the screen allowing you to verify that the scanned
information is correct.
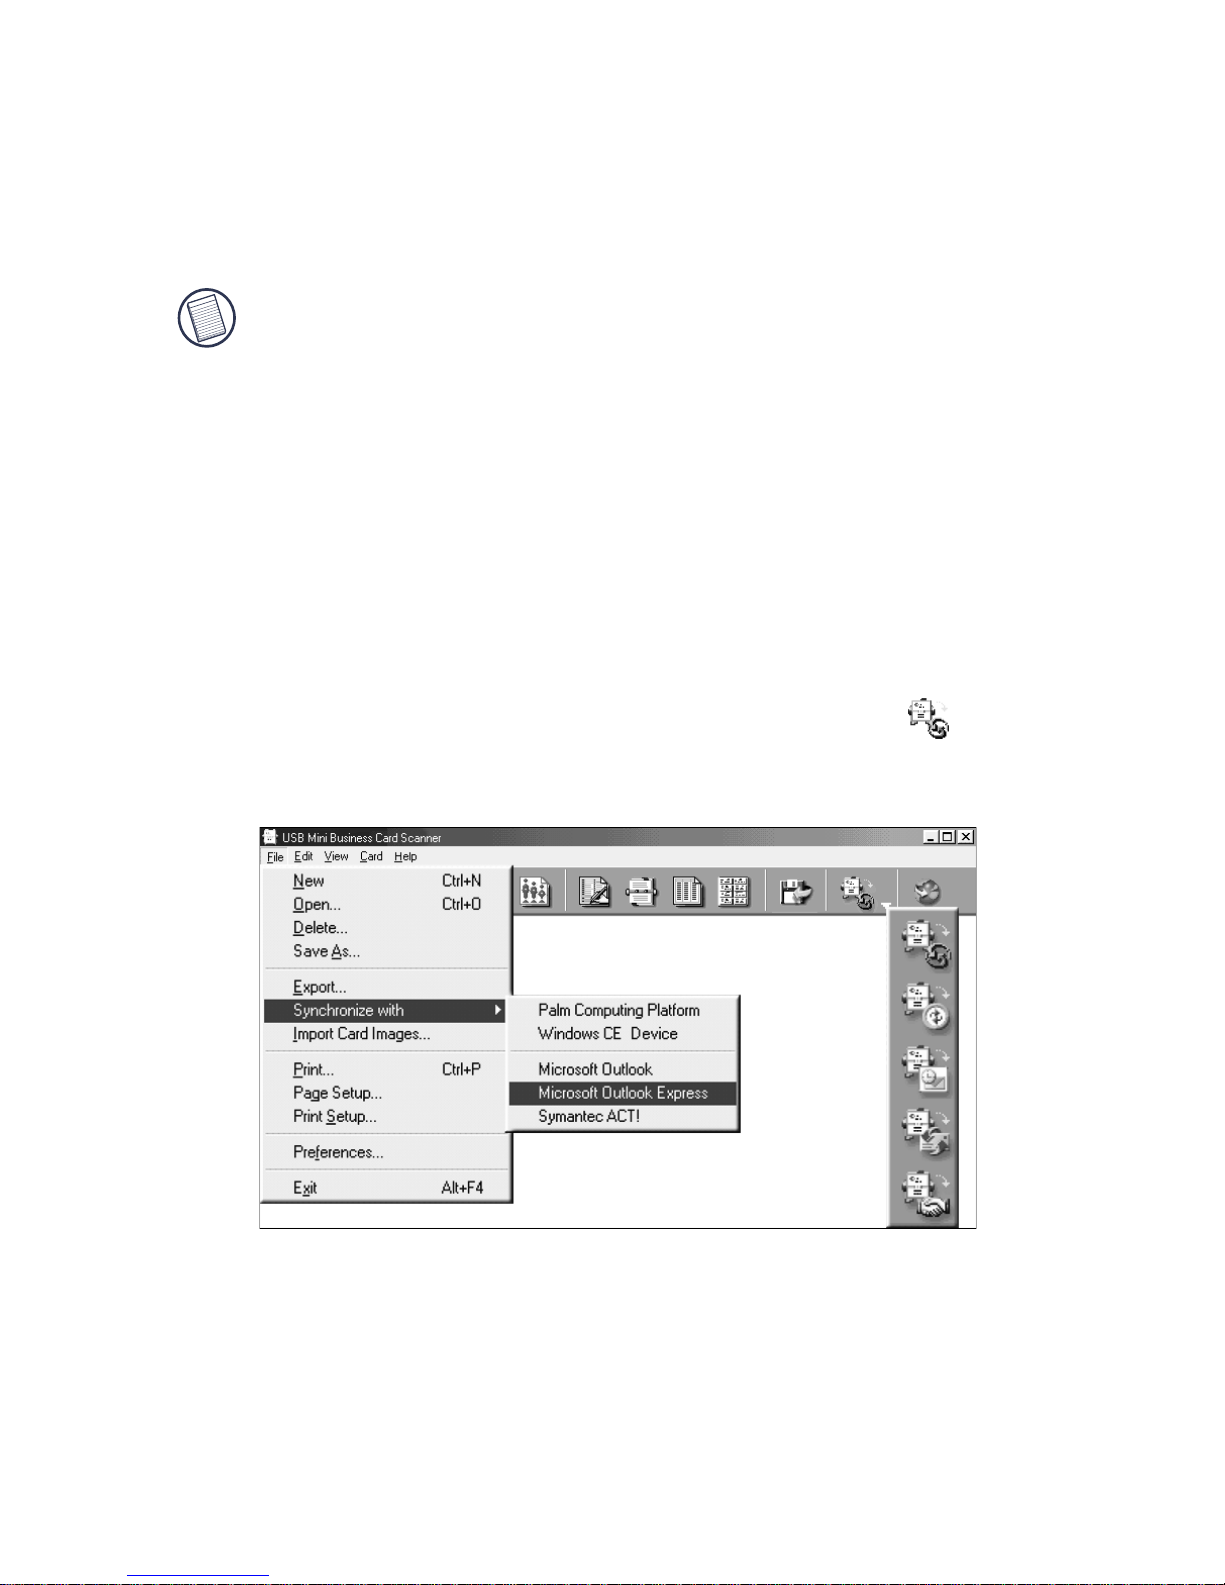
Synchronizing Your Information
Using the MBC Scanner application, you can synchronize your scanned
files with your PDA or PIM to ensure that all your resources contain the
same, most current information.
NOTE: To synchronize your information you need a PIM (personal
information manager) such as Microsoft Outlook or Symantec ACT! or
a PDA running either the Windows
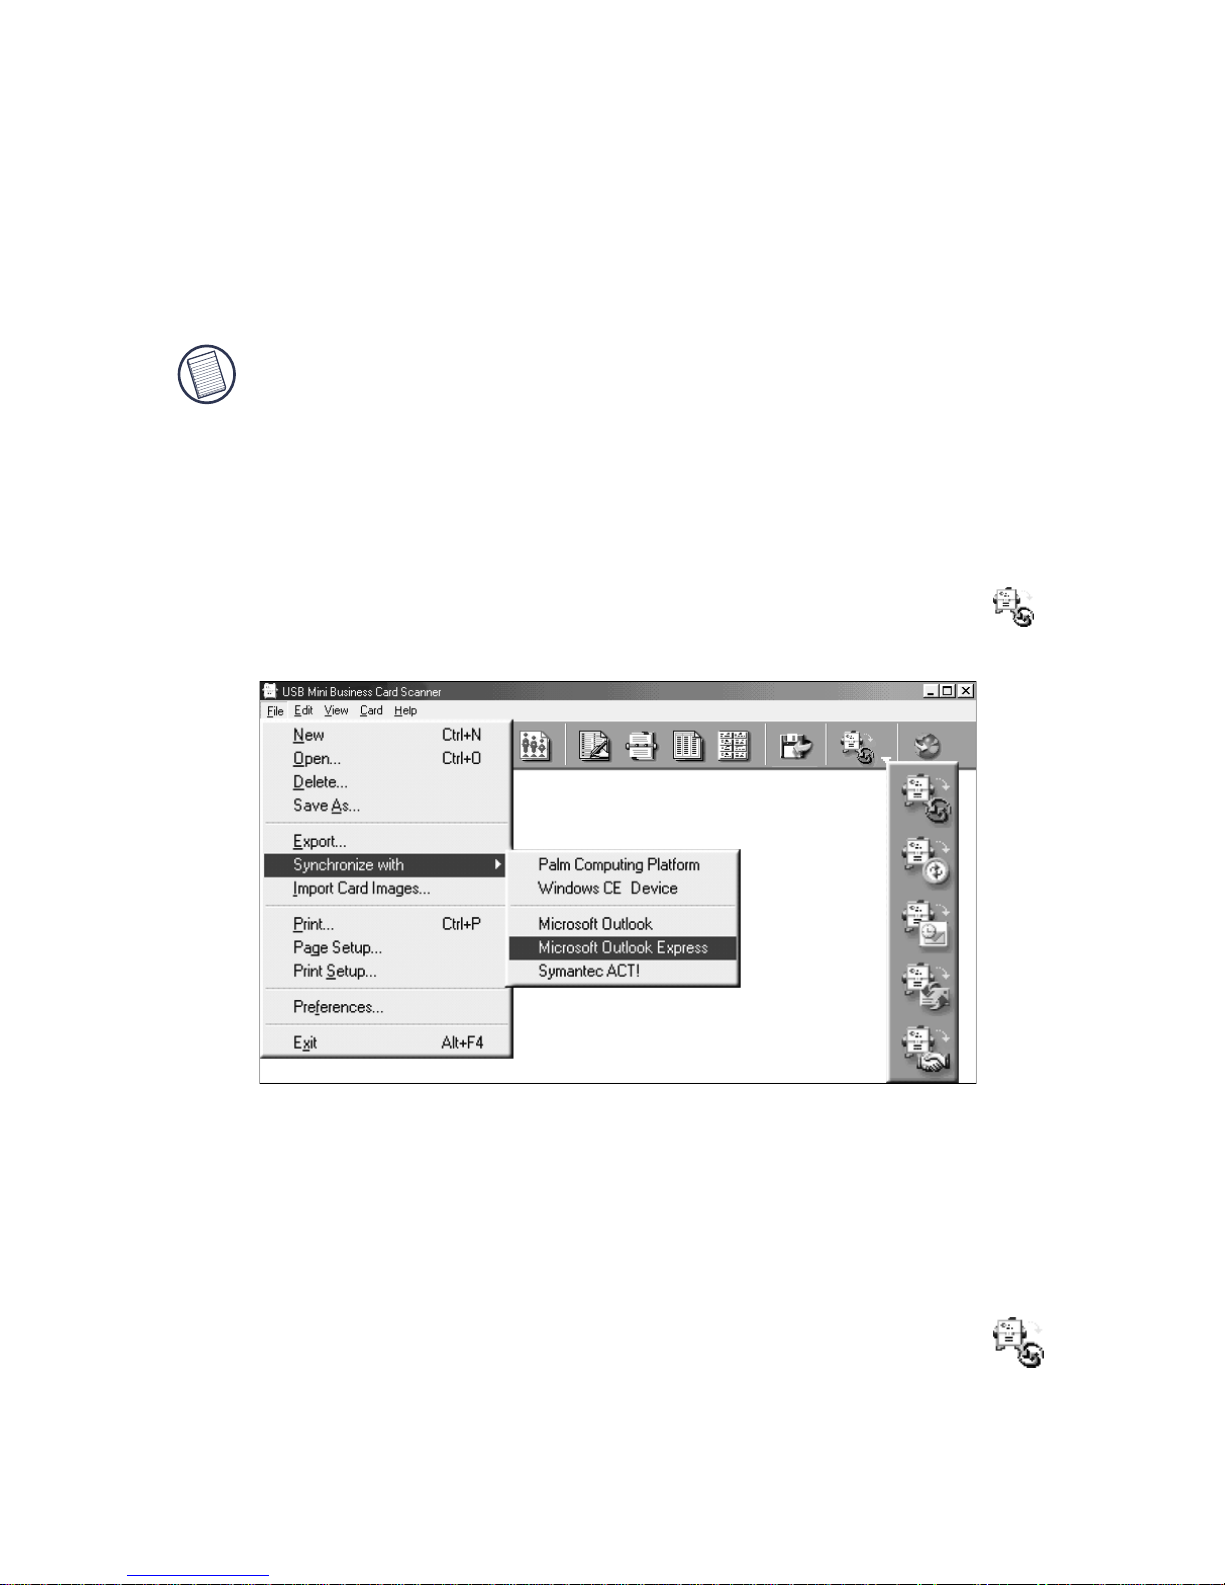
To export information (default setting):
1 From the MBC Scanner application, click View, Card List and select
the entries you want to export.
2 Click File, then Synchronize with or click the Synchronize icon
and select the program that you want to synchronize with.
®
CE or PalmTM operating system.
MBC Scanner application toolbar and synchronization options
Once synchronization is complete, a confirmation message appears.
To import information:
1 From the MBC Scanner application, click File, Preferences and select
the import mode.
2 Click File, then Synchronize with or click the Synchronize icon
and select the program that you want to synchronize with and follow
the on-screen instructions.
Once synchronization is complete, a confirmation message appears.
6
Page 7

NOTE: For more information on synchronizing information, click Help
on the MBC Scanner application toolbar.
Microsoft, Windows, Windows Vista and Outlook are registered trademarks of Microsoft Corporation.
Symantec and ACT! are registered trademarks of Symantec Corporation. Palm is a trademark of Palm, Inc.
NewSoft is a trademark of NewSoft Technology Corporation. All other trademarks are the property of their
respective owners.
7
Page 8

Mini scanner USB de cartes de visite
Nous vous remercions d’avoir acheté le mini scanner USB de cartes de
visite Targus. Le mini scanner de cartes de visite vous permet de stocker
par voie électronique les noms, adresses, numéros de téléphones et adresses
de courrier électronique de votre collection de cartes de visite dans votre
assistant numérique personnel (ANP) ou organisateur personnel
d’informations (OPI), tel que Microsoft
En plus du guide d’installation, ce conditionnement comprend le mini
scanner USB de cartes de visite Targus et le CD du logiciel pilote.
Configuration requise
Pour utiliser le mini scanner de cartes de visite, votre ordinateur doit être
muni du matériel suivant et exécuter l’un des systèmes d’exploitation
indiqués ci-dessous.
®
Outlook® ou Symantec® ACT!®.
Matériel
• PC muni d’un processeur Pentium® ou
Système d’exploitation
• Windows
®
98
équivalent
• 32 Mo de mémoire vive et 40 Mo d’espace
disponible sur le disque dur
• Interface USB version 1.1
• Lecteur de disque
•
• Windows
Millénaire
• Windows
• Windows
Windows Vista
®
Edition
®
2000
®
XP
TM
Installation du pilote de périphérique
Pour utiliser le mini scanner de cartes de visite, vous devez d’abord
installer le pilote de périphérique et le logiciel de l’application. Pour ce
faire, procédez comme suit :
1 Insérez le CD du pilote de périphérique dans le lecteur de disque de
votre ordinateur.
2 Si l’installation ne commence pas automatiquement, cliquez sur
Start(Démarrer), Run (Exécuter), puis entrez
indique le chemin d’accès au lecteur de disque), puis cliquez sur OK.
D:\Setup.exe (où la lettre D:
Sélectionnez la langue de votre choix pour l’installation et cliquez sur OK.
Lorsque la fenêtre Select Components (Sélectionner les composants)
s’affiche à l’écran, cliquez sur Next (Suivant) pour choisir les paramètres
par défaut et poursuivre l’installation.
Lorsque la fenêtre InstallShield Wizard Complete (Terminer Assistant
d’installation), cliquez sur Finish (Terminer). Le système d’exploitation
vous invite à redémarrer l’ordinateur lorsque l’installation est terminée.
Retirez le CD de pilote de périphérique du lecteur de cédérom avant de
redémarrer l’ordinateur.
8
Page 9
Vous êtes maintenant prêt à connecter le mini scanner de cartes de visite à
votre ordinateur.
Connexion du mini scanner USB de cartes de visite à
votre ordinateur
1 Branchez l’extrémité USB standard du câble ( ) sur un port
USB disponible de votre ordinateur.
USB 1
USB 2
Ports USB de votre ordinateur
2 Branchez l’autre extrémité du câble sur le port du mini scanner de
cartes de visite.
Le système d’exploitation reconnaît automatiquement le mini scanner
de cartes de visite et repère l’emplacement du pilote approprié.
Vous êtes maintenant prêt à utiliser le mini scanner de cartes de visite.
Utilisation du mini scanner USB de cartes de visite
Etalonnage du mini scanner de cartes de visite
Avant d’utiliser le mini scanner de cartes de visite pour la première fois,
vous devez l’étalonner à l’aide de la carte d’étalonnage fournie.
L’étalonnage du mini scanner de cartes de visite vous assure l’obtention
d’images numérisées de haute qualité. Pour étalonner le mini scanner de
cartes de visite, procédez comme suit :
1 Introduisez la carte d’étalonnage fournie, côté vierge vers le bas, dans
le scanner.
2 Cliquez sur l’icône Scan (Numérisation) ().
9
Page 10
La fenêtre Calibration Page (Page d’étalonnage) s’affiche à l’écran.
Fenêtre Calibration Page (Page d’étalonnage)
3 Cliquez sur OK.
Une fois le mini scanner de cartes de visite étalonné, un message de
confirmation s’affiche et vous pouvez commencer la numérisation de
cartes de visite.
Il est recommandé d’étalonner le mini scanner de cartes de visite une fois
par mois ou plus, selon votre rythme d’utilisation du scanner, pour
continuer à recevoir des images numérisées de haute qualité. Pour
réétalonner le mini scanner de cartes de visite, procédez comme suit :
1 Ouvrez l’application du mini scanner de cartes de visite, cliquez sur
File (Fichier), puis sélectionnez Preferences (Préférences).
2 Assurez-vous que l’option de numérisation est réglée sur Scan with
TWAIN User Interface (Numériser avec l’interface utilisateur TWAIN).
3 Cliquez sur l’icône Scan (Numérisation) ().
La fenêtre Targus Bizcard Scanner (Scanner de cartes de visite Targus)
s’affiche à l’écran.
4 Cliquez sur Calibrate (Étalonner), puis suivez la procédure
d’étalonnage ci-dessus.
10
Page 11
Numérisation de cartes de visite
Une fois le mini scanner de cartes de visite étalonné, vous pouvez
commencer la numérisation de cartes de visite. Pour ce faire, procédez
comme suit :
1 Posez une carte de visite face vers le bas dans le scanner.
Numérisation d’une carte de visite
2 Cliquez sur l’icône Scan (Numérisation) ().
La fenêtre Targus Bizcard Scanner (Scanner de cartes de visite Targus)
s’affiche à l’écran.
3 Cliquez sur le bouton Scan (Numérisation) à l’écran.
REMARQUES : Le bouton d’écran Scan (Numérisation) s’affiche
seulement lorsque l’option de numérisation est réglée sur Scan with
TWAIN user Interface (Numériser avec l’interface utilisateur TWAIN).
Pour vérifier l’option de numérisation, allez dans l’application MBC
Scanner et cliquez sur File (Fichier) et sélectionnez Preferences
(Préférences).
Le mini scanner de cartes de visite commence la lecture de la carte de
visite et l’application du mini scanner de cartes de visite affiche le
progrès de la reconnaissance.
Une fois la numérisation terminée, une image de la carte et des
informations catégorisées s’affiche à l’écran, ce qui vous permet de vérifier
l’exactitude des informations numérisées.
11
Page 12
Synchronisation des informations
A l’aide de l’application du mini scanner de cartes de visite, vous pouvez
synchroniser vos fichiers numérisés avec votre assistant numérique
personnel ou votre organisateur personnel d’informations pour vous assurer
que toutes vos ressources contiennent des informations identiques et mises
à jour.
REMARQUE : Pour synchroniser vos informations, vous avez besoin
d’un OPI (organisateur personnel d’informations) tel que Microsoft
Outlook ou Symantec ACT! ou d’un ANP (assistant numérique
personnel) exécutant le système d’exploitation Windows
TM
Palm
.
Pour exporter des informations (paramètre par défaut), procédez comme
suit :
1 Dans l’application du mini scanner de cartes de visite, cliquez sur View
(Affichage), Card List (Liste de cartes), puis sélectionnez les entrées
devant être exportées.
®
CE ou
2 Cliquez sur File (Fichier), puis sur Synchronize with (Synchroniser
avec) ou cliquez sur l’icône Synchronize (Synchroniser) et
sélectionnez le programme avec lequel vous voulez effectuer la
synchronisation.
Barre d’outils de l’application du mini scanner de cartes de visite et options
de synchronisation
Une fois la synchronisation terminée, un message de confirmation
s’affiche à l’écran.
12
Page 13

Pour importer des informations, procédez comme suit :
1 Dans l’application du mini scanner de cartes de visite, cliquez sur File
(Fichier), Preferences (Préférences), puis sélectionnez le mode
d’importation.
2 Cliquez sur File (Fichier), puis sur Synchronize with (Synchroniser
avec) ou cliquez sur l’icône Synchronize (Synchroniser)
et sélectionnez le programme avec lequel vous voulez effectuer la
synchronisation et suivez les instructions affichées à l’écran.
Une fois la synchronisation terminée, un message de confirmation
s’affiche à l’écran.
REMARQUE : Pour plus d’informations sur la synchronisation, cliquez
sur Help (Aide) dans la barre d’outils de l’application du mini scanner
de cartes de visite.
Microsoft, Windows, Windows Vista et Outlook sont des marques déposées de Microsoft Corporation. Symantec
et ACT! sont des marques déposées de Symantec Corporation. Palm est une marque de commerce de Palm, Inc.
NewSoft est une marque de commerce de NewSoft Technology Corporation. Toutes les autres marques sont la
propriété de leurs détenteurs respectifs.
13
Page 14

USB-MBC-Scanner (Mini-Visitenkarten-Scanner)
Herzlichen Glückwunsch zum Erwerb des USB-MBC-Scanners (MiniVisitenkarten-Scanners) von Targus. Mit dem MBC-Scanner können Sie
die Namen, Anschriften, Telefonnummern und E-Mail-Adressen Ihrer
Visitenkartensammlung in Ihrem persönlichen, digitalen Assistenten
(PDA) oder Ihrem persönlichen Informationsmanager (PIM) (z.B.
Microsoft
Neben den Installationsanweisungen enthält diese Packung den USBMBC-Scanner von Targus und die CD mit der Treibersoftware.
Systemanforderungen
Zur Verwendung des USB-MBC-Scanners muss die Hardware Ihres
Computers folgende Bedingungen erfüllen und mit einem der nachfolgend
aufgeführten Betriebssysteme laufen:
®
Outlook® oder Symantec® ACT!®) speichern.
Hardware
• PC mit Pentium® Prozessor o.ä.
• 32 MB RAM und 40 MB verfügbarer
Speicherplatz auf der Festplatte
• USB-Schnittstelle Version 1.1
• CD-ROM-Laufwerk
• Windows Vista
Betriebssystem
®
• Windows
• Windows
98
®
Millennium
Edition
• Windows
• Windows
®
2000
®
XP
TM
Installation des Treibers
Sie müssen zuerst den Treiber und die Anwendungssoftware installieren,
bevor Sie den MBC-Scanner verwenden können. Gehen Sie dazu wie folgt
vor:
1 Legen Sie die CD mit der Treibersoftware in das CD-ROM-Laufwerk
Ihres Computers.
2 Wenn die Installation nicht automatisch beginnt, klicken Sie auf Start,
Run (Ausführen) und geben dann
des CD-ROM-Laufwerks ist). Klicken Sie dann auf OK.
3 Wählen Sie die Sprache, die Sie während der Installation verwenden
möchten, und klicken Sie auf OK.
D:\setup.exe ein (wobei D: der Pfad
4 Wenn der Bildschirm zur Auswahl der Komponenten eingeblendet
wird, klicken Sie auf Next (Weiter), um die Standardeinstellungen zu
wählen und mit der Installation fortzufahren.
5 Wenn der Bildschirm „InstallShield-Assistent abgeschlossen“
eingeblendet wird, klicken Sie auf Finish (Fertig stellen). Das
Betriebssystem fordert Sie auf, den Computer neu zu starten, sobald
die Installation beendet ist. Nehmen Sie die CD mit dem Gerätetreiber
aus dem CD-ROM-Laufwerk, bevor Sie den Computer neu starten.
14
Page 15

Sie können den MBC-Scanner nun an Ihren Computer anschließen.
Anschluss des USB-MBC-Scanners am Computer
1 Schließen Sie das eine Ende des standardmäßigen USB-Kabels
( ) an einem freien USB-Anschluss des Computers an.
USB 1
USB 2
USB-Anschlüsse an Ihrem Computer
2 Schließen Sie das andere Ende des Kabels an dem entsprechenden
Anschluss des MBC-Scanners an. Das Betriebssystem erkennt den
MBC-Scanner automatisch und sucht nach dem richtigen Treiber.
Sie können den MBC-Scanner nun verwenden.
Verwendung des USB-MBC-Scanners
Kalibrieren des MBC-Scanners
Bevor Sie den MBC-Scanner zum ersten Mal verwenden können, müssen
Sie ihn mit der im Lieferumfang enthaltenen Karte kalibrieren. Durch die
Kalibrierung des MBC-Scanners ist gewährleistet, dass Sie qualitativ
hochwertige Bilder erhalten. Gehen Sie zur Kalibrierung des MBCScanners wie folgt vor:
1 Legen Sie die im Lieferumfang enthaltene Karte mit der weißen Seite
nach unten in den Scanner.
2 Klicken Sie auf das Symbol Scan (Scannen) ().
Der Kalibrierbildschirm wird eingeblendet.
Kalibrierbildschirm
15
Page 16

3 Klicken Sie auf OK.
Wenn der MBC-Scanner kalibriert ist, wird eine entsprechende
Meldung zur Bestätigung eingeblendet, und Sie können mit dem
Einlesen der Visitenkarten beginnen.
Der MBC-Scanner sollte mindestens einmal im Monat kalibriert werden,
damit Sie weiterhin qualitativ hochwertige Bilder erhalten. Die
Kalibrierhäufigkeit
richtet sich danach, wie oft Sie den Scanner verwenden. Gehen Sie zur
erneuten Kalibrierung des MBC-Scanners wie folgt vor:
1 Öffnen Sie die MBC-Scanner-Anwendung. Klicken Sie auf File
(Datei) und wählen Sie dann Preferences (Einstellungen).
2 Vergewissern Sie sich, dass die Scan-Option auf Scan with TWAIN User
Interface (Mit TWAIN-Benutzerschnittstelle scannen) eingestellt ist.
3 Klicken Sie auf das Symbol Scan (Scannen) ().
Der Bildschirm des MBC-Scanners von Targus wird eingeblendet.
4 Klicken Sie auf Calibrate (Kalibrieren) und beachten Sie das o.a.
Kalibrierverfahren.
Einlesen von Visitenkarten
Wenn der MBC-Scanner kalibriert ist, können Sie Visitenkarten einlesen.
Gehen Sie dazu wie folgt vor:
1 Legen Sie eine Visitenkarte mit der Vorderseite nach unten in den
Scanner.
2 Klicken Sie auf das Symbol Scan (Scannen) ().
Der Bildschirm des MBC-Scanners von Targus wird eingeblendet.
3 Klicken Sie auf die Taste Scan (Scannen) auf dem Bildschirm.
Einlesen von Visitenkarten
16
Page 17

HINWEISE: Die Bildschirmtaste erscheint nur, wenn die Scan-Option
auf Scan with TWAIN User Interface (Mit TWAIN-Benutzerschnittstelle
scannen) eingestellt ist. Wenn Sie die Scan-Option prüfen möchten,
klicken Sie in der MBC-Scanner-Anwendung auf File (Datei) und
wählen Preferences (Einstellungen).
Der MBC-Scanner beginnt mit dem Einlesen der Visitenkarte. Die
Scan-Anwendung zeigt die entsprechende Verlaufsmeldung an.
Sobald die Visitenkarte eingelesen wurde, wird ein Bild der Karte
eingeblendet. Die kategorisierten Informationen erscheinen auf dem
Bildschirm, so dass Sie sie auf ihre Richtigkeit prüfen können.
Synchronisieren von Informationen
Sie können die MBC-Scanner-Anwendung zur Synchronisierung der
eingelesenen Dateien mit dem PDA oder PIM verwenden, um zu
überprüfen, ob alle Ressourcen die gleichen aktuellen Daten enthalten.
HINWEIS: Zur Synchronisierung der Informationen ist ein PIM wie z.B.
Microsoft Outlook oder Symantec ACT! bzw. ein PDA mit dem
Windows
®
CE oder PalmTM Betriebssystem erforderlich.
Gehen Sie für den Export von Informationen (Standardeinstellung) wie
folgt vor:
1 Klicken Sie in der MBC-Scanner-Anwendung auf View (Ansicht) und
Card List (Kartenliste). Wählen Sie dann die zu exportierenden
Einträge.
2 Klicken Sie auf File (Datei) und dann auf Synchronize with
(Synchronisieren mit) oder klicken Sie auf das Symbol Synchronize
(Synchronisieren) . Wählen Sie dann das Programm, mit dem die
Daten synchronisiert werden sollen.
17
Page 18

Symbolleiste der Anwendung für den MBC-Scanner mit
Synchronisieroptionen
Wenn die Synchronisierung beendet ist, wird eine entsprechende
Meldung zur Bestätigung eingeblendet.
Zum Importieren der Informationen gehen Sie wie folgt vor:
1 Öffnen Sie die MBC-Scanner-Anwendung. Klicken Sie auf File
(Datei) und wählen Sie dann Preferences (Einstellungen). Wählen Sie
dann den Importmodus.
2 Klicken Sie auf File (Datei) und dann auf Synchronize with
(Synchronisieren mit) oder klicken Sie auf das Symbol Synchronize
(Synchronisieren) . Wählen Sie dann das Programm, mit dem die
Daten synchronisiert werden sollen. Beachten Sie die Anweisungen
auf dem Bildschirm.
Wenn die Synchronisierung beendet ist, wird eine entsprechende
Meldung zur Bestätigung eingeblendet.
HINWEIS: Weitere Informationen zur Synchronisierung erhalten Sie
über die Hilfefunktion der MBC-Scanner-Anwendung.
Microsoft, Windows, Windows Vista und Outlook sind eingetragene Warenzeichen der Microsoft Corporation.
Symantec und ACT! sind eingetragene Warenzeichen der Symantec Corporation. Palm ist ein Warenzeichen
von Palm, Inc. NewSoft ist ein Warenzeichen der NewSoft Technology Corporation. Alle anderen Warenzeichen
sind das Eigentum ihrer jeweiligen Inhaber.
18
Page 19

USB Mini Business Card scanner
Gefeliciteerd met uw aankoop van de Targus USB Mini Business Card
scanner. Met de MBC-scanner kunt u elektronisch namen, adressen,
telefoonnummers en e-mailadressen opslaan in uw personal digital assistant
(PDA) of personal information manager (PIM) zoals Microsoft
of Symantec
®
ACT!®.
Naast deze installatiegids vindt u de Targus USB Mini Business Card
scanner en een cd met de stuurprogramma’s.
Systeemvereisten
Om de MBC-scanner te kunnen gebruiken, moet uw computer aan de
volgende hardwarevereisten voldoen en tenminste een van de onderstaande
besturingssystemen gebruiken.
®
Outlook®
Hardware
• Pc met Pentium® of gelijkwaardige
Besturingssysteem
• Windows® 98
processor
• 32 MB RAM en 40 MB beschikbare ruimte
op de vaste schijf
• USB versie 1.1 interface
• Cd-rom-station
• Windows
Edition
• Windows
• Windows
®
Millennium
®
2000
®
XP
TM
• Windows Vista
Installeren van het stuurprogramma
Om de MBC-scanner te gebruiken, moet u eerst het stuurprogramma en de
applicatiesoftware installeren. Dit doet u als volgt:
1 Plaats de cd met het stuurprogramma in het cd-rom-station van uw
computer.
2 Als de installatie niet automatisch begint, klikt u op Start (Starten),
Run (Uitvoeren), typt u
station is) en klikt u op OK.
D:\setup.exe (waarbij D: het pad van uw cd-rom-
3 Selecteer de taal die u bij het installeren wilt gebruiken en klik op OK.
4 Wanneer het scherm Select Components (Componenten selecteren)
verschijnt, klikt u op Next (Volgende) om de standaardinstellingen te
selecteren en verder te gaan met de installatie.
5 Wanneer het scherm InstallShield Wizard Complete (InstallShield
wizard voltooid) verschijnt, klikt u op Finish (Voltooien). Het
besturingssysteem vraagt u om uw computer opnieuw te starten nadat
de installatie voltooid is. Haal de cd met het stuurprogramma uit het
cd-rom-station van de computer voordat u uw computer opnieuw start.
U kunt de MBC-scanner nu op uw computer aansluiten.
19
Page 20

Aansluiten van de USB Mini Business Card scanner op
uw computer
1 Steek het standaard USB-uiteinde van de kabel ( ) in een
beschikbare USB-poort op uw computer.
USB 1
USB 2
USB-poorten op uw computer
2 Steek de stekker op het andere uiteinde van de kabel in de poort op de
MBC-scanner.
Het besturingssysteem herkent de MBC-scanner automatisch en
bepaalt de plaats van het juiste stuurprogramma.
U kunt nu beginnen met gebruik van de MBC-scanner.
Gebruik van de USB Mini Business Card scanner
Kalibreren van de MBC-scanner
Voordat u de MBC-scanner voor de eerste keer gebruikt, moet u hem
kalibreren met de meegeleverde kalibratiekaart. Kalibratie van de MBCscanner zorgt ervoor dat u gescande beelden van uitstekende kwaliteit
ontvangt. Zo kalibreert u de MBC-scanner:
1 Steek de meegeleverde kalibratiekaart met de witte kant omlaag in de
scanner.
2 Klik op het pictogram Scan ().
Het scherm Calibration Page (Kalibratiepagina) verschijnt.
3 Klik op OK.
Scherm Calibration Page
20
Page 21

Nadat de MBC-scanner gekalibreerd is, verschijnt er een
bevestigingsbericht en kunt u beginnen met het scannen van
visitekaartjes.
Het verdient aanbeveling de MBC-scanner eenmaal per maand of vaker
(afhankelijk van gebruik) opnieuw te controleren om ervoor te zorgen dat u
gescande beelden van uitstekende kwaliteit blijft ontvangen. Zo kalibreert u
de MBC-scanner opnieuw:
1 Open de applicatie MBC Scanner, klik op File (Bestand) en vervolgens
op Preferences (Voorkeuren).
2 Controleer of de scanoptie is ingesteld op Scan with TWAIN User
Interface (Scannen met TWAIN gebruikersinterface).
3 Klik op het pictogram Scan ( ).
4 Het scherm Targus Bizcard Scanner verschijnt.
5 Klik op Calibrate (Kalibreren) en volg de bovenstaande
kalibratieprocedure.
Scannen van visitekaartjes
Nadat de MBC-scanner gekalibreerd is, kunt u beginnen met het scannen
van visitekaartjes. Dit doet u als volgt:
1 Plaats een visitekaartje met de voorkant omlaag in de scanner.
Scannen van een visitekaartje
2 Klik op het pictogram Scan ().
Het scherm Targus Bizcard Scanner verschijnt.
3 Klik op de Scan-knop op het scherm.
21
Page 22

NB: De Scan-knop op het scherm verschijnt alleen als de scanoptie is
ingesteld op ‘Scan with TWAIN user interface’. Om de scanoptie te
controleren, klikt u vanuit de applicatie MBC Scanner op File (Bestand)
en selecteert u Preferences (Voorkeuren).
De MBC-scanner begint met het lezen van het visitekaartje en de
applicatie MBC Scanner toont het verloop van het herkenningsproces.
Nadat het scannen voltooid is, verschijnt er een afbeelding van het kaartje
met de gecategoriseerde informatie op het scherm, zodat u kunt controleren
of de gescande informatie juist is.
Synchroniseren van uw informatie
Met behulp van de applicatie MBC Scanner kunt u de gescande bestanden
met uw PDA of PIM synchroniseren om ervoor te zorgen dat alle apparaten
dezelfde, meest recente informatie bevatten.
NB: Om uw informatie te synchroniseren, hebt u een PIM (personal
information manager) zoals Microsoft Outlook of Symantec ACT! of
een PDA met het besturingssysteem Windows
®
CE of PalmTM nodig.
Zo exporteert u informatie (standaardinstelling):
1 Klik in de applicatie MBC Scanner op View (Bekijken), Card List
(Kaartlijst) en selecteer de items die u wilt exporteren.
2 Klik op File (Bestand) en op Synchronize with (Synchroniseren met)
of klik op het pictogram Synchronize en selecteer het programma
waarmee u wilt synchroniseren.
Werkbalk en synchronisatie-opties in de applicatie MBC Scanner
Nadat de synchronisatie voltooid is, verschijnt er een
bevestigingsbericht.
22
Page 23

Zo importeert u informatie:
1 Klik in de applicatie MBC Scanner op File (Bestand) en Preferences
(Voorkeuren) en selecteer de importmodus.
2 Klik op File (Bestand) en op Synchronize with (Synchroniseren met)
of klik op het pictogram Synchronize , selecteer het programma
waarmee u wilt synchroniseren en volg de aanwijzingen op het scherm.
Nadat de synchronisatie voltooid is, verschijnt er een
bevestigingsbericht.
NB: Klik voor nadere informatie over synchroniseren op Help op de
werkbalk van de applicatie MBC Scanner.
Microsoft, Windows, Windows Vista en Outlook zijn gedeponeerde handelsmerken van Microsoft Corporation.
Symantec en ACT! zijn gedeponeerde handelsmerken van Symantec Corporation. Palm is een handelsmerk van
Palm, Inc. NewSoft is een handelsmerk van NewSoft Technology Corporation. Alle overige handelsmerken zijn
eigendom van hun respectieve eigenaars.
23
Page 24

Mini escáner USB de tarjetas de visita
Le felicitamos por su compra del Mini escáner USB de tarjetas de visita de
Targus. El Mini escáner de tarjetas de visita le permite almacenar
electrónicamente los nombres, las direcciones, los números telefónicos y
las direcciones email de todas sus tarjetas de visita en su agenda electrónica
o Asistente Digital Personal (PDA, siglas en inglés) o administrador de
información personal (PIM, siglas en inglés), como Outlook
Microsoft
®
o ACT!® de Symantec®.
Además de esta guía de instalación, este paquete también incluye el Mini
escáner USB de tarjetas de visita de Targus y el CD con el software del
controlador.
Requisitos del sistema
Para usar el Mini escáner de tarjetas de visita, su ordenador debe cumplir
con los siguientes requisitos de hardware y ejecutar uno de los sistemas
operativos indicados a continuación.
®
de
Hardware
• PC con procesador Pentium® o equivalente
• 32 MB de RAM y 40 MB de espacio
disponible en el disco duro
• Interfaz USB versión 1.1
• Unidad de CD-ROM
Sistema operativo
®
• Windows
• Windows
98
®
Millennium
Edition
• Windows
• Windows
®
2000
®
XP
TM
• Windows Vista
Instalación del controlador de dispositivos
Para poder usar el Mini escáner de tarjetas de visita, debe instalar primero
el controlador de dispositivos y el software de la aplicación. Para esto:
1 Introduzca en la unidad de CD-ROM de su ordenador el CD con el
controlador de dispositivos.
2 Si el programa de instalación no se inicia automáticamente, haga clic
en Start (Inicio), después en Run (Ejecutar) e introduzca
(donde
D: representa la ruta de la unidad de CD-ROM) y después haga
clic en OK (Aceptar).
D:\setup.exe
3 Seleccione el idioma que desea usar durante la instalación y haga clic
en OK (Aceptar).
4 Cuando aparezca la pantalla Select Components (Seleccionar los
componentes), haga clic en Next (Siguiente) para seleccionar la
configuración predeterminada y continuar con el proceso de
instalación.
5 Cuando aparezca la pantalla InstallShield Wizard Complete (Se ha
completado el Asistente InstallShield), haga clic en Finish (Finalizar).
24
Page 25

Al concluirse la instalación, el sistema operativo le solicitará que
reinicie el ordenador. Retire el CD con el controlador de dispositivos
de la unidad CD-ROM de su ordenador antes de reiniciarlo.
Ahora puede conectar el Mini escáner de tarjetas de visita a su ordenador.
Conexión del Mini escáner USB de tarjetas de visita a su
ordenador
1 Conecte el extremo USB estándar del cable ( ) a un puerto
USB libre de su ordenador.
USB 1
USB 2
Puertos USB del ordenador
2 Conecte el otro extremo del cable al puerto del Mini escáner de tarjetas
de visita.
El sistema operativo reconocerá automáticamente al Mini escáner de
tarjetas de visita y encontrará el controlador correcto.
Puede ahora utilizar el Mini escáner de tarjetas de visita.
Uso del Mini escáner USB de tarjetas de visita
Calibración del Mini escáner de tarjetas de visita
Antes de poder usar el Mini escáner de tarjetas de visita por primera vez,
debe calibrarlo con la tarjeta de calibración adjunta. Calibrar el Mini
escáner de tarjetas de visita garantiza que obtendrá imágenes por escáner de
alta calidad. Para calibrar el Mini escáner de tarjetas de visita:
1 Introduzca en el escáner la tarjeta de calibración provista, con la cara
blanca hacia abajo.
2 Haga clic en el icono del escáner ().
25
Page 26

Aparecerá la pantalla Calibration Page (Página de calibración).
Pantalla de la página de calibración
3 Haga clic en OK (Aceptar).
Una vez que el Mini escáner de tarjetas de visita esté calibrado,
aparecerá un mensaje de confirmación y podrá empezar a pasar las
tarjetas de visita por el escáner.
Para continuar obteniendo imágenes por escáner de alta calidad, se
recomienda que vuelva a calibrar el Mini escáner de tarjetas de visita una
vez al mes o más, según la frecuencia con que use el escáner. Para volver a
calibrar el Mini escáner de tarjetas de visita:
1 Abra la aplicación del Mini escáner de tarjetas de visita, haga clic en
File (Archivo) y después seleccione Preferences (Preferencias).
2 Verifique que la opción de escáner esté establecida en Scan with
TWAIN User Interface (Exploración con interfaz TWAIN de usuario).
3 Haga clic en el icono del escáner ( ).
Aparecerá la pantalla Targus Bizcard Scanner (Escáner de tarjetas de
visita de Targus).
4 Haga clic Haga clic en Calibrate (Calibrar) y después siga los
procedimientos de calibración indicados anteriormente.
26
Page 27

Exploración de tarjetas de visita
Una vez que el Mini escáner de tarjetas de visita esté calibrado, puede
empezar a pasar sus tarjetas de visita por el escáner. Para esto:
1 Coloque una tarjeta de visita boca abajo en el escáner.
Exploración de una tarjeta de visita
2 Haga clic en el icono del escáner ().
Aparecerá la pantalla Targus Bizcard Scanner (Escáner de tarjetas de
visita de Targus).
3 Haga clic en el botón de exploración que aparece en pantalla.
NOTAS: El botón de exploración en pantalla aparece únicamente
cuando la opción de exploración está en Scan with TWAIN user
Interface (Exploración con interfaz TWAIN de usuario). Para verificar la
opción de exploración, acceda a la aplicación del Mini escáner de
tarjetas de visita, haga clic en File (Archivo) y seleccione Preferences
(Preferencias).
El Mini escáner de tarjetas de visita empezará a leer la tarjeta de visita
y la aplicación del Mini escáner de tarjetas de visita indicará el
progreso del reconocimiento.
Una vez concluido el proceso, aparecerá en la pantalla una imagen de la
tarjeta y su información clasificada, con lo que podrá verificar que la
información esté correcta.
Sincronización de la información
Al usar la aplicación del Mini escáner de tarjetas de visita, puede
sincronizar sus archivos explorados con su PDA o PIM para garantizar que
todos sus recursos contengan la misma y más actualizada información.
27
Page 28

NOTA: Para sincronizar su información, necesita un PIM
(administrador de información personal), como Microsoft Outlook o
Symantec ACT! o un PDA que esté ejecutando el sistema operativo ya
sea Windows
®
CE o PalmTM.
Para exportar información (configuración predeterminada):
1 En la aplicación del Mini escáner de tarjetas de visita, haga clic en
View (Ver), Card List (Lista de tarjetas) y seleccione las partidas que
desea exportar.
2 Haga clic en File (Archivos) y después en Synchronize with
(Sincronizar con) o haga clic en el icono de sincronización y
seleccione el programa con que desea realizar la sincronización.
Opciones de sincronización y barra de tareas de la aplicación del Mini
escáner de tarjetas de visita
Una vez concluida la sincronización, aparecerá un mensaje de
confirmación.
Para importar información:
1 En la aplicación del Mini escáner de tarjetas de visita, haga clic en File
(Archivo), Preferences (Preferencias) y seleccione el modo de
importación.
2 Haga clic en File (Archivo) y después en Synchronize with (Sincronizar
con) o haga clic en el icono de sincronización y seleccione el
programa con el que desea realizar la sincronización y siga lo indicado
en las instrucciones en pantalla.
Una vez concluida la sincronización, aparecerá un mensaje de
confirmación.
28
Page 29

NOTA: Para obtener más información sobre la sincronización, haga clic
en Help (Ayuda) en la barra de tareas de la aplicación del Mini escáner
de tarjetas de visita.
Microsoft, Windows, Windows Vista y Outlook son marcas comerciales registradas de Microsoft
Corporation. Symantec y ACT! son marcas comerciales registradas de Symantec Corporation. Palm
es una marca registrada de Palm, Inc. NewSoft es una marca registrada de NewSoft Technology
Corporation. Todas las otras marcas registradas son la propiedad de sus respectivos dueños.
29
Page 30

Miniscanner per biglietti da visita collegabile a USB
Congratulazioni per l’acquisto del Miniscanner Targus per biglietti da vista,
collegabile alla porta USB. Tramite lo scanner MBC si possono
memorizzare elettronicamente i nomi, gli indirizzi, i numeri telefonici e gli
indirizzi e-mail dei biglietti da visita per inserirli nella rubrica del personal
information manager (PIM) o personal digital assistant (PDA) negli
applicativi tipo Microsoft
Oltre a questa Guida per l’installazione, questa confezione contiene il
Miniscanner Targus per biglietti da visita collegabile alla porta USB e il CD
con i driver software.
Requisiti di sistema
Per utilizzare lo scanner MBC, il computer deve soddisfare i seguenti
requisiti di hardware e funzionare con uno dei sistemi operativi elencati
sotto.
®
Outlook® o Symantec® ACT!®.
Hardware
• PC con processore Pentium® o equivalente
• 32 MB di RAM e 40 MB disponibili sul
disco fisso
• Interfaccia USB versione 1.1
•Lettore di CD-ROM
Sistema operativo
®
• Windows
• Windows
98
®
Millennium
Edition
• Windows
• Windows
®
2000
®
XP
TM
• Windows Vista
Installazione del driver del dispositivo
Per potere utilizzare lo scanner MBC bisogna prima avere installato il
driver del dispositivo e il software applicativo, nel seguente modo:
1 Inserire nel lettore di CD-ROM del computer il CD che contiene il
driver del dispositivo.
2 Se l’installazione non si avvia automaticamente fare clic su Start
(Avvio), poi su Run (Esegui), e quindi immettere
il percorso per il lettore di CD-ROM) e poi fare clic su OK.
3 Scegliere la lingua che si desidera usare nel corso dell’installazione e
fare clic su OK.
D:\setup.exe (in cui D: è
4 Quando viene visualizzata la schermata di Selezione dei componenti,
fare clic su Next (Avanti) per scegliere le impostazioni predefinite e
procedere con l’installazione.
5 Quando viene visualizzata la schermata di Installazione guidata
completa, fare clic su Finish (Fine). A questo punto, il sistema
operativo richiede che venga riavviato il computer. Prima di riavviare,
togliere il CD con il driver del dispositivo dal lettore di CD-ROM del
computer.
30
Page 31

A questo punto si può collegare lo scanner MBC al computer.
Collegamento del miniscanner per biglietti da visita alla
porta USB del computer
1 Inserire l’estremità USB standard del cavo ( ) in una delle
porte USB libere del computer.
USB 1
USB 2
Porte USB del computer
2 Collegare l’altra estremità del cavo alla porta dello scanner MBC.
Il sistema operativo riconoscerà lo scanner MBC automaticamente e
individuerà il suo driver.
A questo punto, lo scanner MBC è pronto per essere usato.
Uso del miniscanner per biglietti da visita collegabile a
USB
Calibrazione dello scanner MBC
Prima di utilizzare lo scanner MBC per la prima volta è necessario
effettuarne la calibrazione usando il biglietto di calibrazione fornito. La
calibrazione dello scanner MBC serve ad assicurare l’alta qualità delle
immagini di scansione. Per calibrare lo scanner MBC:
1 Inserire nello scanner il biglietto di calibrazione fornito, con il lato
bianco rivolto in basso.
2 Fare clic sull’icona di scansione ().
Verrà visualizzata la pagina di calibrazione.
Schermata della pagina di calibrazione
31
Page 32

3 Fare clic su OK.
Non appena lo scanner MBC è stato calibrato, verrà visualizzato un
messaggio di conferma e si potrà iniziare a fare la scansione dei
biglietti da visita.
Per continuare a ottenere immagini di alta qualità, si consiglia di eseguire di
nuovo la calibrazione dello scanner MBC una volta al mese o anche più
spesso, a seconda della frequenza d’uso. Per ricalibrare lo scanner MBC:
1 Avviare l’applicativo dello scanner MBC, fare clic su File e poi
selezionare Preferences (Preferenze).
2 Controllare che l’opzione di scansione sia impostata su Scan with
TWAIN User Interface (Scansione con interfaccia utente TWAIN).
3 Fare clic sull’icona di scansione ().
4 Verrà visualizzata la schermata dello scanner Targus Bizcard.
5 Fare clic su Calibrate (Calibrazione) e quindi seguire le procedure di
calibrazione di cui sopra.
Scansione di biglietti da visita
Quando lo scanner è stato calibrato, si può iniziare la scansione dei biglietti
da visita, nel seguente modo:
1 Inserire nello scanner il biglietto da visita a faccia in giù.
Scansione di un biglietto da visita
2 Fare clic sull’icona di scansione ( ).
Verrà visualizzata la schermata dello scanner Targus Bizcard.
3 Fare clic sull’icona di scansione sullo schermo.
32
Page 33

NOTE: il pulsante di scansione sullo schermo appare solamente
quando l’opzione di scansione sia stata impostata sull’interfaccia
utente TWAIN. Per controllare l’opzione di scansione, fare clic su File e
selezionare Preferences (Preferenze) dalla schermata dell’applicativo
MBC.
Lo scanner MBC comincerà a leggere il biglietto da visita e il
programma dello scanner MBC visualizzerà il processo.
Quando la scansione è finita, lo schermo visualizzerà l’immagine del
biglietto e le informazioni in esso contenute, permettendo all’utente di
verificare che le informazioni siano corrette.
Sincronizzazione delle informazioni
Con l’applicativo dello scanner MBC si possono sincronizzare i file di
scansione con il PDA o PIM per assicurare che le informazioni in essi
contenute siano aggiornate e corrette.
NOTA: per sincronizzare le informazioni occorrono un PIM (personal
information manager), come Microsoft Outlook or Symantec ACT!, o
un PDA dotato del sistema operativo Windows
®
CE o PalmTM.
Per esportare le informazioni (impostazione di default):
1 Nell’applicativo dello scanner MBC, fare clic su View (Visualizza),
Card List (elenco biglietti) e scegliere il nominativo che si desidera
esportare.
2 Fare clic su File e poi su Synchronize with (Sincronizza con) oppure
fare clic sull’icona di sincronizzazione e selezionare il programma
con cui si desidera sincronizzarsi.
Barra dello scanner MBC e opzioni di sincronizzazione
33
Page 34

Quando la sincronizzazione è terminata, apparirà un messaggio di
conferma.
Per importare informazioni:
1 Avviare l’applicativo dello scanner MBC, fare clic su File,
Preferences (Preferenze) e quindi selezionare la modalità di
importazione.
2 Fare clic su File e poi su Synchronize with (Sincronizza con) oppure
fare clic sull’icona di sincronizzazione e selezionare il programma
con cui si desidera sincronizzarsi, quindi seguire le istruzioni che
appaiono sullo schermo.
Quando la sincronizzazione è terminata, apparirà un messaggio di
conferma.
NOTA: per ulteriori informazioni sulla sincronizzazione, fare clic su
Guida nella barra degli strumenti dell’applicativo dello scanner MBC.
Microsoft, Windows, Windows Vista e Outlook sono marchi depositati della Microsoft Corporation. Symantec
e ACT! sono marchi depositati della Symantec Corporation. Palm un marchio della Palm, Inc. Newsoft è un
marchio della Network Technology Corporation. Tutti gli altri marchi di fabbrica sono di proprietà dei rispettivi
possessori.
34
Page 35

Mini scanner de cartões de visita USB
Parabéns por adquirir o Mini scanner de cartões de visita USB da Targus.
Com o Scanner MBC pode-se armazenar eletronicamente os nomes,
endereços, números de telefone e endereços de e-mail da sua coleção de
cartões de visita no seu PDA (Assistente digital pessoal) ou PIM
(Gerenciador de informações pessoais), como o Microsoft
®
Symantec
ACT!®.
Além deste guia de instalação, você também está recebendo o Mini scanner
de cartões de visita USB e o CD com o driver do produto.
Requisitos do sistema
Para usar o Scanner MBC, seu computador deve atender aos seguintes
requisitos de hardware e executar um dos sistemas operacionais
mencionados abaixo.
®
Outlook® ou
Hardware
• Computador pessoal com processador
®
Pentium
ou equivalente
• 32 MB de RAM e 40 MB de espaço
disponível no disco rígido
• Interface para USB versão 1.1
• Unidade de CD-ROM
Sistema operacional
®
• Windows
• Windows
98
®
Millennium
Edition
• Windows
• Windows
®
2000
®
XP
• Windows VistaTM
Instalação do driver do dispositivo
Para utilizar o Scanner MBC, deverá primeiro instalar o driver do
dispositivo e o software do aplicativo. Proceda da seguinte forma:
1 Introduza o CD do driver do dispositivo na unidade de CD-ROM do
seu computador.
2 Se a instalação não iniciar automaticamente, clique em Start (Iniciar),
Run (Executar) e digite
CD-ROM) e, em seguida, clique em OK.
3 Selecione o idioma que deseja usar durante a instalação e clique em
OK.
D:\setup.exe (onde D: é o caminho da unidade de
4 Quando aparecer a tela Select Components (Selecionar componentes),
clique em Next (Próximo) para escolher as configurações padrão e
continue o processo de instalação.
5 Quando aparecer a tela InstallShield Wizard Complete (Assistente de
instalação concluído), clique em Finish (Concluir). O sistema
operacional pede que você reinicie seu computador quando a
instalação estiver concluída. Retire de seu computador o CD do driver
do dispositivo antes de reiniciá-lo.
35
Page 36

Você agora está preparado para conectar o Scanner MBC ao seu
computador.
Conexão do mini scanner de cartões de visita USB no seu
computador
1 Conecte a extremidade do cabo USB ( ) numa porta USB do
seu computador.
USB 1
USB 2
Portas USB do seu computador
2 Conecte a outra extremidade do cabo na porta do Scanner MBC.
O sistema operacional reconhece automaticamente o Scanner MBC e
localiza o driver apropriado.
Você pode agora começar a usar o Scanner MBC.
Uso do Mini scanner de cartões de visita USB
Calibragem do Scanner MBC
Antes do Scanner MBC ser usado pela primeira vez, ele deve ser calibrado
usando o cartão de calibragem fornecido. A calibragem do Scanner MBC
garante a recepção de imagens escaneadas de alta qualidade. Para calibrar o
Scanner MBC:
1 Insira o cartão de calibragem fornecido, com a parte branca para
baixo, no scanner.
2 Clique no ícone Scan ().
Aparece a tela da página de calibragem.
Tela da página de calibragem
36
Page 37

3 Clique em OK.
Depois que o Scanner MBC estiver calibrado, aparecerá uma
mensagem de confirmação e ele poderá começar a escanear cartões de
visita.
Recomenda-se a recalibragem do Scanner MBC uma vez por mês ou mais,
dependendo da freqüência de uso, para continuar a usufruir de imagens
escaneadas de alta qualidade. Para recalibrar o Scanner MBC:
1 Abra o aplicativo Scanner MBC, clique em File (Arquivo) e selecione
Preferences (Preferências).
2 Verifique se a opção de escaneamento está configurada para Scan with
TWAIN User Interface (Escaneamento com Interface para usuário
TWAIN).
3 Clique no ícone Scan ().
Aparece a tela do Bizcard Scanner da Targus.
4 Clique em Calibrate (Calibrar) e siga os procedimentos de calibragem
acima.
Escaneamento de cartões de visita
Depois que o Scanner MBC estiver calibrado, pode-se começar a escanear
cartões de visita. Proceda da seguinte forma:
1 Coloque um cartão de visita com a face para baixo no scanner.
Escaneamento de um cartão de visita
2 Clique no ícone Scan ().
Aparece a tela Bizcard Scanner da Targus.
3 Clique no botão Scan, na tela.
37
Page 38

OBSERVAÇÕES: o botão Scan, na tela, aparece somente quando a
opção scan estiver configurada para a interface para usuário TWAIN.
Para verificar a opção scan, a partir do aplicativo do Scanner MBC,
clique em File (Arquivo) e selecione Preferences (Preferências).
O Scanner MBC começa a ler o cartão de visita e o aplicativo do
Scanner MBC mostra o progresso de reconhecimento.
Depois que o escaneamento estiver completo, aparecerá uma imagem do
cartão com as informações categorizadas para você verificar se as
informações escaneadas estão corretas.
Sincronização das informações
Com o aplicativo do Scanner MBC, você pode sincronizar os seus arquivos
escaneados com o seu PDA ou PIM para garantir que todos os seus
recursos contenham as mesmas informações mais atualizadas.
OBSERVAÇÃO: Para sincronizar as informações, você precisa de um
PIM (Gerenciador de informações pessoais) como o Microsoft Outlook
ou Symantec ACT! ou um PDA que execute o sistema operacional
Windows
®
CE ou PalmTM.
Para exportar informações (configuração padrão):
1 A partir do aplicativo do Scanner MBC, clique em View (Exibir), Card
List (Lista de cartões) e selecione as informações que deseja exportar.
2 Clique em File (Arquivo), após Synchronize with (Sincronizar com) ou
clique no ícone Synchronize (Sincronizar) e selecione o programa
com o qual deseja sincronizar.
Barra de ferramentas do Scanner MBC e opções de sincronização
Depois da sincronização completa, aparecerá uma mensagem de
confirmação.
38
Page 39

Para importar informações:
1 A partir do aplicativo Scanner MBC, clique em File (Arquivo),
Preferences (Preferências) e selecione o modo de importação.
2 Clique em File (Arquivo), após Synchronize with (Sincronizar com) ou
clique no ícone Synchronize (Sincronizar) e selecione o programa
com o qual deseja sincronizar e siga as instruções na tela.
Depois da sincronização completa, aparecerá uma mensagem de
confirmação.
OBSERVAÇÃO: Para obter mais informações a respeito de
sincronização de dados, clique em Help (Ajuda) na barra de
ferramentas do aplicativo Scanner MBC.
Microsoft, Windows, Windows Vista e Outlook são marcas comerciais registradas da Microsoft Corporation.
Symantec e ACT! são marcas comerciais registradas da Symantec Corporation. Palm é uma marca comercial
da Palm, Inc. NewSoft é uma marca comercial da NewSoft Technology Corporation. Todas as outras marcas
comerciais pertencem a seus respectivos proprietários.
39
 Loading...