

Page 1

Port 22-Key Keypad
User's Manual
Jan 98
Installation
Keypad Installation
The Port Keypad is designed to connect to a standard RS-232 serial
port. To install the keypad, plug the keypad DB9 connector into an
available serial port on the back of your computer. If your computer
has a 25-pin serial port socket, you will have to use a DB9-to-DB25
converter to connect the keypad.
Software Installation
The Port Keypad Manager software is required for the operation of the
keypad. To install the software, insert the diskette in your computer
and click on File, Run (in Windows 3.1x) or Start, Run (in Windows
95). Then type in A:SETUP or B:SETUP, depending on the drive letter
of your floppy disk drive, and click on OK. The setup program will
guide you through the installation.
Once you have successfully completed the software installation, start
the Port Keypad Manager by clicking on its icon, or by doubleclicking the UKP.EXE filename in the Windows 3.1x File Manager or
the Windows 95 Explorer.
If the Port Keypad Manager launches in its minimized state, doubleclick its icon (in Windows 3.1x) or its task bar button (in Windows 95)
to restore the application. It will look like the following illustration:
Page 2
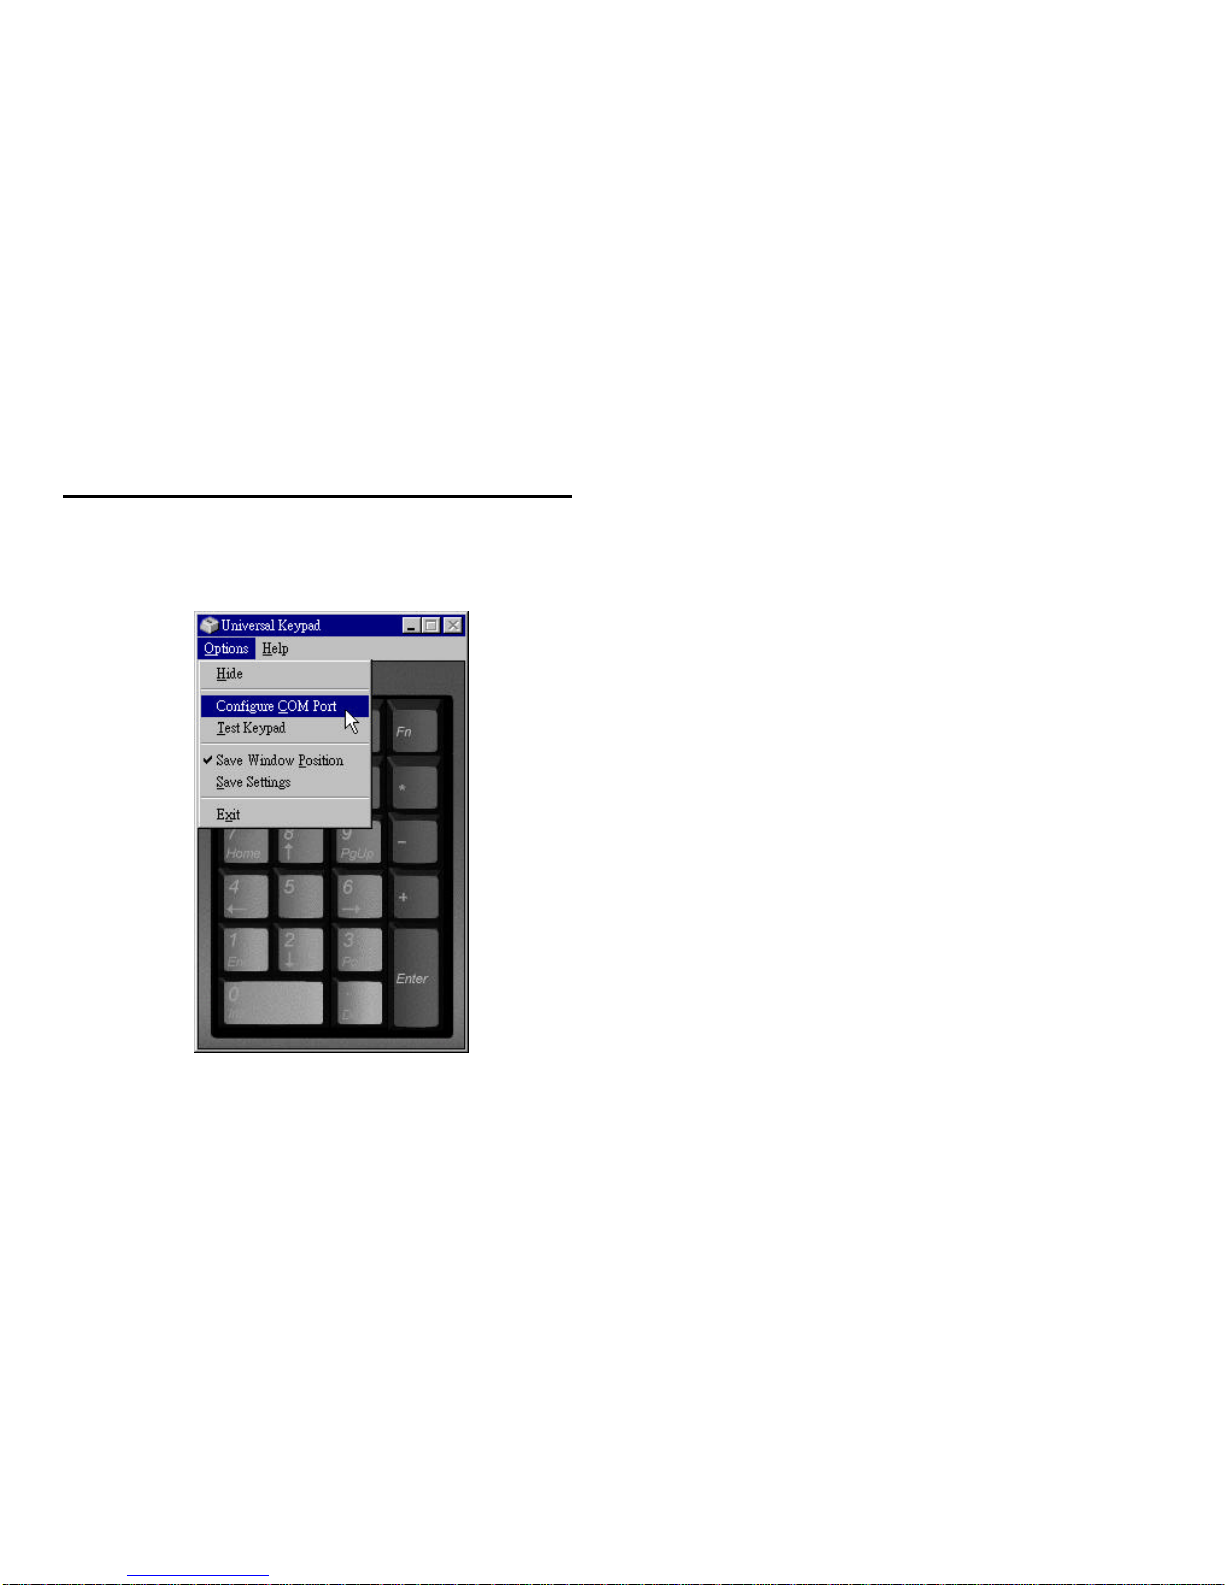
Configuration
Use the Options menu on the Port Keypad Manager to configure the
keypad.
Configure Hardware
You must specify the COM port to which the Port Keypad is
connected. The keypad does not automatically detect this. Determine
the COM port number of your computer external serial port. Then
select Options, Configure Hardware from the Port Keypad Manager
menu. You will see a dialog box similar to the following:
Select the appropriate COM port number and click on OK. There is no
need to restart Windows. Your keypad should be operational if you
have selected the correct COM port.
Test Mode
You may test your keypad to make sure it is operating properly by
selecting Test Mode from the Options menu. A check mark will appear
next to the Test Mode menu item when this option is selected. When
you are finished testing the keypad, click on the Test Mode menu item
again or press ESC to return the keypad to normal operating mode.
The check mark will disappear when you exit Test Mode.
Save Current Settings
Click on this menu item to save all option settings. Whatever
configuration you have established will become the default
configuration the next time you launch the keypad manager.
Page 3

Using the Keypad
Once you have properly installed and configured the Port Keypad and
the Keypad Manager software, the keypad will operate transparently
with any Windows application.
Note
They keypad works in tandem with the Port Keypad Manager
software. You must load the keypad manager software before
operating the keypad.
Num Lock
The Num Lock key on the keypad works independently of the Num
Lock key on your computer keyboard. Toggling Num Lock on the
keypad has no effect on the keyboard Num Lock function. Similarly,
toggling the Num Lock key on the keyboard has no effect on the
keypad Num Lock function.
You also may toggle the keypad Num Lock key by clicking on the
green ED" labeled Num Lock on the keyboard manager interface.
When you toggle the Numlock on Kepad some of the keys will
perform different functions depending on their programming. For
example in Number mode, the "4" key will input a "4" but in Arrow
mode the "4" key will be a left arrow " ". The NumLock state is
represented in the system tray by the 123 icon.
FN Mode
To enable the function keys, hold down on the Fn Key and press any
of the keys labeled F1 through F12. This allows the function keys to
work correctly in the current active application; for example ,in
Windosw 95/98 Notepad the F5 key will input the data and time into
the open text file. Therefore, pressing FN+5 on the keypad will
genable the data and time white in notepad exe.
SHIFT Mode
To enable the Shift+Function capability, hold down on both the Shift
and FN keys and press any of the Keys labeled F1 through F12
Customizing the Keypad
You may disable or change the function of any key on the keypad via
the keypad manager software. When you click a key on the keypad
manager interface, you will see a customization dialog box with a
drop-down list box containing all the alternative functions you may
assign to the key. To change the key function, select an alternative
function and press OK. The key will immediately assume the new role
you have assigned to it.
The key assignment is depentent on the current mode the keypad is in,
Numeric mode or Keyboard mode.
The Win Application keys and the Win logo keys have special
functions in Windows 95/98 and Windows NT. These can also be
Page 4

programmed on your keypad on certain keys such as the Sift key.
You may save customized key settings by selecting Save Current
Settings from the Options menu.
Note
If you do not see a customization dialog box when you click on a
key, make sure that Test Mode in the Options menu is not
checked.
DOS Installation
Follow these steps to install the Port Keypad application for DOS:
1. Insert the Port Keypad setup diskette in your floppy drive.
2. Type DOSINST at the A:\ or B:\ prompt, depending on the drive
letter of your floppy drive.
3. The installation program will ask you for a destination path. The
application files will be installed in this directory. If you are
satisfied with the default path, press Enter. Otherwise, press C for
hange" and enter a new path.
4. Select a source path. This should be the path to the floppy drive.
The default is A:\. Press Enter if the default path is correct, or else
press C for hange" and enter the correct target path.
5. Select the COM port to which the Universal Remote receiver is
connected. You may choose from COM1, COM2, COM3, and
COM4. The associated base address and IRQ are listed for each
COM port.
6. Test the keypad if you wish. If you decide to proceed with the test,
the setup program will display an image of a keypad. Press the
buttons on the remote and look on the image to see the response.
Page 5

7. Next you select to map the period key as a period or as a comma.
8. Press Enter to complete the installation. The installation program
will copy the necessary files to the target directory. Once this is
completed, the Port Keypad application will be ready for operation.
Troubleshooting
Error opening COM port
Typically this will come up when the keypad is trying to access your
serial port, but it is not available. This can be because the Notebook is
configured to a different COM port than the keypad manager is
configured to. Try a different COM port setting.
Also, if your system has an Infrared port enabled and you are not using
any Infrared devices, disabling them will prevent some COM port
conflicts from occurring. To disable in Windows 95/98, you need to
run Settings | Control Panel | System, click on the Device Manager tab,
Double Click the Infrared Device and check the box
Some notebooks in order to save battery power will also turn off the
serial port, so if you have verified that you are configured to the
correct COM port address, but still having problems, check your
power management setup to verify that the serial port is not powered
off.
Technical Support
For additional assistance installing and configuring your keypad,
please contact Port Technical support at:
Technical Support:
Telephone: (503) 684-3147
Email: TechSupport@port.com
WWW: http://www.port.com
Driver/File Updates: http://www.port.com/support/files.htm
Headquarters:
Port, Inc.
66 Fort Point Street
Norwalk, CT 06855
 Loading...